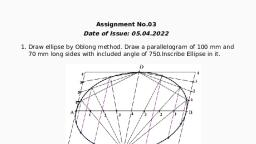
Page 1 :
Engineering Drawing and Computer Graphics, By; Prof. Rajaram Lakkaraju, Department of Mechanical Engineering, Indian Institute of Technology, Kharagpur, , MODULE 01, LECTURE 04: INTRODUCTION TO ENGINEERING DRAWING -IV, Hello everyone, welcome to our NPTEL online certification courses on Engineering Drawing and, Graphics Computer Graphics. I am Rajaram from IIT Kharagpur, welcome to our lecture number 4. In, lecture 3, we try to look at basic dimensions of a technical drawing and the layout of a drawing sheet, and, we have ended the lecture 3 with basic dimensions and their terminology., (Refer Slide Time: 00:12), , For that, we have taken an example of a drawing to try to learn about the basic dimensions, the dimension, line, the termination symbols in terms of arrows and extension lines, radius symbol in terms of R and its, dimension, if a diameter is involved denoted by phi and diameter is this entire thing and its symbol. If, there are any centre lines with, long dash, dot and dash, a long dash, followed by a short dash, followed, by a long dash and also, we learned about how to represents reference dimension., (Refer Slide Time: 02:16)
Page 2 :
In this lecture, we will learn about basic units of dimensions to be used for a technical drawing. In, American practice, it will be in terms of inches, decimal inches, fractional inches, feet and fractional, inches are used. For Indian standards, Bureau of Indian Standards, we use SI units or precisely speaking,, we use millimetres., (Refer Slide Time: 03:00), , For drawings, SI or metric units precisely speaking millimetres we represent. Usually, technical drawings, always consist of it takes mentioning all dimensions are in mm, such kind of text we usually incorporate
Page 3 :
for drawings without ah mentioning mm everywhere of the drawing, we just represent the numbers like, 1.25 without mentioning any basic unit, but it is a common practice to represent in the drawing sheet all, dimensions are in mm., If we are using the metric system, for anything the dimension we put leading 0, if it is inches we do not, put. For example, I would like to represent something like 0.50 units. This leading 0, we show it in the, metric system, if it is inches, it will be just .50. Whenever we are looking at the drawings drawing sheets,, if something like the basic dimensions represented .5, then it should be noted that it is in inch system. If it, is 0.50, it is a metric system., (Refer Slide Time: 04:55), , So, as I said units are not included with each dimension, specify the units used with a note on the drawing, as unless otherwise specified, all dimensions are in mm. This is one kind of template to represent units., (Refer Slide Time: 05:28)
Page 4 :
Let us understand dimensions and units using an example for a plane figure. Here we have a staircase, drawing; for example, this is the staircase given as a drawing., (Refer Slide Time: 06:12), , In this drawing, there are dimensions something represented from here to here whatever that length is, available representing by a line, arrowheads and number 5.25 one of the basic dimensions. From here to, here whatever length is there that’s represented by 4 units. From here to here that line is 2.75.
Page 5 :
Note that, we are showing these dimensions outside of the object outside not inside something like we are, not mentioning it something like this is 5.25 this is a wrong practice, you have to mention any dimension, outside of the object like this., (Refer Slide Time: 07:41), , Similarly, from here to here also we are showing outside and here to here also outside. Further note that,, the lowest dimension mentioned inside further increase in dimension value outside and further outside the, largest one., (Refer Slide Time: 08:26)
Page 6 :
Let us also look at here, similarly let us look at that; let us look at that. So, the inside details we can show, even this dimension as this one also as long as minimum 10 mm length we can maintain it. So, that a, nicely a continuous line with arrowheads we can draw it if that gap is less, then it is not a recommended, practice to show it inside instead of that, we show it from outside this is the lowest dimension 0.75., (Refer Slide Time: 08:53), , The next one is from here to here this height, the projection height vertical thing this is 1.5. From here to, here, that is 2.5., (Refer Slide Time: 09:28)
Page 7 :
This is the object what we are looking at is a stepped one, and the dimensions are these continuous lines, with arrowheads., (Refer Slide Time: 09:55), , Instead of a plane object like a 2D object, if it is a cylindrical object, let us look at it. Here, we can see, that the object on the sheet looks like that with lines. Later lectures, we will understand how to construct, such kind of things, what exactly this entire object represents, but in this class, we will learn about, dimensions., Here, if we are looking at that 3-dimensional perspective, basically it is a cylinder having steps, and that, is again followed by such kind of cylindrical object. These are the steps after turning operation if you are, using lathe machines - constructing such kind of turnings or steps is quite easy., So, there are three cylinders connected or a single machine object, where you made a turning operation of, one radius or one diameter, another diameter and this one is another diameter. That one, if we are looking, at as a view as a 2D one either looking from this side or perhaps looking from that side or perhaps, looking from this side, we will be in a position to construct such kind of 2D object., (Refer Slide Time: 12:18)
Page 8 :
In this case, what we are trying to look at is from this view we are trying to look at. So, that this part is, this part and this part we are looking as this one and this part is that is rotated by 90 degrees object, that, one what we are trying to look at. So, it is a cylindrical one. That is the reason; we have these dash, long, dash, followed by a short dash, followed by a long dash, short dash and so on. This kind of lines we call, centre lines., Whenever we see such kind of centre lines, that indicates that perhaps it might be a part of a cylinder. For, these cylindrical objects what we are showing is there is a step, for that there is a length of 1.75. So, with, respect to the base, we are showing all these dimensions., (Refer Slide Time: 13:09)
Page 9 :
Similar to our 2D objects, plane objects how we have followed smallest, medium and longest dimensions, we show it in that way, always a continuous line followed by this arrowheads terminating., (Refer Slide Time: 13:49), , Now, because it is a cylindrical object, there are certain dimensions associated in this direction also. It is a, cylindrical object; usually, the diameters matter a lot., (Refer Slide Time: 14:16), , Instead of showing the gap between step to step, what is that gap we are not showing, but what we are, showing is what is that diameter, what is the diameter for that step, what is the diameter for that step we
Page 10 :
would like to show. So, the diameter for this object this cylindrical part what we have looked at earlier,, this one this diameter is 2 units. So, that is the thing what we are showing here; the symbol phi represents, diameter., (Refer Slide Time: 14:52), , The outside object, 3 units and the extreme one this is 4 units. So, the lowest dimension first comes, then, followed by medium and longest one., (Refer Slide Time: 15:14), , If we have angles inclined portions, again one has to use standard terminology to denote these angles., For example, let us look at this object is it a 2d object or 3d object like a cylindrical object because we do, not have any centre dashed lines, possibly it must be a planar object this is the one.
Page 11 :
Here, with respect to this reference line, we are showing it as 2.5 units and from here to here, we are, going to show it as 4. One can also show this one as 4, but the standard practice of showing these, dimensions because this 2.5 anyway we have to show and it will be quite easy with respect to that, reference line, we can show these units like 4. It simplifies the drawing., (Refer Slide Time: 16:42), , So, the standard practice is to show it on that side connected with this other dimension. There is nothing, wrong in showing this; however, this is not a standard practice., (Refer Slide Time: 16:59), , Now, we have this length also has to be defined. So, that is what we are showing here as 1 unit 1.00. This, one we are showing as 2.5. One can also show it in this way, but the standard practices because anyway
Page 12 :
we are showing one of the dimensions, it is always good to show the other dimension also required in the, same direction. So, this is the right way of representing the correct way., (Refer Slide Time: 17:31), , Now, because it is an inclined cut section, we may require an angle. So, there are two ways to show these, angles. If we are strictly following Cartesian coordinates, it’s better to use just numbers without showing, any angular coordinate., (Refer Slide Time: 18:14), , In the next example, we will see when we are going to represents those angles. These basic dimensions, 2.5, 4.0 and this one, 0.25 are good enough to represent this incline portion. Because we are already, showing this 2.5 in this way, we don’t require any dimension here.
Page 13 :
One has to follow it in a compact or minimalistic way of representing these dimensions. So, one has to, show all the dimensions required. These are the extra information if we are going to show it understands, practices to minimize these efforts. So, we can show this one also 4.0, anyway we are showing it on that, side so, this is not at all required dimension. Here we are showing 2.5 already so; this dimension is not at, all required in that way. So, this is the minimalistic way of representing this dimension., (Refer Slide Time: 19:07), , For the same example, if I would like to use inclined angles. So, for the same object the 2.5, 4, but we do, not want to represent this height or length, instead of that what we are trying to do is this is having an, incline, incline with respect to this horizontal line. So, we are showing it as an inclined angle. So, we are, using this angular thing mentioning our 45.00 degrees. So, this is 45 degrees., (Refer Slide Time: 19:59)
Page 14 :
When we are showing that, already we know this dimension is 2.5, and the line has to be within 4.(0) - 4, units. So, if we are drawing a vertical line here and a unit of 2.5, whatever these leftover points, those, points has to be connected by 45 degrees that means, once I identify this 2.5 dimension from here to here, as a point then, I go ahead using my protractor with 45 degrees line and stop it when it is these vertical, line going to intersect. So, you draw 45 degrees using protractor as a thin line, then project this vertical, line so, wherever it intersects, that angle we are going to show as 45 degrees., (Refer Slide Time: 21:15), , Sometimes, we have small portions named chamfers. If we are taking any objects, these objects may not, have very sharp corners something like if we have, for example, I would like to have a table edge. These, corners preferably better to avoid them so, for their purpose, either we use cut kind of sections that is, what we call chamfering. We see sometimes rounded corners also that is not chamfering, but we will, learn about that during our technical course., So, whenever we have that kind of small cuts, we call these are chamfering. For example, like you want, to make cylindrical objects, but we cannot straight away jump into this kind of portion like a perfect, vertical cut and jump there instead of that, we gradually use our machine tool and then go ahead construct, that. So, that kind of corners we always see, that is what we call chamfering.
Page 15 :
(Refer Slide Time: 22:55), , So, because it is a chamfer, we are showing 45 degrees, for example, and that is from that chamfer to this, reference base, this is the reference base. So, that angle what we are showing as 45 degrees. Because it is, a cylindrical object that is the reason we have a dash-dot line., (Refer Slide Time: 23:11), , And this chamfering is not just 45 degrees one has to go, but how far we have to go thus, we are, representing 0.25. Whenever you have available long dimensions, we show it like over that.
Page 16 :
(Refer Slide Time: 24:05), , But whenever that space is not there congested instead of that what we use is this kind of dimension. So,, this point to that point, this projector length is 0.25., (Refer Slide Time: 24:20), , If there are arcs involved in that, one has to be careful in showing these dimensions. For example, you, have a room floor where edges are slightly corner. Because there is material on this side, this is the room, air, and this is the room material, these are the edges. So, whenever material is there, we show it by this, kind of hash lines. This indicates that material is there, and there is no material on this side., For example, when you have a cut sections object, for example, let us take a rectangular block 3D one; it, can be a box, iron box, solid block. So, inside everywhere material is there. Now I want to slice it on that, frame. So, if I want to cut it into two parts separate them this is one part, and the other part is this back
Page 17 :
one let us call B part, the front one is A. If I want to show B part, we show it by this kind of hashes, because it is something like material is available there, we are showing by hash and material is not there, so, we are not showing any hash., (Refer Slide Time: 26:15), , However, we have a radius of 6 units and its radius because of this R symbol. So, whenever these, radiuses are there, we have to show it in that way. It can be 6 units; it can be 10 units whatever the units, we go ahead., (Refer Slide Time: 26:38), , Here is another example we have radius R19. These are holes involved, and perhaps it might be going, into a cylindrical shape that is a reason we have this dash-dot kind of lines. Whenever this kind of curves, is there, we show it by radius.
Page 18 :
(Refer Slide Time: 27:11), , These dimensions supposed to be in detail, one has to show. For example, here we are taking a drawing, an example drawing sheet where an object is mentioned, the title block perhaps the material is present, there that is the reason this hashing is done and the intricate details we would like to show., (Refer Slide Time: 27:51), , For example, let us look at this one this small red one, that one extensively we are showing it at sides the, side of this drawing sheet. So, we want to mention those intricate dimensions also that is the reason we, are showing it as a separate one with clear cut dimensioning it is having R of 0.05 units, and that is what, we call detail dimensions, any intricate things which we would like to specifically show, then a separate, thing like rounding it off into circle and show it.
Page 19 :
(Refer Slide Time: 28:29), , And the other basic dimensions, what we can see is here this. Because it is a cylindrical object, so we, have a diameter as dimension and so on., (Refer Slide Time: 28:41), , Few rules to show these dimensions, let us look at a schematic where L, S and so on dimensions are, shown some continuous line, some dash-dot lines, some dashed lines that mean, there is a hole., So, size S dimensions are used to define length, width, height, the diameter of circles, radius of arcs and, so on, so things. For example, let us look at S, S again S, S so; these are the main dimensions one uses. If, there is something like position dimensions with respect to position dimensions, locate L the centre of, circles under the key features. Let us look at this position dimensions L. So, this whole centre is at that L, units. This hole is at a location of L in this direction. The basic dimensions are always the diameter of that
Page 20 :
circle or hole is phi S, the length is S, this length complete length is S, this complete length is S and so on,, so things., (Refer Slide Time: 30:07), , But whenever I would like to show position dimension with respect to a certain base, there is some centre, we will show it in that way. And like I said, we do not repeat the same dimensions every time. So, the, minimalistic way one has to show these dimensions., (Refer Slide Time: 30:31), , Few rules, dimension the feature in a view where its characteristic shape is shown. So, the main features, have to be conveyed through these dimensions. English parts are dimensioned in mm with decimals, not
Page 21 :
fractions. Metric parts are dimensioned in mm with decimals. Units are omitted from the dimension, numbers since they are normally understood to be in millimetres. So, we said like all dimensions are in, mm that kind of standard protocol we will use, instead of writing 1.0 mm. Always leave at least 10 mm, between the object and the first row of dimensions., (Refer Slide Time: 31:30), , Let us look at another example. Here we have an object, where the dimensions are mentioned. You place, dimensions outside of the view except for large circles. So, all the dimensions are mentioned here on the, outside. At least 10 mm from the view has to be maintained, kind of thing., Place longer dimensions outside the shorter ones; longer dimensions outside the shorter ones. Place the, dimension text between the dimensionless in standard practice you use in between that. In certain cases, it, is also allowed to mention dimension above the line that is another style of representing. Use arrowheads, at the end of the dimensions, arrowheads one has to use.
Page 22 :
(Refer Slide Time: 32:54), , Let us close this a session with the last example. Here, I am showing you two pictures, two different, pictures A and B, which one is the correct way of representation. Let us look at picture A and picture B., Picture B is the wrong way of representation when compared to picture A why?, (Refer Slide Time: 33:41), , Let us recall our discussed rules. The rule it is breaking, one should not show dimensions inside of that, object that is a wrong thing and the minimum 1-millimetre gap from the ah 10-millimetre gap one has to, use from the object, in this case, these are followed because the object is in this level. So, these, dimensions are away from that object, but here the dimensions are within the object. So, this is a wrong, representation.
Page 23 :
So, in today’s class, we tried to look at dimensions, how to represents them and for cylindrical objects, and also planar objects, what are the few rules involved for this dimensioning we tried to look at. In the, next class, we will learn more about tolerances and where we use these tolerances, why they are, important., Thank you very much.