Page 1 :
CREATING PRESENTATION
Page 2 :
OUTLINE OF AN EFFECTIVE PRESENTATION, Don't read your presentation straight from the slides, If your audience can both read and hear, it’s a waste of time for you to simply read your slides aloud. Your audience will zone out and stop listening to what you’re saying, which means they won’t hear any extra information you include. Instead of typing out your entire presentation, include only main ideas, keywords, and talking points in your slide show text.
Page 3 :
Don't forget your audience, Who will be watching your presentation? The same goofy effects and funny clip art that would entertain a classroom full of middle-school students might make you look unprofessional in front of business colleagues and clients., Choose readable colors and fonts, Your text should be easy to read and pleasant to look at. Large, simple fonts and theme colors are always your best bet. The best fonts and colors can vary depending on your presentation setting. ark text on a light background is your best bet for visibility.
Page 4 :
Don't overload your presentation with animations, As anyone who’s sat through a presentation while every letter of every paragraph zoomed across the screen can tell you, being inundated with complicated animations and exciting slide transitions can Use animations become irritating., Use animations sparingly to enhance your presentation, Don’t take the last tip to mean you should avoid animations and other effects entirely. When used sparingly, subtle effects and animations can add to your presentation. For example, having bullet points appear as you address them rather than before can help keep your audience’s attention.
Page 5 :
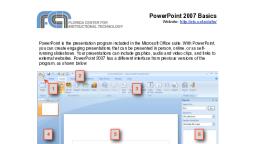
ELEMENTS OF THE USER INTERFACE, User Interface, The most visible element of PowerPoint is its user interface—the screens, dialog boxes, buttons, panes, and other parts of the application window. , The biggest part of the interface is the pane for creating and editing slides. The toolbar, called the Ribbon, is another big chunk of the application window
Page 6 :
Slides, The slide is the PowerPoint element on which you insert text, graphics, audio, video, and anim, Content, PowerPoint's content types include static text and graphics, audio, video, and animation created inside PowerPoint itself. Most of the commands for creating content are on the Insert tab.ations
Page 7 :
Formatting, Formatting commands are the PowerPoint element with which you decorate the content on your slides., Presentation Playback, The final slide presentation will be the only PowerPoint element that your audience sees, if you’ve saved the presentation with the extension PPSX
Page 8 :
To create a new presentation:, Select the File tab to go to Backstage view., , , , , Select New on the left side of the window, then click Blank Presentation.
Page 9 :
3. A new presentation will appear.
Page 10 :
WORKING WITH TEXTBOXES, To add a text box follow the below listed steps., Open the Insert tab, In Text group click the Text Box command, Click on the slide and drag the cursor until text box takes the desired width, Then release the mouse
Page 12 :
CHARACTER FORMATS, How to Format Font Size, Select the text you want to modify, Open the Home tab and locate the Font group, In Font group click the drop-down arrow next to font size option, A list of various font sizes appears, Move the cursor over the list and select the desired font size
Page 14 :
How to Format Font Style, Select the text you want to modify, Select Home tab and locate the Font group, In Font group click the drop-down arrow next to font style option, A list of font styles appears, Move the cursor over the list and select the desired font style
Page 16 :
How to Format Text Color, Select the text you want to change, In Home tab locate the Font group, In Font group click the drop-down arrow next to font color icon, Font color menu appears, Select the desired font color
Page 18 :
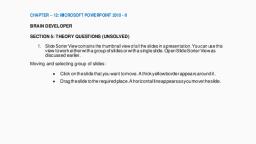
Viewing Slides, Once you create the presentation you can view it in different ways., Select the View tab. Locate the Presentation Views group. It displays four options to view presentations; Normal View, Slide Sorter View, Slide Show View and Notes Page View.
Page 19 :
Normal View: , The normal view appears by default when we open the PowerPoint window. We create and edit slides in Normal View. This view also offers three view options out of four options in the form of buttons on the status bar.
Page 20 :
Slide Sorter View: It offers miniature or thumbnail version of all slides. You can see all your slides at one time in the screen. You can also drag or delete the slides to rearrange them.
Page 21 :
Slide Show View: It displays your presentation in full screen mode. It also offers an additional menu at the left bottom corner of the slide.
Page 22 :
Notes Page View: This view provides space below the slide to add notes.
Page 23 :
SAVING A PRESENTATION, To save a presentation:, Locate and select the Save command on the Quick Access Toolbar., , , , If you're saving the file for the first time, the Save As pane will appear in Backstage view.
Page 24 :
You'll then need to choose where to save the file and give it a file name. Click Browse to select a location on your computer. You can also click OneDrive to save the file to your OneDrive.
Page 25 :
The Save As dialog box will appear. Select the location where you want to save the presentation., Enter a file name for the presentation, then click Save., The presentation will be saved. You can click the Save command again to save your changes as you modify the presentation.
Page 27 :
How to Add Slide, There are multiple ways to add slide in PowerPoint presentation. The frequently used option is to click the New Slide, , , , , The other ways to add a slide are: Office Themes, Duplicate Selected Slide and Reuse Slides.
Page 28 :
1) Using Office Themes to add slide:, Select the slide next to which you want the new slide to appear, In Home tab, click the drop-down arrow on the New Slide button, It will display the office themes, Select the slide choice that suits your requirement
Page 30 :
2) Using Duplicate Selected Slide option to , add slide:, Select the slide you want to duplicate, In Home tab, click the drop-down arrow of New Slide button, Left click the Duplicate Selected Slide
Page 32 :
3) Using Reuse Slides option to add slide:, Select the slide next to which you want the new slide to appear, In Home tab, click the drop-down arrow of New Slide button, Select the Reuse Slides option, Click on Browse then click on Browse File, Select the slide from the presentation that you want to import
Page 34 :
CHANGING A SLIDE LAYOUT, To change the layout of an existing slide, click the Layout command, then choose the desired layout.
Page 35 :
APPLYING A THEME, Select the Design tab on the Ribbon, then locate the Themes group. Each image represents a theme., Click the More drop-down arrow to see all available themes.
Page 36 :
Select the desired theme.
Page 37 :
The theme will be applied to the entire presentation. To apply a different theme, simply select it from the Design tab.
Page 38 :
Change Color in Themes, Open the Design tab, Click the drop-down arrow next to Colors in the Themes group, With a left click select the desired color set, To create new color set click the Create New Theme Colors
Page 40 :
Apply Animation Effect, Select the text or object you want to animate, Select the Animations tab, In Animations group click the drop-down arrow next to Animate option, Animation options will appear, Move the cursor over different options to see live preview on the slide, Select the desired animation
Page 42 :
Apply a Custom Animation Effect, Select the text or object, Select the Animation tab, In Animation group click the Custom Animation, Custom Animation task pane appears on the right, Click the Add Effect, it will display four options that are further divided into different options, Select the desired effect
Page 44 :
Apply Slide Transition Effects, Select the slide to which you want to apply the effect, Select the Animation tab, In Transition to This Slide group you will see the transition effects, Click the drop-down arrow to see menu of transition effects, Select the desired transition effect, Click Apply To All to apply the effect to all slides
Page 45 :
Choosing Theme Colors, Step 1: Select the Design tab, Step 2: Choose a theme from the gallery, Step 3: Select theme colors from the dropdown on the right side of the top panel
Page 47 :
Choosing Theme Fonts, Step 1: Select Slide Master from the View tab, Step 2: Choose Fonts and click Customize Fonts, Step 3: Select Create New Theme Fonts, Step 4: Pick out a Heading font and Body font, Step 5: Press Save
Page 49 :
Creating Custom Themes, Step 1: Click on the Design tab, Step 2: Press the down arrow in the Variants group, Step 3: Choose Colors and click Customize Colors, Step 4: Determine the entire range of colors for your new theme
Page 51 :
How to Change the Background of a Theme, Open the Design tab, Locate the Background group, Click the Background Styles button, Select the desired background style
Page 52 :
ARRANGE SLIDE SEQUENCE, In the pane on the left, click the thumbnail of the slide that you want to move, and then drag it to the new location., To select multiple slides: Press and hold Ctrl, and in the pane on the left, click each slide that you want to move. Release the Ctrl key, and then drag the selected slides as a group to the new location.