Page 1 :
Java Applet, Applet is a special type of program that is embedded in the webpage to generate the, dynamic content. It runs inside the browser and works at client side., Advantage of Applet, , There are many advantages of applet. They are as follows:, o, o, o, , It works at client side so less response time., Secured, It can be executed by browsers running under many, plateforms, including Linux, Windows, Mac Os etc., , Hierarchy of Applet, , Lifecycle of Java Applet, , 1., 2., 3., 4., 5., , Applet is initialized., Applet is started., Applet is painted., Applet is stopped., Applet is destroyed
Page 2 :
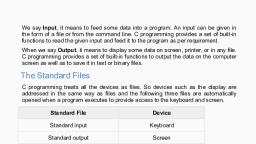
Lifecycle methods for Applet:, The java.applet.Applet class 4 life cycle methods and java.awt.Component class provides, 1 life cycle methods for an applet., , java.applet.Applet class, For creating any applet java.applet.Applet class must be inherited. It provides 4 life cycle, methods of applet., 1. public void init(): is used to initialized the Applet. It is invoked only once., 2. public void start(): is invoked after the init() method or browser is maximized. It, is used to start the Applet., 3. public void stop(): is used to stop the Applet. It is invoked when Applet is stop, or browser is minimized., 4. public void destroy(): is used to destroy the Applet. It is invoked only once., , java.awt.Component class, The Component class provides 1 life cycle method of applet., 1. public void paint(Graphics g): is used to paint the Applet. It provides Graphics, class object that can be used for drawing oval, rectangle, arc etc., , How to run an Applet?, , There are two ways to run an applet, 1. By html file., 2. By appletViewer tool (for testing purpose)., Simple example of Applet by html file:, To execute the applet by html file, create an applet and compile it. After that create an, html file and place the applet code in html file. Now click the html file., 1. //First.java, 2. import java.applet.Applet;, 3. import java.awt.Graphics;, 4. public class First extends Applet{, 5., 6. public void paint(Graphics g){, 7. g.drawString("welcome",150,150);, 8. }, 9., 10. }
Page 3 :
myapplet.html, <html>, 1., 2., 3., 4., 5., , <body>, <applet code="First.class" width="300" height="300">, </applet>, </body>, </html>, To execute the applet by appletviewer tool, write in command prompt:, , c:\>javac First.java, c:\>appletviewer First.java, Displaying Graphics in Applet, java.awt.Graphics class provides many methods for graphics programming., Commonly used methods of Graphics class:, 1. public abstract void drawString(String str, int x, int y): is used to draw the, specified string., 2. public void drawRect(int x, int y, int width, int height): draws a rectangle with, the specified width and height., 3. public abstract void fillRect(int x, int y, int width, int height): is used to fill, rectangle with the default color and specified width and height., 4. public abstract void drawOval(int x, int y, int width, int height): is used to, draw oval with the specified width and height., 5. public abstract void fillOval(int x, int y, int width, int height): is used to fill, oval with the default color and specified width and height., 6. public abstract void drawLine(int x1, int y1, int x2, int y2): is used to draw, line between the points(x1, y1) and (x2, y2)., 7. public abstract boolean drawImage(Image img, int x, int y, ImageObserver, observer): is used draw the specified image., 8. public abstract void drawArc(int x, int y, int width, int height, int startAngle,, int arcAngle): is used draw a circular or elliptical arc., 9. public abstract void fillArc(int x, int y, int width, int height, int startAngle,, int arcAngle): is used to fill a circular or elliptical arc., 10. public abstract void setColor(Color c): is used to set the graphics current color, to the specified color., 11. public abstract void setFont(Font font): is used to set the graphics current font, to the specified font.
Page 4 :
Example of Graphics in applet:, 1. import java.applet.Applet;, 2. import java.awt.*;, 3. public class GraphicsDemo extends Applet{, 4. public void paint(Graphics g){, 5. g.setColor(Color.red);, 6. g.drawString("Welcome",50, 50);, 7. g.drawLine(20,30,20,300);, 8. g.drawRect(70,100,30,30);, 9. g.fillRect(170,100,30,30);, 10. g.drawOval(70,200,30,30);, 11. g.setColor(Color.pink);, 12. g.fillOval(170,200,30,30);, 13. g.drawArc(90,150,30,30,30,270);, 14. g.fillArc(270,150,30,30,0,180);, 15. }, 16. }, , myapplet.html, 1., 2., 3., 4., 5., 6., , <html>, <body>, <applet code="GraphicsDemo.class" width="300" height="300">, </applet>, </body>, </html>, , Displaying Image in Applet, Applet is mostly used in games and animation. For this purpose image is required to be, displayed. The java.awt.Graphics class provide a method drawImage() to display the, image., Syntax of drawImage() method:, 1. public abstract boolean drawImage(Image img, int x, int y, ImageObserver, observer): is used draw the specified image., How to get the object of Image:, The java.applet.Applet class provides getImage() method that returns the object of Image. Syntax:, , 1. public Image getImage(URL u, String image){}, Other required methods of Applet class to display image:, 1. public URL getDocumentBase(): is used to return the URL of the document in which applet, is embedded., 2. public URL getCodeBase(): is used to return the base URL.
Page 5 :
Example of displaying image in applet:, 1. import java.awt.*;, 2. import java.applet.*;, 3. public class DisplayImage extends Applet {, 4. Image picture;, 5. public void init() {, 6., picture = getImage(getDocumentBase(),"sonoo.jpg");, 7. }, 8. public void paint(Graphics g) {, 9., g.drawImage(picture, 30,30, this);, 10. }, 11. }, In the above example, drawImage() method of Graphics class is used to display the image. The, 4th argument of drawImage() method of is ImageObserver object. The Component class, implements ImageObserver interface. So current class object would also be treated as, ImageObserver because Applet class indirectly extends the Component class., , myapplet.html, 1., 2., 3., 4., 5., 6., , <html>, <body>, <applet code="DisplayImage.class" width="300" height="300">, </applet>, </body>, </html>, , Digital clock in Applet, Digital clock can be created by using the Calendar and SimpleDateFormat class. Let's see, the simple example:, Example of Digital clock in Applet:, 1. import java.applet.*;, 2. import java.awt.*;, 3. import java.util.*;, 4. import java.text.*;, 5. public class DigitalClock extends Applet implements Runnable {, 6., Thread t = null;, 7., int hours=0, minutes=0, seconds=0;, 8., String timeString = "";, 9., public void init() {, 10., setBackground( Color.green);, 11. }
Page 6 :
12. public void start() {, 13., t = new Thread( this );, 14., t.start();, 15. }, 16. public void run() {, 17., try {, 18., while (true) {, 19., Calendar cal = Calendar.getInstance();, 20., hours = cal.get( Calendar.HOUR_OF_DAY );, 21., if ( hours > 12 ) hours -= 12;, 22., minutes = cal.get( Calendar.MINUTE );, 23., seconds = cal.get( Calendar.SECOND );, 24., SimpleDateFormat formatter = new SimpleDateFormat("hh:mm:ss");, 25., Date date = cal.getTime();, 26., timeString = formatter.format( date );, 27., repaint();, 28., t.sleep( 1000 ); // interval given in milliseconds, 29., }, 30., }, 31., catch (Exception e) { }, 32. }, 33. public void paint( Graphics g ) {, 34., g.setColor( Color.blue );, 35., g.drawString( timeString, 50, 50 );, 36. }, 37. }, , In the above example, getX() and getY() method of MouseEvent is used to get the current x-axis and yclass returns the object of Graphics., , myapplet.html, 1., 2., 3., 4., 5., 6., , <html>, <body>, <applet code="DigitalClock.class" width="300" height="300">, </applet>, </body>, </html>
Page 7 :
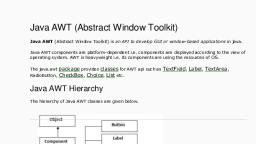
Java AWT (Abstract Window Toolkit) is an API to develop Graphical, User Interface (GUI) or windows, windows-based applications in Java., dependent i.e. components are displayed according, Java AWT components are platform, platform-dependent, to the view of operating system. AWT is heavy weight i.e. its components are using the, resources of underlying operating system (OS)., The java.awt package, provides classes, for AWT API such as TextField, , Label, , TextArea, , RadioButton, CheckBox, , Choice, , List, etc., The AWT tutorial will help the user to understand Java GUI programming in simple and, easy steps., , Why AWT is platform independent?, Java AWT calls the native platform calls the native platform (operating systems), subroutine for creating API components like TextField, ChechBox, button, etc., For example, an AWT GUI with components like TextField, label and button will have, different look and feel for the, different platforms like Windows,, MAC OS, and Unix. The reason for, this is the platforms have, ha, different view for their native, components and AWT directly, calls the native subroutine that, creates those components., , Java AWT Hierarchy, The hierarchy of Java AWT classes, are given below., , Components, All the elements like the button,, text fields, scrollll bars, etc. are, called components. In Java AWT,, there are classes for each, component as shown in above, diagram. In order to place every, component in a particular, position on a screen, we need to, add them to a container.
Page 8 :
Container, The Container is a component in AWT that can contain another components, like buttons, , textfields, labels etc. The classes that extends Container class are known as container such, as Frame, Dialog and Panel., There are four types of containers in Java AWT:, 1. Window, 2. Panel, 3. Frame, 4. Dialog, , Window, The window is the container that have no borders and menu bars. You must use frame,, dialog or another window for creating a window. We need to create an instance of, Window class to create this container., , Panel, The Panel is the container that doesn't contain title bar, border or menu bar. It is generic, container for holding the components. It can have other components like button, text, field etc. An instance of Panel class creates a container, in which we can add, components., , Frame, The Frame is the container that contain title bar and border and can have menu bars. It, can have other components like button, text field, scrollbar etc. Frame is most widely, used container while developing an AWT application., Useful Methods of Component Class, Method, , Description, , public void add(Component c), , Inserts a component on this component., , public void setSize(int width,int height), , Sets the size (width and height) of the, component., , public void setLayout(LayoutManager m), , Defines the, component., , public void setVisible(boolean status), , Changes the visibility of the component, by, default false., , layout, , manager, , for, , the
Page 9 :
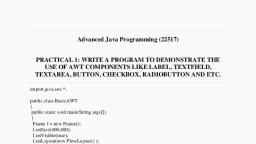
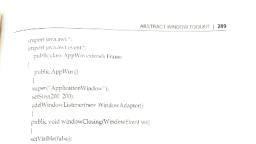
Java AWT Example, To create simple AWT example, you need a frame. There are two ways to create a GUI, using Frame in AWT., 1. By extending Frame class (inheritance), (, 2. By creating the object of Frame class (association), (, , AWT Example by Inheritance, 1. // importing Java AWT class, 2. import java.awt.*;, 3. // extending Frame class to our class AWTExample1, 4. public class AWTExample1 extends Frame {, 5., // initializing using constructor, 6., AWTExample1() {, 7., // creating a button, 8., Button b = new Button("Click, Button(, Me!!");, 9., // setting button position on screen, 10., b.setBounds(30,100,80,30, 30);, 11., // adding button into frame, 12., add(b);, 13., // frame size 300 width and 300 height, 14., setSize(300,300);, 15., // setting the title of Frame, 16., setTitle("This is our basic AWT example");, 17., // no layout manager, 18., setLayout(null);, 19., // now frame will be visible, by default it is not visible, 20., setVisible(true);, 21. }, 22. // main method, 23. public static void main(String, tring args[]) {, 24. // creating instance of Frame class, 25. AWTExample1 f = new AWTExample1();, 26. }, 27. }, Output:
Page 10 :
AWT Example by Association, 1. // importing Java AWT class, 2. import java.awt.*;, 3. // class AWTExample2 directly creates instance of Frame class, 4. class AWTExample2 {, 5., // initializing using constructor, 6., AWTExample2() {, 7., // creating a Frame, 8., Frame f = new Frame();, 9., // creating a Label, 10., Label l = new Label("Employee, "Employee id:");, 11., // creating a Button, 12., Button b = new Button("Submit");, Button(, 13., // creating a TextField, 14., TextField t = new TextField();, 15., // setting position of above components in the frame, 16., l.setBounds(20, 80, 80, 30);, 30, 17., t.setBounds(20, 100, 80,, 30);, 18., b.setBounds(100, 100, 80,, 80 30);, 19., // adding components into frame, 20., f.add(b);, 21., f.add(l);, 22., f.add(t);, 23., // frame size 300 width and 300 height, 24., f.setSize(400,300);, 25., // setting the title of frame, 26., f.setTitle("Employee info");, info", 27., // no layout, 28., f.setLayout(null);, 29., // setting visibility of frame, 30., f.setVisible(true);, 31. }, 32. // main method, 33. public static void main(String args[]) {, 34. // creating instance of Frame class, 35. AWTExample2 awt_obj = new AWTExample2();, 36. }, 37. }, Output:
Page 12 :
Java AWT Button, A button is basically a control component with a label that generates an event when, pushed. The Button class is used to create a labeled button that has platform, independent implementation. The application result in some action when the button is, pushed., When we press a button and release it, AWT sends an instance of ActionEvent to that, button by calling processEvent on the button. The processEvent method of the button, receives the all the events, then it passes an action event by calling its own, method processActionEvent., processActionEvent. This method passes the action event on to action listeners, that are interested in the action events generated by the button., To perform an action on a button being pressed and released,, the ActionListener interface needs to be implemented. The registered new listener can, receive events from the button by calling addActionListener method of the button. The, Java application, cation can use the button's action command as a messaging protocol., , AWT Button Class Declaration, 1. public class Button extends Component implements Accessible, ButtonExample.java, 1. import java.awt.*;, 2. public class ButtonExample {, 3. public static void main (String[] args) {, 4., // create instance of frame with the label, 5., Frame f = new Frame("Button, "Button Example");, 6., // create instance of button with label, 7., Button b = new Button("Click, "Click Here");, 8., // set the position for the button in frame, 9., b.setBounds(50,100,80,30, 30);, 10. // add button to the frame, 11. f.add(b);, 12. // set size, layout and visibility of frame, 13. f.setSize(400,400);, 14. f.setLayout(null);, 15. f.setVisible(true);, 16. }, 17. }
Page 13 :
Java AWT Button Example with ActionListener, Example:, In the following example, we are handling the button click events by implementing, ActionListener Interface., ButtonExample3.java, 1. // importing necessary libraries, 2. import java.awt.*;, 3. import java.awt.event.*;, 4. public class ButtonExample3 {, 5. public static void main(String[] args) {, 6., // create instance of frame with the label, 7., Frame f = new Frame("Button, "Button Example");, 8., final TextField tf=new TextField();, 9., tf.setBounds(50,50, 150,20, 20);, 10. // create instance of button with label, 11. Button b=new Button("Click, "Click Here");, 12. // set the position for the button in frame, 13. b.setBounds(50,100,60,30, 30);, 14. b.addActionListener(new, new ActionListener() {, 15. public void actionPerformed (ActionEvent e) {, 16., tf.setText("Welcome, "Welcome to Javatpoint.");, 17., }, 18. });, 19. // adding button the frame, 20. f.add(b);, 21. // adding textfield the frame, 22. f.add(tf);, 23. // setting size, layout and visibility, 24. f.setSize(400,400);, 25. f.setLayout(null);, 26. f.setVisible(true);, 27. }, 28. }, , Output:
Page 14 :
Java AWT Label, The object of the Label class is a component for placing text in a container. It is used to, display a single line of read only text., text. The text can be changed by a programmer but a, user cannot edit it directly., It is called a passive control as it does not create any event when it is accessed. To create, a label, we need to create the object of Label class., , AWT Label Class Declaration, 1. public class Label extends Component implements Accessible, Java AWT Label Example, In the following example, we are creating two labels l1 and l2 using the Label(String, text) constructor and adding them into the frame., LabelExample.java, 1. import java.awt.*;, 2. public class LabelExample {, 3. public static void main(String args[]){, 4., // creating the object of Frame class and Label class, 5., Frame f = new Frame ("Label, "Label example");, 6., Label l1, l2;, 7., // initializing the labels, 8., l1 = new Label ("First Label.");, Label.", 9., l2 = new Label ("Second Label.");, 10. // set the location of label, 11. l1.setBounds(50, 100, 100,, 100 30);, 12. l2.setBounds(50, 150, 100,, 100 30);, 13. // adding labels to the frame, 14. f.add(l1);, 15. f.add(l2);, 16. // setting size, layout and visibility of frame, 17. f.setSize(400,400);, 18. f.setLayout(null);, 19. f.setVisible(true);, 20. }, 21. }, , Output:
Page 15 :
Java AWT TextField, The object of a TextField class is a text component that allows a user to enter a single, line text and edit it. It inherits TextComponent class, which further, inherits Component class., When we enter a key in the text field (like key pressed, key released or key, ke typed), the, event is sent to TextField.. Then the KeyEvent is passed to the registered KeyListener. It, can also be done using ActionEvent;, ActionEvent; if the ActionEvent is enabled on the text field, then, the ActionEvent may be fired by pressing return key. The event is handled by, the ActionListener interface., , AWT TextField Class Declaration, public class TextField extends TextComponent, , Java AWT TextField Example, 1. // importing AWT class, 2. import java.awt.*;, 3. public class TextFieldExample1 {, 4., // main method, 5., public static void main(String args[]) {, 6., // creating a frame, 7., Frame f = new Frame("TextField, "TextField Example");, 8., // creating objects of textfield, 9., TextField t1, t2;, 10. // instantiating the textfield objects, 11. // setting the location of those objects in the frame, 12. t1 = new TextField("Welcome, "Welcome to Javatpoint.");, 13. t1.setBounds(50, 100, 200,, 200 30);, 14. t2 = new TextField("AWT, "AWT Tutorial");, 15. t2.setBounds(50, 150, 200,, 200 30);, 16. // adding the components to frame, 17. f.add(t1);, 18. f.add(t2);, 19. // setting size, layout and visibility of frame, 20. f.setSize(400,400);, 21. f.setLayout(null);, 22. f.setVisible(true);, 23. }, 24. }, Output:
Page 18 :
Java AWT Checkbox, The Checkbox class is used to create a checkbox. It is used to turn an option on (true) or, off (false). Clicking on a Checkbox changes its state from "on" to "off" or from "off" to, "on"., AWT Checkbox Class Declaration, public class Checkbox extends Component implements ItemSelectable, Accessible, , Java AWT Checkbox Example, In the following example we are creating two checkboxes using the Checkbox(String, label) constructor and adding them into the Frame using add() method., , CheckboxExample1.java, 1. // importing AWT class, 2. import java.awt.*;, 3. public class CheckboxExample1, 4. {, 5. // constructor to initialize, 6., CheckboxExample1() {, 7. // creating the frame with the title, 8., Frame f = new Frame("Checkbox, "Checkbox Example");, 9. // creating the checkboxes, 10., Checkbox checkbox1 = new Checkbox("C++");, 11., checkbox1.setBounds(, checkbox1.setBounds(100,, 100, 50, 50);, 12., Checkbox checkbox2 = new Checkbox("Java", true);, 13. // setting location of checkbox in frame, 14. checkbox2.setBounds(100, 150,, 150 50, 50);, 15. // adding checkboxes to frame, 16., f.add(checkbox1);, 17., f.add(checkbox2);, 18., 19. // setting size, layout and visibility of frame, 20., f.setSize(400,400);, 21., f.setLayout(null);, 22., f.setVisible(true);, 23., }, 24. // main method, 25. public static void main (String args[]), 26. {, 27. new CheckboxExample1();, 28. }, 29. }, Output:
Page 20 :
Java AWT List, The object of List class represents a list of text items. With the help of the List class, user, can choose either one item or multiple items. It inherits the Component class., AWT List class Declaration, 1. public class List extends Component implements ItemSelectable, Accessible, 2. // importing awt class, 3. import java.awt.*;, 4. public class ListExample1, 5. {, 6., // class constructor, 7., ListExample1() {, 8., // creating the frame, 9., Frame f = new Frame();, 10., // creating the list of 5 rows, 11., List l1 = new List(5);, List(, 12., // setting the position of list component, 13., l1.setBounds(100, 100, 100, 75, 75);, 14., // adding list items into the list, 15., l1.add("Item 1");, );, 16., l1.add("Item 2");, );, 17., l1.add("Item 3");, );, 18., l1.add("Item 4");, );, 19., l1.add("Item 5");, );, 20., // adding the list to frame, 21., f.add(l1);, 22., // setting size, layout and visibility of frame, 23., f.setSize(400, 400);, 400, 24., f.setLayout(null, null);, 25., f.setVisible(true, true);, 26., }, 27. // main method, 28. public static void main(String args[]), 29. {, 30. new ListExample1();, 31. }, 32. }, Output:
Page 21 :
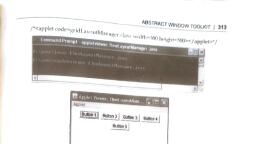
ListExample2.java, // importing awt and event class, 1. import java.awt.*;, 2. import java.awt.event.*;, 3., 4. public class ListExample2, 5. {, 6., // class constructor, 7., ListExample2() {, 8., // creating the frame, 9., Frame f = new Frame();, 10., // creating the label which is final, 11., final Label label = new Label();, 12., 13., // setting alignment and size of label, 14., label.setAlignment(Label.CENTER);, 15., label.setSize(500, 100);, 16., 17., // creating a button, 18., Button b = new Button("Show");, 19., 20., // setting location of button, 21., b.setBounds(200, 150, 80, 30);, 22., 23., // creating the 2 list objects of 4 rows, 24., // adding items to the list using add(), 25., // setting location of list components, 26., final List l1 = new List(4, false);, 27., l1.setBounds(100, 100, 70, 70);, 28., l1.add("C");, 29., l1.add("C++");, 30., l1.add("Java");, 31., l1.add("PHP");, 32., 33., 34., final List l2=new List(4, true);, 35., l2.setBounds(100, 200, 70, 70);, 36., l2.add("Turbo C++");, 37., l2.add("Spring");, 38., l2.add("Hibernate");, 39., l2.add("CodeIgniter");, 40., 41., // adding List, Label and Button to the frame, 42., f.add(l1);, 43., f.add(l2);
Page 22 :
44., 45., 46., 47., 48., 49., 50., 51., 52., 53., 54., 55., , f.add(label);, f.add(b);, // setting size, layout and visibility of frame, f.setSize(450,450);, f.setLayout(null);, f.setVisible(true);, , ));, , // generating event on the button, b.addActionListener(new, new ActionListener() {, public void actionPerformed(ActionEvent e) {, +l1.getItem(l1.getSelectedIndex(, String data = "Programming language Selected: "+l1.getItem(l1.getSelectedIndex(, , 56., data += ", Framework Selected:";, 57., for(String frame:l2.getSelectedItems()) {, 58., data += frame + " ";, 59., }, 60., label.setText(data);, 61., }, 62., });, 63. }, 64., 65. // main method, 66. public static void main(String args[]), 67. {, 68. new ListExample2();, 69. }, 70. }, Output: