Page 1 :
Unit 5, APPLET, , 1
Page 2 :
• An applet is a Java program that runs in a, Web browser. An applet can be a fully, functional Java application because it has, the entire Java API at its disposal., , 2
Page 3 :
differences between an applet and a standalone, Java application, including the following:, • An applet is a Java class that extends the java.applet.Applet class., • A main() method is not invoked on an applet, and an applet class, will not define main()., • Applets are designed to be embedded within an HTML page., • When a user views an HTML page that contains an applet, the code, for the applet is downloaded to the user's machine., • A JVM is required to view an applet. The JVM can be either a plugin of the Web browser or a separate runtime environment., • The JVM on the user's machine creates an instance of the applet, class and invokes various methods during the applet's lifetime., • Applets have strict security rules that are enforced by the Web, browser. The security of an applet is often referred to as sandbox, security, comparing the applet to a child playing in a sandbox with, various rules that must be followed., • Other classes that the applet needs can be downloaded in a single, Java Archive (JAR) file., 3
Page 4 :
4
Page 5 :
Preparing to write applet, , 5
Page 7 :
•, •, , •, •, •, •, , •, , Life Cycle of an Applet:, Four methods in the Applet class give you the framework on which, you build any serious applet:, init: This method is intended for whatever initialization is needed for, your applet. It is called after the param tags inside the applet tag, have been processed., start: This method is automatically called after the browser calls the, init method. It is also called whenever the user returns to the page, containing the applet after having gone off to other pages., stop: This method is automatically called when the user moves off, the page on which the applet sits. It can, therefore, be called, repeatedly in the same applet., destroy: This method is only called when the browser shuts down, normally. Because applets are meant to live on an HTML page, you, should not normally leave resources behind after a user leaves the, page that contains the applet., paint: Invoked immediately after the start() method, and also any, time the applet needs to repaint itself in the browser. The paint(), method is actually inherited from the java.awt., 7
Page 8 :
Creating an Executable Applet, • Executable applet is nothing but the .class file of, applet, which is obtained by compiling the, source code of the applet. Compiling the applet, is exactly the smae as compiling an application, using following command., • javac appletname.javaThe compiled output file, called appletname.class should be placed in the, same directory as the source file., , 8
Page 9 :
Designing a Web Page Applet, Tag, • Java applet are programs that reside on web page. A web page is, basically made up of text and HTML tags that can be interpreted by, a web browser or an applet viewer., • Java source code, it can be prepared using any ASCII text editor., • A web page is also called HTML page or HTML document., • A Web pages are stored using a file extension .html such as my, Applet.html. Such files are referred to as HTML files., • HTML files should be stored in the same directory as the compiled, code of the applets., • A web page is marked by an opening HTML tag <HTML> and, closing HTML tag </HTML> and is divided into the following three, major parts:, • Comment Section, • Head Section, • Body Section, •, 9
Page 10 :
Applet Tag, • The <Applet...> tag supplies the name of the applet to, be loaded and tells the browser how much space the, applet requires., • The ellipsis in the tag <Applet...> indicates that it, contains certain attributes that must specified., • The <Applet> tag given below specifies the minimum, requirements to place the Hellojava applet on a web, page., • <Applet code = "Hellojava.class" width = 400 Height =, 200 > </Applet> This HTML code tells the browser to, load the compiled java applet Hellojava.class, which is in, the same directory as this HTML file., • It also specifies the display area for the applet output as, 400 pixels width and 200 pixels height., 10
Page 11 :
Applet Adding HTML to html file, • To execute an applet in a web browser, you, need to write a short HTML text file that contains, the appropriate APPLET tag. Here is the HTML, file that executes SimpleApplet:, • <Applet code = "Hellojava.class" width = 400, Height = 200 > </Applet> The width and height, attributes specify the dimensions of the display, area used by the applet. After you create this, file, you can execute the HTML file called, RunApp.html (say) on the command line., • c:\ appletviewer RunApp.html, 11
Page 12 :
Running the Applet, • To execute an applet with an applet, viewer, you may also execute the HTML, file in which it is enclosed, eg., • c:\>appletviewer RunApp.htmlExecute the, applet the applet viewer, specifying the, name of your applet's source file. The, applet viewer will encounter the applet, tage within the comment and execute your, applet., 12
Page 13 :
Java Display Numerical Values in Applet, , • In applets, we can display numerical, values by first converting them into strings, and then using the drawstring() method of, Graphics class we can do this easily by, calling the valueOf() Method of String, class., , 13
Page 14 :
import java.awt.*;, import java.applet.*;, public class DisplayNumericalValues, extends Applet, {, public void paint(Graphics g), {, int val1 = 10;, int val2 = 20;, int sum = val1 + val2;, String str_sum =, "Sum="+String.valueOf(sum);, g.drawString(str_sum,100,200);, }, }, <HTML> <HEAD> <TITLE>Display Numerical, Values</TITLE> </HEAD> <BODY>, <APPLET Code="DisplayNumericalValues.class", Width=400 Height=300> &/APPLET> <BODY>, </HTML>, , 14
Page 16 :
• Tell Java that the program uses classes in, the awt package., Tell Java that the program uses classes in, the applet package., Derive the Applet2 class from, Java's Applet class., Declare textField as an object of, the TextField class., Override the Applet class's init() method., Create the new TextField object., Add the TextField object to the applet's display., 16
Page 18 :
•, •, •, •, •, •, •, •, •, , <HTML>, <HEAD>, <TITLE>Getting Input from the User</TITLE>, </HEAD>, <BODY>, <APPLET Code="GettingInputfromtheUser.class“, Width=400 Height=300>, </APPLET>, </BODY>, </HTML>, , 18
Page 19 :
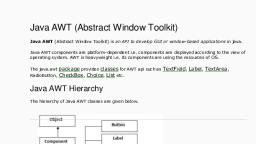
Java Coordinate System, , x, (0, ,0, ), , Y, A, x, is, , X, A, x, is, , y, (x, ,y, ), , (0, ,0, ), J, a, v, aC, o, o, rd, in, a, te, S, y, s, te, m, , Y, A, x, is, , C, o, n, v, e, n, tio, n, a, l, C, o, o, rd, in, a, te, S, y, s, te, m, , X, A, x, is, , 19
Page 20 :
Each GUI Component Has its, Own Coordinate System, (, c, 3, .g, e, t, X, (, ), ,, c, 3, .g, e, t, Y, (, ), ), c, 3, .g, e, t, X, (, ), , (, x, ,y, ), , (, c, 2, .g, e, t, X, (, ), ,, c, 2, .g, e, t, Y, (, ), ), , C, o, m, p, o, n, e, n, tc, 3, , (, 0, ,0, ), (, x, ,y, ), (, 0, ,0, ), (, x, ,y, ), , (, c, 1, .g, e, t, X, (, ), ,, c, 1, .g, e, t, Y, (, ), ), , C, o, m, p, o, n, e, n, tc, 2, (, 0, ,0, ), , c, 3, ’, sc, o, o, r, d, i, n, a, t, e, s, y, s, t, e, m, , c, 2, ’, sc, o, o, r, d, i, n, a, t, e, s, y, s, t, e, m, , C, o, m, p, o, n, e, n, tc, 1, c, 1, ’, sc, o, o, r, d, i, n, a, t, e, s, y, s, t, e, m, , 20
Page 21 :
The Graphics Class, java.awt.Graphics, , •You, , can draw strings,, lines, rectangles, ovals,, arcs, polygons, and, polylines, using the, methods in the Graphics, class., , +setColor(color: Color): void, , Sets a new color for subsequent drawings., , +setFont(font: Font): void, , Sets a new font for subsequent drwings., , +drawString(s: String, x: int, y: int): void, , Draws a string starting at point (x, y)., +drawLine(x1: int, y1: int, x2: int, y2: int): void Draws a line from (x1, y1) to (x2, y2)., +drawRect(x: int, y: int, w: int, h: int): void, Draws a rectangle with specified upper-left corner point at (x,, y) and width w and height h., +fillRect(x: int, y: int, w: int, h: int): void, Draws a filled rectangle with specified upper-left corner point, at (x, y) and width w and height h., +drawRoundRect(x: int, y: int, w: int, h: int, aw: Draws a round-cornered rectangle with specified arc width aw, int, ah: int): void, and arc height ah., +fillRoundRect(x: int, y: int, w: int, h: int, aw:, Draws a filled round-cornered rectangle with specified arc, int, ah: int): void, width aw and arc height ah., +draw3DRect(x: int, y: int, w: int, h: int, raised: Draws a 3-D rectangle raised above the surface or sunk into the, boolean): void, surface., +fill3DRect(x: int, y: int, w: int, h: int, raised:, Draws a filled 3-D rectangle raised above the surface or sunk, boolean): void, into the surface., +drawOval(x: int, y: int, w: int, h: int): void, Draws an oval bounded by the rectangle specified by the, parameters x, y, w, and h., +fillOval(x: int, y: int, w: int, h: int): void, Draws a filled oval bounded by the rectangle specified by the, parameters x, y, w, and h., +drawArc(x: int, y: int, w: int, h: int, startAngle: Draws an arc conceived as part of an oval bounded by the, int, arcAngle: int): void, rectangle specified by the parameters x, y, w, and h., +fillArc(x: int, y: int, w: int, h: int, startAngle:, Draws a filled arc conceived as part of an oval bounded by the, int, arcAngle: int): void, rectangle specified by the parameters x, y, w, and h., +drawPolygon(xPoints: int[], yPoints: int[],, Draws a closed polygon defined by arrays of x and y, nPoints: int): void, coordinates. Each pair of (x[i], y[i]) coordinates is a point., +fillPolygon(xPoints: int[], yPoints: int[],, Draws a filled polygon defined by arrays of x and y, nPoints: int): void, coordinates. Each pair of (x[i], y[i]) coordinates is a point., +drawPolygon(g: Polygon): void, Draws a closed polygon defined by a Polygon object., +fillPolygon(g: Polygon): void, Draws a filled polygon defined by a Polygon object., +drawPolyline(xPoints: int[], yPoints: int[],, nPoints: int): void, , Draws a polyline defined by arrays of x and y coordinates., Each pair of (x[i], y[i]) coordinates is a point., , 21
Page 22 :
Obtaining Graphics Object, •The, , Graphics class is an abstract class that provides a, device-independent graphics interface for displaying figures, and images on the screen on different platforms. Whenever, a component (e.g., a button, a label, a panel) is displayed,, a Graphics object is created for the component on the, native platform. This object can be obtained using the, getGraphics() method. For example, the graphics context, for a label object jlblBanner can be obtained using, , – Graphics graphics = jlblBanner.getGraphics();, •You, , can then apply the methods in the Graphics class to, draw things on the label’s graphics context., 22
Page 23 :
A Drawing Example, (0, 0), , (50, 50), , •Draw, , a line and a text, , TestGetGraphics, , Run, 23
Page 24 :
import java.applet.Applet;, import java.awt.Graphics;, public class DrawLineExample extends Applet{, public void paint(Graphics g){, , g.drawLine(10,10,50,50);, , //draw vertical line, g.drawLine(10,50,10,100);, //draw horizontal line, g.drawLine(10,10,50,10);, }, <html><body>, <applet code="DrawLineExample" width=200 height=200>, </applet></html></body>, , 24
Page 25 :
Drawing Rectangles, •, •, , drawRect(int x, int y, int w, int h);, fillRect(int x, int y, int w, int h);, , 25
Page 26 :
import java.applet.Applet;, import java.awt.Graphics;, public class DrawRectanglesExample extends Applet{, public void paint(Graphics g){, g.drawRect(10,10,50,100);, //this will draw a square, g.drawRect(100,100,50,50);, }, }, , 26
Page 27 :
import java.applet.Applet;, import java.awt.Graphics;, public class DrawRectanglesExample extends Applet{, public void paint(Graphics g){, g.drawRect(10,10,50,100);, , //this will draw a square, g.drawRect(100,100,50,50);, }, }, , 27
Page 28 :
Drawing Rounded Rectangles, •, , drawRoundRect(int x, int y, int w, int h, int aw, int ah);, , •, , fillRoundRect(int x, int y, int w, int h, int aw, int ah);, , 28
Page 29 :
import java.applet.Applet;, import java.awt.Color;, import java.awt.Graphics;, public class DrawRoundedRectExample extends Applet{, public void paint(Graphics g){, setForeground(Color.red);, g.drawRoundRect(10,10,50,100,10,10);, , //this will draw a round cornered square, g.drawRoundRect(100,100,50,50,10,10);, , //draw filled rounded corner rectangle, g.fillRoundRect(200,20,50,100,10,10);, //draw filled square, g.fillRoundRect(200,200,50,50,10,10);, }, }, , 29
Page 30 :
Drawing Ovals, •, , drawOval(int x, int y, int w, int h);, , •, , fillOval(int x, int y, int w, int h);, , 30
Page 31 :
import java.applet.Applet;, import java.awt.Color;, import java.awt.Graphics;, public class DrawOvalsExample extends Applet{, public void paint(Graphics g){, //set color to red, setForeground(Color.red);, g.drawOval(10,10,50,100);, //draw filled oval, g.fillOval(100,20,50,100);, }, , }, , 31
Page 32 :
Drawing Arcs, •, •, , drawArc(int x, int y, int w, int h, int angle1, int angle2);, fillArc(int x, int y, int w, int h, int angle1, int angle2);, , Angles are in, degree, , 32
Page 33 :
import java.applet.Applet;, import java.awt.Color;, import java.awt.Graphics;, public class DrawArcExample extends Applet{, public void paint(Graphics g){, //set color to red, setForeground(Color.red);, g.drawArc(10,10,50,100,10,45);, //draw filled arc, g.fillArc(100,10,100,100,0,90);, }, }, , 33
Page 34 :
Drawing Arcs Example, , DrawArcs, , Run, 34
Page 35 :
Drawing Polygons and, Polylines, •, , •, •, , int[] x = {40, 70, 60, 45, 20};, int[] y = {20, 40, 80, 45, 60};, g.drawPolygon(x,y, x.length);, , g.drawPolyline(x, y, x.length);, , 35
Page 36 :
Drawing Polygons Using the, Polygon Class, •, , •, •, •, •, , Polygon polygon = new Polygon();, polygon.addPoint(40, 59);, polygon.addPoint(40, 100);, polygon.addPoint(10, 100);, g.drawPolygon(polygon);, , 36
Page 37 :
import java.awt.*;, import java.applet.*;, public class DrawingPolygons extends Applet, {, public void paint(Graphics g), {, int x[] = { 70, 150, 190, 80, 100 };, int y[] = { 80, 110, 160, 190, 100 };, g.drawPolygon (x, y, 5);, int x1[] = { 210, 280, 330, 210, 230 };, int y1[] = { 70, 110, 160, 190, 100 };, g.fillPolygon (x1, y1, 5);, , }, }, 37
Page 38 :
Line Graph :, , A line graph represents the relationaship, between two variables graphically., We can implement this relationship using, the drawPolygon() method of the Graphics, class., 38
Page 39 :
Example, Drawing line graph for the following table, X, 50, 100, 150, 200, 250, Y, 175 75, 180 160 250, import java.applet.*;, import java.awt.*;, public class LineGraph extends Applet, {, int x[]={50,100,150,200,250};, int y[]={175,75,180,160,250};, public void paint(Graphics g), {, setBackground(Color.pink);, g.setColor(Color.blue);, g.drawPolygon(x,y,5);, }, }, , 39
Page 40 :
Bar Chart:, Bar Chart are used to show comparative analysis of data., Using the fillRect() method of Graphics class we can draw, bar chart., The values for drawing the chart are passed through the, param tag of the html file., Example, To write an applet program to draw a bar chart for the, following details:, Subject, Tamil English Maths Physics, Marks, 78 85 98, 56, 40
Page 41 :
41
Page 44 :
catch(NumberFormatException e), {, }, }, public void paint(Graphics g), {, for(int i=0;i<n;i++), {, g.setColor(Color.red);, g.drawString(label[i],5,i*50+30);, g.fillRect(50,i*50+10,value[i],40);, }, }, }, , 44
Page 45 :
AWT Controls, • Every user interface considers the following three main aspects:, • UI elements : Thes are the core visual elements the user, eventually sees and interacts with. GWT provides a huge list of, widely used and common elements varying from basic to, complex which we will cover in this tutorial., • Layouts: They define how UI elements should be organized on, the screen and provide a final look and feel to the GUI (Graphical, User Interface). This part will be covered in Layout chapter., • Behavior: These are events which occur when the user interacts, with UI elements., , 45
Page 46 :
46
Page 47 :
• Every AWT controls inherits properties, from Component class., • Component is an abstract super class for, GUI controls and it represents an object, with graphical representation., , 47
Page 48 :
• Label: A Label object is a component for placing, text in a container., • Button: This class creates a labeled button., • Check Box:A check box is a graphical component, that can be in either an on (true) or off (false) state., • Check Box Group:The CheckboxGroup class is, used to group the set of checkbox., • List:The List component presents the user with a, scrolling list of text items., • Text Field:A TextField object is a text component, that allows for the editing of a single line of text., 48
Page 49 :
• Text Area:A TextArea object is a text component, that allows for the editing of a multiple lines of text., • Choice: A Choice control is used to show pop up, menu of choices. Selected choice is shown on the, top of the menu., • Canvas:A Canvas control represents a, rectangular area where application can draw, something or can receive inputs created by user., • ImageAn Image control is superclass for all image, classes representing graphical images., • Scroll BarA Scrollbar control represents a scroll, bar component in order to enable user to select, from range of values., , 49
Page 50 :
• What are Events?, • Java applets are mainly event driven, programs., • User activities related to keyboard and, mouse are called events., •, Event Listener Interfaces, • java.awt.Event package : Listener, interfaces to handle events., 50
Page 51 :
51
Page 53 :
53
Page 54 :
54