Notes of ITI 2020 - 2022, ITI ELECTRICIAN - Study Material
Page 1 :
ELECTRICIAN, NSQF LEVEL - 5, , 1st Year (Volume I of II), TRADE THEORY, SECTOR: Electrical, , DIRECTORATE GENERAL OF TRAINING, MINISTRY OF SKILL DEVELOPMENT & ENTREPRENEURSHIP, GOVERNMENT OF INDIA, , NATIONAL INSTRUCTIONAL, MEDIA INSTITUTE, CHENNAI, Post Box No. 3142, CTI Campus, Guindy, Chennai - 600 032, (i), , Copyright Free under CC BY Licence
Page 2 :
Sector, , : Electrical, , Duration : 2 - Years, Trade, , : Electrician 1St Year (Volume I of II) - Trade Theory - NSQF (LEVEL - 5), , First Edition, : August 2018, Second Edition : November 2018, , Copies : 1,000, Copies : 10,000, , Rs.285/-, , All rights reserved., No part of this publication can be reproduced or transmitted in any form or by any means, electronic or mechanical, including, photocopy, recording or any information storage and retrieval system, without permission in writing from the National, Instructional Media Institute, Chennai., , Published by:, NATIONAL INSTRUCTIONAL MEDIA INSTITUTE, P. B. No.3142, CTI Campus, Guindy Industrial Estate,, Guindy, Chennai - 600 032., Phone : 044 - 2250 0248, 2250 0657, 2250 2421, Fax : 91 - 44 - 2250 0791, email :
[email protected],
[email protected], Website: www.nimi.gov.in, , (ii), , Copyright Free under CC BY Licence
Page 3 :
FOREWORD, The Government of India has set an ambitious target of imparting skills to 30 crores people, one out of every, four Indians, by 2020 to help them secure jobs as part of the National Skills Development Policy. Industrial, Training Institutes (ITIs) play a vital role in this process especially in terms of providing skilled manpower., Keeping this in mind, and for providing the current industry relevant skill training to Trainees, ITI syllabus, has been recently updated with the help of Mentor Councils comprising of various stakeholder's viz. Industries,, Entrepreneurs, Academicians and representatives from ITIs., National Instructional Media Institute (NIMI), Chennai has come up with instructional material to suit, the revised curriculum for Electrician 1st Year (Volume I of II) Trade Theory NSQF Level - 5 in, Electrical sector under Semester Pattern required for ITIs and related institutions imparting skill, development. The NSQF Level 5 will help the trainees to get an international equivalency standard where, their skill proficiency and competency will be duly recognized across the globe and this will also, increase the scope of recognition of prior learning. NSQF level 5 trainees will also get the, opportunities to promote life long learning and skill development. I have no doubt that with NSQF level, 5 the trainers and trainees of ITIs, and all stakeholders will derive maximum benefits from these IMPs, and that NIMI's effort will go a long way in improving the quality of Vocational training in the country., The Executive Director & Staff of NIMI and members of Media Development Committee deserve appreciation, for their contribution in bringing out this publication., Jai Hind, , RAJESH AGGARWAL, Director General / Addl. Secretary,, Ministry of Skill Development & Entrepreneurship,, Government of India., , New Delhi - 110 001, , (iii), , Copyright Free under CC BY Licence
Page 4 :
PREFACE, The National Instructional Media Institute (NIMI) was established in 1986 at Chennai by then Directorate, General of Employment and Training (D.G.E & T), Ministry of Labour and Employment, (now under Directorate, General of Training, Ministry of Skill Development and Entrepreneurship) Government of India, with technical, assistance from the Govt. of the Federal Republic of Germany. The prime objective of this institute is to, develop and provide instructional materials for various trades as per the prescribed syllabi NSQF (Level 5), under the Craftsman and Apprenticeship Training Schemes., The instructional materials are created keeping in mind, the main objective of Vocational Training under, NCVT/NAC in India, which is to help an individual to master skills to do a job. The instructional materials are, generated in the form of Instructional Media Packages (IMPs). An IMP consists of Theory book, Practical, book, Test and Assignment book, Instructor Guide, Audio Visual Aid (Wall charts and Transparencies) and, other support materials., The trade theory book provides related theoretical knowledge required to enable the trainee to do a job. The, test and assignments will enable the instructor to give assignments for the evaluation of the performance of, a trainee. The wall charts and transparencies are unique, as they not only help the instructor to effectively, present a topic but also help him to assess the trainee's understanding. The instructor guide enables the, instructor to plan his schedule of instruction, plan the raw material requirements, day to day lessons and, demonstrations., IMPs also deals with the complex skills required to be developed for effective team work. Necessary care, has also been taken to include important skill areas of allied trades as prescribed in the syllabus., The availability of a complete Instructional Media Package (IMF) in an institute helps both the trainer and, management to impart effective training., The IMPs are the outcome of collective efforts of the staff members of NIMI and the members of the Media, Development Committees specially drawn from Public and Private sector industries, various training institutes, under the Directorate General of Training (DGT), Government and Private ITIs., NIMI would like to take this opportunity to convey sincere thanks to the Directors of Employment & Training, of various State Governments, Training Departments of Industries both in the Public and Private sectors,, Officers of DGT and DGT field institutes, proof readers, individual media developers and coordinators, but for, whose active support NIMI would not have been able to bring out this materials., , R. P. DHINGRA, EXECUTIVE DIRECTOR, , Chennai - 600 032, , (iv), , Copyright Free under CC BY Licence
Page 5 :
ACKNOWLEDGEMENT, National Instructional Media Institute (NIMI) sincerely acknowledges with thanks for the co-operation and, contribution extended by the following Media Developers and their sponsoring organisations to bring out this, instructional material (Trade Theory) for the trade of Electrician NSQF (LEVEL - 5) under Electrical Sector for, ITIs., , MEDIA DEVELOPMENT COMMITTEE MEMBERS, Shri. T. Muthu, , −, , Principal (Retd.),, MDC Member., NIMI, Chennai, , Shri. C.C. Jose, , −, , Training Officer (Retd.),, MDC Member,, NIMI, Chennai, , Shri. K. Lakshmanan, , −, , Assistant Training Officer (Retd.),, MDC Member,, NIMI, Chennai., , NIMI CO-ORDINATORS, Shri. K. Srinivasa Rao, , −, , Joint Director, NIMI, Chennai - 32., , Shri. V. Gopalakrishnan, , −, , Assitant Manager,, NIMI, Chennai - 32, , NIMI records its appreciation for the Data Entry, CAD, DTP operators for their excellent and devoted services in, the process of development of this Instructional Material., NIMI also acknowledges with thanks the invaluable efforts rendered by all other NIMI staff who have contributed, towards the development of this Instructional Material., NIMI is also grateful to everyone who has directly or indirectly helped in developing this Instructional Material., , (v), , Copyright Free under CC BY Licence
Page 6 :
INTRODUCTION, This manual for trade Theory is intended for use in the ITI classoom. It consists of a series of practical exercises, that are to be completed by the trainees during the first semester of course is the Electrician trade under, Electrical Sector. It is National Skills Qualifications Framework (NSQF) - (LEVEL 5), supplemented and, supported by instructions/information to assist the trainees in performing the exercises. The syllabus for the1st, Semester Electrician NSQF (LEVEL - 5) Trade under Electrical Sector Trade Practical is divided into, Six Modules.The allocation of time for the various modules is given below:, , Module 1: Safety Practice and Hand Tools, , 14 Exercises, , 75 Hrs, , Module 2: Basic Workshop Practice (Allied Trade), , 09 Exercises, , 100 Hrs, , Module 3: Wires, Joints - Soldering - U.G. Cables, , 10 Exercises, , 125 Hrs, , Module 4: Basic Electrical Practice, , 11 Exercises, , 75 Hrs, , Module 5: Magnetism and Capacitors, , 08 Exercises, , 50 Hrs, , Module 6: AC Circuits, , 12 Exercises, , 100 Hrs, , 64 Exercises, , 525 Hrs, , Total, , The syllabus and the content in the modules are interlinked. As the number of workstations available in the electrical, section is limited by the machinery and equipment, it is necessary to interpolate the exercises in the modules to, form a proper teaching and learning sequence. The sequence of instruction is given in the schedule of instruction, which is incorporated in the Instructor's Guide. With 25 practical hours a week of 5 working days 100 hours of, practical per month is available., The procedure for working through the 64 exercises for the 1st semester with the specific objectives to be achieved, as the learning out comes at the end of each exercise is given in this book., The symbols used in the diagrams comply with the Bureau of Indian Standards (BIS) specifications., This manual on trade Theory forms part of the Written Instructional Material (WIM). Which includes manual on trade, theory and assignment/test., , (vi), , Copyright Free under CC BY Licence
Page 7 :
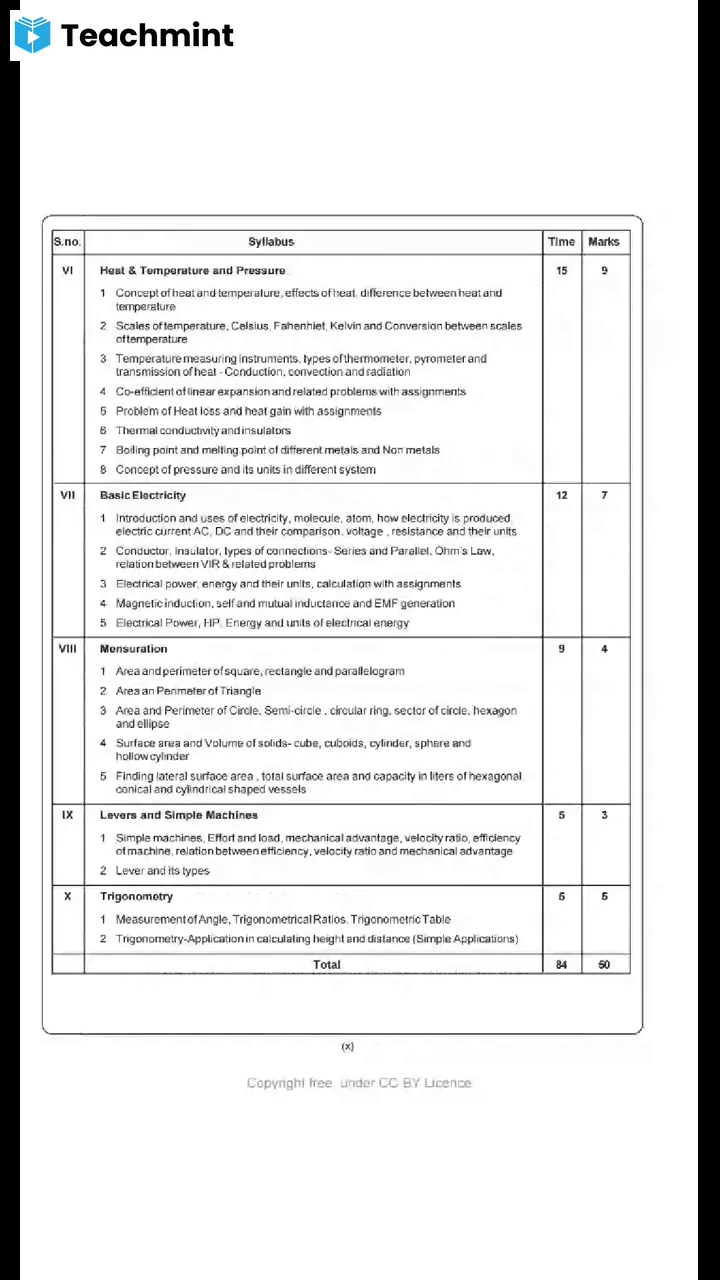
CONTENTS, , Lesson No., , Title of the Lesson, , Page No., , Module 1: Safety practice and hand tools, 1.1.01, , Organization of ITI’s and scope of the Electrician trade, , 1, , 1.1.02 & 1.1.03, , Safety rules - Safety signs - Hazards, , 4, , 1.1.04 & 1.1.05, , Fire - Types - Extinguishers, , 10, , 1.1.06 & 1.1.07, , Rescue operations - First aid treatment - Artificial respiration, , 15, , 1.1.08, , Disposal of waste material, , 21, , 1.1.09, , Personal Protective Equipment, , 23, , 1.1.10, , Guidelines for cleanliness of workshop and maintenance, , 29, , 1.1.11 - 1.1.14, , Trade hand tools - specification - standards - NEC code 2011 lifting of heavy loads, , 31, , Module 2: Basic Workshop Practice (Allied Trade), 1.2.15 & 1.2.16, , Fitting tools - marking tools - specification - grades - uses, , 44, , 1.2.17, , Marking tools - steel rule - punches - calipers - try square - gauges, , 50, , 1.2.18 & 1.2.19, , Carpenter tools - wood saws - planes - wooden joints, , 58, , 1.2.20 & 1.2.23, , Sheet metal - marking and cutting tools - rivet joints, , 74, , 1.2.21 & 1.2.22, , Drills and drilling machines - Internal and external threads, , 82, , Module 3: Wires, Joints - Soldering - U.G. Cables, 1.3.24 - 1.3.26, , Fundamental of electricity - conductors - insulators - wire size, measurement- crimping, , 96, , 1.3.27 - 1.3.29, , Wire joints - Types - Soldering methods, , 120, , 1.3.30 - 1.3.33, , Under ground (UG) cables - construction - materials - types - joints - testing, , 128, , Module 4: Basic Electrical Practice, 1.4.34, , Ohm’s law - simple electrical circuits and problems, , 139, , 1.4.35, , Kirchhoff's law and its applications, , 145, , 1.4.36 - 1.4.37, , DC series and parallel circuits, , 150, , 1.4.38 & 1.4.39, , Open and short circuit in series and parallel network, , 157, , 1.4.40, , Laws of resistance and various types of resistors, , 161, , 1.4.41, , Wheatstone bridge - principle and its application, , 170, , 1.4.42 & 1.4.43, , Effect of variation of temperature on resistance, , 173, , (vii), , Copyright Free under CC BY Licence
Page 8 :
Lesson No., 1.4.44, , Title of the Lesson, Series and parallel combination circuit, , Page No., 175, , Module 5: Magnetism and Capacitors, 1.5.45, , Magnetic terms, magnetic material and properties of magnet, , 178, , 1.5.46 & 1.5.47, , Principles and laws of electro magnetism, , 183, , 1.5.48 -1.5.50, , The magnetic circuits - self and mutually induced emfs, , 186, , 1.5.51 & 1.5.52, , Capacitors - types - functions , grouping and uses, , 196, , Module 6: AC Circuits6: AC Circuits, 1.6.53, , Alternating current - terms & definitions - vector diagrams, , 211, , 1.6.54, , Series resonance circuit, , 236, , 1.6.55, , R-L, R-C and R-L-C parallel circuits, , 239, , 1.6.56, , Parallel resonance circuits, , 246, , 1.6.57, , Power, energy and power factor in AC single phase system - Problems, , 249, , 1.6.58 & 1.6.59, , Power factor - Improvement of power factor, , 259, , 1.6.60 - 1.6.64, , 3-Phase AC fundamentals, , 263, , Project Work, , 276, , (viii), , Copyright Free under CC BY Licence
Page 9 :
ASSESSABLE / LEARNING OUTCOME, On completion of this book you shall be able to, • Apply safe working practices, • Prepare profile with an appropriate accuracy as per drawing, • Prepare electrical wire joints, carry out soldering, crimping and, measure insulation resistance of underground cable., • Verify characteristics of electrical and magnetic circuits., , (ix), , Copyright Free under CC BY Licence
Page 10 :
SYLLABUS, 1st Year (Volume I of II), Ref. Learning, Outcome, , Week, No., 1., , •, , Apply safe working, practices, , • Install and setup, operating system, and related software, in a computer., , 2., , • Install and setup, operating system, and related software, in a computer., , • Prepare profile, 3, , with an, appropriate, accuracy as per, drawing, , Duration: Six Month, , Professional Skills(Trade Practical), with Indicative hours, Safe working practices, 1. Visit various sections of the, institutes and location of, electrical installations. (05, hrs), 2. Identify safety symbols and, hazards. (05 Hrs), 3. Preventive measures for, electrical accidents and, practice steps to be taken in, such accidents. (05 hrs), 4. Practice safe methods of fire, fighting in case of electrical, fire. (05 hrs), 5. Use of fire extinguishers. (05, Hrs), 6. Practice elementary first aid., (05 hrs), 7. Rescue a person and practice, artificial respiration. (05 Hrs), 8. Disposal procedure of waste, materials. (05 Hrs), 9. Use of personal protective, equipments. (05 hrs), 10. Practice on cleanliness and, procedure to maintain it. (05, hrs), 11. Identify trade tools and, machineries. (10 Hrs), 12. Practice safe methods of, lifting and handling of tools, & equipment. (05 Hrs), 13. Select proper tools for, operation and precautions in, operation. (05 Hrs), 14. Care & maintenance of trade, tools, , Professional Knowledge, (Trade Theory), Scope of the electrician trade., Safety rules and safety signs., Types and working of fire, extinguishers, , First aid safety practice., Hazard identification and, prevention., Personal safety and factory, safety., Response to emergencies e.g., power failure, system failure and, fire etc, , Concept of Standards and, advantages of BIS/ISI., Trade tools specifications., Introduction to National, Electrical Code-2011, , Copyright Free under CC BY Licence
Page 11 :
4-5, , • Prepare profile, with an, appropriate, accuracy as, per, drawing, , • Prepare, profile, with an, appropriate, accuracy as, per, drawing, , 6-7, , • Prepare, electrical wire, joints, carry, out, soldering,, crimping and, measure, insulation, resistance of, underground, cable, , 8, , •, , 9 - 10, , Prepare, electrical, wire, joints,, carry out, soldering,, crimping, and, measure, insulation, resistance, of, under, ground, cable, , 15. Operations of allied trade, tools. (05 Hrs), 16. Workshop practice on filing, and hacksawing. (10 Hrs), 17. Prepare hand coil winding, assembly. ( 5 Hrs), 18. Practice on preparing Tjoint,, straight joint and dovetail, joint on wooden blocks. (15, Hrs), 19. Practice sawing, planing,, drilling and assembling for, making a wooden, switchboard. (15 Hrs), , Allied trades: Introduction to, fitting tools, safety precautions., Description of files, hammers,, chisels hacksaw frames, blades,, their specification and grades., Marking tools description and, use., Types of drills, description &, drilling machines., Various wooden joints, , 20. Practice in marking and, cutting of straight and, curved pieces in metal, sheets, making holes,, securing by screw and, riveting. (10 Hrs), 21. Workshop practice on, drilling, chipping, internal, and external threading of, different sizes. (20 Hrs), 22. Practice of making square, holes in crank handle. (5, Hrs), 23. Prepare an open box from, metal sheet. (15 Hrs), , Marking tools; calipers, Dividers, Surface plates,, Angle plates, Scribers, punches,, surface gauges Types, Uses, Care, and maintenance., Sheet metal tools: Description of, marking & cutting tools., Types of rivets and riveted joints., Use of thread gauge., Description of carpenter’s tools, Care and maintenance of tools, , 24. Prepare terminations of, cable ends (02 hrs), 25. Practice on skinning, twisting, and crimping. (15 Hrs), 26. Identify various types of, cables and measure, conductor size using SWG, and micrometer. (8 Hrs), , Fundamentals of electricity,, definitions, units & effects of, electric current., Conductors and insulators., Conducting materials and their, comparison, , 27. Make simple twist,, married,, Tee and western union, joints. (18 Hrs), 28. Make britannia straight,, britannia Tee and rat, tailjoints. (18 Hrs), 29. Practice in Soldering of, joints, / lugs. (14 Hrs), , Joints in electrical conductors., Techniques of soldering., Types of solders and flux, , Copyright Free under CC BY Licence
Page 12 :
•, 11 - 12, , Prepare, electrical wire, joints, carry out, soldering,, crimping and, measure, insulation, resistance of, underground, cable, , • Verify, characteristics, of, electrical and, magnetic, circuits, , 13 - 14, , 15, , •, , Verify, characteristics, of electrical and, magnetic, circuits, , 30. Identify various parts,, skinning and dressing of, underground cable. (15, Hrs), 31. Make straight joint of, different types of, underground cable. (15, Hrs), 32. Test insulation resistance of, underground cable using, megger. (05 hrs), 33. Test underground cables, for, faults and remove the fault., (15 Hrs), 34. Practice on measurement of, parameters in combinational, electrical circuit by applying, Ohm’s Law for different, resistor values and voltage, sources and analyse by, drawing graphs. (15 Hrs), 35. Measure current and voltage, in electrical circuits to verify, Kirchhoff’s Law (10 Hrs), 36. Verify laws of series and, parallel circuits with voltage, source in different, combinations. (05Hrs), 37. Measure voltage and current, against individual resistance, in electrical circuit (10 hrs), 38. Measure current and voltage, and analyse the effects of, shorts and opens in series, circuit. (05 Hrs), 39. Measure current and voltage, and analyse the effects of, shorts and opens in parallel, circuit. (05 Hrs), 40. Measure resistance using, voltage drop method. (5, Hrs), 41. Measure resistance using, wheatstone bridge. (5, Hrs), 42. Determine the thermal, effect of electric current., (5Hrs), 43. Determine the change in, resistance due to, temperature. (5 Hrs), 44. Verify the characteristics, of, series parallel, combination, of resistors. (5 Hrs), , Underground cables: Description,, types, various joints and testing, procedure., Cable insulation & voltage grades, Precautions in using various, types of cables, , Ohm’s Law; Simple electrical, circuits and problems., Kirchoff’s Laws and, applications., Series and parallel circuits., Open and short circuits in, series, and parallel networks, , Laws of Resistance, and various, types of, resistorsWheatstone, bridge; principle and, its applications., Effect of variation of, temperature, on resistance., Different methods of, measuring, the values of, resistance., Series and parallel, combinations, of resistors, , Copyright Free under CC BY Licence
Page 13 :
•, , Verify, characteristics of, electrical and, magnetic, circuits, , •, , Verify, characteristics of, electrical and, magnetic, circuits, , 16 - 17, , 18 - 19, , 45. Determine the poles and, plot the field of a magnet, bar. (08 Hrs), 46. Wind a solenoid and, determine the magnetic, effect of electric current. (06, Hrs), 47. Measure induced emf due to, change in magnetic field. (06, hrs), 48. Determine direction of, induced emf and current. (06, hrs), 49. Practice on generation of, mutually induced emf. (08, hrs), 50. Measure the resistance,, impedance and determine, inductance of choke coils in, different combinations. (06, Hrs), 51. Identify various types of, capacitors, charging /, discharging and testing. (05, Hrs), 52. Group the given capacitors, to get the required capacity, and voltage rating. (05 Hrs), 53. Measure current, voltage, and PF and determine the, characteristics of RL, RC and, RLC in AC series circuits. (08, Hrs), 54. Measure the resonance, frequency in AC series circuit, and determine its effect on, the circuit. (07 hrs), 55. Measure current, voltage, and PF and determine the, characteristics of RL, RC and, RLC in AC parallel circuits., (08 Hrs), 56. Measure the resonance, frequency in AC parallel, circuit and determine its, effects on the circuit. (07, hrs), 57. Measure power, energy for, lagging and leading power, factors in single phase, circuits and compare, characteristic graphically., (08 Hrs), 58. Measure Current, voltage,, power, energy and power, factor in three phase circuits., (07 hrs), 59. Practice improvement of PF, by use of capacitor in three, phase circuit.(05 Hrs), , Magnetic terms, magnetic, materials and properties of, magnet., Principles and laws of, electromagnetism., Self and mutually induced EMFs., Electrostatics: CapacitorDifferent types, functions,, grouping and uses., Inductive and capacitive, reactance, their effect on AC, circuit and related vector, concepts, , Comparison and Advantages of, DC and AC systems., Related terms frequency,, Instantaneous value, R.M.S., value, Average value, Peak factor, form, factor, power factor and, Impedance etc., Sine wave, phase and phase, difference., Active and Reactive power., Single Phase and three-phase, system., Problems on A.C. circuits, , Copyright Free under CC BY Licence
Page 14 :
20 - 21, , •, , 22 - 23, , Project work / Industrial visit, Broad Areas:, a) Prepare and assemble a test board with switches, plug socket, lamp holder, etc., b) Temperature controlled system for switching ‘ON’ and ‘OFF’ of any circuit, using bimetallic, strip., c) Series/ parallel combinational circuits, , Verify, characteristics, of, electrical and, magnetic, circuits, , 60. Ascertain use of neutral by, identifying wires of a 3phase 4 wire system and find, the phase sequence using, phase sequence meter. (10, Hrs), 61. Determine effect of broken, neutral wire in three phase, four wire system.(05 hrs), 62. Determine the relationship, between Line and Phase, values for star and delta, connections. (10Hrs), 63. Measure the Power of three, phase circuit for balanced, and unbalanced loads. (15, Hrs), 64. Measure current and voltage, of two phases in case of one, phase is short-circuited in, three phase four wire system, and compare with healthy, system.(10 hrs), , 24 - 25, , Revision, , 26, , Examination, , Advantages of AC poly-phase, system., Concept of three-phase Star and, Delta connection., Line and phase voltage, current, and power in a 3 phase circuits, with balanced and unbalanced, load., Phase sequence meter, , Copyright Free under CC BY Licence
Page 15 :
Electrical, Related Theory for Exercise 1.1.01, Electrician - Safety Practice and Hand Tools, Organization of ITI’s and scope of the electrician trade, Objectives: At the end of this lesson you shall be able to, • state brief introduction about Industrial Training Institutes (ITI), • state about the organized structure of the Institute., Brief Introduction of Industrial Training Institute (ITIs), Industrial Training Institute plays a vital role in economy of, the country, especially interms of providing skilled, manpower., The Directorate General of Training (DGT) comes under, Ministry of Skill Development and Entrepreneurship, (MSDE) offers a range of vocational training trades in, different sectors based on economy /labour market. The, vocational training programs are delivered under the aegis, of National Council of Vocational Training (NCVT)., Craftsman Training scheme (CTS) and Apprenticeship, Training Scheme (ATS) and two pioneer programs of NCVT, for Propagatory Vocational Training., Total number of ITIs in India as on April 2016 is about, 13105 (Govt. 2293 + 10812 Private ITIs). They are giving, training about 132 trades including Engineering and Non-, , engineering with the duration of 1 or 2 years. The minimum, eligibility for admission in ITIs 8th, 10th and 12th pass, with respect to the trades and admission process will be, held in every year in July., From 2013, semester pattern was introduced with 6, months/Semester and revised the syllabus for each, semester. Then in 2014, they introduced and implemented, "Sector Mentor council (SMC)" re-revised syllabus under, 11 sectors of about 80 trades., At the end of each semester, All India Trade Test (AITT), will be conducted in every July and January, with OMR, answer sheet pattern and multiple choice type questions., After passing, National trade certificates (NTC), will be, issued by DGT which is authorized and recognized, internationally. In 2017, for some trades they have, introduced and implemented National Skill Qualification, Frame work (NSQF) with Level 4 and Level 5., , 1, , Copyright Free under CC BY Licence
Page 16 :
After finishing instructional training with 'NTC' certificate,, they have to undergo Apprenticeship training (ATS) for one, or two year in respective trades under the Apprentice ACT, 1961, in various government and private establishments, with stipend. At the end of the Apprenticeship training, All, India Apprentice Test will be conducted and apprentice, certificate will be issued. They can get job opportunities in, private or government establishment in India/Abroad or they, can start small scale industries in manufacturing or in, service sector with subsidiary government loan., , Organizational Structure of ITIs, In most of the ITIs, the head of the institute is the principal, under him one vice-principal (VP). then Training Officers, (TO)/Group Instructors (GI) who are the management and, supervisory staff. Then Assistant Training Officers(ATO),, Junior Training Officer (JTO), and Vocational Instructors, (VI) are under Training officers for each trade and for, Workshop calculations, Engineering Drawing,, Employability skills etc. Administrative staff, Hostel, Superintendent (H.S.) physical Education Trainer (PET),, Library incharge, Pharmacist, etc. will be under the head, of the Institution., The typical organizational of ITI chart is shown in Fig 1, , Scope of the electrician trade, Objectives: At the end of this lesson you shall be able to, • explain the duties of electrician general and electrical fitter and their NCO, • state the key skills and carrier pathway for electrician, • list out the job opportunities and self employment opportunities., Welcome to the electrician trade, Electrician trade under craftsman training scheme (CTS), is one of the most popular trade delivered nationwide, through the network of ITIs. This trade is of two year (4, semester) duration., It mainly consists of domain area and core areas. In domain, area trade practical and trade theory and core area, workshop calculation and science, Engineering drawing, and employability skills which imparts soft and life skills., There are two professional classification in electrician trade, based on National Code of Occupation (NCO) as, (i) Electrician general (NCO - 2015 reference is 7411.0100), (ii) Electrical fitter (NCO - 2015 reference is 7412.0200), Duties of Electrician - General and Electrical - Fitter, Electrician - General installs, maintains and repairs, electrical machinery, equipment and fittings in factories,, workshops, power houses, business and residential, premises, etc. Studies drawings and other specifications, to determine electrical circuit, installation etc. Positions, and installs electrical motors, transformers, switchboards,, microphones, loud-speakers and other electrical, equipment, fittings and lighting fixtures. Makes connections, and solder terminals. Tests electrical installations and, equipment and locates faults using megger, test lamp etc., Repairs or replaces defective wiring , burnt out fuses and, defective parts and keeps fittings and fixtures in working, order. may do armature winding, draw wires and cables, and do simple cable joining. May operate, attend and, maintain electrical motors, pumps etc. NCO - 2015, reference is 7411.0100, Record class of work in which experienced such as factory,, power-house, ship etc., whether experienced in electrical, repairs or detecting faults, details of experience in electrical, 2, , equipment such as sound recording apparatus, air, purification plant, heating apparatus etc. whether used to, working do drawing, whether accustomed to high tension, or low tension supply system and if in possession of, competency certificate issued under electricity act., Electrical fitter fits and assembles electrical machinery, and equipment such as motors, transformers, generators,, switch gears, fans, etc., Studies drawings and wiring, diagrams of fittings, wiring and assemblies to be made., Collects prefabricated electrical and mechanical, components according to drawing and wiring diagram and, checks them with gauges, megger etc. to ensure proper, function and accuracy., Fits mechanical components, resistance, insulators, etc., as per specification doing supplementary tooling where, necessary. Follows wiring diagrams, makes electrical, connections and solder points as specified. Checks for, continuity, resistance, circuit shorting, leakage, earthing, etc., at each stage of assembly using megger, ammeter,, voltmeter and other appliances and ensures stipulated, performance of both mechanical and electrical components, filled in assembly., Erects various equipment such as bus bars, panel board,, electrical post, fuse boxes switch gears, meters, relays, etc., using non-conductors, insulating and hoisting, equipment as necessary for receipt and distribution of, electrical current to feeder lines., Installs motors, generators, transformers, etc. as per, drawing using lifting and hoisting equipment as necessary,, does prescribed electrical wirings and connects to supply, line. Locates faults in case of breakdown and replaces, blown out fuses, burnt coils, switches, conductors, etc., as required. Checks dismantles, repairs and overhauls, electrical units periodically or as required according to, scheduled procedure., , Electrical : Electrician (NSQF LEVEL - 5) - Related Theory for Exercise 1.1.01, , Copyright Free under CC BY Licence
Page 17 :
of industries and obtain National Apprenticeship, Certificate (NAC), , Test electrical equipment and rewind blown out coils. May, specialize in repairs of particular type of electrical, appliances and machinery, equipment manufacturing,, installation or power house work and be designated, accordingly NCO - 2015 reference is 7412.0200, , •, , Can join Craftsman Instructor Training Scheme (CITS), in the trade to become instructor in ITIs, , •, , Record nature of work done; if specialized in repairing or, assembling any particular item such as generator, motor,, transformer, relays switchgear, domestic appliance etc. ,, experience of working in power-house and distribution, centre and if in possession of electrician's competency, certificate, , Eligible to obtain directly wireman 'B' license, which is, issued by the Electrical Licensing Board Authorities, , Job Opportunities: There are good numbers of job, opportunities for an electrician, •, , Electrician in local electricity boards, railways,, Telephone department, airport and other government, and semi-government establishments, , •, , Electrician in factories (Public/Private) Install, test and, maintain electrical equipment in auditorium and cinema, halls, , •, , Perform tasks with due consideration to safety rules,, accident prevention regulation and environment, protection., , Assembler of electrical control gears and switches on, panel boards at switch gear factories., , •, , Winder of electrical motors in winding shops, , •, , Electrical appliances repairer in electrical shops., , •, , Apply professional skill knowledge and employability, skills while performing jobs., , •, , •, , Checking job/assembly as per drawing for functioning,, identifying and rectifying errors in job/assembly., , Electrician to Install, service and maintain electrical, equipment and circuits in hotels, resorts hospitals and, flats, , •, , Document the technical parameters related to the tasks, undertaken, , Assembler in the domestic appliances manufacturing, factories, , •, , Service technician for domestic appliances in reputed, companies., , Key Skills of Electrician, After passing the electrician trade, they are able to, •, , •, , •, , Read and interpret technical parameter documents, plan, and organic work process, identify necessary materials, and tools, , •, , In 2013, semester systems was introduced and the, syllabus also revised for semester pattern, , •, , Then in 2014 Sector Mentor Council (SMC) was formed, and the syllabus was also re-revised and implemented., , Presently electrician syllabus again revised and, sequentially structured by National Skill Qualification, Framework NSQF - level 5 and implemented from August, 2017, Carrier Progress Pathways, After passing the electrician trade the trainee can appear, in 10+2 examination through National Institute of Open, Schooling (NIOS) for acquiring higher secondary certificate, and can go further for general Technical education., •, , Take admission in diploma course in notified branches, of engineering by lateral entry, , •, , Can join the apprenticeship training in different types, , Self-employment opportunities, •, , Service centre for repairing electrical switch gear and, motors in rural and urban areas., , •, , Maintenance contractor of wiring installation in hotels/, resorts/hospitals/banks etc., , •, , Manufacturer of sub-assembly for electrical panels, , •, , Contractor for domestic wiring and industrial wiring, , •, , Armature winder of electrical motors, , •, , Repairer of simple electronic of gadgets., , •, , Service, maintain and repair of domestic appliances, , •, , Dealership/agency for electrical hardware, , •, , With an added training in the specified field can become, Audio/Radio/ TV Mechanic, , Electrical : Electrician (NSQF LEVEL - 5) - Related Theory for Exercise 1.1.01, , Copyright Free under CC BY Licence, , 3
Page 18 :
Electrical, Related Theory for Exercise 1.1.02 & 1.1.03, Electrician - Safety Practice and Hand Tools, Safety rules - Safety signs - Hazards, Objectives: At the end of this lesson you shall be able to, • explain the necessity of adopting the safety rules, • list the safety rules to be followed by the electrician., • explain how to treat a person for electric shock/injury, Necessity of safety rules: Safety consciousness is one, of the essential attitudes required for any job. A skilled, electrician always should strive to form safe working, habits. Safe working habits always save men, money and, material. Unsafeworking habits always end up in loss of, production and profits, personal injury and even death. The, safety hints given below should be followed by Electrician, to avoid accidents and electrical shocks as his job involves, a lot of occupational hazards., The listed safety rules should be learnt, remembered and, practised by every electrician. Here a electrician should, remember the famous proverb, “Electricity is a good, servant but a bad master”., , fused bulbs. In all the cases, it is always good to open, the main switch and make the circuit dead., •, , Stand on rubber mats while working/operating switch, panels, control gears etc., , •, , Position the ladder, on firm ground., , •, , While using a ladder, ask the helper to hold the ladder, against any possible slipping., , •, , Always use safety belts while working on poles or high, rise points., , •, , Never place your hands on any moving part of rotating, machine and never work around moving shafts or, pulleys of motor or generator with loose shirt sleeves or, dangling neck ties., , •, , Only after identifying the procedure of operation, operate, any machine or apparatus., , •, , Run cables or cords through wooden partitions or floor, after inserting insulating porcelain tubes., , •, , Connections in the electrical apparatus should be tight., Loosely connected cables will heat up and end in fire, hazards., , Safety rules, •, , Only qualified persons should do electrical work., , •, , Keep the workshop floor clean, and tools in good, condition, and keep proper places., , •, , Do not work on live circuits; if unavoidable, use rubber, gloves rubber mats, etc., , •, , Use wooden or PVC insulated handle screwdrivers, when working on electrical circuits., , •, , Do not touch bare conductors, , •, , •, , When soldering, place the hot soldering irons in their, stand. Never lay switched ‘ON’ or heated soldering iron, on a bench or table as it may cause a fire to break out., , Use always earth connection for all electrical appliances, along with 3-pin sockets and plugs., , •, , While working on dead circuits remove the fuse grips;, keep them under safe custody and also display ‘Men on, line’ board on the switchboard., , •, , Do not meddle with interlocks of machines/switch, gears., , •, , Do not connect earthing to the water pipe lines., , •, , Do not use water on electrical equipment., , •, , Discharge static voltage in HV lines/equipment and, capacitors before working on them., , •, , Use only correct capacity fuses in the circuit. If the, capacity is less it will blow out when the load is, connected. If the capacity is large, it gives no protection, and allows excess current to flow and endangers men, and machines, resulting in loss of money., , •, , Replace or remove fuses only after switching off the, circuit switches., , •, , Use extension cords with lamp guards to protect lamps, against breakage and to avoid combustible material, coming in contact with hot bulbs., , Safety practice - first aid, , •, , Use accessories like sockets, plugs, switches and, appliances only when they are in good condition and be, sure they have the mark of BIS (ISI). Necessity of using, BIS(ISI) marked accessories is explained under, standardisation., , We are aware that the prime reasons for severity of shock, are the magnitude of current and duration of contact. In, addition, the other factors contribute to the severity of shock, are:, , •, , Never extend electrical circuits by using temporary, wiring., , •, , Stand on a wooden stool, or an insulated ladder while, repairing live electrical circuits/ appliances or replacing, , Electric shock, , •, , age of person, , •, , body resistance, , •, , not wearing insulating footwear or wearing wet footwear, , 4, , Copyright Free under CC BY Licence
Page 19 :
•, , Weather condition, , •, , Wet or dry floor, , •, , Mains voltage etc., , aid measure, pressure on the wound itself is the best means, of stopping the bleeding and avoiding infection., Immediate action, Always in cases of severe bleeding, , If assistance is close at hand, send for medical aid, then, carry on with emergency treatment., If you are alone, proceed with the treatment immediately., , -, , make the patient to lie down and rest, , -, , if possible, raise the injured part above the level of the, body (Fig 1), , -, , apply pressure to the wound, , -, , call for medical assistance, , Make sure the victim is not in contact with the supply., Effects of electric shock, The effect of current at very low levels may only be an, unpleasant tingling sensation, but this itself may be, sufficient to cause some persons to lose their balance, and fall., At higher levels of current the person receiving a shock, may be thrown off his feet and will experience severe pain, and possibly minor burns at the point of contact., At an excessive shock can also cause burning of the skin, at the point of contact., Treatment of electric shock, , To control severe bleeding, , Prompt treatment is essential., Check for the victim’s natural breathing and consciousness., Take steps to apply respiratory resuscitation if the victim, is unconscious and not breathing., Check the victim for injury and burns. Decide on the suitable, method of artificial resuscitation., In the case of injury/burns to chest and or belly, follow the, mouth-to-mouth method., In the case of burns/injury in the back, follow Nelson’s, method, In case the mouth is closed tightly, use Schafer’s or, Holgen-Nelson method., These methods should be practiced. (Refer Exercise, 1.1.06), Treatment for electrical burns, A person receiving an electric shock may also sustain, burns when the current passes through the body., , Squeeze together the sides of the wound. Apply pressure, as long as it is necessary to stop the bleeding. When the, bleeding has stopped, put a dressing over the wound and, cover it with a pad of soft material. (Fig 2), For an abdominal wound which may be caused by falling, on a sharp tool, keep the patient bending over the wound, to stop internal bleeding., Large wound, Apply a clean pad and bandage firmly in place. If bleeding, is very severe apply more than one dressing. (Fig 3), , Do not waste time by rendering first aid to the, victim until breathing has been restored and, the patient can breathe normally unaided., Burns are very painful. If a large area of the body is burnt,, do not give treatment, except to exclude the air, eg. by, covering with clean paper or a clean cloth, soaked in clean, water. this relieves the pain., Severe bleeding, Any wound which is bleeding profusely, especially in the, wrist, hand or fingers must be considered serious and, must receive professional attention. As an immediate first, , Electrical : Electrician (NSQF LEVEL - 5) - Related Theory for Exercise 1.1.02 & 1.1.03, , Copyright Free under CC BY Licence, , 5
Page 20 :
Safety signs (Road signals), Objectives: At the end of this lesson you shall be able to, • list three kinds of road sign, • describe the “marking” on the road, • describe the various police traffic hand signal and light signal, • list the causes for collision., In olden days road locomotive carrying a red flag by day, and red lantern by night. Safety is the prime motive of, every traffic., , Cautionary/ warning signs are especially safe. Do's and, don'ts for pedestrians, cyclists, bus passengers and, motorists., , Kinds of road signs, , Information signs (Fig 3), , •, , Mandatory, , •, , Cautionary and, , •, , Informatory, , Information signs as especially benefit to the passengers, and two wheelers., , Mandatory signs (Fig 1), , Marking lines on road (Fig 4), •, , Marking lines are directing or warning to the moving, vehicles, cyclist and pedestrians to follow the law., , •, Violation of mandatory sign can lead to penalties., Eg. Stop, give way, limits, prohibited, no parking and, compulsory sign., , Single and short broken lines in the middle of the road, allow the vehicle to cross the dotted lines safely, overtake whenever required., , •, , When moving vehicle approaching pedestrian crossing,, be ready to slow down or stop to let people cross., , Cautionary signs (Fig 2), , •, , Do not overtake in the vicinity of pedestrian crossing., , Police signals (Fig 5), To stop a vehicle approaching from behind. (Fig 5/1), To stop a vehicle coming from front. (Fig 5/2), To stop vehicles approaching simultaneously from front, and behind. (Fig 5/3), To stop traffic approaching from left and wanting to turn, right. (Fig 5/4), To stop traffic approaching from the right to allow traffic, from left to turn right. (Fig 5/5), To allow traffic coming from the right and turning right by, stopping traffic approaching from the left. (Fig 5/6), 6, , Warning signal closing all traffic. (Fig 5/7), Electrical : Electrician (NSQF LEVEL - 5) - Related Theory for Exercise 1.1.02 & 1.1.03, , Copyright Free under CC BY Licence
Page 21 :
Green means you may go on if the way is clear. Take, special care if you mean to turn left or right and give way, to pedestrians who are crossing. (Fig 6/3), Amber means stop at the stop line. you may only go on if, the amber appears after you have crossed the stop line or, so close to it that to pull up may not be possible. (Fig 6/4), Green arrow means that you may go in the direction shown, by the arrow. You may do this whatever other lights may, be showing. (Fig 6/5), Pedestrians - do not cross. (Fig 6/6), Pedestrians - cross now. (Fig 6/7), Flashing red means stop at the stop line and if the way is, clear proceed with caution. (Fig 6/8), Flashing amber means proceed with caution. (Fig 6/9), Collision causes (Fig 7), , Beckoning on vehicles approaching from left. (Fig 5/8), Beckoning on vehicles approaching from right. (Fig 5/9), Beckoning on vehicles from front. (Fig 5/10), Traffic light signals (Fig 6), , Three factors are responsible for collision, •, , Roads, , •, , Vehicles and, , •, , Drivers, , The Fig 8 shows approximately proportionate causes of, collision. In wrong attitudes such that avoid foolish acts at, the wheel (Fig 8). Driving time is not play time., , Red means stop. Wait behind the stop line on the carriage, way. (Fig 6/1), Red and amber also means stop. Do not pass through or, start until green shows. (Fig 6/2), , Electrical : Electrician (NSQF LEVEL - 5) - Related Theory for Exercise 1.1.02 & 1.1.03, , Copyright Free under CC BY Licence, , 7
Page 22 :
Safety practice - Safety signs, Objectives: At the end of this lesson you shall be able to, • state the responsibilities of employer and employees, • state the safety attitude and list the four basic categories of safety signs., Responsibilities, , The four basic categories of signs are as follows:, , Safety doesn't just happen - it has to be organised and, achieved like the work-process of which it forms a part., The law states that both an employer and his employees, have a responsibility in this behalf., , • prohibition signs (Fig 1 & Fig 5), , Employer's responsibilities, , • information signs (Fig 4), , The effort a firm puts into planning and organising work,, training people, engaging skilled and competent workers,, maintaining plant and equipment, and checking, inspecting, and keeping records - all of this contributes to the safety, in the workplace., , Prohibition signs, , • mandatory signs (Fig 2 & Fig 6), • warning signs (Fig 3 & Fig 7), , SHAPE, , Circular., , COLOUR, , Red border, and cross bar., Black symbol, on white, background., , Employee's responsibilities, , MEANING, , You will be responsible for the way you use the equipment,, how you do your job, the use you make of your training,, and your general attitude to safety., , Shows it must, not be done., , Example, , No smoking., , SHAPE, , Circular., , Fig 1, , The employer will be responsible for the equipment, provided, the working conditions, what the employees are, asked to do, and the training given., , A great deal is done by employers and other people to, make your working life safer; but always remember you, are responsible for your own actions and the effect they, have on others. You must not take that responsibility lightly., , Mandatory signs, Fig 2, , COLOUR, , White symbol, on blue, background, , MEANING, , Shows what, must be done., , Example, , Wear hand, protection., , Rules and procedure at work, What you must do, by law, is often included in the various, rules and procedures laid down by your employer. They, may be written down, but more often than not, are just the, way a firm does things - you will learn these from other, workers as you do your job., They may govern the issue and use of tools, protective, clothing and equipment, reporting procedures, emergency, drills, access to restricted areas, and many other matters., Such rules are essential; they contribute to the efficiency, and safety of the job., , Warning signs, SHAPE, Fig 3, , COLOUR, , Yellow, background, with black, border and, symbol., , MEANING, , Warns of, hazard or, danger., , Example, , Caution, risk of, electric shock., , Safety signs, As you go about your work on a construction site you will, see a variety of signs and notices. Some of these will be, familiar to you - a 'no smoking' sign for example; others, you may not have seen before. It is up to you to learn what, they mean - and to take notice of them. They warn of the, possible danger, and must not be ignored., Safety signs fall into four separate categories. These can, be recognised by their shape and colour. Sometimes they, may be just a symbol; other signs may include letters or, figures and provide extra information such as the clearance, height of an obstacle or the safe working load of a crane., , 8, , Triangular., , Electrical : Electrician (NSQF LEVEL - 5) - Related Theory for Exercise 1.1.02 & 1.1.03, , Copyright Free under CC BY Licence
Page 23 :
Information signs, , Warning signs, , Fig 4, SHAPE, , Square or, oblong., , COLOUR, , White symbols, on green, background., , MEANING, , Indicates or, gives, information of, safety, provision., , Example, , First aid point., , Prohibition signs, , Mandatory signs, , Electrical : Electrician (NSQF LEVEL - 5) - Related Theory for Exercise 1.1.02 & 1.1.03, , Copyright Free under CC BY Licence, , 9
Page 24 :
Electrical, Related Theory for Exercise 1.1.04 & 1.1.05, Electrician - Safety Practice and Hand Tools, Fire - Types - Extinguishers, Objectives: At the end of this lesson you shall be able to, • state the effects of a fire break out and causes of fire in a workshop, • distinguish the different types of fire extinguishers, • state the classification of fires and basic ways for extingushing the fire, • determine the correct type of fire extinguisher to be used based on the class of fire, • describe the general procedure to be adopted in the event of fire, • state the method of operation of fire extinguisher and extinguishing of fire., Fire, Fire is the burning of combustible material. A fire in an, unwanted place and on an unwanted occasion and in an, uncontrollable quantity can cause damage or destroy, property and materials. It might injure people, and, sometimes cause loss of life as well. Hence, every effort, must be made to prevent fire. When a fire outbreak is, discovered, it must be controlled and extinguished by, immediate corrective action., Is it possible to prevent fire? Yes, fire can be prevented by, eliminating anyone of the three factors that causes fire., The following are the three factors that must be present in, combination for a fire to continue to burn. (Fig 1), , Removing any one of, extinguish the fire., , these factors will, , Preventing fires: The majority of fires begin with small, outbreaks which burn unnoticed until they have a secure, hold. Most fires could be prevented with more care and by, following some simple common sense rules., Accumulation of combustible refuse (cotton waste soaked, with oil, scrap wood, paper, etc.) in odd corners are a fire, risk. Refuse should be removed to collection points., The cause of fire in electrical equipment is misuse or, neglect. Loose connections, wrongly rated fuses, overloaded, circuits cause overheating which may in turn lead to a fire., Damage to insulation between conductors in cables causes, fire., Clothing and anything else which might catch fire should be, kept well away from heaters. Make sure that the heater is, shut off at the end of the working day., , Fuel: Any substance, liquid, solid or gas will burn, if there, is oxygen and high enough temperatures., Heat: Every fuel will begin to burn at a certain temperature., It varies and depends on the fuel. Solids and liquids give off, vapour when heated, and it is this vapour which ignites., Some liquids do not have to be heated as they give off, vapour at normal room temperature say 150C, eg. petrol., Oxygen: Usually exists in sufficient quantity in air to keep, a fire burning., Extinguishing of fire: Isolating or removing any of these, factors from the combination will extinguish the fire. There, are three basic ways of achieving this., •, , Starving the fire of fuel removes this element., , •, , Smothering - ie. isolate the fire from the supply of, oxygen by blanketing it with foam, sand etc., , •, , Cooling - use water to lower the temperature., , Highly flammable liquids and petroleum mixtures (thinner,, adhesive solutions, solvents, kerosene, spirit, LPG gas, etc.) should be stored in the flammable material storage, area., Blowlamps and torches must not be left burning when they, are not in use., Classification of fires: Fires are classified into four types, in terms of the nature of fuel., Different types of fires (Fig 2, Fig 3 Fig 4 & Fig 5) have to, be dealt with in different ways and with different extinguishing, agents., An extinguishing agent is the material or substance used, to put out the fire, and is usually (but not always) contained, in a fire extinguisher with a release mechanism for spraying, into the fire., It is important to know the right type of agent for extinguishing, a particular type of fire; using a wrong agent can make, things worse.There is no classification for ‘electrical fires’, as such, since these are only fires in materials where, electricity is present., , 10, , Copyright Free under CC BY Licence
Page 25 :
Fire Classification and Fuel, , Extinguishing Method, , Most effective ie., cooling with water. Jets of water, should be sprayed on the base of the fire and then, gradually upwards., , Should be smothered :- The aim is to cover the, entire surface of the burning liquid. This has the, effect of cutting off the supply of oxygen to the fire., Water should never be used on burning liquids., Foam, dry powder or CO2 may be used on this type, of fire., , Extreme caution is necessary in dealing with liquefied, gases. There is a risk of explosion and sudden, outbreak of fire in the entire vicinity. If an appliance, fed from a cylinder catches fire - shut off the supply, of gas. The safest course is to raise an alarm and, leave the fire to be dealt with by trained personnel., Dry powder extinguishers are used on this type of, fire., , Special powders have now been developed which, are capable of controlling and/or extinguishing this, type of fire., The standard range of fire extinguishing agents is, inadequate or dangerous when dealing with metal, fires., Fire on electrical equipment., Halon, Carbon dioxide, dry powder and vapourising, liquid (CTC) extinguishers can be used to deal with, fires in electrical equipment. Foam or liquid (eg., water) extinguishers must not be used on electrical, equipment under any circumstances., , Electrical : Electrician (NSQF LEVEL - 5) - Related Theory for Exercise 1.1.04 & 1.1.05, , Copyright Free under CC BY Licence, , 11
Page 26 :
Types of Fire Extinguisher, Many types of fire extinguishers are available with different, extinguishing ‘agents’ to deal with different classes of fires., (Fig 1), , Dry powder extinguishers (Fig 4): Extinguishers fitted, with dry powder may be of the gas cartridge or stored, pressure type. Appearance and method of operation is the, same as that of the water-filled one. The main distinguishing feature is the fork shaped nozzle. Powders have been, developed to deal with class D fires., , Water-filled extinguishers: There are two methods of, operation. (Fig 2), •, , Gas cartridge type, , •, , Stored pressure type, , With both methods of operation the discharge can be, interruted as required, conserving the contents and, preventing unnecessary water damage., , Foam extinguishers (Fig 3):These may be of stored, pressure or gas cartridge types. Always check the operating, instructions on the extinguisher before use., Most suitable for, •, , flammable liquid fires, , •, , running liquid fires, , Must not be used on fires where electrical equipment is, involved., , 12, , Carbon dioxide (CO2): This type is easily distinguished, by the distinctively shaped discharge horn. (Fig 5)., , Suitable for Class B fires. Best suited where contamination, by deposits must be avoided. Not generally effective in, open air., Always check the operating instructions on the container, before use. Available with different gadgets of operation, such as - plunger, lever, trigger etc., Halon extinguishers (Fig 6): These extinguishers may be, filled with carbon-tetrachloride and Bromochlorodifluoro, methene (BCF). They may be either gas cartridge or stored, pressure type., , Electrical : Electrician (NSQF LEVEL - 5) - Related Theory for Exercise 1.1.04 & 1.1.05, , Copyright Free under CC BY Licence
Page 27 :
They are more effective in extinguishing small fires involving, pouring liquids. These extinguishers are particularly suitable, and safe to use on electrical equipment as the chemicals, are electrically non-conductive., The fumes given off by these extinguishers are, dangerous, especially in confined space., , Failure to do this may mean that some person, being unaccounted for and others may have to, put themselves to the trouble of searching for, him or her at risk to themselves., Working on fire extinguishers:•, , Alert people sorrounding by shouting fire, fire, fire when, observe the fire. (Fig 1a & b), , •, , Inform fire service or arrange to inform immediately., (Fig 1c), , •, , Open emergency exist and ask them to go away., (Fig 1d), , •, , Put “OFF” electrical power supply., , The general procedure in the event of a fire:, •, , Raise an alarm., , •, , Turn off all machinery and power (gas and electricity)., , •, , Close the doors and windows, but do not lock or bolt, them. This will limit the oxygen fed to the fire and prevent, its spreading., , •, , Try to deal with the fire if you can do so safely. Do not, risk getting trapped., , •, , Don’t allow people to go nearer to the fire, , Anybody not involved in fighting the fire should leave, calmly using the emergency exits and go to the, designated assembly point., , Electrical : Electrician (NSQF LEVEL - 5) - Related Theory for Exercise 1.1.04 & 1.1.05, , Copyright Free under CC BY Licence, , 13
Page 28 :
•, , Analyze and identify the type of fire. Refer Table1., Table 1, Class ‘A’, , Wood, paper, cloth,, solid material, , Class ‘B’, , Oil based fire (grease,, gasoline, oil) liquifiable, gases, , Class ‘C’, , Gas and liquifiable, gases, , Class ‘D’, , Metals and electrical, equipment, , Assume the fire is ‘B; type (flammable liquifiable solids), •, , Slect CO2 (Carbon di oxide) fire extinguisher., , •, , Locate and pickup, CO2 fire extinguisher. Click for its, expiry date., , •, , Break the seal (Fig 2), , Fire extinguishers are manufactured for use, from the distance., Caution, , •, , Pull the safety pin from the handle (Pin located at the, top of the fire extinguisher) (Fig 3), , •, , While putting off fire, the fire may flare up, , •, , Do not be panick belong as it put off promptly., , •, , If the fire doesn’t respond well after you, have used up the fire extinguisher move, away yourself away from the fire point., , •, , Do not attempt to put out a fire where it is, emitting toxic smoke leave it for the professionals., , • Remember that your life is more important, than property. So don’t place yourself or, others at risk., In order to remember the simple operation of, the extinguisher. Remember P.A.S.S. This will, help you to use the fire extinguisher., P for Pull, A for Aim, •, , Aim the extinguisher nozzle or hose at the base of the, fire (this will remove the source of fuel fire) (Fig 4), , S for Squeeze, S for Sweep, , Keep your self low and safe distance, •, , Squeeze the handle lever slowly to discharge the agent, (Fig 5), , •, , Sweep side to side approximately 15 cm over the fuel, fire until the fire is put off (Fig 5), , 14, , Electrical : Electrician (NSQF LEVEL - 5) - Related Theory for Exercise 1.1.04 & 1.1.05, , Copyright Free under CC BY Licence
Page 29 :
Electrical, Related Theory for Exercise 1.1.06 & 1.1.07, Electrician - Safety Practice and Hand Tools, Rescue operation - First aid treatment - Artificial respiration, Objectives: At the end of this lesson you shall be able to, • explain how to rescue a person who is in contact with a live wire., • state the first aid and its key aims., • explain ABC of the first aid., • brief how to give first aid treatment for a victim., • explain how to treat a person affected due to electric shock/injury., The severity of an electric shock will depend on the level of, current which passes through the body and the length of, time of contact. Do not delay, act at once. Make sure that, the electric current has been disconnected. If the victim is, still in contact with the supply - break the contact either by, switching off or by removing the plug or pulling the cable, free., , Electric burns on the victim may not cover a big area but, may be deep seated. All you can do is to cover the area, with a clean, sterile dressing and treat for shock. Get, expert help as quickly as possible., If the casualty is unconscious but is breathing, loosen the, clothing about the neck, chest and waist (Fig 3) and place, the casualty in the recovery position., , If not, stand on some insulating material such as dry wood,, rubber or plastic or newspaper and then pull his shirt, sleeves. However, you have to insulate yourself and break, the contact by pushing or pulling the person free., (Figs1 & 2), , Keep a constant check on the breathing and pulse rate., Keep the casualty warm and comfortable in the recover, position. Send for help.(Fig 4), , Do not give an unconscious person anything to, eat or drink., Do not leave an unconscious person, unattended., In any case avoid direct contact with the victim. Wrap your, hands in dry material if rubber gloves are not available., If you remain un-insulated, do not touch the victim with your, bare hands until the circuit is made dead or he is moved, away from the equipment., , If the casualty is not breathing - Act at once to resuscitate, the victim - do not waste time., There are four methods of artificial resuscitation is illustrated, in Exercise 1.1.07 follow them., , If the victim is at a height, efforts must be taken to prevent, him from falling or to make him fall safe., 15, , Copyright Free under CC BY Licence
Page 30 :
Basic first-aid treatment, First aid is defined as the immediate care and support, given to an acutely injured or ill person, primarily to save, life, prevent further deterioration or injury, plan to shift the, victim to safer place, provide best possible comfort and, finally help them to reach the medical centre/ hospital, through all available means. It is an immediate life-saving, procedure using all resources available within reach., Imparting knowledge and skill through institutional teaching, at younger age group in schools, colleges, entry point at, industry level is now given much importance. Inculcating, such habits at early age, helps to build good healthcare, habits among people., First aid procedure often consists of simple and basic life, saving techniques that an individual performs with proper, training and knowledge., The key aims of first aid can be summarized in three key, points:, •, , Preserve life: If the patient was breathing, a first aider, would normally then place them in the recovery position,, with the patient leant over on their side, which also has, the effect of clearing the tongue from the pharynx. It, also avoids a common cause of death in unconscious, patients, which is choking on regurgitated stomach, contents., The airway can also become blocked through a foreign, object becoming lodged in the pharynx or larynx,, commonly called choking. The first aider will be taught, to deal with this through a combination of 'back slaps', and 'abdominal thrusts'. Once the airway has been, opened, the first aider would assess to see if the patient, is breathing., , •, , Prevent further harm: Also sometimes called prevent, the condition from worsening, or danger of further injury,, this covers both external factors, such as moving a, patient away from any cause of harm, and applying, first aid techniques to prevent worsening of the condition,, such as applying pressure to stop a bleed becoming, dangerous., , •, , Promote recovery: First aid also involves trying to, start the recovery process from the illness or injury,, and in some cases might involve completing a, treatment, such as in the case of applying a plaster to, a small wound., , Training, , Training is generally provided by attending a course,, typically leading to certification. Due to regular changes, in procedures and protocols, based on updated clinical, knowledge, and to maintain skill, attendance at regular, refresher courses or re-certification is often necessary., First aid training is often available through community, organization such as the Red cross and St. John, ambulance., ABC of first aid, ABC stands for Airway, Breathing and Circulation., •, , Airway: Attention must first be brought to the airway, to ensure it is clear. Obstruction (choking) is a lifethreatening emergency., , •, , Breathing: Breathing if stops, the victim may die soon., Hence means of providing support for breathing is an, important next steps. There are several methods, practiced in first aid., , •, , Circulation: Blood circulation is vital to keep person, alive. The first aiders now trained to go straight to chest, compressions through CPR methods., , When providing first aid one needs to follow some rule., There are certain basic norms in teaching and training, students in the approach and administration of first aid to, sick and injured., Not to get panic, Panic is one emotion that can make the situation more, worse. People often make mistake because they get panic., Panic clouds thinking may cause mistakes. First aider, need calm and collective approach. If the first aider himself, is in a state of fear and panic gross mistakes may result., It's far easier to help the suffering,, When they know what they are doing, even if unprepared, to encounter a situation. Emotional approach and response, always lead to wrong doing and may lead one to do wrong, procedures. Hence be calm and focus on the given, institution. Quick and confident approach can lessen the, effect of injury., Call medical emergencies, , Basic principles, such as knowing to use an adhesive, bandage or applying direct pressure on a bleed, are often, acquired passively through life experiences. However, to, provide effective, life-saving first aid interventions requires, instruction and practical training., This is especially true where it relates to potentially fatal, illnesses and injuries, such as those that require Cardio, Pulmonary Resuscitation (CPR); these procedures may, , 16, , be invasive, and carry a risk of further injury to the patient, and the provider. As with any training, it is more useful if it, occurs before an actual emergency, and in many countries,, emergency ambulance dispatchers may give basic first, aid instructions over the phone while the ambulance is on, the way., , If the situation demands, quickly call for medical, assistance. Prompt approach may save the life., Surroundings play vital role, Different surroundings require different approach. Hence, first aider should study the surrounding carefully. In other, words, one need to make sure that they are safe and are, not in any danger as it would be of no help that the first, aider himself get injured., , Electrical : Electrician (NSQF LEVEL - 5) - Related Theory for Exercise 1.1.06 & 1.1.07, , Copyright Free under CC BY Licence
Page 31 :
Do no harm, Most often over enthusiastically practiced first aid viz., administering water when the victim is unconscious, wiping, clotted blood (which acts as plug to reduce bleeding),, correcting fractures, mishandling injured parts etc., would, leads to more complication., Patients often die due to wrong FIRST AID methods, who, may otherwise easily survive. Do not move the injured, person unless the situation demands. It is best to make, him lie wherever he is because if the patient has back,, head or neck injury, moving him would causes more harm., Reassurance, Reassure the victim by speaking encouragingly with him., Stop the bleeding, If the victim is bleeding, try to stop the bleeding by applying, pressure over the injured part., Golden hours, India have best of technology made available in hospitals, to treat devastating medical problem viz. head injury,, multiple trauma, heart attack, strokes etc, but patients, often do poorly because they don't gain access to that, technology in time., The risk of dying from these conditions, is greatest in the, first 30 minutes, often instantly. This period is referred to, as Golden period. By the time the patient reach the, hospital, they would have passed that critical period. First, aid care come handy to save lives., It helps to get to the nearest emergency room as quickly, as possible through safe handling and transportation. The, shorter that time, the more likely the best treatment, applied., , compared to when they only do chest compressions., Second, it is very difficult to carry right maneuver in wrong, places. But CPR, if carefully done by highly skilled first, aiders is a bridge that keeps vital organs oxygenated until, medical team arrives., Declaring death, It is not correct to declare the victim's death at the accident, site. It has to be done by qualified medical doctors., How to report an emergency?, Reporting an emergency is one of those things that seems, simple enough, until actually when put to use in emergency, situations. A sense of shock prevail at the accident sites., Large crowd gather around only with inquisitive nature,, but not to extend helping hands to the victims. This is, common in road side injuries., The first aiders need to adapt multi-task strategy to control, the crowd around, communicate to the rescue team, call, ambulance etc., all to be done simultaneously. The mobile, phones helps to a greater extent for such emergencies., Assess the urgency of the situation. Before you report an, emergency, make sure the situation is genuinely urgent., Call for emergency services if you believe that a situation, is life-threatening or otherwise extremely critical., •, , A crime, especially one that is currently in progress. If, you're reporting a crime, give a physical description of, the person committing the crime., , •, , A fire - If you're reporting a fire, describe how the fire, started and where exactly it is located. If someone, has already been injured or is missing, report that as, well., , •, , A life-threatening medical emergency, explain how the, incident occurred and what symptoms the person, currently displays., , •, , A car crash - Location, serious nature of injures, vehicle's, details and registration, number of people involved etc., , Maintain the hygiene, Most important, the first aider need to wash hands and, dry before giving any first aid treatment to the patient or, wear gloves in order to prevent infection., Cleaning and dressing, Always clean the wound thoroughly before applying the, bandage gently wash the wound with clean water., Not to use local medications on cuts or open wounds, They are more irritating to tissue than it is helpful. Simple, dry cleaning or with water and some kind of bandage are, best., CPR (Cardio-Pulmonary Resuscitation) can be lifesustaining, CPR can be life sustaining. If one is trained in PR and the, person is suffering from choking or finds difficulty in, breathing, immediately begin CPR. However, if one is not, trained in CPR, do not attempt as you can cause further, injury. But some people do it wrong., This is a difficult procedure to do in a crowded area. Also, there are many studies to suggest that no survival, advantage when bystanders deliver breaths to victims, , Call emergency service, The emergency number varies - 100 for Police & Fire, 108, for Ambulance., Report your location, The first thing the emergency dispatcher will ask is where, you are located, so the emergency services can get there, as quickly as possible. Give the exact street address, if, you're not sure of the exact address, give approximate, information., Give the dispatcher your phone number, This information is also imperative for the dispatcher to, have, so that he or she is able to call back if necessary., Describe the nature of the emergency, Speak in a calm, clear voice and tell the dispatcher why, you are calling. Give the most important details first, then, answer the dispatcher's follow-up question as best as you, can., , Electrical : Electrician (NSQF LEVEL - 5) - Related Theory for Exercise 1.1.06 & 1.1.07, , Copyright Free under CC BY Licence, , 17
Page 32 :
Do not hang up the phone until you are instructed to do, so. Then follow the instructions you were given., How to do basic first aid?, Basic first aid refers to the initial process of assessing, and addressing the needs of someone who has been injured, or is in physiological distress due to choking, a heart, attack, allergic reactions, drugs or other medical, emergencies. Basic first aid allows one to quickly, determine a person's physical condition and the correct, course of treatment., Important guideline for first aiders, Evaluate the situation, Are there things that might put the first aider at risk. When, faced with accidents like fire, toxic smoke, gasses, an, unstable building, live electrical wires or other dangerous, scenario, the first aider should be very careful not to rush, into a situation, which may prove to be fatal., Remember A-B-Cs, The ABCs of first aid refer to the three critical things the, first aiders need to look for., •, , Airway - Does the person have an unobstructed airway?, , •, , Breathing - Is the person breathing?, , •, , Circulation - Does the person show a pulse at major, pulse points (wrist, carotid artery, groin), , •, , Look, listen and feel for signs of breathing, Look for the victim's chest to raise and fall, listen for sounds, of breathing., If the victim is not breathing, see the section below, • If the victim is breathing, but unconscious, roll them, onto their side, keeping the head and neck aligned, with the body. This will help drain the mouth and prevent, the tongue or vomit from blocking the airway., Check the victim's circulation, Look at the victim's colour and check their pulse (the, carotid artery is a good option; it is located on either side, of the neck, below the jaw bone). If the victim does not, have a pulse, start CPR., Treat bleeding, shock and other problems as needed, After establishing that the victim is breathing and has a, pulse, next priority should be to control any bleeding., Particularly in the case of trauma, preventing shock is the, priority., •, , Stop bleeding: Control of bleeding is one of the most, important things to save a trauma victim. Use direct, pressure on a wound before trying any other method of, managing bleeding., , •, , Treat shock: Shock may causes loss of blood flow, from the body, frequently follows physical and, occasionally psychological trauma. A person in shock, will frequently have ice cold skin, be agitated or have, an altered mental status, and have pale colour to the, skin around the face and lips. Untreated, shock can, be fatal. Anyone who has suffered a severe injury or, life-threatening situation is at risk for shock., , •, , Choking victim: Choking can cause death or, permanent brain damage within minutes., , •, , Treat a burn: Treat first and second degree burns by, immersing or flushing with cool water. Don't use creams,, butter or other ointments, and do not pop blisters. Third, degree burns should be covered with a damp cloth., Remove clothing and jewellery from the burn, but do, not try to remove charred clothing that is stuck to burns., , •, , Treat a concussion: If the victim has suffered a blow, to the head, look for signs of concussion. Common, symptoms are: loss of consciousness following the, injury, disorientation or memory impairment, vertigo,, nausea, and lethargy., , •, , Treat a spinal injury victim: If a spinal injury is, suspected, it is especially critical, not move the victim's, head, neck or back unless they are in immediate, danger., , Avoid moving the victim, Avoid moving the victim unless they are immediate danger., Moving a victim will often make injuries worse, especially, in the case of spinal cord injuries., Call emergency services, Call for help or tell someone else to call for help as soon, as possible. If alone at the accident scene, try to establish, breathing before calling for help, and do not leave the victim, alone unattended., Determine responsiveness, If a person is unconscious, try to rouse them by gently, shaking and speaking to them., If the person remains unresponsive, carefully roll, them on the side (recovery position) and open his, airway., •, , Keep head and neck aligned., , •, , Carefully roll them onto their back while holding his, head., , Open the airway by lifting the chin (Fig 1)., , Stay with the victim until help arrives, Try to be a calming presence for the victim until assistance, can arrive., Unconsciousness (COMA), Unconscious also referred as Coma, is a serious life, 18, , Electrical : Electrician (NSQF LEVEL - 5) - Related Theory for Exercise 1.1.06 & 1.1.07, , Copyright Free under CC BY Licence
Page 33 :
threatening condition, when a person lie totally senseless, and do not respond to calls, external stimulus. But the, basic heart, breathing, blood circulation may be still intact,, or they may also be failing. If unattended it may lead to, death., The condition arises due to interruption of normal brain, activity. The causes are too many., Causes for COMA Stage, •, , Shock (Cardiogenic, Neurogenic), , •, , Head injury (Concussion, Compression), , •, , Asphyxia (obstruction to air passage), , •, , Extreme of body temperature (Heat, Cold), , •, , Cardiac arrest (Heart attack), , •, , Stroke (Cerbro-vascular accident), , •, , Blood loss (Haemorrhage), , •, , Dehydration (Diarrohea & vomiting), , •, , Diabetes (Low or high sugar), , DO NOT, , •, , Blood pressure (Very low or very high), , •, , Do not give an unconscious person any food or drink., , •, , Over dose of alcohol, drugs, , •, , Do not leave the person alone., , •, , Poisoning (Gas, Pesticides, Bites), , •, , •, , Epileptic fits (Fits), , •, , Hysteria (Emotional, Psychological), , •, , Do not place a pillow under the head of an unconscious, person., Do not slap an unconscious person's face or splash, water on the face and try to revive him., , entire body at one time to the side. Support the neck, and back to keep the head and body in the same, position while you roll., •, , Keep the person warm until medical help arrives., , •, , If you see a person fainting, try to prevent a fall. Lay, the person flat on the floor and raise the level of feet, above and support., , •, , If fainting is likely due to low blood sugar, give the person, something sweet to eat or drink when they become, concious., , The following symptoms may occur after a person has, been unconscious:, •, , Confusion, , •, , Drowsiness, , •, , Headache, , •, , Inability to speak or move parts of his or her body (see, stroke symptoms), , •, , Light headedness, , •, , Loss of bowel or bladder control (incontinence), , •, , Rapid heartbeat (palpitation), , •, , Stupor, , First aid, •, , Call EMERGENCY number., , •, , Check the person's airway, breathing, and pulse, frequently. If necessary, begin rescue breathing and, CPR., , •, , If the person is breathing and lying on the back and, after ruling out spinal injury, carefully roll the person, onto the side, preferably left side., , •, , Loss of consciousness may threaten life if the, person is on his back and the tounge has, dropped to the back of the throat, blocking the, airway. Make certain that the person is, breathing before looking for the cause of, unconsciousness. If the injuries permit, place, the casualty in the recovery position (Fig 2) with, the neck extended. Never give any thing by, mouth to an unconscious casualty., How to diagnose an unconscious injured person, •, , Consider alcohol: look for signs of drinking, like empty, bottles or the smell of alcohol., , •, , Consider epilepsy: are there signs of a violent seizure,, such as saliva around the mouth or a generally, dishevelled scene?, , •, , Think insulin: might the person be suffering from, insulin shock., , •, , Bend the top leg so both hip and knee are at right, angles. Gently tilt the head back to keep the airway, open (Fig 2). If breathing or pulse stops at any time,, roll the person on to his back and begin CPR., , Think about drugs: was there an overdose? Or might, the person have under dosed - that is not taken enough, of a prescribed medication?, , •, , Consider trauma: is the person physically injured?, , •, , If there is a spinal injury, the victims position may have, to be carefully assessed. If the person vomits, roll the, , Look for signs of infection: redness and/ or red streaks, around a wound., , •, , Look around for signs of Poison: an empty bottle of, , Electrical : Electrician (NSQF LEVEL - 5) - Related Theory for Exercise 1.1.06 & 1.1.07, , Copyright Free under CC BY Licence, , 19
Page 34 :
pills or a snakebite wound., •, , Consider the possibility of psychological trauma:, might the person have a psychological disorder of some, sort?, , •, , Consider stroke, particularly for elderly people., , •, , Treat according to what you diagnose., , •, , Warmth: Keep the victim warm but do not allow them, to get overheated. If you are outside, try to get, something underneath her if you can do easily. Wrap, blankets and coats around her, paying particular, attention to the head, through which much body heat, is lost., , •, , Air: Maintain careful eye on the victim's airway and be, prepared to turn them into the recovery position if, necessary, or even to resuscitate if breathing stops., Try to keep back bystanders and loosen tight clothing, to allow maximum air to victim., , •, , Rest: Keep the victim still and preferably sitting or lying, down. If the victim is very giddy, lay them down with, there legs raised to ensure that maximum blood and, therefore maximum oxygen is sent to the brain., , Electric Shock (Fig 3), A severe loss of body fluid will lead to a drop in blood, pressure. Eventually the blood's circulation will deteriorate, and the remaining blood flow will be directed to the vital, organs such as the brain. Blood will therefore be directed, away from the outer area of the body, so the victim will, appear pale and the skin will feel ice cold., As blood flow slows, so does the amount of oxygen, reaching the brain. The victim may appear to be confused,, weak, and dizzy and may eventually deteriorate into, unconsciousness. Try to compensate for this lack of, oxygen, the heart and breathing rates both speed up,, gradually becoming weaker, and may eventually cease., , Treatment of electric shock, Prompt treatment is essential., If assistance is close at hand, send for medical aid, then, carry on with emergency treatment., If you are alone, proceed with treatment at once., Switch off the supply, if this can be done without undue, delay. Otherwise, remove the victim from contact with the, live conductor, using dry non-conducting materials such as, a wooden bar, rope, a scarf, the victim's coat-tails, any dry, article of clothing, a belt, rolled-up newspaper, non-metallic, hose, PVC tubing, bakelised paper, tube etc. (Fig 4), , Avoid direct contact with the victim. Wrap your hands in dry, material if rubber gloves are not available., , Symptoms of shock, , Electrical burns: A person receiving an electric shock, may also sustain burns when the current passes through, his body. Do not waste time by applying first aid to the, burns until breathing has been restored and the patient can, breathe normally - unaided., , Victims appear pale, ice cold, pulse appear initially faster, and gets slower, breathing becomes shallow. Weakness,, dizziness, confusion continue. If unattended the patient, may become unconscious and die., , Burns and scalds: Burns are very painful. If a large area of, the body is burnt, give no treatment, except to exclude the, air, eg.by covering with water, clean paper, or a clean shirt., This relieves the pain., , First aid, , Artificial respiration methods to the electric shock, victim, , Keep the patient warm and at mental rest. Assure of good, air circulation and comfort. Call for help to shift the patient, to safer place/ hospital., , Artificical respiration methods already dealt in practical, exercise 1.1.07 in detail. Refer practical book., , Potential causes of shock include: sever internal or external, bleeding; burns; severe vomiting and diarrohea, especially, in children and the elderly; problems with the heart., , 20, , Electrical : Electrician (NSQF LEVEL - 5) - Related Theory for Exercise 1.1.06 & 1.1.07, , Copyright Free under CC BY Licence
Page 35 :
Electrical, Related Theory for Exercise 1.1.08, Electrician - Safety Practice and Hand Tools, Disposal of waste material, Objectives: At the end of this lesson you shall be able to, • state about the waste material, • state the types of waste material and source of waste, • list out the waste material in workshop, • explain the methods of disposal of waste material., Waste, , Sources of waste, , Waste are unwanted or unusable materials. Waste is any, substance which is discarded after primary use, or it is, worthless, defective and of no use., Waste is the by product of all the matter which is consumed, by living organisms and is used in the industries as well, as in agriculture and other fields. Usually this waste is, thrown on areas outside the cities but this open disposal, decreases the usable land into non-usable land and also, polluting the environment., , i) Industrial waste, It contains solid as well as liquid waste and is formed by, the processing of various materials and it contains harmful, chemical and solid metal waste., ii) Domestic waste, , Waste can be broadly classified as follows, , It includes all rubbish, garbage, dust, sewage waste etc., It contains combustible and non-combustible materials., When these waste disposal off openly cause various, harmful effects., , a) Rural waste, , iii) Agricultural waste, , b) Urban waste, i) Solid waste, , It includes the waste produced from the crops and cattle, etc. Open disposal of thin waste create problems for health, of man and other animals., , II) Liquid waste, , iv) Flu ash produced by interval power plants., , a) Rural waste, Rural waste is the waste from agricultural and dairy forms., These can be reused by burning agricultural waste and, composing. The waste produced by the man and animal, is now used in the production of fuel by bio-gas plants., b) Urban waste, It is the waste from house hold articles or from industries, within municipal limit, It can be again classified into two types., i) Solid waste, , v) Hospital waste is most harmful waste off contains, micro organisms which cause both communicable and, non-communicable deseases., List out the waste material in workshop (Fig 1), •, , Oily waste such as lubricating oil, coolant etc., , •, , Cotton waste., , •, , Metal chips of different materials., , •, , Electrical waste such as used and damaged, accessories, wires, cables, pipes etc., , Methods of disposal of waste (Fig 2), , Solid waste is the material is hard (from industries) such, as newspaper, cans, bottles, broken glass, plastics, container, polythene bags etc., ii) Liquid waste, It is the water based waste which is produced by the main, activation sources of waste., , Disposal process : This is the final step of the waste, management. From this disposal point or site the materials, are selected steps as, •, , Recycling, , •, , Composing, , 21, , Copyright Free under CC BY Licence
Page 36 :
Waste compaction, The waste materials such as cans and plastic bottles, compact into blocks and send for recycling. This process, need space, thus making transportation and positioning, difficult., , •, , Landfill, , •, , Incineration, , •, , Waste compaction, , •, , Reuse, , •, , Animal Feed, , •, , Fire Wood, , Reuse, , Recycling, Recycling is one of the most well known method of, managing waste. It is not expensive and can be easily, done by you. If you carry out recycling, you will save a lot, of energy, resources and thereby reduce pollution., Composting, This is a natural process that is completely free of any, hazardous by-products. This process involves breaking, down the material into organic compounds that can be, used as manure., Landfill, In this process, the waste cannot be reused or recycled, separated out and spread as a thin layer in some lowlying areas across the city. A layer of soil added after, each layer of garbage. Once this process is complete,, this area declared unfit for building construction and is, only used as a playground or a park., , The amount of waste disposal can be reduced by carefully, considering the exact throwing away. Before discarding, the item think for the possibility to wash and reuse them., Plastic tubs contents butter or icecream can become, effective storage containers for a range of small item like, nails or screws., Animal Feed:, Vegetable peel and food scraps can be retained to feed, small animals such as lamsters rabbit etc. Large meat, bones will be greately reused by feeding dog., Fire Wood:, A small amount of waste disposal can be reused when it, comes to refurnishing have or replacing furniture. before, dicarding the furniture, cut it into more meaningful process, and use as fire wood., , Incineration (Fig 3), It is the process of controlled combustion of garbage to, reduce it to incombustible matter, ash, waste gas and, heat. It is treated and released into the environment, (Fig 3). This reduced 90% volume of waste, some time, the heat generated used to produce electric power., , 22, , Electrical : Electrician (NSQF LEVEL - 5) - Related Theory for Exercise 1.1.08, , Copyright Free under CC BY Licence
Page 37 :
Electrical, Related Theory for Exercise 1.1.09, Electrician - Safety Practice and Hand Tools, Personal Protective Equipment (PPE), Objectives: At the end of this lesson you shall be able to, • state about Personal Protective Equipment (PPE) and its purpose, • explain the occupational health safety, hygien, • explain occupational hazards, • list the most common type of personal protective equipment for hazards, Personal Protective Equipment (PPE), , Categories of PPEs, , The Devices, equipment, or clothing used or worn by the, employees, as a last resort, to protect against hazards in, the workplace. The primary approach in any safety effort, is that the hazard to the workmen should be eliminated or, controlled by engineering methods rather than protecting, the workmen through the use of personal protective, equipment (PPE)., , Depending upon the nature of hazard, the PPE is broadly, divided into the following two categories:, , Engineering methods could include design change,, substitution, ventilation, mechanical handling, automation,, etc. In situations where it is not possible to introduce any, effective engineering methods for controlling hazards, the, workman shall use appropriate types of PPE., The Factories Act, 1948 and several other labour legislations, 1996 have provisions for effective use of appropriate types, of PPE. Use of PPE is an important., Ways to ensure workplace safety and use personal, protective equipment (PPE) effectively., •, , •, , •, , Workers to get up-to-date safety information from the, regulatory agencies that oversees workplace safety in, their specific area., To use all available text resources that may be in work, area and for applicable safety information on how to, use PPE best., When it comes to the most common types of personal, protective equipment, like goggles, gloves or bodysuits,, these items are much less effective if they are not worn, at all times, or whenever a specific danger exists in a, work process. Using PPE consistently will help to avoid, some common kinds of industrial accidents., , •, , Personal protective equipment is not always enough, to protect workers against workplace dangers. Knowing, more about the overall context of your work activity, can help to fully protect from anything that might, threaten health and safety on the job., , •, , Inspection of gear thoroughly to make sure that it has, the standard of quality and adequately protect the user, should be continuously carried out., , 1 Non-respiratory: Those used for protection against, injury from outside the body, i.e. for protecting the head,, eye, face, hand, arm, foot, leg and other body parts, 2 Respiratory: Those used for protection from harm due, to inhalation of contaminated air., The guidelines on 'Personal Protective Equipment' is issued, to facilitate the plant management in maintaining an, effective programme with respect to protection of persons, against hazards, which cannot be eliminated or controlled, by engineering methods listed in table1., Table1, No., , Title, , PPE1, , Helmet, , PPE2, , Safety footwear, , PPE3, , Respiratory protective, equipment, , PPE4, , Arms and hands protection, , PPE5, , Eyes and face protection, , PPE6, , Protective clothing and coverall, , PPE7, , Ears protection, , PPE8, , Safety belt and harnesses, , 23, , Copyright Free under CC BY Licence
Page 38 :
Personal protective equipments and their uses and hazards are as follows, Types of, protection, , Hazards, , Head Protection, (Fig 1), , 1. Falling objects, 2. Striking against objects, 3. Spatter, , Foot protection, (Fig 2), , 1. Hot spatter, 2. Falling objects, 3. Working wet area, , PPE to be used, , and, leather leg guards, , Nose Mask, , Nose, (Fig 3), , 24, , 1. Dust particles, 2. Fumes/ gases/ vapours, , Electrical : Electrician (NSQF LEVEL - 5) - Related Theory for Exercise 1.1.09, , Copyright Free under CC BY Licence
Page 39 :
Types of, protection, , Hazards, , PPE to be used, , Hand Gloves, , Hand protecion, (Fig 4), , 1. Heat burn due to direct, contact, 2. Blows sparks moderate heat, 3. Electric shock, , Googgles, , Eye protection, (Fig 5, Fig 6), , 1. Flying dust particles, 2. UV rays, IR rays heat and, High amount of visible, radiation, , and, Face Shield, Head Shield, Hand Shield, , Face Protection, (Fig 6, Fig 7), , 1. Spark generated during, Welding, grinding, 2. Welding spatter striking, 3. Face protection from, UV rays, , and, Face Shield, Head Shield with or without Ear Muff, Helmets with screen for welders, , Electrical : Electrician (NSQF LEVEL - 5) - Related Theory for Exercise 1.1.09, , Copyright Free under CC BY Licence, , 25
Page 40 :
Types of, protection, , Hazards, , Ear protection, (Fig 7), , PPE to be used, , 1. High noise level, , Head shield with Ear muff, and, Ear plug, Ear Muff, , Body protection, (Fig 8, Fig 9), , 1. Hot particles, , Body Guard, , 26, , Electrical : Electrician (NSQF LEVEL - 5) - Related Theory for Exercise 1.1.09, , Copyright Free under CC BY Licence
Page 41 :
•, , Quality of PPE’s, PPE must meet the following criteria with regard to its, quality-provide absolute and full protection against possible, hazard and PPE’s be so designed and manufactured out, of materials that it can withstand the hazards against which, it is intended to be used., , It involves interactions among many related areas,, including occupational medicine, occupational (or, industrial) hygiene, public health, and safety, engineering, chemistry, and health physics., , Need of occupational health and safety, •, , Health and safety of the employees is an important, aspect of a company's smooth and successful, functioning., , •, , It is a decisive factor in organizational effectiveness. It, ensures an accident-free industrial environment., , •, , Expected activity of workman and duration of work,, comfort of workman when using PPE, , Proper attention to the safety and welfare of the, employees can yield valuable returns., , •, , Improving employee morale, , •, , Operating characteristics and limitations of PPE, , •, , Reducing absenteeism, , •, , Easy of maintenance and cleaning, , •, , Enhancing productivity, , •, , Conformity to Indian/ International standards and, availability of test certificate., , •, , Minimizing potential of work-related injuries and, illnesses, , •, , Increasing the quality of manufactured products and/, or rendered services., , Selection of PPE’s requires certain conditions, •, , Nature and severity of the hazard, , •, , Type of contaminant, its concentration and location of, contaminated area with respect to the source of, respirable air, , •, , Proper use of PPEs, Having selected the proper type of PPE, it is essential, that the workman wears it. Often the workman avoids using, PPE. The following factors influence the solution to this, problem., •, , The extent to which the workman understands the, necessity of using PPE, , •, , The ease and comfort with which PPE can be worn, with least interference in normal work procedures, , •, , The available economic, social and disciplinary, sanctions which can be used to influence the attitude, of the workman, , •, , The best solution to this problem is to make 'wearing, of PPE' mandatory for every employee., , •, , In other places, education and supervision need to be, intensified. When a group of workmen are issued PPE, for the first time., , Occupational health hazard and safety, Safety, Safety means freedom or protection from harm, danger,, hazard, risk, accident, injury or damage., Occupational health and safety, •, , Occupational health and safety is concerned with, protecting the safety, health and welfare of people, engaged in work or employment., , •, , The goal is to provide a safe work environment and to, prevent hazards., , •, , It may also protect co-workers, family members,, employers, customers, suppliers, nearby communities,, and other members of the public who are affected by, the workplace environment., , Occupational (Industrial) hygiene, •, , Occupational hygiene is anticipation, recognition,, evaluation and control of work place hazards (or), environmental factors (or) stresses, , •, , This is arising in (or) from the workplace., , •, , Which may cause sickness, impaired health and well, being (or) significant discomfort and inefficiency among, workers., , Anticipation (Identification): Methods of identification, of possible hazards and their effects on health, Recognition (Acceptance): Acceptance of ill-effects of, the identified hazards, Evaluation (Measurement & Assessment): Measuring, or calculating the hazard by Instruments, Air sampling, and Analysis, comparison with standards and taking, judgement whether measured or calculated hazard is more, or less than the permissible standard., Control of workplace hazards: Measures like, Engineering and Administrative controls, medical, examination, use of Personal Protective Equipment (PPE),, education, training and supervision, Occupational hazards, "Source or situation with a potential for harm in terms of, injury or ill health, damage to property, damage to the, workplace environment, or a combination of these"., Types of occupational health hazards, •, , Physical Hazards, , •, , Chemical Hazards, , •, , Biological Hazards, , •, , Physiological Hazards, , Electrical : Electrician (NSQF LEVEL - 5) - Related Theory for Exercise 1.1.09, , Copyright Free under CC BY Licence, , 27
Page 42 :
•, , Mechanical Hazards, , •, , Alcoholism, , •, , Electrical Hazards, , •, , Unskilled, , •, , Ergonomic Hazards., , •, , Poor discipline, , 1 Physical hazards, , - absentism, , •, , Noise, , - disobedience, , •, , Heat and cold stress, , - aggressive behaviours, , •, , Vibration, , •, , Accident proneness etc,, , •, , Radiation (ionising & Non-ionising), , •, , Emotional disturbances, , •, , Illumination etc.,, , - voilence, , 2 Chemical hazards, , - bullying, , •, , Inflammable, , - sexual harassment, , •, , Explosive, , 6 Mechanical, , •, , Toxic, , •, , Unguarded machinery, , •, , Corrosive, , •, , No fencing, , •, , Radioactive, , •, , No safety device, , 3 Biological hazards, , •, , No control device etc.,, , •, , Bacteria, , 7 Electrical, , •, , Virus, , •, , No earthing, , •, , Fungi, , •, , Short circuit, , •, , Plant pest, , •, , Current leakage, , •, , Infection., , •, , Open wire, , 4 Physiological, , •, , No fuse or cut off device etc,, , •, , Old age, , 8 Ergonomic, , •, , Sex, , •, , Poor manual handling technique, , •, , Ill health, , •, , Wrong layout of machinery, , •, , Sickness, , •, , Wrong design, , •, , Fatigue., , •, , Poor housekeeping, , •, , Wrong tools etc,, , 5 Psychological, •, , Wrong attitude, , •, , Smoking, , 28, , Safety Slogan, A Safety rule breaker, is an accident maker, , Electrical : Electrician (NSQF LEVEL - 5) - Related Theory for Exercise 1.1.09, , Copyright Free under CC BY Licence
Page 43 :
Electrical, Related Theory for Exercise 1.1.10, Electrician - Safety Practice and Hand Tools, Guidelines for cleanliness of workshop and maintenance, Objectives: At the end of this lesson you shall be able to, • state the necessity of cleaning of workshop, • list the benefits of shop floor cleaning and maintenance, • state the common cleaning procedure in workshop, • list the different methods of cleaning process, • state the concept of 5s techniques and their description, • list the benefits of 5s techniques., Cleaning process, , Common cleaning procedure, , Cleaning is the process of removal of unwanted matter,, contaminants or pollutants from the environment or the, prevention of soiling thus it should be - GREEN clean., , •, , Before starting to clean, read the product and equipment, labels and usage instructions., , •, , Wear recommended Personal Potective Equipment, (PPE) like rubber or surgical type gloves, goggles, dust, mask or respirator, earplugs etc., , •, , Cleaning must be performed to prevent or remove soils,, contaminants or pollutants., , •, , Select and use less toxic products and this system is, known as “Standard Operating Procedures” (SOPs)., , •, , SOPs is the part of the over all operation and maintenance, plan for bending., , ‘Green-cleaning” means the need to clean up the cleaning, process and protect themselves., Cleaning is about removing pollution, not, additing to it., Necessity of cleaning of workshop, A clean workplace ensures safety and health of employees, and injuries can be prevented by taking action to ensure a, clean, safe work environment., Reasons for cleaning the workplace, , Other different methods of cleaning are, – Sprinkling, , •, , Cleaning of dry floors essentially to prevent slips and, falls in the workplace., , •, , Disinfectants prevents the spread germs and illness,, because it will stop germs in their tracks., , – Power wash process, , Proper air filteration reduces the exposures of hazardous, substances like dust and vapors., , – Carbon dioxide cleaning, , •, •, , Cleaning of light fixtures improve lighting efficiency., , •, , Using green cleaning products which is safer for both, employees and the environment., , •, , Proper disposal of waste and recyclable materials, keeps work areas clean., , – Spraying, , – Boiling under pressure, , – Pre cleaning, – Main cleaning, – Rinsing, – Drying etc,, , Benefits of a shop floor maintenance, , For improving the standardising the way to clean Standard, Operating Procedures (SOPs) as a set of written, guidelines must be provided to the cleaners which includes, , •, , Productive can be improved., , 1 Cleaning procedures, , •, , Improves operator’s efficiencies., , 2 Chemical handling and tracking requirements, , •, , Improves the support operations such as replacement, moves and finished goods., , •, , Reduction of scrap., , •, , Manufacturing process can be controlled effectively., , •, , Reduction of downtime due to better machine and tool, manitoring., , •, , Better control of inventory process., , 3 Communication protocols, 4 Training and inspection programs, 5 Reporting and record keeping procedures., The above guidelines should be made available to all, cleaning personel and occupants., , 29, , Copyright Free under CC BY Licence
Page 44 :
Recommended activities for green cleaning, •, , Provide easily understood directions to cleaning staff in, written with local languages., , •, , Use the appropriate technology (coarse spray, automatic, chemical dispensers etc)., , •, , Provide directory for the proper rinsing and disposal of, expended or empty solution containers., , •, , Reduce, minimize or eliminate the need for using, cleaning chemicals if possible., , The list describes how to organize a work space for, efficiency and effectiveness by identifying and storing the, items used, maintaining the area and items and sustaining, the new order., Benefits of 5s, •, , Work place becomes clearer and better organised., , •, , Working in working place becomes easier., , •, , Reduction in cost., , •, , People tend to be more disciplined., , 5 Steps (5s) - Concept, , •, , Delay is avoided., , 5s is a people-oriented and practice-oriented approach. 5s, expects every one to participate in it. It becomes a basic, for continuous improvement in the organisation., , •, , Less absenteeism., , •, , Better use of floor space., , The terms (5s) 5 steps are, , •, , Less accidents., , Step 1: SEIRI (Sorting out), , •, , High productivity with quality etc., , Step 2: SEITON (Systematic arrangement), Step 3: SEISO (Shine cleanliness), Step 4: SEIKTSU (Stanardization), Step 5: SHITSURE (Self discipline), Fig 1 shows the 5s concept wheel., , 30, , Electrical : Electrician (NSQF LEVEL - 5) - Related Theory for Exercise 1.1.10, , Copyright Free under CC BY Licence
Page 45 :
Electrical, Related Theory for Exercise 1.1.11 - 1.1.14, Electrician - Safety Practice and Hand Tools, Trade hand tools - specification - standards - NEC code 2011 - lifting of, heavy loads, Objectives: At the end of this lesson you shall be able to, • list the tools necessary for an electrician, • specify the tools and state the use of each tool, • explain the care and maintenance of electrician hand tools., It is important that the electrician uses proper tools for his, work. The accuracy of workmanship and speed of work, depend upon the use of correct tools. If the tools are, properly used, and maintained, the electrician will find the, working efficiency increases and the skills becomes a, work habit., , Flat nose pliers are used for holding flat objects like thin, plates etc., 3 Long nose pliers or (snip nose pliers) with side, cutter.BIS 5658 (Fig 3), Size 100 mm, 150 mm etc., , Listed below are the most commonly used tools by, electrician., Their specifications and BIS number are given for your, reference. Proper method of care and maintenance will, result in prolonged tool life and improved working efficiency., Pliers, They are specified with their overall dimensions of length in, mm. The pliers used for electrical work will be of insulated, grip., 1 Combination pliers with pipe grip, side cutter and, insulated handle. BIS 3650 (Fig 1), , Long nose pliers are used for holding small objects in, places where fingers cannot reach., 4 Side cutting pliers (Diagonal cutting pliers) BIS 4378, (Fig 4) Size 100 mm, 150 mm etc., , Size 150 mm, 200 mm etc., , It is used for cutting copper and aluminium wires of smaller, diameter (less than 4mm dia)., It is made of forged steel. It is used for cutting, twisting,, pulling, holding and gripping small jobs in wiring assembly, and repairing work. A non-insulated type is also available., Insulated pliers are used for work on live lines., , 5 Round nose pliers BIS 3568 (Fig 5), Size 100 mm, 150 mm etc., , 2 Flat nose pliers BIS 3552 (Fig 2), Size 100 mm, 150 mm, 200 mm etc., , Wire hooks and loops could be made using the round nose, pliers., , 31, , Copyright Free under CC BY Licence
Page 46 :
Care and maintenance of pliers, •, , Do not use pliers as hammers., , •, , Do not use pliers to cut large sized copper or aluminium, wires and hard steel wires of any size., , •, , While using the pliers avoid damages to the insulation, of hand grips., , •, , Lubricate hinged portions., , micro-amps at the maximum voltage, a high value resistance, is connected in series with one of the electrodes. It may, have a tip like a probe or screwdriver at one end. The, presence of supply is indicated by the glow of the lamp, when the tip is touched on the live supply and the brass, contact in the other end of neon tester is touched by hand., , 6 Screwdriver BIS 844 (Fig 6), , Care and maintenance, The screwdrivers used for electrical works generally have, plastic handles and the stem is covered with insulating, sleeves. The size of the screw driver is specified by its, blade length in mm and nominal screwdriver’s point size, (thickness of tip of blade) and by the diameter of the stem., eg., , 75 mm x 0.4 mm x 2.5 mm, 150 mm x 0.6 mm x 4 mm, 200 mm x 0.8 mm x 5.5 mm etc., , •, , Never use the neon tester for voltage higher than the, specified range., , •, , While testing see the circuit is completed through the, body. In case if you are using rubber soled shoes, the, earthing of the body could be provided by touching the, wall by one hand., , •, , Use the screwdriver tipped neon tester for light duty, work only., , 8 Electrician’s knife (Double blade) (Fig 8), , The handle of screwdrivers is either made of wood or, cellulose acetate., Screwdrivers are used for tightening or loosening screws., The screwdriver tip should correctly fit the grooves of the, screw to have maximum efficiency and to avoid damage to, the screw heads., As the length of the screw driver is proportional to the, turning force, for small work choose a suitable small sized, screwdriver and vice versa., Star-head Screwdriver, It is used for driving star headed screws., Care and maintenance, , The size of the knife is specified by its largest blade length, eg. 50 mm, 75 mm., , •, , Never use a screwdriver as a lever to apply force as this, action will make the stem to bend and the use of the, screw driver will be lost., , It is used for skinning the insulation of cables and cleaning, the wire surface. One of the blades which is sharp is used, for skinning the cable and the rough edged blade is used, for cleaning the surface of the wires., , •, , Keep the tip in correct shape and in rare cases it could, be grinded to shape., , Care and maintenance, , 7 Neon tester BIS 5579 - 1985 (Fig 7), It is specified with its working voltage range 100 to 250 volts, but rated to 500 V., It consists of a glass tube filled with neon gas, and, electrodes at the ends. To limit the current within 300, 32, , •, , Do not use the knife for cutting wires., , •, , Keep it free from rust., , •, , Keep one of the blades in a sharp condition., , •, , Fold the knife blade when not in use., , Electrical : Electrician (NSQF LEVEL - 5) - Related Theory for Exercise 1.1.11 - 1.1.14, , Copyright Free under CC BY Licence
Page 47 :
9 Four-fold box wood rule 600mm (Fig 9), , This is specified by its blade length., Eg., , 50 mm x 35 mm, 100 mm x 70 mm, 150 mm x 100 mm etc., , There are two types; one is the bevelled edge with stock, and the other is the flat edge without stock. It is used to, check whether the object is plane, perpendicular and at, right angle. Two straight blades set at right angles to each, other constitute the try-square. The steel blade is riveted to, the stock. The stock is made of cast iron. The stock should, be set against the edge of the job., Do not use it as a hammer., Used for measuring short lengths. To be kept in folded, condition when not in use., , 12 Firmer chisel (Fig 12), , 10 Hammer ball pein (Fig 10), , The size of the hammer is expressed in weight of the metal, head. Eg.125 gms, 250 gms etc., The hammer is made out of special steel and the striking, face is tempered. Used for nailing, straightening, and, bending work. The handle is made of hard wood., Care and maintenance, •, , Do not use a hammer with a loose handle., , •, , The face of the hammer must be free from oil, grease, and mushrooms., , 11 Try-square (Engineer’s square) (Fig 11) BIS 2103, , It has a wooden handle and a cast steel blade of 150 mm, length. Its size is measured according to the width of the, blade eg. 6 mm, 12 mm, 18 mm, 25 mm. It is used for, chipping, scraping and grooving in wood., Care and maintenance, •, , Do not use it for driving screws., , •, , Use mallet for chiseling., , •, , Grind on a water stone and sharpen on an oilstone., , •, , Do not use it in places where nails are driven., , 13 Tenon-saw (Fig 13) BIS 5123, BIS 5130, BIS 5031, , Generally the length of a tenon-saw will be 250 or 300 mm., and has 8 to 12 teeth per 25.4 mm and the blade width is, 10 cm. It is used for cutting thin, wooden accessories like, wooden batten, casing capping, boards and round blocks., Electrical : Electrician (NSQF LEVEL - 5) - Related Theory for Exercise 1.1.11 - 1.1.14, , Copyright Free under CC BY Licence, , 33
Page 48 :
Care and maintenance, •, , Keep free from rust., , •, , Apply grease when not in use., , 14 Wood rasp file (Fig 14) BIS 1931, , 17 Bradawl square pointed (or poker) (Fig 17), BIS 10375 - 1982, It is used for filing wooden articles where finish is not, important. Wood rasp files are of half round shape. They, have sharp coarse single cut teeth., 15 Files (Fig 15) BIS 1931, , It is specified by its length and diameter eg. 150 mm x 6, mm., These are specified by their nominal length., , It is a long sharp tool used for making pilot holes on wooden, articles to fix screws., , Eg.150 mm, 200 mm, 250 mm 300 mm etc., , Care and maintenance, , These files have different numbers of teeth designed to cut, only in the forward stroke. They are available in different, lengths and sections (Eg.flat, half round, round, square,, triangular), grades like rough, bastard second cut and, smooth and cuts like single and double cut., , •, , Do not use it on metals for making holes., , •, , Keep it in good sharpened condition., , 18 Gimlet (Fig 18), , These files are used to remove fine chips of material from, metals. The body of the file is made of cast steel and, hardened except the tang., Care and maintenance, •, , Never use the file as a hammer., , •, , Do not use the file without the handle., , •, , Do not throw a file since the teeth get damaged., , 16 Plumb bob (Fig 16), It has a pointed tip with a centre hole at the top for attaching, a string as shown in Fig 16. It is used for marking vertical, lines on the wall., , It is used for boring small holes on wooden articles. It has, a wooden handle and a boring screwed edge. The size of, it depends upon its diameter. Eg. 3 mm, 4 mm, 5 mm, 6, mm., Care and maintenance, , Care and maintenance, , •, , Do not use it without the handle., , Do not drop to the ground., , •, , Do not use it on nails., , •, , Keep it straight while making holes, otherwise the, screwed portion can get damaged., , 34, , Electrical : Electrician (NSQF LEVEL - 5) - Related Theory for Exercise 1.1.11 - 1.1.14, , Copyright Free under CC BY Licence
Page 49 :
19 Centre punch (Fig 19) BIS 7177, , The size of a ratchet brace is given by the size of drill bit it, can accommodate ie. 0 - 6 mm, 0 - 12 mm. It is used to drill, holes on wooden blocks., 22 Flat cold chisel (Fig 22) BIS 402, , The size is given by its length and diameter of the body., Eg. 100 mm x 8 mm. The angle of the tip of the centre punch, is 90°., It is used for marking and punching pilot holes on metals., It is made of tool steel and the ends are hardened and, tempered., Care and maintenance, •, , Keep the tip sharp and at a proper angle., , •, , Avoid mushroom heads., , 20 Mallet (Fig 20), , Its size is given by the nominal width and length., ie., , 14 mm x 100 mm, 15 mm x 150 mm, 20 mm x 150 mm, , The body shape of a cold chisel may be round or hexagon., The cold chisel is made out of high carbon steel. Its cutting, edge angle varies from 35° to 45°. The cutting edge of the, chisel is hardened and tempered. This chisel is used for, making holes on wall etc., Care and maintenance, The mallet is specified by the diameter of the head or by the, weight., eg., , •, , The edge of a chisel must be maintained as per the, required angle., , •, , While grinding a chisel apply a coolant frequently so, that its temper may not be lost., , 50 mm x 150 mm, 75 mm x 150 mm or 500gms, 1 Kg., , 23 Rawl plug tool and bit (Fig 23), , It is made out of hard wood or nylon. It is used for driving the, firmer chisel, and for straightening and bending of thin, metallic sheets. Also it is used in motor assembly work., Care and maintenance, •, , Do not use it for fixing nails., , •, , Never use it on hard metal like steel and iron., , 21 Ratchet brace (Fig 21) BIS 7042, , Its size depends upon the number. As the number increases, the thickness of the bit as well as the plug also, increases. Eg. Nos.8, 10, 12, 14 etc., A rawl plug tool has two parts, namely the tool bit and tool, holder. The tool bit is made of tool steel and the holder is, made of mild steel. It is used for making holes in bricks,, concrete wall and ceiling. Rawl plugs are inserted in them, to fix accessories., Care and maintenance, •, , Slightly rotate the holder after each hammering stroke., , •, , Hold the tool straight., , •, , Do not throw it on the ground., , •, , Keep its head free from mushrooms., , Electrical : Electrician (NSQF LEVEL - 5) - Related Theory for Exercise 1.1.11 - 1.1.14, , Copyright Free under CC BY Licence, , 35
Page 50 :
24 Spanner: double ended (Fig 24) BIS 2028, , The size of a spanner is indicated so as to fit on the nuts., They are available in many sizes and shapes., , Care and maintenance, •, , Use correct size spanner suitable to the size of nut and, bolt., , •, , Do not use a spanner as a hammer., , •, , While using a spanner do not strike it with a hammer., , •, , Prevent the grease and oil traces on its jaws., , The sizes, indicated in double-ended spanners are, 10-11 mm, 12-13 mm, 14-15 mm, 16-17 mm, , 28 Measuring steel tape (Fig 28), , 18-19 mm, 20-22 mm., For loosening and tightening of nuts and bolts, spanner, sets are used. It is made out of cast steel. They are, available in many sizes and may have single or double, ends., 25 Ring spanner set (Fig 25) BIS 2029, , The size will be the maximum length it can measure., Eg.Blade 12 mm wide 2 metres long., The ring spanner is used in places where the space is, restricted and where high leverage is required., 26 Socket (box) spanner (Fig 26) BIS 7993, 7991, 6129, , The measuring tape is made of thin steel blade, bearing, dimensions on it., It is used for measuring the dimension of the wiring, installation and general measurements., Care and maintenance, Handle with great care as carelessness may spoil the, graduation., 29 Hacksaw (Fig 29) BIS 5169-1986 for frames, BIS 2594 - 1977 for blades, , These spanners are useful at places where the nut or bolt, is located in narrow space or at depth., 27 Single ended open jaw adjustable spanner, (Fig 27) BIS 6149, It saves time and working. The movable jaw is made, adjustable by operating a screw. It is known as a monkey, wrench also. Available in 150,200,250mm etc., 36, , Electrical : Electrician (NSQF LEVEL - 5) - Related Theory for Exercise 1.1.11 - 1.1.14, , Copyright Free under CC BY Licence
Page 51 :
It is made out of sturdy nickel plated steel frame. The frame, can be adjusted for 250 mm to 300 mm blades. It should, be fixed on the frame with its teeth pointing away from the, handle in order to do the cutting in forward stroke. It is, mainly used for cutting metals., Care and maintenance, •, , The blade should be properly tightened., , •, , Use a coolant while cutting., , •, , It should be straight during cutting., , •, , Lift the saw slightly on the return stroke., , •, , Do not attempt to saw too fast., , The size is given by the twist drill bits which can be fitted, in. Eg. 6 mm, 0-12 mm capacity., A hand drill machine is used for making holes in thin metal, sheets or wooden articles., 32 Portable Electric drilling machine (Fig 32), , 30 Pincers (Fig 30) BIS 4195, , The size is given by its length. Eg. 100 mm, 150 mm,, 200 mm., It is used for extracting nails from the wood., , When power is available, a power drilling machine is a more, convenient and accurate tool for drilling holes on wooden, and metal articles., , Care and maintenance, , Care and maintenance, , •, , •, , Lubricate all the moving parts of the machine., , •, , Fix the drill bit firmly in the jaws., , •, , Before drilling, mark the job with a centre punch., , •, , For taking out the drill bit move the chuck in the reverse, direction., , •, , Do not apply excess pressure on small bits., , •, , In the case of an electric drilling machine it must be, properly earthed and the insulation should be sound., , Do not use it as a hammer., , 31 Hand drill (Fig 31), , Electrical : Electrician (NSQF LEVEL - 5) - Related Theory for Exercise 1.1.11 - 1.1.14, , Copyright Free under CC BY Licence, , 37
Page 52 :
Standard and standardisation, Objectives: At the end of this lesson you shall be able to, • state what is meant by standardisation and standard, • state the names of various standard organisation, • read and interpret the basic concept of electrical code 2011, • state the types of injury caused by the improper lifting method, • describe the procedure to be followed for moving heavy equipments, Standardisation can be defined as the process of, formulating and applying rules for an orderly approach to, specific activity for the benefit of the user and the, manufacturer, and in particular for the promotion of optimum, overall economy taking due account of functional conditions, and safety requirement., It is based on the consolidated results of science, technique, and experience. It determines not only the basis for the, present but also for future development, and to keep pace, with progress., The materials/tools/equipment produced in any country, should be of certain standard. To meet this requirement,, the international organisation for standarization(ISO) is, started and specifies the units of measurement, technology, and symbols, products and processes, safety of persons, and goods through a number of booklets coded with ISO, number., Standard can be defined as a formulation established, verbally, in writing or by any other graphical method or by, means of a model, sample or other physical means of, representation to serve during a certain period of time for, defining designating or specifying certain features of a unit, or basis of measurement, physical object, an action,, process, method, practice, capacity, function, duty, right, of responsibility, a behaviour, an attitude a concept or a, conception., To sell Indian goods in the local and international market, certain standardization methods are essential. The standard, is specified by the Bureau of Indian Standard BIS(ISI) for, various goods through their booklets. The BIS only certifies, a good often the product meets the specification and, passes necessary tests. The manufacturer allows to use, the BIS(ISI) mark on the product only after BIS certification., These are a number of organisation for standardisation, throughout the world in different countries., The standard organisation and the respective countries are, given below:, BIS, , - Bureau of Indian Standard (ISI) - India, , ISO, , - International standard Organisation, , JIS, , - Japanese Industrial Standard - Japan, , BSI, , - British Standards Institution BS(S) - Britain, , DIN, , - Deutche Industrie Normen - Germany, , Advantages of BIS(ISI) certification marks scheme:, A number of advantages accrue to different sectors of, economy from the BIS(ISI) certification marks scheme., To manufacturers, •, , Streamlining of production processes and introduction, of quality control system., , •, , Independent audit of quality control system by BIS, , •, , Reaping of production economics accruing from, standardization, , •, , Better image of products in the market, both internal, and overseas, , •, , Winning for whole-salers, retailers and stockists, consumer confidence and goodwill, , •, , Preference for ISI-marked products by organised, purchasers, agencies of Central and State Governments,, local bodies, public and private sector undertakings, etc. Some organised purchasers offer even higher price, for ISI-marked goods., , •, , Financial incentives offered by the Industrial Development, Bank of India (IDBI) and nationalised banks., , To consumers, •, , Conformity with Indian Standards by an independent, technical, National Organisation, , •, , Help in choosing a standard product, , •, , Free replacement of ISI-marked products in case of, their being found to be of substandard quality, , •, , Protection from exploitation and deception, , •, , Assurance of safety against hazards to life and property, , To organised purchasers, •, , Convenient basis for concluding contracts, , •, , Elimination of the need for inspection and testing of, goods purchased, saving time, labour and money, , •, , Free replacement of products with ISI-mark, found to be, sub-standard, , To exporters, •, , Exemption from pre-shipment inspection, wherever, admissible, , •, , Convenient basis for concluding export contracts, , GOST - Russian, , To export inspection authorities, , ASA, , •, , 38, , - American standards association - America, , Elimination of the need for exhaustive inspection of, consignments exported from the country, saving, expenditure, time and labour., , Electrical : Electrician (NSQF LEVEL - 5) - Related Theory for Exercise 1.1.11 - 1.1.14, , Copyright Free under CC BY Licence
Page 53 :
Introduction to National Electrical Code - 2011, National Electrical Code - 2011, National electrical code describes several indian standards, deciding with the various aspects relating to electrical, installation practice. It is there fore recommended that, individual parts/ sections of the code should be read in, conjunction with the relevant indian standards., There are 8 parts and each part contains number of, sections. Each section refers the description of the electrical, item/ devices, equipment etc., Here, 20 sections of the part - 1 are described which aspect, it covers, In part 1, 20 sections are there. Each sections reference is, given below., Section 1 part 1/ section 1 of the code describes the scope, of the NEC., Section 2 covers definition of items with references., Section 3 covers graphical symbols for diagrams, letter, symbols and signs which may be referred for further, details., Section 4 covers of guidelines for preparation of diagrams,, chart and tables in electro technology and for marking of, conductors., Section 5 covers units and systems of measurement in, electro technology., Section 6 covers standard values of AC and DC distribution, voltage preferres values of current ratings and standard, systems frequency., Section 7 enumerates the fundamental principles of design, and execution of electrical installation., Section 8 covers guidelines for assesing the characteristics, of buildings and the electrical installation there in., Section 9 Covers the essential design and constructional, requirement for electrical wiring installation., Section 10 covers guidelines and general requirements, associated with circuit calculators., , Section 16 covers the protection requirements in low, voltage electrical installation of buildings., Section 17 covers causes for low power factor and, guidelines for use of capacitors to improve the same in, consumer installations., Section 18 covers the aspects to be considered for, selection of equipment from energy conservation point of, view and guidence on energy audit., Section 19 covers guidelines on safety procedures and, practices in electrical work., Section 20 gives frequently referred tables in electrical, engineering work., The above description is part 1 only you can refer remaining, parts and section for other electrical installation, items, devices and equipments., Lifting and handling of loads, Many of the accidents reported involve injuries caused by, lifting and carrying loads. A electrician may need to install, motors, lay heavy cables, do wiring, which may involve a lot, of lifting and carrying of loads. Wrong lifting techniques can, result in injury., A load need not necessarily be very heavy to cause injury., The wrong way of lifting may cause injury to the muscles, and joints even though the load is not heavy., Further injuries during lifting and carrying may be caused, by tripping over an object and falling or striking an object, with a load., Types of injury and how to prevent them?, Cuts and abrasions, Cuts and abrasions are caused by rough surfaces and, jagged edges:, -, , By splinters and sharp or pointed projections. (Fig 1), , Leather hand gloves will usually be sufficient for protection,, but the load should be checked to make sure of this, since, large or heavy loads may involve body contact as well., , Section 11 covers requirements of installation work relating, to building services that use electrical power., Section 12 covers general criteria for selection of, equipment., Section 13 covers general principles of installation and, guide lines on initial testing before commissioning., Section 14 covers general requirements associated with, earthing in electrical installations. Specific requirements, for earthing in individual installations are covered in respective, parts of the code., Section 15 covers guidelines on the basic electrical, aspects of lightning protective systems for buildings and, the electrical installation forming part of the system., , Crushing of feet or hands, Feet or hands should be so positioned that they will not be, trapped by the load. Timber wedges can be used when, raising and lowering heavy loads to ensure fingers and, hands are not caught and crushed., , Electrical : Electrician (NSQF LEVEL - 5) - Related Theory for Exercise 1.1.11 - 1.1.14, , Copyright Free under CC BY Licence, , 39
Page 54 :
Safety shoes with steel toe caps will protect the feet., (Fig 2), , 3 Loads high require the arms to be extended in front of, the body, place more strain on the back and stomach., 4 The absence of hand holds or natural handling points, can make it difficult to raise and carry the object., Correct manual lifting techniques, 1 Approach the load squarely, facing the direction of, travel, 2 The lift should start with the lifter in a balanced squatting, position, with the legs slightly apart and the load to be, lifted held close to the body., , Strain to muscles and joints, Strains to muscles and joints may be the result of:, -, , Lifting a load which is too heavy, or of lifting incorrectly., , 3 Ensure that a safe firm hand grip is obtained. Before the, weight is taken, the back should be straightened and, held as near the vertical position as possible. (Fig 4), , Sudden and awkward movements such as twisting or, jerking during a lift can put severe strain on muscles., 'Stoop lifting' - lifting from a standing position with the back, rounded increases the chance of back injury., The human spine is not an efficient weight lifting machine, and can be easily damaged if incorrect techniques are, used., The stress on a rounded back can be about six, times greater than if the spine is kept straight., Fig 3 shows an example of stoop lifting., , 4 To raise the load, first straighten the legs. This ensures, that the lifting strain is being correctly transmitted and, is being taken by the powerful thigh muscles and, bones., 5 Look directly ahead, not down at the load while, straightening up, and keep the back straight; this will, ensure a smooth, natural movement without jerking or, straining (Fig 5), , Preparaing to lift, Load which seems light enough to carry at first will become, progressively heavier, the farther you have to carry it., The person who carries the load should always be able to, see over or around it., The weight that a person can lift will vary according to:, -, , Age, , -, , Physique, and, , -, , Condition, , 6 To complete the lift, raise the upper part of the body to, the vertical position. When a load is near to an individual's, maximum lifting capacity it will be necessary to lean, , It will also depend on whether one is used to lifting and, handling heavy loads., What makes an object difficult to lift and carry?, 1 Weight is not the only factor which makes it difficult to, lift and carry., 2 The size and shape can make an object awkward to, handle., 40, , Electrical : Electrician (NSQF LEVEL - 5) - Related Theory for Exercise 1.1.11 - 1.1.14, , Copyright Free under CC BY Licence
Page 55 :
back on the hips slightly (to counter balance the load), before straightening up. (Fig 6), Keeping the load well near to the body, carry it to the place, where it is to be set down. When turning, avoid twisting from, the waist - turn the whole body in one movement., , Winches, Winches are used to pull heavy loads along the ground., They may be power-driven (Fig 2) or hand operated. (Fig 3)., , Lowering the load, Make sure the area is clear of any obstructions. (Fig 7), Bend the knees to a semi-squatting position; keep the, back and head erect by looking straight a head, not down, at the load. It may be helpful to rest the elbows on the thighs, during the final stage of lowering., , Moving heavy equipment, Heavy equipments are moved in industry using any of the, following methods., Ensure that the safe working load (SWL) of the winch is, adequate for the task., , •, , Crane and slings, , •, , Winches, , •, , Machine moving platforms, , •, , Layers and rollers, , Using crane and slings, This method is used whenever loads are to be lifted and, moved. (Fig 1), , Secure the winch to a structure which is strong enough to, withstand the pull., On open ground, drive long stakes into the ground and, secure the winch to them., Choose a suitable sling and pass it around the base of the, load. Secure it to the hook of the winch., Some heavy items have special lugs welded to, them for jacking and towing purposes., Safety consideration, Before using any winch, check that the brake, and ratchet mechanism are in working order., Practise how to use the brakes., Keep hands and fingers well away from the gear wheels., Keep the bearings and gears oiled or greased., , Examine the steel rope sling for any cut,, abrasion, wear, fraying or corrosion., Damaged slings must not be used., Distribute the weight as evenly as possible between the, slings when using more than one sling. (Fig 1), Keep the slings as near to vertical as possible., , Machine moving platforms, This is a special device made to move heavy equipment in, industry. Fig 4 shows the method of loading a heavy, transformer., Pass a suitable sling round the load at a convenient height., Attach the sling to the hook of the winch and draw the load, on the platform until its centre of gravity lies between the, front and rear wheels., , Electrical : Electrician (NSQF LEVEL - 5) - Related Theory for Exercise 1.1.11 - 1.1.14, , Copyright Free under CC BY Licence, , 41
Page 56 :
Use a winch with an effective brake for this, operation., , To negotiate a corner on rollers, Lower the jacks so that the platform rests on ist wheels., For unloading follow the procedure in the reverse order., Using layers and rollers, , For a moderate load, insert one roller a little larger in, diameter than the others as the corner is approached., When this roller is under the centre of gravity of the load,, the load can be rocked to and fro on the roller and swivelled, around sideways. (Fig 7), , Sometimes a load cannot be moved along the ground, because of the irregular shape of its base or because it is, not rigid enough., Place such a load on a flat-bottomed pallet or 'layer' resting, on the round bars. (Fig 5), , For heavier loads, Stop the load on the roller at the beginning of the corner., Twist the load round on the rollers by pushing the sides with, crowbars until the load is just over the ends of the rollers., (Fig 8), Ensure the bars (rollers) are long enough to project at each, side of the load, for ease of handling., They should be large enough to roll easily over any uneven, surface along the route but should be small enough to be, handled easily., Two or three bars of equal diameter are, sufficient for most loads but if four or more are, used, the load may be moved faster as there is, no delay when moving the rear bar to the front., (Fig 5), Move the load by using a crowbar as shown in Fig 6. Keep, the crowbar at the end of the pallet with an angle and a firm, grip on the ground. Apply the force at the top of the bar as, shown., When a load is on rollers, only shallow slopes, can be negotiated., Hold the load in check all the time if it is on the, slope., , 42, , Place some rollers at an angle to the front of the load., (Fig 9), Push the load forward on to these rollers., Twist the load further round and place the freed rollers in, front of and at an angle to the load., Continue until the load is pointing in the desired direction., , Electrical : Electrician (NSQF LEVEL - 5) - Related Theory for Exercise 1.1.11 - 1.1.14, , Copyright Free under CC BY Licence
Page 57 :
Safety consideration, , Moving a load, , Moving heavy loads with crowbars or jacks, , Check that there are no obstacles in the way of the crane, and load. (Fig 12), , Make sure your hands are clear of the load before lowering, it on to the packing or rollers., Do not use your hands underneath the packing when, positioning it. Use a push block., Place the packing on the floor and push it under the load., (Fig 10), Hold it by its side faces keeping the fingers well away from, the lower edge of the load and from the floor. (Fig 10), , Stand clear off the load and move it steadily., Be prepared to stop the load quickly if somebody moves, into its path., Allow for the natural swing of the load when changing speed, or direction., Ensure that the load will not pass over the head of other, people. (Fig 13), Raising a load, , The tackle or sling may fall or slip., , Check that the slings are correctly secured to the load and, to the hook. Ensure they are not twisted or caught on a, projecting part of the load., Before starting to lift a load, if you cannot see an assistant, on the far side of the load, verify that he is ready to lift the, load and ensure that his hands are clear of the slings., , Warn other workers to stand clearly away from, the route of the load., Remember that accidents do not happen, they are caused., , Warn nearby workers that the lifting is about to begin., Lift slowly., Take care to avoid being crushed against other objects as, the load rises. (Fig 11) it may swing or rotate as it leaves, the ground., Minimise such movement by locating the hooks as, accurately as possible above the centre of gravity of the, load., Keep the floor clear of unnecessary objects., , Electrical : Electrician (NSQF LEVEL - 5) - Related Theory for Exercise 1.1.11 - 1.1.14, , Copyright Free under CC BY Licence, , 43
Page 58 :
Electrical, Related Theory for Exercise 1.2.15 & 1.2.16, Electrician - Workshop practice (Allied trade), Fitting tools - marking tools - specification - grades - uses, Objectives : At the end of this lesson you shall be able to, • state the different types of files and their grades, shapes, specification and application., • state the different cuts of files and their uses, • state the parts of file, File : File is a filing tool, which is used to file the rough, surface & smooth surface on metals, File specification: Files are specified according to their, •, , length, , •, , grade, , •, , cut, , •, , shape, , Single cut: A single cut file has a single row of teeth in one, direction on the face of the file at an angle of 60° and this, file is used for filing soft material such as lead, tin,, aluminium etc. (Figs 3 & 4), , Length is the distance from the tip to the heel (Fig 1). It, may be 300mm, 250mm, 200mm,150mm or 100mm., Rough, bastard, second cut, smooth and dead smooth are, the different grades of files commonly available., A rough file is used for removing more quantity of metal, quickly. (Fig 2a), A bastard file is used for ordinary filing purposes. (Fig 2b), A second cut file is used for good finishing purposes., (Fig 2c), , Double cut: A double cut file has rows of teeth in two, directions across each other, one at an angle of 50° to 60°,, another row at 70° which is used to file hard materials such, as steel, brass, bronze, etc. (Fig 5), , A smooth file is used for removing less metal and for giving, good surface finish. (Fig 2d), , Rasp cut: This has individual, sharp, pointed teeth in a line,, and is useful for filing wood, leather and other soft materials. These files are available only in half-round shape., (Fig 6), , A dead smooth file is used for high degree finishing., (Fig 2e), Cut of file: The rows of teeth determine the cut of a file., Types of cut, Single cut, double cut, rasp cut and curved cut are the, different types of cuts of files., 44, , Copyright Free under CC BY Licence
Page 59 :
Curved cut: These files have deeper cutting action, and, are useful for filing soft materials like - aluminium, tin,, copper and plastic. These are available only in flat shape., (Fig 7), , The selection of the type of cut is based on the material to, be filed. Single cut files are used for filing soft materials. But, certain special files, for example - those used for sharpening, saws, are also of single cut., Shape: The various shapes of files with their application, are shown below. The cross-section drawn in the file refers, to the shape of the file. (Fig 8), Parts of file, File : A file is a cutting tool with multiple cutting edges used, for filing different materials., Parts of a file (Refer Fig 1 below), , Tip or point: This is the end of the file opposite to tang., Face or side: The broad part of the file with teeth cut on it., Edge: The thin part of the file with a simple row of parallel, teeth., Heel: It is the broad part of the file without teeth., Shoulder : It is the curved part of a file separating the tang, from the body., Tang: Narrow and thin part of a file which fits into the, handle., Handle: The part fitted to the tang to hold and use the file., , Bench vice, Objectives: At the end of this lesson you shall be able to, • name the parts and state the uses of a bench vice, • specify the size of a bench vice, • state the uses of vice clamps., Bench vice: Vices are used for holding workpieces. They, are available in different types., The vice used for bench work is the bench vice (Engineer's, vice)., A bench vice is made of cast iron or cast steel, and it is, used to hold work for filing, sawing, threading and other, hand operations. (Fig 1), The size of the vice is stated by the width of the jaws., Parts of a bench vice (Fig 2), •, , Fixed jaw (1), , •, , Movable jaw (2), , •, , Hard jaw (3), Electrical : Electrician (NSQF LEVEL - 5) - Related Theory for Exercise 1.2.15 & 1.2.16, , Copyright Free under CC BY Licence, , 45
Page 60 :
•, , Spindle (4), , The box nut and the spring are the internal parts., , •, , Handle (5), , •, , Box nut (6), , •, , Spring (7), , Vice clamps or soft jaws: To hold a finished work use soft, jaws (vice clamps), (Fig 3) made of aluminium over the, regular hard jaws. This will protect the work surface from, damage. Do not over-tighten the vice so as to prevent, damage to the spindle., , Hammer, Objectives: At the end of this lesson you shall be able to, • state the uses of an engineer's hammer, • name the parts of an engineer's hammer and state their functions, • name the types of engineer's hammers with specifications, Hammer: Engineer's hammer is a hand tool used for, various striking purposes like punching, bending, straightening, chipping, forging and riveting. (Fig 1), , •, , cheek, , •, , eyehole, , Face: Face is the striking portion. A slight convexity is, given to it, to avoid digging of the edge., Peen: Peen is the other end of the head. It is used for, shaping and forming work like riveting and bending. The, peen is of different shapes. (Fig 3) They are:, Major parts of a hammer (Fig 2), •, , Head, , •, , Handle, , The head is made of drop-forged carbon steel, and the, wooden handle must be capable of absorbing shock., The parts of the hammer head are:, •, , face, , •, , peen, , 46, , Electrical : Electrician (NSQF LEVEL - 5) - Related Theory for Exercise 1.2.15 & 1.2.16, , Copyright Free under CC BY Licence
Page 61 :
•, , ball peen, , Specifications: The face and peen are hardened., , •, , cross-peen, , The cheek is left soft., , •, , straight peen, , Engineer's hammers are specified by the weight of the, head and shape of the peen. The weight varies from 125, gms to 1.5 kg., , Cheek: Cheek is the middle portion of the hammer head., The weight of the hammer is stamped here., Eyehole: Eyehole is meant for fixing the handle. It is, shaped to fix the handle rigidly. The wedge fixes the handle, in the eyehole. (Fig 4), , The weight of the engineer's hammer used for marking, purposes is 250 gms., The ball peen hammer is used for general work in machine, fitting shops., Before using a hammer:, •, , make sure the handle is properly fitted, , •, , select the correct weight of hammer suitable for the, type of work, , •, , check the head and handle for any crack, , •, , ensure the face of the hammer is free from oil or grease., , Chisel, Objectives: At the end of this lesson you shall be able to, • list the uses of a cold chisel, • name the parts of a cold chisel and it’s types, • state the different types of hacksaw frames, blades and their uses., The cold chisel is a hand cutting tool used by fitters for, chipping and cutting operations., Chipping is an operation of removing excess metal with the, help of a chisel and hammer. (Fig 1) The chipped surfaces, being rough, they should be finished by filing., , Common types of chisels, •, , Flat chisel, , •, , Cross-cut chisel, , •, , Half-round nose chisel, , •, , Diamond point chisel, , Flat chisels are used to:, •, , remove metal from large flat surfaces, , Parts of a chisel (Refer Fig 2), , •, , chip excess metal off from welded joints and castings, , – Head (not hardened) (1), , •, , part off metal after chain drilling. (Fig 1), , – Body (2), , Cross-cut or cape chisels are used for cutting keyways,, grooves and slots. (Fig 3), , – Point or cutting edge (3), Chisels are made from high carbon steel or chromevanadium steel. The cross-section of chisels is usually, hexagonal or octagonal., , Half round, nose chisels are used for cutting curved grooves, (oil grooves). (Fig 4), Diamond point chisels are used for squaring materials at, the corners. (Fig 5), , Electrical : Electrician (NSQF LEVEL - 5) - Related Theory for Exercise 1.2.15 & 1.2.16, , Copyright Free under CC BY Licence, , 47
Page 62 :
Adjustable frame tubular type (Fig 1): This is the most, commonly used type. It gives a better grip and control while, sawing., Hacksaw blades : The hacksaw blade is a thin, narrow,, steel band with teeth and two pin holes at the ends. It is, , used along with a hacksaw frame. These blades are made, of either low alloy steel (la) or high speed steel (hs) and are, available in standard lengths of 250mm and 300mm., For proper working, it is necessary to have frames of rigid, construction., Types of hacksaw blades, All-hard blades: The width between the pin holes is, hardened all allong the length of the blade., Web chisels/punching chisels are used for separating, metals after chain drilling. (Fig 6), , Flexible blades: For these types of blades only the teeth, are hardened. Because of their flexibility, these blades are, useful for cutting along curved lines (Fig 2)., , Chisels are specified according to the:, •, , length, , •, , width of the cutting edge, , •, , type, , •, , cross-section of the body., , Pitch of the blade: This is the distance between two, adjacent teeth. (Refer Fig 3) Hacksaw blades are designated, according to length, pitch and the type of blade, , The length of chisels ranges from 150 mm to 400 mm., The width of the cutting edge varies according to the type, of chisels., Hacksaw frame and blade, The hand hacksaw is used along with a blade to cut metals, of different sections. It is also used to cut slots and, contours., Types of hacksaw frames, Bold frame: Only a particular standard length of blade can, be fitted., Adjustable frame (flat): Different standard lengths of, blades can be fitted., 48, Electrical : Electrician (NSQF LEVEL - 5) - Related Theory for Exercise 1.2.15 & 1.2.16, , Copyright Free under CC BY Licence
Page 63 :
Pitches of blades, Classification, Coarse, , Pitch, 1.8mm, , Medium, , Wave set: In this, the, teeth of the blade are arranged in a, wave-form. (Fig 6)., For satisfactory results a blade of the correct, pitch should be selected and fitted correctly., , 1.4 mm & 1.0 mm, , Fine, , 0.8mm, , Setting of the saw: To prevent the saw from binding when, penetrating into the material and to allow free movement of, the blade, the cut is to be broader than the thickness of the, saw blade. This is achieved by a proper setting of the saw, teeth (Fig 4). There are two types of saw settings., , Staggered set: Alternate teeth or groups of teeth are, staggered. This arrangement helps for free cutting, and, provides for good chip clearance. (Fig 5), , Saw blades for hacksaws are available with small and large, cutting of teeth, depending on the type and size of material, they are to cut. The size of the teeth is directly related to, their pitch, which is specified by the number of teeth per, 25mm of the cutting edge. Hacksaw blades are avaialable, in pitches of: (Fig 7), • 14 teeth per 25 mm • 18 teeth per 25 mm, • 24 teeth per 25 mm • 32 teeth per 25 mm., , Classification of sets, Pitch, , 0.8mm, , wave set., , Pitch, , 1.0mm, , wave or staggered., , Pitch over, , 1.0mm, , staggered., , Electrical : Electrician (NSQF LEVEL - 5) - Related Theory for Exercise 1.2.15 & 1.2.16, , Copyright Free under CC BY Licence, , 49
Page 64 :
Electrical, Related Theory for Exercise 1.2.17, Electrician - Workshop practice (Allied trade), Marking tools - steel rule - punches - calipers - try square - gauges, Objectives: At the end of this lesson you shall be able to, • state the constructional features of an engineer's steel rule, • explain the uses of the steel rule, • state the maintenance aspects to be considered in respect of the steel rule., Engineer's steel rule: When dimensions are given in a, drawing without any indication about the tolerance, it has, to be assumed that measurements are to be made with a, steel rule., Material and sizes of steel rules: Steel rules are made, of spring steel or stainless steel. The edges are accurately, ground to form a straight line., Steel rules are available in different lengths; the common, sizes are 150mm, 300mm and 600mm. (Refer Fig 1), , Transfer of measurement from the steel rule to the divider, is shown in Fig 4., , The surfaces of the steel rules are satin-chrome finished to, reduce glare and also to prevent rusting. The engineer's, rule is graduated in 10mm, 5mm, 1mm and 0.5mm. Thus, the reading accuracy of a steel rule is 0.5mm., Graduation: The minimum graduation is 0.5mm., Uses: Use a try square on one datum edge and measure, the distance from the other datum edge using a steel rule., (Figs 2a & b), , Steel rule is used to transfer measurements from the rule, to the odd leg calipers. (Fig 5), , A steel rule is used to take the desired height for the, marking surface gauge. (Fig 3), , 50, , Copyright Free under CC BY Licence
Page 65 :
Steel rule is used to transfer measurements from the steel, rule to outside calipers. (Fig 6), , A steel rule is also used to transfer measurements to inside, calipers. (Fig 7), , Marking media, Objectives: At the end of this lesson you shall be able to, • name the common types of marking media, • select the correct marking media for different applications., Different types of marking media, Whitewash: This is applied to rough forgings and castings, with oxidised surfaces. (Fig 1) Whitewash is prepared in, many ways., •, , Chalk powder mixed with water, , •, , Chalk mixed with methylated spirit, , •, , White lead powder mixed with turpentine, Copper sulphate: Used on filed or machine-finished, surfaces. Copper sulphate sticks to the finished surfaces, well. The solution is prepared by mixing copper sulphate in, water with a few drops of nitric acid added., Copper sulplate needs to be handled carefully as it is, poisonous. Copper sulphate coating should be dried well, before commencing marking as otherwise the solution, may stick on the instruments used for marking., Cellulose lacquer: This is a commercially available, marking medium. It is made in different colours and dries, very quickly., , Prussian blue: Used on filed or machine-finished surfaces., This will give very clear lines but takes more time for drying, than the other marking media. (Fig 2), , The selection of marking media depends on the:, •, , the surface finish, , •, , the accuracy of the workpiece., , Types of marking punches, Objectives: At the end of this lesson you shall be able to, • name the different punches used in marking, • state the features of each punch and its uses., Types of marking punches: In order to make certain, dimensional features of the layout permanent, punches are, used. There are two types of punches., Centre punch: The angle of the point is 90°. The punch, mark made by this is wide and not very deep. This punch, is used for locating holes. The wide punch mark gives a, , good seating for starting the drill. (Figs 1a), Prick punch: The angle of the prick punch is 30° or 60°, (Fig 1b). The 30°point punch is used for making light punch, marks needed to position dividers. The divider leg will get, proper seating in this punch mark. The 60o punch is used, for Witness Marks. Witness marks should not be too, close. (Fig 2), , Electrical : Electrician (NSQF LEVEL - 5) - Related Theory for Exercise 1.2.17, , Copyright Free under CC BY Licence, , 51
Page 66 :
Types of calipers, Objectives: At the end of this lesson you shall be able to, • name the commonly used calipers, • compare the features of firm joint and spring joint calipers, • state the advantages of spring joint calipers., Calipers (firm and spring joints) : Calipers are simple, measuring instruments used to transfer measurements, from the steel rule to objects and vice versa., The commonly used calipers are:, •, , firm joint calipers (Fig 1a), , •, , spring joint calipers. (Fig 1b), , Spring calipers have the advantage of quick setting. The, setting made will not change unless the nut is turned., Caliper sizes are specified by the length which is the, distance between the pivot centre and the tip of the leg., Accuracy of the measurement taken depends very much, on the sense of `FEEL' or `TOUCH' while measuring the job., You should get the feel when the legs are just touching the, surface., Firm joint calipers : In the case of firm joint calipers both, legs are pivoted on one end. To take measurement of the, workpiece, it is opened roughly to the size. Fine setting is, done by lightly tapping it on a wooden surface. (Figs 2 & 3), , Outside and inside measurements: Calipers used for, outside measurements are known as outside calipers, while calipers used for internal measurements are the, inside calipers. (Figs 4a & 4b), Calipers are used with steel rules whose accuracy is, limited to 0.5 mm; parallelism can be checked with a higher, degree of accuracy., , Spring joint calipers: For these type of calipers, the legs, are assembled by means of a pivot loaded with a spring., For opening and closing of the caliper legs a screw and nut, are provided., 52, , Electrical : Electrician (NSQF LEVEL - 5) - Related Theory for Exercise 1.2.17, , Copyright Free under CC BY Licence
Page 67 :
Jenny calipers, Objectives: At the end of this lesson you shall be able to, • state the constructional features of jenny calipers, • name the types of jenny calipers, • state the uses of jenny calipers., Jenny calipers: Jenny calipers are used for marking and, layout work., These calipers are also known as, •, , hermaphrodite calipers, , •, , odd leg calipers, , •, , leg and joint calipers, , Jenny calipers can also be used for scribing lines along, curved edges. While setting dimensions and scribing, lines, both legs should be of equal length. (Fig 3), , Jenny calipers have one leg with an adjustable divider point, while the other is a bent leg. The legs are joined together, to make a firm joint., Uses, •, , •, , To mark lines parallel to edges inside and outside., (Fig 1), , To locate the centre of round bars. (Fig 2), , The jenny caliper should be slightly inclined while scribing, lines, Fig 4., , While setting dimensions for accurate setting, the jenny, caliper's point should `click' into the graduation, Fig 5., , Calipers are available with the usual bent leg or with a heel., Calipers with ordinary bent legs are used for drawing lines, parallel along an inside edge, while the heel type is used, for drawing parallel lines along the outer edges., , Electrical : Electrician (NSQF LEVEL - 5) - Related Theory for Exercise 1.2.17, , Copyright Free under CC BY Licence, , 53
Page 68 :
Length measurement, Objectives: At the end of this lesson you shall be able to, • name the base unit of length measurement as per SI (System of International), • state the multiples of metre and their values., Length measurement SI units: When we measure an, object we are actually comparing it with a known standard, of measurement., , Base unit: The base unit of length as per the System, Internationale is the metre., Metre (m), , = 1000 mm, , Centimetre (cm), , = 10 mm, , Try square, Objectives: At the end of this lesson you shall be able to, • name the parts of a try square, • state the uses of a try square., Try square: The try square is a precision instrument which, is used to check squareness (angles of 90°). The accuracy, is about 0.002 mm per 10 mm length, which is accurate, enough for most workshop purposes. The try square has, a blade with parallel surfaces. The blade is fixed in the, stock at 90°. (Fig 1), , = 0.001 m, , = 10-3 m, , 1 Micrometre μm, , = 10-6 m, , = 0.000001 m, , 1 Micrometer, , The base unit of length as per SI is the metre., Length: SI unit and multiples, , Millimetre (mm), , -3, , = 10 mm, , = 0.001 mm, , Measurement in engineering practice: Usually, in, engineering practice, the preferred unit of length measurement is the millimetre. Both large and small dimensions, are stated in millimetres., The British system of length measurement: The other, system of length measurement is the British system. In, this system the base unit is the imperial standard yard., Most countries including Great Britain have, however,, switched over to the SI units in recent years., , •, , check the flatness of surfaces (Fig 3), , •, , mark lines at 90° to the edges of workpieces (Fig 4), , •, , set workpieces at right angles on work-holding devices., (Fig 5), , The try square is used to, •, , check the squareness of machined or filed surfaces., (Fig 2), , Try squares are made of hardened steel., Try sqaures are specified according to the length of the, blade i.e. 100 mm, 150 mm, 200 mm., 54, , Electrical : Electrician (NSQF LEVEL - 5) - Related Theory for Exercise 1.2.17, , Copyright Free under CC BY Licence
Page 69 :
Scriber, divider, Objectives: At the end of this lesson you shall be able to, • state the features of scribers and dividers, • state the uses of scribers and dividers., Scriber: A scriber is a sharp, pointed, steel tool made from, carbon tool steel. There are two types of scribers., •, , Double end and plain scribers (Fig 1), , Divider: A divider consists of a pair of steel legs adjusted, by a screw and nut, and held together by a circular spring, at one end. A handle is inserted on the spring., Uses: A divider is used for, •, , measuring distances between points, , •, , transferring measurements directly from a rule, , •, , scribing circles and arcs on metals. (Fig 3), , Uses: Used for scribing lines on the metal being laid out., (Fig 2), , Radius gauges, Objectives: At the end of this lesson you shall be able to, • state the uses of radius gauges, • state the features of radius gauges., Radius gauges: Radius gauges are used to check the, internal and external radius of workpieces., These gauges are made of high quality steel sheets and, are finished to accurate radius., The radius of parts are checked by comparing the radius, of the gauges., Radius gauges are available in sets of several blades held, in a holder. Each blade can be separately pulled out of the, holder when in use., The size of the radius is marked on individual blades of the, gauges. (Fig 1), , Electrical : Electrician (NSQF LEVEL - 5) - Related Theory for Exercise 1.2.17, , Copyright Free under CC BY Licence, , 55
Page 70 :
The radius gauges are available in different combinations., , – Individual gauges for each radius. (Fig 4), , – Sets with internal and external radius.(Figs 2 & 3), , Before using radius gauges:, •, , ensure the gauges are perfectly clean, , •, , remove burrs, if any, from the workpiece, , •, , check and make sure there is no damage to the profile, of the gauge., , •, , Fixed Surface gauge (Fig 3), , •, , Universal Surface gauge(Fig 4), , Universal surface gauge, Objectives: At the end of this lesson you shall be able to, • state the constructional features of surface gauges, • name the different types of surface gauges, • state the uses of surface gauges, • state the advantages of universal surface gauges., Universal surface gauge : A surface gauge is one of the, most common marking tools used for:, •, , scribing lines parallel to a datum surface (Fig 1), , •, , setting jobs on machines parallel to a datum surface, (Fig 2), , •, , checking the height and parallelism of jobs, , •, , setting jobs concentric to the machine spindle., , Types of surface gauges: A surface gauge/scribing block, is of two types., 56, , Electrical : Electrician (NSQF LEVEL - 5) - Related Theory for Exercise 1.2.17, , Copyright Free under CC BY Licence
Page 71 :
Surface gauge (fixed type): This consists of a heavy flat, base and a spindle, fixed upright to which a scriber is, attached with a snug and a clamp nut., Universal surface gauge: This has the following additional features., •, , The spindle can be set to any position., , •, , Fine adjustments can be made quickly., , •, , Can also be used on cylindrical surfaces., , •, , Parallel lines can be scribed from any datum edge with, the help of guide pins.(Fig 4), , Parts and functions of a universal surface gauge, (Fig 5), Base: The base is made of steel or cast iron with a `Vee', groove at the bottom. The `Vee' helps to seat on the circular, work. The guide pins fitted in the base are helpful for, scribing lines from any datum edge., Rocker arm: A rocker arm is attached to the base along, with a spring and a fine adjustment screw. This is used for, fine adjustments., , Spindle: The spindle is attached to the rocker arm., Scriber: The scriber can be clamped in any position on the, spindle with the help of a snug and clamp nut., , Datum, Objectives: At the end of this lesson you shall be able to, • state the need for datum while marking, • name the different datum points, surfaces or lines, • state the basis of determining the datum while marking., Datum: The height of a person is measured from the floor, on which he stands. The floor becomes the common basis, for measurement, i.e. it becomes the DATUM., , Marking table, surface plate, angle, plate, vee blocks and, parallel blocks - all these serve as datum references., (Figs 3 and 4), , A datum is a reference surface, line or point and its purpose, is to provide a common position from which measurements, may be taken. The datum may be an edge or centre line, depending on the shape of the work. For positioning a point,, two datum references are required. (Figs 1 and 2), , The datum should be indicated in the drawing., The same datum must be used for transferring dimensions, to the workpiece., 57, Electrical : Electrician (NSQF LEVEL - 5) - Related Theory for Exercise 1.2.17, , Copyright Free under CC BY Licence
Page 72 :
Electrical, Related Theory for Exercise 1.2.18 & 1.2.19, Electrician - Workshop practice (Allied trade), Carpenter tools - wood saws - planes - wooden joints, Objective : At the end of this lesson you shall be able to, • state about the timber, • state the grain direction of wood and the common defects in timber, Timber is a raw material used for manufacturing wooden, articles. Timber is a product of a tree., , The following defects are caused due to uneven shrinkage,, improper seasoning and defective storage., , Wood is made up of numerous tube like cells packed, closely together. During the growth of the tree, these cells, are positioned in a certain direction. The direction of these, cells is referred to as the `grain'. The direction of the grain, can be identified by the visible lines on the surface of the, timber., , •, , Twisting (Fig 3a), , •, , Cupping (Fig 3b), , •, , Cracking (Fig 3c), , Any operation performed in the grain direction is called an, operation `along the grain'. (Fig 1), , Any operation performed at right angle to the grain direction, is called `across the grain'., , Shakes, , Any irregularity occuring in the timber is a defect in the, timber. These defects in the timber reduce its strength,, durability and utility value., , •, , Radial shake (Fig 4a), , •, , Star shake (Fig 4b), , Common defects in timber : A knot is caused due to the, growth of branches on the tree. It appears on the surface, of planks and on boards when the logs are sawn. (Fig 2), , •, , Cup shake (Fig 4c), Avoid defective pieces while selecting timber, to get better results., , Marking and measuring tools, Objectives : At the end of this lesson you shall be able to, • name the marking and measuring tools and their functions, • state the functions of straight edge, marking gauge and wooden folding rule, Marking and measuring tools are used in woodwork for, marking, measuring and checking the work at various, stages., , Common marking tools, • Wooden folding rule, • Steel rule, , 58, , Copyright Free under CC BY Licence
Page 73 :
Wooden folding rule: A wooden folding rule is graduated, both in centimetres and inches. The most commonly used, is the two feet, 4-fold wood rule which is shown in Fig 1., , It is used for marking lines parallel to the face or edges., (Fig 4), It is used for taking linear measurements, to an accuracy, of 1 mm or 1/16th of an inch., Steel rule : It is graduated in centimetres/inches with their, subdivisions. The reading accuracy is 0.5 mm., Common marking tools, They are:, •, , straight edge, , •, , marking gauge, , •, , try square., , Try square : It is used for checking marking lines at right, angles. It is also used for checking right angles and, flatness of surfaces., , Straight edge: It is made of steel with perfect straight and, parallel edges. It is normally used for drawing straight lines, on a job. It can also be used for testing flatness of a surface, and straightness of an edge. (Fig 2), , The parts of a try square are shown in Fig 5. It is available, in different sizes, from 150 mm to 800 mm., , Marking gauge: It is a marking tool,consisting of, (1)stock,(2)stem ,(3)spur and (4) thumb (locking) screw as, shown in Fig 3., The stock can be adjusted over the stem to set the required, distance between the spur and the face of the stock. The, thumb screw is tightened to retain the measurement. The, spur, a pointed steel, inscribes lines on the surface of the, wood., , Remember: Keep these tools separately from, the other tools to prevent damage., Avoid dropping or knocking them off the, workbench., , Electrical : Electrician (NSQF LEVEL - 5) - Related Theory for Exercise 1.2.18 & 1.2.19, , Copyright Free under CC BY Licence, , 59
Page 74 :
The mallet, Objectives: At the end of this lesson you shall be able to, • state the constructional feature of mallet, • state the use of mallets, • state specification of mallets., The mallets are made of hard wood and it is used in place, of hammer. But the difference is head only., , handle is driven in from the top and is tapered in its width., Its head is either round or square. (Fig 3), , Mallet are used for driving wood chisels and for adjusting, wooden planes. It is used for assembling and dismantling, wooden works and for adjusting stop dogs in the work, bench., , The mallet is held upside down and dropped once or twice, on the work bench, the head of the mallet will be tightened, on the handle., , The handle is made of beech or ash with straight grained, fibres. The head is made of hard wood with twisted fibres., This prevents splitting of the wood., A special type of mallet is made of ‘Ligno stone’ which is, made of special wood that is treated with heat and high, pressure., Some mallets have removable handles (Fig 1) which can, be taken out of the head easily so that parts can be stored, easily. Fig 2., , The striking faces of mallet heads are so bevelled so that, they can hit the chisel. For most purposes a head of 110, mm long, 80mm wide and 60 mm thick is suitable. The, , Carpenter’s hammer, Objectives : At the end of this lesson you shall be able to, • state the uses of an carpenter’s hammer, • name the parts of a carpenter’s hammer and state their function, • name the type of carpenter’s hammers with specification, A carpenter’s hammer is a hand tool used for striking, purpose while, 1 punching, , Handle, Pein, , 2 striking, , Cheek, , 3 pulling, •, , The major parts of a hammer are a head and a handle, , •, , The head is made of drop-forged carbon steel, , •, , The wooden handle must be capable of absorbing, shock., , 60, , Parts of hammer head (Fig 1), , Eye hole, Cheek, The cheek is the striking portion slight convexly is given to, it to avoid digging of the edge., , Electrical : Electrician (NSQF LEVEL - 5) - Related Theory for Exercise 1.2.18 & 1.2.19, , Copyright Free under CC BY Licence
Page 75 :
Pein (Fig 2), The pein is the other end of the head., It is used for shapping and forming. Work like Rivetting and, bending the pein is of different shapes like (Fig 2), 1 Ball pein (hammer), 2 Cross pein (hammer), 3 Straight pein (hammer), 4 Claw (hammer), 5 Tacks (hammer), Eye hole, An eye hole is meant for the handle. It is shaped to fit the, handle rigidly. The wedges fix the handle in the eye hole., Specification, Carpenter’s hammer’s are specified by their weight and the, shape of the pein. Their weight varies from 125gms to, 1500gms., , Claw hammer (Fig 3), It is made of cast steel and carries the striking face at one, end and the claw at the other. The face is used to drive the, nail into the wood and other striking purposes and the claw, is used for extracting the nails out of the wood. Its size is, designated by its weight and it varies from 0.25kg to 0.75, kg., Ball pein hammer (Fig 4), , It is made of cast steel and weight of about 110 gm to 910, grams. It is also called as engineers’ hammer. One side, of it is in the shape of ball and hence the name it is also used, for riveting., , Electrical : Electrician (NSQF LEVEL - 5) - Related Theory for Exercise 1.2.18 & 1.2.19, , Copyright Free under CC BY Licence, , 61
Page 76 :
Cross pein hammer (Fig 5), , The head part of this hammer is across the handle and, hence the name. It is used for all light works., , Straight pein hammer (Fig 7), , Due to this magnetism nails and screws are taken easily, and is used to hammer or strike very thin nails. Some times, it is called as pin hammer. It is weight is 100gms., , The hammer head is straight to the hammer handle. The, bottom part of the head is large and tapering towards end, side. It is used in rivetting and to extend metal frames. Its, weight is 110gm and varies up to 900gms., , Carpenters’ hammer (Fig 6), , Tacks hammer (Fig 8), , The hammer head has a rectangular or oval hole which is, tapered on the inside. The shape of this hole offers a good, hold for the handle when wedged., , It is lesser in weight than all other hammers. The hammer, head is straightly fitted to the handle of hammer. It has, slight magnetic properties., Precaution, Make sure the handle is properly fitted. Select, a hammer with correct weight suitable for the, job., , The handle must firmly be secured in the head to prevent, accidents. The wedge is driven diagonally into the end of, the handle. The wood splits and is pressed against the, inner wall of the hole., , Check the head and handle for any cracks., Ensure the face of the hammer is free from oil, and grease., , In carpenter shop it is called as warrington hammer. To, extend the iron frames, for bending and for other works it is, used. Its weight varies from 220gms to 910gms., , Wood working saws, Objectives: At the end of this lesson you shall be able to, • state the functions and use of a handsaw, • distinguish between a tenon-saw and a handsaw, • illustrate the setting of the teeth of a saw., • name the various holding tools and their application, The saws are used to cut the timber to the required shapes, and sizes., The saws most commonly used by an electrician are:, , 62, , •, , handsaw, , •, , tenon-saw., , Electrical : Electrician (NSQF LEVEL - 5) - Related Theory for Exercise 1.2.18 & 1.2.19, , Copyright Free under CC BY Licence
Page 77 :
Handsaw: Figure 1 shows the parts of a handsaw. They, are the handle and the blade., , Handle: It is generally made of wood., Blade: It is made of tempered steel having teeth on the, lower edge. The best quality saws are made from spring, steel which decreases in thickness slightly from the teeth, to the back., The blade is about 66cm (26 inches) long, and normally has, 2 1/4 teeth per cm (6tpi). The number of teeth of a handsaw, varies up to 4 teeth per cm (10tpi)., , The hand saw has a rake angle of 8° to 10°. The tenon-saw, has a rake angle of 25° to 30°., Setting of teeth: The teeth are set using setters as shown, in Fig 4. It helps to keep the blade free in the cut slit., , A saw blade with less number of teeth per inch has bigger, teeth. Therefore, it is used for rough work as it cuts quickly., Tenon-saw: The tenon-saw is intended for finer work and, is manufactured with a thinner blade. It is used for general, bench work such as joint construction, where more accuracy is needed., This saw is also known as the back saw. (Fig 2), Sharpening the blunt teeth is done with a triangular file as, shown in Fig 5., , Uses: This saw is used for cutting tenons, sawing sides of, trenches and for general bench work and for cutting in round, blocks and T.W. battens and T.W. boards for wiring, purposes., The blade is stiffened with a brass or steel back. The blade, is about 30cm (12 inch) long. The number of teeth of a, tenon-saw is 12 to 14 per inch., Tooth geometry: The angle between the trailing edge of, one tooth and the leading edge of another is constant at, about 60° - 63° on all styles of saws. The angle on the, leading edge of the tooth varies according to the style of, saw, and the purpose for which it is designed. (Fig 3), , Always use the right saw for the right job., Do not apply excessive force to the saw while, cutting as very little effort is required to operate, a sharpened saw., , Electrical : Electrician (NSQF LEVEL - 5) - Related Theory for Exercise 1.2.18 & 1.2.19, , Copyright Free under CC BY Licence, , 63
Page 78 :
Holding devices, In woodwork various holding devices are used to hold, thewhile performing different operations such as planing,, chiselling, sawing and filing., The common holding tools are:, •, , woodworker's vice/carpenter's vice., , •, , `G' clamp., , •, , bench hook., , Bench hook: It is also known as cutting board and made, of hardwood. (Fig 3) It is used to hold the job while sawing, or chiselling and at the same time protecting the workbench, and surface from damages. (Fig 4), , Woodworker's vice (Fig 1): It is made of metal and is, fitted to the workbench. It is available in various sizes., , It consists of two jaws - movable and fixed. The anticlockwise rotation of the handle, attached to the spindle, causes, the movable jaw to open. The job is held between the two, jaws by rotating the handle in the clockwise direction., G Clamp (Fig 2): It is a metal clamp in the shape of the, letter`G' used for holding the job to the bench, while sawing, or chiselling. It is also used to hold small parts of a job for, gluing., , Using a tenon-saw and a bench hook, •, , Position the bottom rail of the bench hook against the, edge of the bench or hold it in the vice., , •, , Place the timber against the top rail of the hook, the, cutting mark just clear of the edge., , •, , Grip the timber and the top rail together. Use the thumb, to act as a guide for the saw at the start of the cut., Keep your thumb clear off the saw teeth., , 64, , Electrical : Electrician (NSQF LEVEL - 5) - Related Theory for Exercise 1.2.18 & 1.2.19, , Copyright Free under CC BY Licence
Page 79 :
Bench planes, Objectives: At the end of this lesson you shall be able to, • state the different types of planes and their functions, • state the purpose of setting the jack plane blade., • state the parts and function of a rebate plane, Planes are used for producing flat and smooth surfaces by, taking off thin shavings of wood. Different types of planes, are used for this purpose., Types of planes, The most commonly available types of planes are:, , These parts are made of different materials as listed below., Body, , – iron, , Handle, , – wood, , Knob, , – wood, , •, , jack plane (Fig 1a), , Cutting iron/blade – tungsten steel, , •, , smoothing plane (Fig 1b), , All other parts, , •, , rebate plane. (Fig 1c), , – metal, , The size of the plane commonly used by an electrician is, 350 mm long with a 50 mm blade., Smoothing plane: It is used for finishing the job to the, required size, and for planing small wooden pieces/parts of, the job. It is shorter in length as compared to the jack, plane. (Fig 1b), The parts of a smoothing plane are similar to those of the, jack plane. (Fig 2), Rebate plane: It is used for planing or finishing rebates, i.e. rectangular recesses cut along or across the edge. Its, main parts are shown in Fig 3., , Jack plane: It is used for initial planing of timber to bring, the size nearer to the required measurements. Its main, parts are indicated in Fig 2., , The width of the plane and blade is less as compared to, that of the jack plane., Ensure that the blades are well sharpened, before use. Always use the approporiate type, of plane for a given job., , Electrical : Electrician (NSQF LEVEL - 5) - Related Theory for Exercise 1.2.18 & 1.2.19, , Copyright Free under CC BY Licence, , 65
Page 80 :
Rebate plane - parts and their functions, A rebate plane is used for planing and finishing the rebates., Parts of a rebate plane, , Wooden rebate plane: It consists of the following parts., (Fig 2), , A metal rebate plane: A metal rebate plane consists, of the following parts. (Fig 1), , Body: made of wood and holds the other parts., A Body: Made of metal with its face perfectly flat., , Blade: made of well tempered steel., , B Handle: It is the integral part of the body., , Wedge: made of wood to hold the blade in the body to a, set position., , C Blade: It is made of well tempered steel., D Cap with thumb screw: It is made of metal and it holds, the cutter in position., , Be sure that the blade is sharp and it is set, squarely to its base before use., , E Depth gauge: It is made of metal attached to one side, of the plane, and it can be adjusted according to the, depth of the rebate., , Drill bits - Types and sizes, Objectives: At the end of this lesson you shall be able to, • state the different types of drill bits, and their uses, • state the parts of a drill bit., • state the different types of nails, wood screws and their uses, For marking round holes in different types of materials,, such as metal, wood, plastic etc. drills are used., , Parallel or straight shank drills are held in the drill chuck., (Fig 2a), , Types of drill bits, , Taper shank drills are held in taper sockets in the drilling, machine. (Fig 2b), , The most common drill bits are (a) twist drill and (b) flat drill., , Parts of a twist drill: A twist drill consists of a body, point,, neck and shank. The point comprises the cutting elements, while the body guides the drill in operation. (Fig 2c), , Twist drills may be:, •, , parallel shank, , •, , taper shank drills. (Fig 1), , 66, , Electrical : Electrician (NSQF LEVEL - 5) - Related Theory for Exercise 1.2.18 & 1.2.19, , Copyright Free under CC BY Licence
Page 81 :
Parts of a flat drill: The flat drill consists of a head, neck, and shank. It has a tapered shank. (Fig 3), , Taper shank drills are available in sizes from 3mm to 50mm, dia., To protect the twist drill bits from damage,, place them separately in small boxes/containers. (Fig 4), These chill bits are attached to either hand drilling machine, or electric drilling machine to drill holes., , Flat drill is used for drilling shallow holes in heavy works., Sizes of the drill bits: Drills are available in various sizes., The size of the drill is indicated on the plain portion of its, shank., Parallel shank drills are available in small sizes up to 12mm, diameter., , Types of nails and wood screws, Both nails and screws are used as fasteners in woodwork., Nails are used for cheaper types of work, and screws are, used for a better class of work where additional strength, and durability is a must., , Types of nails: There are different types of nails made for, different purposes. Those that are generally used in, electrical work are:, •, , wire nail (Fig 1a), , Specification of nails: Nails are specified stating their, , •, , wire clout nail (Fig 1b), , •, , cut tack or stud (Fig 1c), , •, , wire tack. (Fig 1d), , •, , length,, , •, , type, and, , •, , gauge number., , Length in the case of nail includes the head of the nail., (Fig 1), , Specification of screws: Screws also are specified in a, similar way as nails are i.e. stating their length, designation, number, type and the metal they are made of., Parts of a wood screw: The parts of a wood screw are, shown in Fig 2., , `Type' includes shape of the head, cross-section, purpose,, and the metal the nail is made of., Gauge is indicated by a number in accordance with the, standard wire gauge, where higher gauge number indicates, a smaller diameter of nail and vice versa., Electrical : Electrician (NSQF LEVEL - 5) - Related Theory for Exercise 1.2.18 & 1.2.19, , Copyright Free under CC BY Licence, , 67
Page 82 :
Head, , :, , Uppermost part, , Types of screws, , Shank, , :, , Plain or unthreaded portion of 1/3 of the, length of the screw., , According to the shape of the head, screws are classified, into:, , Pitch, , :, , It is the distance between adjacent threads, , •, , Point, , :, , The sharp edge of the screw end., , Thread, , :, , A special ridge around the core., , Length is measured from the point of the screw to the, portion it can enter the timber. (Fig 3), , slotted countersunk (flat) head wood screw, (Fig 3a), -, , •, , slotted countersunk raised head wood screw, (Fig 3b), -, , •, , used for fixing thick sheets to woods (IS:6736-1972), , slotted round head screw (Fig 3c), -, , •, , used for general purpose (IS:6760-1972), , It is used for fixing thin sheets to woodwork. (IS:67391972), , coach or square head screw (Fig 3d), -, , is used for heavy duty work. It is tightened using, spanner., , Availability: Wood screws are generally made of mild, steel, aluminium and brass, and are from 8 mm to 200 mm, length, with the screw numbers ranging from 0 to 24., , The designation number of a screw indicates the diameter, of the unthreaded shank. The screw number and the, corresponding diameter of the shank are given in IS 6739,, 6736 and 6760. The screw number is the screw designation., It is different from the SWG of wire nails. (Fig 4), , The chart of preferred lengths and screw number, combinations for wood screws is available in the relevant, IS., The screws commonly used by electricians are from screw, No. 4 to 12 and 12 mm to 50 mm in length., Wood screws are available in packets of 100 and 200, numbers. The size and number of the screw are indicated, on the packet., Mild steel screws are most commonly used for general, work. Brass and aluminium screws are used to match the, metal fitting and also to prevent rust under damp conditions., , Ratchet brace, Objective: At the end of this lesson you shall be able to, • name the parts of a ratchet brace and state their functions., • state the countersunk bits sizes, One of the tools for holding various types of bits for making, holes of various diameters in wood by manual operation is, the ratchet brace., It is used for jobs that require slow speed and high torque, operation., Parts and their functions (Fig 1), Head: The head is made of wood and is fitted to the upper, end of the crank with ball bearings. It is used to hold the, brace in an upright position by one hand, and also apply the, required force during operation., Crank: It is a metal rod bent to the form shown in Fig 1., 68, , Ratchet braces with different sweep sizes of crank are, available. The size mostly used is one of 250mm sweep., A wooden handle is provided to rotate the crank by the hand, that is free., Chuck: It is fitted at the lower end of the crank. It has two, jaws for holding square shank bits, and a shell for tightening, and slackening jaws., Ratchet: It permits the chuck to rotate in only one selected, direction. The selection of direction is done by turning the, cam ring. This allows to rotate the bit continuously, and in, confined spaces as well where the full sweep of the crank, is restricted. (Fig 1), , Electrical : Electrician (NSQF LEVEL - 5) - Related Theory for Exercise 1.2.18 & 1.2.19, , Copyright Free under CC BY Licence
Page 83 :
Countersunk bits - types - sizes, Countersunking is done on a drilled screw hole to accommodate the countersunk head of the wood screw. The, process of removing out material round a hole at its surface, up to a depth to match the CS screw head is known as, countersinking. (Fig 1), , Types: The two types of bits are:, •, , Rose countersunk bit (Fig 3a) which is a multi-cutting, edge tool, , •, , Nail countersunk bit (Fig 3b) which has a single-cutting, edge., , Variation of the size of head CS screws with the screw, number makes it necessary to select the suitable CS bit., Sizes of countersunk bits: The countersunk bit size is, specified by the rim diameter., The general size of the bit varies from 10 mm to 25 mm., The 82o cutting angle CS bits are used because wood, screws always bear 90o slope., Method of selection: Select the countersunk bit of the, next higher dia. size to that of the wood screws head, diameter. With the head of screw ensure the required depth, while countersunking. (Fig 2), , Electrical : Electrician (NSQF LEVEL - 5) - Related Theory for Exercise 1.2.18 & 1.2.19, , Copyright Free under CC BY Licence, , 69
Page 84 :
Screwdrivers used in woodwork, Objective: At the end of this lesson you shall be able to, • name the various types of screwdrivers, and state their sizes and uses., Screwdrivers are available in different sizes and patterns, according to their application., Types of screwdrivers: London pattern is a heavy, screwdriver having a size of 75 to 350mm with a flat shank., It is used for general woodwork. (Fig 1a), Cabinet pattern is a medium screwdriver having a size of, 75 to 350mm. It is used for cabinet works. (Fig 1b), Electrician pattern is a common type of screwdriver used, by electricians. It is available from 100mm to 300mm size., The handle is made of either wood or plastic. The shank is, either insulated or non-insulated. (Fig 1c), In the ratchet type of a screwdriver, a ratchet is fitted, within the handle. The blade of the screwdriver can be set, to different positions i.e for clockwise or anti-clockwise, revolution of the screwdriver blade. It can also be set to a, neutral position (locked). It is used for general purposes, and is available in sizes ranging from 50mm to 200mm., (Fig 1d), A cranked screwdriver is a special type used where, normal screwdrivers cannot be applied. (Fig 1e), A spiral ratchet works on rotary action. It is used with, interchangeable blades of different sizes and patterns, available in 300, 500, 600mm length. Only downward, pressure need be applied while using this type of, screwdrivers. This type of screwdriver can also be set in, both clock and anticlockwise revolution for screwing and, unscrewing purposes. (Fig 1f), , A Phillips screwdriver is used to drive Phillips head, screws. It is a special purpose screwdriver available in 75, to 200mm sizes. The Phillips screwdriver (Fig 2) will not, slip and burr the head of the screw if a proper size is, selected., , Sharpening and setting of saw teeth, Objective: At the end of this lesson you shall be able to, • describe the steps involved in `sharpening and setting' of the saw teeth, • explain the methods of re-sharpening jack plane blade, To perform the sawing operations with ease and accuracy,, the saw must be in good condition with its teeth sharpened, and well set., Sharpening of a saw involves 4 steps which are as follows., Topping or jointing: This is done to bring down the points, of all the teeth to the same level. A flat file is held in a, wooden block and rubbed over the teeth until the lowest, tooth touches the file face. (Fig 1), Reshaping: It is necessary to restore the tips of the teeth., Therefore the gullet of each tooth is filed down using a, suitable size triangular file. Care is taken to maintain a, uniform depth of gullets, pitch and angles of teeth. (Fig 2), Setting: Setting is a process of bending every alternate, tooth to the opposite direction. This is carried out by using, a saw-set pliers. (Fig 3), , 70, , Electrical : Electrician (NSQF LEVEL - 5) - Related Theory for Exercise 1.2.18 & 1.2.19, , Copyright Free under CC BY Licence
Page 85 :
Sharpening: This is the final step in which the gullet of, each tooth of the saw is filed to produce a keen cutting, edge, using a suitable size of a triangular file. (Fig 4), , Topping is necessary only when the saw teeth, have become uneven in their height, and resharpening follows it., Re-sharpening of a plane blade, Sharpening of a plane blade is necessary to produce a, keen cutting edge for good surface finish, and perfect, planing with minimum effort., , due to friction and to float off the metal particles from the, pores of the oilstone so as to prevent clogging of the, oilstone., Because of the continuous use and numerous sharpenings,, the bevel of the blade is likely to become shortened or, rounded. The correct bevel is restored by grinding it over an, emery wheel or grindstone. (Fig 3), , Sharpening and honing: The process of sharpening is, carried out on an oilstone by rubbing the blade with its bevel, down, maintaining a constant and correct angle, 25° to 30°., (Fig 1) This rubbing is continued until a burr or wire edge, is produced., The burr is removed by rubbing the back of the flat face of, the plane blade on the oilstone, keeping its bevel up., (Fig 2), During sharpening, oil is used to minimise the heat caused, , Chisel - parts - types - uses, Objectives: At the end of this lesson you shall be able to, • state the parts of firmer chisel and their types, • name the specific use of each chisel., Chisels are used for shaping and finishing the parts of wood, joints. They are also used for shaping different profiles in, woodwork. The size of the chisel is determined by the width, of the blade., Parts of a chisel, , Shoulder :, , the lower end of tang., , Neck, , :, , shaped portion beneath the shoulder., , Blade, , :, , the portion beneath the neck up to the, cutting edge., , A chisel has the following parts. (Fig 1), , Types of chisels, , Handle, , :, , made of wood., , Ferrule, , :, , fitted to the handle., , Firmer chisel (Fig 2a) : It posseses a rectangularsectioned steel blade, the size (width of blade) being 3 mm, to 50 mm. It is used for general chiselling work., , Tang, , :, , tapered end of the blade., , Bevel-edge firmer chisel (Fig 2b) : Its edges are bevelled, , Electrical : Electrician (NSQF LEVEL - 5) - Related Theory for Exercise 1.2.18 & 1.2.19, , Copyright Free under CC BY Licence, , 71
Page 86 :
Paring chisel (Fig 2c) : It has an extra long, thin blade with, the edges bevelled. It is used for paring and finishing joints., Mortise chisel (Fig 2d) : It posseses a stronger, squaresectional blade.It is used for mortising i.e. making, rectangular holes in wood., , along the length. It is used for light chiselling and to clean, sharp corners where the edges of a normal firmer chisel, may not reach., , Half- lap joints - types - uses, Objectives: At the end of this lesson you shall be able to, • state the necessity of lap joints, • state the types of lap joints., Necessity of lap Joint:, Half-lap joints are employed in frame construction where, two parts of a job meet either near the ends or at a distance., To keep them flush, laps are made equal to half the, thickness in each part. These joints are strengthened by, fixing screws., Types of half-lap joints, End-lap joint (Fig 1): This joint is used where two parts of, a job cross each other at the ends, say at the corners., Cross-lap joint (Fig 3): This joint is used where two parts, of a frame cross each other at a distance from the ends., , Middle-lap joint (Fig 2): This joint is used where one part, of a job meets another part at some distance from the ends., , Curve-cutting saws - types - uses, Objectives: At the end of this lesson you shall be able to, • state the necessity of curve-cutting saws, • state the types of curve-cutting saws and their application., Curve-cutting saws have narrow blades which enable them, to turn along the curve with ease while sawing along the, 72, , curves. Stiff and wider blades are provided with handles,, while very fine blades are held in frames to keep them under, , Electrical : Electrician (NSQF LEVEL - 5) - Related Theory for Exercise 1.2.18 & 1.2.19, , Copyright Free under CC BY Licence
Page 87 :
tension. Very narrow, fine blades are dispensed with and, replaced as soon as they become blunt. The other blades, are re-sharpened., There are various types of curve-cutting saws. The saws,, with slightly wider blades are used for cutting larger curves,, and the saws with finer blades are used for cutting sharp, curves., Types of curve-cutting saws, •, , Compass saw (Fig 1): Used for larger curve cutting., , •, , Keyhole saw or pad saw (Fig 2): It is used for internal, cutting., , •, , Coping saw: It is used for cutting sharp corners., (Fig 3), , Blades with larger teeth will cut faster, but the, surface will be rough and the blades with, smaller teeth will cut slower, but the surface, will have a fine finish., , – Fretsaw: It has a very fine blade. (Fig 4) It is used for, cutting sharp and fine curves., , Wood working files - parts - uses, Objectives : At the end of this lesson you shall be able to, • state the use of wood working files, • state the types of wood working files and their application., Wood working files are used to shape various profiles for, smooth finish in wood or laminates., , Round files: Used for finishing concave corners, and for, finishing and enlarging., , Types and uses of wood working files : Various types, of the available wood working files are named according to, the shape of their cross-section. (Fig 1), , Flat files: Used for finishing end grains and corner edges., Half-round files: Used for finishing both corner and convex, edges., Wood rasp files: Used for preliminary rough work for rapid, removal of waste part of the wood., All files should be cleaned frequently. (Fig 2), , Electrical : Electrician (NSQF LEVEL - 5) - Related Theory for Exercise 1.2.18 & 1.2.19, , Copyright Free under CC BY Licence, , 73
Page 88 :
Electrical, Related Theory for Exercise 1.2.20 & 1.2.23, Electrician - Workshop practice (Allied trade), Sheet metal - marking and cutting tools - rivet joints, Objectives : At the end of this lesson you shall be able to, • state the six types of metal sheets used in sheet metal work, • state how the plate and the sheet are differentiated from each other., • state the different types of snips and their uses, • state the uses of solid cold punches, • state the uses of self tapping screw, Types of sheets, A large quantity of sheet metal used in the sheet metal, industry is steel, rolled into sheets of various thicknesses, Sheet steel: It is an uncoated sheet with bluish-black, and coated with zinc, tin or other metals. Other than steel,, appearance. The use of this metal is limited to articles that, the worker uses sheets made out of zinc, copper, aluminium,, are to be painted or enamelled., stainless steel etc., Galvanised iron sheet: The zinc-coated iron sheet is, The term `sheet metal' generally applies to metals and, known as galvanised iron sheet, popularly known as GI, alloys in sheets rolled into various thicknesses less than, sheet. The zinc coating resists rust. Articles like pans,, 5mm. Sheets over 5 mm thick are called plates., buckets, furnaces, cabinets are made with GI sheet., Earlier, the sheets were specified by standard wire gauge, numbers. Each gauge is designated with a definite thickness., (Table 1) The larger the gauge number, the lesser the, thickness. Now the sheet thickness is specified in mm,, say 0.40, 0.50, 0.63, 0.80, 0.90, 1.00, 1.12, 1.25 etc., Table - 1, , Copper sheets: Copper sheets are available either as, cold-rolled or hot-rolled sheets. Cold-rolled sheets are, worked easily in sheet metal shops. Gutters, roof flashing, and hoods are common examples where copper sheet is, used., , Sheet thickness, , Aluminium sheets: Aluminium sheets are highly resistive, to corrosion, whitish in colour and light in weight. They are, widely used in the manufacture of a number of articles such, as household utensils, lighting fixtures, windows etc., , Gauge No., , Inch, , mm, , 18, , 0.048, , 1.22, , 19, , 0.040, , 1.02, , 20, , 0.036, , 0.91, , 21, , 0.032, , 0.81, , 22, , 0.028, , 0.71, , 23, , 0.024, , 0.61, , 24, , 0.022, , 0.56, , 25, 27, 28, , 0.020, 0.0164, 0.0148, , 0.51, 0.42, 0.38, , Snips, , There are two types of snips., Straight snips, , •, , Bent snips, , Tin plates are used for food containers, dairy equipment,, furnace fittings etc., Brass sheet: Brass is an alloy of copper and zinc in various, proportions. It will not corrode and is extensively used in, craft., , Parts of a straight snip (Fig 1), , A snip is a cutting tool and is used for cutting thin sheets, of metal., •, , Tin plates: Tin plate is sheet iron coated with tin to protect, the iron sheet against rust. The size and thickness of the, tin plate are denoted by special marks, not by gauge, numbers., , •, , Handle (1), , •, , Blade (2), , •, , Stops (3), , 74, , Copyright Free under CC BY Licence
Page 89 :
Bent snip: Bent snips have curved blades used for cutting, internal curves. For trimming a cylinder keep the lower, blade on the outside of cut. (Fig 3), , Straight snips: A straight snip has straight blades for, straight line cutting. It can also be used for external curved, cuts.(Fig 2), , Solid cold punches, For making holes in sheet metal, cold punches can be, utilized., There are two types of cold punches used on sheet metal., •, , Solid cold punch, , •, , Hollow cold punch, , In this lesson you will know about solid cold punches., Solid cold punch: It is used to punch small holes in sheet, metal (thin gauge)., Generally small holes can be made by this punch. (Fig 1), , Precautions to be observed while using a solid cold, punch: The sheet should be kept on lead cake or on a, hardwood block while punching (Fig 2)., , While striking, watch the cutting point, not the head of the, punch.Hold the punch in a vertical positon on the correct, locations., , Self-tapping screws, Self-tapping screws are used in assembly where thin, section metal sheets are used. Joints made using these, screws are vibration-resistant, and can be assembled and, dismantled many times. The three types of self-tapping, screws are:, , •, , thread forming (Fig 1a), , •, , thread cutting (Fig 1b), , •, , self-piercing. (Fig 1c), , Electrical : Electrician (NSQF LEVEL - 5) - Related Theory for Exercise 1.2.18 & 1.2.19, , Copyright Free under CC BY Licence, , 75
Page 90 :
Since these screws cut threads in mild steel and soft steel, metal, they are called self-tapping screws., The thread forming type (Fig 1a): This type of metal, screws produces the mating thread by displacing the, material. These are useful for softer and thinner materials., The thread cutting type (Fig 1b): This type cuts the, mating thread in the same way as the thread cutting tap., These screws will have projected ridges in the shape of, thread for the cutting action. These are quite useful for selftapping on hard or brittle materials with thin wall sections., , Self-piercing and tapping (Fig 1c): These screws have, a special piercing point and a twin-start thread. These, screws are used along with a special gun. The sheet is, pierced and the screw driven home., , Folding tools, Objectives: At the end of this lesson you shall able to, • list out the different folding tools, • state the uses of folding tools., • state the types of notches and their uses, • state the types of hem and their application, The common tools used in the folding of sheet metal are:, •, , angle steel and folding bar, , •, , C clamp, , •, , stakes, , •, , mallet., , `C' clamp: The shape of the clamp is in the form of the letter, `C'. `C' clamp is a holding device. This clamp is used when, the piece has to be securely fixed to another piece. It is, available in different sizes according to the opening of jaws., (Fig 3), , Angle steel: Two pieces of angles are used for folding at, 90°. For longer sheets lengthy angles will be used along, clamp (or) hand vice. (Fig 1), , Stakes: Stakes are used for bending, seaming and forming of sheet metal that cannot be done on any regular, machine. For the above purposes, different stakes are, used. Stakes are made of forged steel or cast steel., Folding bar: The sheet metal to be bent is clamped in the, folding bars. The folding bars are clamped in the vice as, shown in the figure. (Fig 2), , Types of stakes, •, , Hatchet stake, , •, , Square stake, , •, , Blow-horn square stake, , •, , Bevel-edge square stake., , Hatchet stake: A hatchet stake has a sharp straight edge, bevelled on one side. It is used for making sharp bends, for, bending edges and for folding sheet metal. (Fig 4), , 76, , Electrical : Electrician (NSQF LEVEL - 5) - Related Theory for Exercise 1.2.18 & 1.2.19, , Copyright Free under CC BY Licence
Page 91 :
Square stake: A square stake has a flat and squareshaped head with a long shank. It is used for general, purposes. (Fig 5), , Mallet: A mallet is used for working on sheet metal. It will, not damage the sheet surface while working. Mallets are, made of wood, rubber, copper etc.(Fig 8), , Blow-horn stake: It has a short tapered horn at one end,, and a long tapered one at the other end. It is used in, forming, riveting or seaming tapered, cone-shaped articles,, such as funnels etc. (Fig 6), Bevel-edged square stake: A bevel-edged square stake, is used to form corners and edges.(Fig 7), , Notches, Notches: Notches are the spaces provided for joining the, edges when sheet metals are cut from the layout. (Fig 1), , Purpose of notches, •, , To prevent excess material from overlapping and causing, a bulge at the seam and edges., , •, , To allow the work to be formed to the required size and, shape., , Types of notches: A straight notch or slit is a straight cut, made in the edge of the sheet where it is to be bent., (Fig 2), , Electrical : Electrician (NSQF LEVEL - 5) - Related Theory for Exercise 1.2.20 & 1.2.23, , Copyright Free under CC BY Licence, , 77
Page 92 :
A square notch is used when forming a square or rectangular box. (Fig 3), , In a `V' notch both the sides are cut at a 45°angle to the, edge of the sheet. The sides of the notch meet at 90°. This, notch is used when making a job with a 90° bend and an, inside flange.(Fig 5), , A slant notch is cut at an angle of 45° to the corner of the, sheet. It is used when a single hem meets at right, angles.(Fig 4), , Edge stiffening, The edges of light gauge sheet metal articles are very sharp, and are unsafe to handle. Safe edges are used to strengthen, the sheet metal and to enhance the appearance of the, finished article like metal tray. (Fig 1), , What is hem?: A hem is an edge or border made by, folding., It stiffens the sheet of the metal and does away with sharp, edges., It prevents the sheet from damage and wear of the edge., Types of hems: There are three types of hems., •, , Single hem, , •, , Double hem, , •, , Wired edge., , Single hem (Fig 2): The single hem is made by folding the, edges of the sheet metal with a single folding., It makes the edge smooth and stiff and is done in the case, of small articles., , 78, , Electrical : Electrician (NSQF LEVEL - 5) - Related Theory for Exercise 1.2.20 & 1.2.23, , Copyright Free under CC BY Licence
Page 93 :
Double hem (Fig 3): A double hem is made by folding the, edges over twice to make it smooth, and this is done, normally to strengthen the edges of lengthy articles., , Pattern development, Objectives: At the end of this lesson you shall able to, • state about pattern development, • state the different types of pattern development., Before starting on any project in sheet metal, a pattern, should be developed for the accuracy of the finished, articles., The pattern is nothing but a flat outline of the job. Most of, the patterns are obtained from development of surfaces of, some common geometrical solids such as cylinder, cone,, prism, pyramid etc., The pattern or outline of an object may be drawn on paper., Then it can be transfered to the sheet metal or it can be, directly developed on the sheet and cut from the metal., Generally there are three methods of development of, patterns., •, , Parallel line development, , •, , Radial line development, , •, , Triangulation, , Methods of pattern development, There are three methods in general use., The class of geometrical form of the object to be made must, be taken into account when deciding on which method is, to be used., Parallel line method (Fig 1): This method is used to, develop patterns for shapes like boxes, prisms and, cylinders., Radial line method (Fig 2): Objects like pyramids and, cones can be developed using this method. These include, all shapes which form parts of pyramids or cones., , Triangulation (Fig 3): This method is used to develop, patterns for shapes having no apex and in which not all, sides are parallel, i.e. Class 3., While both the radial and parallel line methods, cannot be applied to shapes shown in Fig 3, the, method of triangulation can be used in the, development of patterns for shapes depicted in, Fig 1 and Fig 2., , All lines radiate from the apex., Electrical : Electrician (NSQF LEVEL - 5) - Related Theory for Exercise 1.2.20 & 1.2.23, , Copyright Free under CC BY Licence, , 79
Page 94 :
Rivets, Objectives : At the end of this lesson you shall be able to, • define riveting and state their uses, • list out the different types of rivets and which materials the rivets are made., Riveting: Riveting is one of the satisfactory methods of, making permanent joints of two pieces - metal snips., (Fig 1), , Each rivet consists of a head and a cylindrical body called, as shank. (Fig 3), , It is customary to use rivets of the same metal as that of, the parts that are being joined., Uses: Rivets are used for joining metal sheets and plates, in fabrication work, such as bridges, ships, cranes, structural steel work, boilers, aircraft and in various other works., Material: In riveting, the rivets are secured by deforming, the shank to form the head. These are made of ductile, materials like low carbon steel, brass, copper and aluminium., , Sizes of rivets: Sizes of rivets are determined by the, diameter and length of the shank., , Types of rivets (Fig 2), , Selection of rivet size: The diameter of the rivet is, calculated by using the formula, , The four most common types of rivets are:, •, , tinmen's rivet, , •, , flat head rivet, , •, , round head rivet, , •, , countersunk head rivet., , 80, , � 1, �, D � � 2 to 3 � x T where T is total thickness., � 2, �, , Electrical : Electrician (NSQF LEVEL - 5) - Related Theory for Exercise 1.2.20 & 1.2.23, , Copyright Free under CC BY Licence
Page 95 :
The shank length is given by, , L � 2T, , �1 1 D �, � 2 �, �, �, , Spacing of rivets: The space or distance from the edge of, the metal to the centre of any rivet should be atleast twice, the diameter of the rivet to avoid tearing. The `Lap' distance, (4D) is shown in Fig 6., , where `T' is the sheet thickness and `D' is the diameter of, the rivet., Normally tinmen's rivets are designated by numbers., The dimension of the tinmen's rivets is given below. (Fig 4), , The minimum distance between the rivets (pitch) should be, sufficient to allow the rivets to be driven without interference., The distance should be atleast three times the thickness, of the sheet or above., Method of riveting: Riveting may be done by hand or by, machine., While riveting by hand, it can be done with a hammer and, a rivet set., , The maximum distance should never exceed 24 times the, thickness of the sheet. Otherwise buckling will take place, as shown in Fig 7., , Rivet set: A cross-section of a rivet set is shown in the, figure 5a, b and c. The shallow, cup-shaped hole is used, to draw the sheet and the rivet together. The outlet on the, side allows the slug to drop out., The cup shape is used for forming the rivet head., The rivet set selected should have a hole slightly larger than, the diameter of the rivet., , Electrical : Electrician (NSQF LEVEL - 5) - Related Theory for Exercise 1.2.20 & 1.2.23, , Copyright Free under CC BY Licence, , 81
Page 96 :
Electrical, Related Theory for Exercise 1.2.21 & 1.2.22, Electrician - Workshop practice (Allied trade), Drills and drilling machines - Internal and external threads, Objectives : At the end of this lesson you shall be able to, • state the functions of drills, • name the parts of a drill, • name the drill bit holders, • state the uses of countersunking bits, Drill: Drilling is a process of making holes on workpieces, by using a drill., Parts of a drill (Fig 1), , •, , Tang (1), , •, , Shank (2), , •, , Body (3), , •, , Flute (4), , •, , Land (5), , •, , Point angle (6), , •, , Cutting lip (7), , •, , Chisel edge (8), , Body: The body is the portion between the point and, shank., Flutes: Flutes are the spiral grooves which run to the length, of the drill., The flutes help:, , Tang: Tang is the part that fits into the slot of the drilling, machine spindle., , •, , to form the cutting edges, , •, , to curl the chips and allow them to come out (Fig 4), , •, , the coolant to flow to the cutting edge., , Shank: This is the driving end of the drill which is fitted on, the machine. Shanks are of two types., •, , Taper shank: for larger diameter drills., , •, , Straight shank: for smaller diameter drills., , The shank may be parallel or tapered.(Figs 2 and 3) Drills, with parallel or straight shanks are made in small sizes, up, to 12mm (1/2 in) diameter and the shank has the same, diameter as the flutes., Taper shank drills are made in sizes from 3mm (1/8 in), diameter up to 50mm (2 in) diameter., 82, , Copyright Free under CC BY Licence
Page 97 :
Land/margin: Land/margin is the narrow strip which, extends to the entire length of the flutes. The diameter of, the drill is measured across the land/margin., Body clearance: Body clearance is the part of the body, which is reduced in diameter to cut down the friction, between the drill and the hole being drilled., Web: Web is the metal column which separates the flutes., It gradually increases in thickness towards the shank., Drill bit holder, Drill chuck: Drill chuck is attached to the main spindle for, straight shank basis. (Fig 5), , The tang on a taper shank drill enables easy removal of the, drill from the socket at the end of the drilling work. This is, done using a drift. (Fig 9) The tang also serves to prevent, the drill from rotating in the socket., , Sleeve: This is used to match bit tapers and the spindle, taper holes. (Fig 6), Socket: This is used when the main spindle length is too, short, and the bit is changed frequently. (Fig 7), Taper shank drills are held in taper sockets in the, machine.(Fig 8), Use of a coolant: A coolant is used to cool the cutting, tool and the job., , Drilling machines, Objectives: At the end of this lesson you shall be able to, • state the types of hand drilling machines and their uses, • state the parts of bench and pillar drilling machine, • explain the features of machine vice, Making holes in sheet metal by using solid punches is a, slow and inefficient process., It is necessary to drill holes when working with heavy, material., The holes can be drilled by hand or by machine. When, drilling by hand, a hand drilling machine (Fig 1) or the, electric hand drilling machine (Fig 2) is used., Twist drills are used as a cutting tool for drilling holes. The, hand drill is used for drilling holes up to 6.5 mm diameter., The portable electric hand drilling machine is a very popular, and useful power tool. It comes in different sizes and, capacities., The handle shown in Fig 2 is called a pistol grip handle., , Electrical : Electrician (NSQF LEVEL - 5) - Related Theory for Exercise 1.2.21 & 1.2.22, , Copyright Free under CC BY Licence, , 83
Page 98 :
The parts of an electric hand machine are shown in Fig 2., , Sensitive bench driling machine: The simplest type of, sensitive bench drilling machine is shown in the (figure 3), with its various parts marked. This machine is used for light, duty work. (Fig 3), This machine is capable of drilling holes up to 12.5mm, diameter. The drills are fitted in the chuck or directly in the, tapered hole of the machine spindle., Different spindle speeds are achieved by changing the belt, position in the stepped pulley (Fig 4)., , Precautions to be observed : Make sure the holes are, properly located and punched with a centre punch., Check the drill size. If the markings on the drill are not clear,, use a drill gauge., Be sure the drill is properly centred in the chuck by turning, (rotating)., Be sure the work is mounted properly in a holding device, such as a vice or `G' clamp., Check the centering of the drill after the point has just, started in the metal. Relocate the hole with a centre punch,, if necessary. Feed the drill with a light, even pressure., Types of Electric Drilling Machines: Some of the electric, drilling machines are listed here., •, , The sensitive bench dilling mchine, , •, , The pillar drilling machine, , •, , The radial arm drilling machine. (Radial drilling machine), , For normal drilling, the work surface is kept horizontal. If the, holes are to be drilled at an angle, the table can be tilted., The pillar drilling machine: This is an enlarged version, of the sensitive bench drilling machine. These drilling, machines are mounted on the floor and are driven by more, powerful electric motors. They are used for heavy duty, work. Pillar drilling machines are available in different, , (As you are not likely to use the column and radial type of, drilling machines now, only the sensitive and pillar type, machines are explained here.), , 84, , Electrical : Electrician (NSQF LEVEL - 5) - Related Theory for Exercise 1.2.21 & 1.2.22, , Copyright Free under CC BY Licence
Page 99 :
sizes. Large machines are provided with a rack and pinion, mechanism for moving the table for setting the work., The machine vice: Most of the drilling works can be held, in a vice. Ensure that the drill does not drill through the vice, after it has passed through the work. For this purpose, the, work can be lifted up and secured on parallel blocks,, providing a gap between the work and the bottom of the, vice. (Fig 6) Workpieces which are not accurate may be, supported by wooden pieces. (Fig 5), , Parallels: The workpiece can be set on parallels to raise, it off the reference surface, and still maintain parallelism., Parallels are made in pairs to precisely the same, dimensions, from hardened steel, finish-ground, with the, opposite faces parallel and adjacent faces square. A, variety of sizes is available., , Cutting speed and RPM (Revolutions Per Minute), Objectives : At the end of this lesson you shall be able to, • define cutting speed and rpm, • state the factors for determining cutting speed, • determine rpm/spindle speed, Cutting speed and r.p.m.: For a drill to give satisfactory, performance, it must operate at the correct cutting speed, and feed., Cutting speed is the speed at which the cutting edge, passes over the material while cutting, and is expressed in, metres per minute., Cutting speed is also sometimes stated as surface speed, or peripheral speed., Selection of the correct cutting speed for drilling depends, on the materials to be drilled and the tool material. The, recommended cutting speeds for different materials are, given in the table. Based on the cutting speed recommended, the r.p.m. at which a drill has to be driven is, determined., Materials being drilled, , Cutting speed m/min., , RPM, The r.p.m. will differ according to the diameter of the drills., The cutting speed being the same, larger diameter drills will, have lesser r.p.m., and smaller diameter drills will have a, higher r.p.m., Calculating r.p.m., CS =, , Nπd, 1000, , N =, , 1000 x CS, , πd, N = r.p.m., , CS = Cutting speed m / min, d = dia of drill in mm;, , π = 3.14, , Aluminium, , 70 - 100, , Example, , Brass, , 35 - 50, , Bronze, , 20 - 35, , Calculate the spindle speed (r.p.m.) for a high speed steel, drill of 24mm dia. to cut mild steel., , Cast iron (grey), , 25 - 40, , Copper, , 35 - 45, , Steel (mild), , 30 - 40, , Steel (medium carbon), , 20 - 30, , Steel (alloy-high tensile), , 5-8, , Thermo-setting plastic, (Low speed due to, abrasive properties.), , 20 - 30, , N =, , 1000 x 30, , = 398 r.p.m., , 3.14 x 24, , The spindle speed is 400 r.p.m., Feed of drill = Penetration of drill in a job per, revolution of drill., , Angle of chisels, Objectives : At the end of this lesson you shall be able to, • state the point angles of chisels for different materials, • state the different cutting angles of a chisel, • state the effect of rake and clearance angles., Point angles and materials, The coreect point/ cutting angles (b) of the chisel depends, , on the materials to be chipped. sharp angles are given for, soft materials and wide angles for hard materials., , Electrical : Electrician (NSQF LEVEL - 5) - Related Theory for Exercise 1.2.21 & 1.2.22, , Copyright Free under CC BY Licence, , 85
Page 100 :
The correct point angle and angle of inclination generate, the correct rake and clearance angles. (Fig 1), , If the clearance angle is too great, the rake angle reduces., The cutting edge digs in and the cut progressively increases., (Fig 4), Rake angle, Rake angle (g) is the angle between the top face of the, cutting point and normal to the work surface at the cutting, edge. (Fig 2), Clearance angle, Clearance angle (a) is the angle between the bottom face, of the point and tangent to the work surface originating at, the cutting edge. (Fig 2)., , Table, Material to, be cut, , If the clearance angle is too low or zero, the rake angle, increases. the cutting edge cannot penetrate into the work., the chisel will slip. (Fig 3), , Point, angle, , Angle of, inclination, , High carbon, Steel, , 65°, , 39.5°, , Cast iron, , 60°, , 37°, , Midld steel, , 55°, , 34.5°, , Brass, , 50°, , 32°, , Copper, , 45°, , 29.5°, , Aluminium, , 30°, , 22°, , Vee threads - Tap and die set, Objectives : At the end of this lesson you shall be able to, • state the types of threads, • describe the designation of ISO threads., • state pipe thread, parallel female thread and tappered thread, Types of vee threads, Vee threads are available in different forms and standards., The different types of vee threads used for general, engineering threaded fasteners are:, •, , ISO metric thread, , •, , British Standard Whitworth thread, , •, , British Standard fine thread., , 86, , ISO metric thread (Fig 1): This is the form of thread, indicated by B.I.S. for threaded fastening. The standard, identifies two series of threads., •, , ISO Metric coarse, , •, , ISO Metric fine, , The thread angle is 60°. The root of the external thread is, rounded. The crest of the external thread is flat, but, sometimes is rounded depending on the type of manufac-, , Electrical : Electrician (NSQF LEVEL - 5) - Related Theory for Exercise 1.2.21 & 1.2.22, , Copyright Free under CC BY Licence
Page 101 :
turing process. The root of the internal thread is cleared, beyond the width equal to one eighth of the pitch, and is, rounded. The crests of the internal threads are left flat., Designation of ISO metric thread: ISO metric course, threads are designated as, for example - M12., The symbol M indicates that it is ISO metric thread and 12, is the diameter of the thread. For coarse series the pitch of, the threads is standardized for each diameter., ISO metric fine threads are designated as, for example M12 x 1.25., The addition of 1.25 in this case indicates the pitch of the, thread., ISO inch (unified) thread: The ISO inch system (unified), is a recognized standard for interchangeability with the, American National Thread., These threads are used for general purpose engineering, threaded fastening and are of two types, namely, , These threads have 55° angle and are rounded at the crest, and root. There are a definite number of threads per inch for, a particular diameter., The threads are designated by the diameter in inches, followed by the abbreviation of the thread series., Example - 1/2" BSW, British Standard fine (BSF) thread: This thread has the, same form as BSW, but with finer pitches., , •, , unified coarse (UNC), , The threads are designated by the diameter in inches, followed by the thread series., , •, , unified fine (UNF)., , Example - 3/8" BSF, , For unified threads the angle is 60o. The thread profile is, similar to that of the ISO matric thread., Designation of ISO inch (unified) threads, , Screw thread - terms: It is important that the terms used, in describing threads are clearly understood. The following, diagram shows how the terms used relate to a screw of V, form (Fig 3)., , Examples, (a), , 1, 4, , 20 UNC, , (b) 1 28 UNF, 4, Example, This indicates that the diameter of the thread is 1/4", that, it has 20 threads per inch (TPI). The ISO thread series is, UNC (unified coarse). Example (b) has 28 TPI and is of UNF, series., British Standard Whitworth (BSW) thread (Fig 2): This, thread is being replaced by ISO metric thread. However the, application of this thread is still being continued in a limited, manner, particularly in the production of spare parts and, repair works., Electrical : Electrician (NSQF LEVEL - 5) - Related Theory for Exercise 1.2.21 & 1.2.22, , Copyright Free under CC BY Licence, , 87
Page 102 :
Pipe threads, Pipe threads on iron pipe are tapered, so that they form a, water-tight joint when tightened securely. (Fig 1), BSP-Whitworth threads for pipes, BSP-Pipe sizes, of DIN 2999, (inside)(B), , Threads/, inch, , Outside diameter/, mm of the pipe (A), , 1/2", , 14, , 20.955mm, , 3/4", , 14, , 26.441, , 1", , 11, , 33.249, , 1 1/4", , 11, , 41.910, , 1 1/2", , 11, , 47.803, , 2", , 11, , 59.614, , 2 1/2", , 11, , 75.184, , 3", , 11, , 87.884, , 4", , 11, , 113.030, , The actual work of assembling galvanized steel pipe, consists of screwing together lengths of pipes with pipe, fittings. Sealing material must then be applied to fill the, space between the male and female threads in order to, make the joint absolutely water-tight. The Fig 3 shows a, galvanized steel pipe joint., – Parallel female thread (1), – Tapered male thread (2), – Hemp (3), , Hemp packing is used to ensure that any small space, between two metal threads (male and female threads) is, filled up.(Fig 4), , *(BSP - and DIN - pipes meet ISO/P7 standards.), BSP - British Standard Pipe, DIN - German Industrial Norm, ISO - International Organization for Standardization, The illustration shows a galvanized steel pipe with several, full form threads on the end (A) the next two threads have, full form bottoms but flat tops (B) and the last four threads, have flat tops and bottoms (C).(Fig 2), , Hand taps and wrenches, Objectives: At the end of this lesson you shall able to, • list the uses of hand taps, • state the different types of tap wrenches, and state their uses., • distinguish right and left hand thread, • solve the problems related tap drill sizes, Taps: A tap cuts an internal (female) thread either left or, right hand. Taps are usually made in sets of three., •, 88, , First tap or taper tap, , •, , Second tap or intermediate tap, , •, , Plug or bottoming tap., , Electrical : Electrician (NSQF LEVEL - 5) - Related Theory for Exercise 1.2.21 & 1.2.22, , Copyright Free under CC BY Licence
Page 103 :
The taper tap is tapered off for 8 to 10 threads and is used, first, cutting to the full thread gradually. (Fig 1), , The intermediate tap usually has three or four threads, chamfered. This second tap can finish a through hole., (Fig 2), , Soild type tap wrench (Figs 6a and 6b): These wrenches, are not adjustable., They can take only a certain size of a tap. This eliminates, the use of a wrong length of tap wrenches, and thus, prevents damage to the taps., The plug tap has a full-sized untapered thread to the end,, and is the main finishing tap. In the case of a blind hole, a, plug tap must be used. (Fig 3), , Beware of the cutting edges of taps when, handling them., Tap wrenches: Tap wrenches are used to align and drive, the hand taps correctly into the hole to be threaded., Tap wrenches are of different types., •, , Double - ended adjustable wrench, , •, , T-handle tap wrench, , •, , Solid type tap wrench, , Double-ended adjustable tap wrench (Bar type tap, wrench) (Fig 4), , Tap drill size, Before a tap is used for cutting internal threads, a hole is, to be drilled. This hole diameter should be such that is, should have sufficient material in the hole for the tap to cut, the thread., Tap drill sizes for different threads, Tapping drill size for M10 x 1.5 thread, Minor diameter = Major diameter – (2 x depth), , This is the most commonly used type of tap wrench. These, tap wrenches are available in various sizes. They are more, suitable for large diameter taps, and can be used in open, places where there is no obstruction to turn the tap. It is, important to select the correct size of the wrench., T-handle tap wrench (Fig 5): These are small adjustable, chucks with two jaws and a handle to turn the wrench., This tap is useful for working in resctricted places and is, turned with one hand only., This wrench is not available for holding large diameter taps., , Depth of thread = 0.6134 x pitch of a screw, 2 depth of thread = 0.6134 x 2 x pitch, = 1.226 x 1.5 mm = 1.839 mm, Minor dia.(D1) = 10 mm – 1.839 mm, = 8.161 mm or 8.2 mm., This tap drill will produce 100% thread because this is, equal to the minor diameter of the drill. For most fastening, purposes a 100% formed thread is not required., A standard nut with 60% thread is strong enough to be, tightened until the bolt is held firm without stripping the, , Electrical : Electrician (NSQF LEVEL - 5) - Related Theory for Exercise 1.2.21 & 1.2.22, , Copyright Free under CC BY Licence, , 89
Page 104 :
thread. Further it also requires greater force of turning the, tap if a higher percentage formation of thread is required., , Tap drill size, , Considering this aspect a more practical approach for, determining the tap drill sizes is, tap drill size = (major diameter) – pitch, = 10 mm – 1.5 mm = 8.5 mm., , =, , 5", , −, , 1", 11, , =, , 8, 0.625" – 0.091", , =, , 0.534", , 17", , ISO inch (Unified) threads formula, , (0.531 inches)., 32, Compare this with the table of drill sizes for unified inch, threads., , Tap drill size, , What will be the tapping size for following threads?, , Compare this with the table of tap drill sizes for ISO metric, threads., , = (Major diameter) –, , 1, No. of teeth per inch (pitch), , For calculating the tap drill size for, , 5", 8, , The next drill size is, , a M 20, , b UNC, , 3, 8, , UNC thread, , Die and die stock, Objectives: At the end of this lesson you shall be able to, • state the use of each type of die, • state the type of diestock for each type of die., • list the different types of dies, • state the uses of ‘Vee’ blocks, Uses of dies: Threading dies are used to cut external, threads on cylindrical workpieces. (Fig 1), , Types of dies: The following are the different types of dies., Circular split die (Button die), Half die, Adjustable screw plate die, Circular split die\ button die (Fig 2): This has a slot cut, to permit slight variation in size., , 90, , When held in the diestock, variation in the size can be, made by using the adjusting screws. This permits, increasing or decreasing of the depth of cut. When the side, screws are tightened the die will close slightly. (Fig 3) For, adjusting the depth of the cut, the centre screw is advanced, and locked in the groove. This type of die stock is called, button pattern stock., , Half die (Fig 4): Half dies are stronger in construction., Adjustments can be made easily to increase or decrease, the depth of cut., These dies are available in matching pairs and should be, used together., , Electrical : Electrician (NSQF LEVEL - 5) - Related Theory for Exercise 1.2.21 & 1.2.22, , Copyright Free under CC BY Licence
Page 105 :
By adjusting the screw of the diestock, the die pieces can, be brought closer together or can be moved apart., They need a special die holder., Adjustable screw plate die (Fig 5): This is another type, of a two piece die similar to the half die., This provides greater adjustment than the split die., The two die halves are held securely in a collar by means, of a threaded plate (guide plate) which also acts as a guide, while threading (Fig 5), When the guide plate is tightened after placing the die, pieces in the collar, the die pieces are correctly located, and rigidly held., The die pieces can be adjusted, using the adjusting, screws on the collar., , `V' Block, Generally Vee blocks are made of cast iron and have a, large vee on the top surface and a flat bottom or a smaller, vee on the bottom surface.(Fig 1), , This type of die stock is called quick cut diestock.(Fig 6), The bottom of the die halves is tapered to provide the lead, for starting the thread. On one side of each die head, the, serial number is stamped., , Vee block with clamp for marking round bar (Fig 2):, This Vee block has a slot machined on each side so that, a clamp, which is supplied with the block, can be used to, clamp small workpieces for light drilling operations etc., A pair of Vee blocks can be used when the length of bar is, big for the drilling operation., , Both pieces should have the same serial numbers., , Different types of threads (Fig 7), Right hand thread: The shape of thread from right to left, (a)., Left hand thread: The shape of thread from left to right (b)., Single start thread: The pitch and lead are equal or, identical (c)., , Larger sizes are made of cast iron and have one vee only,, machined on the top surface.(Fig 3) These are intended for, supporting larger workpieces, and are not provided with, slots for a clamp. Vee blocks of this type are available in, different sizes., , Double start thread: The lead is twice the pitch (d)., Electrical : Electrician (NSQF LEVEL - 5) - Related Theory for Exercise 1.2.21 & 1.2.22, , Copyright Free under CC BY Licence, , 91
Page 106 :
Pipe vices, Objectives: At the end of this lesson you shall be able to, • name the parts of pipe vice, • state the types and uses of pipe vice, Pipe vices are used to hold pipes, conduits for cutting in, length, thread forming and assembly., Open pipe vice (Fig 1): This type of pipe vice is opened, and closed by turning a spindle with a handle. The movable, jaw is attached to the end of the spindle., , Self-locking hinged pipe vice (Fig 2a): To place the, pipe between the jaws of a self locking hinged pipe vice,, the hinged frame is opened as shown in Fig 2b. A selflocking hook locks the frame, and the pipe is then gripped, between the jaws by turning the spindle of the vice., , Parts, , •, , Hinge to open the frame of the vice. (Refer (a) of Fig 2), , 1. Spindle, , •, , Self-locking hook. (Refer (b) of Fig 2), , Self-locking, hinged pipe vices are available in a number of, sizes to hold pipes and conduits up to an outside diameter, of 150mm., , 2. Handle, 3. Movable jaw, 4. Fixed jaw, Several sizes of one side or open pipe vices are available., They are mainly specified by the maximum outside diameter of the pipe they can hold and by the maximum opening, of the jaws. Three sizes are listed below as an example., Maximum opening, of jaws, , 92, , Maximum outside, diameter of pipe, , 60 mm, , 50 mm, , 90 mm, , 75 mm, , 120 mm, , 100 mm, , Chain pipe vice (Fig 3): A chain pipe vice has only a set, of fixed jaws which are mounted on to a table top or a metal, stand. A strong chain made from high quality steel holds, the pipe to the jaws. The chain is then tightened by turning, the tightening lever of the vice., Chain pipe vices can hold pipes to an outside diameter of, 200mm., Self-locking hinged pipe vice mounted on tripod, stand (Fig 4): This is a self-locking, hinged pipe vice,, mounted on to a foldable metal tripod stand. This kind of, arrangement is very practical as a mobile work-place for, use at building sites, etc., , Electrical : Electrician (NSQF LEVEL - 5) - Related Theory for Exercise 1.2.21 & 1.2.22, , Copyright Free under CC BY Licence
Page 107 :
Marking accessories, Objectives : At the end of this lesson you shall be able to, • state the uses of a box square, • state the uses of a surface plate, • state the uses of an angle plate., Box square (Fig 1): A box square, or key-seat rule, is used, for marking lines on round bars or tubes., , The surface plate is usually made of cast iron or granite., Angle plate: It is made of cast iron. Granite angle plates, are also available.(Fig 3), , It is used as a fixture for holding the work to be laid out and, machined. Faces are right angles, may have slots and may, be fitted with clamps for holding workpieces. (Figs 4 and 5), , Surface plate (Fig 2): This plate with a flat surface of great, accuracy is used for testing the flatness of other surfaces, together with other instruments for measuring, testing and, marking out purposes., , Electrical : Electrician (NSQF LEVEL - 5) - Related Theory for Exercise 1.2.21 & 1.2.22, , Copyright Free under CC BY Licence, , 93
Page 108 :
Limit gauges, Objectives: At the end of this lesson you shall able to, • state the principle of the Go and No-Go gauges and their features, • list out the common types of limit gauges, • state the uses of each type of limit gauges., When a number of components have to be checked it is not, necessary to meassure their sizes exactly but only check, that the component’s sizes lie within the limits of tolerance., The most economical method of checking a component is, with a limit gauge., These gauges are used in inspection because they provide, a quick means of checking a specific dimension., ‘Go’ and ‘No-Go’ end principle, The dimensions of the ‘Go’ and ‘No-Go’ ends of gauges are, determined from the limits stated on the dimension to be, gauged., The ‘Go’ and ‘No-Go’ principle of gaguing is that the ‘Go’, end of the gauges must go into the feature being checked, and the ‘No-Go’ end must not go into the same feature. The, dimension of the ‘Go’ end is equal to the maximum, permissible dimension and that of the ‘No-Go’ end is equal, to the minimum permissible dimension of the component, for external measurements. (Fig 1), , Their production cost must be lower., The ‘Go’ end is made longer than the ‘No-Go’ end for easy, identification. Sometimes a groove is cut on the handle, near the ‘No-Go’ end to distinguish it from the ‘Go’ end., This applies to plug gauges. The dimensions of these, gauges are usually stamped., Thread plug gauges (Fig 3 and 4), Internal threads are checked with thread plug gauges of, ‘Go’ and ‘No-Go’ variety which employ the same principle, as cylindrical plug gauges., , For internal measurements the ‘Go’ end of the gauge is, equal to the minimum limit and that of the ‘No-Go’ end is, equal to the maximum limit of the component. (Fig 2), Essential features, These gauges must be easy to handle and accurately, finished. They are generally finished to one tenth the, tolerance they are designed to control. For example, if the, tolerance is to be maintained at 0.02mm, then the gauge, must be finished to within 0.002mm, of the required size., They must be resistant to wear, corrosion, and expansion, due to temperature., 94, , Electrical : Electrician (NSQF LEVEL - 5) - Related Theory for Exercise 1.2.21 & 1.2.22, , Copyright Free under CC BY Licence
Page 109 :
Thread ring gauges (Fig 5), These gauges are used to check the accuracy of an, external thread. They have a threaded hole in the centre, with three radial slots and a set screw to permit small, adjustments., , Electrical : Electrician (NSQF LEVEL - 5) - Related Theory for Exercise 1.2.21 & 1.2.22, , Copyright Free under CC BY Licence, , 95
Page 110 :
Electrical, Related Theory for Exercise 1.3.24 - 1.3.26, Electrician - Wires - Joints - Soldering - UG cables, Fundamental of electricity - conductors - insulators - wire size measurement, - crimping, Objectives: At the end of this lesson you shall be able to, • define electricity and atom, • explain about the atomic structure, • define the fundamental terms and definition of electricity, • state the type of supply, polarity and the effects of electric current, • state the conductors, insulators, wires - size measurement methods, Introduction, Electricity is one of the today’s most useful sources of, energy. Electricity is of utmost necessity in the modern, world of sophisticated equipment and machinery., Electricity in motion is called electric current. Whereas the, electricity that does not move is called static electricity., Examples of static electricity, •, , Shock received from door knobs of a carpeted room., , •, , Attraction of tiny paper bits to the comb., , Structure of matter, Electricity is related to some of the most basic building, blocks of matter that are atoms (electrons and protons). All, matter is made of these electrical building blocks, and,, therefore, all matter is said to be ‘electrical’., Atom, Matter is defined as anything that has mass and occupies, space. A matter is made of tiny, invisible particles called, molecules. A molecule is the smallest particle of a, substance that has the properties of the substance. Each, molecule can be divided into simpler parts by chemical, means. The simplest parts of a molecule are called atoms., , Electron, It is a small particle revolving round the nucleus of an atom, (as shown in Fig 2). It has a negative electric charge. The, electron is three times larger in diameter than the proton., In an atom the number of protons is equal to the number of, electrons., , Basically, an atom contains three types of sub-atomic, particles that are of relevance to electricity. They are the, electrons, protons and neutrons. The protons and neutrons, are located in the centre, or nucleus, of the atom, and the, electrons travel around the nucleus in orbits., Atomic structure, The Nucleus, The nucleus is the central part of the atom. It contains the, protons and neutrons in equlal numbrs shown in Fig 1., Protons, , Neutron, , The proton has a positive electrical charge. (Fig 1) It is, almost 1840 times heavier than the electron and it is the, permanent part of the nucleus; protons do not take an, active part in the flow or transfer of electrical energy., , A neutron is actually a particle by itself, and is electrically, neutral. Since neutrons are electrically neutral, they are, not too important to the electrical nature of atoms., , c, , d, , Energy shells, , f, , d, , f, , a, , In an atom, electrons are arranged in shells around the, nucleus. A shell is an orbiting layer or energy level of one, or more electrons. The major shell layers are identified by, numbers or by letters starting with ‘K’ nearest the nucleus, 96, , Copyright Free under CC BY Licence, , d, , f
Page 111 :
and continuing alphabetically outwards. There is a maximum, number of electrons that can be contained in each shell., Fig 3 illustrates the relationship between the energy shell, level and the maximum number of electrons it can contain., , Electron distribution, The chemical and electrical behaviour of atoms depends on, how completely the various shells and sub-shells are filled., Atoms that are chemically active have one electron more, or one less than a completely filled shell. Atoms that have, the outer shell exactly filled are chemically inactive. They, are called inert elements. All inert elements are gases and, do not combine chemically with other elements., Metals possess the following characteristics., , If the total number of electrons for a given atom is known,, the placement of electrons in each shell can be easily, determined. Each shell layer, beginning with the first, is, filled with the maximum number of electrons in sequence., For example, a copper atom which has 29 electrons would, have four shells with a number of electrons in each shell as, shown in Fig 4., , •, , They are good electric conductors., , •, , Electrons in the outer shell and sub-shells can move, more easily from one atom to another., , •, , They carry charge through the material., , The outer shell of the atom is called the valence shell and, its electrons are called valence electrons. Because of their, greater distance from the nucleus, and because of the, partial blocking of the electric field by electrons in the inner, shells, the attracting force exerted by nucleus on the, valence electrons is less. Therefore, valence electrons can, be set free most easily. Whenever a valence electron is, removed from its orbit it becomes a free electron. Electricity, is commonly defined as the flow of these free electrons, through a conductor. Though electrons flow from negative, terminal to positive terminal, the conventional current flow, is assumed as from positive to negative., Conductors, insulators and semiconductors, Conductors, A conductor is a material that has many valance electrons, permitting electrons to move through it easily. Generally,, conductors have many valence shells of one, two or three, electrons. Most metals are conductors., Some common good conductors are Copper, Aluminium,, Zinc, Lead, Tin, Eureka, Nichrome, are conductors, where, as silver and gold are very good conductors, Insulators, , Similarly an aluminium atom which has 13 electrons has, 3 shells as shown in Fig 5., , An insulator is a material that has few, if any, free electrons, and resists the flow of electrons. Generally, insulators, have full valence shells of five, six or seven electrons. Some, common insulators are air, glass, rubber, plastic, paper,, porcelain, PVC, fibre, mica etc., Semiconductors, A semiconductor is a material that has some of the, characteristics of both the conductor and insulator., Semiconductors have valence shells containing four, electrons., Common examples of pure semiconductor materials are, silicon and germanium. Specially treated semiconductors, are used to produce modern electronic components such, as diodes, transistors and integrated circuit chips., , Electrical : Electrician (NSQF LEVEL - 5) - Related Theory for Exercise 1.3.24 - 1.3.26, , Copyright Free under CC BY Licence, , 97
Page 112 :
Simple electrical circuit and its elements, Objectives: At the end of this lesson you shall be able to, • describe a simple electric circuit, • explain the current, its units and method of measurement (ammeter), • explain the emf, potential difference, their units and method of measurement (voltmeter), • explain resistance and its unit, and quantity of electricity., Simple electric circuit, A simple electrical circuit is one in which the current flows, from the source to a load and reaches back the source to, complete the path., As shown in Fig 1, the electrical circuit should consist of, the following., •, , An energy source (cell) to provide the voltage needed to, force the current through the circuit., , •, , Conductors through which the current can flow., , •, , A load (resistor ‘R’) to control the amount of current and, to convert the electrical energy to other forms., , •, , A control device (switch ‘S’) to start or stop the flow of, current., , Flow of electric current is nothing but the flow of free, electrons. Actually the electrons flow is from the negative, terminal of the battery to the lamp and reaches back to the, positive terminal of the battery., However direction of current flow is taken conventionally, from the +ve terminal of the battery to the lamp and back, to the –ve terminal of the battery. Hence, we can conclude, that conventional flow of current is opposite to the direction, of the flow of electrons. Throughout the Trade Theory book,, the current flow is taken from the +ve terminal of source to, the load and then back to the –ve terminal of the source., Ampere, The unit of current (abbreviated as I) is an ampere (symbol, A). If 6.24 x 10¹⁸ electrons pass through a conductor per, second having one ohm resistance with a potential difference, of one volt causes one ampere current has passed through, the conductor., Ammeter, We know the electrons cannot be seen and no human, being can count the electrons. As such an instrument, called ammeter is used to measure the current in a circuit., As an ammeter measures the flow of current in amperes it, should be connected in series with the resistance (Load)., as shown in Fig 3. For the decimal and decimal sub-, , In addition to the above, the circuit may have insulators, (PVC or rubber) to confine the current to the desired path,, and a protection device (fuse ‘F’) to interrupt the circuit in, case of malfunction of the circuit (excess current)., Electric current, Fig 2 shows a simple circuit which consists of a battery as, the energy source and a lamp as the resistance. In this, circuit, when the switch is closed, the lamp glows because, of the electric current flows from the +ve terminal of the, source (battery) via the lamp and reaches back the –ve, terminal of the source., , multiples of the ampere we use the following expressions., 1 kilo-ampere = 1 kA = 1000 A = 1 x 10³A, 1 milli-ampere = 1 mA = 1/1000 A = 1 x 10⁻³A, 1 micro-ampere = 1 μA = 1/1000000 A = 1 x 10⁻⁶A, 98, , Electrical : Electrician (NSQF LEVEL - 5) - Related Theory for Exercise 1.3.24 - 1.3.26, , Copyright Free under CC BY Licence
Page 113 :
Electro Motive Force (EMF), In order to move the electrons in a circuit- that is to make, the current to flow, a source of electrical energy is required., In a torch light, the battery is the source of electrical, energy., The terminals of the battery are indicated in the circuit, symbol by two lines, the longer line for the positive and the, shorter for the negative terminal., Within the battery the negative terminal contains an, excess of electrons whereas the positive terminal has a, deficit of electrons. The battery is said to have an, electromotive force (emf) which is available to drive the free, electrons in the closed path of the electrical circuit. The, difference in the distribution of electrons between the two, terminals of the battery produces this emf., , circuit shown in Fig 4, when the switch is in open conidition,, the voltage across the terminals of the cell is called, electromotive force (E) whereas when the switch is in the, closed position, the voltage across the cell is called, potential difference (p.d) which wil be lesser in value than, the electromotive force earlier measured. This is due to the, fact that the internal resistance of the cell drops a fer volts, when the cell supplies current to the load., The force which causes current to flow in the circuit is, called emf. Its symbol is E and its unit is Volts (V). It can, be calculated as, EMF = voltage at the terminal of source of supply +, voltage drop in the source of supply, or emf = VT + IR, Terminal voltage (p.d), It is the voltage available at the terminal of the source of, supply. Its symbol is VT. Its unit is also the volt and is also, measured by a voltmeter. It is given by the emf minus the, voltage drop in the source of supply, i.e., VT = EMF - IR, where I is the current and R is the resistance., Hence EMF is always greater than p.d [E.M.F>p.d], Voltmeter, , In Simple,, Electromotive force (EMF) is the electrical force, which is, initially available in elecrical source, cause to move the free, electrons in a conductor, , Electrical voltage is measured with a voltmeter. In order to, measure the voltage of a source, the terminals of the, voltmeter must be connected to the terminals of the, source. Positive to the positive terminal and negative to the, negative terminal, as shown in Fig 5. The voltmeter, connection is across or it is a parallel connection., , Its unit is ‘Volt’, It is denoted by letter ‘E’, It cannot be measured by any meter. It can be only, calculated by using the formula, E = Potential Difference (P.D) + V. drop, = p.d + V.drop, E = V + IR, Electromotive force is essential to drive the electrons in, circuit, This force is obtained from the source of supply i.e. Torch, lights, dynamo, System International (SI) unit of electromotive force is, Volts (symbol ‘E’), Potential Difference (PD), The difference of volatge and pressure across two points in, a circuit is called a potential difference (p.d) and is, measured in volts., In a circuit, when a current flows, there will be a potential, difference across the terminals of the resistor/load. In the, , For the decimal or decimal sub-multiples of the volt, we use, the following expressions., 1 kilo-volt, , = 1 KV = 1000 V, = 1 x 10³V, , Electrical : Electrician (NSQF LEVEL - 5) - Related Theory for Exercise 1.3.24 - 1.3.26, , Copyright Free under CC BY Licence, , 99
Page 114 :
1 milli-volt, , = 1 mV = 1/1000 V, , International Ohm, , –3, , = 1 x 10 V, , It is defined as that resistance offered to an unvarying, current (DC) by a column of mercury at the temperature of, melting ice (i.e. 0°C), 14.4521 g in mass, of constant crosssectional area (1 sq. mm) and 106.3 cm in length., , 1 micro-volt = 1 μV = 1/1000000, V = 1 x 10⁻⁶V, Resistance (R), , International ampere, , In addition to the current and voltage there is a third quantity, which plays a role in a circuit, called the electrical resistance. Resistance is the property of a material by which it, opposes the flow of electric current., , One international ampere may be defined as that unvarying, current (DC) which when passed through a solution of silver, nitrate in water, deposits silver at the rate of 1.118 mg per, second at the cathode., , The resistance is the property of opposition to the flow of, the current offered by the circuit elements like resistance, of the conductor or load is limit the flow of current, , Internation volt, , In absence of resistance in a circuit, the current, will reach an abnormal high value endangering the circuit itself, Ohm, The unit of electrical resistance (abbreviated as R) is ohm, (symbol Ω)., For the decimal multiples or decimal sub-multiples of the, ohm we use the following expressions:, 1 megohm, , = 1 MΩ = 1000000Ω, , = 1 x 10⁶Ω, , 1 kilo-ohm, , = 1 kΩ = 1000Ω, , = 1 x 10³Ω, , 1 milli-ohm, , = 1 mΩ = 1/1000Ω, , = 1 x 10⁻³Ω, , 1 micro-ohm, , = 1 μΩ = 1/1000000Ω = 1 x 10⁻⁶Ω, , Meter to measure resistance, Ohmic value of a medium resistance is measured by an, ohmmeter or a Wheatstone bridge. (Fig 6) There is a, provision to measure the ohmic value of a resistance in a, multimeter. There are various methods to determine the, ohmic value of resistance. Some of these methods will be, explained later in this book., , It is defined as that potential difference which when applied, to a conductor whose resistance is one international ohm, produces a current of one international ampere. Its value is, equal to 1.00049V., Conductance, The property of a conductor which conducts the flow of, current through it is called conductance. In other words,, conductance is the reciprocal of resistance. Its symbol is, G (G = 1/R) and its unit is mho represented by Ʊ . Good, conductors have large conductances and insulators have, small conductances. Thus if a wire has a resistance of R, Ω, its conductance will be 1/R, Quantity of electricity, As the current is measured in terms of the rate of flow of, electricity, another unit is necessary to denote the quantity, of electricity (Q) passing through any part of the circuit in, a certain time. This unit is called the coulomb (C). It is, denoted by the letter Q. Thus, Quantity of electricity = current in amperes (I), x time in seconds (t), or, , Q=Ixt, , Coulomb, It is the quantity of electricity transferred by a current of one, ampere in one second. Another name for the above unit is, the ampere-second. A larger unit of the quantity of electricity, is the ampere-hour (A.h) and is obtained when the time unit, is in hours, 1 A.h = 3600 Asec or 3600 C, , 100, , Electrical : Electrician (NSQF LEVEL - 5) - Related Theory for Exercise 1.3.24 - 1.3.26, , Copyright Free under CC BY Licence
Page 115 :
Types of electrical supply, Objectives: At the end of this lesson you shall be able to, • explain the difference types of electrical supply, • differentiate between alternating current and direct current, • explain the method of identification of polarity in DC source, • state the effect of electric current, There are various types of instruments working on different, principles. Each instrument is designed to measure a, particular electrical quantity or more than one quantity with, suitable modification and necessary instruction. Further, they may be designed to measure AC or DC supply, quantities or can be used in either supply., To enable proper use of the instruments, the technician, should be able to identify the type of supply with the help, of the details given below., Type of electrical supply (Voltage), There are two types of electrical supply in use for various, technical requirements. The alternating current supply, (AC) and the direct current supply (DC)., ___ DC is represented by this symbol., , ~, , AC is represented by this symbol., , DC Supply, The most common sources of DC supply are the cells/, batteries (Figs 1a and 1b) and DC generators (dynamos)., (Fig 1C), Direct voltage is of constant magnitude (amplitude). It, remains at the same amplitude from the moment of, switching on to the moment of switching off. The polarity of, the voltage source does not change. (Fig 2), , The polarity of direct voltage (commonly known as DC, voltage) is positive (+ve) and negative (–ve). The direction, of conventional flow of current is taken as from the positive, to the negative terminal outside the source. (Fig 3), Direct Current (D.C) (Fig 4), Voltage is the cause of electrical current. If a direct current, flows through a circuit, the movement of electrons in the, circuit is unidirectional., , Thus direct current remains at the same value from the, moment of switching on to the moment of switching off., (Direct current in common usage is known as DC current.), AC Supply, The source of AC supply is AC generators (alternators)., (Fig 5a) The supply from a transformer (Fig 5b) is also AC., , Electrical : Electrician (NSQF LEVEL - 5) - Related Theory for Exercise 1.3.24 - 1.3.26, , Copyright Free under CC BY Licence, , 101
Page 116 :
For example, the AC supply used for lighting is 240V 50 Hz., (Alternating voltage in common use is known as AC, voltage.) AC supply terminals are marked as phase/line(L), and neutral(N)., Current is caused in an electric circuit due to the application of voltage. If an alternating voltage is applied to an, electrical circuit, an alternating current (commonly known, as AC current) will flow. (Figs 7 and 8), , Alternating voltage, AC supply sources change their polarity constantly, and, consequently the direction of voltage also magnitude. The, voltage supplied to our homes by power plants is alternating., Fig 6 shows a sinusoidal alternating voltage over time, (wave-form)., , AC supply is expressed by the effective value of the voltage,, and the number of times it changes in one second is known, as frequency. Frequency is represented by 'F' and its unit, is in Hertz(Hz)., , Polarity test in DC, Polarity, The polarity of a DC supply source should be identified as, positive or negative. We can also use the term to indicate, how an electric device is to be connected to the supply. For, example, when putting new cells in a transistor radio we, must put the cells correctly such that the positive terminal, of one cell connects to the positive terminal of the radio and, the negative terminal of the other cell connects to the, negative terminal of the radio as shown in Fig 1., , 102, , Electrical : Electrician (NSQF LEVEL - 5) - Related Theory for Exercise 1.3.24 - 1.3.26, , Copyright Free under CC BY Licence
Page 117 :
Importance of the polarity, Direct current supply has fixed polarity, positive and, negative marked as + and –. Electric devices which have, positive and negative identifications on their terminals are, said to be polarised. When connecting such devices to a, source of voltage (such as a battery or DC supply), We must observe the correct polarity markings. That is the, positive terminal of the device must be connected to the, positive terminal of the source, and the negative to the, negative. If the polarity is not observed correctly (that is,, if +ve is connected to –ve) the device will not function and, may be damaged., To get more voltage, current and power, the voltage, sources like cells, batteries and generator are often connected in series, or in parallel or in series/parallel combination circuit. To connect them in such a manner we must, know the correct polarity of the source. Fig 2 shows the, method of connecting 3 cells in series to get more voltage., Fig 3 shows connection of 3 cells in parallel for getting more, current., , Polarity of the battery, , Testing polarity by MC meter, The polarity of a cell is determined by the use of a moving, coil volt-meter. The terminals of the MC meter are marked, as +ve and –ve. MC meters are called as polarised as they, have to be connected as per the polarity marking. By using, a low range (0-10V) MC voltmeter we can find out the, voltage of a cell., , To determine the polarity of the terminals of an unmarked, battery, that is +ve and –ve we can use a low range MC, voltmeter. If the voltmeter reads positive reading, say 10 or, 12 volts then the polarity of the terminals are correct as per, the markings on the meter terminals. If the meter reading, is negative, that is below zero, the battery polarity is not, correct with respect to the meter., Polarity of DC supply, , The connections are made as per Fig 4 the voltmeter reads, 1.5 volts. The polarity of the cell is correct as per the, marked polarity on the meter terminals. If the pointer of the, voltmeter deflects as in Fig 5, below zero, the polarity is not, correct. From this we conclude that the meter reads in, forward direction only if the instrument is connected with, correct polarity as per the markings on the instrument, terminals., , Electrical : Electrician (NSQF LEVEL - 5) - Related Theory for Exercise 1.3.24 - 1.3.26, , Copyright Free under CC BY Licence, , 103
Page 118 :
In the same way to find out the polarity of DC generator or, a DC source it is advisable to use a moving coil type, voltmeter with a suitable range, of say 0-300 volts (Fig 6)., To protect the meters, always use higher range meters, above the rated voltage of the generator or DC source, supply., Marking made in practice, Generally in DC source the +ve terminal of the supply lead, is Red in colour and –ve terminal of the supply lead is Blue, or Black in colour. Battery terminals are marked as +ve, and –ve on the body or on the terminal post., •, , For cells on top of the cell is marked as +ve and the, bottom is marked as –ve, , •, , The battery terminal is marked as + and is Red in, colour, and the other terminal is marked as – and, Black or Blue in colour. (Fig 7), Effects of electric current, When an electric current flows through a circuit, is judged, by its effects, which are given below., 1 Chemical effect, When an electric current is passed through a conducting, liquid (i.e. acidulated water) called an electrolyte, it is, decomposed into its constituents due to chemical action., The practical application of this effect is utilized in, electroplating, block making, battery charging, metal, refinery, etc., 2 Heating effect, , Neon polarity indicator, To check the polarity, a neon lamp in series with a 220k, ohms resistor could be used (as shown in Fig 8). Touch the, probes of the neon lamp circuit across the circuit to be, tested. The lamp will light when voltage is present. If both, electrodes in the lamp glow, you have an AC power source., If only one electrode glows, the voltage is DC and the, lighted electrode will be on the side of the negative polarity, of the source., Therefore, you also have a polarity check on DC circuits., (Fig 8) A commercial neon polarity indicator is shown in Fig, 9. It has an indicating glass window in which the polarity, touched by the pointed end of the indicator will be displayed, as +ve or –ve through neon signs., , When an electric potential is applied to a conductor, the, flow of electrons is opposed by the resistance of the, conductor and thus some heat is produced. The heat, produced may be greater or lesser according to the, circumstances, but some heat is always produced. The, application of this effect is in the use of electric presses,, heaters, electric lamps, etc., 3 Magnetic effect, When a magnetic compass is placed under a current, carrying wire, it is deflected. It shows that there is some, relation between the current and magnetism. The wire, carrying current does not become magnet but produces a, magnetic field in the space. If this wire is wound on an iron, core (i.e. bar), it becomes an electro-magnet. This effect of, electric current is applied in electric bills, motors, fans,, electric instruments, etc., 4 Gas ionization effect, When electrons pass through a certain gase sealed in a, glass tube, it becomes ionised and starts emitting light, rays, such as in fluorescent tubes, mercury vapour lamps,, sodium vapour lamps, neon lamps, etc., 5 Special rays effect, Special rays like X-rays and laser rays can also be, developed by means of an electric current., , 104, , Electrical : Electrician (NSQF LEVEL - 5) - Related Theory for Exercise 1.3.24 - 1.3.26, , Copyright Free under CC BY Licence
Page 119 :
6 Shock effect, The flow of current through the human body may cause a, severe shock or even death in many cases. If this current, is controlled to a specific value, this effect of current can be, used to give light shocks to the brain for the treatment of, mental patients., , Conductors - insulators - wires - types, Objectives: At the end of this lesson you shall be able to, • differentiate between conducting and insulating materials, • state the electrical properties of conducting materials, • state the terms used in electrical cables, • state the characteristics of copper and aluminium conductors, • state the types and propertites of insulating materials., • describe the method of measurement of wire size using SWG, • explain the method of measure wire size by outside micrometer, Conductors and insulators, Material with high electron mobility (many free electrons), are called conductor., Materials that contain many free electrons and are capable, of carrying an electric current are known as conductors., Examples - silver, copper, aluminium and most other, metals., Materials with low electron mobility (few (or) no free, electron) are called insulators, Materials that have only a few electrons and are incapable, of allowing the current to pass through them are known as, insulators., Examples - wood, rubber, PVC, porcelain, mica, dry paper, and fibreglass., Conductors, The use of conductors and their insulation is regulated by, I E regulations and BIS (ISI) code of practice., The I E regulations and I S cover all electrical conductors, listing the minimum safety precautions needed to safeguard, people, buildings and materials from the hazards of using, electricity., , Conductors form an unbroken line carrying electricity from, the generating plant to the point where it is used. Conductors, are usually made of copper or aluminium., Current passing through a conductor generates heat. The, amount of heat generated depends on the square of the, current that passes through the conductor and the, resistance of the conductor., As the heat developed in the conductor depends upon the, resistance of the conductor the cross-sectional area of the, conductor must have a large enough area to give it a low, resistance. But the cross- sectional area must also be, small enough to keep the cost and weight as low as, possible., The best cross-sectional area depends upon how much, current the conductor can carry without much voltage drop, in the line and heat generation in the conductor., There is a limit to the temperature each kind of insulation, can safely withstand and also the type of insulation which, can withstand the physical chemical and temperature, zones of the surroundings., BIS (ISI) code specifies the maximum current considered, safe for conductors of different sizes, having different, insulation and installed in different surroundings., Size of conductors, The size is specified by the diameter in mm or the crosssectional area. Typical sizes are 1.5 sq.mm, 2.5 sq.mm,, 6 sq.mm etc., Still in India the old method of specifying the diameter by, the standard wire gauge number is in use., Classfication of conductors, Wires and cables can be classified by the type of covering, they have., Bare conductors, , Wires and cables are the most common forms of conductors., They are made in a wide variety of forms to suit many, different applications. (Fig 1), , They have no covering. The most common use of bare, conductors is in overhead electrical transmission and, distribution lines. For earthing also bare conductors are, used., , Electrical : Electrician (NSQF LEVEL - 5) - Related Theory for Exercise 1.3.24 - 1.3.26, , Copyright Free under CC BY Licence, , 105
Page 120 :
Insulated conductors, , Cable (flexible), , They have a coating of insulation. The insulation separates, the conductor electrically from other conductors and from, the surroundings. It allows conductors to be grouped, without danger. Additional covering over the insulation, adds mechanical strength and protection against weather,, moisture and abrasion., , A flexible cable contains one or more cores, each formed, of a group of wires, the diameters of the cores and of the, wires being sufficiently small to afford flexibility., , Solid and stranded conductors, A solid conductor is one in which there will be only one, conductor in the core as shown in Fig 2. A stranded, conductor is one in which there will be a number of smaller, sized conductors twisted to form the core as shown in, Fig 3., The number of conductors ranges from 3 to 162 and the, conductor size varies from 0.193 mm to 3.75 mm diameter, depending upon the current carrying capacity and also, upon whether these conductors are used in cables or, overhead lines., , Core, All cables have one central core or a number of cores of, stranded conductors farming high conductivity; generally, there are one, two, three, three and half and four cores., Each core is insulated separately and there is overall, insulation around the cores., Wire, A solid substance (conductor) or an insulated conductor, (solid or stranded) subjected to tensile stress with or, without screen is called a wire., Copper and aluminium, In electrical work, mostly copper and aluminium are used, for conductors. Though silver is a better conductor than, copper, it is not used for general work due to higher cost., Copper used in electrical work is made with a very high, degree of purity, say 99.9 percent., Characteristics of copper, 1 It has the best conductivity next to silver., 2 It has the largest current density per unit area compared, to other metals. Hence the volume required to carry a, given current is less for a given length., 3 It can be drawn into thin wires and sheets., 4 It has a high resistance to atmospheric corrosion:, hence, it can serve for a long time., , Normally stranded conductors are designated as 10 sq., mm cable of size 7/1.40 where 10 sq.mm gives the area of, the cross-section, in the size, numerator (7) gives the, number of conductors and the denominator 1.40 gives the, diameter of the conductor in mm. Alternatively 7/1.40 cable, is the same as 7/17 whereas in the latter case the, denominator is expressed in Standard Wire Gauge (SWG), number., Stranded conductors are more flexible and have better, mechanical strength. According to recent stipulation, the, cable size should be expressed in sq. millimetres or they, can be expressed in terms of the number of conductors in, the cable and the diameter of the conductor in mm., Cable, A cable is a length of single, insulated conductor (single or, stranded), or two or more such conductors - each provided, with its own insulation, and are laid up together. The, insulated conductor or conductors may or may not be, provided with an overall mechanical protective covering., Cable (armoured), , 5 It can be joined without any special provision to prevent, electrolytic action., 6 It is durable and has a high scrap value., Next to copper, aluminium is the metal used for electrical, conductors., Characteristics of aluminium, 1 It has good conductivity, next to copper. When compared, to copper, it has 60.6 percent conductivity. Hence, for, the same current capacity, the cross-section for the, aluminium wire should be larger than that for the copper, wire., 2 It is lighter in weight., 3 It can be drawn into thin wires and sheets. But loses its, tensile strength on reduction of the cross-sectional, area., 4 A lot of precautions needs to be followed while joining, aluminium conductors., 5 The melting point of aluminium is low, hence it may get, damaged at points of loose connection due to heat, developed., , An armoured cable is provided with a wrapping of metal, 6 It is cheaper than copper., (usually in the form of tape or wire), serving as a mechanical, protection., 106, Electrical : Electrician (NSQF LEVEL - 5) - Related Theory for Exercise 1.3.24 - 1.3.26, , Copyright Free under CC BY Licence
Page 121 :
Table 1 shows the properties of copper compared with, those of aluminium., Table 1, Chararacteristics of conductor materials, Sl., No., , Properties, , Copper, (Cu), , high dielectric strength, , White, brown, , •, , resistance to temperature, , •, , flexibility, , 35, , •, , mechanical strength., , Colour, , 2, , Electrical conductivity, in MHO/metre, , 3, , Resistivity at 20°C in, ohm/metre (Crosssectional area in, 2, 1 mm ), , 0.01786, , Melting point, , 1083°C, , 660°C, , 8.93, , 2.7, , 0.00393, , 0.00403, , 3, , 5, , Density in kg/cm, , 6, , Temperature coefficient, of resistance at 20°C, per °C, , 7, , Coefficient of linear, expansion at 20°C, per °C, , 8, , Tensile strength in, 2, Nw/mm, , 56, , Every electrical device is protected by some kind of, insulation. The desirable characteristics of insulation materials are:, •, , 1, , 4, , Reddish, , Aluminium, (Al), , insulation layer can withstand without breaking down. The, potential difference that causes a breakdown is called the, breakdown voltage of the insulation., , No single material has all the characteristics required for, every application. Therefore, many kinds of insulating, materials have been developed., , 0.0287, , Insulating tapes, Various tapes are used for insulating electrical equipments,, conductors and components. Some of these are adhesive., The tapes commonly used include friction, rubber, plastic, and varnished cambric tapes., Rubber tape, -6, 17 x 10, , 220, , 23 x 10, , -6, , 70, , Properties of insulating materials, Two fundamental properties of insulation materials are, insulation resistance and dielectric strength. They are, entirely different from each other and measured in different, ways., Insulation resistance, It is the electrical resistance of the insulation against the, flow of current. Megohmmeter (Megger) is the instrument, used to measure insulation resistance. It measures high, resistance values in megohms without causing damage to, the insulation. The measurement serves as a guide to, evaluate the condition of the insulation., Dielectric strength, It is the measure of how much potential difference the, , Rubber tapes are used for insulating joints. The tape is, applied under slight tension. Pressure causes the layers, to bend together. Application of this restores insulation but, will not be mechanically strong., Friction tape, This is used over rubber tape insulation. This is made up, of cotton cloth impregnated with an adhesive. It does not, stretch like the rubber tape. The friction tape does not have, insulating qualities of the rubber tape, hence should not be, used by itself for insulation., Plastic tape (PVC tape), This is used more than the other tapes. PVC tapes have, the following advantages., •, , High dielectric strength, , •, , Very thin, , •, , Stretches to conform to contours of joints, , Varnished cambric tapes, These tapes are made of cloth impregnated with varnish., It usually has no adhesive coating. Available in sheets and, rolls and are ideal for insulating motor connecting leads., , Measurement of wire sizes - standard wire gauge - outside micrometer, Necessity of measuring the wire sizes, To execute a wiring job proper planning is necessary. After, considering the requirements of the house owner, the, electrician prepares a layout plan of the wiring and an, estimate of the cost of the wiring materials and labour. A, proper estimate involves determination of current in different, , loads, correct selection of the type of cable, size of the, cable and the required quantity. Any error will result in, defective wiring, fire accidents and bring unhappiness to, both the house owner and the electrician., , Electrical : Electrician (NSQF LEVEL - 5) - Related Theory for Exercise 1.3.24 - 1.3.26, , Copyright Free under CC BY Licence, , 107
Page 122 :
While selecting the cable sizes, the electrician has to take, into consideration the proposed connected load, future, changes in load, the length of the cable run and the, permissible voltage drop in the cable., , A sound knowledge about the area of the cross-section of, the core, the diameter of the single strand of the conductor, and the number of conductors in each core of the stranded, conductor is essential for a wireman to be successful in his, carreer., , Table 1 - Conversion table SWG to mm/inch, SWG No., , 108, , mm, , inch, , SWG No., , mm, , inch, , 7/0, , 12.7, , 0.500, , 23, , 0.61, , 0.024, , 6/0, , 11.38, , 0.464, , 24, , 0.56, , 0.022, , 5/0, , 10.92, , 0.432, , 25, , 0.51, , 0.020, , 4/0, , 10.16, , 0.400, , 26, , 0.46, , 0.018, , 3/0, , 9.44, , 0.372, , 27, , 0.42, , 0.0164, , 2/0, , 8.83, , 0.348, , 28, , 0.38, , 0.0148, , 0, , 8.23, , 0.324, , 29, , 0.34, , 0.0136, , 1, , 7.62, , 0.300, , 30, , 0.31, , 0.0124, , 2, , 7.01, , 0.276, , 31, , 0.29, , 0.0116, , 3, , 6.40, , 0.252, , 32, , 0.27, , 0.0108, , 4, , 5.89, , 0.234, , 33, , 0.25, , 0.0100, , 5, , 5.38, , 0.212, , 34, , 0.23, , 0.0092, , 6, , 4.88, , 0.192, , 35, , 0.21, , 0.0084, , 7, , 4.47, , 0.176, , 36, , 0.19, , 0.0076, , 8, , 4.06, , 0.160, , 37, , 0.17, , 0.0068, , 9, , 3.66, , 0.144, , 38, , 0.15, , 0.0060, , 10, , 3.25, , 0.128, , 39, , 0.13, , 0.0052, , 11, , 2.95, , 0.116, , 40, , 0.12, , 0.0048, , 12, , 2.64, , 0.104, , 41, , 0.11, , 0.0044, , 13, , 2.34, , 0.092, , 42, , 0.10, , 0.0040, , 14, , 2.03, , 0.080, , 43, , 0.09, , 0.0036, , 15, , 1.83, , 0.072, , 44, , 0.08, , 0.0032, , 16, , 1.63, , 0.064, , 45, , 0.07, , 0.0028, , 17, , 1.42, , 0.056, , 46, , 0.06, , 0.0024, , 18, , 1.22, , 0.048, , 47, , 0.05, , 0.0020, , 19, , 1.02, , 0.040, , 48, , 0.04, , 0.0016, , 20, , 0.91, , 0.036, , 49, , 0.03, , 0.0012, , 21, , 0.81, , 0.032, , 50, , 0.02, , 0.0010, , 22, , 0.71, , 0.028, , Electrical : Electrician (NSQF LEVEL - 5) - Related Theory for Exercise 1.3.24 - 1.3.26, , Copyright Free under CC BY Licence
Page 123 :
To measure the size of conductors, a electrician can use, normally a standard wire gauge or an outside micrometer, for more accurate results., , For example, SWG No. 0 (zero) is equal to 0.324 inch or, 8.23 mm in diameter whereas SWG No.36 is equal to, 0.0076 inch or 0.19 mm in diameter., , The size of wires are designed more carefully by the, manufacturers. Though the Bureau of Indian Standards, (BSI) specifies the cables by the area of the cross-section, in square millimetres, the manufacturers still produce the, cable with the diameter of each wire and number of wires, in the stranded cables. Sometimes the indicated size of, cable by the manufacturer may not be correct and the, electrician has to ascertain the size by measurement., , While measuring the wire, the wire should be cleaned and, then inserted into the slot of the wire gauge to determine the, SWG number (Fig 2). The slot in which the wire just slides, in is the correct slot and the SWG number could be read, in the gauge directly. In most of the wire gauges to save the, trouble of referring to the table, the wire diameter is, inscribed on the reverse of the gauge., , Standard Wire Gauge (SWG), The size of the conductor is given by the standard wire, gauge number. According to the standards each number, has an assigned diameter in inch or mm. This is given in, Table 1. The standard wire gauge, shown in Figure 1 could, measure the wire size in SWG numbers from 0 to 36. It, should be noted that the higher the number of wire gauge, the smaller is the diameter of the wire., , American Wire Gauge (AWG), The American wire gauge is different from the British, standard wire gauge. In an American wire gauge (AWG) the, diameter is represented in mils rather than inch or mm. One, mil is one thousandth part of an inch. Please note there is, no direct conversion from AWG to SWG., , Measurement of wire size by Outside micrometers, A micrometer is a precision instrument used to measure a, job, generally within an accuracy of 0.01 mm., Micrometers used to take the outside measurements are, known as outside micrometers. (Fig 1), The parts of a micrometer, Frame, The frame is made of drop-forged steel or malleable cast, iron. All other parts of the micrometer are attached to this., Barrel/sleeve, The barrel or sleeve is fixed to the frame. The datum line and, graduations are marked on this., Thimble, The thimble is attached to the spindle and on the bevelled, surface of the thimble, the graduation is marked., , Electrical : Electrician (NSQF LEVEL - 5) - Related Theory for Exercise 1.3.24 - 1.3.26, , Copyright Free under CC BY Licence, , 109
Page 124 :
Spindle, , This value is called the least count of the micrometer., , One end of the spindle is the measuring face. The other end, is threaded and passes through a nut. The threaded, mechanism allows for the forward and backward movement, of the spindle., Anvil, The anvil is one of the measuring faces which is fitted on the, micrometer frame. It is made of alloy steel and finished to, a perfectly flat surface., Spindle lock-nut, The spindle lock-nut is used to lock the spindle at a desired, position., Ratchet stop, The ratchet stop ensures a uniform pressure between the, measuring surfaces., , The accuracy or least count of a metric outside, micrometer is 0.01 mm., Outside micrometers are available in ranges of 0 to 25 mm,, 25 to 50 mm, and so on. For electrician, to read the size, of the wire 0 to 25 mm is only suitable., Reading micrometer measurements, How to read a measurement with an outside micrometer?, a) Read on the barrel scale, the number of whole millimetres, that are completely visible from the bevel edge of the, thimble. It reads 4 mm. (Fig 3), b) Add to this any half millimetre that is completely visible, from the bevel edge of the thimble and away from the, whole millimetre reading., , Principle of the micrometer, The micrometer works on the principle of screw and nut., The longitudinal movement of the spindle during one, rotation is equal to the pitch of the screw. The movement, of the spindle to the distance of the pitch or its fractions can, be accurately measured on the barrel and thimble., Graduations, In metric micrometers the pitch of the spindle thread is 0.5, mm., Thereby, in one rotation of the thimble, the spindle advances, by 0.5 mm., , The figure reads one division (Fig 4) mm after the 4 mm, mark. Hence 0.5 mm to be added to the previous, reading., c) Add the thimble reading to the two earlier readings., , In a 0-25 mm outside micrometer, on the barrel a 25 mm, long datum line is marked. (Fig 2) This line is further, graduated in millimetres and half millimetres (ie. 1 mm &, 0.5 mm). The graduations are numbered as 0, 5, 10, 15, 20, & 25 mm on the barrel., The circumference of the bevel edge of the thimble is, graduated into 50 divisions and marked 0-5-10-15... 45-50, in a clockwise direction., The distance moved by the spindle during one rotation of, the thimble is 0.5 mm., Movement of one division of the thimble, , The figure shows the 5th division of the thimble is coinciding, with the datum line of the barrel. Therefore, the reading of, the thimble is 5 x 0.01 mm = 0.05 mm. (Fig 5), The total reading of the micrometer., a 4.00 mm, b 0.50 mm, c 0.05 mm., Total reading = 4.55 mm (Fig 5), , = 0.5 x 1/50 = 0.01 mm., , 110, , Electrical : Electrician (NSQF LEVEL - 5) - Related Theory for Exercise 1.3.24 - 1.3.26, , Copyright Free under CC BY Licence
Page 125 :
measuring surfaces using the ratchet. Read the micrometer., If the thimble zero is coincident with the datum line of the, barrel, error is zero. If it reads higher value, the error is +ve;, if it reads lesser value the difference between zero and the, read value is -ve error., If there is minus error it should be added to the total reading, and if there is plus error the value should be subtracted from, the total reading., The faces of the anvil and spindle must be free from dust,, dirt and grease., Precautions to be followed while using a micrometer, Before using the micrometer for measurement, it is, necessary to ascertain that there is no error in the, micrometer. To find the error, close the jaws of the, , While reading the micrometer, the spindle must be locked, with the reading., Do not drop or handle the micrometer roughly., , Skinning of cables, Objective: At the end of this lesson you shall be able to, • state the method of skinning of cable., The installation technique for aluminium cables is the, same as that for copper cables. Certain additional, precautions are necessary as aluminium has low, mechanical strength, less current carrying capacity for the, same area of cross-section, low melting point, and is, quicker in forming oxides on the surface than copper., , Using the knife as shown in Fig 2 at an angle of 20° to the, axis of the core will avoid knicking of the conductor., , Accordingly, while, using aluminium cables proper care is, to be taken regarding the following., •, , Handling, , •, , Skinning of the cables, , •, , Connecting the cable ends, , Handling: Remember that aluminium conductors when, compared to copper conductors have less tensile strength, and less resistance to fatigue. As such, bending or twisting, of aluminium conductors while laying the cables should be, avoided as far as possible., Skinning of cables: While skinning the insulation from, the cables, knicks and scratches should be avoided. As, shown in Fig 1, the insulation should not be ringed as there, is a danger of nicking the aluminium conductor while, ringing the insulation with a knife., , Connecting the cable ends, The following problems are encountered while connecting, aluminium cables to the accessories., The termination holes in the accessories may be, undersized., This normally happens in old accessories as they are, designed for copper cable ends. Hence, while selecting, accessories, a thorough check is necessary of all, accessories to ensure whether the holes in the terminating, connectors as shown in Fig 4 are suitable to accommodate, the specified aluminium conductors. In any case, the, strands should not be cut or the conductor filed as shown, in Fig 3 to enable insertion in the undersized hole as this, operation results in the heating of the cable end on load, condition., Joints in electrical conductors are necessary to extend the, cables, overhead lines, and also to tap the electricity to, other branch loads wherever required., , Electrical : Electrician (NSQF LEVEL - 5) - Related Theory for Exercise 1.3.24 - 1.3.26, , Copyright Free under CC BY Licence, , 111
Page 126 :
Cable end termination - crimping tool, Objectives: At the end of this lesson you shall be able to:, • state the necessity of proper termination, • list the different types of terminations, • describe the parts and their functions of crimping tool, • state the advantages of crimping termination, Necessity of termination, Cables are terminated at electrical appliances, accessories, and equipment etc. for providing electrical connections. All, terminations must be made to provide good electrical, continuity, and made in such a manner as to prevent, contact with other metallic parts and other cables., Loose terminations will lead to overheating of cables, plugs, and other connecting points due to higher resistance at, those terminations. Fires may also be started due to the, excess heat. Wrong termination like excess or extended, conductor touching metallic part of the equipment may, lead to giving shock to the person who comes in contact, with the equipment., Touching of strands projecting from one terminal with other, terminal leads to short circuit. To conclude, we can state, that wrong termination will lead to overheating of terminating, points and cables, short circuits and earth leakage., Types of termination, Crimp connection: In this type of connection the conductor, is inserted into a crimp terminal and is then crimped with, a crimping tool (Fig 1)., , It is important to choose a crimp terminal that matches the, conductor diameter and the dimensions of the connecting, screw terminal. (Figs 2 and 3), , 112, , Insert screw setting: The conductor is inserted between, the terminal block and the special form of washer (Fig 4),, and then the screw is tightened., , Screw on terminals with loop/ring conductor: A loop, is formed clockwise in the bare portion of the conductor to, match the size of the screw diameter. Then the loop is, inserted to the screw and tightened. (Fig 5) In the case of, a stranded conductor, soldering of the loop is essential to, prevent strands getting fray., , Electrical : Electrician (NSQF LEVEL - 5) - Related Theory for Exercise 1.3.24 - 1.3.26, , Copyright Free under CC BY Licence
Page 127 :
Connections and terminals, There is an electrical fire risk if:, , While connecting the plug and socket for extension of the, cable, Line (L), the Neutral (N) and Earth (E) terminals must, be properly identified by markings on them .(Fig 6), , •, , the current-carrying capacity of the cable is inadequate, , •, , the capacity of the plug is inadequate, , •, , the insulation is cut back too far, , •, , the conductor is damaged while cutting back the, insulation, , •, , the connections are not right, , •, , the cable is not adequately supported at the point of, entry to the plug or to the appliance., When a reinforcing rubber shroud is provided,, ensure that it is used. (Fig 7), , The colour code while connecting 3 core cable must be, properly followed. Red wire to L, black/blue to N, green wire, or yellow with green line to E terminal. The earth terminal, in a 3 pin plug is bigger than the other two., , Crimping and crimping tool, The ends of cables can be prepared for termination with, lugs by the soldering process or by mechanical means compression or crimp fitting., In crimp compression fitting, a ring-tongued terminal (lug), is to be compressed to the bared end of an insulated multistrand cable. The process is called crimping and the tool, used is called crimping pliers or crimping tool., Compression type connectors apply and maintain pressure, by compressing the connector around the conductor., The principal purpose of the pressure is to establish and, maintain suitable low contact resistance between the, contact surfaces of the conductor. Improper crimping will, create increased contact resistance and will cause, overheating while carrying electrical load., , The tool is operated by squeezing the handles. The jaws, move together, grip and then crimp the fitting. Using the, crimping tool that matches the specific crimp lug will give, the correct crimping force for a properly executed crimp., Properly executed crimp will indent the top of the lug and, the indentation will hold the conductor securely as shown, in Fig 2., , Crimping tools, The crimping pliers illustrated in Fig 1 is of a type which, crimps from 0.5 to 6 mm cables., , Electrical : Electrician (NSQF LEVEL - 5) - Related Theory for Exercise 1.3.24 - 1.3.26, , Copyright Free under CC BY Licence, , 113
Page 128 :
If the terminal has too deep a crimp, the strength of the joint, is reduced. With too shallow a crimp, the electrical contact, has a high resistance. Selection of the correct crimping, tool is essential. A properly crimped terminal is shown in, Fig 3., , Terminal types, It is important to consider both the mechanical and, electrical requirements when selecting a lug connector., The factors are:, , Terminal lug crimping pliers are available in lengths ranging, from 180 to 300 mm. Crimping tools are available in sets., For higher capacity cables crimping tools are operated by, hydraulic force., Fig 4 shows another type of crimping tool which crimps, from 26 to 10 SWG., , •, , the type of tongue, i.e. rectangular, ring, spade, etc., , •, , the mechanical size, i.e. tongue size and thickness,, hole size etc. for the cable selected, , •, , the electrical considerations such as the current carrying, capacity, that may also determine some of the, mechanical dimensions., , The electrical and mechanical requirements for the lug and, the base material of the lug are decided by the cable, material, and the place of connection will determine the, minimum tongue size and the barrel size. The most, commonly used base materials are copper and brass., Nickel, aluminium and steel are also used, but less, frequently., Fig 6 shows some lug connectors normally used in, practice terminals. They are ring, rectangular, spade,, flanged spade etc. Ring and rectangular terminals are not, intended for frequent removal to disconnect the terminal, whereas in spade and flanged spade lugs (terminals) the, screw need not be removed to disconnect., , The head and jaws, may be removed, by unscrewing the, screws S1 and S2. A head with different shaped jaws may, then be secured to the tool. The shape of the jaws, determines the shape of the crimp (indent). Some crimp, sections are shown in Fig 5., Safety, When using this type of crimping tool care must be taken, not to trap the finger, as the operating cycle of the tool is, non-reversible i.e. once the handles are squeezed together, the jaws can only be released by applying further pressure, to the handles as shown in Fig 4., , Precautions for crimping tool application, Do not handle the job/tool roughly e.g. drop, hammer, etc., which may harm the tool., Do not alter the crimping tool, e.g. alter the shape of the die, etc., , 114, , Electrical : Electrician (NSQF LEVEL - 5) - Related Theory for Exercise 1.3.24 - 1.3.26, , Copyright Free under CC BY Licence
Page 129 :
Do not let metal chips adhere to the working position of the, tool, particularly on the lower surface of replaceable die on, the crimping part., If a pin, spring, etc. is found damaged in the crimping tool,, repair it immediately., Apply oxide inhibiting grease to the aluminium conductor, end just before crimping., Advantages of crimping terminations, 1 A properly made crimp is better in electrical conductivity, and mechanical strength., , 2 Less costly., 3 When the same size cables are to be terminated, through lug connectors, the crimping process is faster, than soldering., 4 The crimping operation surely needs good skill but, soldering operation needs advanced skills., 5 Heat generated in the conductor sometimes melts the, solder and the connection is open circuited. But crimped, connection will not open that easily., , Current carrying capacity of copper & aluminium cables - voltage grading, Objectives: At the end of this lesson you shall be able to, • list out the factors for selection of cables, • state the types of protection based on current carrying capacity, • state the size and number of strands available in copper and aluminium cables and their current carrying, capacity, • state the rating factor and determine the current capacity of cables with respect to temperature, • differentiate between solid and stranded conductors., Selection of cables, The current carrying capacity of a particular area of crosssection cable depends upon the following factors., , Hence, the current rating of cables are given under two, headings:, •, , cables provided with coarse excess current protection, cables provided with close excess current protection., , •, , Type of conductors (metal), , •, , •, , Type of insulation, , Coarse excess current protection, , •, , Cable run in conduit or in open surface, , •, , Single or three phase circuit, , •, , Type of protection - coarse or close excess current, protection, , In this type of protection, circuit protection will not operate, within four hours at 1.5 times the designed load current of, the circuit which it protects., , •, , Ambient temperature, , •, , Number of cables in bunches, , •, , Length of circuit (permissible voltage drop) - this will be, discussed at a later stage., , Depending upon the above factors the current rating of, cables may vary to a great extent., , The devices affording coarse excess current protection, include:, •, , fuses which are having a fusing factor exceeding 1.5, times the marked rating., , •, , carriers and bases used in rewirable type electrical, fuses., , Close excess current protection, , Information in this lesson will enable the wireman to select, the correct cable under normal working conditions., , In this type of protection the circuit protection will operate, within four hours at 1.5 times the designed load current of, the circuit which it protects., , Current rating of cables based on type of protection, , Devices include:, , Cables insulated with PVC, may sustain serious damage, when subjected, even for relatively short periods, to higher, temperature than the temperature permissible for continuous operation., , •, , fuses fitted with fuse links having fusing factor not, exceeding 1.5 times the marked rating (H R C &, cartridge etc.), , •, , miniature and moulded case circuit breakers., , Therefore, current ratings of cables insulated with PVC are, determined not only by the maximum conductor temperature admissible for continuous rating but also by the, temperature likely to be attained under conditions of, excess current., , •, , circuit breakers set to operate at an overload not, exceeding 1.5 times the designed load current of the, circuit., , Electrical : Electrician (NSQF LEVEL - 5) - Related Theory for Exercise 1.3.24 - 1.3.26, , Copyright Free under CC BY Licence, , 115
Page 130 :
Electrical inspectors, who are assigned by the Government to test installation and give permission for effecting, supply, now recommend close excess current protection, devices like MCB and HRC fuses to be included in the, circuit for safety to the user and to reduce fire accidents., , Current capacity of the same cable when protected by, coarse excess current protection (Rating factor 0.81), , Rating factor with respect to protection, , Close excess current protection (Rating factor 1.23), , For circuits with coarse excess current protection (rewirable, fuse unit) current rating of cables is given in Table 1. Though, the cables can carry a higher value of current than the, current notified in the Table 1, for circuits having coarse, excess current protection, the permissible current in, cables is obtained by multiplying the normal current, capacity by a rating factor of 0.81, whereas for circuits, protected by close current protection the normal current, capacity is multiplied by a rating factor of 1.23., The following example will clarify the above information., , = Normal capacity x Rating factor, = 16 x 0.81 = 13 amps., , = Normal capacity x Rating factor, = 16 x 1.23 = 19.7 = 20 amps., Current capacity for close excess current protection could, be obtained by the following formula also., Coarse excess current, protection rating, , Rating factor of close, = _______________________________ x excess current, Rating factor of coarse, protection, protection, , Normal current carrying capacity of 1.5 sq mm copper, cable = 16 amps (normal rating), Table 1, Current rating for single core PVC insulated sheathed copper and aluminium conductor cables of size 1 to 50 sq. mm at, ambient temperature of 40°c (Refer to IS 694 Part I -1964). (Cables provided with coarse excess current protection.), , Nominal crosssectional area, , Number and diameter, of wires, , Bunched and enclosed in conduit or trunking, , 2 cables single, phase AC or DC, mm2, , 116, , Number of strands/, dia, in mm, , Copper, Amps., , Aluminium, Amps., , 3 or 4 cables, 3-phase AC, Copper, Amps., , Aluminium, Amps., , 1, , 1/1.12, , 11, , --, , 9, , --, , 1.5, , 1/1.40, , 13, , 8, , 11, , 7, , 2.5, , 1/1.80, , 18, , 11, , 16, , 10, , 4, , 1/2.24, , 24, , 15, , 20, , 13, , 6, , 1/2.80, , 31, , 19, , 25, , 16, , 10, , 1/1.40, , 42, , 26, , 35, , 22, , 16, , 7/1.70, , 57, , 36, , 48, , 30, , 25, , 7/2.24, , 71, , 45, , 60, , 38, , 35, , 7/2.50, , 91, , 55, , 77, , 47, , 50, , 19/1.80, , 120, , 69, , 100, , 59, , Electrical : Electrician (NSQF LEVEL - 5) - Related Theory for Exercise 1.3.24 - 1.3.26, , Copyright Free under CC BY Licence
Page 131 :
Rating factor for ambient temperature, Further the current rating of cables is greatly affected by the, ambient temperature. As such if the ambient temperature, , is other than 40°C the current rating shown in the above, table should be multiplied by the rating factor given in, Table 2., , Table 2, SL., No., , Ambient Temp. °C, Rating factor for, cables, , 25, , 30, , 35, , 40, , 45, , 50, , 55, , 60, , 65, , 1, , Having coarse excess, current protection, , 1.09, , 1.06, , 1.03, , 1.00, , 0.97, , 0.94, , 0.82, , 0.67, , 0.46, , 2, , Having close excess, current protection, , 1.22, , 1.15, , 1.08, , 1.00, , 0.91, , 0.82, , 0.70, , 0.57, , 0.40, , 3, , Flexible cords, , --, , 1.09, , 1.04, , 1.00, , 0.95, , 0.77, , 0.54, , --, , --, , Example 1, Find the current rating of 2.5 sq mm, aluminium cable at, 50°C. The circuit is single phase AC, protected by rewirable, fuses and the cable is run in conduit., Solution, , Advantages of stranded conductors over solid, conductors, As stranded conductors are more flexible, chances of, break of conductors and crack of insulation at the bend is, less. They can be easily handled and laid., , The protection is coarse excess current protection. Hence, referring to Table 1 the current rating of 2.5 sq mm, aluminium cable at 40°C is = 11 amps., , Connections and joints of stranded conductors are stronger, and have longer life., , Rating factor at 50°C referring to Table 2 = 0.94., , Current ratings for copper conductor flexible cords,, insulated with PVC according to BIS No.694, , The current rating of 2.5 sq.mm aluminium cable protected, by coarse excess current protection run in conduit and at, ambient temperature of 50°C = 11 x 0.94 = 10 amps., Example 2, Find the current rating of 4 sq mm copper cable at 60°C,, when used in a 3-phase circuit and the circuit is protected, by H R C fuses., Solution, The protection is close excess current protection., Referring to Table 1, the current, rating of 4 sq. mm copper cable for, coarse excess current protection, (rewirable fuse) at 40°C, when, used in 3 phase circuit is, Current rating for closed excess, current protection at 40oC when, used in 3-phase circuit, The rating factor at 60°C is, (Referring to Table 2), , = 20 amps, , = (20 x 1.23)/0.81, = 30.37 amps., = 0.57., , Hence, the current rating of 4 sq. mm, copper cable in a circuit protected, by close excess current protection, at an ambient temperature of 60oC is = 30.37 x 0.57, = 17.31 amps, = say 17 amps., Current rating of flexible cables is given in Table 3., , Table 3, , Nominal crosssectional area, of conductor, mm2, , Number and, diameter of, wires, Number/mm, , Current rating, DC, single, phase or 3phase AC, (Amperes), , 0.50, , 16/0.20, , 4, , 0.75, , 24/0.20, , 7, , 1.00, , 32/0.20, , 11, , 1.50, , 48/0.20, , 14, , 2.50, , 80/0.20, , 19, , 4.00, , 128/0.20, , 26, , Comparison between solid and stranded conductors, Solid conductor, Rigid., , Stranded conductor, Flexible., , Less mechanical strength., , More mechanical, strength, , Available in square,round, and flat shapes., , Available in round, shape having, small diameters., , Used for bus-bars and in, the winding of large, capacity transformers., , Used for cables, and wires., , Electrical : Electrician (NSQF LEVEL - 5) - Related Theory for Exercise 1.3.24 - 1.3.26, , Copyright Free under CC BY Licence, , 117
Page 132 :
In stranded conductors the insulation has a better grip on, the wire., Solid conductors between supports of overhead lines may, break due to vibration. This breakage is less in stranded, conductors., The space between the strands permits flow of oil in U G, cables enabling better insulation properties and cooling., , Classification of voltage grading, Voltage is classified as, 1 Low voltage (L.V): Normally not exceeding 250V (i.e.), from 0 to 250 volts., 2 Medium voltage (M.V): Exceeding 250V but not exceeding 650V from 250 to 650 volts, 3 High voltage (H.V): Exceeding 650V but not exceeding, 33000V.(650-33000 volts), , For a given area of cross- section stranded cables carry, more current than solid conductors., , 4 Extra high voltage: All voltages above 33000V comes, under this category., , Table 4 shows the various types of cables., , TABLE 4, Various types of electrical cables, Type of code, , Voltage grade, , A.Wiring cable, 1 PVC insulated, a)non-sheathed single core, , Range of, cross, section, in (mm2), , Application, , B.I.S., applicable, , 250/440,650/, 1100, , 1.5 to 50, , Domestic/industrial, wiring in conduits., Domestic/industrial, wiring in batten., , -do-do-, , -do1.5 to 16, , iii) flat twin-core, ECC and 3-core, iv) circular 2,3 or 4 core, , 250/440, , 1.5 to 50, , 650/1100V, , 1.5 to 300, , -doDomestic wiring for, power plug., Domestic/industrial, wiring on batten., Sub-main/industrial., , c)non-sheathed single, core and twisted, twin flexible copper, , 250/400, 650/1100, , 4 to 5, , d)PVC sheathed circular, twin, 3 and 4 core flexible, copper, , -do-, , -do-, , e)Single extrusion, , -do-, , 1.5 to 50, , Domestic wiring, on batten, , 694 part I,II, , 250/440, , 1.5 to 50, , Domestic wiring, on batten, , 1596, , -do-, , 1.5 to 10, , -do-, , 1596, , b) PVC sheathed, i) single core, ii) flat twin-core, , 2 Polythene insulated and PVC, sheathed with aluminium, conductor, a) single core flat &, circular twin core, b) flat twin with ECC &, circular, 3 Lead alloy sheathed, i) single core, ii) 2,3 and 4-core circular, iii) twin & 3 core flat (ECC), 250/440, 118, , 250/440, 650/1100, , Temporary wiring, interconnections,, household, applicances., , Aluminium Copper, 1.5 to 50 1.5 to 50, 70 to 625 64.5 to 645, 1.5 to 16 1.5 to 16, Industrial wiring in damp, corrosive atmosphere., , Electrical : Electrician (NSQF LEVEL - 5) - Related Theory for Exercise 1.3.24 - 1.3.26, , Copyright Free under CC BY Licence, , 694 part II, , 694 part I, 694 part I&II, , 434 part I,II
Page 133 :
Type of code, , Voltage grade, , 4 TRS sheathed, i) single core, ii) 2,3 and 4-core circular, iii) Twin & 3 core flat (ECC), e) TRS sheathed flexible, f) Fire resisting asbestos, sheathed, g) Poly Phropene, sheathed flexible, , 5 Weather-proof cables, a)VIR insulated cotton,, braided and treated with, weather resistance, compound, b)PVC insulated PVC, sheathed, c)Polythene insulated, taped, braided and compounded, 6 Power cables heavy duty, 1.1kV grade, PVC insulated PVC, sheathed cable, a)Unarmoured/armoured, i) Single core, ii) Twin core, iii) Three-core, iv) Three and a half core, v) Four core, , 7 Paper insulated, lead,, covered, single core,, unarmoured., a) Twin-core, armoured, b) Three and three and, half, armoured., , 8 Varnished cambric insulated, , -do-do250/440, 650/1100, -do-do-, , Range of, cross, section, in (mm2), , Application, , 1.5 to 50 0.5 to 50, , Wiring residential on, batten,industrial wiring, 1.5 to 625 64.5 to 645 Residential batten, 1.5 to 16 1.5 to 16, Welding cables in fire, hazards., Training cable for lifts, and other mobile, equipments, , B.I.S., applicable, , 434 part I,II, -do-do-do-, , 250/440, 650/1100, , 1.50 to 50, , -do-, , -do-, , -do-, , -do-, , 650/1100, 650/1100, -do-do-do-, , 1.5 to 1000, 1.5 to 500, 1.5 to 400, 16 to 400, 1.5 to 50, , Armoured cable in, singlecore not available., Unarmoured power, cables are used only in, protected places. Use of, copper is banned for, such applications, , 1554, Part I/76, , 1.1kV, -do-, , 6 to 625 6 to 625, -do-do-, , Dry places, heavy duty,, hazardous applications, underground., , 692-73, , -do-do-, , -do-do-, , Dry places for cotton, braided, otherwise metal, sheathed., , 693-1965, , Service connection and, 434 part I,II, other outdoor application. 3035 part I, 3035 part II, , -do-do-, , -do-, , N.B. 1 Where material of core is not mentioned, it is aluminium., 2 ECC - Earth continuity conductor., , Electrical : Electrician (NSQF LEVEL - 5) - Related Theory for Exercise 1.3.24 - 1.3.26, , Copyright Free under CC BY Licence, , 119
Page 134 :
Electrical, Related Theory for Exercise 1.3.27 - 1.3.29, Electrician - Wires - Joints - Soldering - UG cables, Wire joints - Types - Soldering methods, Objective: At the end of this lesson you shall be able to, • state the different types of wire joints and their uses, • state the necessity of soldering and types of soldering, • state the purpose and types of fluxes, • explain the different method of soldering and techniques of soldering, • explain the type of solder and flux used for soldering aluminium conductor, Joints in electrical conductors are necessary to extend the, cables, overhead lines, and also to tap the electricity to, other branch loads wherever required., Definition of joint: A joint in an electrical conductor, means connecting/tying or interlaying together of two or, more conductors such that the union/junction becomes, secured both electrically and mechanically., Types of joints: In electrical work, different types of joints, are used, based on the requirement. The service to be, performed by a joint determines the type to be used., , As the mechanical strength is less, this joint could be used, at places where the tensile stress is not too great., Tee joint (Fig 3): This joint could be used in overhead, distribution lines where the electrical energy is to be tapped, for service connections., , Some joints may require to have good electrical conductivity. They need not necessarily be mechanically strong., Example : The joints made in junction boxes and conduit, accessories., On the other hand, the joints made in overhead conductors,, need to be not only electrically conductive but also mechanically strong to withstand the tensile stress due to the, weight of the suspended conductor and wind pressure., Some of the commonly used joints are listed below., • Pig-tail or rat-tail, • twisted joints, • Married joint, • Tee joint, • Britannia straight joint, • Britannia tee joint, • Western union joint, • Scarfed joint, • Tap joint in single stranded conductor, Pig-tail/Rat-tail/Twisted joint: (Fig 1) This joint is, suitable for pieces where there is no mechanical stress on, the conductors, as found in the junction box or conduit, accessories box. However, the joint should maintain good, electrical conductivity., , Britannia joint: (Fig 4) This joint is used in overhead lines, where considerable tensile strength is required., , It is also used both for inside and outside wiring where, single conductors of diameter 4 mm or more are used., Britannia tee joint: This joint (shown in Fig 5) is used for, overhead lines for tapping the electrical energy perpendicular to the service lines., , Married joint: (Fig 2) A married joint is used in places, where appreciable electrical conductivity is required, along, with compactness., 120, , Copyright Free under CC BY Licence
Page 135 :
Western union joint (Fig 6): This joint is used in overhead, lines for extending the length of wire where the joint is, subjected to considerable tensile stress., , Knotted tap joint : (Fig 10) A knotted tap joint is designed, to take considerable tensile stress., Scarfed joint (Fig 7): This joint is used in large single, conductors where good appearance and compactness are, the main considerations, and where the joint is not subjected to appreciable tensile stress as in earth conductors, used in indoor wiring., , Duplex cross-tap joint: (Fig 11) This joint is used where, two wires are to be tapped at the same time. This joint could, be made quickly., Tap joints in single stranded conductors of diameter, 2 mm or less, By definition, a tap is the connection of the end of one wire, to some point along the run of another wire., The following types of taps are commonly used., – Plain, – Aerial, – Knotted, – Cross - Double - Duplex, Plain tap joint: (Fig 8) This joint is the most frequently, used, and is quickly made. Soldering makes the joint more, reliable., , Double-cross tap joint: (Fig 12) This joint (shown in, Fig 12) is simply a combination of two plain taps., , Aerial tap joint : (Fig 9) This joint is intended for wires, subjected to considerable movement, and it is left without, soldering for this purpose. This joint is suitable for low, current circuits only. It is similar to the plain tap joint, except that it has a long or easy twist to permit the, movement of the tap wire over the main wire., , Electrical : Electrician (NSQF LEVEL - 5) - Related Theory for Exercise 1.3.27 - 1.3.29, , Copyright Free under CC BY Licence, , 121
Page 136 :
Soldering - types of solders, flux and methods of soldering, Soldering: Soldering is the process of joining two metal, plates or conductors without melting them, with an alloy, called solder whose melting point is lower than that of the, metals to be soldered. The molten solder is added to the, two surfaces to be joined so that they are linked by a thin, film of the solder which has penetrated into the surfaces., Necessity of soldering: Wire and cable joints should have, the same electrical conductivity and mechanical strength, as that of the parent conductor. This cannot be achieved by, a mere mechanical joint. As such cable joints are soldered, to have good mechanical strength, electrical conductivity, and also to avoid corrosion., Solders, The following are the general proportions of tin and lead, used in the solders., Designation, , Composition, , Working, temp., , •, , place of use, , •, , melting point, , •, , solidification range, , •, , strength, , •, , hardness, , •, , sealability, , •, , price., , Flux: Flux is a substance used to dissolve oxides on the, surface of conductors and to protect against de-oxidisation, during the soldering process., , The purpose of the flux is to, , 212°C.or, 413.6°F., , Heavy duty, soldering, , Electrician's, solder, , Lead-40%, , 185°C., or, 365°F., , Tinning and, soldering, electrical, joints etc., , Tin-63%, Lead-37%, , 183°C.or, 361°F., , Tinning/, Electrical/, Electronic, Compound, , Fine solder, , The factors that influence the choice of a solder are:, , General properties of flux, , Uses, , Plumbing/, Tin-50%, Tinman's solder Lead-50%, Tin-60%, , Factors influencing the choice of a solder, , •, , dissolve oxides, sulphides etc. thereby making the, soldering surface free of oxides and dirt, , •, , prevent re-oxidation during the soldering operation, thereby making the solder adhere to the surface to be, soldered., , •, , facilitate the flow of the solder through surface tension, so as to make the solder flow into the surface to be, soldered., , The state of the flux can be solid or liquid., , Solder used for copper: The metal alloy used as a, bonding agent in soldering is called a solder. The solders, used for soft soldering consist of an alloy (mixture) of, mostly tin and lead., , The activity of the flux can be weak or strong, and is, classified with regard to the corrosive properties, as slightly, corrosive or highly corrosive., The type of solder often determines the flux to be used for, soldering., The following table lists the fluxes used for soldering., , Table, Sl., No., , Suitable flux, , Metals/job - used for, , Type of solder, , 1, , Zinc chloride (acidic), , Cast iron, wrought iron, mild steel,cast steel, brass,, bronze, copper etc. for soldering at low temperature, , Tinman's solder, Fine solder, , 2, , Hydrochloric acid 10%, diluted with water 90%, , Zinc, Galvanised iron, , Coarse solder, , 3, , Sal ammonia rosin, (Not fully acid-free), , Copper, brass, tin plate, gun-metal:, for clean and finer soldering work., , Coarse solder, , 4, , Rosin, , Joining electrical conductors, , Electrician's solder, , 5, , Tallow - (turpentine,, acid free), , For joining electrical conductors, for soldering., , Electrician's fine solder, , 122, , Electrical : Electrician (NSQF LEVEL - 5) - Related Theory for Exercise 1.3.27 - 1.3.29, , Copyright Free under CC BY Licence
Page 137 :
Fluxes shown under 1, 2 and 3 are not recommended for, electrical purposes as they are highly corrosive, hygroscopic, (absorb moisture), and the residues are electricity, conductive., Soldering methods, Soldering with a soldering iron: The most common, method of soldering is with a soldering iron as shown in, Fig 1. This is widely used for most kinds of soft soldering, work., , The principle of this method is that an electric current flows, through a wire coil heating it. The temperature is difficult to, check, and overheating can easily occur. This is the, disadvantage., Soldering with a flame: Soldering with a flame is used, when the heat capacity of a soldering iron is insufficient., This method, shown in Fig 4, permits rapid heating and is, used primarily for larger jobs, such as piping and cable, work, vehicle body repairs and some applications in the, building trade., This method requires skilful management of the flame., , This tool is simple and inexpensive. Soldering irons are, available in a wide range of sizes and models. Heating is, generally by electrical means, though non-electrical irons, are also used., Temperature controlled soldering, For soldering miniature components on printed circuit, boards, a temperature-controlled soldering iron is used as, shown in Fig 2. The electrical supply given to the soldering, iron is of low voltage, and is completely isolated from the, main supply. Low voltage does not endanger the life of the, user and will also not spoil the sensitive electronic, components. Controlled temperature makes the job easy, for the user., Dip soldering: This method, shown in Fig 5, is used for, quantity production and for tinning work similar to component, soldering on Printed Circuit Boards (P.C.B.). Components, to be soldered or tinned are dipped into a bath of molten, solder, which is heated electrically., The solder is kept in motion by an agitator in order to obtain, an even temperature and to keep the surface free from, oxides. If no agitator is provided, the surface must be, protected or skimmed at regular intervals to remove the, oxides., The temperature can be controlled very accurately., , Soldering with a soldering gun: This method, shown in, Fig 3, is used for individual soldering, e.g. for servicing and, repair work., , Machine soldering: This method, shown in Fig 6, is used, for quantity production, and is based on the principle that, molten solder or a mixture of oil and molten solder is set in, rapid motion, thus breaking up the oxide film. The solder, comes into direct contact with the component ends to be, soldered., , Electrical : Electrician (NSQF LEVEL - 5) - Related Theory for Exercise 1.3.27 - 1.3.29, , Copyright Free under CC BY Licence, , 123
Page 138 :
Soldering machines of different designs are used for wave, soldering, cascade soldering and jet soldering., Equipment for machine soldering is expensive and the cost, of production is high., Accurate temperature control can be arranged., Apart from these, any one of the following methods can, also be used for soldering., •, , Resistance soldering, , •, , Induction soldering, , •, , Oven soldering, , •, , Soldering in vegetable oil, , •, , Soldering by hot gas, , Soldering - Techniques - pot and laddle, Soldering with electric soldering iron: In this method,, the joining surface is first cleaned and then the flux is, applied over the surface. The joint is then heated, and the, solder is kept over the surface to be soldered, and heat is, applied by keeping the soldering iron tip over it. The solder, melts and spreads on the surface evenly., The electric soldering iron: The heating element in the, iron is heated by an electric current passing through it., The bit is heated by the heating element., The face of the bit is the part of the iron, used to make, contact with the surfaces to be soldered., Soldering irons of the following voltages and input power, (wattage) are available (I.S.950-1980)., Ratings, Voltage, , 6, , 12, , Wattage, , 25 25, , 24 50 110, , 230 or 240, , 25 25 25,75, 5,10,25,75,, 250, 125,250,500, , Selecting the bit (Fig 2): Select the bit to give a compromise, between:, •, , the best approach to the work, , •, , the shortest bit and bit taper, , •, , the ideal contact with the surfaces., , Select an iron with adequate power to suit the size of the, work., The bit: Most bits are made of copper because it is a good, conductor of heat. The face of the bit may be either:, •, , un-plated or, , •, , iron-plated., , Iron-plated faces do not wear out as rapidly as un-plated, faces., Most irons are so constructed that the bit can be changed., Different shapes of bits are available as shown in Fig 1., , 124, , Electrical : Electrician (NSQF LEVEL - 5) - Related Theory for Exercise 1.3.27 - 1.3.29, , Copyright Free under CC BY Licence
Page 139 :
Care of the bit (Fig 3): Un-plated bits become pitted, quickly and get covered in oxide. If the iron is in constant, use, this will occur within a few hours., , Good wetting results can be obtained if:, •, , the surfaces are clean, , •, , sufficient flux of the correct type is used, , •, , the surfaces are hot enough, , •, , the surfaces have been tinned., , Techniques of soldering, Soldering involves the following main operations., To make a good soldered joint, the bit must be maintained, clean, smooth and correctly shaped., Dressing the bit (Fig 4): To dress an un-plated bit follow, the procedure stated below., •, , Switch off, unplug the iron and allow it to cool., , •, , Remove the bit from the iron, if possible., , •, , Mount the bit in a vice., , •, , File to shape., , Do not file the bit in an electronic assembly area. Copper, dust from the bit may settle in the equipment and cause a, short circuit. Iron-plated bits must not be filed. Renew when, worn out., , •, , Tinning the soldering iron, , •, , Cleaning the parts to be soldered, , •, , Applying the solder, , Tinning the soldering iron: To make the solder adhere, to the tip of the soldering iron, the surface of the tip must, be coated with the solder, and this operation is known as, tinning., First the tip is cleaned with a cloth and heated either, directly or indirectly. The tip is then filed to remove the, scales, and is wiped again with a cloth., The right temperature for tinning could be judged by the, change of colour of the tip when heated. If the surface of the, copper tip tarnishes immediately, the temperature is high, and needs to be cooled slightly by withdrawing the source, of heat temporarily. A correctly heated tip tarnishes slowly., After the soldering iron tip attains the correct temperature,, place a small quantity of solder and the flux on a tin plate, and rub the bit on the mixture. The solder should stick to, the surface of the tip evenly. Wipe out the superfluous, solder with a clean damp cloth., The whole process of tinning is shown in Figures 6a and, 6b., , Cleaning the bit: (Fig 5) The bit should be cleaned, frequently. To clean the bit, rub the face of the un-plated bits, on a wire brush or special sponge pad when the iron is hot., , The surface should present a bright silvery appearance, when properly tinned., , Iron-plated bits must not be cleaned on a wire brush. Rub, on a sponge pad., , Wetting (soldering): To make a good joint, the solder, must flow evenly over and between the surfaces to be, soldered. Wetting is a term used to describe the extent to, which this occurs., , Cleaning the surface to be soldered: The parts to be, soldered should be well cleaned for perfect soldering. The, scales, dirt, oil and grease should be completely removed, either by wiping or by rubbing with a sandpaper. Immediately, after cleaning, the flux should be applied on the surface to, avoid oxidization., , Electrical : Electrician (NSQF LEVEL - 5) - Related Theory for Exercise 1.3.27 - 1.3.29, , Copyright Free under CC BY Licence, , 125
Page 140 :
Applying the flux: The rosin which is recommended as, a flux may be sprinkled over the surface to be soldered or, may be applied with a brush as shown in the Fig 7., , slowly poured on the surface as it forms an even layer., Superfluous solder collected in the tray is re-melted in the, pot., , Applying the solder: The quantity of the solder to be, applied depends upon the size of the job. For small jobs like, printed circuit boards soldering or soldering joints in wires, of diameter 2 mm or lower, an electric soldering iron is used, whereas for soldering joints of large sized cables, pot and, ladle are used., , Safety, , Soldering precautions: Remove the iron as soon as the, solder has flowed over the surfaces., Excessive heating may damage:, •, , the wire and its insulation, , •, , the component being soldered, , •, , the adjoining components., , Safety, Soldering irons can be dangerous if not maintained or used, proprerly. Follow the directions given below., Inspect the iron regularly for physical damage, especially, the power cord. Replace it, if found damaged., Keep the iron in a stand when not in use. This prevents, burns and fires and protects the iron from damage., , Ensure that the conductor is dry and clean before applying, the molten solder, and that it is not allowed to enter the, insulation., Never drop anything, including the metal to be soldered into, the bath. Splashes of hot molten solder can cause serious, injury. Always wear protective clothing when working with, solder baths, like gloves, apron, boots etc. and ensure that, no unprotected part of the body touches the pot., When pouring solder over a joint, keep the ladle low as far, as possible to prevent splashing of the molten solder over, the sides of the pot., During the solidification period, the parts of the joint must, not be disturbed under any circumstances. If they are, disturbed, the strength, conductivity and appearance of the, joint will be endangered. The result will be what is often, called cold solder and the joint will be defective., Cooling must not be accelerated. If cooling is accelerated,, the solder will assume a crystalline form. This lowers the, mechanical strength., , Do not subject the iron to rough treatment., , Do not allow the molten solder to fall on to the gas pipe or, the electric cables nearby., , Keep the iron away from all parts of the body and from its, own power cord., , Beware of the naked flames to avoid a fire risk., , A proper earth connection must be made to all mainsconnected irons. If you suspect that an iron is not earthed,, do not use the iron., Never flick excess solder off the bit. The hot solder may, cause burns to someone or fall into a part of the work, and, cause a short circuit., Soldering with pot and ladle: (Fig 8) For larger sized, jobs like underground cable jointing, a melting pot and ladle, are used. The solder is kept in the pot and heated either, by a blowlamp or by charcoal. Initially the surface to be, soldered is cleaned and a coat of flux is given., Then the surface to be soldered is heated by pouring, molten solder over it in quick succession. The dripping, solder is collected in a clean tray. After several pourings,, the surface attains the same temperature as that of the, molten solder. The flux is again applied and the solder is, 126, , Reconditioning of solder which is subjected to, repeated melting, In practice, when the solder is subjected to repeated, melting during the soldering process, the tin content in the, solder is considerably reduced due to:, •, , the slug formation of tin on the molten solder, , •, , oxidization of tin due to its low boiling point., , As such the solder, which is subjected to repeated heating,, will have a low percentage of tin as compared with the, solder taken from the stores., To recondition the solder and to bring up the tin percentage,, tin is added to the solder at the end of each use. The, quantity to be added depends upon the length of time the, solder is kept in the molten state., , Electrical : Electrician (NSQF LEVEL - 5) - Related Theory for Exercise 1.3.27 - 1.3.29, , Copyright Free under CC BY Licence
Page 141 :
Soldering aluminium cables, Soldering of aluminium cables: Soldering aluminium, conductors is more difficult than soldering copper conductors, owing to the highly tenacious, refractory and stable nature, of the oxide film which forms immediately on any aluminium, exposed to air., This oxide film does not allow the solder to wet the surface, to be soldered, and also prevents the solder from entering, the interior surface by capillary action. Hence special, solders and fluxes are used for aluminium soldering., Solder: A special soft solder having a small percentage, of zinc is used for joining aluminium conductors. (Soft, solders are alloys which have a melting point below 3000C.), IS 5479-1985 gives details of the chemical composition of, soft solders and their grades used for soldering aluminium, conductors. Details are given in Table 1., The object of this small zinc content which is a common, feature of aluminium solders is to fecilitate the alloying of, the solder with an aluminium surface. A typical composition, of solder with 51% lead, 31% tin, 9 % zinc and 9%, cadmium with the brand name `ALCA P' solder is available, in the market for soldering aluminium conductors. In, addition a special solder by name Ker-al-lite is also, available for soldering aluminium conductors., Flux: In soldering aluminium conductors, organic fluxes of, reaction type, free from chlorides and suitable for soft, soldering are used., The composition of the organic fluxes decomposes at, approximately 250°C to effect the removal of the oxide film, and also to assist in the spreading of the molten solder to, enable tinning the de-oxidised surface immediately., The major disadvantage of organic flux is that it tends to, char at a temp. above 360°C. The charring, thus caused,, renders the flux ineffective and gives rise to the danger of, creating voids in the joint due to charred flux residues. For, this reason, it is essential that the temp. of this solder, during the operation is maintained well within 360°C. The, commercial name of fluxes used for joining aluminium, conductors are Kynal Flux and Eyre No.7., , Spread out the strands so as to effect a general loosening, and slight displacement of the wires, and clean the surface, preferably with a wire brush., Apply a small quantity of flux by brushing well into the, fanned-out ends of the conductor and baste (moisten) the, fluxed conductor with a full ladle of molten solder., Apply more flux and baste again with the molten solder., Continue to make repeated alternate applications of flux, and solder until the wires exhibit a brightly tinned surface, free from dull spots., After the final basting, wipe off the surplus metal from the, strands with a clean and dry piece of cloth., Flux the lug inner surface and fill it with the molten solder., Insert the tinned end of the cable inside the lug and hold, both the cable and the lug firmly without shaking., Allow the lug to cool and baste the surface quickly with the, molten solder to remove the excess solder., Wipe the lug surface with a clean cloth., Apply a coating of graphite conducting grease on the lug, before using., Precautions to be followed while soldering aluminium, All surfaces must be scrupulously clean., When a joint is being made between stranded conductors,, the strands must be `stepped' to increase the surface area., The surface must be fluxed before the heat is applied., Safety, During the jointing operation copious fumes are given off, when the flux is heated. These fumes contain small, quantities of fluorine, and it is, therefore, advisable not to, inhale them., As smoking during the jointing operation results in the, inhaling of toxic fumes, smoking during soldering should be, avoided., , Procedure of soldering aluminium cables, The procedure of soldering aluminium cables to standard, copper lugs employing Kynal's flux and Ker-al-lite special, solder is explained below., Strip the cable in preparation for jointing in the usual, manner., Table 1, Grade, , % of alloying elements, Zinc, , Lead, , Tin, , Melting temp., , Flux type, , Applications, , Organic, , Conductors of electrical cables, , in °C, , SnPb53Zn, , 1.75 2.25, , 52–54, , 45.71 45.21, , 170 215, , SnPb58Zn, , 1.75 2.25, , 57–59, , 40.66 40.6, , 175 220, , -do-, , Electrical : Electrician (NSQF LEVEL - 5) - Related Theory for Exercise 1.3.27 - 1.3.29, , Copyright Free under CC BY Licence, , 127
Page 142 :
Electrical, Related Theory for Exercise 1.3.30 - 1.3.33, Electrician - Wires - Joints - Soldering - UG cables, Under ground (UG) cables - construction - materials - types - joints - testing, Objectives: At the end of this lesson you shall be able to, • define UG cable, • explain the construction of UG cables, • list and state the insulating materials used in cables, • list out and state the types of UG cables used for 3 phase service, • state the types of cable joints and laying methods, • expalin the faults and testing procedures of cables., Under Ground (UG) cables, “A cable so prepared that it can withstand pressure and, can be installed below the ground level and normally two, or more conductors are placed in an UG cablewith separate insulation on each conductor”, Electric power can be transmitted (or) distributed either by, over-head lines system or by underground cable system., The underground cable system have several advantage,, such, Advantages, , at high voltage transmission of electric power for same, moderate distances., General construction of UG cables, An underground cable essentially consists of one or more, conductors covered with suitable insulation and surrounded, by a protecting cover., Necessity requirements for cables, In general, a cable must fulfill the following necessary, requirements., i, , •, , Less chance to damage through storms or lightning., , •, , Low maintenance cost., , •, , Less chances of fault., , •, , Not affected by man- made problems like sabotage,, strike etc., , •, , Voltage regulation in UG cables system is much, better, because they have less inductive losses., , •, , Better general appearance of area compared to O.H, lines., , Disadvantages, However, their major draw back / disadvantages are, •, , Initial cost of UG cable system is heavy., , •, , The cost of joints are more., , •, , Introduce insulation problems at high voltages, compared with O.H lines., , The conductor used in cables should be tinned stranded, copper or aluminum of high conductivity. (Strands of, cable gives flexibility and carry more current)., , ii The size of the conductor should be selected, so that the, cable carries the desired load current without overheating, and limits the voltage drop to a permissible value., iii The cable must have proper thickness of insulation to, ensure the safety and reliability for the designed voltage., General construction of UG cables, iv The cable must be provided with suitable mechanical, protection so that it may withstand the rough use in, laying it., v The materials used in cables should be with complete, chemical and physical stability throughout., , For these reasons UG cables are employed where it is, impracticable to use O.H lines like (i) thickly populated, areas, where municipal authorities prohibit O.H lines for, the reason of safety., ii Around plants, iii In Substations,, iv Where maintenance conditions do not permit the use, of O.H construction., The UG cable were used many years for distribution of, electric power in congested urban areas to low and, medium voltages. Then with improvement and development, of design, the manufactures have made it possible to use, , Construction of Cables, Fig 1 shows the general construction of a 3-core cable., The various parts are:, i) Cores or conductors: A cable may have one or more, than one core (conductor) depending upon the type of, service for which it is intended. For instance, the 3-, , 128, , Copyright Free under CC BY Licence
Page 143 :
conductor cable shown in Fig 1 is used for 3-phase, service. The conductors are made of tinned copper or, aluminium and are usually stranded in order to provide, flexibility to the cable and having high conductivity., ii Insulation: Each core or conductor is provided with a, suitable thickness of insulation, the thickness of layer, depending upon the voltage to be withstood by the, cable. The commonly used materials for insulation, are impregnated paper, varnished cambric or rubber, mineral compound. Petrolium jelly is applied to the, layers of the cambric to prevent damage., iii Metallic sheath: In order to protect the cable from, moisture, gases or other damaging liquids (acids or, alkalies) in the soil and atmosphere, a metallic sheath, of lead or aluminium is provided over the insulation as, shown in Fig 1. The metallic sheath is usually a lead, or lead alloy., iv Paper Belt: Layer of imprignated paper tape is wound, round the grouped insulated cores. The gap in the cores, is filled with fibrous insulating material (jute etc.), v Bedding: Over the metallic sheath is applied a layer of, bedding which consists of a fibrous material like jute, or hessian tape. The purpose of bedding is to protect, the metallic sheath against corrosion and from, mechanical injury due to armouring., vi Armouring: Over the bedding, armouring is provided, which consists of one or two layers of galvanized steel, wire or steel tape. Its purpose is to protect the cable, from mechanical injury while laying it and during the, course of handling. Armouring may not be done in the, case of some cables., vii Serving: In order to protect armouring from atmospheric, conditions, a layer of fibrous material (like jute) similar, to bedding is provided over the armouring. This is known, as serving., It may not be out of place to mention here that bedding,, armouring and serving are only applied to the cables for, the protection of conductor insulation and to protect the, metallic sheath from mechanical injury., Insulating materials for cables, The satisfactory operation of a cable depends to a great, extent upon the characteristics of insulation used., Therefore, the proper choice of insulating material for cables, is of considerable importance. In general, the insulating, material used in cables should have the following properties:, i) High insulation resistance to avoid leakage current., ii) High dielectric strength to avoid electrical breakdown, of the cable., iii) High mechanical strength to withstand the mechanical, handling of cables., iv) Non-hygroscopic i.e. it should not absorb moisture from, air or soil The moisture tends to decrease the insulation, resistance and hastens the breakdown of the cable., , In case the insulating material is hygroscopic, it must, be enclosed in a waterproof covering like lead sheath., v) Non-inflammable, vi) Low cost compared to O.H. system., vii) Unaffected by acids and alkalies to avoid any chemical, action., The type of insulating material to be used depends upon, the purpose for which the cable is required and the quality, of insulation to be aimed at., The principal insulating materials used in cables are, (i) Rubber, (ii) Vulcanized India rubber, (iii) Impregnated paper, (iv) Varnished cambric and, (v) Polyvinyl chloride., 1 Rubber: Rubber may be obtained from milky sap of, tropical trees or it may be produced from oil products. It, has relative permittivity varying between 2 and 3, dielectric, strength is about 30 KV/mm and resistivity of insulation is, 1017 Ω cm., It suffers from some major drawbacks viz readily, (i) absorbs moisture, (ii) maximum safe temperature is low (about 380 C), (iii) soft and liable to damage due to rough handling, and ages when exposed to light., Therefore, pure rubber cannot be used as an insulating, material., 2 Vulcanised Indian Rubber (V.I.R.) : It is prepared by, mixing pure rubber with mineral matter such as zinc oxide,, red lead etc. and 3 to 5% of sulphur. The compound so, formed is rolled into thin sheets and cut into strips. The, rubber compound is then applied to the conductor and is, heated to a temperature of about 150°C. The whole,, process is called vulcanization and the product obtained, is known as Vulcanized Indian Rubber., Advantages: Vulcanised India rubber has greater, mechanical strength, durability and water resistant property, than pure rubber., Disadvantages: Its main drawback is that sulphur reacts, quickly with copper. So, cables using VIR insulation must, have tinned copper conductor. The VIR insulation is, generally used for low and moderate voltage cables., 3 Impregnated paper: It consists of chemically pulped, paper made from wood chippings and impregnated with, some compound such as paraffinie or naphthenic material., Aadvantages:, (i) Low cost, (ii) Low capacitance, (iii) High dielectric strength and, (iv) High insulation resistance., , Electrical : Electrician (NSQF LEVEL - 5) - Related Theory for Exercise 1.3.30 - 1.3.33, , Copyright Free under CC BY Licence, , 129
Page 144 :
Disadvantages:, (i) The paper is hygroscopic and even if it is impregnated, with suitable compound, (ii) It absorbs moisture and thus lowers the insulation, resistance of the cable., For this reason, paper insulated cables are always provided, with some protective covering and are never left unsealed., If it is required to be left unused on the site during laying,, its ends are temporarily covered with wax or tar., Since the paper-insulated cables have the tendency to, absorb moisture, they are used where the cable route has, a few joints. For instance, they can be profitably used for, distribution at low voltages in congested areas where the, joints are generally provided only at the terminal apparatus., However, for smaller installations, where the lengths are, small and joints are required at a number of places, VIR, Cables will be cheaper and durable than paper insulated, cables., 4 Varnished cambric: It is a cotton cloth impregnated, and coated with varnish. This type of insulation is also, known as empire type. The cambric is lapped on to the, conductor in the form of tape and its surface is coated, with petroleum jelly compound to allow for the sliding of, one turn over another as the cable is bent. As the varnished, cambric is hygroscopic, therefore, such cables are always, provided with metallic sheath. Its dielectric strength is, about 4 KV/mm and permittivity is 2.5 to 3.8., 5 Polyvinyl chloride (PVC): This insulating material is, a synthetic compound. It is obtained from the, polymerization of acetylene and is in the form of white, powder. For obtaining this material as a cable insulation,, it is compounded with certain materials known as, plasticiser which are liquids with high boiling point., , A cable may have one or more than one core depending, upon the type of service for which it is intended. It may be, (i) single-core (ii) two-core (iii) three-core (iv) four-core etc., For a 3-phase service, either 3-single core cables or threecore cable can be used depending upon the operating, voltage and load demand., Fig 2 shows the constructional details of a single-core low, tension cable. The cable has ordinary construction because, the stresses developed in the cable for low voltages (upto, 6600 V) are generally small. It consists of one circular, core of tinned stranded copper (or aluminium) insulated, by layers of impregnated paper. The insulation is, , surrounded by a lead sheath which prevents the entry of, moisture into inner parts. In order to protect the lead sheath, from corrosion, an overall serving of compounded fibrous, material (jute etc.) is provided. Single-core cables are not, usually armoured in order to avoid excessive sheath losses., The principal advantages of single-core cables are simple, construction and availability of large copper section., Cables for 3-Phase Service, , (ii) Good dielectric strength, , In practice, underground cables are generally required to, deliver 3-phase power. For the purpose, either three-core, cables or three single core cables may be used. For, voltages upto 66 KV, 3-core cable (i.e. multi-core, construction) is preferred due to economic reasons. The, following types of cables are generally used for 3-phase, service., , (iii) Mechanical toughness over a wide range of temperature., , 1. Belted cables – upto 11 KV, , This type of insulation is preferred over VIR in extreme, environmental conditions such as in cement factory or, chemical factory., , 2. Screened cables – from 22 KV to 66 KV, , Classification of cables, , 1. Belted cables, , Advantages:, (i) It has high insulation resistance, , 3. Pressure cables – beyond 66 KV, , Cables for underground service may be classified in two, ways according to (i) the type of insulating material used, in their manufacture (ii) the voltage for which they are, manufactured. However, the later method of classification, is generally preferred as, (i) Low-tension (L.T) cables – upto 1100 V, (ii) High-tension (H.T) cables – upto 11,000 V, (iii) Super-tension (S.T cables – from 22 KV to 33 KV, (iv) Extra high-tension (E.H.T) cables – from 33 to 66 KV, (v) Extra super voltage cables – beyond 132 KV, 130, , Electrical : Electrician (NSQF LEVEL - 5) - Related Theory for Exercise 1.3.30 - 1.3.33, , Copyright Free under CC BY Licence
Page 145 :
These cables are used for voltages upto 11 KV but in, extraordinary cases, their use may be extended upto 22, KV. Fig 3 shows the constructional details of a 3-core, belted cables. The cores are insulated from each other, by layers of impregnated paper., Another layer of impregnated paper tape called paper belt, is wound round the grouped insulated cores. The gap, between the insulated cores is filled with fibrous insulating, material (jute etc.) The belt is covered with lead sheath to, protect the cable against ingress of moisture and, mechanical injury., , The S.L type cables have two main advantages over Htype cables., a) The separate sheaths minimize the possibility of coreto-core breakdown., b) Bending of cables become easy due to the elimination, of overall lead sheath., The disadvantage is that the three lead sheaths of S.L., cable are much thinner than the single sheath of H-cable, , The belted type construction is suitable only for low and, medium voltages as the electrostatic stresses developed, in the cables for these voltages are more or less radial i.e., across the insulation. However, for high voltages (beyond, 22 KV), the tangential stresses also become important., 2. Screened cable, These cables are meant for use upto 33 KV but in particular, cases their use may be extended to operating voltages, upto 66 KV. Two principal types of screened cables are, H-type cable and S.L. type cables., (i) H-type cables. This type of cable was first designed, by H. Horchstadter and hence the name. Fig 4 shows the, constructional details of a typical 3-core, H-type cable., Each core is insulated by layers of impregnated paper., The insulation on each core is covered with a metallic, screen which usually consists of a perforated aluminium, foil., , Limitations of solid type cables, All the cables of above constructions are referred to as, solid type cables because solid insulation is used and no, gas or oil circulates in the cable sheath. The voltage limit, for solid type cables is 66 KV due to the following reasons:, a. As a solid cable carries the load, its conductor, temperature increases and the cable compound (i.e., insulating compound over paper) expands. This action, stretches the lead sheath which may be damaged., b. When the load on the cable decreases, the conductor, cools and a partial vacuum is formed within the cable, sheath. If the pinholes are present in the lead sheath,, moist air may be drawn into the cable. The moisture, reduces the dielectric strength of insulation and may, eventually cause the breakdown of the cable., , The cable has no insulating belt but lead sheath, bedding,, armouring and serving follow as usual. As all the four, screens (3 core screens and one conducting belt) and the, lead sheath are at earth potential., Advantages:, • The posibility of air pockets or volds in the dielectric is, eleminated, • The metalic screen increase the heat dissipating power, of the cable, (ii) S.L. type cables Fig 5 shows the constructional, details of 3-core S.L (separate lead) type cable. It is, basically H-type cable but the screen round each core, insulation is covered by its own lead sheath. There is no, overall lead sheath but only armouring and serving are, provided., , c. In practice, voids are always present in the insulation, of a cable. Modern techniques of manufacturing have, resulted in void free cables. However, under operating, conditions, the voids are formed as a result of the, differential expansion and contraction of the sheath and, impregnated compound., 3. Pressure cables, For voltages beyond 66 KV, solid type cables are unreliable, because there is a danger of breakdown of insulation due, to the presence of voids. When the operating voltages are, greater than 66 KV, pressure cables are used. In such, cables, voids are eliminated by increasing the pressure of, compound and for this reason they are called pressure, cables. Two types of pressure cables viz oil filled cables, and gas pressure cables are commonly used., (i) Oil filled cables. In such type of cables, channels of, ducts are provided in the cable for oil circulation. The oil, under pressure (it is the same oil used for impregnation), is kept constantly supplied to the channel by means of, , Electrical : Electrician (NSQF LEVEL - 5) - Related Theory for Exercise 1.3.30 - 1.3.33, , Copyright Free under CC BY Licence, , 131
Page 146 :
external reservoirs placed at suitable distances (say 500, m) along the route of the cable., Oil under pressure compresses the layers of paper, insulation and is forced into any voids that may have formed, between the layers. Due to the elimination of voids, oilfilled cables can be used for higher voltages, the range, being from 66 KV upto 230 KV., Oil-filled cables are of three types viz., (i) Single-core conductor channel, (ii) Single-core sheath channel and, (iii) Three-core filler-space channels., (i) Single-core Conductor channel, Fig 6 shows the constructional details of a single-core, conductor channel, oil-filled cable. The oil channel is formed, at the centre by stranding the conductor wire around a, hallow cylindrical steel spiral tape. The oil under pressure, is supplied to the channel by means of external reservoir., As the channel is made of spiral steel tape, it allows the, oil to percolate between copper strands to the wrapped, insulation., The oil pressure compresses the layers of paper insulation, and prevents the possibility of void formation. The, disadvantage of this type of cable is that the channel is at, the middle of the cable which is at full voltage w.r.t earth,, so that a very complicated system of joints is necessary., , (ii) Single-core sheath channel (Fig 7), , Advantages, (a) Formation of voids and ionization are avoided., (b) Allowable temperature range and dielectric strength, are increased., (c) If there is leakage, the defect in the lead sheath is at, once indicated and the possibility of earth faults is, decreased., Disadvantages, (a) High initial cost and complicated system of laying, (ii) Gas pressure cables. The voltage required to set up, ionization inside a void increases as the pressure is, increased. Therefore, if ordinary cable is subjected to a, sufficiently high pressure, the ionization can be altogether, eliminated. At the same time, the increased pressure, produces radial compression which tends to close any, voids. This is the underlying principle of gas pressure, cables., Fig 9 shows the section of external pressure cable designed, by Hockstadter, Vogal and Bowden. The construction of, the cable is similar to that an ordinary solid type except, that it is of triangular shape and thickness of lead sheath, is 75% that of solid cable. The triangular section reduces, the weight and gives low thermal resistance but the main, reason for triangular shape is that the lead sheath acts as, a pressure membrane. The sheath is protected by a thin, metal tape. The cable is laid is a gas-tight steel pipe., , In this type of cable, the conductor is solid similar to that, of solid cable and is paper insulated. However, oil ducts, are provided in the metallic sheath., , The pipe is filled with dry nitrogen gas at a pressure of 12, to 15 atmospheres. The gas pressure produces radial, compression and closes the voids that may have formed, between the layers of paper insulation., Advantages:, In the 3-core oil-filled cable shown in Fig 8, the oil ducts, are located in the filler space. These channels are, composed of perforated metal-ribbon tubing and are at, earth potential., 132, , a) Cables can carry more load current, b) Operate at higher voltages than a normal cable., , Electrical : Electrician (NSQF LEVEL - 5) - Related Theory for Exercise 1.3.30 - 1.3.33, , Copyright Free under CC BY Licence
Page 147 :
c) Maintenance cost is small and the nitrogen gas helps, in quenching any flame., Disadvantages:, The overall cost is very high., Further the cables are also classified according to their, insulation system as under:, PVC insulated cables, , (Poly vinyl chloride), , MI cables, , (Mineral insulation), , PILC cables, , (Paper insulated lead covered), , XLPE cables, , (Cross linked poly ethylene), , PILCDTA cables (Paper insulated lead covered, double tape armoured), The specification of underground cables, The cables shall carry the following information either, labelled or stenciled on the reel or drum or container., 1 Reference to the Indian Standard; for example Ref. IS, 694-1977., 2 Manufacturer’s name, brand name or trademark., 3 Type of cable and voltage grade., 4 Number of cores., , The choice of any of the systems given above depends on, (i) The actual installation conditions, (ii) Inital cost of laying, , 5 Nominal cross-sectional area of conductor., 6 Cable code., 7 Colour of cores (in case of single core cables), 8 Length of cable on the reel, drum or coil, 9 Number of lengths on the reel, drum or coil (if more, than one)., 10 Direction of rotation of drum (by means of arrow)., 11 Approximate gross weight., 12 Country of manufacturing., 13 Year of manufacture., Fig 10 shows the paper insulated 3 phase 3 ½ core cable., UG cables laying method, , (iii) Maintenance and repair charges, (iv) Deisred care in replacement of any cable or adding, new cables for the future., As far as the possible cable should be laid along the roads, and streets. Power and communication cables should, cross at right angles., During the preliminary stages of laying the cable,, consideration should be given to a proper location of the, joints position so that when the cable is actually laid, the, joints are made in the most suitable places., As far as possible water logged locations, carriage ways,, pavements, proximity to telephone cables, gas or water, mains in accessible places, ducts pipes, racks etc shall, be avoided for joint position., , The reliability of the underground cable (UG) installation, depends upon the proper laying and attachment of fittings, (i.e) cable and boxes, joints, branch connectors etc., Methods of laying of UG cables, The following are the methods of laying underground cables, 1 Laying direct in ground, 2 Laying in ducts, 3 Laying on racks in air., 4 Laying on racks inside a cable tunnel., 5 Laying along buildings or structures., , Electrical : Electrician (NSQF LEVEL - 5) - Related Theory for Exercise 1.3.30 - 1.3.33, , Copyright Free under CC BY Licence, , 133
Page 148 :
For cable of rating, , Laying direct in ground:, This method involves digging a trench in the ground and, laying cable(s) on a bedding of minimum 75 mm riddled soil, or sand at the bottom of the trench, and covering it with, additional riddled soil or sand of minimum 75 mm and, protecting it by means of tiles, bricks or slabs., , Ref., , B, , 8, , 8, , Depth: The desired minimum depth from ground surface to, the top of cable is as follows:, , C, , 17, , 17, , D, , 35, , 35, , a) High voltage cables, 3.3 KV to 11 KV rating : 0.9 m., b) High voltage cables, 22 KV, 33 KV rating : 1.05 m., c) Low and medium voltage and control cables : 0.75 m., d) Cables at road crossings : 1.00 m., e) Cables at railway level crossings (measured from bottom, of sleepers to the top of pipe) : 1.00 m., Width: The width of a trench for laying a single cable should, be minimum 35 cm. When more than one cable is laid in, the same trench in horizontal formation, the width of the, trench shall be so increased that the inter-axial spacing, between two cables is 20 cm., Clearance from the terminal cable to the sides of a trench, should be 15 cm., , A, A1, , D1, E, , Upto 1.1 kV, , Exceeding 1.1 kV, , 75, (75+n1x30), , (30+n2x20), , 120, (120+n1x30), , (30+n2x20), , 15, , 15, , n1 = Number of additional cables in vertical formation., n2 = Number of additional cables in horizontal formation., For road crossings cast iron, or 2nd class RCC pipes or, M.S/G.I. Pipe of medium class having an appropriate, diameter should be laid during construction of the road to, avoid damage to the road later on. The top surface of the, pipe should be at a minimum depth of 1m. Pipes provided, for entry to a building shall slope upward to prevent entry of, water into the building. After laying of the cable they should, be sealed., Advantages, , Cable is protected by sand or layer of brick as shown in, Fig 1a. Bricks should be second class bricks of a size not, less than 20 cm x 10 cm x 10 cm and laid for full length for, one cable (bricks to be laid breadthwise)., , 1 It is a simple and less costly method., , When more than one cable is to be laid in the same trench,, this protective covering shall extend atleast 5 cm. over the, sides of the end cables. An alternative to this covering can, be earth ware or R.C.C. or fire-bricks of peaked covers, section as shown in Fig 1b., , 3 It is a clean and safe method as the cable is invisible and, free from external disturbances., , 2 It gives the best conditions for dissipating the heat, generated in the cables., , Disadvantages, 1 The extension of load is possible only by a complete, new excavation which may cost as much as the original, work., 2 The alterations in the cable network cannot be made, easily., 3 The maintenance cost is very high., 4 Localisation of fault is difficult., 5 It cannot be used in congested areas where excavation, is difficult., Drawing the cables into duct pipes: When drawing the, cables through ducts, lack of space in the drawing pits, usually restricts the distance from the cable drum to the, duct mouth. It is essential that the direction of curvature of, the cables is not reversed as it enters the duct. If the cable, drum is on the same side of the drawing pit, as shown in, Fig 2, this condition is fulfilled., , It is good practice to leave about 3 metres of cable spare, in a loop formation near poles and joints, so that in case, joint fails, this additional cable comes to rescue. Cable, should be laid 0.4 metre away from water and power mains., , 134, , Electrical : Electrician (NSQF LEVEL - 5) - Related Theory for Exercise 1.3.30 - 1.3.33, , Copyright Free under CC BY Licence
Page 149 :
Precautions while handling cables, 1 Prevent the cable from dragging on the floor., Advantages, , 2 Prevent kinking of the cable., , 1 Reparis, alterations or additions to the cable network, can be made without opening the ground., 2 As the cables are not armoured, therefore, joints, become simpler and maintenance cost is reduced, considerably., 3 There are very less chances of fault occurrence due to, strong mechanical protection provided by the system., Disadvantages, 1 The initial cost is very high., 2 The current carrying capacity of the cables is reduced, due to the close grouping of cables and unfavourable, conditions for dissipation of heat., This method of cable laying is suitable for congested areas, where excavation is expensive and inconvenient, for once, the conduits have been laid, repairs or alterations can be, made without opening the ground. This method is generally, used for short length cable routes such as in workshops,, road crossing where frequent digging is costlier or impossible., Laying cables on racks in air: Inside buildings, industrial, plants, generating stations, substations and tunnels, cables, are generally installed on racks fixed to the walls or, supported from the ceiling. Racks may be ladder or, perforated type and may be either fabricated at the site or, pre-fabricated. Considerable economy can be achieved by, using standard factory made racks. The necessary size of, the racks and associated structure has to be worked out, taking into consideration the cable grouping and permissible, bending radii. Fig 3 shows the method of laying cables, inside a tunnel on racks., Laying cables along buildings or structures: Cables, can be routed inside the building along with structural, elements or with trenches under floor ducts or tunnels. The, route of the proposed cable should be such that intersection, with other cables will be minimum. The route should not, subject these cables to any vibrations, damage due to heat, or other mechanical causes. All adequate precautions, should be taken to protect the cables., , 3 After laying the cable in the ducts it should be, immediately covered or suspended., Cable jointing methods: This process consists of the, following steps., a) Exact measurement of the cable for insulation removal., b) Removal of insulation., c) Replacing of the original insulation with high grade, tapes and sleeves., d) Dressing the cable ends and conductor joints through, sleeves/split sleeves., e) Providing separators between cables., f) Fixing a cast iron or any other protective shell around, the joint and filling the joint boxes with molten bitumen, compound., g) Plumbing metallic sleeves or brass glands to the lead, sheath of the cable to prevent moisture from entering, the joint in case of cast iron joint boxes or tape, insulation in case of cast resin kit joint boxes., Straight through joints, The emphasis should be laid on quality and selection of, proper cable, cable accessories, proper jointing techniques., The quality of joint in cable should be such that, it does, not add any resistance to the circuit. The material and, techniques employed in joining the cables should give, adequate mechanical and electrical protection to the joint, under all service conditions. The joints should further be, resistant to corrosion and other chemical effects., For PILC cable: For paper insulated lead sheathed, cables, straight joints are made either by using sleeve, joints or crimping joints up to voltage grade 11 KV. Above, 11 KV, compound filled copper or brass sleeves, along with, cast iron, fibre glass protection boxes are used., Fig 4 shows such a joint., , Electrical : Electrician (NSQF LEVEL - 5) - Related Theory for Exercise 1.3.30 - 1.3.33, , Copyright Free under CC BY Licence, , 135
Page 150 :
a) High electrical strength, b) High resistance to moisture, Compounding process: Heat the compound in a special, bucket on firewood or charcoal fire, stir with a clean metal, rod to have even melting of the compound. Check the, temperature with a thermometer and heat the compound, up to 180° to 190°C., The cast iron protection boxes used up to 11 KV or moulds, used for 1.1 KV joints in cast resin joints should conform, to the relevant Indian Standard. Above 11 KV cast resin, system is not yet standardized., Tee joint: These joints are to be restricted up to 11 KV., These joints are made either using cast resin kits or C.I., boxes with or without sleeves for PILC cables and cast, resin kits for PVC and XLPE cables. (Fig 5), , Heat the sealing box to 70oC with a blow torch. Open all air, escape plugs. Fit a heated funnel to the pouring hole. Pour, the compound carefully and evenly in 2 or 3 stages with an, interval between them to allow the compound to solidify., Take care that no air bubble is trapped inside., Cold pouring compound: Cold pouring is used by using, cast resin system for PVC cable jointing. This has been, developed for application up to 11 KV grade cables. The, compound consists of a resin base and a polyamino, hardener. The two component liquids are mixed at the site, in accordance with the recommendation of the manufacturer., Typical epoxy straight joint for PVC cable: In this, system of jointing the insulation is removed and conductors, are joined. The core joints in the case of LV/MV cables, should be kept apart to avoid any flash over between them., Spacers are provided between the cores for H.V. cables., , Tri-furcating end connections: In order to connect UG, cables to the air break switches etc. tri-furcating boxes are, used. They can be either cast resin type up to 1.1 KV or, cast iron type for 11 KV and above. This type of box is, shown in Fig 6., , No insulation is applied over the core joints. A cover earth, ring is placed tight over the two cut ends of the armour and, soldered to the armour wires. The two rings are then jointed, by a copper wire and the cut ends of the armouring are bent, over the rings to have continuity of armour as earth, conductor., Sandpaper is applied to the inner sheath surface and is, cleaned by using methyl chloride. The joint is enclosed by, plastic mould, which is in two parts, whose ends are duly, cut to match the size of cable. PVC tape is wrapped at the, two places where the mould will touch the cables. The two, halves are pasted together and kept clamped to avoid any, air gap. The mould ends are enclosed with putty which is, supplied in the joint kit., The expiry date of resin is checked and the hardener added, to resin. The mixture is churned thoroughly for about 15 to, 20 minutes till the colour of the mixed compound becomes, grey. The mix is poured slowly into the mould taking care, to avoid formation of air bubbles till the mould is filled and, it comes out at the risers., , Method of preparing and filling compounds, – Hot pouring, – Cold pouring, Hot pouring compounds: A bituminous compound of, melting temperature 90°C and pouring temperature 180°C, - 190°C is used for hot pouring., , Allow the joint to set for a minimum of three hours till it, becomes a solid mass before charging the cable. The, mould may be removed, if desired., Normally all the components required for joints are supplied, as kits for various sizes of cables., Fig 7 illustrates a typical straight through and outdoor, termination of PVC cable with epoxy resin respectively., , Properties: The bituminous compound has the following, properties., 136, , Electrical : Electrician (NSQF LEVEL - 5) - Related Theory for Exercise 1.3.30 - 1.3.33, , Copyright Free under CC BY Licence
Page 151 :
Types of cable faults and testing procedure, The common faults which are likely to occur in cables, are:, 1. Ground fault. The insulation of the cable may, breakdown causing a flow of current from the core of, the cable to the lead sheath or to the earth. This is, called “Ground Fault”., 2. Short circuit fault. If the insulation between two, conductors is faulty, a current flows between them., This is called a “short circuit fault”., Methods for locating ground and short circuit faults., The methods used localizing the ground and short circuit, faults differ from those used for localizing open circuit faults., In the case of multi core cables it is advisable, first of all,, to measure the insulation resistance of each core to earth, and also between cores. This enables us to sort out the, core that is earthed in-case of ground fault; and to sort out, the cores that are shorted in case of a short circuit fault., Loop tests are used for location of ground short circuit, faults. These tests can only be used if a sound cable, runs along with the faulty cable or cables., The loop tests work on the principle of a Wheatstone bridge., The advantage of these tests is that their setup is such, that the resistance of fault is connected in the battery, circuit and therefore does not effect the result. However, if, the fault resistance is high, the sensitivity is adversely, affected. In this section only two types of tests viz., Murray, and Varley loop tests are being described., Murray Loop Test. The connection for this test are shown, in Fig 8a relates to the ground fault and Fig 8b relates to, the short circuit fault., In both cases, the loop circuit formed by the cable, conductors is essentially a wheatstone bridge consisting, of resistances P, Q, R and X. G is a galvanometer for, indication of balance,, The resistors P, Q forming the ratio arms may be decade, resistance boxes or slide wires., Under balance conditions :, X, , =, , Q, , R, , ∴X =, , or, , P, , X, R+X, , Q, P+Q, , =, , Q, P+Q, , (R + X), , Where (R+X) is total loop resistance formed by the sound, cable and the faulty cable. When the conductors have, the same cross-sectional area and the same resistivity,, the resistance are proportional to lengths. If l1 represents, the length of the fault from the test end and ‘l’ is the length, of each cable. Then, I =, 1, , Q, P+Q, , . 2I, , The above relation shows that the position of the fault may, be located when the length of the cable is known. Also,, the fault resistance does not alter the balance condition, because its resistance enter the battery circuit hence, effects only the sensitivity of the bridge circuit. However,, if the magnitude of the fault resistance is high, difficulty, may be experienced in obtaining the balance condition on, account of decrease in sensitivity and hence accurate, determination of the position of the fault may not be, possible., In such a case, the resistance of the fault may be reduced, by applying a high direct or alternating voltage, in, consistence with the insulation rating of the cable, on the, line so as to carbonize the insulation at the point of the, fault., Varley loop test. In this test we can determine, experimentally the total loop resistance instead of, calculating it from the known lengths of the cable and its, resistance per unit length. The necessary connections, for the ground fault are shown in Fig 9a and for the short, circuit fault in Fig 9b. The treatment of the problem, in, both cases, is identical., A single pole double throw switch A is used in this circuit., Switch K is first thrown to position ‘I’ and the resistance, ‘S’ is varied and balance obtained., , Electrical : Electrician (NSQF LEVEL - 5) - Related Theory for Exercise 1.3.30 - 1.3.33, , Copyright Free under CC BY Licence, , 137
Page 152 :
At balance, , R, X+S, , P, , =, , Q, , 2, , R+X+S, X+S, , 2, , =, , P+Q, , or X =, , (R + X) Q − S P, , Q, , 2, , 2, , P+Q, , Hence, X is known from the known value of P, Q, S2 from, this equation and R+X (the total resistance of 2 cables) as, determined from Eqn. knowing the value of X, the position, of the fault is determined., Now, , X, R+X, , =, , I, , 1, , 2I, , or I =, 1, , X, R+X, , 2I, , Where, I1= length of fault from the test end and, Measurement of resistance, Let the value of S for balance be S. The four arms of the, Wheatstone bridge are P, Q, R + X, S1 at balance:, , R+X, S, , 1, , =, , P, Q, , This determines R + X i.e. the total loop resistance as P,, Q and S1 are known., The switch K is then thrown to position ‘2’ and the bridge, is rebalanced. Let the new value of S for balance be S2., The four arms of the bridge now are P, Q, R, X + S2., , 138, , l = total length of conductor., Equations for murrary loop test and varley loop test are, valid only when the cable sections are uniform throughout, the loop. Corrections must be applied in case the crosssections of faulty and sound cables are different or when, the cross-section of the faulty cable is not uniform over its, entire length., Since temperature affects the value of resistance,, corrections must be applied on this account if the, temperatures of the two cables are different. Corrections, may also have to be applied in case the cables have a, large number of joints., , Electrical : Electrician (NSQF LEVEL - 5) - Related Theory for Exercise 1.3.30 - 1.3.33, , Copyright Free under CC BY Licence
Page 153 :
Electrical, Electrician - Basic Electrical Practice, , Related Theory for Exercise 1.4.34, , Ohm’s law - simple electrical circuits and problems, Objectives: At the end of this lesson you shall be able to, • describe the essential factors in an electrical circuit, • state the relation between circuit factors through Ohm’s law, • apply Ohm’s law in an electric circuit., • define electrical power and energy and calculate related problems, Simple electric circuit, In the simple electric circuit shown in Fig 1, the current, completes its path from the positive terminal of the battery, via the switch and the load back to the negative terminal of, the battery., The circuit shown in Fig 1 is a closed circuit. In order to, make a circuit to function normally the following three, factors are essential., , (ie) I α V (When 'R' is kept constant), I α R (When 'V' is kept constant), I α V/R (Relation between I,V and R), , I�, , V, R, , It means I = V/R, V = Voltage applied to the circuit in ‘Volt’, I = Current flowing through the circuit in ‘Amp’, R = Resistance of the circuit in Ohm (Ω), The above relationship can be referred to in a triangle as, shown in Fig 2. In this triangle whatever the value you want, to find out, place the thumb on it then the position of the, other factors will give you the required value., , •, , Electromotive force (EMF ) to drive the electrons through, the circuit., , •, , Current (ΙΙ), the flow of electrons., , •, , Resistance (R) - the opposition to limit the flow of, electrons., , Ohm’s law, In 1826 George Simon Ohm discoverd that for metallic, conductor, there is a substantially constant ratio of the, potential difference between the ends of the conductor, Ohm’s law gives the relation between the voltage, current, and resistance of a circuit., Ohm’s law states that the ratio of the voltage (V) across any, two points of a circuit to the current (I) flowing through is, constant provided physical conditions, namely temperature, etc. remain constant. This constant is denoted as resistance, (R) of the circuit., (or), In simple,, , For example for finding ‘V’ close the value ‘V’ then readable, values are IR, so V = IR., Again for finding ‘R’, close the value R, then readable values, are V/I so R = V/I, like that Ι =, , V, , ., , R, , Written as a mathetical expression, Ohm’s Law is, Resistance =, (or) R =, , V, I, , Voltage (V), Current (I), , (Refer Fig 3), , (Refer Fig 3), , Ohm's law states that in any electrical closed circuit,, the current (I) is directly proportional to the voltage, (V), and it is inversely proportional to the resistance, 'R' at constant temperature., 139, , Copyright Free under CC BY Licence
Page 154 :
V, R, V, I=, R, 10, I=, = 2 ampe, 5, I∝, , Of course, the above equation can be rearranged as:, , How much current (I) flows in the circuit shown in Fig 7, , Voltage (V, Resistance (R, , (, , (, , Current (I =, , Example 2, , (, , V, , (or I = R (Refer Fig 4, , (, , (, , Given:, Voltage (V), In the same way, ‘V’ can be found by covering ‘V’, , = 1.5 Volts, , Resistance (R) = 1 kOhm, = 1000 Ohms, , Voltage (V) = Current (I) x Resistance (R), , Find : Current (I), , or V - IR (Refer Fig 5), , Known, , I=, , V, R, , Solution:, I=, , Application of Ohm’s law in circuits, , 1.5 V, = 0.0015 amp, 1000 Ohms, , Example 1, , Answer:, , Let us take a circuit shown in Fig 6 having a source of 10V, battery and a load of 5 Ohms resistance. Now we can find, out the current through the conductor., , The current in the circuit is 0.0015 A, or, the current in the circuit is 1.5 milliampere (mA), (1000 milliamps = 1 ampere), Problem, Find the value of voltage across a 10 Ohms resistor in the, circuit shown in Fig 8. When the current of 2 Amps flows, through the 10 Ohm resistor, Solution, Voltage across 10 Ohm, V= I x R, = 2 x 10, = 20 Volt, Similarly if the value of the other resistance is known we, can find the voltage drop across them., , 140, , Electrical : Electrician (NSQF LEVEL - 5) - Related Theory for Exercise 1.4.34, , Copyright Free under CC BY Licence
Page 155 :
Short circuit, The other important extreme condition is the short circuit., A short circuit will occur, for example, when the two, terminals of a cell are joined (Fig 9). A short circuit may, also occur if the insulation between the two cores of a cable, is defective., The resulting negligible resistance will cause large currents, which can become a hazard. A fuse, if provided in the circuit, as shown in Fig 9, could then blow and automatically open, the circuit., Practical application, , Extreme circuit conditions, , The knowledge gained by this exercise can be applied to, calculate the current drawn by a particular load resistance, when the supply voltage is known. This will enable the, technician to select a proper size of cable for the circuit., , Two important extreme conditions can occur in a circuit., Open circuit, In an open circuit, there is an infinitely high resistance in the, circuit. This condition can happen in a circuit when the, switch is open. Therefore, no current of flow., For example, a generator is said to be in an open circuit, when the switch is open and running without supplying, current to the circuit. A wall socket, too, is an open circuit, if the control switch of the wall socket is ‘OFF’or 'ON', position provided there is no appliance plugged to the wall, socket., , Electrical : Electrician (NSQF LEVEL - 5) - Related Theory for Exercise 1.4.34, , Copyright Free under CC BY Licence, , 141
Page 156 :
Electrical Power (P) & Energy (E), The product of voltage (V) and current (I) is called electrical, power. Electrical power (P) = Voltage x Current P=V x I, The unit of Electrical power is ‘Watt’ It is denoted by the, letter ‘P’ It is measured by Watt meter. The following, formulae can also be derived from formula of power (P) as, (i), , E, , = IR x I, P = I2 R, , Example 2, Calculate the power of a lamp, which takes a current of 0.42, Amp at 240 V supply, , Voltage (V), , = 240 V, , Current (I), , = 0.5 A, , Find:, , P =VXI, , Power(P), V, , = Vx, , P�, , =?, , Solution:, , R, , V, , = 1.125 kWH, , Given:, , P =VXI, , (ii), , = 1125 WH (or), , P, , =VXI, = 240 x 0.42, , 2, , = 100.8W, , R, , Hence, Power (P), , = 100 W (approx), , Electrical Energy (E), , Example 3:, , The product of power (P) and time (t) is called as electrical, energy (E), , Calculate the hot resistance (R) of the 200W/250V rated, bulb?, , Electrical Energy (E) = Power x time, , Given:, , E =Pxt, = (V x I) x t, E =VxIxt, , Power (P), , = 200 W, , Voltage (V), , = 250 V, , Find:, , The unit of electrical energy is “Watt hour” (Wh), The commercial unit of Electrical energy is “Kilo watt hour”, (KWH) or unit, , Resistance (R), , =?, , Solution:, , B.O.T (Board of Trade) unit / KWH/Unit, P�, , One B.O.T (Board of Trade) unit is defined as that one, thousand watt lamp is used for one hour time, it consumes, energy of one kilowatt hour (1kWH). It is also called as, “unit”, , R�, , Energy = 1000W x 1Hr = 1000WH (or) 1kWH, Example - 1, , (R) Resistance, , How much electrical energy is consumed in an electric iron, rated as 750W/250V used for 90 Minutes, , V, , 2, , R, V, , 2, , P, , �, , 250 X 250, 200, , = 312.5 Ohm (Ω ), , Example 4, In a house, the following electrical loads are daily used:-, , Given:, Power (P), , = 750W, , Voltage (V), , = 250V, , Time, , = 90min (or) 1.5Hr, , (i) 5 Nos of 40W Tube Lights used for 5 hours/day, (ii) 4 Nos of 80W fans used for 8 hours/day, (iii) 1 No of 120W T.V. receiver used for 5 hours/day, (iv) 4 No of 60W lamps used for 4 hours/day, , Find:, Electrical Energy (E) = ?, Solution:, , Calculate the total energy consumed in unit’s per day and, also the cost of electric bill for the month of January If the, cost of energy is 1.50/unit, , Electrical Energy (E) = P x t, =750 w x 1.5Hr, , 142, , Electrical : Electrician (NSQF LEVEL - 5) - Related Theory for Exercise 1.4.34, , Copyright Free under CC BY Licence
Page 157 :
Given, , Work, Power and Energy, , Load details per day, , Work is said to be done, when a force (F) displaces a body, from one distance (s) to another (or), , Electric Device, (i) Tube light -, , Power, 40W -, , Numbers, Time in hours, 5, 5 hr/day, , (ii) Fans, , -, , 80W -, , 4, , -, , 8 hr/day, , (iii) T.V., , -, , 120W -, , 1, , -, , 6 hr/day, , It is generally denoted as “W”, , (iv) Lamps, , -, , 60W, , 4, , -, , 4 hr/day, , The unit of work done is, , -, , cost of energy - Rs.1.50/unit, , (i) Energy consumption in unit per day = ?, (ii) Cost of energy for the month of January = ?, Solution, Energy consumption/day, = 40W x 5 x 5 hr /day, �, , 2. Fans, , 1000 wh, 1000, , � 1Kwh/day, , = 80W x 4x8 hr/day, , �, 3. T.V., , w.d, , =FxS, , (i) In Foot Pound Second (F.P.S) System is “Foot Pound, (Ib.ft)”, , Find:, , 1. Tube light, , Work done = Force x distance moved, , (ii) In Centimetre Gram Second (C.G.S) System “Gram, Centimetre (gm.cm)”, or, 1 gm.cm, , = 1 dyne, , 1 dyne, , = 107 ergs, , The smallest unit of work done is “Erg”, (iii) In Metre - Kilogram - Second (M.K.S.) System is, “Kilogram Metre (Kg-M)’, 1 Kilogram = 9.81Newton, (iv) In system of international unit (S.I. Unit) is ‘Joule’, , 2560, , � 2.56 Kwh/day, , 1000, , = 120W x 1x6 hr/day, , 1 Joule = 1 Newton Metre (Nw-M), Power (P), The rate of doing work is called as Power (P), , �, , 4.Lamp, , 720 wh, 1000, , � 0.72 Kwh/day, , = 60W x 4x4 hr/day, �, , 960, 1000, , � Kwh �, , 0.96 kwh/day, 5.24 kwh/day, , (i) Total energy consumption in unit per day, = 5.24 unit, , = 5.24 x 31, = 162.44 units, = Rs. 1.50/unit, , Total electric bill for the month of, January, Electricity Bill for the month, , P�, , FxS, t, , It’s unit is Lb.ft/sec in FPS system, gm-cm/sec is in C.G.S. System, (or), Dyne/sec, , (ii) Total energy consumption for the, month of January (i.e 31 days), , Cost of energy, , Power (P) = work done / time taken, , (or), Kg-M/sec in M.K.S System (or) NW - M/ sec, (1kg, , = 9.81 Newton), , Joule/sec in (S.I), = 162.44 x 1.50, = Rs.243.66, = Rs. 244/-, , Assignment :, , 1 Joule/Sec, , = 1 watt, , Electrical Power, , = VI Watt, , The unit of Mechanical power is “Horse Power” (H.P), Horse Power (HP) further classified into two:, , Note : The instructor may ask the trainees to, prepare electric bill for the current month for, his house (or) any building., , They are:Indicated Horse Power - (IHP), Brake Horse Power - (BHP), Indicated Horse Power (IHP), The power developed inside the engine (or) pump (or) motor, is called Indicated Horse Power (IHP), , Electrical : Electrician (NSQF LEVEL - 5) - Related Theory for Exercise 1.4.34, , Copyright Free under CC BY Licence, , 143
Page 158 :
Brake Horse Power (BHP), The useful Horse Power which is available at the shaft of the, engine/motor/pump is called Brake Horse Power (BHP), So,, , Energy, The capacity for doing work is called as electrical, Energy, , IHP is always greater than, , BHP due to friction losses, , (or), The product of power and time is known as Electrical, energy, , IHP > BHP, The relation between Mechanical and Electrical Power, (ie)1 HP (British) = 746 Watt, 1 HP (Metric) = 735.5 Watt, , (ie) Energy, , t�, , workdone, xtime, time, , Electric - energy, , One HP (Metric), Theamount of Mechanical Power required to move/displace, a body/substance by force of 75 Kg to one metre distance, in one second is called as one HP (metric), , = Power x time, , = Power x time, = VI x t, , S.I unit of energy is “Joule”, (ie) Energy, , = (Joule/sec) x sec, , HP (Metric) = 75kg - M/Sec, One HP (British), , =, , Theamount of Mechanical power required to move/displace, a body/substance of force 550Ib to one foot (ft) distance in, one second is called as one HP (British), 1 HP (British) = 550 Ib.ft/sec, , Joulle, Sec, , � Sec = joule, , (ie) The S.I of unit of work done and energy is same (Joule), The energy can be divided into two main categories (ie), (i) Potential Energy (eg. Loaded gun, energy (stored in, spring etc), (ii) Kinetic Energy (eg. Moving of car, raining etc)., , 144, , Electrical : Electrician (NSQF LEVEL - 5) - Related Theory for Exercise 1.4.34, , Copyright Free under CC BY Licence
Page 159 :
Electrical, Electrician - Basic Electrical Practice, , Related Theory for Exercise 1.4.35, , Kirchhoff's law and its applications, Objectives: At the end of this lesson you shall be able to, • state Kirchhoff's first law, • apply Kirchhoff's first law to find the circuit current, • state Kirchhoff's second law and apply the same to find the voltage drop in branches, • solve problems by applying Kirchhoff's laws., Kirchoff's laws are used in determinig the equivalent, resistance of a complex network and the current flowing in, the various conductors., Kirchhoff's laws, Kirchhoff's first law: At each junction of currents, the sum, of the incoming currents is equal to the sum of the outgoing, currents. (Figs 1 & 2) (or) The algebric sum of all branch, currents meeting at a point/node is zero, , Solution, V, , I1 =, , R1, , I2 =, , I3 =, , I4 =, , If all inflowing currents have positive signs and all outflowing, currents have negative signs, then we can state that, , __, , I4, , __, , V, , 220 V, , 220 V, , =, , R2, V, , 55 ohms, , V, , 40 ohms, , =, , R4, , = 4A, , 220 V, , =, , R3, , = 2.2A, , 100 ohms, , = 5.5A, , 220 V, 200 ohms, , = 1.1A, , I = I1+ I2 + I3 + I4, , I1+ I2 = I3 + I4 + I5, + I1+ I2 __ I3, , =, , I5 = 0, , In the above example the sum of all the currents flowing at, the junction (node) is equal to zero., , = 2.2A + 4A + 5.5A + 1.1A = 12.8A, Checking the calculation, 1, , ΣI = 0, I = I1+ I2 + I3 + ................., , R, , =, , Example: Apply Kirchhoff's First Law to find the current, shown in circuit Fig 3., , 1, R1, , =, , Find current, =, , I, I1, I2, I3 , I4, , 1, R TOT, , 1, , +, , 1, 100, , R2, +, , +, , 1, 55, , 1, R3, , +, , 1, 40, , +, , +, , 1, R4, 1, 200, , 22 + 40 + 55 + 11, , =, , 2200, , =, , 128, 2200, , =, , 16, 275, , 16, 275, 145, , Copyright Free under CC BY Licence
Page 160 :
RTOT, , I=, , V, R TOT, , =, , = 17.19 ohms, , 220V, 17.19 ohms, , = 12.798 A, , Kirchhoff's second law, A simple case: In closed circuits, the applied terminal, voltage V is equal to the sum of the voltage drops V1+V2 and, so forth. (Fig 4), , First simplify by calculating the equivalent resistance for, R2, R3 according to Kirchhoff's First Law., , R, , =, , 23, , R2 × R3, R2 + R3, , =, , 40 ohms × 60 ohms, (40 + 60) ohms, , = 24 ohms, R TOT = R 1+ R 2||3 + R 4, = 36 ohms + 24 ohms + 50 ohms, = 110 ohms, The total current I can now be calculated by means of, Ohm's Law:, If all the generated voltages are taken as positive, and all, the consumed voltages are taken as negative, then it can, be stated that:, in each closed circuit the sum of all voltages is equal to, zero., ΣV = 0, , I=, , R TOT, , =, , 220 V, 110 ohms, , = 2A, , The partial voltages are accordingly:, V1 = I x R1 = 2A x 36 ohms = 72 V, V, , Example, , V, , 2||3, , = I x R2||3 = 2A x 24 ohms = 48 V, , V4 = I x R4 = 2A x 50 ohms = 100 V, , Given, , Checking the calculation, V, R1, R2, R3, R4, , =, =, =, =, =, , 220V, 36 ohms, 40 ohms, 60 ohms, 50 ohms, , Find, R, I, I1, I2,, V1, V2 || 3 , V4, Solution, Apply Kirchhoff's First Law to find the voltage drops in the, branches (Fig 5)., , V = V1 + V2||3 + V4, 220 V = 72V + 48V + 100 V, 220 V = 220 V, Suggested steps for the application of Kirchhoff's Laws to, solve problems., 1 Mark the nodes (junction points) in the given network., 2 Mark the current direction over each element (resistor), in the circuit. The current direction is arbitrary. But it is, often convenient to use a direction that goes from ve, to +ve through an emf., 3 Indicate the loop currents withI1,I2,I3 etc. Apply Kirchhoff's, First Law to the junction nearer to it. (Fig 7), , Calculate the total resistance R of the series circuit, according to Kirchhoff's Second Law. (Fig 6), , 146, , Electrical : Electrician (NSQF LEVEL - 5) - Related Theory for Exercise 1.4.35, , Copyright Free under CC BY Licence
Page 161 :
4 Once the current and its direction are marked over an, element, keep it the same until the problem is solved., 5 Select the windows, (closed loops) in the circuit and, name the window. eg. Fig 8., , VB = 13.2 V, VG = 14.5 V,, RG = 0.1 - 2 Ω, , RB, , = 0.5 Ω and RL = 2 Ω,, , Solution, 1 Draw a circuit diagram. (Fig 9), , 6 Each element should be included atleast once in any, one of the closed loops selected in the above step., 7 Raise in potential is considered as +ve. A drop (fall) in, potential is considered as ve., , 2 It can be seen from Fig 9 that there are two `windows’, loops in the circuit. this means that we must show two, currents, one in each loop, in any arbitrary direction., (We shall show currents IB and IG in the direction we, think the current might flow). (Fig 10), , 8 Trace around each loop and write Kirchhoff's Voltage, Law equation. For such tracing to be complete, one, should return to the starting point., 9 While tracing, the direction of movement is important., For the source of emf, A raise in potential occurs when moving from the ve to, the +ve terminal of a source. Therefore the value is positive., A drop in potential occurs when moving from a +ve to a, ve terminal of a source. Therefore the value is negative., The current direction is not considered to fix, the potential-raise or potential-drop across a, source of emf., For the resistors, A drop in potential occurs when moving across the resistor, in the same direction as that of the current through the, resistor. Therefore the value is negative., A raise in potential occur when moving across the resistor, in the opposite direction to that of the current through the, resistor. Therefore, the value is positive., The direction of movement while tracing the, loop and related current direction in each, element is important. The polarity of the source, of emf is not considered to fix the potential, raise or drop across a resistor., , 3 Using Kirchoff’s Current Law, we can identify the, current through the load resistor as, IL =IB + IG., Indicate this current in Fig 10., 4 Show the polarity signs of the voltage drops across, each resistor using the assumed directions of the, current. (Fig 10), 5 Indicate, in each window, a current loop that goes, around a complete circuit. The direction is arbitrary, but, it is often convenient to use a direction that goes from, - to + through an emf. (See loops 1 and 2 in Fig 8)., 6 Trace around each loop, writing Kirchhoff’s Voltage Law, equation by applying the following basic principles, •, , If you encounter - VG of the voltage source first then, the +ve of the source while tracing through a loop, take the source as +ve., , •, , If you encounter positive of the source first and then, negative of the source while tracing through a loop, take the source is negative., , •, , When you trace a voltage drop in the same direction, of current take the voltage drop as negative., , •, , When you trace a voltage drop in the opposite, direction of current take the voltage drop as positive., , 10 Solve the equations to determine the current through, each element., Example 1: A battery of open-circuit voltage VB and, internal resistance RB is connected in parallel with a, generator of open-circuit voltage VG and internal resistance, RG. This combination feeds load resistance RL. For the, following values find the battery current, generator current,, load current and load voltage., , •, , Form clear loops denoting the line of tracing starting, with alphabet `A’ then after completing the path end, with `A’., 147, Electrical : Electrician (NSQF LEVEL - 5) - Related Theory for Exercise 1.4.35, , Copyright Free under CC BY Licence
Page 162 :
Refer Fig 10. Let us start from first loop starting with A, and ending with A., i.e. ABEFA, , Accordingly current supplied by the generator, , Applying the above principles, A to B = – IB RB (Voltage drop alongwith, current direction), B to E = – ILRL, E to F =, , Minus sign in the answer indicates that the battery is not, sending any current but receives a charging current of, 1.024 amps., , -do-, , 0, , F to A = +VB (First negative and then positive, of the source in the direction of current), , IG, , Current taken by the battery IB, (Battery in getting charged) = 1.024 amps, Load current IL, , = IB + IG, , where IB, , = –1.024 amps, , Hence for first loop, we have, –IBRb – ILRL + VB = 0, , IG, , = +7.88, , IL, , = (–1.024 + 7.88), , .... Eqn. (1), , OR, , = 6.856 amps, Voltage across the load, , = IBRB + (IB + IG)RL, , = 7.88 amps, , .... Eqn. (2), , = ILRL, = 6.856 x 2, , For loop 2 we have C B E D C, , = 13.712 volts, , –IGRG – ILRL + VG, , =0, , .... Eqn. (3), , –IGRG – (IB + IG) RL + VG, , =0, , VG, , = IGRG + (IB + IG)RL, .... Eqn. (4), , Example 2: For the given circuit in Fig 11, determine the, following, , Insert in eqn. (2) and (4) the numerical values we have, 13.2, , = 0.5IB + 2(IB + IG), , .... Eqn. (5), , 14.5, , = 0.1IB + 2(IB + IG), , ... Eqn.(6), , Collect together like terms and solve for IG IB, 13.2, , = 2.5IB + 2IG, , .... Eqn. (7), , 14.5, , = 2IB + 2.1IG, , .... Eqn.(8), , Multiply eqn.(7) by 2 and eqn. (8) by 2.5 we have, 26.4, , = 5IB + 4IG, , ..... Eqn.(9), , 36.25, , = 5IB + 5.25IG, , .....Eqn.(10), , Subtract eqn.(9) from eqn. (10) we have, , 1 Mark the nodes and name the closed loops., 2 Name and mark the direction of current in the element, following Kirchhoff’s First Law., 3 Trace around each loop and write Kirchhoff’s 2nd law., 4 Solve the problem using simultaneous equation to find, the current delivered or received by the battery 6 V and, 9 V., , 36.25, , = 5IB + 5.25IG, , 26.4, , = 5IB + 4IG, , 5 Find the current passing through the 5 ohm resistor., , 9.85, , = 1.25 IG, , 6 Cross check your calculation., i, , IG, , =, , 9.85, , = 7.88 amps, , The nodes are marked and the closed loops are, named (Fig 12), , 1.25, , Substituting the value IG = 7.88 in eqn. (9) we have, 26.4, , = 5IB + 4 x 7.88, = 5IB + 31.52, , 26.4 – 31.52 = 5IB, –5.12, , = 5 IB, , IB, , =, , − 5.12, 5, , = – 1.024 amps, 148, , Electrical : Electrician (NSQF LEVEL - 5) - Related Theory for Exercise 1.4.35, , Copyright Free under CC BY Licence
Page 163 :
Loop 1 = a b c d e f a, , 30I1 + 25I2, , Loop2 = f c d e f, , Substracting equation 4 from eqn.3 we have, , ii Direction of current is marked (Fig 13), , 17I2, , = 24, , I2, , =, , Substituting I2, , = 1.41 in eqn. 1 we have, , 6I1 + 5(1.41), , =6, , 6I2 + 7.05, , =6, , 6I1, , = 6 – 7.05 = –1.05, , + 6 – I1 – 5I1 – 5I2, , =0, , +6 – 6I1 – 5I2, , = 0, , 6I1 + 5I2, , = 6, , = 1.41 amps, , = –0.175 amps., , As the current value of I1 is minus sign the current is, assumed to flow in opposite direction to the asumed, direction, , Loop 1 – a b c d e f a, =0, , 24, 17, , I1, + 6 – 1I1 – 5(I1 + I2), , = 30 .... Eqn. (4), , .... Eqn.(1), , Only the 9V battery delivers current, while the current received by the 6 V battery, = 0.175 amps., Current delivered by 9 V battery = 1.41 amps, , Loop 2- f c d e f, +9 – 2I2 – 5(I1 + I2), , =0, , 9 – 2I2 – 5I1 – 5I2, , =0, , 9 – 5I1 – 7I2, , =0, , 5I1 + 7I2, , =9, , Current passing through 5 ohms resistor, I 1 + I2, , = –0.175 + 1.41, = 1.235 amps, , .... Eqn. (2), , iv Multiplying eqn. (2) by 6 and eqn. (1) by 5 we have, 5I1 + 7I2, , =9x6, , 6I1 + 5I2, , =6x5, , 30I1 + 42 I2, , = 54 .... Eqn. (3), , PD across 5 ohm resistor, , = 1.235 x 5 = 6.175 V., , Cross check, Taking loop 3 a b c f a, +6 – I1 +2 I2 –9 = 0, 6–(–0.175)+2.82–9=0, 8.995 – 9 = 0, As the values are more or less the same verified by cross, checking and found to be corre., , Electrical : Electrician (NSQF LEVEL - 5) - Related Theory for Exercise 1.4.35, , Copyright Free under CC BY Licence, , 149
Page 164 :
Electrical, Related Theory for Exercise 1.4.36 & 1.4.37, Electrician - Basic Electrical Practice, DC series and parallel circuits, Objectives: At the end of this lesson you shall be able to, • state the characteristics of series circuit and determine the current and voltage across each resistors, • determine the total voltage sources in series circuit, • state the relation between EMF potential difference and terminal voltage, • determine the polarity of voltage drops with respect to ground, The series circuit, , The current relationship in a series circuit is, , If more than one resistors are connected one by one like a, chain and if the current has only one path is called as series, circuit. It is possible to connect two incandescent lamps in, the way shown in Fig 1. This connection is called a series, connection, in which the same current flows in the two, lamps., , I = IR1 = IR2 = IR3. (Refer Fig 4a & 4b ), We can conclude that there is only one path for the current, to flow in a series circuit. Hence, the current is the same, throughout the circuit., , The lamps are replaced by resistors in Fig 2. Fig 2 (a), shows two resistors are connected in series between point, A and point B. Fig 2(b) shows four resistors are in series., Of course, there can be any number of resistors in a series, connection. Such connection provides only one path for the, current to flow., Total resistance in series circuit, You know how to calculate the current in a circuit, by, Ohm’s law, if resistance and voltage are known. In a circuit, consisting of two resistors R1 and R2 we know that the, resistor R1 offers some opposition to the current flow. As, the same current should flow through R2 in series it has to, overcome the opposition offered by R2 also., , Identifying series connections, In an actual circuit diagram, a series connection may not, always be as easy to identify as those in the figure. For, example, Fig 3(a), 3(b), 3(c) & 3(d) shows series, resistors drawn in different ways. In all the above circuits we, find there is only one path for the current to flow., , If there are a number of resistors in series, they all oppose, the flow of current through them., The 2nd characteristic of a DC series circuit could be, written as follows (R)., The total resistance in a series circuit is equal to the sum, of the individual resistances around the series circuit. This, statement can be written as, , Current in series circuits, , R = R1+ R2+ R3+.......Rn, , The current will be the same at any point of the series, circuit. This can be verified by measuring the current in any, two points of a given circuit as shown in Figs 4(a) and 4(b)., The ammeters will show the same reading., , where R is the total resistance, R1, R2 , R3,.......Rn are the resistors connected in series., When a circuit has more than one resistor of the same, value in series, the total resistance is R = r x N, , 150, , Copyright Free under CC BY Licence
Page 165 :
where 'r' is the value of each resistor and N is the number, of resistors in series., Voltage in series circuits, In DC circuit voltage divides up across the load resistors,, depending upon the value of the resistor so that the sum of, the individual load voltages equals the source voltage., The 3rd characteristic of a DC circuit can be written as, follows., As the source voltage divides/drops across the series, resistance depending upon the value of the resistances, V = VR1 + VR2 + VR3 + ........VRH, the total voltage of a series circuit must be measured, across the voltage source, as shown in Fig 5., Voltages across the series resistors could be measured, using one voltmeter at different positions as illustrated in, Fig 6., , When Ohm’s law is applied to the complete circuit having, an applied voltage V, and total resistance R, we have the, current in the circuit as, Ι=, , V, R, , Application of Ohm’s law to DC series circuits, Applying to Ohm’s law to the series circuit, the relation, between various currents could be stated as below, I = IR1 = IR2 = IR3, , This could be stated as, , V, R, , V, =, , R1, , R1, , =, , V, , R2, , R2, , =, , V, , R3, , R3, , You can use any of the above formulae to calculate current, in a series circuit., We know the total supply voltage, Electrical : Electrician (NSQF LEVEL - 5) - Related Theory for Exercise 1.4.36 & 1.4.37, , Copyright Free under CC BY Licence, , 151
Page 166 :
V = VR1 + VR2 + VR3, i.e.IR = R1 IR1+ R2 IR2 + R3 IR3, , in polarity as indicated in the schematic of Fig 8 its voltage, to be subtracted as follows., , and Total resistance R = R1 + R2 + R3 ., Voltage sources in series, When cells are placed in a torch light, they are connected, in series to produce a higher voltage as shown in Fig 7., , VTotal = VS1 – VS2 + VS3, = 1.5 V – 1.5 V + 1.5 V, = 1.5 V, Use of series connection, 1 Cells in torch light, car batteries, etc., 2 Cluster of mini-lamps used for decoration purposes., 3 Fuse in circuit., Series voltage sources are added when their polarities are, in the same direction and or subtracted when their polarities are in the opposite direction. For example, if one of the, ends of the cell, say VS2 in a torch light is wrongly placed, , 4 Overload coil in motor starters., 5 Multiplier resistance of a voltmeter., , Polarity of IR voltage drops, Definitions, Electromotive force (emf), We have seen that the electromotive force (emf) of a cell is, the open circuit voltage, and the potential difference (PD), is the voltage across the cell when it delivers a current. The, potential difference is always less than the emf., Potential difference, PD = emf – voltage drop in the cell, Potential difference can also be called by another term, the, terminal voltage, as explained below., Terminal voltage, It is the voltage available at the terminal of the source of, supply. Its symbol is VT. Its unit is also the volt. It is given, by the emf minus the voltage drop in the source of supply,, i.e., , VT = emf – IR, , Voltage drop (IR drop), The voltage lost by resistance in a circuit is called the, Voltage drop or IR drop., Example 1, , where I is the current and R the resistance of the source., , The resistances and applied voltage are known. (Fig 1), The voltage drops across the resistors, The total resistance of the circuit in Fig 1 would be equal, to RT = 100 + 100 + 100 + 100 = 400 ohms., , 152, , Electrical : Electrician (NSQF LEVEL - 5) - Related Theory for Exercise 1.4.36 & 1.4.37, , Copyright Free under CC BY Licence
Page 167 :
The current flowing through the circuit would be, I, , = (100/400) = 0.25 amps., , But point A has a potential of 100 volts and point B has zero., Somewhere along the circuit between A and B, the 100, volts have been lost., To find the voltage drop for each resistor is easy. First find, the current, which we have calculated as 0.25 amps, then, VR1 = 0.25 x 100 = 25 V, VR2 = 0.25 x 100 = 25 V, VR3 = 0.25 x 100 = 25 V, VR4 = 0.25 x 100 = 25 V., Add up all the voltage drops and they will total 100 volts, which is the applied voltage of the circuit., 25 + 25 + 25 + 25 = 100 volts., The sum of the voltage drops in a circuit must be equal to, the applied voltage., VTotal = VR1 + VR2 + VR3 + VR4., Polarity of voltage drops, When there is a voltage drop across a resistance, one end, must be more positive or more negative than the other end., The polarity of the voltage drop is determined by the, direction of conventional current. In Figure 2, the current, direction is through R1 from point A to B., Therefore, the terminal of R1 connected to point A has a, more positive potential than point B. We say that the, voltage across R1 is such that point A is more positive than, point B. Similarly the voltage of point B is more positive, than point C., , Example 2, Find the voltage at the points A,B, C and D with respect to, ground., Mark the polarity of voltage drops in the circuit (Fig 3) and, find the voltage values at points A, B, C and D with respect, to ground., Trace the complete circuit in the direction of current from, the + terminal of the battery to A, A to B, B to C, C to D,, and D to the negative terminal. Mark plus (+) where the, current enters each resistor and minus (–) where the, current leaves each resistor., The voltage drops indicate (Fig 3) Point A is the nearest, point to the positive side of the terminal; so voltage at A with, respect to ground is, VA = +95 V., There is a voltage drop of 10 V across R1; so voltage at B, is, VB = 95 – 10 = + 85 V., There is a voltage drop of 25 V across R2; so voltage at C, is, VC = 85 – 25 = + 60 V., There is a voltage drop of 60V across R3; so voltage at D is, VD = 60 – 60 = 0 V., Since the circuit is grounded at D, VD must equal 0 V., Positive and Negative grounds, , Another way to look at polarity between any two points is, that the one nearer to the positive terminal of the voltage, source is more positive; also, the point nearer to the, negative terminal of the applied voltage is more negative., Therefore, point A is more positive than B, while C is more, negative than B. (Fig 2), , In the electrical system of automobiles it is customary to, connect one side of the battery to the metal chassis and, call it the ground side. In this way metal chassis can be, used as the return path for any circuit without providing an, extra wire., While most cars have ‘negative grounds,’ some (European), vehicles have a ‘positive-ground’ system. In the positive, ground system reduced corrosion problems are claimed., Fig 4 shows both the systems., , Electrical : Electrician (NSQF LEVEL - 5) - Related Theory for Exercise 1.4.36 & 1.4.37, , Copyright Free under CC BY Licence, , 153
Page 168 :
In the negative ground system all wiring is at a positive, potential with respect to the chassis, (as shown in Fig 4a), , whereas in a positive ground system (Fig 4b), all potentials, are negative. Current flows in opposite directions in the two, systems. But in both systems, the metal chassis is used, as a common reference point to state the value of voltage, at any point in the system., , Practical application, The knowledge gained by this lesson will help you to:, , Figure 4c shows symbols for different types of ground, systems., , •, , connect resistors in series to limit the current to the, required level, , Strictly speaking,the word ground being used for the metal, chasis is not correct. A better symbol to use for chassis, ground is shown in Fig 4c. This is because ground usually, implies a connection to earth ground. (In a car the chassis, is insulated from the ground by its rubber tires.) For, example, one side of the domestic 240V AC outlet, the, neutral is connected to earth by the system earthing, method., , •, , determine the current in the series circuit when PD and, resistance value are known, , •, , connect voltage sources like cells in a proper manner, to have higher voltage, , •, , determine with polarised meters, the polarity of IR, drops, and, thereby, current direction in circuits, , •, , detect faults in series-connected decorative lamp circuits., , Marking the polarity of the voltage drop with respect, to ground?, To mark the polarity of the voltage drops across the, resistances R1, R2, find the voltage drops at points A and, B in Fig 5(a), follow the steps as shown in Figures 5(b) and, 5(c)., , 154, , Electrical : Electrician (NSQF LEVEL - 5) - Related Theory for Exercise 1.4.36 & 1.4.37, , Copyright Free under CC BY Licence
Page 169 :
DC parallel circuit, Objectives: At the end of this lesson you shall be able to, • explain a parallel circuit, • determine the voltages in a parallel circuit, • determine the current in a parallel circuit, • determine the total resistances in a parallel circuit, • state the application of a parallel circuit., In an electrical circuit, if the current has more than one, paths and equal voltage in each branch is called parallel, circuit., It is possible to connect three incandescent lamps as, shown in Fig 1. This connection is called parallel connection, in which, the same source voltage is applied across all the, three lamps., , Current in parallel circuit, Again referring to Fig 2 and applying Ohm’s law, the, individual branch currents in the parallel circuit could be, determined., , Voltage in parallel circuit, The lamps in Fig 1 are replaced by resistors in Fig 2. Again, the voltage applied across the resistors is the same and, also equal to the supply voltage., We can conclude that the voltage across the parallel circuit, is the same as the supply voltage., , Current in resistor R1 = I1 =, , Current in resistor R 2 = I 2 =, , Current in resistor R 3 = I3 =, , V1, R1, , =, , V2, R2, V3, R3, , V, R1, , =, , =, , ., , V, R2, , ., , V, R3, , as V1 = V2 = V3., Refer to Fig 4 in which the branch currents I1, I2 and I3 are, shown to flow into resistance branches R1, R2 and R3, respectively., , Fig 2 could also be drawn as shown in Fig 3., Mathematically it could be expressed as V = V1 = V2 = V3., , Electrical : Electrician (NSQF LEVEL - 5) - Related Theory for Exercise 1.4.36 & 1.4.37, , Copyright Free under CC BY Licence, , 155
Page 170 :
The total current I in the parallel circuit is the sum of the, individual branch currents., Mathematically it could be expressed as I = I1 + I2 +I3 +, ..... In., , Special case: Equal resistances in parallel, Total resistance R, of equal resistors in parallel (Fig 5) is, equal to the resistance of one resistor, r divided by the, number of resistors, N., , Resistance in parallel circuit, In a parallel circuit, individual branch resistances offer, opposition to the current flow though the voltage across the, branches will be same., Let the total resistance in the parallel circuit be R ohms., By the application of Ohm’s law, we can write, R=, , V, I, , ohms or Ι =, , V, , amps., , R, , where, R is the total resistance of the parallel circuit in ohms, V is the applied source voltage in volts, and, I is the total current in the parallel circuit in amperes., We have also seen, I = I1 + I2 + I3, or, , R=, , V, V, V, V, =, +, +, R R1 R 2 R 3, , N, , Applications of parallel circuits, , As V is the same throughout the equation and dividing the, above equation by V, we can write, , 1, 1, 1, 1, =, +, +, R R1 R 2 R 3, The above equation reveals that in a parallel circuit, the, reciprocal of the total resistance is equal to the sum of the, reciprocals of the individual branch resistances., , 156, , r, , An electric system in which one section can fail and other, sections continue to operate has parallel circuits. As, previously mentioned, the electric system used in homes, consists of many parallel circuits., An automobile electric system uses parallel circuits for, lights, horn, motor, radio etc. Each of these devices, operates independent of the others., Individual television circuits are quite complex. However,, the complex circuits are connected in parallel to the main, power source. That is why the audio section of television, receivers can still work when the video (picture) is inoperative., , Electrical : Electrician (NSQF LEVEL - 5) - Related Theory for Exercise 1.4.36 & 1.4.37, , Copyright Free under CC BY Licence
Page 171 :
Electrical, Related Theory for Exercise 1.4.38 & 1.4.39, Electrician - Basic Electrical Practice, Open and short circuit in series and parallel network, Objectives: At the end of this lesson you shall be able to, • state about short circuit in series circuit and its effect in series circuit, • state the effect of an open circuit in series circuit and its causes, • state the effect of shorts and open in parallel circuit., Short circuits, , Protection against dangers of short circuit, , A short circuit is a path of zero or very low resistance, compared to the normal circuit resistance., , Dangers of short circuit can be prevented by means of, fuses and circuit breakers in series with the circuit., , In a series circuit, short circuits may be partial or full (dead, short) as shown in Fig 1 and Fig 2 respectively., , Detecting short circuit, When the ammeter in the circuit indicates excessive, current then it indicates a short circuit in the circuit. The, location of short in a circuit can be detected by connecting, a voltmeter across each of the elements (resistors) and, circuit source. If the voltmeter indicates zero volts or, reduced voltage across the element, it is short circuited as, shown in Fig 3., , Methods used to protect the circuit in case of a short, circuit, As heavy currents flow through the short circuit, the circuit, cables should be protected against the large currents. If the, short circuit current is allowed to flow through the circuit,, the cables which are rated for normal circuit current, will get, heated up and become potential fire hazards., , Short circuits cause an increase in current that may or, damage the series circuit., Effects due to short circuit, Excess current due to short circuit can damage the circuit, components, power sources, or burn the insulation of, connecting wires. Fire is also caused due to intense heat, generated in the conductors., , To open the circuit automatically in cases of short circuits,, fuses or circuit breakers are used in the circuit. The rating, of the fuse wire or setting of the overload relay in circuit, breakers will be selected depending upon the lowest rating, of any one of the following used in the circuit., i, , Load current in the circuit, , ii Cable rating of the circuit, iii Series meter (ammeter etc.) rating of the circuit., , 157, , Copyright Free under CC BY Licence
Page 172 :
Open circuit in series circuit, , Voltmeter reading, , An open circuit results whenever a circuit is broken or is, incomplete, and there is no continuity in the circuit., In a series circuit, open circuit means that there is no path, for the current, and no current flows through the circuit. Any, ammeter in the circuit will indicate no current as shown in, Fig 4., , = 18 V – VR1 – VR2 – VR3, = 18 V – O V – O V – O V = 18 V., If the circuit was open due to a defective resistor, as shown, in Fig 5 (resistors usually open when they burn out), the, voltmeter would indicate 18 V when connected across this, resistor, R2., Alternatively, the open circuit may be found using an, ohmmeter. With the voltage removed, the ohmmeter will, show no continuity (infinite resistance), when connected, across the broken wire or open resistor. (Fig 6), , Causes for open circuit in series circuit, Open circuits, normally, happen due to improper contacts, of switches, burnt out fuses, breakage in connection wires, and burnt out resistors etc., Effect of open in series circuit, a No current flows in the circuit., b No device in the circuit will function., c Total supply voltage/ source voltage appear across the, open., Determination the location of break in the circuit has, occurred, Use a voltmeter on a range that can accommodate the, supply voltage; connect it across each connecting wire in, turn. If one of the wires is open as shown in Fig 4, the full, supply voltage is indicated on the voltmeter. In the absence, of a current, there is no voltage drop across any of the, resistors. Therefore, the voltmeter must be reading full, supply voltage across the open. part of the circuit, , 158, , Practical application, With the knowledge gained from this exercise:, •, , locate open and short circuit faults in a series circuit, , •, , repair series-connected decoration bulb sets., , Electrical : Electrician (NSQF LEVEL - 5) - Related Theory for Exercise 1.4.38 & 1.4.39, , Copyright Free under CC BY Licence
Page 173 :
Shorts and opens in parallel circuits, The two possible defects that can occur in an electrical, circuit they are:, •, , short circuit, , •, , open circuit, , To avoid burning of circuit components safety devices like, ‘fuse’, circuit breakers etc. are used to open the circuit.(Figs, 3 a and 3b)., , Shorts in parallel circuit:, Fig 1 shows a parallel circuit with short between points ‘a’, and ‘b’., , This causes reduction of circuit resistance almost to zero., Therefore, the voltage drop across ‘ab’ will be almost zero, (by Ohms law)., Thus current through the resistors R1, R2, R3 will be, negligible and not their normal current., , For a fuse to protect a parallel circuit, it should be placed, in the circuit where the total current flows or else each, branch must have a fuse. (Fig 4(a&b)), , The result is that a very high current in the order of hundred, times of the normal current will flow through the short, circuit., A short circuit exists when current can flow from the, positive terminal of the power source through connecting, wires and back to the negative terminal of the power source, without going through any load. (Fig 2), Short circuit may cause burning of the circuit, elements like cables, switches etc., , Electrical : Electrician (NSQF LEVEL - 5) - Related Theory for Exercise 1.4.38 & 1.4.39, , Copyright Free under CC BY Licence, , 159
Page 174 :
Opens in parallel circuit, An open in the common line at point A as shown in Fig 5, causes no current flow in that circuit whereas an open in the, branch at point B causes no current flow only in that, branch. (Fig 6), However, the current in branches R1 and R3 will continue to, flow so long as they are connected to the voltage source., Full voltage of the source will be available at, open circuit terminals. It is dangerous to meddle, with the terminals which are open., Practical application, Knowledge gained in this exercise can be applied to, identify open circuits or short circuits in wiring installations., , 160, , Electrical : Electrician (NSQF LEVEL - 5) - Related Theory for Exercise 1.4.38 & 1.4.39, , Copyright Free under CC BY Licence
Page 175 :
Electrical, Electrician - Basic Electrical Practice, , Related Theory for Exercise 1.4.40, , Laws of resistance and various types of resistors, Objectives: At the end of this lesson you shall be able to, • state the laws of resistance, compare resistances of different materials, • state the relationship between the resistance and diameter of a conductor, • calculate the resistance and diameter of a conductor from the given data (i.e. dimensions etc.), • explain various types of resistors., Laws of resistance: The resistance R offered by a, conductor depends on the following factors., •, , The resistance of the conductor varies directly with its, length., , •, , The resistance of the conductor is inversely proportional, to its cross-sectional area., , •, , The resistance of the conductor depends on the material, with which it is made of., , •, , It also depends on the temperature of the conductor., , Hence the unit of specific resistance is ohm metre, (Ωm)., Comparison of the resistance of different materials:, Fig 2 gives some relative idea of the more important, materials as conductors of electricity. All the conductors, shown have the same cross-sectional area and the same, amount of resistance. The silver wire is the longest while, that of copper is slightly short and that of aluminium is, shorter still. The silver wire is more than 5 times longer than, the steel wire., , Ignoring the last factor for the time being,we can say that, R=, , ρL, a, , where ‘ρ’ (rho - Greek alphabet) - is a constant depending, on the nature of the material of the conductor, and is known, as its specific resistance or resistivity., If the length is one metre and the area, 'a' = 1 m2,, then R = r., Hence, specific resistance of a material may be defined as, `the resistance between the opposite faces of a metre cube, of that material'. (or, sometimes, the unit cube is taken in, centimetre cube of that material) (Fig 1)., , We have ρ =, , Since different metals have different conductance ratings,, they must also have different resistance ratings. The, resistance ratings of the different metals can be found by, experimenting with a standard piece of each metal in an, electric circuit. If you cut a piece of each of the more, common metals to a standard size, and then connect the, pieces to a battery, one at a time, you would find that, different amounts of current would flow. (Fig 3), , aR, L, , In the SI system of units, ρ=, , =, , a metre 2 x R ohm, L metre, , aR, ohm − metre, L, , The bar graph (Fig 4) shows the resistance of some, common metals as compared to copper. Silver is a better, conductor than copper because it has less resistance., Nichrome has 60 times more resistance than copper, and, copper will conduct 60 times as much current as Nichrome,, if they were connected to the same battery, one at a time., 161, , Copyright Free under CC BY Licence
Page 176 :
=, , Relationship between the resistance and the diameter, of a conductor: For a uniform wire of a given material, the, value obtained by dividing the P.D. between any two points, by the current is the resistance between those two points,, and is directly proportional to the distance between them., Also if two equal value resistors, each having resistance R,, are connected in parallel it's equivalent RT is given by, , R(ohms) =, , x, , (a constant) ρ given material, , L (metres), a metre 2, , ×ρ, , So that ρ = Ra ÷ L ohm/ meter, where ρ (greek letter, pronounced 'rho') represents the, constant., L is the length of the wire in metres, a is the area in square metres., , 1, 1 1 2, = + =, RT, R R R, Therefore R T =, , length, area, , Example: Calculate the length of a copper wire of 1.5 mm, diameter which is to have a resistance of 0.3 ohms given, that resistivity of copper is 0.017 microohm meter., , R, 2, , Solution, , Hence, if two wires of the same material having the same, length and diameter are connected in parallel the resistance, of the two parallel wires is half that of one wire alone., But the effect of connecting two wires in parallel is exactly, similar to doubling the area of the conductor in just the, same way as the effect of connecting, say, five wires in, parallel is the same as increasing the cross-sectional area, of a wire five times, and the result is to reduce the, resistance to a fifth of that of one wire., In general, we may, therefore, say that the resistance of a, given length of a conductor is inversely proportional to its, cross-sectional area., The other factor that influences the resistance is the nature, of the material. Hence, we may now say that resistance of, a wire (Fig 5 & Fig 6), , Cross-sectional area of wire, = (π/4) x (1.5)2= 1.766mm2, = 1.766 x 10⁻⁶m2, R=, , ρL, a, , = 0.3 =, , 0.017 × 10 −6 × L, 1.766 × 10 −6, , Ans: Length = 31.2 m., We can reduce all this into a simple statement: the larger, the wire, the lower its resistacne; the smaller cross, sectional area of the wire, the higher its resistance., We can summarize with the universal rule: the electrical, resistance of any metallic conductor is inversely proportional, to its cross-sectional area., All of this provides us with a useful rule in working with, electrical conductors of any kind. Electrical resistance is, directly porportional to the length of the conductor, provided,, of course, the conductor is of the same diameter and is, made of the same material throughout. (Figs 7 & 8), Thus, the length of wire has a considerable influence on its, ability to conduct electricity. The longer the wire, the more, difficult it is for the current to get through it. In other words,, the longer the wire the greater its resistance., , 162, , Electrical : Electrician (NSQF LEVEL - 5) - Related Theory for Exercise 1.4.40, , Copyright Free under CC BY Licence
Page 177 :
Solution, Allowing for twist, the length of strands,, = 2000 + 5% of 2000 metre, = 2100m, Area of cross-section of 19 strands of copper conductor is, 2, , = 19 x = πd, 4, , (1.32 × 10 −3 ) 2 m 2, 4, , = 19 × π, , �L 1.72 x 10 �6 x 2100 x 4 x 7, Now R � a �, 19 x (1.32 x 10 � 3 )2 x 22, , =, , 1.72 × 10 −8 × 2100 × 4 × 7, 19 × 22 × (1.32) 2 × 10 −6, , = 1.388 ohms., , Calculation of resistance, Example 1: If a 15m eureka wire 0.14cm in diameter has, a resistance of 3.75 ohms find the specific resistance of the, material., , Example 3: Calculate in mm the dia. of a copper wire; the, resistance of 3km of the wire is 14.4 ohms. Specific, resistance of copper may be taken as 1.7 micro-ohm per, centimetre cube., Solution, Length = 3km = 3 x 1000 x 100, , Solution, , = 300 000 cm, , Length of wire L = 15m = 15 x 100 = 1500 cm, Diameter of wire = 0.14cm, Resistance = 3.75 ohm, Cross-sectional area of the wire, 2, , a = πr2 = πd, 4, , ρ = 1.7μΩ/cm, a=, , =, , ρL, we know R =, a, , =, , Specific resistance = ρ =, , =, , Resistance = 14.4 ohms, , R×a, L, , 3.75 × 22 × (0.14) 2, ohm/cm, 15 × 100 × 7 × 4, , 3.75 × 22 × (0.14) 2 × 10 6, micro ohm/cm, 15 × 100 × 7 × 4, = 38.5 micro ohm cm, , =, , R, , 1.7 × 300 000, 10, , −6, , × 14.4, , 1.7 × 3, 144, 51, , =, , 5.1, 144, , cm, , 2, , = cm2 = 0.035 cm2, , 1440, 2, , Now a = πd, 4, , =, , d=, , = 38.5 μ ohm cm., Example 2: Calculate the resistance of a 2 km long wire, composed of 19 strands copper conductor, each strand, being 1.32mm in diameter. Resistivity of copper may be, taken as 1.72 x 10⁻⁸ ohm-m. Allow 5% increase in length, for the `lay' (twist) of each strand in the completed cable., , ρL, , =, , or d2 =, , a×4, π, , a×4, π, 0.035 × 4 × 7, 22, , = 0.0445, = 0.21 cm, = 2.1 mm., , Electrical : Electrician (NSQF LEVEL - 5) - Related Theory for Exercise 1.4.40, , Copyright Free under CC BY Licence, , 163
Page 178 :
Resistors, Objectives: At the end of this lesson you shall be able to, • explain the construction and characteristics of various types of resistors, • explain the functions and applications of the resistors in electrical and electronic circuits., Resistors : These are the most common passive component, used in electrical and electronic circuits. A resistor is, manufactured with a specific value of ohms (resistance)., The purpose of using a resistor in circuit is either to limit the, current to a specific value or to provide a desired voltage, drop (IR). The power rating of resistors may be from, fractional walts to hundreds of Watts., There are five types of resistors, 1 Wire-wound resistors, 2 Carbon composition resistors, , 3 Metal film resistors ( Fig 3), , 3 Metal film resistors, 4 Carbon film resistors, 5 Special resistors, 1 Wire-wound resistors, Wire-wound resistors are manufactured by using resistance wire (nickel-chrome alloy called Nichrome) wrapped, around an insulating core, such as ceramic porcelain,, bakelite pressed paper etc. Fig 1, shows this type of, resistor. The bare wire used in the unit is generally, enclosed in insulating material. Wire wound resistors are, used for high current application. They are available in, wattage ratings from one watt to 100 watts or more. The, resistance can be less than 1 ohm and go up to few, thousand ohms., , Metal film resistors are manufactured by two processes., Thick film resistors are pasted with metal compound and, powdered glass which are spread on the ceramic base and, then backed., Thin film resistors are processed by depositing a metal, vapour on a ceramic base. Metal film resistors are available, from 1 ohm to 10 MΩ, upto 1W. Metal film resistors can, work from 120°C to 175°C., 4 Carbon film resistors (Fig 4), , One type of wire-wound resistor is called as fusible resistor, enclosed in a porcelain case. This resistor is designed to, open the circuit when the current through it exceeds certain, limit., , In this type, a thin layer of carbon film is deposited on the, ceramic base/tube. A spiral groove is cut over the surface, to increase the length of the foil by a specialised process., , 2 Carbon composition resistors, , Carbon film resistors are available from 1 ohm to 10 meg, ohm and up to 1 W and can work from 85°C to 155°C., , These are made of fine carbon or graphite mixed with, powdered insulating material as a binder in the proportion, needed for the desired resistance value. Carbon-resistance elements are fixed with metal caps with leads of, tinned copper wire for soldering the connection into a, circuit. Fig 2 shows the construction of carbon composition resistor., Carbon resistor are available in values of 1 ohm to 22, megohms and of different power ratings, generally 0.1,, 0.125, 0.25, 0.5, 1.0 and 2 watts., , 164, , All the above four types of resistors are coated with, synthetic resin to protect them against mechanical damages and climatic influences, It is therefore, difficult to, distinguish them from each other externally., Specification of resistors : Resistors are specified normally with the four important parameters, 1 Type of resistor, 2 Nominal value of the resistors in ohm (or) kilo ohm (or), mega ohm., , Electrical : Electrician (NSQF LEVEL - 5) - Related Theory for Exercise 1.4.40, , Copyright Free under CC BY Licence
Page 179 :
3 Tolerance limit for the resistance value in percentage., 4 Loading capacity of the components in wattage, Example, 100 ± 10% , 1W, where as nominal value of resistance is, 100Ω., The actual value of resistance may be between 90Ω to, 110 Ω, and the loading capacity is maximum 1 watt., The resistors can also be classified with respect to their, function as, 1 Fixed resistors, 2 Variable resistors, Fixed resistors : The fixed resistors is one in which the is, nominal value of resistance is fixed. These resistors are, provided with pair of leads. (Fig 1 to 4), Variable resistors (Fig 5) : Variable resistors are those, whose values can be changed. Variable resistors includes, those components in which the resistance value can be set, at the different levels with the help of sliding contacts., These are known as potentio meter resistors or simply as, a potentio meters., , Resistance depends upon temperature, voltage,, light : Special resistors are also produced whose resistance varies with temperature, voltage, and light., PTC resistors (Sensistors) : Since, different materials, have different crystal structure, the rate at which resistance, increases with raising temperature varies from material to, material. In PTC resistor (positive Temp. coefficient, resistor), as the temp increases, the resistance increases, non linearly. For example, the resistance of PTC at room, temperature may be of nominal value 100 Ω when the, temperature rises say 10°C, it may increase to 150 Ω and, with further increase of another 10°C, it may increases to, 500 Ω., NTC Resistors (Thermistors) : In case of NTC resistors, (Negative temperature co-efficient resistors) as the temperature increases, the value of resistance decreases nonlinearly, For example, NTC resistor, which has nominal, value of resistance is 500 Ω at room temperature may, decrease to 400 Ω with the rise of 10°C temperature and, further decrease to 150 Ω when the temperature rises to, another 10°C., The PTC and NTC resistors can perform switching operation at specific temperature. They are also used for, measurements and temperature compensators., VDR (Varistors) : The VDR (Voltage dependent resistor), resistance falls non-linearly with increasing voltage. For, example, a VDR, may have 100 Ω resistance at 10 V, and, it may decrease to 90 Ω at rise in 5V. By further increasing, the voltage to another 5V, the resistance may fall to 50 Ω., The VDRS are used in voltage stabilisation, arc quenching, and over voltage protection., , It is provided with 3 terminals as shown in Fig 5 and 6. They, are available with carbon tracks (Fig 5) and wire wound (Fig, 6) types. Trimmer potentio meters (or) resistor which can, be adjusted with the help of a small screw drivers. (Fig 7)., , Light dependent resistor (LDR) : The LDRs are also, known as photo- conductors. In LDRs the resistance falls, with increase in intensity of illumination. The phenomena, is explained as the light energy frees some electron in the, materials of the resistors, which are then available as extra, conducting electrons. The LDR shall have exposed surface, to sense the light. These are used for light barriers in, operating relays. These are also used for measuring the, intensity of light., , Electrical : Electrician (NSQF LEVEL - 5) - Related Theory for Exercise 1.4.40, , Copyright Free under CC BY Licence, , 165
Page 180 :
Marking codes for resistors, Objectives: At the end of this lesson you shall be able to, • interpret the coded marking of colours on the resistors, • interpret the letter and digit codes for resistance values, • state the tolerance value for resistors., Resistance and tolerance value of colour coded, resistors, Commercially, the value of resistance and tolerance value, are marked over the resistors by colour codes (or) letter and, digital codes., The colour codes for indicating the values to two significant, figure and tolerances are given in Table 1 as per IS 8186., , The two significant figures and tolerances colour coded, resistors have 4 bands of colours coated on the body as in, Fig.1., The first band shall be the one nearest to one end of the, component resistor. The second, third and four colour, bands are shown in Fig 1., , Table 1, Values to two significant figures and tolerances, corresponding to colours, Colour, , Silver, , First, Band/, Dot, , Second Third, Band/ Band/, Dot, Dot, , First, Figure, , Second Multiplier Tolerance, Figure, , —, , —, , 10-2, -1, , Fourth, Band/, Dot, , The first two colour bands indicate the first two digits in the, numeric value of resistance. The third colour band indicates, the multiplier. The first two digits are multiplied by the, multiplier to obtain the actual resistance value. The forth, colour band indicates the tolerance in percentage., , ± 10 %, , Example, Resistance value : If the colour band on a resistor are in, the order- Red, Green, Orange and Gold, then, , Gold, , —, , —, , 10, , ±5%, , Black, , —, , 0, , 1, , —-, , Brown, , 1, , 1, , 10, , ±1%, , Red, , 2, , 2, , 102, , ±2%, , Orange, , 3, , 3, , 103, , —-, , Yellow, , 4, , 4, , 104, , —-, , Green, , 5, , 5, , 105, , —-, , Blue, , 6, , 6, , 106, , —-, , 7, , Violet, , 7, , 7, , 10, , —-, , Grey, , 8, , 8, , 108, , —-, , 9, , White, , 9, , 9, , 10, , —-, , None, , —, , —, , —, , ± 20 %, , First, colour, , Second, colour, , Third, colour, , Red, , Violet, , Orange, , 2, , 7, , Fourth, colour, Gold, 3, , 1000(10 ), , ±5%, , the value of the resistor is 27,000 ohms with +5% tolerance., Tolerance value : The fourth band (tolerance) indicates, the resistance range within which is the actual value falls., In the above example, the tolerance is ±5%. ±5% of 27000, is 1350 ohms. Therefore, the value of the resistor is any, value between 25650 ohms and 28350 ohms. The resistors, with lower value of tolerance (precision) are costlier than, normal value of resistors., , Methods of measuring low and medium resistance, Objectives: At the end of this lesson you shall be able to, • state the different methods of measuring resistance, • describe the ammeter & voltmeter method., Classification of resistance: Based on the ohmic value of, resistance, we name it as low, medium and high resistance., A resistance is classified on its ohmic value as low,, medium, or high., , Ranges, Low resistance, , - one ohm and below one ohm, , Medium resistance, ohms(100 kΩ), , - above one ohm up to 100,000, , High resistance, , - above 100 kΩ (i.e 100000Ω), , The above classification is not rigid., 166, , Electrical : Electrician (NSQF LEVEL - 5) - Related Theory for Exercise 1.4.40, , Copyright Free under CC BY Licence
Page 181 :
Uses, Low resistance: Armature winding, ammeter shunt, cable, length, contact resistance., , with a suitable ammeter. Then assuming the current, through the unknown resistance to be the same as that, measured by the ammeter A, the formula is given as, , Medium resistance: All electrical apparatus normally, used have resistance in this range - bulbs, heaters, relay,, motor starters., , Rm =, , Voltmeter reading, Ammeter reading, , Rm = Measured value, , High resistance: Insulation resistance, carbon composition, resistors above 100K in the circuit., We shall limit for the present to the methods used for, measuring low and medium resistances in the following, section., Question, 1 The lamp resistance of a mini-torch light, operating on, 1.5 volts is classified as ___________ resistance., Methods of measuring low resistance: The following, three methods are used to measure low resistance., •, , Voltmeter and ammeter method., , •, , Comparison of unknown with standard using potentiometer., , •, , Kelvin bridge, , •, , Shunt type Ohmmeter, , Ammeter and voltmeter method: This method, which is, the simplest of all, is very commonly used for the, measurement of low resistance., In Fig 1, Rmis the resistance to be measured and V is a high, resistance voltmeter of resistance Rv. A current from a, steady direct current supply is passed through R in series, , If the voltmeter resistance is not very large, compared with, the resistor to be measured, the voltmeter current will be an, appreciable fraction of the current I, measured by the, ammeter, and a serious error may be introduced on this, account., Medium resistance: The following three methods are, used to measure medium resistance., •, , Series type Ohmmeter, , •, , Voltmeter and ammeter method, , •, , Substitution method, , •, , Wheatstone bridge method, , The first method has been considered in the section on low, resistance measurement. Substitution method and the, wheatstone bridge method is explained subsequently., , Ohmmeter, Objectives: At the end of this lesson you shall be able to, • classify resistances in terms of their values, • explain the principle, construction and use of a series type ohmmeter, • explain the principle, construction and use of a shunt type ohmmeter., Resistances could be broadly classified according to their, values as indicated below., Low resistance, All resistances of the order of one ohm and below one ohm,, may be classified as low resistances., Example Armature and series field resistances of large, DC machines, ammeter shunts, cable resistance, contact, resistance etc., Medium resistances, Resistances above 1 ohm up to 100,000 ohms are classified, as medium resistances., Example Heater resistances, shunt field resistance,, relay coil resistance etc., , High resistances, Resistances above 100,000 ohms are classified as high, resistances., Example Insulation resistance of equipment ,cables etc., Measurement of resistances, Medium resistances could be measured by instruments, like Kelvin’s bridge, Wheatstone bridge, Slide wire bridge,, Post Office box and Ohmmeter. Special designs of the, above instruments allow measurement of low resistances,, accurately., However, for measuring high resistances, instruments like, megohmmeter or megger are used., , Electrical : Electrician (NSQF LEVEL - 5) - Related Theory for Exercise 1.4.40, , Copyright Free under CC BY Licence, , 167
Page 182 :
Ohmmeter, The ohmmeter is an instrument that is used for measuring, resistance. There are two types of ohmmeters: the series, ohmmeter is used for measuring medium resistances and, the shunt type ohmmeter is used for measuring low and, medium resistances. The ohmmeter in it basic form, consists of an internal dry cell, a PMMC meter movement, and a current limiting resistance., , value, adjusting R2 may not bring the pointer to zero, position, and hence, the battery should be replaced with a, good one., As shown in Fig 2, the meter scale will be marked zero, ohms at the right end and infinity ohms at the left end., , Before using an ohmmeter in a circuit, for resistance, measurement, the current in the circuit must be switched, off and also any electrolytic capacitor in the circuit should, be discharged. Remember that the ohmmeter has its own, source of supply., Series type ohmmeter: construction, A series type ohmmeter shown in Fig 1 essentially, consists of a PMMC (Permanent magnet moving coil) (‘d’, Arsonval) movement ‘M’, a limiting resistance R1 and a, battery ‘E’ and a pair of terminals A and B to which the, unknown resistance ‘Rx’ is to be connected. The shunt, resistance R2 connected in parallel to meter ‘M’ is used for, adjusting the zero position of the pointer., , This ohmmeter has a non-linear scale because of the, inverse relationship between resistance and current. This, results in an expanded scale near the zero end and a, crowded scale at the infinity end., Multiple ohmmeter range, Most of the ohmmeters have a range switch to facilitate, measurement of a wide range of resistors, say from 1 ohm, up to 100,000 ohms. The range switch acts as the, multiplying factor for the ohms scale. To get the actual, value of measurement,the scale reading need to be multiplied, by the Rx factor of the range switch., The range switch arrangement is provided either through a, network of resistances powered through a cell of 1.5V or, through a battery of 9 or 22.5 volts. The arrangement is, shown in Fig 3. The resistance value of R3 is so chosen that, the full scale current is passed through the meter at the, enhanced source voltage., , Working, When the terminals A and B are shorted (unknown resistor, Rx = zero), maximum current flows in the circuit. The meter, is made to read full scale current (Ifsd)by adjusting the shunt, resistance R2. The full scale current position of the pointer, is marked zero(0) ohm on the scale., When the ohmmeter leads (A & B terminals) are open, no, current flows through the meter movement. Therefore, the, meter does not deflect and the pointer remains in the left, hand side of the dial. The left side of the dial is marked as, infinity ( ∝ ) resistance which means that there is infinite, resistance (open circuit) between the test leads., Intermediate marking may be placed in the dial (scale) by, connecting different known values of Rx, to the instrument, terminals A and B., The accuracy of the ohmmeter depends greatly upon the, condition of the battery. The voltage of the internal battery, may decrease gradually due to usage or storage time. As, such the full scale current drops and the meter does not, read zero when the terminals A and B are shorted., The variable shunt resistor R2 in Fig 1 provides an adjustment, to counteract the effect of reduced battery voltage within, certain limits. If the battery voltage falls below a certain, 168, , Use, This type of ohmmeter is used for measuring medium, resistances only and the accuracy will be poor in the case, of very low and very high resistance measurements., Shunt type ohmmeter, Fig 4 shows the circuit diagram of a shunt type ohmmeter., In this meter the battery ‘E’ is in series with the zero ohm,, adjustment resistor R1 and the PMMC meter movement., The unknown resistance Rx which is connected across the, terminals A and B forms a parallel circuit with the meter. To, avoid draining of the battery during storage, the switch S is, of a spring-loaded, push-button type., , Electrical : Electrician (NSQF LEVEL - 5) - Related Theory for Exercise 1.4.40, , Copyright Free under CC BY Licence
Page 183 :
The shunt type ohmmeter, therefore, has the zero mark at, the left hand side of the scale (no current) and the infinite, mark at right hand side of the scale (full scale deflection, current) as shown in Fig 5. When measuring the resistance, of the intermediate values the current flow divides in a ratio, inversely proportional to the meter resistance and the, unknown resistance. Accordingly the pointer takes an, intermediate position., , Working, When the terminals A and B are shorted (the unknown, resistance Rx = zero ohm), the meter current is zero. On, the other hand if the unknown resistance Rx = ∝ = (keeping, A and B open) the current flows only through the meter, and, by proper selection of the value R1, the pointer can be made, to read its full scale., , Use, This type of ohmmeter is particularly suitable for measuring, low value resistors., , Electrical : Electrician (NSQF LEVEL - 5) - Related Theory for Exercise 1.4.40, , Copyright Free under CC BY Licence, , 169
Page 184 :
Electrical, Electrician - Basic Electrical Practice, , Related Theory for Exercise 1.4.41, , Wheatstone bridge - principle and its application, Objectives: At the end of this lesson you shall be able to, • describe the method of obtaining equal potential points in two branches of a parallel circuit, • state wheatstone bridge circuit, construction, function and uses., • determine the unknown resistance by the wheatstone bridge., Points of equal potential in parallel circuits: An, electrical current flows only when a potential difference is, present. Without a potential difference, current will not flow., , Again no current can flow in a conductor connected across, the points C and D., A conductor between C and D is called a bridge connection., , In the Fig 1, the resistances R1and R2in each of the parallel, branches are equal. Therefore, the potential differences, across the two resistors R1 are equal, i.e. from A to C and, from A to D. Hence, even when the points C and D are, connected with the galvanometer no current will flow., , The wheatstone bridge circuit, The equal resistance ratio in parallel circuits can be used, for the measurement of resistance., Four resistors R1,R2 ,R3 and R4 are arranged as shown in, Fig 2. Select the values of R2, R3 and R4 from the list so that, no current flows between points C & D. Resistance values, are 20 ohms, 30 ohms, 40 ohms, 70 ohms, 15 ohms., , In the circuit arrangement shown in Fig 4, the sliding, contact C slides along a resistance wire., , Equal resistance ratio in parallel circuit: One does not, need equal resistances in the parallel circuits to obtain, equal potential nodes. It suffices if the resistances are in, the same ratio to each other., , R1 is a standard resistor, e.g. 1 ohm., , In the circuit diagram (Fig 3), the resistances in the top, conductor branch are in the ratio 1 : 3., The resistances in the bottom conductor branch are also, in the ratio 1:3. The supply emf V, is therefore, divided in, the both conductor branches in the same ratio 1:3. The first, potential difference is, =, , 1, 3, V and second = V, 4, 4, , The sliding contact C is moved along the resistance wire, until the detector or bridge galvanometer across C-D reads, zero. Then the resistance ratios in the two parallel branches, are equal., Rx : R1= R4 : R3, If R1 = 1 ohm then, Rx =, , R4, R3, , This circuit arrangement can, therefore, be used to measure, , 170, , Copyright Free under CC BY Licence
Page 185 :
an unknown resistance Rx. The resistance can be directly, read from a scale on the resistance wire. (Fig 4), For determining the unknown resistance by, Wheatstone Bridge, •, , The current flowing through the bridge connection, should be zero., , •, , The values of the other three resistances should be, precisely known., , The resistors P and Q are called ratio arms. P and Q are, varied in steps to give a range of values and the resistance, value of 'S' is set by the decade resistance S.(Fig 6), , How to find no current flows through the bridge, connection?: An instrument, that can indicate the flow of, even a few micro amperes (millionth of an ampere), called, galvanometer, is used. There are galvanometers that give, full scale deflection for 25 microamperes., In the professional Wheatstone bridges, the galvanometer, is provided with a parallel resistance and switch. The bridge, connection is made only by pressing a push button. This, enables the user to check a momentary deflection of the, meter. In the case of excessive deflection, adjustment of, the variable resistor is done. Final and precise adjustment, of the variable resistance is made keeping the shunt, resistor of the galvanometer open., The three arms of the bridge are made of standard/, precision resistors. The contact resistance is kept very, very low to increase the accuracy of the measurement, made by the Wheatstone bridge., In short, the use of the galvanometer is to ensure that the, current through the bridge connection is zero, i.e. both, parallel branches have equipotential points connected by, the bridge connector., This arrangement is named after its inventor and is called, the Wheatstone Bridge., , R=, , Q, , multiplied by S., , P, , The ratio, , Q, , is arranged to be 1, 10, 100 or 1,000 for, , P, , ease of calculation., S is the variable resistance. Four decade resistances are, connected in series. The value of S can be set in steps of, one ohm from 1.0 ohm to 9999 ohms by suitably setting the, four decade resistance units., Example 1: The Wheatstone Bridge circuit is used to, determine the value of the unknown resistor Rx. The bridge, is balanced when P = 100 ohms, Q = 1000 ohms and S is, adjusted to 130 ohms. Calculate the value of the unknown, resistor Rx. (Fig 7), , The Wheatstone Bridge is used for measurements in the, range of about 1.0 ohm to 1.0 megohm. In Fig 5, resistors, P,Q and S are internal to the instrument. R is the resistor, of unknown value to be measured., , Solution, At balance VAB = VAD, and VBC = VDC, therefore, I1P = I2S, and I1Q = I2 RX, , The instrument is adjusted until the ratio, , Q R, =, P S, , This is indicated by a zero reading on the galvanometer with, its switch in the closed position., , I1 S I1 R x, = = =, I2 P I2, Q, S Rx, =, P Q, , Electrical : Electrician (NSQF LEVEL - 5) - Related Theory for Exercise 1.4.41, , Copyright Free under CC BY Licence, , 171
Page 187 :
Electrical, Related Theory for Exercise 1.4.42 & 1.4.43, Electrician - Basic Electrical Practice, Effect of variation of temperature on resistance, Objectives: At the end of this lesson you shall be able to, • explain on what factors electrical resistance of a conductor depends, • state the temperature co-efficient of resistance., The resistance of material largely depends on temperature, and varies according to the material. The phenomenon is, used to develop special resistors, PTC & NTC etc., but the, overall effect of temperature normally increase the current, in that conductor material., When resistance r is a constant depending on the nature, of the material of the conductor and known as its specific, resistance or resistivity. Dependency of resistance on, temperature is explained in detail below:Effect of temperature on resistance: Actually, the, relative values of resistance that were given earlier apply to, the metals when they are at about room temperature. At, higher or lower temperatures, the resistances of all materials, change., In most cases, when the temperature of a material goes up,, its resistance goes up too. But with some other materials,, increased temperature causes the resistance to go down., The amount by which the resistance is affected by each, degree of temperature change is called the temperature, coefficient. And the words positive and negative are used, to show whether the resistance goes up or down with the, temperature., When the resistance of the material goes up as temperature, is increased, it has a positive temperature coefficient. It is, appropriate in the case of pure metals such as silver,, copper, aluminium, brass etc. (Fig 1), , Temperature coefficient of resistance (a) of a, conductor: Let a metallic conductor, having a resistance, of R0 at 0°C, be heated to t°C and let its resistance at this, temperature be Rt. Then, considering normal ranges of, temperature, it is found that the increase in resistance, depends:, •, , directly on its initial resistance, , •, , directly on the rise in temperature, , •, , on the nature of the material of the conductor, , Hence (Rt, , Ro) = Ro t α, , .....(i), , where α (alpha) is constant and is known as the temperature, coefficient of resistance of the conductor., Rearranging Eq.(i), we get, α=, , R t - R0, ΔR, =, R0 × t, R0 × t, , If Ro= 1Ω, t = 1°C, then α = ΔR = Rt Ro., Hence, the temperature-coefficient of a material may be, defined as: the change in resistance in ohm per °C rise in, temperature., From Eq.(i), we find that RT = Ro(1+α t), , .....(ii), , In the case of certain alloys such as eureka, manganin,, etc. increase in resistance due to increase in temperature, is relatively less and irregular., , In view of the dependence of α on the initial temperature, we, may define the temperature coefficient of resistance at a, given temperature as the change in resistance per ohm per, degree centigrade change in temperature from the given, temperature., , When a material's resistance goes down as the temperature, is increased, it has a negative temperature coefficient., (Fig 2), , In case Rois not given, the relationship between the known, resistance R1 at t1°C and the unknown resistance R2 at t2°C, can be found as follows:, , This applies in the case of electrolytes, insulators such as, paper, rubber, glass, mica etc. and partial conductors such, as carbon., , 173, , Copyright Free under CC BY Licence
Page 188 :
R2 = Ro(1 +αo t2) and, Insulators, , R1 = Ro(1 + αot1)., Therefore, , R2, R1, , =, , Resistivity in, ohm-metre, at 20°C, , 1+ α0 t 2, , Amber, , 5 x 10¹⁴, , 1 + α 0 t1, , Bakelite, , 1010, , Glass, , 1010 1012, , Mica, , 1015, , Rubber, , 1016, , Shellac, , 1014, , Sulphur, , 1015, , Resistivities and temperature coefficients, Material, Metals-Alloys, , Aluminimum, Brass, , Resistivity in Temperature, ohm-metre, coefficient, at 20°C, at 20°C, x 10–8, x 10–4, 2.8, 6, , Carbon, , 40.3, , 8, , 20, , 3000 7000, , (5), (+0.160, , Temperature, coefficient, at 20°C, , Example: The resistance of a field coil measures 55 ohms, at 25°C and 65 ohms at 75°C. Find the temperaturecoefficient of the conductor at 0°C., , Constant or Eureka, , 49, , Copper (annealed), , 1.72, , 39.3, , R25 = 55 = Ro(1 + 25αo), , ..... Eqn.1, , German silver, , 20.2, , 2.7, , R75 = 65 = Ro(1 + 75αo), , ..... Eqn.2, , Iron, , 9.8, , 65, , Manganin, (84% Cu; 25% Mn;, 4% Ni), , 44 48, , 0.15, , Mercury, , 95.8, , 8.9, , Nichrome, (60% Cu;25% Fe;, 15% Cr), , 108.5, , 1.5, , Nickel, , 7.8, , 54, , Platinum, , 9 15.5, , 36.7, , Silver, , 1.64, , 38, , Tungsten, , 5.5, , 47, , 0.4), , Rt = Ro(1 + αot), , Dividing Eqn.2 by Eqn.1 we get, R 75, R 25, , =, , 65 1 + 75α 0, =, 55 1 + 25α 0, , 13 1 + 75α 0, =, 11 1 + 25α 0, , Cross multipling we get, 13[1 + 25αo] = 11[1 + 75αo), 13 + 325αo = 11 + 825αo, 13, , 11, , = 825αo 325αo, 2 = 500αo, , ao =, , 174, , 1012, , 2, = 0.004 per °C.., 500, , Electrical : Electrician (NSQF LEVEL - 5) - Related Theory for Exercise 1.4.42 & 1.4.43, , Copyright Free under CC BY Licence
Page 189 :
Electrical, Electrician - Basic Electrical Practice, , Related Theory for Exercise 1.4.44, , Series and parallel combination circuit, Objectives: At the end of this lesson you shall be able to, • compare the characteristics of series and parallel circuits, • solve series-parallel circuit problems, Comparison of characteristics of DC series and parallel ciruits, Sl., No., , Series circuit, , Parallel circuit, , 1, , The sum of voltage drops across the individual, resistances equals the applied voltage., , The applied voltage is the same across each branch., , 2, , The total resistance is equal to the sum of the, individual resistances that make up the circuit., Rt = R1+R2+R3+... etc, combination., , The reciprocal of the total resistance equals the sum of, the reciprocal of the resistances. The resultant resistance is less than the smallest resistance of the parallel, , 3, , Current is the same in all parts of the circuit., resistance of each branch., , The current divides in each branch according to the, resistance of each branch, , 4, , Total power is equal to the sum of the power, dissipated by the individual resistances., , (Same as series circuit) Total power is equal to the, sum of the power dissipated by the individual resistances., , Formation of series parallel circuit, Apart from the series circuit and parallel circuits, the third, type of circuit arrangement is the series-parallel circuit. In, this circuit, there is at least one resistance connected in, series and two connected in parallel. The two basic, arrangements of the series-parallel circuit are shown here., In one, resistor R1 and R2 are connected in parallel and this, parallel connection, in turn, is connected in series with, resistance R3. (Fig 1), , Thus, R1 and R2 form the parallel component, and R3 the, series component of a series-parallel circuit. The total, resistance of any series-parallel circuit can be found by, merely reducing it into a simple series circuit. For example,, the parallel portion of R1 and R2 can be reduced to an, equivalent 5-ohm resistor(two 10-ohm resistors in parallel)., Then it has an equivalent circuit of a 5-ohm resistor in series, with the 10-ohm resistor(R3), giving a total resistance of 15, ohms for the series-parallel combination., , A second basic series-parallel arrangement is shown in, Fig 2 where basically it has two branches of a parallel, circuit. However, in one of the branches it has two, resistances in series R2 and R3 . To find the total resistance, of this series -parallel circuit, first combine R2 and R3 into, an equivalent 20-ohm resistance. The total resistance is, then 20 ohms in parallel with 10 ohms, or 6.67 ohms., , Combination circuits, A series-parallel combination appears to be very complex., However, a simple solution is to break down the circuit into, series/or parallel groups, and while solving problems, each, may be dealt with individually. Each group may be replaced, by one resistance, having the value equal to the sum of all, resistances., , 175, , Copyright Free under CC BY Licence
Page 190 :
Each parallel group may be replaced by one resistance, value equivalent to the combined resistance of that group., Equivalent circuits are to be prepared for determining the, current, voltage and resistance for each component., Example, Determine the combined resistance of the circuit shown in, Fig 3., , 6 Draw the equivalent circuit. (Fig 6), , Procedure, 1 Combine R6 and R7., Ra = R6 + R7, Ra = 2 + 4, , 7 Combine R2 and Rc and call the equivalent resistance, Rd., , Ra = 6 ohms., 2 Draw an equivalent circuit with resistance Ra. (Fig 4), , Rd = R2 + Rc, , 3 Combine R4 and R5 of Fig 4., , Rd = 1 + 3, , Rd = 4 ohms., , 8 Draw an equivalent circuit. (Fig 7), , Rb = R4 + R5, Rb = 3 + 3, Rb = 6 ohms., , 9 Now combine R3 and Rd and call it Re, , R, , e, , =, , R =, c, , R ×R, a, , R +R, a, , =, , 176, , b, b, , =, , 3, , R +R, 3, , 4 Draw an equivalent circuit as per Fig 5., 5 Combine Ra and Rb and call the equivalent resistance, value as RC. (Fig 5), , R ×R, , =, , 8, 6, , =, , 4, , d, d, , =, , 2× 4, 2+4, , = 1 1/3 ohms., , 3, , 6×6, 6+6, , 36, = 3 ohms, 12, Electrical : Electrician (NSQF LEVEL - 5) - Related Theory for Exercise 1.4.44, , Copyright Free under CC BY Licence
Page 191 :
10 Draw an equivalent circuit. (Fig 8), , However, as soon as another resistor (load) is added as in, Fig 10, there is a further change. The load resistor serves, to drop the total resistance of the lower part of the voltage, divider. Use this formula for finding the equivalent resistance, (Req) of resistors of equal value in a parallel circuit:, Req =, , Req =, , Rt = R1 + Re + R8, , Rt = 9, , 1, +5, 3, , 1, ohms., 3, , The total combined resistance of the circuit is 9, , 15, = 7.5 ohms., 2, , The equivalent resistance of these two 15 ohm resistors in, the lower part of the voltage divider is 7.5 ohms. What will, happen to the current and voltage in the circuit as a result, of this resistance change?, , 11 Combine R1, Re, and R8., , Rt = 3 + 1, , r, N, , 1, ohms., 3, , Remember that, as resistance goes down, current goes, up. Therefore, with the addition of the load resistor, the, circuit will now carry higher amperage but the voltage, between points A and B as well as A and C changes. It is, important, then, when constructing a voltage divider circuit,, to watch the resistance values which change both voltage, and current values. Study Fig 10 carefully to make sure, you understand how a voltage divider works., , Application, Series-parallel circuits can be used to form a non-standard, resistance value which is not available in the market and, can be used in the voltage divider circuits., Voltage divider, If one wants to have different voltages for different parts of, a circuit, he can construct a voltage divider. In effect, a, voltage divider is nothing more than a series-parallel circuit., A good voltage divider cannot be designed without first, looking at the load resistance. Note in Fig 9 that a voltage, divider is made with three 15 ohm resistors to get 10 volts, drop across each one., , Electrical : Electrician (NSQF LEVEL - 5) - Related Theory for Exercise 1.4.44, , Copyright Free under CC BY Licence, , 177
Page 192 :
Electrical, Electrician - Magnetism and Capacitors, , Related Theory for Exercise 1.5.45, , Magnetic terms, magnetic material and properties of magnet, Objectives: At the end of this lesson you shall be able to, • state the different kinds of magnets and state the classification of magnetic material., • state the molecular theory of magnetism, • describe the earth as a magnet, • state the classifications of magnets., Under ordinary conditions, these molecules arrange, Magnetism and magnets: Magnetism is a force field, themselves in a disorderly manner, the north and south, that acts on some materials and not on other materials., pole of these tiny magnets pointing in all directions and, Physical devices which possess this force are called, neutralizing one another. Thus a non-magnetized, magnets. Magnets attract iron and steel, and when free, ferromagnetic bar is one in which there is no definite, to rotate, they will move to a fixed position relative to the, arrangement of the magnetic poles as shown in Fig 2., north pole., When iron or steel is magnetized, the molecules are, Classification of magnets, moved into a new arrangement as shown in Fig 3, which, is caused by the force used to magnetize them., Magnets are classified into two groups., •, , Natural magnets, , •, , Artificial magnets, , Lodestone (an iron compound) is a natural magnet which, was discovered centuries ago. (Fig 1), , There are two types of artificial magnets. Temporary and, permanent magnets., Temporary magnets or electromagnets: If a piece of, magnetic material, say, soft iron is placed in a strong, magnetic field of a solenoid it becomes magnetised by, induction. The soft iron itself becomes a temporary, magnet as long as the current continues to flow in the, solenoid. As soon as the source producing the magnetic, field is removed, the soft iron piece will loose its magnetism., , The earth's magnetic field: Since the earth itself is a, large spinning mass, it too produces a magnetic field., The earth acts as though it has a bar magnet extending, through its centre, with one end near the north geographic, pole and the other end near the south geographic pole., (Fig 4), , Permanent magnets: If steel is substituted for soft iron, in the same inducing field as in the previous case, due to, the residual magnetism, the steel will become a permanent, magnet even after the magnetising field is removed. This, property of retention is termed retentivenes. Thus,, permanent magnets are made from steel, nickel, alnico,, tungsten all of which have higher retentiveness., Molecular theory of magnetism: In magnetic materials, such as iron, steel, nickel, cobalt and their alloys, which, are ferromagnetic materials, the molecules themselves, are tiny magnets, each of them having a north pole and, south pole. This is basically due to their special crystalline, structure and to the continuous movements of electrons, in their atoms., 178, , Copyright Free under CC BY Licence
Page 193 :
Classification of magnetic substances, Materials can be classified into three groups as follows., Ferromagnetic substances: Those substances which, are strongly attracted by a magnet are known as, ferromagnetic substances. Some examples are iron,, nickel, cobalt, steel and their alloys., Paramagnetic substances: Those substances which, are slightly attracted by a magnet of common strength, are called paramagnetic substances. Their attraction, can easily be observed with a powerful magnet. In short,, paramagnetic substances are similar in behaviour to, ferromagnetic materials. Some examples are aluminium,, manganese, platinum, copper etc., , Diamagnetic substances: Those substances which, are slightly repelled by a magnet of powerful strength only, are known as diamagnetic substances. Some examples, are bismuth, sulphur, graphite, glass, paper, wood, etc., Bismuth is the strongest of the diamagnetic substances., There is no substance which can be properly, called non-magnetic. It may also be noted that, water is a diamagnetic material, and air is a, paramagnetic substance., , Magnetic terms and properties of magnet, Objectives: At the end of this lesson you shall be able to, • define the terms magnetic field, magnetic line, magnetic axis, magnetic neutral axis and unit pole, • explain the properties of a magnet, • describe magnetic shielding, • describe the shape of magnets and the method of magnetizing, • state the application, care and maintenance of a permanent magnet., Magnetic fields: The force of magnetism is referred to as, a magnetic field. This field extends out from the magnet, in all directions, as illustrated in Fig 1. In this figure, the, lines extending from the magnet represent the magnetic, field., The space around a magnet in which the influence of the, magnet can be detected is called the magnetic field., Magnetic lines: Magnetic lines of force (flux) are assumed, to be continuous loops, the flux lines continuing on, through the magnet. They do not stop at the poles., The magnetic lines around a bar magnet are shown in, Fig 1., Unit pole: A unit pole may be defined as that pole which,, when placed one metre apart from an equal and similar, pole, repels it with a force of 10 newtons., Properties of a magnet, The following are the properties of magnets., Attractive property : A magnet has the property of, attracting magnetic substances (such as iron, nickel and, cobalt) and its power of attraction is greatest at its poles., (Fig 3), , Magnetic axis: The imaginary line joining the two poles, of a magnet are called the magnetic axis. It is also known, as the magnetic equator., Magnetic neutral axis (Fig 2): The imaginary lines which, are perpendicular to the magnetic axis and pass through, the centre of the magnet are called the magnetic neutral, axis., Electrical : Electrician (NSQF LEVEL - 5) - Related Theory for Exercise 1.5.45, , Copyright Free under CC BY Licence, , 179
Page 194 :
Directive property: If a magnet is freely suspended, its, poles will always tend to set themselves in the direction, of north and south. (Fig 4), , Induction property: A magnet has the property of, producing magnetism in a nearby magnetic substance, by induction. (Fig 5), , Assumed physical properties of magnetic lines of, force: The lines of force always travel from the north to, the south pole outside the magnet through air and from, the south to the north pole inside the magnet., All the magnetic lines of force complete their circuit (form, a loop)., The magnetic lines do not cross each other. The lines of, force travelling in one direction have a repulsive force, between them, and, therefore, do not cross., Poles-existing property: A single pole can never exist, in a magnet. If it is broken into its molecules, each, molecule will have two poles. (Fig 6), , The magnetic lines prefer to pass and complete their, circuit through a magnetic material., They behave like a magnetic elastic band., Magnetic shielding: Magnetic flux lines can pass through, all materials. Magnetic materials have a very low, reluctance to flux lines. The lines of flux will be attracted, through a magnetic material even if they have to take a, longer path. (Fig 9) This characteristic allows us to shield, things from magnetic lines of force by enclosing them, with a magnetic material. This is the way anti-magnetic, watches are made. Measuring instruments which are to, be shielded are enclosed inside an iron case. (Fig 10), Shapes of magnets: Magnets are available in various, shapes, with the magnetism concentrated at their ends, known as poles. The common shapes are listed here., – Bar magnet, , Demagnetising property: If a magnet is handled roughly, by heating, hammering, etc. it will lose its magnetism., , – Horseshoe magnet, , Property of strength: Every magnet has two poles. The, two poles of a magnet have equal pole strength., , – Cylindrical type magnet, , Saturation property: If a magnet of higher strength is, further subjected to magnetization, it will never acquire, more magnetization due to its being already saturated., Property of attraction and repulsion: Unlike poles (i.e., north and south) attract each other, (Fig 7) while like, poles (north/north and south/south) repel each other., (Fig 8), , 180, , – Ring magnet, , – Specially shaped magnets, Bar magnet: It is in the form of a rectangular block with, the magnetism concentrated at the ends, north pole and, south pole. (Fig 11a), Horseshoe magnet : A rectangular iron rod bent to the, shape of a horseshoe with the magnetism concentrated, at their ends forming the north pole and south pole., (Fig 11b), , Electrical : Electrician (NSQF LEVEL - 5) - Related Theory for Exercise 1.5.45, , Copyright Free under CC BY Licence
Page 195 :
Ring magnet: A ferrous metal formed into a ring as, shown in Fig 11c is a ring magnet., Cylindrical type magnet: It is formed by a cylindrical iron, rod with concentration of magnetism at the north and, south pole ends as shown in Fig 11d., , Specially shaped magnets: Permanent magnets for, special purposes like, for the use of magnet in automobiles,, cycle dynamos, electrical instruments and energy meters,, are made to special shapes depending upon the purpose, for which they are needed. (Fig 12), , Methods of magnetizing: There are three principal, methods of magnetizing a material., •, , Touch method, , •, , By means of electric current, , •, , Induction method., , Touch method: This method can be further divided into:, •, , single touch method, , •, , double touch method, and, , •, , divided touch method, , Single touch method: In the single touch method, the, steel bar to be magnetized is rubbed with either of the, poles of a magnet, keeping the other pole away from it., Rubbing is done only in one direction as shown in Fig 13., The process should be repeated many times for inducing, magnetization of the bar., , Double touch method: In this method the steel bar to be, magnetized is placed over the two opposite pole ends of, a magnet, and the rubbing magnets are placed together, over the centre of the bar with a small wooden piece in, between, as shown in Fig 14. They are never lifted off the, surface of the steel bar, but rubbed again and again from, , Electrical : Electrician (NSQF LEVEL - 5) - Related Theory for Exercise 1.5.45, , Copyright Free under CC BY Licence, , 181
Page 196 :
end to end, finally ending at the centre where the rubbing, was started., Divided touch method: Here the two different poles of, the rubbing magnets are placed as in the previous case., They are then moved along the surface of the steel bar to, the opposite ends. The rubbing magnets are then lifted, off the surface of the steel bar and placed back in the, centre of the bar. The whole process is repeated again, and again as shown in Fig 15., , Care and maintenance of permanent magnets:, Permanent magnets should not be thrown or dropped., They should not be hammered. (Fig 18), , The steel bar thus magnetized becomes a permanent, magnet but the degree of magnetization is very low., By electric current: The bar to be magnetized is wound, with an insulated copper wire, and then a strong electric, current (DC) from a battery is passed through the wire for, some time. The steel bar then becomes highly magnetized., If the bar is of soft iron, the magnetism remains as long, as the current continues but almost completely disappears, as soon as the current ceases. The magnet made by, such an arrangement is called an electromagnet and is, generally used in laboratories. (Fig 16), , They should not be heated. (Fig 19), , Bar magnets should be placed side by side with their, ends facing opposite polarity, with keepers at their ends., Keepers should be used while storing the magnets., (Fig 20), Induction method: This is a commercial method of, making permanent magnets. In this method a pole charger, is used which has a coil of many turns and an iron core, inside it as shown in Fig 17. The direct current supply is, fed to the coil through a push-button switch., The steel piece to be magnetized is placed on the iron, core kept inside the coil, and direct current is passed, through the coil. The iron core now becomes a powerful, magnet, and thus the steel piece is magnetised by, induction. The magnetised piece is then removed after, switching off the supply., This is a commercial process for making permanent, magnets for speakers, telephones, microphones,, earphones, electrical instruments, magnets,compasses, etc., 182, , As far as possible, the north and south poles of the, magnet should be kept in the direction of the south and, north directions of the earth respectively., , Electrical : Electrician (NSQF LEVEL - 5) - Related Theory for Exercise 1.5.45, , Copyright Free under CC BY Licence
Page 197 :
Electrical, Related Theory for Exercise 1.5.46 & 1.5.47, Electrician - Magnetism and Capacitors, Principles and laws of electro magnetism, Objectives: At the end of this lesson you shall be able to, • state the oersted principle, • explain what is meant by electromagnetism, • describe the magnetic field in current-carrying conductors, loop, coil, magnetic core • state right Hand Grip rule, Corkscrew rule and Right Hand palm rule, • state the interaction of the magnetic field, • state the magnetic materials for a temporary magnet., Oersted's experiment: Oersted, a Danish scientist, discovered in 1819, while giving a demonstration lecture,, that there is a close relationship between electricity and, magnetism. He observed that when a magnetic needle is, placed under and parallel to a conductor, and then the, current switched on, the needle tends to deflect at right, angles to the wire., Suppose, a wire in which the current is to be passed, is, arranged in the direction north to south by placing the, needle above the wire as in Fig 1a. Then the north pole, of the needle will be deflected to the west, nearly, perpendicular to the wire. The deflection will be to the, east, as in Fig 1b by placing needle below the wire. When, the direction of the flow of current is reversed, the, deflections of the needle will be in the opposite direction, as shown in Fig 1c and 1d., , of the current is altered, the polarity of the magnetic field, will also be changed as shown in Fig 2., , Electromangetism in a wire (current-carrying, conductor): A magnetic field is formed around a conductor, carrying current. The field is so arranged around the, conductor as to form a series of loops. (Fig 3), , The direction of the magnetic field depends on the, direction of the current flow. A compass moved around, the wire will align itself with the flux lines., In these cases the deflection of the needle shows that the, lines of force are produced around the current-carrying, conductor as shown in Fig 3., Electromagnetism: On passing a current through a coil, of wire, a magnetic field is set up around the coil. If a soft, iron bar is placed in the coil of wire carrying the current,, the iron bar becomes magnetized. This process is known, as `electromagnetism'. The soft iron bar remains as a, magnet as long as the current is flowing in the circuit. It, loses its magnetism when the current is switched off from, the coil., , The Right Hand Grip Rule can be used to determine the, direction of the magnetic field. If you wrap your fingers, around the wire with your thumb pointing in the direction, of current flow, your fingers will point in the direction of the, magnetic field as shown in Fig 4., , The polarity of this electromagnet depends upon the, direction of the current flowing through it. If the direction, 183, , Copyright Free under CC BY Licence
Page 198 :
Assume a right handed corkscrew to be along the wire so, as to advance in the direction of the current. The motion, of the handle gives the direction of magnetic lines of force, around the conductor (Fig 5), , If two wires carrying current in opposite directions are, brought close to each other, their magnetic fields will, oppose one another, since the flux lines are going in the, opposite directions. The flux lines cannot cross, and the, fields move the wires apart. (Fig 6), , When wires carrying current in the same direction are, brought together, their magnetic fields will aid one another,, since the flux lines are going in the same direction. The, flux lines join and form loops around both the wires, and, the fields bring the wires together. The flux lines of both, wires add to make a stronger mangetic field. Three or four, wires put together in this way would make a still stronger, field. (Fig 7), , Electromagnetism in a loop: If the wire is made to form, a loop, the magnetic fields around the wire will all be so, arranged that they each flow into the loop on one side,, and come out on the other side. In the centre of the loop,, the flux lines are compressed to create a dense and, strong field. This produces magnetic poles, with north on, the side that the flux lines come out and south on the side, that they go in as shown in Fig 8., 184, , Electromagnetism in a coil: If a number of loops are, wound in the same direction to form a coil, more fields will, add to make the flux lines through the coil even more, dense. The magnetic field through the coil becomes even, stronger. The greater the number of loops, the stronger, the magnetic field becomes. If the coil is compressed, tightly, the fields would join even more to produce an, even stronger electromagnet as shown in Fig 9., , A helically wound coil that is made to produce a strong, magnetic field is called a solenoid. The flux lines in a, solenoid act in the same way as in a magnet. They leave, the N pole and go around to the S pole. When a solenoid, attracts an iron bar, it will draw the bar inside the coil., (Fig 10), , The magnetic core: The magnetic field of a coil can be, made stronger still by keeping an iron core inside the coil, of wire. Since the soft iron is magnetic and has a low, reluctance, it allows more flux lines to be concentrated in, it than it would in the air. The greater the number of flux, lines, the stronger the magnetic field. (Fig 11), Soft iron is used as a core in an electromagnet because, hard steel would become permanently magnetized., , Electrical : Electrician (NSQF LEVEL - 5) - Related Theory for Exercise 1.5.46 & 1.5.47, , Copyright Free under CC BY Licence
Page 199 :
The direction of the magnetic field can be found from, palm rule right hand palm rule. (Fig 12), , The Right Hand Palm Rule : Hold the right hand palm, over the solenoid in such a way the fingers point in the, direction of current in the solenoid conductors then the, thumb indicates the direction of magnetic field (North, Pole) of the solenoid., Interaction of magnetic fields: When two magnets are, brought together, their fields interact. The magnetic lines, of force will not cross one another. This fact determines, how the fields act together., If the lines of force are going in the same direction, they, will attract each other and join together as they approach, each other. This is why unlike poles attract. (Fig 13a), If the lines of force are going in opposite directions, they, cannot combine. And, since they cannot cross, they, apply a force against each other. This is why like poles, repel., , Magnetic materials for temporary magnets:, Electromagnets are generally known as temporary, magnets. The magnetic strength of such magnets can be, varied by varying the current passing through them. Soft, iron is used in electromagnets as a magnetic core. Silicon, steel is very much used in bigger magnets (steel with, 2.4% silicon). Nowadays other metals like permalloy,, mumetal are also used for some applications., Permalloy is an alloy of iron and nickel which can be, magnetized by a very weak magnetic field and is useful, for telephones., Mumetal is an alloy of nickel, copper, chromium and iron., It has very high permeability and resistivity. Eddy current, loss is very low. It is used in instrument transformers and, for screening magnetic fields., , The interaction of the flux lines can also be shown with, iron filings. (Fig 13b), , Electrical : Electrician (NSQF LEVEL - 5) - Related Theory for Exercise 1.5.46 & 1.5.47, , Copyright Free under CC BY Licence, , 185
Page 200 :
Electrical, Related Theory for Exercise 1.5.48 - 1.5.50, Electrician - Magnetism and Capacitors, The magnetic circuits - self and mutually induced emfs, Objectives: At the end of this lesson you shall be able to, • define the magnetic terms in a magnetic circuit (like M.M.F., reluctance, flux, field strength, flux density,, permeability, relative permeability), • state hysterisis and explain hysterisis loop, • describe pulling power of magnet., MagnetoMotive Force (MMF): The amount of flux density, set up in the core is dependent upon five factors - the, current, number of turns, material of the magnetic core,, length of core and the cross-sectional area of the core., More current and the more turns of wire we use, the, greater will be the magnetising effect. We call this product, of the turns and current the magnetomotive force (mmf),, similar to the electromotive force (emf). (Fig 1 & 2), , φ =, , NI, S, , Where φ is flux and reluctances S =, , l, μ °μr a, , where S - reluctance, I - length of the magnetic path in metres, μo - permeability of free space, μr - relative permeability, a - cross-sectional area of the magnetic path in, sq.mm., The unit of reluctance is ampere turns/Wb., Magnetic flux:The magnetic flux in a magnetic circuit is, equal to the total number of lines existing on the, cross-section of the magnetic core at right angle to the, direction of the flux. Its symbol is Ø and the SI unit is, weber., φ =, , =, , NI, S, NIaμ μr, °, , l, , where, , MMF, , = NI ampere-turns, , where mmf - is the magnetomotive force in ampere, turns, N, , - is the number of turns wrapped on, the core, , I, , - is the current in the coil, in amperes,, A., , If one ampere current is flowing through a coil having 200, turns then the mmf is 200 ampere turns., Reluctance: In the magnetic circuit there is something, analogous to electrical resistance, and is called reluctance, (symbol S). The total flux is inversely proportional, to the reluctance and so if we denote mmf by ampere, turns. we can write, 186, , φ, , - total flux, , N, , - number of turns, , I, , - current in amperes, , S, , - reluctance, , μo, , - permeability of free space, , μr, , - relative permeability, , a, , - magnetic path cross-sectional area in m2, , l, , - length of magnetic path in metres., , Magnetic field strength: This is also known sometimes, as field intensity, magnetic intensity or magnetic field,, and is represented by the letter H. Its unit is ampere turns, per metre., , H=, , M.M.F, Length of coil in meters, , =, , NI, l, , Flux density (B): The total number of lines of force per, square metre of the cross- sectional area of the magnetic, core is called flux density, and is represented by the, symbol B. Its SI unit (in the MKS system) is tesla (weber, per metre square)., , Copyright Free under CC BY Licence
Page 201 :
B -, , φ, , If the connections to the coil are reversed, and the current, is again increased, it is found that a certain amount of H, is required to bring the magnetism in the core down to, zero. This is called the coercivity and is represented by, the distance OC., , Weber/ m2, , A, where φ - total flux in webers, A, - area of the core in square metres, B, - flux density in weber/metre square., , Permeability: The permeability of a magnetic material is, defined as the ratio of flux created in that material to the, flux created in air, provided that mmf and dimensions of, the magnetic circuit remain the same. It's symbol is μ and, μ = B/H, where B is the flux density, H is the magnetising force., Being a ratio it has no unit and it is expressed as a mere, number. The permeability of air μ air = unity. The relative, permeability μr of iron and steel ranges from 50 to 2000., The permeability of a given material varies with its flux, density., , Further, any increase in the current in the opposite, direction increases the magnetism in the core as before, in the opposite direction, until once again saturation, occurs., Hysteresis loop: Reduction of the current and, subsequent reversal of the direction will produce a closed, figure called a B-H curve or hysteresis loop. The name, comes from the Greek word `hysteros' meaning `to lag, behind'. That is, the state of the flux density is always, lagging behind the efforts of the magnetising intensity., The shape of a B-H loop is an indication of the magnetic, properties of the material. (Fig 4), , Hysteresis: Consider the graphical relation between B, and H for a magnetic material. Since μ = B/H, the, graphical relationship shows how the permeability of a, material varies with the magnetizing intensity H., Assume that the magnetic core is initially completely, demagnetised. As we increase the current, H =, , NI, , l, increases and there will be an increase in the flux density,, B. Since the number of turns and the length of core of a, coil are fixed, H is directly proportional to the current or, ammeter reading. The flux density can be measured by, inserting the probe of a flux meter into a small hole drilled, in the core., , Hysteresis results in the dissipation of energy which, appears in the form of heat. The energy wasted in this, manner is proportional to the area of the loop. Thus, the, energy expanded, in joules per cubic metre of material in, one cycle, is equal to the area of the loop in M.K.S. units., , A plot of the values of B and H gives the normal, magnetization curve, as shown in Fig 3.There is evidently, a linear portion where B is relatively proportional to H. But, then a condition of saturation occurs when a very large, increase in H is required to significantly increase B. This, point in the curve is called as saturation point., , The shape of the hysteresis loop depends on the nature, of the iron or steel. Iron is subject to rapid reversal of, magnetism and in this case the area of loop is very small., , Energy expended/cycle/m2 in joules= Area of hysteresis, loop in m2., , Numerically the loss is given by the equation,energy, dissipated per second = ηfBm1.6 joules/m3, where η - constant, called hysteresis coefficient, Bm - maximum flux density, f, , - frequency., , Pulling power of solenoid: When the coil is energised,, it produces a magnetic field which also magnetises the, iron core. The iron core is attracted to the coil and they, , If the current is now gradually reduced towards zero, H, returns to zero, but B does not. The core exhibits, retentiveness and retains some residual magnetism. The, retentiveness is represented by the distance OR., Electrical : Electrician (NSQF LEVEL - 5) - Related Theory for Exercise 1.5.48 - 1.5.50, , Copyright Free under CC BY Licence, , 187
Page 202 :
snap together. Once the core is in the centre of the coil,, the magnetic field is concentrated with that core and, there is no room for further movement., The pulling power of a solenoid depends on the number, of turns of the coil, the current, material, flux density of the, , magnetic core, length and cross-sectional area of the, core. The strength of an electromagnet depends upon its, ability to conduct magnetism. The ability of conduction, depends on mmf, reluctance and permeability of the, magnetic path. (Fig 5), , Electromagnet applications - Electromagnetic induction, Objectives: At the end of this lesson you shall be able to, • compare the magnetic circuit and electric circuit, • state the applications of an electromagnet (Bell & Buzzer tubelight choke), • state the principle and laws of electromagnetic induction, • explain the energy stored in induction coil, • explain about the series and parallel connection of inductors and types of inductors, • state function of choke in a flourscent light circuit, • state the factors that contribute to induced voltage, • explain about the counter EMF-induced reactance-time constant., Comparison between magnetic and electric circuits, Similarities (Fig 1a & 1b), Magnetic Current, , 1, , Electrical Current, , mmf, , Flux =, , Current =, , reluctance, , 2, 3, 4, 5, , 6, 7, 8, , resistance, , M.M.F. (Ampere-turns), Flux φ (Webers), Flux density B (Wb/m2), Reluctance S =, , l, μA, , emf, , or S =, , Fig 1a, , l, μ0μr a, , Permeance = (1/reluctance), Reluctivity μoμrA, Permeability (=1/reluctivity), , E.M.F. (Volts), Current I (amperes), Current density (A/m2), , Fig 1b, , ρL, Resistance R =, A, Conductance (= 1/resistance), Resistivity, Conductivity(=1/resistivity), , Practical applications of electromagnets:, Electromagnets are used in the manufacture of all types, of electrical machines, such as motors, generators,, transformers, convertors, some electrical measuring, instruments, protective relays, for medical purposes (like, removing iron pieces from eyes) and in many other, electrical devices like bells, buzzers, circuit-breakers,, relays, telegraphic circuits, lifts and other industrial uses., (Figs 2, 3, 4, 5 & 6), a Bells (Fig 2), b Buzzers, c Circuit-breakers (Fig 3), d Relays (Fig 4), e Telegraphic circuits, f, , Lifts (Fig 5), , g Industrial uses (Fig 6), 188, , Electrical : Electrician (NSQF LEVEL - 5) - Related Theory for Exercise 1.5.48 - 1.5.50, , Copyright Free under CC BY Licence
Page 203 :
Principles and laws of electromagnetic induction, Faraday’s Laws of Electromagnetic Induction are also, applicable for conductors carrying alternating current., Faradays’ Laws of Electromagnetic Induction, Faraday’s First Law states that whenever the magnetic, flux is linked with a circuit changes, an emf is always, induced in it., The Second Law states that the magnitude of the, induced emf is equal to the rate of change of flux linkage., Dyanamically Induced EMF, Accordingly induced emf can be produced either by, moving the conductor in a stationery magnetic field or by, changing magnetic flux over a stationery conductor., When conductor moves and produces emf, the emf is, called as dynamically induced emf Ex. generators., Statically Induced EMF, When changing flux produces emf the emf is called as, statically induced emf as explained below., Ex: Transformer., Statically induced emf: When the induced emf is, produced in a stationery conductor due to changing, magnetic field, obeying Faraday’s laws of electro, magnetism, the induced emf is called as statically induced, emf., There are two types of statically induced emf as stated, below:1 Self induced emf produced with in the same coil, 2 mutually induced emf produced in the neighbouring, coil, Self-induction: The production of an electromotive force, in a circuit, when the magnetic flux linked with the circuit, changes as a result of the change in a current inducing, in the same circuit., At any instant, the direction of the magnetic field is, determined by the direction of the current flow., With one complete cycle, the magnetic field around the, conductor builds up and then collapses. It then builds up, in the opposite direction, and collapses again. When the, magnetic filed begins building up from zero, the lines of, force or flux lines expand from the centre of the conductor, outward. As they expand outward, they can be thought, of as cutting through the conductor., , Electrical : Electrician (NSQF LEVEL - 5) - Related Theory for Exercise 1.5.48 - 1.5.50, , Copyright Free under CC BY Licence, , 189
Page 204 :
According to Faraday’s Laws, an emf is induced in the, conductor. Similarly, when the magnetic field collapses,, the flux lines cut through the conductor again, and an emf, is induced once again. This is called self-induction., (Fig 7), Mutual Inductance: When two or more coils one, magnetically linked together by a common magnetic flux,, they are said to have the property of mutual inductance., It is the basic operating principal of the transformer, motor, generaters and any other electrical component that, interacts with another magnetic field. It can define mutual, induction on the current flowing in one coil that induces a, voltage in an adjacement coil., In the Fig,8 current flowing in coil L1 sets up a magnetic, field around it self with some of its magnetic field line, passing through coil L2 giving in mutual inductance coil, one L on has a current of I, and N, turns while coil two L2,, has N2 turns therefore mutual inductance M, of coil two, that exists with respect to coil one L, depend on their, position with inspect to each other., , Inductance: Inductance (L) is the electrical property of an, electrical circuit or device to oppose any change in the, magnitude of current flow in a circuit., Devices which are used to provide inductance in a circuit, are called inductors. Inductors are also known as chokes,, coils, and reactors. Inductors are usually coils of wire., Factors determining inductance: The inductance of an, inductor is primarily determined by four factors., •, , Type of core permeability of the core mr., , •, , Number of turns of wire in the coil ‘N’., , •, , Spacing between turns of wire (Spacing factor)., , •, , Cross-sectional area (diameter of the coil core) ‘a’ or, ‘d’., , The amount of inductance in a coil of wire is affected by, the physical make up of the coil. (Fig 8.), Core ( Fig 9a): If soft iron is used as a core material, instead of hardened steel, the coil will have more, inductance., If all the factors are equal, an iron core inductor has more, inductance than an air core inductor. This is because iron, has a higher permeability, that is, it is able to carry more, flux. With this higher permeability there is more flux, change, and thus more counter induced emf (cemf), for, a given change in current., , The mutual inductance M that exists between the two, coils can be greately measured by positioning them on a, common soft iron cone or by measuring the number of, turns of either coil on would he found in a transformer., , Number of turns (Fig 9b): Adding more turns to an, inductor increases its inductance because each turn, adds more magnetic field strength to the inductor., Increasing the magnetic field strength results in more flux, to cut the conductors (turns) of the inductor., , The two coils are tightly wound one on top of the other over, a common soft iron core unity in said to exist between them, as any losses due to the leakage of flux will be extremely, small. Then assuring a perfect flux leakage between the, two coils the mutual inductance M that exists between, them can be given on:, M�, , MoMr N1 N2 A, L, , Value, Mo is the permeability of free space ( 4� x 10 �7 ), Mr - is the relative permability of soft iron cone, N is the no. of turns of coil, A is the cross sectional area in m2, l is the coil length in meters, , 190, , Electrical : Electrician (NSQF LEVEL - 5) - Related Theory for Exercise 1.5.48 - 1.5.50, , Copyright Free under CC BY Licence
Page 205 :
Spacing between turns of wire (Fig 9c): When the, distance between the turns of wire in a coil is increased, the, inductance of the coil decreases. Fig 10 illustrates why this, is so. With widely spaced turns Fig 10 many of the flux, lines from adjacent turns does not link to gether. Those, lines that do not link together produce no voltage in other, turns. As the turns come closer together Fig 10 only a fewer, lines of flux fail to link up., Cross sectional area (Fig 9d):For a given material having, same number of turns, the inductance will be high with, large cross-sectional area and will be low for smaller crosssectional area., Symbol and unit of Self-inductance: The property of a, coil or conductor to self-induce an emf, when the current, though it is changing, is called the coil’s (conductor’s), self-inductance of simply inductance. The letter symbol, for inductance is L; its basic unit is henry, H., , The magnitude of induced emf:The magnitude of selfinduced emf depends on the rate at which the magnetic, field changes. However magnetic field is proportional to, current., v=Lx, , di, dt, , where, v, , is the emf induced in volts, V (some times called, as counter emf ( cemf), , L, , is the inductance in henrys, H, , di, , is the change in current in amperes, A., , dt, , is the change in time in seconds s,, , di, , is the rate of change of current inamperes/second,, dt, A/s., Coefficient of self-inductance : It is defined as the flux, linkage of weber turns per ampere in the coil., By definition L ×, , Nφ, , henry, I, where ‘N’ is the number of turns, ‘f’ is the flux in webers, I is the current in amperes, Henry: A conductor or coil has an inductance of one henry, if a current that changes at the rate of one ampere per, second produces a induced voltage (cemf) of 1 volt., The inductance of straight conductors is usually very low,, and for our proposes can be considered zero. The, inductance of coiled conductors will be high, and it plays, an important role in the analysis of AC circuits., What will be the direction of the induced emf? (Lenz’s, Law): The direction of the self-induced emf is explained, by Lenz’s Law., A change in current produces an emf whose direction is, such that it opposes the change in current. In other, words, when a current is decreasing, the induced emf is, in the same direction as the current and tries to oppose, the current from decreasing. And when a current is, increasing, the polarity of the induced emf is opposite to, the direction of the current and tries to prevent the current, from increasing (Fig 11)., , Energy storage: An inductor stores energy in the magnetic field created by the current. The energy stored is, expressed as follows., W=, , 1, , LI2, , 2, , where I is in amperes,, L is in henries and, W is energy in joules or watt-second, To obtain the desired value of inductors, some series and, parallel combination of inductors can be used., Series and Parallel Inductors, Series inductors: When inductors are connected in, series, as in Fig 12a, the total inductance LT is the sum, of the individual inductances. The formula for LT is, expressed in the following equation for the general case, of n inductors in series., LT = L1 + L2 + L3 +.....Ln, Notice that inductance in series to resistance in series., Parallel inductors: When inductors are connected in, parallel, as in Fig 12b, the total inductance is less than the, smallest inductance. The formula for total inductance in, parallel is similar to that for total parallel resistance., , Electrical : Electrician (NSQF LEVEL - 5) - Related Theory for Exercise 1.5.48 - 1.5.50, , Copyright Free under CC BY Licence, , 191
Page 206 :
1, LT, , =, , 1, L1, , +, , 1, L2, , +, , 1, , + .......... .........., , L3, , 1, L, , n, , Example 1: Determine the total inductance for each of the, series connections in Fig 13., , When an inductor is wound around an insulating core, the, core is used only for a support, since it has no magnetic, properties. If heavy wire is used in making the inductor, a, core is actually not needed; the regid loops of wire support, themselves. When a magnetic core is not used, the, inductor is usually referred to as an air-core inductor., (Fig 16), , Solution, a) LT = 1H + 2H + 1.5H + 5H = 9.5H, b) LT = 5mH + 2mH + 10mH + 1mH = 18mH, Note 1000mH = 1 H, Example 2: Determine LT in Fig 14., Inductor with set values of inductance that cannot be, changed are called fixed inductors. Inductors whose, inductance can be varied over some range are called, variable inductors. Usually, variable inductors are made, so that the core can be moved into and out of the winding., The position of the core will determine the inductance, value. (Fig 17), , Solution, LT =, , =, , LT =, , 1, , ⎛ 1, ⎞ ⎛1, ⎞ ⎛1, ⎞, ⎜ mH ⎟ + ⎜ mH ⎟ + ⎜ mH ⎟, ⎝ 10, ⎠ ⎝5, ⎠ ⎝2, ⎠, 1, 0.1 + 0.2 + 0.5, 1, 0.8, , = 1.25 mH., , Types of Inductor: Basically, all inductors are made by, winding a length of conductor around a core (Fig 15)., The conductor is usually a solid copper or aluminum wire, coated with enamel insulation, and the core is made, either of magnetic material, such as powered iron, or of, insulating material., , 192, , Electrical : Electrician (NSQF LEVEL - 5) - Related Theory for Exercise 1.5.48 - 1.5.50, , Copyright Free under CC BY Licence
Page 207 :
Inductors are also frequently called chokes or coils. All, these three terms mean the same thing., Fixed inductors are used as ballast in gas discharge, lamps. They are also used in electronics as power supply, filters. Variable inductors and tapped inductors are used, for obtaining variation of current in welding transformers, to suit the electrode size and weld material., Function of choke in a fluorescent lamp circuit: Fig 18, shows a fluorescent lamp circuit. The inductor (ballast), is used to induce a momentary high voltage to fire the, lamp. The ballast then limits the current through the, lamp, after the lamp is lit, because of the coil’s inductive, reactance. The operation of the lamp circuit is as follows., The fluorescent lamp is a glass tube with a tungsten, filament sealed at each end. The inner surface of the, tube is coated with a phosphor material this determines, the colour of the light produced. Most of the air is, removed during manufacture and a small amount of, argon gas and mercury are admitted to the sealed, tube.(Fig 18), , It should be noted that the ballast gets its name from the, second function it provides. After the lamp is lit, a typical, 40W lamp requires only 110V to maintain proper current, through the lamp. The opposition to alternating current, caused by the inductance, its inductive reactance, help in, the applied 240V dropping to the required value across, the lamp., Flourecent lamps that use a single on/off switch1 in the, supply line for control purposes employ a starter inplace, of the switch 2., When a fluorescent lamp circuit is connected to DC, supply, the choke serves the first purpose only. An, additional resistor is to be connected in series to limit the, current through the lamp., Disadvantage of Inductance:, Inductance increases arcing in switch contact which is a, major disadvantage. A large voltage across the contacts,, while opening the switch of the inductive circuit, sets an, arc, and the stored energy in the magnetic field increases, the arcing. Additional measures are required to suppress, the arc in such circuits., Factors that contribute to induced voltage: The ability, of a coil to induce high voltage can be observed by, connecting a neon lamp across a coil as in Fig 19., A neon lamp used as an indicator requires a minimum of, about 70V to ‘fire’ or light. It is observed that a battery, does not light the lamp as the voltage is only 10V at the, time of switching ON. But when the switch is opened the, lamp flashes indicating the presence of high voltage,, more than 70 V., , When the momentary contact of the switch 2 is pushed, (CLOSED), and held closed for several seconds, a, complete series path exists for current to flow through the, two filaments to become heated, emitting electrons. A, dull glow is observed at each end of the tube. When the, switch 2 is released (OPEN), the current through the, ballast is interrupted, causing a high voltage to be, momentarily induced. This voltage, along with the 240V, input, is sufficient to cause the lamp to ‘fire’. This means, that the current is conducted through the ionized gas in, the tube from one filament to the other., , A major application of the high voltage induced in a coil, by interrupting the current through the coil is in fluorescent, lamp circuits and ignitors of petrol engines., , Counter emf - inductive reactance - time constant, Objectives: At the end of this lesson you shall be able to, • explain the term Counter EMF (CEMF), • explain about the inductive reactance, • state the reasons for the difference between ohmic resistance and impedance of a coil, • explain time constant of an inductive circuit., Counter EMF and LENZ’s law: The voltage induced in, a conductor or coil by its own magnetic field is called a, counter electromotive force (cemf). Since the induced, emf (voltage) is always opposing, or countering, the, action of the source voltage, it is known as cemf. Counter, electromotive force is sometimes referred to as back, electromotive force (bemf)., , In any type of inductive circuit there is an important, relationship between the direction of the current change, and the induced voltage. Lenz’s law states that a cemf, always has a polarity which opposes the force that, created it., , Electrical : Electrician (NSQF LEVEL - 5) - Related Theory for Exercise 1.5.48 - 1.5.50, , Copyright Free under CC BY Licence, , 193
Page 208 :
The inductance rating of an inductor refers to its ability to, generate a counter voltage to a change in current flow., One henry (1H - the SI unit) represents the inductance of, a coil in which a current change of one ampere per, second (1 A/s) will produce a cemf of one volt (1V)., Inductive reactance:The opposition offered to an AC, current flow by the inductive effect is called inductive, reactance. Inductive reactance is the result of the cemf, of the inductor. The inductor cemf is just equal to (and, opposite) the source voltage., Current flow through a coil connected to a DC source is, limited by the wire resistance of the coil only (Fig 1a), Current flow through the same coil connected to an AC, source is limited by the wire resistance and the inductive, reactance (Fig 1b), , The reactance of an inductor can be calculated with the, following formula, XL = 2πfL = 6.28 fL, The inductive reactance is in ohms while the frequency, is in hertz and the inductance is in henrys., From the above formula it can be seen that inductive, reactance is directly proportional to both frequency and, inductance., This direct proportional relationship makes sense when, one recalls two things., , •, , DC resistance, , •, , •, , Skin effect, , •, , Eddy currents, , •, , Hysteresis, , •, , Dielectric stress, , •, , The higher the frequency, the more rapidly the current, is changing. Thus more cemf and more reactance are, produced (Fig 2), The higher the inductance, the more the flux change, per unit of current change. Again more cemf and, reactance are produced.(Fig 3), , OHMIC resistance: The DC resistance is the resistance, measured with a very accurate ohmmeter. It is the total, resistive effect to pure DC., Effective resistance: In general, a pure resistive circuit, reacts in much the same way for both AC or DC. There, are, however, some differences that must be considered., These differences vary with the frequency of AC and are, generally negligible at low frequencies., The following five factors affect the amount of current, flow in a pure resistive circuit., , 194, , The DC resistance is the resistance offered by the, conductor (element) to pure DC. The fact that the, alternating current changes in value and direction tends, to make it flow along the outer surface of the conductor., This phenomenon, known as skin effect, reduces the, inner conductive effect of the conducting material and, increases the circuit resistance., Alternating current produces a magnetic flux which, changes its polarity with each reversal of current flow., The change in polarity causes the molecules in the metal, parts near the circuit to be in motion, thus producing heat., The heat either radiates back into the circuit conductors, , Electrical : Electrician (NSQF LEVEL - 5) - Related Theory for Exercise 1.5.48 - 1.5.50, , Copyright Free under CC BY Licence
Page 209 :
or retards the dissipation of heat produced by the current, flowing in the conductors. The hysteresis effect increases the effective resistance of the circuit., Eddy currents are caused by voltages induced into the, conductors and other surrounding metal parts. They are, directly proportional to the frequency of the supply. The, heat produced by these currents tends to increase the, effective resistance of the circuit., , The time constant is in seconds when L is in henry and R, is in ohms. The current after the time t = t has reached, 63.2% of its final value. The table shows after five time, constants have elapsed (t=5t), the current has reached, 99.3% of its final value, i.e. it has practically reached its, final value., , As the alternating voltage varies in strength, the stress on, the conductor insulation increases and decreases. This, variation in electric stress also produces heat which, increases the circuit resistance., Effect of inductance present in a AC circuit: Coils, have various uses in electrical engineering such as, • excitation coils in electric machines or magnets, • relay coils in switching devices, • choke coils for limiting current etc., If a coil with the current passing through it is compared to, a vehicle being moved, then the momentary value of the, coil’s current I can be compared to the velocity V of the, vehicle. An increase in the current corresponds to, accelerating the vehicle and a decrease in the current, corresponds to braking (retarding) the vehicle. Due to, the inertia of the vehicle’s mass the velocity cannot, suddenly change. The same applies to the coil’s current,, where a sudden change is prevented by the self-induced, emf (voltage)., Time constant for inductors: When a coil with inductance L and resistance RL is fed by a direct voltage (Fig 4a), the flux increasing with the current induces cemf, so that, the current only increases to its final value I =, , V, , with a, , RL, , time delay Fig 4b. The time constant for an RL circuit is, defined as the time required for the current through the, resistor-inductor to rise to 63.2% of its final value. The, time constant of an RL circuit can be calculated using the, formula t =, , L, , ., , R, , τ, , Time t =, Current value I =, , 63.2%, , 2τ, 86.46, , 3τ, 95.02, , 4τ, , 5τ, , 6τ, , 98.10, , 99.33, , 99.75, , 7τ, 99.9, , Electrical : Electrician (NSQF LEVEL - 5) - Related Theory for Exercise 1.5.48 - 1.5.50, , Copyright Free under CC BY Licence, , 8τ, 99.966, , 195
Page 210 :
Electrical, Related Theory for Exercise 1.5.51 & 1.5.52, Electrician - Magnetism and Capacitors, Capacitors - types - functions , grouping and uses, Objectives: At the end of this lesson you shall be able to, • describe capacitor its construction and charging, • explain capacitance and the factors determining, • state the different types and application of capacitors, • state the testing and defects of capacitors, Capacitor:, Capacitor is a passive two terminal electrical/electronic, component that stores potential energy in the form of, electrostatic field, The effect of capacitor is called as capacitance. It consists, of two conducting plates separated by an insulating, material called as dielectric. In simple, capacitor is a, device designed to store electric charge., Construction: A capacitor is an electrical device, consisting of two parallel conductive plates, separated by, an insulating material called the dielectric. Connecting, leads are attached to the parallel plates. (Fig 1), , Function: In a capacitor the electric charge is stored in, the form of an electrostatic field between the two, conductors or plates, due to the ability of dielectric, material to distort and store energy while it is charged and, keep that charge for a long period or till it is discharged, through a resistor or wire. The unit of charge is coulomb, and it is denoted by the letter `C'., How a capacitor stores charge?: In the neutral state,, both plates of a capacitor have an equal number of free, electrons, as indicated in Fig 2a. When the capacitor is, connected to a voltage source through a resistor, the, electrons (negative charge) are removed from plate A,, and an equal number are deposited on plate `B'. Plate A, becomes positive with respect to plate B as shown in, Fig 2b., The current enters and leaves the capacitor, but the, insulation between the capacitor plates prevents the, current from flowing through the capacitor., , 196, , As electrons flowing into the negative plate of a capacitor, have a polarity opposite to that of the battery supplying, the current, the voltage across the capacitor opposes the, battery voltage. The total circuit voltage, therefore, consists, of two series-opposing voltages., As the voltage across the capacitor increases, the effective, circuit voltage, which is the difference between the battery, voltage and the capacitor voltage, decreases. This, in, turn, causes a decrease in the circuit current., , When the voltage across the capacitor equals the battery, voltage, the effective voltage in the circuit is zero, and so, the current flow stops. At this point, the capacitor is fully, charged, and no further current can flow in the circuit., Capacitance : The ability or capacity to store energy in, the form of electric charge is called capacitance. The, symbol used to represent capacitance is C., Unit of capacitance: The base unit of capacitance is the, Farad. The abbreviation for Farad is F. One farad is that, amount of capacitance which stores 1 coulomb of charge, when the capacitor is charged to 1 V. In other words, a, Farad is a coulomb per volt (C/V)., Farad, A farad is the unit of capacitance (C), and a coulomb is the, unit of charge(Q), and a volt is the unit of voltage(V)., Therefore, capacitance can be mathematically expressed, as C =, , Q, V, , Copyright Free under CC BY Licence
Page 211 :
This relationship is very useful in understanding voltage, distribution in series-capacitor circuits. The other forms, of equation are V =, , Q, C, , Example 1: What is the capacitance of a capacitor that, requires 0.5 C to charge it to 25V?, Given: Charge(Q) = 0.5C, Voltage(V) = 25V, Find :, Capacitance(C), C=, , Solution, Answer:, , Q, , where, , V, , C=, , 0.5 C, 25 V, , and, = 0.02F, , The capacitance is 0.02F., , Capacitive reactance, Similar to resistors and inductors, a capacitor also offers, opposition to the flow of AC current. This opposition, offered to the flow of current by a capacitor is called, capacitive reactance abbreviated as XC., Recall expressions,, , I�, , Q, � and Q � CV, t, , and I α f, , (Because, 1/t = f), , From the above equation, the amount of AC current that, a capacitor conducts depends on;, –, –, –, , the frequency (f) of the applied voltage, the capacitance (C) of the capacitor, the amplitude of the applied voltage(V)., , Fig 3a shows the graph of variation of current(I) through, a capacitor with frequency or capacitance when the, applied voltage is kept constant., Since current flow through a capacitor is directly proportional to frequency and capacitance, the opposition to, current flow by the capacitor is inversely proportional to, these quantities., Capacitive reactance, XC can be mathematically represented as;, Xc �, , 1, 2�fc, , Fig 3b shows the graph of variation of XC with frequency, or capacitance., Capacitive reactance, XC, expressed in ohms, acts just, like a resistance in limiting the AC current flow., Sub-units of a farad: Most capacitors that you will use, in electronics work, have capacitance values in microfarads (μF) and picofarads (pF). A microfarad is onemillionth of a farad (1μF = 1 x 10⁻⁶ F), and a picofarad, is one-trillionth of a farad (1 PF = 1 x 10–12PF) one nano, farad (1nF = 1 x 10⁻⁹ F)., Factors determining capacitance: The capacitance of, a capacitor is determined by four factors., , Substituting Q = CV in I = Q/t, CV, I�, t, This means,, I α C, I α V, , XC is the capacitive reactance in ohms, f is the frequency of the applied voltage in Hz, C is the capacitance in farads., , —, , Area of the plates (C α Α), , —, , Distance between the plates (C α d), , —, , Type of dielectric material, , —, , Temperature, , —, , Resistance of the plates, , Area of the plates: The capacitance of a capacitor is, directly proportional to the area of its plates (or the area, of its dielectric). All other factors remaining the same,, doubling the plate area doubles the capacitance., Thus, when the dielectric area is increased, the amount, of energy stored in the dielectric is increased and the, capacitance is also increased. (Remember, capacitance, is defined as the ability to store energy.) (Fig 4a), Distance between the plates: Other factors being equal,, the amount of capacitance is inversely proportional to the, distance between the plates. The strength of the electric, field between the plates decreases, when the distance, between the plates increases. The force on the electrons, in the dielectric decreases accordingly. Again the amount, of energy stored in the capacitor, for a given voltage applied, to the capacitor, would decrease. Thus, the capacitance, decreases. (Fig 4b), , Electrical : Electrician (NSQF LEVEL - 5) - Related Theory for Exercise 1.5.51 & 1.5.52, , Copyright Free under CC BY Licence, , 197
Page 212 :
6 KV. A typical temperature coefficient for ceramic, capacitors is 200,000 PPM/°C., Mica capacitors: There are two types of mica capacitors,, stacked foil as shown in Fig 5(c). It consists of alternate, layers of metal foil and thin sheets of mica. The metal foil, forms the plate, with alternate foil sheets connected, together to increase the plate area, thus increasing the, capacitance., The mica foil-stack is encapsulated in an insulating, material such as bakelite, as shown in Fig 5d of the figure., The silver-mica capacitor is formed in a similar way by, stacking mica sheet with silver electrode material screened, on them., , Type of dielectric material: In general, those materials, which undergo the greatest distortion store the most, capacitance. The ability of a dielectric material to distort, and store energy is indicated by its dielectric constant, (K)., The dielectric constant of a material is a mere number, (that is, it has no units). It compares the material's ability, to distort and store energy, when in an electric field, with, the ability of air to do the same., Since air is used as the reference, it has been given K, equal to 1. Mica, often used as a dielectric, has a, dielectric constant approximately 5 times that of air., Therefore, for mica, K = 5 (approximately). Suppose all, the other factors (plate area, distance between plates,, and temperature) are the same, then a capacitor with a, mica dielectric will have 5 times as much capacitance as, the one using air as its dielectric., Dielectric constants for materials commonly used for, dielectrics range from 1 for air to more than 4000 for some, types of ceramics., Temperature: The temperature and resistance of the, capacitor is the least significant of the four factors. It need, not be considered for many general applications of, capacitors., Types of capacitors: Capacitors are manufactured in a, wide variety of types, sizes and values. Some are fixed in, value, in others the value is variable., Fixed capacitors, Ceramic capacitors: Ceramic dielectrics provide very, high dielectric constants (1200 is typical). As a result,, comparatively high capacitance values can be achieved, in a small physical size., Ceramic capacitors are illustrated in Figs 5a) and (b)., These discs are made by using ceramic as an insulator, with a silver deposit on each side of the plates. These are, used for small values of capacitance and an ordinary TV, set might contain several dozens in its circuitry., Ceramic capacitors are typically available in capacitance, values ranging from 1μF to 2.2μ F with voltage ratings up to, 198, , Mica capacitors are available with capacitance values, ranging from 1 pF to 0.1 pF and voltgage ratings from 100, to 2500 V DC. Temperature coefficients from 20 to, +100 PPM/°C are common. Mica has a typical dielectric, constant of 5., Electrolytic capacitors: Electrolytic capacitors are, polarised so that one plate is positive and the other, negative., These capacitors are used for high capacitance values, up to over 200,000μ F, but they have relatively low, breakdown voltages (350 V is a typical maximum) and, high amounts of leakage., Electrolytic capacitors are available in two types:, aluminium and tantalum. The basic construction of an, electrolytic capacitor is shown in Figs 5(e) and (f)., The capacitor consists of two strips of either aluminum or, tantalum foil separated by a paper or gauze strip, saturated, with an electrolyte. During manufacturing, an, electrochemical reaction is induced which causes an, oxide layer (either aluminum oxide or tantalum oxide) to, form on the inner surface of the positive plate. This oxide, layer acts as the dielectric., One particular point you must always remember about, the electrolytic capacitor is that one end is positive (+), and the other negative ( ). You must always observe this, polarity when connecting in your circuit. The symbol on, a drawing will have positive and negative marks. These, polarity marks will tell you it is an electrolytic capacitor., Since an electrolytic capacitor is polarized, the positive, plate must always be connected to the positive side of a, circuit. Be very careful to make the correct connection, and to install the capacitor only in a DC, not AC, circuit., Reverse polarity on an electrolytic capacitor causes, excessively high current in the capacitor. It causes the, capacitor to heat up, and possibly to explode. Thus, the, common electrolytic capacitor is limited to use in DC, circuits., Special electrolytic capacitors are manufactured for use in, AC circuits. These capacitors are usually listed in, catalogues as `non-polarised' or `AC' electrolytic, capacitors. An AC electrolytic capacitor is really two, electric capacitors packaged in a single container.(Fig 6), , Electrical : Electrician (NSQF LEVEL - 5) - Related Theory for Exercise 1.5.51 & 1.5.52, , Copyright Free under CC BY Licence
Page 213 :
strips which act as plates. One lead is connected to the, inner plate and the other to the outer plate as indicated., The strips are then rolled in a spiral configuration and, encapsulated in a moulded case. Thus a large plate area, can be packaged in a relatively small physical size,, thereby achieving larger capacitance values. Fig 7b, shows a construction view for one type of plastic-film, capacitor., , Variable capacitors, Variable capacitors are used in a circuit when there is a, need to adjust the capacitance value either manually or, automatically. For example, in radio or TV tuners. The, major types of variable or adjustable capacitors are now, discussed., Air capacitor: Variable capacitors with air dielectrics,, such as the one shown in Fig 8(b), are sometimes used, as tuning capacitors in applications requiring frequency, selection. This type of capapcitor is constructed with, several plates that mesh together. One set of plates can, be moved relative to the other, thus changing the effective, plate area and the capacitance. The movable plates are, linked together mechanically so that they move when a, shaft is rotated., The schematic symbol for a variable capacitor is shown in, Fig 8(a)., , The two internal capacitors are in series, with their positive, ends connected together. Regardless of the polarity on the, leads of the AC electrolytic capacitor, one of the two, internal capacitors will be correctly polarized., Paper/plastic capacitors: There are several types of, plastic-film capacitors and the older paper dielectric, capacitors. Polycarbonate, parylene, polyester,, polystyrene, polypropylene, mylar, and paper are some, of the more common dielectric materials used. Some of, these types have capacitance values up to 100μF., Fig 7 show a common basic construction used in many, plastic-film and paper capacitors. A thin strip of plasticfilm dielectric is sandwiched between two thin metal, , Trimmers and padders: These adjustable capacitors, normally have screwdriver adjustments, and are used for, very fine adjustments in a circuit. Ceramic or mica is a, common dielectric in these types of capacitors, and the, capacitance usually is changed by adjusting the plate, separation.(Fig 9), , Electrical : Electrician (NSQF LEVEL - 5) - Related Theory for Exercise 1.5.51 & 1.5.52, , Copyright Free under CC BY Licence, , 199
Page 214 :
Varactors: A varactor is a semiconductor device that, exhibits a capacitance characteristic which is varied by, changing the voltage across its terminals. This device is, usually covered in greater detail in a course on electronic, devices., , Application of capacitors with type and ratings - Chart I, Type, , Capacitance, , Voltage WVDC, (Working voltage DC), , Applications, , Monolithic, , 1 pF-10μF, , 50-200, , UHF,RF coupling., , Disc and tube ceramics, , 1pF - 1μF, , 50-500, , General, VHF., , Paper, , 0.001-1μF, , 200-1600, , Motors, power supplies., , Film - polypropylene, , 0.001-0.47μF, , 400-1600, , TV vertical circuits, RF., , Polyester, , 0.001-1μF, , 100-600, , Enetertainment- electronics., , Polystyrene, , 0.001-1μF, , 100-200, , General, high stability., , Polycarbonate, , 0.01 -18μF, , 50-200, , General., , Metallized polypropylene, , 4-60μF, , 400 VAC 50Hz, , AC motors., , Metallized polyester, , 0.01-10μF, , 100-600, , Coupling, RF filtering., , Electrolytic-aluminum, , 1-500,000μF, , 5-500, , Power supplies, filters., , Electrolytic-tantalum, , 0.1-1000μF, , 3-125, , Small space requirement, high relia-, , ElectrolyticNon-polarised, , bility, low leakage., 0.47-220μF, , 16-100, , Loudspeaker cross-overs., , Mica, , 330pF-0.05μF, , 50-100, , High frequency., , Silver-mica, , 5-820pF, , 50-500, , High frequency., , Variable-ceramic, , 1-5 to 16-100pF, , 200, , Radio, TV, communications., , Film, , 0.8-5 to 1.2-30pF, , 50, , oscillators, antenna, RF circuits., , Air, , 10-365pF, , 50, , Broadcast receivers., , (either Al or Ta), , Teflon 0.25-1.5pF, , 200, , 2000, , VHF, UHF., , Electrical : Electrician (NSQF LEVEL - 5) - Related Theory for Exercise 1.5.51 & 1.5.52, , Copyright Free under CC BY Licence
Page 215 :
Common defects in capacitors, Short circuited capacitors: In the course of normal, usage, capacitors can become short-circuited/shorted., This is because of the deterioration of the dielectric used, due to ageing., Usually such a defect occurs when the capacitor is used, over a period of years under the stress of changing, voltage across it. This period gets reduced if the capacitor, is operated at higher temperatures., Short-circuiting of capacitors is more common in paper, and electrolytic capacitors than in the other types., Short circuiting of capacitor also occurs due to puncturing, of the dielectric when voltages much higher than its rated, and applied. A shorted capacitor cannot store energy., Open capacitors: A capacitor may become open due to, loose/broken lead connections or due to the electrolyte., In electrolytic capacitors, the electrolyte develops high, resistance with age, particularly when operated at high, temperatures. After a few years of usage, the electrolyte, may dry up resulting in open-circuit of the capacitor. An, open capacitor cannot store energy., The storage (shelf) life of wet type electrolytic capacitors, is small because the electrolyte dries up over period of, time., Leaky capacitors/leakage resistance: Theoretically,, the current that flows in a pure capacitive circuit results, from the charge and discharge currents of the capacitors., The dielectric, which is an insulator, should prevent any, current flow between the plates. However, even the best, dielectric conduct very small current., , Normal leakage resistance across a good capacitor has to, be very high. Depending upon the type of dielectric used,, the normal resistance varies., For paper, plastic, mica and ceramic capacitors the, normal resistance will be of the order of 500 to 1000 M or, more. For electrolytic capacitors the normal resistance, will be of the order of 200 KΩ to 500 KΩ., A capacitor is said to have become leaky when the, resistance across it is less than normal when read with, any average quality ohmmeter., Checking capacitors: The two simple methods to check, a capacitor is by carrying out,, i, , capacitor action-normal resistance test, using a ohmmeter/multimeter (This test is also referred as quick, test), , ii charging-holding test, using a battery and voltmeter/, multimeter., Capacitor action-normal charging test: When an, ohmmeter is connected across a fully discharged, capacitor, initially, the battery insider the meter charges, the capacitor. During this charging, at the first instance,, a reasonably high charging current flows., Since more current through the ohm meter means less, resistance, the meter pointer moves quickly towards zero, ohms of the meter scale as shown in Fig 11a., , The dielectric, then has some high value of resistance,, known as leakage resistance. This leakage resistance,, as shown in Fig 10, allows some leakage current to flow., This leakage current tends to reduce the capacitance, value., , In a good capacitor, the leakage resistance is generally, of the order of several tens of megohms and hence can, be considered negligible for most applications. As the, capacitor ages, the leakage resistance could reduce., Generally, the leakage resistance is lower with high value, capacitors than with low value capacitors., The reason for this is that, larger capacitors have larger, plate areas that are closer together. Therefore their, dielectrics must have large areas and be thin. Recall,, resistance reduces as the -sectional area is increased or, when the length or thickness is decreased., So, larger the capacitor, lower the leakage resistance, and, higher is the leakage current., , As the initial charging, the charging current to the capacitor, slowly decreases (as the voltage across the capacitor, increases towards the applied voltage). Since less and, less current through the ohmmeter means high and higher, resistance the meter pointer slowly moves towards infinite, resistance of the meter scale as shown is Fig 11b. Finally,, when the capacitor is completely charged to the ohmmeter, , Electrical : Electrician (NSQF LEVEL - 5) - Related Theory for Exercise 1.5.51 & 1.5.52, , Copyright Free under CC BY Licence, , 201
Page 216 :
internal battery voltage, the charging current is almost zero, and the ohmmeter reads the normal resistance of the, capacitor which is a result of just the small leakage current, through the dielectric., This changing effect commonly known as Capacitor, action indicates, whether the capacitor can store charge,, whether the capacitor is excessively leaky, whether the, capacitor is fully short-circuited or whether the capacitor, is fully open-circuited., The capacitor-action test is most suitable for high value, capacitors and specially electrolyte capacitors. When, small value capacitors such as ceramic disc or paper, capacitors are tested for capacitor-action, due to the, extremely low charging current the capacitor-action can, not be observed on the meter dial. For such small, capacitors the capacitor-charging-holding test is preferred., However, if small capacitors are subjected for the capacitoraction test, if the meter shows high resistance the capacitor, can be taken as not shorted and hence may be taken as, good., Charging-holding test on capacitors: In this test, a, given capacitor is charged to some voltage level using an, external battery as shown in Fig 12a., Once the capacitor is charged to the applied voltage level,, the battery is disconnected and the voltage across the, capacitor is monitored as shown in Fig 12b. The voltage is, , monitored for a period of time to confirm whether he, capacitor is able to hold the charge atleast for a small, period of time (of the order of few seconds)., In this test, when the capacitor is tried for charging, if the, capacitor does not charge at all even after connecting the, battery for a considerable period of time, it can be, concluded that the capacitor is either short-circuited or, fully open circuited., If the capacitor is unable to hold the charge even for a, considerably small period of time, then it can be concluded, that the capacitor is excessively leaky., The following points are important and are to be noted to, get correct results from the test., •, , If the capacitor to be tested is marked + and – at its, terminals (polarized-capacitor) then connect the, battery with the same polarity. If a polarized capacitor, is tried for changing with wrong polarity, the capacitor, may get permanently damaged., , •, , Use a FET input voltmeter or high ohm/volt voltmeter, to monitor the holding of voltage across the charged, capacitor. This is because a low ohm/volt voltmeter will, draw current from the charged capacitor resulting in a, early discharge of stored charges on capacitor., Note: FET voltmeters have input resistance in, the order of 6 to 10 Megohms and draws only, micro ampere current for full scale deflection., , For determining values of capacitors by colour code of, capacitor is given in chart-2 for reference (Fig 13)., , 202, , Electrical : Electrician (NSQF LEVEL - 5) - Related Theory for Exercise 1.5.51 & 1.5.52, , Copyright Free under CC BY Licence
Page 217 :
Capacitors colour code chart-2, Tolerance, Colour, , Significant, figures, , Multiplier, , Over 10pF, , Under 10pF, , Dipped, tantalum, voltage, rating, , Black, , 0, , 1, , ±20%, , ± 2 pF, , 4 VDC, , Brown, , 1, , 10, , ±1%, , ± 0.1 pF, , 6 VDC, , Red, , 2, , 102 or 100, , ±2%, , -, , 10 VDC, , Orange, , 3, , 103 or 1000, , ±3%, , -, , 15 VDC, , Yellow, , 4, , 104 or 10,000, , +100%, , -, , 20 VDC, , - 0%, Green, , 5, , 105 or 100,000, , ±5%, , Blue, , 6, , 106 or 1,000,000, , -, , -, , 35 VDC, , Violet, , 7, , 107 or 10,000,000, , -, , -, , 50 VDC, , Grey, , 8, , 10-2 or 0.01, , +80%, , ± 0.25 PF, , ±10%, , ± 1 pF, , ± 0.5 pF, , 25 VDC, , -, , -20%, 10-1 or 0.1, , White, , 9, , Gold, , -, , -, , -, , -, , -, , Silver, , -, , -, , -, , -, , -, , None, , -, , -, , ±10%, , ± 1 pF, , -, , 3 VDC, , Note: Main types of fixed value capacitors are given in Chart 3. Constructional details of fixed value, capacitors are shown in Chart 4., , Electrical : Electrician (NSQF LEVEL - 5) - Related Theory for Exercise 1.5.51 & 1.5.52, , Copyright Free under CC BY Licence, , 203
Page 219 :
CHART - 4, Constructional details of fixed value capacitors, Paper Capacitors, Ceramic Capacitors, , MICA Capacitors, , Electrical : Electrician (NSQF LEVEL - 5) - Related Theory for Exercise 1.5.51 & 1.5.52, , Copyright Free under CC BY Licence, , 205
Page 220 :
Electrolytic Capacitors, Aluminium Type, , Glass Capacitors, , Tantalum Capacitors, , 206, , Electrical : Electrician (NSQF LEVEL - 5) - Related Theory for Exercise 1.5.51 & 1.5.52, , Copyright Free under CC BY Licence
Page 221 :
Grouping of capacitors, Objectives: At the end of this lesson you shall be able to, • state the necessity of grouping capacitors and method of connection, • state the conditions for connecting capacitors in parallel and in series, • explain the values of capacitance and voltage in parallel and series combination, Necessity of grouping of capacitors: In certain instances, we may not be able to get a required value of, capacitance and a required voltage rating. In such, instances, to get the required capacitances from the, available capacitors and to give only the safe voltage, across capacitor, the capacitors have to be grouped in, different fashions. Such grouping of capacitors is very, essential., Methods of grouping: There are two methods of grouping., •, , Parallel grouping, , •, , Series grouping, , Parallel grouping, Conditions for parallel grouping, •, , Voltage rating of capacitors should be higher than the, supply voltage Vs., , •, , Polarity should be maintained in the case of polarised, capacitors (electrolytic capacitors)., , where CT is the total capacitance,, C1,C2,C3 etc. are the parallel capacitors., , Necessity of parallel grouping: Capacitors are connected in parallel to achieve a higher capacitance than, what is available in one unit., , The voltage applied to a parallel group must not exceed, the lowest breakdown voltage for all the capacitors in the, parallel group., , Connection of parallel grouping: Parallel grouping of, capacitors is shown in Fig 1 and is analogous to the, connection of resistance in parallel or cells in parallel., , Example: Suppose three capacitors are connected in, parallel, where two have a breakdown voltage of 250 V, and one has a breakdown voltage of 200 V, then the, maximum voltage that can be applied to the parallel, group without damaging any capacitor is 200 volts., , Total capacitance: When capacitors are connected in, parallel, the total capacitance is the sum of the individual, , The voltage across each capacitor will be equal to the, applied voltage., Charge stored in parallel grouping: Since the voltage, across parallel-grouped capacitors is the same, the larger, capacitor stores more charge. If the capacitors are equal, in value, they store an equal amount of charge. The, charge stored by the capacitors together equals the total, charge that was delivered from the source., QT= Q1+ Q2 + Q3+.....+ Qn, capacitances, because the effective plate area increases., The calculation of total parallel capacitance is analogous, to the calculation of total resistance of a series circuit., By comparing Figs 2a and 2b, you can understand that, connecting capacitors in parallel effectively increases the, plate area., General formula for parallel capacitance: The total, capacitance of parallel capacitors is found by adding the, individual capacitances., , where QTis the total charge, Q1,Q2,Q3.....etc. are the individual charges of the capacitors in parallel., Using the equation Q = CV,, the total charge QT = CTVS, where VS is the supply voltage., Again, , CTVS = C1VS + C2VS + C3VS, , CT = C1 + C2 + C3 +.............+ Cn, , Electrical : Electrician (NSQF LEVEL - 5) - Related Theory for Exercise 1.5.51 & 1.5.52, , Copyright Free under CC BY Licence, , 207
Page 222 :
Because all the VS terms are equal, they can be, cancelled., Therefore, CT = C1 + C2 + C3, Example: Calculate the total capacitance, individual, charges and the total charge of the circuit given in Fig 3., Solution, , Necessity of grouping of capacitors in series: The, necessity of grouping capacitors in series is to reduce the, total capacitance in the circuit. Another reason is that two, or more capacitors in series can withstand a higher, potential difference than an individual capacitor can. But,, the voltage drop across each capacitor depends upon, the individual capacitance. If the capacitances are unequal, you must be careful not to exceed the breakdown, voltage of any capacitor., Conditions for series grouping, —, , If different voltage rating capacitors have to be connected in series, take care to see that the voltage drop, across each capacitor is less than its voltage rating., , —, , Polarity should be maintained in the case of polarised, capacitors., , CT = C1 + C2 + C3 + C4, , Connection in series grouping: Series grouping of, capacitors, as shown in Fig 4 is analogous to the, connection of resistances in series or cells in series., , CT = 250 micro farads., , Total capacitance:When capacitors are connected in, , Total capacitance = CT, , Individual charge = Q = CV, Q1 = C1V, = 25 x 100 x 10–6, = 2500 x 10–6, = 2.5 x 10⁻³ coulombs., Q2 = C2V, = 50 x 100 x 10–6, series, the total capacitance is less than the smallest, capacitance value, because, , = 5000 x 10–6, = 5 x 10⁻³ coulombs., Q3 = C3V, = 75 x 100 x 10–6, = 7500 x 10–6, = 7.5 x 10⁻³ coulombs., Q4, , •, , the effective plate separation thickness increases, , •, , and the effective plate area is limited by the smaller, plate., , The calcualtion of total series capacitance is analogous to, the calculation of total resistance of parallel resistors., By comparing Figs 5a and 5b you can understand that, connecting capacitors in series increases the plate separation thickness, and also limits the effective area so as, to equal that of the smaller plate capacitor., , = C4 V, = 100 x 100 x 10-6, = 10000 x 10-6, = 10 x 10-3coulombs., , Total charge = Qt= Q1+ Q2 + Q3 + Q4, = (2.5x10⁻³) + (5x10⁻³), +(7.5x10⁻³) + (10x10-3), = (2.5+5+7.5+10) x 10-3, = 25 x 10-3 coulombs., or QT = CTV, = 250 x 10-6x 100, = 25 x 10-3 coulombs., Series grouping, , 208, , Electrical : Electrician (NSQF LEVEL - 5) - Related Theory for Exercise 1.5.51 & 1.5.52, , Copyright Free under CC BY Licence
Page 223 :
General formula for series capacitance: The total, capacitance of the series capacitors can be calculated by, using the formula, , C, , T, , =, , C, , +, , 1, , 1, C, , 1, , +, , C, , 2, , Solution, Total capacitance: CT, , 1, 1, , Example: Find the voltage across each capacitor in, Fig 6., , + ....... +, , 3, , 1, C, , n, , or, 1, CT, , =, , 1, C1, , +, , 1, C2, , +, , 1, C3, , + ....... +, , 1, Cn, , If there are two capacitors in series, 1, CT =, , C1 C 2, , CT, , C1 + C 2, , If there are three capacitors in series, , 1, CT, , CT =, , C1 C 2 C 3, (C1C 2 ) + (C 2 C 3 ) + (C 3 C1 ), , If there are `n' equal capacitors in series, CT =, , CT, , C, , 1, , n, , CT, , Maximum voltage across each capacitor: In series, grouping, the division of the applied voltage among the, capacitors depends on the individual capacitance value, according to the formula, V=, , 1, , Q, , =, , =, , =, , =, , V1 =, , 1, , +, , C1, 1, 0.1, 10, 1, 17, 1, , CT, C1, , +, , +, , 1, C2, 1, 0.5, 2, , +, , 1, , +, , +, , 1, C3, 1, 0.2, , macro farad, , 5, 1, , and CT = 0.0588 micro farad, , × VS, , V1 = 14.71 VS, , C, , The largest value capacitor will have the smallest voltage, because of the reciprocal relationship., Likewise, the smallest capacitance value will have the, largest voltage., The voltage across any individual capacitor in a series, connection can be determined using the following formula., VX =, , CT, CX, , V2 =, , V2 =, , where Vx - individual voltage of each capacitor, Cx - individual capacitance of each capacitor, Vs - supply voltage., The potential difference does not divide equally if the, capacitances are unequal. If the capacitances are unequal, you must be careful not to exceed the breakdown voltage, of any capacitor., , C2, , × VS, , 0.0588, 0.5, , × 25, , V2 = 2.94 volts, V3 =, , × VS, , CT, , V3 =, , CT, C3, , × VS, , 0.0588, 0.2, , × 25, , V3 = 7.35 volts, Charge stored in series grouping: Based on previous, knowledge, we know that, , Electrical : Electrician (NSQF LEVEL - 5) - Related Theory for Exercise 1.5.51 & 1.5.52, , Copyright Free under CC BY Licence, , 209
Page 224 :
– the current is the same at all points in a series circuit, the current is defined as the rate of flow of charge., (I = Q/t) or Q = It, The same current is flowing for the same period through, the different capacitors of the series circuit. So the charge, of each capacitor will be equal (same), and also equal to the, total charge QT., , (V = Q ), C, By Kirchoff's voltage law, which applies to capacitive as, well as to resistive circuits, the sum of the capacitor, voltages equals the source voltage., V9 = V1+V2+V3+.........+Vn, , QT= Q1=Q2=Q3=.............=Qn, But the voltage across each one depends on its capacitance value., , 210, , Electrical : Electrician (NSQF LEVEL - 5) - Related Theory for Exercise 1.5.51 & 1.5.52, , Copyright Free under CC BY Licence
Page 225 :
Electrical, Electrician - AC Circuits, , Related Theory for Exercise 1.6.53, , Alternating current - terms & definitions - vector diagrams, Objectives: At the end of this lesson you shall be able to, • state the features of direct current, • list out the advantages of DC over AC, • compare the features of DC and AC, • explain the generation of alternating current and terms used, • state the advantages of AC over DC, Direct current (DC): Electric current can be defined as, the flow of electrons in a circuit. Based on the electron, theory, electrons flow from the negative ( ) polarity to the, positive (+) polarity of a voltage source., Direct current (DC) is the current that flows only in one, direction in a circuit. (Fig 1) The current in this type of, circuit is supplied from a DC voltage source. Since the, polarity of a DC source remains fixed, the current produced, by it flows in one direction only., , A constant DC current shows no variation in value over, a period of time. Both varying and pulsating DC currents, have a changing value when plotted against time. The, pulsating DC current variations are uniform, and repeat, at regular intervals., , Dry cells are commonly used as a DC voltage source., Both the voltage and polarity of the dry cell are fixed., When connected to a load, the current produced flows in, one direction at some steady or constant value., , Advantages of DC over AC, , A direct current flow need not necessarily be constant,, but it must travel in the same direction at all times. There, are several types of direct current, and all of them, depend upon the value of the current in relation to time., (Fig 2), , 2 The corona loss associated with DC is negligible, while for AC it increases with its frequency., , 1 DC needs only two wires of transmission, while a 3, phase AC may need upto 4 wires., , 3 The skin effect is also observed in AC leading to, problems in transmission conductor designs., 4 No inductive and capacitive losses., 5 No proximity effect., , Comparison of AC and DC, Alternating current, , Direct current, , Amount of energy that, can be carried, , Safe to transfer over longer city, distances and can provide more, power., , Voltage of DC cannot travel very far, until it begins to lose energy., , Cause of the direction, of flow of electrons, , Rotating magnet along the wire., , Steady magnetism along the wire., , Frequency, , The frequency of alternating, current is 50Hz or 60Hz, depending upon the country., , The frequency of direct current is zero., , Direction, , It reverse its direction while, flowing in a circuit., , It flows in one direction in the circuit., , 211, , Copyright Free under CC BY Licence
Page 226 :
Alternating current, , Direct current, , Current, , It is the current of magnitude, varying with time., , It is the current of constant magnitude., , Flow of electrons, , Electrons keep switching, directions - forward and, backward., , Electrons move steadily in one direction, or ‘forward’., , Obtained from, , AC generator and mains., , Cell or battery., , Passive parameters, , Impedence., , Resistance only., , Power factor, , Lies between 0 to 1., , It is always 1., , Types, , Sinusoidal, trapezoidal,, triangular, square, , Pure and pulsating., , Alternating current (AC): An alternating current (AC), circuit is one in which the direction and amplitude of the, current flow change at regular intervals. The current in, this type of circuit is supplied from an AC voltage source., The polarity of an AC source changes at regular intervals, resulting in a reversal of the circuit current flow., Alternating current usually changes in both value and, direction. The current increases from zero to some, maximum value, and then drops back to zero as it flows, in one direction. This same pattern is then repeated as it, flows in the opposite direction. The wave-form or the, exact manner in which the current increases and, decreases is determined by the type of AC voltage, source used. (Fig 3), , Alternating current generation: Alternating current is, used wherever a large amount of electrical power is, required. Almost all of the electrical energy supplied for, domestic and commercial purposes is alternating current., AC voltage is used because it is much easier and, cheaper to generate, and when transmitted over long, distances, the power loss is low., AC equipment is generally more economical to maintain, and requires less space per unit of power than the DC, equipment., Alternating current can be generated at higher voltages, than DC, with fewer problems of heating and arcing., Some standard values of voltages are 1.1KV, 2.2.KV,, 3.3KV for low capacity and 6.6KV (6600V), 11KV(11000V), and 33KV(33000V) for high capacity requirements. The, values are increased to 66 000, 110 000, 220 000, 400, 000 volts for transmission over long distances. At the, load area, the voltage is decreased to working values of, 240V and 415V., , to convert mechanical energy into electrical energy. The, generator principle, simply stated, is that a voltage is, induced in a conductor whenever the conductor is moved, through a magnetic field so as to cut the lines of magnetic, force., Fig 4 shows the basic generator principle. A change in a, magnetic field around a conductor tends to set electrons, in motion. The mere existence of a magnetic field is not, enough; there must be some form of change in the field., , If we move the conductor through the magnetic field, a, force is exerted by the magnetic field on each of the free, electrons within the conductor. These forces add together, and the effect is that voltage is generated or induced into, the conductor., An AC generator produces an AC voltage by causing a, loop of wire to turn within a magnetic field. This relative, motion between the wire and the magnetic field causes, a voltage to be induced between the ends of the wire., This voltage changes in magnitude and polarity as the, loop is rotated within the magnetic field. (Fig 5), The force required to turn the loop can be obtained from, various sources. For example, very large AC generators, are turned by steam turbines or by the movement of, water., , The basic method of obtaining AC is by the use of an AC, generator. A generator is a machine that uses magnetism, 212, , Electrical : Electrician (NSQF LEVEL - 5) - Related Theory for Exercise 1.6.53, , Copyright Free under CC BY Licence
Page 227 :
The voltage produced by a single loop generator is too, weak to be of much practical value. A practical AC, generator has many more turns of wire wound on an, armature. The armature is made up of a number of coils, wound on an iron core., The AC voltage induced in the armature coils is connected, to a set of slip rings from which the external circuit, receives the voltage through a set of brushes. An, electromagnet is used to produce a stronger magnetic, field., The sine wave: The shape of the voltage wave-form, generated by a coil rotating in a magnetic field is called a, sine wave. The generated sine wave voltage varies in, both voltage value and polarity., If the coil is rotated at a constant speed, the number of, magnetic lines of force cut per second varies with the, position of the coil. When the coil is moving parallel to the, magnetic field, it cuts no lines of force., Therefore, no voltage is generated at this instant. When, the coil is moving at right angles to the magnetic field, it, cuts the maximum number of lines of force., , Therefore, maximum or peak voltage is generated at this, instant. Between these two points the voltage varies in, accordance with the sine of the angle at which the coil, cuts the lines of force., The coil is shown in five specific positions in Fig 6. These, are intermediate positions which occur during one, complete revolution of the coil position. The graph shows, how the voltage increases and decreases in amount, during one rotation of the loop., Note that the direction of the voltage reverses each, half-cycle. This is because, for each revolution of the coil,, each side must first move down and then up through the, field., The sine wave is the most basic and widely used AC, wave-form. The standard AC generator (alternator), produces a voltage of sine wave-form. Some of the, important electrical characteristics and terms used when, referring to AC sine wave voltage or current are as, follows., , Cycle: One cycle is one complete wave of alternating, voltage or current. During the generation of one cycle of, output voltage, there are two changes or alternations in, the polarity of the voltage., These equal but opposite halves of a complete cycle are, referred to as alternations. The terms positive and negative, are used to distinguish one alternation from the other., (Fig 7), , Electrical : Electrician (NSQF LEVEL - 5) - Related Theory for Exercise 1.6.53, , Copyright Free under CC BY Licence, , 213
Page 228 :
Period: The time required to produce one complete cycle, is called the period of the wave-form. In Fig 8, it takes 0.25, seconds to complete one cycle. Therefore, the period (T), of that wave-form is 0.25 seconds., The period of a sine wave (any symmetrical wave-form), need not necessarily be measured between the zero, crossings at the beginning and the end of a cycle. It can, be measured from any point in a given cycle to the, corressponding point in the next cycle. (See Fig 8-AB, CD, or EF.), Frequency: The frequency of an AC sine wave is the, number of cycles produced per second.(Fig 8) The SI, unit of frequency is the hertz (Hz). For example, the 240V, AC at your home has a frequency of 50 Hz., , The peak value of a sine wave refers to the maximum, voltage or current value. Note that two equal peak values, occur during one cycle., Peak-to-peak value: The peak-to-peak value of a sine, wave refers to its total overall value from one peak to the, other. (Fig 10) It is equal to two times the peak value., Effective value: The effective value of an alternating, current is that value which will produce the same heating, effect as a specific value of a steady direct current. In, other words, an alternating current has an effective value, of 1 ampere, if it produces heat at the same rate as the, heat produced by 1 ampere of direct current, both flowing, in the same value of resistance., Another name for the effective value of an alternating, current or voltage is the root mean square (rms) value., This term was derived from a method used to compute, the value. The rms is calculated as follows., , Instantaneous value: The value of an alternating quantity, at any particular instant is called instantaneous value., The instantaneous values of a sine wave voltage is, shown in Fig 9. It is 3.1 volts at 1μs, 7.07 V at 2.5μs, 10V, at 5μs, 0V at 10μs, 3.1 volt at 11 μs and so on., , AC voltage and current values: Since the value of a, sine wave of voltage or current continuously changes,, one must be specific, while referring to and describing, the values of the wave-form . There are several ways of, expressing the value of a sine wave., , The instantaneous values for one cycle are selected for, equal periods of time. Each value is squared, and the, average of the squares is calculated (values are squared, because the heating effect varies as square of the current, or voltage). The square root of this is the rms value., (Fig 11), , By using this method it can be proved that the effective, value of a sine wave of current is always equal to 0.707, times its peak value. A simple equation for calculating the, effective value of sine wave is:, for voltage, V = 0.707 Vm, for current, I = 0.707 Im, , where subscript m refers to the maximum value., Peak value or maximum value: Each alternation of the, When an alternating current or voltage is specified, it is, sine wave is made up of a number of instantaneous, always the effective value that is meant, unless otherwise, values. These values are plotted at various heights, stated. Standard AC meters indicate effective, values, above and below the horizontal line to form a continuous, only., wave-form. (Fig 10), 214, Electrical : Electrician (NSQF LEVEL - 5) - Related Theory for Exercise 1.6.53, , Copyright Free under CC BY Licence
Page 229 :
Average value: It is sometimes useful to know the, average value for one half cycle. If the current is changed, at the same rate over the entire half cycle as in Fig 12, the, average value would be one half of the maximum value., , However, because the current does not change at the, same rate, another method is used. Find the area covered, by the curve over the horizontal axis, then divide that area, by the base horizontal length. It has been determined that, the average value is equal to 0.637 times the maximum, value for sine wave-form i.e., for voltage, Vav = 0.637 Vm, for current,Iav = 0.637Im, where subscript av refers to the average value and, subscript m refers to the maximum value., Form factor (kf): Form factor is defined as the ratio of, effective value to average value of half cycle., For sinusoidal AC, kf =, , 0.707 Im, 0.6637 Im, , = 1.11, , DC generators limit their output voltage to 6000V or less., The voltage cannot be raised or lowered through the, transformers. Long distance transmission requires heavy, cables. AC generators are built with a capacity up to, 500000 kilowatts. The DC generators capacity is limited, to 10000 kw., AC motors are less expensive to build, install and maintain, than the DC motors. DC motors have one distinct, advantage over AC motors: they have better speed, control., •, , AC is easy to generate than DC., , where the subscript m refers to the maximum value., , •, , It is cheaper to generate AC than DC., , Advantages of AC over DC:, , •, , AC generators take higher efficiency than DC., , 1. AC voltages can be raised or lowered with ease. This, makes it ideal for transmission purposes., , •, , The loss of energy during transmission in negligible, for AC in long distance., , 2. Large amounts of power can be transmitted at high, voltage and low currents with minimum loss., , •, , The AC can be easily converted to DC., , 3. Because the current is low, smaller transmission wires, can be used to reduce installation and maintenance, costs. (Fig 13), , •, , It can easily stepup or stepdown using transformer., , •, , The value or magnitude of AC can be decreased, easily without loss of excess of energy using choke., , Neutral and earth conductors, Objectives: At the end of this lesson you shall be able to, • describe the purpose of earthing, • describe the two types of earthing, • differentiate between `neutral' and `earth wire'., Earthing: The importance of earthing lies in the fact that, it deals with safety. One of the most important, but least, understood, considerations in the design of electrical, systems is that of earthing (grounding). The word `earthing', comes from the fact that the technique itself involves, making a low-resistance connection to the earth or to the, ground. The earth can be considered to be a large, conductor which is at zero potential., Purpose of earthing: The purpose of earthing is to, provide protection to personnel, equipment and circuits, , by eliminating the possibility of dangerous or excessive, voltage., There are two distinct considerations in the earthing of an, electrical system: earthing of one of the conductors of the, wiring system, and earthing of all metal enclosures which, contain electrical wires or equipment. The two types of, earthing are:, • System earthing, • Equipment earthing., , Electrical : Electrician (NSQF LEVEL - 5) - Related Theory for Exercise 1.6.53, , Copyright Free under CC BY Licence, , 215
Page 230 :
System earthing: This consists of earthing one of the, wires of the electrical system, such as the neutral, to limit, the maximum voltage to earth under normal operating, conditions., Equipment earthing: This is a permanent and continuous, bonding together (i.e. connecting together) of all, non-current carrying metal parts of the electrical, equipment to the system earthing electrode., What is an earthing electrode?: A metal plate, pipe or, other conductors electrically connected to the general, mass of the earth is known as an earthing electrode., Earth electrodes shall be provided at generating stations,, substations and consumer premises (in accordance with, the requirements of IS : 3043-1966)., The neutral used in single phase system is to provide, return path for load current to the source. Various, method of neutral earthing is provided to serve neutral in, single phase distribution at substation according to the, requirements., What is an `earth wire'?: A conductor connected to, earth and usually situated in proximity to the associated, line conductors which is used for equipment earthing is, called an earth wire., The purpose of equipment earthing: By connecting, the metal work not intended to carry current to earth, a, path is provided for leakage current which can be detected,, and, if necessary, interrupted by the following devices., —, —, Fuses, Circuit breakers., Identification: All cores of cables and conductors should, be identified at the points of termination, and preferably, throughout their length to indicate their function., Methods of identification may include coloured insulation, applied to conductors in manufacture or the application, of coloured tape, sleeves or discs (Fig 1). The colours, used must be of those specified for the function in Table, 52A of IEE wiring regulations., , 216, , Table 52A of IEE regulations, Colour identification of cores of non-flexible, cables and bare conductors for fixed wiring, Function, Protective (including, earthing)conductor, Phase of ac. singleor three-phase circuit, Neutral of ac singleor three-phase circuit, Phase R of 3-phase ac circuit, Phase Y of 3-phase ac circuit, Phase B of 3-phase ac circuit, , Colour, identification, Green-and-yellow, Red(or yellow, or blue*), Black, , Positive of dc 2-wire circuit, Negative of dc 2-wire circuit, Outer (positive or negative), of dc 2-wire circuit derived, from 3-wire system, Positive of 3-wire dc circuit, , Red, Yellow, Blue, Red, Black, Red, Red, , Middle wire of 3-wire dc circuit, , Black, , Negative of 3-wire dc circuit, , Blue, , As alternatives to the use of red, if desired, in, large installations, on the supply side of the, final distribution board., Flexible cables and flexible cords: Every core of a, flexible cable or flexible cord shall be identifiable, throughout its length as appropriate to its function, as, indicated in Table 52B of IEE Regulations., Flexible cables or flexible cords having the following core, colours shall not be used; green alone, yellow alone, or, any bi-colour other than the colour combination green, and yellow. When armoured PVC insulated auxiliary, cables or paper insulated cables are used an alternative, identification system may be used using numbers, where, 1, 2 & 3 signify phase conductors and O the neutral, conductor. The number 4 is used to identify any special, purpose conductor (Fig 2)., , Electrical : Electrician (NSQF LEVEL - 5) - Related Theory for Exercise 1.6.53, , Copyright Free under CC BY Licence
Page 231 :
Table 52B of IEE regulations, Colour identification of cores of flexible cables, and flexible cords, No. of cores Function of core, 1, , 2, 3, , 4 or 5, , Phase, Neutral, Protective, (combination), Phase, Neutral, Phase, Neutral, Protective, (combination), Phase, Neutral, Protective, , Colour(s) of core, Brown, Blue, Green and yellow, , The colour combination of green and yellow is, to be used exclusively for the identification of, protective conductors., Where electrical conduits need to be easily, identified from the pipelines of other services, such as gas, oil, water, steam, etc. they should, be painted orange., , Brown, Blue, Brown, Blue, Green and yellow, Brown or black, Blue, Green and yellow, (combination), , Use of vector diagram, Objectives: At the end of this lesson you shall be able to, • distinguish between scalar and vector quantity, • illustrate the method of drawing vector diagram for two vectors., Definition of scalar and vector quantity and phasor, Scalar quantity:A scalar quantity is a quantity which is, determined by the magnitude alone, for example energy,, volume, temperature etc., Vector quantity: A vector quantity is a quantity which is, represented by straight line with an arrow head to, represent the magnitude and direction of it. For example,, - force, velocity, weight., Phasor: Phasor is a vector that is rotating at a constant, angular velocity. A straight line with an arrow head is, used to represent graphically the magnitude and phase, of a sinusoidal alternating quantity (i.e. current, voltage, and power) is called phasor., Plotting a curve of alternating voltage: If the maximum, voltage of the alternator is known, the generated voltage, can be plotted to form a curve. Draw a circle with the, radius representing the maximum value of voltage., , lines in Fig 1. The intersection of the lines represents the, value of voltage at that instant. For example, a horizontal, and a vertical line intersect at point X., Using the same scale as used for the radius of the circle,, the vlaue of voltage can be measured. This value is the, emf produced when the coil is cutting the lines of force at, a 30-degree angle., Use of vector diagrams: The change which occurs in, the value of an alternating voltage and/or current during, a cycle can also be shown by using vector diagrams., , Any convenient scale may be used. Divide the circle into, equal parts. (Fig 1) Draw a horizontal line to scale, along, which one voltage cycle will be plotted. Divide the line into, the same number of equal parts as in the circle. Draw, horizontal and vertical lines, as illustrated by the dashed, , A vector is a line segment that has a define length and, direction. A vector diagram is two or more vectors joined, together to convey information. Vector diagrams drawn, to scale can be used to determine instantaneous values, of current and/or voltage., , Scalar quantity, , Vector quantity, , 1., , Scalar quantity can be presented by magnitude, only, for example - energy, volume etc., , Vector quantity must represent magnitude and, direction also, for example - force velocity etc., , 2., , Addition and substraction of scalar quantities, can be done algebraically, , Addition and subtraction of vector quantities cannot, be done algebracially but by vector summation., , Electrical : Electrician (NSQF LEVEL - 5) - Related Theory for Exercise 1.6.53, , Copyright Free under CC BY Licence, , 217
Page 232 :
Fig 1 can be analyzed by means of vector diagrams, according to the following procedure. Draw a horizontal, line as a reference line (Fig 2). Starting at point O and 30, degrees from the reference line, draw OA to scale to, represent a maximum voltage (Vm) of 100 volts. From, the end of vector OA, draw a vertical dashed line is, labelled AB and represents the instantaneous value of, voltage (Vi) when the coil is cutting the lines of force at a, 30 degree angle. Measure vector AB. It should scale to, 50 volts., , The same procedure can be followed for any degree of, rotation. The vector diagram shown in Fig 3 is used to, determine the value of voltage when the coil has rotated, 120 degrees., , Referring back to Fig 1, it can be seen that each division, of the circle can represent vector OA. Vector AB can be, represented by points along the voltage curve. The angle, between the horizontal diameter of the circle and the, radius vm is the angle at which the coil is cutting the flux., Although vector diagrams are seldom used alone, they, are a simple way of presenting a visual illustration of a, problem. Vector diagrams are usually used with, trigonometric functions., Many electrical problems are solved through the use of, trigonometry. The vector diagrams used with trigonometric, functions are generally in the form of triangles and/or, parallelograms.(Fig 5 & 6), , .Although the coil has rotated 120 degrees, the angle it is, making with the lines of force is only 60 degrees. It is this, angle that determines the value of the instantaneous, voltage. For example, if the coil rotates 210 degrees, it, cuts the lines of force at angle of 30 degrees. (Fig 4), , AC simple circuit - with inductance only, Objectives: At the end of this lesson you shall be able to, • state phase relation between V and I in a pure inductive circuit, • state about inductive reactance, • state power in pure inductive circuit, • define power factor., Circuit with pure inductance only: Inductance affects, the operation of pure DC circuits only at the instant they, are opened and the instant they are closed. In an AC, circuit, the current is always changing, and the inductance, is always opposing the change. The inductance, therefore,, has a constant effect on circuit operation., , circuit current than does the inductance, the circuit can, be considered as containing only inductance. (Fig 1), , A circuit with pure inductance alone can never be formed,, because the source, the connecting wires, and the inductor, all have some resistance. However, if these resistances, are very small and have a much smaller effect on the, , 218, , Electrical : Electrician (NSQF LEVEL - 5) - Related Theory for Exercise 1.6.53, , Copyright Free under CC BY Licence
Page 233 :
In any AC circuit that contains only inductance, there are, three varying quantities. These are (1) the applied voltage,, (2) the induced back emf, and (3) the circuit current., Phase relationship between voltage and current: The, phase relationships in an inductance can most easily be, understood by considering first the current and the back, emf. You know two things about the current and the back, emf. One is that the counter emf is maximum when the, rate of change of current is the greatest, and is zero when, the current is not changing., The second relationship is that the direction of the cemf, is such that it always opposes the current change., The wave-form in Fig 2 shows one cycle of AC current., The rate of change is greatest where the slope of the, wave-form is greatest. You can see that this occurs at, those points where the wave-form passes through zero;, or at 0,180, and 360 degrees. This means that the, highest cemf is generated at 0,180 and 360 degrees, as, shown by the wave-forms in Fig 2. Around 90 and 270, degrees, the change is very little; as a matter of fact, at, exactly 90 and 270 degrees, where the current change is, from rising to falling, the current is momentarily steady., Therefore, the flux lines do not change at those points,, and no cemf is induced., , In an inductance: (1) the applied voltage leads the current, by 90o; (2) the back emf lags the current by 90° and (3) the, applied voltage and the back emf are 180° out of phase., This is known as 'phase difference'., Phase difference: If two alternating quantities attain, maximum value in the same direction after passing, through zero value at different times, they are said to, have a phase difference., Phase difference can be expressed in fractions of a, cycle. For more accuracy, phase difference is given in, degrees. The terms `lead' and `lag' are used to describe, the relative positions in time of two voltages or currents, that are not in phase. The one that is ahead in time is said, to lead, while the one behind lags. (Figs 5 and 6), , What should be the amount and direction of counter emf, (back emf) when the current is passing through zero and, in the positive direction?, Since at 0 degrees the current is passing through zero in, a positive direction, the cemf must be maximum in the, negative direction, in as much as it always opposes the, increase in current. Similarly, when the current begins to, decrease at 90 degrees, the cemf must be increasing in, the positive direction to aid the current flow., As shown, therefore, the cemf follows Lenz's Law by, lagging the current by 90 degrees. You know that the, applied voltage is 180 degrees out of phase with the, cemf, and so the applied voltage must lead the current by, 90 degrees. This is shown in the wave-form in Fig 3. The, relationships between the three quantities (current, cemf,, and applied voltage) is shown in the wave-forms in Fig 4., We know they are not in phase as in the case of resistive, circuits., , When maximum and minimum points of one voltage or, current occur before the corresponding points of another, voltage or current, the two are out of phase. When such, a phase difference exists, one of the voltages or currents, leads, and the other lags., Phase difference can also be illustrated by a vector, diagram. While representing phase difference, the, reference quantity is shown on the +ve side of the x, axis.(Figs 7 & 8), , Electrical : Electrician (NSQF LEVEL - 5) - Related Theory for Exercise 1.6.53, , Copyright Free under CC BY Licence, , 219
Page 234 :
inductor, and the frequency (f) of the current, the inductive, reactance must also depend on these things. The inductive, reactance can be calculated by the equation, XL = 2πfL, where XL is the inductive reactance in ohms; f is the, frequency of the current in cycles per second; and L is the, inductance in henrys. The quantity 2π together actually, represents the rate of change of the current, usually, denoted by the Greek letter `ω' (Omega)., Since 2π = 2(3.14) = 6.28, the Eqn. becomes similarly, The quantity of lead is shown by an angle in an, anticlockwise and a lagging quantity is shown by a, clockwise angle., , L=, , Phase relationship between current and voltage in a, circuit with inductance only, When AC voltage is applied to an inductive circuit, the, current lags behind the applied voltage by a quarter cycle, or by 90°. (Fig 9), , In a purely inductive circuit, the current lags behind the, applied voltage by 90°. This is illustrated in the Fig 9 as, wave-form. This also can be stated as voltage leads, current. The vector diagram for both expressions is given, in Figs 10 and 11., , f =, , XL, 6.28 f, XL, 6.28 L, , In a circuit containing only inductance, Ohm's Law can be, used to find the current and voltage by substituting XL for, R. (Fig 12), , V, IL = L, XL, V, XL = L, IL, VL = IL XL, where IL = current through the inductance,in amperes, VL = voltage across the inductance, in volts, XL = inductive reactance in ohms, Example: An AC circuit consists of a 20-mH coil operating, at a frequency of 1000 kHz. What is the inductive reactance, of the coil?, XL, , = 6.28fL, = 6.28(1000 x 103)(20 x 10—3), = 12.56 x 104 = 125600 ohms., , Inductive reactance:The cemf acts just like a resistance, to limit the current flow. But cemf is discussed in terms of, volts, so it cannot be used in Ohm's Law to compute the, current. However, the effect of cemf can be given in terms, of ohms. This effect is called inductive reactance, and is, abbreviated as XL. Since the cemf generated by an, inductor is determined by the inductance (L) of the, 220, , Example: What must the inductance of a coil be so that, it has a reactance of 628 ohms at a frequency of 40KHz?, L=, , XL, 6.28f, , =, , 628, 3, , 6.28(40 × 10 ), , = 2.5 x 10-3 = 2.5 mH, , Electrical : Electrician (NSQF LEVEL - 5) - Related Theory for Exercise 1.6.53, , Copyright Free under CC BY Licence
Page 235 :
Power in pure inductance: If an AC circuit contains only, inductance, the voltage and current are 90° out of phase,, as shown by the phasor and wave diagrams in Fig 13., The result of multiplying the V and I wave-forms is a, power curve that again has a frequency twice that of the, source is as shown in Fig 13. However, over a complete, cycle of input voltage, the power curve has an average, value of zero. That is, the power curve shows an equal, alternation of positive and negative power above and, below the zero time axis., , The average true power, P, is zero, in a pure inductance., In AC circuits,, Power = VI Cos φ watts, where φ is the phase angle between voltage and current., As the phase angle between V & I in pure inductive circuit, is 90°, Cos 90° is zero., Therefore P = V x I x (zero) = zero., The term Cos φ is known as `power factor'., Reactive power: However, the source must be capable, of delivering power for a quarter of a cycle, even though, this power will be returned during the next quartercycle., This stored or transferred power is called reactive power,, Pq., In the case of a purely inductive circuit, the reactive power, is given by, Pq = VLIL volt-amperes reactive (var), where Pq is the reactive power in volt-amperes reactive,, var, VL is the voltage across the inductance in volts, IL is the current through the inductance in ampere., Since VL = ILXL, then Pq = IL2XL var., where XL is the inductive reactance in ohms. Note how, the equations for relative power are similar to those for, true power with XL used in place of R. But we must, remember to use var for the unit of reactive power, not, watts., , Positive and negative power: (Fig 13) The shaded, portion of the power curve above the zero axis represents, energy being delivered to the inductor (or load) from the, source. This positive power actually represents a storage, of energy in the magnetic field of the inductance., , Example: Calculate the reactive power of a circuit that, has an inductance of 4 H when it draws 1.4 amps from a, 50Hz supply., Solution, XL = 2πfL = 2π x 50Hz x 4H, , = 1256 ohms, , Pq = IL2XL = (1.4A)2 x 1256 ohms = 2462 vars, , The shaded portion of the power curve below the zero, axis represents energy returned to the source from the, inductor. This negative power indicates that a flow of, energy is taking place in the opposite direction(from load, to source) when the coil's magnetic field collapses., , = 2.462 kvar, Note that 1 kvar = 1 kilo-var = 1000 vars.ea, , A.C. circuit with R & L in series, Objectives: At the end of this lesson you shall be able to, • state the voltage and current relationship, • determine impedance of a series circuit with RL in series, • calculate power in a series circuit (with RL in series), • calculate the power factor in RL series circuit., When resistance and inductance are connected in series,, or in the case of a coil with resistance, the rms current IL, is limited by both XL, and R however the current I is the, same in XL and R since they are in series, the voltage drop, , across R is VR = IR and the voltage drop across XL is VL, = IXL. The current I through XL must lag VL by 90° because, this is the phase angle between current through an, inductance and its self-induced voltage. The current I, , Electrical : Electrician (NSQF LEVEL - 5) - Related Theory for Exercise 1.6.53, , Copyright Free under CC BY Licence, , 221
Page 236 :
through R,and its IR voltage drop,are in phase and so the, phase angle is 0°., Now let us apply the principle of phasor representation to, a series circuit containing pure resistance and pure, inductance. (Fig 1), , Consider the `voltage triangle' for a series, RL circuit, as, shown in Fig 4a. This is similar to the phasor diagram in, Fig 3 with VL transferred to make a closed triangle., Given V2 = VR2 + VL2 and VR = IR and VL = IXL, , Since we are considering a series circuit, it is convenient, if we draw the current phasor in the horizontal reference, position because it is `common' to both the resistor and, inductor. Superimposed upon this phasor is the voltage, phasor across the resistor VR. This is because the current, and voltage are always in phase with each other in a pure, resistor. (Fig 2), , Similarly, the voltage phasor across the inductor VL is, drawn 90° ahead of the current I in other words leading, the current phasor. This is because, as we know, the, current always lags the inductor voltage by 90° in a pure, inductance., , then V = (IR) 2 + (IX L ) 2, , =, , However, these two voltages are 90° out of phase with, each other. This means that the total voltage across the, series combination cannot be obtained simply by adding, VR to VL algebraically. We must take into account the, angle between them., , V2 = VR2 + VL2, Impedance of a series RL circuit: The total opposition, to current in a series, RL circuit, is called the impedance, Z. It is the ratio of the total applied voltage V to the current, I. Impedance is measured in ohms as are resistance and, inductive reactance. But, as shown by the following,, impedance is the vector sum of resistance and reactance., 222, , 2, , 2, , 2, , 2, , 2, , = I (R + XL ), 2, , =I R + X, , The applied voltage V is the (phasor) sum of VR and VL, with the phase angle added., This phasor addition can be carried out simply by, constructing a parallelogram (a square in this case) and, drawing the diagonal. This is shown in Fig 3. Clearly, the, phasor sum V is less than the algebraic sum of VL and VR., Also, because V is the hypotenuse of a right-angled, triangle, V is given by, , 2 2, , I R + (I XL ), , But, , V, , 2, L, , and, , V, 2, = R2 + X, L, I, , is the impedance Z., , I, , Therefore, Z = R 2 + X, , 2, L, , ohms, , where Z is the impedance in ohms, R is the resistance in ohms, XL is the inductive reactance in ohms, and I =, , V, , amperes (A)., , Z, , Electrical : Electrician (NSQF LEVEL - 5) - Related Theory for Exercise 1.6.53, , Copyright Free under CC BY Licence
Page 237 :
We can also see from Fig 4b & 4c that, if the impedance, and phase angle are known, we can obtain the resistance, and inductive reactance., R = Z cos φ, , 2, , V = VR + VL, , 2, , Therefore V × I = (VR × I)2 + (VL × I)2, , XL = Z sin φ, where φ is the angle between Z and R., Power in a series RL circuit: We have seen that, inductance is always accompanied by resistance. Thus, coils in motors, generators, relay coils etc. contain both, resistance and inductance. When an AC voltage is applied,, the current I is neither in phase nor 90° out of phase with, the applied voltage V as shown in Fig 5., , But V x I = apparent power in VA, VR x I = true power in watts, VL x I = reactive power in vars, Therefore,, (apparent power)2 = (true power)2 + (reactive power)2, or, , 2, , 2, , VA = (W ) + (VAR ), , This relation can be represented in a power triangle, as, in Fig 7., , This means, unlike pure resistance and pure reactance,, the product of the voltmeter and ammeter readings in, Fig 6 is a combination of the true and (quadrature), reactive power. We call the product of total V and total I, apparent power Ps. Since it is neither true power in watts, nor reactive power in vars, we use a new unit - the volt, ampere, VA to measure the apparent power., P = V x I volt-amperes (VA), where P is the apparent power in volt amperes VA,, V is the total applied voltage in volts V,, I is the total circuit current in amperes A., , Fig 7 shows the apparent power as represented by the, hypotenuse of the right angled triangle. The true power is, the product of the current and voltage in phase with each, other, and is drawn horizontally. The out-of-phase product, of VL and I gives the reactive power, and is drawn, vertically downward. This is a convention used to show a, lagging, inductive, reactive power corresponding to a, lagging current. (A capacitive reactive power is drawn, vertically upward, corresponding to a leading current.), We can also have other relations., W = VA Cos φ, VAR = VA Sin φ, Power factor: The ratio of the true power delivered to an, AC circuit compared to the apparent power that the, source must supply is called the power factor of the load., If we examine any power triangle, as in Fig 7, we see that, the ratio of the true power to the apparent power is cosine, of the angle Ø., Power factor =, , Power triangle: In AC circuit we had identified three, types of power., —, , True power in watts as in circuit with resistors only., , —, , Reactive power in vars as in the case of pure inductive, or pure capacitive circuit., , —, , Apparent power in VA as in the case of circuits with R, and L or R & C. All the three are interrelated., , As, , W, , W, VA, , = Cos φ, , = VR x I and, , VA = V x I also, VR = I x R, = IxZ, power factor must also be equal to, , We know in a series RL circuit, , VR, V, , Electrical : Electrician (NSQF LEVEL - 5) - Related Theory for Exercise 1.6.53, , Copyright Free under CC BY Licence, , and to, , R, Z, , 223
Page 238 :
Power factor (PF) =, , V, R, = R = cos φ, VA, V, Z, W, , What should be the power factor for a circuit, containing pure resistance only?. As the phase angle, Ø between current and voltages is φ = 0., , ii Power factor =, , R, Z, , =, , 10, 18.6, , = 0.537, , iii Power consumed = I2R = (12.9)2 x 10, = 166.72 x 10, = 1667 W., , Cos φ = 1 and PF = 1., Similarly the power factor for circuit containing pure, inductance or pure capacitance only is zero as, Cos φ = Cos 90° = zero., Example: An inductive coil with a resistance of 10 ohms, and inductance of 0.05 henry is connected across 240, volt 50 cycle AC mains., Calculate, , iv The current is lagging in the circuit., Example: An inductive circuit has a resistance of 2 ohms, in series with an inductance of 0.015 henry. Find (i), current and (ii) power factor when connected across 200, volt 50 cycles per second supply mains., Solution, XL = 2πfL = 2x3.142x50x0.015 = 4.71 ohms, , i) current taken by the coil, 2, , 2, , 2, , Z = R + XL = (2) + (4.71), , ii) power factor of the circuit, , 2, , iii) power consumed, and answer, , = 4 + 17.39 =, , iv) whether the current in the circuit is lagging or leading., Solution, XL, , = 2πfL = 2 x 3.142 x 50 x 0.05 = 15.7 ohms, 2, , 2, , 2, , Z = R + XL = (10) + (15.7), , i. I =, , 200, , 26.19, , = 39.13 amps, , 5.11, , 2, , ii. Power factor =, , R, Z, , =, , 2, 5.11, , = 0.39, , = 346.49 = 18.6 ohms, i, , I = (240/18.6) = 12.9 Amps, , Phase relation between V & I in R - L series circuit, Objectives: At the end of this lesson you shall be able to, • explain how to add and subtract vector quantities, • represent voltage of R-L circuit by vector ., Consider circuit diagram as shown in Fig 1., , When an alternating voltage is applied to a pure inductor,, the resultant alternating current through the inductor is, lagging by 90° with the supply voltage due to presence of, counter emf. (Fig 2b). As current I is shown first Fig 2(a), the voltage across resistor 'R' i.e. this in phase with, current. (Fig 2a & 3b), , 224, , The voltage across inductor (L) EL is 90° leading with, current I. (Figs 2b and 3c). Hence the applied voltage E, is obviously the resultant of ER & EL. It is obtained by simply, summing up the instantaneous values of ER and EL. (Figs, 2c & 3d), , Electrical : Electrician (NSQF LEVEL - 5) - Related Theory for Exercise 1.6.53, , Copyright Free under CC BY Licence
Page 239 :
Addition and subtraction of vectors by parallelogram, method, , Now 'OC' represents the resultant vector of both vectors., , Addition of two vectors: Two vectors OA & OB are acting, on the same point '0' at an angle a as shown in, , from vector OB (as shown in Fig 5) (OB − OA ) then OA is, , Subtraction of two vectors: If vector OA is to be subtracted, , produced backward so that OA' = OA complete, parallelogram OBCA'. The diagonal OC drawn from point, '0'' of the parallelogram represents the resultant of OA &, OB., OC = (OB − OA ), , Addition of voltage across resistance and, inductance connected in series by vector, method to compare with supply voltage., , Phasor is representation of sinusoidal quantities. Hence, two electrical quantities can be represented by a phase, diagram as shown in Fig 6a and wave form a shown by, Fig 6b., Two electrical quantities both (ER & EL) voltage can be, added by the vector diagram methods as shown in Fig 6c., , Fig 4. Both vectors can be added by the parallelogram, method. On completion of parallelogram OACB, draw the, diagonal 'OC' from point 0., , AC Simple circuit - with capacitor only, Objectives: At the end of this lesson you shall be able to, • explain AC circuit with capacitor only, • state phase relation between V and I, • state power in pure capacitance only., Circuit with capacitance only: In an AC circuit, the, applied voltage as well as the current it produces,, periodically changes direction. (Fig 1) A capacitor in an, AC circuit is first charged by the voltage being applied in, one direction. Then, when the applied voltage starts to, , decrease, less current flows, but the capacitor is still, being charged in the same direction. As a result, as the, applied voltage continues to drop, the voltage developed, across the capacitor becomes greater., , Electrical : Electrician (NSQF LEVEL - 5) - Related Theory for Exercise 1.6.53, , Copyright Free under CC BY Licence, , 225
Page 240 :
This is because the plates are in neutral state and, present no opposing electrostatic forces to the source, terminals. Therefore, as you can see by Ohm's Law, if, the opposition to the current flow is very, very low, a small, applied voltage can cause considerable current to flow., As the source voltage rises, however, the charges on the, capacitor plates, (which result from the current flow) build, up. The charge voltage, then, presents an increasing, opposition to the source voltage and so the current, decreases., , The capacitor then acts as the source, and starts discharging., The capacitor becomes fully discharged when the applied, voltage drops to zero and reverses its direction. Then the, capacitor starts charging again, but in the same direction, in which it was previously discharging., This continues until the applied voltage again starts to, drop, and the events repeat themselves. This alternate, charging and discharging, first in one direction, and then, in the other, occur during every cycle of the applied AC., An AC current, therefore, flows in the circuit continuously., It can be said, then, that although a capacitor blocks DC, it passes AC., Voltage and current realtionship: When an AC voltage, source is connected across a capacitor, maximum current, flows in the circuit the instant the source voltage begins, its sinusoidal rise from zero. (Fig 2a), , When the source voltage reaches its peak value, the, charge voltage across the capacitor plates is maximum., This charge is sufficient to completely cancel the source, voltage, so that the current flow in the circuit stops., As the source voltage begins to decrease, the electrostatic, charge on the capacitor plates becomes greater than the, potential of the source terminals, and so the capacitor, starts to discharge. (Fig 2b), Is the current flow in the same direction when the, voltage decreases?, The direction of electron flow is opposite to the direction, taken by the electrons during capacitor charging. Thus,, at the point that the applied voltage passes through its, maximum value and begins decreasing, the current in, the circuit passes through zero and changes direction., As can be seen from the graph, this constitutes a, 90-degree phase difference, with the current leading the, applied voltage., This 90-degree difference is maintained throughout the, complete cycle of applied voltage. When the applied, voltage has dropped to zero, the circuit current has, increased to its maximum in the opposite direction, and, when the voltage reverses the direction, the current, begins decreasing. (Fig 2c) Therefore, the voltage applied, to a capacitor is said to lag the current through the, capacitor by 90 degrees. Or, the current through a, capacitor leads the applied voltage by 90 degrees., Hence the current increases from zero to maximum, when voltage starts decreasing from the peak value in, the opposite direction to zero. (Fig 2d), The phase relation between voltage and current in a, pure capacitor circuit is shown in the wave-form and, vector diagram. (Fig 3), , 226, , Electrical : Electrician (NSQF LEVEL - 5) - Related Theory for Exercise 1.6.53, , Copyright Free under CC BY Licence
Page 241 :
Capacitive reactance: The opposition offered to the flow, of current by a capacitor is called capacitive reactance,, and is abbreviated Xc. Capacitive reactance can be, calculated by:, , 1, , XC =, , 2πfC, , =, , 1, ωc, , where 2π is approximately 6.28, f is the frequency in Hz, C is the capacitance in farad and ω = 2.π.f., Like its inductive counterpart - inductive reactance,, capacitive reactance is expressed in ohms. Ohm's Law, can also be applied to a circuit containing capacitive, reactance only. (Fig 4), , VC = Ic Xc, Ic =, , Vc, , V, Xc = c, Ic, , ,, , Xc, , where, Ic is current through capacitor in amps, VC is the voltage across the capacitor in volts, XC is the capacitive reactance in ohms., Example: A 10 micro-farad capacitor is connected to a, 200V 50Hz supply. Find the current taken., , Xc, , ,, , VC = V, , Ic =, , Pq = VcIc volt-amperes reactive (var), where, , Ic is the current through the capacitance in amperes., Since Vc = IcXc, , where Xc is the capacitive reactance., , Xc =, , For a purely capacitive circuit, the reactive power is given, by, , Vc is the voltage across the capacitance in volts, , Vc, , Xc =, , However, reactive power Pq is drawn by the capacitor,, and the source must be able to supply this power., , Pq is the reactive power in volt-amperes reactive, var, , Solution, Ic =, , The product of v and i gives a power curve as shown in Fig, 5b. We see that the energy delivered to the capacitor and, stored in the electric field is represented as a positive, quantity. A quarter of a cycle later, all of this energy is, returned to the source, as the capacitor discharges., Thus the average true power, P, is zero in a pure, capacitance., , 1, 2πfc, , =, , 1000, π, 200, 318.4, , 10, , then, , Pq = Ic2Xc var, , 6, , 2π × 50 × 10, , and, , Pq =, , Vc, , 2, , Xc, , where Xc is the capacitive reactance in ohms., , = 318.4 ohms, , Again the equations for reactive and true power are, similar with Xc used in place of R. We must use vars, not, watts, for the reactive power., , = 0.628 amps, , As in the case of pure inductive circuit, the power factor, of the pure capacitive circuit is also zero., , Power in pure capacitance: For pure capacitance, the, voltage and current are 90° out of phase with each other,, the current leading as shown by the phase diagram in, Fig 5a., , Why is it so?, This is because the angle between the current and, voltage in a capacitive circuit is 90o. Result cos φ = 0., , Electrical : Electrician (NSQF LEVEL - 5) - Related Theory for Exercise 1.6.53, , Copyright Free under CC BY Licence, , 227
Page 242 :
Example: A reactive power of 100 vars is drawn by a 10, micro farad capacitor due to a current of 0.87A. Calculate, the frequency., , Therefore, f =, , 1, 2.π.X c .C, , Solution, Xc =, , Pq, Ic, , 2, , =, , 100 vars, (0.87), , 2, , =, = 132 ohms, , 1, 2π × 132 ohms × 10 × 10, , −6, , F, , = 120 Hz., , Power and power factor in AC single phase circuit, Objective: At the end of this lesson you shall be able to, • calculate power and power factor of a single phase AC circuit from the given relevant values., Power in pure resistance circuit: Power can be, calculated by using the following formulae., 1) P = VRx IR watts, 2) P = I2R R watts, 3) P =, , E, , 2, , watts, , R, , Example 1: Calculate the power taken by an incandescent, lamp rated 250V when it carries a current of 0.4A if the, resistance is 625 ohms.(Fig 1), Solution, Known: P = IR2R, The circuit arrangement and wave-forms of I, V and P are, shown in Fig 2., Given: I = 1.5 amperes, P = 50 watts., Therefore,, P = VR x I R, = 250 x 0.4, , R=, , Alternately, P = I2R, = 0.4 x 0.4 x 625, , P=, , 2, , R, , =, , 250, , 2, , 50W, (1.5), , 2, , = 22.2 ohms, , Power in pure capacitance: If an AC circuit contains, only capacitor, the voltage and current are 90°. Out of, phase and the product of instantaneous values of voltage, and current gives both positive and negative power. Net, result is the power consumed in a pure capacitive circuit, is zero., , 625, , 250 × 250, , 625, = 100 watts., , Since the current and voltage are in phase, the phase, angle is zero and the power factor is unity. Therefore, the, power can be calculated with voltage and current itself., Example 2: A wattmeter connected in an AC circuit, indicates 50W. The ammeter connected in series with the, load reads 1.5A. Determine the resistance of the load., 228, , =, , Power in pure inductance: If an AC circuit contains only, inductance, the voltage and current are 90° out of phase,, and the circuit of the instantaneous values of voltage and, current gives with positive and negative power. Net result, is the power consumed in a pure inductive circuit is zero., , = 100 watts, , E, , 2, , I R, , = 100 watts., , or P =, , P, , Most industrial installations have a lagging PF because, of the large number of AC induction motors that are, inherently inductive., Effect of a low power factor: To show the important, effect of the power factor, let us consider a 240V, 50 Hz,, 1 hp motor. Let us assume that it is 100% efficient so that, it draws a true power of 746 W. Such a motor has a typical, power factor of 0.75 lagging. (Fig 3), , Electrical : Electrician (NSQF LEVEL - 5) - Related Theory for Exercise 1.6.53, , Copyright Free under CC BY Licence
Page 243 :
I�, , 746 W, � 3.108 A, 240 V x 1, , Evidently, it requires a higher current to deliver a given, quantity of true power if the power factor of the load is less, than unity. This higher current means that more energy, is wasted in the feeder wires serving the motor. In fact, if, an industrial installation has a power factor less than 85%, (0.85) overall, a `power factor penalty' is assessed by the, electric utility company. It is for this reason that power, factor correction is necessary in large installations., Power factor correction: In order to make the most, efficient use of the current delivered to a load we desire, a high PF or a PF that approaches unity., To deliver 746 W from 240V at a power factor of 0.75, requires a current of, , I=, , =, , P, V × Cos θ, , A, , 746W, 240V × 0.75, , = 4.144 A, , Now let us assume that we can modify the motor in some, way to make the power factor unity (I). The current now, required is, , I=, , A low PF is generally due to the large induction loads, such as discharge lamps, induction motors, transformers, etc. which take a lagging current and produce heat which, returns to the generating station without doing any useful, work as such it is essential to improve or correct the low, PF so as to bring the current as closely in phase with the, voltage as possible. That is the phase angle θ is made, as small as possible. This is usually done by placing a, capacitor load which produces a leading current., The capacitor is to be connected in parallel with the, inductive load., , P, V × Cos θ, , R - C Series circuit, Objectives: At the end of this lesson you shall be able to, • state the effect of frequency on capacitive reactance in R-C series circuit, • calculate power factor, • determine the power factor and phase angle, • state the R-C time constant while charging and discharging, In a circuit with capacitance, the capacitive reactance (XC), decreases when the supply frequency (f) increases as, shown in Fig 1., , When the capacitive reactance XC increases the circuit, current decreases., , I∝, , 1, XC, , Therefore the increase in frequency (f) results in the, increase of the circuit current in the capacitive circuit., When resistance (R), capacitance (C) and frequency f, are known in a circuit, the power factor cos q can be, determined as follows. (Fig 2), , XC =, , XC ∝, , 1, 2πfC, , 1, f, , Electrical : Electrician (NSQF LEVEL - 5) - Related Theory for Exercise 1.6.53, , Copyright Free under CC BY Licence, , 229
Page 244 :
Power consumed in a R-C series circuit can be determined, using the formula, P = VI cos θ where, , P = power in watts, , I = current in ampere, cos θ = power factor., Vector diagram of voltages and their use to determine, pf angle θ. (Fig 4), 2, , Z= R +X, , 2, C, , Power factor, cos θ =, , R, Z, , Example 1: A capacitance of 20 μ f and a resistance of, 100Ω are connected in series across a supply frequency, of 50 Hz. Determine the power factor. (Fig 3), , VR = IR drop across R (in phase with I), VC = IXC drop across capacitor (lagging I by 90°), V=, , ∴I =, , 2, , VR + V, , 2, C, , V, 2, , 2, , 2, , 2, C, , =, , R +X C, ∴Z =, , Solution, 1, , XC =, , 2πfC, , 1, , =, 2x, , 22, 7, , 7 x 10, , =, , R +X, , (IR )2 + (IX C )2, , =, , 2, , =I R +X, , 2, C, , V, Z, , where Z is the impedance of the circuit., , Power factor, cos θ = R/Z., , x 50 x 20 x10, , -6, , From pf cos θ the angle θ can be known referring to the, Trignometric table., Example 2: In RC series circuit shown in the diagram, (Fig 5) obtain the following., , -6, , 2 x 22 x 50 x 20, 7000000, , =, , 44000, = 159.1 Ω, say 160 Ω., 2, , Z= R +X, , 2, C, , = 10000 + 25600, = 36600 = 191.3Ω, , P.F. =, , R, , =, , 100, , = - .522, , Z 191.3, Capacitive reactance XC in a capacitive circuit can be, determined with the formula, XC =, where, , Impedance in ohms, , •, , Current in amps, , •, , True power in watts, , •, , Reactive power in var, , •, , Apparent power in volt amp., , •, , Power factor, , Solution, , 1, , 2πfC, X = capacitive reactance in ohm, C, , f, , •, , = frequency in Hz, , 1 Impedence (Z), 2, , = R +X, , 2, C, , 2, , 2, , = 30 + 40 = 2500 = 50Ω, , C = Capacitance in farad, 230, , Electrical : Electrician (NSQF LEVEL - 5) - Related Theory for Exercise 1.6.53, , Copyright Free under CC BY Licence
Page 245 :
2 Current I =, , V, Z, , =, , 200, , = 4A, , 50, 2, , 4 Reactive power VAR = VCI = 160 x 4 = 640 VAR, Apparent power VI = 200 x 4 = 800 VA, , cosθ =, , R, Z, , =, , 30, 50, , = 185600 = 430 Ω, , 2, , 3 True power W = I R = 4 x 30 = 480W, (Power consumed by capacitoir = zero), VC = IXC = 4 x 40 = 160 V, , PF, , b) Z = R 2 + X 2 = 160 2 + 400 2, C, , = 0.6, , The impedance triangle, power triangle and voltage, triangle for exercise 2 are showm in Fig 6, , c) I =, , V, , =, , Z, , 220, 430, , = 0.51A, , 2, , 2, , d) W = I R = 0.51 x 160 = 41.62W, e) VAR = V x I Sin θ = 220 x 0.51 x 0.9291, = 102.2 VAR, , R, , Cos θ =, , Z, , =, , 160, 430, , = 0.37, , (θ = 18°18’,Referring to the sine table,, sin θ = sin 18°18’ = 0.9291., , Example 4: In the circuit shown in Fig 8, calculate a) the, capacitive reactance and b) the capacitance of the, capacitor., Solution, VR = IR = 0.16 x 50 = 8V, 2, 2, 2, 2, VC = V − VR = 12 − 8 = 80 = 9V (App), , Example 3: An 8 μf capacitor is connected in series with, an ohmic resistance of 160 Ω. A voltage of 220V AC, 50, Hz is applied to the circuit (Fig 7), , XC =, , XC =, , C=, Calculate, a) the capacitive reactance, b) the impedance, c) the current, d) the active power, , V, , =, , I, , 9, 0.16, , = 56Ω, , 1, 2πfC, , 1, 2πfXC, , =, , 1, 314 × 56, , =, , 10, , 6, , 314 × 56, , = 57 μF, , Example 5: A voltage of 125V at 60Hz is applied across, a non-inductive resistance connected in series with a, condenser. The current in the circuit is 2.2A. The power, loss in the resistor is 96.8W and that in the condenser is, negligible. Calculate the resistance and capacitance., (Fig 9), , e) the reactive power., Solution, a) X =, C, , 1, 2πfC, , =, , 10, , 6, , 314 x 8, , = 400Ω, , Electrical : Electrician (NSQF LEVEL - 5) - Related Theory for Exercise 1.6.53, , Copyright Free under CC BY Licence, , 231
Page 246 :
= 400 = 20V, Example 7: In the circuit shown, Fig 12 calculate, a) the resistor voltage, b) the capacitor reactance voltage., , 2, , Solution : Power loss I R = 96.8W, , ∴R =, , 96.8, I, , 2, , =, , 96.8, 2.2, , Impedence Z =, , = 20Ω, , 2, , V, I, , Solution, , =, , 125, 2.2, , a) VR = V cos θ = 12 x 0.31 = 3.72V, , = 56.82Ω, , b) VC = V sin θ = 12 x 0.9595 x 11.4V, Vector diagram Fig 13, , Capacitance reactance X, , 2, , C, , = Z −R, , 2, , 2, , = 56.82 − 20, , 2, , = 53.2Ω, XC= 1 / (2πfC), 2πfC = 1 / XC, 2 x 3.14 x 60 x C = 1/53.2, C = 1 / (53.2 x 2 x 3.14 x 60), = 0.00005 F = 50 mF, Example 6: In the circuit shown (Fig 10), , ‘Time constant’: One time constant is that time in, seconds required for a completely discharged capacitor, to charge 63% of the source voltage (charging voltage)., τ=RxC, where τ = one time constant in seconds, R = resistance in ohms, C = capacitance in farad., As shown in the (Fig 14), if, , a) calculate the voltage V, b) draw the voltage triangle (Fig 11)., C= 5 μF, R = 3 M Ω, then, τ = 5 x 10-6 x 3 x 106 = 15 seconds, charging voltage, , = 100 V, , one time (τ) constant = 15 seconds. Ve= 63V, After 5 time constant a capacitor is 99.3% charged, for, practical purposes it is taken that the capacitor is fully, charged. A capacitor charges in 5 time constant., A charging curve is shown in Fig 15., , Solution, 2, , a) V = VR + V, , C, , 232, , 2, , = 12 2 + 16 2 = 144 + 256, , During discharging, a fully charged capacitor discharges, in five time constant. A discharging curve is shown in, Fig 16., , Electrical : Electrician (NSQF LEVEL - 5) - Related Theory for Exercise 1.6.53, , Copyright Free under CC BY Licence
Page 247 :
τ, (sec), , Time taken, (V), , At the time of, switching on, , Charging voltage, plates (V), , Voltage across the capacitor, , 100, , 0, , 1τ, , 15, , 63% of 100, , = 63, , 0 + 63, , = 63, , 2τ, , 30, , 63% of (100-63) = 23.3 say 23, , 63 + 23 = 86, , 3τ, , 45, , 63% of (100-86) = 8.82 say 9, , 86 + 9, , = 95, , 4τ, , 60, , 63% of (100-95) = 3.15 say 3, , 95 + 3, , = 98, , 5τ, , 75, , 63% of (100-98) = 1.26 say 1.3, , 98 + 1.13 = 99.3, , R L C series circuit, Objectives: At the end of this lesson you shall be able to, • calculate the resultant reactance and impedance of the RLC series circuit, • state the impedance, voltage and power triangle., • explain the necessary conditions for series resonance., Assume an AC single phase circuit consisting a resistance,, inductor and capacitor in series. Various parameters, could be calculated as shown in the example., Example : The value of the components shown in Fig 1, is R = 40 ohms L = 0.3 H and C = 50μf. The supply voltage, is 240 V 50 Hz. Calculate the inductive reactance,, capacitance reactance, net reactance, impedance,, current in the circuit, voltage drops across the R, L and C, power factor, active power, reactive power and apparent, power. Also draw the impedance triangle, voltage triangle, and power triangle., , Calculate the resultant reactance in RLC circuit :, Inductance and capacitance have directly opposite effects, in an AC circuit. The voltage drop caused by the inductive, reactance of the coil leads the line current by 90°. The, voltage drop across the inductor coil and the capacitor, are 180 degrees apart and oppose each other. To, calculate the net reactance in the above example:, Inductive reactance, X = 2πfL = 314 x 0.3 = 94.2Ω, Capacitive reactance, , X=, , 1, 2πfC, , =, , 1, 314 × 0.00005, , =, , 1, 0.0157, , = 63.69 Ω, , Net reactance - XL - XC = 94.2 - 63.69 = 30.51Ω, Calculate the impedance: From the circuit given above, the impedance can be found. The impedance is the, , Electrical : Electrician (NSQF LEVEL - 5) - Related Theory for Exercise 1.6.53, , Copyright Free under CC BY Licence, , 233
Page 248 :
resultant combination resistance and reactance. In this, circuit, the impedance is the combination of the 40 ohms, resistance and 30.51 Ω resultant reactance. The, impedance for this circuit is, 2, , 2, , 2, , 2, , Z = R + (XL − X C ) = 40 + 30.51, , = 1600 + 930.86 = 2530.86 = 50.30 Ω, Draw the impedance triangle: Draw the horizontal line, (X axis) indicating the circuit current., Draw along with current vector the value of R to a suitable, scale i.e. 1cm = y ohm., draw the vertical line perpendicular to the current vector, in +y axis indicating the value of inductive reactance to, the scale selected (1cm = y ohm), draw a vertical the perpendicular to the current vector in, _y axis indicating the value of capacitive reactance to the, scale selected (1cm = y ohm)., Substract the value of XC from, XL as shown in Fig 2 the, net reactance value is equal to 30.51 ohms. Complete, the vectors by closing the parallelogram the reactance of, the parallelogram is the impedance of the series RLC, circuit., , Mathematically what we determined the values of net, reactance and impedance could also be determined by, the above vectorial method., Measurement of current and voltage drop in RLC, circuit. The voltage drop across R =ER across L = EL and, drop across C = EC and the formula for finding their values, and given below., ER = IR, EL = IXL, EC = IXC, Current in given RLC series circuit: Current in this, series circuit is I = E/Z = 240/50.3 = 4.77 amps., , 234, , Identifying whether the current flow is leading or, lagging the voltage in a RLC series circuit: As this is, a series circuit, the current is the same in all parts of the, circuit, but the voltage drop across the resistor, the, inductor coil and capacitor are, ER = IR = 4.77 x 40 = 190.8 volts, EL = IXL = 4.77 x 94.2 Ω = 449.33 volts, EC = IXC = 4.77 x 63.69 = 303.80 volts., The vector sum of the voltage of 190.8 volts across the, resistor and 145.53 volts across the net reactance of, 30.51Ω is equal to the line voltage of 240 volts as shown, below., 2, , E = E R + (EL − E C ), , 2, , 2, , = 190.8 + (449.33 − 303.80), 2, , = 190.8 + 145.53, , 2, , 2, , E = 240 volts., The voltage vector diagram could be drawn as shown in, Fig 3., , In this type of series circuit, the current is used as a, horizontal reference line. The voltage value of 145.53, volts across the portion of the inductive reactance which, is not cancelled out by the voltage across the capacitive, reactance. The PF = ER/E = 190.8/240 = 0.795 lag or, PF = R/Z = 40/50.30 = 0.795 lag PF. In this circuit the, phase angle is 37.3° lagging. This means that current, lags the line voltage., In an RLC series circuit, if XL is greater then the voltage, appearing across the inductor is high and that can be, found out by IXL. In the same way if the XC value is, greater in an RLC series circuit, the voltage appearing, across the capacitor is more and can be found out by, IXC., In the example given above, the voltage drop across, resistance 40 Ω = 190.8 volts., , Electrical : Electrician (NSQF LEVEL - 5) - Related Theory for Exercise 1.6.53, , Copyright Free under CC BY Licence
Page 249 :
Voltage drop across inductance 0.3 H = 449.33 volts., Voltage drop across capacitor of 50 mf = 303.80 volts., From these values it is clear that the voltage drop across, the inductor and capacitor is higher than the supply, voltage. Hence while connecting the meter to measure, the voltage drop across inductor and capacitor it, should be noted that the range of this should be high (in, this case 0 - 500 volts), , PAPP = EI volt-amperes, = 240 x 4.77, = 1145 Volt-amperes., Draw the power triangle: Power triangle is shown in, Fig 4., , Calculate the power factor: Power factor of the RLC, series circuit can be found from the impedance triangle, or voltage triangle as shown below, Power factor = Cos θ =, , Power factor =, , R, Z, , =, , R, Z, , 40, 50.3, , or, , ER, V, , = 0.795, , E, 190.8, = R =, = 0.795, V, 240, Calculate the active power (RA): Active power can be, calculated by using any one of the formulae given below, , P = EI Cos θ = I2R, = EI Cos θ = 240 x 4.77 x 0.795, = 910 walts, = I2R = 4.772 x 40, = 910 watts., Calculate the reactive power Pq: Reactive power can, be calculated using the formula, Pq = EI sin θ Vars, = 240 x 6.77 x 0.6074, = 695 Vars, Cos θ = 0.795, , Resonance circuit: When the value of XL and XC are equal,, the voltage drop across them will be equal and hence they, cancel each other. The value of voltage drops VL and VC, may be much higher than the applied voltage., The impedance of the circuit will be equal to the, resistance value. Full value of applied voltage appears, across R and the current in the circuit is limited by the, value of resistance only. Such circuits are used in, electronic circuits like radio/TV turning circuits. When, XL = XC the circuit is said to be in resonance., As current will be maximum in series resonant circuits it, is also called acceptor circuits. For a known value of L, and C the frequency at which this occurs is called as, resonant frequency. This value can be calculated as, follows when XC = XL, , 2πfL =, , 1, 2πfC, , Hence resonant frequency f =, , 1, 2π LC, , Power factor angle is commonly denoted by Theta, θ. In some pages of this text it is denoted by Phi, φ. As such these terms are used alternatively in, this text., , θ = 37 3’, o, , Sin θ = Sin 37o3’, = 0.6074, Calculate the apparent power (PAPP): Apparent power, can be calculated using the formula, , Electrical : Electrician (NSQF LEVEL - 5) - Related Theory for Exercise 1.6.53, , Copyright Free under CC BY Licence, , 235
Page 250 :
Electrical, Electrician - AC Circuits, , Related Theory for Exercise 1.6.54, , Series resonance circuit, Objectives: At the end of this lesson you shall be able to, • explain the impedance of series resonance circuit, • state the condition for series resonance and its expression, • state the resonance frequency and its formula, • state about the ‘Q’ factor (selectivity) of RLC circuit from graph., Series resonance circuit, , 2, , Impedance of series resonance circuit, A simple series LC circuit shown in Fig 1. In this series LC, circuit,, , Z = R + (XL − X C ), , 2, , For the circuit in Fig 2(a), total impedance Z is,, 2, , 2, , – resistance R is the total resistance of the series, circuit(internal resistance) in ohms,, , Z = R + (X C − XL ), , – XL is the inductive reactance in ohms, and, , Z = 40 + 30, , – XC is the total capacitive reactance in ohms., , Z = 50Ω, Capacitive (because XC > XL ), , In the circuit at Fig 1a, since the capacitive reactance(90Ω), is larger than inductive reactance(60Ω), the net reactance, of the circuit will be capacitive. This is shown in Fig 1b., , 2, , 2, , Current I through the circuit is given by,, , I=, , V, Z, , =, , 100, 50Ω, , = 2 Amps, , Therefore, the voltage drop across the components will, be,, VR = voltage drop across R = I.R = 2x40 = 80 volts, VL = voltage drop across L = I.XL = 2x60 = 120 volts, VC = voltage drop across C = I.XC = 2x90 = 180 volts., Since VL and VC are of opposite polarity, the net reactive, voltage VX is = 180 - 120 = 60V as shown in Fig 2., , Note: If the capacitive reactance was smaller, than inductive reactance the net reactance of, the circuit would have been inductive., All though the unit of measure of reactance and resistance, is the same(ohms), the impedance, Z of the circuit is not, given by the simple addition of R, XL and XC. This is, because, XL is +90° out of phase with R and XC is -90° out, of phase with R., Hence the impedance Z of the circuit is the phasor, addition of the resistive and reactive components as, shown by dotted lines in Fig 1c. Therefore, Impedance Z, of the circuit is given by,, 2, , Z = R + (X C − XL ), , 2, , Note that the applied voltage is not equal to the sum of, voltage drops across reactive component X and resistive, component. This is again because the voltage drops are, not in phase. But the phasor sum of VR and VX will be, equal to the applied voltage as given below,, 2, , If XL were greater than XC, then the absolute value of, impedance Z is will be,, , VT = VR + VX, , 2, , 236, , Copyright Free under CC BY Licence
Page 251 :
2, , = VR + (VL − VC ), 2, , = 80 + 60, , 2, , – Circuit current, I is in-phase with the applied voltage V, (i.e. Phase angle = 0)., , 2, , = 100 volts(applied voltage)., , At this particular frequency fr called resonance frequency,, the series RLC is said to in a condition of series, resonance., , Phase angle θ of the circuit is given by,, θ = tan, , −1, , X C − XL, R, , Condition at which current through the RLC Series, circuit is maximum, From the formula,, 2, , Z = R + (X C − XL ), , 2, , it is clear that the total imped-, , ance Z of the circuit will become purely resistive when,, reactance XL = XC, In this condition, the impedance Z of the circuit will not, only be purely resistive but also minimum., Since the reactance of L and C are frequency dependent,, at some particular frequency say f r, the inductive, reactance XL becomes equal to the capacitive reactance, XC. In such a case, since the impedance of the circuit, will be purely resistive and minimum, current through, the circuit will be maximum and will be equal to the, applied voltage divided by the resistance R., Series resonance, From the above discussions it is found that in a series, RLC circuit,, , Resonance occurs at that frequency when,, XL = XC or 2πfL = 1/2πfC, Therefore, Resonance frequency, fr is given by,, fr =, , 1, 2π LC, , Hz, , ....[1], , Reactance of series RLC above and below resonance, frequency fr, Fig 4 shows the variation of net reactance of a RLC circuit, with the variation in frequency., , Impedance Z = R 2 + (XL − X C ) 2, Current I =, , V, Z, , and,, Phase angle θ = tan −1, , XL − X C, R, , If the frequency of the signal fed to such a series LC, circuit (Fig 1a) is increased from 0 Hz, as the frequency, is increased, the inductive reactance(XL = 2πfL) increases, linearly and the capacitive reactance (X C = 1/2πfL), decreases exponentially as shown in Fig 3., As shown in Fig 3, at a particular frequency called the, resonance frequency, fr, the sum of XL and XC becomes, zero( XL – XC = 0)., From Fig 3 above, at resonant frequency ,, – Net reactance, X = 0 (i.e, XL = XC), , From Fig 4 above,it can be seen that the,, – net reactance is zero at resonant frequency fr, – net reactance is capacitive below the resonant, frequency fr, _ net reactance is inductive above the resonant frequency fr., Selectivity or Q factor of a series RLC circuit, , Figs 5a and 5b two graphs showing the current through, series two different RLC circuits for frequencies above, and below fr. f1 and f2 are frequencies at which the circuit, – Current I through the circuit is maximum and equal to, current is 0.707 times the maximum current,Imax or the V/R, 3dB points., 237, Electrical : Electrician (NSQF LEVEL - 5) - Related Theory for Exercise 1.6.54, – Impedance of the circuit is minimum, purely resistive, and is equal to R, , Copyright Free under CC BY Licence
Page 252 :
Comparing Figs 5a and 5b, it is seen that the bandwidth, of 5b is smaller than that of 5a. This is referred to as the, selectivity or quality factor, Q of the resonance circuit., The RLC circuit having the response shown in Fig 5b is, more selective than that of Fig 5a. The quality factor, Q, of a resonance circuit is given by,, Quality factor = Q =, , fr, Δf, , =, , fr, f2 − f1, , ...[2], , If Q is very large, the bandwidth f will be very narrow and, vice-versa. The Q factor of the series resonance circuit, depends largely upon the Q factor of the coil(inductance), used in the RLC circuit., Therefore,, Q of coil, , =, , XL, R, , =, , 2πfr L, R, , since,, fr =, Q FACTOR OF RLC SERIES CIRCUIT, , Fig 5 indicates that series RLC circuits select a band of, frequencies around the resonant frequency, fr. This, band(f1 to f2 is called the band width f of the series RLC, circuit., Bandwidth = Δf = f2 – f1 Hz., where, f2 is called the upper cut off frequency and f1 is, called the lower cut off frequency of the resonant circuit., , 238, , 1, 2π LC, , Q of the series RLC circuit is given by,, Q=, , 1, R, , ., , L, C, , ...[3], , Application of series resonance circuits, A series resonance circuit can be used in any application, where it is required to select a desired frequency. One, such application is radio receiver., , Electrical : Electrician (NSQF LEVEL - 5) - Related Theory for Exercise 1.6.54, , Copyright Free under CC BY Licence
Page 253 :
Electrical, Electrician - AC Circuits, , Related Theory for Exercise 1.6.55, , R-L, R-C and R-L-C parallel circuits, Objectives: At the end of this lesson you shall be able to, • explain the admittance triangle and the relationship between conductance, susceptance and admittance, • explain susceptance, conductance and admittance by symbols., • A component in phase with the applied voltage called, R-L Parallel circuit, the conductance denoted by g., When a number of impedances are connected in parallel, • A component in quadrature (at right angle) with the, across an AC voltage, the total current taken by the circuit, is the phasor sum of the branch currents (Fig 1)., There are two methods for finding the total current., •, , Admittance method, , •, , Phasor method, , Admittance method, The current in any branch I =, , applied voltage called susceptance, denoted by b., , E, Z, , =E x, , g = Y Cos φ =, 1, Z, , where, , I= E x, , Z, , = EY, , or, , Y=, , ∴ Total admittance (YT ) =, , =, , Z, , ×, , R, Z, , 1, Z, , is called the admittance of the circuit i.e. admittance is, the reciprocal of impedance. Admittance is denoted by, ‘Y’ (Fig 2)., 1, , 1, , R, R, = 2 = 2, 2, Z, R +Z, b = Y sin φ =, , I, E, , =, total current, , common applied voltage, , phasor sum of branch currents, common applied voltage, , = phase sum of separate admittance, Note: Supply voltage is referred as V or E, interchangeably., , An admittance may be resolved into two components., , 1, Z, , ×, , X, , X, = 2, Z Z, , X, 2, , R +X, , 2, , The unit of admittance, conductance and susceptance, is called the mho symbol Ʊ ., Relationship between branch current and supply, voltage, In a R-L parallel circuit, the voltage across resistor (ER), and inductor (EL) are the same and equal to the supply, voltage E. Hence E is the reference vector. The current, through resistor (IR) in phase with ER is E. (Fig 3) The, current through inductor (IL) is lagging the EL is E by, 90o. In short the current through resistor IR is in phase, and the current through inductor IL, lags with applied, voltage (E) by 90° . The power factor of R-L parallel circuit is cos φ where φ is the angle in between the total, current and applied voltage., , Representation of two branch currents and total, current in the circuit containing R, R coil, XL coil, and supply voltage, 239, , Copyright Free under CC BY Licence
Page 254 :
IR = branch current through resistor, , IT = total current lagging E by an angle φ., , IC = branch effective current through coil, In a parallel circuit, the voltage across R (ER) and across, coil (EC) is the same. Due to the applied voltage across, coil (EC) the coil current (IC) flows through the coil. The, current flowing through the coil is the effective current., The same current flows through the resistance and inductance of the coil (Fig 4)., The power factor of the above circuit is cos φ where φ is, the phase angle between the applied voltage and total, current (Fig 6)., Assignment, 1 A coil of resistance 15 ohms and inductance 0.05H is, connected in parallel with a non-inductive resistance, of 20 ohms. Find (a) the current in each branch and, (b) the phase angle between the total current of the, whole arrangement and the applied voltage of 200 V, at 50 Hz., 2 The load on a 250 V supply system is IC, ECR, , = current flow through the resistance and induct, ance of the coil, =, , ECL =, , voltage drop in the coil due to resistance and, in phase with IC, voltage drop in the coil due to inductance and, leads the current by 90° (Fig 5)., , a) 12 A at 0.8 power factor lagging, b) 5 A at unity power factor., Find the total load in kVA and its power factor., 3 The load on a 250 V supply system is a) 10 A at 0.5 power factor lagging, b) 5 A at unity power factor, c) 12 A at 0.866 power factor lagging., Draw the vector diagram. Find the total load in kVA, and its power factor., , IR = current through resistor in phase with E, IC = current through coil lagging with E by α, , 4 A coil of resistance 15 ohms and inductance 0.05 H is, connected in parallel with a non-inductive resistor of, 40 ohms. Find the total current when a voltage of 200, V at 50 Hz. is applied. Give the phasor diagram., , AC Parallel circuit (R and C), Objectives: At the end of this lesson you shall be able to, • state the relationship between branch current, voltage in a parallel circuit, • solve problems in RC parallel circuit by admittance method, • compare the charecteristics of A.C series and parallel circuits, • state the R-L-C parallel circuit vector diagram, Parallel RC circuits: In a parallel RC circuit, one or more, resistive loads and one or more capacitive loads are connected in parallel across a voltage source. Therefore,, resistive branches, containing only resistance and, capacitive branches, containing only capacitance. (Fig, 1) The current that leaves the voltage source divides, among the branches; so there are different currents in, different branches. The current is, therefore, not a common quantity, as it is in the series RC circuits., Voltage: In a parallel RC circuit, as in any other parallel, circuit, the applied voltage is directly across each branch., The branch voltages are, therefore, equal to each other,, as well as to the applied voltage, and all three are in, 240, , Electrical : Electrician (NSQF LEVEL - 5) - Related Theory for Exercise 1.6.55, , Copyright Free under CC BY Licence
Page 255 :
phase. (Fig 2) So if you know any one of the circuit, voltages, you know all of them., , The current in the resistive branch is calculated from the, equation: IR = EAPP/R., , Since the voltage is common throughout the circuit, it, serves as the common quantity in any vector representation of the parallel RC circuits. This means that on any, vector diagram, the reference vector will have the same, direction, or phase relationship, as the circuit voltage., , The current in the capacitive branch is found with the, equation: IC = EAPP/XC ., , The two quantities that have this relationship with the, circuit voltage, and whose vectors, therefore, have a, direction of zero degrees, are the capacitor voltage and, the current through the resistance., , The current in the resistive branch is in phase with the, branch voltage, while the current in the capacitive branch, leads the branch voltage by 90 degrees. Since the two, branch voltages are the same, the current in the capacitive branch (IC) must lead the current in the resistive, branch (IR) by 90 degrees. (Fig 4), , Line current: Since the branch currents in a parallel RC, circuit are out of phase with each other, they have to be, added vectorially to find the line current (Fig 5)., The two branch currents are 90 degrees out of phase,, so their vectors form a right triangle, whose hypotenuse, is the line current. The equation for calculating the line, current, I, , is, LINE, , 2, , Branch current: The current in each branch of a parallel, RC circuit is independent of the current in the other, branches. The current within a branch depends only on, the voltage across the branch, and the resistance or, capacitive reactance contained in it. (Fig 3), , ILINE = IR + IC, , 2, , If the impedance of the circuit and the applied voltage are, known, the line current can also be calculated from, Ohm’s Law., , ILINE =, , E, Z, , Electrical : Electrician (NSQF LEVEL - 5) - Related Theory for Exercise 1.6.55, , Copyright Free under CC BY Licence, , 241
Page 256 :
In as much as the current in the resistive branch of a parallel, RC circuit is in phase with the applied voltage, while the, current in the capacitive branch leads the applied voltage, by 90 degrees, the sum of the two branch currents, or line, current, leads the applied voltage by some phase angle, less than 90 degrees but greater than 0 degrees., The exact angle depends on whether the capacitive current, or resistive current is greater. If there is more capacitive, current, the angle will be closer to 90 degrees; while if the, resistive current is greater, the angle is closer to 0 degrees., In cases where one of the currents is 10 or more times, greater than the other, the line current can be considered, to have a phase angle of 0 degrees if the resistive current, is the larger (Fig 6). The value of the phase angle can be, calculated from the values of the two branch currents with, the equation:, Impedance: The impedance of a parallel RC circuit represents the total opposition to the current flow offered by, the resistance of the resistive branch and the capacitive, reactance of the capacitive branch. Like the impedance, of a parallel RL circuit, it can be calculated with an equation that is similar to the one used for finding the total, resistance of two parallel resistances., However, just as you learned for parallel RL circuits, two, vector quantities cannot be added directly, vector addition, must be used. Therfore, the equation for calculating the, impedance of a parallel RC circuit is, , I, tan θ = C, IR, , Z=, , By substituting the quantitites IC = E/XC and IR = E/R in, the above equation, two other useful equations for, calcualting the phase angle, θ, can be derived, they are:, , tan θ =, , R, , Cos θ =, , EC, , P, , APP, , =E, TRUE, , .I, , APP, , where, , 2, , 2, , R + XC, , is the vector addition of the resist-, , Z, , In cases where you know the applied voltage and the, circuit line current, the impedance can be found simply by, using Ohm’s law in the form:, , E, Z = APP, ILINE, , LINE, , LINE, , .Cos θ, , where cos θ is the power factor., Current wave-forms: Since the branch currents in a, parallel RC circuit are out of phase, their vector sum, rather than their arithmetic sum equals the line current., This is the same condition that exists for the voltage, drops in a series RC circuit. By adding the currents, vectorially, you are adding their instantaneous values at, every point, and then finding the average or effective, value of the resulting current. This can be seen from the, current wave-forms shown (Fig 7). They are the waveforms for the circuit solved on the previous page., 242, , 2, , ance and capacitive reactance., , .I, , =E, , APPARENT, , 2, , R + XC, , R, , Once you know the line current and the applied voltage in, a parallel RC circuit, you can find the circuit power using, the same equations you learned for parallel RL circuits., These are:, P, , RXC, , The impedance of a parallel RC circuit is always less than, the resistance or capacitive reactance of the individual, branches., The relative values of XC and R determine how capacitive, or resistive the circuit line current is. The one that is the, smallest, and therefore, allows more branch current to, flow, is the determining factor., Thus, if XC is smaller than R, the current in the capacitive, branch is larger than the current in the resistive branch,, and the line current tends to be more capacitive., The opposite is true if R is smaller than XC. When XC or, R is 10 or more times greater than the other, the circuit will, operate for all practical purposes as if the branch with the, larger of the two did not exist., , Electrical : Electrician (NSQF LEVEL - 5) - Related Theory for Exercise 1.6.55, , Copyright Free under CC BY Licence
Page 257 :
RC Parallel circuit - Admittance method, Admittance: In order to derive the admittance of a parallel, circuit consisting of a resistance R and a capacitive, reactance XC we use the phasor diagram representation, of the currents, IA, IC and I (Fig 1), and the corresponding, admittance triangle (Fig 2)., , Y=, , V, I, , conductance G = Y cos φ, , susceptance BC = Y sin φ, , R=, , 1, G, , and X C =, , 1, BC, , ., , Parallel connection of R and XC (Fig 3), Graphic solution:, 1 V as common vector, 2 IR in phase with V, 3 IC leads by 90o, , Admittance Y = G2 + B, C, , 2, , Total current I = VY, 4 I as resultant (Fig 4), 5 f between V and I., , The current triangle gives, Active current, , IA = I cos θ, , Reactive current IC = I sin θ, Total current I � I2A � IC2, From both triangles, the phase relationship is given by, , 2, ⎛ 1 ⎞ ⎛⎜ 1 ⎞⎟, = ⎜ ⎟ +, Z, ⎝ R ⎠ ⎜⎝ XC ⎟⎠, , 2, , 1, , Y � G2 � B C2 (Re fer Fig 4), , I, B, R, tan φ = C = C =, XC, I, G, A, , We can derive the values of R and XC if we know the voltage V, the current I and the phase angle φ., , Electrical : Electrician (NSQF LEVEL - 5) - Related Theory for Exercise 1.6.55, , Copyright Free under CC BY Licence, , 243
Page 258 :
Comparison of series and parallel RC circuits, Quantity, Current, , Series RC circuit, It is the same everywhere in circuit., Currents through R and C are, therefore,, , Parallel RC circuit, It divides between resistive and capacitive, branches., 2, , in phase., , ITOT = IR + IC, IR =, , 2, , E APP, , IC =, , R, , E APP, XC, , Current through C leads current through R by 0°, Voltage, , Vector sum of voltage drops across R, and C equals applied voltage (Fig 5)., 2, , E APP = ER + E C, , 2, , Voltage across C lags voltage across, R by 90°., Impedance, , It is the vector sum of resistance and, capacitive reactance., used., , Z=, Phase angle θ, , 2, , R + XC, , 2, , It is the angle between the circuit current, and the applied voltage., , X, E, tan θ = C = C, R, ER, Cos θ =, , R, Z, , Voltage across each branch is the same as, applied voltage. Voltages across R and C are,, therefore, in phase., ER = EC = EAPP, It is calculated the same way as parallel, resistances are, except that vector addition is, , Z=, , RXC, 2, , R + XC, , 2, , It is the angle between line current and applied, voltage., , tan θ =, , Cos θ =, , IC, IR, , =, , R, XC, , R, Z, , Power, , Power delivered by source is apparent power. Power actually consumed in the circuit is true, power. Power factor determines what portion of apparent power is true power., PAPP = EAPPI, PTRUE = EAPPI Cos θ, P.F. = Cos θ, , Effect of, increasing, frequency, , Xc decreases, which in turn causes the, circuit current to increase. Phase angle, decreases,which means that the circuit, is more resistive., , Xc drecreases, the capacitive branch current, increases, and so line current also increases., phase angle increases, which means that, the circuit is more capacitive., , Effect of, increasing, resistance, , Phase angle decreases, which means, that the circuit is more resistive, , Phase angle increases, which means that the, circuit is more capactive, , Effect of, increasing, capacitance, , Phase angle decreases, which means, that the circuit is more resistive, , Phase angle increases, which means that the, circuit is more capactive, , 244, , Electrical : Electrician (NSQF LEVEL - 5) - Related Theory for Exercise 1.6.55, , Copyright Free under CC BY Licence
Page 259 :
R, L and C Parallel circuit - Vector diagram, Parallel connection of R, XL and XC: XL and XC oppose, each other, that is to say, IL and IC are in opposition, and, partly oppose one another (Fig 1)., , Example: Calculate the value of IT Z power factor and, power for the circuit in Fig 3., , IX = IC - IL or IL - IC, depending on whether the capacitive or, inductive current dominates., Graphic solution: when IL > IC, , Given, VT = 10V, R = 1000 Ω, XL = 1570 Ω, XC = 637 Ω, , 1 V as common value, , Known: Ohm’s Law, , 2 IR in phase with V, , 2, , I = (IC − IL ) + IR, T, , 3 IC leads by 90°, 4 IL lags by 90°, , 2, , Solution, , 5 IX = IL - IC, , 10 V, , IC =, , 6 I as resultant, , 637 Ω, , φ in this case inductive, I lags (Fig 2), , = 0.0157 A = 15.7 mA, , 10 V, , IL =, , 1570 Ω, , IR =, , 10 V, 1000 Ω, , = 0.0064 A = 6.4 mA, , = 0.01 = 10 mA, 2, , IT = (0.0157 − 0.0064) + (0.01), , 2, , = 0.0137A = 13.7 mA, , Z =, , P.F =, Particular case: XL and XC are equally large - IL and IC, cancel each other. Z = R; parallel resonance occurs., , =, , Currents in the reactances may be greater than the total, current., The calculation of the resonant frequency is the same as, for the series connection., , =, , 10V, 0.0137 A, Z, , Y=, , R, 730, , 1000, g, Y, , =, , = 730 Ω, , 1, Z, , and g =, , 1, R, , = 0.73, , 1, R, , x, , 1, 1, , Z, , =, , Z, R, , Electrical : Electrician (NSQF LEVEL - 5) - Related Theory for Exercise 1.6.55, , Copyright Free under CC BY Licence, , 245
Page 260 :
Electrical, Electrician - AC Circuits, , Related Theory for Exercise 1.6.56, , Parallel resonance circuits, Objectives: At the end of this lesson you shall be able to, • state the characteristics of R-L-C parallel circuits at resonance, • explain the term band-width in parallel LC circuits, • explain the storage action in parallel LC circuits, • list a few applications of parallel LC circuits, • compare the properties of series and parallel resonance circuits, Parallel resonance, XL = XC,, The circuit at Fig 1, having an inductor and a capacitor, Zp = ∞, connected in parallel is called parallel LC circuit or, = IC, IL, parallel resonance circuit. The resistor R, shown in, dotted lines indicate the internal DC resistance of the coil, 1, L. The value of R will be so small compared to the, fr =, inductive reactance, that it can be neglected., 2π LC, From Fig 1a, it can be seen that the voltage across L and, C is same and is equal to the input voltage VS ., , I=, , V, ZP, , ≈0, , In a parallel resonance circuit, with a pure L(no resistance), and a pure C(loss-less), at resonance the impedance will, be infinite. In practical circuits, however small, the inductor, will have some resistance. Because of this, at resonance,, the phasor sum of the branch currents will not be zero but, will have a small value I., This small current I will be in phase with the applied, voltage and the impedance of the circuit will be very high, although not infinite., L-C PARALLEL CIRCUIT, , By Kirchhoff’s law, at junction A,, I = IL + I C ., The current through the inductance IL (neglecting, resistance R), lags VS by 90°. The current through the, capacitor IC, leads the voltage VS by 90°. Thus, as can be, seen from the phasor diagram at Fig 1b, the two currents, are out of phase with each other. Depending on their, magnitudes, they cancel each other either completely or, partially., , Summarizing, the three main characteristics of parallel, resonance circuit at resonance are,, – phase difference between the circuit current and the, applied voltage is zero, – maximum impedance, – minimum line current., The variation of impedance of a parallel resonance circuit, with frequency is shown in Fig 2., , If XC < XL, then IC > IL, and the circuit acts capacitively., If XL < XC, then IL > IC, and the circuit acts inductively., If XL = XC, then IL = IC, and hence, the circuit acts as a, purely resistive., Zero current in the circuit means that the impedance of, the parallel LC is infinite. This condition at which, for a, particular frequency, fr, the value of XC = XL, the parallel, LC circuit is said to be in parallel resonance., Summarizing, for a parallel resonant circuit, at resonance,, , 246, , Copyright Free under CC BY Licence
Page 261 :
In Fig 2, when the input signal frequency to the parallel, resonance circuit is moved away from resonant frequency, fr , the impedance of the circuit decreases. At resonance, the impedance Zp is given by,, , ZP =, , L, , Since the bandwidth depends on Zp and Zp depends on, R, we can say that the bandwidth of a resonant circuit, depends upon the resistance associated with the coil., The resistance of the coil in turn decides the Q of the, circuit. Thus, the Q of the coil decides the band width of, the resonant circuit and is expressed as,, , CR, , At resonance, although the circuit current is minimum,, the magnitudes of IL & IC will be much greater than the line, current. Hence, a parallel resonance circuit is also called, current magnification circuit., For further details on current magnification in parallel, resonance refer reference books at the end of this book., Bandwidth of parallel resonant circuits, As discussed in series resonance, all resonant circuits, have the property of discriminating between the frequency, at resonance(fr), and those not at resonance. This, discriminating property of the resonant circuit is expressed, in terms of its bandwidth(BW)., In the case of series resonant circuits the response of the, circuit at resonance frequency(fr) is in terms of the line, current(which is maximum), and in a parallel resonant, circuit, it is in terms of the impedance(which is maximum)., The bandwidth of a parallel resonant circuit is also, defined by the two points on either side of the resonant, frequency at which the value of impedance Zp drops to, 0.707 or 1/ 2 of its maximum value at resonance, as, shown Fig 3., , Bandwidth(BW) = (f2 – f1) =, , fr, Q, , Storage action of parallel resonance circuit, At parallel resonance, though the circuit current is, minimum(ideally zero), IL and IC will still be there. This IL, and IC will be a circulating current in the closed loop, formed by L and C., This circulating current will be very high at resonance., This circulating current flip-flops between the capacitor, and inductor, alternately charging and discharging each., When a capacitor or an inductor is charged, it stores, energy. When it is discharged it gives up the energy, stored in it. The current inside the LC circuit switches the, stored energy back and forth between L and C. If the, inductor had no resistance and if the capacitor was lossfree, then, no more external energy would be required to, retain this flip-flop or oscillation of charging and, discharging., But, in a practical circuit, since ideal L and C cannot be, obtained, some amount of the circulating energy is lost, due to the resistance of the coil and the loss due to, capacitor. This lost energy is the only energy the power, supply source(VS) must supply in the form of circuit, current,I., This current, therefore, is called as make-up current. It, is this storage action of the parallel-resonant circuit which, gives rise to the term tank circuit, often used with parallel, resonant circuits. Hence, parallel resonant circuits are, also called tank circuits., Application of parallel resonant circuits, Parallel resonance circuits or tank circuits are commonly, used in almost all high frequency circuits. Tank circuits, are used as collector load in class-C amplifiers instead of, a resistor load as shown in Fig 4., , From Fig 3, the bandwidth of the parallel resonance, circuit is,, Bandwidth, BW = Δf = f2 – f1, As can be seen in Fig 3, the value of Zp is dependent on, the resistance R of the coil (Zp = L/CR). If R is less Zp will, be larger and vice versa., TANK CIRCUIT, , Electrical : Electrician (NSQF LEVEL - 5) - Related Theory for Exercise 1.6.56, , Copyright Free under CC BY Licence, , 247
Page 262 :
Table below gives a comparison between series resonant and parallel resonant circuit at frequencies above and below, their resonant frequency fr., Series circuit, , Parallel circuit, , Property, At resonant frequency, , 1, , =, , Reactance, , XL = XC, , XL = XC, , Impedance, , Minimum (Zr = R), , Maximum (Zr = L/CR), , Current, , Maximum, , Minimum, , X, Quality factor, , Bandwidth, , =, , 1, , Resonant frequency, fr, , 2π LC, , X, , L, , 2π LC, , L, , R, , R, , X, , X, , L, , R, , L, , R, Above resonant frequency, , Reactance, , XL > XC, , XC > XL, , Impedance, , Increases, , Decreases, , Phase difference, , The current lags behind, the applied voltage., , The current leads the applied, voltage., , Type of reactance, , Inductive, , Capacitive, Below resonant frequency, , 248, , Reactance, , XC > XL, , XL > XC, , Impedance, , Increases, , Decreases, , Phase difference, , The current leads the, applied voltage., , The current lags behind the, applied voltage., , Type of reactance, , Capacitive, , Inductive, , Electrical : Electrician (NSQF LEVEL - 5) - Related Theory for Exercise 1.6.56, , Copyright Free under CC BY Licence
Page 263 :
Electrical, Electrician - AC Circuits, , Related Theory for Exercise 1.6.57, , Power, energy and power factor in AC single phase system - Problems, Objectives: At the end of this lesson you shall be able to, • state the relationship between power and power factor in single phase circuits, • state the connection diagram for measuring power factor using a direct reading meter., • calculate the problem related to P.F and power in A.C circuits, The power in a DC circuit can be calculated by using the, formulae., —, , P = E x I watts, , —, , P = E2/R watts., , The relationship among the three types of power can be, obtained by referring to the power triangle. (Fig 1), , The use of the above formulae in AC circuits will give true, power only if the circuit contains pure resistance. Note, that the effect of reactance is present in AC circuits., Power in AC circuit: There are three types of power in, AC circuits., —, , Active power (True power), , —, , Reactive power, , —, , Apparent power, , Therefore, Pa2 = P2+ Pr2 volt-amperes (VA), , Active power (True power): The calculation of active, power in an AC circuit differs from that in a direct current, circuit. The active power to be measured is the product of, V x I x Cos θ where Cos θ is the power factor (cosine of, the phase angle between current and voltage). This, indicates that with a load which is not purely resistive and, where the current and voltage are not in phase, only that, part of the current which is in phase with the voltage will, produce power. This can be measured with a wattmeter., Reactive power (Pr): With the reactive power (wattless, power), , where `Pa' is the apparent power in volt-ampere (VA), `P' is the true power in watts (W), Pq is the reactive power in volt-amperes, reactive. (VAR), Power factor:The ratio of the true power delivered to an, AC circuit compared to the apparent power that the, source must supply is called the power factor of the load., If we examine any power triangle (Fig 2), you may see the, ratio of the true power to the apparent power is the cosine, of the angle θ., , Pr = V x I x Sin θ, only that part of the current which is 90° out of phase (90°, phase shift) with the voltage is used in this case. Capacitors and inductors, on the other hand, alternatively store, energy and return it to the source. Such transferred, power is called reactive power measured in volt/ampere, reactive or vars. Unlike true power, reacitve power can do, no useful work., Apparent power: The apparent power, Pa = V x I., The measurement can be made in the same way as for, direct current with a voltmeter and ammeter., , Power factor =, , P, Pa, , = Cos θ, , From the equation, you can observe that the three, powers are related and can be represented in a rightangled power triangle, from which the power factor can, be obtained as the ratio of true power to apparent power., For inductive loads, the power factor is called lagging to, distinguish it from the leading power factor in a capacitive, load. (Fig 2), , It is simply the product of the total applied voltage and the, total circuit current and its unit is volt-ampere (VA)., The power triangle: A power triangle identifies three, different types of power in AC circuits., —, , True power in watts (P), , —, , Reactive power in vars (Pr), , —, , Apparent power VA (Pa), 249, , Copyright Free under CC BY Licence
Page 264 :
A circuit's power factor determines how much current is, necessary from the source to deliver a given true power., A circuit with a low power factor requires a higher current, than a unity power factor circuit., , Single phase energy can be measured by energy meter., It contains 4 terminals (Incoming 2 and outgoing 2, common neutral), The connection is shown in Fig 3., , Single phase energy, The product of true power and time is known as energy., (ie) Energy = T.Power x time, = Voltage x current x power factor x time, = VI Cos θ x t (time is in hour), The unit of energy is watt hour and commercial unit is, represented in 'KWH' (or) unit. (Board of trade unit., B.O.T), The energy depends upon the following factors:, -, , Voltage, , -, , Current, , -, , Power factor (load), , -, , Time, , SINGLE PHASE ENERGY METER CONNECTION, , Power in AC circuit having R L and C in series, As we have already studied, the power triangle has three, components as shown in Fig 1., , The impedance =, , 2, , R + (XL − X C ), , 2, , 1, 2, , = 100 + (62.83 − 26.53), 2, , = 100 + (36.3), , The current =, The above formula could be used in any AC single phase, circuit. But the value of capacitive reactance and the, inductive reactance decides whether the circuit is capacitive or inductive. When the value of the capacitive reactance is more than the value of inductive reactance, the, PF will be leading or vice versa., , Voltage, Impedence, , The power factor =, , R, Z, , =, , =, , 100, 106.4, , 2, , 2, , = 106.4ohms, , 200, 106.4, , = 1.88A, , = 0.94 (lagging), , As the value of XL is greater than that of Xc the circuit is, having a lagging PF., , A series AC circuit consisting of 100 ohms, an inductance, of 0.2 H and a capacitance of 120 μF are connected, across 200 V 50c/s. Calculate the impedance, current,, power factor and power absorbed., , The power absorbed = V I cos θ, , The capacitive reactance = 1/ 2πfc ohms., , Calculate the current and its power factor when a resistance of 10 ohms, an inductance of 0.1 H and a, condenser of 100μF capacitance are connected in series, across 220 V 50 c/s supply mains., , XC =, , 1× 10, , 6, , 2 × π × 50 × 120, , = 26.53 ohms, , = 200 x 1.88 x 0.94 = 353.4 W., Example 1, , Solution, , The inductive reactance, , R = 10 ohms, , XL = 2πfL., , L = 0.1 H, , XL = 2 x π x 50 x 0.2 = 62.83 ohms., , C = 100 μF, , Therefore, XL– XC = 62.83 – 26.53 = 36.30 ohms., , XC = 1/ 2πfC, , 250, , Electrical : Electrician (NSQF LEVEL - 5) - Related Theory for Exercise 1.6.57, , Copyright Free under CC BY Licence
Page 265 :
XC =, , 10, , 6, , c Current in given RLC series circuit, , 2 × 3.14 × 50 × 100, , Current in this series circuit is I = E/ Z = 240/50.3= 4.77, amps., , = 31.85 ohms., , d Voltage drop across R, L and C. (Fig 3), XL = 2πFL, 3, , = 2 x 3.14 x 50 x 0.1, = 31.4 ohms., X = XC – XL = 31.85 – 31.4, = 0.45 ohms., 2, , Z = 10 + (0.45), , 2, , = 10 ohms (approx.), , I = 220/ 10 = 22 A, PF = cos θ = R/Z = 10/10 = 1.Unity PF approx., Example 2, In the circuit given in Fig 2., , ER = IR = 4.77 X 40 = 190.8 volts, , 2, , EL = IXL = 4.77 X 94.2 ohms = 449.33 volts, EC = IXC = 4.77 X 63.69 = 303.80 volts., The vector sum of the voltage of 190.8 volts across the, resistor and the difference between the drops across, inductor and the capacitor (EL – EC) 145.53 volts is equal, to the line voltage of 240 volts where, , Calculate:-, , 2, , a the resulting reactance, , 2, , 2, , Therefore E = 240 volts., , b the impedance, , e Vector diagram is shown in Fig 4., , c the current, , f, , d voltage drop across R,L&C, e draw the vector diagram, f, , 2, , E = ER + (EL − E C ) = 190.8 + (449.33 − 303.80), , The calculated voltage and the applied voltages are, equal i.e say 240V, , g The power factor Cos θ = ER/ E = 190.8/240 = 0.798., , Compare the calculated supply voltage with the applied supply voltage, , h The power factor angle is 37o3’.(Refer to Natural, cosine table.), , g power factor, 4, , h power factor angle., Solution, a Inductive reactance, XL = 2πfL = 2 x 3.14 x 50 x 0.3 = 94.2 ohms, XC = 1/2πfC, , XC =, , 1, 2π × 50 × 50 × 10, , −6, , =, , 10, , 6, , 15714, , = 63.69 ohms, , Net reactance = XL – XC = 94.2 – 63.69 = 30.51 ohms., The impedance for this circuit is Z, b, , 2, , 2, , Z = R + (XL − X C ) = 40 2 + (30.51) 2, , = 1600 + 930.86 = 2530.86 = 50.30 ohms, Electrical : Electrician (NSQF LEVEL - 5) - Related Theory for Exercise 1.6.57, , Copyright Free under CC BY Licence, , 251
Page 266 :
Application, These AC circuits having R, L and C in series are used in, electronic tuning circuits in radio or TV to select the, desired station/channel. A variable condenser called, gang condenser is used to change the value of XC equal, to XL at a desired station/channel frequency allowing only, resistance in the circuit which, in turn, allows maximum, current to flow in the circuit., 2, , R + (XL − X C ), , Z=, , iv Draw the current in the pure capacitive branch circuit, at 90o leading the reference vector (Y axis) to the, same scale as in Ι., v Use vector subtraction and addition methods to obtain the total current., Example 1, Parallel circuit with pure resistance, Let us consider an AC parallel circuit having three, branches of pure resistance as shown in Fig 1., , 2, , when XL = XC, Z=R, Current I = V/ R which is maximum., At this condition the circuit is said to be resonant., The frequency at resonance, 1, , f =, , 2π LC, , R, , as X = X, L, , C, , Determine the following for the circuit shown in Fig 1., , 2πf L = 1/2π/RC, R, , i, , Hence, , The current taken by each branch (I1, I2 & I3)., , ii Vector diagram of branch currents and voltage., f =, R, , 1, , iii The line current IT., , 2π LC, , iv The combined resistance., , AC Parallel circuit problem, , v The power factor angle and the power factor., , In practice all industrial and domestic electrical circuits, are connected in parallel as we follow the constant, voltage system. In a parallel circuit, the voltage across, any branch circuit is the same as the supply voltage., However, the arithmetical sum of the branch currents, does not necessarily equal the total current. This is true, because the branch current values may be out-of-phase, due to the fact that the loads connected may be resistive,, inductive, (V lead I) or capacitive (I lead V)., , vi The total power taken by the parallel circuit., , Therefore, the total current must be obtained by adding, or subtracting vectors of the branch currents either mathematically (admittance method) or graphically (vector, method)., Vector method of solving AC parallel circuit, While drawing vectors for the AC parallel circuit, the, following rules need to be followed., i, , Draw the line voltage as the horizontal reference line, as this voltage is the same across all branch circuits, (X axis)., , solution, i, , The branch current I1 =, , =, , 240, 60, , R1, , = 4 amps, , Pure resistive, hence, in phase with the voltage., The branch current I2 =, , =, , 240, 30, , V, R2, , = 8 amps, , Pure resistive, hence, in phase with the voltage., , ii Draw the current in the pure resistive branch circuit in, phase with the reference vector (X axis) to a scale., , The branch current I3 =, , iii Draw the current in the pure inductive branch circuit at, 90o lagging the reference vector (Y axis) to the same, scale as in Ι ., , =, , 252, , V, , 240, 20, , V, R3, , = 12 amps, , Electrical : Electrician (NSQF LEVEL - 5) - Related Theory for Exercise 1.6.57, , Copyright Free under CC BY Licence
Page 267 :
Pure resistive, hence, in phase with the voltage., , i, , The branch currents., , ii Now draw the vector diagram following the rules, mentioned above., , ii, , Draw the vector diagram., , iii, , The total current., , Decide a scale 1cm = 2 amps. (Fig 2), iii Total current IT is the sum of the branch currents I1, I2, and I3 as they are in phase with each other., IT, , = I1 + I2 + I3, = 4 + 8 + 12 = 24 amps., , iv The power factor angle and the power factor., v, , The combined impedance., , vi The power in the circuit., SOLUTION, i, , V, , The branch current I1=, , R, , 1, , =, iv As all branches have pure resistance load, the total, resistance RT is equal to the total impedance Z., The total resistance RT = Z =, , =, , 240, , V, I, , v The power factor angle between the applied voltage, and the current is found to be zero as per the vector, diagram., , = 4 amps, , To calculate the branch current I2 first find out the inductive reactance XL., XL = 2πFL = 2 x, , = 10 ohms., , 60, , Pure resistive, hence, in phase with the voltage., , T, , 24, , 240, , 22, , x 50 x 0.0955, , 7, , = 30 ohms., So the branch current IL=, , V, X, , L, , =, , 240, , = 8 amps., , 30, , Power factor angle = 0, Power factor, , = cos ø, = cos 0 = 1 unity., , vi Total power taken by the circuit, IT2 RT = VIT cos ø = 242 x 10, = 240 x 24 = 5760 watts., (Total current IT is in phase with the voltage.), , Pure inductive, hence, lags the applied voltage, by 90o., ii Draw the vector diagram by following the rules: Scale, 1 cm = 2 amps. (Fig 4), Complete the parallelogram to find the total current, IT., Measure the angle ø and the length of 0IT., , Example 2, Parallel circuit with R and XL in branches, Now consider a parallel circuit having one branch consisting of a pure resistance and the other branch having, pure inductance., Determine the following for the circuit shown in Fig 3., , Electrical : Electrician (NSQF LEVEL - 5) - Related Theory for Exercise 1.6.57, , Copyright Free under CC BY Licence, , 253
Page 268 :
iii, , Measured angle is 63º 26’, Power factor, , The branch current I3 =, , = Cos 63º 26’, , = 0.447 lagging., , R, , =, , 240, 120, , = 2 amps, , ii Draw the vector diagram to scale., , iv Length of 0IT = 4.47 cm., , Complete the parallelogram to find the total current, IT. (Fig 6), , Hence, IT = 4.47 x 2 = 8.94 amps., The combined impedance of the circuit = Z., v, , V, , iii Measured length OIT = 8.5cm., , Power taken by the circuit, P = VI cos ø = I12R, = 240 x 8.94 x 0.447 = 42 x 60, = 959 watts approx. 960 watts., , Example 3, Parallel circuit with R and XC, Now consider a parallel circuit having pure resistance in, two branches and a pure capacitance in the third branch., Total current IT., , Find the following for the circuit shown in Fig 5., i, , The branch currents., , ii, , Vector diagram of the branch currents., , = 8.5 x 1 = 8.5 amps., , iv Measure the angle between the total current and the, voltage., Measured angle θ = 45º leading., v Power factor cos ø = cos 45º = 0.707., vi Power taken by the circuit., P = VΙ cos θ = (Ι12R1 + Ι32R2) = 240 x 85 x 0.707, = (42 x 60 + 22 x 120), 1442 approx.1440 watts., Example 4, Parallel circuit with R, XL and XC, , iii, , Now consider a parallel circuit having pure resistance in, one branch, pure inductance in the 2nd branch and a, pure capacitance in the 3rd branch as shown in Fig 7., , Total current IT., , iv Power factor angle., v, , Find the following for the circuit shown in Fig 7., , Power factor., , vi Power in the circuit., , i, , The branch currents., , ii, , The vector diagram., , iii, , Total current IT., , Solution, i, , The branch current I1 =, , V, RI, , =, , 240, 60, , = 4 amps, , Pure resistive, hence, in phase with the voltage., To calculate the branch current I2 first find out the, capacitive reactance XC., XC =, , 1, 2πFC, , 1, , =, , = 40Ω, , 2 x 3.142 x 50 x 79.56 x 10, , So the branch current I2 =, , V, X, , C, , =, , 240, , -6, , = 6 amps, , 40, , Pure capacitive, hence, current leads the applied voltages by 90º., 254, , iv Power factor angle., v, , Power factor., , Electrical : Electrician (NSQF LEVEL - 5) - Related Theory for Exercise 1.6.57, , Copyright Free under CC BY Licence
Page 269 :
vi Power taken by the circuit., , Admittance method of solving AC parallel circuit, , vii Impedance of the circuit., , In solving problems in AC circuit of parallel groups either, the vector or the admittance method could be used. However, there will be considerable difficulty in solving problems by vector method if series parallel combination, groups are to be dealt with., , SOLUTION, i, , The branch current, I1 =, , V, R, , =, , 1, , 240, 30, , = 8 amps in phase with V., , The branch current, I2 =, , V, X, , =, , L, , 240, 24, , = 10 amps lagging 'V' by 90º., , ii, , V, X, , c, , =, , 240, , Let us find how this method could be used to solve problems in parallel AC circuits., When several impedances say Z1, Z2 and Z3 are connected in parallel, their combined impedance Z could be, found by, , The branch current, I3 =, , Though admittance method requires simple knowledge, of mathematics, the numbers to be handled are decimals, their addition, subtraction, square and roots will, make the solutions a little more cumbersome., , = 5 amps leading 'V' by 90º., , 48, , Z=, , Draw the vector diagram to scale., , 1, 1, z1, , +, , Scale 1 cm = 1 ampere, Complete the parallelogram to find the total current IT, (Fig 8)., , 1, z2, , +, , 1, z3, , 1, , 1, =, z, 1, z1, , +, , 1, z2, , +, , (Equation ........... 1), , 1, , .......... ...... +, , 1 (Vector sum), z, n, , z3, , Alternatively, Y = Y1 + Y2 + Y3 Where, , 1, =Y, Z, , where the reciprocal impedance is called admittance,, the unit is Siemens and the symbol is Y., Just like impedance, the admittance also has two components as shown in Fig 9., , iii, , One component which is in phase with the voltage is, called conductance, the unit is Siemens, and the symbol is G., , Measured OIT = 9.4 cm., Total current, IT = 9.4 x 1 = 9.4 amps., , iv Measure the angle between voltage and the total, current., , The other component which is in quadrature with the, applied voltage V is called susceptance, the unit is Siemens and the symbol is B., Admittance Y = Y1 + Y2 + Y3 vectorially., , Measured angle = 32º lagging., v, , Power factor cos θ = cos 32º = 0.85., , vi Power taken by the circuit, VI cos θ = I12R, = 240 x 9.4 x 0.85 = 82 x 30, = 1918 approx.1920 watts., vii Combined impedance Z, Z =, , V, I, , T, , =, , 240, 9.4, , From the admittance triangle we have, Y=, , = 25.5 ohms, , 2, , G +B, , G = Y Cos θ, Where Y =, , 2, , ................. Eqn., ................. Eqn., , 1, R, and sin θ =, Z, Z, , Electrical : Electrician (NSQF LEVEL - 5) - Related Theory for Exercise 1.6.57, , Copyright Free under CC BY Licence, , 255
Page 270 :
Hence G = Y x, , R, R, R, =, =, ................. Eqn., Z Z 2 R 2 + X2, , B = Y Sin θ ................. Eqn., , X, 1, and sin θ =, Z, Z, , Where Y =, , R, 1 X R, x, =, =, ................. Eqn., Z Z Z 2 R 2 + X2, , Hence B =, , Further when several resistances, reactances are connected in parallel the conductances of individual, branches can be added to get the total conductance, G = G1 + G2 + G3 + ....+Gm, Likewise when several reactances are connected in parallel, the susceptance of individual branches can be, added algebraically to get the total susceptance. The, susceptance due to inductive reactances are taken as, +ve sign where the susceptance due to capacitive reactances are taken as –ve sign., , In branch 2, , 22, , XL = 2πfL = 2 ∞, , 7, , R1, , g2 =, , 2, , R2 + X2, , 2, , RL + X, , 0, = 2, =0, 2, 0 + 30, , 2, , X, , b2 =, , 2, , ∞50 ∞0.0955 = 30 ohms, , 30, , =, , 2, , 0 + 30, , Determine the following for the circuit shown in Fig 10., i, , 1, = 0.033Siemens, 30, , where G = g1 + g2 = 0.01667 + 0 = 0.01667 Siemens, and B = b1 + b2 = 0 + 0.0333 = 0.0333 Siemens, i.e Y = 0.01667 2 + 0.0333 2 = 0.0372 Siemens, = 0.0372 Siemens, , Example 1, Parallel circuit with R and XL in branches., , =, , Admittance Y = G 2 + B 2, , The branch current I1 =, , B = b1 + b2 + (–b3) ...., , 2, , V, R, , =, , 240, 60, , V, Z1, , = 4amps in phase with the voltage, , Conductance in branch circuits:, , The conductance G = g1 + g2, , The branch current I2 =, , V, XL, , =, , 240, 30, , V, Z2, , = 8amps, , lagging behind the applied voltage by 90o., 2, , Total current = IT = I1 + I2, 2, , = 4 +8, , g1 =, , Alternatively, I =, , =, , R1, 2, R1, , 60, 60, , 2, , =, , +, , 2, X1, , 1, 60, , =, , 60, 2, , 60 + 0, , 256, , 2, , 2, , R 1 + X1, , = VY = 240 x 0.0372, , Z, , = 8.94 amps., Power factor =, , =, b1 =, , V, , 2, , = 0.01667 Siemens, , X, , = 16 + 64, , = 8.94 amps, , where g1 and g2 are the conductance of branch 1 and 2, respectively., In branch 1, , 2, , 2, , 0, =, 2, 2, 60 + 0, , 0.01667, 0.0372, , I, = 1, Y IT, , G, , =, , 4, 8.94, , = 0.448 approx. 0.447., , So power factor angle = 63o 26’., , Electrical : Electrician (NSQF LEVEL - 5) - Related Theory for Exercise 1.6.57, , Copyright Free under CC BY Licence
Page 271 :
Impedance of the circuit Z =, , 1, Y, , =, , 1, 0.0372, , = 26.88 ohms, , Power taken by the circuit = VI cos ø, = 240 x 8.94 x 0.447, = 959 watts., , - 48, , =, , 2, Z1, , - 48, , 2, , =-, , 1, 48, , = - 0.02083 siemens, ii Total conductance G = g1 + g2 + g3, = 0.0333 + 0 + 0, , Example 2, , = 0.0333 Siemens., , In Fig 11, Parallel circuit with R, XL and XC, Find the following., i, , - X3, , b3 =, , Total susceptance B = b1 + b2 + b3, = 0 + 0.04167 + (– 0.02083), , Conductance and susceptance of each branch., , = 0.02084 Siemens., , ii Total G, B and Y., iii Branch currents., , Y=, , 2, , G +B, , 2, , iv PF and PF angle., v Power taken by the circuit., , = 0.3332 + 0.020842, = 0.03928 Siemens., V, , iii The branch current I =, , Z, , 1, , V 240, =, = 8 amps in phase with V, R, 30, , =, , The branch current I =, 2, , i, , V, Z, , Conductance in branch circuits, g1 =, , R1, , =, 2, , Z1, , 30, , 1, =, 2, 30, 30, , V, X, , 240, , =, , 24, , L, , The branch current I =, 3, , R2, , 0, , Z2, , 24, , =, 2, , g3 =, , Z3, , 2, , =, , 0, 48, , 2, , =0, , Susceptance in branch cirucits, , 240, , X1, 2, Z1, , =, , 0, 30, , X, , 2, , =0, , 3, , = 5 amps lagging 90° with V, , 48, , Total current, I =, T, , b1 =, , V, , =0, 2, , =, R3, , 2, , = 10 amps lagging 90° with V, , = 0.0333 siemens, g2 =, , 1, , =, , I, , 2, , 1, , + (I − I ), 2, , 2, , 3, , 2, 2, 8 + (10 − 5) = 89, , = 9.43 amps, X2, , 24, , 1, =, =, b2 =, 2, 2, 24, 24, Z2, , = 0.04167 siemens, , Alternatively, IT = VY = 240 X 0.03928, = 9.43 amps., , Electrical : Electrician (NSQF LEVEL - 5) - Related Theory for Exercise 1.6.57, , Copyright Free under CC BY Licence, , 257
Page 272 :
iv Power factor =, , G IR, =, Y I, , Total impedance = Z =, , 1, Y, , T, , =, , 0.0333, 0.03929, , =, , 1, , 8, , 0.03929, , 9.43, , = 25.5.ohms, , Check these answers with the answers obtained by the, vector method., , = 0.848., v Power factor angle = 32o lagging., Power taken by the circuit = VIcos ø, = 240 x 9.43 x 0.848, = 1919 watts., , 258, , Electrical : Electrician (NSQF LEVEL - 5) - Related Theory for Exercise 1.6.57, , Copyright Free under CC BY Licence
Page 273 :
Electrical, Electrician - A.C.Circuit, , Related Theory for Exercise 1.6.58 & 1.6.59, , Power factor - improvement of power factor, Objectives: At the end of this lesson you shall be able to, • define power factor - explain the causes of low power factor, • list out disadvantage of low power factor and advantage of higher power factor in a circuit, • explain the methods to improve the power factor in an AC circuit, • illustrate the importance of power factor improvement in industries, • distinguish between leading, lagging and zero PF, • state the recommended power factor as per ISI 7752 (Part I) 1975 for electrical equipment., Power Factor (P.F.), , Lagging power factor, , The power factor is defined as the ratio of true power to, apparent power and it is denoted by Cos θ., , In such a circuit the true power is less than the apparent, power and current lags behind the voltage by an angle, in, electrical degrees. Mostly inductive loads like induction, motors and induction furnaces account for lagging power, factor. (Fig 1c), , True Power (WT, = Cos θ, Apparent Power ( Wa, , (, , (, , i. e. Power Factor =, WT, or Cos θ =, VxI, , Where WT is the real power (true power) and is measured, in watts or some times in kilowatts (kW). Similarly the, product VI is known as the apparent power measured in, volt amperes or sometimes in kilo-volt amperes written as, kVA., , Zero power factor, When there is a phase difference of 90° between the current, and voltage, the circuit will have zero power factor and no, useful work can be done. Pure inductive or pure capacitive, circuits account for zero power factor. (Fig 1d), , The majority of AC electrical machines and equipment, draw from the supply the apparent power (kVA) which, exceeds the required useful power (KW). This is due to, the reactive power (kVAR) necessary to produce the, alternating magnetic field in motors and transformers., The ratio of useful power (kW) to apparent power (kVA) is, termed the PF of the load. The reactive power is, indispensable and constitutes an additional demand on, the system., The principal cause of a low power factor is due to the, reactive power flowing in the circuit. The reactive power, mostly due to inductive load rather than capacitive load., , The power factor can be one or less than one, but can never be greater than one., , Variation in power factor and the type of circuits, The following are the different conditions of the power factor, in different circuits., , Table 1 shows the most common electrical appliances, used, the power in watts and the average power factor., TABLE 2 shows the natural power factor of the various, installations used in the industries., , Unity power factor, A circuit with a unity power factor will have equal real and, apparent power, so that the current remains in phase with, the voltage, and hence, some useful work can be done., (Fig 1a), Leading power factor, A circuit will have a leading power factor if the current, leads voltage by an angle q of electrical degrees and the, true power will be less than the apparent power. Mostly, capacitive circuits and synchronous motors operated at, over excitation contribute for leading power factor., (Fig 1b), , 259, , Copyright Free under CC BY Licence
Page 274 :
TABLE 1, Power factor for single phase electrical appliances and equipment (Reference IS 7752 (Part I) - 1975), Sl.No., 1, 2, , Appliance/Equipment, Neon sign, Window type air- conditioners, , Power output, Min.(W), Max.(W), 500, 5000, 750, 2000*, , Average natural, power factor, 0.5 to 0.55, 0.75 to 0.85, 0.68 to 0.82, 0.62 to 0.65, 0.8, 0.75, 0.65, 0.7, 0.6, 0.5 to 0.6, 0.5 to 0.7, 0.6 to 0.7, 0.7 to 0.8, 0.6 to 0.7, 0.8, 0.7, 0.5, 0.9, , 3, Mixer, 150, 450, 4, Coffee grinder, 200, 400, 5, Refrigerator, 200, 800, 6, Freezer, 600, 1000, 7, Shaver, 80, 250, 8, Table fan, 25, 120, 9, Ceiling fan, 60, 100, 10, Exhaust fan, 150, 350, 11, Sewing machine, 80, 120, 12, Washing machine, 300, 450, 13, Radio, 25, 450, 14, Vacuum cleaner, 200, 450, 15, Tube light, 40, 100, 16, Clock, 5, 10, * Starts dropping when compressor motor is not in circuit., TABLE 2, Power factor for three-phase electrical installations (Reference IS 7752 (Part I) - 1975), Sl.No., , Type of installation, , 1, , Cold storage and fisheries, , 0.7 to 0.80, , 2, , Cinemas, , 0.78 to 0.80, , 3, , Confectionery, , 0.77, , 4, , Dyeing and printing (Textile), , 0.60 to 0.87, , 5, , Plastic moulding, , 0.57 to 0.73, , 6, , Film studios, , 0.65 to 0.74, , 7, , Heavy engineering works, , 0.48 to 0.75, , 8, , Pharmaceuticals, , 0.75 to 0.86, , 9, , Oil and paint manufacturing, , 0.51 to 0.69, , 10, , Printing press, , 0.65 to 0.75, , 11, , Food products, , 0.63, , 12, , Laundries, , 0.92, , 13, , Flour mill, , 0.61, , 14, , Textile mills, , 0.86, , 15, , Oil mill, , 0.51 to 0.59, , 16, , Woolen mills, , 0.70, , 17, , Cotton press, , 0.63 to 0.68, , 18, , Foundries, , 0.59, , 19, , Tiles and mosaic, , 0.61, , 20, , Chemicals, , 0.72 to 0.87, , 21, , Rolling mills, , 0.72 to 0.60, , 22, , Irrigation pumps, , 0.50 to 0.70, , 260, , Natural power factor, , Electrical : Electrician (NSQF LEVEL - 5) - Related Theory for Exercise 1.6.58 & 1.6.59, , Copyright Free under CC BY Licence
Page 275 :
Causes of low power factor, The following are the reasons., i, , In industrial and domestic fields, the induction motors, are widely used. The induction motors always take lagging current which results in low power factor., , ii The industrial induction furnaces have low power factor., iii The transformers at substations have lagging power, factor because of inductive load and magnetising currents., , The leading volt-ampere reactive power taken by a synchronous motor, when over- excited will be opposite in, nature to the lagging voltage pure reactive due to inductive, loads, and, thereby, reduces the volt-ampere reactive component to improve the power factor., Example, A factory is having a load of 100 kW working at 0.6 PF, lagging. A synchronous motor is connected in the factory, and is made to run over-excited to improve the power factor. The synchronous motor is of 30 kW and is working at, 0.8 PF leading. Calculate the following:, , iv Inductive load in houses like fluorescent tubes, mixers, fans etc., , i, , The disadvantages of low power factor are as follows., , ii The true power in watt, apparent power in volt- ampere, and leading reactive power in VAR for the synchoronous, motor at 0.8P.F lagging., , a For a given true power, a low power factor causes increased current, thereby, overloading of the cables, generators, transmission and distribution lines and transformers., b Decreased line voltage at the point of application (voltage drop at consumer end) due to voltage drop and, power losses in the supply system., c Inefficient operation of plant and machine (efficiency, drops due to low voltage)., , the true power in watt, aspperent power in VAR for the, factory load at 0.6p.f lagging., , iii The true power in watt, reactive power in VAR and apparent power in Volt - ampere and PF supplied by the, feeder lines., i, , Factory Load, Load in kW, , = 100 kW, , Load in watts, , = 100 x 103 watts, , d Penal power rates (increased electricity bills)., The advantages of high power factor are as follows., , Load in volt-amperes =, , As the higher PF for a given load, reduces the current,, there will be:, a a possibility of connecting extra load on existing generators and transmit additional power through the same, lines, b lesser losses and voltage drop in lines; thereby, transmission efficiency is high and the voltage at the point, of application will be normal without much drop, c normal voltage improves the efficiency of operation of, plants and machinery, , True power, PF, , =, , 100x10 3, 0.6, , = 167 x 103 volt - amperes, Load in vars, , = Volt ampere x sin θ, = Cos θ = 0.6, =, , θ, , = 53.1º, , = Sin θ = Sin 53.10 = 0.8, Load in vars, , = 167 x 103 x 0.8, = 133.6 x 10³ vars lagging, , Refer to Fig 2., , d reduction in electricity bills for the given load during, the given time., Method of improving the power factor, To improve the power factor of a circuit, two methods are, used:, i, , to run a lightly loaded synchronous motor with overexcitation on that line in which the PF is to be improved, , ii to connect capacitors in parallel with the load., Usually the capacitor method is used in Indian factories., , ii Synchronous motor, , Synchronous condenser method, , Motor load in kW, , The synchronous motor is used in certain industries as, well as in receiving end substations to drive a mechanical, load and also to correct the power factor. An over-excited, synchronous motor draws leading current to compensate, the lagging current taken by the other loads., , = 30 kW = 30 x 103 watts, , Motor load in volt - amperes=, , True power, PF, , =, , 30x10 3, 0.8, , = 37.5 x 10³ volt - amperes, , Electrical : Electrician (NSQF LEVEL - 5) - Related Theory for Exercise 1.6.58 & 1.6.59, , Copyright Free under CC BY Licence, , 261
Page 276 :
= Volt ampere sin θ, , Motor load in vars, Cos θ, , = 0.8, , θ, , This could be represented by a vector diagram as shown, in the Fig 4., , = 36.1º, , Sin θ, , = Sin 36.1º = 0.6, = 37.5 x 103 x 0.6, , Motor load in vars, , = 22.5 x 10³ vars lagging, , Now Tan α =, , Opp. side, Adj. side, , =, , 111.1x10 3, 130x10 3, , = 0.8546, , Angle α = 40.5º, Power factor of the factory after the connection of, synchronous motor = Cos θ = Cos 40.5o = 0.7604, , Refer to Fig 3., , The PF has improved from 0.6 to 0.7604 by the use of the, synchronous motor., Present volt-amperes supplied by the factory, =, iii Feeder line, , True power, PF, 130 x 10, , 3, , =, , Truepower, Cos α, , 130 x 10 3, 0.7604, , Condition: Combined load condition for improvement of, PF by the synchronous motor, , =, , Total load in watts = Factory true power + true power taken, by synchronous motor, , = 171 x 103 Volt amperes, , = 100 x 103 + 30 x 103, , Condenser method, , = 130 x 103 watts, , Capacitors when used for PF improvement are connected, in parallel to the supply. In three-phase circuits the capacitors are connected in delta across the load lines. Now, automatic devices are available which can be connected, to the supply lines to detect low power factor and to switch, on the required capacity of capacitors in the line to improve the power factor., , Total load in VARS =, factory reactive, power (Inductive), , -, , syn. motor reactive, power (Capacitance), , = 133.6 x 10³ – 22.5 x 10³ VARS lagging, = 111.1 x 10³ VARS lagging, , 262, , Cos 40.5º, , =, , Normally these capacitors are provided with discharge, resistances to discharge the stored energy. However, no, capacitor terminal should be touched to avoid shock., , Electrical : Electrician (NSQF LEVEL - 5) - Related Theory for Exercise 1.6.58 & 1.6.59, , Copyright Free under CC BY Licence
Page 277 :
Electrical, Electrician - A.C.Circuit, , Related Theory for Exercise 1.6.60 - 1.6.64, , 3-Phase AC fundamentals, Objectives: At the end of this lesson you shall be able to, • state and describe the generation of 3-phase system with single loops, • state the advantages of the 3-phase system over a single phase system, • state and explain the 3-phase, 3-wire, and 4-wire system, • state and explain the relation between phase and line voltage., Introduction, , •, , When a piece of electrical equipment is plugged into the, socket of a normal alternating current supply (e.g. a ring, main circuit), it is connected between the terminal of one, phase and the neutral wire. (Fig 1), , Copper required for 3-phase transmission for a given, power and distance is low when compared to single, phase system., , •, , 3-phase motor like squirrel cage induction motor is, robust in construction and more are less maintenance free., , The basic principle used in generating an alternating voltage is that of rotating a wire loop at a constant angular, speed in a uniform magnetic field. (Fig 3) The alternating, voltage thus produced varies sinusoidally with time., Thus a normal domestic alternating current circuit may, also be described as a single-phase circuit., Similarly, a three-phase power consumer is provided with, the terminals of three phases. (Fig 2), , One great advantage of a three-phase AC supply is that it, can produce a rotating magnetic field when a set of stationary three-phase coils is energized from the supply., This is the basic operating principle for most modern rotating machines and, in particular, the three-phase induction motor., Further, lighting loads can be connected between any one, of the three phases and neutral., Review: Further to the above two advantages the following are the advantages of polyphase system over single, phase system., •, , 3-phase motors develop uniform torque whereas single, phase motors produce pulsating torque only, , •, , Most of the 3-phase motors are self starting whereas, single phase motors are not, , •, , Power factor of 3-phase motors are reasonably high, when compared to single phase motors, , •, , For a given size the power out put is high in 3-phase, motors whereas in single phase motors the power output is low., , The effective (RMS) value is the same as that of a direct, current that would produce the same heating effect, RMS, voltage and frequency are usually quoted for a sinusoidal, alternating voltage (Fig 4)., , 263, , Copyright Free under CC BY Licence
Page 278 :
Three-phase generation: To generate three-phase voltages, a similar method to that used for generating singlephase voltages is employed but with the difference that,, this time, three wire loops U1, U2, V1, V2 and W1, W2, rotate at a constant angular speed about the same axis in, the uniform magnetic field. U1, U2, V1, V2 and W1 , W2,, are displaced 120o in position with respect to each other,, permanently. (Fig 5), , In three-phase networks, the following statements can be, made about the three-phase voltages., •, , The three-phase voltages have the same frequency., , •, , The three-phase voltages have the same peak value., , •, , The three-phase voltages are displaced by one third of, a period in time with respect to each other., , •, , At every instant in time, the instantaneous sum of the, three voltages, VU+ VV+ VW= 0., , The fact that the sum of the instantaneous voltages is, zero is illustrated in Fig 6. At time t 1 , U has the, instantaneous value VU. At the same time, VV = 0, and, the instantaneous value for W is VW. Because VU and, VW have the same value but are opposite in sign, it follows, that, VU1 + VV1 + VW1 = 0., For each wire loop, the same result is obtained as for the, alternating voltage generator. This means that an alternating voltage is induced in each wire loop. However, since, the wire loops are displaced by 120o from each other, and, a complete revolution (360o), takes one period, the three, induced alternating voltages are delayed in time by a third, of a period with respect to each other., , The three voltages of the same amplitude and frequency, are shown together in Fig 7., , Because of the spatial displacement of the three wire loops, by 120o, three alternating phase voltages result, which are, displaced by one third of a period, T, with respect to each, other. (Fig 6), , Three-phase network: A three-phase network consists, of three lines or phases. In Fig 8, these are indicated by, the capital letters U, V and W., , To distinguish between the three phases, it is a common, practice in (heavy current) electrical engineering to designate them by the capital letters U,V and W or by a colour, code red, yellow and blue. At a time 0, U is passing, through zero volts with positively increasing voltage. (Fig, 6a) V follows with its zero crossing 1/3 of the period later, (Fig 6b), and the same applies to W with respect to V., (Fig 6c), 264, , The return lead of the individual phases consists of a common neutral conductor N, which is described later in more, detail. Voltmeters are connected between each of the, lines U, V and W, and the neutral line N. They indicate, the RMS (effective) values of the voltages between each of, the three phases and neutral., These voltages are designated as phase, voltages VUN, VVN and VWN., , Electrical : Electrician (NSQF LEVEL - 5) - Related Theory for Exercise 1.6.60 - 1.6.64, , Copyright Free under CC BY Licence
Page 279 :
The individual, phase voltages all have the same magnitude., They are simply displaced from each other by one third of, a period in time. (Fig 9), , Relationship between line and phase voltage: The, possibility of combining pairs of phases in a generator is a, basic property of three-phase electricity. The, understanding of this relationship will be enhanced by, studying the following illustrative example which explains, the concept of phase difference in a very simple way., The phase voltages VUNand VVN are separated in phase, by one third of a period, or 120o between the two phasors., (Fig 10), The phasor sum of the two phase voltages VUNand VNVcan, be obtained geometrically, and the resultant phasor so, obtained is the line voltage VUV through the relation VUV=, VUN + VNV., Note that to obtain the line voltage VUV the measurement, is made from the U terminal through the common point N, to the V terminal, for a star connection., , The individual instantaneous, peak and RMS values are, the same as for a single-phase alternating voltage., , This fact is illustrated in Fig 11. Starting with the phasors, VUN and VVN (Fig 10), the phasor, VVN = VNV is produced, from the point N. The diagonal of the parallelogram with, sides VUN and VNV is the phasor representing the resulting, line voltage VUV., , Line and phase voltage:If a voltmeter is connected, directly between line U and line V (Fig 10), the RMS, value of the voltage VUV is measured, and this is different, from any of the three phase voltages., , It can be concluded, therefore, that in a generator the line, voltage VL is related to the phase voltage VP by a multiplying, factor. This factor can be shown to be 3 , so that, VL = 3 x VP, In a three-phase generating system, the line voltage is, always 3 times the phase-to-neutral voltage. The factor, relating the line voltage to the phase voltage is 3 ., Its magnitude is directly proportional to the phase voltage., The relationship is shown in Fig 9, where the time-variation, wave- forms of VUV and the phase voltages VUN and VVN are, drawn., VUV has a sinusoidal wave-form and the same frequency, as the phase voltages. However, Vuv has a higher peak, value since it is computed from the phase voltages VUN, and VVN. The varying positive and negative instantaneous, values of VUN and V VN at a particular time produce the, instantaneous value of VUV. VUV is the phasor sum of the, two phase voltages VUN and VNV., , It was shown that the line voltage is greater than the phase, voltage. Here is a numerical example., The RMS phase voltage in a three-phase system is 240V., Since the ratio of line voltage to phase voltage is 3 the, RMS line voltage is, VL = 3 x VP = 3 x 240, = 415.68V, or rounded down, VL = 415V., , This combination of phase-displaced alternating voltages, is called phasor addition., The voltage across phase-to-phase is called, the line voltage., , Electrical : Electrician (NSQF LEVEL - 5) - Related Theory for Exercise 1.6.60 - 1.6.64, , Copyright Free under CC BY Licence, , 265
Page 280 :
Systems of connection in 3-phase AC, Objectives: At the end of this lesson you shall be able to, • explain the star and delta systems of connection, • state phase relationship between line and phase voltages and current in a star connection delta connection, • state the relationship between phase and the voltage and current in star and delta connection, Methods of 3-phase connection: If a three-phase load is, connected to a three-phase network, there are two basic, possible configurations. One is `star connection' (symbol, Y) and the other is `delta connection' (symbol Δ )., Star connection: In Fig 1 the three-phase load is shown, as three equal magnitude resistances. From each phase,, at any given time, there is a path to the terminal points U,, V, W of the equipment, and then through the individual, elements of the load resistance. All the elements are, connected to one point N: the `star point'. This star point, is connected to the neutral conductor N. The phase, currents iU, iV, and iW flow through the individual elements,, and the same current flows through the supply lines, i.e., in a star connected system, the supply line current (IL) =, phase current (IP)., , In the phasor diagram (Fig 3), , VL = VUV = VUN Cos 30o+ VNV Cos 30o, But Cos 30o =, , 3, ., 2, , Thus as VUN, , = VVN = VP, , VL, , =, , 3 VP., , This same relationship is applied to VUV, VVWand VWU., In a three-phase star connection, the line, The potential difference for each phase, i.e. from a line to, the star point, is called the phase voltage and designated, as VP. The potential difference across any two lines is, called the line voltage VL. Therefore, the voltage across, each impedance of a star connection is the phase voltage, VP. The line voltage VL appears across the load terminals, U-V, V-W and W-U and designated as VUV, VVW and VWU in, the Fig 1. The line voltage in a star-connected system, will be equal to the phasor sum of the positive value of one, phase voltage and the negative value of the other phase, voltage that exist across the two lines (Fig 2)., , voltage is always 3 times the phase-to-neutral, voltage. The factor relating the line voltage, to the phase voltage is 3 (Fig 3)., The voltage and current relationship in a star connection, is shown in the phasor diagrams. (Fig 4) The phase, , Thus, VL = VUV = (phasor VUN), , (phasor VVN), , = phasor VUN+ VVN., , 266, , Electrical : Electrician (NSQF LEVEL - 5) - Related Theory for Exercise 1.6.60 - 1.6.64, , Copyright Free under CC BY Licence
Page 281 :
voltages are displaced 120o in phase with respect to each, other., Derived from these are the corresponding line voltages., The line voltages are displaced 1200 in phase with respect, to each other. Since the loads in our example are provided, by purely resistive impedances, the phase currents IP (IU,, IV, IW) are in phase with the phase voltages VP (VUN, VVN, and VWN). In a star connection, each phase current is, determined by the ratio of the phase voltage to the load, resistance R., Example 1: What is the line voltage for a three-phase,, balanced star-connected system, having a phase voltage, of 240V?, VL = 3 VP = 3 x 240, = 415.7V, Example 2: What is the magnitude of each of the supply, line currents for the circuit shown in Fig 5?, , In contrast to a star connection, in a delta, connection the line voltage appears across, each of the load phases., The voltages, with symbols VUV, VVWand VWU are, therefore, the line voltages., The phase currents through the elements in a delta arrangement are composed of IUV, IVW and IWU. The currents, from the supply lines are IU, IV and IW, and one line current, divides at the point of connection to produce two phase, currents., The voltage and current relationships of the delta connection can be explained with the aid of an illustration. The, line voltages VUV, VVW and VWU are directly across the, load resistors, and in this case, the phase voltage is the, same as the line voltage. The phasors VUV, VVW and VWU, are the line voltages. This arrangement has already been, seen in relation to the star connection., , Because of the arrangements of a star connection there, is a voltage, VP =, , Because of the purely resistive load, the corresponding, phase currents are in phase with the line voltages. (Fig 7), , 380, = 220 V, 173, ., , across each of the purely resistive loads R., The three-supply line currents have the same magnitude, since the star-connected load is balanced, and they are, given by, , IU, , V, R, , 220, 10, , P, I=, =, = 22A = IL, IP, V = IW =, , Delta connection: There is a second possible arrangement, for connecting a three-phase load in a three-phase network., This is the delta or mesh connection (Δ).(Fig 6), The load impedances form the sides of a triangle. The, terminals U, V and W are connected to the supply lines of, the L1, L2 and L3., , Their magnitudes are determined by the ratio of the line, voltage to the resistance R., On the other hand, the line currents IU, IV and IW are now, compounded from the phase currents. A line current is, always given by the phasor sum of the appropriate phase, currents. This is shown in Fig 8. The line current IU is the, phasor sum of the phase currents IUVand IUW. (See also, Fig 8), , Electrical : Electrician (NSQF LEVEL - 5) - Related Theory for Exercise 1.6.60 - 1.6.64, , Copyright Free under CC BY Licence, , 267
Page 282 :
Thus, the phase current in the case of delta is 38A., Expressed in words:, , Phase current =, , lineor phase voltage, phase resistance, , The line current is 3 times the phase current., Therefore the line current is, , IU=IV= IW=, Hence,, , IU, , =, , But Cos 30o =, Thus, , IL, , IUV Cos 30o+ IIUWCos 30o, 3, ., 2, , =, , 3, , Iph, , Thus, for a balanced delta connection, the ratio of the line, current to the phase current is 3 ., Thus, line current =, , 3 x phase current., , Example 3: What are the values of the line currents, IU,, , 3 x 38A = 1.73 x 38A = 66A., , Example 4: Three identical coils, each of resistance 10, ohms and inductance 20mH is delta connected across a, 400-V, 50Hz, three-phase supply. Calculate the line, current., For a coil,, reactance XL = 2πfL = 2 x 3.142 x 50 X, , 20, = 6.3 ohms., 1000, , Impedance of a coil is thus given by, Z=, , (R 2 + X 2 =, , (10 2 + 6.3 2 ) = 11.8 ohms., , For a delta connected system, according to equation, VL= VP., Thus VP= 400V., Hence the phase current is given by, , IP=, , VP, 400, =, = 33.9 A., Z, 118, ., , But for a delta connected system, according to equation,, , IL=, , 3 IP=, , 3 x 33.9 = 58.7A., , Application of star and delta connection with balanced loads, An important application is the `star-delta change over, switch' or star-delta starter., , IV and IW in the above example? (Fig 9), Solution, Since the load is balanced (i.e. the resistance of each, phase is the same), the phase currents are of equal, magnitude, and are given by the ratio of the line voltage to, the load phase resistance, , IUV = IVW = IWU, , 268, , V, V, 380, = P = L =, = 38A., R, R, 10, , For a particular three-phase load, the line current in a delta, connection is three times as great as for a star connection, for a given line voltage, i.e. for the same three-phase load, (D line current) = 3 (Y - line current)., This fact is used to reduce the high starting current of a 3phase motor with a star-delta change over switch., Application of star connection: Alternators and, secondoary of distribution transformers, have their three,, single-phase coils interconnected in star., , Electrical : Electrician (NSQF LEVEL - 5) - Related Theory for Exercise 1.6.60 - 1.6.64, , Copyright Free under CC BY Licence
Page 283 :
Neutral in 3-phase system, Objectives: At the end of this lesson you shall be able to, • explain the current in neutral of a 3-phase star connection, • state the method of producing artificial neutral in a 3-phase delta connection, • state the method of earthing the neutral, φ system when neutral open., • explain the behaviour of 3φ, Neutral: In a three-phase star connection, the star point, is known as neutral point, and the conductor connected, to the neutral point is referred as neutral conductor, (Fig 1)., , With unequal value the phase currents are different in, magnitude and the neutral current is not zero. Then a, `neutral' current IN does flow in the neutral conductor, but, this, however, is less than any of the supply line currents., Thus, neutral conductors, when they are used, have a, smaller cross-section than the supply lines., , Current in the neutral conductor: In a star-connected,, four-wire system, the neutral conductor N must carry the, sum of the currents IU, IV and IW. One may, therefore, get, the impression that the conductor must have sufficient, area to carry a particularly high current. However, this is, not the case, because this conductor is required to carry, only the phasor sum of the three currents., IN = phasor sum of IU, IV and IW, Fig 2 shows this phasor addition for a situation where the, loads are balanced and the currents are equal. The result, is that the current in the neutral line I N is zero., This can also be shown for the other instantaneous values., , Effect of imbalance: If the load is not balanced and there, is no neutral conductor, there is no return path for the sum, of the phase currents which will be zero. The phase, voltages will not now be given by the line voltage divided, by 3 , and will have different values., Earthing of neutral conductor: Supply of electrical, energy to commercial and domestic consumers is an, important application of three-phase electricity. For `low, voltage distribution' - in the simplest case, i.e. supply of, light and power to buildings - there are two requirements., 1 It is desirable to use conductors operating at the highest, possible voltage but with low current in order to save, on expensive conductor material., 2 For safety reasons, the voltage between the conductor, and earth must not exceed 250V., A voltage distribution system according to criterion 2, only, possible with a low line voltage below 250 V. However,, this is contrary to criterion 1. On the other hand, with a, star connection, a line voltage of 415V is available. In this, case, there is only 240V between the supply line and the, neutral conductor. Criterion 1 is satisfied and, to comply, with 2, the neutral conductor is earthed., , At a particular instant in time, t1, the instantaneous value, iU= 0 (Fig 3), iV and iW, have equal magnitudes, but they, have opposite signs,i.e. they are in opposition and the, phasor sum is zero. Taking the other values of t, it can be, seen that the sumof the three phase currents to equal to, zero., Therefore, for a balanced load the neutral conductor carries, no current., , Indian Electricity Rules: I.E.Rules insist that the neutral, conductor must be earthed by two separate and distinct, connections to earth. Rule No.61(1)(a), Rule No.67(1)(a), and Rule No.32 insist on the identification of neutral at the, point of commencement of supply at the consumer's, premises, and also prevent the use of cut outs or links in, the neutral conductor. BIS stipulate the method of earthing, the neutral. (Code No.17.4 of IS 3043-1966), Cross-sectional area of neutral conductor: The neutral, conductor in a 3-phase, 4-wire system should have a, smaller cross-section. (half of the cross-section of the, supply lines)., , Electrical : Electrician (NSQF LEVEL - 5) - Related Theory for Exercise 1.6.60 - 1.6.64, , Copyright Free under CC BY Licence, , 269
Page 284 :
Artificial neutral: Normally neutral conductors are, available with a 3-phase, 4-wire system only. Neutral, conductors are not drawn for a 3-phase, 3-wire system., Neutral conductors are also not available with the deltaconnected supply system., A neutral conductor is required for measuring phase, voltage, energy, power to connect indicating lamps, etc., An artificial neutral for connecting indicating lamps can be, formed by connecting them in star. (Fig 4) Artificial neutral, for instruments can be formed by connecting additional, resistors in star. (Fig 5), , In this method, the value of R must be equal to the, resistance of the voltmeter. The same method can be used, while measuring power or energy by connecting resistors, of equal resistance as of potential coil., When three instruments of a similar kind are in use, their, pressure coils can be connected to form an artificial neutral., (Fig 6), , This type of neutral cannot allow a large current. When, earthing of a delta-connected system is required, neutral, earthing compensators are used. These can sink or source, large currents while keeping neutral to phase voltages, constant., IS 3043 Code No.17, provide a method to obtain neutral, for earthing purposes by an earthing compensator., , Power in star and delta connections, Objectives: At the end of this lesson you shall be able to, • explain active, appparent and reactive power in AC 3 phase φ, • explain behaviour of unbalanced and balance load, • state the method of earthing the neutral, • determine the power in 3-phase star and delta connected balanced load., Fig 1 shows the load of three resistances in a star, connection. So the power must be three times as great, as the single phase power., P = 3VpIp., If the quantities VPand IPin the individual phases are, replaced by the corresponding line quantities VL and IL, respectively, we obtain:, V, P = 3 L IL., 3, , (Because VP= VL ¸, Since 3 =, the form, , 270, , 3 x, , 3 and Ip = IL), , 3 , this equation can be simplified to, , P = 3 VLIL, Note that power factor in resistance circuit is, unity. Hence power factor is not taken into, account., Quantity, , P, , VL, , IL, , Unit, , W, , V, , A, , The, power in this purely resistive load(φ=0 o ,, cosφ= 1) is entirely active power which is converted into, heat. The unit of active power is the watt (W)., As the last formula shows, three-phase power in a, star-connected load circuit can be calculated from the line, quantities, and there is no need to measure the phase, quantities., , Electrical : Electrician (NSQF LEVEL - 5) - Related Theory for Exercise 1.6.60 - 1.6.64, , Copyright Free under CC BY Licence
Page 285 :
P = 3 x V x I(Formula holds good for pure resistive load), It is always possible, in practice, to measure the line, quantities but the accessibility of the star point cannot, always be guaranteed, and so it is not always possible to, measure the phase voltages., , If we compare the two power formulae for the, star and delta connections, we see that the, same formula applies to both. In other words,, the way in which the load is connected has no, effect on the formula to be used, assuming that, the load is balanced., , Three-phase power with a delta-connected load:, Active,reactive and apparent power: As you already, know from AC circuit theory, load circuits which contain, both resistance and inductance, or both resistance and, capacitance, take both active and reactive power because, of the phase difference existing between the voltage and, current in them. If these two components of power are, added geometrically, we obtain the apparent power. Precisely the same happens in each phase of the three-phase, systems. Here we have to consider the phase difference f, between the voltage and current in each phase., Applying the factor 3 , the components of power in a threephase system follow from the formulae derived for singlephase, AC circuits, namely:, Fig 2 shows the load of three resistances connected in, delta. Three times the phase power will be dissipated., , Apparent power S=VI, Active power, , S = 3 VLIL, , P=VI Cosφ P = 3 VLILcos φ, , Reactive power Q=VI sinφ, , Q = 3 VLILsin φ, , VA, W, var, , Finally, the well known relationships found in single-phase, AC circuits apply also to three-phase circuits., Cos ɐ =, Sin ɐ =, , active power, apparentpower, reactive power, , apparentpower, , =, =, , P, S, Q, S, , This can also be seen from Fig 3., , P = 3PP= 3VPIP, If the quantities VPand IPare replaced by the corresponding, line quantities VL and IL, we obtain:, Since, VL = VP, , IL =, but since 3 =, to the form:, P=, load), , 3 IP and, , 3 x, , IP =, , IL, 3, , 3 , this equation can be simplified, , 3 VLIL.(Formula holds good for pure resistive, , Cos φ is called the power factor, while sin φ is sometimes, called the reactive power factor., Unbalanced load: The most convenient distribution system for electrical energy supply is the 415/240 V four-wire,, three-phase AC system., This offers the possibility of supplying three-phase, as well, as single-phase current, to users simultaneously. Supply, to buildings can be arranged as in the given example., (Fig 4), The individual houses utilize one of the phase voltages. L1,, L2 and L3 to N are distributed in sequence (light current)., However, large loads (eg.three-phase AC motors) may be, fed with the line voltage (heavy current)., , Electrical : Electrician (NSQF LEVEL - 5) - Related Theory for Exercise 1.6.60 - 1.6.64, , Copyright Free under CC BY Licence, , 271
Page 286 :
This fact will now be confirmed by a numerical example., A star-connected load consisting of impedances `Z', each of 10 ohms, is connected to a three-phase network, with line voltage VL = 415V. (Fig 5), Because of the arrangements of a star connection, the, phase voltage is 240V (415/ 3 )., The three load currents taken froms supply have the same, magnitude since the star-connected load is balanced, and, they are given by, , IU= IV= IW = VP ÷, , Z., , The measurement of power: The number of wattmeters, used to obtain power in a three-phase system depends on, whether the load is balanced or not, and whether the neutral, point, if there is one, is accessible., , However, certain equipment which needs single or two, phase supply can be connected to the individual phases, so that the phases will be differently loaded, and this means, that there will be unbalanced loading of the phases of, the four-wire, three-phase network., Balanced load in a star connection: In a star connection, each phase current is determined by the ratio of, phase voltage and load impedance `Z'., , •, , Measurement of power in a a star-connected balanced, load with neutral point is possible by a single wattmeter., , •, , Measurement of power in a star or delta-connected,, balanced or unbalanced load (with or without neutral) is, possible with two wattmeter method., , Single wattmeter method: Fig 6 shows the circuit, diagram to measure the three-phase power of a starconnected, balanced load with the neutral point accessible, the current coil of the wattmeter being connected to one, line, and the voltage coil between that line and neutral point., The wattmeter reading gives the power per phase. So the, total is three times the wattmeter reading., Power/phase = 3VPIP Cos θ = 3P = 3W., , The two-wattmeter method of measuring power, Objectives: At the end of this lesson you shall be able to:, • measure 3-phase power using two single phase wattmeter, • calculate power factor from meter reading., • explain the `two-wattmeter' method of measuring power in a three-phase, three-wire system, Power in a three-phase, three-wire system is normally, measured by the `two-wattmeter' method. It may be used, with balanced or unbalanced loads, and separate connections to the phases are not required. This method is not,, however, used in four-wire systems because current may, flow in the fourth wire, if the load is unbalanced and the, assumption that IU + IV + IW = 0 will not be valid., 272, , The two wattmeters are connected to the supply system as, shown in Fig 1. The current coils of the two wattmeters are, connected in two of the lines, and the voltage coils are, connected from the same two lines to the third line. The, total power is then obtained by adding the two readings:, PT = P1+ P2., , Electrical : Electrician (NSQF LEVEL - 5) - Related Theory for Exercise 1.6.60 - 1.6.64, , Copyright Free under CC BY Licence
Page 287 :
Consider the total instantaneous power in the system, PT= P1+ P2+ P3where P1, P2and P3 are the instantaneous, values of the power in each of the three phases., PT = VUN iU+ VVN i V + VWN IW, Since there is no fourth wire, iU+iV+iW= 0; iV=, PT = VUNiU, , (iU+ iW)., , VVN(iU+iW) + VWN iW, , = iU(VUN VVN) + iW(VWN VUN), = iUVUV + iWVWV, , Power factor calculation in the two-watmeter, method of measuring power, As you have learnt in the previous lesson, the total power, PT= P1 + P2 in the two-wattmeter method of measuring, power in a 3-phase, 3-wire system., From the readings obtained from the two wattmeters, the, tan f can be calculated from the given formula, , tan φ =, , (, (, , ), ), , 3 P1 − P2, 3 (W1 − W2 ), =, P1 + P2, (W1 + W2 ), , Now iUVUVis the instantaneous power in the first wattmeter, and iWVWV is the instantaneous power in the second, wattmeter. Therefore, the total mean power is the sum of, the mean powers read by the two wattmeters., , from which f and power factor of the load may be found., , It is possible that with the wattmeters connected correctly,, one of them will attempt to read a negative value because, of the large phase angle between the voltage and current, for that instrument. The current coil or voltage coil must, then be reversed and the reading given a negative sign, when combined with the other wattmeter readings to, obtain the total power., , Solution, , Example 1: Two wattmeters connected to measure the, power input to a balanced three-phase circuit indicate, 4.5 KW and 3 KW respectively. Find the power factor of, the circuit., , 3 (P1 − P2 ), , (P1, , tan φ =, , + P2 ), , At unity power factor, the readings of two wattmeter will, be equal. Total power = 2 x one wattmeter reading., , P1= 4.5 KW, , When the power factor = 0.5, one of the wattmeter's reading is zero and the other reads total power., , P1+ P2= 4.5 + 3 = 7.5 KW, , When the power factor is less than 0.5, one of the wattmeters will give negative indication. In order to read the, wattmeter, reverse the pressure coil or current coil connection. The wattmeter will then give a positive reading, but this must be taken as negative for calculating the total, power., When the power factor is zero, the readings of the two, wattmeters are equal but of opposite signs., Self-evaluation test, 1 Draw a general wiring diagram for the two-wattmeter, method of three-phase power measurement., 2 Why is it desirable, in practice, to use the two-wattmeter method? (Fig 2), 3 Why can the two-wattmeter method not be used in a, three-phase, four-wire system with random loading?, , P2= 3 KW, P1 P2 = 4.5, tan φ =, , 3 = 1.5 KW, , 3 × 1.5, =, 7.5, , 3, = 0.3464, 5, , φ = tan 1 0.3464 = 1906', Power factor Cos 1906' = 0.95, Example 2: Two wattmeters connected to measure the, power input to a balanced three-phase circuit indicate 4.5, KW and 3 KW respectively. The latter reading is obtained, after reversing the connection of the voltage coil of that, wattmeter. Find the power factor of the circuit., Solution, tan φ =, , 3 (P1 − P2 ), , (P1, , + P2 ), , 4 Which of the above circuits is used for the two-wattmeter method of power measurement?, , Electrical : Electrician (NSQF LEVEL - 5) - Related Theory for Exercise 1.6.60 - 1.6.64, , Copyright Free under CC BY Licence, , 273
Page 288 :
2, =, , =, , =, , a), , 3 ( 4.5 − ( −3)), , ( 4.5, , P2= 5 KW, , + ( −3)), , 3 ( 4.5 + 3), , ( 4.5, , tan φ =, , − 3), , 3 × 7.5, =, 1.5, , P1= 25 KW, , 3 x5, , =, , = 1.732 × 5 = 8.66., , 3 (P1 − P2 ), , (P1 + P2 ), , 3 × 20, =, 30, , =, , 3 ( 25 − 5), 25 + 5, , 3 × 2, 2, = 1.1547, =, 3, 3, , φ = tan 1 1.1547 = 49o6', , φ = tan—1 8.66 = 83o.27', , Power factor (Cosφ) = Cos 49o6' = 0.6547, , since power factor (Cos 83o 27') = 0.114., Question 1: The reading on the two wattmeters connected, to measure the power input to the three-phase, balanced, load are 600W and 300W respectively., , b), , P1= 25 KW, P2= –5 KW, , Calculate the total power input and power factor of the load., Question 2: Two wattmeters connected to measure the, power input to a balanced, three-phase load indicate 25KW, and 5KW respectively., Find the power factor of the circuit when (i) both readings, are positive and (ii) the latter reading is obtained after, reversing the connections of the pressure coil of the, wattmeter., Solution, , tan φ =, , 3 (P1 − P2 ), , (P1, , + P2 ), , =, , =, , 3 (25 + 5), =, 25 − 5, , =, , 3 × 3, 2, , 3 ( 25 − ( −5)), 25 + ( −5), 3 × 30, 20, , = 2.5980, , φ = tan 1 2.5980= 68o57', , 1 Total power = PT= P1+ P2, , Power factor = Cos 68o 57' = 0.3592, , P1= 600W., P2= 300W., PT= 600 + 300 = 900 W, tan φ =, , =, , 3 (P1 − P2 ), , (P1, , + P2 ), , 3 ( 600 − 300), , =, , 600 + 300, , =, , 3 × 300, 900, , 3, 1, = 0.5774, =, 3, 3, , φ = tan 10.5774 = 30o, Power factor = Cos 30o = 0.866., , Phase-sequence indicator (Meter), Objectives: At the end of this lesson you shall be able to, • describe the method of finding the phase sequence of a 3-phase supply using a phase-sequence indicator, • explain the methods of finding phase sequence using lamps., Review, A three-phase alternator contains three sets of coils, positioned 120o apart and its output is a three-phase, voltage as shown in Fig 1. A three-phase voltage consists, of three voltage waves, 120 electrical degrees apart., , 274, , At a time 0, phase U is passing through zero volts with, positively increasing voltage. (Fig 1) V follows with its zero, crossing 1/3 of the period later and the same applies to W, with respect to V. The order in which the three-phases, attain their maximum or minimum values is called the, phase sequence. In the illustration given here the phase, sequence is U,V,W., , Electrical : Electrician (NSQF LEVEL - 5) - Related Theory for Exercise 1.6.60 - 1.6.64, , Copyright Free under CC BY Licence
Page 289 :
Phase-sequence indicator using choke and lamps:, The phase-sequence indicator consists of four lamps and, an inductor connected in a star formation (Y). A test lead, is connected to each leg of the `Y'. One lamp is labelled UV-W, and the other is labelled U-W-V. When the three, leads are connected to a three-phase line, the brighter, lamp indicates the phase sequence. (Fig 3), , Importance of correct phase sequence: Correct phase, sequence is important in the construction and connection, of various three-phase systems. For example, correct, phase sequence is important when the outputs of threephase alternators must be paralleled into a common, voltage system. The phase `U' of one alternator must be, connected to phase `U' of another alternator. The phase `V', to phase `V' and phase `W' to phase `W' must be similarly, connected to each other., In the case of an induction motor, reversal of the sequence, results in the reversal of the direction of motor rotation, which will drive the machinery the wrong way., Phase-sequence indicator(meter): A phase-sequence, indicator (meter) provides a means of ensuring the correct, phase-sequence of a three-phase system. The phasesequence indicator consists of 3 terminals `UVW' to, which three-phases of the supply are connected. When the, supply is fed to the indicator a disc in the indicator moves, either in the clockwise direction or in the anticlockwise, direction. The direction of the disc movement is marked with, an arrowhead on the indicator. Below the arrowhead the, correct sequence is marked. (Fig 2), , Phase-sequence indicator using capacitor & lamps:, The phase-sequence indicator consists of four lamps and, a capacitor connected in a star formation (Y). A test lead, is connected to each leg of the `Y'. One pair of lamps are, labelled U-V-W,and the other pair are labelled U-W-V., When the three leads are connected to a 3-phase line, the, brighter lamp indicates the phase sequence. (Fig 4), , The phase sequence of the three-phase system may be, reversed by interchanging the connections of any two of the, three phases., , Electrical : Electrician (NSQF LEVEL - 5) - Related Theory for Exercise 1.6.60 - 1.6.64, , Copyright Free under CC BY Licence, , 275
Page 290 :
Project Work, Objectives: At the end of this lesson you shall be able to, • prepare project report of the project selected, • draw circuit diagram/layout diagram, • list the specification of the material/component to be procured, • list the plan of action to be executed, • develop the project, complete and submit it., Selection of project & its execution, , Preparation of project report, , •, , Discuss in details of the project - necessity, marketting, facility , cost involvement, availability of material and, hope of future development and expansion., , •, , Report should be started with a intreductory, infoprmation connected with a known subject and, highlight its importance in present conditions, , •, , Collect all material and tools required to start the work., , •, , •, , The project has to be agreed by all members involved, and get the approval of the concerned., , A survey to be conducted regarding the marketing and, its commercial application, , •, , •, , Prepare an action oriented plan to execute the work, with in a stipulated time table, accepted by all member, and approval of instructor concerned., , A brief working principle and its operation has to be, illustarted in the report, , •, , Highlight the maintenance, repair and periodic servicing, etc in the report, , •, , Complete the project as per the expectation., , •, , •, , Test, calibrate and finish the project as per the plan, and execution, , Costing should be so competitive and affordable to the, concerned without any reservations, , •, , •, , Keep the project with optimum finish and good workman, ship, , Further expansion to an advanced version without any, much changes and cost to be an added attraction to, your project, , •, , Report shall be followed with ref. books and websiite, details, , 276, , Copyright Free under CC BY Licence
 Learn better on this topic