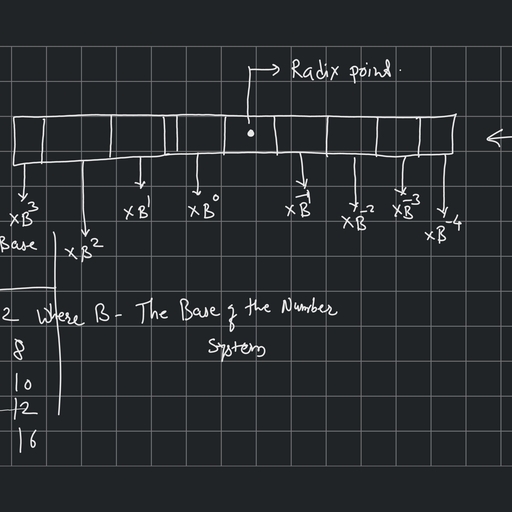
Notes of S.Y.Bsc. Computer Science, Electronics Introduction to embedded system - Study Material
Page 1 :
INTRODUCTION TO, EMBEDDED SYSTEMS, Second Edition
Page 2 :
About the Author, , Shibu Kizhakke Vallathai has over fifteen years of hands-on experience in the Embedded & Real Time, System domain with solid background on all phases of Embedded Product Development Life Cycle. He, holds a B Tech Degree (Hons) in Instrumentation & Control Engineering from the University of Calicut,, Kerala. He started his professional career as Research Associate in the VLSI and Embedded Systems Group, of India’s prime Electronics Research & Development Centre (ER&DCI—under the ministry of Information, & Communication Technology, Government of India) Thiruvananthapuram Unit. He has conducted research, activities in the embedded domain for Contactless Smart Card Technology and Radio Frequency Identification, (RFID). He has developed a variety of products in the Contactless Smart Card & RFID Technology platform, using industry’s most popular 8-bit microcontroller—8051., Shibu has sound working knowledge in Embedded Hardware development using EDA Tools and, firmware development in Assembly Language and Embedded C using a variety of IDEs and cross-compilers, for various 8/16/32 bit microprocessors/microcontrollers and System on Chips. He is also an expert in, RTOS based Embedded System design for various RTOSs including Windows CE, VxWorks, MicroC/, OS-II and RTX-51. He is well versed in various industry standard protocols and bus interfaces. Presently,, he is engaged with the Devices Group of Microsoft Corporation, USA (www.microsoft.com) as senior, Firmware Engineer. Prior to joining Microsoft, he was engaged with the Embedded Systems and Product, Engineering practice unit of Infosys Technologies Limited (www.infosys.com), Thiruvananthapuram unit as, senior Technology Architect.
Page 3 :
INTRODUCTION TO, EMBEDDED SYSTEMS, Second Edition, , Shibu Kizhakke Vallathai, Senior Firmware Engineer, Microsoft Corporation, , McGraw Hill Education (India) Private Limited, NEW DELHI, McGraw Hill Education Offices, New Delhi New York St Louis San Francisco Auckland Bogotá Caracas, Kuala Lumpur Lisbon London Madrid Mexico City Milan Montreal, San Juan Santiago Singapore Sydney Tokyo Toronto
Page 4 :
McGraw Hill Education (India) Private Limited, Published by McGraw Hill Education (India) Private Limited,, P-24, Green Park Extension, New Delhi 110 016., Introduction to Embedded Systems, 2e, Copyright © 2017, 2009 by McGraw Hill Education (India) Private Limited, No part of this publication may be reproduced or distributed in any form or by any means, electronic, mechanical,, photocopying, recording, or otherwise or stored in a database or retrieval system without the prior written permission of, the publishers. The program listing (if any) may be entered, stored and executed in a computer system, but they may not, be reproduced for publication., This edition can be exported from India only by the publishers,, McGraw Hill Education (India) Private Limited., Print Edition:, ISBN (13): 978-93-392-1968-0, ISBN (10): 93-392-1968-6, E-Book Edition:, ISBN (13): 978-93-392-1969-7, ISBN (10): 93-392-1969-4, Managing Director: Kaushik Bellani, Director—Products (Higher Education and Professional): Vibha Mahajan, Specialist—Product Development: Piyush Priyadarshi, Researcher—Product Development: Lubna Irfan, Head—Production (Higher Education and Professional): Satinder S Baveja, Senior Copy Editor: Kritika Lakhera, Senior Production Specialist: Suhaib Ali, Assistant General Manager—Product Management (Higher Education and Professional): Shalini Jha, Manager—Product Management: Kartik Arora, General Manager—Production: Rajender P Ghansela, Manager—Production: Reji Kumar, Information contained in this work has been obtained by McGraw Hill Education (India), from sources believed to be, reliable. However, neither McGraw Hill Education (India) nor its authors guarantee the accuracy or completeness of any, information published herein, and neither McGraw Hill Education (India) nor its authors shall be responsible for any errors,, omissions, or damages arising out of use of this information. This work is published with the understanding that McGraw, Hill Education (India) and its authors are supplying information but are not attempting to render engineering or other, professional services. If such services are required, the assistance of an appropriate professional should be sought., , Typeset at Text-o-Graphics, B-1/56, Aravali Apartment, Sector-34, Noida 201 301, and printed at, Cover Printer:, , Visit us at: www.mheducation.co.in
Page 5 :
I dedicate this book to all Infoscions, my beloved mother late Smt. Santha, my wife Cini,, my son Tejas, my papa, my friends, my other family members and my loved ones
Page 7 :
Contents, , Preface, Acknowledgements, , xiii, xvii, , Part-1: Embedded Systems: Understanding the Basic Concepts, , 1, , 1., , 3, , Introduc on to Embedded Systems, 1.1, 1.2, 1.3, 1.4, 1.5, 1.6, 1.7, , 2., , What is an Embedded System? 4, Embedded Systems VS. General Computing Systems 4, History of Embedded Systems 5, Classification of Embedded Systems 6, Major Application Areas of Embedded Systems 8, Purpose of Embedded Systems 8, Wearable Devices—The Innovative Bonding of Lifestyle with Embedded Technologies 11, Summary 13, Keywords 14, Objective Questions 14, Review Questions 15, , The Typical Embedded System, 2.1, 2.2, 2.3, 2.4, 2.5, 2.6, 2.7, , Core of the Embedded System 18, Memory 29, Sensors and Actuators 35, Communication Interface 45, Embedded Firmware 59, Other System Components 60, PCB and Passive Components 64, Summary 64, Keywords 65, Objective Questions 67, Review Questions 70, Lab Assignments 72, , 16
Page 8 :
viii, , 3., , Contents, , Characteris cs and Quality A ributes of Embedded Systems, 3.1, 3.2, , 4., , Embedded Systems—Applica on- and Domain-Specific, 4.1, 4.2, , 5., , 6., , 7., , Different Addressing Modes Supported by 8051, The 8051 Instruction Set 175, Summary 199, Keywords 200, Objective Questions 201, Review Questions 206, Lab Assignments 207, , 168, 169, , Hardware So ware Co-Design and Program Modelling, 7.1, 7.2, 7.3, 7.4, , 93, , Factors to be Considered in Selecting a Controller 94, Why 8051 Microcontroller 95, Designing with 8051 96, The 8052 Microcontroller 157, 8051/52 Variants 157, Summary 158, Keywords 159, Objective Questions 160, Review Questions 164, Lab Assignments 166, , Programming the 8051 Microcontroller, 6.1, 6.2, , 84, , Washing Machine—Application-Specific Embedded System 84, Automotive–Domain Specific Examples of Embedded System 86, Summary 90, Keywords 91, Objective Questions 91, Review Questions 92, , Designing Embedded Systems with 8bit Microcontrollers—8051, 5.1, 5.2, 5.3, 5.4, 5.5, , 73, , Characteristics of an Embedded System 73, Quality Attributes of Embedded Systems 75, Summary 80, Keywords 80, Objective Questions 81, Review Questions 82, , Fundamental Issues in Hardware Software Co-Design 210, Computational Models in Embedded Design 212, Introduction to Unified Modelling Language (UML) 220, Hardware Software Trade-offs 225, Summary 225, Keywords 226, Objective Questions 228, Review Questions 229, Lab Assignments 230, , 209
Page 9 :
Contents, , Part-2: Design and Development of Embedded Product, 8., , Embedded Hardware Design and Development, 8.1, 8.2, 8.3, 8.4, 8.5, 8.6, 8.7, 8.8, , 9., , 234, , 308, , Embedded Firmware Design Approaches 309, Embedded Firmware Development Languages 312, Programming in Embedded C 324, Summary 376, Keywords 377, Objective Questions 378, Review Questions 383, Lab Assignments 386, , 10. Real-Time Opera ng System (RTOS) based Embedded System Design, 10.1, 10.2, 10.3, 10.4, 10.5, 10.6, 10.7, 10.8, 10.9, 10.10, , 231, , Analog Electronic Components 235, Digital Electronic Components 236, VLSI and Integrated Circuit Design 249, Electronic Design Automation (EDA) Tools 254, How to use the OrCAD EDA Tool? 255, Schematic Design using Orcad Capture CIS 255, The PCB Layout Design 273, Printed Circuit Board (PCB) Fabrication 293, Summary 299, Keywords 300, Objective Questions 301, Review Questions 304, Lab Assignments 305, , Embedded Firmware Design and Development, 9.1, 9.2, 9.3, , ix, , 387, , Operating System Basics 389, Types of Operating Systems 392, Tasks, Process and Threads 396, Multiprocessing and Multitasking 408, Task Scheduling 410, Threads, Processes and Scheduling: Putting them Altogether 428, Task Communication 433, Task Synchronisation 449, Device Drivers 482, How to Choose an RTOS 484, Summary 485, Keywords 487, Objective Questions 489, Review Questions 499, Lab Assignments 504, , 11. An Introduc on to Embedded System Design with VxWorks and MicroC/OS-II RTOS, 11.1 VxWorks 508, 11.2 MicroC/OS-II 523, , 507
Page 10 :
x, , Contents, , Summary 552, Keywords 553, Objective Questions 554, Review Questions 556, Lab Assignments 557, , 12. Integra on and Tes ng of Embedded Hardware and Firmware, , 560, , 12.1 Integration of Hardware and Firmware 561, 12.2 Board Bring up 565, Summary 566, Keywords 567, Review Questions 567, , 13. The Embedded System Development Environment, 13.1, 13.2, 13.3, 13.4, 13.5, 13.6, , 568, , The Integrated Development Environment (IDE) 570, Types of Files Generated on Cross-Compilation 598, Disassembler/Decompiler 607, Simulators, Emulators and Debugging 607, Target Hardware Debugging 615, Boundary Scan 617, Summary 619, Keywords 620, Objective Questions 621, Review Questions 622, Lab Assignments 623, , 14. Product Enclosure Design and Development, , 624, , 14.1 Product Enclosure Design Tools 625, 14.2 Product Enclosure Development Techniques 625, 14.3 Summary 627, Summary 628, Keywords 629, Objective Questions 629, Review Questions 630, , 15. The Embedded Product Development Life Cycle (EDLC), 15.1, 15.2, 15.3, 15.4, 15.5, , What is EDLC? 632, Why EDLC 632, Objectives of EDLC 633, Different Phases of EDLC 635, EDLC Approaches (Modeling the EDLC) 646, Summary 651, Keywords 652, Objective Questions 653, Review Questions 654, , 631
Page 11 :
Contents, , 16. Trends in the Embedded Industry, 16.1, 16.2, 16.3, 16.4, 16.5, 16.6, 16.7, , xi, , 656, , Processor Trends in Embedded System 657, Embedded OS Trends 659, Development Language Trends—BEYOND EMBEDDED C 660, Open Standards, Frameworks and Alliances 663, Bottlenecks 664, Development Platform Trends 665, Cloud, Internet of Things (IoT) and Embedded Systems – The Next Big Thing 666, , Appendix I: Overview of PIC and AVR Family of Microcontrollers and ARM Processors, Appendix II: Design Case Studies, Bibliography, Index, , 669, 688, 726, 728
Page 13 :
Preface, , There exists a common misconception amongst students and young practising engineers that embedded, system design is ‘writing ‘C’ code’. This belief is absolutely wrong and I strongly emphasise that embedded, system design refers to the design of embedded hardware, embedded firmware in ‘C’ or other supporting, languages, integrating the hardware and firmware, and testing the functionalities of both., Embedded system design is a highly specialised branch of Electronics Engineering where the technological, advances of electronics and the design expertise of mechanical engineering work hand-in-hand to deliver, cutting edge technologies and high-end products to a variety of diverse domains including consumer, electronics, telecommunications, automobile, retail and banking applications. Embedded systems represent, an integration of computer hardware, software along with programming concepts for developing specialpurpose computer systems, designed to perform one or a few dedicated functions., The embedded domain offers tremendous job opportunities worldwide. Design of embedded system is, an art, and it demands talented people to take up the design challenges keeping the time frames in mind., The biggest challenge faced by the embedded industry today is the lack of skilled manpower in the domain., Though most of our fresh electronics and computer science engineering graduates are highly talented, they, lack proper training and knowledge in the embedded domain. Lack of suitable books on the subject is one of, the major reasons for this crisis. Although various books on embedded technology are available, almost none, of them are capable of delivering the basic lessons in a simple and structured way. They are written from a, high-end perspective, which are appropriate only for the practising engineers., This book ‘Introduction to Embedded Systems’ is the first-of-its-kind, which will appeal as a, comprehensive introduction to students, and as a guide to practising engineers and project managers. It, has been specially designed for undergraduate courses in Computer Science & Engineering, Information, Technology, Electrical Engineering, Electronics & Communication Engineering and Instrumentation, & Control Engineering. Also, it will be a valuable reference for the students of BSc / MSc / MTech, (CS/IT/Electronics), MCA and DOEACC ‘B’ level courses., The book has been organised in such a way to provide the fundamentals of embedded systems;, the steps involved in the design and development of embedded hardware and firmware, and their integration;, and the life cycle management of embedded system development. Chapters 1 to 4 have been structured, to give the readers a basic idea of an embedded system. Chapters 5 to 13 have been organised to give an, in-depth knowledge on designing the embedded hardware and firmware. They would be very helpful to, practising embedded system engineers. Chapter 15 dealing with the design life cycle of an embedded system, would be beneficial to both practising engineers as well as project managers. Each chapter begins with, learning objectives, presenting the concepts in simple language supplemented with ample tables, figures, and solved examples. An important part of this book comes at the end of each chapter where you will find a
Page 14 :
xiv, , Preface, , brief summary, list of keywords, objective questions (in multiple-choice format) and review questions. To, aid students commence experimentation in the laboratory, lab assignments have been provided in relevant, chapters. An extremely beneficial segment at the end of the book is the overview of PIC & AVR Family, of Microcontrollers & ARM Processors as well as innovative design case studies presenting real-world, situations., The major highlights of this book are as follows:, �, Brings an entirely different approach in the learning of embedded system. It looks at embedded, systems as a whole, specifies what it is, what it comprises of, what is to be done with it and how to, go about the whole process of designing an embedded system., �, Follows a design- and development-oriented approach through detailed explanations for Keil, Micro Vision (i.e., embedded system/integrated development environment), ORCAD (PCB design, software tool) and PCB Fabrication techniques., �, Practical implementation such as washing machines, automotives, and stepper motor and other I/O, device interfacing circuits., �, Programming concepts: deals in embedded C, delving into basics to unravelling advance level, concepts., �, Complete coverage of the 8051 microcontroller architecture and assembly language programming., �, Detailed coverage of RTOS internals, multitasking, task management, task scheduling, task, communication and synchronisation. Ample examples on the various task scheduling policies., �, Comprehensive coverage on the internals of MicroC/OS-II and VxWorks RTOS kernels., �, Written in lucid, easy-to-understand language with strong emphasis on examples, tables and, figures., �, Useful reference for practicing engineers not well conversant with embedded systems and their, applications., �, Rich Pedagogy includes objective questions, lab assignments, solved examples and review, questions., The comprehensive online learning centre http://www.mhhe.com/shibu/es2e accompanying this book, offers valuable resources for students, instructors and professionals., For Instructors, �, PowerPoint slides (chapter-wise), �, A brief chapter on Embedded Programming Language C++/ Java, �, Case studies given in the book, �, Solution manual (chapter-wise), �, Short questions, quizzes in the category of fill in the blanks, true/false and multiple choice questions, (25); programming questions with solution (5). (Level of difficulty: hard), �, Chapter-wise links to important websites and important text materials, �, Digital Pedometer, �, Micro/OSIII, �, Designing with TI MSP430 RISC Microcontrollers, For Students, �, Chapter-wise tutorials, �, A brief chapter on Embedded Programming Language C++/ Java, �, Case studies given in the book and, �, Answers for objective questions/selected review questions and hints for lab assignments provided in, the book., �, Digital Pedometer
Page 15 :
Preface, , xv, , Additional detailed reading material on Micro C/OS III, Designing with TI MSP430 RISC Microcontrollers, �, Short questions, self-test quizzes in the category of fill in the blanks, true/false and multiple choice, questions (25); programming questions with solutions (5). (Level of difficulty: easy/medium/, difficult), �, List of project ideas, �, Chapter-wise links to important websites and important text materials., This book is written purely on the basis of my working knowledge in the field of embedded hardware, and firmware design, and expertise in dealing with the life cycle management of embedded systems. A few, descriptions and images used in this book are taken from websites with prior written copyright permissions, from the owner of the site/author of the articles., The design references and data sheets of devices including the parametric reference used in the illustrative, part of this book are taken from the following websites. Readers are requested to visit these sites for getting, updates and more information on design articles. Also, you can order some free samples from some of the, sites for your design., �, �, , www.intel.com, www.maxim-ic.com, www.atmel.com, www.analog.com, www.microchip.com, www.ti.com, www.nxp.com, www.national.com, www.fairchildsemi.com, www.intersil.com, www.freescale.com, www.xilinx.com, www.orcad.com, www.keil.com, www.embedded.com, www.electronicdesign.com, , Intel Corporation, Maxim/Dallas Semiconductor, Atmel Corporation, Analog Devices, Microchip Technology, Texas Instruments, NXP Semiconductors, National Semiconductor, Fairchild Semiconductor, Intersil Corporation, Freescale Semiconductor, Xilinx (Programmable Devices), Cadence Systems (Orcad Tool), Keil (MicroVision IDE), Online Embedded Magazine, Electronic Design Magazine, , I would be looking forward to suggestions for further improvement of the book which can be sent to,
[email protected]. Kindly mention the title and author name in the subject line. Wish you luck as, you embark on an exhilarating career path!, , Shibu Kizhakke Vellathai
Page 17 :
Acknowledgements, , I take this opportunity to thank Mohammed Rijas (CEO Attinad Software and former Group Project, Manager, Mobility and Embedded Systems Practice, Infosys Technologies Ltd Thiruvananthapuram) and, Shafeer Badharudeen (CTO Attinad Software and former Senior Project Manager, Mobility and Embedded, Systems Practice, Infosys Technologies Ltd Thiruvananthapuram) for their valuable suggestions and, guidance in writing this book. I am also grateful to my team and all other members of the Embedded Systems, Group, Infosys Technologies for inspiring me to write this book. I acknowledge my senior management, team at the Embedded Systems and Mobility practice, Infosys Technologies—Rohit P, Srinivasa Rao, M, Tadimeti Srinivasan, Darshan Shankavaram and Ramesh Adiga—for their constant encouragement, and appreciation of my efforts. I am immensely grateful to R Ravindra Kumar (Senior Director, CDAC, Thiruvananthapuram) for giving me an opportunity to work with the Hardware Design Group of CDAC, (Erstwhile ER&DCI), K G Sulochana (Joint Director CDAC Thiruvananthapuram) for giving me the first, embedded project to kick start my professional career and also for all the support provided to me during my, tenure with CDAC. I convey my appreciation to Biju C Oommen (Associate Director, Hardware Design, Group, CDAC Thiruvananthapuram), who is my great source of inspiration, for giving me the basic lessons, of embedded technology, S Krishnakumar Rao, Sanju Gopal, Deepa R S, Shaji N M and Suresh R Pillai for, their helping hand during my research activities at CDAC, and Praveen V L whose contribution in designing, the graphics of this book is noteworthy. I extend my heartfelt gratitude to all my friends and ex-colleagues of, Hardware Design Group CDAC Thiruvananthapuram—without their prayers and support, this book would, not have been a reality. Last but not the least, I acknowledge my beloved friends and my family members for, their understanding and support during the writing of this book., A token of special appreciation to S Krishnakumar Rao (Joint Director, Hardware Design Group, CDAC, Thiruvananthapuram) for helping me in compiling the section on VLSI Design and Shameerudheen P T for, his help in compiling the section on PCB Layout Design using Orcad Layout Tool., I would like to extend my special thanks to the following persons for coordinating and providing, timely feedback on all requests to the concerned product development/service companies, semiconductor, manufacturers and informative web pages., Angela Williams of Keil Software, Natasha Wan, Jessen Wehrwein and Scott Wayne of Analog Devices, Derek Chan of Atmel Asia, Moe Rubenzahl of Maxim Dallas Semiconductor
Page 20 :
Visual Walkthrough, , LEARNING OBJECTIVES, LEARNING OBJECTIVES, LO 1, LO 2, LO 3, LO 4, , Know what an embedded system is, Differen ate between embedded and general compu ng systems, Underline the history of embedded systems, Classify embedded systems based on performance, complexity and the era in which, they evolved, LO 5 Explain the domains and areas of applica ons of embedded systems, LO 6 Iden fy the different purposes of embedded systems, LO 7 Analyse a real life example on the bonding of embedded technology with human, life, , Our day-to-day life is becoming more and more dependent on “embedded systems” and digital technologies., Embedded technologies are bonding into our daily activities even without our knowledge. Do you know the, f, h h, fi, hi, hi, i, i, di i, l ii, DVD l, d, , Learning Objectives appear at the, beginning of every chapters are intended, to provide students the opportunity to, prepare for what they will be required to, understand in their reading and learning, of the chapter., , LEARNING OBJECTIVES TAGGING, 1.1, , WHAT IS AN EMBEDDED SYSTEM?, , An embedded system is an electronic/electro-mechanical system designed to, perform a specific function and is a combination of both hardware and firmware, (software)., Every embedded system is unique, and the hardware as well as the firmware is, highly specialised to the application domain. Embedded systems are becoming an, inevitable part of any product or equipment in all fields including household appliances, telecommunications,, medical equipment, industrial control, consumer products, etc., LO 1 Know what, an embedded, system is, , 1.2, , It is indicated in every chapter where, specific learning objectives are covered, inside a chapter and also help learners, identify how sections are keyed to the, objectives., , EMBEDDED SYSTEMS VS. GENERAL COMPUTING SYSTEMS, , The computing revolution began with the general purpose computing, requirements. Later it was realised that the general computing requirements are not, sufficient for the embedded computing requirements. The embedded computing, requirements demand ‘something special’ in terms of response to stimuli, meeting, the computational deadlines, power efficiency, limited memory availability, etc., Let’s take the case of your personal computer, which may be either a desktop PC, or a laptop PC or a tablet PC. It is built around a general purpose processor like an Intel® Celeron/Core M or, *, a Duo/Quad core or an AMD A-Series processor and is designed to support a set of multiple peripherals like, l i l USB 3 0, Wi Fi h, id, IEEE1394 SD/CF/MMC, li, f, Bl, h, LO 2 Differentiate, between embedded, and general, computing systems
Page 21 :
xxi, , Visual Walkthrough, , SECTIONS AND SUB-SECTIONS, 6.1 DIFFERENT ADDRESSING MODES SUPPORTED BY 8051, The term ‘addressing mode’ refers to “How the operand is specified in an, instruction” along with opcode. The operand may be one or a combination, of the following–memory location(s), contents of memory location(s),, register(s), or constant. Depending on the type of operands, the addressing, modes are classified as follows., , LO 1 Learn how to, program the 8051, microcontroller using, Assembly Language, , 6.1.1 Direct Addressing, The operand is specified as an 8 bit memory address. For 8051 processor, only the lower 128 byte internal, data memory and the SFRs are directly accessible., For example, MOV A, 07H (Moves the content of memory location 07H to the accumulator. 07H refers, to the address of data memory at location 7. If memory location 07H contains the value 255, executing this, instruction will modify the content of A to 255) uses MOV as opcode and A, 07H as operands (Fig. 6.1)., Registers, , A, , Each chapter has been neatly divided, into Sections and Sub-sections so that, the subject matter is studied in a logical, progression of ideas and concepts., , Data memory, , Memory, address, , SOLVED EXAMPLES, Provided at appropriate locations, Solved, Examples aid in understanding of the, fundamentals of embedded hardware, and firmware design., , Example 2, Register R0 contains 0BH. Add the contents of register R0 with the sum obtained in the previous example, using ADDC instruction. Explain the output of the summation and the status of the carry flag after the, addition operation., The instruction ADDC A, R0 adds accumulator content with contents of register R0 and the carry flag, (CY). Before executing this instruction, the accumulator contains the sum of previous addition operation,, which is 0FH and the carry flag (CY) is in the set state. Register R0 contains 0BH. Executing the instruction, ADDC A, R0 adds 0FH with 0BH and 1. The resulting output is 1BH which is less than FFH. This resets the, carry flag. Accumulator register holds the sum. It should be noted that each addition operation sets or resets, the carry flag based on the result of addition, regardless of the previous condition of the carry flag. Figure, 6.12 explains the ADDC operation., D7 D6 D5 D4 D3 D2 D1 D0, A, ADDC A,R0, , 0, , 0, , 0, , 0, , 1, , 1, , 1, , R0, , 1, , 0FH, , CY, =1, , +, 0, , 0, , 0, , 0, , 1, , 0, , 1, , 1, , 0BH, , 1.6.3 Data (Signal) Processing, As mentioned earlier, the data (voice, image, video,, electrical signals, and other measurable quantities), collected by embedded systems may be used for, various kinds of data processing. Embedded systems, with signal processing functionalities are employed in, applications demanding signal processing like speech, coding, synthesis, audio video codec, transmission, applications, etc., A digital hearing aid is a typical example of an, embedded system employing data processing. Digital, hearing aid improves the hearing capacity of hearing, impaired persons., , 1.6.4 Monitoring, , PHOTOGRAPHS, , Fig. 1.3, , A digital hearing aid employing signal processing, , technique (Siemens TRIANO 3 Digital hearing aid;, Embedded systems falling under this category are, Siemens Audiology Copyright© 2005), specifically designed for monitoring purpose. Almost, all embedded products coming under the medical, domain are with monitoring functions only. They, are used for determining the state of some variables, using input sensors. They cannot impose control, over variables. A very good example is the electro, cardiogram (ECG) machine for monitoring the, heartbeat of a patient. The machine is intended to do the, monitoring of the heartbeat. It cannot impose control, over the heartbeat. The sensors used in ECG are the, different electrodes connected to the patient’s body., Some other examples of embedded systems with, monitoring function are measuring instruments like, digital CRO, digital multimeters, logic analysers,, etc. used in Control & Instrumentation applications. Fig. 1.4 A patient monitoring system for monitoring, They are used for knowing (monitoring) the status of, heartbeat (Photo courtesy of Philips Medical Systems, (www.medical.philips.com/)), some variables like current, voltage, etc. They cannot, control the variables in turn., , Photographs of important concepts,, designs and architectural descriptions, bring the subject to life.
Page 22 :
xxii, , Visual Walkthrough, , ILLUSTRATIONS, Machine cycle (M1), S1, , S2, , S3, , S4, , S5, , Machine cycle (M2), S6, , T State, S1 S2, , S3, , S4, , S5, , S6, , Clock Cycles, P P P P P P P P P P P P P P P P P P P P P P P P, 1 2 1 2 1 2 1 2 1 2 1 2 1 2 1 2 1 2 1 2 1 2 1 2, , ALE, , Effective and accurate Illustrations, demonstrate the concepts, design, problems and steps involved in the design, of embedded systems., , PSEN, RD, , PCH out, , P2, P0, , INST, in, , Fig. 6.10, , PCL, out, , INST, in, , DPH or P2 SFR out, ADDR, (DPL/Ri), out, , Data, in, , PCH out, PCL, out, , INST, in, , PCH ou, PCL, out, , Timing diagram for MOVX instruction when the program memory is external, , MOVX is a two machine cycle instruction. The opcode fetching starts at state-1 (S1) of the first machine, cycle and it is latched to the instruction register. A second program memory fetch occurs at State 4 (S4) of the, same machine cycle. Program memory fetches are skipped during the second machine cycle. This is the only, time program memory fetches are skipped. The instruction-fetch and execute sequence and timing remains, the same regardless the physical location of program memory (it can be either internal or external). If the, program memory is external, the Program Strobe Enable (PSEN) is asserted low on each program memory, fetch and it is activated twice per machine cycle (Fig. 6.10). Since there is no program fetch associated with, , CHAPTER SUMMARY AND KEYWORDS, , Summary, � There exists a set of characteristics which are unique to each embedded system., , LO1, , � Embedded systems are application and domain specific., , LO2, , � Quality attributes of a system represents the non-functional requirements that need to be, LO2, documented properly in any system design., � The operational quality attributes of an embedded system refers to the non-functional requirements, that needs to be considered for the operational mode of the system. Response, Throughput,, Reliability, Maintainability, Security, Safety, etc. are examples of operational quality LO2, attributes., � The non-operational quality attributes of an embedded system refers to the non-functional, requirements that needs to be considered for the non-operational mode of the system. Testability,, debug-ability, evolvability, portability, time-to-prototype and market, per unit cost and LO2, revenue, etc. are examples of non-operational quality attributes., � The product life cycle curve (PLC) is the graphical representation of the unit cost, product sales and, profit with respect to the various life cycle stages of the product starting from conception, LO2, to disposal., � For a commercial embedded product, the unit cost is peak at the introductory stage and it falls in, the maturity stage., LO2, � The revenue of a commercial embedded product is at the peak during the maturity stage. LO2, , Keywords, Reac ve system: An embedded system which produces changes in output in response to the changes in input, , [LO 1], Real-Time system: A system which adheres to strict ming behaviour and responds to requests in a known, amount of me, [LO 1], Quality a ributes: The non-func onal requirements that need to be addressed in any system design [LO 2], Response: It is a measure of quickness of the system, [LO 2], Throughput: The rate of produc on or opera on of a defined process over a stated period of me [LO 2], Reliability: It is a measure of how much % one can rely upon the proper func oning of a system, [LO 2], MTBF: Mean Time Between Failures–The frequency of failures in hours/weeks/months, [LO 2], MTTR: Mean Time To Repair–Specifies how long the system is allowed to be out of order following a failure, Time-to-prototype: A measure of the me required to prototype a design, [LO 2], Product life-cycle (PLC): The representa on of the different stages of a product from its concep on to disposal, , [LO 2], Product life cycle curve: The graphical representa on of the unit cost, product sales and profit with respect, to the various life cycle stages of the product star ng from concep on to disposal, [LO 2], , Summary: Each chapter ends with a LO, tagged summary to give learners a gist of, the chapter and help them have a quick, glance on the main points of a chapter, Keywords: A list of important terms, used in the chapter have been given to, help learners recapitulate what has been, dealt with in the various topics covered in, the chapter
Page 23 :
xxiii, , Visual Walkthrough, , OBJECTIVE AND REVIEW QUESTIONS, Objec ve Ques ons, , Readers can assess their knowledge by, answering the Objective Questions in, multiple-choice format. Review Questions, spur students to apply and integrate, chapter content. They are tagged with, LOs of the chapter, , 1. Which of the following is true about VxWorks OS, (a) Hard real-time (b) Soft real-time, (c) Multitasking, (d) (a) and (c), (e) (b) and (c), 2. A task is waiting for a semaphore for its operation. Under VxWorks task state terminology, the task is said, to be in _______ state, (a) READY, (b) RUNNING, (c) PEND, (d) SUSPEND, (e) None of these, 3. Under VxWorks kernel the state of a task which is currently executing is changed to SUSPEND. Which of, the following system call might have occurred?, (a) taskSpawn(), (b) taskActivate(), (c) taskSuspend(), (d) msgQSend(), (e) None of these, 4 U d V W k k, l h, f, k i SUSPEND Whi h f h f ll i, i, ?, , Review Ques ons, 1. What is EDLC? Why EDLC is essential in embedded product development?, , [LO 1], , 2. What are the objectives of EDLC?, [LO 1, LO 2], 3. Explain the significance of Productivity in embedded product development. Explain the techniques for, productivity improvements., [LO 3], 4. Explain the different phases of Embedded Product Development Life Cycle (EDLC)., 5. Explain the term ‘model’ in relation to EDLC., 6. Explain the different types of Product Development needs., , [LO 4], [LO 5], [LO 4], [LO 4], , 7. Explain the Product Re-engineering need in detail., 8. Explain the various activities performed during the Conceptualisation phase of an Embedded product, development, [LO 4], , LAB ASSIGNMENTS, Lab Assignments, 1. Write an Embedded C program for building a dancing LED circuit using 8051 as per the requirements, given below, (a) 4 Red LEDs are connected to Port Pins P1.0, P1.2, P1.4 and P1.6 respectively, (b) 4 Green LEDs are connected to Port Pins P1.1, P1.3, P1.5 and P1.7 respectively, (c) Turn On and Off the Green and Red LEDs alternatively with a delay of 100 milliseconds, (d) Use a clock frequency of 12 MHz, (e) Use Keil μVision IDE and simulate the application for checking the firmware, (f) Write the application separately for delay generation using timer and software routines, 2. Implement the above requirement in Assembly Language, 3. Write an Embedded C application for reading the status of 8 Dip switches connected to the Port P1 of, the 8051 microcontroller using μVision IDE. Debug the application using the simulator and simulate, the state of DIP switches using the Port simulator for P1, 4. Implement the above requirement in Assembly language, 5. Write an Embedded C program to count the pulses appearing on the C/T0 input pin of 8051, microcontroller for a duration of 100 milliseconds using μVision IDE, 6. Implement the above requirement in Assembly language, , To aid students conduct experiments in, the laboratory, Lab Assignments have, been provided at the end of relevant, chapters.
Page 24 :
xxiv, , Visual Walkthrough, , APPENDIX ON DIFFERENT FAMILY OF, MICROPROCESSORS AND CONTROLLERS, Appendix, , I, The Appendix section is intended to give, an overview of PIC & AVR family of, microcontrollers & ARM processor., , Overview of PIC, and AVR Family of, Microcontrollers and, ARM Processors, , INTRODUCTION TO PIC® FAMILY OF MICROCONTROLLERS, PIC® is a popular 8/16/32 bit RISC microcontroller family from Microchip Technology (www.microchip., com). The 8bit PIC family comprises the products PIC10F, PIC12F, PIC16F and PIC18F. They differ in, the amount of program memory supported, performance, instruction length and pin count. Based on the, architecture, the 8bit PIC family is grouped into three namely;, , Baseline Products based on the original PIC architecture. They support 12bit instruction set with very, limited features. They are available in 6 to 40 pin packages. The 6 pin 10F series, some 12F series (8 pin, 12F629) and some 16F series (The 20-pin 16F690 and 40-pin 16F887) falls under this category., Mid-Range This is an extension to the baseline architecture with added features like support for interrupts,, on-chip peripherals (Like A/D converter, Serial Interfaces, LCD interface, etc.), increased memory, etc. The, instruction set for this architecture is 14bit wide. They are available in 8 to 64 pin packages with operating, voltage in the range 1.8V to 5.5V. Some products of the 12F (The 8 pin 12F629) and the 16F (20-pin 16F690, and 40-pin 16F887) series comes under this category., , High Performance The PIC 18F J and K series comes under this category. The memory density for these, devices is very high (Up to 128KB program memory and 4KB data memory). They provide built-in support, for advanced peripherals and communication interfaces like USB, CAN, etc. The instruction set for this, architecture is 16bit wide. They are capable of delivering a speed of 16MIPS., As mentioned earlier we have a bunch of devices to select for our design, from the PIC 8bit family., Some of them have limited set of I/O capabilities, on-chip Peripherals, data memory (SRAM) and program, memory (FLASH) targeting low end applications. The 12F508 controller is a typical example for this. It, contains 512 × 12 bits of program memory, 25 bytes of RAM, 6 I/O lines and comes in an 8-pin package., On the other hand some of the PIC family devices are feature rich with a bunch of on-chip peripherals (Like, ADC, UART, I2C, SPI, etc.), higher data and program storage memory, targeting high end applications. The, 16F877 controller is a typical example for this. It contains 8192 × 14 bits of FLASH program memory, 368, bytes of RAM, 256 bytes of EEPROM, 33 I/O lines, On-chip peripherals like 10-bit A/D converter, 3-Timer, units USART Interrupt Controller etc It comes in a 40 pin package, , CASE STUDIES, Appendix, , II, , Design Case Studies, , 1. DIGITAL CLOCK, Design and Implement a Digital Clock as per the requirements given below., 1. Use a 16 character 2-line display for displaying the current Time. Display the time in DAY HH:MM:SS, format on the first line. Display the message ‘Have A Nice Day!’ on the second line. DAY represents, the day of the Week (SUN, MON, TUE, WED, THU, FRI and SAT). HH represents the hour in 2 digit, format. Depending on the format settings it may vary from 00 to 12 (12 Hour Format) or from 00 to 23, (24 Hour format). MM represents the minute in 2 digit format. It varies from 00 to 59. SS represents the, seconds in 2 digit format. It varies from 00 to 59. The alignment of display character should be centre, justified (Meaning if the characters to display are 12, pack it with 2 blank space each at right and left, and then display)., 2. Interface a Hitachi HD44780 compatible LCD with 8051 microcontroller as per the following interface, details, Data Bus: Port P2, Register Select Control line (RS): Port Pin P1.4, Read/Write Control Signal (RW): Port Pin P1.5, LCD Enable (E): P1.6, , A comprehensive set of five Case Studies,, at the end of the book demonstrate the, applications of theoretical concepts.
Page 25 :
PART-1, Embedded Systems:, Understanding the Basic Concepts
Page 26 :
Understanding the basic concepts is essential in the learning of any subject. Designing an Embedded, System is not a herculean task if you know the fundamentals. Like any general computing systems, Embedded, Systems also possess a set of characteristics which are unique to the embedded system under consideration., In contrast to the general computing systems, Embedded Systems are highly domain and application specific, in nature, meaning; they are specifically designed for certain set of applications in certain domains like, consumer electronics, telecom, automotive, industrial control, measurement systems etc. Unlike general, computing systems it is not possible to replace an embedded system which is specifically designed for an, application catering to a specific domain with another embedded system catering to another domain. The, designer of the embedded system should be aware of its characteristics, and its domain and application, specific nature., An embedded system is an electrical/electro mechanical system which is specifically designed for an, application catering to a specific domain. It is a combination of specialised hardware and firmware (software),, which is tailored to meet the requirements of the application under consideration. An embedded system, contains a processing unit which can be a microprocessor or a microcontroller or a System on Chip (SoC), or an Application Specific Integrated Circuit (ASIC)/Application Specific Standard Product (ASSP) or a, Programmable Logic Device (PLD) like FPGA or CPLD, an I/O subsystem which facilitates the interfacing, of sensors and actuators which acts as the messengers from and to the ‘Real world’ to which the embedded, system is interacting, on-board and external communication interfaces for communicating between the, various on-board subsystems and chips which builds the embedded system and external systems to which, the embedded system interacts, and other supervisory systems and support units like watchdog timers, reset, circuits, brown-out protection circuits, regulated power supply unit, clock generation circuit etc. which, empower and monitor the functioning of the embedded system. The design of embedded system has two, aspects: The hardware design which takes care of the selection of the processing unit, the various I/O sub, systems and communication interface and the inter connection among them, and the design of the embedded, firmware which deals with configuring the various sub systems, implementing data communication and, processing/controlling algorithm requirements. Depending on the response requirements and the type of, applications for which the embedded system is designed, the embedded system can be a Real-time or a, Non-real time system. The response requirements for a real-time system like Flight Control System, Airbag, Deployment System for Automotive etc, are time critical and the hardware and firmware design aspects for, such systems should take these into account, whereas the response requirements for non-real time systems, like Automatic Teller Machines (ATM), Media Playback Systems etc, need not be time critical and missing, deadlines may be acceptable in such systems., Like any other systems, embedded systems also possess a set of quality attributes, which are the nonfunctional requirements like security, scalability, availability, maintainability, safety, portability etc. The, non-functional requirements for the embedded system should be identified and should be addressed properly, in the system design. The designer of the embedded system should be aware of the different non-functional, requirement for the embedded system and should handle this properly to ensure high quality., This section of the book is dedicated for describing the basic concepts of Embedded Systems. The chapters, in this section are organised in a way to give the readers a comprehensive introduction to ‘Embedded Systems,, their application areas and their role in real life’, ‘The different elements of a typical Embedded System’, the, basic lessons on ‘The characteristics and quality attributes of Embedded Systems’, ‘Domain and Application, specific usage examples for Embedded Systems’ and the ‘Hardware and Software Co-design approach for, Embedded System Design’, and a detailed introduction to ‘The architecture and programming concepts for, 8051 Microcontroller – The 8bit Microcontroller selected for our design examples’. We will start the section, with the chapter on ‘Introduction to Embedded Systems’
Page 27 :
Introduc on to Embedded Systems, , 1, , 3, , Introduction to, Embedded Systems, , LEARNING OBJECTIVES, LO 1, LO 2, LO 3, LO 4, , Know what an embedded system is, Differen ate between embedded and general compu ng systems, Underline the history of embedded systems, Classify embedded systems based on performance, complexity and the era in which, they evolved, LO 5 Explain the domains and areas of applica ons of embedded systems, LO 6 Iden fy the different purposes of embedded systems, LO 7 Analyse a real life example on the bonding of embedded technology with human, life, , Our day-to-day life is becoming more and more dependent on “embedded systems” and digital technologies., Embedded technologies are bonding into our daily activities even without our knowledge. Do you know the, fact that the refrigerator, washing machine, microwave oven, air conditioner, television, DVD players, and, music systems that we use in our home are built around an embedded system? You may be traveling by a, ‘Honda’ or a ‘Toyota’ or a ‘Ford’ vehicle, but have you ever thought of the genius players working behind the, special features and security systems offered by the vehicle to you? It is nothing but an intelligent embedded, system. In your vehicle itself the presence of specialised embedded systems vary from intelligent head lamp, controllers, engine controllers and ignition control systems to complex air bag control systems to protect, you from a severe accident. People experience the power of embedded systems and enjoy the features and, comfort provided by them. Most of us are totally unaware or ignorant of the intelligent embedded systems, giving us so much comfort and security. Embedded systems are like reliable servants–they don’t like to reveal, their identity and neither they complain about their workloads to their owners or bosses. They are always, working behind the scenes and are dedicated to their assigned task till their last breath. This book gives you, an overview of embedded systems, the various steps involved in their design and development and the major, domains where they are deployed.
Page 28 :
4, , Introduc on to Embedded Systems, , 1.1, , WHAT IS AN EMBEDDED SYSTEM?, , An embedded system is an electronic/electro-mechanical system designed to, perform a specific function and is a combination of both hardware and firmware, (software)., Every embedded system is unique, and the hardware as well as the firmware is, highly specialised to the application domain. Embedded systems are becoming an, inevitable part of any product or equipment in all fields including household appliances, telecommunications,, medical equipment, industrial control, consumer products, etc., LO 1 Know what, an embedded, system is, , 1.2, , EMBEDDED SYSTEMS VS. GENERAL COMPUTING SYSTEMS, , The computing revolution began with the general purpose computing, requirements. Later it was realised that the general computing requirements are not, sufficient for the embedded computing requirements. The embedded computing, requirements demand ‘something special’ in terms of response to stimuli, meeting, the computational deadlines, power efficiency, limited memory availability, etc., Let’s take the case of your personal computer, which may be either a desktop PC, or a laptop PC or a tablet PC. It is built around a general purpose processor like an Intel® Celeron/Core M or, a Duo/Quad* core or an AMD A-Series processor and is designed to support a set of multiple peripherals like, multiple USB 3.0 ports, Wi-Fi, ethernet, video port, IEEE1394, SD/CF/MMC external interfaces, Bluetooth,, etc and with additional interfaces like a DVD read/writer, on-board Hard Disk Drive (HDD), gigabytes of, RAM, etc. You can load any supported operating system (like Windows® 8.X/10, or Red Hat Linux/Ubuntu, Linux, UNIX etc) into the hard disk of your PC. You can write or purchase a multitude of applications for, your PC and can use your PC for running a large number of applications (like printing your dear’s photo using, a printer device connected to the PC and printer software, creating a document using Microsoft® Office Word, tool, etc.) Now, let us think about the DVD player you use for playing DVD movies. Is it possible for you, to change the operating system of your DVD? Is it possible for you to write an application and download it, to your DVD player for executing? Is it possible for you to add a printer software to your DVD player and, connect a printer to your DVD player to take a printout? Is it possible for you to change the functioning of, your DVD player to a television by changing the embedded software? The answers to all these questions are, ‘NO’. Can you see any general purpose interface like Bluetooth or Wi-Fi on your DVD player? Of course, ‘NO’. The only interface you can find out on the DVD player is the interface for connecting the DVD player, with the display screen and one for controlling the DVD player through a remote (May be an IR or any, other specific wireless interface). Indeed your DVD player is an embedded system designed specifically, for decoding digital video and generating a video signal as output to your TV or any other display screen, which supports the display interface supported by the DVD Player. Let us summarise our findings from the, comparison of embedded system and general purpose computing system with the help of a table:, LO 2 Differentiate, between embedded, and general, computing systems, , General Purpose Computing System, , Embedded System, , A system which is a combination of a generic hardware A system which is a combination of special purpose, and a General Purpose Operating System for executing a hardware and embedded OS for executing a specific set, variety of applications, of applications, (Contd.), *The illustration given here is based on the processor details available till Dec 2015. Since processor technology is undergoing rapid, changes, the processor names mentioned here may not be relevant in future.
Page 29 :
5, , Introduc on to Embedded Systems, , General Purpose Computing System, Contains a General Purpose Operating System (GPOS), , Embedded System, May or may not contain an operating system for functioning, , Applications are alterable (programmable) by the user (It is The firmware of the embedded system is pre-programmed, possible for the end user to re-install the operating system, and it is non-alterable by the end-user (There may be exceptions for systems supporting OS kernel image flashing, and also add or remove user applications), through special hardware settings), Performance is the key deciding factor in the selection of Application-specific requirements (like performance, power, the system. Always, ‘Faster is Better’, requirements, memory usage, etc.) are the key deciding, factors, Less/not at all tailored towards reduced operating power Highly tailored to take advantage of the power saving modes, requirements, options for different levels of power man- supported by the hardware and the operating system, agement., Response requirements are not time-critical, , For certain category of embedded systems like mission, critical systems, the response time requirement is highly, critical, , Need not be deterministic in execution behaviour, , Execution behaviour is deterministic for certain types of, embedded systems like ‘Hard Real Time’ systems, , However, the demarcation between desktop systems and embedded systems in certain areas of embedded, applications are shrinking in certain contexts. Smart phones are typical examples of this. Nowadays smart, phones are available with RAM 2 to 3 GB and users can extend most of their desktop applications to the, smart phones and it invalidates the clause “Embedded systems are designed for a specific application” from, the characteristics of the embedded system for the mobile embedded device category. However, smart phones, come with a built-in operating system and it is not modifiable by the end user. It makes the clause: “The, firmware of the embedded system is unalterable by the end user”, still a valid clause in the mobile embedded, device category., , 1.3, , HISTORY OF EMBEDDED SYSTEMS, , Embedded systems were in existence even before the IT revolution. In the olden, LO 3 Underline, days, embedded systems were built around the old vacuum tube and transistor, the, history of, technologies and the embedded algorithm was developed in low level languages., embedded, systems, Advances in semiconductor and nano-technology and IT revolution gave, way to the development of miniature embedded systems. The first recognised, modern embedded system is the Apollo Guidance Computer (AGC) developed by the MIT Instrumentation, Laboratory for the lunar expedition. They ran the inertial guidance systems of both the Command Module, (CM) and the Lunar Excursion Module (LEM). The Command Module was designed to encircle the moon, while the Lunar Module and its crew were designed to go down to the moon surface and land there safely., The Lunar Module featured in total 18 engines. There were 16 reaction control thrusters, a descent engine, and an ascent engine. The descent engine was ‘designed to’ provide thrust to the lunar module out of the lunar, orbit and land it safely on the moon. MIT’s original design was based on 4K words of fixed memory (Read, Only Memory) and 256 words of erasable memory (Random Access Memory). By June 1963, the figures, reached 10K of fixed and 1K of erasable memory. The final configuration was 36K words of fixed memory, and 2K words of erasable memory. The clock frequency of the first microchip proto model used in AGC
Page 30 :
6, , Introduc on to Embedded Systems, , was 1.024 MHz and it was derived from a 2.048 MHz crystal clock. The computing unit of AGC consisted, of approximately 11 instructions and 16 bit word logic. Around 5000 ICs (3-input NOR gates, RTL logic), supplied by Fairchild Semiconductor were used in this design. The user interface unit of AGC is known as, DSKY (display/keyboard). DSKY looked like a calculator type keypad with an array of numerals. It was used, for inputting the commands to the module numerically., The first mass-produced embedded system was the guidance computer for the Minuteman-I missile in, 1961. It was the ‘Autonetics D-17’ guidance computer, built using discrete transistor logic and a hard-disk for, main memory. The first integrated circuit was produced in September 1958 but computers using them didn’t, begin to appear until 1963. Some of their early uses were in embedded systems, notably used by NASA, for the Apollo Guidance Computer and by the US military in the Minuteman-II intercontinental ballistic, missile., , 1.4, , CLASSIFICATION OF EMBEDDED SYSTEMS, , LO 4 Classify, embedded systems, based on performance,, complexity and the era, in which they evolved, , It is possible to have a multitude of classifications for embedded systems,, based on different criteria. Some of the criteria used in the classification of, embedded systems are as follows:, (1), (2), (3), (4), , Based on generation, Complexity and performance requirements, Based on deterministic behaviour, Based on triggering., , The classification based on deterministic system behaviour is applicable for ‘Real Time’ systems. The, application/task execution behaviour for an embedded system can be either deterministic or non- deterministic., Based on the execution behaviour, Real Time embedded systems are classified into Hard and Soft. We will, discuss about hard and soft real time systems in a later chapter. Embedded Systems which are ‘Reactive’ in, nature (Like process control systems in industrial control applications) can be classified based on the trigger., Reactive systems can be either event triggered or time triggered., , 1.4.1, , Classification Based on Generation, , This classification is based on the order in which the embedded processing systems evolved from the, first version to where they are today. As per this criterion, embedded systems can be classified into the, following:, , 1.4.1.1 First Genera on The early embedded systems were built around 8bit microprocessors like, 8085 and Z80, and 4bit microcontrollers. Simple in hardware circuits with firmware developed in Assembly, code. Digital telephone keypads, stepper motor control units etc. are examples of this., , 1.4.1.2 Second Genera on These are embedded systems built around 16bit microprocessors and 8 or, 16 bit microcontrollers, following the first generation embedded systems. The instruction set for the second, generation processors/controllers were much more complex and powerful than the first generation processors/, controllers. Some of the second generation embedded systems contained embedded operating systems, for their operation. Data Acquisition Systems, SCADA systems, etc. are examples of second generation, embedded systems., 1.4.1.3 Third Genera on With advances in processor technology, embedded system developers started, making use of powerful 32bit processors and 16bit microcontrollers for their design. A new concept of
Page 31 :
Introduc on to Embedded Systems, , 7, , application and domain specific processors/controllers like Digital Signal Processors (DSP) and Application, Specific Integrated Circuits (ASICs) came into the picture. The instruction set of processors became more, complex and powerful and the concept of instruction pipelining also evolved. The processor market was, flooded with different types of processors from different vendors. Processors like Intel Pentium, Motorola, 68K, etc. gained attention in high performance embedded requirements. Dedicated embedded real time and, general purpose operating systems entered into the embedded market. Embedded systems spread its ground, to areas like robotics, media, industrial process control, networking, etc., , 1.4.1.4 Fourth Genera on The advent of System on Chips (SoC), reconfigurable processors and, multicore processors are bringing high performance, tight integration and miniaturisation into the embedded, device market. The SoC technique implements a total system on a chip by integrating different functionalities, with a processor core on an integrated circuit. We will discuss about SoCs in a later chapter. The fourth, generation embedded systems are making use of high performance real time embedded operating systems, for their functioning. Smart phone devices, mobile internet devices (MIDs), etc. are examples of fourth, generation embedded systems., , 1.4.1.5, , What Next? The processor and embedded market is highly dynamic and demanding. So ‘what, will be the next smart move in the next embedded generation?’ Let’s wait and see., , 1.4.2, , Classification Based on Complexity and Performance, , This classification is based on the complexity and system performance requirements. According to this, classification, embedded systems can be grouped into the following:, , 1.4.2.1 Small-Scale Embedded Systems, , Embedded systems which are simple in application needs, and where the performance requirements are not time critical fall under this category. An electronic toy is a, typical example of a small-scale embedded system. Small-scale embedded systems are usually built around, low performance and low cost 8 or 16 bit microprocessors/microcontrollers. A small-scale embedded system, may or may not contain an operating system for its functioning., , 1.4.2.2 Medium-Scale Embedded Systems Embedded systems which are slightly complex in, hardware and firmware (software) requirements fall under this category. Medium-scale embedded systems, are usually built around medium performance, low cost 16 or 32 bit microprocessors/microcontrollers or, digital signal processors. They usually contain an embedded operating system (either general purpose or real, time operating system) for functioning., 1.4.2.3 Large-Scale Embedded Systems/Complex Systems Embedded systems which involve, highly complex hardware and firmware requirements fall under this category. They are employed in mission, critical applications demanding high performance. Such systems are commonly built around high performance, 32 or 64 bit RISC processors/controllers or Reconfigurable System on Chip (RSoC) or multi-core processors, and programmable logic devices. They may contain multiple processors/controllers and co-units/hardware, accelerators for offloading the processing requirements from the main processor of the system. Decoding/, encoding of media, cryptographic function implementation, etc. are examples for processing requirements, which can be implemented using a co-processor/hardware accelerator. Complex embedded systems usually, contain a high performance Real Time Operating System (RTOS) for task scheduling, prioritisation, and, management.
Page 32 :
8, , Introduc on to Embedded Systems, , 1.5, , MAJOR APPLICATION AREAS OF EMBEDDED SYSTEMS, , We are living in a world where embedded systems play a vital role in our dayto-day life, starting from home to the computer industry, where most of the, people find their job for a livelihood. Embedded technology has acquired a new, dimension from its first generation model, the Apollo guidance computer, to the, latest radio navigation system combined with in-car entertainment technology, and the wearable computing devices (Apple watch, Microsoft Band, Fitbit fitness, trackers etc.). The application areas and the products in the embedded domain are countless. A few of the, important domains and products are listed below:, (1) Consumer electronics: Camcorders, cameras, etc., (2) Household appliances: Television, DVD players, washing machine, fridge, microwave oven, etc., (3) Home automation and security systems: Air conditioners, sprinklers, intruder detection alarms, closed, circuit television cameras, fire alarms, etc., (4) Automotive industry: Anti-lock breaking systems (ABS), engine control, ignition systems, automatic, navigation systems, etc., (5) Telecom: Cellular telephones, telephone switches, handset multimedia applications, etc., (6) Computer peripherals: Printers, scanners, fax machines, etc., (7) Computer networking systems: Network routers, switches, hubs, firewalls, etc., (8) Healthcare: Different kinds of scanners, EEG, ECG machines etc., (9) Measurement & Instrumentation: Digital multimeters, digital CROs, logic analysers PLC systems, etc., (10) Banking & Retail: Automatic teller machines (ATM) and currency counters, point of sales (POS), (11) Card Readers: Barcode, smart card readers, hand held devices, etc., (12) Wearable Devices: Health and Fitness Trackers, Smartphone Screen extension for notifications, etc., (13) Cloud Computing and Internet of Things (IOT), LO 5 Explain the, domains and areas, of applications of, embedded systems, , 1.6, , PURPOSE OF EMBEDDED SYSTEMS, , LO 6 Identify the, different purposes, of embedded, systems, (1), (2), (3), (4), (5), (6), , As mentioned in the previous section, embedded systems are used in various, domains like consumer electronics, home automation, telecommunications,, automotive industry, healthcare, control & instrumentation, retail and banking, applications, etc. Within the domain itself, according to the application usage, context, they may have different functionalities. Each embedded system is, designed to serve the purpose of any one or a combination of the following tasks:, , Data collection/Storage/Representation, Data communication, Data (signal) processing, Monitoring, Control, Application specific user interface, , 1.6.1, , Data Collection/Storage/Representation, , Embedded systems designed for the purpose of data collection performs acquisition of data from the external, world. Data collection is usually done for storage, analysis, manipulation, and transmission. The term “data”, refers to all kinds of information, viz. text, voice, image, video, electrical signals and any other measurable, quantities. Data can be either analog (continuous) or digital (discrete). Embedded systems with analog data, capturing techniques collect data directly in the form of analog signals whereas embedded systems with, digital data collection mechanism converts the analog signal to corresponding digital signal using analog to, digital (A/D) converters and then collects the binary equivalent of the analog data. If the data is digital, it can, be directly captured without any additional interface by digital embedded systems.
Page 33 :
Introduc on to Embedded Systems, , 9, , The collected data may be stored directly in the system or may be transmitted to some other systems or it, may be processed by the system or it may be deleted instantly after giving a meaningful representation. These, actions are purely dependent on the purpose for which the embedded system is designed. Embedded systems, designed for pure measurement applications without storage, used in control and instrumentation domain,, collects data and gives a meaningful representation of the collected data by means of graphical representation, or quantity value and deletes the collected data when new data arrives at the data collection terminal. Analog, and digital CROs without storage memory are typical examples of this. Any measuring equipment used in the, medical domain for monitoring without storage functionality also comes under this category., Some embedded systems store the collected data for processing and analysis. Such systems incorporate a, built-in/plug-in storage memory for storing the captured data. Some of them give the user a meaningful, representation of the collected data by visual, (graphical/quantitative) or audible means using, display units [Liquid Crystal Display (LCD), Light, Emitting Diode (LED), etc.] buzzers, alarms, etc., Examples are: measuring instruments with storage, memory and monitoring instruments with storage, memory used in medical applications. Certain, embedded systems store the data and will not give, a representation of the same to the user, whereas, the data is used for internal processing., A digital camera is a typical example of an, embedded system with data collection/storage/, representation of data. Images are captured and the, captured image may be stored within the memory Fig. 1.1 A digital camera for image capturing/ storage/display, (Photo courtesy of Casio-Model EXILIM ex-Z850, of the camera. The captured image can also be, (www.casio.com)), presented to the user through a graphic LCD unit., , 1.6.2, , Data Communication, , Embedded data communication systems are deployed in applications ranging from complex satellite, communication systems to simple home networking systems., As mentioned earlier in this chapter, the data collected by an, embedded terminal may require transferring of the same to some, other system located remotely. The transmission is achieved, either by a wire-line medium or by a wireless medium. Wireline medium was the most common choice in all olden days, embedded systems. As technology is changing, wireless medium, is becoming the de-facto standard for data communication, in embedded systems. A wireless medium offers cheaper, connectivity solutions and make the communication link free, from the hassle of wire bundles. Data can either be transmitted, by analog means or by digital means. Modern industry trends, are settling towards digital communication., The data collecting embedded terminal itself can incorporate, Fig. 1.2 A wireless network router for data, data communication units like wireless modules (Bluetooth,, communication (Photo courtesy of Linksys, ZigBee, Wi-Fi, EDGE, GPRS, etc.) or wire-line modules (RS(www.linksys.com). A division of CISCO, 232C, USB, TCP/IP, PS2, etc.). Certain embedded systems, system)
Page 34 :
10, , Introduc on to Embedded Systems, , act as a dedicated transmission unit between the sending and receiving terminals, offering sophisticated, functionalities like data packetizing, encrypting and decrypting. Network hubs, routers, switches, etc., are typical examples of dedicated data transmission embedded systems. They act as mediators in data, communication and provide various features like data security, monitoring etc., , 1.6.3, , Data (Signal) Processing, , As mentioned earlier, the data (voice, image, video,, electrical signals, and other measurable quantities), collected by embedded systems may be used for, various kinds of data processing. Embedded systems, with signal processing functionalities are employed in, applications demanding signal processing like speech, coding, synthesis, audio video codec, transmission, applications, etc., A digital hearing aid is a typical example of an, embedded system employing data processing. Digital, hearing aid improves the hearing capacity of hearing, impaired persons., , 1.6.4, , Monitoring, , Fig. 1.3, , A digital hearing aid employing signal processing, technique (Siemens TRIANO 3 Digital hearing aid;, , Embedded systems falling under this category are, Siemens Audiology Copyright© 2005), specifically designed for monitoring purpose. Almost, all embedded products coming under the medical, domain are with monitoring functions only. They, are used for determining the state of some variables, using input sensors. They cannot impose control, over variables. A very good example is the electro, cardiogram (ECG) machine for monitoring the, heartbeat of a patient. The machine is intended to do the, monitoring of the heartbeat. It cannot impose control, over the heartbeat. The sensors used in ECG are the, different electrodes connected to the patient’s body., Some other examples of embedded systems with, monitoring function are measuring instruments like, digital CRO, digital multimeters, logic analysers,, etc. used in Control & Instrumentation applications. Fig. 1.4 A patient monitoring system for monitoring, They are used for knowing (monitoring) the status of, heartbeat (Photo courtesy of Philips Medical Systems, (www.medical.philips.com/)), some variables like current, voltage, etc. They cannot, control the variables in turn., , 1.6.5, , Control, , Embedded systems with control functionalities impose control over some variables according to the changes, in input variables. A system with control functionality contains both sensors and actuators. Sensors are, connected to the input port for capturing the changes in environmental variable or measuring variable. The
Page 35 :
11, , Introduc on to Embedded Systems, , actuators connected to the output port are controlled according to the changes in input variable to put an, impact on the controlling variable to bring the controlled variable to the specified range., Air conditioner system used in our home to, control the room temperature to a specified limit is a, typical example for embedded system for control, purpose. An airconditioner contains a room, temperature-sensing element (sensor) which may be, a thermistor and a handheld unit for setting up, (feeding) the desired temperature. The handheld unit, may be connected to the central embedded unit, Fig. 1.5 An Airconditioner for controlling room, residing inside the airconditioner through a wireless, temperature. Embedded System with Control, link or through a wired link. The air compressor unit, functionality, acts as the actuator. The compressor is controlled, (Photo courtesy of Electrolux Corpora on), according to the current room temperature and the, desired temperature set by the end user., Here the input variable is the current room temperature, and the controlled variable is also the room temperature. The, controlling variable is cool air flow by the compressor unit., If the controlled variable and input variable are not at the, same value, the controlling variable tries to equalise them, through taking actions on the cool air flow., , 1.6.6, , Application Specific User, Interface, , These are embedded systems with application-specific user, interfaces like buttons, switches, keypad, lights, bells, display, units, etc. Mobile phone is an example for this. In mobile, phone the user interface is provided through the keypad,, graphic LCD module, system speaker, vibration alert, etc., , 1.7, , Fig. 1.6 An embedded system with an applicationspecific user interface (Photo courtesy of, BlackBerry Smartphone Handsets, (amazon.com)), , WEARABLE DEVICES—THE INNOVATIVE BONDING, OF LIFESTYLE WITH EMBEDDED TECHNOLOGIES, , Wearable Devices/Wearables is a hot topic of discussion at the time of the first, revision of this book (Year 2015). Wearable Devices/Wearables refer to embedded, LO 7 Analyse a, technologies/systems which are incorporated into accessories (watch, bracelet,, real life example, ring, necklace, eye glass, headband, beanies, etc.) and apparels. Wearable, on the bonding, technology envisions the bonding of embedded technologies into our day-to-day, of embedded, life and is setting a new dimension to fashion and lifestyle. It empowers you, technology with, with the power of embedded computing and communication, keeping you always, human life, connected and alerted with things which you are most interested (e.g. Social, Feeds - Twitter, Facebook, etc., Instant Messages from your dear and near, tracking your fitness activities,, etc.), without compromising on the fashion aspects of your lifestyle.
Page 36 :
12, , Introduc on to Embedded Systems, , The calculator watch from Casio, introduced in the 1980s, was a classic example for the concept of, wearable device. In terms of the computing power, today's wearable devices are capable of performing many, of the same computing tasks as smartphones and tablets; and in some cases they can even outperform these, gadgets. While the term Wearables is generally used to specify a set of accessories and apparels which can be, put on and taken off easily, certain type of devices which are implanted into the body like smart tattoos, RFID, microchips etc. also falls under the broad definition of Wearables. The primary goal of wearable technologies, is to smoothly integrate functional, portable embedded computing devices into individuals’ day-to-day life to, provide constant, convenient, seamless integration (Information at a quick glance—View your social feeds, from Facebook, Twitter, etc. on the screen of a Smartwatch which is connected to your Smartphone and act as, a second screen for your phone) and hands-free access to other connected devices (e.g. Interact with a gaming, console or Music player App on a smartphone through simulated touch gestures from a wearable device like, smart ring). The majority of the wearable devices out there in the market today/proposed for future fall under, the Health and Fitness monitoring/Entertainment/Smartphone Accessory or feature extension category., What is inside a wearable device is solely dependent on the targeted end functionality. In general, wearable, device includes an embedded controller which acts as the master brain of the unit, a wireless Communication, subsystem [(Based on Wireless technologies like Bluetooth/Wi-Fi/NFC (Near Field Communication)/, Cellular, etc.)] for establishing data/voice communication with other electronic systems like Smartphones,, Laptops, Tablets, Gaming consoles, etc. Let us consider a concept Smartwatch which acts a normal watch, and at the same time has a bunch of sensors embedded into it to keep track of the various fitness activities, like number of steps taken and distance walked (Pedometer functionality), number of floors climbed etc., and to track and record vital signs like heart-rate. An embedded Processor/Microcontroller (Like ARM) will, act as the master controller unit, which interfaces with the on-board subsystems like sensor modules which, keep track of the various fitness activities and record the vital signals, wireless communication link like, Bluetooth for establishing communication channel with an interfacing device like Smartphone/Tablet. The, pedometer functionality is implemented through MEMS 3-D accelerometer sensor (e.g. LIS2DH from ST, Microelectronics). An Altimeter/Barometric sensor can be used for tracking the number of floors climbed., The heart rate monitoring functionality is implemented by the combination of an Optic/Photo sensor or, Pressure Sensor or Electrodes with an Analog Front End (AFE) chip (e.g. Analog Devices AD8232 AFE, chip) for signal conditioning. Depending on the volume of readings to be stored in the device, the device, may contain a few kilobytes to a few Megabytes of Flash (Storage) memory. An ultra-low power Bluetooth, transceiver is used for establishing a wireless communication interface with the device and it can talk to other, peripherals over standard Bluetooth profiles like (SPP - Serial Port Profile, MAP - Message Access Profile,, GATT - Generic Attribute Profile, etc.). Since the device is intended to work as a standalone, portable device, it will contain a battery (Mostly a rechargeable Li-lo battery) to power the unit and a battery charging and, monitoring subsystem to re-charge the battery and to keep track of the battery status., Fitbit Charge, Surge (www.fitbit.com), are examples of wearable devices for fitness and activity tracking., Sony SmartWatch 3 (http://www.sonymobile.com/us/products/smartwear/smartwatch-3-swr50/), Samsung, Galaxy Gear Series Smart watches are examples of wearable devices which provide the functionality of, a watch and at the same time acts an accessory/extension to your smartphone - Featuring Quick Glance, notifications, such as texts, emails social feeds, phone calls, hands-free calling all on your wrist. APPLE, WATCH announced in Sep 2014 is an example of a Wearable device which acts as an accessory to the, iPhone for providing notifications and content from apps and also integrates the functionality of a watch,, health and fitness tracking, mobile payment and many other niche features. Microsoft Band is a wearable, device which provides integration with multi-mobile-platforms (Windows/Android/iOS) for notifications, (Call, Text, Social Feeds etc.) and also acts a fitness tracker and health monitoring device. It integrates, multiple sensors (Optical Heart Rate sensor, 3-axis accelerometer/gyro, GPS, Ambient light sensor, Skin, temperature sensor, UV sensor, Galvanic skin response sensor, Barometer etc.) and tracks steps, heart rate,
Page 37 :
13, , Introduc on to Embedded Systems, , calories burned, sleep quality, floors climbed, detects the presence of harmful UV light and maps the route, during a run., , (a) Fitness Activity Tracker Smartwatch, , (b) Interfacing Smartphone App, , Fig. 1.7 Fitness Watch—A concept Model of a Wearable Device for Fitness Ac vity Tracking, , The wearable technology is constantly evolving and gaining more popularity. It has the potential to, significantly influence the fields of Interactive Entertainment (Gaming, Music, Video etc.) Health and Fitness,, Education, Enterprise, Transportation, Retail etc. According to a leading US Market analysis and Research, firm, the total shipment volume of wearable devices is expected to surpass150 millions by year 2019 with a, Compound Annual Growth Rate (CGAR) of over 40%., , Summary, � An embedded system is an Electronic/Electro-mechanical system designed to perform a specific, function and is a combination of both hardware and firmware (Software)., LO1, � A general purpose computing system is a combination of generic hardware and general, purpose operating system for executing a variety of applications, whereas an embedded LO2, system is a combination of special purpose hardware and embedded OS/firmware for, executing a specific set of applications., � Apollo Guidance Computer (AGC) is the first recognised modern embedded system and ‘Autonetics, D-17’, the guidance computer for the Minuteman-I missile, was the first mass-produced LO3, embedded system., � Based on the complexity and performance requirements, embedded systems are classified into, small-scale, medium-scale and large-scale/complex., LO4, � The presence of embedded systems vary from simple electronic toys to complex flight and, missile control systems., LO5, � Embedded systems are designed to serve the purpose of any one or a combination of data, collection/storage/representation, data communication, data (signal) processing, LO6, monitoring, control or application specific user interface., � Wearable devices refer to embedded technologies/systems which are incorporated into accessories, and apparels. It envisions the bonding of embedded technology in our day-to-day lives., LO7
Page 38 :
14, , Introduc on to Embedded Systems, , Keywords, Embedded system: An electronic/electro-mechanical system which is designed to perform a specific func on, and is a combina on of both hardware and firmware, [LO 1], Opera ng system: A piece of so ware designed to manage and allocate system resources and execute other, pieces of so ware, [LO 2], RAM: Random Access memory. Vola le memory, [LO 3], Microprocessor: A silicon chip represen ng a Central Processing Unit (CPU), [LO 4], Microcontroller: A highly integrated chip that contains a CPU, scratchpad RAM, special and general purpose, register arrays and integrated peripherals, [LO 4], SCADA: Supervisory Control and Data Acquisi on System. A data acquisi on system used in industrial control, applica ons, [LO 4], DSP: Digital Signal Processor is a powerful special purpose 8/16/32 bit microprocessor designed specifically to, meet the computa onal demands and power constraints, [LO 5], ASIC: Applica on Specific Integrated Circuit is a microchip designed to perform a specific or unique applica on, , [LO 6], Sensor: A transducer device that converts energy from one form to another for any measurement or control, purpose, [LO 6], Actuator: A form of transducer device (mechanical or electrical) which converts signals to corresponding, physical ac on (mo on), [LO 6], LED: Light Emi ng Diode. An output device producing visual indica on in the form of light in accordance with, current flow, [LO 6], Buzzer: A piezo-electric device for genera ng audio indica on. It contains a piezo-electric diaphragm which, produces audible sound in response to the voltage applied to it, [LO 6], Electro Cardiogram (ECG): An embedded device for heartbeat monitoring, [LO 6], ADC: Analog to Digital Converter. An integrated circuit which converts analog signals to digital form [LO 6], Bluetooth: A low cost, low power, short range wireless technology for data and voice communica on [LO 6], Wi-Fi: Wireless Fidelity is the popular wireless communica on technique for networked communica on of, devices, [LO 6], , Objec ve Ques ons, 1. Embedded systems are, (a) General purpose, (b) Special purpose, 2. Embedded system is, (a) An electronic system, (b) A pure mechanical system, (c) An electro-mechanical system, (d) (a) or (c), 3. Which of the following is not true about embedded systems?, (a) Built around specialised hardware, (b) Always contain an operating system, (c) Execution behaviour may be deterministic(d) All of these, (e) None of these
Page 39 :
15, , Introduc on to Embedded Systems, , 4. Which of the following is not an example of a ‘Small-scale Embedded System’?, (a) Electronic Barbie doll, (b) Simple calculator, (c) Cell phone, (d) Electronic toy car, 5. The first recognised modern embedded system is, (a) Apple Computer, (b) Apollo Guidance Computer (AGC), (c) Calculator, (d) Radio Navigation System, 6. The first mass produced embedded system is, (a) Minuteman-I, (b) Minuteman-II, (c) Autonetics D-17, (d) Apollo Guidance Computer (AGC), 7. Which of the following is (are) an intended purpose(s) of embedded systems?, (a) Data collection, (b) Data processing (c), Data communication, (d) All of these, (e) None of these, 8. Which of the following is an (are) example(s) of embedded system for data communication?, (a) USB Mass storage device, (b) Network router, (c) Digital camera, (d) Music player, (e) All of these, (f) None of these, 9. A digital multi meter is an example of an embedded system for, (a) Data communication, (b) Monitoring, (c) Control, (d) All of these, (e) None of these, 10. Which of the following is an (are) example(s) of an embedded system for signal processing?, (a) Apple iPOD (media player device), (b) SanDisk USB mass storage device, (c) Both (a) and (b), (d) None of these, , Review Ques ons, 1. What is an embedded system? Explain the different applications of embedded systems., , [LO 1, LO 2, LO 3], 2. Explain the different classifications of embedded systems. Give an example for each., , [LO 4, LO 5, LO 6, LO7], 3. Explain the various purposes of embedded systems in detail with illustrative examples., , [LO 5, LO 6, LO 7]
Page 40 :
16, , Introduc on to Embedded Systems, , 2, , The Typical Embedded, System, , LEARNING OBJECTIVES, LO 1 Iden fy the building blocks of a typical Embedded System, Learn about GPPs, ASIPs, Microprocessors, Microcontrollers, Digital Signal, Processors, RISC & CISC processors, Harvard and Von-Neumann Processor, Architecture, Big-endian v/s Li le endian processors, Load Store opera on and, Instruc on pipelining, Understand different PLDs like CPLDs, FPGAs, etc., LO 2 Explain different memory technologies and memory types used in embedded system, development, Learn about MROM, PROM, OTP, EPROM, EEPROM and FLASH memory, Describe SAM, SRAM, DRAM, and NVRAM, List the factors to be considered in the memory selec on, LO 3 Analyse the role of sensors, actuators, and their interfacing with the I/O subsystems of, an embedded system, Learn about the interfacing of LEDs, 7-segment LED Displays, Piezo Buzzer,, Stepper Motor, Relays, Optocouplers, Matrix keyboard, Push bu on switches,, Programmable Peripheral Interface Device (e.g. 8255 PPI), etc. with the I/O, subsystem of the embedded system, LO 4 Examine the different communica on interfaces of an embedded system, Understand the various chip level communica on interfaces like I2C, SPI, UART,, 1-wire, parallel bus, etc., Know the different wired and wireless external communica on interfaces like, RS-232C, RS-485, Parallel Port, USB, IEEE 1394, Infrared (IrDA), Bluetooth, Wi-Fi,, ZigBee, GPRS, etc., LO 5 Describe what embedded firmware is and its role in embedded systems, LO 6 Know the different system components like Reset Circuit, Brown-out protec on circuit,, Oscillator Unit, Real-Time Clock (RTC) and Watchdog Timer unit, LO 7 Discuss the role of PCB in embedded systems
Page 41 :
The Typical Embedded System, , 17, , A typical embedded system (Fig. 2.1) contains a single chip controller, which acts as the master brain of the, system. The controller can be a Microprocessor (e.g. Intel 8085) or a microcontroller (e.g. Atmel AT89C51), or a Field Programmable Gate Array (FPGA) device (e.g. Xilinx Spartan) or a Digital Signal Processor (DSP), (e.g. Blackfin® Processors from Analog Devices) or an Application Specific Integrated Circuit (ASIC)/, Application Specific Standard Product (ASSP) (e.g. ADE7760 Single Phase Energy Metreing IC from), Analog Devices for energy metering applications)., , Fig. 2.1, , Elements of an embedded system, , Embedded hardware/software systems are basically designed to regulate a physical variable or to, manipulate the state of some devices by sending some control signals to the Actuators or devices connected, to the O/p ports of the system, in response to the input signals provided by the end users or Sensors which are, connected to the input ports. Hence an embedded system can be viewed as a reactive system. The control is, achieved by processing the information coming from the sensors and user interfaces, and controlling some, actuators that regulate the physical variable., Key boards, push button switches, etc. are examples for common user interface input devices whereas, LEDs, liquid crystal displays, piezoelectric buzzers, etc. are examples for common user interface output, devices for a typical embedded system. It should be noted that it is not necessary that all embedded systems, should incorporate these I/O user interfaces. It solely depends on the type of the application for which the, embedded system is designed. For example, if the embedded system is designed for any handheld application,, such as a mobile handset application, then the system should contain user interfaces like a keyboard for, performing input operations and display unit for providing users the status of various activities in progress.
Page 42 :
18, , Introduc on to Embedded Systems, , Some embedded systems do not require any manual intervention for their operation. They automatically, sense the variations in the input parameters in accordance with the changes in the real world, to which, they are interacting through the sensors which are connected to the input port of the system. The sensor, information is passed to the processor after signal conditioning and digitisation. Upon receiving the sensor, data the processor or brain of the embedded system performs some predefined operations with the help of the, firmware embedded in the system and sends some actuating signals to the actuator connected to the output, port of the embedded system, which in turn acts on the controlling variable to bring the controlled variable to, the desired level to make the embedded system work in the desired manner., The Memory of the system is responsible for holding the control algorithm and other important, configuration details. For most of embedded systems, the memory for storing the algorithm or configuration, data is of fixed type, which is a kind of Read Only Memory (ROM) and it is not available for the end user for, modifications, which means the memory is protected from unwanted user interaction by implementing some, kind of memory protection mechanism. The most common types of memories used in embedded systems for, control algorithm storage are OTP, PROM, UVEPROM, EEPROM and FLASH. Depending on the control, application, the memory size may vary from a few bytes to megabytes. We will discuss them in detail in the, coming sections. Sometimes the system requires temporary memory for performing arithmetic operations, or control algorithm execution and this type of memory is known as “working memory”. Random Access, Memory (RAM) is used in most of the systems as the working memory. Various types of RAM like SRAM,, DRAM, and NVRAM are used for this purpose. The size of the RAM also varies from a few bytes to, kilobytes or megabytes depending on the application. The details given under the section “Memory” will give, you a more detailed description of the working memory., An embedded system without a control algorithm implemented memory is just like a new born baby. It is, having all the peripherals but is not capable of making any decision depending on the situational as well as, real world changes. The only difference is that the memory of a new born baby is self-adaptive, meaning that, the baby will try to learn from the surroundings and from the mistakes committed. For embedded systems it, is the responsibility of the designer to impart intelligence to the system., In a controller-based embedded system, the controller may contain internal memory for storing the control, algorithm and it may be an EEPROM or FLASH memory varying from a few kilobytes to megabytes. Such, controllers are called controllers with on-chip ROM, e.g. Atmel AT89C51. Some controllers may not contain, on-chip memory and they require an external (off-chip) memory for holding the control algorithm, e.g. Intel, 8031AH., , 2.1, , CORE OF THE EMBEDDED SYSTEM, , Embedded systems are domain and application specific and are built around a, LO 1 Identify, central core. The core of the embedded system falls into any one of the following, the building, categories:, blocks of a typical, (1) General Purpose and Domain Specific Processors, Embedded System, 1.1 Microprocessors, 1.2 Microcontrollers, 1.3 Digital Signal Processors, (2) Application Specific Integrated Circuits (ASICs), (3) Programmable Logic Devices (PLDs), (4) Commercial off-the-shelf Components (COTS), If you examine any embedded system you will find that it is built around any of the core units mentioned, above.
Page 43 :
The Typical Embedded System, , 2.1.1, , 19, , General Purpose and Domain Specific Processors, , Almost 80% of the embedded systems are processor/controller based. The processor may be a microprocessor, or a microcontroller or a digital signal processor, depending on the domain and application. Most of the, embedded systems in the industrial control and monitoring applications make use of the commonly available, microprocessors or microcontrollers whereas domains which require signal processing such as speech coding,, speech recognition, etc. make use of special kind of digital signal processors supplied by manufacturers like,, Analog Devices, Texas Instruments, etc., , 2.1.1.1 Microprocessors A Microprocessor is a silicon chip representing a central processing unit, (CPU), which is capable of performing arithmetic as well as logical operations according to a pre-defined set, of instructions, which is specific to the manufacturer. In general, the CPU contains the Arithmetic and Logic, Unit (ALU), control unit and working registers. A microprocessor is a dependent unit and it requires the, combination of other hardware like memory, timer unit, and interrupt controller, etc. for proper functioning., Intel claims the credit for developing the first microprocessor unit Intel 4004, a 4bit processor which was, released in November 1971. It featured 1K data memory, a 12bit program counter and 4K program memory,, sixteen 4bit general purpose registers and 46 instructions. It ran at a clock speed of 740 kHz. It was designed, for olden day’s calculators. In 1972, 14 more instructions were added to the 4004 instruction set and the, program space is upgraded to 8K. Also interrupt capabilities were added to it and it is renamed as Intel 4040., It was quickly replaced in April 1972 by Intel 8008 which was similar to Intel 4040, the only difference was, that its program counter was 14 bits wide and the 8008 served as a terminal controller. In April 1974 Intel, launched the first 8 bit processor, the Intel 8080, with 16bit address bus and program counter, and seven, 8bit registers (A-E,H,L: BC, DE, and HL pairs formed the 16bit register for this processor). Intel 8080 was, the most commonly used processors for industrial control and other embedded applications in the 1975s., Since the processor required other hardware components as mentioned earlier for its proper functioning, the, systems made out of it were bulky and were lacking compactness., Immediately after the release of Intel 8080, Motorola also entered the market with their processor,, Motorola 6800 with a different architecture and instruction set compared to 8080., In 1976 Intel came up with the upgraded version of 8080 – Intel 8085, with two newly added instructions,, three interrupt pins and serial I/O. Clock generator and bus controller circuits were built-in and the power, supply part was modified to a single +5 V supply., In July 1976 Zilog entered the microprocessor market with its Z80 processor as competitor to Intel., Actually it was designed by an ex-Intel designer, Frederico Faggin and it was an improved version of Intel’s, 8080 processor, maintaining the original 8080 architecture and instruction set with an 8bit data bus and a, 16bit address bus and was capable of executing all instructions of 8080. It included 80 more new instructions, and it brought out the concept of register banking by doubling the register set. Z80 also included two sets of, index registers for flexible design., Technical advances in the field of semiconductor industry brought a new dimension to the microprocessor, market and twentieth century witnessed a fast growth in processor technology. 16, 32 and 64 bit processors came, into the place of conventional 8bit processors. The initial 2 MHz clock is now an old story. Today processors, with clock speeds over 3.0 GHz are available in the market. More and more competitors entered into the, processor market offering high speed, high performance and low cost processors for customer design needs., Intel, AMD, Freescale, GLOBALFOUNDRIES, TI, Cyrix, NVIDIA, Qualcomm, MediaTek, etc. are, the key players in the processor market. Intel still leads the market with cutting edge technologies in the, processor industry., Different instruction set and system architecture are available for the design of a microprocessor. Harvard, and Von-Neumann are the two common system architectures for processor design. Processors based on
Page 44 :
20, , Introduc on to Embedded Systems, , Harvard architecture contains separate buses for program memory and data memory, whereas processors, based on Von-Neumann architecture shares a single system bus for program and data memory. We will, discuss more about these architectures later, under a separate topic. Reduced Instruction Set Computing, (RISC) and Complex Instruction Set Computing (CISC) are the two common Instruction Set Architectures, (ISA) available for processor design. We will discuss the same under a separate topic in this section., , 2.1.1.2 General Purpose Processor (GPP) vs. Applica on-Specific Instruc on Set Processor (ASIP), A General Purpose Processor or GPP is a processor designed for general computational tasks. The processor, running inside your laptop or desktop (Pentium 4/AMD Athlon, etc.) is a typical example for general purpose, processor. They are produced in large volumes and targeting the general market. Due to the high volume, production, the per unit cost for a chip is low compared to ASIC or other specific ICs. A typical general, purpose processor contains an Arithmetic and Logic Unit (ALU) and Control Unit (CU). On the other hand,, Application Specific Instruction Set Processors (ASIPs) are processors with architecture and instruction, set optimised to specific-domain/application requirements like network processing, automotive, telecom,, media applications, digital signal processing, control applications, etc. ASIPs fill the architectural spectrum, between general purpose processors and Application Specific Integrated Circuits (ASICs). The need for an, ASIP arises when the traditional general purpose processor are unable to meet the increasing application, needs. Most of the embedded systems are built around application specific instruction set processors. Some, microcontrollers (like Automotive AVR, megaAV from Atmel), system on chips, digital signal processors,, etc. are examples for application specific instruction set processors (ASIPs). ASIPs incorporate a processor, and on-chip peripherals, demanded by the application requirement, program and data memory., , 2.1.1.3 Microcontrollers A Microcontroller is a highly integrated chip that contains a CPU, scratch, pad RAM, special and general purpose register arrays, on chip ROM/FLASH memory for program storage,, timer and interrupt control units and dedicated I/O ports. Microcontrollers can be considered as a super set, of microprocessors. Since a microcontroller contains all the necessary functional blocks for independent, working, they found greater place in the embedded domain in place of microprocessors. Apart from this, they, are cheap, cost effective and are readily available in the market., Texas Instrument’s TMS 1000 is considered as the world’s first microcontroller. We cannot say it as a fully, functional microcontroller when we compare it with modern microcontrollers. TI followed Intel’s 4004/4040,, 4 bit processor design and added some amount of RAM, program storage memory (ROM) and I/O support on, a single chip, there by eliminated the requirement of multiple hardware chips for self-functioning. Provision, to add custom instructions to the CPU was another innovative feature of TMS 1000. TMS 1000 was released, in 1974., In 1977 Intel entered the microcontroller market with a family of controllers coming under one umbrella, named MCS-48TM family. The processors came under this family were 8038HL, 8039HL, 8040AHL, 8048H,, 8049H, and 8050AH. Intel 8048 is recognised as Intel’s first microcontroller and it was the most prominent, member in the MCS-48TM* family. It was used in the original IBM PC keyboard. The inspiration behind 8048, was Fairchild’s F8 microprocessor and Intel’s goal of developing a low cost and small size processor. The, design of 8048 adopted a true Harvard architecture where program and data memory shared the same address, bus and is differentiated by the related control signals., Eventually Intel came out with its most fruitful design in the 8bit microcontroller domain–the 8051 family, and its derivatives. It is the most popular and powerful 8bit microcontroller ever built. It was developed in, the 1980s and was put under the family MCS-51. Almost 75% of the microcontrollers used in the embedded, domain were 8051 family based controllers during the 1980–90s. 8051 processor cores are used in more than, *, , MCS-48TM is a trade mark owned by Intel
Page 45 :
21, , The Typical Embedded System, , 100 devices by more than 20 independent manufacturers like Maxim, NXP, Atmel, etc. under the license, from Intel. Due to the low cost, wide availability, memory efficient instruction set, mature development tools, and Boolean processing (bit manipulation operation) capability, 8051 family derivative microcontrollers are, much used in high-volume consumer electronic devices, entertainment industry and other gadgets where, cost-cutting is essential., Another important family of microcontrollers used in industrial control and embedded applications is the, PIC family micro controllers from Microchip Technologies (It will be discussed in detail in a later section of, this book). It is a high performance RISC microcontroller complementing the CISC (Complex Instruction Set, Computing) features of 8051. The terms RISC and CISC will be explained in detail in a separate heading., Some embedded system applications require only 8bit controllers whereas some embedded applications, requiring superior performance and computational needs demand 16/32bit microcontrollers. Infineon,, Freescale, Philips, Atmel, Maxim, Microchip etc. are the key suppliers of 16bit microcontrollers. Philips, tried to extend the 8051 family microcontrollers to use for 16bit applications by developing the Philips XA, (eXtended Architecture) microcontroller series., 8bit microcontrollers are commonly used in embedded systems where the processing power is not a big, constraint. As mentioned earlier, more than 20 companies are producing different flavours of the 8051 family, microcontroller. They try to add more and more functionalities like built in SPI, I2C serial buses, USB, controller, ADC, Networking capability, etc. So the competitive market is driving towards a one-stop solution, chip in microcontroller domain. High processing speed microcontroller families like ARM Cortex M Series, are also available in the market, which provides solution to applications requiring hardware acceleration and, high processing capability., Freescale, Renesas, Zilog, Cypress (Spansion), Infineon, ST Micro Electronics, EPSON, Texas Instruments,, Toshiba, NXP, Microchip, Analog Devices, Daewoo, Intel, Maxim, Sharp, Silicon Laboratories, HOLTEK,, LAPIS, CYROD, Atmel, etc. are the key players in the microcontroller market. Of these Atmel has got, special significance. They are the manufacturers of a variety of Flash memory based microcontrollers. They, also provide In-System Programmability (which will be discussed in detail in a later section of this book) for, the controller. The Flash memory technique helps in fast reprogramming of the chip and thereby reduces the, product development time. Atmel also provides another special family of microcontroller called AVR (it will, be discussed in detail in a later chapter), an 8bit RISC Flash microcontroller, fast enough to execute powerful, instructions in a single clock cycle and provide the latitude you need to optimise power consumption., The instruction set architecture of a microcontroller can be either RISC or CISC. Microcontrollers are, designed for either general purpose application requirement (general purpose controller) or domain- specific, application requirement (application specific instruction set processor). The Intel 8051 microcontroller is a, typical example for a general purpose microcontroller, whereas the automotive AVR microcontroller family, from Atmel Corporation is a typical example for ASIP specifically designed for the automotive domain., , 2.1.1.4 Microprocessor vs Microcontroller The following table summarises the differences between, a microcontroller and microprocessor., Microprocessor, , Microcontroller, , A silicon chip representing a central processing unit (CPU), A microcontroller is a highly integrated chip that contains a, which is capable of performing arithmetic as well as logical CPU, scratchpad RAM, special and general purpose register, operations according to a predefined set of instructions, arrays, on chip ROM/FLASH memory for program storage,, timer and interrupt control units and dedicated I/O ports, (Contd.)
Page 46 :
22, , Introduc on to Embedded Systems, , Microprocessor, , Microcontroller, , It is a dependent unit. It requires the combination of other It is a self-contained unit and it doesn’t require external, chips like timers, program and data memory chips, interrupt interrupt controller, timer, UART, etc. for its functioning, controllers, etc. for functioning, Most of the time general purpose in design and operation, , Mostly application-oriented or domain-specific, , Doesn’t contain a built in I/O port. The I/O port functionality Most of the processors contain multiple built-in I/O ports, needs to be implemented with the help of external program- which can be operated as a single 8 or 16 or 32 bit port or, mable peripheral interface chips like 8255, as individual port pins, Targeted for high end market where performance is im- Targeted for embedded market where performance is not so, portant, critical (At present this demarcation is invalid), Limited power saving options compared to microcon- Includes lot of power saving features, trollers, , 2.1.1.5 Digital Signal Processors Digital Signal Processors (DSPs) are powerful special purpose, 8/16/32 bit microprocessors designed specifically to meet the computational demands and power constraints, of today’s embedded audio, video, and communications applications. Digital signal processors are 2 to 3, times faster than the general purpose microprocessors in signal processing applications. This is because, of the architectural difference between the two. DSPs implement algorithms in hardware which speeds up, the execution whereas general purpose processors implement the algorithm in firmware and the speed of, execution depends primarily on the clock for the processors. In general, DSP can be viewed as a microchip, designed for performing high speed computational operations for ‘addition’, ‘subtraction’, ‘multiplication’, and ‘division’. A typical digital signal processor incorporates the following key units:, Program Memory, Data Memory, , Memory for storing the program required by DSP to process the data., , Working memory for storing temporary variables and data/signal to be processed., , Computa onal Engine Performs the signal processing in accordance with the stored program memory., Computational Engine incorporates many specialised arithmetic units and each of them operates simultaneously, to increase the execution speed. It also incorporates multiple hardware shifters for shifting operands and, thereby saves execution time., I/O Unit Acts as an interface between the outside world and DSP. It is responsible for capturing signals to, be processed and delivering the processed signals., Audio video signal processing, telecommunication, and multimedia applications are typical examples, where DSP is employed. Digital signal processing employs a large amount of real-time calculations. Sum of, products (SOP) calculation, convolution, fast fourier transform (FFT), discrete fourier transform (DFT), etc,, are some of the operations performed by digital signal processors., Blackfin®† processors from Analog Devices is an example of DSP which delivers breakthrough signalprocessing performance and power efficiency while also offering a full 32-bit RISC MCU programming, model. Blackfin processors present high-performance, homogeneous software targets, which allows flexible, resource allocation between hard real-time signal processing tasks and non real-time control tasks. System, control tasks can often run in the shadow of demanding signal processing and multimedia tasks., , 2.1.1.6 RISC vs. CISC Processors/Controllers The term RISC stands for Reduced Instruction Set, Computing. As the name implies, all RISC processors/controllers possess lesser number of instructions,, †, , Blackfin® is a Registered trademark of Analog Devices Inc.
Page 47 :
23, , The Typical Embedded System, , typically in the range of 30 to 40. CISC stands for Complex Instruction Set Computing. From the definition, itself it is clear that the instruction set is complex and instructions are high in number. From a programmers, point of view RISC processors are comfortable since s/he needs to learn only a few instructions, whereas for, a CISC processor s/he needs to learn more number of instructions and should understand the context of usage, of each instruction (This scenario is explained on the basis of a programmer following Assembly Language, coding. For a programmer following C coding it doesn’t matter since the cross-compiler is responsible for the, conversion of the high level language instructions to machine dependent code). Atmel AVR microcontroller, is an example for a RISC processor and its instruction set contains only 32 instructions. The original version, of 8051 microcontroller (e.g. AT89C51) is a CISC controller and its instruction set contains 255 instructions., Remember it is not the number of instructions that determines whether a processor/controller is CISC or, RISC. There are some other factors like pipelining features, instruction set type, etc. for determining the, RISC/CISC criteria. Some of the important criteria are listed below:, RISC, , CISC, , Lesser number of instructions, , Greater number of Instructions, , Instruction pipelining and increased execution speed, , Generally no instruction pipelining feature, , Orthogonal instruction set (Allows each instruction to oper- Non-orthogonal instruction set (All instructions are not, ate on any register and use any addressing mode), allowed to operate on any register and use any addressing, mode. It is instruction-specific), Operations are performed on registers only, the only Operations are performed on registers or memory dependmemory operations are load and store, ing on the instruction, A large number of registers are available, , Limited number of general purpose registers, , Programmer needs to write more code to execute a task Instructions are like macros in C language. A programmer, since the instructions are simpler ones, can achieve the desired functionality with a single instruction which in turn provides the effect of using more simpler, single instructions in RISC, Single, fixed length instructions, , Variable length instructions, , Less silicon usage and pin count, , More silicon usage since more additional decoder logic is, required to implement the complex instruction decoding., , With Harvard Architecture, , Can be Harvard or Von-Neumann Architecture, , I hope now you are clear about the terms RISC and CISC in the processor technology. Isn’t it?, , 2.1.1.7 Harvard vs. Von-Neumann Processor/Controller Architecture The terms Harvard and, Von-Neumann refers to the processor architecture design., Microprocessors/controllers based on the Von-Neumann architecture shares a single common bus for, fetching both instructions and data. Program instructions and data are stored in a common main memory., Von-Neumann architecture based processors/controllers first fetch an instruction and then fetch the data to, support the instruction from code memory. The two separate fetches slows down the controller’s operation., Von-Neumann architecture is also referred as Princeton architecture, since it was developed by the Princeton, University., Microprocessors/controllers based on the Harvard architecture will have separate data bus and instruction, bus. This allows the data transfer and program fetching to occur simultaneously on both buses. With Harvard, architecture, the data memory can be read and written while the program memory is being accessed. These, separated data memory and code memory buses allow one instruction to execute while the next instruction, is fetched (“prefetching”). The prefetch theoretically allows much faster execution than Von-Neumann
Page 48 :
24, , Introduc on to Embedded Systems, , architecture. Since some additional hardware logic is required for the generation of control signals for this, type of operation it adds silicon complexity to the system. Figure 2.2 explains the Harvard and Von-Neumann, architecture concept., , Fig. 2.2, , Harvard vs Von-Neumann architecture, , The following table highlights the differences between Harvard and Von-Neumann architecture., Harvard Architecture, , Von-Neumann Architecture, , Separate buses for instruction and data fetching, , Single shared bus for instruction and data fetching, , Easier to pipeline, so high performance can be achieved, , Low performance compared to Harvard architecture, , Comparatively high cost, , Cheaper, , No memory alignment problems, , Allows self modifying codes*, , Since data memory and program memory are stored Since data memory and program memory are stored, physically in different locations, no chances for accidental physically in the same chip, chances for accidental, corruption of program memory, corruption of program memory, , 2.1.1.8 Big-Endian vs. Li le-Endian Processors/Controllers Endianness specifies the order in which, the data is stored in the memory by processor operations in a multibyte system (Processors whose word size, is greater than one byte). Suppose the word length is two byte then data can be stored in memory in two, different ways:, (1) Higher order of data byte at the higher memory and lower order of data byte at location just below the, higher memory., (2) Lower order of data byte at the higher memory and higher order of data byte at location just below the, higher memory., Li le-endian Little-endian (Fig. 2.3) means the lower-order byte of the data is stored in memory at the, lowest address, and the higher-order byte at the highest address. (The little end comes first.) For example, a 4, byte long integer Byte3 Byte2 Byte1 Byte0 will be stored in the memory as shown below:, , Fig. 2.3, *, , Little-Endian operation, , Self-modifying code is a code/instruction which modifies itself while execution.
Page 49 :
The Typical Embedded System, , 25, , Big-endian Big-endian (Fig. 2.4) means the higher-order byte of the data is stored in memory at the lowest, address, and the lower-order byte at the highest address. (The big end comes first.) For example, a 4 byte long, integer Byte3 Byte2 Byte1 Byte0 will be stored in the memory as follows‡:, , Fig. 2.4 Big-Endian operation, , 2.1.1.9 Load Store Opera on and Instruc on Pipelining As mentioned earlier, the RISC processor, instruction set is orthogonal, meaning it operates on registers. The memory access related operations are, performed by the special instructions load and store. If the operand is specified as memory location, the, content of it is loaded to a register using the load instruction. The instruction store stores data from a specified, register to a specified memory location. The concept of Load Store Architecture is illustrated with the, following example:, Suppose x, y and z are memory locations and we want to add the contents of x and y and store the result in, location z. Under the load store architecture the same is achieved with 4 instructions as shown in Fig. 2.5., , Fig. 2.5, , The concept of load store architecture, , The first instruction load R1, x loads the register R1 with the content of memory location x, the second, instruction load R2,y loads the register R2 with the content of memory location y. The instruction add R3,, R1, R2 adds the content of registers R1 and R2 and stores the result in register R3. The next instruction store, R3,z stores the content of register R3 in memory location z., The conventional instruction execution by the processor follows the fetch-decode-execute sequence., Where the ‘fetch’ part fetches the instruction from program memory or code memory and the decode part, decodes the instruction to generate the necessary control signals. The execute stage reads the operands,, ‡, , Note that the base address is chosen arbitrarily as 0×20000
Page 50 :
26, , Introduc on to Embedded Systems, , perform ALU operations and stores the result. In conventional program execution, the fetch and decode, operations are performed in sequence. For simplicity let’s consider decode and execution together. During, the decode operation the memory address bus is available and if it is possible to effectively utilise it for an, instruction fetch, the processing speed can be increased. In its simplest form instruction pipelining refers to, the overlapped execution of instructions. Under normal program execution flow it is meaningful to fetch the, next instruction to execute, while the decoding and execution of the current instruction is in progress. If the, current instruction in progress is a program control flow transfer instruction like jump or call instruction,, there is no meaning in fetching the instruction following the current instruction. In such cases the instruction, fetched is flushed and a new instruction fetch is performed to fetch the instruction. Whenever the current, instruction is executing the program counter will be loaded with the address of the next instruction. In case of, jump or branch instruction, the new location is known only after completion of the jump or branch instruction., Depending on the stages involved in an instruction (fetch, read register and decode, execute instruction,, access an operand in data memory, write back the result to register, etc.), there can be multiple levels of, instruction pipelining. Figure 2.6 illustrates the concept of Instruction pipelining for single stage pipelining., , Fig. 2.6, , 2.1.2, , The single-stage pipelining concept, , Application Specific Integrated Circuits (ASICs), , Application Specific Integrated Circuit (ASIC) is a microchip designed to perform a specific or unique, application. It is used as replacement to conventional general purpose logic chips. It integrates several, functions into a single chip and there by reduces the system development cost. Most of the ASICs are, proprietary products. As a single chip, ASIC consumes a very small area in the total system and thereby helps, in the design of smaller systems with high capabilities/functionalities., ASICs can be pre-fabricated for a special application or it can be custom fabricated by using the components, from a re-usable ‘building block’ library of components for a particular customer application. ASIC based, systems are profitable only for large volume commercial productions. Fabrication of ASICs requires a nonrefundable initial investment for the process technology and configuration expenses. This investment is, known as Non-Recurring Engineering Charge (NRE) and it is a one time investment., If the Non-Recurring Engineering Charges (NRE) is borne by a third party and the Application Specific, Integrated Circuit (ASIC) is made openly available in the market, the ASIC is referred as Application Specific, Standard Product (ASSP). The ASSP is marketed to multiple customers just as a general-purpose product, is, but to a smaller number of customers since it is for a specific application. “The ADE7760 Energy Metre, ASIC developed by Analog Devices for Energy metreing applications is a typical example for ASSP”., Since Application Specific Integrated Circuits (ASICs) are proprietary products, the developers of such, chips may not be interested in revealing the internal details of it and hence it is very difficult to point out, an example of it. Moreover it will create legal disputes if an illustration of such an ASIC product is given, without getting prior permission from the manufacturer of the ASIC. For the time being, let us park the, discussion about it aside. We will come back to it in another part of this book series.
Page 51 :
The Typical Embedded System, , 2.1.3, , 27, , Programmable Logic Devices, , Logic devices provide specific functions, including device-to-device interfacing, data communication, signal, processing, data display, timing and control operations, and almost every other function a system must, perform. Logic devices can be classified into two broad categories–fixed and programmable. As the name, indicates, the circuits in a fixed logic device are permanent, they perform one function or set of functions–, once manufactured, they cannot be changed. On the other hand, Programmable Logic Devices (PLDs) offer, customers a wide range of logic capacity, features, speed, and voltage characteristics–and these devices can, be re-configured to perform any number of functions at any time., With programmable logic devices, designers use inexpensive software tools to quickly develop, simulate,, and test their designs. Then, a design can be quickly programmed into a device, and immediately tested in, a live circuit. The PLD that is used for this prototyping is the exact same PLD that will be used in the final, production of a piece of end equipment, such as a network router, a DSL modem, a DVD player, or an, automotive navigation system. There are no NRE costs and the final design is completed much faster than that, of a custom, fixed logic device. Another key benefit of using PLDs is that during the design phase customers, can change the circuitry as often as they want until the design operates to their satisfaction. That’s because, PLDs are based on re-writable memory technology–to change the design, the device is simply reprogrammed., Once the design is final, customers can go into immediate production by simply programming as many PLDs, as they need with the final software design file., , 2.1.3.1 CPLDs and FPGAs The two major types of programmable logic devices are Field Programmable, Gate Arrays (FPGAs) and Complex Programmable Logic Devices (CPLDs). Of the two, FPGAs offer the, highest amount of logic density, the most features, and the highest performance. The largest FPGA now, shipping, part of the Xilinx Virtex™§ line of devices, provides eight million “system gates” (the relative, density of logic). These advanced devices also offer features such as built-in hardwired processors (such as, the IBM power PC), substantial amounts of memory, clock management systems, and support for many of, the latest, very fast device-to-device signaling technologies. FPGAs are used in a wide variety of applications, ranging from data processing and storage, to instrumentation, telecommunications, and digital signal, processing., CPLDs, by contrast, offer much smaller amounts of logic–up to about 10,000 gates. But CPLDs offer, very predictable timing characteristics and are therefore ideal for critical control applications. CPLDs such, as the Xilinx CoolRunner™† series also require extremely low amounts of power and are very inexpensive,, making them ideal for cost-sensitive, battery-operated, portable applications such as mobile phones and, digital handheld assistants., Advantages of PLD Programmable logic devices offer a number of important advantages over fixed logic, devices, including the following:, (1) PLDs offer customers much more flexibility during the design cycle because design iterations are, simply a matter of changing the programming file, and the results of design changes can be seen, immediately in working parts., (2) PLDs do not require long lead times for prototypes or production parts–the PLDs are already on a, distributor’s shelf and ready for shipment., (3) PLDs do not require customers to pay for large NRE costs and purchase expensive mask sets–PLD, suppliers incur those costs when they design their programmable devices and are able to amortize those, costs over the multi-year lifespan of a given line of PLDs., (4) PLDs allow customers to order just the number of parts they need, when they need them, allowing them, to control inventory. Customers who use fixed logic devices often end up with excess inventory which, § Virtex™ and CoolRunner™ are the registered trademarks of Xilinx Inc.
Page 52 :
28, , Introduc on to Embedded Systems, , must be scrapped, or if demand for their product surges, they may be caught short of parts and face, production delays., (5) PLDs can be reprogrammed even after a piece of equipment is shipped to a customer. In fact, thanks, to programmable logic devices, a number of equipment manufacturers now tout the ability to add, new features or upgrade products that already are in the field. To do this, they simply upload a new, programming file to the PLD, via the Internet, creating new hardware logic in the system., Over the last few years programmable logic suppliers have made such phenomenal technical advances, that PLDs are now seen as the logic solution of choice from many designers. One reason for this is that PLD, suppliers such as Xilinx are “fabless” companies; instead of owning chip manufacturing foundries, Xilinx, outsource that job to partners like Toshiba and UMC, whose chief occupation is making chips. This strategy, allows Xilinx to focus on designing new product architectures, software tools, and intellectual property, cores while having access to the most advanced semiconductor process technologies. Advanced process, technologies help PLDs in a number of key areas: faster performance, integration of more features, reduced, power consumption, and lower cost., FPGAs are especially popular for prototyping ASIC designs where the designer can test his design by, downloading the design file into an FPGA device. Once the design is set, hardwired chips are produced for, faster performance., Just a few years ago, for example, the largest FPGA was measured in tens of thousands of system gates, and operated at 40 MHz. Older FPGAs also were relatively expensive, costing often more than $150 for the, most advanced parts at the time. Today, however, FPGAs with advanced features offer millions of gates of, logic capacity, operate at 300 MHz, can cost less than $10, and offer a new level of integrated functions such, as processors and memory., , 2.1.4, , Commercial Off-the-Shelf Components (COTS), , A Commercial Off-the-Shelf (COTS) product is one which is used ‘as-is’. COTS products are designed in, such a way to provide easy integration and interoperability with existing system components. The COTS, component itself may be developed around a general purpose or domain specific processor or an Application, Specific Integrated circuit or a programmable logic device. Typical examples of COTS hardware unit are, remote controlled toy car control units including the RF circuitry part, high performance, high frequency, microwave electronics (2–200 GHz), high bandwidth analog-to-digital converters, devices and components, for operation at very high temperatures, electro-optic IR imaging arrays, UV/IR detectors, etc. The major, advantage of using COTS is that they are readily available in the market, are cheap and a developer can cut, down his/her development time to a great extent. This in, turn reduces the time to market your embedded systems., The TCP/IP plug-in module available from various, manufactures like ‘WIZnet’, ‘HanRun’, ‘Viewtool’, etc., are very good examples of COTS product (Fig. 2.7). This, network plug-in module gives the TCP/IP connectivity to, the system you are developing. There is no need to design, this module yourself and write the firmware for the TCP/, IP protocol and data transfer. Everything will be readily, supplied by the COTS manufacturer. What you need to do, is identify the COTS for your system and give the plugin option on your board according to the hardware plug- Fig. 2.7 An example of a COTS product for TCP/IP, plug-in from WIZnet, in connections given in the specifications of the COTS., (WIZnet Network Plug in Module-Courtesy of, Though multiple vendors supply COTS for the same, WIZnet h p://www.wiznet.co.kr/en/)
Page 53 :
29, , The Typical Embedded System, , application, the major problem faced by the end-user is that there are no operational and manufacturing, standards. A Commercial Off-The-Shelf (COTS) component manufactured by a vendor need not have, hardware plug-in and firmware interface compatibility with one manufactured by a second vendor for the, same application. This restricts the end-user to stick to a particular vendor for a particular COTS. This greatly, affects the product design., The major drawback of using COTS components in embedded design is that the manufacturer of the, COTS component may withdraw the product or discontinue the production of the COTS at any time if a, rapid change in technology occurs, and this will adversely affect a commercial manufacturer of the embedded, system which makes use of the specific COTS product., , 2.2, , MEMORY, , Memory is an important part of a processor/controller based embedded systems., Some of the processors/controllers contain built in memory and this memory is, referred as on-chip memory. Others do not contain any memory inside the chip, and requires external memory to be connected with the controller/processor to, store the control algorithm. It is called off-chip memory. Also some working, memory is required for holding data temporarily during certain operations. This, section deals with the different types of memory used in embedded system, applications., , 2.2.1, , LO 2 Explain, different memory, technologies and, memory types used, in embedded system, development, , Program Storage Memory (ROM), , The program memory or code storage memory of an embedded system stores the program instructions and it, can be classified into different types as per the block diagram representation given in Fig. 2.8., , Fig. 2.8, , Classification of Program Memory (ROM), , The code memory retains its contents even after the power to it is turned off. It is generally known as, non-volatile storage memory. Depending on the fabrication, erasing, and programming techniques they are, classified into the following types., , 2.2.1.1 Masked ROM (MROM) Masked ROM is a one-time programmable device. Masked ROM, makes use of the hardwired technology for storing data. The device is factory programmed by masking and, metallisation process at the time of production itself, according to the data provided by the end user. The, primary advantage of this is low cost for high volume production. They are the least expensive type of solid, state memory. Different mechanisms are used for the masking process of the ROM, like
Page 54 :
30, , Introduc on to Embedded Systems, , (1) Creation of an enhancement or depletion mode transistor through channel implant., (2) By creating the memory cell either using a standard transistor or a high threshold transistor. In the high, threshold mode, the supply voltage required to turn ON the transistor is above the normal ROM IC, operating voltage. This ensures that the transistor is always off and the memory cell stores always logic 0., Masked ROM is a good candidate for storing the embedded firmware for low cost embedded devices., Once the design is proven and the firmware requirements are tested and frozen, the binary data (The firmware, cross compiled/assembled to target processor specific machine code) corresponding to it can be given to the, MROM fabricator. The limitation with MROM based firmware storage is the inability to modify the device, firmware against firmware upgrades. Since the MROM is permanent in bit storage, it is not possible to alter, the bit information., , 2.2.1.2 Programmable Read Only Memory (PROM) / (OTP) Unlike Masked ROM Memory, One, Time Programmable Memory (OTP) or PROM is not pre-programmed by the manufacturer. The end user, is responsible for programming these devices. This memory has nichrome or polysilicon wires arranged, in a matrix. These wires can be functionally viewed as fuses. It is programmed by a PROM programmer, which selectively burns the fuses according to the bit pattern to be stored. Fuses which are not blown/burned, represents a logic “1” whereas fuses which are blown/burned represents a logic “0”. The default state is, logic “1”. OTP is widely used for commercial production of embedded systems whose proto-typed versions, are proven and the code is finalised. It is a low cost solution for commercial production. OTPs cannot be, reprogrammed., 2.2.1.3 Erasable Programmable Read Only Memory (EPROM) OTPs are not useful and worth for, development purpose. During the development phase, the code is subject to continuous changes and using an, OTP each time to load the code is not economical. Erasable Programmable Read Only Memory (EPROM), gives the flexibility to re-program the same chip. EPROM stores the bit information by charging the floating, gate of an FET. Bit information is stored by using an EPROM programmer, which applies high voltage to, charge the floating gate. EPROM contains a quartz crystal window for erasing the stored information. If the, window is exposed to ultraviolet rays for a fixed duration, the entire memory will be erased. Even though the, EPROM chip is flexible in terms of re-programmability, it needs to be taken out of the circuit board and put, in a UV eraser device for 20 to 30 minutes. So it is a tedious and time-consuming process., 2.2.1.4 Electrically Erasable Programmable Read Only Memory (EEPROM) As the name indicates,, the information contained in the EEPROM memory can be altered by using electrical signals at the register/, Byte level. They can be erased and reprogrammed in-circuit. These chips include a chip erase mode and in, this mode they can be erased in a few milliseconds. It provides greater flexibility for system design. The only, limitation is their capacity is limited when compared with the standard ROM (A few kilobytes)., 2.2.1.5 FLASH FLASH is the latest ROM technology and is the most popular ROM technology used, in today’s embedded designs. FLASH memory is a variation of EEPROM technology. It combines the reprogrammability of EEPROM and the high capacity of standard ROMs. FLASH memory is organised as, sectors (blocks) or pages. FLASH memory stores information in an array of floating gate MOSFET transistors., The erasing of memory can be done at sector level or page level without affecting the other sectors or pages., Each sector/page should be erased before re-programming. The typical erasable capacity of FLASH is of the, order of a few 1000 cycles. SST39LF010 from Microchip (www.microchip.com) is an example of 1Mbit, (Organised as 128K x8) Flash memory with typical endurance of 100,000 cycles., 2.2.1.6 NVRAM Non-volatile RAM is a random access memory with battery backup. It contains static, RAM based memory and a minute battery for providing supply to the memory in the absence of external
Page 55 :
31, , The Typical Embedded System, , power supply. The memory and battery are packed together in a single package. The life span of NVRAM is, expected to be around 10 years. DS1644 from Maxim/Dallas is an example of 32KB NVRAM., , 2.2.2, , Read-Write Memory/Random Access Memory (RAM), , RAM is the data memory or working memory of the controller/processor. Controller/processor can read from, it and write to it. RAM is volatile, meaning when the power is turned off, all the contents are destroyed. RAM, is a direct access memory, meaning we can access the desired memory location directly without the need for, traversing through the entire memory locations to reach the desired memory position (i.e. random access of, memory location). This is in contrast to the Sequential Access Memory (SAM), where the desired memory, location is accessed by either traversing through the entire memory or through a ‘seek’ method. Magnetic, tapes, CD ROMs, etc. are examples of sequential access memories. RAM generally falls into three categories:, Static RAM (SRAM), dynamic RAM (DRAM), and non-volatile RAM (NVRAM) (Fig. 2.9)., , Read/Write, Memory (RAM), , SRAM, , NVRAM, , DRAM, , Fig. 2.9, , Classification of Working Memory (RAM), , 2.2.2.1 Sta c RAM (SRAM) Static RAM stores data in the form of voltage. They are made up of flipflops. Static RAM is the fastest form of RAM available. In typical implementation, an SRAM cell (bit) is, realised using six transistors (or 6 MOSFETs). Four of the transistors are used for building the latch (flipflop) part of the memory cell and two for controlling the access. SRAM is fast in operation due to its resistive, networking and switching capabilities. In its simplest representation an SRAM cell can be visualised as, shown in Fig. 2.10., Bit Line B\, , Bit Line B, Q1, , Q3, , Q6, , Q5, Q2, , Q4, Vcc, , Word Line, , Fig. 2.10, , SRAM cell implementation
Page 56 :
32, , Introduc on to Embedded Systems, , This implementation in its simpler form can be visualised as two-cross coupled inverters with read/write, control through transistors. The four transistors in the middle form the cross-coupled inverters. This can be, visualised as shown in Fig. 2.11., Write control, Read control, From the SRAM implementation diagram, it is, clear that access to the memory cell is controlled, by the line Word Line, which controls the access, Data, transistors (MOSFETs) Q5 and Q6. The access Data to, write, read, transistors control the connection to bit lines B & B\., In order to write a value to the memory cell, apply the, desired value to the bit control lines (For writing 1,, make B = 1 and B\ =0; For writing 0, make B = 0 and, Fig. 2.11 Visualisation of SRAM cell, B\ =1) and assert the Word Line (Make Word line, high). This operation latches the bit written in the flip-flop. For reading the content of the memory cell, assert, both B and B\ bit lines to 1 and set the Word line to 1., The major limitations of SRAM are low capacity and high cost. Since a minimum of six transistors, are required to build a single memory cell, imagine how many memory cells we can fabricate on a silicon, wafer., , 2.2.2.2 Dynamic RAM (DRAM) Dynamic RAM stores data in the, form of charge. They are made up of MOS transistor gates. The advantages, of DRAM are its high density and low cost compared to SRAM. The, disadvantage is that since the information is stored as charge it gets leaked, off with time and to prevent this they need to be refreshed periodically., Special circuits called DRAM controllers are used for the refreshing, operation. The refresh operation is done periodically in milliseconds, interval. Figure 2.12 illustrates the typical implementation of a DRAM, cell., The MOSFET acts as the gate for the incoming and outgoing data, whereas the capacitor acts as the bit storage unit. Table given below, summarises the relative merits and demerits of SRAM and DRAM, technology., SRAM cell, , Bit line B, , Word line, +, –, , Fig. 2.12, , DRAM cell implementation, , DRAM cell, , Made up of 6 CMOS transistors (MOSFET), , Made up of a MOSFET and a capacitor, , Doesn’t require refreshing, , Requires refreshing, , Low capacity (Less dense), , High capacity (Highly dense), , More expensive, , Less expensive, , Fast in operation. Typical access time is 10ns, , Slow in operation due to refresh requirements. Typical access, time is 60ns. Write operation is faster than read operation., , 2.2.2.3 NVRAM Non-volatile RAM is a random access memory with battery backup. It contains static, RAM based memory and a minute battery for providing supply to the memory in the absence of external, power supply. The memory and battery are packed together in a single package. NVRAM is used for the nonvolatile storage of results of operations or for setting up of flags, etc. The life span of NVRAM is expected to, be around 10 years. DS1744 from Maxim/Dallas is an example for 32KB NVRAM.
Page 57 :
The Typical Embedded System, , 2.2.3, , 33, , Memory According to the Type of Interface, , The interface (connection) of memory with the processor/controller can be of various types. It may be a, parallel interface [The parallel data lines (D0-D7) for an 8 bit processor/controller will be connected to, D0-D7 of the memory] or the interface may be a serial interface like I2C (Pronounced as I Square C. It is a, 2 line serial interface) or it may be an SPI (Serial peripheral interface, 2+n line interface where n stands for, the total number of SPI bus devices in the system). It can also be of a single wire interconnection (like Dallas, 1-Wire interface). Serial interface is commonly used for data storage memory like EEPROM. The memory, density of a serial memory is usually expressed in terms of kilobits, whereas that of a parallel interface, memory is expressed in terms of kilobytes. Atmel Corporations AT24C512 is an example for serial memory, with capacity 512 kilobits and 2-wire interface. Please refer to the section ‘Communication Interface’ for, more details on I2C, SPI, and 1-Wire Bus., , 2.2.4, , Memory Shadowing, , Generally the execution of a program or a configuration from a Read Only Memory (ROM) is very slow, (120 to 200 ns) compared to the execution from a random access memory (40 to 70 ns). From the timing, parameters it is obvious that RAM access is about three times as fast as ROM access. Shadowing of memory, is a technique adopted to solve the execution speed problem in processor-based systems. In computer systems, and video systems there will be a configuration holding ROM called Basic Input Output Configuration ROM, or simply BIOS. In personal computer systems BIOS stores the hardware configuration information like the, address assigned for various serial ports and other non-plug ‘n’ play devices, etc. Usually it is read and the, system is configured according to it during system boot up and it is time consuming. Now the manufactures, included a RAM behind the logical layer of BIOS at its same address as a shadow to the BIOS and the first, step that happens during the boot up is copying the BIOS to the shadowed RAM and write protecting the, RAM then disabling the BIOS reading. You may be thinking that what a stupid idea it is and why both, RAM and ROM are needed for holding the same data. The answer is: RAM is volatile and it cannot hold the, configuration data which is copied from the BIOS when the power supply is switched off. Only a ROM can, hold it permanently. But for high system performance it should be accessed from a RAM instead of accessing, from a ROM., , 2.2.5, , Memory Selection for Embedded Systems, , Embedded systems require a program memory for holding the control algorithm (For a super-loop based, design) or embedded OS and the applications designed to run on top of it (for OS based designs), data memory, for holding variables and temporary data during task execution, and memory for holding non-volatile data, (like configuration data, look up table etc) which are modifiable by the application (Unlike program memory,, which is non-volatile as well unalterable by the end user). The memory requirement for an embedded system, in terms of RAM and ROM (EEPROM/FLASH/NVRAM) is solely dependent on the type of the embedded, system and the applications for which it is designed. There is no hard and fast rule for calculating the memory, requirements. Lot of factors need to be considered when selecting the type and size of memory for embedded, system. For example, if the embedded system is designed using SoC or a microcontroller with on-chip RAM, and ROM (FLASH/EEPROM), depending on the application need the on-chip memory may be sufficient for, designing the total system. As a rule of thumb, identify your system requirement and based on the type of, processor (SoC or microcontroller with on-chip memory) used for the design, take a decision on whether the, on-chip memory is sufficient or external memory is required. Let’s consider a simple electronic toy design, as an example. As the complexity of requirements are less and data memory requirement are minimal, we, can think of a microcontroller with a few bytes of internal RAM, a few bytes or kilobytes (depending on the, number of tasks and the complexity of tasks) of FLASH memory and a few bytes of EEPROM (if required)
Page 58 :
34, , Introduc on to Embedded Systems, , for designing the system. Hence there is no need for external memory at all. A PIC microcontroller device, which satisfies the I/O and memory requirements can be used in this case. If the embedded design is based on, an RTOS, the RTOS requires certain amount of RAM for its execution and ROM for storing the RTOS image, (Image is the common name given for the binary data generated by the compilation of all RTOS source files)., Normally the binary code for RTOS kernel containing all the services is stored in a non-volatile memory, (Like FLASH) as either compressed or non-compressed data. During boot-up of the device, the RTOS files, are copied from the program storage memory, decompressed if required and then loaded to the RAM for, execution. The supplier of the RTOS usually gives a rough estimate on the run time RAM requirements and, program memory requirements for the RTOS. On top of this add the RAM requirements for executing user, tasks and ROM for storing user applications. On a safer side, always add a buffer value to the total estimated, RAM and ROM size requirements. A smart phone device with Windows mobile operating system is a typical, example for embedded device with OS. Say 512MB RAM and 1GB ROM are the minimum requirements for, running the Windows mobile device, indeed you need extra RAM and ROM for running user applications., So while building the system, count the memory for that also and arrive at a value which is always at the, safer side, so that you won’t end up in a situation where you don’t have sufficient memory to install and, run user applications. There are two parameters for representing a memory. The first one is the size of the, memory chip (Memory density expressed in terms of number of memory bytes per chip). There is no option, to get a memory chip with the exact required number of bytes. Memory chips come in standard sizes like, 512bytes, 1024bytes (1 kilobyte), 2048bytes (2 kilobytes), 4Kb,¶ 8Kb, 16Kb, 32Kb, 64Kb, 128Kb, 256Kb,, 512Kb, 1024Kb (1 megabytes), etc. Suppose your embedded application requires only 750 bytes of RAM,, you don’t have the option of getting a memory chip with size 750 bytes, the only option left with is to choose, the memory chip with a size closer to the size needed. Here 1024 bytes is the least possible option. We cannot, go for 512 bytes, because the minimum requirement is 750 bytes. While you select a memory size, always, keep in mind the address range supported by your processor. For example, for a processor/controller with, 16 bit address bus, the maximum number of memory locations that can be addressed is 216 = 65536 bytes =, 64Kb. Hence it is meaningless to select a 128Kb memory chip for a processor with 16bit wide address bus., Also, the entire memory range supported by the processor/controller may not be available to the memory, chip alone. It may be shared between I/O, other ICs and memory. Suppose the address bus is 16bit wide and, only the lower 32Kb address range is assigned to the memory chip, the memory size maximum required is, 32Kb only. It is not worth to use a memory chip with size 64Kb in such a situation. The second parameter, that needs to be considered in selecting a memory is the word size of the memory. The word size refers to the, number of memory bits that can be read/write together at a time. 4, 8, 12, 16, 24, 32, etc. are the word sizes, supported by memory chips. Ensure that the word size supported by the memory chip matches with the data, bus width of the processor/controller., FLASH memory is the popular choice for ROM (Program Storage Memory) in embedded applications., It is a powerful and cost-effective solid-state storage technology for mobile electronics devices and other, consumer applications. FLASH memory comes in two major variants, namely, NAND and NOR FLASH., NAND FLASH is a high-density low cost non-volatile storage memory. On the other hand, NOR FLASH is, less dense and slightly expensive. But it supports the Execute in Place (XIP) technique for program execution., The XIP technology allows the execution of code memory from ROM itself without the need for copying it to, the RAM as in the case of conventional execution method. It is a good practice to use a combination of NOR, and NAND memory for storage memory requirements, where NAND can be used for storing the program, code and or data like the data captured in a camera device. NAND FLASH doesn’t support XIP and if NAND, FLASH is used for storing program code, a DRAM can be used for copying and executing the program code., NOR FLASH supports XIP and it can be used as the memory for bootloader or for even storing the complete, program code., ¶, , Kb—Kilobytes
Page 59 :
The Typical Embedded System, , 35, , The EEPROM data storage memory is available as either serial interface or parallel interface chip. If, the processor/controller of the device supports serial interface and the amount of data to write and read, to and from the device is less, it is better to have a Serial EEPROM chip. The Serial EEPROM saves the, address space of the total system. The memory capacity of the serial EEPROM is usually expressed in bits or, kilobits. 512 bits, 1Kbits, 2Kbits, 4Kbits, etc. are examples for serial EEPROM memory representation. For, embedded systems with low power requirements like portable devices, choose low power memory devices., Certain embedded devices may be targeted for operating at extreme environmental conditions like high, temperature, high humid area, etc. Select an industrial grade memory chip in place of the commercial grade, chip for such devices., , 2.3, , SENSORS AND ACTUATORS, , At the very beginning of this chapter it is already mentioned that an embedded, system is in constant interaction with the Real world and the controlling/, monitoring functions executed by the embedded system is achieved in, accordance with the changes happening to the Real world. The changes in, system environment or variables are detected by the sensors connected to the, input port of the embedded system. If the embedded system is designed for any, controlling purpose, the system will produce some changes in the controlling, variable to bring the controlled variable to the desired value. It is achieved, through an actuator connected to the output port of the embedded system. If the embedded system is designed, for monitoring purpose only, then there is no need for including an actuator in the system. For example, take, the case of an ECG machine. It is designed to monitor the heart beat status of a patient and it cannot impose, a control over the patient’s heart beat and its order. The sensors used here are the different electrode sets, connected to the body of the patient. The variations are captured and presented to the user (may be a doctor), through a visual display or some printed chart., LO 3 Analyse the, role of sensors,, actuators, and their, interfacing with the, I/O subsystems of, an embedded system, , 2.3.1, , Sensors, , A sensor is a transducer device that converts energy from one form to another for any measurement or control, purpose. This is what I “by-hearted” during my engineering degree from the transducers paper., Looking back to the ‘Wearable devices’ example given at the end of Chapter 1, we can identify that the, sensor which counts steps for pedometer functionality is an Accelerometer sensor and the sensor used in, some of the smartwatch devices to measure the light intensity is an Ambient Light Sensor (ALS), , 2.3.2, , Actuators, , Actuator is a form of transducer device (mechanical or electrical) which converts signals to corresponding, physical action (motion). Actuator acts as an output device., Looking back to the ‘Wearable devices’ example given at the end of Chapter 1, we can see that certain, smartwatches use Ambient Light Sensor to detect the surrounding light intensity and uses an electrical/, electronic actuator circuit to adjust the screen brightness for better readability., , 2.3.3, , The I/O Subsystem, , The I/O subsystem of the embedded system facilitates the interaction of the embedded system with the, external world. As mentioned earlier the interaction happens through the sensors and actuators connected to, the input and output ports respectively of the embedded system. The sensors may not be directly interfaced to, the input ports, instead they may be interfaced through signal conditioning and translating systems like ADC,
Page 60 :
36, , Introduc on to Embedded Systems, , optocouplers, etc. This section illustrates some of the sensors and actuators used in embedded systems and, the I/O systems to facilitate the interaction of embedded systems with external world., , 2.3.3.1 Light Emi ng Diode (LED) Light Emitting Diode (LED) is an important output device for, , R, , visual indication in any embedded system. LED can be used as an indicator for the status of various signals, or situations. Typical examples are indicating the presence of power conditions like ‘Device ON’, ‘Battery, low’ or ‘Charging of battery’ for a battery operated handheld embedded devices., Vcc, Light Emitting Diode is a p-n junction diode (Refer Analog Electronics, fundamentals to refresh your memory for p-n junction diode ☺) and it contains an, anode and a cathode. For proper functioning of the LED, the anode of it should be, connected to +ve terminal of the supply voltage and cathode to the –ve terminal, of supply voltage. The current flowing through the LED must be limited to a value, below the maximum current that it can conduct. A resister is used in series between, the power supply and the LED to limit the current through the LED. The ideal, GND, LED interfacing circuit is shown in Fig. 2.13., LEDs can be interfaced to the port pin of a processor/controller in two ways. Fig. 2.13 LED interfacing, In the first method, the anode is directly connected to the port pin and the port pin drives the LED. In this, approach the port pin ‘sources’ current to the LED when the port pin is at logic High (Logic ‘1’). In the, second method, the cathode of the LED is connected to the port pin of the processor/controller and the anode, to the supply voltage through a current limiting resistor. The LED is turned on when the port pin is at logic, Low (Logic ‘0’). Here the port pin ‘sinks’ current. If the LED is directly connected to the port pin, depending, on the maximum current that a port pin can source, the brightness of LED may not be to the required level., In the second approach, the current is directly sourced by the power supply and the port pin acts as the sink, for current. Here we will get the required brightness for the LED., , 2.3.3.2 7-Segment LED Display The 7-segment LED display is an output device for displaying alpha, numeric characters. It contains 8 light-emitting diode (LED), segments arranged in a special form. Out of the 8 LED, A, segments, 7 are used for displaying alpha numeric characters, and 1 is used for representing ‘decimal point’ in decimal, B, F, number display. Figure 2.14 explains the arrangement of, LED segments in a 7-segment LED display., The LED segments are named A to G and the decimal, G, E, C, point LED segment is named as DP. The LED segments A, to G and DP should be lit accordingly to display numbers, and characters. For example, for displaying the number 4,, D, the segments F, G, B and C are lit. For displaying 3, the, DP, segments A, B, C, D, G and DP are lit. For displaying the, Fig. 2.14 7-Segment LED Display, character ‘d’, the segments B, C, D, E and G are lit. All these, 8 LED segments need to be connected to one port of the processor/controller for displaying alpha numeric, digits. The 7-segment LED displays are available in two different configurations, namely; Common Anode, and Common Cathode. In the common anode configuration, the anodes of the 8 segments are connected, commonly whereas in the common cathode configuration, the 8 LED segments share a common cathode line., Figure 2.15 illustrates the Common Anode and Cathode configurations., Based on the configuration of the 7-segment LED unit, the LED segment’s anode or cathode is connected, to the port of the processor/controller in the order ‘A’ segment to the least significant port pin and DP, segment to the most significant port pin.
Page 61 :
37, , The Typical Embedded System, , Anode, DP, , DP, , G, , F, , E, , D, , C, , B, , F, , E, , D, , C, , B, , A, , A, , Common Anode LED Display, , Fig. 2.15, , G, , Cathode, Common Cathode LED Display, , Common anode and cathode configurations of a 7-segment LED Display, , The current flow through each of the LED segments should be limited to the maximum value supported, by the LED display unit. The typical value for the current falls within the range of 20mA. The current, through each segment can be limited by connecting a current limiting resistor to the anode or cathode of, each segment. The value for the current limiting resistors can be calculated using the current value from the, electrical parameter listing of the LED display., For common cathode configurations, the anode of each LED segment is connected to the port pins of the, port to which the display is interfaced. The anode of the common anode LED display is connected to the 5V, supply voltage through a current limiting resistor and the cathode of each LED segment is connected to the, respective port pin lines. For an LED segment to lit in the Common anode LED configuration, the port pin to, which the cathode of the LED segment is connected should be set at logic 0., 7-segment LED display is a popular choice for low cost embedded applications like, Public telephone call, monitoring devices, point of sale terminals, etc., , 2.3.3.3 Optocoupler Optocoupler is a solid state device to isolate two parts of a circuit. Optocoupler, combines an LED and a photo-transistor in a single housing (package). Figure 2.16 illustrates the functioning, of an optocoupler device., In electronic circuits, an optocoupler is used for suppressing, LED, interference in data communication, circuit isolation, high voltage I/O interface, separation, simultaneous separation and signal intensification,, I/O interface, etc. Optocouplers can be used in either input circuits or in output, Photo-transistor, circuits. Figure 2.17 illustrates the usage of optocoupler in, input circuit and output circuit of an embedded system with a, Fig. 2.16 An optocoupler device, microcontroller as the system core., Vcc, , I/p interface, , AT89C51, , LED, , LED, , Port pin, Port pin, Photo-transistor, Optocoupler, IC MCT2M, , O/p interface, Photo-transistor, , Microcontroller, , Optocoupler, IC MCT2M, , Fig. 2.17 Optocoupler in Input and Output circuit
Page 62 :
38, , Introduc on to Embedded Systems, , Optocoupler is available as ICs from different semiconductor manufacturers. The MCT2M IC from, Fairchild semiconductor (http://www.fairchildsemi.com/) is an example for optocoupler IC., , 2.3.3.4 Stepper Motor A stepper motor is an electro-mechanical device which generates discrete, displacement (motion) in response to dc electrical signals. It differs from the normal dc motor in its operation., The dc motor produces continuous rotation on applying dc voltage whereas a stepper motor produces discrete, rotation in response to the dc voltage applied to it. Stepper motors are widely used in industrial embedded, applications, consumer electronic products and robotics control systems. The paper feed mechanism of a, printer/fax makes use of stepper motors for its functioning., Based on the coil winding arrangements, a two-phase stepper motor is classified into two. They are:, (1) Unipolar, (2) Bipolar, , A, GND, , (1) Unipolar A unipolar stepper motor contains two windings per, phase. The direction of rotation (clockwise or anticlockwise) of a, stepper motor is controlled by changing the direction of current flow., Current in one direction flows through one coil and in the opposite, direction flows through the other coil. It is easy to shift the direction, of rotation by just switching the terminals to which the coils are, connected. Figure 2.18 illustrates the working of a two-phase unipolar, stepper motor., The coils are represented as A, B, C and D. Coils A and C carry, current in opposite directions for phase 1 (only one of them will, be carrying current at a time). Similarly, B and D carry current in, opposite directions for phase 2 (only one of them will be carrying, current at a time)., , M, C, B, , D, GND, , Fig. 2.18 2-Phase unipolar stepper motor, , (2) Bipolar A bipolar stepper motor contains single winding per phase. For reversing the motor rotation, the current flow through the windings is reversed dynamically. It requires complex circuitry for current flow, reversal. The stator winding details for a two phase unipolar stepper motor is shown in Fig. 2.19., The stepping of stepper motor can be implemented in different ways by changing the sequence of activation, of the stator windings. The different stepping modes supported by stepper motor are explained below., Full Step In the full step mode both the phases are energised simultaneously. The coils A, B, C and D are, energised in the following order:, Step, , Coil A, , Coil B, , Coil C, , Coil D, , 1, , H, , H, , L, , L, , 2, , L, , H, , H, , L, , 3, , L, , L, , H, , H, , 4, , H, , L, , L, , H, , It should be noted that out of the two windings, only one winding of a phase is energised at a time.
Page 63 :
39, , The Typical Embedded System, , A, , C, , B, , D, , GND, , N, , GND, , S, , Fig. 2.19, , Stator Winding details for a 2 Phase unipolar stepper motor, , Wave Step In the wave step mode only one phase is energised at a time and each coils of the phase is, energised alternatively. The coils A, B, C, and D are energised in the following order:, Step, , Coil A, , Coil B, , Coil C, , Coil D, , 1, , H, , L, , L, , L, , 2, , L, , H, , L, , L, , 3, , L, , L, , H, , L, , 4, , L, , L, , L, , H, , Half Step It uses the combination of wave and full step. It has the highest torque and stability. The coil, energising sequence for half step is given below., Step, , Coil A, , Coil B, , Coil C, , Coil D, , 1, , H, , L, , L, , L, , 2, , H, , H, , L, , L, , 3, , L, , H, , L, , L, , 4, , L, , H, , H, , L, , 5, , L, , L, , H, , L, , 6, , L, , L, , H, , H, , 7, , L, , L, , L, , H, , 8, , H, , L, , L, , H
Page 64 :
40, , Introduc on to Embedded Systems, , The rotation of the stepper motor can be reversed by reversing the order in which the coil is energised., Two-phase unipolar stepper motors are the popular choice for embedded applications. The current, requirement for stepper motor is little high and hence the port pins of a microcontroller/processor may not be, able to drive them directly. Also the supply voltage required to operate stepper motor varies normally in the, range 5V to 24 V. Depending on the current and voltage requirements, special driving circuits are required to, interface the stepper motor with microcontroller/processors. Commercial off-the-shelf stepper motor driver, ICs are available in the market and they can be directly interfaced to the microcontroller port. ULN2803 is, an octal peripheral driver array available from Texas Instruments and ST microelectronics for driving a 5V, stepper motor. Simple driving circuit can also be built using transistors., The following circuit diagram (Fig. 2.20) illustrates the interfacing of a stepper motor through a driver, circuit connected to the port pins of a microcontroller/processor., , Port pins, , A, M, C, , Driver IC, ULN2803, , Microcontroller, , B, , Vcc, Fig. 2.20, , D, , Vcc, , Interfacing of stepper motor through driver circuit, , 2.3.3.5 Relay Relay is an electro-mechanical device. In embedded application, the ‘Relay’ unit acts as, dynamic path selectors for signals and power. The ‘Relay’ unit contains a relay coil made up of insulated, wire on a metal core and a metal armature with one or more contacts., ‘Relay’ works on electromagnetic principle. When a voltage is applied to the relay coil, current flows, through the coil, which in turn generates a magnetic field. The magnetic field attracts the armature core and, moves the contact point. The movement of the contact point changes the power/signal flow path. ‘Relays’ are, available in different configurations. Figure 2.21 given below illustrates the widely used relay configurations, for embedded applications., , Single pole single, throw normally, closed, , Fig. 2.21, , Relay configurations, , Relay coil, , Relay coil, , Relay coil, Single pole single, throw normally, open, , Single pole double, throw
Page 65 :
41, , The Typical Embedded System, , The Single Pole Single Throw configuration has only one path for information flow. The path is either, open or closed in normal condition. For normally Open Single Pole Single Throw relay, the circuit is normally, open and it becomes closed when the relay is energised. For normally closed Single Pole Single Throw, configuration, the circuit is normally closed and it becomes open when the relay is energised. For Single, Pole Double Throw Relay, there are two paths for information flow and they are selected by energising or, de-energising the relay., The Relay is normally controlled using a relay driver circuit connected to the port pin of the processor/, controller. A transistor is used for building the relay driver circuit. Figure 2.22 illustrates the same., , Relay coil, , Port pin, , Freewheeling diode, , Vcc, , Load, , Relay unit, , Fig. 2.22, , Transistor based Relay driving circuit, , A free-wheeling diode is used for free-wheeling the voltage produced in the opposite direction when the, relay coil is de-energised. The freewheeling diode is essential for protecting the relay and the transistor., Most of the industrial relays are bulky and requires high voltage to operate. Special relays called ‘Reed’, relays are available for embedded application requiring switching of low voltage DC signals., , 2.3.3.6 Piezo Buzzer Piezo buzzer is a piezoelectric device for generating audio indications in embedded, application. A piezoelectric buzzer contains a piezoelectric diaphragm which produces audible sound in, response to the voltage applied to it. Piezoelectric buzzers are available in two types. ‘Self-driving’ and, ‘External driving’. The ‘Self-driving’ circuit contains all the necessary components to generate sound at a, predefined tone. It will generate a tone on applying the voltage. External driving piezo buzzers supports the, generation of different tones. The tone can be varied by applying a variable pulse train to the piezoelectric, buzzer. A piezo buzzer can be directly interfaced to the port pin of the processor/control. Depending on the, driving current requirements, the piezo buzzer can also be interfaced using a transistor based driver circuit as, in the case of a ‘Relay’., , 2.3.3.7 Push Bu on Switch It is an input device. Push button switch comes in two configurations,, namely ‘Push to Make’ and ‘Push to Break’. In the ‘Push to Make’ configuration, the switch is normally in, the open state and it makes a circuit contact when it is pushed or pressed. In the ‘Push to Break’ configuration,, the switch is normally in the closed state and it breaks the circuit contact when it is pushed or pressed. The, push button stays in the ‘closed’ (For Push to Make type) or ‘open’ (For Push to Break type) state as long as, it is kept in the pushed state and it breaks/makes the circuit connection when it is released. Push button is used, for generating a momentary pulse. In embedded application push button is generally used as reset and start, switch and pulse generator. The Push button is normally connected to the port pin of the host processor/
Page 66 :
42, , Introduc on to Embedded Systems, , controller. Depending on the way in which the push, button interfaced to the controller, it can generate either, a ‘HIGH’ pulse or a ‘LOW’ pulse. Figure 2.23 illustrates, how the push button can be used for generating ‘LOW’, and ‘HIGH’ pulses., , Vcc, , Vcc, , Port pin, , Port pin, , 2.3.3.8 Keyboard Keyboard is an input device for, user interfacing. If the number of keys required is very, limited, push button switches can be used and they, can be directly interfaced to the port pins for reading., However, there may be situations demanding a large, ‘HIGH’ Pulse generator, number of keys for user input (e.g. PDA device with ‘LOW’ Pulse generator, alpha-numeric keypad for user data entry). In such, Fig. 2.23 Push button switch configurations, situations it may not be possible to interface each keys, to a port pin due to the limitation in the number of general purpose port pins available for the processor/, controller in use and moreover it is wastage of port pins. Matrix keyboard is an optimum solution for handling, large key requirements. It greatly reduces the number of interface connections. For example, for interfacing, 16 keys, in the direct interfacing technique 16 port pins are required, whereas in the matrix keyboard only, 8 lines are required. The 16 keys are arranged in a 4 column × 4 Row matrix. Figure 2.24 illustrates the, connection of keys in a matrix keyboard., , 4.7K, , 4.7K, , 4.7K, , 4.7K, , Vcc, , Row 1, , Row 2, , To microcontroller /processor port, , Fig. 2.24, , Matrix keyboard Interfacing, , Column 3, , Column 2, , Column 1, , Row 3, Column 0, , To microcontroller /processor port, , Row 0
Page 67 :
43, , The Typical Embedded System, , In a matrix keyboard, the keys are arranged in matrix fashion (i.e. they are connected in a row and column, style). For detecting a key press, the keyboard uses the scanning technique, where each row of the matrix, is pulled low and the columns are read. After reading the status of each columns corresponding to a row,, the row is pulled high and the next row is pulled low and the status of the columns are read. This process is, repeated until the scanning for all rows are completed. When a row is pulled low and if a key connected to the, row is pressed, reading the column to which the key is connected will give logic 0. Since keys are mechanical, devices, there is a possibility for de-bounce issues, which may give multiple key press effect for a single, key press. To prevent this, a proper key de-bouncing technique should be applied. Hardware key de-bouncer, circuits and software key de-bounce techniques are the key de-bouncing techniques available. The software, key de-bouncing technique doesn’t require any additional hardware and is easy to implement. In the software, de-bouncing technique, on detecting a key-press, the key is read again after a de-bounce delay. If the key, press is a genuine one, the state of the key will remain as ‘pressed’ on the second read also. Pull-up resistors, are connected to the column lines to limit the current that flows to the Row line on a key press., , 2.3.3.9 Programmable Peripheral Interface (PPI) Programmable Peripheral Interface (PPI) devices, are used for extending the I/O capabilities of processors/controllers. Most of the processors/controllers, provide very limited number of I/O and data ports and at times it may require more number of I/O ports, than the one supported by the controller/processor. A programmable peripheral interface device expands the, I/O capabilities of the processor/controller. 8255A is a popular PPI device for 8bit processors/controllers., 8255A supports 24 I/O pins and these I/O pins can be grouped as either three 8-bit parallel ports (Port A,, Port B and Port C) or two 8bit parallel ports (Port A and Port B) with Port C in any one of the following, configurations:, (1) As 8 individual I/O pins, (2) Two 4bit ports namely Port CUPPER (CU) and Port CLOWER (CL), This is configured by manipulating the control register of 8255A. The control register holds the configuration, for Port A, Port B and Port C. The bit details of control register is given below:, D7, , D6, , D5, , D4, , D3, , D2, , D1, , D0, , The table given below explains the meaning and use of each bit., Bit, , Description, , D0, , Port C Lower (CL) I/O mode selector, D0 = 1; Sets CL as input port, D0 = 0; Sets CL as output port, , D1, , Port B I/O mode selector, D1 = 1; Sets port B as input port, D1 = 0; Sets port B as output port, , D2, , Mode selector for port C lower and port B, D2 = 0; Mode 0 – Port B functions as 8bit I/O Port. Port C lower functions as 4bit port., D2 = 1; Mode 1 – Handshake mode. Port B uses 3 bits of Port C as handshake signals, (Contd.)
Page 68 :
44, , Introduc on to Embedded Systems, , Bit, , Description, , D3, , Port C Upper (CU) I/O mode selector, D3 = 1; Sets CU as input port, D3 = 0; Sets CU as output port, , D4, , Port A I/O mode selector, D4 = 1; Sets Port A as input port, D4 = 0; Sets Port A as output port, , D5, D6, , D7, , Mode selector for port C upper and port A, D6 D5 = 00; Mode 0 – Simple I/O mode, D6 D5 = 01; Mode 1 – Handshake mode. Port A uses 3 bits of, Port C as handshake signals, D6 D5 = 1X; Mode 2. X can be 0 or 1 – Port A functions as bi-directional port, Control/Data mode selector for port C, D7 = 1; I/O mode., D7 = 0; Bit set/reset (BSR) mode. Functions as the control/status lines for ports A and B. The bits of, port C can be set or reset just as if they were output ports., , Please refer to the 8255A datasheet available at http://www.intersil.com/data/fn/fn2969.pdf for more, details about the different operating modes of 8255., Figure 2.25 illustrates the generic interfacing of a 8255A device with an 8bit processor/controller with, 16bit address bus (Lower order Address bus is multiplexed with data bus)., , Processor/, Controller, Data bus port, , Data bus, , 82C55A, D0….D7, Pins 34 to 27, , D0….D7, , Latch, (Eg: 74LS373), , PA0….PA7, Port A, , ALE, Higher order, Address bus, , A0 Pin 9, A1 Pin 8, A2….A7, , PB0….PB7, Port B, , Address bus, (A8….A15), , Address, decoder, , CS\ Pin 6, , PC0….PC7, Port C, , RD\\, WR\, RESET OUT, , Fig. 2.25, , RD\ Pin 5, WR\ Pin 36, RESET Pin 35, , Interfacing of 8255 with an 8 bit microcontroller, , The ports of 8255 can be configured for different modes of operation by the processor/controller.
Page 69 :
The Typical Embedded System, , 2.4, , 45, , COMMUNICATION INTERFACE, , Communication interface is essential for communicating with various subsystems, LO 4 Examine, of the embedded system and with the external world. For an embedded product,, the different, the communication interface can be viewed in two different perspectives; namely;, communication, Device/board level communication interface (Onboard Communication Interface), interfaces of an, and Product level communication interface (External Communication Interface)., embedded system, Embedded product is a combination of different types of components (chips/, devices) arranged on a printed circuit board (PCB). The communication channel which interconnects the, various components within an embedded product is referred as device/board level communication interface, (onboard communication interface). Serial interfaces like I2C, SPI, UART, 1-Wire, etc and parallel bus, interface are examples of ‘Onboard Communication Interface’., Some embedded systems are self-contained units and they don’t require any interaction and data transfer, with other sub-systems or external world. On the other hand, certain embedded systems may be a part of a large, distributed system and they require interaction and data transfer between various devices and sub-modules., The ‘Product level communication interface’ (External Communication Interface) is responsible for data, transfer between the embedded system and other devices or modules. The external communication interface, can be either a wired media or a wireless media and it can be a serial or a parallel interface. Infrared (IR),, Bluetooth (BT), Wireless LAN (Wi-Fi), Radio Frequency waves (RF), GPRS/3G/4GLTE, etc. are examples, for wireless communication interface. RS-232C/RS-422/RS-485, USB, Ethernet, IEEE 1394 port, Parallel, port, CF-II interface, SDIO, PCMCIA/PCIex, etc. are examples for wired interfaces. It is not mandatory that, an embedded system should contain an external communication interface. Mobile communication equipment, is an example for embedded system with external communication interface., The following section gives you an overview of the various ‘Onboard’ and ‘External’ communication, interfaces for an embedded product. We will discuss about the various physical interface, firmware, requirements and initialisation and communication sequence for these interfaces in a dedicated book titled, ‘Device Interfacing’, which is planned under this series., , 2.4.1, , Onboard Communication Interfaces, , Onboard Communication Interface refers to the different communication channels/buses for interconnecting, the various integrated circuits and other peripherals within the embedded system. The following section gives, an overview of the various interfaces for onboard communication., , 2.4.1.1 Inter Integrated Circuit (I2C) Bus The Inter Integrated Circuit Bus (I2C–Pronounced ‘I square, C’) is a synchronous bi-directional half duplex (one-directional communication at a given point of time) two, wire serial interface bus. The concept of I2C bus was developed by ‘Philips semiconductors’ in the early, 1980s. The original intention of I2C was to provide an easy way of connection between a microprocessor/, microcontroller system and the peripheral chips in television sets. The I2C bus comprise of two bus lines,, namely; Serial Clock–SCL and Serial Data–SDA. SCL line is responsible for generating synchronisation, clock pulses and SDA is responsible for transmitting the serial data across devices. I2C bus is a shared bus, system to which many number of I2C devices can be connected. Devices connected to the I2C bus can act as, either ‘Master’ device or ‘Slave’ device. The ‘Master’ device is responsible for controlling the communication, by initiating/terminating data transfer, sending data and generating necessary synchronisation clock pulses., ‘Slave’ devices wait for the commands from the master and respond upon receiving the commands. ‘Master’, and ‘Slave’ devices can act as either transmitter or receiver. Regardless whether a master is acting as transmitter, or receiver, the synchronisation clock signal is generated by the ‘Master’ device only. I2C supports multi
Page 70 :
46, , Introduc on to Embedded Systems, , masters on the same bus. The following bus interface diagram shown in Fig. 2.26 illustrates the connection, of master and slave devices on the I2C bus., SCL SDA, , SDA, Port pins, , Vcc, 2.2K, , 2.2K, , SCL, , Master, (Microprocessor/, Controller), , SCL, SDA, , Slave 1, I2C Device, (e.g. Serial, EEPROM), , SCL, SDA, , Slave 2, I2C Device, , I2C bus, , Fig. 2.26, , 12C Bus Interfacing, , The I2C bus interface is built around an input buffer and an open drain or collector transistor. When the, bus is in the idle state, the open drain/collector transistor will be in the floating state and the output lines (SDA, and SCL) switch to the ‘High Impedance’ state. For proper operation of the bus, both the bus lines should, be pulled to the supply voltage (+5V for TTL family and +3.3V for CMOS family devices) using pull-up, resistors. The typical value of resistors used in pull-up is 2.2K. With pull-up resistors, the output lines of the, bus in the idle state will be ‘HIGH’., The address of a I2C device is assigned by hardwiring the address lines of the device to the desired logic, level. The address to various I2C devices in an embedded device is assigned and hardwired at the time of, designing the embedded hardware. The sequence of operations for communicating with an I2C slave device, is listed below:, 1. The master device pulls the clock line (SCL) of the bus to ‘HIGH’, 2. The master device pulls the data line (SDA) ‘LOW’, when the SCL line is at logic ‘HIGH’ (This is the, ‘Start’ condition for data transfer), 3. The master device sends the address (7 bit or 10 bit wide) of the ‘slave’ device to which it wants to, communicate, over the SDA line. Clock pulses are generated at the SCL line for synchronising the bit, reception by the slave device. The MSB of the data is always transmitted first. The data in the bus is, valid during the ‘HIGH’ period of the clock signal, 4. The master device sends the Read or Write bit (Bit value = 1 Read operation; Bit value = 0 Write, operation) according to the requirement, 5. The master device waits for the acknowledgement bit from the slave device whose address is sent on, the bus along with the Read/Write operation command. Slave devices connected to the bus compares, the address received with the address assigned to them
Page 71 :
The Typical Embedded System, , 47, , 6. The slave device with the address requested by the master device responds by sending an acknowledge, bit (Bit value = 1) over the SDA line, 7. Upon receiving the acknowledge bit, the Master device sends the 8bit data to the slave device over, SDA line, if the requested operation is ‘Write to device’. If the requested operation is ‘Read from, device’, the slave device sends data to the master over the SDA line, 8. The master device waits for the acknowledgement bit from the device upon byte transfer complete for, a write operation and sends an acknowledge bit to the Slave device for a read operation, 9. The master device terminates the transfer by pulling the SDA line ‘HIGH’ when the clock line SCL is, at logic ‘HIGH’ (Indicating the ‘STOP’ condition), The first generation I2C devices were designed to support data rates only up to 100kbps. Over time there, have been several additions to the specification so that there are now five operating speed categories; Namely,, Standard mode (Sm - Data rate up to 100kbit/sec), Fast mode (Fm - Data rate up to 400kbit/sec), Fast mode, Plus (Fm+ - Data rate up to 1Mbit/sec), and High-speed mode (Hs-mode - Data rate up to 3.4Mbit/sec) and, an Ultra Fast-mode (UFm), with a bit rate up to 5 Mbit/s for unidirectional I2C bus., , 2.4.1.2 Serial Peripheral Interface (SPI) Bus The Serial Peripheral Interface Bus (SPI) is a synchronous, bi-directional full duplex four-wire serial interface bus. The concept of SPI was introduced by Motorola. SPI, is a single master multi-slave system. It is possible to have a system where more than one SPI device can be, master, provided the condition only one master device is active at any given point of time, is satisfied. SPI, requires four signal lines for communication. They are:, Master Out Slave In (MOSI):, Master In Slave Out (MISO):, Serial Clock (SCLK):, Slave Select (SS):, , Signal line carrying the data from master to slave device. It is also, known as Slave Input/Slave Data In (SI/SDI), Signal line carrying the data from slave to master device. It is also, known as Slave Output (SO/SDO), Signal line carrying the clock signals, Signal line for slave device select. It is an active low signal, , The bus interface diagram shown in Fig. 2.27 illustrates the connection of master and slave devices on, the SPI bus., The master device is responsible for generating the clock signal. It selects the required slave device by, asserting the corresponding slave device’s slave select signal ‘LOW’. The data out line (MISO) of all the, slave devices when not selected floats at high impedance state., The serial data transmission through SPI bus is fully configurable. SPI devices contain a certain set of, registers for holding these configurations. The serial peripheral control register holds the various configuration, parameters like master/slave selection for the device, baudrate selection for communication, clock signal, control, etc. The status register holds the status of various conditions for transmission and reception., SPI works on the principle of ‘Shift Register’. The master and slave devices contain a special shift register, for the data to transmit or receive. The size of the shift register is device dependent. Normally it is a multiple, of 8. During transmission from the master to slave, the data in the master’s shift register is shifted out to, the MOSI pin and it enters the shift register of the slave device through the MOSI pin of the slave device., At the same time the shifted out data bit from the slave device’s shift register enters the shift register of the, master device through MISO pin. In summary, the shift registers of ‘master’ and ‘slave’ devices form a, circular buffer. For some devices, the decision on whether the LS/MS bit of data needs to be sent out first is, configurable through configuration register (e.g. LSBF bit of the SPI control register for Motorola’s 68HC12, controller)., When compared to I2C, SPI bus is most suitable for applications requiring transfer of data in ‘streams’., The only limitation is SPI doesn’t support an acknowledgement mechanism.
Page 72 :
48, , Introduc on to Embedded Systems, , MOSI, , SCL, , MISO, , MISO, SCL, MOSI, Master, (Microprocessor/, Controller), SS1\, SS2\, , MOSI, SCL, MISO, SS\, , Slave 1, SPI device, (e.g.: Serial, EEPROM), , MOSI, SCL, MISO, SS\, , Slave 2, SPI device, (e.g.: LCD), , SPI bus, , Fig. 2.27, , SPI bus interfacing, , 2.4.1.3 Universal Asynchronous Receiver Transmi er (UART) Universal Asynchronous Receiver, Transmitter (UART) based data transmission is an asynchronous form of serial data transmission. UART, based serial data transmission doesn’t require a clock signal to synchronise the transmitting end and receiving, end for transmission. Instead it relies upon the pre-defined agreement between the transmitting device and, receiving device. The serial communication settings (Baudrate, number of bits per byte, parity, number of, start bits and stop bit and flow control) for both transmitter and receiver should be set as identical. The start, and stop of communication is indicated through inserting special bits in the data stream. While sending a byte, of data, a start bit is added first and a stop bit is added at the end of the bit stream. The least significant bit of, the data byte follows the ‘start’ bit., The ‘start’ bit informs the receiver that a data byte is about to arrive. The receiver device starts polling its, ‘receive line’ as per the baudrate settings. If the baudrate is ‘x’ bits per second, the time slot available for one, bit is 1/x seconds. The receiver unit polls the receiver line at exactly half of the time slot available for the bit., If parity is enabled for communication, the UART of the transmitting device adds a parity bit (bit value is 1, for odd number of 1s in the transmitted bit stream and 0 for even number of 1s). The UART of the receiving, device calculates the parity of the bits received and compares it with the received parity bit for error checking., The UART of the receiving device discards the ‘Start’, ‘Stop’ and ‘Parity’ bit from the received bit stream, and converts the received serial bit data to a word (In the case of 8 bits/byte, the byte is formed with the, received 8 bits with the first received bit as the LSB and last received data bit as MSB)., For proper communication, the ‘Transmit line’ of the sending device should be connected to the ‘Receive, line’ of the receiving device. Figure 2.28 illustrates the same.
Page 73 :
49, , The Typical Embedded System, , UART, , TXD, , TXD, , RXD, , RXD, , UART, , TXD: Transmitter line, RXD: Receiver line, , Fig. 2.28, , UART Interfacing, , In addition to the serial data transmission function, UART provides hardware handshaking signal support, for controlling the serial data flow. UART chips are available from different semiconductor manufacturers., National Semiconductor’s 8250 UART chip is considered as the standard setting UART. It was used in the, original IBM PC., Nowadays most of the microprocessors/controllers are available with integrated UART functionality and, they provide built-in instruction support for serial data transmission and reception., , 2.4.1.4 1-Wire Interface 1-wire interface is an asynchronous half-duplex communication protocol, developed by Maxim Dallas Semiconductor (http://www.maxim-ic.com). It is also known as Dallas 1-Wire®, protocol. It makes use of only a single signal line (wire) called DQ for communication and follows the, master-slave communication model. One of the key feature of 1-wire bus is that it allows power to be sent, along the signal wire as well. The 1-Wire slave devices incorporate internal capacitor (typically of the order, of 800 pF) to power the device from the signal line. The 1-wire interface supports a single master and one, or more slave devices on the bus. The bus interface diagram shown in Fig. 2.29 illustrates the connection of, master and slave devices on the 1-wire bus., Vcc, 4.7K, DQ, , Port pin, , GND, Master, (Microprocessor/, Controller), , DQ, GND, , Fig. 2.29, , GND, , Slave 1, 1-wire device, (e.g.: DS2762 Battery, monitor IC ), , Slave 2, 1-wire device, (e.g.: DS2431 1024, Bit EEPROM ), , 1-Wire Interface bus
Page 74 :
50, , Introduc on to Embedded Systems, , Every 1-wire device contains a globally unique 64bit identification number stored within it. This unique, identification number can be used for addressing individual devices present on the bus in case there are, multiple slave devices connected to the 1-wire bus. The identifier has three parts: an 8bit family code, a 48bit, serial number and an 8bit Cyclic Redundancy Check (CRC) computed from the first 56 bits. The sequence of, operation for communicating with a 1-wire slave device is listed below., 1. The master device sends a ‘Reset’ pulse on the 1-wire bus., 2. The slave device(s) present on the bus respond with a ‘Presence’ pulse., 3. The master device sends a ROM command (Net Address Command followed by the 64bit address of, the device). This addresses the slave device(s) to which it wants to initiate a communication., 4. The master device sends a read/write function command to read/write the internal memory or register, of the slave device., 5. The master initiates a Read data/Write data from the device or to the device, All communication over the 1-wire bus is master initiated. The communication over the 1-wire bus is, divided into timeslots of 60 microseconds for the regular speed mode of operation (16.3kbps). The ‘Reset’, pulse occupies 8 time slots. For starting a communication, the master asserts the reset pulse by pulling the, 1-wire bus ‘LOW’ for at least 8 time slots (480ms). If a ‘slave’ device is present on the bus and is ready for, communication it should respond to the master with a ‘Presence’ pulse, within 60ms of the release of the, ‘Reset’ pulse by the master. The slave device(s) responds with a ‘Presence’ pulse by pulling the 1-wire bus, ‘LOW’ for a minimum of 1 time slot (60ms). For writing a bit value of 1 on the 1-wire bus, the bus master, pulls the bus for 1 to 15ms and then releases the bus for the rest of the time slot. A bit value of ‘0’ is written on, the bus by master pulling the bus for a minimum of 1 time slot (60ms) and a maximum of 2 time slots (120ms)., To Read a bit from the slave device, the master pulls the bus ‘LOW’ for 1 to 15ms. If the slave wants to send a, bit value ‘1’ in response to the read request from the master, it simply releases the bus for the rest of the time, slot. If the slave wants to send a bit value ‘0’, it pulls the bus ‘LOW’ for the rest of the time slot., , 2.4.1.5 Parallel Interface The on-board parallel interface is normally used for communicating with, peripheral devices which are memory mapped to the host of the system. The host processor/controller of, the embedded system contains a parallel bus and the device which supports parallel bus can directly connect, to this bus system. The communication through the parallel bus is controlled by the control signal interface, between the device and the host. The ‘Control Signals’ for communication includes ‘Read/Write’ signal and, device select signal. The device normally contains a device select line and the device becomes active only, when this line is asserted by the host processor. The direction of data transfer (Host to Device or Device, to Host) can be controlled through the control signal lines for ‘Read’ and ‘Write’. Only the host processor, has control over the ‘Read’ and ‘Write’ control signals. The device is normally memory mapped to the host, processor and a range of address is assigned to it. An address decoder circuit is used for generating the chip, select signal for the device. When the address selected by the processor is within the range assigned for the, device, the decoder circuit activates the chip select line and thereby the device becomes active. The processor, then can read or write from or to the device by asserting the corresponding control line (RD\ and WR\, respectively). Strict timing characteristics are followed for parallel communication. As mentioned earlier,, parallel communication is host processor initiated. If a device wants to initiate the communication, it can, inform the same to the processor through interrupts. For this, the interrupt line of the device is connected to, the interrupt line of the processor and the corresponding interrupt is enabled in the host processor. The width, of the parallel interface is determined by the data bus width of the host processor. It can be 4bit, 8bit, 16bit,, 32bit or 64bit etc. The bus width supported by the device should be same as that of the host processor. The, bus interface diagram shown in Fig. 2.30 illustrates the interfacing of devices through parallel interface.
Page 75 :
51, , The Typical Embedded System, , D0 to, Dx-1, RD\, WR\, Host, (Microprocessor /, Controller ), A0 to, Ay-1, , Data bus, , Control signals, , Peripheral device, RD\ (e.g.: ADC), WR\, CS\, Chip select, , Address bus, , Address de-coder, circuit, , x: Data bus width, y: Address bus width, Fig. 2.30 Parallel Interface Bus, Parallel data communication offers the highest speed for data transfer., , 2.4.2, , External Communication Interfaces, , The External Communication Interface refers to the different communication channels/buses used by the, embedded system to communicate with the external world. The following section gives an overview of the, various interfaces for external communication., , 2.4.2.1 RS-232 C & RS-485 RS-232 C (Recommended Standard number 232, revision C from the, Electronic Industry Association) is a legacy, full duplex, wired, asynchronous serial communication interface., The RS-232 interface is developed by the Electronics Industries Association (EIA) during the early 1960s., RS-232 extends the UART communication signals for external data communication., UART uses the standard TTL/CMOS logic (Logic ‘High’ corresponds to bit value 1 and Logic ‘Low’, corresponds to bit value 0) for bit transmission whereas RS-232 follows the EIA standard for bit transmission., As per the EIA standard, a logic ‘0’ is represented with voltage between +3 and +25V and a logic ‘1’ is, represented with voltage between –3 and –25V. In EIA standard, logic ‘0’ is known as ‘Space’ and logic ‘1’, as ‘Mark’. The RS-232 interface defines various handshaking and control signals for communication apart, from the ‘Transmit’ and ‘Receive’ signal lines for data communication. RS-232 supports two different types, of connectors, namely; DB-9: 9-Pin connector and DB-25: 25-Pin connector. Figure 2.31 illustrates the, connector details for DB-9 and DB-25., 1, , 5, , 6, , 9, , 13, , 1, , 14, , 25, , DB-25, DB-9, Fig. 2.31, , DB-9 and DB-25 RS-232 Connector Interface
Page 76 :
52, , Introduc on to Embedded Systems, , The pin details for the two connectors are explained in the following table:, Pin Name, , Pin no: (For DB-9, Connector), , Pin no: (For DB-25, Connector), , Description, , TXD, , 3, , 2, , Transmit Pin for Transmitting Serial Data, , RXD, , 2, , 3, , Receive Pin for Receiving Serial Data, , RTS, , 7, , 4, , Request to send., , CTS, , 8, , 5, , Clear To Send, , DSR, , 6, , 6, , Data Set Ready, , GND, , 5, , 7, , Signal Ground, , DCD, , 1, , 8, , Data Carrier Detect, , DTR, , 4, , 20, , Data Terminal Ready, , RI, , 9, , 22, , Ring Indicator, , FG, , 1, , Frame Ground, , SDCD, , 12, , Secondary DCD, , SCTS, , 13, , Secondary CTS, , STXD, , 14, , Secondary TXD, , TC, , 15, , Transmission Signal Element Timing, , SRXD, , 16, , Secondary RXD, , RC, , 17, , Receiver Signal Element Timing, , SRTS, , 19, , Secondary RTS, , SQ, , 21, , Signal Quality detector, , NC, , 9, , No Connection, , NC, , 10, , No Connection, , NC, , 11, , No Connection, , NC, , 18, , No Connection, , NC, , 23, , No Connection, , NC, , 24, , No Connection, , NC, , 25, , No Connection, , RS-232 is a point-to-point communication interface and the devices involved in RS-232 communication, are called ‘Data Terminal Equipment (DTE)’ and ‘Data Communication Equipment (DCE)’. If no data flow, control is required, only TXD and RXD signal lines and ground line (GND) are required for data transmission, and reception. The RXD pin of DCE should be connected to the TXD pin of DTE and vice versa for proper, data transmission., If hardware data flow control is required for serial transmission, various control signal lines of the RS-232, connection are used appropriately. The control signals are implemented mainly for modem communication, and some of them may not be irrelevant for other type of devices. The Request To Send (RTS) and Clear To, Send (CTS) signals co-ordinate the communication between DTE and DCE. Whenever the DTE has a data to, send, it activates the RTS line and if the DCE is ready to accept the data, it activates the CTS line.
Page 77 :
The Typical Embedded System, , 53, , The Data Terminal Ready (DTR) signal is activated by DTE when it is ready to accept data. The Data Set, Ready (DSR) is activated by DCE when it is ready for establishing a communication link. DTR should be in, the activated state before the activation of DSR., The Data Carrier Detect (DCD) control signal is used by the DCE to indicate the DTE that a good signal, is being received., Ring Indicator (RI) is a modem specific signal line for indicating an incoming call on the telephone line., The 25 pin DB connector contains two sets of signal lines for transmit, receive and control lines. Nowadays, DB-25 connector is obsolete and most of the desktop systems are available with DB-9 connectors only., As per the EIA standard RS-232 C supports baudrates up to 20Kbps (Upper limit 19.2 Kbps) The commonly, used baudrates by devices are 300bps, 1200bps, 2400bps, 9600bps, 11.52Kbps and 19.2Kbps. 9600 is the, popular baudrate setting used for PC communication. The maximum operating distance supported by RS-232, is 50 feet at the highest supported baudrate., Embedded devices contain a UART for serial communication and they generate signal levels conforming, to TTL/CMOS logic. A level translator IC like MAX 232 from Maxim Dallas semiconductor is used for, converting the signal lines from the UART to RS-232 signal lines for communication. On the receiving side, the received data is converted back to digital logic level by a converter IC. Converter chips contain converters, for both transmitter and receiver., Though RS-232 was the most popular communication interface during the olden days, the advent of other, communication techniques like Bluetooth, USB, Firewire, etc are pushing down RS-232 from the scenes., Still RS-232 is popular in certain legacy industrial applications., RS-232 supports only point-to-point communication and not suitable for multi-drop communication. It, uses single ended data transfer technique for signal transmission and thereby more susceptible to noise and it, greatly reduces the operating distance., RS-422 is another serial interface standard from EIA for differential data communication. It supports data, rates up to 100Kbps and distance up to 400 ft. The same RS-232 connector is used at the device end and an, RS-232 to RS-422 converter is plugged in the transmission line. At the receiver end the conversion from RS422 to RS-232 is performed. RS-422 supports multi-drop communication with one transmitter device and, receiver devices up to 10., RS-485 is the enhanced version of RS-422 and it supports multi-drop communication with up to 32, transmitting devices (drivers) and 32 receiving devices on the bus. The communication between devices in, the bus uses the ‘addressing’ mechanism to identify slave devices., , 2.4.2.2 Universal Serial Bus (USB) Universal Serial Bus (USB) is a wired high speed serial bus for, data communication. The first version of USB (USB1.0) was released in 1995 and was created by the USB, core group members consisting of Intel, Microsoft, IBM, Compaq, Digital and Northern Telecom. The USB, communication system follows a star topology with a USB host at the centre and one or more USB peripheral, devices/USB hosts connected to it. A USB 2.0 host can support connections up to 127, including slave, peripheral devices and other USB hosts. Figure 2.32 illustrates the star topology for USB device connection., USB transmits data in packet format. Each data packet has a standard format. The USB communication is, a host initiated one. The USB host contains a host controller which is responsible for controlling he data, communication, including establishing connectivity with USB slave devices, packetizing and formatting the, data packet. There are different standards for implementing the USB Host Control interface; namely Open, Host Control Interface (OHCI) and Universal Host Control Interface (UHCI)., The physical connection between a USB peripheral device and master device is established with a USB, cable. The USB cable in USB 2.0 specification supports communication distance of up to 5 meters. The USB, 2.0 standard uses two different types of connector at the ends of the USB cable for connecting the USB
Page 78 :
54, , Introduc on to Embedded Systems, , peripheral device and host device. ‘Type A’ connector is used for upstream connection (connection with, host) and Type B OR Mini/Micro USB connector is used for downstream connection (connection with slave, device). The USB 2.0 connector seen at desktop PCs or laptops, are examples for ‘Type A’ USB connector. Both Type A and, Type B connectors contain 4 pins for communication. The Pin, details for the USB 2.0 Type A & B connectors are listed in the, Peripheral, table given below., device 2, Pin no., , Pin name, , Description, , 1, , VBUS, , Carries power (5V), , 2, , D–, , Differential data carrier line, , 3, , D+, , Differential data carrier line, , 4, , GND, , Ground signal line, , Peripheral, device 1, , USB host, (Hub), , Peripheral, device 3, , USB uses differential signals for data transmission. It, USB host, improves the noise immunity. USB interface has the ability to, (Hub), supply power to the connecting devices. Two connection lines, (Ground and Power) of the USB interface are dedicated for, carrying power. A Standard Downstream USB 2.0 Port (SDP), Peripheral, Peripheral, can supply power up to 500 mA at 5 V, whereas a Charging, device 4, device 5, Downstream USB 2.0 Port (CDP) can supply power up to 1500, Fig. 2.32 USB Device Connection topology, mA at 5 V. It is sufficient to operate low power devices. Mini, and Micro USB connectors are available for small form factor, devices like portable media players and Smartphones. Each USB device contains a Product ID (PID) and a, Vendor ID (VID). The PID and VID are embedded into the USB chip by the USB device manufacturer. The, VID for a device is supplied by the USB standards forum. PID and VID are essential for loading the drivers, corresponding to a USB device for communication., USB supports four different types of data transfers, namely; Control, Bulk, Isochronous and Interrupt., Control transfer is used by USB system software to query, configure and issue commands to the USB, device. Bulk transfer is used for sending a block of data to a device. Bulk transfer supports error checking and, correction. Transferring data to a printer is an example for bulk transfer. Isochronous data transfer is used for, real-time data communication. In Isochronous transfer, data is transmitted as streams in real-time. Isochronous, transfer doesn’t support error checking and re-transmission of data in case of any transmission loss. All, streaming devices like audio devices and medical equipment for data collection make use of the isochronous, transfer. Interrupt transfer is used for transferring small amount of data. Interrupt transfer mechanism makes, use of polling technique to see whether the USB device has any data to send. The frequency of polling is, determined by the USB device and it varies from 1 to 255 milliseconds. Devices like Mouse and Keyboard,, which transmits fewer amounts of data, makes use of Interrupt transfer., USB 3.x is the latest version of the USB standard for peripheral connectivity. USB 3.x brings a number of, improvements over USB 2.0, and adds a new transfer mode called SuperSpeed (SS), capable of transferring, data at speeds up to 4.8 Gbps, which is more than ten times as fast as the 480 Mbps high speed of USB 2.0., USB 3.x uses an entirely different set of Type A & B physical connectors compared to USB 2.0, connectors. Both Type A and Type B USB 3.0 connectors contain 9 pins. Similar to the USB 2.0 connector,, 3.0 connectors include VBUS, Differential data pair (D−, D+), and GND. In addition to these pins, USB, 3.0 connectors include two additional differential pairs (StdA_SSRX−, StdA_SSRX+ and StdA_SSTX−,, StdA_SSTX+; StdB_SSRX−, StdB_SSRX+ and StdB_SSTX− StdB_SSTX+,) for Superspeed data transfer
Page 79 :
55, , The Typical Embedded System, , and an associated ground (GND_DRAIN). USB 3.0 also introduced a new Micro-B connector, which is a, combination of the standard USB 2.0 Micro-B connector side by side with an additional 5-pin plug. USB, Type-C is a small, compact and reversible plug connector for USB devices and USB cabling. It replaces the, standard USB Type-A and B connections as well as the myriad of micro and mini USB ports. It supports, various new USB standard like USB 3.1 and USB power delivery (USB PD) and also a variety of different, protocols using “alternate modes,” which allows outputting HDMI, VGA, Display Port, or other types of, connections from the single USB Type C port through adapters., USB.ORG (www.usb.org) is the standards body for defining and controlling the standards for USB, communication. Presently USB supports different data rates namely; Low Speed (1.5Mbps), Full Speed, (12Mbps), High Speed (480Mbps) , SuperSpeed (5Gbps) and SuperSpeed + (or SuperSpeed USB 10 Gbps)., The Low Speed and Full Speed specifications are defined by USB1.0 and the High Speed specification, is defined by USB 2.0. USB 3.0 defines the specifications for Super Speed. Wireless USB is the wireless, extension to USB based on Ultra Wide Band (UWB) technology for data transmission. Wireless USB, combines the speed and security of wired USB technology with the ease-of-use of wireless technology., , 2.4.2.3 IEEE 1394 (Firewire) IEEE 1394 is a wired, isochronous high speed serial communication bus., It is also known as High Performance Serial Bus (HPSB). The research on 1394 was started by Apple Inc., in 1985 and the standard for this was coined by IEEE. The implementation of it is available from various, players with different names. Apple Inc’s (www.apple.com) implementation of 1394 protocol is popularly, known as Firewire. i.LINK is the 1394 implementation from Sony Corporation (www.sony.net) and Lynx is, the implementation from Texas Instruments (www.ti.com). 1394 supports peer-to-peer connection and pointto-multipoint communication allowing 63 devices to be connected on the bus in a tree topology. 1394 is a, wired serial interface and it can support a cable length of up to 15 feet for interconnection., The 1394 standard has evolved a lot from the first version IEEE 1394–1995 released in 1995 to the, recent version IEEE 1394–2008 released in June 2008. The 1394 standard supports a data rate of 400 to, 3200Mbits/second. The IEEE 1394 uses differential data transfer (The information is sent using differential, signals through a pair of twisted cables. It increases the noise immunity) and the interface cable supports 3, types of connectors, namely; 4-pin connector, 6-pin connector (alpha connector) and 9 pin connector (beta, connector). The 6 and 9 pin connectors carry power also to support external devices (In case an embedded, device is connected to a PC through an IEEE 1394 cable with 6 or 9 pin connector interface, it can operate, from the power available through the connector.) It can supply unregulated power in the range of 24 to 30V., (The Apple implementation is for battery operated devices and it can supply a voltage in the range 9 to 12V.), The table given below illustrates the pin details for 4, 6 and 9 pin connectors., Pin name, , Pin no: (4 Pin, Connector), , Power, Signal Ground, , Pin no: (6 Pin, Connector), , Pin no: (9 Pin, Connector), , 1, , 8, , Description, Unregulated DC supply. 24 to 30V, , 2, , 6, , Ground connection, , TPB–, , 1, , 3, , 1, , Differential Signal line for Signal line B, , TPB+, , 2, , 4, , 2, , Differential Signal line for Signal line B, , TPA–, , 3, , 5, , 3, , Differential Signal line for Signal line A, , TPA+, , 4, , 6, , 4, , Differential Signal line for Signal line A, , TPA(S), , 5, , Shield for the differential signal line A., Normally grounded, , TPB(S), , 9, , Shield for the differential signal line B., Normally grounded, , NC, , 7, , No connection
Page 80 :
56, , Introduc on to Embedded Systems, , There are two differential data transfer lines A and B per connector. In a 1394 cable, normally the, differential lines of A are connected to B (TPA+ to TPB+ and TPA–to TPB–) and vice versa., 1394 is a popular communication interface for connecting embedded devices like Digital Camera,, Camcorder, Scanners to desktop computers for data transfer and storage., Unlike USB interface (Except USB OTG), IEEE 1394 doesn’t require a host for communicating between, devices. For example, you can directly connect a scanner with a printer for printing. The data-rate supported, by 1394 is far higher than the one supported by USB2.0 interface. The 1394 hardware implementation is, much costlier than USB implementation., , 2.4.2.4 Infrared (IrDA) Infrared (IrDA) is a serial, half duplex, line of sight based wireless technology, for data communication between devices. It is in use from the olden days of communication and you may be, very familiar with it. The remote control of your TV, VCD player, etc. works on Infrared data communication, principle. Infrared communication technique uses infrared waves of the electromagnetic spectrum for, transmitting the data. IrDA supports point-point and point-to-multipoint communication, provided all devices, involved in the communication are within the line of sight. The typical communication range for IrDA lies in, the range 10 cm to 1 m. The range can be increased by increasing the transmitting power of the IR device. IR, supports data rates ranging from 9600bits/second to 16Mbps. Depending on the speed of data transmission, IR is classified into Serial IR (SIR), Medium IR (MIR), Fast IR (FIR), Very Fast IR (VFIR), Ultra Fast IR, (UFIR) and GigaIR. SIR supports transmission rates ranging from 9600bps to 115.2kbps. MIR supports data, rates of 0.576Mbps and 1.152Mbps. FIR supports data rates up to 4Mbps. VFIR is designed to support high, data rates up to 16Mbps. The UFIR supports data rates up-to 96Mbps, whereas the GigaIR supports data rates, 512 Mbps to 1 Gbps., IrDA communication involves a transmitter unit for transmitting the data over IR and a receiver for, receiving the data. Infrared Light Emitting Diode (LED) is the IR source for transmitter and at the receiving, end a photodiode acts as the receiver. Both transmitter and receiver unit will be present in each device, supporting IrDA communication for bidirectional data transfer. Such IR units are known as ‘Transceiver’., Certain devices like a TV remote control always require unidirectional communication and so they contain, either the transmitter or receiver unit (The remote control unit contains the transmitter unit and TV contains, the receiver unit)., ‘Infra-red Data Association’ (IrDA - http://www.irda.org/) is the regulatory body responsible for defining, and licensing the specifications for IR data communication. IrDA communication has two essential parts; a, physical link part and a protocol part. The physical link is responsible for the physical transmission of data, between devices supporting IR communication and protocol part is responsible for defining the rules of, communication. The physical link works on the wireless principle making use of Infrared for communication., The IrDA specifications include the standard for both physical link and protocol layer., The IrDA control protocol contains implementations for Physical Layer (PHY), Media Access Control, (MAC) and Logical Link Control (LLC). The Physical Layer defines the physical characteristics of, communication like range, data rates, power, etc., IrDA is a popular interface for file exchange and data transfer in low cost devices. IrDA was the prominent, communication channel in mobile phones before Bluetooth’s existence. Even now most of the mobile phone, devices support IrDA., 2.4.2.5 Bluetooth (BT) Bluetooth is a low cost, low power, short range wireless technology for data and, audio communication. Bluetooth was first proposed by ‘Ericsson’ in 1994. Bluetooth operates at 2.4GHz, of the Radio Frequency spectrum and uses the Frequency Hopping Spread Spectrum (FHSS) technique for, communication. Literally it supports a data rate of up to 1Mbps to 24Mbps (and a range of approximately
Page 81 :
The Typical Embedded System, , 57, , 30 to 100 feet (Depending on the Bluetooth version – v1.2 supports datarate up to 1Mbps, v2.0 + EDR, supports datarate up to 3Mbps, v3.0 + HS and v4.0 supports datarate up to 24Mbps)) for data communication., Like IrDA, Bluetooth communication also has two essential parts; a physical link part and a protocol part., The physical link is responsible for the physical transmission of data between devices supporting Bluetooth, communication and protocol part is responsible for defining the rules of communication. The physical, link works on the Wireless principle making use of RF waves for communication. Bluetooth enabled, devices essentially contain a Bluetooth wireless radio for the transmission and reception of data. The rules, governing the Bluetooth communication is implemented in the ‘Bluetooth protocol stack’. The Bluetooth, communication IC holds the stack. Each Bluetooth device will have a 48 bit unique identification number., Bluetooth communication follows packet based data transfer. Bluetooth supports point-to-point (device to, device) and point-to-multipoint (device to multiple device broadcasting) wireless communication. The pointto-point communication follows the masterslave relationship. A Bluetooth device can function as either, master or slave. When a network is formed with one Bluetooth device as master and more than one device as, slaves, it is called a Piconet. A Piconet supports a maximum of seven slave devices., Bluetooth is the favourite choice for short range data communication in handheld embedded devices., Bluetooth technology is very popular among cell phone users as they are the easiest communication channel, for transferring ringtones, music files, pictures, media files, etc. between neighboring Bluetooth enabled, phones. Bluetooth Low Energy (BLE)/Bluetooth Smart is a latest addition to the Bluetooth technology. BLE, allows devices to use much less power compared to the standard Bluetooth connections, while offering most, of the connectivity of Bluetooth and maintaining a similar communication range., Bluetooth 4.2 specification enables IoT support through Low-power IP connectivity, with support for, flexible Internet connectivity options (IPv6/6LoWPAN or Bluetooth Smart Gateways) and implements, industry-leading privacy, power efficiency and industry standard security, The Bluetooth standard specifies the minimum requirements that a Bluetooth device must support for a, specific usage scenario. The Generic Access Profile (GAP) defines the requirements for detecting a Bluetooth, device and establishing a connection with it. All other specific usage profiles are based on GAP. Serial Port, Profile (SPP) for serial data communication, File Transfer Profile (FTP) for file transfer between devices,, Human Interface Device (HID) for supporting human interface devices like keyboard and mouse are examples, for Bluetooth profiles. BLE implements various application specific profiles for communicating with low, power Bluetooth peripherals like fitness devices, Blood Pressure and heart rate monitors etc. Healthcare, Profiles (HTP, GLP, BLP etc.), Sports and Fitness Profiles (HRP, LNP, RNCP etc.) etc. are examples for this., The specifications for Bluetooth communication is defined and licensed by the standards body ‘Bluetooth, Special Interest Group (SIG)’. For more information, please visit the website www.bluetooth.org, , 2.4.2.6 Wi-Fi Wi-Fi or Wireless Fidelity is the popular wireless communication technique for networked, communication of devices. Wi-Fi follows the IEEE 802.11 standard. Wi-Fi is intended for network, communication and it supports Internet Protocol (IP) based communication. It is essential to have device, identities in a multipoint communication to address specific devices for data communication. In an IP based, communication each device is identified by an IP address, which is unique to each device on the network., Wi-Fi based communications require an intermediate agent called Wi-Fi router/Wireless Access point to, manage the communications. The Wi-Fi router is responsible for restricting the access to a network, assigning, IP address to devices on the network, routing data packets to the intended devices on the network. Wi-Fi, enabled devices contain a wireless adaptor for transmitting and receiving data in the form of radio signals, through an antenna. The hardware part of it is known as Wi-Fi Radio. Wi-Fi operates at 2.4GHz or 5GHz of, radio spectrum and they co-exist with other ISM band devices like Bluetooth. Figure 2.33 illustrates the
Page 82 :
58, , Introduc on to Embedded Systems, , typical interfacing of devices in a Wi-Fi, network. For communicating with devices over, a Wi-Fi network, the device when its Wi-Fi, radio is turned ON, searches the available WiFi network in its vicinity and lists out the, Service Set Identifier (SSID) of the available, networks. If the network is security enabled, a, password may be required to connect to a, particular SSID. Wi-Fi employs different security, mechanisms like Wired Equivalency Privacy, (WEP) Wireless Protected Access (WPA), etc., for securing the data communication. Wi-Fi, supports data rates ranging from 1Mbps to, 1300Mbps (Growing towards higher rates as, technology progresses), depending on the, standards (802.11a/b/g/n/ac) and access/, modulation method. Depending on the type of, antenna and usage location (indoor/outdoor),, Wi-Fi offers a range of 100 to 1000 feet., , Wi-Fi router, , Device 1, Device 3, , Device 2, , Fig. 2.33, , Wi-Fi network, , 2.4.2.7 ZigBee ZigBee is a low power, low cost, wireless network communication protocol based on, the IEEE 802.15.4-2006 standard. ZigBee is targeted for low power, low data rate and secure applications, for Wireless Personal Area Networking (WPAN). The ZigBee specifications support a robust mesh network, containing multiple nodes. This networking strategy makes the network reliable by permitting messages to, travel through a number of different paths to get from one node to another., ZigBee operates worldwide at the unlicensed bands of Radio spectrum, mainly at 2.400 to 2.484 GHz,, 902 to 928 MHz and 868.0 to 868.6 MHz. ZigBee Supports an operating distance of up to 100 metres and a, data rate of 20 to 250Kbps., In the ZigBee terminology, each ZigBee device falls under any one of the following ZigBee device category., ZigBee Coordinator (ZC)/Network Coordinator The ZigBee coordinator acts as the root of the ZigBee, network. The ZC is responsible for initiating the ZigBee network and it has the capability to store information, about the network., ZigBee Router (ZR)/Full func on Device (FFD) Responsible for passing information from device to another, device or to another ZR., ZigBee End Device (ZED)/Reduced Func on Device (RFD) End, device containing ZigBee functionality for data communication. It, can talk only with a ZR or ZC and doesn’t have the capability to act, as a mediator for transferring data from one device to another., The diagram shown in Fig. 2.34 gives an overview of ZC, ZED, and ZR in a ZigBee network., ZigBee is primarily targeting application areas like home &, industrial automation, energy management, home control/security,, medical/patient tracking, logistics & asset tracking and sensor, networks & active RFID. Automatic Meter Reading (AMR), smoke, detectors, wireless telemetry, HVAC control, heating control,, , Fig. 2.34, , A ZigBee network model
Page 83 :
59, , The Typical Embedded System, , lighting controls, environmental controls, etc., are examples for applications which can make use of the, ZigBee technology., ZigBee PRO offers full wireless mesh, low-power networking capable of supporting more than 64,000, devices on a single network. It provides standardised networking designed to connect the widest range of, devices, in any industry, into a single control network. ZigBee PRO offers an optional new and innovative, feature, ‘Green Power’ to connect energy harvesting or self-powered devices into ZigBee PRO networks., The ‘Green Power’ feature of ZigBee PRO is the most eco-friendly way to power battery-less devices such as, sensors, switches, dimmers and many other devices and allows them to securely join ZigBee PRO networks., ZigBee 3.0 delivers all the features of ZigBee while unifying the ZigBee application standards found in, ZigBee devices. ZigBee 3.0 standard enables communication and interoperability among devices for smart, homes, connected lighting, and other markets., The specifications for ZigBee is developed and managed by the ZigBee alliance (www.zigbee.org), a, non-profit consortium of leading semiconductor manufacturers, technology providers, OEMs and end-users, worldwide., , 2.4.2.8 General Packet Radio Service (GPRS), 3G, 4G, LTE General Packet Radio Service (GPRS),, 3G, 4G and LTE are cellular communication technique for transferring data over a mobile communication, network like GSM and CDMA. Data is sent as packets in GPRS communication. The transmitting device splits, the data into several related packets. At the receiving end the data is re-constructed by combining the received, data packets. GPRS supports a theoretical maximum transfer rate of 171.2kbps. In GPRS communication,, the radio channel is concurrently shared between several users instead of dedicating a radio channel to a, cell phone user. The GPRS communication divides the channel into 8 timeslots and transmits data over the, available channel. GPRS supports Internet Protocol (IP), Point to Point Protocol (PPP) and X.25 protocols, for communication. GPRS is mainly used by mobile enabled embedded devices for data communication., The device should support the necessary GPRS hardware like GPRS modem and GPRS radio. To accomplish, GPRS based communication, the carrier network also should have support for GPRS communication. GPRS, is an old technology and it is being replaced by new generation cellular data communication techniques, like 3G (3rd Generation), High Speed Downlink Packet Access (HSDPA), 4G (4th Generation), LTE (Long, Term Evolution) etc. which offers higher bandwidths for communication. 3G offers data rates ranging from, 144Kbps to 2Mbps or higher, whereas 4G gives a practical data throughput of 2 to 100+ Mbps depending on, the network and underlying technology., , 2.5, , EMBEDDED FIRMWARE, , Embedded firmware refers to the control algorithm (Program instructions) and, or the configuration settings that an embedded system developer dumps into the, code (Program) memory of the embedded system. It is an un-avoidable part of, an embedded system. There are various methods available for developing the, embedded firmware. They are listed below., (1), , LO 5 Describe what, embedded firmware, is and its role in, embedded systems, , Write the program in high level languages like Embedded C/C++ using an Integrated Development, Environment (The IDE will contain an editor, compiler, linker, debugger, simulator, etc. IDEs are, different for different family of processors/controllers. For example, Keil micro vision3 IDE is used, for all family members of 8051 microcontroller, since it contains the generic 8051 compiler C51)., (2) Write the program in Assembly language using the instructions supported by your application’s, target processor/controller., The instruction set for each family of processor/controller is different and the program written in either of, the methods given above should be converted into a processor understandable machine code before loading, it into the program memory.
Page 84 :
60, , Introduc on to Embedded Systems, , The process of converting the program written in either a high level language or processor/controller, specific Assembly code to machine readable binary code is called ‘HEX File Creation’. The methods used for, ‘HEX File Creation’ is different depending on the programming techniques used. If the program is written, in Embedded C/C++ using an IDE, the cross compiler included in the IDE converts it into corresponding, processor/controller understandable ‘HEX File’. If you are following the Assembly language based, programming technique (method 2), you can use the utilities supplied by the processor/controller vendors to, convert the source code into ‘HEX File’. Also third party tools are available, which may be of free of cost,, for this conversion., For a beginner in the embedded software field, it is strongly recommended to use the high level language, based development technique. The reasons for this being: writing codes in a high level language is easy,, the code written in high level language is highly portable which means you can use the same code to run on, different processor/controller with little or less modification. The only thing you need to do is re-compile, the program with the required processor’s IDE, after replacing the include files for that particular processor., Also the programs written in high level languages are not developer dependent. Any skilled programmer can, trace out the functionalities of the program by just having a look at the program. It will be much easier if the, source code contains necessary comments and documentation lines. It is very easy to debug and the overall, system development time will be reduced to a greater extent., The embedded software development process in assembly language is tedious and time consuming. The, developer needs to know about all the instruction sets of the processor/controller or at least s/he should carry, an instruction set reference manual with her/him. A programmer using assembly language technique writes, the program according to his/her view and taste. Often he/she may be writing a method or functionality, which can be achieved through a single instruction as an experienced person’s point of view, by two or three, instructions in his/her own style. So the program will be highly dependent on the developer. It is very difficult, for a second person to understand the code written in Assembly even if it is well documented., We will discuss both approaches of embedded software development in a later chapter dealing with, design of embedded firmware, in detail. Two types of control algorithm design exist in embedded firmware, development. The first type of control algorithm development is known as the infinite loop or ‘super loop’, based approach, where the control flow runs from top to bottom and then jumps back to the top of the program, in a conventional procedure. It is similar to the while (1) { }; based technique in C. The second method deals, with splitting the functions to be executed into tasks and running these tasks using a scheduler which is part, of a General Purpose or Real Time Embedded Operating System (GPOS/RTOS). We will discuss both of, these approaches in separate chapters of this book., , 2.6 OTHER SYSTEM COMPONENTS, The other system components refer to the components/circuits/ICs which, are necessary for the proper functioning of the embedded system. Some of, these circuits may be essential for the proper functioning of the processor/, controller and firmware execution. Watchdog timer, Reset IC (or passive, circuit), brown-out protection IC (or passive circuit), etc. are examples of, circuits/ICs which are essential for the proper functioning of the processor/, controllers. Some of the controllers or SoCs integrate these components, within a single IC and doesn’t require such components externally, connected to the chip for proper functioning. Depending on the system, requirement, the embedded system may include other integrated circuits for performing specific functions,, level translator ICs for interfacing circuits with different logic levels, etc. The following section explains the, essential circuits for the proper functioning of the processor/controller of the embedded system., LO 6 Know the different, system components like, Reset Circuit, Brownout protection circuit,, Oscillator Unit, RealTime Clock (RTC) and, Watchdog Timer unit
Page 85 :
61, , The Typical Embedded System, , 2.6.1, , Reset Circuit, , Freewheeling diode, , Freewheeling, diode, , Vcc, Vcc, The reset circuit is essential to ensure, that the device is not operating at a, +, C, voltage level where the device is not, –, Reset pulse, R, guaranteed to operate, during system, Active high, power ON. The reset signal brings, Reset pulse, the internal registers and the different, R, Active low, hardware systems of the processor/, controller to a known state and starts, +, C, the firmware execution from the, –, reset vector (Normally from vector, GND, GND, address 0x0000 for conventional, processors/controllers. The reset, Fig. 2.35 RC based reset circuit, vector can be relocated to an address, for processors/controllers supporting bootloader). The reset signal can be either active high (The processor, undergoes reset when the reset pin of the processor is at logic high) or active low (The processor undergoes, reset when the reset pin of the processor is at logic low). Since the processor operation is synchronised to a, clock signal, the reset pulse should be wide enough to give time for the clock oscillator to stabilise before the, internal reset state starts. The reset signal to the processor can be applied at power ON through an external, passive reset circuit comprising a Capacitor and Resistor or through a standard Reset IC like MAX810, from Maxim Dallas (www.maxim-ic.com). Select the reset IC based on the type of reset signal and logic, level (CMOS/TTL) supported by the processor/controller in use. Some microprocessors/controllers contain, built-in internal reset circuitry and they don’t require external reset circuitry. Figure 2.35 illustrates a resistor, capacitor based passive reset circuit for active high and low configurations. The reset pulse width can be, adjusted by changing the resistance value R and capacitance value C., , 2.6.2, , Brown-out Protection Circuit, Vcc, R1, E, , VB, , R2, , Q, Reset pulse, , DZ, , Active low, , Vz, , Brown-out protection circuit prevents the processor/controller from, unexpected program execution behaviour when the supply voltage, to the processor/controller falls below a specified voltage. It is, essential for battery powered devices since there are greater chances, for the battery voltage to drop below the required threshold. The, processor behaviour may not be predictable if the supply voltage, falls below the recommended operating voltage. It may lead to, situations like data corruption. A brown-out protection circuit, holds the processor/controller in reset state, when the operating, voltage falls below the threshold, until it rises above the threshold, voltage. Certain processors/controllers support built in brown-out, protection circuit which monitors the supply voltage internally., If the processor/controller doesn’t integrate a built-in brown-out, protection circuit, the same can be implemented using external, passive circuits or supervisor ICs. Figure 2.36 illustrates a brownout circuit implementation using Zener diode and transistor for, processor/controller with active low Reset logic., , R3, GND, , Fig. 2.36 Brown-out protection circuit, with Active low output
Page 86 :
62, , Introduc on to Embedded Systems, , The Zener diode Dz and transistor Q forms the heart of this circuit. The transistor conducts always, when the supply voltage Vcc is greater than that of the sum of VBE and Vz (Zener voltage). The transistor, stops conducting when the supply voltage falls below the sum of VBE and Vz. Select the Zener diode with, required voltage for setting the low threshold value for Vcc. The values of R1, R2, and R3 can be selected, based on the electrical characteristics (Absolute maximum current and voltage ratings) of the transistor in, use. Microprocessor Supervisor ICs like DS1232 from Maxim Dallas (www.maxim-ic.com) also provides, Brown-out protection., , 2.6.3, , Oscillator Unit, , A microprocessor/microcontroller is a digital device made up of digital combinational and sequential circuits., The instruction execution of a microprocessor/controller occurs in sync with a clock signal. It is analogous, to the heartbeat of a living being which synchronises the execution of life. For a living being, the heart is, responsible for the generation of the beat whereas the oscillator unit of the embedded system is responsible, for generating the precise clock for the processor. Certain processors/controllers integrate a built-in oscillator, unit and simply require an external ceramic resonator/quartz crystal for producing the necessary clock signals., Quartz crystals and ceramic resonators are equivalent in operation, however they possess physical difference., A quartz crystal is normally mounted in a hermetically sealed metal case with two leads protruding out of the, case. Certain devices may not contain a built-in oscillator unit and require the clock pulses to be generated, and supplied externally. Quartz crystal Oscillators are available in the form chips and they can be used for, generating the clock pulses in such a cases. The speed of operation of a processor is primarily dependent, on the clock frequency. However we cannot increase the clock frequency blindly for increasing the speed, of execution. The logical circuits lying inside the processor always have an upper threshold value for the, maximum clock at which the system can run, beyond which the system becomes unstable and non functional., The total system power consumption is directly proportional to the clock frequency. The power consumption, increases with increase in clock frequency. The accuracy of program execution depends on the accuracy of, the clock signal. The accuracy of the crystal oscillator or ceramic resonator is normally expressed in terms of, +/-ppm (Parts per million). Figure 2.37 illustrates the usage of quartz crystal/ceramic resonator and external, oscillator chip for clock generation., Microcontroller, , C : Capacitor, Y : Resonator, , Quartz crystal, resonator, , Microprocessor, , Oscillator, unit, C, , p, , p, , C, Y, , Oscillator, unit, , Fig. 2.37 Oscillator circuitry using quartz crystal and quartz crystal oscillator, , 2.6.4, , Real-Time Clock (RTC), , Real-Time Clock (RTC) is a system component responsible for keeping track of time. RTC holds information, like current time (In hours, minutes and seconds) in 12 hour/24 hour format, date, month, year, day of the, week, etc. and supplies timing reference to the system. RTC is intended to function even in the absence of
Page 87 :
The Typical Embedded System, , 63, , power. RTCs are available in the form of Integrated Circuits from different semiconductor manufacturers like, Maxim/Dallas, ST Microelectronics etc. The RTC chip contains a microchip for holding the time and date, related information and backup battery cell for functioning in the absence of power, in a single IC package., The RTC chip is interfaced to the processor or controller of the embedded system. For Operating System based, embedded devices, a timing reference is essential for synchronising the operations of the OS kernel. The, RTC can interrupt the OS kernel by asserting the interrupt line of the processor/controller to which the RTC, interrupt line is connected. The OS kernel identifies the interrupt in terms of the Interrupt Request (IRQ), number generated by an interrupt controller. One IRQ can be assigned to the RTC interrupt and the kernel, can perform necessary operations like system date time updation, managing software timers etc when an RTC, timer tick interrupt occurs. The RTC can be configured to interrupt the processor at predefined intervals or to, interrupt the processor when the RTC register reaches a specified value (used as alarm interrupt)., , 2.6.5, , Watchdog Timer, , In desktop Windows systems, if we feel our application is behaving in an abnormal way or if the system hangs, up, we have the ‘Ctrl + Alt + Del’ to come out of the situation. What if it happens to our embedded system? Do, we really have a ‘Ctrl + Alt + Del’ to take control of the situation? Of course not , but we have a watchdog to, monitor the firmware execution and reset the system processor/microcontroller when the program execution, hangs up. A watchdog timer, or simply a watchdog, is a hardware timer for monitoring the firmware execution., Depending on the internal implementation, the watchdog timer increments or decrements a free running, counter with each clock pulse and generates a reset signal to reset the processor if the count reaches zero for, a down counting watchdog, or the highest count value for an upcounting watchdog. If the watchdog counter, is in the enabled state, the firmware can write a zero (for upcounting watchdog implementation) to it before, starting the execution of a piece of code (subroutine or portion of code which is susceptible to execution hang, up) and the watchdog will start counting. If the firmware execution doesn’t complete due to malfunctioning,, within the time required by the watchdog to reach the maximum count, the counter will generate a reset, pulse and this will reset the processor (if it is connected to the reset line of the processor). If the firmware, execution completes before the expiration of the watchdog timer you can reset the count by writing a 0 (for, an upcounting watchdog timer) to the watchdog timer register. Most of the processors implement watchdog, as a built-in component and provides status register to control the watchdog timer (like enabling and disabling, watchdog functioning) and watchdog timer register for writing the count value. If the processor/controller, doesn’t contain a built in watchdog timer, the same can be implemented using an external watchdog timer IC, circuit. The external watchdog timer uses hardware logic for enabling/disabling, resetting the watchdog count,, etc instead of the firmware based ‘writing’ to the status and watchdog timer register. The Microprocessor, supervisor IC DS1232 integrates a, hardware watchdog timer in it. In, Microprocessor/, modern systems running on embedded, Controller, operating systems, the watchdog can, Watchdog, be implemented in such a way that, Free running, Reset pin, when a watchdog timeout occurs,, counter, an interrupt is generated instead of, resetting the processor. The interrupt, Watchdog Reset, handler for this handles the situation, in an appropriate fashion. Figure, 2.38 illustrates the implementation, System clock, of an external watchdog timer based, microprocessor supervisor circuit for, Fig. 2.38 Watchdog timer for firmware execution supervision, a small scale embedded system.
Page 88 :
64, , 2.7, , Introduc on to Embedded Systems, , PCB AND PASSIVE COMPONENTS, , Printed Circuit Board (PCB) is the backbone of every embedded system. After, finalising the components and the inter-connection among them, a schematic, design is created and according to the schematic the PCB is fabricated. This will, be described in detail in a chapter dedicated for “Embedded Hardware Design, and Development”. PCB acts as a platform for mounting all the necessary components as per the design, requirement. Also it acts as a platform for testing your embedded firmware. Apart from the above-mentioned, important subsystems of an embedded system, you can find some passive electronic components like resistor,, capacitor, diodes, etc. on your board. They are the co-workers of various chips contained in your embedded, hardware. They are very essential for the proper functioning of your embedded system. For example for, providing a regulated ripple-free supply voltage to the system, a regulator IC and spike suppressor filter, capacitors are very essential., LO 7 Discuss the, role of PCB in, embedded systems, , Summary, The core of an embedded system is usually built around a commercial off-the-shelf component or an, application specific integrated circuit (ASIC) or a general purpose processor like a LO1, microprocessor or microcontroller or application specific instruction set processors (ASIP, like DSP, Microcontroller, etc.) or a Programmable Logic Device (PLD) or a System on Chip, (SoC), Processors/controllers support either Reduced Instruction Set Computing (RISC) or Complex, Instruction Set Computing (CISC), LO1, Microprocessors/controllers based on the Harvard architecture will have separate data bus, and instruction bus, whereas Microprocessors/controllers based on the Von-Neumann LO1, architecture shares a single common bus for fetching both instructions and data, The Big-endian processors store the higher-order byte of the data in memory at the lowest address,, whereas Little-endian processors store the lower-order byte of data in memory at the LO1, lowest address, Field Programmable Gate Arrays (FPGAs) and Complex Programmable Logic Devices (CPLDs), are the two major types of programmable logic devices, LO1, The Read Only Memory (ROM) is a non-volatile memory for storing the firmware and, embedded OS files. MROM, PROM (OTP), EPROM, EEPROM and FLASH are the LO2, commonly used firmware storage memory, Random Access Memory (RAM) is a volatile memory for temporary data storage. RAM can be, either Static RAM (SRAM) or Dynamic RAM (DRAM). SRAM is made up of flip-flops, LO2, whereas DRAM is made up of MOS Transistor and Capacitor, The sensors connected to the input port of an embedded system senses the changes in input variables, and the actuators connected at the output port of an embedded system controls some LO3, variables in accordance with changes in input, Light Emitting Diode (LED), 7-Segment LED displays, Liquid Crystal Display (LCD), Piezo, Buzzer, Speaker, Optocoupler, Stepper Motor, Digital to Analog Converters (DAC), Relays LO3, etc are examples for output devices of an embedded system, Keyboard, Touch screen, Push Button switches, Optocoupler, Analog to Digital Converter (ADC), etc are examples for Input devices in an embedded system, LO3, The Programmable Peripheral Interface (PPI) device extends the I/O capabilities of the, processor used in embedded system, LO3
Page 89 :
65, , The Typical Embedded System, , I2C, SPI, UART, 1-Wire, Parallel bus etc are examples for onboard communication interface and, RS-232C, RS-485, USB, IEEE1394 (FireWire), Wi-Fi, ZigBee, Infrared (IrDA), Bluetooth, LO4, GPRS, etc. are examples for external communication interface, The control algorithm for the embedded device is known as Embedded Firmware. Embedded, firmware can be developed on top of an embedded operating system or without an operating LO5, system, The reset circuit ensures that the device is not operating at a voltage level where the device is not, guaranteed to operate, during system power ON. The reset signal brings the internal LO6, registers and the different hardware systems of the processor/controller to a known state, and starts the firmware execution from the reset vector, The brown-out protection circuit prevents the processor/controller from unexpected program, execution behaviour when the supply voltage to the processor/controller falls below a LO6, specified voltage, The oscillator unit generates clock signals for synchronising the operations of the processor, The time keeping activity for the embedded system is performed by the Real Time Clock LO6, (RTC) of the system. RTC holds current time, date, month, year, day of the week, etc., The watchdog timer monitors the firmware execution and resets the processor or generates an, Interrupt in case the execution time for a task is exceeding the maximum allowed limit, LO6, Printed circuit board or PCB acts as a platform for mounting all the necessary hardware, components as per the design requirement, LO7, , Keywords, COTS: Commercial-off-the-Shelf. Commercially available ready to use component, [LO 1], ASIC: Applica on Specific Integrated Circuit is a microchip designed to perform a specific or unique applica on, , [LO 1], ASSP: Applica on Specific Standard Product—An ASIC marketed to mul ple customers just as a generalpurpose product is, but to a smaller number of customers, [LO 1], Microprocessor: A silicon chip represen ng a Central Processing Unit (CPU), [LO 1], GPP: General Purpose Processor or GPP is a processor designed for general computa onal tasks, [LO 1], ASIP: Applica on Specific Instruc on Set processors are processors with architecture and instruc on set, op mised to specific domain/applica on requirements, [LO 1], Microcontroller: A highly integrated chip that contains a CPU, scratchpad RAM, Special and General purpose, Register Arrays and Integrated peripherals, [LO 1], DSP: Digital Signal Processor is a powerful special purpose 8/16/32 bit microprocessors designed specifically, to meet the computa onal demands and power constraints, [LO 1], RISC: Reduced Instruc on Set Compu ng. Refers to processors with Reduced and Orthogonal Instruc on Set, CISC: Refers to processors with Complex Instruc on Set Compu ng, [LO 1], Harvard Architecture: A type of processor architecture with separate buses for program instruc on and data, fetch, [LO 1], Von-Neumann Architecture: A type of processor architecture with a shared single common bus for fetching, both instruc ons and data, [LO 1], Big-Endian: Refers to processors which store the higher-order byte of the data in memory at the lowest, address, [LO 1]
Page 90 :
66, , Introduc on to Embedded Systems, , Li le-Endian: Refers to processors which store the lower-order byte of the data in memory at the lowest, address, [LO 1], FPGA: Field Programmable Gate Array Device. A programmable logic device with reconfigurable func on., Popular for prototyping ASIC designs, [LO 1], MROM: Masked ROM is a one- me programmable memory, which uses the hardwired technology for storing, data, [LO 2], OTP: One Time Programmable Read Only Memory made up of nichrome or polysilicon wires arranged in a, matrix, [LO 2], EPROM: Erasable Programmable Read Only Memory. Reprogrammable ROM. Erased by exposing to UV light, , [LO 2], EEPROM: Electrically Erasable Programmable Read Only Memory. Reprogrammable ROM. Erased by applying, electrical signals, [LO 2], FLASH: Electrically Erasable Programmable Read Only Memory. Same as EEPROM but with high capacity and, support for block level memory erasing, [LO 2], RAM: Random Access memory. Vola le memory, [LO 2], SRAM: Sta c RAM. A type of RAM, made up of flip-flops, [LO 2], DRAM: Dynamic RAM. A type of RAM, made up of MOS Transistor and Capacitor, [LO 2], NVRAM: Non-vola le SRAM. Ba ery-backed SRAM, [LO 2], ADC: Analog to Digital Converter. An integrated circuit which converts analog signals to digital form [LO 3], LED: Light Emi ng Diode. An output device which produces visual indica on in the form of light in accordance, with current flow, [LO 3], 7-Segment LED Display: The 7-segment LED display is an output device for displaying alpha numeric characters., It contains 8 light-emi ng diode (LED) segments arranged in a special form, [LO 3], Optocoupler: A solid state device to isolate two parts of a circuit. Optocoupler combines an LED and a phototransistor in a single housing (package), [LO 3], Stepper motor: An electro-mechanical device which generates discrete displacement (mo on) in response to, dc electrical signals, [LO 3], Relay: An electro-mechanical device which acts as dynamic path selector for signals and power, [LO 3], Piezo Buzzer: A piezo-electric device for genera ng audio indica on. It contains a piezo-electric diaphragm, which produces audible sound in response to the voltage applied to it, [LO 3], Push Bu on switch: A mechanical device for electric circuit ‘make’ and ‘break’ opera on, [LO 3], PPI: Programmable Peripheral Interface is a device for extending the I/O capabili es of processors/controllers, , [LO 3], I2C: The Inter Integrated Circuit Bus (I2C–Pronounced ‘I square C’) is a synchronous bi-direc onal half duplex, two wire serial interface bus., [LO 4], SPI: The Serial Peripheral Interface Bus (SPI) is a synchronous bi-direc onal full duplex four wire serial interface, bus, [LO 4], UART: The Universal Asynchronous Receiver Transmi er is an asynchronous communica on implementa on, standard, [LO 4], 1-Wire interface: An asynchronous half-duplex communica on protocol developed by Maxim Dallas, Semiconductor. It is also known as Dallas 1-Wire® protocol., [LO 4], RS-232 C: Recommended Standard number 232, revision C from the Electronic Industry Associa on, is a, legacy, full duplex, wired, asynchronous serial communica on interface, [LO 4]
Page 91 :
The Typical Embedded System, , 67, , RS-485: The enhanced version of RS-232, which supports mul -drop communica on with up to 32 transmi ng, devices (drivers) and 32 receiving devices on the bus, [LO 4], USB: Universal Serial Bus is a wired high speed serial bus for data communica on, [LO 4], IEEE 1394: A wired, isochronous high speed serial communica on bus, [LO 4], Firewire: The Apple Inc.’s implementa on of the 1394 protocol, [LO 4], Infrared (IrDA): A serial, half duplex, line of sight based wireless technology for data communica on between, devices, [LO 4], Bluetooth: A low cost, low power, short range wireless technology for data and voice communica on [LO 4], Wi-Fi: Wireless Fidelity is the popular wireless communica on technique for networked communica on of, devices, [LO 4], ZigBee: A low power, low cost, wireless network communica on protocol based on the IEEE 802.15.4-2006, standard. ZigBee is targeted for low power, low data-rate and secure applica ons for Wireless Personal Area, Networking (WPAN), [LO 4], GPRS: General Packet Radio Service is a communica on technique for transferring data over a mobile, communica on network like GSM, [LO 4], Reset Circuit: A passive circuit or IC device to supply a reset signal to the processor/controller of the embedded, system, [LO 6], Brown-out Protec on Circuit: A passive circuit or IC device to protect the processor from unexpected program, execu on flow due to the drop in power supply voltage, [LO 6], RTC: Real Time Clock is a system component keeping track of me, [LO 6], Watchdog Timer (WDT): Timer for monitoring the firmware execu on, [LO 6], PCB: Printed Circuit Board is the place holder for arranging the different hardware components required to, build the embedded product, [LO 4], , Objec ve Ques ons, 1. Embedded hardware/software systems are basically designed to, (a) Regulate a physical variable, (b) Change the state of some devices, (c) Measure/Read the state of a variable/device, (d) Any/All of these, 2. Little Endian processors, (a) Store the lower-order byte of the data at the lowest address and the higher-order byte of the data at the, highest address of memory, (b) Store the higher-order byte of the data at the lowest address and the lower-order byte of the data at the, highest address of memory, (c) Store both higher order and lower order byte of the data at the same address of memory, (d) None of these, 3. An integer variable with value 255 is stored in memory location at 0x8000. The processor word length is 8, bits and the processor is a big endian processor. The size of integer is considered as 4 bytes in the system., What is the value held by the memory location 0x8000?, (a) 0xFF, (b) 0x00, (c) 0x01, (d) None of these
Page 92 :
68, , Introduc on to Embedded Systems, , 4. The instruction set of RISC processor is, (a) Simple and lesser in number, (b) Complex and lesser in number, (c) Simple and larger in number, (d) Complex and larger in number, 5. Which of the following is true about CISC processors?, (a) The instruction set is non-orthogonal, (b) The number of general purpose registers is limited, (c) Instructions are like macros in C language, (d) Variable length Instructions, (e) All of these, (f) None of these, 6. Which of the following processor architecture supports easier instruction pipelining?, (a) Harvard, (b) Von Neumann, (c) Both of them, (d) None of these, 7. Microprocessors/controllers based on the Harvard architecture will have separate data bus and instruction, bus. This allows the data transfer and program fetching to occur simultaneously on both buses. State True or, False, (a) True, (b) False, 8. Which of the following is one-time programmable memory?, (a) SRAM, (b) PROM, (c) FLASH, (d) NVRAM, 9. Which of the following memory type is best suited for development purpose?, (a) EEPROM, (b) FLASH, (c) UVEPROM, (d) OTP, (e) (a) or (b), 10. EEPROM memory is alterable at byte level. State True or False, (a) True, (b) False, 11. Non-volatile RAM is a Random Access Memory with battery backup. State True or False, (a) True, (b) False, 12. Execution of program from ROM is faster than the execution from RAM. State True or False, (a) True, (b) False, 13. Dynamic RAM stores data in the form of voltage. State True or False, (a) True, (b) False, 14. The control algorithm (Program instructions) and or the configuration settings that are kept in the code, (Program) memory of the embedded system are known as Embedded Software. State True or False, (a) True, (b) False, 15. Which of the following is an example for Wireless Communication interface?, (a) RS-232C, (b) Wi-Fi, (c) Bluetooth, (d) EEE1394, (e) both (b) and (c), 16. Which of the following is (are) examples for Application Specific Instruction set Processor(s), (a) Intel Centrino, (b) Atmel Automotive AVR, (c) AMD Turion, (d) Microchip CAN PIC, (e) All of these, (f) both (b) and (d), 17. How many memory cells are present in 1Kb RAM, (a) 1024, (b) 8192, (c) 512, (d) 4096, (e) None of these, 18. Which of the following memory supports Execute in Place (XIP)?, (a) EEPROM, (b) NOR FLASH, (c) NAND FLASH, (d) both (b) and (c), (e) None of these
Page 93 :
The Typical Embedded System, , 69, , 19. How many memory cells are present in 1Kb Serial EEPROM, (a) 1024, (b) 8192, (c) 512, (d) 4096, (e) None of these, 20. Which of the following is (are) example(s) for the input subsystem of an embedded system dealing with, digital data?, (a) ADC, (b) Optocoupler, (c) DAC, (d) All of them, (e) only (a) and (b), 21. Which of the following is (are) example(s) for the output subsystem of an embedded system dealing with, digital data?, (a) LED, (b) Optocoupler, (c) Stepper Motor, (d) All of these, (e) only (a) and (c), 22. Which of the following is true about optocouplers, (a) Optocoupler acts as an input device only, (b) Optocoupler acts as an output device only, (c) Optocoupler can be used in both input and output circuitry, (d) None of these, 23. Which of the following is true about a unipolar stepper motor, (a) Contains only a single winding per stator phase, (b) Contains two windings per stator phase, (c) Contains four windings per stator phase, (d) None of these, 24. Which of the following is (are) true about normally open single pole relays?, (a) The circuit remains open when the relay is not energised, (b) The circuit remains closed when the relay is energised, (c) There are two output paths, (d) Both (a) and (b), (e) None of these, 25. What is the minimum number I/O line required to interface a 16-Key matrix keyboard?, (a) 16, (b) 8, (c) 4, (d) 9, 26. Which is the optimal row-column configuration for a 24 key matrix keyboard?, (a) 6 × 4, (b) 8 × 3, (c) 12 × 2, (d) 5 × 5, 27. Which of the following is an example for on-board interface in the embedded system context?, (a) I2C, (b) Bluetooth, (c) SPI, (d) All of them, (e) Only (a) and (c), 28. What is the minimum number of interface lines required for implementing I2C interface?, (a) 1, (b) 2, (c) 3, (d) 4, 29. What is the minimum number of interface lines required for implementing SPI interface?, (a) 2, (b) 3, (c) 4, (d) 5, 30. Which of the following are synchronous serial interface?, (a) I2C, (b) SPI, (c) UART, (d) All of these, (e) Only (a) and (b), 31. RS-232 is a synchronous serial interface. State True or False, (a) True, (b) False, 32. What is the maximum number of USB devices that can be connected to a USB host?, (a) Unlimited, (b) 128, (c) 127, (d) None of these, 33. In the ZigBee network, which of the following ZigBee entity stores the information about the network?, (a) ZigBee Coordinator, (b) ZigBee Router, (c) ZigBee Reduced Function Device, (d) All of them
Page 94 :
70, , Introduc on to Embedded Systems, , 34. What is the theoretical maximum data rate supported by GPRS, (a) 8Mbps, (b) 12Mbps, (c) 100Kbps, (d) 171.2Kbps, 35. GPRS communication divides the radio channel into __________ timeslots, (a) 2, (b) 3, (c) 5, (d) 8, , Review Ques ons, 1. Explain the components of a typical embedded system in detail., [LO 1, LO 7], 2. Which are the components used as the core of an embedded system? Explain the merits, drawbacks, if any,, and the applications/domains where they are commonly used., [LO 1], 3. What is Application Specific Integrated Circuit (ASIC)? Explain the role of ASIC in Embedded System, design?, [LO 1], 4. What is the difference between Application Specific Integrated Circuit (ASIC) Application Specific Standard, Product (ASSP)?, [LO 1], 5. What is the difference between microprocessor and microcontroller? Explain the role of microprocessors, and controllers in embedded system design?, [LO 1], 6. What is Digital Signal Processor (DSP)? Explain the role of DSP in embedded system design?, , [LO 1], [LO 1], , 7. What is the difference between RISC and CISC processors? Give an example for each., 8. What is processor architecture? What are the different processor architectures available for processor/, controller design? Give an example for each., [LO 1], 9. What is the difference between big-endian and little-endian processors? Give an example of each. [LO 1], 10. What is Programmable Logic Device (PLD)? What are the different types of PLDs? Explain the role of, PLDs in Embedded System design., [LO 1], 11. What is the difference between PLD and ASIC?, , [LO 1], [LO 1], , 12. What are the advantages of PLD over fixed logic device?, 13. What are the different types of memories used in Embedded System design? Explain the role of each., , [LO 2], 14. What are the different types of memories used for Program storage in Embedded System Design? [LO 2], 15. What is the difference between Masked ROM and OTP?, [LO 2], 16. What is the difference between PROM and EPROM?, [LO 2], 17. What are the advantages of FLASH over other program storage memory in Embedded System design?, 18. What is the difference between RAM and ROM?, 19. What are the different types of RAM used for Embedded System design?, 20. What is memory shadowing? What is its advantage?, 21. What is Sensor? Explain its role in Embedded System Design? Illustrate with an example., , [LO 2], [LO 2], [LO 2], [LO 2], [LO 3], [LO 3], , 22. What is Actuator? Explain its role in Embedded System Design? Illustrate with an example., 23. What is Embedded Firmware? What are the different approaches available for Embedded Firmware, development?, [LO 5]
Page 95 :
The Typical Embedded System, , 71, , 24. What is the difference between General Purpose Processor (GPP) and Application Specific Instruction Set, [LO 1], Processor (ASIP). Give an example for both., 25. Explain the concept of Load Store architecture and instruction pipelining., 26. Explain the operation of Static RAM (SRAM) cell., , [LO 1], [LO 2], [LO 2], , 27. Explain the merits and limitations of SRAM and DRAM as Random Access Memory., 28. Explain the difference between Serial Access Memory (SAM) and Random Access Memory (RAM). Give, an example for both., [LO 2], 29. Explain the different factors that needs to be considered in the selection of memory for Embedded Systems., 30. Explain the different types of FLASH memory and their relative merits and de-merits., 31. Explain the different Input and output subsystems of Embedded Systems., 32. What is stepper motor? How is it different from ordinary dc motor?, 33. Explain the role of Stepper motor in embedded applications with examples., , [LO 2], [LO 2], [LO 1, 3], [LO 3], [LO 3], [LO 3], , 34. Explain the different step modes for stepper motor., 35. What is Relay? What are the different types of relays available? Explain the role of relay in embedded, applications., [LO 3], 36. Explain the operation of the transistor based Relay driver circuit., , [LO 3], [LO 3], , 37. Explain the operation of a Matrix Keyboard., 38. What is Programmable Peripheral Interface (PPI) Device? Explain the interfacing of 8255 PPI with an 8bit, microprocessor/controller., [LO 3], 39. Explain the different on-board communication interfaces in brief., 40. Explain the different external communication interfaces in brief., 41. Explain the sequence of operation for communicating with an I2C slave device., 42. Explain the difference between I2C and SPI communication interface., 43. Explain the sequence of operation for communicating with a 1-Wire slave device., 44. Explain the RS-232 C serial interface in detail., 45. Explain the merits and limitations of Parallel port over Serial RS-232 interface., 46. Explain the merits and limitations of IEEE1394 interface over USB., 47. Compare the operation of ZigBee and Wi-Fi network., 48. Explain the role of Reset circuit in Embedded System., 49. Explain the role of Real Time Clock (RTC) in Embedded System., 50. Explain the role of Watchdog Timer in Embedded System., , [LO 4], [LO 4], [LO 4], [LO 4], [LO 4], [LO 4], [LO 4], [LO 4], [LO 4], [LO 6], [LO 6], [LO 6]
Page 96 :
72, , Introduc on to Embedded Systems, , Lab Assignments, 1. Write a ‘C’ program to find the endianness of the processor in which the program is running. If the processor, is big endian, print “The processor architecture is Big endian”, else print “The processor architecture is, Little endian” on the console window. Execute the program separately on a PC with Windows, Linux and, MAC operating systems., 2. Draw the interfacing diagram for connecting an LED to the port pin of a microcontroller. The LED is, turned ON when the microcontroller port pin is at Logic ‘0’. Calculate the resistance required to connect, in series with the LED for the following design parameters., (a) LED voltage drop on conducting = 1.7V, (b) LED current rating = 20 mA, (c) Power Supply Voltage = 5V, 3. Design an RC (Resistor-Capacitor) based reset circuit for producing an active low Power-On reset pulse, of width 0.1 milli seconds., 4. Design a zener diode and transistor based brown-out protection circuit with active low reset pulse for the, following design parameters., (a) Use BC327 PNP transistor for the design, (b) The supply voltage to the system is 5V, (c) The reset pulse is asserted when the supply voltage falls below 4.7V
Page 97 :
73, , Characteris cs and Quality A ributes of Embedded Systems, , 3, , Characteristics and, Quality Attributes of, Embedded Systems, , LEARNING OBJECTIVES, LO 1 Understand the characteris cs describing an embedded system, LO 2 Explain the non-func onal requirements that needs to be addressed in the design of, an embedded system, Learn the important quality a ributes of the embedded system that needs to be, addressed for the opera onal mode (online mode) of the system. This includes, Response, Throughput, Reliability, Maintainability, Security, Safety, etc., Know the important quality a ributes of the embedded system that needs to, be addressed for the non-opera onal mode (offline mode) of the system. This, includes Testability, Debug-ability, Evolvability, Portability, Time to prototype, and market, Per unit cost and revenue, etc., Understand the Product Life Cycle (PLC), , No matter whether it is an embedded or a non-embedded system, there will be a set of characteristics, describing the system. The non-functional aspects that need to be addressed in embedded system design are, commonly referred as quality attributes. Whenever you design an embedded system, the design should take, into consideration of both the functional and non-functional aspects. The following topics give an overview, of the characteristics and quality attributes of an embedded system., , 3.1, , CHARACTERISTICS OF AN EMBEDDED SYSTEM, , Unlike general purpose computing systems, embedded systems possess certain, specific characteristics and these characteristics are unique to each embedded, system. Some of the important characteristics of an embedded system are as, follows:, (1) Application and domain specific, (2) Reactive and Real Time, (3) Operates in harsh environments, , LO 1 Understand, the characteristics, describing an, embedded system
Page 98 :
74, , Introduc on to Embedded Systems, , (4) Distributed, (5) Small size and weight, (6) Power concerns, , 3.1.1, , Application and Domain Specific, , If you closely observe any embedded system, you will find that each embedded system is designed to perform, a set of defined functions and they are developed in such a manner to do the intended functions only. They, cannot be used for any other purpose. It is the major criterion which distinguishes an embedded system from, a general purpose computing system. For example, you cannot replace the embedded control unit of your, microwave oven with your air conditioner’s embedded control unit, because the embedded control units of, microwave oven and airconditioner are specifically designed to perform certain specific tasks. Also, you, cannot replace an embedded control unit developed for a particular domain say telecom with another control, unit designed to serve another domain like consumer electronics., , 3.1.2, , Reactive and Real Time, , As mentioned earlier, embedded systems are in constant interaction with the Real world through sensors and, user-defined input devices which are connected to the input port of the system. Any changes happening in, the Real world (which is called an Event) are captured by the sensors or input devices in Real Time and the, control algorithm running inside the unit reacts in a designed manner to bring the controlled output variables, to the desired level. The event may be a periodic one or an unpredicted one. If the event is an unpredicted one, then such systems should be designed in such a way that it should be scheduled to capture the events without, missing them. Embedded systems produce changes in output in response to the changes in the input. So they, are generally referred as Reactive Systems., Real Time System operation means the timing behaviour of the system should be deterministic; meaning, the system should respond to requests or tasks in a known amount of time. A Real Time system should not, miss any deadlines for tasks or operations. It is not necessary that all embedded systems should be Real, Time in operations. Embedded applications or systems which are mission critical, like flight control systems,, Antilock Brake Systems (ABS), etc. are examples of Real Time systems. The design of an embedded Real, time system should take the worst case scenario into consideration., , 3.1.3, , Operates in Harsh Environment, , It is not necessary that all embedded systems should be deployed in controlled environments. The environment, in which the embedded system deployed may be a dusty one or a high temperature zone or an area subject, to vibrations and shock. Systems placed in such areas should be capable to withstand all these adverse, operating conditions. The design should take care of the operating conditions of the area where the system is, going to implement. For example, if the system needs to be deployed in a high temperature zone, then all the, components used in the system should be of high temperature grade. Here we cannot go for a compromise, in cost. Also proper shock absorption techniques should be provided to systems which are going to be, commissioned in places subject to high shock. Power supply fluctuations, corrosion and component aging,, etc. are the other factors that need to be taken into consideration for embedded systems to work in harsh, environments., , 3.1.4, , Distributed, , The term distributed means that embedded systems may be a part of larger systems. Many numbers of such, distributed embedded systems form a single large embedded control unit. An automatic vending machine
Page 99 :
75, , Characteris cs and Quality A ributes of Embedded Systems, , is a typical example for this. The vending machine contains a card reader (for pre-paid vending systems), a, vending unit, etc. Each of them are independent embedded units but they work together to perform the overall, vending function. Another example is the Automatic Teller Machine (ATM). An ATM contains a card reader, embedded unit, responsible for reading and validating the user’s ATM card, transaction unit for performing, transactions, a currency counter for dispatching/vending currency to the authorised person and a printer unit, for printing the transaction details. We can visualise these as independent embedded systems. But they work, together to achieve a common goal., Another typical example of a distributed embedded system is the Supervisory Control And Data Acquisition, (SCADA) system used in Control & Instrumentation applications, which contains physically distributed, individual embedded control units connected to a supervisory module., , 3.1.5, , Small Size and Weight, , Product aesthetics is an important factor in choosing a product. For example, when you plan to buy a new, mobile phone, you may make a comparative study on the pros and cons of the products available in the, market. Definitely the product aesthetics (size, weight, shape, style, etc.) will be one of the deciding factors, to choose a product. People believe in the phrase “Small is beautiful”. Moreover it is convenient to handle a, compact device than a bulky product. In embedded domain also compactness is a significant deciding factor., Most of the application demands small sized and low weight products., , 3.1.6, , Power Concerns, , Power management is another important factor that needs to be considered in designing embedded systems., Embedded systems should be designed in such a way as to minimise the heat dissipation by the system. The, production of high amount of heat demands cooling requirements like cooling fans which in turn occupies, additional space and make the system bulky. Nowadays ultra low power components are available in the, market. Select the design according to the low power components like low dropout regulators, and controllers/, processors with power saving modes. Also power management is a critical constraint in battery operated, application. The more the power consumption the less is the battery life., , 3.2, , QUALITY ATTRIBUTES OF EMBEDDED SYSTEMS, , Quality attributes are the non-functional requirements that need to be, documented properly in any system design. If the quality attributes are, more concrete and measurable it will give a positive impact on the system, development process and the end product. The various quality attributes, that needs to be addressed in any Embedded System development are, broadly classified into two, namely ‘Operational Quality Attributes’ and, ‘Non-Operational Quality Attributes’., , 3.2.1, , LO 2 Explain the nonfunctional requirements, that needs to be, addressed in the design, of an embedded system, , Operational Quality Attributes, , The operational quality attributes represent the relevant quality attributes related to the Embedded System, when it is in the operational mode or ‘online’ mode. The important quality attributes coming under this, category are listed below:, (1) Response, (2) Throughput, (3) Reliability, (4) Maintainability
Page 100 :
76, , Introduc on to Embedded Systems, , (5) Security, (6) Safety, , 3.2.1.1 Response Response is a measure of quickness of the system. It gives you an idea about how fast, your system is tracking the changes in input variables. Most of the embedded systems demand fast response, which should be almost Real Time. For example, an embedded system deployed in flight control application, should respond in a Real Time manner. Any response delay in the system will create potential impact to the, safety of the flight as well as the passengers. It is not necessary that all embedded systems should be Real, Time in response. For example, the response time requirement for an electronic toy is not at all time-critical., There is no specific deadline that this system should respond within this particular timeline., 3.2.1.2 Throughput Throughput deals with the efficiency of a system. In general it can be defined as the, rate of production or operation of a defined process over a stated period of time. The rates can be expressed, in terms of units of products, batches produced, or any other meaningful measurements. In the case of a Card, Reader, throughput means how many transactions the Reader can perform in a minute or in an hour or in, a day. Throughput is generally measured in terms of ‘Benchmark’. A ‘Benchmark’ is a reference point by, which something can be measured. Benchmark can be a set of performance criteria that a product is expected, to meet or a standard product that can be used for comparing other products of the same product line., 3.2.1.3 Reliability Reliability is a measure of how much % you can rely upon the proper functioning of, the system or what is the % susceptibility of the system to failures., Mean Time Between Failures (MTBF) and Mean Time To Repair (MTTR) are the terms used in defining, system reliability. MTBF gives the frequency of failures in hours/weeks/months. MTTR specifies how long, the system is allowed to be out of order following a failure. For an embedded system with critical application, need, it should be of the order of minutes., , 3.2.1.4 Maintainability Maintainability deals with support and maintenance to the end user or client, in case of technical issues and product failures or on the basis of a routine system checkup. Reliability and, maintainability are considered as two complementary disciplines. A more reliable system means a system, with less corrective maintainability requirements and vice versa. As the reliability of the system increases,, the chances of failure and non-functioning also reduces, thereby the need for maintainability is also reduced., Maintainability is closely related to the system availability. Maintainability can be broadly classified into, two categories, namely, ‘Scheduled or Periodic Maintenance (preventive maintenance)’ and ‘Maintenance to, unexpected failures (corrective maintenance)’. Some embedded products may use consumable components, or may contain components which are subject to wear and tear and they should be replaced on a periodic, basis. The period may be based on the total hours of the system usage or the total output the system delivered., A printer is a typical example for illustrating the two types of maintainability. An inkjet printer uses ink, cartridges, which are consumable components and as per the printer manufacturer the end user should replace, the cartridge after each ‘n’ number of printouts to get quality prints. This is an example for ‘Scheduled or, Periodic maintenance’. If the paper feeding part of the printer fails the printer fails to print and it requires, immediate repairs to rectify this problem. This is an example of ‘Maintenance to unexpected failure’., In both of the maintenances (scheduled and repair), the printer needs to be brought offline and during this, time it will not be available for the user. Hence it is obvious that maintainability is simply an indication of, the availability of the product for use. In any embedded system design, the ideal value for availability is, expressed as, Ai = MTBF/(MTBF + MTTR)
Page 101 :
Characteris cs and Quality A ributes of Embedded Systems, , 77, , where Ai = Availability in the ideal condition, MTBF = Mean Time Between Failures, and MTTR =, Mean Time To Repair, , 3.2.1.5 Security ‘Confidentiality’, ‘Integrity’, and ‘Availability’ (The term ‘Availability’ mentioned, here is not related to the term ‘Availability’ mentioned under the ‘Maintainability’ section) are the three, major measures of information security. Confidentiality deals with the protection of data and application, from unauthorised disclosure. Integrity deals with the protection of data and application from unauthorised, modification. Availability deals with protection of data and application from unauthorised users. A very good, example of the ‘Security’ aspect in an embedded product is a Personal Digital Assistant (PDA). The PDA, can be either a shared resource (e.g. PDAs used in LAB setups) or an individual one. If it is a shared one, there should be some mechanism in the form of a user name and password to access into a particular person’s, profile–This is an example of ‘Availability’. Also all data and applications present in the PDA need not be, accessible to all users. Some of them are specifically accessible to administrators only. For achieving this,, Administrator and user levels of security should be implemented –An example of Confidentiality. Some data, present in the PDA may be visible to all users but there may not be necessary permissions to alter the data by, the users. That is Read Only access is allocated to all users–An example of Integrity., , 3.2.1.6 Safety ‘Safety’ and ‘Security’ are two confusing terms. Sometimes you may feel both of them as, a single attribute. But they represent two unique aspects in quality attributes. Safety deals with the possible, damages that can happen to the operators, public and the environment due to the breakdown of an embedded, system or due to the emission of radioactive or hazardous materials from the embedded products. The, breakdown of an embedded system may occur due to a hardware failure or a firmware failure. Safety analysis, is a must in product engineering to evaluate the anticipated damages and determine the best course of action, to bring down the consequences of the damages to an acceptable level. As stated before, some of the safety, threats are sudden (like product breakdown) and some of them are gradual (like hazardous emissions from, the product)., , 3.2.2, , Non-Operational Quality Attributes, , The quality attributes that needs to be addressed for the product ‘not’ on the basis of operational aspects are, grouped under this category. The important quality attributes coming under this category are listed below., (1) Testability & Debug-ability, (2) Evolvability, (3) Portability, (4) Time to prototype and market, (5) Per unit and total cost., , 3.2.2.1 Testability & Debug-ability Testability deals with how easily one can test the design,, application and by which means he/she can test it. For an embedded product, testability is applicable to both, the embedded hardware and firmware. Embedded hardware testing ensures that the peripherals and the total, hardware functions in the desired manner, whereas firmware testing ensures that the firmware is functioning, in the expected way. Debug-ability is a means of debugging the product as such for figuring out the probable, sources that create unexpected behaviour in the total system. Debug-ability has two aspects in the embedded, system development context, namely, hardware level debugging and firmware level debugging. Hardware, debugging is used for figuring out the issues created by hardware problems whereas firmware debugging is, employed to figure out the probable errors that appear as a result of flaws in the firmware.
Page 102 :
78, , Introduc on to Embedded Systems, , 3.2.2.2 Evolvability Evolvability is a term which is closely related to Biology. Evolvability is referred, as the non-heritable variation. For an embedded system, the quality attribute ‘Evolvability’ refers to the ease, with which the embedded product (including firmware and hardware) can be modified to take advantage of, new firmware or hardware technologies., , 3.2.2.3 Portability Portability is a measure of ‘system independence’. An embedded product is said to, be portable if the product is capable of functioning ‘as such’ in various environments, target processors/, controllers and embedded operating systems. The ease with which an embedded product can be ported on, to a new platform is a direct measure of the re-work required. A standard embedded product should always, be flexible and portable. In embedded products, the term ‘porting’ represents the migration of the embedded, firmware written for one target processor (e.g. Intel x86) to a different target processor (say an ARM Cortex, M3 processor from Freescale). If the firmware is written in a high level language like ‘C’ with little target, processor-specific functions (operating system extensions or compiler specific utilities), it is very easy to, port the firmware for the new processor by replacing those ‘target processor-specific functions’ with the ones, for the new target processor and re-compiling the program for the new target processor-specific settings., Re-compiling the program for the new target processor generates the new target processor-specific machine, codes. If the firmware is written in Assembly Language for a particular family of processor (say x86 family),, it will be very difficult to translate the assembly language instructions to the new target processor specific, language and so the portability is poor., If you look into various programming languages for application development for desktop applications,, you will see that certain applications developed on certain languages run only on specific operating systems, and some of them run independent of the desktop operating systems. For example, applications developed, using Microsoft technologies (e.g. Microsoft Visual C++ using Visual studio) is capable of running only on, Microsoft platforms and may not function on other operating systems; whereas applications developed using, ‘Java’ from Sun Microsystems works on any operating system that supports Java standards., , 3.2.2.4 Time-to-Prototype and Market Time-to-market is the time elapsed between the, conceptualisation of a product and the time at which the product is ready for selling (for commercial, product) or use (for non-commercial products). The commercial embedded product market is highly, competitive and time to market the product is a critical factor in the success of a commercial embedded, product. There may be multiple players in the embedded industry who develop products of the same, category (like mobile phone, portable media players, etc.). If you come up with a new design and, if it takes long time to develop and market it, the competitor product may take advantage of it with, their product. Also, embedded technology is one where rapid technology change is happening. If you, start your design by making use of a new technology and if it takes long time to develop and market, the product, by the time you market the product, the technology might have superseded with a new, technology. Product prototyping helps a lot in reducing time-to-market. Whenever you have a product, idea, you may not be certain about the feasibility of the idea. Prototyping is an informal kind of rapid, product development in which the important features of the product under consideration are developed., The time to prototype is also another critical factor. If the prototype is developed faster, the actual, estimated development time can be brought down significantly. In order to shorten the time to prototype,, make use of all possible options like the use of off-the-shelf components, re-usable assets, etc., 3.2.2.5 Per Unit Cost and Revenue Cost is a factor which is closely monitored by both end user (those, who buy the product) and product manufacturer (those who build the product). Cost is a highly sensitive, factor for commercial products. Any failure to position the cost of a commercial product at a nominal rate,
Page 103 :
79, , Characteris cs and Quality A ributes of Embedded Systems, , may lead to the failure of the product in the market. Proper market study and cost benefit analysis should be, carried out before taking a decision on the per-unit cost of the embedded product. From a designer/product, development company perspective the ultimate aim of a product is to generate marginal profit. So the budget, and total system cost should be properly balanced to provide a marginal profit., The Product Life Cycle (PLC) Every embedded product has a product life cycle which starts with the design, and development phase. The product idea generation, prototyping, Roadmap definition, actual product design, and development are the activities carried out during this phase. During the design and development phase, there is only investment and no returns. Once the product is ready to sell, it is introduced to the market. This, stage is known as the Product Introduction stage. During the initial period the sales and revenue will be low., There won’t be much competition and the product sales and revenue increases with time. In the growth phase,, the product grabs high market share. During the maturity phase, the growth and sales will be steady and, the revenue reaches at its peak. The Product Retirement/Decline phase starts with the drop in sales volume,, market share and revenue. The decline happens due to various reasons like competition from similar product, with enhanced features or technology changes, etc. At some point of the decline stage, the manufacturer, announces discontinuing of the product. The different stages of the embedded products life cycle–revenue,, unit cost and profit in each stage–are represented in the following Product Life-cycle graph (Fig. 3.1)., Product, introduction, , Product, maturity, , Growth, , Product, retirement, , Pr, , od, uc, , ts, , al, , es, , Revenue, , Product, development, , Unit cost, t, Profi, , 0, Time, , Fig. 3.1, , Product life cycle (PLC) curve, , From the graph, it is clear that the total revenue increases from the product introduction stage to the, product maturity stage. The revenue peaks at the maturity stage and starts falling in the decline/retirement, stage. The unit cost is very high during the introductory stage (a typical example is cell phone; if you buy a, new model of cell phone during its launch time, the price will be high and you will get the same model with, a very reduced price after three or four months of its launching). The profit increases with increase in sales, and attains a steady value and then falls with a dip in sales. You can see a negative value for profit during the, initial period. It is because during the product development phase there is only investment and no returns., Profit occurs only when the total returns exceed the investment and operating cost.
Page 104 :
80, , Introduc on to Embedded Systems, , Summary, � There exists a set of characteristics which are unique to each embedded system., � Embedded systems are application and domain specific., , LO1, LO2, , � Quality attributes of a system represents the non-functional requirements that need to be, LO2, documented properly in any system design., � The operational quality attributes of an embedded system refers to the non-functional requirements, that needs to be considered for the operational mode of the system. Response, Throughput,, Reliability, Maintainability, Security, Safety, etc. are examples of operational quality LO2, attributes., � The non-operational quality attributes of an embedded system refers to the non-functional, requirements that needs to be considered for the non-operational mode of the system. Testability,, debug-ability, evolvability, portability, time-to-prototype and market, per unit cost and LO2, revenue, etc. are examples of non-operational quality attributes., � The product life cycle curve (PLC) is the graphical representation of the unit cost, product sales and, profit with respect to the various life cycle stages of the product starting from conception, LO2, to disposal., � For a commercial embedded product, the unit cost is peak at the introductory stage and it falls in, the maturity stage., LO2, � The revenue of a commercial embedded product is at the peak during the maturity stage. LO2, , Keywords, Reac ve system: An embedded system which produces changes in output in response to the changes in input, , [LO 1], Real-Time system: A system which adheres to strict ming behaviour and responds to requests in a known, amount of me, [LO 1], Quality a ributes: The non-func onal requirements that need to be addressed in any system design [LO 2], Response: It is a measure of quickness of the system, [LO 2], Throughput: The rate of produc on or opera on of a defined process over a stated period of me [LO 2], Reliability: It is a measure of how much % one can rely upon the proper func oning of a system, [LO 2], MTBF: Mean Time Between Failures–The frequency of failures in hours/weeks/months, [LO 2], MTTR: Mean Time To Repair–Specifies how long the system is allowed to be out of order following a failure, Time-to-prototype: A measure of the me required to prototype a design, [LO 2], Product life-cycle (PLC): The representa on of the different stages of a product from its concep on to disposal, , [LO 2], Product life cycle curve: The graphical representa on of the unit cost, product sales and profit with respect, to the various life cycle stages of the product star ng from concep on to disposal, [LO 2]
Page 105 :
Characteris cs and Quality A ributes of Embedded Systems, , 81, , Objec ve Ques ons, 1. Embedded systems are application and domain specific. State True or False, (a) True, (b) False, 2. Which of the following is true about Embedded Systems?, (a) Reactive and Real Time, (b) Distributed, (c) Operates in harsh environment, (d) All of these, (e) None of these, 3. Which of the following is a distributed embedded system?, (a) Cell phone, (b) Notebook Computer, (c) SCADA system, (d) All of these, (e) None of these, 4. Quality attributes of an embedded system are, (a) Functional requirements, (b) Non-functional requirements, (c) Both, (d) None of these, 5. Response is a measure of, (a) Quickness of the system, (b) How fast the system tracks changes in Input, (c) Both, (d) None of these, 6. Throughput of an embedded system is a measure of, (a) The efficiency of the system, (b) The output over a stated period of time, (c) Both, (d) None of these, 7. Benchmark is, (a) A reference point, (b) A set of performance criteria, (c) (a) or (b), (d) None of these, 8. Mean Time Between Failures (MTBF) and Mean Time To Repair (MTTR) defines the reliability of an, embedded system. State True or False, (a) True, (b) False, 9. MTBF gives the frequency of failures of an embedded system. State True or False, (a) True, (b) False, 10. Which of the following is true about the quality attribute ‘maintainability’?, (a) The corrective maintainability requirement for a highly reliable embedded system is very less, (b) Availability of an embedded system is directly related to the maintainability of the system, (c) Both of these, (d) None of these, 11. The Mean Time Between Failure (MTBF) for an embedded product is very high. This means:, (a) The product is highly reliable, (b) The availability of the product is very high, (c) The preventive maintenance requirement for the product is very less, (d) All of these, (e) None of these, 12. The Mean Time Between Failure (MTBF) of an embedded product is 4 months and the Mean Time To, Repair (MTTR) of the product is 2 weeks. What is the availability of the product?, (a) 100%, (b) 50%, (c) 89%, (d) 10%, 13. Which of the following are the three measures of information security in embedded systems?, (a) Confidentiality, secrecy, integrity, (b) Confidentiality, integrity, availability
Page 106 :
82, , Introduc on to Embedded Systems, , 14., , 15., , 16., , 17., , 18., , 19., , 20., , 21., , 22., 23., , 24., , (c) Confidentiality, transparency, availability, (d) Integrity, transparency, availability, You are working on a mission critical embedded system development project for a client and the client, and your company has signed a Non Disclosure Agreement (NDA) on the disclosure of the project-related, information. You share the details of the project you are working with your friend. Which aspect of, Information security you are violating here?, (a) Integrity, (b) Confidentiality, (c) Availability, (d) None of these, Which of the following is an example of ‘gradual’ safety threat from an embedded system?, (a) Product blast due to overheating of the battery, (b) UV emission from the embedded product, (c) Both of these, (d) None of these, Non operational quality attributes are, (a) Non-functional requirements, (b) Functional requirements, (c) Quality attributes for an offline product (d) (a) and (c), (e) None of these, Which of the following is (are) an operational quality attribute?, (a) Testability, (b) Safety, (c) Debug-ability, (d) Portability, (e) All of these, Which of the following is (are) non-operational quality attribute?, (a) Reliability, (b) Safety, (c) Maintainability, (d) Portability, (e) All of these, (f) None of these, In the Information security context, Confidentiality deals with the protection of data and application from, unauthorised disclosure. State True or False, (a) True, (b) False, What are the two different aspects of debug-ability in the embedded system development context?, (a) Hardware & Firmware debug-ability, (b) Firmware & Software debug-ability, (c) None of these, For an embedded system, the quality attribute ‘Evolvability’ refers to, (a) The upgradability of the product, (b) The modifiability of the product, (c) Both of these, (d) None of these, Portability is a measure of ‘system independence’. State True or False, (a) True, (b) False, For a commercial embedded product the unit cost is high during, (a) Product launching, (b) Product maturity, (c) Product growth, (d) Product discontinuing, For a commercial embedded product the sales volume is high during, (a) Product launching, (b) Product maturity, (c) Product growth, (d) Product discontinuing, , Review Ques ons, 1. Explain the different characteristics of embedded systems in detail., [LO 1], 2. Explain quality attribute in the embedded system development context? What are the different Quality, attributes to be considered in an embedded system design., [LO 2]
Page 107 :
Characteris cs and Quality A ributes of Embedded Systems, , 83, , 3. What is operational quality attribute? Explain the important operational quality attributes to be considered in, any embedded system design., [LO 2], 4. What is non-operational quality attribute? Explain the important non-operational quality attributes to be, considered in any embedded system design., [LO 2], 5. Explain the quality attribute Response in the embedded system design context., 6. Explain the quality attribute Throughput in the embedded system design context., 7. Explain the quality attribute Reliability in the embedded system design context., , [LO 2], [LO 2], [LO 2], [LO 2], , 8. Explain the quality attribute Maintainability in the embedded system design context., 9. The availability of an embedded product is 90%. The Mean Time Between Failure (MTBF) of the product, is 30 days. What is the Mean Time To Repair (MTTR) in days/hours for the product?, [LO 2], 10. Explain the quality attribute Information Security in the embedded system design context., , [LO 2], , 11. Explain the quality attribute Safety in the embedded system design context., [LO 2], 12. Explain the significance of the quality attributes Testability and Debug-ability in the embedded system, design context., [LO 2], 13. Explain the quality attribute Portability in the embedded system design context., 14. Explain Time-to-market? What is its significance in product development?, 15. Explain Time-to-prototype? What is its significance in product development?, 16. Explain the Product Life-cycle curve of an embedded product development., , [LO 2], [LO 2], [LO 2], [LO 2]
Page 108 :
84, , Introduc on to Embedded Systems, , Embedded Systems—, Applicationand Domain-Specific, , 4, LEARNING OBJECTIVES, , LO 1 Illustrate the applica on specific aspect of embedded systems with examples, LO 2 Know the domain specific aspect of embedded systems in automo ve industry, Learn about HECUs and LECUs employed in automo ve applica ons, Learn about the CAN, LIN and MOST communica on buses used in automo ve, applica ons, Know the semiconductor chip providers, tools and pla orm providers, and, solu on providers for automo ve embedded applica ons, , As mentioned in the previous chapter on the characteristics of embedded systems, embedded systems are, application and domain specific, meaning; they are specifically built for certain applications in certain domains, like consumer electronics, telecom, automotive, industrial control, etc. In general purpose computing, it is, possible to replace a system with another system which is closely matching with the existing system, whereas, it is not the case with embedded systems. Embedded systems are highly specialised in functioning and are, dedicated for a specific application. Hence, it is not possible to replace an embedded system developed for a, specific application in a specific domain with another embedded system designed for some other application, in some other domain. The following sections are intended to give the readers some idea on the application, and domain specific characteristics of embedded systems., , 4.1, , WASHING MACHINE—APPLICATION-SPECIFIC EMBEDDED SYSTEM, , LO 1 Illustrate, the application, specific aspect of, embedded systems, with examples, , People experience the power of embedded systems and enjoy the features, and comfort provided by them, but they are totally unaware or ignorant of the, intelligent embedded players working behind the products providing enhanced, features and comfort. Washing machine is a typical example of an embedded, system providing extensive support in home automation applications (Fig. 4.1).
Page 109 :
Embedded Systems—Applica on- and Domain-Specific, , Fig. 4.1 Washing Machine – Typical example of, an embedded system, (Photo courtesy of Electrolux Corpora on, (www.electrolux.com/au)), , 85, , As mentioned in an earlier chapter, an embedded system, contains sensors, actuators, control unit and application-specific, user interfaces like keyboards, display units, etc. You can see, all these components in a washing machine if you have a closer, look at it. Some of them are visible and some of them may be, invisible to you., The actuator part of the washing machine consists of a, motorised agitator, tumble tub, water drawing pump and inlet, valve to control the flow of water into the unit. The sensor, part consists of the water temperature sensor, level sensor,, etc. The control part contains a microprocessor/controller, based board with interfaces to the sensors and actuators. The, sensor data is fed back to the control unit and the control unit, generates the necessary actuator outputs. The control unit also, provides connectivity to user interfaces like keypad for setting, the washing time, selecting the type of material to be washed, like light, medium, heavy duty, etc. User feedback is reflected, through the display unit and LEDs connected to the control, board. The functional block diagram of a washing machine is, shown in Fig. 4.2., , Fig. 4.2 Washing machine – Functional block diagram, Washing machine comes in different designs, like top loading and front loading machines. In top loading, models the agitator of the machine twists back and forth and pulls the cloth down to the bottom of the tub.
Page 110 :
86, , Introduc on to Embedded Systems, , On reaching the bottom of the tub the clothes work their way back up to the top of the tub where the agitator, grabs them again and repeats the mechanism. In the front loading machines, the clothes are tumbled and, plunged into the water over and over again. This is the first phase of washing., In the second phase of washing, water is pumped out from the tub and the inner tub uses centrifugal force, to wring out more water from the clothes by spinning at several hundred Rotations Per Minute (RPM). This is, called a ‘Spin Phase’. If you look into the keyboard panel of your washing machine you can see three buttons, namely* Wash, Spin and Rinse. You can use these buttons to configure the washing stages. As you can see, from the picture, the inner tub of the machine contains a number of holes and during the spin cycle the inner, tub spins, and forces the water out through these holes to the stationary outer tub from which it is drained off, through the outlet pipe., It is to be noted that the design of washing machines may vary from manufacturer to manufacturer, but, the general principle underlying in the working of the washing machine remains the same. The basic controls, consist of a timer, cycle selector mechanism, water temperature selector, load size selector and start button., The mechanism includes the motor, transmission, clutch, pump, agitator, inner tub, outer tub and water inlet, valve. Water inlet valve connects to the water supply line using at home and regulates the flow of water into, the tub., The integrated control panel consists of a microprocessor/controller based board with I/O interfaces and, a control algorithm running in it. Input interface includes the keyboard which consists of wash type selector, namely* Wash, Spin and Rinse, cloth type selector namely* Light, Medium, Heavy duty, and washing time, setting, etc. The output interface consists of LED/LCD displays, status indication LEDs, etc. connected to the, I/O bus of the controller. It is to be noted that this interface may vary from manufacturer to manufacturer and, model to model. The other types of I/O interfaces which are invisible to the end user are different kinds of, sensor interfaces, namely, water temperature sensor, water level sensor, etc. and actuator interface including, motor control for agitator and tub movement control, inlet water flow control, etc., , 4.2, , AUTOMOTIVE–DOMAIN SPECIFIC EXAMPLES OF EMBEDDED SYSTEM, , LO 2 Know the, domain specific, aspect of embedded, systems in, automotive industry, , 4.2.1, , The major application domains of embedded systems are consumer, industrial,, automotive, telecom, etc., of which telecom and automotive industry holds a, big market share., Figure 4.3 gives an overview of the various types of electronic control units, employed in automotive applications., , Inner Workings of Automotive Embedded Systems, , Automotive embedded systems are the one where electronics take control over the mechanical and electrical, systems. The presence of automotive embedded system in a vehicle varies from simple mirror and wiper, controls to complex air bag controller and Anti-lock Brake Systems (ABS). Automotive embedded systems, are normally built around microcontrollers or DSPs or a hybrid of the two and are generally known as, Electronic Control Units (ECUs). The number of embedded controllers in an ordinary vehicle varies from, 20 to 40 whereas a luxury vehicle like Mercedes S and BMW 7 may contain over 100 embedded controllers., Government regulations on fuel economy, environmental factors and emission standards and increasing, customer demands on safety, comfort and infotainment forces the automotive manufactures to opt for, sophisticated embedded control units within the vehicle. The first embedded system used in automotive, application was the microprocessor based fuel injection system introduced by Volkswagen 1600 in 1968., *, , Name may vary depending on the manufacturer.
Page 111 :
Embedded Systems—Applica on- and Domain-Specific, , Fig. 4.3, , 87, , Embedded system in the automotive domain, (Photo courtesy of Honda Siel Car India (www.hondacarindia.com)), , The various types of electronic control units (ECUs) used in the automotive embedded industry can be, broadly classified into two–High-speed embedded control units and Low-speed embedded control units., , 4.2.1.1 High-speed Electronic Control Units (HECUs) High-speed electronic control units (HECUs), are deployed in critical control units requiring fast response. They include fuel injection systems, antilock brake, systems, engine control, electronic throttle, steering controls, transmission control unit and central control unit., 4.2.1.2 Low-speed Electronic Control Units (LECUs) Low-Speed Electronic Control Units (LECUs), are deployed in applications where response time is not so critical. They generally are built around low cost, microprocessors/microcontrollers and digital signal processors. Audio controllers, passenger and driver door, locks, door glass controls (power windows), wiper control, mirror control, seat control systems, head lamp, and tail lamp controls, sun roof control unit, etc. are examples of LECUs., , 4.2.2, , Automotive Communication Buses, , Automotive applications make use of serial buses for communication, which greatly reduces the amount of, wiring required inside a vehicle. The following section will give you an overview of the different types of, serial interface buses deployed in automotive embedded applications., , 4.2.2.1 Controller Area Network (CAN) The CAN bus was originally proposed by Robert Bosch,, pioneer in the Automotive embedded solution providers. It supports medium speed (ISO11519-class B with, data rates up to 125 Kbps) and high speed (ISO11898 class C with data rates up to 1Mbps) data transfer., CAN is an event-driven protocol interface with support for error handling in data transmission. It is generally, employed in safety system like airbag control; power train systems like engine control and Antilock Brake, System (ABS); and navigation systems like GPS. The protocol format and interface application development, for CAN bus will be explained in detail in another volume of this book series.
Page 112 :
88, , Introduc on to Embedded Systems, , 4.2.2.2 Local Interconnect Network (LIN) LIN bus is a single master multiple slave (up to 16, independent slave nodes) communication interface. LIN is a low speed, single wire communication interface, with support for data rates up to 20 Kbps and is used for sensor/actuator interfacing. LIN bus follows the, master communication triggering technique to eliminate the possible bus arbitration problem that can occur, by the simultaneous talking of different slave nodes connected to a single interface bus. LIN bus is employed, in applications like mirror controls, fan controls, seat positioning controls, window controls, and position, controls where response time is not a critical issue., 4.2.2.3 Media Oriented System Transport (MOST) Bus The Media Oriented System Transport, (MOST) is targeted for high-bandwidth automotive multimedia networking (e.g. audio/video, infotainment, system interfacing), used primarily in European cars. A MOST bus is a multimedia fibre-optic point-to-point, network implemented in a star, ring or daisy-chained topology over optical fibre cables. The MOST bus, specifications define the physical (electrical and optical parameters) layer as well as the application layer,, network layer, and media access control. MOST bus is an optical fibre cable connected between the Electrical, Optical Converter (EOC) and Optical Electrical Converter (OEC), which would translate into the optical, cable MOST bus., , 4.2.3, , Key Players of the Automotive Embedded Market, , The key players of the automotive embedded market can be visualised in three verticals namely, silicon, providers, solution providers and tools and platform providers., , 4.2.3.1 Silicon Providers Silicon providers are responsible for providing the necessary chips which are, used in the control application development. The chip may be a standard product like microcontroller or DSP, or ADC/DAC chips. Some applications may require specific chips and they are manufactured as Application, Specific Integrated Chip (ASIC). The leading silicon providers in the automotive industry are:, Analog Devices (www.analog.com) Provider of world class digital signal processing chips, precision, analog microcontrollers, programmable inclinometer/accelerometer, LED drivers, etc. for automotive signal, processing applications, driver assistance systems, infotainment, powertrain body and chassis, etc., Xilinx (www.xilinx.com) Supplier of high performance FPGAs, CPLDs, and automotive specific IP cores, for GPS navigation systems, driver information systems, distance control, collision avoidance, rear seat, entertainment, adaptive cruise control, voice recognition, etc., Atmel (www.atmel.com) Supplier of cost-effective high-density Flash controllers and memories. Atmel, provides a series of high performance microcontrollers, namely, ARM®†, AVR®‡, and 80C51. A wide range, of Application Specific Standard Products (ASSPs) for chassis, body electronics, security, safety and car, infotainment and automotive networking products for CAN, LIN, and FlexRay are also supplied by Atmel., Maxim/Dallas (www.maximintegrated.com) Supplier of world class analog, digital and mixed signal, products (Microcontrollers, ADC/DAC, amplifiers, comparators, regulators, etc), RF components, etc. for all, kinds of automotive solutions., NXP Semiconductor (www.nxp.com) Supplier of 8/16/32 Flash microcontrollers, CAN/LIN/FlexRay, transceivers, LED controllers, LCD drivers, Audio amplifiers, Angular/Rotational/Temperature sensors,, automotive lighting control and discrete components etc., Renesas (www.renesas.com) Provider of high speed microcontrollers, battery control systems, powertrain, solutions, chassis and safety solutions, body control solutions, instrument cluster solutions, etc., †, ‡, , ARM® is the registered trademark of ARM Holdings., AVR® is the registered trademark of Atmel Corporation.
Page 113 :
Embedded Systems—Applica on- and Domain-Specific, , 89, , Texas Instruments (www. .com) Supplier of microcontrollers, digital signal processors, and automotive, communication control chips for Local Inter Connect (LIN) bus products, Advanced Driver Assistance, Systems, Body Electronics and Lighting Solutions, Hybrid, Electric and Power train systems, Infotainment,, Meter cluster and safety solutions, etc., Fujitsu (www.fujitsu.com) Fujitsu is the global leader in graphics display controllers (GDCs), including, instrument clusters, in-dash navigation, heads-up displays and rear-seat entertainment. Fujitsu also offers the, world’s first automotive controller for HD video in vehicle networks and delivers CAN microcontrollers that, are used widely for critical automotive functions., Infineon (www.infineon.com) Supplier of high performance microcontrollers and customised application, specific chips for body and convenience, safety, powertrain, security systems., Freescale Semiconductor (www.freescale.com) Solution provider for Advanced Driver Assistance Systems, (ADAS), Body Electronics, Chassis and Safety, Infotainment, Instrument Cluster, Powertrain and Hybrid systems, Microchip (www.microchip.com) Supplier of robust automotive grade microcontroller, analog and memory, products, CAN/LIN transceivers, etc., There are lots of other silicon manufactures which provides various automotive support systems like, power supply, sensors/actuators, optoelectronics, etc. Describing all of them is out of the scope of this book., Readers are requested to use the Internet for finding more information on them., 4.2.3.2 Tools and Pla orm Providers Tools and platform providers are manufacturers and suppliers, of various kinds of development tools and Real Time Embedded Operating Systems for developing and, debugging different control unit related applications. Tools fall into two categories, namely embedded software, application development tools and embedded hardware development tools. Sometimes the silicon suppliers, provide the development suite for application development using their chip. Some third party suppliers, may also provide development kits and libraries. Some of the leading suppliers of tools and platforms in, automotive embedded applications are listed below., ENEA (www.enea.com) Enea Embedded Technology is the developer of the OSE Real-Time operating, system. The OSE RTOS supports both CPU and DSP and has also been specially developed to support multicore and fault-tolerant system development., The MathWorks (www.mathworks.com) It is the world’s leading developer and supplier of technical, software. It offers a wide range of tools, consultancy and training for numeric computation, visualisation,, modelling and simulation across many different industries. MathWork’s breakthrough product is MATLAB–a, high-level programming language and environment for technical computation and numerical analysis., Together MATLAB, SIMULINK, Stateflow, and Real-Time Workshop provide top quality tools for data, analysis, test & measurement, application development and deployment, image processing and development, of dynamic and reactive systems for DSP and control applications., Keil So ware (www.keil.com) The Integrated Development Environment Keil Microvision from Keil, software is a powerful embedded software design tool for ARM, 8051 & C166 family of microcontrollers., Lauterbach (h p://www.lauterbach.com/) It is the world’s number one supplier of debug tools, providing, support for processors from multiple silicon vendors in the automotive market., Atego Modeling Tools (h p://www.atego.com) Is the leading supplier of collaborative modeling tools for, requirements analysis, specification, design and development of complex applications., Microso (www.microso .com) Is a platform provider for automotive embedded applications. Microsoft’s, Windows Embedded Automotive is an extensible technology platform for automakers and suppliers to deliver, in-car experiences that keep drivers connected and informed. Leveraging a range of devices, services and, technology, the platform extends work and home into the vehicle through connected car scenarios.
Page 114 :
90, , Introduc on to Embedded Systems, , 4.2.3.3 Solu on Providers Solution providers supply OEM and complete solution for automotive, applications making use of the chips, platforms, and different development tools. The major players of this, domain are listed below., Bosch Automo ve (www.boschindia.com) Bosch is providing complete automotive solution ranging, from body electronics, diesel engine control, gasoline engine control, powertrain systems, safety systems,, in-car navigation systems, and infotainment systems., DENSO Automo ve (www.globaldenso.com) Denso is an Original Equipment Manufacturer (OEM) and, solution provider for engine management, climate control, body electronics, driving control & safety, hybrid, vehicles, embedded infotainment, and communications., Infosys Technologies (www.infosys.com) Infosys is a solution provider for automotive embedded hardware, and software. Infosys provides the competitive edge in integrating technology change through costeffective solutions., Delphi (www.delphi.com) Delphi is the complete solution provider for engine control, safety, infotainment,, etc., and OEM for spark plugs, bearings, etc., ……and many more. The list is incomplete. Describing all providers is out of the scope of this book., , Summary, Embedded systems designed for a particular application for a specific domain cannot be replaced, with another embedded system designed for another application for a different domain, LO1, Consumer, industrial, automotive, telecom, etc. are the major application domains of, embedded systems. Telecom and automotive industry are the two segments holding a big LO2, market share of embedded systems, Automotive embedded systems are normally built around microcontrollers or DSPs or a hybrid of, LO2, the two and are generally known as Electronic Control Units (ECUs), High speed Electronic Control Units (HECUs) are deployed in critical control units, requiring fast response, like fuel injection systems, antilock brake system, etc., LO2, Low speed Electronic Control Units (LECUs) are deployed in applications where response, time is not so critical. They are generally built around low cost microprocessors/, microcontrollers and digital signal processors. Audio controllers, passenger and driver LO2, door locks, door glass controls, etc., are examples for LECUs., Automotive applications use serial buses for communication. Controller Area Network (CAN),, Local Interconnect Network (LIN), Media Oriented System Transport (MOST) bus, etc. LO2, are the important automotive communication buses., CAN is an event driven serial protocol interface with support for error handling in data transmission., It is generally employed in safety system like airbag control, powertrain systems like LO2, engine control and Antilock Brake Systems (ABS)., LIN bus is a single master multiple slave (up to 16 independent slave nodes) communication, interface. LIN is a low speed, single wire communication interface with support for data LO2, rates up to 20Kbps and is used for sensor/actuator interfacing., The Media Oriented System Transport (MOST) bus is targeted for automotive audio video, equipment interfacing. MOST bus is a multimedia fibre-optic point-to-point network, LO2, implemented in a star, ring or daisy-chained topology over optical fibres cables, The key players of the automotive embedded market can be classified into ‘Silicon Providers’,, LO2, ‘Tools and Platform Providers’ and ‘Solution Providers’
Page 115 :
Embedded Systems—Applica on- and Domain-Specific, , 91, , Keywords, ECU: Electronic Control Unit. The generic term for the embedded control units in automo ve applica on, , [LO 2], HECU: High-speed Electronic Control Unit. The high-speed embedded control unit deployed in automo ve, applica ons, [LO 2], LECU: Low-speed Electronic Control Unit. The low-speed embedded control unit deployed in automo ve, applica ons, [LO 2], CAN: Controller Area Network. An event driven serial protocol interface used primarily for automo ve, applica ons, [LO 2], LIN: Local Interconnect Network. A single master mul ple slave, low speed serial bus used in automo ve, applica on, [LO 2], MOST: Media Oriented System Transport Bus. A mul media fibre-op c point-to-point network implemented, in a star, ring or daisy-chained topology over op cal fibres cables, [LO 2], , Objec ve Ques ons, 1. In Automotive systems, High-speed Electronic Control Units (HECUs) are deployed in, (a) Fuel injection systems, (b) Antilock brake systems, (c) Power windows, (d) Wiper control, (e) Only (a) and (b), 2. In Automotive systems, Low speed electronic control units (LECUs) are deployed in, (a) Electronic throttle, (b) Steering controls, (c) Transmission control, (d) Mirror control, 3. The first embedded system used in automotive application is the microprocessor based fuel injection system, introduced by ______ in 1968, (a) BMW, (b) Volkswagen 1600, (c) Benz E Class, (d) KIA, 4. CAN bus is an event driven protocol for communication. State True or False, (a) True, (b) False, 5. Which of the following serial bus is (are) used for communication in Automotive Embedded Applications?, (a) Controller Area Network (CAN), (b) Local Interconnect Network (LIN), (c) Media Oriented System Transport (MOST) bus, (d) All of these, (e) None of these, 6. Which of the following is true about LIN bus?, (a) Single master multiple slave interface, (b) Low speed serial bus, (c) Used for sensor/actuator interfacing, (d) All of these, (e) None of these, 7. Which of the following is true about MOST bus?, (a) Used for automotive audio video system interfacing, (b) It is a fibre optic point-to-point network
Page 116 :
92, , Introduc on to Embedded Systems, , (c) It is implemented in star, ring or daisy-chained topology, (d) All of these, (e) None of these, 8. Which of the following is (are) example(s) of Silicon providers for automotive applications?, (a) Maxim/Dallas (b) Analog Devices (c) Xilinx, (d) Atmel, (e) All of these, (f) None of these, , Review Ques ons, [LO 1, LO 2], 2. Explain the different electronic control units (ECUs) used in automotive systems., [LO 2], 3. Explain the different communication buses used in automotive application., [LO 2], 4. Give an overview of the different market players of the automotive embedded application domain. [LO 2], 1. Explain the role of embedded systems in automotive domain.
Page 117 :
Designing Embedded Systems with 8bit Microcontrollers—8051, , 5, , Designing Embedded, Systems with 8bit, Microcontrollers—8051, , LEARNING OBJECTIVES, LO 1 Discuss the different factors that need to be considered while selec ng a, microcontroller for an embedded design, LO 2 Explain why 8051 is the popular choice for low cost low performance embedded, system design, LO 3 Discuss the A to Z of 8051 microcontroller architecture, Learn the Internals of the 8051 microcontroller, Understand the program memory and internal data memory organisa on of, 8051, Explain the Paged Data memory access and Von-Neumann memory model, implementa on for 8051, Learn about the organisa on of lower 128 bytes RAM for data memory, upper 128, bytes RAM for SFR and upper 128bytes RAM for Internal Data memory (IRAM), Learn about the CPU registers and general purpose registers of 8051, Learn about the Oscillator unit and speed of execu on of 8051, Learn about the different I/O ports, organisa on of the ports, the internal, implementa on of the port pins, the different registers associated with the ports, and the opera on of ports, Learn about interrupts and its significance in embedded applica ons, Learn about the Interrupt System of 8051, the interrupts supported by 8051,, interrupt priori es, different registers associated with configuring the interrupts,, Interrupt Service Rou ne and their vector address, Learn about the Timer/Counter units supported by 8051 and configuring the Timer, unit for Timer/Counter opera on., Learn the different registers associated with mer units and the different modes, of opera ons supported by Timer/Counter units, Learn about the Serial Port of the 8051, the different control, status and data, registers associated with it, , 93
Page 118 :
94, , Introduc on to Embedded Systems, , Learn the different modes of opera ons supported by the Serial port and se ng, the baudrate for each mode, Learn about the Power-On Reset circuit implementa on for 8051, Learn about the different power saving modes supported by 8051, LO 4 Differen ate between 8051 and 8052, LO 5 Know the 8052 variants, , Even though 16/32-bit microcontrollers are being increasingly used in the embedded design, 8bit, microcontrollers still hold a huge market share. Among the 8bit microcontrollers, the 8051 family is the most, popular, cost effective and versatile device offering extensive support in the embedded application domain., Looking back to the history of microcontrollers you will find that the 8bit microcontroller industry has travelled, a lot from its first popular model 8031AH built by Intel in 1977 to the advanced 8bit microcontroller built, by Maxim/Dallas recently, which offers high performance 4 Clock, 75MHz operation 8051 microcontroller, core (Remember the original 8031 core was 12 Clock with support for a maximum system clock of 6MHz,, so a performance improvement of 3 times on the original version in execution) with extensive support for, networking by integrating 10/100 Ethernet MAC with IEEE 802.3 MMI, CAN bus for automotive application, support, RS-232 C interface for legacy serial applications, SPI serial interface for board level device inter, connect, 1-wire interface for connecting to low cost multi-drop sensors and actuators, and 16MB addressing, space for code and data memory., , 5.1, , FACTORS TO BE CONSIDERED IN SELECTING A CONTROLLER, , LO 1 Discuss the, different factors that, need to be considered, while selecting a, microcontroller for an, embedded design, , Selection of a microcontroller for any application depends on some design, factors. A good designer finalises his selection based on a comparative study, of the design factors. The important factors to be considered in the selection, process of a microcontroller are listed below., , 5.1.1, , Feature Set, , The important queries related to the feature set are: Does the microcontroller, support all the peripherals required by the application, say serial interface,, parallel interface, etc.? Does it satisfy the general I/O port requirements by the application? Does the, controller support sufficient number of timers and counters? Does the controller support built-in ADC/DAC, hardware in case of signal processing applications? Does the controller provide the required performance?, , 5.1.2, , Speed of Operation, , Speed of operation or performance of the controller is another important design factor. The number, of clocks required per instruction cycle and the maximum operating clock frequency supported by the, processor greatly affects the speed of operation of the controller. The speed of operation of the controller is, usually expressed in terms of Million Instructions Per Second (MIPS).
Page 119 :
Designing Embedded Systems with 8bit Microcontrollers—8051, , 5.1.3, , 95, , Code Memory Space, , If the target processor/controller application is written in C or any other high level language, does the, controller support sufficient code memory space to hold the compiled hex code (In case of controllers with, internal code memory)?, , 5.1.4, , Data Memory Space, , Does the controller support sufficient internal data memory (on chip RAM) to hold run time variables and, data structures?, , 5.1.5, , Development Support, , Development support is another important factor for consideration. It deals with - Does the controller, manufacture provide cost-effective development tools? Does the manufacture provide product samples for, prototyping and sample development stuffs to alleviate the development pains? Does the controller support, third party development tools? Does the manufacture provide technical support if necessary?, , 5.1.6, , Availability, , Availability is another important factor that should be taken into account for the selection process. Since the, product is entirely dependent on the controller, the product development time and time to market the product, solely depends on its availability. By technical terms it is referred to as Lead time. Lead time is the time, elapsed between the purchase order approval and the supply of the product., , 5.1.7, , Power Consumption, , The power consumption of the controller should be minimal. It is a crucial factor since high power requirement, leads to bulky power supply designs. The high power dissipation also demands for cooling fans and it will, make the overall system messy and expensive. Controllers should support idle and power down modes of, operation to reduce power consumption., , 5.1.8, , Cost, , Last but not least, cost is a big deciding factor in selecting a controller. The cost should be within the reachable, limit of the end user and the targeted user should not be high tech. Remember the ultimate aim of a product, is to gain marginal benefit., , 5.2, , WHY 8051 MICROCONTROLLER, , 8051 is a very versatile microcontroller featuring powerful Boolean processor, LO 2 Explain why, which supports bit manipulation instructions for Real-time industrial, 8051 is the popular, control applications. The standard 8051 architecture supports 6 interrupts, choice for low cost low, (2 external interrupts, 2 timer interrupts and 2 serial interrupts), two 16bit, performance embedded, timers/counters, 32 I/O lines and a programmable full duplex serial interface., system design, Another fascinating feature of 8051 is the way it handles interrupts. The, interrupts have two priority levels and each interrupt is allocated fixed 8, bytes of code memory. This approach is very efficient in real time application. Though 8051 is invented, by Intel, today it is available in the market from more than 20 vendors and with more than 100 variants of
Page 120 :
96, , Introduc on to Embedded Systems, , the original 8051 flavor, supporting CAN, USB, SPI and TCP/IP interfaces, integrated ADC/DAC, LCD, Controller and extended number of I/O ports. Another remarkable feature of 8051 is its low cost. The 8051, flash microcontroller (AT89C51) from Atmel is available in the market for less than 1US$ per piece. So, imagine its cost for high volume purchases., , 5.3, , DESIGNING WITH 8051, , 5.3.1, , The 8051 Architecture, , The basic 8051 architecture consist of an 8bit CPU with Boolean processing, capability, oscillator driver unit, 4K bytes of on-chip program memory, 128 bytes, of internal data memory, 128 bytes of special function register memory area, 32, general purpose I/O lines organised into four 8bit bi-directional ports, two 16bit, timer units and a full duplex programmable UART for serial data transmission, with configurable baudrates. Figure 5.1 illustrates the basic 8051 architecture., LO 3 Discuss the, A to Z of 8051, microcontroller, architecture, , Internal circuitry, , Counter, inputs, , P0.0 to P0.7, , P2.0 to P2.7, , Port 0, drivers, , Port 2, drivers, , Serial, (TI, RI), Timer 1, Timer 0, , Timer, increment, TIMER 1, Port 0 latch, , Interrupt, controller, , Port 2 latch, , TIMER 0, , External, interrupts, EX0, EX1, , CPU, RAM, (128 Bytes), ROM, (4K Bytes), , UART, (Serial Port), , RXD TXD, , SFR, (128 Bytes), , Port 1 latch, , Timing & Control, unit, Port 3 latch, Oscillator, unit, , Port 1, drivers, , Port 3, drivers, , P1.0 to P1.7, , P3.0 to P3.7, , Crystal, , Fig. 5.1, , 8051 Architecture—Block diagram representation, , PSEN\, ALE/PROG\, EA\ /VPP, RST, RD\, WR\
Page 121 :
Designing Embedded Systems with 8bit Microcontrollers—8051, , 5.3.2, , 97, , The Memory Organisation, , 8051 is built around the Harvard processor architecture. The program and data memory of 8051 is logically, separated and they physically reside separately. Separate address spaces are assigned for data memory and, program memory. 8051’s address bus is 16bit wide and it can address up to 64KB (216) memory., , 5.3.2.1 The Program (Code) Memory, The basic 8051 architecture provides lowest 4K bytes of program memory as on-chip memory (built-in, chip memory). In 8031, the ROMless counterpart of 8051, all program memory is external to the chip., Switching between the internal program memory and external program memory is accomplished by changing, the logic level of the pin External Access (EA\). Tying EA\ pin to logic 1 (VCC), configures the chip to execute, instructions from program memory up to 4K (program memory location up to 0FFFH) from internal memory, and 4K (program memory location from 1000H) onwards from external memory, while connecting EA\ pin, to logic 0 (GND) configures the chip to external program execution mode, where the entire code memory is, executed from the external memory. Remember External Access pin is an active low pin (Normally referred, as EA\). The control signal for external program memory execution is PSEN\ (Program Strobe Enable)., For internal program memory fetches PSEN\ is not activated. For 8031 controller without on-chip memory,, the PSEN\ signal is always activated during program memory execution. The External Access pin (EA\), configuration and the corresponding code memory access are illustrated in Fig. 5.2., FFFFH, , FFFFH, , External program, memory, (Off-Chip ROM), , External program, memory, (Off-Chip ROM), 1000H, 0FFFH, , Internal program, memory, (On-Chip ROM), 0000H, , 0000H, EA\ = 0, External program, memory access, , Fig. 5.2, , EA\ = 1, Internal program, memory access, , 8051 Program memory organisation, , If the program memory is external, 16 I/O lines are used for accessing the external memory. Port 0 and, Port 2 are used for external memory accessing. Port 0 serves as multiplexed address/data bus for external, program memory access. Similar to the 8085 microprocessor, Port 0 emits the lower order address first. This, can be latched to an 8bit external latch with the Address Latch Enable (ALE) signal emitted by 8051. Once, the address outing is over, Port 0 functions as input port for data transfer from the corresponding memory, location. The address from which the program instruction to be fetched is supplied by the 16bit register,, Program Counter (PC), which is part of the CPU. The Program Counter is a 16bit register made up of two
Page 122 :
98, , Introduc on to Embedded Systems, , 8bit registers. The lower order byte of program counter register is held by the PCL register and higher, order by the PCH register. PCL and PCH in combination serve as a 16bit register. During external program, memory fetching, Port 0 emits the contents of PCL and Port 2 emits the contents of PCH register. Port 0, emits the contents of PCL only for a fixed duration allowing the external latch to hold the content on arrival, of the ALE signal. Afterwards Port 0 goes into high impedance state, waiting for the arrival of data from, the corresponding memory location of external memory. Whereas Port 2 continues emitting the contents of, PCH register throughout the external memory fetch. Once the PSEN\ signal is active, data from the program, memory is clocked into Port 0. Remember, during external program memory access Port 0 and Port 2 are, dedicated for it and cannot be used as general purpose I/O ports. The interfacing of an external program, memory chip is illustrated in Fig. 5.3., Program Memory, , 8051, , Data Bus D0….D7, P0, , O0….O7, , A0….A7, , ALE, P2, , A8….A15, , (E.g.: W27C512), , Latch, (e.g.: 74LS373), , Address Bus, PSEN\, , Output enable of ROM chip, , OE\, , EA\, , Fig. 5.3 8051 External Program Memory chip (ROM) interfacing, , 5.3.2.2 The Data Memory, The basic 8051 architecture supports 128 bytes of internal data memory and 128 bytes of Special Function, Register memory. Special Function Register memory is not available for the user for general data memory, applications. The address range for internal user data memory is 00H to 7FH. Special Function Registers, are residing at memory area 80H to FFH. 8051 supports interface for 64 Kbytes of external data memory., The control signals used for external data memory access are RD\ and WR\ and the 16bit register holding, the address of external data memory address to be accessed is Data Pointer (DPTR). Similar to the Program, Counter, the Data Pointer is also made up of two 8bit registers, namely, DPL (holding the lower order, 8bit) and DPH (holding the higher order 8bit). The program counter is not accessible to the user whereas, DPTR is accessible to the user and the contents of DPTR register can be modified. In external data memory, operations, Port 0 emits the content of DPL and Port 2 emits the content of DPH. Port 0 is address/data, multiplexed in external data memory operations also. The internal and external data memory model of 8051, is diagrammatically represented in Fig. 5.4., Internal data memory addresses are always one byte long. So it can accommodate up to 256 bytes, of internal data memory (Ranging from 0 to 255). However the addressing techniques used in 8051, can accommodate 384 bytes using a simple memory addressing technique. The technique is: Direct addressing, of data memory greater than 7FH will access one memory space, namely Special Function Register memory
Page 123 :
99, , Designing Embedded Systems with 8bit Microcontrollers—8051, , and indirect addressing of memory address greater than 7FH will access another memory space, the upper, 128 bytes of data memory (Direct and indirect memory addressing will be discussed in detail in a later, section). Remember these techniques will work only if the upper data memory is physically implemented in, the chip. The basic version of 8051 does not implement the upper data memory physically. However the 8052, family implements the upper data memory physically in the chip and so the upper 128 byte memory is also, available for the user as general purpose memory, if accessed through indirect addressing., External data memory address can be either one or two bytes long. As described earlier, Port 0 emits the, lower order 8bit address and, if the memory address is two bytes and if it ranges up to 64K, the entire bits, of Port 2 is used for holding the higher order value of data memory address. If the memory range is 32K,, only 7 bits of Port 2 is required for addressing the memory. For 16K, only 6 lines of Port 2 are required for, interfacing and so on. Thereby you can save some port pins of Port 2. The interfacing of an external data, memory chip is illustrated Fig. 5.5., FFFFH, , On-chip RAM, , Off-chip RAM, , FFH, Upper 128 bytes, (IRAM), (Present in 8052, family only), , SFR memory, space, 64KB external, RAM, , 80H, 7FH, Lower 128 bytes, (RAM), 00H, 0000H, , Fig. 5.4, , Data memory map for 8051, , 8051, Data bus D0….D7, P0, Latch, (e.g. 74LS373), , External data, memory, D0….D7, , A0….A7, , ALE, , P2, , A8….A15, Higher order address bus, , P3, , RD\, WR\, , OE\, WR\, , Fig. 5.5, , External Data memory access
Page 124 :
100, , Introduc on to Embedded Systems, , 5.3.2.3 Paged Data Memory Access, In paged mode addressing, the memory is arranged like the lines of a notebook. The notebook may contain, 100 to 200 pages and each page may contain a fixed number of lines. You can access a specific line by, knowing its page number and the line number. Memory can also arrange like the lines of a notebook. By, using 8bit address, memory up to 256 bytes can be accessed. Imagine the situation where the memory is, stacked of 256 bytes each. You can use port pins (High order address rule) to signal the page number and the, lower order 8 bits to indicate the memory location corresponding to that page., For example, take the case where paging is done using the port pin P2.0 and port 0 is used for holding the, lower address. The memory range will be, Page selector (P2.0), , Lower order address, , Address range, , 0, , 00H to FFH, , 000H to 0FFH, , 1, , 00H to FFH, , 100H to 1FFH, , 5.3.2.4 The Von-Neumann Memory Model for 8051, The code memory and data memory of 8051 can be combined together to give the Von-Neumann architectural, benefit for 8051. A single memory chip with read/write option can be used for this. The program memory, can be allocated to the lower memory space starting from 0000H and data memory can be assigned to some, other specific area after the code memory. For program memory fetching and data memory read operations, combine the PSEN\ and RD\ signals using an AND gate and connect it to the Output Enable (OE\) signal, of the memory chip as shown in Fig. 5.6., , Data bus D0….D7, P0, Latch, (e.g.: 74LS373), , External memory, (Code + Data), D0….D7, , A0….A7, , AL E, , E.g.: DS 1644, , 8051, , A8….A15, , P2, Higher order address bus, , EA\, , RD\, PSEN\, , OE\, , WR\, , WR\, , Fig. 5.6, , Combining Code memory and Data memory, , The Von-Neumann memory model is very helpful in evaluation boards for the controller, which, allows modification of code memory on the fly. The major drawbacks of using a single chip for program and, data memory are, ∑ Accidental corruption of program memory
Page 125 :
Designing Embedded Systems with 8bit Microcontrollers—8051, , ∑, , 101, , Reduction in total memory space. In separate program and data memory model the total available, memory is 128KB (64KB program memory + 64KB Data memory) whereas in the combined model, the total available memory is only 64KB, , 5.3.2.5 Lower 128 Byte Internal Data Memory (RAM) Organisa on, This memory area is volatile; meaning the contents of these locations are not retained on power lose. On, power up these memory locations contain random data. The lowest 32 bytes of RAM (00H to 1FH) are, grouped into 4 banks of 8 registers each. These registers are known as R0 to R7 registers which are used as, temporary data storage registers during program execution. The effective usage of these registers reduces the, code memory requirement since register instructions are shorter than direct memory addressing instructions., The next 16 bytes of RAM with address 20H to 2FH is a bit addressable memory area. It accommodates 128, bits (16 bytes x 8), which can be accessed by direct bit addressing. The address of bits ranges from 00H to, 7FH. This is very useful since 8051 is providing extensive support for Boolean operations (Bit Manipulation, Operations). Also it saves memory since flag variables can be set up with these bits and there is no need to, waste one full byte of memory for setting up a flag variable. These 16 bytes can also be used as byte variables., The context in which these bytes are used as either byte variable or bit variable is determined by the type of, instruction. If the instruction is a bit manipulation instruction and the operand is given as a direct address in, the range 00H to 7FH, it is treated as a bit variable. The lower 128 bytes of internal RAM for 8051 family, members is organised as shown in Fig. 5.7., 7FH, Scratchpad RAM, 80 bytes 30H –7FH, 30H, 2FH, 20H, Bank 3, Bank 2, Bank 1, Bank 0, , 18H, , 1FH, 17H, , 10H, 08H, 00H, , Bit addressable area, (Bit addresses 00-07H), 16 bytes 20H –2FH, , 0FH, , 4 banks of 8 registers R0-R7, 32 bytes 00H –1FH, , 07H, , Fig. 5.7 Internal 128 bytes of lower order data memory organisation, Remember the byte-wise storage and bitwise storage in the area 20H to 2FH shares a common physical, memory area and you cannot use this for both byte storage and bit storage simultaneously. If you do so,, depending on the usage, the byte variables and bit variables may get corrupted and it may produce unpredicted, results in your application. This is explained more precisely using the following table.
Page 127 :
103, , Designing Embedded Systems with 8bit Microcontrollers—8051, , 5.3.2.6 The Upper 128 bytes RAM (Special Func on Registers), The upper 128 bytes of RAM when accessed by direct addressing, accesses the Special Function Registers, (SFRs). SFRs include port latches, status and control bits, timer control and value registers, CPU registers,, stack pointer, accumulator, etc. Some of the SFR registers are only byte level accessible and some of them, are both byte-wise and bit-wise accessible. SFRs with address ends in 0H and 8H are both bit level and byte, level accessible. In the standard 8051 architecture, among the 128 bytes, only a few bytes are occupied by the, SFR and the rest are left unused and are reserved for future implementations. The table given below explains, the SFR implementation for standard 8051 architecture., Memory, Address, , SFR Name, , Memory, Address, , SFR Name, , Memory, Address, , SFR Name, , 80H, , Port 0, , 8AH, , TL0, , A0H, , Port 2, , 81H, , SP, , 8BH, , TL1, , A8H, , IE, , 82H, , DPL, , 8CH, , TH0, , B0H, , Port 3, , 83H, , DPH, , 8DH, , TH1, , B8H, , IP, , 87H, , PCON, , 90H, , Port 1, , D0H, , PSW, , 88H, , TCON, , 98H, , SCON, , E0H, , A, , 89H, , TMOD, , 99H, , SBUF, , F0H, , B, , SFR memory is not available to the user for general purpose scratchpad RAM usage. However the user, can modify the contents of some of the SFR according to the program requirements. Some of the SFRs, are Read Only. Some of the SFR memory spaces are not implemented in the basic 8051 version. They are, reserved for future use and users are instructed not to do anything with this reserved SFR space. Reading, from the unimplemented SFR memory address returns random data and writing to this memory location will, not produce any effect. Each of the SFRs will be discussed in detail in the sections covering their usage., , 5.3.2.7 The Upper 128 Bytes of Scratchpad RAM (IRAM), Variants of 8051 and the 8052 architecture where the upper 128 bytes of RAM are physically implemented in, the chip can be used as general purpose scratchpad RAM by indirect addressing. They are generally known, as IRAM. The address of IRAM ranges from 80H to FFH and the access is indirect. Registers R0 and R1 are, used for indirect addressing. For example, for accessing the IRAM located at address 80H, load R0 or R1, with 80H and use the indirect memory access instruction. The following piece of assembly code illustrates, the same., MOV, MOV, , 5.3.3, , R0,#80H ; Load IRAM address 80H in indirect register, A,@R0, ; Load Accumulator with IRAM content at address 80H, , Registers, , Registers of 8051 can be broadly classified into CPU Registers and Scratchpad Registers., , 5.3.3.1 CPU Registers, Accumulator, B register, Program Status Word (PSW), Stack Pointer (SP), Data Pointer (DPTR, Combination, of DPL and DPH), and Program Counter (PC) constitute the CPU registers. They are described in detail, below.
Page 128 :
104, , Introduc on to Embedded Systems, , Accumulator (ACC) (SFR-E0H) It is the most important CPU register which acts as the heart of all CPU, related Arithmetic operations. Accumulator is an implicit operand in most of the arithmetic operations., Accumulator is a bit addressable register., ACC.7, , ACC.6, , ACC.5, , ACC.4, , ACC.3, , ACC.2, , ACC.1, , ACC.0, , B Register (SFR-F0H) It is a CPU register that acts as an operand in multiply and division operations. It, also stores the remainder in division and MSB in multiplication Instruction. B can also be used as a general, purpose register for programming., Program Status Word (PSW) (SFR-D0H) It is an 8-bit, bit addressable Special Function register signalling, the status of accumulator related operations and register bank selector for the scratch pad registers R0 to R7., The bit details of PSW register is given below., PSW.7, , PSW.6, , PSW.5, , PSW.4, , PSW.3, , PSW.2, , CY, , AC, , F0, , RS1, , RS0, , OV, , PSW.1, , PSW.0, P, , The table given below explains the meaning and use of each bit., Bit, , Name, , Description, , CY, , Carry flag, , Sets when a carry occurs on the addition of two 8-bit numbers or when a borrow, occurs on the subtraction of two 8-bit numbers., , AC, , Auxiliary carry flag, , Sets when a carry generated out of bit 3 (bit index starts from 0) on addition, , F0, , Flag 0, , General purpose user programmable flag (PSW.5), , OV, , Over flow, , Sets when overflow occurs. OV is set if there is a carry-out of bit 6 but not out of, bit 7, or a carry-out of bit 7 but not bit 6; otherwise OV is cleared. When adding, signed integers, OV indicates a negative number produced as the sum of two, positive operands, or a positive sum from two negative operands., , P, , Parity flag, , Set or cleared by hardware each instruction cycle to indicate an odd or even, number of 1s in the accumulator. ‘P’ is set to 1 if the number of 1s in the accumulator content is odd else reset to 0., , PSW.1, , General flag, , User programmable general purpose bit, , Register bank selector, , The bit status and bank selected is given in the following table, , RS0, RS1, , The following table illustrates the possible combinations for the register bank select bits, the corresponding, register bank number and the address for the scratchpad registers R0-R7 in the specified register bank., RS1, , RS0, , Register Bank, , Register Address, , 0, , 0, , 0, , 00H-07H, , 0, , 1, , 1, , 08H-0FH, , 1, , 0, , 2, , 10H-17H, , 1, , 1, , 3, , 18H-1FH, , The power-on reset value for the bits RS1 and RS2 are 0 and the default register bank for scratchpad, registers R0 to R7 is 0 and the address range for R0 to R7 is 00H to 07H. A programmer can change the
Page 129 :
105, , Designing Embedded Systems with 8bit Microcontrollers—8051, , register bank by changing the values of RS1 and RS0. The following piece of assembly code illustrates the, selection of bank 2 for the scratchpad registers R0 to R7., CLR RS0, SETB RS1, , ; Clear bit RS1, ; Set bit RS1. Bank 2 is selected, , Data Pointer (DPTR) (DPL: SFR-82H, DPH: SFR-83H) It is a combination of two 8-bit register namely, DPL (Lower 8-bit holder of DPTR) and DPH (Higher order 8-bit holder of DPTR). DPTR holds the 16-bit, address of the external memory to be read or written in external data memory operations. DPH and DPL can, be used as two independent 8-bit general purpose registers for application programming., Program Counter (PC) It is a 16-bit register holding the address of the code memory to be fetched. It is an, integral part of the CPU and it is hidden from the programmer (It is not accessible to the programmer)., Stack Pointer (SP) (SFR-81H) It is an 8-bit register holding the current address of stack memory. Stack, memory stores the program counter address, other memory and register values during a sub routine/function, call. On power on reset the stack pointer register value is set as 07H. The stack pointer address and bank 0,, address of R7 is same when the controller is at reset, so care should be taken for selecting SP address. It is the, responsibility of the programmer to assign sufficient stack memory by entering the starting address of stack, into the Stack Pointer register. Care should be taken to avoid the overflow of stacks and merging of stack, memory with data memory. This will result in un-predicted program flow. The stack grows up in memory., 5.3.3.2 Scratchpad Registers (R0 to R7), The scratchpad registers R0 to R7 is located in the lower 32 bytes of internal RAM. It can be on one of the, four banks, which is selected by the register selector bits RS0 and RS1 of the PSW register. On power on, reset, by default, RS0 and RS1 are 0 and the default bank selected is bank 0. There are eight scratchpad, registers and they are named as R0, R1…R7. The register names and their memory address corresponding to, bank 0 are given below., R7, , R6, , R5, , R4, , R3, , R2, , R1, , R0, , 07H, , 06H, , 05H, , 04H, , 03H, , 02H, , 01H, , 00H, , As the bank number changes the register address also offsets by the memory address bank number, multiplied by 8. Though you can select between the register banks 0 and 3, there will be only one active, register bank at a time and it depends on the RS0 and RS1 bits of Program Status Word (PSW). Registers R0, to R7 are used as general purpose working registers. R0 and R1 also handle the role of index addressing or, indirect addressing register (@R0 and @R1 instructions). R0 and R1 can also be used for external memory, access in place of DPTR, if the memory address is 8-bit wide ((MOVX A, @R0) – will be discussed later)., , 5.3.4, , Oscillator Unit, , The program execution is dependent on the clock and the oscillator unit is responsible for generating the, clock signals. All 8051 family microcontrollers contain an on-chip oscillator. This contains all necessary, oscillator driving circuits. The only external component required is a ceramic crystal resonator. The 8051, on chip oscillator circuit provides external interface option through two pins of the microcontroller, namely,, XTAL1 and XTAL2., If you are using a ceramic resonator, you can connect it across the XTAL1 and XTAL2 pins of the, chip with two external capacitors. Capacitors with values 15pF, 22pF, 33pF, etc. are used with the crystal
Page 130 :
106, , Introduc on to Embedded Systems, , resonator. This is the cheapest solution since the total cost for a ceramic resonator and two capacitors is, always less than a standalone oscillator module., If an external stand alone oscillator unit is used, the, 8051, output signal of the oscillator unit should be connected, (CMOS Type), to the pin XTAL1 of the chip and the pin XTAL2, 18 XTAL1, should be left unconnected for a CMOS* type, 19 XTAL2, microcontroller (80C51). For an NMOS† type, microcontroller, the oscillator output signal should be, connected to the Pin XTAL2 and the pin XTAL1 22 pF, 22 pF, 20 VSS, should be grounded (Fig. 5.8)., Crystal, You may be thinking why an oscillator circuit is, resonator, required? The answer is–The microcontroller chip, is made up of digital combinational and sequential, circuits and they require a clock to drive the digital Fig. 5.8 Circuit configuration for using on-chip oscillator, circuitry. The clock is supplied by this oscillator circuit and the operational speed of the chip is dependent, on the clock speed., , 5.3.4.1 Execu on Speed, The execution speed of the processor is directly proportional to the oscillator clock frequency. Increasing the, clock speed will have direct impact on the speed of program execution. But the internal processor core design, will always have certain limitations on the maximum clock frequency on which it can be operated. During, program execution the instructions stored in the code memory is fetched, decoded and corresponding action, is initiated. Each instruction fetching consists of the number of machine cycles. The instruction set of 8051, contains single cycle to four machine cycle instructions., Each machine cycle is made up of a sequence of states called T states. The original 8051 processor’s, machine cycle consists of 6 T states and is named S1, S2, S3…S6. Each T states in turn consist of two, oscillator periods (Clock cycles) and so one machine cycle contains 12 clock cycles. For a one machine cycle, instruction to execute, it takes 12 clock cycles. If the system clock frequency is 12MHz, it takes 1microsecond, (1µs) time to execute one machine cycle. The machine cycle, T state and clock cycle relationship is illustrated, in the following Fig. 5.9., , Machine cycle (M1), T state, S1, , S2, , S3, , S4, , S5, , S6, , Clock cycles, P1, , P2, , P1, , P2, , P1, , P2, , P1, , P2, , P1, , P2, , P1, , P2, , S1P1, , S1P2, , S2P1, , S2P2, , S3P1, , S3P2, , S4P1, , S4 P2, , S5P1, , S5P2, , S6P1, , S6P2, , Fig. 5.9, *, , Machine Cycles, T state & clock periods, , CMOS—Complementary Metal Oxide Semiconductor field effect transistor technology for digital circuit design. CMOS features less, power consumption and high logic density on an integrated circuit., †, NMOS—n-type Metal Oxide Semiconductor field effect transistor technology for digital circuit design. It is an old technology and, possesses the drawback of noise susceptibility and slow logic transition. In modern designs it is supplanted by CMOS technology.
Page 131 :
107, , Designing Embedded Systems with 8bit Microcontrollers—8051, , 5.3.5, , Port, , Port is a group of Input/Output (I/O) lines. Each port has its own port control unit, port driver and buffers., The original version of 8051 supports 32 I/O lines grouped into 4 I/O ports, consisting of 8 I/O lines per port., The ports are named as Port 0, Port 1, Port 2 and Port 3. One output driver and one input buffer is associated, with each I/O line. All four ports are bi-directional and an 8bit latch (Special Function Register) is associated, with each port., , 5.3.5.1 Port 0, PORT 0 is a bi-directional port, which is used as a multiplexed address/data bus in external data memory/, program memory operations. Port 0 pin organisation is illustrated in Fig. 5.10., Internal bus, Address/, data, Control, , Read latch, , Read pin, , Q, , D, Write to, latch, , Vcc, , P0.x Latch, , P0.x pin, (x = 0,1, ….7), , CL, Multiplexer, , Fig. 5.10, , Port 0 pin organisation, , Each pin of Port 0 possesses a bit latch which is part of the Special Function Register (SFR) for Port 0, P0., The latch is a D flip flop and it clocks in a logic value (either logic 1 or logic 0) from the internal bus when, a write to the corresponding latch signal is issued by the internal control unit. Apart from the write to latch, operation you can read the contents of the corresponding Port 0 Pin latch by activating a Read Latch signal., The Read Latch signal is asserted on executing an instruction with a read from the corresponding ‘port latch’, instruction (e.g. ANL P0, A reads the P0 latch, logical AND it with accumulator and loads the latch with the, result. Similarly, the instruction MOV P0.0,C reads the Port 0 byte (8 bits of the P0 latch) and modify bit 0, and write the new byte back to the P0 latch. In summary all ‘Read-Modify-Write’ instructions generate Read, Latch control signal)., The Read Pin control signal enables reading the status of a port pin. The Read Latch and Read Pin, operations act on two different ways. Read Latch reads the content of corresponding port’s SFR/SFR bit latch, whereas Read Pin reads the present state of the corresponding port pin., Port 0 is designed in a way to operate in different modes. It acts as an I/O port in normal mode of operation, and as a multiplexed address data bus in external data memory/program memory operations. If the program, memory is external to the chip, Port 0 emits the program counter low byte in external program memory, operation for specific time duration and then acts as an input port to fetch the instruction from the address, specified by the program counter. In external data memory operations P0 emits the lower order byte of the, DPTR Register (DPL)., If you look back to the Port 0 pin organisation, you can see that during external memory related operations, the multiplexer disconnects the port 0 bit output line from its corresponding bit latch and directly connect it, to the ADDRESS/DATA line and the output driver circuitry is driven according to the ADDRESS/DATA, line and the control.
Page 132 :
108, , Introduc on to Embedded Systems, , The output drivers of Port 0 are formed by two FETs, out of which the top FET functions as the internal port, pull-up. The pull-up FET driver for Port 0 is active only when the address line is emitting 1s during external, memory operations. The pull-up FET will be off on all other conditions and the Port 0 pins which are used as, output pins will become open drain (Open Collector for TTL logic). On writing a 1 to the corresponding port, bit SFR latch, the bottom FET is turned off and the pin floats and it enters in a high impedance state., In order to make any Port 0 pin an input pin, a logic 1 should be written to the corresponding Port 0 SFR, latch bit and an external pull-up resistor (in the range of Kilo ohms, typically 4.7K) should be connected, across the corresponding Port 0 pin and power supply VCC, which will act as a bypass to the internal pull-up, FET., If Port 0 is used for external memory or device interfacing, it should be equipped with external pull-up, resistors to provide noise immunity to Port 0 data lines., When configured as O/p port by writing 1s to the Port 0 SFR, all Port 0 pins floats and it is said to be in a, high impedance state. Port 0 is a true bi-directional port., Port 0 SFR (P0) (SFR-80H), for each Port 0 pins., , Port 0 SFR is a bit addressable Special Function Register that acts as the bit latch, , BIT 7, , BIT 6, , BIT 5, , BIT 4, , BIT 3, , BIT 2, , BIT 1, , BIT 0, , P0.7, , P0.6, , P0.5, , P0.4, , P0.3, , P0.2, , P0.1, , P0.0, , During external memory operations P0 SFR gets 1s written into it. The reset value of Port 0 SFR is FFH, (All latch bits set to 1), , 5.3.5.2 Port 1, PORT 1 is a bi-directional port which is used as a general purpose I/O port. The Port 1 pin organisation is, given in Fig. 5.11., Internal bus, Vcc, Read latch, Q, , D, Write to, latch, , Internal, pull-up, , Read pin, , P1.x latch, P1.x pin, (x = 0,1, ….7), , CL, , Fig. 5.11, , Port 1 pin organisation, , As seen in the pin organisation, Port 1 pin contains an internal pull-up resistor. In order to make the Port 1, pins as input line, the corresponding SFR latch bit for Port 1 should be kept as 1. Writing a 1 into any of the, P1 SFR bit latch turns off the output driver FET and produces logic high at the corresponding port pin. The, internal pull up for Port 1 is fixed and weak. When Port 1 pins are configured as inputs (by writing a 1 to the, corresponding Port 1 SFR bit latch) the pins are pulled high and they can source current when an externally, connected device pulls the port pin to low, signaling a logic 0 at the corresponding input line and places logic, 0 to the internal bus in response to a Read Pin command. If the externally connected device forces logic high,, the Read Pin control signal generated by a Read Pin related command (e.g. MOV A,P1, MOV C,P1.0, etc.), places logic high into the internal bus.
Page 133 :
109, , Designing Embedded Systems with 8bit Microcontrollers—8051, , Since Port 1 holds fixed internal pull ups and are capable of sourcing current, it is known as Quasi Bidirectional., Port 1 SFR (P1) (SFR- 90H) It is also a bit addressable Special Function Register that acts as the bit latch for, each pin of Port 1. The bit details of Port1 SFR is given below., BIT 7, , BIT 6, , BIT 5, , BIT 4, , BIT 3, , BIT 2, , BIT 1, , BIT 0, , P1.7, , P1.6, , P1.5, , P1.4, , P1.3, , P1.2, , P1.1, , P1.0, , The reset value of Port 1 SFR is FFH (All bit latches set to 1)., , 5.3.5.3 Port 2, Port 2 is designed to operate in two different modes. It acts as general purpose I/O port in normal operational, mode and acts as higher order address bus in external data memory/program memory operations. Figure 5.12, illustrates the Port 2 pin organisation., Internal bus, , Vcc, Control, Address, , Read latch, D, Write to, latch, , Read pin, Internal, pull-up, , Q, P2.x latch, , P2.x Pin, (x = 0,1, ….7), , CL, Multiplexer, , Fig. 5.12, , Port 2 pin organisation, , Port 2 emits the higher order byte of external memory address if the address is 16 bits wide. As seen in, the figure, during 16-bit wide external memory operations the base drive for the O/p driver FET is internally, switched to the address line. If the address line is emitting a 1, the O/p driver FET is turned off and the logic, 1 is reflected on the O/p pin. If the address line is emitting a 0, the O/p driver FET is turned on and the logic, 0 is reflected at the corresponding pin., The content of Port 2 SFR remains unchanged during external memory access and it holds the previous, content as such. It is to be noted that if Port 2 is in external memory operation it cannot be used as general, purpose I/O line. When not used for external memory access, Port 2 can be used as general purpose I/O port., During normal operation mode, the internal multiplexer switches the base line (GATE) of O/p FET to the D, latch O/p of corresponding SFR bit latch. In normal operation mode when a 1 is written into any of the P2 bit, latch, the O/p driver FET is turned off and as in the case of Port 1 this line acts as an I/p line. P2 is a Quasi, bi-directional port., Port 2 SFR (P2) (SFR- A0H) It is a bit addressable Special Function Register that acts as the bit latch for each, pins of Port 2. The reset value of Port 2 SFR is FFH (All bit latches set to 1)., BIT 7, , BIT 6, , BIT 5, , BIT 4, , BIT 3, , BIT 2, , BIT 1, , BIT 0, , P2.7, , P2.6, , P2.5, , P2.4, , P2.3, , P2.2, , P2.1, , P2.0
Page 134 :
110, , Introduc on to Embedded Systems, , 5.3.5.4 Port 3, Port 3 is a general purpose I/O port which is also configurable for implementing alternative functions. Port 3, Pin configuration is shown in Fig. 5.13., Internal bus, Vcc, , Read latch, D, Write to, latch, , Q, , Internal, pull-up, , Alternate O/p, function, , P3.x latch, , P3.x Pin, (x = 0,1, ….7), , CL, , Read pin, , Alternate I/p function, , Fig. 5.13, , Port 3 pin organisation, , Port 3 is identical to Port 1 in operation. All the settings that need to be done for configuring Port 1 as I/O, port is applicable to Port 3 also. The only difference is that the SFR latch for Port 3 is P3. Port 3 supports, alternate I/O functions. The alternate I/O functions supported by Port 3 and the pins used for these alternate, functions are tabulated below., Port Pin, , Alternate I/O Function, , P3.0, , RXD (Receive Pin – Serial Input Port Pin) – Input line, , P3.1, , TXD (Transmit Pin – Serial O/p Pin) – Output line, , P3.2, , INT0\ (External Interrupt 0 line) – Input line, , P3.3, , INT1\ (External Interrupt 1 line) – Input line, , P3.4, , T0 (Counter 0 External Input line) – Input line, , P3.5, , T1 (Counter 1 External Input line) – Input line, , P3.6, , WR\ (Write signal for External data memory access) – O/p line, , P3.7, , RD\ (Read signal for External data memory access) – O/p line, , It is obvious from the table that all 8 pins of Port 3 are having some alternate I/O function associated with, them. From the Port 3 pin configuration it is clear that the alternate I/O functions will come into action only, if the corresponding SFR bit latch is set to logic 1. Otherwise the port pin remains at logic 0., Port 3 SFR (P3) (SFR-B0H) It is a bit addressable Special Function Register that acts as the bit latch for each, pin of Port 3. Reset value of Port 3 SFR is FFH (All bit latches set to 1)., BIT 7, , BIT 6, , BIT 5, , BIT 4, , BIT 3, , BIT 2, , BIT 1, , BIT 0, , P3.7, , P3.6, , P3.5, , P3.4, , P3.3, , P3.2, , P3.1, , P3.0
Page 135 :
Designing Embedded Systems with 8bit Microcontrollers—8051, , 111, , 5.3.5.5 ‘Read Port Latch’ and ‘Read Port Pin’ Opera ons, As we discussed earlier, the ‘Port Read’ operations fall into two categories namely, Read Latch and Read Pin., The Read Latch operation reads the content of the corresponding port latch. The port architecture for all 4, ports contains necessary circuit for reading the Port Latch for all port pins. The read Port Latch operation is, triggered by the control signal Read Latch. The Read Latch control signal is generated internally on executing, an instruction implementing the Read Latch operation. The Read-Modify-Write instructions which reads the, port, modifies it and re-writes it to the port, operates on the port latch instead of port pins. The following, Read-Modify-Write instructions operate on port latch when the destination operand is a Port or a Port bit., ANL Px, <source> (x= 0,1,2,3. e.g. ANL P0, A), ORL Px, <source> (x= 0,1,2,3. e.g. ORL P1, A), XRL Px, <source> (x= 0,1,2,3. e.g. XRL P2, A), JBC Px.y, LABEL (x= 0,1,2,3. y = 0 to 7 e.g. JBC P3.0, REPEAT), CPL Px.y (x= 0,1,2,3. y = 0 to 7 e.g. CPL P0.2), INC Px (x= 0,1,2,3. e.g. INC P0), DEC Px (x= 0,1,2,3. e.g. DEC P1), DJNZ Px, LABEL Px (x= 0,1,2,3. e.g. DJNZ P0, REPEAT), MOV Px.y, C (x= 0,1,2,3. y = 0 to 7 e.g. MOV P3.7, C), CLR Px.y (x= 0,1,2,3. y = 0 to 7 e.g. CLR P1.0), SETB Px.y (x= 0,1,2,3. y = 0 to 7 e.g. SETB P3.6), The instructions MOV Px.y, C, CLR Px.y and SETB Px.y, read the Port x byte (8 bits of the Px latch) and, modify bit y and write the new byte back to the Px latch., The following assembly code snippet illustrates the Read Latch operation., MOV P0, #0FH, MOV A, #0FH, ANL P0, A, , ;, ;, ;, ;, , Configure P0.0 to P0.3 pins as input pins, Load Accumulator with 0FH, Read P0 latch, logical AND with Accumulatorcontent and load P0 latch with the result, , Executing the instruction MOV P0, #0FH loads the Port 0 latch with 0FH (The latches for port pins P0.0, to P0.3 are set). Now Port pins P0.0 to P0.3 acts as input pins. Executing the instruction MOV A, #0FH loads, the accumulator with 0FH. The ANL P0, A instruction reads the P0 latch and logical AND it with accumulator, and rewrites the P0 latch with the ANDed result. The status of port pins configured as input port has no effect, on the instruction ANL P0, A. Suppose P0.0 pin (Not P0.0 latch bit) is at logic 0 and pins P0.1 to P0.3 are, at logic 1 at the time of executing the instruction ANL P0, A, still Port 0 latch is loaded with 0FH and not, 0EH., The Read Pin operation reads the status of a port pin when the corresponding port pin is configured as, input pin (When the corresponding port latch bit is loaded with logic 1). The port architecture for all 4 ports, contains necessary circuit for reading the Port Pin for all ports. The read Port Pin operation is triggered by, the control signal Read Pin. The Read Pin control signal is generated internally on executing an instruction, implementing the Read Pin operation. MOV A, Px, MOV C, Px.y are examples for Read Pin instructions. The, following code snippet illustrates the ‘Read Pin’ operation., MOV P0, #0FH, MOV A, P0, , ; Configure P0.0 to P0.3 pins as input pins, ; Load Accumulator with P0 Port pin status, , Executing the instruction MOV P0, #0FH loads the Port 0 latch with 0FH (The latches for port pins P0.0, to P0.3 are set). Now Port pins P0.0 to P0.3 act as input pins. Executing the instruction MOV A, P0 loads, accumulator with the Pin status of pins P0.0 P0.3. Suppose P0.0 pin is at logic 0 and pins P0.1 to P0.3 are at, logic 1 at the time of executing the instruction MOV A, P0, the accumulator is loaded with 0EH.
Page 136 :
112, , Introduc on to Embedded Systems, , 5.3.5.6 Source and Sink Currents for 8051 Ports, Source Current The term source current refers to how much current the 8051 port pin can supply to drive, an externally connected device. The device can be an LED, a buzzer or a TTL logic device. For TTL family, of 8051 devices the source current is defined in terms of TTL logic. TTL logic has two logic levels namely, logic 1 (High) and logic 0 (Low). The typical voltage levels for logic Low and High is given in the following, table., Input signal level, , Logic Level, , Output signal level, , Vcc, , Min, , Max, , Min, , Max, , Low, , 0V, , 0.8V, , 0V, , 0.5V, , 5V, , High, , 2V, , 5V, , 2.7V, , 5V, , 5V, , The logic levels are defined for a TTL gate acting as input and output. For logic 0 the input voltage level is, defined as any voltage below 0.8V and the current is 1.6mA sinking current to ground through a TTL input., According to the 8051 design reference, the maximum current that a port pin (For an LS TTL logic based, 8051 devices) can source is 60 mA., Sink Current It refers to the maximum current that the 8051 port pin can absorb through a device which is, connected to an external supply. The device can be an LED, a buzzer or a TTL logic device (For TTL logic, based 8051 devices). Pins of Ports P1, P2 and P3 can sink a maximum current of 1.6 mA. Port 0 pins can, sink currents up to 3.2 mA. Under steady state the maximum sink current is limited by the criteria: Maximum, Sink Current per port pin = 10 mA, Maximum Sink current per 8-bit port for port 0 = 26 mA, Maximum Sink, Current per 8-bit port for port 1, 2, & 3 = 15 mA, Maximum total Sink current for all output pin = 71 mA (As, per the AT89C51 Datasheet). Figure 5.14 illustrates the circuits for source, sink and ideal port interfacing for, 8051 port pins., , P1.0, , Vcc, LED, , LED, , VSS, , P1.0, VSS, , VSS, (a), , 8051, , LED, , P1.0, , Fig. 5.14, , Vcc, , 8051, , Resistor, , 8051, , (b), , (c), , (a) Current Sourcing, (b) Current Sinking (c) Ideal Port pin interface for 8051, , Figure 5.14(a) illustrates the current sourcing for port pins. Since 8051 port pins are only capable, of sourcing less than 1 mA current, the brightness of LED will be very poor. Figure 5.14(b) illustrates, the current sinking for port pins. In this configuration, the forward voltage of LED while conducting is, approximately 2V and the supply voltage 5V (Vcc) is distributed across the LED and the internal TTL, circuitry. The extra 3V has to be dropped across the internal TTL circuitry and this will lead to high power, dissipation, which in turn will result in the damage of the LED or the port pin. This type of design is not, recommended in embedded design. Instead the current through the LED is limited by connecting the LED, to the power supply through a resistor as shown in Fig. 5.14(c). In this configuration, the port pin should
Page 137 :
Designing Embedded Systems with 8bit Microcontrollers—8051, , 113, , be at Logic 0 for the LED to conduct. For a 2.2V LED, the drop across Resistor is calculated as Supply, voltage – (LED Forward Voltage + TTL Low Voltage) = 5 – (2.2 + 0.8) = 2.0V. The Resistance value is, calculated as 2V / (Required LED Current). Refer LED data sheet for LED current. If the resistance value, is not properly selected, it may lead to the flow of high current through the LED and may damage the LED., , Example 1, Design an 8051 microcontroller based system for displaying the binary numbers from 0 to 255 using 8 LEDs, as per the specifications given below:, 1. Use Atmel’s AT89C51/52 or AT89S8252 (Flash microcontroller with In System Programming (ISP), support) for designing the system., 2. Use a 12MHz crystal resonator for generating the necessary clock signal for the controller., 3. Use on-chip program memory for storing the program instructions., 4. The 8 LEDs are connected to the port pins P2.0 to P2.7 of the microcontroller and are arranged in a, single row with the LED connected to P2.0 at the rightmost position (LSB) and the LED connected to, P2.7 at the leftmost position (MSB)., 5. The LEDs are connected to the port pins through pull-up resistors of 470 ohms and will conduct only, when the corresponding port pin is at logic 0., 6. Each LED represents the corresponding binary bit of a byte and it reflects the logic levels of the bit, through turning ON and OFF the LED (The LED is turned on when the bit is at logic 1 and off when the, LED is at logic 0)., 7. The counting starts from 0 (All LEDs at turned OFF state) and increments by one. The counter is, incremented at the rate of 5 seconds., 8. When the counter is at 255 (0FFH, all LEDs are in the turn ON state), the next increment resets the, counter to 00H and the counting process is repeated., The design of this system has two parts. The first part is the design of the microcontroller based hardware, circuit. The hardware circuit part can be wired on a breadboard for simplifying the development. The, controller for this can be chosen as either AT89C51/52 or AT89S8252. Both of these controllers are from the, 8051 family and are pin compatible. Both of them contain built in program memory. The only difference is, that for programming the AT89C51/52 device an EEPROM/FLASH programmer device is required whereas, AT89S8252 doesn’t require a special programmer. It can be programmed through the In System Programming, (ISP) utility running on the firmware development PC and through the parallel port of the PC. The In System, Programming technique for AT89S8252 is described in OLC. For the controller to work, a regulated 5V dc, supply is required. For generating a regulated 5V dc supply, a regulator IC is used. For the current design the, regulator IC LM7805 from National semiconductor is selected. The input voltage required for this regulator, IC is in the range of 9V to 12V dc. A wall mounted dc adaptor with ratings 9V or 12V, 250mA can be used for, supplying the input power. It is better to use a 9V dc adaptor to avoid the excessive heating of the regulator, IC. Excessive heat production in the regulator IC leads to the requirement for heat sinks. The circuit details, and the components required to implement the counter is shown in Fig. 5.15., The circuit shows the minimal components and the interconnection among them to make the controller, operational. As mentioned earlier, it requires a regulated 5V dc supply for powering the controller. The 12, MHZ crystal resonator in combination with the external 22 picofarad (pF) capacitors drives the on-chip, oscillator unit and generates the required clock signal for the controller. The RC circuit connected to the, RST pin of the controller provides Power-On reset for the controller. The capacitor and resistor values are, selected in such a way that the reset pulse is active (high) for at least 2 machine cycle duration. The diode
Page 138 :
114, , Introduc on to Embedded Systems, , in the reset circuitry is used as freewheeling diode and it is not mandatory. The 0.1 Microfarad (0.1 MFD), capacitor connected to the power supply line filters the spurious (noise) signals from the power supply line., For proper driving, the LEDs should be connected to the respective port pins through pull-up resistors. The, LM7805, , LM78O5, , DC, 7V to, 12 V, , 12MHz, Crystal, , 3, , 0.1MFD, , GND, 2, , 0.1MFD, , VCC, 5V DC, , OUT, , 1, , +, 220MFD/, –, 25V, , IN, , 1N4007, +, , 1 2 3, , –, AT89C51/, AT89S8252 LED 5V, , VCC 40, 470E, , Binary Counter, , 9 RST, 1N4148/, 1N4007, , 470E, , 470E, , 470E, , 470E, , 470E, , 470E, , 0.1MFD, 470E, , AT89C51, , 470E, , 1 P1.0, +, 10 MFD, –, , EA\ 31, , D7, , D6, , D5, , D4, , D3, , D2, , D1, , D0, , 8.2K, , 19 XTAL1, 18 XTAL2, , 20 GND, , 22pF, 12 MHz, , 22pF, , Fig. 5.15, , P2.7 28, P2.6 27, P2.5 26, P2.4 25, P2.3 24, P2.2 23, P2.1 22, P2.0 21, , Binary number display circuit using 8051 and LEDs, , pull-up resistor values are determined by the forward voltage of LEDs and the current rating of the LEDs., The current design uses 470 ohms as the pull up resistor. If you are not sure about the forward voltage and, current ratings of the LED, it is better to start with a high value (say 8.2K) for the resistor and replace it with, successive low value resistors (4.2 K, 2.7K, 1 K, 870 E, 470 E etc.) till you feel that the brightness of the, LED while it is conducting is reasonably good. The controller contains on-chip program memory and it can, be used for storing the firmware. In order to use the on-chip program memory, the EA\ pin should be tied to, VCC. Pulling the EA\ pin to VCC through a high value resistor ensures that the pin draws very minimal amount, of current., The second part is the design and development of program code (firmware) for implementing the binary, counter and displaying the counter content using the LEDs interfaced to Port 2. The firmware requirement, can be modelled in the form of a flow chart as given in Fig. 5.16.
Page 139 :
Designing Embedded Systems with 8bit Microcontrollers—8051, , 115, , Start, , 1. Initialise Port 2, 2. Initialise stack pointer, 3. Disable all interrupts (Optional), 4. Initialise counter to zero, , Wait for 5 seconds, , 1. Increment the counter, 2. Display the counter content on LED, , Fig. 5.16, , Flow chart for Binary Number Display using LEDs, , Once the firmware requirements are modelled using the flow chart, the next step is implementing it in, either processor specific assembly code or high level language. For the time being let us implement the, requirements in 8051 specific assembly language. The firmware for implementing the binary counter in 8051, assembly language is given below., ;####################################################################, ;Binary_Counter.src, ;Source code for implementing a binary counter and displaying the, ;count through the LEDs connected to P2.0 to P2.7 port pins, ;The LED is turned on when the port line is at logic 0, ;The counter value should be complemented to display the count, ;using the LEDs connected at Port 2. Written by Shibu K V, ;Copyright (C) 2008, ;####################################################################, ORG 0000H, ; Reset vector, JMP 0050H, ; Jump to code mem location 0050H, ORG 0003H, ; External Interrupt 0 ISR location, RETI, ; Simply return. Do nothing, ORG 000BH, ; Timer 0 Interrupt ISR location, RETI, ; Simply return. Do nothing, ORG 0013H, ; External Interrupt 1 ISR location, RETI, ; Simply return. Do nothing, ORG 001BH, ; Timer 1 Interrupt ISR location, RETI, ; Simply return. Do nothing, ORG 0023H, ; Serial Interrupt ISR location, RETI, ; Simply return. Do nothing, ORG 0050H, ; Start of Program Execution
Page 140 :
116, , Introduc on to Embedded Systems, , MOV P2, #0FFH ; Turn off all LEDs, CLR EA, ; Disable All interrupts, MOV SP, #08H, ; Set stack at memory location 08H, MOV R7,#00H, ; Set counter Register R7 to zero., REPEAT: CALL DELAY, ; Wait for 5 seconds, INC R7, ; Increment binary counter, MOV A, R7, ;, CPL A; The LED’s are turned on when corresponding bit is 0, MOV P2, A ; Display the count on LEDs connected at Port 2, JMP REPEAT, ; Repeat counting, ;####################################################################, ;Routine for generating 5 seconds delay, ;Delay generation is dependent on clock frequency, ;This routine assumes a clock frequency of 12.00MHZ, ;LOOP1 generates 248 x 2 Machine cycles (496microseconds) delay, ;LOOP2 generates 200 x (496+2+1) Machine cycles (99800microseconds), ;delay. LOOP3 generate 50 x (99800+2+1) Machine cycles, ;(4990150microseconds) delay. The routine generates a;precise delay of 4.99 seconds, ;####################################################################, DELAY:, MOV R2, #50, LOOP1:, MOV R1, #200, LOOP2:, MOV R0, #248, LOOP3:, DJNZ R0, LOOP3, DJNZ R1, LOOP2, DJNZ R2, LOOP1, RET, END ; END of Assembly Program, , Once the assembly code is written and checked for syntax errors, it is converted into a controller, specific machine code (hex file) using an assembler program. The conversion can be done using a freely/, commercially available assembler program for 8051 or an IDE based tool (like Keil microvison 3). The final, stage is embedding the hex code in the program memory of the controller. If the controller used is AT89C51,, the program can be embedded using a FLASH programmer device. For controllers supporting In System, Programming (ISP), like AT89S8252, the hex file can be directly loaded into the program memory of the, controller using an ISP application running on the development PC., , Example 2, Design an 8051 microcontroller based control system for controlling a 5V, 2-phase 6-wire stepper motor. The, system should satisfy the following:, 1. Use Atmel’s AT89C51/52 or AT89S8252 (Flash microcontroller with In System Programming (ISP), support) for designing the system.
Page 141 :
117, , Designing Embedded Systems with 8bit Microcontrollers—8051, , 2. Use a 12 MHz crystal resonator for generating the necessary clock signal for the controller., 3. Use on-chip program memory for storing the program instructions., 4. The wires of the stepper motor are marked corresponding to the coils (A, B, C & D) and Ground (2, wires), 5. Use the octal peripheral driver IC ULN2803 from National semiconductors for driving the stepper, motor., 6. Step the motor in ‘Full step’ mode with a delay of 1 sec between the steps., 7. Connect the coil drives to Port 1 in the order Coil A to P1.0, Coil B to P1.1, Coil C to P1.2, and Coil D, to P1.3., Refer to the description on stepper motors given in Chapter 2 to get an understanding of unipolar stepper, motors and the coil energising sequence for ‘Full step’ mode., Figure 5.17 illustrates the interfacing of stepper motor through the driver circuit connected to Port 1 of, 8051., , LM78O5, , OUT, , 1, , 3, , 2, , 0.1MFD, , Vcc, , 0.1MFD, , GND, , 5V DC, , DC, 7V to, 12V, , +, 220MFD/, 25V -, , IN, , 1N4007, +, , -, , Vcc 40, 1MFD, , 0.1MFD, , AT89C51, , +, –, , 8.2K, , +, 10 MFD, –, , 10 COM, 18 OUT1, 17 OUT2, 16 OUT3, 15 OUT4, , 9 RST, 1N4148/, 1N4007, , EA\ 31, 8.2K, , 18 XTAL2, , 20 GND, 12 MHz, , 22pF, , M, C, , 19 XTAL1, , 22pF, , A, , 4, P1.3, 3, P1.2, 2, P1.1, 1, P1.0, , B, , D, , 4 IN4 ULN2803, 3 IN3, 2 IN2, 1 IN1, , 9 GND, , Fig. 5.17 Stepper Motor Interfacing circuit for 8051, The flow chart given in Fig. 5.18 models the firmware requirements for interfacing the stepper motor.
Page 142 :
118, , Introduc on to Embedded Systems, , Start, , 1. Initialise Port P1 to 00H to disable, current flow through all coils, 2. Initialise stack pointer, 3. Load accumulator with the pulse, sequence for first rotation, , Output accumulator content to Port P1, Rotate Accumulator to Right, , Wait for 1 second, , Fig. 5.18, , Flow chart for Implementing Stepper Motor Interfacing, , From the pulse sequence for running the stepper motor in ‘Full step’ it is clear that the pulse sequence, for next step is obtained by right shifting the current pulse sequence. The initial pulse sequence required is, H, H, L, L at coils A, B, C & D respectively (Please refer to the stepper motor section in Chapter 2). In our, case we have only 4 bits to shift and our controller is an 8bit controller. Performing a right shift operation of, the accumulator moves the LS bit of accumulator to the MS bit position (Bit position 7 in 0–7 numbering)., We want the LS bit to be available at 3rd bit position after each rotation. This can be achieved by some bit, manipulation operation. We can also achieve it by loading the MS nibble of accumulator with the same, initial sequence HHLL. In this example we are not using Port P1 for any other operation. Hence the values of, port pins P1.4 to P1.7 are irrelevant in our case. But in real life scenario it may not be the case always. The, firmware implementation for this is given below:, ;####################################################################, ;Stepper_motor.src. Firmware for Interfacing stepper motor, ;The stator coils A, B, C and Dare controlled through Port pins P1.0,, ;P1.1, P1.2 and P1.3 respectively., ;Accumulator is used for generating the pulse sequence for ‘Fullstep’, ;The initial pulse sequence is represented by 0CH, ;Written & Compiled for A51 Assembler. Written by Shibu K V, ;Copyright (C) 2008, ;####################################################################, ORG 0000H, ; Reset vector, JMP 0100H, ; Jump to code mem location 0100H to start; execution, ORG 0003H, ; External Interrupt 0 ISR location, RETI, ; Simply return. Do nothing, ORG 000BH, ; Timer 0 Interrupt ISR location
Page 144 :
120, , Introduc on to Embedded Systems, , Here we are allocating the address space 8000H to FFFFH to 8255. Hence the 8255 is activated when, the 15th bit of address line becomes 1. Here we have to use a single NOT gate to invert the A15 line before, applying it to the Chip Select (CS\) line of 8255. In this configuration 8255 requires only four address space, namely 8000H for Port A, 8001H for Port B, 8002H for Port C and 8003H for the Control Register. Rest, of the address space 8004H to FFFFH is left unused. Here we have the luxury of using the entire address, range since we don’t have any other devices to connect. In real life applications it may not be the case. We, may have multiple devices sharing the entire address space 0000H to FFFFH and we need to select each, device in their own address space. In such scenarios the address lines A2 to A15 needs to be decoded using, a combination of logic gates (NAND, AND, NOT, OR, NOR) and decoders. Figure 5.19 illustrates the, interfacing of 8255 with 8051., , LM7805, , OUT, , 3, , DC, 7V to, 12 V, , 0.1MFD, , GND, 2, , 0.1MFD, , VCC, 5V DC, , 1, , +, 220MFD/, 25V –, , IN, , 1N4007, +, , –, , +, –, , AT89C51, EA\ 31, P1.0 1, RD\, WR\, , 9 RST, 1N4148/, 1N4007, , 1MFD, +, –, , 10 MFD, , 0.1MFD, 8.2K, , VCC 40, , 35 RST 26 Vcc, 5 RD\, 36 WR\, D0 Pin 34, , 8.2K, D7 Pin 27, , 19 XTAL1, 18 XTAL2, , 20 GND, , 22pF, 12 MHz, , 22pF, , P2.7, , P0.7, P0.6, P0.5, P0.4, P0.3, P0.2, P0.1, P0.0, ALE, , D7 Pin 18, 17, 14, 13 74LS373, 8, 7, 4, 5, D0 Pin 3, 2, LE Pin 3, 10 20, , OE\, , Fig. 5.19, , 1 LSB, , A1 Pin 8, A0 Pin 9, , 6 CS\, 7 GND, , GND, , 5 E2\ 4 E1\ 8 GND, 3 MSB, E3, 3 to 8 Decoder 16 Vcc, 2, 74LS138, A15, , 82C55A, , Vcc, , 14 Y1, , Interfacing 8255 PPI with 8051, , The Octal latch 74LS373 latches the lower order address bus (A0-A7) which is multiplexed with the data, bus (D0-D7). A 3 to 8 decoder chip, 74LS138, decodes the address bus to generate the Chip Select (CS\), signal for 8255. Here we have only one address line (A15) to decode. The rest of the 2 input lines to the, decoder (Pins 2 & 3) are grounded. Our intention is to assert the CS\ signal of 8255 when A15 line is 1. The, I/p condition corresponds to this is 001. The decoded output for this is Output 1 (Y1). You can replace the
Page 145 :
121, , Designing Embedded Systems with 8bit Microcontrollers—8051, , decoder with a NOT Logic IC. The reset line of 8255 is controlled through port pin P1.0. The Reset of 8255, is active high and when 8051 is initialised, the port pin P1.0 automatically generates a reset high signal for, 8255., The flow chart given in Fig. 5.20 models the firmware requirements for interfacing 8255 with 8051, controller., Start, , 1. Reset P1.0 to hold the RESET line of 8255 inactive, 2. Initialise Stack Pointer, 3. Load Accumulator with the control word for configuring, 8255 Ports, 4. Load DPTR with the address of 8255 control register (8003H), 5. Write the control word to 8255 Control Register, , End, , Fig. 5.20, , Flow chart for Interfacing 8255 with 8051, , The control word for configuring all the 8255 ports as output ports in mode 0 is shown below. Please refer, to the section on Programmable Peripheral Interface (PPI) given in Chapter 2 for more details on 8255’s, control register., D7, , D6, , D5, , D4, , D3, , D2, , D1, , D0, , 1, , 0, , 0, , 0, , 0, , 0, , 0, , 0, , The firmware implementation for this is explained below., ;####################################################################, ;8255.src. Firmware for Interfacing 8255A PPI, ;8255 is memory mapped at 8000H to FFFFH. The address assignment for, ;various port and control register are: Port A : 8000H,, ;Port B : 8001H, Port C : 8002H, Control Register : 8003H, ;Reset of 8255 is controlled through P1.0 of 8051, ;Written & Compiled for A51 Assembler. Written by Shibu K V, ;Copyright (C) 2008, ;####################################################################, ORG 0000H, ; Reset vector, JMP MAIN, ; Jump to the address location pointed by, ; the Label ‘MAIN’ to start execution, ORG 0003H, ; External Interrupt 0 ISR location, RETI, ; Simply return. Do nothing, ORG 000BH, ; Timer 0 Interrupt ISR location, RETI, ; Simply return. Do nothing, ORG 0013H, ; External Interrupt 1 ISR location, RETI, ; Simply return. Do nothing, ORG 001BH, ; Timer 1 Interrupt ISR location
Page 146 :
122, , Introduc on to Embedded Systems, , RETI, ; Simply return. Do nothing, ORG 0023H, ; Serial Interrupt ISR location, RETI, ; Simply return. Do nothing, ;####################################################################, ; Start of main Program, MAIN:, CLR P1.0, ; De-activate 8255 Reset line, MOV SP, #08H ; Set stack at memory location 08H, MOV A, #80H, ; Load the initial Control Word, MOV DPTR,#8003H ; Load DPTR with the address of Control, ;Register, MOVX @DPTR, A ; Output the Control word to Control Register, JMP $, ; Simply Loop here, END, ;END of Assembly Program, , 5.3.6, , Interrupts, , Before going to the details of 8051 interrupt system, let us have a look at interrupts in general and how, interrupts work in microprocessor/controller systems., , 5.3.6.1 What is Interrupt?, As the name indicates, interrupt is something that produces some kind of interruption. In microprocessor and, microcontroller systems, an interrupt is defined as a signal that initiates changes in normal program execution, flow. The signal that generates changes in normal program execution flow may come from an external device, connected to the microprocessor/controller, requesting the system that it needs immediate attention or the, interrupt signal may come from some of the internal units of the processor/controller such as timer overflow, indication signal. The first type of interrupt signals are referred as external interrupts., , 5.3.6.2 Why Interrupts?, From a programmer point of view interrupt is a boon. Interrupts are very useful in situations where you, need to read or write some data from or to an externally connected device. Without interrupts, the normal, procedure adopted is polling the device to get the status. You can write your program in two ways to poll the, device. In the first method your program polls the device continuously till the device is ready to send data, to the controller or ready to accept data from the controller. This technique achieves the desired objective, effectively by sacrificing the processor time for that single task. Also there is a chance for the program hang, up and the total system to crash in certain situations where the external device fails or stops functioning., Another approach for implementing the polling technique is to schedule the polling operation on a time slice, basis and allocate the total time on a shared basis to rest of the tasks also. This leads to much more effective, utilisation of the processor time. The biggest drawback of this approach is that there is a chance for missing, some information coming from the device if the total tasks are high in number. Your device polling will get, another chance to poll the device only after the other tasks are done at least once., Here comes the role of interrupts. If the external device supports interrupt, you can connect the interrupt, pin of the device to the interrupt line of the controller. Enable the corresponding interrupt in firmware., Write the code to handle the interrupt request service in a separate function and put the other tasks in the, main program code. Here the main program is executed normally and when the external device asserts an, interrupt, the main program is interrupted and the processor switches the program execution to the interrupt, request service. On finishing the execution of the interrupt request service, the program flow is automatically, diverted back to the main stream and the main program resumes its execution exactly from the point where, it got interrupted.
Page 147 :
123, , Designing Embedded Systems with 8bit Microcontrollers—8051, , 5.3.6.3 Use of Interrupts, In any interrupt based systems, interrupts are mainly used for accomplishing the following tasks:, 1. I/O data transfer between peripheral devices and processor/controller, 2. Timing applications, 3. Handling emergency situations (e.g. switch off the system when the battery status falls below the, critical limit in battery operated systems), 4. Context switching/Multitasking/Real-Time application programming, 5. Event driven programming, , 5.3.7, , The 8051 Interrupt System, , I hope by now you got reasonably good information on interrupts and interrupt handling. Now let us move, on to the interrupt system of 8051 microcontroller. The basic 8051 and its ROMless counterpart 8031AH, supports five interrupt sources; namely two external interrupts, two timer interrupts and the serial interrupt., The serial interrupt is an ORed combination of the two serial interrupts; Receive Interrupt (RI) and Transmit, Interrupt (TI)., , 5.3.7.1 Enabling Interrupts, The interrupt system of 8051 can be enabled or disabled totally under software control. This is achieved, by setting or clearing the global interrupt enable bit of the Special Function Register Interrupt Enable (IE)., Also, each interrupt can be enabled or disabled individually by setting or clearing the corresponding interrupt, enable bit in the SFR Interrupt Enable., Interrupt Enable (IE) (SFR- A8H) The bit details of the Interrupt Enable Register is given below:, IE.7, , IE.6, , IE.5, , IE.4, , IE.3, , IE.2, , IE.1, , IE.0, , EA, , RSD, , RSD, , ES, , ET1, , EX1, , ET0, , EX0, , The table given below explains the meaning and use of each bit., Bit, , Name, , Description, , EA, , Enable All, , EA = 0 disable all interrupts. EA = 1 enable all interrupts, which are individually, enabled by setting their corresponding enable bit in Interrupt Enable SFR., , RSD, , Reserved, , Unimplemented. Reserved for future use, , ES, , Enable Serial, , ES = 1 enables Serial Interrupt. ES = 0 disables it, , ET1, , Enable Timer 1, , ET1 = 1 enable Timer1 Interrupt. ET1 = 0 disables it, , EX1, , Enable External 1, , EX1 = 1 enable External Interrupt 1. EX1 = 0 disables it, , ET0, , Enable Timer 0, , ET0=1 enable Timer0 Interrupt. ET0=0 disables it, , EX0, , Enable External 0, , EX0=1 enable External Interrupt 0. EX0 = 0 disables it, , The following code snippet illustrates the enabling of Timer 0 interrupt and disabling of all other, interrupts., ORL IE, #10O00010B, ANL IE, #11100010B, , ;, ;, ;, ;, , Set bits EA & ET0. Preserve other, bits as such, Reset bits ES, ET1, EX1 and EX0., Preserve other bits as such
Page 148 :
124, , Introduc on to Embedded Systems, , The instruction ORL IE, #10000010B sets the global interrupt enabler bit EA(IE.7) and the Timer 0, Interrupt enabler bit ET0 (IE.1). The status of all other bits in the IE register is preserved. The instruction ANL, IE, #11100010B preserves the status of the global interrupt enabler bit EA(IE.7), the RSD (IE.6 & IE.5) bits, and the Timer 0 Interrupt enabler bit ET0 (IE.1) and resets the Serial interrupt enabler bit ES(IE.4), Timer 1, Interrupt enabler bit ET1 (IE.3), External Interrupt 1 enabler bit EX1 (IE.2) and External Interrupt 0 enabler, bit EX0 (IE.0). This ensures that the reserved bits RSD (IE.6 & IE.5) are left untouched. The same can also, be achieved by individually setting or clearing the corresponding bits of IE register using SETB and CLR, instructions. This requires more number of instructions to achieve the result., Note: Though the corresponding interrupt bits are ‘set’ in the IE register, the Interrupts will not be enabled, and serviced if the global interrupt enabler, EA bit of the Interrupt Enable Register (IE) is 0., , 5.3.7.2 Se ng Interrupt Priori es, In a Real World application, interrupts can occur at any time (asynchronous behaviour) and different interrupts, may occur simultaneously. This may confuse the processor on deciding which interrupt is to be serviced first., This arbitration problem is resolved by setting interrupt priorities. Interrupt priority is configured under, software control. The Special Function Register Interrupt Priority (IP) Register is the one holding the interrupt, priority settings for each interrupt., Interrupt Priority Register (IP) (SFR-B8H), the table below., , The bit details of the Interrupt Priority Register is explained in, , IP.7, , IP.6, , IP.5, , IP.4, , IP.3, , IP.2, , IP.1, , IP.0, , RSD, , RSD, , RSD, , PS, , PT1, , PX1, , PT0, , PX0, , The table given below explains the meaning and use of each bit in the IP register., Bit, , Name, , Description, , RSD, , Reserved, , Unimplemented. Reserved for future use, , PS, , Serial interrupt priority, , PS = 1 sets priority to Serial Interrupt, , PT1, , Timer 1 interrupt priority, , PT1 = 1 sets priority to Timer1 Interrupt, , PX1, , External 1 interrupt priority, , PX1 = 1 sets priority to External Interrupt 1, , PT0, , Timer 0 interrupt priority, , PT0 = 1 sets priority to Timer 0 interrupt, , PX0, , External 0 interrupt priority, , EX0 = 1 sets priority to External interrupt 0, , The interrupt control system of 8051 contains latches to hold the status of each interrupt. The status of, each interrupt flags are latched and updated during S5P2 of every machine cycle (Refer to machine cycles for, information on S5P2). The latched samples are polled during the following machine cycle. If the flag for an, enabled interrupt is found to be set in S5P2 of the previous cycle, the interrupt system transfers the program, flow to the corresponding interrupt’s service routine in the code memory (Provided none of the conditions, described in section “Different conditions blocking an interrupt” blocks the vectoring of the interrupt). The, Interrupt Service Routine address for each interrupt in the code memory is listed below., Interrupt number, , Interrupt source, , ISR Location in code memory, , 0, , External interrupt 0, , 0003H, , 1, , Timer 0 interrupt, , 000BH, , 2, , External interrupt 1, , 0013H
Page 149 :
125, , Designing Embedded Systems with 8bit Microcontrollers—8051, , 3, , Timer 1 interrupt, , 001BH, , 4, , Serial interrupt, , 0023H, , It is to be noted that each Interrupt Service Routine (ISR) is allocated 8 bytes of code memory in the code, memory space., From the IP Register architecture it is obvious that each interrupt can be individually programmed to one, of two priority levels by setting or clearing the corresponding priority bit in the Interrupt Priority Register., Some general info on 8051 interrupts is given below:, 1. If two interrupt requests of different priority levels are received simultaneously, the request of higher, priority interrupt is serviced., 2. If interrupt requests of the same priority level are received simultaneously, the order in which the, interrupt flags are polled internally is served first. First polled first served. (Also known as internal, polling sequence.), 3. A low-priority interrupt can always be interrupted by a high priority interrupt., 4. A low-priority interrupt in progress can never be interrupted by another low priority interrupt., 5. A high priority interrupt in progress cannot be interrupted by a low priority interrupt or an interrupt of, equal priority., , 5.3.7.3 Different condi ons blocking an Interrupt, It is not necessary that an interrupt should be serviced immediately on request. The following situations can, block an interrupt request or delay the servicing of an interrupt request in 8051 architecture., 1. All interrupts are globally disabled by clearing the Enable All (EA) bit of Interrupt Enable register., 2. The interrupt is individually disabled by clearing its corresponding enable bit in the Interrupt Enable, Register (IE)., 3. An interrupt of higher priority or equal priority is already in progress., 4. The current polling machine cycle is not the final cycle in the execution of the instruction in progress, (To ensure that the instruction in progress will be completed before vectoring to the interrupt service, routine. In this state the LCALL generation to the ISR location is postponed till the completion of the, current instruction)., 5. The instruction in execution is RETI or a write to the IE/IP Register. (Ensures the interrupt related, instructions will not make any conflicts)., In the first three conditions the interrupt is not serviced at all whereas conditions 4 and 5 services the, interrupt request with a delay., , 5.3.7.4 Returning from an Interrupt Service Rou ne, An Interrupt Service Routine should end with an RETI instruction as the last executable instruction for the, corresponding ISR. Executing the RETI instruction informs the interrupt system that the service routine for, the corresponding interrupt is finished and it clears the corresponding priority-X (X=1 High priority) interrupt, in progress flag by clearing the corresponding flip flop. This enables the system to accept any interrupts with, low priority or equal priority of the interrupt which was just serviced. Remember an interrupt of higher, priority can always interrupt a lower priority even if the corresponding priority’s interrupt in progress flag is, set. Executing the RETI instruction POPs (retrieves) the Program Counter (PC) content from stack and the, program flow is brought back to the point where the interruption occurred., In operation, RETI is similar to RET where RETI indicates return from an Interrupt Service Routine, and RET indicates return from a normal routine. RETI clears the interrupt in progress flag as well as POPs, (retrieves) the content of the Program Counter register to bring the program flow back to the point where
Page 150 :
126, , Introduc on to Embedded Systems, , it got interrupted. RET instruction only POPs the content of the Program Counter register and brings the, program flow back to the point where the interruption occurred., Will a non serviced Interrupt be serviced later? This is a genuine doubt raised by beginners in the 8051, based system design. The answer is ‘No’. Each interrupt polling sequence is a new one and it happens at, S5P2 of each machine cycle. If an interrupt is not serviced in a machine cycle for the reason that it occurred, simultaneously with another high priority interrupt, will be lost. There is no mechanism in place for holding, the non serviced interrupts in queue and marking them as pending interrupts and servicing them later., , 5.3.7.5 Priority Levels for 8051 Interrupts, By default the 8051 architecture supports two levels of priority which is already explained in the previous, sections. The first priority level is determined by the settings of the Interrupt Priority (IP) register. The second, level is determined by the internal hardware polling sequence. The internal polling sequence based priority, determination comes into action if two or more interrupt requests of equal priority occurs simultaneously., The internal polling based priority within the same level of priority is listed below in the descending order, of priority., Interrupt, External interrupt 0, , Priority, HIGHEST, , Timer 0 overflow interrupt, External interrupt 1, Timer 1 overflow interrupt, Serial interrupt, , LOWEST, , 5.3.7.6 What Happens when an Interrupt Occurs?, On identifying the interrupt request number, the following actions are generated by the processor:, 1. Complete the execution of instruction in progress., 2. The Program Counter (PC) content which is the address of the next instruction in code memory which, will be executed in normal program flow is pushed automatically to the stack. Program Counter Low, byte (PCL) is pushed first and Program Counter High (PCH) byte is pushed next., 3. Clear the corresponding interrupt flags if the interrupt is a timer or external interrupt (only for transition, activated (edge triggered) configuration)., 4. Set interrupt in progress flip flop., 5. Generate a long call (LCALL) to the corresponding Interrupt Service Routine address in the code, memory (Known as vectoring of interrupt)., , 5.3.7.7 Interrupt Latency, In the 8051 architecture, the interrupt flags are sampled and latched at S5P2 of each machine cycle. The, latched samples are polled during S5P2 of the following machine cycle to find out their state. If the polling, process identifies a priority interrupt flag’s flip flop as set, an LCALL to its ISR location is generated (If and, only if none of the conditions listed under the topic “Different conditions blocking an interrupt” blocks it)., Interrupt latency is the time elapsed between the assertion of the interrupt and the start of the ISR for the, same., Interrupt latency is highly significant in real-time applications and is very crucial in time-critical applications., Interrupt latency can happen due to various reasons. For external interrupts there is no synchronisation with, the system (asynchronous in behaviour) and so it can occur at any point of time. But the processor latches
Page 151 :
127, , Designing Embedded Systems with 8bit Microcontrollers—8051, , Start of, ISR, , Interrupt, asserted, , each interrupt flag only at S5P2 of each machine cycle. So there is no point even if the interrupt occurs at, S1P1 of the machine cycle. It is latched only at S5P2 of the current machine cycle and the latched interrupts, flags are polled at S5P2 of the following machine cycle and an LCALL is generated to the corresponding, ISR, if no other conditions block the call. So this delay itself contributes a significant part in interrupt latency., Even if the ISR is entered some delay can be happened by the number of register contents to be stored (PUSH, instructions) and other actions to be taken before executing the ISR task. The interrupt latency part which, contributes the delay in servicing the ISR is the sum of the following time delays., , Interrupt latency time = tISR – tIA, tIA, , tISR, , Time, , Fig. 5.21 Interrupt Latency, Time between the interrupt assertion to the start of state S5 of current machine cycle (polling cycle), + (Time for S5 & S6) + Remaining machine cycles for the current instruction in execution (The current, execution should not be RETI or instructions accessing registers IE or IP, if so there will be an additional, delay of the execution time for the next instruction) + LCALL generation time. The LCALL generation time, is 12 T States (2 Machine cycles)., If the current machine cycle (the polling cycle) is the last cycle of the current instruction in execution and, the current instruction in execution is other than RETI or instruction accessing IE or IP register, the interrupt, vectoring happens at the shortest possible time and it is given as, Time between the interrupt asserted to start of state S5 of current machine cycle (polling cycle), + (S5+S6 T state + 12 clock), = Time between the Interrupt Asserted to the start of state S5 + (((1+1+12) × 2)/fosc) seconds., (1 T state = 2 clock cycles and 1 clock cycle = 1/fosc), The minimum time required to identify an interrupt by the system is one machine cycle, i.e. if an interrupt, occurs at S5 of a machine cycle, it is latched and it is identified as an interrupt at state S5 of next machine, cycle (Polling cycle). Hence the minimum time from interrupt assertion to S5 of the polling machine cycle, is 1 machine cycle (12 clock periods). The maximum time required to identify an interrupt by the system is, approximately 2 machine cycles. Assume the interrupt is asserted at state S6 of a machine cycle, it is latched, at S5 of next machine cycle and the latched value is polled at S5 of next machine cycle. Hence the minimum, time between the ‘Interrupt Asserted’ to state S5 of the current machine cycle (polling cycle) is 6 T States, (1 machine cycle). That means State S6 of previous machine cycle to state S5 of current machine cycle., Hence the minimum acknowledgement time will be 20 T States (Since 1 machine cycle = 6 T states. The, approximate response delay will be 3 machine cycles)., 3 machine cycles is the minimum response delay for acknowledging an interrupt in a single interrupt, system. There may have additional wait times which come as an addition to the minimum response delay,, depending on some other conditions. If you look back to the section “Different conditions blocking an, Interrupt” you can see that if the current machine cycle when the interrupt asserted (The machine cycle at, which the interrupt is latched) is the last machine cycle of the current instruction in progress, the interrupt
Page 152 :
128, , Introduc on to Embedded Systems, , vectoring will happen only after completing the next instruction. If the instruction in progress is not in its final, machine cycle, the maximum additional waiting (waiting time excluding the LCALL generation time) time, required to vector the Interrupt cannot be more than 3 machine cycles since the longest instructions MUL, AB and DIV AB are 4 cycle instructions. If the instruction in progress is a RETI instruction or any access, to IP or IE register then also the vectoring of the interrupt service routine will be delayed till the execution, of next instruction. If the next instruction following the RETI or IP/IE register related instruction is MUL, AB or DIV AB, the additional wait time will be 5 machine cycles (RETI and IP/IE related instructions are 2, machine cycle instructions)., In brief, the response time for interrupt in 8051 system is always more than 3 machine cycles and less than, 9 machine cycles., , 5.3.7.8 Configuring External Interrupts, 8051 supports two external interrupts, namely, External interrupt 0 and External interrupt 1. These are, hardware interrupts. Two port pins of Port 3 serve the purpose of external interrupt input line. External, interrupts are usually used for connecting peripheral devices. The external interrupt assertion can be either, level triggered or edge triggered depending on the external device connected to the interrupt line. From, the 8051 side it is configurable and the configuration is done at the SFR Timer/Counter Control Register, (TCON). Bits TCON.0 and TCON.2 of TCON register configures the same for External Interrupt 0 and 1, respectively. TCON.0 is also known as Interrupt 0 type control bit (IT0). Setting this bit to 1 configures the, external interrupt 0 as falling edge triggered. Clearing the bit configures the external interrupt 0 as low level, triggered. Similarly, TCON.2 is known as Interrupt 1 type control bit (IT1). Setting this bit to 1 configures, the external interrupt 1 as falling edge triggered. Clearing this bit configures the external interrupt 1 as low, level triggered., For external interrupts, the interrupt line should be asserted by the externally connected device to a, minimum time period of the interval between two consecutive latching, i.e. S6P1 of previous machine cycle, to S5P2 of current machine cycle (1 Machine cycle). Otherwise it may not be identified by the processor, (Only interrupts which are found asserted during the latching time (S5P2) will be identified)., , 5.3.7.9 Single Stepping Program with the Help of External Interrupts, Single stepping is the process of executing the program instruction by instruction. This can be achieved, with the help of the external interrupt 0 or 1 and a small firmware modification. This works on the basic, principle that an interrupt request will not be acknowledged if an interrupt of equal priority is in progress, and if the instruction in progress when the interrupt is asserted is a RETI instruction, the vectoring will, happen only after executing an instruction from the main, program, which is interrupted by the interrupt. If the external, Vcc, 8051, interrupt is in the asserted state, the interrupt vectoring happens, 40 VCC, after executing one instruction from the main program. This, Resistor, execution switching between the main program and ISR can be, 8.2K, achieved by a simple ISR firmware modification. Connecting, a push button switch to the external interrupt line 0 through a, 12 INT0\, resistor is the only hardware change needed for a single step, Push button, operation (Fig. 5.22). Configure INT0 as level triggered in, firmware. Activating the push button asserts the INT0 interrupt, 20 GND, and the processor starts executing the ISR for interrupt 0. At, the end, the ISR waits for a 1 to 0 transition at the INT0 line, that asserts the external interrupt 0 again. The next instruction, Fig. 5.22 Hardware setup for single stepping, that is going to be executed on asserting the INT0 is RETI and, program with external interrupt
Page 153 :
Designing Embedded Systems with 8bit Microcontrollers—8051, , 129, , according to the general interrupt vectoring principle the processor will go back to the point in the main code, where it got interrupted and after completing one instruction it will again come back to the INT0 ISR. This, process is repeated., Single stepping can also be done with external interrupt 1. Make external interrupt 1 as level triggered, and connect the hardware set up to pin P3.3 (external interrupt 1 line) and modify the ISR for external, interrupt 1 as explained for external interrupt 0 ISR. It will work fine. Single stepping is a very useful method, in debugging the application. It gives an insight into the various effects produced by the execution of an, instruction, like registers and memory locations modified as a result of the execution of an instruction., , Example 1, Design an 8051 microcontroller based data acquisition system for interfacing the Analog to Digital Converter, ADC, ADC0801 from National semiconductors. The system should satisfy the following:, 1. Use Atmel’s AT89C51/52 or AT89S8252 (Flash microcontroller with In System Programming (ISP), support) for designing the system. Use a 12MHZ crystal resonator for generating the necessary clock, signal for the controller. Use on-chip program memory for storing the program instructions., 2. The data lines of the ADC is interfaced to Port 2 of the microcontroller. The control signals (RD\, WR\,, CS\) to the ADC is supplied through Port 3 pins of microcontroller., 3. The Analog voltage range for conversion is from 0V to 5. The varying analog input voltage is generated, from the 5V supply voltage (Vcc) using a variable resistor (Potentiometer). The ADC asserts its interrupt, line to interrupt the microcontroller when the AD conversion is over and data is available at the ADC, data port., 4. The microcontroller reads the data on receiving the interrupt and stores it in the memory. The successive, data conversion is initiated after reading the converted data for a sample. Only the most recent 16, samples are stored in the microcontroller memory., This example is a good starting point for a discussion on data converters and their use in embedded, applications. The processing/controlling unit (The core of the embedded system) of every embedded system, is made up of digital systems and they work only on digital data. The processor/controller is capable of, dealing with binary (digital) data only. As mentioned in the beginning, embedded systems are in constant, interaction with the real world through sensors and actuators. In most of the situations, the signals which are, handled by embedded systems fall into the category ‘analog’. Analog signals are continuous in nature. Most, of the embedded systems used in control and instrumentation applications include the monitoring or control, of at least one analog signal. The thermocouple-based temperature sensing system used in industrial control, is a typical example for this. The thermocouple generates millivoltage (mV) in response to the changes in, temperature. This voltage signals are filtered and signal conditioned and then applied to the monitoring, system for monitoring and control purpose. Digital systems are not capable of handling analog signals as, such for processing. The analog input signal from sensors needs to be digitised (quantised) before inputting, to the digital systems. In a similar fashion, the output from digital systems are digital (discrete) in nature, and they cannot be applied directly to analog systems which require continuous signals for their operation., The problem of handling the analog and digital data in embedded systems is handled by data converters., Data converters fall into two categories, namely; Analog to Digital Converters (ADC) and Digital to Analog, Converters (DAC). Analog to Digital Converter (ADC) converts analog signals to corresponding digital, representation, whereas Digital to Analog Converter (DAC) converts digital signals to the corresponding, analog representation., ADCs are used at the input stage of the processor/controller and DACs are used at the output stage of the, processor/controller. ADCs and DACs are available in the form of Integrated Circuits (ICs) from different
Page 154 :
130, , Introduc on to Embedded Systems, , manufacturers. These chips are used for interfacing the processor/controller with sensors/actuators which, produces/requires analog signals., Analog to digital conversion can be accomplished through different conversion techniques. Successive, approximation and integrator are the two commonly adopted analog to digital conversion techniques. In, the successive approximation technique, the input analog signal is compared against a reference voltage. The, reference voltage is adjusted till it matches the input analog voltage. The integrator technique changes the, input voltage to time and compares the new parameters with known values. Discussing each technique in, detail is out of the scope of this book (The current scope is limited to how data converters are used in embedded, system designs) and readers are advised to refer books dedicated on digital systems/data acquisition systems., The successive approximation technique is faster in data conversion and at the same time less accurate,, whereas, integrator technique is highly accurate but the conversion speed is slow compared to successive, approximation technique. The successive approximation ADCs are used in embedded systems like control, and instrumentation systems, which demands high conversion speed. The Integrator type ADCs are used in, systems where the accuracy of conversion required is high. A typical example is a digital multimeter., ADCs convert analog voltages in a given range to a binary data within the range supported by the ADC, register. For example, for an 8bit ADC, the voltage range 0 to 5 V is represented with binary data 00H to, FFH. The voltage range (5-0) is split across the 256 (0 to 255) steps. Hence the resolution of the ADC is, represented as 1/256, meaning the binary data is incremented by one for a rise in 1/256 V in the input voltage., The resolution offered by the ADC depends on the input voltage range and the register width of the ADC., ADC can be used for the conversion of +ve as well as –ve voltage and range of I/p with offset from 0. It is, the responsibility of the firmware developer to interpret all these conditions based on the system design. For, example, if the input voltage is in the range 1 to 5V, the ADC represents 1 as 00H and 5 as FFH. The firmware, developer should handle this appropriately., The ICADC0801ADC from National Semiconductor is an example for successive approximation ADC., The ADC0801 is designed in such a way that its tri-stated output latches can directly drive the processor/, controller data bus/port. ADC0801 appears as a memory location or I/O port to the processor/controller and, it doesn’t require any additional bus interface logic. The logic inputs and outputs of ADC0801 meets both, TTL and CMOS voltage level specifications and it can be used with processors/controllers from the CMOS/, TTL logic family without using any interface conversion logic. ADC0801 supports input voltage range from, 0 to 5V and two inputs, VIN(+) and VIN(–) for differential analog voltages. The input signal is applied to, VIN(+) and VIN(–) is grounded for converting single ended positive voltages. For single ended negative, voltage conversion, the input voltage is applied to VIN(–) and VIN(+) is grounded. ADC0801 provides an, option for adjusting the span (range) of input voltage for conversion. The span adjustment is achieved by, applying a voltage, which is half of the required span, at the VREF/2 (Pin N0. 9) of ADC0801. For example,, if the required span is 3V, apply a voltage 1.5V at pin VREF/2. This converts the input voltage range 0V to, 3V to digital data 00H to FFH. Keeping the VREF/2 pin unconnected sets the span to 5V (The input varies, from 0V to 5V). If the span is less than 5 and the range of input signal starts with an offset from 0V, the same, can be achieved by applying corresponding voltages at pins VREF/2 and VIN(–). As an example consider the, requirement where, the span is 3V and range is from 0.5V to 3.5V, a voltage of 1.5V is applied to Pin VREF/2, and 0.5V to pin VIN(–).The AD converter requires a clock signal for its operation. The minimal hardware, connection required to build the AD converter system is shown in Fig. 5.23., The AD converter contains an internal clock generator circuit. For putting the chip into operation, either, an external clock or the built in clock generator can be used. ADC0801 provides a pin, CLK IN (Pin No. 4),, for connecting external clock signal. The external clock signals can be generated using an oscillator circuit, or the clock signal available from the CLK OUT pin of the microcontroller can be applied to the CLK IN., The internal clock generator circuit of the ADC can be used for generating the necessary clock signal to the
Page 156 :
132, , Introduc on to Embedded Systems, , The frequency of the circuit is represented as fCLK = 1/1.1 RC. The frequency range for ADC0801 is in the range, 100 kHz to 800 kHz, ADC0801 requires three necessary control signals namely; RD\, WR\, CS\ for its operation. The CS\, signal is used for activating the ADC chip. For starting a conversion, the CS\ and WR\ signals should be, asserted low. The internal Successive Approximation Register (SAR) of the chip is reset and the output data, lines of the ADC enter high impedance state on asserting the WR\ signal. The data conversion begins when, the WR\ signal makes a transition from asserted state to high. The ADC asserts the line INTR\ on completion, of the conversion. This signal generates an interrupt at the processor. The converted digital data is available, on the data bus of the ADC from the moment when the INTR\ line is asserted low. The INTR\ signal is reset, when the RD\ signal is asserted low by the processor., In the current design, a potentiometer is used for varying the voltage from 0V to 5V. The data lines of the, ADC are interfaced to Port 2 of the controller. The control signals to the ADC are supplied through the pins, of Port 3. Port Pin P3.3 supplies the Chip Select (CS\) signal and Port Pin P3.0 supplies the RD\ Signal to the, ADC. The WR\ signal to ADC is supplied through Port Pin P3.1. The INTR\ signal line of ADC is interfaced, to the External Interrupt 0 (INT0\) line (Port Pin P3.2) of 8051. The flow chart given in Fig. 5.25 illustrates, the firmware design for the system., ADC main routine, start, , External interrupt 0, routine, , 1. Initialise Port 2 as I/p port, 2. Initialise stack pointer, 3. Disable all Interrupts (Optional), , 1. Select the ADC chip, 2. Clear the interrupt line of ADC, 3. De-select ADC chip, 4. Set the counter for sample counting, 5. Select the start address of storage, memory for storing the first sample, , 1. Set External 0 Interrupt as level, triggered, 2. Enable interrupts and EXT0 Interrupt, 3. Select the ADC, 4. Assert the Start of Conversion signal, , 1. Read the data from ADC, 2. Store the read data in memory location, 3. Reset the ADC interrupt, 4. Deselect the ADC chip, 5. Decrement the counter and reset the, memory location to store the next sample, to the start address of storage memory if, the counter value is zero, 6. If the decremented counter value is nonzero increment the memory location to, store the next sample, , 1. Reset the EXT0 Flag, 2. Select the ADC chip, 3. Assert Start of Conversion signal, , Wait forever, , Fig. 5.25, , Flow chart for interfacing ADC0801
Page 158 :
134, , Introduc on to Embedded Systems, , ;####################################################################, EXTERNAL_INTR0:, MOV @R1, P2, CLR P3.0, ; Assert RD\ Signal to clear INTR\ ADC Signal, ; line, NOP, NOP, SETB P3.0, SETB P3.3, ; De-select ADC, DJNZ R0, RETURN, ; The 16 samples are taken, ; overwrite the previous samples with new, MOV R1, #1FH ; 20H is the mem loc holding the start of sample, MOV R0, #16, ; Reload Sample counter with 16, RETURN: INC R1, ; Increment mem loc to hold next sample, CLR IE0, ; Clear the interrupt 0 edge detect flag, CLR P3.3, ; Select ADC, CLR P3.1, ; Trigger ADC Conversion; Reset ADC SAR, NOP, ; Hold the WR\Signal low for 2 machine cycles, NOP, SETB P3.1, ; Toggle WR\ line to initiate conversion, RET, END, ; END of Assembly Program, , 5.3.8, , Timer Units, , Timers are very essential for generating precise time reference in any system. Timers can be implemented in, either software or hardware. Hardware timers are dedicated hardware units and are highly precise in operation., The Standard 8051architecture supports two 16bit hardware timers that can be configured to operate in either, timer mode or external event counting mode. The timers are named as Timer 0 and Timer 1. If the timers are, configured in timer function mode, the corresponding timer register is incremented once in each machine, cycle. Since one machine cycle consists of six T-States (12 clock cycles), the timer increment rate is 1/12th of, the oscillator frequency (fosc/12)., If the timer unit is configured for counter mode, the timer register is incremented in response to a one to, zero transition at the corresponding external port pin for counter mode. The external input pins are sampled, during S5P2 of each machine cycle. If the sample shows a high in S5P2 of one machine cycle and a low, in any of the next sampling time, the counter register is incremented by one. The count is updated only at, S3P1 of the machine cycle following the machine cycle in which the transition is detected. It is obvious that, it takes a minimum of two machine cycles to identify a 1 to 0 transition (2 machine cycle corresponds to 24, clock periods). So the maximum count rate for external events is fosc/24, where fosc is the oscillator frequency, (Clock frequency). Timer 0 and Timer 1 can be configured as timer unit or counter unit by using timer/, counter mode select bit of the special function register Timer/counter Mode Control (TMOD). Timer 0 and, Timer 1 can be operated in four different modes. The mode selection is done by the timer mode select bits, of TMOD register.
Page 159 :
135, , Designing Embedded Systems with 8bit Microcontrollers—8051, , Timer/Counter Mode Control Register (TMOD) (SFR-89H), BIT 7, , BIT 6, , BIT 5, , BIT 4, , BIT 3, , BIT 2, , BIT 1, , BIT 0, , GATE, , C/T, , M1, , M0, , GATE, , C/T, , M1, , M0, , , Timer 1 Configuration, , Timer 0 Configuration, , The following table explains the meaning and use of each bit in the TMOD register., Bit, , Name, , GATE, , C/T, , M1, , Description, , Gating control, , If this bit is set to 1 in the corresponding timer configuration nibble of TMOD, the, corresponding timer/counter will be enabled only when the INT0 /INT1 (INT0, corresponds Timer 0 /Counter 0 & INT1 corresponds Timer 1/Counter 1) line is, high and the corresponding timer/counter’s run bit TR is enabled in the TCON, register. If GATE bit is 0, the timer/counter will run when the corresponding, timer/counter’s run bit TR is enabled in the TCON register., , Counter/Timer selector, , Counter or timer mode select bit. If this bit is set to 1 in the corresponding timer, configuration nibble of TMOD register, the corresponding timer will act as a, counter. If the bit is cleared in the corresponding timer configuration nibble of, TMOD register, the corresponding timer will function as timer unit., The Timer/Counter operation ‘mode select’ bits. It can be one among the 4, modes., , Mode select bits, , M0, , The values for bits M0 and M1 and the corresponding mode of operation for the timer/counter is explained, in the table given below., Mode Select Bits, , Description, , M1, , M0, , 0, , 0, , Mode 0. 8bit timer with divided by 32 prescaler., , 0, , 1, , Mode 1. 16bit timer., , 1, , 0, , Mode 2. Autoreload mode. Configures timer register as 8bit timer/counter with, auto reload. The lower byte of timer register only gets incremented and when a, roll over from FFH to 00H occurs, the lower byte of register is re-loaded with the, higher byte of the corresponding timer register. The higher byte always holds the, reload value. Timer x can be viewed as two 8bit registers namely (TLx) & (THx), where x = timer number (0 or 1), , 1, , 1, , Mode 3. Timer 1 in this mode simply holds its count. It is similar to disabling the, Timer 1 run control bit TR1. Timer 0 in this mode configures as two 8bit registers, TL0 and TH0. TL0 is configured by the Timer 0 configuration nibble and TH0 is, configured by the Timer 1 configuration nibble., , Timer/Counter Control Register (TCON) (SFR-88H) It is a bit addressable special function register that, holds the timer/counter interrupt flags and run control bits., BIT 7, , BIT 6, , BIT 5, , BIT 4, , BIT 3, , BIT 2, , BIT 1, , BIT 0, , TF1, , TR1, , TF0, , TR 0, , IE1, , IT1, , IE0, , IT 0
Page 160 :
136, , Introduc on to Embedded Systems, , The following table explains the meaning and use of each bit in the TCON register., Bit, , Name, , Description, , TF1, , Timer/Counter 1 overflow flag, , Set by hardware when timer/counter 1 overflows. The flag is automatically cleared when timer 1 interrupt is vectored., , TR1, , Timer/Counter 1 Run control, , TR1=1 Start timer/counter1, TR1= 0 Stops timer/counter 1, , TF0, , Timer/Counter 0 overflow flag, , Set by hardware when timer/counter 0 overflows. The flag is automatically cleared when timer 0 interrupt is vectored., , TR0, , Timer/Counter 0 Run control, , TR0 = 1 Start Timer/Counter 0, TR0 = 0 Stops Timer/Counter 0, , IE1, , External Interrupt 1 edge detect flag, , Set by hardware when external interrupt 1 edge is detected. Cleared, by hardware when interrupt is vectored, , IT1, , External Interrupt 1 type control, , IT1 = 1 Configures the external interrupt 1 to edge triggered (Falling Edge), IT1= 0 Configures the external interrupt 1 to level triggered, (Low level), , IE0, , External interrupt 0 edge detect flag, , Set by hardware when external interrupt 0 edge is detected. Cleared, by hardware when interrupt is vectored, , IT0, , External interrupt 0 type control, , IT0 = 1 Configures the external interrupt 0 to edge triggered, (Falling edge), IT0 = 0 Configures the external interrupt 0 to level triggered, (Low level), , 5.3.8.1 Timer/Counter in Mode 0, Timer/Counter-0 and Timer/Counter-1 in mode 0 acts as a 13bit timer/counter (Fig. 5.26). The 13bit register, is formed by all 8 bits of TH0 and the lower 5 bits of TL0 for Timer/Counter-0 (All 8 bits of TH1 and the, lower 5 bits of TL1 for Timer/Counter-1). The timer/counter mode selection is done by the bit C/T of the, register TMOD. Timer/Counter-0 & Timer/Counter-1 has separate selection bits as described earlier. If Timer/, Counter-0 is configured as timer and if the corresponding run control bit for Timer/Counter-0 (TR0 in Timer, Control Register (TCON)) is set, registers TL0 & TH0 functions as a 13bit register and starts incrementing, from its current value. The timer register is incremented by one on each machine cycle. When the 13bit Timer, register rolls over from all 1s to all 0s (FF1FH to 0000H), the corresponding timer overflow flag TF0, present, in TCON register is set. If the Timer 0 interrupt is in the enabled state and no other conditions block the Timer, 0 interrupt, Timer 0 interrupt is generated and is vectored to its corresponding vector address 000BH. On, vectoring the interrupt, the TF0 flag is automatically cleared. Operation of Timer 1 in mode 0 is same as that, of Timer 0 except that for Timer 1, the 13bit timer register is formed by the registers TL1 and TH1 and the, corresponding Timer run control bit is TR1. The Timer 1 overflow flag is TF1 and the corresponding interrupt, vector location for Timer 1 is 001BH. It is advised to set the GATE control bit to 0 for timer operations. If the, GATE control is set to 1, the timer register is incremented in accordance with each machine cycle only if the, corresponding Interrupt line INTRx is high (INT0 for Timer 0 and INT1 for Timer 1)., Figure 5.27 illustrates the operation of Timer/Counter in Mode 0.
Page 161 :
137, , Designing Embedded Systems with 8bit Microcontrollers—8051, , TH0/TH1, , Bit 7 Bit 6, , Bit 5, , Bit 4, , TL0/TL1, , Bit 3, , Bit 2, , Bit 1, , Bit 0, , Bit 4, , Bit 3, , Bit 2, , Bit 1, , Bit 0, , 13 bit timer register, , Fig. 5.26, Machine cycle, (fosc/12), , Timer (Counter) Register for Mode 0, , C/T = 0, , Counter input (T0/T1 Pin), Timer/Counter function select logic (C/T\), Timer run control (TR0/TR1), , Fig. 5.27, , TH0/TH1, 8 Bits, , Timer 0/Timer 1, Interrupt, , TL0/TL1, 5 Bits, Timer interrupt, flags, TF0/TF1, , Timer overflow, , C/T = 1, , 13 bit Timer Register, , Timer (Counter) 0/ Timer (Counter) 1 in Mode 0, , It is to be noted that for mode 0 operation, the lower 5 bits of TL0/TL1 (Bit 0 to Bit 4) and all 8 bits of, TH0/TH1 forms the 13bit register. When the 5 bits of TL0 rolls over from all 1s (IFH) to all 0s (00H), TH0, is incremented by one. The upper 3 bits of TL0/TL1 is indeterminate (Don’t care bits). TH0/TH1 runs in its, full 8bit mode and act as the 8bit counter whereas, only the 5 least significant bits of TL0/TL1 undergoes, changes in accordance with machine cycle and so TL0/TL1 is said to be acting as a prescaler 32 for the 8bit, counter TH0/TH1. The timer interrupt is generated when the 13bit timer register rolls over from all 1s to all, 0s, i.e. when TH0 count is FFH and TL0 count rolls from 1FH to 00H. The count range for mode 0 is 0000H, to 1FFFH., , 5.3.8.2 Timer/Counter in Mode 1, Mode 1 operation of Timer (Counter) 0/ Timer (Counter) 1 is similar to that of mode 0 except the timer, register size (Fig. 5.28). The timer register is 16bit wide in mode 1. The timer/counter mode selection is done, by the bit C/T of the register TMOD. Timer (Counter) 0 and Timer (Counter) 1 has separate selection bits, as described earlier. If Timer 0 is configured as a timer and if the corresponding run control bit for Timer, 0 (TR0 in Timer Control Unit (TCON)) is set, registers TL0 and TH0 functions as 16bit register and starts, incrementing from its current value. The timer register is incremented by one on each machine cycle. When, the timer register rolls over from all 1s to all 0s (FFFFH to 0000H), the corresponding timer overflow flag, TF0, present in TCON register is set. If Timer 0 interrupt is in the enabled state and no other conditions, block the Timer 0 interrupt, Timer 0 interrupt is generated and is vectored to its corresponding vector address, 000BH. On vectoring the interrupt, the TF0 flag is automatically cleared. Operation of Timer 1 in mode 1 is, same as that of Timer 0 except that for Timer 1 the 16bit timer register is formed by the registers TL1 and TH1, and the corresponding Timer run control bit is TR1. The Timer 1 overflow flag is TF1 and the corresponding, interrupt vector location for Timer 1 is 001BH.
Page 162 :
138, , Introduc on to Embedded Systems, , Machine cycle, (fosc/12), , C/T = 0, , Fig. 5.28, , Timer 0/Timer 1, Interrupt, , TL0/TL1, 8 Bits, Timer interrupt, flags, TF0/TF1, , Timer overflow, , C/T = 1, Counter input (T0/T1 Pin), Timer/Counter function select logic (C/T\), Timer run control (TR0/TR1), , 16bit Timer Register, TH0/TH1, 8 Bits, , Timer (Counter) 0/ Timer (Counter) 1 in Mode 1, , It is advised to set the GATE control bit to 0 for timer operations. If the GATE control is set to 1, the timer, register is incremented in accordance with each machine cycle only if the corresponding Interrupt line INTx, is high (INT0 for Timer 0 and INT1 for Timer 1)., If the counter mode is set, and the corresponding counter run control bit (TR0 for counter 0 and TR1 for, counter 1) is 1, the timer register ((TH0 & TL0) for Counter 0 and (TH1 & TL1) for Counter 1) is incremented, by one on each traceable logic transitions at the counter input pins (T0 for Counter 0 and T1 for Counter 1)., The above said actions are followed only if the gating control bit GATE is set to 0. If GATE is set to 1 the, counter (timer) register is incremented by one for each traceable logic transitions at the counter input pins, only when the corresponding Interrupt line INTx is high (INT0 for Counter 0 and INT1 for Counter 1). The, overflow process and interrupt vectoring are similar to that for the Timer0/Timer1 operation., , 5.3.8.3 Timer/Counter in Mode 2 (Auto Reload Mode), Timer (Counter) 0/ Timer (Counter) 1 in mode 2 acts as 8bit timer/counter (TL0 for Timer (Counter) 0 and, TL1 for Timer (Counter) 1) with auto reload on the timer/counter register overflow (TL0 or TL1) (Fig., 5.29). The timer/counter mode selection is done by the bit C/T of the register TMOD. Timer (Counter) 0 &, Timer (Counter) 1 has separate selection bits as described earlier. If Timer 0 is configured as timer and if the, corresponding run control bit for Timer 0 (TR0) in Timer Control Unit (TCON)) is set, register TL0 functions, as 8bit register and starts incrementing from its current value. The timer register is incremented by one on, each machine cycle. When the Timer register rolls over from all 1s to all 0s (FFH to 00H), the corresponding, timer overflow flag TF0, present in TCON register is set and TL0 is reloaded with the value from TH0. TH0, remains unchanged. If Timer 0 interrupt is in the enabled state and no other conditions block the Timer 0, interrupt, it is vectored to the corresponding vector address 000BH. On vectoring the interrupt, the TF0 flag, is automatically cleared. Operation of Timer 1 in mode 2 is same as that of Timer 0 except that for Timer 1, the 8bit timer register is formed by the register TL1 and the corresponding Timer run control bit is TR1. The, Timer 1 overflow flag is TF1 and the corresponding interrupt vector location is 001BH. It is advised to set the, GATE control bit to 0 for timer operations. If the GATE control is set to 1, the timer register is incremented, in accordance with each machine cycle only if the corresponding Interrupt line INTx is high (INT0 for Timer, 0 and INT1 for Timer 1)., If the counter mode is set, and the corresponding counter run control bit (TR0 for counter 0 and TR1 for, counter 1) is 1, the timer register (TL0 for Counter 0 and TL1 for Counter 1) is incremented by one on each, traceable logic transitions at the counter input pins (T0 for Counter 0 and T1 for Counter1). The above said, actions are followed only when the gating control bit GATE is set to 0. If GATE is set to 1, the timer register, is incremented by one for each traceable logic transitions at the counter input pins only if the corresponding, Interrupt line INTx (INT0 for Counter 0 and INT1 for Counter 1) is high. The overflow process and interrupt, vectoring are similar to that of Timer0/Timer1 operation. Timer 1 in Mode 2 is generally used for baudrate, generation in serial data transmission.
Page 163 :
139, , Machine cycle, (fosc/12), , TH0/TH1, 8 Bits, Reload Count, C/T = 0, , TL0/TL1, 8 Bits, Timer interrupt, flags, , C/T = 1, Counter input (T0/T1 Pin), Timer/Counter function select logic (C/T\), Timer run control (TR0/TR1), , Fig. 5.29, , Timer 0/Timer 1, Interrupt, , TF0/TF1, , Timer overflow Trigger auto reload, , Designing Embedded Systems with 8bit Microcontrollers—8051, , Timer (Counter) 0/ Timer (Counter) 1 in Mode 2, , 5.3.8.4 Timer/Counter in Mode 3, Timer/Counter 0 in mode 3 functions as two separate 8bit Timers/Counters (Fig. 5.30). TL0 acts as the timer/, counter register for Timer/Counter 0 and TH0 acts as the timer/counter register for Timer/Counter 1. TL0, uses the Timer 0 control bits namely TR0, GATE, C/T, INT0 and TF0. TL0 can run in either counter/timer, mode by setting or clearing the C/T bit. Counter operation is controlled by GATE, INT0 pin, T0 pin and TR0, bit as explained earlier. But the operation is similar to that of Timer 0 in mode 3. In mode 3, TH0 supports, only timer function and does not support counter function. TH0 counts only the machine cycles, not external, events., , Machine cycle, (fosc/12), , TF1, TH0, 8 Bits, , C/T = 0, , Counter input (T0/T1 Pin), Timer/Counter function select logic (C/T\), Timer 0 run control (TR0), , Fig. 5.30, , Timer 0, interrupt, , TF0, , Timer overflow, , TL0, 8 Bits, Timer 0, Interrupt Flag, , C/T = 1, , Timer overflow, , Timer 1, interrupt, , Timer 1 run control (TR1), , Timer (Counter) 0 in Mode 3, , The actual Timer 1 (TH1 TL1), when configured to run in mode 3, by using the Timer 1 configuration bits,, stops its functioning and simply holds its count., Thus mode 3 provides an extra 8bit timer. The original Timer 1 (TH1 TL1) can be turned on and off, by switching it out and into mode 3 and it can run in either mode 0, mode 1 or mode 2 apart from mode, 3 since the acting Timer 1, TH0 in mode 3 is forced to run as an 8bit timer by default, by putting Timer 0, configuration bits to mode 3 (M0, M1 of Timer 0 Control Register = 1). The only shortcoming is that since, TH0 is responsible generating Timer 1 interrupt when Timer 0 is configured in mode 3, no interrupt is, generated by the actual Timer 1 (TH1 TL1) when it runs in mode 0, 1 or 2 with Timer 0 in mode 3. But still, Timer 1 can use for applications that doesn’t require Timer interrupts like baudrate generation.
Page 164 :
140, , Introduc on to Embedded Systems, , Example 1, Implement the example 1 given under ‘Ports’ section (Binary Counter implementation) using timer interrupts., In the example given under the ‘Ports’ section, the display delay is implemented using a delay generator, loop. The delay generation can be easily implemented using a timer and the required operations following the, delay can be implemented in the timer interrupt handling routine., 8051 provides two timer units and they can be operated in four different modes. The timer units in mode, 1 acts as a 16bit timer unit which counts machine cycles from 0 (0000H) to 65535 (FFFFH) and generates, timer interrupt when rolls over from 65535 (FFFFH) to 0 (0000H). If the system clock is 12MHz, the timer, interrupt is asserted after every 65536 microseconds (0.0655 seconds), if the counter is started with an initial, count 00H. For generating a delay of 1 second, the timer interrupt should be generated multiple times. If, one timer interrupt generates 50000 microseconds, 100 such interrupts are required to generate a delay of, 5 seconds. For generating a delay of 50000 microseconds, the timer should be loaded with a count 65536 –, 50000 = 15536 (3CB0H). The following assembly code illustrates the use of timer and timer interrupts for, implementing the binary counter requirement. Timer 0 is used for this., ;####################################################################, ;binary_counter_timer.src, ;Application for implementing binary counter using Timer Interrupt, ;The LED is turned on when the port line is at logic 0, ;Written by Shibu K V. Copyright (C) 2008, ;####################################################################, ORG 0000H, ; Reset vector, JMP 0050H, ; Jump to main routine, ORG 0003H, ; External Interrupt 0 ISR location, RETI, ; Simply return. Do nothing, ORG 000BH, ; Timer 0 Interrupt ISR location, ; The ISR will not fit in 8 bytes size., ; Hence it is implemented as separate routine, JMP TIMER0_INTR ; Function implementing Timer 0 routine, ORG 0013H, ; External Interrupt 1 ISR location, RETI, ; Simply return. Do nothing, ORG 001BH, ; Timer 1 Interrupt ISR location, RETI, ; Simply return. Do nothing, ORG 0023H, ; Serial Interrupt ISR location, RETI, ; Simply return. Do nothing, ORG 0050H, ; Start of Program Execution, MOV P2, #0FFH ; Turn off all LEDs, ORL IE, #10O00010B ; Enable Timer 0 Interrupt, ANL IE, #11100010B ; Disable all interrupts Except Timer 0, MOV SP, #08H ; Set stack at memory location 08H, MOV R7,#00H, ; Set counter Register R7 to zero., CLR TR0, ;Load Timer 0 with count corresponding to 50000 microseconds, MOV TL0, #0B8H, MOV TH0, #3CH, MOV R0, #100 ; Load The multiplier for the time delay
Page 165 :
141, , Designing Embedded Systems with 8bit Microcontrollers—8051, , ; Configure Timer 0 as Timer in mode 1 (16 bit Timer), MOV TMOD, #00000001b, SETB TR0, ; Start Timer 0, JMP $, ; Loop for ever, ;####################################################################, ; Routine for handling Timer 0 Interrupt, ; Checks whether the timer runs for generating the desired delay, ; If so display increment the binary counter and display the count, ; Load Timer 0 Register and the multiplier for generating next; 5 seconds delay, ; If the delay generation is not complete (R0>0) simply return, ;####################################################################, TIMER0_INTR:, DJNZ R0, RETURN, INC R7, ; Increment binary counter, MOV A, R7, ;, CPL A; The LED’s are turned on when corresponding bit is 0, MOV P2, A ; Display the count on LEDs connected at Port 2, MOV R0, #100 ; Load the multiplier for the time delay, RETURN: MOV TH0, #3CH, MOV TL0, #0B8H, RETI, END, ;END of Assembly Program, , It should be noted that the Timer 0 ISR involves lot of activities including binary counter increment and, display and hence the delay between the successive count display may not be exactly 5 seconds. The timer, count can be adjusted to take these operations into account or the displaying of the count can be moved to the, main routine and synchronisation between main routine and ISR can be implemented through a flag. It is left, to the readers as an exercise., , 5.3.9, , Serial Port, , The standard 8051 supports a full duplex (simultaneous data transmission and reception), receive buffered, (supports the pipelining system of the reception of second byte before the previously received byte is read, from the receive buffer) standard serial interface for serial data transmission. The Special Function Register, SBUF provides a common interface to both serial reception and transmission registers. The serial reception, and transmission register exist physically as two separate registers but they are accessed by a read/write to, the SBUF register. The Serial communication module contains a Transmit control unit and a Receive control, unit. The transmit control unit is responsible for handling the serial data transmission and receive control unit, is responsible for handling all serial data reception related operations. The Serial Port can be operated in four, different modes. The mode selection is configured by setting or clearing the SM0 and SM1 bits of the Special, Function Register Serial Port Control SCON., Serial Port Control Register (SCON) (SFR-98H) SCON is a bit addressable Special Function Register holding, the Serial Port Control related bits. The details of SCON bits are given below., SCON. 7, , SCON. 6, , SCON. 5, , SCON. 4, , SCON. 3, , SCON. 2, , SCON. 1, , SCON. 0, , SM0, , SM1, , SM2, , REN, , TB8, , RB8, , TI, , RI
Page 166 :
142, , Introduc on to Embedded Systems, , The following table explains the meaning and use of each bit in the SCON register., Bit, , Name, , SM0, , Description, , Serial port mode selector, , Sets the serial port operation mode, , SM2, , Multiprocessor communication flag, , SM2 = 1 Enable Multiprocessor communication, SM2 = 0 Disable Multiprocessor communication, , REN, , Serial data reception enable, , REN = 1 Enables reception, REN = 0 Disables serial data reception, , SM1, , TB8, , 9th Data bit that will be transmitted in Modes 2 & 3. Setting/Clearing under software control, , RB8, , 9th Data bit received in Modes 2 & 3. Counterpart for, TB8. In Mode 1, if multiprocessor mode is disabled, RB8, will be the stop bit received in serial transmission. RB8 is, not used in Mode 0. RB8 is Software controllable, , TI, , Transmit interrupt, , Set by internal circuitry at the end of transmission of, the 8th bit in Mode 0. For other modes it is set at the, beginning of the stop bit (9th bit). TI should be cleared by, firmware, , Receive interrupt, , Set by internal circuitry at the end of reception of the 8th, bit in Mode 0. For other modes it is set on half way of, reception of the stop bit (9th bit). RI should be cleared by, firmware., , RI, , 5.3.9.1 Serial Communica on Modes, As mentioned earlier, 8051 supports four different modes of operation for Serial data communication. The, mode is selected by the SM0 and SM1 bits of SCON register. The table given below gives the different, combinations of SM0 and SM1 and the serial communication modes corresponding to it., SM0, , SM1, , Mode, , Type, , 0, , 0, , 0, , Shift Register, , 0, , 1, , 1, , 8 bit UART, , 1, , 0, , 2, , 9 bit UART, , 1, , 1, , 3, , 9 bit UART, , Mode 0 The Mode 0 operation of serial port is same as that of the operation of a clocked shift register., In Mode 0 operation Pin RXD (Port Pin P3.0) is used for transmitting and receiving serial data and Pin, TXD (Port Pin P3.1) outputs the shift clock. 8 data bits are transmitted in this mode with LSB first. The, baudrate‡ is fixed for this mode and it is 1/12 of the oscillator frequency. Mode 0 is half duplex, meaning, it supports only unidirectional communication at a time. It can be either transmission or reception. Serial, data transmission is initiated by a write access to the SBUF register (Any Instruction that uses SBUF as, the destination register. E.g. MOV SBUF, A; ANL SBUF, A; MOV SBUF, #data etc). The write to SBUF, loads a 1 to the MSB of the transmit shift register which acts as the stop bit in the serial transmission., ‡ Baudrate is defined as the number of bits per second.
Page 167 :
143, , Designing Embedded Systems with 8bit Microcontrollers—8051, , The contents of SBUF register is shifted out to the RXD Pin in the order LSB first. The bit shifting, occurs in each machine cycle until all bits including the stop bit is shifted out. The bit shift rate is same as, the machine cycle rate and hence the transmission rate in mode 0 is 1/12th of the oscillator frequency. The, Transmit Interrupt TI is set by the Transmit Control unit when all the 8 bits are shifted out. The TXD pin, outputs the transmit shift clock during data transmission. Serial data reception is enabled only when the, reception enable bit, REN is set 1 and the Receive Interrupt bit, RI is in the cleared state. A ‘write to SCON’, (Clear RI/Set REN) initiates the data reception. The receive control unit samples the receive pin, RXD during, each machine cycle and places the sample at the LSB of the receive shift register and left shifts the receive, shift register. The Receive Interrupt (RI) is set when all the 8 data bits are received. Pin TXD outputs the, receive shift clock throughout the reception process., , Stop Bit, , MSB, Bit 7, , LSB, Bit 0, , Start Bit, , Mode 1 In Mode 1, serial data pin TXD transmits the serial data and pin RXD receives the serial data., Mode 1 is a full duplex mode, meaning it supports simultaneous reception and transmission of serial data. 10, bits are transmitted or received in Mode 1. The 10 bits are formed by the start bit, 8 data bits and one stop bit., The stop bit on reception is moved to RB8 bit of SCON. The baudrate is variable and it can be configured for, different bauds. Similar to Mode 0, transmission is triggered by a write access to the SBUF register in Mode, 1. A ‘write to SBUF’ signal loads a 1, which acts as the stop bit, to the 9th bit position of the transmit shift, register and informs the transmit control unit that a serial data transmission is requested. Unlike Mode 0, where transmission is synchronised to ‘write to SBUF’ signal, in Mode 1, the transmission is synchronised to, a divide-by-16 counter. The divide-by-16 counter count rate is dependent on the timer 1 overflow rate. The, transmission starts with sending the start bit (logic, 0), when the divide-by-16 counter rolls over after, the ‘write to SBUF’ signal. The transmit register, contents are shifted out to the TXD pin (P3.1 Port, pin) at the successive rollover of the divide-by-16, counter. The Transmit Interrupt TI is set by the t = 0, Time, transmit control unit when all the 8 bits are shifted, Fig. 5.31 Bit Transmission with respect to time in Mode 1, out. Figure 5.31 illustrates the bit transmission, with respect to time in Mode 1., Serial data reception is triggered by a 1 to 0 transition detected at the Receive pin RXD. The RXD pin is, sampled at a rate of 16 times the baudrate. On detecting a 1 to 0 transition at the RXD pin, the divided-by-16, counter is reset and 1FFH is loaded into the receive shift register. The divide-by-16 counter divides the bit, time of a bit (1/baudrate) into 16 time frames. In order to reduce noise in input data, the RXD pin is sampled, at 7th, 8th and 9th frames of the bit time. If the value remains the same for at least two of the samples, it is, taken as the data bit. If the value obtained for the first bit time (start bit) is not 0, the receiver circuitry resets, and it will look for another 1 to 0 transition as a valid start bit condition. On receiving a valid start bit it is, placed in the receive shift register at the rightmost position after shifting the present contents of the receive, shift register to the left by one. As data bits enter into the rightmost position, the initially loaded 1s in the, receive shift register is shifted out through the left most position. As the reception goes on, when the start, bit (the first received 0 bit) reaches at the left most position of the receive shift register, the Receiver unit is, informed that only one more bit reception is required and to load the SBUF with the contents of receive shift, register after the reception of next bit, move the next receiving bit (stop bit) into RB8 and set the Receive, Interrupt RI. The signal to load SBUF and RB8 and set RI is generated only when Receive Interrupt RI = 0, and Bit SM2 in SCON is 0 or received stop bit = 1 at the time of generation of the final shift pulse. If both of, these conditions are not met, the received byte is not moved into SBUF else the received byte is moved into, SBUF, the received stop bit is placed in the RB8 bit, present in the SCON register and the Receive Interrupt
Page 168 :
144, , Introduc on to Embedded Systems, , (RI) is activated. After the reception of the stop bit, irrespective of the above-mentioned meeting criteria, the, receiver unit looks for the next 1 to 0 transition at the RXD pin for catching the next byte., , Baudrates for Mode 1 As mentioned earlier, the baudrate for Mode 1 is variable. Mode 1 baudrate is, dependent on the operating frequency and Timer 1 overflow rate. The bit transmission rate in mode 1 is, dependent on the divide-by-16 counter overflow rate. The count rate of divide-by-16 counter is dependent on, the timer 1 overflow rate. Depending on the value of the SMOD bit, the divide-by-16 counter is incremented, directly on the overflow of Timer 1 or after the two consecutive overflow of the timer 1. If SMOD is 0, the, divide-by-16 counter is incremented only after two consecutive overflow of timer 1. If SMOD is 1, the divideby-16 counter is incremented with the overflow of timer 1. The baudrate in Mode 1 expressed as:, Baudrate = ((2SMOD) × Timer 1 Overflow rate)/(16 × 2), For baudrate generation operations, Timer 1 interrupt should be disabled. It is advised to run Timer 1 in, the timer mode for baudrate generation operation. Normally Timer 1 is configured in Mode 2 (Auto reload, mode) for baudrate generation. In this case the equation will become, Baudrate = 2SMOD × fOSC/((12 × [256-TH1]) × 16 × 2), (Timer 1 in mode 2 is incremented at each machine cycle. One machine cycle contains 12 clock periods, and so the timer 1 increment rate is fOSC / 12. In Auto reload mode the timer counts from Auto reload value, to FF and then rolls over. The machine cycles counted in mode 2 for overflow is expressed as 256 – Reload, count = 256 – TH1 (TH1 holds the auto reload count). Hence, Timer 1 overflow rate can be expressed as, fOSC/(12 × [256-TH1]), where, SMOD is the Baudrate multiplier bit present in PCON SFR, fOSC is the oscillator frequency, TH1 is the Timer 1 Auto re-load value., For achieving low baudrates, Timer 1 can be configured in Mode 1 to run as 16bit timer with interrupt, enabled. In Timer 1 interrupt handler write the code to re-load Timer 1 with the count required to get the, desired baudrate., Theoretically the maximum baudrate that can be achieved with Timer 1 running in Mode 1 is given as, Max baudrate = 2SMOD × fOSC/(12 × 16 × 2), Re-load Timer 1 with FFFFH in Timer 1 interrupt handler., Minimum baudrate that can be achieved with Timer 1 running in Mode 1 is given as Min Baudrate =, 2SMOD × fOSC/(12 × 16 × 2 × 65536)., There is no need of re-loading Timer 1, The commonly used baudrates for Mode 1 of serial communication, required oscillator frequency, timer, mode and Timer 1 reload value for auto reload mode of Timer 1 are tabulated below. Timer 1 is assumed to, be run in the timer mode (Not in counter mode) for all these calculations., Baudrate, , fOSC(MHz), , SMOD, , Timer 1, Timer Mode, , Reload Value, , 9600, , 11.0592, , 0, , 2, , FDH, , 4800, , 11.0592, , 0, , 2, , FAH, , 2400, , 11.0592, , 0, , 2, , F4H, , 1200, , 11.0592, , 0, , 2, , E8H
Page 169 :
145, , Designing Embedded Systems with 8bit Microcontrollers—8051, , 137.5, , 11.0592, , 0, , 2, , 1DH, , 2400, , 11.0592, , 1, , 2, , E8H, , 4800, , 11.0592, , 1, , 2, , F4H, , 9600, , 11.0592, , 1, , 2, , FAH, , 19200, , 11.0592, , 1, , 2, , FDH, , 6.00, , 0, , 2, , 72H, , 110, , Mode 1 baudrate 9600 is the most compatible to communicate with PC’s COM port., Modes 2 & 3 11 bits are transmitted in Modes 2 & 3. The 11 bits are formed by the 8 data bits, 1 start bit (0),, 1 stop bit (1) and a programmable bit that acts as the 9th data bit. Mode 2 & 3 are also full duplex and serial, data is transmitted through the pin TXD and reception is carried out through the pin RXD. TB8 bit of SCON, register is transmitted as the 9th bit. TB8 is programmable; it can be set to either 1 or 0. TB8 bit can be used as, a parity bit for transmission. The parity bit of PSW reflects the parity of Accumulator content. If the data byte, to be sent is the Accumulator content, the parity bit of PSW can be directly moved to TB8 bit of SCON for, transmitting it as the 9th data bit, which will give the functionality of a parity enabled serial data transmission., On reception of serial data, the 9th data bit is moved to the RB8 bit of SCON register. If the serial reception, is also parity enabled, RB8 can be used for checking the parity of the received byte. The bits of the received, byte can be XORed and the resulting bit can be compared to the received 9th bit (which is present in the RB8, bit of SCON) in firmware to check whether the parity bit matches with the parity of the received byte. This, ensures error free reception of data. The received stop bit is ignored in Modes 2 & 3. Mode 2 and Mode 3 of, Serial communication is similar in all respect except that the Mode 2 and Mode 3 baudrates are different., Mode 2 baudrate is fixed and is given as 2SMOD × fOSC/64, Depending on the SMOD bit, it can be either fOSC/64 or fOSC/32, Mode 3 baudrate is same as that of Mode 1. Refer back to Mode 1 baudrate for details., , 5.3.9.2 Mul processor/Controller Communica on Support, Multiprocessor/controller communication implements communication between multiple processors/, controllers connected to the same serial interface bus. Each processor is assigned an address which is set in, the firmware., One of the processor/controller acts as the master controller and the other controllers act as slave controllers, (Fig. 5.32)., Master controller, , Slave controller 1, , RXD, TXD, GND, , Slave controller 2, , Slave controller 3, , Fig. 5.32 Multiprocessor communication setup
Page 170 :
146, , Introduc on to Embedded Systems, , Modes 2 & 3 of 8051 serial transmission supports multiprocessor communication if the SM2 bit present in, the SCON register is set for each controller. In Modes 2 & 3 operation, 9 data bits and a stop bit are received., The received 9th data bit goes to the RB8 bit of SCON register. With SM2 set, the serial port interrupt is, activated on reception of the stop bit only if the received RB8 bit is 1. When the master processor/controller, wants to transmit a block of data to any one of the slave controllers, it sends out the address byte of the slave, controller, to which it wants to communicate. The 9th data bit that will be sending along with the address byte, will be 1. If the multiprocessor mode is enabled in slaves, on receiving the address byte the receive interrupt, is activated and each slave controller can use the interrupt handler to examine whether the received address, byte is matching to its assigned address (which is stored in the firmware). If a slave finds that the received, address byte is matching with its address, it clears its SM2 bit and waits to receive the data byte block from, the master. The data bytes are sent along with a 9th data bit which is 0. If the 9th data bit is 1 it implies that, the incoming byte is an address byte and if it is 0, it informs the controller that the incoming bytes are data, bytes. Once a slave is selected, it clears its SM2 bit and generates interrupt for all incoming data bytes, while all other slaves ignore the received bytes since their SM2 bit is still in the set condition. To enable the, multiprocessor communication again in the selected slave which is presently involved in the transmission it, should be informed the end of reception of data bytes through some mechanism. On receiving the end of data, byte reception information, the slave sets the SM2 bit and brings back the slave controller into multiprocessor, communication enabled mode., Setting SM2 bit in Mode 0 will not produce any effect in transmission/reception. If SM2 is set in Mode 1, the validity of the received stop bit is checked. If SM2 = 1 and Mode = 1, receive interrupt RI is generated, only if the received stop bit is 1., , Example 1, Design an 8051 microcontroller based system for serial data communication with a PC as per the requirements, given below., 1. Use Atmel’s AT89C51/52 or AT89S8252 (Flash microcontroller with In System Programming (ISP), support) for designing the system., 2. The baudrate for communication is 9600., 3. The serial data transmission format is 1 Start bit, 8 data bits and 1 Stop bit., 4. The system echoes (sends back) the data byte received from the PC to the PC., 5. On receiving a data byte from the Serial port it is indicated through the flashing of an LED connected to, a port pin., 6. Use Maxim’s MAX232 RS-232 level shifter IC for converting the TTL serial data signal to RS-232, compatible voltage levels., 7. Use on-chip program memory for storing the program instructions., 8. Use the ‘Hyper Terminal’ application provided by Windows Operating system for sending and receiving, serial data to and from the microcontroller., The 8051 microcontroller has a built-in serial communication module which is capable of operating in, different modes with different data rates (baudrate). The only limitation is that the serial data is transmitted, and received in either TTL/CMOS logic. (The voltage levels are the one corresponding to logic 0 and logic, 1 in the respective logic family.) The serial communication supported by PC follows the RS-232 Serial, communication standard and the voltage levels are entirely different from the TTL/CMOS logic. The voltage, levels for RS-232 is +/–12 V (We will discuss about the RS-232 Protocol, voltage level and electrical, characteristics in a dedicated book, which is planned under this book series.) For translating the RS-232
Page 171 :
147, , Designing Embedded Systems with 8bit Microcontrollers—8051, , voltage levels to the TTL/CMOS compatible voltage level, an RS-232 translator chip is required between the, PC interface and the microcontroller interface. The RS-232 translator chip is available from different chip, manufacturers and the MAX232 IC from Maxim Dallas Semiconductors is a very popular level translator, IC. The Serial data is usually routed to an RS-232 connector (DB Connector). The RS-232 connector comes, in two different pin counts namely; DB9 – 9 Pin connector and DB25 – 25-Pin connector. For proper data, communication, the Transmit Pin of one device (Here either PC or microcontroller) should be connected, to the receive pin of the other device and vice versa. This can be done at the microcontroller board side by, connecting the TXDOUT pin of MAX232 to the RX (Receive) pin of DB connector and the RXDIN Pin of, MAX232 to the TX (Transmit) pin of DB9 connector. An RS-232 cable is used for connecting the PC COM, Port with DB Connector of the microcontroller board. For the above configuration, the RS-232 cable should, be 1-1 wired meaning, the RXD and TXD lines of the connectors present at both ends are 1-1 connected., If the Serial lines are not used in the cross over mode in the microcontroller board, a twisted cable (cable, with RXD pin connected to TXD pin of the other end connector and TXD pin connected to RXD pin) can, be used for establishing the proper communication. The hardware connection for implementing the serial, communication is given in Fig. 5.33., , LM78O5, , OUT, , 1, , 3, , 0.1MFD, , GND, , 220MFD/, 25V –, , 2, , 0.1MFD, , VCC, 5V DC, , DC, 7V to, 12V, , +, , IN, , 1N4007, +, , –, , VCC 40, , 1MFD, , P2.0 28, , 470E, , D1, , 1MFD 1MFD, , EA\ 31, 8.2K, , +, –, , 1 C1 + 16 Vcc 2 V +, 3 C1 –, MAX232, 4 C2 +, , +, –, , 1N4148/, 1N4007, , +, –, , 1MFD, , 9 RST, , 1MFD, , 8.2K, , 0.1MFD, , +, –, , AT89C51, , +, –, , 1 P1.0, +, 10 MFD, –, , 5 C2 –, , 19 XTAL1, 18 XTAL2, , 20 GND, , 22pF, 12 MHz, , P3.1 11, TXD, P3.0 10, RXD, , 10 TXD, IN, 12 RXD, OUT, , 22pF, , Fig. 5.33, , 7 TXD, OUT, 13 RXD, IN, , 15 GND, , Serial communication circuit implementation using 8051, , For implementing the serial data communication as 1 Start bit + 8 Data bits + 1 Stop bit with a data, rate (baudrate) of 9600, the serial port should be configured in mode 1. Timer 1 should be configured to, run in auto reload mode (Mode 2) to generate the required baudrate. With an operating clock frequency of, 11.0592 MHz, Timer 1 in mode 2 should be reloaded with a count 0FDH for generating a baudrate of 9600
Page 172 :
148, , Introduc on to Embedded Systems, , (Refer section Baudrates for Mode 1: for more details on baudrate generation for serial communication in, mode 1)., The flow chart given in Fig. 5.34 illustrates the firmware design for implementing serial data, communication., Main routine, start, , 1. Turn off LED connected at Pin P2.0, 2. Initialise stack pointer, , Configurations for generating 9600 Baud, 1. Configure Timer 1 in Mode 2, 2. Disable Timer 1 interrupt, 3. Load Timer 1 reload count (0FDH), 4. Disable serial interrupt, 5. Select Mode 1 for serial communication, , 1. Set reception enable ‘REN’, 2. Clear receive and transmit interrupt flag, 3. Start Timer 1, , Read receive interrupt (RI) flag, NO, RI = 1?, , 1. Read the received data, 2. Turn on LED to indicate data reception, 3. Reset RI Flag, 4. Transmit the received data back, , Read transmit interrupt (TI) flag, NO, , TI = 1?, , 1. Turn off LED, 2. Reset TI flag, , Fig. 5.34, , Flow chart for implementing polling based serial communication
Page 174 :
150, , Introduc on to Embedded Systems, , The firmware polls the serial interrupt flags and takes the corresponding actions when either the receive, interrupt or transmit interrupt flag is set. This approach is CPU-intensive and the CPU is dedicated for, serial data communication. Another approach in which the serial communication is handled is the interrupt, based communication approach. The flow chart given in Fig. 5.35 models the interrupt based serial, communication., Main routine, start, , Serial interrupt, handler, , 1. Turn off LED connected at Pin P2.0, 2. Initialise stack pointer, , Configurations for generating 9600 Baud, 1. Configure Timer 1 in mode 2, 2. Disable timer 1 interrupt, 3. Load timer 1 reload count (0FDH), 4. Enable serial interrupt, 5. Select mode 1 for serial communication, , 1. Set reception enable ‘REN’, 2. Clear receive and transmit interrupt flags, 3. Start timer 1, , Perform other tasks or simply wait forever, , Fig. 5.35, , RI = 1?, , Receive Interrupt Handling, NO, 1. Read the received data, 2. Turn on LED to indicate data reception, 3. Reset RI flag, 4. Transmit the received data back, Transmit Interrupt Handling, 1. Turn off LED, 2. Reset TI flag, , Return, , Flow chart for implementing interrupt based serial communication, , The firmware implementation for the interrupt based serial data communication is given below., ;####################################################################, ;serial_interrupt.src, ;Firmware for Implementing Serial Communication with PC, ;Serial Data reception and transmission handled through Interrupts, ;Written by Shibu K V. Copyright (C) 2008, ;####################################################################, ORG 0000H, ; Reset vector, JMP 0050H, ; Jump to start of main routine, ORG 0003H, ; External Interrupt 0 ISR location, RETI, ; Simply return. Do nothing, ORG 000BH, ; Timer 0 Interrupt ISR location, RETI, ; Simply return. Do nothing, ORG 0013H, ; External Interrupt 1 ISR location, RETI, ; Simply return. Do nothing, ORG 001BH, ; Timer 1 Interrupt ISR location
Page 176 :
152, , Introduc on to Embedded Systems, , This design will not be complete without explaining the PC side application responsible for sending, and receiving serial data to and from the 8051 based system connected to the serial port (Communication, Port 1, COM 1) of the PC. The 8051 based system should be connected to the serial port using one of the, cables (twisted/ one-to-one), as per the design requirement, as explained earlier. Figure 5.36 illustrates the, interfacing of the microcontroller board to the COM port of the PC., , Terminal Program, PuTTY/Tera Term, Terminal, , DB-9 COM connector, RS-232 Cable, , PC, , Fig. 5.36, , PC COM Port/USB Port, with USB to, Serial Port Converter H/w, , Microcontroller board, , Serial Port Interfacing with PC, , Use a terminal program like PuTTY (www.putty.org) or Tera Term (https://ttssh2.osdn.jp/index.html.en)., If the PuTTY terminal program is used, select ‘Session’ from the ‘Category:’ menu and choose ‘Serial’ as, the ‘Connection type:’. Now Configure the Serial connection parameters under ‘Connection’ à ‘Serial’ from, the Category: menu. Type the COM number to which the 8051 system is connected, say COM1, against, the connection setting ‘Serial line to connect to’. Configure Speed (baud) to 9600, Data bits to 8, Stop bits, to 1, Parity to None and Flow Control to None. Start the communication by pressing the Open button on, the PuTTY terminal window. Now you are ready to communicate with the 8051 system connected to the, communication port configured as per the requirement. Start sending data by typing on the hyper terminal, application. You can see the data echoed by the 8051 system on the terminal application., , 5.3.10, , Reset Circuitry, , Reset is necessary to bring the different internal register values and associated internal hardware circuitry to, a known state. Before putting the 8051 controller into operation a reset should be applied to the controller., As mentioned earlier, applying a reset loads the registers with default known values and loads the Program, Counter (PC) with 0000H. This ensures that the program execution starts from the start of the code memory, (0000H) and stack will reset to the memory location 07H. Reset can be of two types: hardware and software, reset. Hardware reset brings all associated hardware units to a well-defined initial state. 8051 provides a pin, named RST for applying the hardware reset., The reset signal must be kept active until all the three of the following conditions are met, 1. The power supply must be in the specified range., 2. The oscillator must reach a minimum oscillation level to ensure a good noise to signal ratio and a, correct internal duty cycle generation., 3. The reset pulse width duration must be at least two machine cycles (24 Clock periods) when conditions, 1 and 2 are met.
Page 177 :
Designing Embedded Systems with 8bit Microcontrollers—8051, , 153, , If one of the conditions is not satisfied, the microcontroller may not startup properly. To ensure a good, startup, the reset pulse width has to be wide enough to cover the period of time, where the electrical conditions, are not met. Please refer to the note given on the ‘On line Learning Centre’, on the important parameters that, should be taken into account for determining the reset pulse width., The C51 family of microcontrollers support two kinds of, reset input. The first one is a pure input which allows an, Vcc, 8051, external device or circuitry to reset the microcontroller. The, VCC, Capacitor, second one is bidirectional, in which the microcontroller is, 10MFD, capable of resetting an external device. In actual practice a, RST, power on reset (unidirectional input) is given to the 8051, controller by connecting an external resistor and capacitor as, Resistor, shown in Fig. 5.37., 8.2K, When the power supply is turned on, initially the capacitor, VSS, acts as short circuit and the full applied voltage appears across, the resistor (RST pin becomes at logic 1). The capacitor starts, charging gradually and the applied voltage is build across the, capacitor (RST pin becomes at logic 0). The time taken by the, Fig. 5.37 Power on reset circuitry for 8051, capacitor to get charged to a voltage Vc, which brings the RST, pin to logic LOW, is calculated as, Vc = Vf – (Vf – Vi) × e–t/RC, Vc = voltage at which RST pin logic high changes to LOW, Vf = final voltage (VDD =5 V), Vi = initial voltage (=0 V), RC = time constant of resistor capacitor circuit (8.2 × 103 × 10 × 10–6), The reset pulse width ‘t’ can be calculated from the above equation with Vc = The voltage across RST, pin which makes the RST pin at logic 0 and Vf = 5V. The pulse width will be of the order of milliseconds, to seconds. This ensures that the RST pin remains HIGH for enough time to allow the oscillator to start up, (A few milliseconds), the power supply to stabilise plus two machine cycles. It is to be noted that the port, pins will be in a random state until the oscillator is started and the internal reset algorithm writes 1 to the, corresponding port SFRs., , 5.3.11, , Power Saving Modes, , For applications like battery operated systems where power consumption is critical, the CMOS version of, 8051 provides power reduced modes of operation namely IDLE and POWER DOWN modes., , 5.3.11.1 IDLE Mode, The IDLE mode is activated by setting the bit PCON.0 of the SFR power control register (PCON). The, instruction setting the PCON.0 bit pushes the processor into an idle state where the internal clock to the, processor is temporarily suspended. Before putting the CPU into idle state, the various CPU statuses like, Stack Pointer (SP), Program Counter (PC), Program Status Word (PSW) and Accumulator and all other, register values are preserved as such. All port pins will hold the logical states they had at the moment at, which the idle mode is activated by setting the PCON.0 bit. ALE and PSEN remains at logic high during, Idle Mode. The interrupt, Timer and Serial port sections continue functioning since the clock signal is not, withdrawn for the same. The Idle mode is terminated by asserting any enabled interrupt. The interrupt can
Page 178 :
154, , Introduc on to Embedded Systems, , be any one of the external interrupt (INT0 or INT1) or Serial Interrupt. On asserting the interrupt, the IDL, bit (PCON.0) is cleared and the interrupt routine is serviced. After executing the RETI instruction, the next, instruction executing will be the instruction which follows immediately the instruction that put the processor, in Idle Mode. Two general purpose flag bits GF0 & GF1 present in the PCON register can be used for giving, an indication for whether an interrupt occurred in normal mode or Idle Mode. Since PCON register is not a, bit addressable register, the instruction which sets the IDLE Mode control bit PCON.0 can also set the flags, either GF0 or GF1 or both. When an interrupt occurs its service routine can examine whether the interrupt, occurred in the Idle mode or Normal mode by checking the status of GF0 or GF1 bits of PCON (valid only if, the Idle mode enabling instruction sets the GF0/GF1 bit along with PCON.0)., The second method for terminating the idle mode is the application of a reset input signal at the RST pin., Since the clock oscillator is already running and it is in the stable state, the RST pin need to be held high, for only 2 machine cycles. Resetting the processor clears the IDL bit (PCON.0) directly and at this point the, processor resumes program execution from where it left off, that is, at the instruction which immediately, follows the one that invoked the idle mode. When the internal circuitry undergoes the reset algorithm following, the Reset, two or three machine cycles of program execution may take place. The On-chip hardware inhibits, any read/write access to the scratchpad RAM during the internal reset algorithm execution, but access to the, port pins are not inhibited. Hence it is advised to put a minimum of 3 NOP instructions which follows the, instruction that triggers the idle mode., , Power Control Register (PCON) (SFR-87H) It is the Special Function Register holding the power control, bits and baudrate multiplier bit. PCON is not a bit addressable register. The details of PCON bits are given, below., BIT 7, , BIT 6, , BIT 5, , BIT 4, , BIT 3, , BIT 2, , BIT 1, , BIT 0, , SMOD, , RSD, , RSD, , RSD, , GF1, , GF0, , PD, , IDL, , The following table explains the meaning and use of each bit in the PCON register., Bit, , Name, , Description, , SMOD, , Baudrate multiplier, , If Serial port is operating in Modes 1, 2 or 3 and timer 1 is used for baudrate, generation, setting SMOD to 1 doubles the baudrate, , RSD, , Reserved, , Unimplemented. Reserved for future use. Users are advised not to modify it, , GF1, , General purpose flag bit 1, , User programmable bit. Can be set or reset under firmware control, , GF0, , General purpose flag bit 0, , User programmable bit. Can be set or reset under firmware control, , PD, , Power down control bit, , PD = 1 Invokes power down mode., , IDL, , Idle mode control bit, , IDL = Invoke Idle mode, , The NMOS version of 8051 devices implement only SMOD bit in PCON register. The other 4 bits are, available only in CMOS versions. Reset value of PCON is 0XXX0000 (X denotes don’t care. It may be either, 0 or 1). PD bit always take precedence over IDL bit and if an instruction sets both IDL and PD bits to 1, action, corresponding to PD = 1 is performed and it masks the IDL bits activity.
Page 179 :
Designing Embedded Systems with 8bit Microcontrollers—8051, , 155, , 5.3.11.2 Power Down Mode, When the PD bit (PCON.1) is set by an instruction, the Power Down mode is activated. The CPU stops, executing instructions; clock signal to all internal hardware including timer unit, interrupt system and CPU is, terminated. The contents of internal RAM and SFR are maintained. All ports continue emitting their respective, SFR contents. ALE and PSEN signals are held at low. Power Down mode can only be terminated through, hardware reset. All SFRs are brought into their reset values. However the on-chip RAM retains their contents, to that of the values when the Power Down mode is entered. The supply voltage Vcc to the controller can be, brought down to as low as 2V when the controller is in Power Down mode. However before terminating the, Power Down mode with a hardware reset, the supply voltage Vcc should be brought into the normal operating, level. If the hardware reset is applied to the controller to terminate the processor before bringing the operating, voltage to the nominal level, the controller may behave in an unexpected way. Hence reset should not be, activated before Vcc is brought to its normal operating level, and the reset signal should be held active till the, oscillator is re-started and becomes stabilised., Oscillator, unit, FREEZE, , Clock signal, , To interrupt control,, timer & serial port unit, , To CPU, PD, , IDL, , Fig. 5.38, , Power down and IDLE mode operation, , 5.3.11.3 Power Consump on V/s Oscillator Frequency, Average Power consumption is directly proportional to the operating frequency (Clock frequency). Increasing, the clock frequency (subject to the condition that it will not exceed the maximum supported frequency by, the system core) increases the execution speed of the, controller. But it also has a direct impact on the total, power consumption. Figure 5.39 illustrates the typical, power curve for a generic 8051 microcontroller., Generally, the current consumption v/s operating, frequency characteristics is linear with a dc offset., The dc quiescent current is generated by static onchip circuitry such as op amps, comparators, etc., This current is a constant drain current typically in, the range of 1mA. From the power curve it is obvious, that as the operating speed demand is high, the power, consumption also goes high. So there is always, a trade-off between processing power and power, consumption with the generic 8051 design. Some, techniques used to achieve high processing speeds, by maintaining the power consumption to the least, possible are explained below., Fig. 5.39 Typical Power consumption curve for generic 8051, High-speed core The original 8051 design was, Copyright Maxim Integrated Products, (h p://www.maxim-ic.com) used by permission, based on a 12 clock/machine cycle and two fetches
Page 180 :
156, , Introduc on to Embedded Systems, , per machine cycle architecture. The high speed core uses, 4 clocks or 1 clock per machine cycle design. Comparing, this with the original 12 clock/machine cycle for the same, operating frequency, the performance will be, approximately 3 times for the 4 clock core and 12 times, for the 1 clock core preserving the same power, consumption. Figure 5.40 gives a comparative measure, of power consumption for 80C31 and 80C32 core based, on 12 clock/machine cycle and Maxim/Dallas’ DS80C320, core based on 4 clock/machine cycle design., Use of Single Chip with integrated peripherals A, typical 8051 microcontroller based embedded system, incorporates a number of peripherals ranging from, external UART to reset ICs (e.g. DS1232 from Maxim, Integrated Products/Dallas Semiconductor), brownout circuits and watch dog timers. Using these chips Fig. 5.40 Power Consumption curve for normal core, v/s Reduced Clock cycle, as separate ICs will definitely increase the total system, Copyright Maxim Integrated Products, power consumption. An effective way of reducing this, (h p://www.maxim-ic.com) used by permission, kind of power consumption is the use of a single chip, that integrates the 8051 controller and the related necessary chips in a single chip. Apart from significant, reduction in power consumption, this approach also reduces the space required for placing the components, on the PCB and thereby makes the embedded product much more compact one., Use of On-chip program memory and RAM Use of external Program Memory (EEPROM/FLASH) and RAM, requires an additional latch circuit (e.g. 74LS373) to latch the lower order address bus from the multiplexed, address/data bus. Adding this chip will again increase the total system power. Nowadays controllers with, internal program memory ranging from 4K to 64K are available in the market. Some manufacturers provide, extra RAM up to 1 KB as on-chip RAM., Clock source The standard 8051 design uses either an, external quartz crystal resonator to excite the internal on-chip, oscillator circuitry or an external standalone crystal oscillator., If an external crystal oscillator is used, the waveform of the, clock can affect power consumption. The input stage of the, XTAL1 pin, used for driving the external clock signals into, the 8051, typically employs complementary drivers. As the, input clock transitions between high and low, the drivers will, momentarily both be ON, causing a significant current rush., With a square wave clock signal, the transition between high, and low is almost instantaneous and the time in which both, drivers are ON is minimised. A waveform with a slower rise, and fall time, such as a sine or triangle wave, will take long, time to complete the transition and both drivers will be on for, a long time. This will increase the current and power, consumption. A comparison diagram for power consumption, for different clock waves is given in Fig. 5.41., , Fig. 5.41 Power consumption curve for different, clock waves, Copyright Maxim Integrated Products, (h p://www.maxim-ic.com). used by, permission.
Page 181 :
157, , Designing Embedded Systems with 8bit Microcontrollers—8051, , 5.3.11.4 On Circuit Emula on (ONCE) Mode, The On Circuit Emulation (ONCE) Mode helps in testing and debugging the system without removing the, microcontroller from the circuit. The ONCE mode is invoked through the following steps:, 1. Pulling the ALE pin while the controller is in reset and PSEN is high, 2. Holding the ALE pin low as Reset is de-activated, In ONCE mode, Port 0 pins stay in the floating state and other Port pins, ALE and PSEN are pulled, high weakly internally. The oscillator circuit remains active. With these conditions an emulator or another, controller can be used for driving the circuit. Normal operation of the target controller can be restored by, applying a normal reset., , 5.4, , THE 8052 MICROCONTROLLER, , The 8052 microcontroller is a member of the 8051 family and it can be considered, LO 4 Differentiate, as the ‘big’ brother of 8051. 8052 is pin to pin compatible with the standard 8051, between 8051 and, microcontroller. The only difference between the 8051 and 8052 is that 8052, 8052, contains certain additional functionalities. The 8052 architecture implements the, upper 128 bytes of user data RAM physically on the chip and application programmers can access this, memory through indirect addressing, whereas the standard 8051 architecture doesn’t implement the upper, 128 bytes of data RAM physically on the chip. 8052 also implements an additional 16bit timer (Timer 2) and, thus the total number of timers available in 8052 is three, whereas the standard 8051 architecture implements, only two timers. T2CON is the SFR register implemented in 8052 for controlling the timer 2 operations. The, 16bit timer register is formed by the register pair TH2 and TL2. Timer 2 supports interrupt and the interrupt, vector location for Timer 2 is 002BH. Timer 2 supports a special mode of operation called ‘Capture Mode’, and when the timer is in capture mode the contents of TH2 and TL2 is captured to the capture SFR RCAP2H, and RCAP2L respectively when a 1 to 0 transition is detected at the P1.1 pin of the microcontroller. The timer, 2 interrupt is also generated if the timer 2 interrupt is in the enabled state., , 5.5 8051/52 VARIANTS, Lot of variants are available for the basic 8051 architecture from different, microcontroller manufactures including Atmel, Maxim/Dallas, etc. We will have a, glance through on some of them., , LO 5 Know the, 8052 variants, , 5.5.1 Atmel’s AT89C51RD2/ED2, The AT89C51RD2 from Atmel Corporation is a high speed 8052 core compatible microcontroller. It contains, six 8bit I/O ports, three 16bit Timers/Counters, 256 bytes of user data RAM, 9 interrupt sources with 4, levels of priority and 64 Kbytes of on-chip In System Programmable FLASH memory for program storage., It also contains 1792 bytes of on-chip expanded RAM (XRAM), SPI port, pulse width modulation (PWM), unit, integrated watch dog timer (WDT), integrated power monitor for Power On reset and power supply fail, detect, dual full duplex serial port and dual Data Pointer Register (DPTR). The 89C51RD2 controller can, be operated in standard mode and high-speed mode. The standard mode of operation requires 12 clocks per, machine cycle, whereas the high-speed mode (Also known as X2 mode) requires only 6 clock periods per, machine cycle for instruction fetch and execution. Standard mode supports clock speed of up to 60 MHz and, high speed mode supports clock speed up to 30 MHz. It also supports variable length MOVX instruction, for synchronising the data communication with slow RAM/peripheral devices. It also contains 2Kbytes of, FLASH bootloader containing the low level FLASH memory programming routines and default serial loader.
Page 182 :
158, , Introduc on to Embedded Systems, , The 89C51ED2 version is similar to the RD2 version in all respect and it supports 2Kbytes of On-Chip, EEPROM memory for non-volatile data storage., , 5.5.2, , Maxim/Dallas’ DS80C320/ DS80C323, , The DS80C320/DS80C323 microcontrollers from Maxim/Dallas are high speed low power microcontrollers, compatible with the standard 80C31/80C32 architecture. It contains four 8bit I/O ports, three 16bit timers/, counters, 256 bytes of user data RAM, 13 total interrupt sources with six external, with 3 levels of priority,, programmable watch dog timer (WDT), integrated power monitor for Power On reset and power supply fail, detect and dual Data Pointer Register (DPTR). The high speed core of DS80C320/DS80C323 uses 4 clocks, or 1 clock per machine cycle design. Comparing this with the original 12 clock/machine cycle for the same, operating frequency, the performance will be approximately 3 times for the 4 clock core and 12 times for the, 1 clock core preserving the same power consumption., , Summary, Feature set, speed of operation, code memory space, data memory space, development support,, availability, power consumption, cost, etc. are the important factors that need to be, LO1, considered in the selection of a microcontroller for an embedded design, The basic 8051 architecture consist of an 8bit CPU with Boolean processing capability, oscillator, driver unit, 4K bytes of on-chip program memory, 128 bytes of internal data memory, 128 bytes of, special function register memory area, 32 general purpose I/O lines organised into four 8bit bidirectional ports, two 16bit timer units and a full duplex programmable UART for serial LO2, data transmission with configurable baudrates, 8051 is built around the ‘Harvard’ processor architecture. The program and data memory of 8051, is logically separated and they physically reside separately. Separate address spaces are assigned, for data memory and program memory. 8051’s address bus is 16bit wide and it can address, LO3, up to 64KB memory, The Program Strobe Enable (PSEN) signal is activated during the external program memory, fetching operation, whereas it is not activated if the program memory is internal to the, microcontroller. The Program Counter (PC) Register supplies the address from which the, LO3, program instruction to be fetched., The 8051 architecture implements 8 general purpose registers with names R0 to R7 and they are, LO3, available in 4 different banks, The lower 128 byte RAM of 8051 is organised into register banks, Bit addressable memory and, LO3, Scratchpad RAM, Accumulator, B register, Program Status Word (PSW), Stack pointer (SP), Data pointer (DPTR,, combination of DPL and DPH), and Program Counter (PC) constitute the CPU registers, LO3, of 8051, The instruction fetch operation consists of a number of machine cycles and one machine cycle, consists of 12 clock periods for the standard 8051 architecture, LO3, 8051 supports 4 bi-directional ports. The ports are named as Port 0, 1, 2 and 3. Each port contains, 8 bidirectional port pins, LO3, The ‘Read Latch’ operation for all port pins return the content of the corresponding pin’s latch,, whereas the ‘Read Pin’ operation returns the status of the port pin, LO3
Page 183 :
Designing Embedded Systems with 8bit Microcontrollers—8051, , 159, , The basic 8051 and its ROMless counterpart 8031AH supports five interrupt sources; namely two, external interrupts, two timer interrupts and the serial interrupt. The serial interrupt is an ORed, combination of the two serial interrupts; Receive Interrupt (RI) and Transmit Interrupt (TI). An, interrupt vector is assigned to each interrupts in the program memory and 8 bytes of code, LO3, memory location is allocated for writing the ISR corresponding to each interrupt, The interrupt system of 8051 can be enabled or disabled totally under software control by setting or, clearing the global interrupt enable bit of the Special Function Register Interrupt Enable LO3, (IE)., The 8051 architecture supports two levels of interrupt priority. The first priority level is determined, by the settings of the Interrupt Priority (IP) register. The second level is determined by, LO3, the internal hardware polling sequence, An interrupt service routine always ends with the instruction RETI. The RETI instruction informs, the interrupt system that the service routine for the corresponding interrupt is finished LO3, and it clears the corresponding priority-X interrupt in progress flag by clearing the corresponding, flip flop, The basic 8051 architecture supports two timer units namely Timer 0 and Timer 1. The timer units, can be configured to operate as either timer or counter. The timers support four modes of LO3, operation namely Mode 0, 1, 2 and 3, The standard 8051 supports a full duplex, receive buffered serial interface for serial data, transmission, LO3, The CMOS version of 8051 supports two power down modes, namely, IDLE and POWERDOWN., They are activated by setting the corresponding bit in Special Function Register PCON, LO3, The on circuit emulation (ONCE) mode of 8051 helps in testing and debugging the 8051, microcontroller based system without removing the microcontroller from the circuit, LO3, The 8052 microcontroller architecture supports an additional 16bit timer and it supports capture, mode for timer operation in addition to the four modes supported by 8051. It also, LO4, implements the upper 128bytes of user data RAM physically on the chip, A lot of variants are available for the basic 8051 architecture from different microcontroller, manufactures including Atmel, Maxim/Dallas, etc., LO5, , Keywords, MIPS: Million instruc ons per second–A measure of processor speed, [LO 1], Microcontroller: A highly integrated chip that contains a CPU, scratchpad RAM, Special and General purpose, register Arrays and Integrated peripherals, [LO 2], Code Memory: Memory for storing program instruc ons, [LO 3], Data Memory: Memory for holding temporary data during program execu on, [LO 3], Register: Data holding unit made up of flip-flops, [LO 3], On-Chip Memory: Memory internal to the microcontroller, [LO 3], Port: An I/O unit which groups a number of I/O pins together and provides a control/status register for, controlling the I/O pins and monitoring the pin status, [LO 3], ALE: Address latch enable. A control signal generated by the processor/controller for indica ng the arrival of, valid address signal on the address/data mul plexed bus, [LO 3]
Page 184 :
160, , Introduc on to Embedded Systems, , Program Counter: CPU register which holds the address of the program memory loca on from which the next, instruc on is to be fetched (Its width depends on the processor architecture), [LO 3], Data Pointer Register (DPTR): 16bit register which holds the address of external data memory address to be, accessed, in 8051 architecture, [LO 3], Special Func on Register: Register holding the status and control informa on and data associated with, the various configura ons, status and data for on-chip peripheral units like Timer, Interrupt Controller, etc., , [LO 3], Accumulator: CPU register which holds the results of all CPU related arithme c opera ons, [LO 3], B Register: CPU register that acts as an operand in mul ply and division opera ons, in 8051 architecture, , [LO 3], Program Status Word (PSW): 8bit, bit addressable special func on register signalling the status of accumulator, related opera ons and register bank selector for the scratchpad registers R0 to R7, in 8051 architecture, , [LO 3], Stack Pointer (SP): 8bit register holding the current address of stack memory in 8051 architecture, [LO 3], Machine Cycle: The fundamental unit of instruc on execu on. One instruc on execu on may require one or, more machine cycles. Under standard 8051 architecture, one machine cycle corresponds to 12 clock periods, , [LO 3], Source Current: The maximum current a port pin can supply to drive an externally connected device [LO 3], Sink Current: The maximum current a port pin can absorb through a device which is connected to an external, supply, [LO 3], Interrupt: Signal that ini ates changes in normal program execu on flow, [LO 3], Interrupt Service Rou ne (ISR): Piece of code represen ng the ac ons to be done when an interrupt occurs, , [LO 3], Interrupt Vector: The start address of the program memory where the ISR corresponding to an interrupt is to, be located, [LO 3], Interrupt Latency: The me elapsed between the asser on of the interrupt and the start of the ISR for the, same, [LO 3], Timer: A hardware or so ware unit which generates me delays. Hardware mers generate more precise, me delays, [LO 3], Serial Port: The I/O unit which transmits and receives data in serial format, [LO 3], Mul processor Communica on: A serial communica on implementa on for communica ng between, mul ple processors on the same serial bus. Only one device acts as the master and rest act as slave at any, given point of me, [LO 3], High-Speed Core: A processor core which requires lesser number of clock periods for instruc on fetch, decode, and execu on, [LO 3], , Objec ve Ques ons, 1. What is the size of internal data memory supported by the standard 8051 architecture, (a) 64 bytes, (b) 128 bytes, (c) 256 bytes, (d) 1024 bytes, (e) No internal data memory
Page 185 :
Designing Embedded Systems with 8bit Microcontrollers—8051, , 161, , 2. What is the size of a ‘Special Function Register’ memory supported by the standard 8051 architecture, (a) 64 bytes, (b) 128 bytes, (c) 256 bytes, (d) 1024 bytes, (e) No internal SFR memory, 3. What is the size of an internal program memory supported by the standard 8051 architecture, (a) 128 bytes, (b) 1024 bytes, (c) 2 Kbytes, (d) 4 Kbytes, (e) No internal program memory, 4. What is the number of general purpose I/O lines supported by the standard 8051 architecture, (a) 8, (b) 16, (c) 32, (d) 64, 5. The general purpose I/O lines of a standard 8051 is grouped into, (a) Two 8-bit bi-directional ports, (b) Four 8-bit bi-directional ports, (c) Two 16-bit bi-directional ports, (d) Four 16-bit bi-directional ports, 6. What is the number of timer units supported by a standard 8051 architecture, (a) Two 16-bit timers, (b) Three 16-bit timers, (c) Two 8-bit timers, (d) One 16-bit timer, 7. The UART of the standard 8051 controller is, (a) Half duplex with configurable baudrate (b) Half duplex with fixed baudrate, (c) Full duplex with configurable baudrate (d) Full duplex with fixed baudrate, 8. The standard 8051 controller is built around, (a) Harvard Architecture, (b) Von Neumann Architecture, (c) None of these, 9. Which of the following is True for a 8051 controller?, (a) The program and data memory of 8051 is logically separated, (b) The program and data memory of 8051 physically resides separately., (c) Separate address spaces are assigned for data memory and program memory, (d) All of these, (e) None of these, 10. The address bus of 8051 is, (a) 8-bit wide, (b) 16-bit wide, (c) 32-bit wide, (d) 20-bit wide, 11. Which of the following is True about external program memory access?, (a) Port 0 acts as the data bus and Port 2 acts as the higher order address bus, (b) Port 2 acts as the data bus and Port 0 acts as the higher order address bus, (c) Port 0 acts as the multiplexed address/data bus and Port 2 acts as the higher order address bus, (d) Port 2 acts as the multiplexed address/data bus and Port 0 acts as the higher order address bus, 12. Name the register holding the address of the memory location holding the next instruction to fetch, (a) DPTR, (b) PC, (c) SP, (d) None of these, 13. Name the register holding the address of the external data memory to be accessed in 16bit external data, memory operation, (a) DPTR, (b) PC, (c) SP, (d) None of these, 14. For standard 8051 architecture, the internal data memory address is, (a) 8bit wide, (b) 4bit wide, (c) 16bit wide, (d) None of these, 15. The external data memory is 4 Kbytes in size and it is arranged in paged addressing mode where 1 page, consists of 256 bytes. Port 2 is used as the page selector. How many port bits are required for implementing, the paging?, (a) 1, (b) 2, (c) 3, (d) 4, 16. Which of the following conditions should be satisfied to implement the Von-Neumann memory model for, 8051?, (a) The data memory and code memory should be stored in a single memory chip (RAM/NVRAM)
Page 186 :
162, , 17., 18., 19., , 20., , 21., , 22., , 23., 24., 25., , 26., 27., 28., 29., 30., , Introduc on to Embedded Systems, , (b) The external access pin should be tied to logic 0, (c) The external access pin should be tied to logic 1, (d) The PSEN\ and RD\ signals of 8051 should be ANDed to generate the output enable (OE\) of the, memory chip, (e) (a) (b) and (d), (f) (a) (c) and (d), What is the number of general purpose registers supported by the standard 8051 architecture, (a) 1, (b) 8, (c) 16, (d) 32, What is the number of bit variables supported by 8051 in the internal data memory area?, (a) 8, (b) 16, (c) 32, (d) 64, (e) 128, Bit address 07H contains logic 1, what is the value of bit 07H after executing the instruction MOV 20H,, #01H, (a) 0, (b) 1, Memory location 81H contains F0H. What will be the value of Accumulator after executing the instruction, MOV A, 81H, (a) 81H, (b) 00H, (c) F0H, (d) Random data, The target controller is a standard 8051. Memory location 81H contains F0H. What will be the value of, accumulator after executing the instructions, MOV R0, #81H, MOV A, @R0, (a) 81H, (b) 00H, (c) F0H (e) Random data, Name the register signalling the status of accumulator related operations, (a) A, (b) B, (c) PSW, (d) SP, (e) None of these, How many user programmable general purpose bits are available in the status register of 8051?, (a) 0, (b) 1, (c) 2, (d) 3, (e) 4, The accumulator content is 02H. What will be the status of the ‘parity bit P’ of the Status Register?, (a) 1, (b) 0, The accumulator contains 0FH. The overflow (OV) carry (C) flag and Auxiliary carry flag (AC) are in the, set state. What will be status of these flags after executing the instruction ADD A, #1, (a) OV = 0; C = 0; AC = 0, (b) OV = 0; C = 0; AC = 1, (c) OV = 1; C = 1; AC = 1, (d) OV = 1; C = 1; AC = 0, The register bank selector bits RS0, RS1 are 0 and 1. What is the physical address of register R0?, (a) 00H, (b) 08H, (c) 0FH, (d) 10H, (e) 18H, The machine cycle for a standard 8051 controller consists of, (a) 2T States, (b) 4T States, (c) 6T States, (d) 8T States, Which port of 8051 is ‘true-bidirectional’?, (a) Port 0, (b) Port 1, (c) Port 2, (d) Port 3, For configuring a port pin as input port, the corresponding port pins bit latch should be at, (a) Logic 0, (b) Logic 1, Port 2 latch contains A5H. What will be the value of Port 2 latch after executing the following, instructions?, MOV DPTR, #0F00H, MOV A, #0FFH, MOVX @DPTR, A, (a) 00H, (b) 0FH, (c) A5H, (d) FFH
Page 187 :
Designing Embedded Systems with 8bit Microcontrollers—8051, , 163, , 31. The alternate I/O function for the pins of Port 3 will come into action only when the corresponding bit latch, is, (a) 1, (b) 0, 32. The interrupts Timer 0 and serial interrupt are enabled individually in the interrupt enable register and high, priority is given to Timer 0 interrupt by setting the Timer 0 priority selector in the interrupt priority register., It is observed that the serial interrupt is not at all occurring. What could be the reasons for this?, (a) The global interrupt enable bit (EA) is not in the set state, (b) The Serial interrupt always occurs with Timer 0 interrupt, (c) There is no Serial data transmission or reception activity happening in the system, (d) None of these, (e) (a) or (b) or (c), 33. Timer 0 and External 0 interrupts are enabled in the system and are given a priority of 1. Incidentally, the, Timer 0 interrupt and External 0 interrupt occurred simultaneously. Which interrupt will be serviced by the, 8051 CPU?, (a) Timer 0, (b) External 0, (c) External 0 interrupt is serviced first and after completing it Timer 0 interrupt is serviced, (d) None of them are serviced, 34. What is the maximum ISR size allocated for each interrupt in the standard 8051 Architecture, (a) 1 Byte, (b) 4 Byte, (c) 8 Byte, (d) 16 Byte, 35. What is the minimum interrupt acknowledgement latency in a single interrupt system for standard 8051, architecture, (a) 1 Machine cycle (b) 2 Machine cycle (c) 3 Machine cycle, (d) 8 Machine cycle, 36. External 0 interrupt is asserted and latched at S5P2 of the first machine cycle of the instruction MUL AB., What will be the minimum interrupt acknowledgement latency time?, (a) 6 Machine cycles (b) 5 Machine cycles (c) 3 Machine cycles (d) 2 Machine cycles, 37. What is the minimum duration in which the external interrupt line should be asserted to identify it as a valid, interrupt for level triggered configuration?, (a) 1 Machine cycle (b) 3 T States, (c) 2 Machine cycles (d) 3 Machine cycles, 38. What is the timer increment rate for timer operation for standard 8051 architecture, (a) Oscillator Frequency/6, (b) Oscillator Frequency/12, (c) Same as Oscillator Frequency, (d) Oscillator Frequency/24, 39. What is the maximum count rate for counting external events for standard 8051 architecture, (a) Oscillator Frequency/6, (b) Oscillator Frequency/12, (c) Same as Oscillator Frequency, (d) Oscillator Frequency/24, 40. Which is the ‘Timer’ used for baudrate generation for serial communication?, (a) Timer 0, (b) Timer 1, 41. The ‘Timer’ used for baudrate generation should run in, (a) Mode 0, (b) Mode 1, (c) Mode 2, (d) Mode 3, 42. For ‘Mode 0’ operation, the 13 bit register is formed by, (a) 8 bits of TH0/TH1 and least significant 5 bits of TL0/TL1, (b) 8 bits of TH0/TH1 and most significant 5 bits of TL0/TL1, (c) 8 bits of TL0/TL1 and least significant 5 bits of TH0/TH1, (d) 8 bits of TL0/TL1 and most significant 5 bits of TH0/TH1, 43. The serial port of the standard 8051 architecture is, (a) Full duplex, (b) Half duplex, (c) ‘Receive’ buffered (d) (a) and (c) (e) (b) and (c), 44. Name the ‘Register’ which acts as the ‘Receive’ and ‘Transmit’ buffer in serial communication operation?, (a) SCON, (b) PCON, (c) SBUF, (d) Accumulator
Page 188 :
164, , Introduc on to Embedded Systems, , 45. Which of the following is (are) true about ‘Mode 0’ operation of serial communication, (a) The baudrate is variable, (b) The baudrate is given as oscillator frequency/12, (c) The baudrate is same as oscillator frequency, (d) The baudrate is given as oscillator frequency/2, 46. The ‘Auto Reload’ count for ‘Timer 1’ is FDH and the operating frequency is 11.0592 MHz and baudrate, doubler bit SMOD is 0. What is the baudrate for communication?, (a) 2400, (b) 4800, (c) 9600, (d) 19200, 47. What will be the value of ‘Program Counter (PC)’ after a proper power on reset?, (a) FFFFH, (b) 0000H, (c) Random value, (d) 0001H, 48. What will be the value of internal RAM after a reset?, (a) 00H, (b) FFH, (c) The value before reset if the system is resetted during operation, (d) Random if the system is resetted immediately after Power ON, (e) (c) or (d), 49. Which of the following is (are) ‘True’ about ‘IDLE’ mode?, (a) The internal clock to the processor is temporarily suspended, (b) The various CPU status like SP, PC, PSW, Accumulator and all other register values are preserved, (c) All port pins will retain their logical state, (d) ALE and PSEN are pulled high, (e) All of these (f) (a), (b) and (c) only, 50. A reset signal is applied to the 8051 processor when it is in the ‘Idle’ mode. How will the system behave?, (a) The idle mode setting bit IDL is cleared, (b) The processor resumes program execution from where it left off, (c) The processor resumes program execution from 0000H, (d) (a) and (b) only, (e) (a) and (c) only, , Review Ques ons, 1. Explain the various factors to be considered while selecting a microcontroller for an embedded system, design., [LO 1, LO 2], 2. Explain the architecture of the 8051 microcontroller with a block diagram., [LO 3], 3. Explain the different operating modes of 8051 (Hint: normal operation mode, power saving mode and ONCE, mode), [LO 3], 4. Explain the code memory organisation for 8051 for internal and external program memory access. [LO 3], 5. Explain the data memory organisation for standard 8051 controller., [LO 3], 6. Explain the Von-Neumann memory model implementation for 8051 based system. What are the merits and, demerits of using a Von-Neumann memory model?, [LO 3], 7. Explain the memory organisation for lower 128 bytes of internal RAM for standard 8051 architecture., , [LO 3], 8. Explain how Port 0 acts as a normal I/O port and multiplexed address data bus for external data/program, memory access?, [LO 3]
Page 189 :
Designing Embedded Systems with 8bit Microcontrollers—8051, , 9. What is the difference between Read Latch and Read Pin operation for port lines?, 10. Why is Port 0 known as true-bidirectional?, , 165, , [LO 3], [LO 3], [LO 3], , 11. Why is Port 1 known as quasi-bidirectional?, 12. Explain how Port 2 acts as a normal I/O port and higher order address bus for external data/program memory, access?, [LO 3], 13. Explain how Port 3 acts as a normal I/O port and an alternate I/O function port?, [LO 3], 14. What is the difference between RET and RETI instructions for indicating the end of a subroutine call?, , [LO 3], [LO 3], , 15. Explain how a third priority level can be achieved in 8051 interrupt system?, 16. What is interrupt latency? What is the minimum and maximum interrupt latency time for a single interrupt, system in standard 8051 architecture? Explain in detail., [LO 3], , [LO 3], 18. Explain the different actions generated by the processor on identifying an interrupt request number.[LO 3], 17. Explain the different conditions that block or delay the vectoring of an interrupt., , 19. The external interrupt INT0 is enabled, and set to be level triggered. The Port pin P3.2 is set at logic 0., Explain the behaviour of the system., [LO 3], 20. Explain the operation of Timer 0 in Mode 0. Why is Mode 0 operation known as 8-bit Timer with a divide, by 32 prescaler?, [LO 3], 21. Explain the auto reload mode of operation of a timer. Give an example for the usage of Timer 1 in auto, reload mode., [LO 3], 22. Explain the Mode 1 operation of serial communication. How is configurable baudrate achieved for serial, communication in Mode 1? What is the Timer 1 auto reload count for a baudrate of 9600 bits/second for a, system working at 11.0592MHz?, [LO 3], 23. What is multiprocessor communication? Explain the multiprocessor communication for 8051 for serial, communication Mode 2., [LO 3], 24. How a ‘power on reset’ can be implemented for an 8051-based system? Explain the changes that happen to, various registers and internal RAM on a proper reset., [LO 3], 25. Explain the two power saving modes Idle and Power Down modes for 8051. What is the difference between, the two? Explain the methods of terminating each of the power saving modes., [LO 3], 26. Explain the Power consumption v/s Operating Frequency characteristics for an 8051 based system. Why do, the characteristics curve contain an offset from the origin?, [LO 3], 27. What are the different techniques that can be adopted for reducing the power consumption of an 8051 based, system?, [LO 3], 28. What is On Circuit Emulation (ONCE) mode? How is ONCE mode enabled? What is the use ONCE mode, in system design?, [LO 3], 29. Explain the difference between 8051 and 8052 microcontroller., [LO 4], 30. Only Timer 0 interrupt is enabled in the system and it is assigned a priority of 1. It is observed that the timer, interrupt occurred only once and it is not occurring even though the timer roll over happens. The program, does not contain any instruction for disabling the global interrupt enable flag IE and Timer 0 interrupt. What, could be the reason?, [LO 3]
Page 190 :
166, , Introduc on to Embedded Systems, , Lab Assignments, 1. Write an 8051 assembly language program for transmitting 1 byte data through the serial port with a, ninth bit which is used as an even parity bit. The program should configure the serial communication, settings as: Baudrate = 9600, 1 start bit, 1 stop bit and also depending on the parity of the data byte to, be sent, the parity bit should be set properly., 2. Write an 8051 assembly language program for receiving an even parity enabled 8-bit data through the, serial port. The program should configure the serial communication settings as: Baudrate = 9600, 1 start, bit, 1 stop bit. Upon receiving the data byte, the parity of it is calculated and it is verified with the parity, bit received. Use interrupts for implementing the serial data reception, 3. Develop a hardware system to single step the program written for 8051. The firmware running in the, controller sends the register contents A, B, PSW and R0 to R7 on executing each instruction to a, program running on PC. Develop a PC application to capture the register details and display it. Use RS232 UART communication for sending the debug info to PC. Use the following configuration settings, for the RS-232 link: Baudrate = 9600, 1 start bit, 1 stop bit, No parity., 4. Develop an 8051-based system for detecting the keypress of a pushbutton switch connected to the port, pin P1.0 of the microcontroller. Implement the key de-bouncing for the push button in firmware (Upon, detecting a keypress, the firmware waits for 20 milliseconds and then checks the push button switch, again, if the switch remains in the depressed state, the key press is identified as a valid key depression)., For a valid keypress, a buzzer connected to port pin P1.1 is activated for a period of 1 second. Use a, BC547 transistor-based driver circuit for driving the buzzer., 5. Implement the above requirement using a hardware key de-bounce circuit and connecting the push, button switch to the external interrupt 0 pin of the controller. Implement the buzzer control logic in the, Interrupt Service Routine for External Interrupt 0., 6. Develop an 8051-based system for detecting the keypress of an array of 8 pushbutton switches, connected to the port pins P1.0 to P1.7 of the microcontroller. Using an AND gate generate an external, interrupt signal when any one of the push button switch is depressed. Identify which push button is, depressed by scanning the status of the push button connected port pins, in the interrupt service routine, for the external interrupt. The port pins are scanned in the order P1.0 to P1.7. Even if multiple push, buttons are depressed, the first identified push button switch is recognised as the valid keypress. Use, a hardware key de-bounce circuit/IC for implementing the key de-bouncing for all push buttons. An, 8 ohm speaker is connected to port pin P2.0. Generate different tones (by varying the frequency (say, 100Hz, 200Hz, 300Hz, 500Hz, etc) of the pulse generated at the port pin in which the speaker is, connected, corresponding to each push button press. Use BC547 transistor based driver circuit for, driving the speaker., 7. Design an 8051 based system for interfacing an RF transceiver (e.g. RF Modem from SUNROM, Technologies http://www.sunrom.com/c/rf-serial-link) and a relay driver circuit using an NPN, transistor for driving a normally open relay with coil voltage 12V for switching Alternating Current, with ratings 5Amps and 50Hz. Connect a 100W/240V bulb through the relay. Turn ON and OFF, the bulb in response to the command received by the RF transceiver. The commands are sent by an, application running on PC through an RF transceiver., 8. Implement the above system using infrared (IR) remote control and receiver, supporting the RC5, protocol (e.g. TV remote and SFH 506-36 IR receiver unit (Use the reference design http://www.atmel., com/dyn/resources/prod_documents/doc1473.pdf from Atmel for SFH 506 interfacing)), in place of the, RF based control implementation., 9. Develop a miniature ‘Traffic Light Control’ system based on 8051 and LEDs for controlling the ‘Red’, ‘Green’ and ‘Yellow’ signal lights present at a junction where four roads meet. The ‘Green’ and ‘Red’, signal will be on for a duration of 30 seconds and ‘Yellow’ for 5 seconds.
Page 191 :
Designing Embedded Systems with 8bit Microcontrollers—8051, , 10. Develop a simple electronic calculator using 8051 microcontroller with 16 push button keys arranged in, a 4×4 matrix for representing digits 0 to 9, operators +, –, ×, %, = and ‘Clear’ button. Use two 7-segment, LEDs for displaying the result. Only single digit operations are allowed. The system requirements are, listed below., (a) Upon power on both the 7-Segment LEDs display 0, (b) When a numeric key is pressed, it is displayed on the rightmost 7-segment LED, (c) Enter the first operand (digit) by pressing the corresponding push button, (d) To perform an operation (+, –, ×, %) press the corresponding push button, (e) Now press the second operand (digit), (f) Press the ‘=’ operator for displaying the result of the operation, (g) Pressing the ‘Clear’ key at any point clears the display and displays ‘0’ on both LED displays. For, division operation, display the quotient as result., , 167
Page 192 :
168, , Introduc on to Embedded Systems, , 6, , Programming the 8051, Microcontroller, , LEARNING OBJECTIVES, LO 1 Learn how to program the 8051 microcontroller using Assembly Language, Discuss the direct, indirect, register, immediate and indexed addressing modes, supported by 8051. Learn about register instruc ons and register specific, instruc ons supported by 8051, LO 2 Discuss what an instruc on and instruc on set is, Know the different instruc ons supported by 8051 instruc on set architecture, Describe the internal and external data transfer instruc ons, data exchange, instruc ons, Stack memory related data transfer instruc ons and code memory, read instruc ons supported by 8051, Learn the addi on and subtrac on, mul plica on and division, increment and, decrement, and decimal adjust instruc ons supported by 8051, Iden fy the different logical instruc ons (Rotate, Shi , Complement, etc.), supported by 8051, Understand the bit manipula on instruc ons supported by 8051, List the different program execu on control transfer instruc ons supported by, 8051. Learn the uncondi onal program control transfer instruc ons (Jump,, Subrou ne Call, return from ISR and func on call, etc.) supported by 8051, Learn the condi onal program control transfer instruc ons (Decrement and, Jump if non zero, Compare and jump if not equal, Jump if carry flag is set or, not set, Jump if a specified bit is set or not, etc.) supported by 8051, , As you learned in the basic 8085/8088 microprocessor class, an Instruction consists of two parts namely;, Opcode and Operand(s). The opcode tells the processor what to do on executing an instruction. The, operand(s) is the parameter(s) required by opcode to complete the action. The term Instruction Set refers to, the set of instructions supported by a processor/controller architecture. The instruction set of 8051 family, microcontroller is broadly classified into five categories namely; Data transfer instructions, Arithmetic
Page 193 :
169, , Programming the 8051 Microcontroller, , instructions, Logical instructions, Boolean instructions and Program control transfer instructions. Before, going to the details of each type of instructions, it is essential to understand the different addressing modes, supported by the 8051 microcontroller., , 6.1, , DIFFERENT ADDRESSING MODES SUPPORTED BY 8051, , The term ‘addressing mode’ refers to “How the operand is specified in an, instruction” along with opcode. The operand may be one or a combination, of the following–memory location(s), contents of memory location(s),, register(s), or constant. Depending on the type of operands, the addressing, modes are classified as follows., , 6.1.1, , LO 1 Learn how to, program the 8051, microcontroller using, Assembly Language, , Direct Addressing, , The operand is specified as an 8 bit memory address. For 8051 processor, only the lower 128 byte internal, data memory and the SFRs are directly accessible., For example, MOV A, 07H (Moves the content of memory location 07H to the accumulator. 07H refers, to the address of data memory at location 7. If memory location 07H contains the value 255, executing this, instruction will modify the content of A to 255) uses MOV as opcode and A, 07H as operands (Fig. 6.1)., Registers, , Data memory, , Memory, address, , A, B, R0, , 07 H, , 255 (FFH), , R7, , Fig. 6.1, , 6.1.2, , Illustration of direct memory addressing (E.g. MOV A, 07H), , Indirect Addressing, , As the name indicates, the operand is specified indirectly in indirect addressing. A register is used for holding, the address of the memory variable on which the operations are to be performed. The indirect operations are, performed using @register technique. For 8-bit internal data memory operations, register R0 or R1 is used, as the indirect addressing register. The whole 256 bytes (if present physically on the chip) can be accessed, by indirect addressing., E.g. MOV R0, #55H, MOV A,@R0, , ; Load R0 with 55H, The address of mem loc, ; Load Accumulator with the contents of the; memory location pointed by R0, , Register R0 is loaded with 55H (85 in decimal) on executing the first instruction. Here R0 is used as, the indirect addressing register and data memory 55H is the memory variable on which the operations are, performed. Executing the second instruction moves the contents of memory address 55H to the accumulator., This can be interpreted as MOV A, content @Memory Address 55H. Suppose 55H contains 255, executing, the second instruction will load the accumulator with 255 (Fig. 6.2).
Page 194 :
170, , Introduc on to Embedded Systems, , Data memory, , Registers, , Memory, address, , A, B, R0, , 55H, 55H, , 255 (F FH ), , R7, , Fig. 6.2 Illustration of indirect memory addressing with 8bit indirect register (E.g. MOV A, @R0), Among the scratchpad registers R0 to R7, only R0 and R1 can be used for indirect addressing. For 16bit, external data memory/memory mapped register operations, 16bit register DPTR is used as the indirect, addressing register. The whole 64K bytes of the external memory (if present physically on chip) can be, accessed by indirect addressing., E.g., , MOV DPTR, #0055H ;, ;, MOVX A,@DPTR, ;, ;, , Load DPTR register with 0055H, Theaddress of the memory location, Load Accumulator with the contentsof the memory location pointed by DPTR, , Executing these two instructions moves the content of external data memory at address 0055H to the, Accumulator (Fig. 6.3)., Registers, , Memory, address, , A, B, DPH, , 00H, , DPL, , 55H, , Fig. 6.3, , External data memory, , 0055H, , 255 (FFH), , Illustration of Indirect memory addressing with 16bit Indirect Register (E.g. MOVX A, @DPTR), , Indirect addressing is same as the pointer concept in C Programming. Indirect addressing is commonly, used for operations similar to pointer based operations in C Programming like array, external memory access,, etc., , 6.1.3, , Register Addressing, , Register addressing is of two types. In some instructions, the register operand is implicitly specified by, some bits of the opcode. These types of instructions are referred as Register Instructions. Some instructions, implicitly work on certain specific registers. They are known as Register Specific Instructions.
Page 195 :
Programming the 8051 Microcontroller, , 171, , 6.1.3.1 Register Instruc ons, In register instructions, the register operand is specified by some bits of the opcode itself. If scratchpad, registers R0 to R7 are used as operands, they can be specified along with the opcode by using the last 3 bits, of the opcode. Such instructions are code efficient since the opcode itself specifies one operand; it eliminates, the need for storing the operand as a byte in code memory and also saves the time in fetching the operand., Generally register variable access is faster than general memory access., E.g. MOV R0, 01H, , This is a two byte instruction where the first operand R0 is indicated by the last 3 bits of the opcode, byte., Register to register data transfer is not allowed and hence instructions like MOV R1, R2 are invalid., , 6.1.3.2 Register Specific Instruc ons, Some of the 8051 instructions are specific to certain registers. Examples are accumulator and data pointer, specific instructions., E.g. ADD A, #50, , During the assembly process, this instruction is converted to a two byte instruction in which A is implicitly, specified by the opcode corresponding to ADD., , 6.1.4, , Immediate Constants, , Constants can be an operand for some instructions. If an instruction makes use of a constant data as the, operand, the type of addressing is called immediate addressing. In immediate addressing, a constant follows, the opcode as operand in code memory. An immediate constant is represented with a leading ‘#’ symbol in, the assembly code. A leading ‘#’ tells the assembler that the operand is a constant. For example, if you want, to load accumulator with the constant 9, the following instruction will do it., MOV A, #09, , 6.1.5, , Indexed Addressing, , Indexed addressing is used for program memory access. This addressing mode is used for reading look, up table from code memory and is Read Only. A 16bit register is used for holding the base address of the, lookup table. The offset of the table entry from which the data to be retrieved is loaded in Accumulator. The, instruction MOVC is used for indexed addressing., E.g. MOV DPTR, #2008H, MOV A, #00, MOVC A, @A+DPTR, , The above example assumes that the lookup table is at memory location 2008H and so the base address, of the lookup table is 2008H. The first instruction loads the base pointer address 2008H to the base pointer, register DPTR. The table index is provided by the accumulator register. To access the corresponding entry of, the table, load accumulator with the offset from the base address. For accessing the base element the offset, should be 0. The second instruction loads the offset to accumulator. For example, if you want to access, the entry which is just above the base entry, the accumulator should be loaded with 1. Executing the third, instruction moves the content of the table entry at memory location 0+2008H to the accumulator. Since the
Page 196 :
172, , Introduc on to Embedded Systems, , offset address register, accumulator, is an 8bit register, the maximum size of the look up table is 256 bytes, (Base address + 0 to Base address + 255)., Another register, which is 16bit wide, used for indexed addressing is Program Counter (PC). The only, difference in using PC for indexed addressing when compared to DPTR is that the PC is not available to user, for direct manipulation and user cannot directly load the desired base address to the PC register by a MOV, instruction as in the case of DPTR. Instead the desired address is loaded to the PC by diverting the program, flow to the location where the Lookup table is held in the code memory by using a CALL instruction., First the desired table index is loaded to the accumulator register and a call is made to the location where, the lookup table is stored. For this type of tables, the index should be within 1 to 255 (including both). 0, cannot be used as an index since the execution of MOVC A,@A+DPTR increments the PC to the address of, the RET instruction’s memory location. If you use a 0 index along with the PC, the contents retrieved will, be the binary data corresponding to the RET instruction. Code memory lookup tables are usually used for, storing string constants and other configuration data. Another use of indexed addressing is the ‘case jump’, instruction in 8051. Here the jump instruction’s destination address is calculated as the sum of the base, pointer (PC) and the Accumulator data., , Example 1, Write an assembly program to display the numbers from 0 to 9 on a 7-segment common-anode LED display, which is connected to Port 2 of the 8051. The seven segment codes for displaying the numerals 0 to 9 on the, common anode LED is stored as lookup table in the code memory starting at 0050H. Use DPTR register for, holding the base address of the table., Please refer to the section on 7-segment LED Display given in Chapter 2 for more details on 7-segment, LED Display. Figure 6.4 illustrates the interfacing of common anode LED Display with Port 2 of 8051., VCC, , Vcc, , AT89C51, R, , Common anode, 7-segment LED display, , DP, , G, , F, , E, , D, , C, , P2.7, P2.6, P2.5, P2.4, P2.3, P2.2, P2.1, P2.0, , GND, , Fig. 6.4, , Circuit for interfacing 7-segment LED display with 8051, , B, , A
Page 197 :
173, , Programming the 8051 Microcontroller, , Now we need to design the different bit patterns (code) to be outputted to the Port 2 pins to display the, numbers from 0 to 9 on the LED Display. The following table explains the same. Refer to the LED segment, arrangement diagram given earlier for clarification., Digit, , DP, P2.7, , G, P2.6, , F, P2.5, , E, P2.4, , D, P2.3, , C, P2.2, , B, P2.1, , A, P2.0, , Code, (Hex), , 0, , 1, , 1, , 0, , 0, , 0, , 0, , 0, , 0, , C0, , 1, , 1, , 1, , 1, , 1, , 1, , 0, , 0, , 1, , F9, , 2, , 1, , 0, , 1, , 0, , 0, , 1, , 0, , 0, , A4, , 3, , 1, , 0, , 1, , 1, , 0, , 0, , 0, , 0, , B0, , 4, , 1, , 0, , 0, , 1, , 1, , 0, , 0, , 1, , 99, , 5, , 0, , 0, , 0, , 1, , 0, , 0, , 1, , 0, , 12, , 6, , 0, , 0, , 0, , 0, , 0, , 0, , 1, , 0, , 02, , 7, , 1, , 1, , 1, , 1, , 1, , 0, , 0, , 0, , F8, , 8, , 1, , 0, , 0, , 0, , 0, , 0, , 0, , 0, , 80, , 9, , 1, , 0, , 0, , 1, , 0, , 0, , 0, , 0, , 90, , Now the codes for displaying the digits and the port interfacing for the LED display is complete. The next, step required for setting up the decimal counter for counting from 0 to 9 is the development of firmware. The, flow chart given in Fig. 6.5 illustrates the firmware requirements for building the decimal counter., Start, , Store the display codes corresponding to 0 to 9 in, code memory location starting from 0050H, , 1. Initialise Port 2, 2. Initialise Stack Pointer, 3. De-select ADC chip, 4. Load DPTR with the base address of look-up, table stored in code memory, , Initialise Index Register to 0, , YES, , 1. Get the ‘Display Code’ from the code memory, address pointed by DPTR and Index Register, 2. Load P2 with the data retrieved from code, memory, , NO, 1.Wait for 1 second, 2. Increment Index Register, , Index Register = 9?, , Fig. 6.5, , Flowchart for displaying digits using 7-Segment LED Display
Page 199 :
175, , Programming the 8051 Microcontroller, , REPEAT: MOVC A,@A+DPTR ; Get the display code, MOV P2, A, ; Load P2 with Display code, CALL DELAY, ; Wait for 1 second, INC R7, ; Increment index, MOV A, R7, CJNE A, #10, REPEAT, ; Are all 9 digits displayed?, ; All 9 digits displayed. Reset counter to 0, JMP RESET, ;####################################################################, ;Routine for generating 1 second delay, ;Delay generation is dependent on clock frequency, ;This routine assumes a clock frequency of 12.00MHZ, ;LOOP1 generates 248 x 2 Machine cycles (496microseconds) delay, ;LOOP2 generates 200 x (496+2+1) Machine cycles (99800microseconds), ;delay. LOOP3 generate 10 x (99800+2+1) Machine cycles, ;(998030microseconds) delay, ;The routine generates a precise delay of 0.99 seconds, ;####################################################################, DELAY: MOV R2, #10, LOOP1: MOV R1, #200, LOOP2: MOV R0, #248, LOOP3: DJNZ R0, LOOP3, DJNZ R1, LOOP2, DJNZ R2, LOOP1, RET, END, ;END of Assembly Program, , 6.2, , THE 8051 INSTRUCTION SET, , As mentioned earlier, the 8051 Instruction Set is broadly classified into five, categories namely; Data transfer instructions, Arithmetic instructions, Logical, instructions, Boolean instructions and Program control transfer instructions., The following sections describe each of them in detail., , 6.2.1, , LO 2 Discuss what, an instruction and, instruction set is, , Data Transfer Instructions, , Data transfer instructions transfer data between a source and destination. The source can be an internal data, memory, a register, external data memory, code memory or immediate data. Destination may be an internal, data memory, external data memory or a register., , 6.2.1.1 Internal Data Transfer Opera ons, Internal data transfer instructions perform the movement of data between, register, memory location,, accumulator and stack. MOV instruction is used for data transfer between register, memory location and, accumulator. PUSH and POP instructions transfer data between memory location/register and stack. The, following table summarises the various internal data transfer instructions.
Page 200 :
176, , Introduc on to Embedded Systems, , Instruction, Mnemonic, MOV <dest>,, <src>, , Action, , Comments, , <dest> = <src>, , Copies the content of <src> to <dest>. <dest>, can be one of the registers B, R0, R1, … R7, any, SFR, a direct internal data memory or an internal, data memory pointed indirectly by the indirect, addressing register R0 or R1 and @. <src> can be, any of the above said locations or an immediate, constant. (General register to register based direct, and indirect data transfer (e.g. MOV R0, R1;, MOV @R0, @R1; MOV @R0, R1; MOV R0, @, R1; etc) is not allowed in the case of registers R0, to R7), Copies the content of <src> to Accumulator., <src> can be registers B, R0, R1, … R7, any SFR,, a direct internal data memory, or an internal data, memory pointed indirectly by indirect addressing, register R0 or R1 and @ or an immediate constant, Copies the content of A to destination. <dest> can, be registers B, R0, R1, …R7, any SFR, or a direct, internal data memory or an internal data memory, pointed indirectly by indirect addressing register, R0 or R1 and @, Loads DPTR register with a 16bit data (immediate addressing), Increment Stack Pointer register by one and stores, the content of <src> at the location pointed by SP, register., Retrieve the content from the location pointed by, stack pointer to <dest> and decrement SP register, by one, Exchange data between accumulator and a memory location/ register/a memory location pointed, indirectly by indirect addressing register., , MOV A,< src >, , A= <src>, , MOV < dest >, A, , <dest> =A, , MOV, DPTR,#const, PUSH <src>, , DPTR=16bit, data (const), SP=SP+1 (@, SP)=<src>, , POP <dest>, , <dest> = @ SP, SP = SP-1, , XCH A,<byte>, , XCHD A,@Ri, (i=0 or 1), , temp = A, A = byte, byte = temp, , Exchanges the low nibble (lower 4 bits) of ‘A’, with the low nibble of data pointed by indirect, addressing Register R0 or R1, , Machine, Cycles, 2†, , Exec. Time, (ms), 2*(fOSC/12), , 1, , fOSC/12, , 1, , fOSC/12, , 2, , 2*(fOSC/12), , 2, , 2*(fOSC/12), , 2, , 2*(fOSC/12), , 1, , fOSC/12, , 1, , fOSC/12, , MOV instruction copies the content of source to destination. Only the destination is modified. The source, data remains unchanged., , 6.2.1.2 Stack Memory Related Data Transfer, ‘Stack’ is an internal memory for storing variables temporarily. Stack memory is normally used for storing the, data during subroutine calls. In 8051, by default the stack memory is allocated from the memory location 07H, onwards by loading the stack pointer (SP) register with 07H on power on reset. PUSH instruction stores data, on stack memory. The PUSH instruction first increments the SP by one and copies the data to the memory, †, , For all data transfer instruction involving an immediate constant as the source, and scratchpad register R0 to R7 as the destination, (e.g. MOV R0,#00; MOV @R0, #00) the execution cycle is 1 machine cycle.
Page 201 :
177, , Programming the 8051 Microcontroller, , location pointed by the SP register. POP instruction retrieves the data, which is stored on the stack memory, using PUSH instruction. POP instruction copies the data stored in memory location pointed by SP register to, the variable given along with POP instruction and decrements the SP by one. In 8051 architecture the stack, memory grows upward in memory and follows Last In First Out (LIFO) method. PUSH and POP instructions, use only direct addressing mode and hence the instructions PUSH R0, PUSH R1, PUSH A, etc. are not, valid. They are valid only if the arguments are used with absolute addressing. Hence the valid instructions, corresponding to them are PUSH AR0, PUSH AR1, and PUSH ACC, etc. The operation of PUSH and POP, instructions are illustrated in Fig. 6.6 and Fig. 6.7., Registers, , Data memory, Memory, address, , 07H, , SP, R0, , Load R0, with 55, Get Contents of R0, , MOV R0, #55, PUSH AR0, , * Random Data, , Fig. 6.6, , Increment SP register, Store the Contents of, R0 at Memory Location, Pointed by SP, , 07H, , 55, , 08H, , Illustration of PUSH instruction, , Registers, SP, , *, , Data memory, , 08H, , Memory, address, , * Random data, , R0, , Load R0 with the, POPed Data, , POP AR0, , Retrieve the contents, of the memory location, Pointed by SP register, Decrement SP register, , *, , 07H, , 55, , 08H, , Fig. 6.7 Illustration of POP instruction, The upper 128 bytes of RAM are not implemented physically in the basic 8051 architecture and its, ROMless counterpart 8031. With these devices, if the SP is set to a location in the upper 128 byte area, the, PUSHed bytes will be lost and POPed bytes will be indeterminate., , 6.2.1.3 Data Exchange Instruc ons, The data exchange instructions exchange data between a memory location and the accumulator register., Data exchange instructions modify both memory location and accumulator register. 8051 supports two data, exchange instructions, namely, XCH A, <memloc> and XCHD A, @Ri., The XCH A,<memloc> instruction performs the exchange of the data at memory location ‘memloc’ with, the accumulator. By using MOV instructions the XCH instruction can be implemented as, MOV, MOV, , R0, A, A, memloc, , MOV, , memloc, R0, , ; ‘memloc’ is a memory in the range, ; 00H to 7FH, , It requires three instructions and 4 machine cycles and a temporary variable R0 to achieve this. Whereas, the XCH A, <memloc> accomplishes this task with a single instruction and one machine cycle. The XCHD
Page 202 :
178, , Introduc on to Embedded Systems, , A,@Ri (where i = 0 or 1) instruction exchanges the low nibbles between the accumulator and the data memory, pointed by the indirect memory register R0 or R1. Both XCH and XCHD are accumulator specific instructions., The operation of XCH A, <memloc> and XCHD A,@Ri instructions are illustrated in Figs 6.8 and 6.9., Registers, A, , Memory, address, , 0FH, , Data memory, , 07H, , F0H, , Before executing XCH A, 07H instruction, Registers, A, , Memory, address, , F0H, , Data memory, , 07H, , 0FH, , After executing XCH A, 07H instruction, , Fig. 6.8, , Illustration of XCH A, <memloc> Instruction, , Registers, A, , 0FH, , R0, , 07H, , Memory, address, , Data memory, , 07H, , F0H, , Before executing XCHD A, @R0 instruction, Registers, A, , 00H, , R0, , 07H, , Memory, address, , Data memory, , 07H, , FFH, , After executing XCHD A, @R0 instruction, , Fig. 6.9, , Illustration of XCHD A,@Ri Instruction, , 6.2.1.4 External Data Memory Instruc ons, External data memory instructions are used for transferring data between external memory and processor., The registers involved in external data memory instructions are the Data Pointer (DPTR) or the indirect, addressing register R0/R1 and the accumulator. Only indirect addressing works on external data memory, operations. If the external data memory is 16bit wide, a 16bit register DPTR is used for holding the 16 bit, address to function as the external memory pointer. During 16bit external data memory operations Port 0, emits the content of DPL register (Lower order 8bit address) and Port 2 emits the content of DPH register, (Higher order 8 bit address)., If the external data memory is only 8bit wide, either the DPTR or the indirect address register R0 or R1, can be used for holding the 8bit address to function as the external memory pointer. If DPTR is used as
Page 203 :
179, , Programming the 8051 Microcontroller, , the memory pointer register, Port 0 emits the content of DPL register (Lower order 8bit address) and Port, 2 emits the content of DPH register. If R0 or R1 is used as the memory pointer register, Port 0 emits the, contents of R0 or R1 register (Lower order 8bit address) and Port 2 emits the contents of its SFR register (P2, SFR). The instruction mnemonic used for external data transfer operation is MOVX and depending on the, memory pointer register the operand will be R0, R1 or DPTR. The accumulator is the implicit operand in, MOVX instruction. The direction of external data memory operation (Read or write operation) is determined, by the use of the accumulator register. If the accumulator register is used as the source register, the external, data memory operation is a Write operation and the WR\ signal is also asserted. The external data memory, operation is a Read operation if the accumulator is used as destination register. This also generates the RD\, signal., External data memory related instructions are listed in the table given below., Instruction Mnemonic, , Comments, , Machine Cycles, , Exec. Time (ms), , MOVX A,@Ri, , Read the content of external data memory (8bit, address) pointed by R0 or R1 to accumulator, , 2, , 2* (fOSC/12), , MOVX @Ri,A, , Write accumulator content to external data memory (8bit address) pointed by R0 or R1, , 2, , 2* (fOSC/12), , MOVX A,@DPTR, , Read the content of external data memory (16 bit, address) pointed by DPTR register to accumulator, , 2, , 2* (fOSC/12), , MOVX @DPTR,A, , Write accumulator content to external data memory (16bit address) pointed by DPTR register, , 2, , 2* (fOSC/12), , The following sample code illustrates how to read and write from and to an 8bit external memory., ; Method-1, ; Using Indirect register R0, MOV R0, #055H, , ;, ;, ;, ;, ;, , Let 55H be the external data memory, address, Reads the content of 55H to accumulator, Clear Accumulator, Writes 0 to external memory 55H, , MOVX A,@R0, MOV A, #00H, MOVX @R0, A, ; Method-2, ; Using Data Pointer (DPTR) Register, MOV DPTR, #55H, ; Let 55H be the external data memory, ; address, MOVX A,@DPTR, ; Reads the content of 55H to accumulator, MOV A, #00H, ; Clear Accumulator, MOVX @DPTR, A, ; Writes 0 to external memory 55H, , The following sample code illustrates how to read and write data from and to a 16bit external memory., MOV DPTR, #2055H ;, ;, MOVX A,@DPTR, ;, MOV A, #01H, ;, MOVX @DPTR, A, ;, , Let 2055H be the external data memory, address, Reads the content of 2055H to Accumulator, Load Accumulator with 1, Writes 1 to external memory 2055H
Page 204 :
180, , Introduc on to Embedded Systems, , Figure 6.10 is given the Instruction fetch and execute sequence for the MOVX instruction., Machine cycle (M1), S1, , S2, , S3, , S4, , S5, , Machine cycle (M2), T State, S6 S1 S2, , S3, , S4, , S5, , S6, , Clock Cycles, P P P P P P P P P P P P P P P P P P P P P P P P, 1 2 1 2 1 2 1 2 1 2 1 2 1 2 1 2 1 2 1 2 1 2 1 2, , ALE, , PSEN, RD, , PCH out, , P2, P0, , INST, in, , Fig. 6.10, , PCL, out, , INST, in, , DPH or P2 SFR out, ADDR, (DPL/Ri), out, , Data, in, , PCH out, PCL, out, , INST, in, , PCH ou, PCL, out, , Timing diagram for MOVX instruction when the program memory is external, , MOVX is a two machine cycle instruction. The opcode fetching starts at state-1 (S1) of the first machine, cycle and it is latched to the instruction register. A second program memory fetch occurs at State 4 (S4) of the, same machine cycle. Program memory fetches are skipped during the second machine cycle. This is the only, time program memory fetches are skipped. The instruction-fetch and execute sequence and timing remains, the same regardless the physical location of program memory (it can be either internal or external). If the, program memory is external, the Program Strobe Enable (PSEN) is asserted low on each program memory, fetch and it is activated twice per machine cycle (Fig. 6.10). Since there is no program fetch associated with, the second machine cycle of MOVX instruction, PSEN is not asserted during this (two PSEN signals are, skipped). During the second machine cycle of MOVX instruction, the address and data bus are used for data, memory access., The lower order address bus is multiplexed with the data bus in 8051 and Port 0 outputs the lower order, address bus during external memory operations and it is available at S5-S6 states of the first machine cycle., Since it is available only for a short duration of 1 to 1.5 states, it should be latched. The trigger for latch is, provided by the signal Address Latch Enable (ALE). ALE is asserted twice in each machine cycle (during S1, Phase 2 (S1P2) and S4 Phase 2 (S4P2)). Since data is outputted to or read from the external memory at State, 1 (S1) to State 3 (S3) of the second machine cycle, during a MOVX instruction, ALE is not emitted at S1P2, of the second machine cycle. Without a MOVX instruction ALE is emitted twice per each machine cycle and, it can be used as a clock signal to any device.
Page 205 :
181, , Programming the 8051 Microcontroller, , The control signal PSEN is not asserted if the program memory is internal to the chip. However, ALE, signal is asserted even if the program memory is internal., The external data memory timing for external data memory write is similar to the Read operation except, that the control signal used is WR\ instead of RD\ and the data for writing is available in the place of ‘Data, in’ in the above timing diagram . The timing for all signals remains the same., , 6.2.1.5 Code Memory Read Instruc ons, Code memory read instruction is used for reading from the code memory. There is only one instruction for, code memory read operation and it is MOVC. Detailed description of MOVC instruction is given in an earlier, section with subtitle “Indexed Addressing”. Please refer back., , 6.2.2, , Arithmetic Instructions, , Arithmetic instructions perform basic arithmetic operations including addition, subtraction, multiplication,, division, increment and decrement. The various arithmetic instructions supported by 8051 are listed below., Instruction, Mnemonic, ADD A,<loc>, , Action, A = A+<loc>, , ADDC, A,<loc>, , A= A+<loc>, + Carry bit, (PSW.7), , SUBB A,<loc>, , A=A-<loc>Carry bit, (PSW.7), , INC A, , A=A+1, , INC <loc>, , <loc > =, <loc> + 1, , INC DPTR, , DPTR =, DPTR + 1, A=A–1, , DEC A, DEC <loc>, , <loc > =, <loc> – 1, , Comments, Add the content of <loc> with accumulator and stores the, result in accumulator. <loc> can be registers B, R0, R1, …, R7 or any SFR or an immediate constant or an internal data, memory or an internal data memory pointed indirectly by, indirect addressing register R0 or R1 and @, Add the content of <loc> with accumulator and carry, bit and stores the result in accumulator. <loc> can be, registers B, R0,R1, …R7 or any SFR or an immediate, constant or an internal data memory or an internal, data memory pointed indirectly by indirect addressing, register R0 or R1 and @, Subtract the content of <loc> from accumulator and borrow bit and stores the result in accumulator. <loc> can, be registers B, R0,R1, …R7 or any SFR or an internal, data memory or an immediate constant or an internal, data memory pointed indirectly by indirect addressing, register R0 or R1 and @, Increments accumulator content by one. (Accumulator, Specific Instruction), Increments the content of <loc> by 1. <loc> can be, registers B, R0,R1, …R7, or any SFR or an internal data, memory or an internal data memory pointed indirectly, by indirect addressing register R0 or R1 and @, Increments the content of 16bit register DPTR by one., (DPTR Specific Instruction), Decrements accumulator content by one. (Accumulator, Specific Instruction), Decrements the content of <loc> by 1. <loc> can be, registers B, R0, R1, …R7 or any SFR or an internal data, memory or an internal data memory pointed indirectly, by indirect addressing register R0 or R1 and @, , Machine, Cycles, 1, , Exec. Time, (ms), fOSC/12, , 1, , fOSC/12, , 1, , fOSC/12, , 1, , fOSC/12, , 1, , fOSC/12, , 2, , 2*(fOSC/12), , 1, , fOSC/12, , 1, , fOSC/12
Page 206 :
182, , Introduc on to Embedded Systems, , MUL AB, , A=AxB, , DIV AB, , A = integer, part of [A/B], B=Remainder, of [A/B], , DA A, , Multiplies accumulator with B register and stores the, result in accumulator & B (Lower order byte of result, in accumulator and higher order byte in B register), Divides accumulator with B register and stores the result, in accumulator and remainder in B register, , 4, , 4*(fOSC/12), , 4, , 4*(fOSC/12), , Decimal adjust Accumulator. Used in BCD arithmetic, , 1, , fOSC/12, , 6.2.2.1 Addi on and Subtrac on, The 8051 supports the addition of 8bit binary numbers and stores the sum in the accumulator register. The, instructions ADD A,<loc> and ADDC A,<loc> are used for performing addition operations. Both of these, instructions are accumulator specific, meaning the accumulator is an implicit operand in these instructions., The ADD A,<loc> is used for performing a normal addition and the carry flag gets modified accordingly, on executing this instruction. If the addition results in an output greater than FFH, the carry flag is set and, the accumulator content will be the final result–FFH + carry. The carry flag is reset when the result of an, addition is less than or equal to FFH. The ADDC A,<loc> instruction operates in the same way as that of, ADD A,<loc> instruction except that it adds the carry flag with A and <loc>. The changes to the carry flag, on executing this instruction remains the same as that of executing the ADD A, <loc> instruction. Executing, these instructions modify the content of accumulator only and <loc> remains unchanged., The instruction SUBB A, <loc> performs the subtraction operation. The carry flag acts as the borrow, indicator in the subtraction operation. The SUBB A, <loc> instruction subtracts the borrow flag and the, contents pointed by <loc> from accumulator and modifies the accumulator with the result. The content of, <loc> remains unchanged. For performing a normal subtraction operation, first clear the carry flag and then, call the SUBB A, <loc> instruction. The carry (borrow) flag gets modified accordingly on executing this, instruction. If the subtraction results in a –ve number (‘A’ less than (<loc> + Carry)), the borrow (carry) flag, is set and the accumulator content will be the 2’s complement† representation of the result (e.g. Accumulator, contains 0FEH and borrow (carry) flag is 0, executing the instruction SUBB A, #0FFH results in –1 which is, represented in the accumulator by the 2’s complement form of 1. Hence the content of accumulator becomes, FFH (2’s complement form of 1) and the borrow (carry) flag is also set). The carry flag is reset when the result, of a subtraction is +ve (‘A’ is greater than (<loc> + Carry)). The SUBB A, <loc> instruction is accumulator, specific, meaning accumulator is an implicit operand for this instruction., *, , Example 1, The accumulator register contains 80H and B register contains 8FH. Add accumulator content with B register., Explain the output of the summation and the status of the carry flag after the addition operation., Adding 80H with 8FH results in 10FH. Since 10FH requires more than 8 bits to represent, the accumulator, holds only the least significant 8 bits of the result (Here 0FH). The carry bit CY present in the Program Status, Word (PSW) register is set to indicate that the output of the addition operation resulted in a number greater, than FFH. Figure 6.11 illustrates the addition operation and the involvement of Carry bit (CY)., , †, , *, , 2’s complement of a number = 1’s complement of the number +1
Page 207 :
183, , Programming the 8051 Microcontroller, , D7 D6 D5 D4 D3 D2 D1 D0, CY, , 1, , 0, , 0, , 0, , 0, , 0, , 0, , 0, , 80H, , B, , 1, , 1, , 0, , 0, , 0, , 1, , 1, , 1, , 1, , 8FH, , A, , CY, =1, , 0, , 0, , 0, , 0, , 1, , 1, , 1, , 1, , 0FH, , A, ADD A,B, , +, , Fig. 6.11, , Illustration of ADD instruction operation, , Example 2, Register R0 contains 0BH. Add the contents of register R0 with the sum obtained in the previous example, using ADDC instruction. Explain the output of the summation and the status of the carry flag after the, addition operation., The instruction ADDC A, R0 adds accumulator content with contents of register R0 and the carry flag, (CY). Before executing this instruction, the accumulator contains the sum of previous addition operation,, which is 0FH and the carry flag (CY) is in the set state. Register R0 contains 0BH. Executing the instruction, ADDC A, R0 adds 0FH with 0BH and 1. The resulting output is 1BH which is less than FFH. This resets the, carry flag. Accumulator register holds the sum. It should be noted that each addition operation sets or resets, the carry flag based on the result of addition, regardless of the previous condition of the carry flag. Figure, 6.12 explains the ADDC operation., D7 D6 D5 D4 D3 D2 D1 D0, 0, , A, ADDC A,R0, , 0, , 0, , 0, , 1, , 1, , 1, , 0FH, , CY, =1, , +, 0, , R0, , A, , 1, , CY, =0, , Fig. 6.12, , 0, , 0, , 0, , 0, , 0, , 0, , 1, , 0, , 1, , 1, , 1, , 1, , 1, , 1, , 1, , 0, , 1, , 1, , 0BH, , 1, , 1BH, , Illustration of ADDC instruction operation, , Example 3, The accumulator register contains 8FH and B register contains 0FH. The borrow Flag (CY) is in the set state., Subtract the contents of accumulator with borrow and B register. Explain what is the output of the subtraction, and the status of the borrow flag after the subtraction operation., 8051 supports only SUBB instruction for subtraction. The SUBB instruction subtracts the borrow flag, (CY) and the number to be subtracted, from accumulator. The subtraction operation is implemented by
Page 208 :
184, , Introduc on to Embedded Systems, , adding accumulator with the 2’s complement of borrow flag and the 2’s complement of the number to be, subtracted., The 2’s complement of borrow flag (CY=1) results in FFH. The 2’s complement of B register content, (0FH) yields F1H. The accumulator content is added with the 2’s complement of borrow flag (8FH + FFH), and the result (8E) is added with the 2’s complement of B register (8EH + F1H). This results in 7FH with the, borrow flag (CY) in the set state. The final step in the subtraction operation is complementing the borrow flag, (Carry Flag). A value of 1 for borrow flag after complementing indicates that the result is negative whereas, a value of 0 indicates that the result of subtraction is positive. If the result is negative, accumulator contains, the 2’s complement of the negative number. Figure 6.13 illustrates subtract with borrow operation and the, involvement of borrow bit (CY)., CY, =1, , 0, , 0, , 0, , 0, , 0, , 0, , 0, , 1, , 01H, , 1's Complement of, Carry, , 1, , 1, , 1, , 1, , 1, , 1, , 1, , 0, , FEH, , 2's Complement of, Carry = 1's, Complement of, Carry + 1, , 1, , 1, , 1, , 1, , 1, , 1, , 1, , 1, , FFH, , B, , 0, , 0, , 0, , 0, , 1, , 1, , 1, , 1, , 0FH, , 1's Complement of B, , 1, , 1, , 1, , 1, , 0, , 0, , 0, , 0, , F0H, , 2's Complement of B, = 1's Complement of, B+1, , 1, , 1, , 1, , 1, , 0, , 0, , 0, , 1, , F1H, , A, , 1, , 0, , 0, , 0, , 1, , 1, , 1, , 1, , 8FH, , 1, , 1, , 1, , 1, , FFH, , +, SUBB B, CY, 1, , A, , CY, =1, , 1, , 1, , 1, , 1, , 1, , 1, , 1, , 0, , 0, , 1, 1, , 0, , 1, , 1, , 1, , 1, , 1, , 1, , 0, , 8EH, , +, 1, , 1, , 1, , 1, , 0, , 0, , 0, , 1, , F1H, , 0, , 1, , 1, , 1, , 1, , 1, , 1, , 1, , 7FH, , 1, , A, , CY, =1, Complement, CY, =0, , Fig. 6.13, , 0, , 1, , 1, , 1, , 1, , 1, , 1, , 1, , Illustration of SUBB instruction operation, , A=, 7FH
Page 209 :
Programming the 8051 Microcontroller, , 185, , 6.2.2.2 Mul plica on and Division, The instruction MUL AB multiplies two 8bit unsigned numbers and stores the 16bit result in the register pair, A, B. The accumulator stores the lower order 8 bits of the result and B register stores the higher order 8 bits, of the result. The overflow flag (OV) is set when the product is greater than 0FFH and cleared otherwise. The, carry flag becomes cleared state irrespective of the product., The DIV AB instruction divides the content of accumulator register with the content of B register and stores, the integer part of the quotient (A/B) in accumulator and the modulus (A%B) in B register (e.g. If A contains, 03H and B contains 02H, executing the instruction DIV AB loads accumulator with 01H (3/2) and B register, with 01H (3%2). 8051 does not have a divide by zero interrupt mechanism to indicate a divide by zero error., However 8051 indicates the divide by zero condition by setting the overflow flag (OV) in the Program Status, Word (PSW) register. The values returned in A and B are undefined for a divide-by-zero operation., The overflow flag (OV) and carry flag (CY) are cleared for normal division operation., MUL and DIV instructions are accumulator and register B specific instructions. They work only with these, two registers. If register B is not used for multiplication and division, it can be used for temporary storage., , Example 1, Convert the binary number FFH present in the accumulator to unpacked BCD and store the resultant 3 digit, BCD number in consecutive memory locations starting from 20H, BCD numbers are numbers with base 10. BCD numbers use digits 0 to 9 for representing a number. They, are normally used for representing a meaningful decimal number. Each digit in the BCD number represents, the consecutive powers of 10. For example, the BCD number 255 is interpreted as 2 × 10² + 5 × 101 + 5, × 100. Binary numbers follow the base 2 numbering system. Regardless of the numbering system, digital, systems internally represent the numbers in binary format. For an 8bit word length controller/processor,, the maximum number value that can be represented in binary is 11111111, which is equivalent to FFH in, hexadecimal and 255 in decimal. For retrieving the digits of a decimal number, the number is divided with 10, repeatedly until the quotient is zero. The remainder from each division gives the successive LSB digits of the, corresponding BCD number. For example, for 255, the first division gives the quotient as 25 and remainder, as 5, hence the LSB digit for the BCD number is 5. The next division of the quotient by 10 gives 2 as quotient, and 5 as remainder. The remainder 5 forms the next LSB digit for the BCD. Performing one more division, with 10 on the quotient (2) gives 0 as quotient and 2 as remainder. This remainder acts as the MSB digit, for the corresponding BCD number. In fact for an 8bit binary number, only two divisions are required. The, remainders from the two consecutive divisions form the consecutive LSB digits for the BCD number and the, quotient after the second division becomes the MSB digit for the corresponding BCD number. The following, assembly code implements this principle. The DIVAB instruction performs the successive divisions with 10., ;####################################################################, ;binary_unpacked_bcd.src, ;Firmware for converting binary number to unpacked BCD, ;The binary number to be converted is present in the accumulator, ;The BCD corresponding to the converted binary is stored in;memory location starting from 20H with the least significant digit, ;of BCD stored in memory location 20H, ;Written & Compiled for A51 Assembler, ;Written by Shibu K V. Copyright (C) 2008, ;####################################################################, ORG 0000H, ; Reset vector
Page 212 :
188, , Introduc on to Embedded Systems, , pointed by <loc>. If the content pointed by the operand of DEC instruction is 00H, executing the DEC, instruction simply rolls over it to FFH. None of the status bits are modified to indicate this. The following, code snippet illustrates the usage of DEC instruction., MOV 00H,#80H, MOV A,#0FFH, DEC 00H, DEC A, , ;, ;, ;, ;, ;, ;, , Load Data memory location 00H (R0) with 80H, Load Accumulator with FFH, Decrement the contents of Data memorylocation 00H. It becomes 7FH, Decrement the content of Accumulator. Itbecomes FEH, , There is no specific instruction to decrement the DPTR register content by one in 8051 instruction set., However decrementing the DPTR can be achieved by using other instructions in the optimal way., , 6.2.2.4 Decimal Adjust, The DA A instruction adjusts the accumulator content to give a meaningful BCD result in BCD arithmetic., Binary Coded Decimal (BCD) is a number representation in numeric systems. In the BCD number system,, numerals from 0 to 9 are used for representing a number. Based on the number of BCD digits represented in a, single byte, the BCD numbers are known as packed and unpacked BCDs. In the unpacked BCD representation,, a single BCD digit (0 to 9) is represented by a single byte whereas in the packed BCD representation two, BCD digits (00 to 99) are represented using a single byte. ADD and ADDC instructions used for BCD, addition should follow a DA A instruction to bring the Accumulator content to a meaningful BCD result. It, should be noted that the DA A instruction will not convert a binary number to a BCD. The DA A instruction, always follow the ADD instruction., , Example 1, Write an assembly program to add two packed BCD numbers ‘28’ and ‘12’ stored in consecutive memory, locations starting from data memory address 50H. The result of the addition should be adjusted for BCD., The Assembly code snippet shown below illustrates the implementation., ;####################################################################, ;BCD_addition.src, ;Firmware for adding two packed BCD numbers, ;The BCD numbers to be added are present in the memlocation 50H & 51H, ;The resultant BCD number is held in Accumulator register, ;After addition the result is adjusted for BCD, ;Written & assembled for A51 Assembler, ;Written by Shibu K V. Copyright (C) 2008, ;####################################################################, ORG 0000H, ; Reset vector, JMP 0100H, ; Jump start of main program, ORG 0003H, ; External Interrupt 0 ISR location, RETI, ; Simply return. Do nothing, ORG 000BH, ; Timer 0 Interrupt ISR location
Page 215 :
191, , Programming the 8051 Microcontroller, , RRC A, , A = A>1, , Rotate the accumulator content 1 bit to the, right through carry bit. The LSB of the accumulator is shifted out to carry bit and content, of carry bit enters at the MSB position of the, accumulator, , 1, , fOSC/12, , SWAP A, , Before swap, A = Nib2 Nib1, After swap, A = Nib1 Nib2, , Exchanges between the low nibble and high, nibble of the accumulator., , 1, , fOSC/12, , The ANL instruction performs bitwise ANDing operation. The operation of ANL instruction is illustrated, below. Suppose the Accumulator contains 80H and if it is ANDed with an immediate constant 80H, the, following actions shown in Fig. 6.14 take place., Accumulator, , 1, , 0, , 0, , 0, , 0, , 0, , 0, , 0, , AND operation, , &, , &, , &, , &, , &, , &, , &, , &, , Constant, , 1, , 0, , 0, , 0, , 0, , 0, , 0, , 0, , 80H, , Result in, accumulator, , 1, , 0, , 0, , 0, , 0, , 0, , 0, , 0, , 80H, , Fig. 6.14, , 80H, , Illustration of ANL instruction operation, , Similarly the ORL instruction performs the bitwise ORing operation. For example, let us assume that the, accumulator contains 01H and it is ORed with an immediate data 80H. The result will be 81H and it is stored, in the accumulator. It is explained in Fig. 6.15., Accumulator, , 0, , 0, , 0, , 0, , 0, , 0, , 0, , 1, , ‘OR’ operation, , |, , |, , |, , |, , |, , |, , |, , |, , Constant, , 1, , 0, , 0, , 0, , 0, , 0, , 0, , 0, , 80H, , Result in, accumulator, , 1, , 0, , 0, , 0, , 0, , 0, , 0, , 1, , 81H, , Fig. 6.15, , 01H, , Illustration of ORL instruction operation, , The XRL instruction performs the bitwise XORing operation. The principle of XOR is that if both the, XORing bits are same (both are either 0 or 1) the output bit is 0 and if the XORing bits are complement, to each other the output bit is 1. For example, if the accumulator content is 81H and an XOR operation of, the accumulator with an immediate constant 80H yields 01H as output. The XRL instruction operation is, explained in Fig. 6.16.
Page 216 :
192, , Introduc on to Embedded Systems, , 1, , 0, , 0, , 0, , 0, , 0, , 0, , 1, , ^, , ^, , ^, , ^, , ^, , ^, , ^, , ^, , Constant, , 1, , 0, , 0, , 0, , 0, , 0, , 0, , 0, , 80H, , Result in, accumulator, , 0, , 0, , 0, , 0, , 0, , 0, , 0, , 1, , 01H, , Accumulator, ‘XOR’ operation, , Fig. 6.16, , 81H, , Illustration of XRL instruction operation, , The CLR A and CPL A instructions are accumulator specific instructions. The CLR A instruction clears, the content of accumulator (loads accumulator with 00H), whereas the CPL A instruction complements, the accumulator content (negates the accumulator content). Both CLR A and CPL A instructions are single, machine cycle instructions., Assuming accumulator contains F0H, Fig. 6.17 illustrates the operation of CLR A and CPL A, instructions., Accumulator, Accumulator after CLR A, instruction execution, , 1, , 1, , 1, , 1, , 0, , 0, , 0, , 0, , F0H, , 0, , 0, , 0, , 0, , 0, , 0, , 0, , 0, , 00H, , (a) CLR A instruction operation, Accumulator, , 1, , 1, , 1, , 1, , 0, , 0, , 0, , 0, , F0H, , 0, , 0, , 0, , 0, , 1, , 1, , 1, , 1, , 0FH, , ‘CPL’ operation, , (b) CPL A instruction operation, , Fig. 6.17, , Illustration of (a) CLR A instruction operation (b) CPL A instruction operation, , Rotate instructions rotates the bits of the Accumulator. All Rotate instructions are Accumulator specific, instructions and Accumulator is the implicit register for rotate operations. Accumulator bits can be either, rotated to left or right., The RL A instruction rotates the accumulator bits to the left by one position and the MSB of the accumulator, comes in place of the LSB. For example, the accumulator contains 80H, after executing an RL A instruction,, the contents of the accumulator will become 01H. It is illustrated in Fig. 6.18., The RLC A instruction is similar in operation to RL A instruction except that in RLC A instruction the MSB, of the Accumulator is shifted to the Carry bit (CY) and the content of carry flag at the moment of execution of, the RLC A instruction is shifted to the LSB of Accumulator. The operation of RLC A instruction is illustrated, in Fig. 6.19. Assuming the Accumulator contains 80H and the carry bit is in the cleared state (0). Executing, the RLC A instruction sets the carry flag and modifies the Accumulator content to 00H., One more execution of the RLC A instruction will change the accumulator content to 01H and resets the, carry flag.
Page 217 :
193, , Programming the 8051 Microcontroller, , Accumulator, Result in Accumulator, after RLA instruction, execution, , 1, , 0, , 0, , 0, , 0, , 0, , 0, , 0, , 80H, , 0, , 0, , 0, , 0, , 0, , 0, , 0, , 1, , 01H, , Illustration of RL A instruction operation, , Fig. 6.18, , CY, 0, 1, , Accumulator, , 0, , 0, , 0, , 0, , 0, , 0, , 0, , 0, , 0, , 0, , 0, , 80H, , CY, 1, Result in Accumulator, after RLC A instruction, execution, , Fig. 6.19, , 0, , 0, , 0, , 0, , 00H, , Illustration of RLC A instruction operation, , The RR A instruction rotates the accumulator bits to the right by one position and the LSB of the, accumulator comes in place of the MSB. For example if the accumulator contains 01H, after executing the, RR A instruction, the contents of the accumulator will become 80H (Fig. 6.20)., , Accumulator, Result in Accumulator, after RR A instruction, execution, , Fig. 6.20, , 0, , 0, , 0, , 0, , 0, , 0, , 0, , 1, , 01H, , 1, , 0, , 0, , 0, , 0, , 0, , 0, , 0, , 80H, , Illustration of RR A instruction operation, , The RRC A instruction is similar to RLC A instruction except that in RRC A instruction the LSB of the, accumulator is shifted to the carry bit (CY) and the content of carry flag at the moment of execution of, RRC A instruction is shifted to the MSB of the accumulator. Assuming that the accumulator contains 01H, and the carry bit is in the set state (1). Executing the RRC A instruction sets the carry flag and modifies the, accumulator content to 80H (Fig. 6.21)., The SWAP A instruction interchanges the lower and higher order nibbles of the Accumulator. Assuming, the accumulator contains F5H, executing SWAP A instruction modifies the accumulator content to 5FH., The SWAP A instruction shown in Fig. 6.22 is very helpful in BCD to binary conversion.
Page 218 :
194, , Introduc on to Embedded Systems, , CY, 1, Accumulator, , 0, , 0, , 0, , 0, , 0, , 0, , 1, , 0, , 0, , 0, , 0, , 01H, , CY, , Carry Flag after RRC A, instruction execution, , 1, , Result in Accumulator, after RRC A, instruction execution, , Fig. 6.21, , 0, , 1, , 0, , 0, , 0, , 80H, , Illustration of RRC A instruction operation, , Accumulator, , 1, , 1, , 1, , 1, , 0, , 1, , 0, , 1, , F5H, , Result in Accumulator, after SWAP A instruction, execution, , 0, , 1, , 0, , 1, , 1, , 1, , 1, , 1, , 5FH, , Higher Nibble, , Lower Nibble, , Fig. 6.22 Illustration of SWAP A instruction operation, , 6.2.4, , Boolean Instructions, , The 8051 CPU provides extensive support for bit manipulation instructions. Internal RAM of 8051 contains, 128 bit-addressable memory and all SFRs whose address ends with 0H and 8H are bit addressable. Boolean, instructions are used for performing various operations like bit transfer, bit manipulation, logical operations, on bits, program control transfer based on bit state, etc., The carry bit ‘C’, present in the Special Function Register PSW, takes the role of accumulator in all bit, related operations. The various Boolean instructions supported by the 8051 CPU are listed below. It is to be, noted that all bit access is through direct addressing only., Instruction, Mnemonic, , Action, , MOV C, Bit, , C = Bit, , MOV Bit, C, , Bit = C, , CLR C, CLR Bit, , Comments, , Machine, Cycles, , Exec. Time, (ms), , Moves Bit to carry flag, , 1, , fOSC/12, , Moves carry flag to Bit, , 2, , 2*(fOSC/12), , C=0, , Clears carry flag, , 1, , fOSC/12, , Bit = 0, , Clears specified Bit, , 1, , fOSC/12, , Bit manipulation & transfer Instructions
Page 219 :
195, , Programming the 8051 Microcontroller, , SETB C, , C=1, , Sets carry flag, , 1, , fOSC/12, , SETB Bit, , Bit = 1, , Sets specified Bit, , 1, , fOSC/12, , Logical Operations on Bits, ANL C, Bit, , C = C & Bit, , Logical AND Carry flag with Bit and store the, result in Carry flag, , 2, , 2*(fOSC/12), , ANL C, /Bit, , C=C&, (.NOT. Bit†), , Logical AND the complemented value of Bit with, Carry flag and store the result in Carry flag, , 2, , 2*(fOSC/12), , ORL C, Bit, , C = C | Bit, , Logical OR Carry flag with Bit and store the result, in Carry flag, , 2, , 2*(fOSC/12), , 2, , 2*(fOSC/12), , Complements the Carry flag, , 1, , fOSC/12, , Complements Bit, , 1, , fOSC/12, , ORL C, /Bit, , C= C | (.NOT. Logical OR the complemented value of Bit with, Bit††), Carry flag. Result in Carry flag, , CPL C, , C=.NOT.C, , CPL Bit, , C=.NOT. Bit, , Program Control transfer based on Bit status, JC rel, , If (C), Jump to rel, , Jump to the relative address ‘rel’ if Carry flag is 1, , 2, , 2*(fOSC/12), , JNC rel, , If (!C), Jump to rel, , Jump to the relative address ‘rel’ if Carry flag is 0, , 2, , 2*(fOSC/12), , JB Bit, rel, , If (Bit), Jump to rel, , Jump to the relative address ‘rel’ if the specified Bit, is 1, , 2, , 2*(fOSC/12), , JNB Bit, rel, , If (!Bit), Jump to rel, , Jump to the relative address ‘rel’ if the specified Bit, is 0, , 2, , 2*(fOSC/12), , If the specified Bit is 1, clear the bit and jump to the, relative address ‘rel’, , 2, , 2*(fOSC/12), , If (Bit), {, JBC Bit, rel, , Clear Bit;, Jump to rel;, }, , The Boolean instructions are very useful in bit manipulation operation for bit-addressable SFRs., Manipulation of port status registers (P0 to P3) is a typical example. The usage of Boolean instructions is, illustrated below., MOV C, P2.0, MOV P2.0, C, SETB C, CLR C, ANL C, P2.0, , †, , ;, ;, ;, ;, ;, ;, , Load carry flag with Port pin 2.0’s status., Load Port 2.0 latch with content of carry flag, Set the carry flag, Clear carry flag, Logical AND P2.0 Latch bit with Carry flag and, load Carry bit with the result, , The actual state of the bit remains unchanged. If bit 0H is in the cleared state, executing the instruction ANL C, /0H will not change, the state of bit 0H to set., ††, The actual state of the Bit remains unchanged. If bit 0H is in the cleared state, executing the instruction ORL C, /0H will not change, the state of bit 0H to set.
Page 220 :
196, , Introduc on to Embedded Systems, , The JC rel and JNC rel instructions has got special significance in comparison operation. The 8051, supports only one compare instruction, CJNE, which checks only for the equality of the register/data pair, compared. There is no built in instruction for checking above or below condition (Compare and jump if above, and Compare and jump if below). These conditions can be checked by using the JC and JNC instructions in, combination with the CJNE instruction. The CJNE instruction followed by the JNC instruction implements, the Compare and jump if above condition and the CJNE instruction followed by the JC instruction implements, the Compare and jump if below condition. The following code snippet illustrates the same. Assume that the, accumulator content is 50H and it is compared against 51H., //Implementation of Compare and Jump if above, CJNE A, #51H,above?, ; Check whether accumulator content is greater than 51H, ; The Carry flag is cleared if Accumulator >= const, above?: JNC acc_high, ; Accumulator < 51H. Do the rest of processing here, acc_high:, ; Accumulator >= 51H. Do the rest of processing here, //Implementation of Compare and Jump if below, CJNE A, #51H, below?, ; Check whether accumulator content is less than 51H, ; The Carry flag is set if Accumulator < const, below?: JC acc_low, Accumulator >= 51H. Do the rest of processing here, acc_low: ; Accumulator < 51H. Do the rest of processing here, , 6.2.5, , Program Control Transfer Instructions, , The Program control transfer instructions change the program execution flow. The 8051 instruction set supports, two types of program control transfer instructions namely; Unconditional program control instructions and, Conditional program control instructions. They are explained below., , 6.2.5.1 Uncondi onal Program Control Transfer Instruc ons, The unconditional program control instructions transfer the program flow to any desired location in the code, memory. The unconditional program control instructions supported by 8051 are listed below., Instruction Mnemonic, , Machine Cycles, , Exec. Time (ms), , Jump to the specified address, , 2, , 2*(fOSC/12), , Jump to the address (A+DPTR), , 2, , 2*(fOSC/12), , Call subroutine located at the code, memory ‘address’, , 2, , 2*(fOSC/12), , RET, , Return from a subroutine, , 2, , 2*(fOSC/12), , RETI, , Return from an Interrupt routine, , 2, , 2*(fOSC/12), , NOP, , No operation (Do nothing), , 1, , fOSC/12, , JMP address, JMP @A+DPTR, CALL address, , Action, , Comments
Page 221 :
Programming the 8051 Microcontroller, , 197, , Jump Instruc ons The instruction JMP represents three type of jumps. They are SJMP, LJMP and AJMP, and they are used in appropriate contexts. If the programmer is not interested in analysing the contexts, he/, she can simply use the JMP instruction., SJMP instruction stands for Short Jump. The destination address is given as an offset to the current address, held by the Program Counter (PC). The SJMP instruction is a two byte instruction consisting of the opcode, for SJMP and the relative offset address which is one byte. The jump distance for the SJMP instruction is, limited to the range of –128 to +127 bytes relative to the instruction following the jump., LJMP instruction stands for Long Jump. The destination address for LJMP is given as the real physical, address of the code memory location to which the jump is intended. The LJMP instruction is a three byte, instruction consisting of the opcode for LJMP and the two byte physical address of the location to which the, program flow is to be diverted. The jump location can be anywhere within the 64K program memory., The third type of jump instruction AJMP stands for Absolute Jump. The AJMP instruction encodes the, destination address as 11-bit constant. The instruction is two byte long consisting of the opcode, which itself, contains higher 3 bits of the 11-bit constant. Rest 8 bits of the destination address is held by the second byte, of the instruction. When an AJMP instruction is executed, these 11 bits are substituted for the lower 11 bits in, the Program Counter (PC). The higher 5 bits of the Program Counter remains the same. Hence the destination, will be within the same 2K block of the current instruction. In general AJMP is used for jumping within a, memory block., The programmer need not bother about handling these three jumps, what he/she can do is simply provide, the destination address as label or a 16 bit constant. The assembler converts the JMP instruction to any of the, three jump instruction depending on the context., Case jumps for diverting program execution flow dynamically can be implemented using JMP, @A+DPTR instruction. The destination address is computed during run time as the sum of the DPTR register, content and accumulator. Normally DPTR is loaded with the address of a jump table which holds jump, instructions to the memory location corresponding to a ‘case’. For an n-way branching requirement, the, accumulator is loaded with 0 through n–1. The following code snippet illustrates the implementation of a, switch case statement using JMP @ A+DPTR., //switch case in ‘Embedded C’, switch (var), {, Case0:, // Action…, Case1:, // Action…, Case2:, // Action…, }, , Corresponding switch case implementation in 8051 Assembly using JMP @ A+DPTR, var EQU 50H ;Assume memory location 50H is holding variable ‘var’, MOV DPTR, #CASE_TABLE ;Load the base address of jump table, MOV A,var; Load Accumulator with the case index, RL A ; Convert the case table index to corresponding offset, JMP @A+DPTR ; Jump to the case condition, ;###################################################################
Page 222 :
198, , Introduc on to Embedded Systems, , CASE_TABLE:, AJMP CASE0 ; Jump to location implementing code for CASE0, AJMP CASE1 ; Jump to location implementing code for CASE1, AJMP CASE2 ; Jump to location implementing code for CASE2, CASE0:, ; Action corresponding to case0, CASE1:, ; Action corresponding to case1, CASE2:, ; Action corresponding to case2, , Locations CASE0, CASE1 and CASE2 should contain the action item to be implemented for each case, statement., The subroutine calling instruction CALL is of two types; namely LCALL and ACALL. LCALL is a three, byte instruction of which the first byte represents the opcode and the second and third bytes hold the physical, address of the program memory where the subroutine, which is to be executed, is located. For LCALL the, subroutine can be anywhere within the 64K byte of program memory. ACALL is similar to AJMP. ACALL is, a two byte instruction of which the first byte holds the opcode as well as the higher 3 bits of the 11-bit address, of the location where the subroutine is located. The second byte holds the remaining 8 bits of the address, location. ACALL is used for calling a subroutine which is within the 2K block of the instruction, calling the, subroutine., RET instruction performs return from a subroutine call. Executing the RET instruction brings the program, flow back to the instruction following the CALL to the subroutine. RETI performs the return from an interrupt, routine. RETI instruction is similar to the RET instruction in all respect except that the RETI informs the, interrupt system that the interrupt in progress is serviced., The NOP instruction does not perform anything specific. It simply forces the CPU to wait for one machine, cycle. It is very useful for generating short waits. It simply eats up the processor time. For example, if you, need a short delay between the toggling of a control line/device select line or port pin, simply add some NOP, instructions. The following code snippet illustrates the usage of NOP instruction in programming., SETB P2.0, NOP, NOP, CLR P2.0, , ; Pull P2.0 line HIGH, ; Hold P2.0 line HIGH for 2 machine cycles, ; Release P2.0 line, , 6.2.5.2 Condi onal Program Control Transfer Instruc ons, The conditional program control transfer instructions transfer the program flow depending on certain, conditions. The program flow is diverted from the normal line only if a specified condition is met. The, conditional program control transfer instructions supported by 8051 are listed below., Instruction, Mnemonic, , Action, , Comments, , Machine, Cycles, , Exec. Time, (ms), , JZ rel, , If (A == 0), Jump to ‘rel’, , Jump to the relative address ‘rel’ if Accumulator, content is zero., , 2, , 2*(fOSC/12), , JNZ rel, , If (A != 0), Jump to ‘rel’, , Jump to the relative address ‘rel’ if Accumulator, content is non zero., , 2, , 2*(fOSC/12), , <loc>=<loc>–1, If(<loc>!=0), Jump to ‘rel’, , Decrement the contents of <loc> and jumps to, the relative address ‘rel’ if content of <loc> is non, zero <loc> can be a direct memory or scratchpad, registers R0 through R7 or any SFR., , DJNZ <loc>, rel, , 2, , 2*(fOSC/12)
Page 223 :
199, , Programming the 8051 Microcontroller, , CJNE A, <loc>,, rel, , CJNE <loc>,, #data, rel, , If (A!=<loc>), Jump to ‘rel’, , Compares the content of Accumulator with the, content of <loc> and jumps to the relative address, ‘rel’ if both are not equal. <loc> can be a direct, memory or an immediate constant., , 2, , 2*(fOSC/12), , If (<loc>!= #data), Jump to ‘rel’, , Compares the content of <loc> with an immediate constant and jumps to the relative address, ‘rel’ if both are not equal. <loc> can be a memory, pointed indirectly or register R0 through R7 or, Accumulator., , 2, , 2*(fOSC/12), , All the conditional branching instructions specify the destination address by relative offset method and, so the jump locations are limited to –128 to +127 bytes from the instruction following the conditional jump, instruction. Even if the user specifies the actual address, the assembler converts it to an offset at the time of, assembling the code., Unlike the 8085 and 8086 CPU architecture, there is no zero flag for 8051. The instructions JZ and, JNZ instructions implement the zero flag check functionality by checking the accumulator content for zero., DJNZ instruction is used for setting up loop control and generating delays. CJNE instruction compares two, variables and check whether they are equal. CJNE instruction in combination with the carry flag can be used, for testing the conditions ‘greater than’, ‘greater than or equal’ and ‘less than’. The two bytes in the operand, field of CJNE are taken as unsigned integers. If the first is less than the second, the Carry bit is set (1). If, the first is greater than or equal to the second, the carry bit is cleared. Boolean instructions are also used for, conditional program control transfer. Please refer to the “Program Control Transfer based on bit status” under, the Boolean Instructions section for more details., Please refer to the Online Learning Centre for the Complete 8051 Instruction Set reference, , Summary, � An Instruction consists of two parts namely; Opcode and Operand(s). The Opcode tells the processor, what to do on executing an instruction. Operand(s) is the parameter(s) required by opcode LO1, to complete the action, � Addressing Mode refers to the way in which an operand is specified in an instruction along with the, opcode, LO1, � Direct Addressing, Indirect Addressing, Register Addressing, Immediate Addressing and Indexed, Addressing are the addressing modes supported by 8051, LO1, � Instructions in which the register operand is implicitly specified by some bits of the opcode referred, as register Instructions, whereas instructions which implicitly work on certain specific, LO2, registers are known as Register Specific Instructions, � The instruction set of 8051 family microcontroller is broadly classified into five categories, namely;, Data transfer instructions, Arithmetic instructions, Logical instructions, Boolean, LO2, instructions and Program Control Transfer instructions, � ‘Stack’ is an internal memory for storing variables temporarily. The instruction PUSH saves data, to the stack and the instruction POP retrieves the pushed data from the stack memory, LO2, � Data transfer instructions transfer data between a source and destination. The data transfer can be, between register or memory (internal or external). Arithmetic instructions perform arithmetical, operations like addition, subtraction, multiplication, division, increment and decrement, LO2
Page 224 :
200, , Introduc on to Embedded Systems, , � Logical instructions perform logical operations such as ‘ORing’, ‘ANDing’, ‘XORing’,, LO2, complementing, clearing, bit rotation and swapping nibbles of a byte, etc, � Boolean instructions perform various operations like bit transfer, bit manipulation, logical, operations on bits, program control transfer based on bit state, etc. The carry bit ‘C’, present in the, Special Function Register PSW, takes the role of Accumulator in all bit related LO2, operations, � Program Control transfer instructions change the program execution flow. The 8051 instruction set, supports two types of program control transfer instructions namely; Unconditional, LO2, program control instructions and Conditional program control instructions, � The unconditional program control instructions transfer the program flow to any desired location, in the code memory. JMP, CALL, RET, RETI and NOP are the unconditional program, LO2, control transfer instructions in 8051 instruction set, � The conditional program control transfer instructions transfer the program flow depending on, certain conditions. The program flow is diverted from the normal line only if a specified condition is, met. Jump on Zero (JZ), Jump on Non Zero (JNZ), Decrement and Jump if Non Zero (DJNZ),, Compare and Jump if not equal (CJNE), Jump if specified bit is set (JB), Jump if specified bit is not, set (JNB), Jump if the bit is set and clear the bit (JBC), Jump if Carry flag is set (JC) and Jump if, Carry flag is not set (JNC) are the conditional program control transfer instructions in, LO2, 8051, � The DJNZ instruction is used for setting up loop control and generating delays. CJNE instruction, compares two variables and check whether they are equal. CJNE instruction in combination with, the Carry flag can be used for testing the conditions ‘greater than’, ‘greater than or equal’ LO2, and ‘less than’, , Keywords, Opcode: The command that tells the processor what to do on execu ng an instruc on, [LO 1], Operand(s): The parameter(s) required by an opcode to complete the ac on, [LO 1], Addressing Mode: The way in which an operand is specified in an instruc on along with opcode, [LO 1], Direct Addressing: The addressing mode in which the operand is specified as direct memory address [LO 1], Indirect Addressing: The addressing mode in which the operand is specified as memory address indirectly,, using indirect addressing registers, [LO 1], Register Addressing: Addressing mode in which the operand is specified as Registers, [LO 1], Register Instruc ons: Instruc ons in which the register operand is implicitly specified by some bits of the, opcode, [LO 1], Register Specific Instruc ons: Instruc ons which implicitly work on certain specific registers only, [LO 1], Immediate Addressing: Addressing mode in which the operand is specified as immediate constants [LO 1], Indexed Addressing: Addressing mode in which the operand is specified through an index register [LO 1], Data Transfer Instruc ons: Instruc ons for transferring data between a source and des na on, [LO 2], Stack: Internal memory for storing variables temporarily, [LO 2], PUSH: Instruc on for pushing data to the stack memory, [LO 2], POP: Instruc on for retrieving the pushed data bytes from stack memory, [LO 2]
Page 225 :
Programming the 8051 Microcontroller, , 201, , Data Exchange Instruc ons: Instruc ons for exchanging data between a memory loca on and the accumulator, register in 8051 architecture, [LO 2], External Data Memory Instruc on: Instruc on for transferring data between external memory and processor, , [LO 2], Arithme c Instruc ons: Instruc ons for performing basic arithme c opera ons including addi on, subtrac on,, mul plica on, division, increment and decrement, [LO 2], 2’s Complement: A binary data representa on used in subtrac on opera on, [LO 2], Binary Coded Decimal (BCD): Numbers with base 10. Represented using digits 0 to 9, [LO 2], Unpacked BCD: A single BCD digit (0 to 9) represented in a single byte, [LO 2], Packed BCD: Two BCD digits (00 to 99) represented using a single byte, [LO 2], Decimal Adjust Accumulator (DAA): An instruc on for adjus ng the accumulator content to give a meaningful, BCD, a er BCD arithme c, [LO 2], Logical Instruc ons: Instruc ons for performing logical opera ons such as ‘ORing’, ‘ANDing’, ‘XORing’,, complemen ng, clearing, bit rota on and swapping nibbles of a byte, etc, [LO 2], Boolean Instruc ons: Instruc ons for performing various opera ons like bit transfer, bit manipula on, logical, opera ons on bits, program control transfer based on bit state, etc, [LO 2], , Objec ve Ques ons, 1. What are the different addressing modes supported by 8051?, (a) Direct Addressing, (b) Indirect Addressing, (c) Register Addressing, (d) Indexed Addressing, (e) Immediate Addressing, (f) All of these, 2. Which is the addressing mode for the instruction MOV A, #50H, (a) Direct, (b) Indirect, (c) Immediate, (d) None of these, 3. Which is the addressing mode for the instruction MOV A, 50H, (a) Direct, (b) Indirect, (c) Immediate, (d) None of these, 4. Which is the addressing mode for the instruction MOV A, @R0, (a) Direct, (b) Indirect, (c) Immediate, (d) None of these, 5. Which is the addressing mode for the instruction MOVC A, @A+DPTR, (a) Direct, (b) Indirect, (c) Immediate, (d) None of these, 6. Code memory starting from 0050H holds a lookup table of 10 bytes. The first element of the lookup table is, 00H. What is the content of accumulator after executing the following piece of code?, MOV A, #00H, LCALL TABLE, NOP, ORG 004EH, TABLE: MOVC A, @A+PC, RET, (a) 00H, (b) 22, (c) 22H, (d) Undefined, (e) None of these
Page 227 :
Programming the 8051 Microcontroller, , 203, , 15. How many ‘program memory fetches’ are skipped during the execution of MOVX instruction?, (a) 1, (b) 2, (c) 3, (d) 4, 16. The Address Latch Enable (ALE) signal is asserted how many times in a machine cycle?, (a) 1, (b) 2, (c) 3, (d) 4, 17. How many times the ALE signal is skipped during the execution of a MOVX instruction?, (a) 1, (b) 2, (c) 3, (d) 4, 18. Which of the following is true about MOVC instruction, (a) Used for reading from Program memory (b) Uses Indexed Addressing technique, (c) Both a & b, (d) None of these, 19. The content of Accumulator is FFH and the Carry Flag is in the cleared state. What will be the contents of, Accumulator and carry flag after executing the instruction ADD A,#1, (a) Accumulator = 01H; Carry flag = 1, (b) Accumulator = 01H; Carry flag = 0, (c) Accumulator = 00H; Carry flag = 0, (d) Accumulator = 00H; Carry flag = 1, 20. Accumulator register contains 0FH and the Carry flag CY is in the set state. What will be the state of Carry, flag after executing the instruction ADD A,#0F0H, (a) 1, (b) 0, (c) Indeterminate, 21. The content of the accumulator is FFH and the Carry flag is in the cleared state. What will be the contents of, the accumulator and carry flag after executing the instruction ADDC A,#1, (a) Accumulator = 01H; Carry flag = 1, (b) Accumulator = 01H; Carry flag = 0, (c) Accumulator = 00H; Carry flag = 0, (d) Accumulator = 00H; Carry flag = 1, 22. Accumulator register contains 0FH and the Carry flag CY is in the cleared state. What will be the contents, of Carry flag and Accumulator after executing the instruction SUBB A,#0F0H, (a) Accumulator = E1H; Carry flag = 1, (b) Accumulator = E1H; Carry flag = 0, (c) Accumulator = 1FH; Carry flag = 0, (d) Accumulator = 1FH; Carry flag = 1, 23. Accumulator register contains F0H and the Carry flag CY is in the cleared state. What will be the contents, of the Carry flag and the accumulator after executing the instruction SUBB A,#0FH, (a) Accumulator = E1H; Carry flag = 1, (b) Accumulator = E1H; Carry flag = 0, (c) Accumulator = 1FH; Carry flag = 0, (d) Accumulator = 1FH; Carry flag = 1, 24. Accumulator register contains 0FFH and the B register contains 02H. What will be the contents of the, Accumulator and B register after executing the instruction MUL AB, (a) Accumulator = 0FEH; B = 01H, (b) Accumulator = 00H; B = 0FEH, (c) Accumulator = 0FEH; B = 00H, (d) Accumulator = 01H; B = 0FEH, 25. Accumulator register contains 0FFH, B register contains 02H and the Carry flag is in the cleared state. What, will be the contents of the Carry flag and Overflow flag after executing the instruction MUL AB, (a) Carry flag = 1; Overflow flag = 0, (b) Carry flag = 0; Overflow flag = Remains same as the previous value, (c) Carry flag = 1; Overflow flag = 1, (d) Carry flag = 0; Overflow flag = 1, 26. Accumulator register contains 0FFH, B register contains 02H and the Overflow flag is in the cleared state., What will be the contents of the Carry flag and Overflow flag after executing the instruction MUL AB, (a) Carry flag = remains same as the previous value; Overflow flag = 0, (b) Carry flag = remains same as the previous value; Overflow flag = 1, (c) Carry flag = 1; Overflow flag = 1, (d) Carry flag = 0; Overflow flag = 1, 27. Accumulator contains 0FFH and the B Register contains 02H. What will be the contents of the accumulator, and B register after executing the instruction DIV AB
Page 229 :
Programming the 8051 Microcontroller, , 39., , 40., , 41., , 42., , 43., , 44., , 45., , 46., , 47., , 48., , 49., , 205, , (a) Accumulator = 7FH; Carry flag = 0, (b) Accumulator = 7FH; Carry flag = 1, (c) Accumulator = 00H; Carry flag = 0, (d) Accumulator = 00H; Carry flag = 1, What changes will happen on executing the instruction CLR 00H, (a) The code memory location 00H becomes 00H, (b) The data memory location 00H becomes 00H, (c) The external data memory location 00H becomes 00H, (d) The LS Bit of the data held by data memory location 20H becomes 0, Accumulator register contains 0FH and carry flag is in the set state. What will be the contents of the, Accumulator and carry flag after executing the instruction CPL A, (a) Accumulator = 0FH; Carry flag = 0, (b) Accumulator = 0FH; Carry flag = 1, (c) Accumulator = F0H; Carry flag = 0, (d) Accumulator = F0H; Carry flag = 1, Accumulator register contains 01H and carry flag is in the set state. What will be the contents of Accumulator, and carry flag after executing the instruction RL A, (a) Accumulator = 02H; Carry flag = 0, (b) Accumulator = 02H; Carry flag = 1, (c) Accumulator = 80H; Carry flag = 0, (d) Accumulator = 80H; Carry flag = 1, Accumulator register contains 01H and carry flag is in the set state. What will be the contents of Accumulator, and carry flag after executing the instruction RLC A, (a) Accumulator = 02H; Carry flag = 0, (b) Accumulator = 02H; Carry flag = 1, (c) Accumulator = 03H; Carry flag = 0, (d) Accumulator = 03H; Carry flag = 1, Accumulator register contains 01H and carry flag is in the set state. What will be the contents of the, accumulator and carry flag after executing the instruction RR A, (a) Accumulator = 02H; Carry flag = 0, (b) Accumulator = 02H; Carry flag = 1, (c) Accumulator = 80H; Carry flag = 0, (d) Accumulator = 80H; Carry flag = 1, Accumulator register contains 01H and carry flag is in the set state. What will be the contents of the, accumulator and carry flag after executing the instruction RRC A, (a) Accumulator = 80H; Carry flag = 0, (b) Accumulator = 80H; Carry flag = 1, (c) Accumulator = 03H; Carry flag = 0, (d) Accumulator = 03H; Carry flag = 1, Accumulator register contains 5FH. What will be the content of the accumulator after executing the instruction, SWAP A, (a) 00H, (b) F5H, (c) 5FH, (d) 00H, What changes will happen on executing the instruction CPL 00H, (a) The code memory location 00H becomes 00H, (b) The data memory location 00H becomes 00H, (c) The external data memory location 00H becomes 00H, (d) The LS Bit of the data held by data memory location 20H is complemented, The carry bit is in the set state and the port status bit P1.0 is in the cleared state. What will be the values of, Carry bit and P1.0 after executing the instruction ANL C, /P1.0, (a) Carry flag = 0; P1.0 = 0, (b) Carry flag = 0; P1.0 = 1, (c) Carry flag = 1; P1.0 = 0, (d) Carry flag = 1; P1.0 = 1, The Carry bit is in the cleared state and the Port status bit P1.0 is in the cleared state. What will be the values, of Carry bit and P1.0 after executing the instruction ORL C, /P1.0, (a) Carry flag = 0; P1.0 = 0, (b) Carry flag = 0; P1.0 = 1, (c) Carry Flag = 1; P1.0 = 0, (d) Carry flag = 1; P1.0 = 1, Which of the following Jump instruction is the optimal instruction if the offset (relative displacement of, jump location from the current instruction location) of the jump location is greater than 127 and less than, –128 and is within the same 2K block of the current instruction
Page 230 :
206, , Introduc on to Embedded Systems, , (a) AJMP, (b) SJMP, (c) LJMP, (d) All of these, 50. The program execution needs to be diverted to a location within the 2K memory block of the current instruction, and the 11 least significant bits of the code memory address to which the jump is intended is 050FH. The, AJMP instruction is used for implementing the jump. What is the machine code for implementing the AJMP, instruction for jumping to the specified location?, (a) 01H, 0FH, 05H (b) 01H, 05H, 0FH, (c) A1H, 0FH, (d) None of these, 51. Which of the following Jump instruction encodes the jump location as absolute memory address, (a) SJMP, (b) AJMP, (c) LJMP, (d) All of these, (e) only (b) and (c), 52. All the conditional branching instructions specify the destination address by, (a) Relative offset method, (b) Absolute address method, (c) Either relative or absolute address method, (d) None of these, , Review Ques ons, 1. Explain with examples the different addressing modes supported by 8051 CPU., [LO 1], 2. What is the difference between Register Instructions and Register Specific Instructions? Give an example for, each., [LO 2], 3. What is the difference between Immediate addressing and Indexed addressing? State where these addressing, techniques are used. Give an example for each., [LO 1], 4. What is Data transfer instruction? Explain the different data transfer instructions supported by 8051 CPU., , [LO 2], 5. Explain the arithmetic operations/instructions supported by 8051 CPU., [LO 2], 6. Accumulator register contains 01H and Carry flag is in the state. What will be the contents of accumulator, and Carry flag on executing the instruction, [LO 1, LO 2], RR A, RR C A, 7. Examine the following piece of code and explain whether the program will work in the expected way. Justify, [LO 1, LO 2], your statement, MOV P1.0, P1.2, 8. In the following code snippet, the jump location is intended to a memory address with offset beyond +127., Suggest a workaround to solve this issue, [LO 1, LO 2], CJNE A,#01H, JUMP_HERE, .............................., ..............................., ;The relative address of label ‘ JUMP_HERE ‘ is greater than 127 JUMP_HERE: XCH A,B, 9. Explain the stack memory related data transfer instructions in detail., , [LO 1, LO 2], , 10. Explain the data exchange instructions in detail with examples., [LO 1, LO 2], 11. Explain the timing diagram for the MOVX instruction execution when the program memory is internal to the, processor., [LO 1, LO 2]
Page 231 :
Programming the 8051 Microcontroller, , 207, , 12. Explain the difference between ADD, ADDC and DAA instructions. Explain the significance of DAA, instruction?, [LO 1, LO 2], 13. Explain the instruction for division operation. How is a divide by zero condition handled in the 8051, architecture?, [LO 1, LO 2], 14. Explain the different logical operations supported by 8051 and the corresponding instruction in detail., 15., 16., 17., , [LO 1, LO 2], Explain the different Boolean instructions supported by 8051., [LO 1, LO 2], Explain the different unconditional program control transfer instructions supported by 8051.[LO 1, LO 2], Explain the different conditional program control transfer instructions supported by 8051. [LO 1, LO 2], Explain the implementation of switch() case statement using jump tables., [LO 1, LO 2], , 18., 19. The 8051 status register doesn’t contain a zero flag. Explain how the 8051 architecture implements the Jump, on zero and Jump on non-zero conditions., [LO 1, LO 2], 20. Explain the difference between LCALL and ACALL for subroutine invocation? Which one is faster in, execution and why?, [LO 1, LO 2], 21. Explain the difference between RET and RETI instructions., [LO 1, LO 2], 22. Explain the different types of jumps supported by 8051 architecture. Which one is faster in execution and, why?, [LO 1, LO 2], , Lab Assignments, 1. A lookup table with 6 bytes is stored in code memory location starting from 8000H. Write a small 8051, assembly program to read the lookup table, 2. Implement a BCD counter to count from 00 to 99 with a delay of 1 second between the successive counts., Display the count using two 7-Segment LED displays in multiplexed configuration, 3. Optimise the following piece of code (Rewrite the code with instructions/operations giving the same, functionality) for memory size and performance, ORG 0000H, JB P1.0, PORT_SET, MOV A, #50H, LJMP SKIP, PORT_SET: CLR P1.0, SKIP: LCALL DELAY, ORG 0050H, DELAY: NOP, NOP, RET, 4. Write a 8051 assembly language program using timer interrupt for generating a 50 Hz square wave at the, port pin P1.0. The oscillator frequency applied to the microcontroller is 12.00MHz, 5. Write a 8051 assembly language program for generating a 5 kHz square wave at the port pin P1.0. The, oscillator frequency applied to the microcontroller is 12.00 MHz.
Page 232 :
208, , Introduc on to Embedded Systems, , 6. Write a 8051 Assembly language program to generate the Fibonacci series of a given number. Assume the, number whose Fibonacci number is to be calculated is received from the hyper terminal application, running on a PC to which the microcontroller is interfaced. Upon receiving the number from the hyper, terminal application, the Fibonacci series for the number is generated and it is sent to the hyper terminal, application running on the PC. The program also inserts the character ‘,’ to separate the two consecutive, numbers in the series while sending it. The numbers are sent with their corresponding ASCII value (e.g., 0 is sent as 30H). The serial communication parameter settings for both hyper terminal application and, microcontroller program are: baudrate = 9600, 1 start bit, 8 data bits, 1 stop bit, No parity. Use a crystal, resonator with frequency 11.0592MHz for designing the microcontroller hardware., 7. Write a 8051 assembly language program to find the largest number from an array of 10 numbers. The, array is located in the data memory and the start address of the array is 20H., 8. Write a 8051 assembly language program to generate a PWM signal of ON time 100 microseconds and, duty cycle of 39.06%, at port pin P1.0, 9. Explain with code snippet how the 8051 timer can be used for the measurement of the width of an, unknown pulse, 10. It is required by an experimental setup to count the number of pulses arrived during a time period of 50, milliseconds. Explain with code snippets how it can be implemented using the 8051 timers.
Page 233 :
Hardware So ware Co-Design and Program Modelling, , 7, , 209, , Hardware Software, Co-Design and Program, Modelling, , LEARNING OBJECTIVES, LO 1 Know the co-design approach for embedded hardware and firmware development, Learn about the fundamental issues in model, architecture and language selec on, for hardware so ware co-design and par oning the system requirements into, hardware and so ware (firmware), LO 2 Discuss the different computa onal models used in Embedded System design, Learn about Data Flow Graphs (DFG) Model, Control Data Flow Graph (CDFG),, State Machine Model, Sequen al Program Model, Concurrent/Communica ng, Model and Object Oriented Model for embedded design, LO 3 Explain Unified Modelling Language (UML) for system modelling, the building, blocks of UML, and different types of diagrams supported by UML for requirements, modelling and design, Learn about the different tools for UML modelling, LO 4 Iden fy the trade-offs like performance, cost, etc. to be considered in the, par oning of a system requirement into either hardware or so ware, , In the traditional embedded system development approach, the hardware software partitioning is done at, an early stage and engineers from the software group take care of the software architecture development, and implementation, whereas engineers from the hardware group are responsible for building the hardware, required for the product. There is less interaction between the two teams and the development happens either, serially or in parallel. Once the hardware and software are ready, the integration is performed. The increasing, competition in the commercial market and need for reduced ‘time-to-market’ the product calls for a novel, approach for embedded system design in which the hardware and software are co-developed instead of, independently developing both., During the co-design process, the product requirements captured from the customer are converted into, system level needs or processing requirements. At this point of time it is not segregated as either hardware, requirement or software requirement, instead it is specified as functional requirement. The system level
Page 234 :
210, , Introduc on to Embedded Systems, , processing requirements are then transferred into functions which can be simulated and verified against, performance and functionality. The Architecture design follows the system design. The partition of system, level processing requirements into hardware and software takes place during the architecture design phase., Each system level processing requirement is mapped as either hardware and/or software requirement. The, partitioning is performed based on the hardware-software trade-offs. We will discuss the various hardware, software tradeoffs in hardware software co-design in a separate topic. The architectural design results in, the detailed behavioural description of the hardware requirement and the definition of the software required, for the hardware. The processing requirement behaviour is usually captured using computational models, and ultimately the models representing the software processing requirements are translated into firmware, implementation using programming languages., , 7.1, , FUNDAMENTAL ISSUES IN HARDWARE SOFTWARE CO-DESIGN, , The hardware software co-design is a problem statement and when we try to, solve this problem statement in real life we may come across multiple issues in, the design. The following section illustrates some of the fundamental issues in, hardware software co-design., , Selec ng the model In hardware software co-design, models are used for, , LO 1 Know the codesign approach for, embedded hardware, and firmware, development, , capturing and describing the system characteristics. A model is a formal system, consisting of objects and composition rules. It is hard to make a decision on which model should be followed, in a particular system design. Most often designers switch between a variety of models from the requirements, specification to the implementation aspect of the system design. The reason being, the objective varies with, each phase; for example at the specification stage, only the functionality of the system is in focus and not the, implementation information. When the design moves to the implementation aspect, the information about the, system components is revealed and the designer has to switch to a model capable of capturing the system’s, structure. We will discuss about the different models in a later section of this chapter., , Selec ng the Architecture A model only captures the system characteristics and does not provide, information on ‘how the system can be manufactured?’. The architecture specifies how a system is going, to implement in terms of the number and types of different components and the interconnection among, them. Controller Architecture, Datapath Architecture, Complex Instruction Set Computing (CISC), Reduced, Instruction Set Computing (RISC), Very Long Instruction Word Computing (VLIW), Single Instruction, Multiple Data (SIMD), Multiple Instruction Multiple Data (MIMD), etc. are the commonly used architectures, in system design. Some of them fall into Application Specific Architecture Class (like Controller Architecture),, while others fall into either general purpose architecture class (CISC, RISC, etc.) or Parallel processing class, (like VLIW, SIMD, MIMD, etc.)., The Controller Architecture implements the finite state machine model (which we will discuss in a later, section) using a state register and two combinational circuits (we will discuss about combinational circuits in, a later chapter). The state register holds the present state and the combinational circuits implement the logic, for next state and output., The Datapath Architecture is best suited for implementing the data flow graph model where the output, is generated as a result of a set of predefined computations on the input data. A datapath represents a channel, between the input and output and in datapath architecture the datapath may contain registers, counters, register, files, memories and ports along with high speed arithmetic units. Ports connect the datapath to multiple buses., Most of the time the arithmetic units are connected in parallel with pipelining support for bringing high, performance.
Page 235 :
Hardware So ware Co-Design and Program Modelling, , 211, , The Finite State Machine Datapath (FSMD) architecture combines the controller architecture with, datapath architecture. It implements a controller with datapath. The controller generates the control input, whereas the datapath processes the data. The datapath contains two types of I/O ports, out of which one, acts as the control port for receiving/sending the control signals from/to the controller unit and the second, I/O port interfaces the datapath with external world for data input and data output. Normally the datapath is, implemented in a chip and the I/O pins of the chip acts as the data input output ports for the chip resident, data path., The Complex Instruction Set Computing (CISC) architecture uses an instruction set representing, complex operations. It is possible for a CISC instruction set to perform a large complex operation (e.g., Reading a register value and comparing it with a given value and then transfer the program execution to a new, address location (The CJNE instruction for 8051 ISA)) with a single instruction. The use of a single complex, instruction in place of multiple simple instructions greatly reduces the program memory access and program, memory size requirement. However it requires additional silicon for implementing microcode decoder for, decoding the CISC instruction. The datapath for the CISC processor is complex. On the other hand, Reduced, Instruction Set Computing (RISC) architecture uses instruction set representing simple operations and it, requires the execution of multiple RISC instructions to perform a complex operation. The data path of RISC, architecture contains a large register file for storing the operands and output. RISC instruction set is designed, to operate on registers. RISC architecture supports extensive pipelining., The Very Long Instruction Word (VLIW) architecture implements multiple functional units (ALUs,, multipliers, etc.) in the datapath. The VLIW instruction packages one standard instruction per functional unit, of the datapath., Parallel processing architecture implements multiple concurrent Processing Elements (PEs) and each, processing element may associate a datapath containing register and local memory. Single Instruction, Multiple Data (SIMD) and Multiple Instruction Multiple Data (MIMD) architectures are examples for parallel, processing architecture. In SIMD architecture, a single instruction is executed in parallel with the help of the, Processing Elements. The scheduling of the instruction execution and controlling of each PE is performed, through a single controller. The SIMD architecture forms the basis of re-configurable processor (We will, discuss about re-configurable processors in a later chapter). On the other hand, the processing elements of the, MIMD architecture execute different instructions at a given point of time. The MIMD architecture forms the, basis of multiprocessor systems. The PEs in a multiprocessor system communicates through mechanisms like, shared memory and message passing., , Selec ng the language A programming language captures a ‘Computational Model’ and maps it into, architecture. There is no hard and fast rule to specify this language should be used for capturing this model., A model can be captured using multiple programming languages like C, C++, C#, Java, etc. for software, implementations and languages like VHDL, System C, Verilog, etc. for hardware implementations. On the, other hand, a single language can be used for capturing a variety of models. Certain languages are good, in capturing certain computational model. For example, C++ is a good candidate for capturing an object, oriented model. The only pre-requisite in selecting a programming language for capturing a model is that the, language should capture the model easily., , Par oning System Requirements into hardware and so ware So far we discussed about the, models for capturing the system requirements and the architecture for implementing the system. From an, implementation perspective, it may be possible to implement the system requirements in either hardware, or software (firmware). It is a tough decision making task to figure out which one to opt. Various hardware, software trade-offs are used for making a decision on the hardware-software partitioning. We will discuss, them in detail in a later section of this chapter.
Page 236 :
212, , 7.2, , Introduc on to Embedded Systems, , COMPUTATIONAL MODELS IN EMBEDDED DESIGN, , Data Flow Graph (DFG) model, State Machine model, Concurrent, Process model, Sequential Program model, Object Oriented model,, etc. are the commonly used computational models in embedded system, design. The following sections give an overview of these models., , 7.2.1, , LO 2 Discuss the different, computational models, used in Embedded System, design, , Data Flow Graph/Diagram (DFG) Model, , The Data Flow Graph (DFG) model translates the data processing requirements into a data flow graph. The, Data Flow Graph (DFG) model is a data driven model in which the program execution is determined by data., This model emphasises on the data and operations on the data which transforms the input data to output data., Indeed Data Flow Graph (DFG) is a visual model in which the operation on the data (process) is represented, using a block (circle) and data flow is represented using arrows. An inward arrow to the process (circle), represents input data and an outward arrow from the process (circle) represents output data in DFG notation., Embedded applications which are computational intensive and data driven are modeled using the DFG, model. DSP applications are typical examples for it., a, b, c, Now let’s have a look at the implementation of a DFG., Suppose one of the functions in our application contains, the computational requirement x = a + b; and y = x – c., +, Figure 7.1 illustrates the implementation of a DFG Data flow node, model for implementing these requirements., x, In a DFG model, a data path is the data flow path, from input to output. A DFG model is said to be acyclic, Data flow node, –, DFG (ADFG) if it doesn’t contain multiple values for, the input variable and multiple output values for a given, set of input(s). Feedback inputs (Output is fed back, y, to Input), events, etc. are examples for non-acyclic, inputs. A DFG model translates the program as a single, Fig. 7.1 Data flow graph (DFG) model, sequential process execution., , 7.2.2, , Control Data Flow Graph/, Diagram (CDFG), flag = 1?, a, , Control node, b, , T, , F, , We have seen that the DFG model is a data driven model in, which the execution is controlled by data and it doesn’t involve, any control operations (conditionals). The Control DFG, (CDFG) model is used for modelling applications involving, conditional program execution. CDFG models contains, both data operations and control operations. The CDFG, uses Data Flow Graph (DFG) as element and conditional, (constructs) as decision makers. CDFG contains both data, flow nodes and decision nodes, whereas DFG contains only, data flow nodes. Let us have a look at the implementation of, the CDFG for the following requirement., If flag = 1, x = a + b; else y = a – b;, This requirement contains a decision making process., The CDFG model for the same is given in Fig. 7.2., , +, , –, , Fig. 7.2, , Data flow node, , Data flow node, , Control Data Flow Graph (CDFG) Model
Page 237 :
213, , Hardware So ware Co-Design and Program Modelling, , The control node is represented by a ‘Diamond’ block which is the decision making element in a normal, flow chart based design. CDFG translates the requirement, which is modeled to a concurrent process model., The decision on which process is to be executed is determined by the control node., A real world example for modelling the embedded application using CDFG is the capturing and saving, of the image to a format set by the user in a digital still camera where everything is data driven starting from, the Analog Front End which converts the CCD sensor generated analog signal to Digital Signal and the task, which stores the data from ADC to a frame buffer for the use of a media processor which performs various, operations like, auto correction, white balance adjusting, etc. The decision on, in which format the image is, stored (formats like JPEG, TIFF, BMP, etc.) is controlled by the camera settings, configured by the user., , 7.2.3, , State Machine Model, , The State Machine model is used for modelling reactive or event-driven embedded systems whose processing, behaviour are dependent on state transitions. Embedded systems used in the control and industrial applications, are typical examples for event driven systems. The State Machine model describes the system behaviour with, ‘States’, ‘Events’, ‘Actions’ and ‘Transitions’. State is a representation of a current situation. An event is an, input to the state. The event acts as stimuli for state transition. Transition is the movement from one state to, another. Action is an activity to be performed by the state machine., A Finite State Machine (FSM) model is one in which the number of states are finite. In other words the, system is described using a finite number of possible states. As an example let us consider the design of an, embedded system for driver/passenger ‘Seat Belt Warning’ in an automotive using the FSM model. The, system requirements are captured as., 1. When the vehicle ignition is turned on and the seat belt is not fastened within 10 seconds of ignition, ON, the system generates an alarm signal for 5 seconds., 2. The Alarm is turned off when the alarm time (5 seconds) expires or if the driver/passenger fastens the, belt or if the ignition switch is turned off, whichever happens first., Here the states are ‘Alarm Off’, ‘Waiting’ and ‘Alarm On’ and the events are ‘Ignition Key ON’,, ‘Ignition Key OFF’, ‘Timer Expire’, ‘Alarm Time Expire’ and ‘Seat Belt ON’. Using the FSM, the system, requirements can be modeled as given in Fig. 7.3., Ignition Key ON, Alarm, Off, , Waiting, , Ignition Key OFF, Seat Belt ON, , A, , la, , rm, Ti, m, Ig Sea, eE, ni t, tio B, xp, n elt, ire, K O, ey N, O, FF, , Fig. 7.3, , re, pi, , x, rE, , e, m, , Ti, Alarm, On, , FSM Model for Automatic seat belt warning system, , The ‘Ignition Key ON’ event triggers the 10 second timer and transitions the state to ‘Waiting’. If a ‘Seat, Belt ON’ or ‘Ignition Key OFF’ event occurs during the wait state, the state transitions into ‘Alarm Off’.
Page 238 :
214, , Introduc on to Embedded Systems, , When the wait timer expires in the waiting state, the event ‘Timer Expire’ is generated and it transitions, the state to ‘Alarm On’ from the ‘Waiting’ state. The ‘Alarm On’ state continues until a ‘Seat Belt ON’ or, ‘Ignition Key OFF’ event or ‘Alarm Time Expire’ event, whichever occurs first. The occurrence of any of, these events transitions the state to ‘Alarm Off’. The wait state is implemented using a timer. The timer also, has certain set of states and events for state transitions. Using the FSM model, the timer can be modeled as, shown in Fig. 7.4., , IDLE, , Event: Load Timer, Action: Timer Count = New Count, , READY, , Ev, en, er, or t: St, T, unt, Tim, Ac, im op T, t, r, Co, a, er, tio, t, t, i, m, n, Ex, t: S, me, or n: Se, pir er, ven, cre, Tim t T, e, E, e, D, eou ime, n:, t In out, RUNNING, tio, Ac, ter Fla, rup g, t, , Fig. 7.4, , FSM Model for timer, , As seen from the FSM, the timer state can be either ‘IDLE’ or ‘READY’ or ‘RUNNING’. During the, normal condition when the timer is not running, it is said to be in the ‘IDLE’ state. The timer is said to be, in the ‘READY’ state when the timer is loaded with the count corresponding to the required time delay., The timer remains in the ‘READY’ state until a ‘Start Timer’ event occurs. The timer changes its state to, ‘RUNNING’ from the ‘READY’ state on receiving a ‘Start Timer’ event and remains in the ‘RUNNING’, state until the timer count expires or a ‘Stop Timer’ even occurs. The timer state changes to ‘IDLE’ from, ‘RUNNING’ on receiving a ‘Stop Timer’ or ‘Timer Expire’ event., , Example 1, Design an automatic tea/coffee vending machine based on FSM model for the following requirement., The tea/coffee vending is initiated by user inserting a 5 rupee coin. After inserting the coin, the user can, either select ‘Coffee’ or ‘Tea’ or press ‘Cancel’ to cancel the order and take back the coin., The FSM representation for the above requirement is given in Fig. 7.5., In its simplest representation, it contains four states namely; ‘Wait for coin’ ‘Wait for User Input’, ‘Dispense, Tea’ and ‘Dispense Coffee’. The event ‘Insert Coin’ (5 rupee coin insertion), transitions the state to ‘Wait for, User Input’. The system stays in this state until a user input is received from the buttons ‘Cancel’, ‘Tea’ or, ‘Coffee’ (Tea and Coffee are the drink select button). If the event triggered in ‘Wait State’ is ‘Cancel’ button, press, the coin is pushed out and the state transitions to ‘Wait for Coin’. If the event received in the ‘Wait, State’ is either ‘Tea’ button press, or ‘Coffee’ button press, the state changes to ‘Dispense Tea’ and ‘Dispense, Coffee’ respectively. Once the coffee/tea vending is over, the respective states transitions back to the ‘Wait, for Coin’ state. A few modifications like adding a timeout for the ‘Wait State’ (Currently the ‘Wait State’ is, infinite; it can be re-designed to a timeout based ‘Wait State’. If no user input is received within the timeout, period, the coin is returned back and the state automatically transitions to ‘Wait for Coin’ on the timeout, event) and capturing another events like, ‘Water not available’, ‘Tea/Coffee Mix not available’ and changing, the state to an ‘Error State’ can be added to enhance this design. It is left to the readers as exercise.
Page 239 :
215, , Hardware So ware Co-Design and Program Modelling, , sed, ispen, D, a, e, t: T, Even, ne, n: Do, Actio, , State A, , State C, nP, , tto, , e, t: T, , u, aB, , eT, , ns, spe, , en, Di, Event: Insert Coin, Ev, n:, tio, c, A, Action: ok, State B, Event: Cancel Button, Ev, e, Bu nt: C, Ac, Action: Coin Out, o, tto, tio, n P ffee, n:, Di, r, Even, e, ss, spe, t: Co, ffee D, nse, ispen, Co, sed, Actio, ffe, n: Do, e, ne, , Fig. 7.5, , s, res, ea, , State A: Wait for coin, State B: Wait for user input, State C: Dispense tea, State D: Dispense coffee, , State D, , FSM Model for Automatic Tea\Coffee Vending Machine, , Example 2, Design a coin operated public telephone unit based on FSM model for the following requirements., 1. The calling process is initiated by lifting the receiver (off-hook) of the telephone unit, 2. After lifting the phone the user needs to insert a 1 rupee coin to make the call., 3. If the line is busy, the coin is returned on placing the receiver back on the hook (on-hook), 4. If the line is through, the user is allowed to talk till 60 seconds and at the end of 45th second, prompt for, inserting another 1 rupee coin for continuing the call is initiated, 5. If the user doesn’t insert another 1 rupee coin, the call is terminated on completing the 60 seconds time, slot., 6. The system is ready to accept new call request when the receiver is placed back on the hook (on-hook), 7. The system goes to the ‘Out of Order’ state when there is a line fault., The FSM model shown in Fig. 7.6, is a simple representation and it doesn’t take care of scenarios like,, user doesn’t insert a coin within the specified time after lifting the receiver, user inserts coins other than a one, rupee etc. Handling these scenarios is left to the readers as exercise., Most of the time state machine model translates the requirements into sequence driven program and it, is difficult to implement concurrent processing with FSM. This limitation is addressed by the Hierarchical/, Concurrent Finite State Machine model (HCFSM). The HCFSM is an extension of the FSM for supporting, concurrency and hierarchy. HCFSM extends the conventional state diagrams by the AND, OR decomposition, of States together with inter level transitions and a broadcast mechanism for communicating between, concurrent processes. HCFSM uses statecharts for capturing the states, transitions, events and actions., The Harel Statechart, UML State diagram, etc. are examples for popular statecharts used for the HCFSM, modelling of embedded systems. In statecharts, the state is usually represented using geometric shapes like, rounded rectangle, rectangle, ellipse, circle, etc. The Harel Statechart uses a rounded rectangle for representing, state. Arrows are used for representing the state transition and they are marked with the event associated, with the state transition. Sometimes an optional parenthesised condition is also labelled with the arrow. The, condition specifies on what basis the state transition happens at the occurrence of the specified event. Lots of, design tools are available for state machine and statechart based system modelling. The IAR visualSTATE
Page 240 :
216, , Introduc on to Embedded Systems, , (https://www.iar.com/iar-embedded-workbench/add-ons-and-integrations/visualstate/) from IAR systems is, a popular visual modelling tool for embedded applications., , r, er, ve, eiv, c, ne, ei n, ec Coi ce Re ct Li, a, l, eR n, nne, ac etur ent: P isco, Pl, D, v, t: : R E tion:, en on, Ac, Ev cti, A, , Event: Place Receiver, Action: Done, , State A, , State G, , State H, , Even, , Ev, , tio, , n:, , ent, , :T, im, Di, sco e Ou, t, nn, ect, Lin, , e, State E, , Fig. 7.6, , 7.2.4, , r, umbe, lid N, a, v, n, I, o, t:, Err r, Even, splay, i, D, :, n, Actio, , t: Lin, e Fau, Actio, lt/Lin, n: Di, e Bus, splay, y, Error, , State F, , Ac, , State B, , e, abl, ail, n, v, tio, A, ura, ine, d, L, r, :, o, nit, ent, Ev, Mo, :, n, tio, Ac, , State C, , t: Va, lid N, umbe, Actio, r, n: Di, al, , Action: Display OK, , Event: Line Fault, Action: Display, Error, Event: Line OK, , r, ceive, ft Re, i, L, :, t, Even, n: OK, Actio, Even, t: Pl, Actio ace Recei, v, n: Re, turn C er, oin, , State E: Call in progress, State F: Call terminated, State G: Unable to make call, State H: Invalid number input, State I: Out of order, Even, t: Co, in Ins, Actio, n: OK ert, , Even, , State A: Ready, State B: Wait for coin, State C: Wait for number, State D: Dialling, , State I, , State D, , FSM Model for Coin Operated Telephone System, , Sequential Program Model, , In the sequential programming Model, the functions or processing requirements are executed in sequence., It is same as the conventional procedural programming. Here the program instructions are iterated and, executed conditionally and the data gets transformed through a series of operations. FSMs are good choice, for sequential program modelling. Another important tool used for modelling sequential program is Flow, Charts. The FSM approach represents the states, events, transitions and actions, whereas the Flow Chart, models the execution flow. The execution of functions in a sequential program model for the ‘Seat Belt, Warning’ system is illustrated below., #define ON 1, #define OFF 0, #define YES 1, #define NO 0, void seat_belt_warn()
Page 241 :
Hardware So ware Co-Design and Program Modelling, , 217, , {, wait_10sec();, if (check_ignition_key()==ON), {, if (check_seat_belt()==OFF), {, set_timer(5);, start_alarm();, while ((check_seat_belt()==OFF )&&(check_ignition_key()==OFF )&&, (timer_expire()==NO));, stop_alarm();, }, }, }, , Figure 7.7 illustrates the flow chart approach for modelling the ‘Seat Belt Warning’ system explained in, the FSM modelling section., Ignition Key ON, Wait for 10 Seconds, Ignition ON?, Y, Seat Belt ON?, N, Set Timer for 5 Seconds, Start Alarm, , Ignition ON?, Y, , NO, , YES, , NO, , Seat Belt ON?, N, Timer Expired?, , YES, , Y, Stop Alarm, End, , Fig. 7.7, , Sequential Program Model for seat belt warning system
Page 242 :
218, , 7.2.5, , Introduc on to Embedded Systems, , Concurrent/Communicating Process Model, , The concurrent or communicating process model models concurrently executing tasks/processes. So far we, discussed about the sequential execution of software programs. It is easier to implement certain requirements, in concurrent processing model than the conventional sequential execution. Sequential execution leads to a, single sequential execution of task and thereby leads to poor processor utilisation, when the task involves I/O, waiting, sleeping for specified duration etc. If the task is split into multiple subtasks, it is possible to tackle, the CPU usage effectively, when the subtask under execution goes to a wait or sleep mode, by switching the, task execution. However, concurrent processing model requires additional overheads in task scheduling, task, synchronisation and communication. As an example for the concurrent processing model let us examine how, we can implement the ‘Seat Belt Warning’ system in concurrent processing model. We can split the tasks, into:, 1. Timer task for waiting 10 seconds (wait timer task), 2. Task for checking the ignition key status (ignition key status monitoring task), 3. Task for checking the seat belt status (seat belt status monitoring task), 4. Task for starting and stopping the alarm (alarm control task), 5. Alarm timer task for waiting 5 seconds (alarm timer task), We have five tasks here and we cannot execute them randomly or sequentially. We need to synchronise, their execution through some mechanism. We need to start the alarm only after the expiration of the 10, seconds wait timer and that too only if the seat belt is OFF and the ignition key is ON. Hence the alarm, control task is executed only when the wait timer is expired and if the ignition key is in the ON state and seat, belt is in the OFF state. Here we will use events to indicate these scenarios. The wait_timer_expire event is, associated with the timer task event and it will be in the reset state initially and it is set when the timer expires., Similarly, events ignition_on and ignition_off are associated with the task ignition key status monitoring and, the events seat_belt_on and seat_belt_off are associated with the task seat belt status morning. The events, ignition_off and ignition_on are set and reset respectively when the ignition key status is OFF and reset and, set respectively when the ignition key status is ON, by the ignition key status monitoring task. Similarly, the events seat_belt_off and seat_belt_on are set and reset respectively when the seat belt status is OFF and, reset and set respectively when the seat belt status is ON, by the seat belt status monitoring task. The events, alarm_timer_start and alarm_timer_expire are associated with the alarm timer task. The alarm_timer_start, event will be in the reset state initially and it is set by the alarm control task when the alarm is started. The, alarm_timer_expire event will be in the reset state initially and it is set when the alarm timer expires. The, alarm control task waits for the signaling of the event wait_timer_expire and starts the alarm timer and, alarm if both the events ignition_on and seat_belt_off are in the set state when the event wait_timer_expire, signals. If not the alarm control task simply completes its execution and returns. In case the alarm is started,, the alarm control task waits for the signalling of any one of the events alarm_timer_expire or ignition_off or, seat_belt_on. Upon signalling any one of these events, the alarm is stopped and the alarm control task simply, completes its execution and returns. Figure 7.8 illustrates the same., It should be noted that the method explained here is just one way of implementing a concurrent model for, the ‘Seat Belt Warning’ system. The intention is just to make the readers familiar with the concept of multi, tasking and task communication/synchronisation. There may be other ways to model the same requirements., It is left to the readers as exercise. The concurrent processing model is commonly used for the modelling, of ‘Real Time’ systems. Various techniques like ‘Shared memory’, ‘Message Passing’, ‘Events’, etc. are, used for communication and synchronising between concurrently executing processes. We will discuss these, techniques in a later chapter.
Page 243 :
219, , Hardware So ware Co-Design and Program Modelling, , Create and initialise events, wait_timer_expire, ignition_on, ignition_off,, seat_belt_on, seat_belt_off,, alarm_timer_start, alarm_timer_expire, Create task Wait Timer, Create task Ignition Key Status Monitor, Create task Seat Belt Status Monitor, Create task Alarm Control, Create task Alarm Timer, (a), Wait Timer Task, Sleep(10s);, //Signal wait_timer_expire, Set Event wait_timer_expire;, , Ignition Key Status Monitor, Task, while(1) {, if (Ignition key ON), {, Set Event ignition_on;, Reset Event ignition_off;, }, else, {, Set Event ignition_off;, Reset Event ignition_on;, }, }, , Alarm Control Task, Wait for the signalling of, wait_timer_expire, if (ignition_on && seat_belt_off), {, Start Alarm();, Set Event alarm_start;, Wait for the signalling of, alarm_timer_expire or, ignition_off or seat_belt_on;, Stop Alarm();, }, , Alarm Timer Task, Wait for the Event alarm_start;, Sleep(5s);, //Signal alarm_timer_expire, Set Event alarm_timer_expire;, , Ignition Seat belt Status Monitor, Task, while(1) {, if (Seat Belt ON), {, Set Event seat_belt_on;, Reset Event seat_belt_off;, }, else, {, Set Event seat_belt_off;, Reset Event seat_belt_on;, }, }, (b), , Fig. 7.8, , 7.2.6, , (a) Tasks for ‘Seat Belt Warning System’ (b) Concurrent processing Program model for ‘Seat Belt Warning System’, , Object-Oriented Model, , The object-oriented model is an object based model for modelling system requirements. It disseminates a, complex software requirement into simple well defined pieces called objects. Object-oriented model brings, re-usability, maintainability and productivity in system design. In the object-oriented modelling, object is an, entity used for representing or modelling a particular piece of the system. Each object is characterised by a, set of unique behaviour and state. A class is an abstract description of a set of objects and it can be considered, as a ‘blueprint’ of an object. A class represents the state of an object through member variables and object, behaviour through member functions. The member variables and member functions of a class can be private,, public or protected. Private member variables and functions are accessible only within the class, whereas
Page 244 :
220, , Introduc on to Embedded Systems, , public variables and functions are accessible within the class as well as outside the class. The protected, variables and functions are protected from external access. However classes derived from a parent class can, also access the protected member functions and variables. The concept of object and class brings abstraction,, hiding and protection., , 7.3, , INTRODUCTION TO UNIFIED MODELLING LANGUAGE (UML), , Unified Modelling Language (UML) is a visual modelling, language for Object Oriented Design (OOD). UML helps in all, phases of system design through a set of unique diagrams for, requirements capturing, designing and deployment., , 7.3.1, , UML Building Blocks, , ‘Things’, ‘Relationships’ and ‘Diagrams’ are the fundamental, building blocks of UML., , LO 3 Explain Unified Modelling, Language (UML) for system, modelling, the building blocks, of UML, and different types of, diagrams supported by UML for, requirements modelling and design, , 7.3.1.1 Things, A ‘Thing’ is an abstraction of the UML model. The ‘Things’ in UML are classified into:, Structural things Represents mostly the static parts of a UML model. They are also known as ‘classifiers’., Class, interface, use case, use case realisation (collaboration), active class, component and node are the, structural things in UML., Behavioural things Represents mostly the dynamic parts of a UML model. Interaction, state machine and, activity are the behavioural things in UML., Grouping things Are the organisational parts of a UML model. Package and sub-system are the grouping, things in UML., Annota onal things Are the explanatory parts of a UML model. Note is the Annotational thing in UML., The table given below gives a snapshot of various structural, behavioural, grouping and Annotational, things in UML., Thing, , Element, Class, , Description, A template describing a set of objects which, share the same attributes, relationships, operations and semantics. It can be considered as a, blueprint of object., , Representation, Identifier, Variables, Methods, , Active Class, Structural, , Class presenting a thread of control in the system. It can initiate control activity. Active class is, represented in the same way as that of a class but, with thick border lines., , Interface, , A collection of externally visible operations, which specify a service of a class. It is represented as a circle attached to the class, , Use case, , Defines a set of sequence of actions. It is normally represented with an ellipse indicating the, name., , Identifier, Variables, Methods, , Name
Page 245 :
221, , Hardware So ware Co-Design and Program Modelling, , Collaboration, (Use case Realisation), Component, , Node, , Behavioural, , Interaction diagram specifying the collaboration, of different use cases. It is normally represented, with a dotted ellipse indicating the name., Physical packaging of classes and interfaces., , A computational resource existing at run time., Represented using a cube with name., , Interaction, , Behaviour comprising a set of objects exchanging messages to accomplish a specific purpose., Represented by arrow with name of operation, , State Machine, , Behaviour specifying the sequence of states, in response to events, through which an object, traverses during its lifetime., , Grouping, , Package, , Annotational, , Note, , Organises elements into packages. It is only a, conceptual thing. Represented as a tabbed folder, with name., Explanatory element in UML models. Contains, formal informal explanatory text. May also contain embedded image., , Alarm ON, +Start(), +Stop(), , +Start(), +Stop(), (a), , Fig. 7.9, , (b), , Name, , Name, , Name, , Name, , Name, , Text, , Timer, –Period, +Set Time(), +Start(), +Stop(), , Alarm, , Alarm, , Name, , (c), , (a) The Alarm Class. (b) State Representation for ‘Alarm ON’ state. (c) Alarm – Timer Class, interaction for the Seat belt Warning System, , 7.3.1.2 Rela onships, As the name indicates, they express the type of relationship between UML elements (objects, classes, etc)., The table given below gives a snapshot of the various relationships in UML., Relationship, , Description, , Representation, , Association, , It is a structural relationship describing the link between, objects. The association can be one-to-one or one-to-many., Aggregation and Composition are the two variants of Association., , relationship, , Aggregation, , It represents is “a part of” relationship. Represented by a, line with a hollow diamond at the end., , a part of
Page 246 :
222, , Introduc on to Embedded Systems, , Composition, , Aggregation with strong ownership relation to represent, the component of a complex object. Represented by a line, with a solid diamond at the end., , Generalisation, , Represents a parent-child relationship. The parent may be, more generalised and child being specialised version of, the parent object., , Child, , Parent, Dependency, , Represents a relationship in which one element (object,, class) uses or depends on another element (object, class)., Represented by a dotted arrow with head pointing to the, dependent element., , Realisation, , The relationship between two elements in which one, element realises the behaviour specified by the other element., , Element 1, , Element 2, , Audio Visual Indicators, , Alarm, , +Start(), +Stop(), +Set Type(), , +Start(), +Stop(), , +Start(), +Stop(), , (a ), Fig. 7.10, , Warning System, –, +Alarm(), +Display(), , Alarm, , (b), , (a) Alarm is a special type of Audio Visual Indicator (Generalisation),, (b) Alarm is a part of Warning System (Aggregation), , 7.3.1.3 UML Diagrams, UML Diagrams give a pictorial representation of the static aspects, behavioural aspects and organisation and, management of different modules (classes, packages, etc.) of the system. UML diagrams are grouped into, Static Diagrams and Behavioural Diagrams., Sta c Diagrams Diagram representing the static (structural) aspects of the system. Class Diagram, Object, Diagram, Component Diagram, Package Diagram, Composite Structure Diagram and Deployment Diagram, falls under this category. The table given below gives a snapshot of various static diagrams., Diagram, , Description, , Object diagram, , Gives a pictorial representation of a set of objects and their relationships. It represents the structural organisation between objects., , Class diagram, , Gives a pictorial representation of the different classes in a UML model, their, interfaces, the collaborations, interactions and relationship between the classes,, etc. It captures the static design of the system.
Page 247 :
223, , Hardware So ware Co-Design and Program Modelling, , Component diagram, , It is a pictorial representation of the implementation view of a system. It comprises components (physical packaging of classes and interfaces), relationships and, associations among the components., , Package diagram, , It is a representation of the organisation of packages and their elements. Package, diagrams are mostly used for organising use case diagrams and class diagrams., , Deployment diagram, , It is a pictorial representation of the configuration of run time processing nodes, and the components associated with them., , Behavioural Diagrams These are diagrams representing the dynamic (behavioural) aspects of the system., Use Case Diagram (Fig. 7.11), Sequence Diagram (Fig. 7.12), State Diagram, Communication Diagram,, Activity Diagram, Timing Diagram and Interaction Overview Diagram are the behavioural diagrams in UML, model. The table given below gives a snapshot of the important behavioural diagrams., Diagram, , Description, Use Case diagrams are used for capturing system functionality as seen by users., It is very useful in system requirements capturing. Use case diagram comprise use, cases, actors (users) and the relationship between them. In use case diagram, an, actor is one (or something) who (or which) interacts with the system and use case, is the sequence of interaction between the actor and system., , Sequence diagram, , Sequence diagram is a type of interaction diagram representing object interactions, with respect to time. It emphasises on the time ordering of messages. Best suited, for the interaction modelling of real-time systems., , Collaboration (Communication), diagram, , Collaboration or Communication diagram is a type of interaction diagram representing the object interaction and ‘how they are linked together’. It gives emphasis, to the structural organisation of objects that send and receive messages. In short, it, represents the collaboration of objects using messages., , State Chart diagram, , A diagram showing the states, transitions, events and activities similar to a state, machine representation. Best suited for modelling reactive systems., , Activity diagram, , It is a special type of state chart diagram showing activity to activity transition in, place of state transition. It emphasises on the flow control among objects., , Actors, , Use Case diagram, , Seat Belt, , Enable or, Disable Alarm, Use case, , Ignition Key, , Fig. 7.11, , Use Case diagram for seat belt warning system, , Alarm
Page 248 :
224, , Introduc on to Embedded Systems, , Wait Timer, , Alarm, Timer, , Alarm, 3 OFF, 5 Trigger, Seat Belt, , Ignition Key, 1 Trigger, , 2 Timeout, 6 Timeout, 4 ON, , Fig. 7.12, , 7.3.2, , Sequence diagram for one possible sequence for the seat belt warning system, , The UML Tools, , The tools for building UML based models and diagrams are available from different vendors. Some of them, are commercial and some of them are either free or open source. The table given below gives a summary of, the popular UML modelling tools., Tool, , Provider/Comments, , Rational Rose Enterprise, , IBM Software (http://www-03.ibm.com/software/products/en/enterprise), , Rational System Developer, , Eclipse† based tool from IBM Software (http://www-03.ibm.com/software/, products/en/ratisoftarch), , Telelogic Rhapsody, , UML/SysML-based model-driven development tool for real-time or embedded systems from IBM Software (http://www-03.ibm.com/software/products/, en/ratirhapfami), , Borland® Together®, , Borland (www.borland.com), , Enterprise Architect, , Sparx Systems (http://www.sparxsystems.com), , ARTiSAN Studio, , Artisan Software Tools Inc (http://www.artisansoftwaretools.com/), , Microsoft® Visio, , Microsoft Corporation. The Microsoft Visio (Part of Microsoft® Office, product) supports UML model Diagram generation. www.microsoft.com/, office/visio, , Some of the tools generate the skeletal code (stub) for the classes and application in programming, languages like C++, C#, Java, etc., , † Eclipse is an open source Integrated Development Environment (IDE). Visit www.eclipse.org for more details.
Page 249 :
Hardware So ware Co-Design and Program Modelling, , 7.4, , 225, , HARDWARE SOFTWARE TRADE-OFFS, , Certain system level processing requirements may be possible to, develop in either hardware or software. The decision on which one, to select is based on the trade-offs and actual system requirement., For example, if the embedded system under consideration involves, some multimedia codec* requirement. The media codec can be, developed in either software or using dedicated hardware chip, (like ASIC or ASSP). Here the trade-off is performance and re-configurability. A codec developed in hardware, may be much more efficient, optimised with low processing and power requirements. It is possible to develop, the same codec in software using algorithm. But the software implementation need not be optimised for, performance, speed and power efficiency. On the other hand, a codec developed in software is re-usable and, re-configurable. With certain modification it can be configured for other codec implementations, whereas a, codec developed in a fixed hardware (like ASIC/ASSP) is fixed and it cannot be changed., Memory size is another important hardware software trade-off. Evaluate how much memory is required if, the system requirement under consideration is implemented in software (firmware). Embedded systems are, highly memory constrained and embedded designers don’t have the luxury of using extravagant memory for, implementing requirements. On the other hand, evaluate the gate count required (Normally hardware chips, are implemented using logic gates and the density of the chip is expressed in terms of the number of gates, used in the design (millions of gates ☺)), if the required feature is going to implement in hardware., Effort required in terms of man hours, if the required feature is going to build in either software or custom, hardware implementation using VHDL or any other hardware description languages and the cost for each are, another important hardware-software trade-off in any embedded system development., To summarise, the important hardware-software trade-offs in embedded system design are, (1) Processing speed and performance, (2) Frequency of change (Re-configurability), (3) Memory size and gate count, (4) Reliability, (5) Man hours (Effort) and cost, LO 4 Identify the trade-offs, like performance, cost, etc. to be, considered in the partitioning of, a system requirement into either, hardware or software, , Summary, Model selection, Architecture selection, Language selection, Hardware Software partitioning, etc., are some of the main activities in the hardware-software co-design, LO1, A model captures and describes the system characteristics. The architecture specifies how, a system is going to implement in terms of the number and types of different components LO1, and the interconnection among them, Controller architecture, Datapath architecture, Complex Instruction Set Computing (CISC),, Reduced Instruction Set Computing (RISC), Very long Instruction Word Computing (VLIW),, Single Instruction Multiple Data (SIMD), Multiple Instruction Multiple Data (MIMD), etc., LO1, are the commonly used architectures in system design, Data Flow Graph (DFG) Model, State Machine Model, Concurrent Process Model, Sequential, Program model, Object Oriented model, etc. are the commonly used computational models LO2, in embedded system design, , * Multimedia codec is a compression and de-compression algorithm for compressing and de-compression of raw data media files, (audio and video data)
Page 250 :
226, , Introduc on to Embedded Systems, , A programming language captures a ‘Computational Model’ and maps it into architecture. A model, can be captured using multiple programming languages like C, C++, C#, Java, etc. for, software implementations and languages like VHDL, System C, Verilog, etc. for hardware LO2, implementations, The Hierarchical/Concurrent Finite State Machine Model (HCFSM) is an extension of the FSM for, supporting concurrency and hierarchy. HCFSM extends the conventional state diagrams by the, AND, OR decomposition of States together with inter level transitions and a broadcast LO2, mechanism for communicating between concurrent processes, HCFSM uses statecharts for capturing the states, transitions, events and actions. The Harel, Statechart, UML State diagram, etc. are examples for popular statecharts for the HCFSM LO2, modelling of embedded systems, In the sequential model, the functions or processing requirements are executed in sequence. It is, same as the conventional procedural programming, LO2, The concurrent or communicating process model models concurrently executing tasks/, LO3, processes, The object oriented model is an object based model for modelling system requirements, LO3, Unified Modelling Language (UML) is a visual modelling language for Object Oriented Design, (OOD). Things, Relationships and Diagrams are the fundamental building blocks of, LO3, UML, UML diagrams give a pictorial representation of the static aspects, behavioural aspects and, organisation and management of different modules. Static Diagrams, Object diagram,, Usecase diagram, Sequence diagram, Statechart diagram etc. are the different UML LO3, diagrams, Hardware-Software trade-offs are the parameters used in the decision making of partitioning a, system requirement into either hardware or software. Processing speed, performance, frequency of, changes, memory size and gate count requirements, reliability, effort, cost, etc. are LO4, examples for hardware-software trade-offs, , Keywords, Hardware-So ware Co-design: The modern approach for the interac ve ‘together’ design of hardware and, firmware for embedded systems, [LO 1], Controller Architecture: Architecture implemen ng the Finite State Machine model using a state register and, two combina onal circuits, [LO 1], Datapath Architecture Datapath: Architecture implemen ng the Data Flow Graph model; A channel between, the input and output. The datapath may contain registers, counters, register files, memories and ports along, with high speed arithme c units, [LO 1], Finite State Machine Datapath (FSMD) Architecture: Architecture combining the controller architecture with, datapath architecture, [LO 1], Complex Instruc on Set Compu ng (CISC) Architecture: Architecture which uses instruc on set represen ng, complex opera ons, [LO 1], Reduced Instruc on Set Compu ng (RISC) Architecture: Architecture which uses instruc on set represen ng, simple opera ons, [LO 1], Very Long Instruc on Word (VLIW) Architecture: Architecture implemen ng mul ple func onal units (ALUs,, mul pliers, etc.) in the datapath, [LO 1]
Page 252 :
228, , Introduc on to Embedded Systems, , Objec ve Ques ons, 1. Which of the following programming model is best suited for modelling a data driven embedded system, (a) State Machine, (b) Data Flow Graph, (c) Harel Statechart Model, (d) None of these, 2. Which of the following programming model is best suited for modelling a Digital Signal Processing (DSP), embedded system, (a) Finite State Machine, (b) Data Flow Graph, (c) Object Oriented Model, (d) UML, 3. Which of the following architecture is best suited for implementing a Digital Signal Processing (DSP), embedded system, (a) Controller Architecture, (b) CISC, (c) Datapath Architecture, (d) None of these, 4. Which of the following is a multiprocessor architecture?, (a) SIMD, (b) MIMD, (c) VLIW, (d) All, (e) (a) and (b), (f) (b) and (c), 5. Which of the following model is best suited for modelling a reactive embedded system?, (a) Finite State Machine (FSM), (b) DFG, (c) Control DFG, (d) Object Oriented Model, 6. Which of the following models is best suited for modelling a reactive real time embedded system?, (a) Finite State Machine, (b) DFG, (c) Control DFG, (d) Hierarchical/Concurrent Finite State Machine Model, 7. Which of the following model is best suited for modelling an embedded system demanding multitasking, capabilities with data sharing?, (a) Finite State Machine, (b) DFG, (c) Control DFG, (d) Communicating Process Model, 8. Which of the following is a hardware description language?, (a) C, (b) System C, (c) VHDL, (d) C++, (e) (b) and (c), 9. Which of the following is a structural thing in UML?, (a) Class, (b) Interaction, (c) State Machine, (d) Activity, (e) None of these, 10. Which of the following is a behavioural thing in UML?, (a) Class, (b) Interface, (c) State Machine, (d) Component, (e) None of these, 11. Which of the following is not a static diagram in UML?, (a) Class Diagram (b) Object Diagram (c) Use case Diagram (d) Component Diagram, (e) None of these, 12. Which of the following is not a behavioural diagram in UML?, (a) State Diagram (b) Object Diagram (c) Use case Diagram (d) Sequence Diagram, (e) None of these, 13. Which of the following UML diagrams is best suited for Requirements Capturing?, (a) State Diagram (b) Use case Diagram (c) Object Diagram, (d) Sequence Diagram, (e) None of these
Page 253 :
229, , Hardware So ware Co-Design and Program Modelling, , 14. Which of the following UML diagram represents object interactions with respect to time?, (a) State Diagram (b) Sequence Diagram (c) Object Diagram, (d) Use case Diagram, (e) None of these, 15. Which of the following UML interaction diagram(s) emphasises on structural organisation of objects?, (a) Collaboration Diagram, (b) Sequence Diagram, (c) State Diagram, (d) Use case Diagram, (e) None of these, 16. Which of the following is (are) trade-offs in hardware software partitioning?, (a) Processing speed, (b) Memory requirement, (c) Cost, (d) All of these, (e) None of these, , Review Ques ons, 1. What is hardware software co-design? Explain the fundamental issues in hardware software co-design., 2. Explain the difference between SIMD, MIMD and VLIW architecture., 3. What is Computational model? Explain its role in hardware software co-design., , [LO 1], [LO 1], [LO 2], [LO 2], , 4. Explain the different computational models in embedded system design., 5. What is the difference between Data Flow Graph (DFG) and Control Data Flow Graph (CDFG) model?, Explain their significance in embedded system design., [LO 2], 6. What is State and State Machine? Explain the role of State Machine in embedded system design. [LO 2], 7. What is the difference between Finite State Machine Model (FSM) and Hierarchical/Concurrent Finite State, Machine Model (HCFSM)?, [LO 2], 8. What is ‘Statechart’? Explain its role in embedded system design., , [LO 2], , 9. Explain the ‘Sequential’ Program model with an example., [LO 2], 10. Explain the ‘Concurrent/Communicating’ program model. Explain its role in ‘Real Time’ system design., , [LO 2], 11. Explain the ‘Object-Oriented’ program model for embedded system design. Under which circumstances an, Object- Oriented model is considered as the best suited model for embedded system design?, [LO 2], 12. Explain the role of programming languages in system design., , [LO 2], [LO 3], , 13. What are the building blocks of UML? Explain in detail., 14. Explain the different types of UML diagrams and their significance in each stage of the system development, life cycle., [LO 3], 15. Explain the important hardware software ‘trade-offs’ in hardware software partitioning?, , [LO 4]
Page 254 :
230, , Introduc on to Embedded Systems, , Lab Assignments, 1. Draw the Data Flow Graph (DFG) model for the FIR filter implementation y[n] = a0 × [n] + a1 × [n – 1], + a2 × [n – 2] + a3 × [n – 3] + … + a(n–1) × [1], 2. Draw the sequence diagram for the automatic coffee vending machine using UML, 3. Model the following Automatic Teller Machine (ATM) requirement using UML statecharts., (a) The transaction is started by user inserting a valid ATM card, (b) Upon detecting the card, the system prompts for a Personal Identification Number (PIN)., (c) The card is validated against the PIN and on successful validation, the system displays the following, options: ‘Balance Enquiry’, ‘Cash Withdrawal’ and ‘Cancel’, (d) If the user selects ‘Cash Withdrawal’, the system prompts for entering the amount to withdraw and, upon entering the amount it asks whether a printed receipt is required for the transaction. Upon, receiving an input for this, the system verifies the available balance, deduct the amount to withdraw,, dispense the cash, prints the transaction receipt (if the user answer to the system query ‘whether, a printed receipt is required for the transaction’ is ‘YES’) and returns back to the original state to, accept a new transaction request., (e) If the user selects the option ‘Balance Enquiry’ in step ‘c’, the system prompts the message whether, a printed receipt is required for the transaction. If user response is ‘YES’, the balance is printed, and the system returns to the original state to accept new transaction request. If the user input is, ‘NO’ to the query ‘whether a printed receipt is required for the transaction’, the balance amount is, displayed on the screen for 30 seconds and the system returns back to the original state to accept a, new transaction request., (f) If the user selects the option ‘Cancel’ in step ‘c’, the system returns back to the original state to, accept a new transaction request., (g) If there is no response from the user for a period of 30 seconds in steps ‘b’, ‘c’, ‘d’ and ‘e’ and if the, time interval between the two consecutive digit entering for the PIN exceeds 30 seconds, the system, displays the message ‘User Failed to Respond within the specified Time’ for 10 seconds and returns, back to the original state to accept a new transaction request.
Page 255 :
PART-2, Design and Development of, Embedded Product
Page 256 :
232, , Introduc on to Embedded Systems, , I hope by now you got a reasonably good knowledge on embedded systems, the different elements of an, embedded system, their application areas and domains, their characteristics and quality attributes. Now it is, time to move on to the various steps involved in the design of embedded systems. As mentioned in Chapter, 2 of the previous section, embedded systems are built around a central core which can be a Commercialoff-the-Shelf Component (COTS) or an Application Specific Integrated Circuit/Application Specific, Standard Product (ASIC/ASSP) or a Programmable Logic Device (PLD) or a General Purpose Processor, (Microprocessor/General Purpose Microcontrollers) or Application Specific Instruction Set Processors, (Special Purpose Microcontrollers/Digital Signal Processors). Describing all of them in detail is outside the, scope of this book and for the time being we will be dealing with the design of embedded systems using, Application Specific Instruction Set Processor and the scope of this design is again limited to designing with, Microcontroller. The target microcontroller selected for the design approach is 8051 - Industry’s most popular, 8bit microcontroller. The architecture details of the basic 8051 controller and the instructions supported by it, are already explained in some of the previous chapters. In the next sections we will explore the possibilities, of how the 8051 controller can be embedded into different applications and how the 8051 can be programmed, for various embedded applications., The embedded product design starts with product requirements specification and analysis. When a, requirement arises for an embedded product, the requirements are listed out including the hardware features, required, the functionalities to be supported, the product aesthetics (look ‘n’ feel) etc. On finalising the, requirements, the various hardware components and peripherals required to implement the hardware features, are identified and the interconnection among them are defined, the control algorithm for controlling the, various hardware and peripherals are developed, product aesthetics like look and feel, enclosure unit, etc., are defined and the control algorithm is transformed to controller specific instructions using the firmware, development tools and finally the hardware and firmware are integrated together and the resulting product, is tested for the required functionalities as per the requirement specifications. The mechanical design of, the product takes care of the product aesthetics and develops a suitable enclosure for the product. Various, standards like International Organisation for Standards (ISO) and models like Capability Maturity Model, (CMM), Process Capability Maturity Model (PCMM) etc. are used in the entire design life cycle management., There will be well-defined documentation structure (Templates) for the entire design life cycle. The, Requirement Specification Document records the entire requirement for the product. Formal verifications of, this document will be carried out before the system design starts and it is termed as “Document Reviews”., Once the requirement specifications are finalised the preliminary design and detailed designs are carried out., The preliminary design and detailed design deals with the different modules of the total system and what all, hardware/firmware components are required to build these modules, how these modules are interconnected, and how they are controlled., The chapters in this section are organised in a way to give the readers the basic lessons on “Embedded, Hardware Design and Development”, “Embedded Firmware Design and Development”, “Integration and, testing of the Embedded Hardware and Firmware”, “Product Enclosure Development” and Embedded, Product Development Life Cycle Management”. We will start the section with Embedded Hardware Design, and Development.
Page 257 :
Requirement, specification, , System, design, Schematic, design, , Firmware, development, , Board layout design,, PCB fabrication, and testing, , Firmware testing, and simulation, , Mechanical design and development, , Product enclosure, development, , Hardware design and development, , Product aesthetics design, (CAD design. Solid works, 3D, Modeller etc...), , Design and, prototyping, , Control algorithm, design, , Firmware design and development, , Typical Embedded product design and development approach, , Hardware software partitioning, , Hardware software co-design, , Final product, (Hardware +, firmware +, mechanical, enclosure), , Total system, testing, , Hardware and, firmware, integration, , Design and Development of Embedded Product, 233, , Integration testing
Page 258 :
234, , Introduc on to Embedded Systems, , 8, , Embedded Hardware, Design and, Development, , LEARNING OBJECTIVES, LO 1 List the various elements of Embedded Hardware and their design principles, Refresh knowledge on the basic Analog Electronic components and circuits –, Resistor, Capacitor, Diode, Inductor, Transistor etc., and their use in embedded, applica ons, LO 2 Recognise the basic Digital Electronic components and circuits – Logic Gates, Buffer ICs,, Latch ICs, Decoder and Encoder ICs, Mul plexer (MUX) and De-mul plexer (D-MUX),, Combina onal and Sequen al Circuits and their use in embedded applica ons, LO 3 Explain Integrated Circuits (ICs), the degree of integra on in various types of, Integrated Circuits, Analog, Digital and Mixed Signal Integrated Circuits, the steps, involved in IC Design, LO 4 Discuss Electronic Design Automa on tools for Embedded Hardware Design and EDA, tools for Printed Circuit Board Design, LO 5 Underline usage of the OrCAD EDA tool from Cadence so ware for Printed Circuit, Board Design, LO 6 Iden fy the different en es for circuit diagram design (schema c design) using the, OrCAD Capture CIS tool. Familiarise with the different en es of the Capture CIS, tool like ‘Drawing Canvas’, ‘Drawing Tool’, ‘Drawing Details’, ‘Part Number crea on’,, ‘Design Rule Check (DRC)’, ‘Bill of Material (BoM)’ crea on, ‘Netlist file crea on for, PCB blueprint design, etc., LO 7 Discuss the usage of ‘Layout’ tool from Cadence for genera ng the PCB design files, from the circuit diagram descrip on file (From Netlist file), Learn the building blocks of ‘PCB Layout’ – Footprints (Component Packages),, Routes/Traces, Layers, Via, Marking text and graphics, etc., Learn about Board Outline crea on, Component placement, Layer selec on, PCB, Track Rou ng, Assembly note crea on, Text and graphics addi on, PCB Moun ng, hole crea on, Design Rule Checking, Gerber file crea on, etc. using Layout tool
Page 259 :
Embedded Hardware Design and Development, , 235, , Learn the important guidelines for a good PCB design, LO 8 Learn the different mechanisms for PCB fabrica on, different types of PCBs, How, a finished PCB looks like and how it is made opera onal, , As mentioned at the beginning of this book, an embedded system is a combination of special purpose, hardware and software (firmware). The hardware of embedded system is built around analog electronic, components and circuits, digital electronic components and circuits, and Integrated Circuits (ICs). A Printed, Circuit Board (PCB) provides a platform for placing all the necessary hardware components for building an, embedded product, like a chess board where you can move the pawns, rookies and bishop. If you are building, a simple hardware or a test product, you can use a bread-board to interconnect the various components. For, a commercial product you cannot go for a bread-board as an interconnection platform since they make your, product bulky and the breadboard connections are highly unstable and your product may require thousands of, inter connections. Printed Circuit Boards (PCB) acts as the backbone of embedded hardware. This chapter is, organised in such a way to refresh the reader’s knowledge on various analog and digital electronic components, and circuits, familiarise them with Integrated Circuit designing and provide them the fundamentals of printed, circuit boards, its design and development using Electronic Design Automation (EDA) tools., , 8.1, , ANALOG ELECTRONIC COMPONENTS, , Resistors, capacitors, diodes, inductors, operational amplifiers (OpAmps),, LO 1 List the, transistors, etc. are the commonly used analog electronic components in, various elements, embedded hardware design. A resistor limits the current flowing through a, of Embedded, circuit. Interfacing of LEDs, buzzer, etc. with the port pins of microcontroller, Hardware and their, through current limiting resistors is a typical example for the usage of resistors in, design principles, embedded application. Capacitors and inductors are used in signal filtering and, resonating circuits. Reset circuit implementation, matching circuits for RF designs, power supply decoupling,, etc. are examples for the usage of capacitors in embedded hardware circuit. Electrolytic capacitors, ceramic, capacitors, tantalum capacitors, etc. are the commonly used capacitors in embedded hardware design., Inductors are widely used for filtering the power supply from ripples and noise signals. Inductors with, inductance value in the microhenry (µH) range are commonly used in embedded applications for filter and, matching circuit implementation., P-N Junction diode, Schottky diode, Zener diode, etc. are the commonly used diodes in embedded, hardware circuits. A schottky diode is same as a P-N junction diode except that its forward voltage drop, (voltage drop across diode when conducting) is very low (of the order of 0.15V to 0.45) when compared, to ordinary P-N junction diode (of the order of 0.7V to 1.7V). Also the current switching time of schottky, diode is very small compared to the ordinary P-N junction diode. A zener diode acts as normal P-N junction, diode when forward biased. It also permits current flow in the reverse direction, if the voltage is greater than, the junction breakdown voltage. It is normally used for voltage clamping applications. Reverse polarity, protection, voltage rectification (AC-DC converters), freewheeling of current produced in inductive circuits,, clamping of voltages to a desired level (e.g., Brown-out protection circuit implementation using zener diode),, etc. are examples for the usage of diodes in embedded applications.
Page 260 :
236, , Introduc on to Embedded Systems, , Transistors in embedded applications are used for either switching or amplification purpose. In switching, application, the transistor is in either ON or OFF state. In amplification operation, the transistor is always, in the ON state (partially ON). The current is below saturation current value and the current through the, transistor is variable. The common emitter configuration of NPN transistor is widely used in switching and, driving circuits in embedded applications. Relay, buzzer and stepper motor driving circuits are examples, for common emitter configuration based driver circuit implementation using transistor (Please refer to, Chapter 2)., , 8.2, , DIGITAL ELECTRONIC COMPONENTS, , LO 2 Recognise the, basic Digital Electronic, components and, circuits – Logic Gates,, Buffer ICs, Latch ICs,, Decoder and Encoder, ICs, Multiplexer (MUX), and De-multiplexer, (D-MUX), Combinational, and Sequential Circuits, and their use in, embedded applications, , 8.2.1, , Digital electronics deal with digital or discrete signals. Microprocessors,, Microcontrollers, and System on Chips (SoCs) work on digital principles., They interact with the rest of the world through digital I/O interfaces and, process digital data. Embedded systems employ various digital electronic, circuits for ‘Glue logic’ implementation. ‘Glue logic’ is the custom digital, electronic circuitry required to achieve compatible interface between two, different integrated circuit chips. Address decoders, latches, encoders/, decoders, etc. are examples for glue logic circuits. Transistor Transistor, Logic (TTL), Complementary Metal Oxide Semiconductor (CMOS) logic, etc are some of the standards describing the electrical characteristics of, digital signals in a digital system. The following sections give an overview, of the various digital I/O interface standards and the digital circuits/, components used in embedded system development., , Open Collector and Tri-State Output, , Open collector is an I/O interface standard in digital system design. The term ‘open collector’ is commonly, used in conjunction with the output of an Integrated Circuit (IC) chip. It facilitates the interfacing of IC output, to other systems which operate at different voltage levels. In the open collector configuration, the output, line from an IC circuit is connected to the base of an NPN transistor. The collector of the transistor is left, unconnected (floating) and the emitter is internally connected to the ground signal of IC. Figure 8.1 illustrates, an open collector output configuration., , IC internal circuitry, , C, B, , External interface, , Vcc, Pull-up, resistor, , E, , Fig. 8.1, , Open collector output configuration, , O/p pin
Page 261 :
Embedded Hardware Design and Development, , 237, , For the output pin to function properly, the output pin should be pulled, to the desired voltage for the o/p, device, through a pull-up resistor. The output signal of the IC is fed to the base of an open collector transistor., When the base drive to the transistor is ON and the collector is in open state, the o/p pin floats. This state is, also known as ‘high impedance’ state. Here the output is neither driven to logic ‘high’ nor logic ‘low’. If a, pull-up resistor is connected to the o/p pin, when the base drive is ON, the o/p pin becomes at logic 0 (0V)., With a pull-up resistor, if the base driver is 0, the o/p will be at logic high (Voltage = Vcc). The advantage of, open collector output in embedded system design is listed below., (1) It facilitates the interfacing of devices, operating at a voltage different from the IC, with the IC., Thereby, it eliminates the need for additional interface circuits for connecting devices at different, voltage levels., (2) An open collector configuration supports multi-drop connection, i.e., connecting more than one open, collector output to a single line. It is a common requirement in modern embedded systems supporting, communication interfaces like I2C, 1-Wire, etc. Please refer to the various interfaces described in, Chapter 2 under the section ‘Onboard Communication Interfaces’., (3) It is easy to build ‘Wired AND’ and ‘Wired OR’ configuration using open collector output lines., The output of a standard logic device has two states, namely ‘Logic 0 (LOW)’ and ‘Logic 1 (HIGH),, and the output will be at any one of these states at a given point of time, whereas tri-state devices have three, states for the output, namely, ‘Logic 0 (LOW)’, ‘Logic 1 (HIGH) and ‘High Impedance (FLOAT)’. A tristate logic device contains a device activation line called ‘Device Enable’. When the ‘Device Enable’ line, is activated (set at ‘Logic 1’ for an active ‘HIGH’ enable input and at ‘Logic 0’ for an active ‘LOW’ enable, input), the device acts like a normal logic device and the output will be in any one of the logic conditions,, ‘Logic 0 (LOW)’ or ‘Logic 1 (HIGH)’. When the ‘Device Enable’ line is de-activated (set at ‘Logic 0’ for, an active ‘HIGH’ enable input and at ‘Logic 1’ for an active ‘LOW’ enable input), the output of the logic, device enters in a high impedance state and the device is said to be in the floating state. The tri-stated output, condition produces the effect of ‘removing’ the device from a circuit and allows more than one devices to, share a common bus. With multiple ‘tri-stated’ devices share a common bus, only one ‘device’ is allowed to, drive the bus (drive the bus to either ‘Logic 0’ or ‘Logic 1’) at any given point of time and rest of the devices, should be in the ‘tri-stated’ condition., , 8.2.2, , Logic Gates, , Logic gates are the building blocks of digital circuits. Logic gates control the flow of digital information by, performing a logical operation of the input signals. Depending on the logical operation, the logic gates used in, digital design are classified into–AND, OR, XOR, NOT, NAND, NOR and XNOR. The logical relationship, between the output signal and the input signals for a logic gate is represented using a truth table. Figure 8.2, illustrates the truth table and symbolic representation of each logic gate., , 8.2.3, , Buffer, , A buffer circuit is a logic circuit for amplifying the current or power. It increases the driving capability of, a logic circuit. A tri-state buffer is a buffer with Output Enable control. When the Output Enable control is, active (Low for Active low enable and High for Active high enable), the tri-state buffer functions as a buffer., If the Output Enable is not active, the output of the buffer remains at high impedance state (Tri-stated). Tristate buffers are commonly used as drivers for address bus and to select the required device among multiple, devices connected to a shared data bus. Tri-state buffers are available as either unidirectional or bi-directional, buffers. 74LS244/74HC244 is an example of unidirectional octal buffer. It contains 8 individual buffers, which are grouped into two. Each buffer group has its own output enable line. Figure 8.3 illustrates the, 74LS244 buffer device.
Page 262 :
238, , Introduc on to Embedded Systems, , NAND Gate –Truth Table, , AND Gate –Truth Table, I1, 0, 0, 1, 1, , I2, 0, 1, 0, 1, , O, 0, 0, 0, 1, , I1, I2, , O, , I2, 0, 1, 0, 1, , O, 0, 1, 1, 1, , I1, I2, , O, , O, , 0, , 1, , 1, , 0, , O, 1, 1, 1, 0, , I1, I2, , O, , I1, 0, 0, 1, 1, , I2, 0, 1, 0, 1, , O, 1, 0, 0, 0, , I1, I2, , O, , XOR Gate –Truth Table, , NOT Gate –Truth Table, I, , I2, 0, 1, 0, 1, , NOR Gate –Truth Table, , OR Gate –Truth Table, I1, 0, 0, 1, 1, , I1, 0, 0, 1, 1, , O, , I, , I1, 0, 0, 1, 1, , I2, 0, 1, 0, 1, , O, 0, 1, 1, 0, , I1, I2, , O, , XNOR Gate –Truth Table, I1, 0, 0, 1, 1, , I2, 0, 1, 0, 1, , O, 1, 0, 0, 1, , Fig. 8.2, , I1, I2, , O, , Logic Gates Truth Table and Symbolic representation, , IC 74LS245 is an example of bi-directional tri-state buffer. It allows data flow in both directions, one at a, time. The data flow direction can be set by the direction control line. One buffer is allocated for the data line, associated with each direction. Figure 8.4 illustrates the 74LS245 octal bi-directional buffer., , 8.2.4, , Latch, , A latch is used for storing binary data. It contains an input data line, clock or gating control line for triggering, the latching operation and an output line. The gating signal can be either a positive edge (raising edge) or a, negative edge (falling edge). Whenever a latch trigger happens, the data present on the input line is latched., The latched data is available on the output line of the latch until the next trigger. D flip flop is a typical, example of a latch (refer to your Digital Electronics course material—there exist different types of latches, namely S-R, J-K, D, T, etc.). In electronic circuits, latches are commonly used for latching data, which is, available only for a short duration. A typical example is the lower order address information in a multiplexed, address-data bus system. Latches are available as integrated circuits, IC 74LS373 being a typical example. It, contains 8 individual D latches.
Page 263 :
239, , Embedded Hardware Design and Development, , OE \, 74L S244, IN, , OUT, , IN, , OUT, , IN, , OUT, , IN, , OUT, , IN, , OUT, , IN, , OUT, , IN, , OUT, , IN, , OUT, , 74LS373, A1, A2, A3, A4, A5, A6, A7, A8, , 74LS245, , B1, B2, B3, B4, B5, B6, B7, B8, E\, , DI R, OE \, , Fig. 8.3, , 74LS244 Octal Buffer IC Fig. 8.4, , 74LS245 Octal bidirectional Buffer IC, , D0, D1, D2, D3, D4, D5, D6, D7, , D, G, , Latch Enable, (LE), , Fig. 8.5, , Q\, , O0, O1, O2, O3, O4, O5, O6, O7, , Output, Enable (OE\), , 74LS373 Octal Latch IC, , The 74LS373 latch IC (Fig. 8.5) is commonly used for latching the lower order address byte in a, multiplexed address data bus system. The Address Latch Enable (ALE) pulse generated by the processor,, when the Address bits are available on the multiplexed bus, is used as the latch trigger. Figure 8.6 illustrates, the usage of latches in address latching., Processor, Multiplexed Address Data Bus, D0….D7, Latch, (E.g. 74LS373), ALE, , Fig. 8.6, , 8.2.5, , A0….A7, , G, , Latch IC for address latching in multiplexed address data-bus, , Decoder, , A decoder is a logic circuit which generates all the possible combinations of the input signals. Decoders are, named with their input line numbers and the possible combinations of the input as output. Examples are 2, to 4 decoder, 3 to 8 decoder and 4 to 16 decoder. The 3 to 8 decoder contains 3 input signal lines and it is, possible to have 8 different configurations with the 3 lines (000 to 111 in the input line corresponds to 0 to, 7 in the output line). Depending on the input signal, the corresponding output line is asserted. For example,, for the input state 001, the output line 2 is asserted. Decoders are mainly used for address decoding and chip, select signal generation in electronic circuits and are available as integrated circuits. 74LS138/74AHC138 is, an example for 3 to 8 decoder IC. Figure 8.7 illustrates the 74AHC138 decoder and the function table for it.
Page 264 :
240, , Introduc on to Embedded Systems, , 74AHC138, , E 3\, , E2 \, , E1\, , A0, A1, A2, , O0\, O1\, O2\, O3\, O4\, O5\, O6\, O7\, , A2, 0, 0, 0, 0, 1, 1, 1, 1, , A1, 0, 0, 1, 1, 0, 0, 1, 1, , A0, 0, 1, 0, 1, 0, 1, 0, 1, , Input, E1\ E2\, 0 0, 0 0, 0 0, 0 0, 0 0, 0 0, 0 0, 0 0, , E3\, 1, 1, 1, 1, 1, 1, 1, 1, , O0\, 0, 1, 1, 1, 1, 1, 1, 1, , O1\, 1, 0, 1, 1, 1, 1, 1, 1, , Output, O2\ O3\, 1 1, 1 1, 0 1, 1 0, 1 1, 1 1, 1 1, 1 1, , O4\, 1, 1, 1, 1, 0, 1, 1, 1, , O5\, 1, 1, 1, 1, 1, 0, 1, 1, , O6\, 1, 1, 1, 1, 1, 1, 0, 1, , O7\, 1, 1, 1, 1, 1, 1, 1, 0, , Fig. 8.7 3 to 8 Decoder IC and I/O signal states, The decoder output is enabled only when the ‘Output Enable’ signal lines E1\, E2\ and E3 are at logic, levels 0, 0 and 1 respectively. If the output-enable signals are not at the required logic state, all the output, lines are forced to the inactive (High) state. The output line corresponding to the input state is asserted ‘Low’, when the ‘Output Enable’ signal lines are at the required logic state (Here E1\=E2\=0 and E3 =1). The output, line can be directly connected to the chip select pin of a device, if the chip select logic of the device is active, low., , 8.2.6, , Encoder, , An encoder performs the reverse operation of decoder. The encoder encodes the corresponding input state, to a particular output format. The binary encoder encodes the input to the corresponding binary format., Encoders are named with their input line numbers and the encoder output format. Examples are 4 to 2, encoder, 8 to 3 encoder and 16 to 4 encoder. The 8 to 3 encoder contains 8 input signal lines and it is possible, to generate a 3 bit binary output corresponding to the input (e.g. inputs 0 to 7 are encoded to binary 111 to, 000 in the output lines). The corresponding output line is asserted in accordance with the input signals. For, example, if the input line 1 is asserted, the output lines A0, A1 and A2 are asserted as 0, 1 and 1 respectively., Encoders are mainly used for address decoding and chip select signal generation in electronic circuits and are, available as integrated circuits. 74F148/74LS148 is an example of 8 to 3 encoder IC. Figure 8.8 illustrates the, 74F148/74LS148 encoder and the function table for it., The encoder output is enabled only when the ‘Enable Input (EI)’ signal line is at logic 0. A ‘High’ on, the Enable Input (EI) forces all outputs to the inactive (High) state and allows new data to settle without, producing erroneous information at the outputs. The group signal (GS) is active-Low when any input is, Low: this indicates when any input is active. The Enable Output (EO) is active-Low when all inputs are at, logic ‘High’. 74LS148/74F148 is a priority encoder and it provides priority encoding of the inputs to ensure, that only the highest order data line is encoded when multiple data lines are asserted (e.g., when both input, lines 1 and 6 are asserted, only 6 is encoded and the output will be 001. It should be noted that the encoded, output is an inverted value of the corresponding binary data. (e.g., the output lines A2, A1 and A0 will be at, logic levels 000 when the input 7 is asserted). Encoding of keypress in a keyboard is a typical example for an, application requiring encoder. The encoder converts each keypress to a binary code.
Page 265 :
241, , Embedded Hardware Design and Development, , EI\, , GS\, , EO, , A0, A1, A2, , Fig. 8.8, , 8.2.7, , Output, , Input, , 74LS148, , 0, 1, 2, 3, 4, 5, 6, 7, , 7, , 6, , 5, , 4, , 3, , 2, , 1, , 0, , EI, , GS EO A2 A1, , 1, 1, 1, , 1, 1, 1, , 1, 1, 1, , 1, 1, 1, , 1, 1, 1, , 1, 1, 0, , 1, 1, 1, 1, 0, , 1, 1, 1, 0, 1, , 1, 1, 0, 1, 1, , 1, 0, 1, 1, 1, , 0, 1, 1, 1, 1, , 1, 1, 1, 1, 1, , 1, 0, 1, 1, 1, , 0, 1, 1, 1, 1, , 0, 0, 0, 0, 0, , 0, 0, 0, 0, 0, , 1, 1, 1, 1, 1, , 1, 1, 1, 1, 0, , 1, 1, 0, 0, 1, , 1, 0, 1, 0, 1, , 1, 1, , 1, 1, , 0, 0, , 0, 0, , 1, 1, , 0, 0, , 1, 0, , 0, 1, , 1, , 1, , 0, , 0, , 1, , 0, , 0, , 0, , A0, , 8 to 3 Encoder IC and I/O signal states, , Multiplexer (MUX), , A multiplexer (MUX) can be considered as a digital switch which connects one input line from a set of input, lines, to an output line at a given point of time. It contains multiple input lines and a single output line. The, inputs of a MUX are said to be multiplexed. It is possible to connect one input with the output line at a time., The input line is selected through the MUX control lines. 74S151 is an example for 8 to 1 multiplexer IC., Figure 8.9 illustrates the 74S151 multiplexer and the function table for it., D0, D1, D2, D3, D4, D5, D6, D7, , 74LS151, , Y, , EN\, , A2, A1, A0, , Y\, , Channel Select, Fig. 8.9, , Input, Output, A2 A1 A0 EN\ Y Y\, 0, 0, 0, 0 D0 D0\, 0, 0, 1, 0 D1 D1\, 0 D2 D2\, 0, 1, 0, 0, 1, 1, 0 D3 D3\, 0, 0, 0 D4 D4\, 1, 0, 1, 0 D5 D5\, 1, 1, 1, 0, 0 D6 D6\, 1, x, , 1, x, , 1, x, x:, , 0, , D7, , D7\, , 1 0, 1, Don’t care, , 8 to 1 multiplexer IC and I/O signal states, , The multiplexer is enabled only when the ‘Enable signal (EN)’ line is at logic 0. A ‘High’ on the EN, line forces the output to the inactive (Low) state. The input signal is switched to the output line through, the channel select control lines A2, A1 and A0. In order to select a particular input line, apply its binary, equivalent to the channel select lines A0, A1 and A2 (e.g. set A2A1A0 as 000 for selecting Input D0, and as, 001 for selecting channel D1, etc.).
Page 266 :
242, , 8.2.8, , Introduc on to Embedded Systems, , De-multiplexer (D-MUX), , A de-multiplexer performs the reverse operation of multiplexer. De-multiplexer switches the input signal to, the selected output line among a number of output lines. The output line to which the input is to be switched, is selected by the output selector control lines. The 1 to 2 de-multiplexer, NL7SZ18 is a typical example for 1, to 2 de-multiplexer IC. It contains a single input line and two output lines to switch the input line. The output, switching is controlled by the output selector control. Figure 8.10 illustrates the NL7SZ18 de-multiplexer, and the function table for it., , Input Output, , NL7SZ18, I, , Y0, , S, Output, Selector, , Y1, , S, , I, , Y0, , Y1, , 0, 0, 1, 1, , 0, 1, 0, 1, , 0, 1, Z, Z, , Z, Z, 0, 1, , Z : High Impedance, , Fig. 8.10, , 1 to 2 De-multiplexer IC and I/O signal states, , When one output line is selected by the output selector control (S), the other output line remains in the, High impedance state., , 8.2.9, , Combinational Circuits, , In digital system design, a combinational circuit is a combination of the logic gates. The output of the, combinational circuit, at a given point of time, is dependent only on the state of the inputs at the given point, of time. Encoders, decoders, multiplexers, de-multiplexers, adder circuits, comparators, multiple input gates,, etc. are examples of digital combinational circuits. The design requirements for a combinational circuit are, expressed as ‘A set of statements’ or ‘Truth Table’ or ‘Boolean Expressions’. The combinational circuit, can be implemented either by simplifying the Boolean expression/Truth table and realising the simplified, expression using logic gates or by directly implementing the logic expressions using an ‘Off-the-shelf’, Medium Scale Integrated Circuit Chip. Various logic simplification techniques like ‘Karnaugh Map (K Map)’,, ‘Algebraic method’, ‘Variable Entered Mapping (VEP)’ and ‘Quine-McCluskey method,’ etc. are used for the, simplification of logic expressions., In digital system design, logical functions representing a combinational circuit are expressed as either, ‘Sum of Products (SOP)’ or ‘Product of Sums (POS)’ form. The SOP form represents the logic as the sum, of the products of the logical variables whereas the POS form represents the logic as the product of sums of, the logical variable., __, The expression Y = AB + BC + AC is an example for SOP form representation of the logical function. Here, Y is the output signal and A, B and C are the input signals., The expression Y = (A+B) (B+C) (A+C) is an example for POS form representation of the logical function., Here Y is the output signal and A, B and C are the input signals., ‘Karnaugh map’ or K-map is the easiest logic simplification technique for arriving at the logic expression, when the ‘Truth Table’ of the combinational circuit is given. Depending on the number of input signal, variables, K-maps are named as 2-variable, 3-variable, 4-variable, etc. K-map is the most suitable candidate, for handling input variables up to 6. Now let us try to implement a 2 input half adder combinational circuit,
Page 267 :
243, , Embedded Hardware Design and Development, , for adding two one-bit numbers, using the K-map technique. The ‘Truth Table’ and the corresponding K-map, drawing* for the 2 input ‘half adder’ circuit is given below., A, , Input Output, B, , A, , O, , C, , 0, 0, 1, 1, , 0, 1, 0, 1, , 0, 1, 1, 0, , 0, 0, 0, 1, , 0, , A, , 1, , B, , 0, , 0, , 1, , 1, , 0, , 1, , C : Carry, , 0, , 1, , 0, 0, , 0, 1, , 1, , K-Map for Output (O), , Fig. 8.11, , 0, , B, , K-Map for Carry (C), , Truth Table and K-map representation for Half Adder, , The simplified logical, expression, for the output (Y) and carry (C) of half adder is given below., __, __, Y = AB + AB, C = AB __, __, The logical expression AB + A B represents an XOR gate. Please refer to the ‘truth table’ of XOR gate given, under the ‘Logic Gates’ section. Using K-map it can be represented as:, , XOR Gate - T ruth Table, , A, , 0, , B, , 1, , I1, , I2, , O, , 0, , 0, , 0, , 0, , 0, , 1, , 0, 1, 1, , 1, 0, 1, , 1, 1, , 1, , 1, , 0, , Fig. 8.12, , 0, , K-Map for XOR Gate, , Truth Table and K-map representation for XOR Gate, , Hence, the half adder circuit can be realised using an XOR, and an AND gate. The circuit implementation is shown in, Fig. 8.13., , 8.2.10 Sequential Circuits, , A, B, , Y = A\ B + AB\, , C = AB, , Digital logic circuit, whose output at any given point of, time depends on both the present and past inputs, is known, Fig. 8.13 Half Adder Circuit Implementation, as sequential circuits. Hence, sequential circuits contain a, memory element for holding the previous input states. In general, a sequential circuit can be visualised as a, combinational circuit with memory elements., Flip-flops act as the basic building blocks of sequential circuits. Sequential circuits are of two types,, namely–synchronous (clocked) sequential circuits and asynchronous sequential circuits. The operation of a, synchronous sequential circuit is synchronised to a clock signal, whereas an asynchronous sequential circuit, does not require a clock for operation. For an asynchronous sequential circuit, the response depends upon, * Please refer the book ‘Modern Digital Electronics by R P Jain’ for more details on the K-map drawing and simplification methods.
Page 268 :
244, , Introduc on to Embedded Systems, , the sequence in which the input signal changes. The memory capability to asynchronous sequential circuit is, provided through feedback. Register, synchronous counters, etc. are examples of synchronous serial circuits,, whereas ripple or asynchronous counter is an example for asynchronous sequential circuits., Now let us have a look at how a flip-flop circuit acts as a memory storage element. The name flip-flop is, conveying its intended purpose. It tumbles the output based on the input and other controlling signals. As a, starting point on the discussion of flip-flops, let us talk about Set Reset (S-R) flip-flop. The logic circuit and, the I/O states for an S-R flip-flop are given in Fig. 8.15., , Input, S, Q\, , Inputs, , Combinational, Circuit, , Output, Q, , R, Memory, Elements, , Fig. 8.14, , Visualisation of Sequential Circuit, , Fig. 8.15, , S, , R, , 0, 0, 0, 0, 1, 1, 1, 1, , 0, 0, 1, 1, 0, 0, 1, 1, , Output, Previous Present, State, State, , 0, 1, 0, 1, 0, 1, 0, 1, , 0, 1, 0, 0, 1, 1, x, x, , S-R Flip-Flop and Truth Table, , The S-R flip-flop is built using 2 NOR gates. The output of each NOR gate is fed back as input to the other, NOR gate. This ensures that if the output of one NOR gate is at logic 1, the output of the other NOR gate will, be at logic 0. The S-R flip-flop works in the following way., (1) If the Set input (S) is at logic high and Reset input (R) is at logic low, the output remains at logic high, regardless of the previous output state., (2) If the Set input (S) is at logic low and Reset input (R) is at logic high, the output remains at logic low, regardless of the previous output state., (3) If both the Set input (S) and Reset input (R) are at logic low, the output remains at the previous logic, state., (4) The condition Set input (S) = Reset input (R) = Logic high (1) will lead to race condition and the state, of the circuit becomes undefined or indeterminate (x)., A clock signal can be used for triggering the state change of flip-flops. The clock signal can be either level, triggered or edge triggered. For level triggered flip-flops, the output responds to any changes in input signal,, if the clock signal is active (i.e., if the clock signal is at logic 1 for ‘HIGH’ level triggered and at logic 0 for, ‘LOW’ level triggered clock signal). For edge triggered flip-flops, the output state changes only when a clock, trigger happens regardless of the changes in the input signal state. The clock trigger signal can be either a, positive edge (A 0 to 1 transition) or a negative edge (A 1 to 0 transition). Figure 8.16 illustrates the, implementation of an edge triggered S-R flip-flop., The clocked S-R flip-flop functions in the same way as, S, that of S-R flip-flop. The only difference is that the output, Q\, state changes only with a clock trigger. Even though there, is a change in the input state, the output remains unchanged, until the next clock trigger. When a clock trigger occurs, the C, output state changes in accordance with the values of S and R, Q, at the time of the clock trigger., R, We have seen that the input condition S=R= 1 is undefined, in an S-R flip-flop. The J-K flip-flop augments the behaviour, Fig. 8.16 Clocked S-R Flip-Flop
Page 269 :
245, , Embedded Hardware Design and Development, , of S-R flip by interpreting the input state S=R=1 as a toggle command. The logic circuit and the I/O states for, a J-K flip-flop are given in Fig. 8.17., Input, J, , S, S-R FlipFlop, , CL, , K, , R, , Fig. 8.17, , Output, , Q, , J, , K, , Previous, State, , Q\, , 0, 0, 0, 0, 1, 1, 1, 1, , 0, 0, 1, 1, 0, 0, 1, 1, , 0, 1, 0, 1, 0, 1, 0, 1, , Present, State, , 0, 1, 0, 0, 1, 1, 1, 0, , J-K Flip-Flop Implementation and Truth Table, , From the circuit implementation, it is clear that for a J-K flip-flop, S = JQ\ and R = KQ. The J-K flip-flop, operates in the following way:, (1) When J = 1 and K = 0, the output remains in the set state., (2) When J = 0 and K = 1, the output remains in the reset state., (3) When J = K = 0, the output remains at the previous logic state., (4) When J = 1 and K = 1, the output toggles its state., A D-type (Delay) flip-flop is formed by connecting a NOT gate in between the S and R inputs of an S-R, flip-flop or by connecting a NOT gate between the J and K inputs of a J-K flip-flop. Figure 8.18 illustrates a, D-type flip-flop and its I/O states., S, Q\, , Q, , J, J-K FlipFlop, K, , Q, , R, , Fig. 8.18, , Input Output, D, Q, 0, 0, 1, , Q\, , 1, , D-Type Flip-Flop – Circuit and Truth Table, , This flip-flop is known with the so-called name ‘Delay’ flip-flop for the following reason–the input to the, flip-flop appears at the output at the end of the clock pulse (for falling edge triggering)., A Toggle flip-flop or T flip-flop is formed by combining the J and K inputs of a J-K flip-flop. Figure 8.19, illustrates a T flip-flop and its I/O states., , Q, , J, CL, , K, , J-K FlipFlop, , Input Output, , Q\, , Fig. 8.19, , T, , Qn+1, , 0, 1, , Qn, Q n\, , Q n+1 : Present Output, Qn : Previous Output, , T (Toggle) Flip-Flop – Circuit and Truth Table
Page 270 :
246, , Introduc on to Embedded Systems, , When the ‘T’ input is held at logic 1, the T flip-flop toggles the output, with each clock signal. An S-R flip-flop cannot be converted to a ‘T’ flipQ, flop by combining the inputs S and R. The logic state S=R=1 is not defined S, in the S-R flip-flop. However, an S-R flip-flop can be configured for toggling, S-R FlipCL, the output with the circuit configuration shown in Fig. 8.20., Flop, Q\, The synchronous sequential circuit uses clocked flip-flops (S-R, J-K, D,, R, T etc.) as memory elements and a ‘state’ change occurs only in response to a, synchronising clock signal. The clock signal is common to all flip-flops and, the clock pulse is applied simultaneously to all flip-flops. As an illustrative, example for synchronous sequential circuit, let us consider the design of a Fig. 8.20 S-R Flip-Flop acting as, Toggle switch, synchronous 3-bit binary counter., The counting sequence for a 3-bit binary counter is given below., Count, , Q2, , Q1, , Q0, , 0, , 0, , 0, , 0, , 1, , 0, , 0, , 1, , 2, , 0, , 1, , 0, , 3, , 0, , 1, , 1, , 4, , 1, , 0, , 0, , 5, , 1, , 0, , 1, , 6, , 1, , 1, , 0, , 7, , 1, , 1, , 1, , From the count sequence, it is clear that the LS bit (Q0) of the binary counter toggles on each count and the, next LS bit (Q1) toggles only when the LS bit (Q0) makes a transition from 1 to 0. The Bit (Q2) of the binary, counter toggles its state only when the Q1 bit and Q0 bits are at logic 1. This logic circuit can be realised with, 3 T flip-flops satisfying the following criteria:, (1) All the T flip-flops are driven simultaneously by a single clock (synchronous design)., (2) The output of the T flip-flop representing the Q0 bit is initially set at 0. The input line of Q0 flip-flop is, connected to logic 1 to ensure toggling of the output with input clock signal., (3) Since Q1 bit changes only when Q0 makes a transition from 1 to 0, the output of the T flip-flop, representing Q0 is fed as input to the T flip-flop representing the Q1 bit., (4) The output bit Q2 changes only when Q0 = Q1 = 1. Hence the input to the flip-flop representing bit Q2, is fed by logically ANDing Q0 and Q1., The circuit realisation of 3-bit binary counter using 3 T flip-flops is given in Fig. 8.21., The Preset line is used for setting the output of flip-flop, whereas the Clear line is used for resetting the, output of flip-flops. The counter changes in accordance with the count pulses., Another example for synchronous sequential circuit is ‘register’. A register can be considered as a group, of bits holding information. A D flip-flop can be used for holding a ‘bit’ information. An 8 bit wide register, can be visualised as the combination of 8 D flip-flops. The bit storing operation is controlled by the signal, associated with a latch write (like a write to latch pulse). The figure given below illustrates the implementation, of a 4 bit register using D flip-flops.
Page 271 :
247, , Embedded Hardware Design and Development, , Q0, , Q1, , Q2, , Preset Logic, Preset, , Preset, , Q0, , Logic 1T, , T FlipFlop, , Pulse to, Count, , Preset, , Q1, , T, T FlipFlop, , CL, , Q2, , T, T FlipFlop, , CL, , Clear, , Clear, , Clear, , Clear Logic, , Fig. 8.21, , Binary Counter Implementation using T Flip-Flops, , Q3, , Q2, , Q1, , Q0, , Preset Logic, Preset, , Preset, D, , Clo ck, , D, CL, , D FlipFlop, , Clear, , Preset, D, , D FlipFlop, , CL, , Clear, , Preset, D, , D FlipFlop, , CL, , Clear, , D FlipFlop, , Clear, , Clear Logic, , D3, , D2, , Fig. 8.22, , D1, , D0, , 4 bit Register Implementation using D Flip-Flops, , The state of an asynchronous sequential circuit changes instantaneously with changes in input signal, state. The asynchronous sequential circuit does not require a synchronising clock signal for its operation., The memory element of an asynchronous sequential circuit can be either an un-clocked flip-flop or logical, gate circuits with feedback loops for latching the state. As an illustrative example, let us explore how we can, implement the above 3-bit binary counter using an asynchronous sequential circuit. From the count sequence, of the 3-bit binary counter, it is clear that the least significant (LS) bit (Q0) of the binary counter toggles on, each count and the next LS bit (Q1) toggles only when the LS bit (Q0) makes a transition from 1 to 0. The, most significant (MS) Bit (Q2) of the binary counter toggles its state only when the Q1 bit makes a transition, from 1 to 0. This logic circuit can be realised with 3 T flip-flops satisfying the following criteria:, (1) The T input of all flip-flops are connected to logic high (it is essential for the toggling condition of the, T Flip-flop).
Page 272 :
248, , Introduc on to Embedded Systems, , (2) The pulse for counting is applied to the clock input of the first T flip-flop representing the LS bit Q0., (3) The clock to the T flip-flop representing bit Q1 is supplied by the output of the T flip-flop representing, bit Q0. This ensures that the output of Q1 toggles only when the output of Q0 transitions from 1 to 0., (4) The clock to the T flip-flop representing bit Q2 is supplied by the output of the T flip-flop representing, bit Q1. This ensures that the output of Q2 toggles only when the output of Q1 transitions from 1 to 0., The circuit realisation of the 3-bit binary counter using 3 T flip-flops in an asynchronous sequential circuit, is given below., Q0, , Logic 1, , Q2, , Q1, , Preset Logic, Preset, Q0, , T, T FlipFlop, , Pulse to, Count, , T, CL, , Clear, , Preset, Q1, T FlipFlop, , Clear, , T, CL, , Preset, Q2, T FlipFlop, , Clear, , Clear Logic, , Fig. 8.23, , 3-Bit Binary Counter Implementation using T Flip-Flop, , The Preset line is used for setting the output of flip-flop, whereas the Clear line is used for resetting the, output of flip-flops. Here the input line (T) of all flip-flops is tied to logic 1 permanently. Hence, the clock, signal to each flip-flop can be treated as the input to the flip-flop, instead of treating it as a clock pulse., The table given below summarises the characteristics, pros and cons of synchronous and asynchronous, sequential circuits., Synchronous Sequential Circuit, , Asynchronous Sequential Circuit, , Clocked flip-flops act as the memory element in the circuit. All flip-flops are clocked to the same clock signal., , Un-clocked flip-flops or logic gate circuits with feedback, loops act as the memory element in the circuit., , The output state of the circuit changes only with clock, trigger., , The output state change happens instantaneously with, changes in input state., , The speed of operation depends on the maximum supported clock frequency., , Faster than synchronous sequential circuits., , The output state of asynchronous circuit changes instantaneously with input signals; hence the speed of, operation of asynchronous sequential circuits is high compared to that of synchronous sequential circuits., Asynchronous sequential circuits are preferred over synchronous sequential circuits for applications requiring, high speeds and applications in which the input state change can happen asynchronously. Asynchronous, sequential circuits are cheaper to develop, compared to synchronous sequential circuits.
Page 273 :
Embedded Hardware Design and Development, , 8.3, , 249, , VLSI AND INTEGRATED CIRCUIT DESIGN, , In the beginning of the electronics revolution we started building electronic, LO 3 Explain, circuits around the early vacuum tube technologies. As technology, Integrated Circuits, progressed, transistors came into the picture and we shifted our circuit, (ICs), the degree of, designs to transistor based technology. In the ancient times thousands of, integration in various, individual transistors were required to build a digital or analog functionality., types of Integrated, The transistors were interconnected using conductive wires for building the, Circuits, Analog,, required functionality. As technology gained new dimensions, the concept of, Digital and Mixed, miniaturisation evolved and researchers and designers were able to build the, Signal Integrated, required functionality within a single silicon wafer, in places of thousands of, Circuits, the steps, interconnected transistors. An Integrated Circuit (IC) is a miniaturised form, involved in IC Design, of an electronic circuit containing transistors and other passive electronic, components. In an IC, the circuits, required for building the functionality, (say Processing logic: CPU), are built on the surface of a thin silicon wafer. The first integrated circuit was, designed in the 1950s. Depending on the number of integrated components, the degree of integration within, an integrated circuit (IC) is known as:, Small-Scale Integra on (SSI) Integrates one or two logic gate(s) per IC, e.g. LS7400, Medium-Scale Integra on (MSI) Integrates up to 100 logic gates in an IC. The decade Counter 7490 is an, example for MSI device, Large-Scale Integra on (LSI) Integrates more than 1000 logic gates in an IC, Very Large-Scale Integra on (VLSI) Integrates millions of logic gates in an IC. Pentium processor is an, example of a VLSI Device., The IC design methodology has evolved over the years from the first generation design, SSI to designs, with millions of logic gates. The gate count is a measure of the complexity of the IC. In today’s world almost, all IC designs fall under the category VLSI and it is a common practice to term IC design as VLSI design., Depending on the type of circuits integrated in the IC, the IC design is categorised as:, Digital Design Deals with the design of integrated circuits handling digital signals and data. The I/O, requirement for such an IC is always digital. Microprocessor/microcontroller, memory, etc. are examples of, digital design., Analog Design Deals with the design of integrated circuits handling analog signals and data. Analog, design gives more emphasis to the physics aspects of semiconductor devices such as gain, power dissipation,, resistance, etc. RF IC design, Op-Amp design, voltage regulator IC design, etc. are examples for Analog IC, Design., Mixed Signal Design In today’s world, most of the applications require the co-existence of digital signals, and analog signals for functioning. Mixed signal design involves design of ICs, which handle both digital, and analog signals as well as data. Design of an analog-to-digital converter is an example for mixed signal, IC design., Integrated circuit design or VLSI design involves a number of steps namely, system specification,, functional or architectural design, functional simulation, logic synthesis, physical layout (placement and, routing) and timing simulation. As in the case of any other system design, VLSI design also starts with the, system specification in which the requirements of the chip under development are listed out. The system, specification captures information on ‘what the chip does?’, the input and output to the chip, timing constraints,
Page 274 :
250, , Introduc on to Embedded Systems, , power dissipation requirements, etc. (e.g. For an IC for AND gate implementation, the intended function is, logical ANDing of input signals and input per gate is 2 and output is 1). The functional design or architectural, design involves identifying the various functional modules in the design and their interconnections. It, represents an abstraction of the chip under development. computer aided design (CAD) tools are available for, architectural design. The functional aspects of a chip can be captured using CAD tools with various methods, like block diagrams, truth tables, flow charts, state diagrams, schematic diagrams and Hardware Description, Language (HDL). This process of entering the system description into the CAD tool is known as Design, Entry. The truth table based design entry uses the truth table of a logic function. This method is suitable for, the realisation of logic function implementation involving lesser number of logic variables. The schematic, capture based design entry uses the schematic diagram created with an EDA tool (Please refer to the section, on Schematic Capture using Capture CIS of this chapter for more details on Schematic Capture). Flow charts, can also be used for design entry because of their inherent flow structure to describe any sequential flow., State diagrams are employed to display state machines graphically. State diagrams are used for modelling, sequential circuits, characterised by a finite number of states and state-transitions. A Hardware Description, Language (HDL) based design flow involves describing the design (circuit) to be realised in a Hardware, Description Language like Very High Speed Integrated Circuit HDL (VHDL) or Verilog HDL. HDL is, similar to software application programming languages but is used for describing hardware., The functional simulation process simulates the functioning of the circuit captured using one of the abovementioned design entry techniques, using a functional simulation tool. During simulation, input stimuli are, applied to the circuit and the output is verified for the required functionality. The logic synthesis phase, involving optimisation and mapping transforms the design into a gate level netlist corresponding to the logic, resource available in the target chip. The chip design may be for the development of a custom ASIC or for, implementation of the required functionalities of the IC in a standard Programmable Integrated Circuit like, CPLD or FPGA. In case of CPLD, the logic gates are realised in terms of the gates available in the macrocells, of the CPLD, whereas for FPGAs the logic gates are realised in terms of the Look Up Tables (LUTs)., The optimisation and mapping process optimises the logic expressions for speed, area and power and maps, the design to the target technology (FPGA, CPLD, etc.) keeping their functionality unaltered. The physical, design or layout design is the process of implementing the circuit using the logic resources present in the final, device (CPLD, FPGA) or creating the logic partitioning, floor planning, placement, routing, pin assignment,, etc for a custom IC (ASIC), using a supported CAD tool. The Timing Simulation is performed using CAD, tools for analysing the propagation delay of the circuit, for a particular technology like FPGA, CPLD, etc., For custom ICs (ASICs), the physical design converts the circuit description into geometric description in the, form of a GDSII file. The GDSII file is sent to a semiconductor fab for fabricating the IC. The IC is fabricated, in silicon wafer and finally it is packaged with the necessary pin layouts. The following section gives you an, overview of the VHDL based VLSI design., , 8.3.1, , VHDL for VLSI Design, , Very High Speed Integrated Circuit HDL or VHDL is a hardware description language used in VLSI design., VHDL is a technology independent description, which enables creation of designs targeted for a chosen, technology (like CPLD, FPGA, etc.) using synthesis tools. This enables one keep up with the fast development, of semiconductor technology. VHDL can be used for describing the functionality and behaviour of the system, (Behavioural representation), or describing the actual gate and register levels of the system [Register Transfer, Level (RTL) representation]. VHDL supports concurrent, sequential, hierarchical and timing modelling. The, concurrent modelling describes the activities happening in parallel, whereas sequential modelling describes, the activities in a serial fashion one after another. Hierarchical model describes the structural aspects, and, timing model models the timing requirements of the design. Like any other programming language, VHDL
Page 275 :
Embedded Hardware Design and Development, , 251, , also possess certain set of rules and characteristics. The following table gives a snapshot of the important, rules and characteristics specific to VHDL., Type, , Representation/Remark, , Comment, , -- (Start with two adjacent hyphens), , Identifier, , Reserved words and programmer chosen names for entity and signal description., Supports any length and characters A-Z, a-z, numbers 0-9 and special character underscore, (_). Non-case sensitive. Must start with a character, , character, , ASCII character in single quote. e.g. ‘A’, ‘a’, etc, , string, , Characters grouped in double quotes, e.g. “VHDL”, , Bit strings, , Arrays of bits with base Binary (B), Octal (O) or Hexadecimal (X)., e.g. B“100” Only 1 and 0 allowed in string, O“127” numerals only 0 to 7 are allowed, X“1F9” Numerals 0 to 9 and letters A to F, and a to f are allowed in string, , Numerals, , universal_integer does not include points, e.g. 100, universal_real include a point, e.g. 100.1, The special character ‘_’ can be used for increasing the readability e.g. 1000 can be represented as 1_000, Character E or e can be used for including exponent, e.g. 1E3, ‘#’ can be used for describing the base of the numbering system, e.g. 2#011# Number base, 2 and representing number 3. Base can be between 2 and 16, , if statement, , if condition then, --Corresponding actions, else, --Corresponding actions, end if;, , case statement, , case expression, when case 0, --statements or case ;, when case 1, --statements or case 1;, --………….., when others, --statements or default case;, end case;, , Loop statement, , loop, --Body of loop;, end loop;
Page 276 :
252, , Introduc on to Embedded Systems, , while loop, , while expression loop, --Body of loop;, end loop;, , for loop, , for item in start item to end item loop, --Body of loop;, end loop;, , Important Syntax Rules 1., 2., 3., 4., 5., 6., , Reserved words are written in bold letters, All statements end with a semicolon (;), | is used for separating mutually exclusive alternatives, ( ) is used for clarifying the order in which a rule is evaluated, {} used for representing optional things that may occur once or many times or never, [ ] used for representing optional things that may occur once or never, , The basic structure of a VHDL design consists of an entity, architecture and signals. The entity declaration, defines the name of the function being modelled and its interface ports to the outside world, their direction, and type. The basic syntax for an entity declaration is given below., Entity name-of-entity is, Port (list of interface ports and their types);, Entity item declarations;, Begin, Statements;, End entity name-of-entity, , The architecture describes the internal structure and behaviour of the model. Architecture can define a, circuit structure using individually connected modules or model its behaviour using suitable statements. The, basic syntax of architecture body is given below, Architecture name-of-architecture of name-of-entity is, Begin, Statements;, End architecture name-of-architecture;, , Signals in VHDL carry data. A signal connects an output and an input of two components (e.g. Gates,, flip-flops, etc.) of a circuit. A signal must be defined prior to its use., e.g. Signal a: bit; This is an example of a signal ‘a’ which can take values of type bit., Once a signal has been defined, values can be assigned to the signal., e.g. a <= ‘1’; In this example a value ‘1’ is assigned to the signal ‘a’., Similar to software languages like ‘C’, where functions are stored in a library which can be re-used, in, VHDL also all compiled modules are stored in library. Packages are also stored in a library. A package may, contain functions, types, components, etc. For using components from a particular library, first the library and, packages must be specified in the VHDL code as, Library name-of-library;, Use name-of-library.name-of-package.ALL;
Page 277 :
Embedded Hardware Design and Development, , 253, , When a VHDL module is compiled, it is saved in the work library by default. As per the VHDL standard, the work library is always visible and need not be specified in the VHDL code. If other packages or libraries, are to be used, they must be defined before the entity declaration., e.g., Library ieee;, Use ieee.std_logic_1164.ALL;, , The above library definition defines that all data types, functions, etc available in the package std_, logic_1164 in the library ieee can be used in the underlying entity. As an example for VHDL based design,, let us consider the design of a D flip-flop. The VHDL description of the D Flip-flop is given below., Library ieee;, Use ieee.std_logic_1164.all;, Entity DFF is, Port (D, CLK: in bit; Q: out bit);, End DFF;, Architecture DFF-ARCH of DFF is, Begin, Process (D, CLK), Begin, If CLK=’1’ and CLK’event then, Q <= D;, End if;, End Process;, End DFF_ARCH;, , In the above example “DFF” is the name of the model and D, CLK, Q are the interface ports. The architecture, describes the internal structure and behaviour of the model. In the above example, the architecture “DFFARCH” describes the D flip-flop function., The HDL model of the circuit is then complied and loaded in an HDL simulator. The simulator enables, the designer to apply the input stimuli to the design and observe whether the output response is as expected., If there are any functional errors, the HDL code is corrected and the design re-simulated, till the design, meets the functional specifications. In the above example on simulation, by applying a clock and data inputs, the model functions like a D-flip-flop. The design is now ready for synthesis. A synthesiser tool compiles, the source code to an optimised technology dependent circuit at the gate level. The inputs to a synthesiser, are the HDL code, a technology library, and constraints. The constraints are in terms of the area and speed, requirements of the circuit to be realised in the target technology. This process is done in two phases:, Compilation: The HDL is translated to a generic netlist, Optimisation: The generic netlist is mapped to a target technology (ASIC/FPGA) satisfying the requirements, of area and speed., Q, D, On synthesis, the VHDL model described above results in a D flip-flop to, D Flipbe realised as shown in Fig. 8.24., CLK, Flop, The next phase of implementation is physical layout (Place and Route). In, the case of an FPGA implementation, during the placement stage the various, instances in the netlist are mapped and their relative position inside the target, FPGA resources is fixed. During the routing phase, the interconnection Fig. 8.24 Realisation of a D, between the various placed instances is done as per the netlist to realise the, Flip-Flop using VHDL
Page 278 :
254, , Introduc on to Embedded Systems, , circuit. Once the layout is complete, the final step is timing simulation. The design is now re-simulated with, the actual component and interconnect delays to verify the functionality. Figure 8.25 illustrates the various, steps involved in a HDL based design., , VHDL or Verilog Description, , 1, Functional Simulation, 2, , Area and Timing, Constraints, , Synthesis, , Technology, Library, , 3, Placement and Routing, 4, Timing Simulation, , Fig. 8.25, , 8.4, , The HDL based VLSI Design Process, , ELECTRONIC DESIGN AUTOMATION (EDA) TOOLS, , Early embedded products were built around the old transistor and vacuum, tube technologies, where the designers built the PCB with their hands,, oil paper, pencil, pen, ruler and copper plates. The process of building a, PCB was a tedious and time consuming process in ancient times where the, designers sketch the required connections using pen, pencil and ruler on, papers and the finished sketch was used for etching the connections on a, copper plate and it took weeks and months time to finish a PCB. The more, the inter connections involved in the hardware, the more difficult was the process. The accuracy and finishing, of the PCB was highly dependent on the artistic skills of the designer. Today the scenario is totally changed., Advances in computer technology and IT brought out highly sophisticated and automated tools for PCB, design and fabrication. The process of manual sketching the PCB has given way to software packages that, gives an automatic routing and layout for your product in a few seconds. These software packages are widely, known as Electronic Design Automation (EDA) tools and various manufactures offer these tools for different, operating systems (Windows, UNIX, Linux etc). EDA tool is a set of Computer Aided Design/Manufacturing, (CAD/CAM) software packages which helps in designing and manufacturing the electronic hardware like, integrated circuits, printed circuit board, etc. The key players of the EDA tool industry are Cadence, Protel,, Altium, Cadsoft, Zuken, Mentor, etc. OrCAD, Cadstar, Protel, Eagle, etc. are the popular EDA tool packages, available in the market for PCB design. Of these, I feel Cadence OrCAD as the most flexible and user, LO 4 Discuss Electronic, Design Automation, tools for Embedded, Hardware Design and, EDA tools for Printed, Circuit Board Design
Page 279 :
Embedded Hardware Design and Development, , 255, , friendly tool. The reference tool used for hardware design throughout this book is OrCAD. An evaluation, copy with limited features (for Windows OS) is available for free download from the Cadence website, http://www.orcad.com/. Readers can use this tool for their hardware design. Remember this tool is a demo, version and you cannot use this for any commercial design and it does not provide you the full features of, the licensed version., , 8.5, , HOW TO USE THE OrCAD EDA TOOL?, , Install the demo version of the OrCAD Software for a PC with Microsoft®, LO 5 Underline usage, Operating System (Windows 7/8.x/10 or any other version supported by, of the OrCAD EDA tool, the tool). If the installation is successful you can see the installed software, from Cadence software, under the group name OrCAD xx.x† Demo OR OrCAD Capture CIS† Lite, for Printed Circuit, (Depending on the version of the tool you installed) under the All programs‡, Board Design, Tab which can be selected through the ‘Start’ menu of your desktop. The, ‘OrCAD xx.x† Demo / OrCAD Capture CIS† Lite’ contains three main, tools namely ‘Capture CIS Demo’ / ‘OrCAD Capture CIS Lite’—The schematic creation tool, ‘Layout Demo’, / ‘OrCAD Capture PCB Editor Lite’—PCB Layouting Tool, and ‘PSpice AD Demo’ / ‘PSpice AD Lite’—The, circuit simulation tool along with a set of documentation. Let us have a look at these tools to get an idea on, how they are used in PCB Designing., , 8.6, , SCHEMATIC DESIGN USING OrCAD CAPTURE CIS, , Schematic is a way of representing the different components (can be an, electronic component like resistor, integrated circuit, capacitor, etc. or, a mechanical/electromechanical component like push button switch,, relay, etc.) involved in a hardware product and how each components are, interconnected together. You can create a schematic design either by hand, sketch on a paper or by electronic sketch using CAD tool. The OrCAD, capture CIS tool is an electronic schematic design tool. To create a schematic, using this, execute the ‘Capture CIS Demo/Lite’ application. The following, window will appear on your desktop (Fig. 8.26)., Create a new project by choosing the ‘New Project’ tab from the File, menu of Capture CIS (File New Project…)*. The following dialog box, appears on the screen (Fig. 8.27)., Type a name for the project (say, for example, 8051_project1). Choose, the ‘Schematic’ option for ‘Create New Project Using’ and select a location, for the new project by filling the ‘Location’ box and finally click the OK, button. Now a schematic capture project is created at the specified location, with the specified name and the schematic tool opens default page (PAGE1), with various schematic drawing tools on the right side for creating the, schematic (Fig. 8.28). Close the default page by clicking the page close, button ‘X’. Now you will be taken to the project window where you can, view the following categories., †, , LO 6 Identify the, different entities for, circuit diagram design, (schematic design), using the OrCAD, CaptureCIS tool., Familiarise with the, different entities of, the Capture CIS tool, like ‘Drawing Canvas’,, ‘Drawing Tool’,, ‘Drawing Details’,, ‘Part Number creation’,, ‘Design Rule Check, (DRC)’, ‘Bill of Material, (BoM)’ creation, ‘Netlist, file creation for PCB, blueprint design, etc., , xx.x Represents the version number of the tool. If the version is 16.6, xx.x becomes 16.6, The explanation given here is for Microsoft® Windows operating system, *, The ‘Menu’ option may vary with change in version of the application. If you find it different from the one explained here, please refer, to the user’s manual of the application provided by Cadence., ‡
Page 280 :
256, , Introduc on to Embedded Systems, , Fig. 8.26, , OrCAD Capture CIS Tool, , Fig. 8.27 New Project Creation using OrCAD Capture CIS Tool, On creating a new project, two files are created at the location for the new project with extensions .opj, and .dsn. The file names will be the same as that of the project name. The .opj file stands for OrCAD project, file and it holds all project related settings for the project. The .dsn file represents the data source name file, holding the schematic drawing settings and data.
Page 281 :
Embedded Hardware Design and Development, , 257, , Design Resources, .\Project Name.dsn, Library, Outputs, , Referenced Projects, , Fig. 8.28, , Project view for New project created on Capture CIS, , The .dsn tab in the project window is an expandable tab and it contains the ‘SCHEMATIC’ and ‘Design, Cache’ details as shown in Fig. 8.29., To start with the schematic design, double click on the ‘PAGE1’ tab under the ‘SCHEMATIC1’ node. It, will take you to the schematic drawing canvas along with the drawing tools on the right side of the canvas., ‘PAGE1’ is created by default on creating a new project. You can change the name of it by right clicking, ‘PAGE1’ and choosing the ‘Rename option’. The schematic drawing canvas details are given in Fig. 8.30., , 8.6.1, , The Drawing Canvas, , The drawing canvas is the area on which the different schematic components are placed and interconnected, according to the requirements., , 8.6.2, , Schematic Drawing Tools, , Schematic drawing tools are the various tools available in the canvas editor to place a component (Resistor,, capacitor, IC, etc), to interconnect different components (a connection between two points), to add a text, description, etc. The available schematic drawing tools and their usage are described in the following, sections.
Page 282 :
258, , Introduc on to Embedded Systems, , Fig. 8.29, , Project view for new project showing Schematic page view, , Fig. 8.30, , Schematic drawing canvas, , Place Part: Component placing tool. Place various components like resistor, capacitor, different ICs, etc, on the drawing canvas. Invoking this button pops up a place part dialog box as shown in Fig. 8.31.
Page 283 :
Embedded Hardware Design and Development, , Fig. 8.31, , 259, , Selecting a component to place in the schematic canvas, , The manufacturer of different ICs and other components give them a Part Number/Part Name and the, component is identified by this name/number. OrCAD incorporates a number of libraries to incorporate the, skeletal drawing of these components. The library is located at the path /OrCAD Root Directory/tools/capture/, library, where /OrCAD Root Directory is the installation directory of OrCAD tool. You can add these libraries, using the ‘Add Library’ button. Add the library you want by using this button. Each library contains specific, skeletal drawings. For example, the Library ‘GATE’ contains the skeletal diagram (Pin Diagram) of almost, all available Logic Gate ICs from different manufacturers. Similarly, the Library ‘MICROCONTROLLER’, contains the skeletal sketch (Pin Diagram) for almost all commercially available microcontrollers. If you are, not sure about the component you are going to use belongs to which library, select all libraries by pressing, ‘Ctrl + A’ key in the ‘Libraries’ box (remember the libraries will only be seen in the Libraries section if, you add the libraries explicitly to your project using the ‘Add Library’ option). If you are certain, on which, library the component you are going to add belongs, you can select that particular library by clicking it on, the libraries section. For example, if you want to add AT89C51 microcontroller, you can go for two options, either use the ‘MICROCONTROLLER’ library or use the entire libraries.
Page 284 :
260, , Introduc on to Embedded Systems, , To select a component, type its name under the ‘Part:’ section. The part selector supports auto complete, for selecting part numbers. If you type the first few words of the part number, the auto complete will display, the list of components starting with the typed part number. A preview of the selected component is also, shown on the right corner of the ‘Place Part’ pop-up dialog box. The ‘Part Search…’ function will help you, to find out the library that contains a particular Part (component). Once you select the part, click ‘OK’ button, of the ‘Place Part’ pop-up dialog box. Move the cursor within the drawing canvas and place the selected part, on the desired location of the drawing canvas. Press down the mouse cursor and then press ‘ESC’ key to end, the place operation., , Fig. 8.32, , Placing component in the schematic canvas, , Place Wire Component interconnection tool. It interconnects various components like resistor,, capacitor, different ICs, etc. within the drawing canvas. Choose this tool and click at the starting point, where the connection needs to be started and move the mouse till the end point of the connection. The wire, follows the mouse movement. Press ‘Esc’ when you are done with the connecting action., Place Net Alias Tool for interconnecting various components like resistor, capacitor, different ICs,, etc within the drawing canvas without using a direct interconnection using ‘Place Wire’ Techniques., This is used if the number of interconnections within a drawing is large and complex. Clicking this tool popsup a dialog box to input the Net Alias name. Input the Alias name and Press OK button. Now your mouse, pointer carries the Net Alias. Move the mouse pointer to the start point where the connection starts and place, it there. Take the tool again, select the same Net Alias and place it at the other end, where the connection, needs to be terminated. If you add the same Net Alias each to different interconnection points, each of them, gets connected together. The schematic diagram given in Fig. 8.33 illustrates the use of ‘Place Net Alias’, tool.
Page 287 :
Embedded Hardware Design and Development, , 263, , Place No Connect Some components may have some pins left unconnected. The No connect tool is, used for representing non-connected pins., Place off Page Connector For modularity, the schematic can be drawn in different pages with each, page representing the associated hardware for that particular module. For example, the schematic can, be drawn on different pages for power supply module, processor module, PC interface module etc. If a, connection is required from one page to another page it is achieved by using the ‘Off Page Connector’ tool., If a connection is going out from a page to other pages, it is represented using an outgoing ‘off Page Connector’, (Fig. 8.36) in that page and if a connection is coming into a page from any other pages it is represented using, an incoming ‘off Page Connector’ in that page., RXD, , Incoming off Page Connector, , Outgoing off Page Connector, RXD, , Fig. 8.36, , Illustration of off Page Connector, , 8.6.2.1 Schema c Part Crea on, Forma ng and Labelling Tools, Certain parts may not be available as readymade part in the Part library of the tool. In such situations, if, you know the Pin number for the part you want to create, you can create it using the following part creation, tools. Labeling tools are used for putting text labels and others in the canvas to give more readability and, understanding of the schematic drawing., Place Rectangle Creates a rectangle within the drawing canvas. This rectangle can either be used as, an outline to a New Part to be created or as an outline to a labelling text or to isolate some part of the, schematic from other area to give visibility., Place Line Used for creating Pins on the Rectangular Part for part creation. When used as a formatting, tool it is used for drawing lines to separate different areas of the schematic diagram., Place Poly line Tool used for creating poly lines on the drawing page., Place Ellipse Place an elliptical shape within the drawing canvas., Place Arc Tool used for placing different forms of arcs and circle in the drawing area., Place text Tool used for creating text labels for documenting the drawing and to add Pin names,, description, Part Number etc in the new part creation., , 8.6.2.2 Crea ng a New Schema c Page, As mentioned earlier you can provide modularity to the schematic drawing by placing the schematic drawing, of different modules in different pages. If your drawing is a simple drawing you can use a single page. If the, drawing does not fit into a single page, you can create a new page by going back to the project window by, closing the current page. (Don’t forget to save your changes ☺ before closing the page you were working)., Refer the Fig. 8.29 (‘Project view for new project showing schematic page view’) for schematic page, view. In the schematic Page view, right click on the ‘SCHEMATIC1’ and select ‘New Page’
Page 288 :
264, , 8.6.3, , Introduc on to Embedded Systems, , Schematic Drawing Details, , Whenever you create a new schematic page, the schematic drawing details entering table gets attached to the, bottom right corner of the page by default. Figure 8.37 illustrates a schematic drawing details template., , Fig. 8.37, , Schematic drawing details template, , The ‘Title’ section is used for entering the title of the Schematic (e.g. 8051 Evaluation board). You can, also add the name of the person who carried out the drawing. ‘Size’ indicates the size of the drawing page., To get the details of the ‘Size’ take the ‘Schematic Page Properties…’ tab from the ‘Options’ menu when the, page is in the opened state. (Options, Schematic Page Properties). Whatever values you set there is taken, as the default value for a page., The document number should be given according to the format specified by the QA standard you are, following, e.g. ISO standard. ‘Rev’ gives the version number of the drawing (Version number increases, with each revision). Date represents the date on which the schematic is created. ‘Sheet No.’ represents the, Sheet/Page Number in a multi sheet/page drawing. Out of these ‘Title’, ‘Document Number’ and ‘Rev Code’, is very important in reviewing the document. A typical schematic drawing details table is illustrated in, Fig. 8.38., , Fig. 8.38, , Schematic drawing details table, , I hope the basic lessons of schematic design creation and how different tools are used for creating a, schematic diagram has been covered in this section. Now let’s create a complete schematic diagram using the, Capture CIS tool (Fig. 8.39). Part of this schematic (Power Supply Part) is available for download from the, Online Learning Centre web page of this book., Once the schematic is finished, part numbers should be assigned to the various components present in the, schematic and error checking should be performed. If there are no errors, you can proceed to the next step,, the netlist creation. The following sections illustrate each of these steps, namely ‘Part Number Creation’,, ‘Design Rule Check’ and ‘Net List Creation’.
Page 290 :
266, , Introduc on to Embedded Systems, , window pops up. Choose the option ‘Incremental reference update’ for ‘Action’ item and keep the rest, same as the above settings. Pressing ‘OK’ button prompts again for user confirmation and if you confirm, it, the design part number is updated automatically. It is to be noted that no two components will have the, same Part Number. Eventhough there are two or more capacitors or ICs or resistors present in the schematic, diagram with the same values (e.g. 0.1MFD (Microfarad) for capacitor or 8.2K (kilo ohms) for resistors, etc.), different part numbers should be used for them. Part numbers are very helpful in PCB routing, soldering of, components in the finished PCB and in the creation of Bill of Materials (BoM)., , Fig. 8.40, , 8.6.5, , Part Number generation settings, , Design Rules Check, , Design Rules Check (DRC) is performed for checking any possible errors in the schematic diagram, like, duplicate part references, missing off-page connector connections, unconnected nets, unconnected power and, ground pins, etc. For performing the DRC check, highlight the dsn name or schematic name from the project, window and select ‘Design Rules Check…’ option from the ‘Tools’ menu. The following window as shown, in Fig. 8.41 pops up.
Page 291 :
Embedded Hardware Design and Development, , 267, , Select the option ‘Check entire design’ from ‘Scope’, ‘Check design rules’ from ‘Action’. Select the, required rules and Reports under ‘Electrical Rues’ and ‘Physical Rules’ tab and select the options ‘Run, Electrical Rules’ and ‘Run Physical Rules’ from ‘Design Rules’ Group box., , Fig. 8.41, , DRC settings window, , You can select the location for the DRC report file to be created. By default it is generated with name, ‘project name.drc’ (e.g. 8051_project1.drc) and it is created at the project location directory., The .drc file gives you the details of any errors present in the schematic along with the point (x & y coordinates) in schematic diagram where the error is occurred. Sometimes the .drc may report warnings. You, can ignore some of the warnings. But you must look into the warnings and should confirm that the warnings, will not create any issue in the total circuit. Examples of warnings that may be ignored are “Bi-directional, pin connected to input pin”, “Output pin connected to Power line”. The second example is a very common, one where the o/p pin of regulator gives the regulated supply and it usually gets connected to the power pins, of other ICs in the circuit. Here, though the o/p Pin of the regulator IC is giving the o/p power, the ‘Pin Type’, will be output and you are connecting that pin to a ‘Pin Type’ power of other ICs. This is a possible Pin type, conflict. You can either discard this warning or can avoid this warning by changing the ‘Pin Type’ of the, regulator o/p Pin to ‘power’ by right clicking the Regulator IC component in the schematic and choosing, the ‘Edit Part’ option. Double click on the pin, for which you want to change the ‘Type’, choose the desired, type., Don’t ignore all warnings blindly. First look at the warning and understand its consequence in the, schematic. If you are sure that it will not create any impact on the schematic, simply ignore it or if you have, enough time, rectify it by resolving the condition that resulted in the warning.
Page 292 :
268, , 8.6.6, , Introduc on to Embedded Systems, , Creating Bill of Materials, , Bill of Materials (BOM) gives the list of various components (in terms of component type and value) present, in the schematic and their quantity. BOM gives the exact number of components required to fabricate a, board and so it plays a vital role in cost estimation and component procurement. When a PCB is fabricated,, it contains only the part number of the components (like R1, C1, C2, U1, etc.). BOM is the cross-link chart, which gives the component value for the part references listed on the PCB. Bill of Material is a useful, information for the person who assembles the various components on the finished PCB. For generating the, BOM of the schematic, go to the Project Window, highlight the .dsn name or schematic name in the Project, window as mentioned earlier, select ‘Bill of Materials…’ option from the ‘Tools’ menu (Fig. 8.42)., , Fig. 8.42 Bill of Material (BOM) creation, Select ‘Process entire design’ from ‘Scope’ and ‘Use instances (Preferred)’ from ‘Mode’. The default, location for the report file is the Project directory and the BOM name is the project name with extension, .bom. You can change the report file location by giving the desired path name in the edit box present in the, ‘Report’ section. Press ‘OK’ to proceed. The BOM is generated automatically and it is visible under the, ‘Outputs’ section of the Project Window. The BOM can be opened for viewing by double clicking on the, .bom file. A sample BOM file is shown in Fig. 8.43.
Page 293 :
Embedded Hardware Design and Development, , 269, , If you observe the BOM closely, you can find that the BOM gives different types of information to the, different type of users. Take the first item in the BOM list. For a person who is interested in procuring the, components, the first line of BOM gives the information on the quantity required for capacitor with value, 0.1MFD per board is 3. For a person who is involved in the assembling of components on the board, the, first line gives the information, the part numbers with reference values C1, C3, C9 should be soldered with, capacitors with value 0.1MFD., , Fig. 8.43, , Sample BOM
Page 294 :
270, , 8.6.7, , Introduc on to Embedded Systems, , Netlist Creation, , ‘Netlist’ refers to the representation of interconnection of various components within the schematic diagram., If the PCB design is viewed as a step-by-step process, schematic creation is the first step, layout creation is, the next step and PCB fabrication is the final step. ‘Netlist’ is the output of first step (schematic) and this is, fed as input to the second step (layout creation)., In general, ‘Netlist’ is the soft form representation of the different components present in the schematic, and the hard wired connections required among the various components. Creation of ‘Netlist’ from the, schematic design varies depending on the type of tool used for ‘Layout creation’. OrCAD schematic design, tools provide support for different kinds of layout tools and depending on the type of layout tool, the steps, involved in ‘Netlist’ creation varies. We will discuss the creation of ‘Netlist’ for two different Layout tools, namely ‘Layout / PCB Editor’—which is part of the OrCAD EDA package itself and ‘Allegro’–The second, product line from OrCAD for layout design., For creating the ‘Netlist’, highlight the dsn name or schematic name from the Project Window and choose, the ‘Create Netlist…’ option from the ‘Tools’ menu. The following window as shown in Fig. 8.44 appears, on the screen., If you plan to use OrCAD ‘Layout’ as the layout tool, select the tab ‘Layout’ from the pop-up window and, select the options as given in Fig. 8.44 and proceed. The ‘Netlist’ is generated automatically with extension, .mnl and it will be shown in the ‘Output’ section of your project window., , Fig. 8.44, , Netlist creation for ‘Layout’ tool
Page 295 :
Embedded Hardware Design and Development, , 271, , Telesis is a widely adopted netlist format by a variety of PCB Layouting tools. To generate a netlist in, telesis format select the tab ‘Other’ from the ‘Create Netlist’ pop-up window as shown in Fig. 8.45., Select ‘orTelesis.dll’ from the ‘Formatters’ option and change the ‘Netlist’ file creation directory if you, want (By default the ‘Netlist’ file is generated at the project directory with same name as the project name, and extension .net) and press ‘OK’ to proceed., , Fig. 8.45, , Netlist Creation in Telesis format, , The ‘Netlist’ file is generated automatically and it is visible in the ‘Outputs’ section of the project window., If you open the ‘Netlist’ by double clicking the .net file from the ‘Outputs’ section, a file describing the, various nets is displayed. A sample ‘Netlist’ file generated in ‘telesis’ format is shown in Fig. 8.46., On a closer look at this file, you can find that it is a representation of the packages (will be described in, a later section of this chapter) for various components of the schematic and a ‘soft form’ representation of, the interconnections among the components present in the schematic. The .net list file contains two sections, namely–PACKAGES section and NETS section. The packages section defines the packages of different, components in the schematic and the NETS section lists out the various connections in the schematic. A, group of connections is given a net name and the component parts which are getting interconnected at that, net are listed against the net name. In the net list file given above, the first net is named as N1274902 and, it represent the interconnection of Pin 2 & 3 of Jack JACK1 and Pin 1 of Diode D1. You can verify this, interconnection by referring back to the schematic diagram in which Pins 2 & 3 of JACK1 is connected to, Pin 1 of Diode D1. The ‘.net’ file is fed as input to the layout tool for generating the PCB layout.
Page 297 :
Embedded Hardware Design and Development, , 8.7, , 273, , THE PCB LAYOUT DESIGN, , Layout design is the process of creating the blueprint of the actual PCB, LO 7 Discuss the usage, from the ‘Netlist’ file. The layout file generated for a ‘Netlist’ file is given, of ‘Layout’ tool from, for the final PCB fabrication. Whenever we plan to build a new house, we, Cadence for generating, usually approach a designer to build the ‘plan’ for the house. The ‘plan’, the PCB design files, contains all information regarding the house, like number of rooms, area, from the circuit, of each room, window and door positions for each room, number of floors, diagram description file, (single or multistoried house), etc. A ‘Layout’ file is similar to the ‘plan’ for, (From Netlist file), a house in the sense, the ‘Layout’ file contains the information on different, components present, their physical appearance (footprint), the component, placement, interconnection among the components, number of layers for inter connection etc for the PCB., , 8.7.1, , The Building blocks of Layout, , Before going to the details of the usage of the ‘Layout Tool’ let’s have a brief discussion on ‘What is meant by, Layout file creation and what all are there in the layout file’. ‘Footprints’, ‘Routes/Traces’, ‘Layers’ ‘Vias’,, ‘Marking text and graphics’ are the basic building blocks of Layout., , 8.7.1.1 Footprint (Package), Footprint is a pictorial representation of a component when it is looked from the top (top view of a component)., It is a 1:1 representation of the bottom portion of a component. Imagine you have a chip and a sand-filled box, in your hand and if you place the chip on top of the sand-filled box and press it gently, you will get the exact, impression of the chip including the body and pin shape of the chip when the chip is removed from the sand., This is what is exactly meant by a footprint., Package and footprints are two identical terms used interchangeably in PCB layout design. In layout, both, the terms represent the same identity. But technically they are two different entities. Footprint can be viewed, as a subset of package. Package is a three-dimensional drawing showing all measurements of the component,, viz. length, width, thickness for the body as well as pins of the component. Package drawing contains ‘Top, View’, ‘Side View’ and ‘End View’ of the component. Out of this, ‘Top View’ is important in PCB layout, design. It gives the space requirement for the component within the board, the orientation of pins, width of, pin holes (for through hole components) and the size of pin pads (for surface mount components). The ‘Side, View’ and ‘End View’ of the component have nothing to do with the board space requirement except in cases, where a plug-in board is supposed to put on top of the current board. ‘Side view’ gives an idea about the, component height. In layout, the ‘Top view’ of the component is known as ‘Footprint’., Different manufactures produce same chip/component with different names and a large number of chips/, components are available in the market. If each manufacturer starts developing chips/components with their, own package, it will be very difficult for a layout designer to create a footprint for all. Hence there is a, standard for packages and each chip manufacturer should develop chips according to any one of the standard, packages supported. The standard package’s footprint is available as library in the Layouting Tool and the, layout designer can choose that ‘Footprint’ for a component. Some of the commonly available packages are, explained below., , Single In-line Package Single In-line Package is a single line package where the pins are arranged in a, single row with specific pitch spacing. The pins can be either ‘Through hole’ pins or ‘Surface mount leads’. For, ‘Through hole’ pins, the footprint represents the number of pins by drills or vias and the dimensional details, of the drill are same as that of the pin dimensions. If the pins are surface mount pins, they are represented in
Page 298 :
274, , Introduc on to Embedded Systems, , the footprint as pads. For ‘Through hole’ pins, the first pin is indicated by a square pad with a drill/via. The, footprint of a 10 pin SIP package is given in Fig. 8.47. SIP package is commonly used for connector parts., , 10 Pin Single In-line Packages (SIP) Through Hole, , 10 Pin Single In-line Package (SIP) Surface Mount, Fig. 8.47, , Single In-line Package (SIP) Footprint, , Dual In-line Package Dual In-line Package (DIP) is a commonly used ‘through hole’ package for Integrated, Circuits from the early days of IC technology. DIP, contains chip body and through hole pins on both sides, Dimensions in Inches and (Millimetres), of the body of the chip. DIP package itself is varying,, 2.07(52.6), 2.04(51.8), PIN, depending on the body width of the IC, the pin spacing, 1, (lead pitch), etc. The commonly used DIP is with 1, inch pin spacing and 0.3 inch to 0.6 inch body width., .566(14.4), .530(13.5), The number of pins for DIP varies from 8 to 64 in an, even number multiple. An example of the package, drawings and footprint of DIP is shown in Fig. 8.48., .090(2.29), 1.900(48.26) REF, MAX, The body of the chip is encapsulated in plastic,, .220(5.59), .005(.127), MAX, ceramic or some other material. Depending on this, the, MIN, Dual In-Line Package is named as PDIP (Plastic DIP), SEATING, PLANE, CDIP (Ceramic DIP), etc. (see Fig. 8.49)., .065(1.65), .161(4.09), , .0.16(.381), , Zigzag Inline Package (ZIP) ZIP package is a, .125(3.18), .022(.659), .065(1.65), .014(.356), modified form of DIP. DIP contains leads (pins), .110(2.79), .041(1.04), symmetric to both sides of the body of the package,, .090(2.29), .630(16.0), .590(16.0), whereas ZIP holds pins in a zigzag manner as shown, 0, REF, in Fig. 8.50., 15, .012(.305), If you observe this package, you can identify that the, .008(.203), .690(17.5), pin numbering for this is entirely different from that of, .610(15.5), the DIP. In DIP, the pins are numbered in incremental, order in one direction starting from the topmost pin (Left Fig. 8.48 Package Drawing for 40 Pin Plastic Dual In-line, topmost pin) and on the second row the pin numbering, Package (PDIP), Courtesy of Atmel (www.atmel.com)
Page 299 :
Embedded Hardware Design and Development, , 275, , continues from the bottom pin (Right bottommost pin) whereas in the case of ZIP, the pins are arranged in, zigzag form and the numbering of pins also is zigzag starting from the first pin as shown in Fig. 8.50., , Fig. 8.49, , PCB Footprint for 24 Pin Dual In-line Package (DIP), , Fig. 8.50 Zigzag In-line Package (ZIP), , Small Outline Integrated Circuit (SOIC) Package SOIC is a rectangular surface mount package with eight, or more gull wing leads. The leads protrude from the longer edge of the package. SOIC packages come in a, variety of body widths, namely narrow body (150 mils, (1 millimetre = 39.37 mils)) and wide body (300 mils)., The standard SOIC lead pitch is nominally 50 mils, (1.27 mm). The pin count for SOIC package varies, from 8 to 28 Fig. 8.51., Thin Shrink Small Outline Package (TSSOP) Thin, shrink small outline package is a surface mount, package with very small body size and smaller lead, pitch. TSSOP comes in the following sizes 3.0 mm ×, 0.85 mm (Width × Height), 4.4 mm × 0.9 mm (Width ×, Height) and 6.1 mm × 0.9 mm (Width × Height). Lead, count for TSSOP ranges from 8 to 56. Its standard, lead pitch is 0.65 mm. The package drawing details of, TSSOP is shown in Fig. 8.52., Quad Flat Pack (QFP) So far we discussed about, packages with leads (pins) only on the two sides of, the body of the chip. There are chips with leads/pins, on all four sides of the chip. These chip packages are, called Quad Flat Pack (QFP). QFP itself is available Fig. 8.51 Package drawing for 8 Pin SOIC, in different packages namely Plastic Quad Flat Pack, Courtesy of Atmel (www.atmel.com), (PQFP), Thin Quad Flat Pack (TQFP), (VQFP), etc. A, footprint of 84 pin PQFP is shown in Fig. 8.53., With this we are concluding the discussion on footprints/packages. There are lots of other packages/, footprints remaining. Describing all of them in detail is beyond the scope of this book. The aim of this session, was to give the readers a basic understanding of packages and the commonly used packages in layout design., Interested readers are requested to visit the websites www.atmel.com and www.maxim-ic.com for getting, additional details on packages.
Page 300 :
276, , Introduc on to Embedded Systems, , Pin 1 Indicator, this corner, , Fig. 8.52 8 Pin TSSOP Package, Courtesy of Atmel (www.atmel.com), , Fig. 8.53, , Footprint of 84 Pin PQFP, , (Courtesy of Cadence OrCAD), , 8.7.1.2 Routes/Traces, ‘Routes’ are the interconnection among the pins/leads, of various components. In schematic capture, it is, represented as an electrical connection line. Whereas, in layout, the interconnection is represented as copper, track interconnection among the leads/pins of different, footprints. This copper interconnection is known as ‘PCB, Track’. The width of the copper track can be set to various, values during layout to represent tracks with different, widths. Commonly used track widths are 5 mils, 7 mils,, 12 mils (1 mm = 39.37 mils), etc. Proper track width, should be allocated to tracks connecting to power supply, line and ground line. Some reference chart is available, for determining the minimum track width required for, Fig. 8.54 Routes (Track) and footprint of a PCB layout, carrying a particular current (e.g. For carrying a current, of 500 mA, the track width should be minimum 12 mils,, etc). The routes and footprint of a PCB layout are shown in Fig. 8.54., , 8.7.1.3 Layers, ‘Layers’ act as the ‘Multiple planes’ for performing the routing operation, if the number of interconnections, in a design is high. Normally the routing is done on the top and bottom layers of the PCB. If the complexity
Page 301 :
Embedded Hardware Design and Development, , 277, , of the circuit increases, additional layers are added in between the top and bottom layers and the track routing, is done on this layers. It is also advised to allocate separate layers with copper spreading for power supply and, ground connections. This avoids noise and electromagnetic interference issues in printed circuit board., , 8.7.1.4 Via, In a ‘Multilayer’ board, the interconnection among various layers is provided through conductive drill holes., These drill holes are known as ‘via’. Drilling is done on the physical PCB using Computer Numeric Control, (CNC) drill machines or laser drills. The drilled holes should be copper plated or riveted (Inserting a rivet, into the drill hole) to establish the necessary inter-electrical connection among the various layers. ‘Vias’ are, also known as through holes. If the through hole is plated or riveted for establishing electrical connection, it, is called ‘Plated Through Hole (PTH). If non-plated, it is referred as none-PTH. Figure 8.55 illustrates ‘via’, and ‘PTH’ in PCB layout., , Fig. 8.55, , Illustration of Multiple layers and PTH, , 8.7.1.5 Marking Text and Graphics, Marking text and graphics provide information like part, number, part name, polarities of polar components (like, capacitors, diodes, etc.), pin number, product name, company, name, board name, graphic outline of components, etc. These, text and graphics are printed on PCB after fabrication (Fig., 8.56). Refer to section Silk Screen for more details., , 8.7.2, , Layout Design with OrCAD, Layout Tool, , We will discuss about the layout creation using OrCAD, Layout tool. Visit the Online Learning Centre for details on, OrCAD PCB Router based layout design. To create a PCB, Fig. 8.56 Usage of marking text and graphics, layout using OrCAD Layout tool, execute “Layout Demo§”, from the ‘Start Menu’. You can see the following tool window on your PC screen (Fig. 8.57)., Select ‘New’ from the ‘File’ menu. A pop up window (AutoECO) describing the inputs to be fed to the, tool appears on the screen (Fig. 8.58)., §, , The name given here indicates the name of the demo version tool. It may be different for the commercial version of the tool. Please, refer to the OrCAD documentation for more details.
Page 302 :
278, , Introduc on to Embedded Systems, , Fig. 8.57, , Fig. 8.58, , OrCAD Layout Tool, , Creating a New PCB Layout using Layout Tool
Page 303 :
Embedded Hardware Design and Development, , 279, , The AutoECO pop up window contains the following sections., Layout TCH or TPL or Max file This is the reference template and you can select the _default.tch file for, this. Clicking on the ‘Browse’ button by the side of the edit box for this section guides you to the directory, containing the tch/tpl/max file. Select ‘_default.tch’ from it., Input MNL netlist File This is the section for inputting the ‘Netlist’ file created using OrCAD ‘Capture CIS’, schematic design tool. The file extension of the ‘Netlist’ file specifically created for ‘Layout’ in the Capture, CIS tool is ‘.MNL’. This ‘Netlist’ file, containing the component information and component interconnection, is going to be transferred to a PCB layout format. In our case the netlist file for the design for power supply, part of the 8051_Project is POWER_SUPPLY.MNL., Output File Sec on This is the O/p file generated in layout corresponding to the .MNL ‘Netlist’ file input., By default its name appears same as netlist name and the file extension is ‘.MAX’, Select the default values for all other options and press ‘Apply ECO’ button to create the new layout, file. The ‘Netlist’ is processed and if it is error free, the layout tool associates each component’s package, (footprint) as per the ‘Netlist’ file. The ‘Netlist’ file associates a package to each component as per the package, value given for each component given in the schematic diagram (which is created using Capture CIS). To, assign a package value to a component at the time of schematic design itself, right click the component in, the schematic page and edit the package information from ‘Edit Properties…’ section. If you do not assign, the correct package name to a component during schematic creation, a default package is associated to the, component. You have to search the layout library for the different package names corresponding to the, various packages. If the layout tool is not able to find out a package associated with a component, at the time, of layout creation, it will prompt for the package name for the component. You should select a package for, the component from the existing component library or should create a new package if the package is not, present in the library (refer to layout package creation and usage documentation by OrCAD for more details)., In our power supply example we haven’t associated any package name for any of the component during, schematic design with Capture CIS. Hence the layout tool will prompt for the package for each component, is shown in Fig. 8.59., , Fig. 8.59, , Package (footprint) selection for component, , Select the option “Link existing footprint to component…” and link a footprint to the component, (Fig. 8.60).
Page 304 :
280, , Introduc on to Embedded Systems, , Fig. 8.60, , Package (footprint) selection for component, , The set of available footprint libraries and the footprints available in the selected library is listed on the, footprint selection dialog box. As you move between different footprints, its preview also is shown on the, selection dialog box. Since we are using the demo version, the number of footprint libraries and footprints, within each library are limited. Select the footprint fitting to the package of your component in terms of size., Repeat the selection for all components., On completion of the footprint assignment and ‘Netlist’ verification, Layout generates an ‘AutoECO’, report describing the errors, if any. Accept the report if it is error free. Now you can see the package of various, components placed on a layouting canvas (Separate Window along with the drill chart). The interconnections, among various components are represented in the form of lines as shown in Fig. 8.61., , 8.7.2.1 Board Outline Crea on, To start with the physical layout process, the first step is assigning the physical board size (PCB size in length, × width) to the layout area where the components are going to be placed. For this, the datum (reference point), needs to be fixed first. Move the datum to a convenient location using the command ‘Move Datum’ from, ‘Tool’ menu (Tool Dimension Move Datum). Place the datum at the desired position by clicking on the, desired point on the layout window after executing the ‘Move Datum’ command. Press ‘ESC’ key to exit the, command. Move the drill chart to a convenient location by executing the command ‘Move Drill Chart’ from, the ‘Tool’ menu (Tool Drill Chart Move Drill Chart). After selecting this command, click on the desired, portion where you want to place the drill chart. The drill chart will be moved to that location. Press ‘ESC’ to, exit the drill chart movement operation., Datum acts as the reference point (0,0) for the design. All measurements are taken with respect to the datum., The co-ordinate left to the datum is taken as –ve and right to datum is taken as +ve. Also co-ordinate on top, of datum is +ve and bottom one is –ve. The co-ordinates are displayed as per the co-ordinate system selected, during the ‘Netlist’ file creation. If the selected system is in inches, the co-ordinate positions are shown in, inches. If it is in metric, the co-ordinate system is represented in millimetres in the layout tool (Fig. 8.62).
Page 305 :
281, , Embedded Hardware Design and Development, , Layouting tools, , Layouting canvas, , Fig. 8.61, , Component interconnection, , Component footprints, , Datum, , Component Packages (footprint) placed at the layout tool, , After fixing the datum, provide an outline to the layout by using the obstacle tool from the tool window., Select the ‘Obstacle’ tool from the Tool window (Tool Obstacle Select Tool) and click at the datum to, start the layout boundary. Move the cursor up till the y co-ordinate reaches the desired width of your layout, (PCB width) and then move the cursor towards the right till the x co-ordinate reaches the desired length, of your layout (PCB length). Now move the cursor down from this position. Once the cursor reaches a, point which is in line with the datum, a rectangle with width and length set for your layout is formed. Press, ‘ESC’ key to stop the execution of ‘Obstacle’ creation command. The boundary for your layout (Blueprint, of original PCB) is ready and you need to move all the components inside this boundary and arrange them, within that boundary and interconnect the various components as per the connections coming from various, components. For this, various ‘layout tools’ are required. Before proceeding to the next steps let’s have a, quick glance at the important tools used from the tool window for this. Figure 8.63 illustrates the different, layout tools.
Page 306 :
282, , Introduc on to Embedded Systems, , Co-ordinate Representation, Layout Tool Window, , Components, , Datum, , Co-ordinate Representation, , Fig. 8.62, , Co-ordinate representation in layout tool, Text Tool, , Component Tool, , Edit Segment, Connect Tool, , Obstacle Tool, Zooming Tools, , Fig. 8.63, , Design Rule Check, , Online DRC, , Error Tool, , Refresh, Add/Edit Route, , Different layouting tools (Tool Window), , Component Tool Selects a component. Mainly used for positioning the selected component within the, selected boundary of the layout., Zooming Tools Zooms in and out the selected portion of the Layout.
Page 307 :
Embedded Hardware Design and Development, , 283, , Obstacle Tool Allows the drawing and editing of obstacles such as board outline, outline of components, (parts) etc., Text Tool Inserts texts in the selected area. It is used for placing and editing Part Number, value, notes etc on, the layout area. After selecting this tool right click on the layout window and input the required parameters., Online DRC Error checking option. If the online DRC option is selected (ON) during the component layout, and inter-connection, any errors occurred (Package to package distance error, track to track distance less than, the set value, connection error, etc.) at the layout operation is indicated in real time., Add/Edit Route Mode Adds or edits a connection (Route), Edit Segment Mode Edits a selected segment of a connection (Route), Design Rule Check (DRC) When selected, this tool checks the errors in the layout, like, missing connections,, wrong connections, package errors (package to package distance less than the minimum value set), trace, errors (Distance between routes less than the minimum value set), etc. Normally DRC is performed at the, end of layouting. If the online DRC was not kept ‘ON’ during layouting, at the end of layouting, you should, run DRC command to verify that there are no errors in layouting the board., Connect Tool Inserts a new connection between any components which is not present in the original, schematic/netlist. It is useful in situations where you need to add an extra connection apart from the original, schematic/netlist. Adding an extra connection without modifying the original netlist file will generate DRC, errors. DRC will assume it as a connection made by mistake. If you added it deliberately, you can ignore the, error., Error Tool Error tool gives the complete description of an error in the layout. Select the error tool and click, at the error mark on the layout window to get the corresponding error’s description., Refresh Tool Refreshes the layout window., There are lots of other tools also available for layout process. Describing all of them is out of the scope of, this book. Readers are requested to get the details of the rest of the tools using the ‘Help’ provided by Layout, Demo tool., We have already fixed the board outline for the design using the obstacle tool. Ensure that the obstacle, tool created the obstacle as ‘board outline’, by checking the properties of the board outline rectangle. Double, clicking on the outline rectangle displays its properties window. Verify that the ‘Obstacle Type’ is ‘Board, Outline’ and ‘Obstacle Layer’ is ‘Global Layer’. If not, set them to these values from the appropriate combo, box. Use ‘ESC’ key to exit the properties selection command. Now set the number of layers required for, your PCB. For a through hole component based board we require at least two layers namely; ‘TOP’ and, ‘BOT’ (bottom) layers. The component is placed usually at ‘TOP’ layer and inter connections (routes) are, created at the ‘BOTTOM’ layer. For Surface Mount Device (SMD) components based boards, the minimum, number of layers required is one, where both component placement and interconnection are done on the, same side (layer). Depending on the complexity of interconnections and the number of components, you, can use multiple layers for routing the connections. The additional layers come in between the ‘TOP’ and, ‘BOTTOM’ layers and they are referred as inner layers. Inner layers are usually represented as ‘IN1’, ‘IN2’, etc. The number of extra layers (Inner layers) used in the layout (PCB) solely depends on the complexity and, number of inter-connections., , 8.7.2.2 Layer Selec on, For setting the number of layers for the board, select ‘layer tool’ from the Tool menu (Tool Layer Select, From Spreadsheet…). The following spreadsheet as shown in Fig. 8.64 pops up on the design window.
Page 308 :
284, , Introduc on to Embedded Systems, , Fig. 8.64, , PCB Layer Selection, , The spreadsheet contains various information like ‘Layer Name’, hot key to activate the layer (‘Layer, Hotkey’), ‘Layer NickName’, ‘Layer Type’ (whether the layer is used for routing or not), and Mirror Layer, (mirror the connections and components)., Select the different layers you want to include in your PCB. You can see different layers namely ‘TOP’,, ‘BOT’, ‘GND’, ‘PWR’, ‘IN1’, ‘IN2’, etc. As explained earlier, ‘IN’ stands for inner layers. Our illustrative, design is a very simple board for power supply part and it does not contain any inner layers and separate, Ground and Power layers. Disable whatever layers we are not using in the design by double clicking on, the corresponding cell of ‘Layer type’ and set it to ‘Unused’. For a double sided through hole PCB with, components placed at TOP layer and routing at Bottom layer, the minimum layers required are Top Layer, (‘TOP’), Bottom Layer (‘BOT’), Solder Mask Bottom (‘SMBOT’), Silk Screen Top (SSTOP) for legend, printing, Assembly Top (‘ASYTOP’) for giving component assembly notes, Drill drawing (‘DRLDWG’), and ‘DRILL’. Keep the ‘Layer Type’ of all other layers to ‘Unused’ and close the spreadsheet. The layers, Solder mask, Silk screen, etc. are explained in a separate section of PCB fabrication. Please refer it for more, details., , 8.7.2.3 Component Placement, Component placement is the process of moving components into the layout area within the board outline and, arranging them properly within the area. Components can be placed either automatically or manually. If the, automatic placement option is selected, ‘Layout’ automatically arranges the components within the area covered, by the board outline. Select the Automatic component placement option from menu (Auto Place Board) to, enable automatic placement. Auto place option is normally used with boards with lesser number of components, and interconnections. For boards with large number of components and interconnections, the auto place option
Page 309 :
Embedded Hardware Design and Development, , 285, , need not be an optimised one, especially when the board size requirement, component placement, routing,, etc. are critical. Manual placing is the advised method in such situations. Manual placement involves moving, of the component manually to the desired location on the layout area and placing it appropriately. To activate, manual placement, select the ‘Component’ icon from the tool window or ‘Select Tool’ from the ‘Tool’ menu, (Tool Component Select Tool). Click on the component and move it to the desired position within the area, defined by the board outline. Move all components like this. Place the components in a way facilitating their, easy interconnection. For easy interconnection, components should be oriented properly. Rotate component, option helps in orienting a component properly. Select the component, right click it and select ‘Rotate’, option to rotate it. While placing components, give special care to place components which are advised to, be kept closer by the design guide (e.g. Placing decoupling capacitors very close to the power supply pin of, IC), placing connectors at the edge of the board, etc. The various points to be taken care of in component, placement are explained in a later section. The command ‘Unplace Board’ (Auto Unplace Board) removes, all components which are placed within the area bounded by the board outline., The package of each component incorporates texts for the reference name of the component—, ‘Reference Designator’ (Component names, C1, C2, etc. for capacitors, R1, R2, etc. for Resistors, etc.) on, the Assembly layer (ASYTOP) and on the Silk Screen Layer (SSTOP), ‘Component Value’ (e.g. 220uF/25V, - Value of capacitor C1 in the example) on the Assembly layer (ASYTOP), the ‘Footprint Name’ (e.g., BLKCON.100/VH/TM1 SQ/W.1 for connector J1) on the Assembly layer (ASYTOP) and the First pin, indicator of the component (e.g. 1) on the Assembly layer (ASYTOP) and on the Silk Screen Layer (SSTOP)., Reference Designator and First pin indicator are very essential for assembling the component on the PCB., Component Value is optional since it is available from the Bill of Material (BOM) file. ‘Footprint Name’, is not required. Select ‘Text Tool’ from Tool window and click on the corresponding text string and move/, edit/delete or rotate the text string as per the requirement. Unwanted text is deleted and other text strings, are placed close to the corresponding footprint. Use rotate option for orienting the text strings properly. The, yellow lines represent the interconnection among various footprint pins. The interconnection is performed, in the next step. Normally the pad corresponding to pin number 1 of a footprint is square in appearance. The, component placement for ‘power_supply.mnl’ net file considered for illustration is shown in Fig. 8.65., , Fig. 8.65, , Component Placement, Datum and Board outline
Page 310 :
286, , Introduc on to Embedded Systems, , 8.7.2.4 PCB Track Rou ng, Routing deals with interconnecting the various components as per the capture schematic diagram. The routing, information is passed to the layout tool from schematic capture through the ‘Netlist’ file. Routing is performed, after component placement. First the components are arranged in the desired manner. The interconnection, among various components is shown in the layout as ‘Yellow lines’. The interconnection lines of a net are, referred as ‘rats’ in PCB terminology. ‘Route/track’ represents the actual copper path present on the PCB. The, track properties of the physical board are determined by the ‘Route’ in the layout., Similar to component placement, routing can also be performed either automatically or manually. If, automatic routing command is executed, the sweeps are executed automatically and the complete board, is routed automatically. Execute the ‘Autoroute’ command (Auto Autoroute Board) from the menu, for routing the board automatically. Auto routing is suitable for boards with lesser number of routes, (Interconnections). For complex routing, auto routing is comparatively inefficient and requires multiple, layers, more layout area and route connecting holes across different layer (PTH). Manual routing is the best, choice for routing complex boards. Though it takes lots of time (of the order weeks) to route a complex board,, manual routing provides highly optimised layout with minimal number of layers and plated through holes., Complex boards can be autorouted if the time required to complete the board is critical and the number of, layers involved as well as number of plated through holes (PTH) in the board is not a constraint. For a double, sided, ‘Through hole’ board, normally the components are placed at the ‘TOP’ layer and track routing is, done at the bottom (‘BOT’) layer. If the board is a multilayer board and the number of interconnection are, very high, layout contains multiple layers (Inner layers; IN1, IN2 etc). In multilayer boards, apart from inner, layers, there may be separate layers for ground ‘GND’ and power ‘PWR’. These layers are usually spread, with copper. For multilayer boards the connections are routed through different layers and the continuation, of a connection from one layer to the other layer is achieved through a special mechanism called ‘via’. Via, is a drill hole connecting a route from one layer to another route present in a different layer. Vias are copper, plated or riveted to maintain electrical connectivity between the two connecting routes., While working with multilayered layouts, as routing progresses, the layout area becomes congested with, the different tracks routed on various layers. To avoid this you can selectively turn ON and OFF different, layers. Say, for example, if you are placing tracks on the second inner layer (IN2) and you feel the routes, which are already placed on the first inner layer (IN1) is creating difficulties in placing the routes on the, second inner layer, you can turn off the first inner layer. Any layer can be turned off while routing by selecting, the corresponding layer from the layer selection combo box and pressing the minus key¶ ‘-’ on the keyboard., This removes the selected layer from view. To activate the layer, press ‘-’ key again (Toggling with ‘-’ key)., Layers like Assembly Layers (AST, ASB), Silk Screen Layers (SST, SSB) can always be switched OFF till, the layout process is complete. Other layers are switched ON and OFF conveniently according to the routing, process. Layer selection enabling and disabling is depicted in Fig. 8.66., By default the different layers of the layout are colour coded with different colours to distinguish them., The default colours¶ for different layers are given below:, Global layer = Yellow, Top = Green, Bottom (BOT) = Red, Inner Layer 1 (IN1) = Aqua, Inner Layer 2 (IN2) = Blue, Silk screen Top (SST) = White, Assembly Top (AST) = Green, Drill Details (DRD) = Red, ¶, , May change with change in tool version.
Page 311 :
Embedded Hardware Design and Development, , 287, , Layer Selection Combo box, , Selected Layer = TOP, Layer on, , Fig. 8.66, , TOP, Layer off, , Layer selection, enabling and disabling, , The colour code for different layers can be edited with the ‘Colour Settings’ Tool from the ‘Layout Tool’, window or by executing the ‘Colours…’ command (Options Colours…) from the ‘Options’ menu. Invoking, the ‘Colour Settings’ pops up a colour selection spreadsheet. Double click on the present colour for the layer, in the spreadsheet and select the desired colour from the colour selection window (Note: Always perform the, layout operation with the default colours provided by a layout tool for different colours. Changing the colour, of the layer is for user convenience only)., Defining Global spacing The following spacing parameters should be set before starting the routing, (component interconnection) of the board., Track-to-Track: Track-to-track spacing specifies the minimum space required between two adjacent tracks,, and between tracks and adjacent obstacles. Normally the track to track spacing is set as 12 mil (1 mm= 39.37, mils). The track to track spacing is a critical criterion in PCB fabrication. Always set a track to track space, value supported by the PCB fabricator. Nowadays PCBs with 6mil track to track separation is possible with, latest PCB fabrication techniques., Track-to-Via Spacing: Track-to-via spacing specifies the minimum space required between via and an, adjacent track. Normal value is 12 mils, Track-to-Pad Spacing: Specifies the minimum space required between pads (Pin pads of components) and, tracks of different nets. Normally used value is 12 mils, Via-to-Via Spacing: Specifies the minimum space required between two adjacent vias. Normally used value, is 12 mil, Via-to-Pad Spacing: Specifies the minimum space required between pads and adjacent vias., Pad-to-Pad Spacing: Specifies the minimum space required between two adjacent pads., Select the ‘Global Spacing’ command (Options Global Spacing…) from the ‘Options’ menu and set, the desired values for all spacing in the ‘Route Spacing’ spreadsheet pop-up window., Manual rou ng of Board Now all pre-requisite for routing is through. To start with the routing process,, select the layer on which the routing operation is carrying out, from the layers selection combo box. Follow, the steps given below:, (1) Select the ‘Edit Segment Mode’ tool from the tools window (or execute the command, Tool Track Select Tool from the Tool menu), (2) From the View menu, choose Zoom In, click on the screen to magnify the routing area you are working, on, and then press ESC to end the zoom command
Page 312 :
288, , Introduc on to Embedded Systems, , (3) Select a ratsnest (A point from which the yellow line indicating an interconnection starts). The cursor, changes to a small-size cross** and the ratsnest is attached to the pointer, (4) Drag the pointer to draw a track on your layout area. Right clicking the left mouse button, anchors the, track at the nearest pad on the net, (5) Continue to move the cursor to draw additional segments of the track, clicking the left mouse button, to create vertices (corners) in the track as you route. You can delete a routed segment by placing the, cursor over the segment and pressing DELETE key, (6) Click the left mouse button to complete the route. The cursor changes to a regular-size cross and the, ratsnest disappears from the cursor, (7) Select the completed route and choose Lock from the pop-up menu. This locks the route you created so, that it cannot be moved if the board is later autorouted, (8) Repeat the process for all rats of the layout. On completing a track drawing, the rat representing it is, replaced with the route, (9) For adding a via (through hole) to connect the route (track) to a track placed on other layers, right click, the mouse on the desired location, while you are dragging the mouse to draw a track. Select the ‘Add, Via’ option, (10) To draw the tracks on a different layer select the layer from the layer selection combo and proceed, (11) To change the width of the track, right click on the track and select the ‘Change Width’ option. Type, the desired track width and execute. The normal value for track width is 12 mil. The minimum width, of track depends on the value supported by PCB fabricators and the comments from the component, manufacturer like the track width of the signal lines should be this much, etc. Nowadays fabrication of, PCBs with track width 6 mil is possible. Ensure that proper track width is provided to tracks representing, power supply lines and ground. There is a standard guideline for track width selection for power supply, lines. Follow these guidelines strictly, (12) If possible reduce the track length from a component to ground and always connect the ground tracks, coming from different components in a ‘star’ model. This eliminates ground elevation problems in, PCB, , 8.7.2.5 Placement & Rou ng Sta s cs, Placement and routing statistics ensures that all components are placed in the layout and all nets are routed, perfectly. It is mandatory to verify the same to ensure that nothing is missed from the components and routes, section. For verifying the placing and routing statistics follow the steps given below., (1) Select the ‘View Spreadsheet’ toolbar button and choose ‘Statistics’. The Statistics spreadsheet window, is displayed, (2) Scroll until you find the ‘Placed’ and ‘Routed’ rows, showing the placing and routing statistics., The statistics should be 100% for both. A statistics value less than 100 for ‘Placed’ indicates some, components are missed from placing. Similarly if the statistics for ‘Routed’ is less than 100, the routing, is incomplete, meaning some tracks are yet to be routed, (3) Close the spreadsheet when you have finished viewing the statistics, , 8.7.2.6 Adding/Edi ng Texts in Layout Design, Text strings in ‘Layout’ is used for creating Assembly notes and labels. To create/edit/delete a text string,, select the ‘Text Tool’ from the Tools Menu (Tool Text Select Tool from Tool menu). Right click on the, layout window for inserting a new text string and select the ‘new’ option (or Press ‘Insert’ key of keyboard)., The following text properties window appears on the screen depicted in Fig. 8.67., **, , Depends on the tool version in use.
Page 313 :
Embedded Hardware Design and Development, , Fig. 8.67, , 289, , Text Edit Dialog Box, , Adding a Text String, (1) From the ‘Type of Text’ group box, select the type of text that you want to create, (2) Select the ‘Free’ option or the ‘Custom Properties’ option for adding assembly note and labels. Type, a text string into the ‘Text String’ text box, (3) Edit the ‘Line Width’, ‘Rotation’, ‘Radius’, ‘Text Height’, ‘Char Rot’ (character rotation) and Char, Aspect (character aspect) text boxes as desired, (4) Select the Mirrored option if you want the text to appear mirrored on the layer (useful for placing text, on the bottom of the board), (5) Select the target layer from the ‘Layer drop-down list’ (If the text is to be printed on the silkscreen, layer, select the corresponding silkscreen layer (e.g. SST–Silkscreen Top). For assembly texts choose, the corresponding assembly layer (e.g. AST–Assembly Top), (6) If you want the text to be attached to a component, choose the ‘Comp Attachment’ button, select the, ‘Attach to Component’ option, input the component’s reference designator (e.g. C1, U1, etc.), then, press OK button, (7) Press OK button to close the Text Edit dialog box, (8) Position the text on the screen and click the left mouse button to place it, Moving a Text String For moving a text string in the layout area, follow the steps given below., (1) Select the ‘Text Tool’ from the Tools menu, (2) Click on the text, which is to be moved, with the left mouse button. Text gets attached to the cursor, (3) Move the mouse to position the text in the new location, (4) Click the left mouse button to place the text, Edi ng a Text String Execute the following steps to edit an existing text in layout, (1) Select the ‘Text Tool’ from the the Tools menu, (2) Double click on the text which is to be edited, with the left mouse button. The ‘Text Edit’ window pops-up, (3) Perform the required changes on the Text Edit Dialog box and press OK, (4) Press ‘ESC’ key to exit the text edit mode
Page 314 :
290, , Dele, (1), (2), (3), , Introduc on to Embedded Systems, , ng a Text String Follow the steps given below to delete a text string., Select the ‘Text Tool’ from Tools menu, Select the text by clicking on it with the left mouse button, Press the DELETE key, , 8.7.2.7 Assembly Notes, Assembly notes are useful information for those who are assembling components on the PCB. To provide, useful information, layout should contain component information like name of the component (C1, R1, D1,, L1, U1, etc.), pin number of component, polarity of the component, if any, point indicating the placement, of an IC, etc. Some information (Like component name, pin number, etc.) embeds with the ‘Netlist’ file by, default and they appear on the layout at the time of placing the component. The assembly note information is, kept on the Assembly layer (e.g. Assembly Top Layer (AST)). If the same information is present on assembly, and silk screen (SST or SSB) layers, you can remove it from one of the layers. Use the ‘Text Tool’ from Tools, menu (or Tool Text Select Tool from Tools menu) to add, delete, modify or rotate Assembly note Texts., Apart from the text information, graphic information can also be added to the Assembly layer. Symbols of, diode, capacitor, etc. showing the polarity are typical examples. Use the obstacle tool to create symbols on the, assembly layer. For performing any operation with the assembly layer, select the assembly layer (e.g. AST), from the layer selection combo box. Now select the obstacle tool and draw whatever symbol you want (e.g. A, diode symbol is created as the combination of a triangle obstacle and three line obstacles). You can group the, obstacles together by right clicking on the layout area where the obstacles are present and moving the mouse, icon in a rectangle area which contains all the obstacles that needs to be moved together. After all obstacles, of the group are selected, hold down the right button of mouse and move the group of obstacles to the area in, layout where you want to place them. Set the ‘Obstacle Type’ of the obstacle/obstacle group to ‘Free track’, by editing the obstacle/obstacle group properties. An obstacle/obstacle group can be linked to a component by, editing the properties of the obstacle/obstacle group (obstacles selected together). Enable Obstacle tool, right, click on the obstacle/obstacle group and select the option ‘Comp Attachment…’ from the ‘Edit Obstacle’, pop-up window. Give the Reference name of the component to which the obstacle is to be linked (say C1, U1,, etc.) on the ‘Reference designator’ edit box. Linking the assembly not obstacles to the component moves it, along with the component whenever the component is re-arranged in the layout window., , 8.7.2.8 Drill Details, To set the pad stack and drill dimensions of the vias used in the layout, execute the steps given below., (1) Select the pin tool from the ‘Tool’ menu (Tool Pin Select Tool), (2) Click on the via with left mouse button, (3) Select ‘View Spreadsheet’ from Tools menu, (4) Set the pad stack size and drill diameter, , 8.7.2.9 PCB Moun ng Hole Crea on, Mounting holes are required for mounting the PCB on the enclosure. PCB is fixed to the enclosure using, screws and washers. PCB should contain mounting holes and the size of the mounting hole is determined, by the mounting screws. The size of the screw is expressed as M2, M3, etc. The ‘Capture CIS’ schematic, tool does not contain a part for mounting holes and we cannot add mounting hole information to schematic, diagram. Mounting holes are directly added to the layout. Follow the steps given below to add a mounting, hole to the PCB layout., (1) Select the ‘Component Tool’ button from the toolbar, (2) Right click on the layout window and select New (or Tool Component New… from the ‘Tool’, menu). The ‘Add Component’ dialog box appears on the screen
Page 315 :
Embedded Hardware Design and Development, , 291, , (3) Select the ‘Footprint’ button. The ‘Select Footprint dialog’ box is displayed, (4) In the Libraries group box, select the library ‘LAYOUT’. Use the Add button, if necessary, to add this, library to the list of available libraries, (5) In the footprints group box, select a mounting hole (OrCAD provides three types of mounting holes:, MTHOLE1, MTHOLE2, and MTHOLE3), (6) Press OK to close the ‘Select Footprint’ dialog box, (7) Tick the ‘Non-Electric’ option, and then press ‘OK’ to close the ‘Add Component’ dialog box. The, mounting hole gets attached to the cursor, (8) Place the mounting hole on the desired area of your board layout by clicking the left mouse button, (9) Select ‘Padstack’ command from the Tool menu (Tool Padstack Select from Spreadsheet). Scroll, down to the “100R110” section of the spreadsheet, double click on the name and select ‘Non-Plated’, option, Note: This feature is not available with the demo version of the software. Only the full featured version, supports it., , 8.7.2.10 Design Rule Check (DRC), Design Rule Check (DRC) is performed to verify the layout is meeting all design criteria and there are no, errors in the layout. If online DRC is enabled, any error in layout is automatically reported at the design time, itself. If online DRC is ON, a white rectangle box (DRC Box) appears on the layout window. Keep the layout, area within this rectangle so that any errors at the time of placing or routing are notified by online DRC. If the, layout is not fitting in the current DRC box, execute the following steps to incorporate the entire layout area, within the board outline to the DRC Box., (1) Select ‘Zoom DRC/Route Box’ from the View menu. The cursor shape changes to the zoom cursor, ‘Z’, (2) Move the cursor to the target location and click the left mouse button. Layout zooms in at the new, location, centering it on the screen, (3) Adjust the click till the layout area fits into the DRC Box, The final DRC check is performed by executing the ‘Design Rule Check’. Executing DRC checks the, layout for all kinds of design rule errors, missing connections and components, etc. DRC reports all errors., The description of each error can be obtained using the error tool (Tool Error Select Tool). If there is any, error in the layout process, rectify it before proceeding to the next stage (creation of gerber files), , 8.7.2.11 Cleanup Design, Cleanup design command enhances the manufacturability of the board. Executing it automatically smoothens, and checks for both aesthetic and manufacturing problems that might have been created in the process of, manual or automatic routing. The design should be cleaned up at least once, at the end of the layout process., For cleaning up the design, execute the command ‘Cleanup Design’ from the ‘Auto’ menu (Auto Cleanup, Design…). Cleanup command corrects the problems listed below., Acute angles, Bad copper share, Pad exits, Overlapping vias., , 8.7.2.12 Gerber File Crea on, Gerber file creation is the final stage in the ‘Layout’ process (PCB design process). Gerber file transforms the, ‘Layout’ into PCB fabricating tool understandable format. All the component info, layer info, routing info,, drill info etc are included in the gerber file. Gerber is a universally accepted file exchange protocol between, the PCB manufacturer and PCB designer.
Page 316 :
292, , Introduc on to Embedded Systems, , Follow the sequence of operations listed below for generating gerber file corresponding to the design., 1. Save the layout file (The file is saved with extension ‘.max’ and with the name given at the time of, creating a new design), 2. Execute ‘Post Process Settings’ command from ‘Options’ menu (Options Post Process Settings…)., The ‘Post Process’ window appears, 3. In the ‘Post Process’ window ensure that the ‘Batch Enabled’ option is set ‘Yes’ only to the layers, which are selected during the layout design process, 4. Ensure that the ‘Device’ option for all entry is ‘EXTENTED GERBER’, 5. Right click on the ‘Post Process’ window and select ‘Run Batch’ (or execute ‘Run Post Processor’, from ‘Auto’ menu after closing the ‘Post Processor’ window), 6. The gerber file is generated automatically and the confirmation and path of the created file is provided, in the form of message boxes, Corresponding to each layer of the ‘Layout’, a file is created with the layer name as extension (e.g., ‘power_supply.top’ for TOP layer). This file contains all information related to that layer. The ‘.tap’ file gives, the drill detail information for CNC drilling. All these files (files corresponding to each layer and ‘.tap’ file), are sent to the PCB manufacturer for fabricating the PCB., , 8.7.2.13 Finished Layout, An example of a finished layout is given in Fig. 8.68. This layout is created for our ‘power_supply.mnl’ netlist, example., , Fig. 8.68, , Finished Layout, , The layout contains component footprints, tracks, mounting holes, top and bottom layer, silkscreen top, layer and assembly top layer. The tracks are routed at the bottom layer and they are shown in red colour., The white coloured text and diode symbol is assembly note and they are drawn on the assembly top layer., Green coloured texts are labels and they are drawn on the silkscreen top layer. Save the layout file. The file
Page 317 :
Embedded Hardware Design and Development, , 293, , extension for layout file is ‘.max’. The ‘.max’ file can be opened with the ‘Layout Demo’ Tool at any time, for viewing the routing/placing and modifying., , 8.7.3, , Guidelines for PCB Layout, , The proper functioning of the PCB as well as its dimensions depends on the positioning of the various, components and the interconnection among them within the ‘Layout’ design. PCB manufacturer fabricates, the PCB as per the layout files. An inefficient layout leads to an inefficient PCB. As a rule of thumb, follow, the basic guidelines given below, while laying the components and interconnecting them in the ‘Layout’., 1. Place the components inside the layout area within the board outline, keeping the physical size of the, PCB in mind, 2. Always keep the minimum component to component distance while placing components, 3. Place connectors towards the edge of the PCB and consider the enclosure thickness while placing, connectors, 4. Keep the number of layers minimal. As the number of layers increases, the complexity of the board, and fabrication cost also increases and it is very difficult to debug the connections against any nonfunctioning, 5. Use lesser number of vias in the board. Board strength reduces with increase in number of vias., 6. Provide sufficient fixing holes on the board. Arrange fixing holes in a way providing maximum strength/, support to the board, 7. Provide appropriate track width for signal lines and power carrying lines (Refer to the design guideline, for getting the standard track width), 8. Keep the track to track spacing at least the minimum value supported by the PCB fabricator, 9. Avoid routing of signal lines over power lines. (If not it may create Electromagnetic Interference, issues), 10. Always connect ground point of different components in star model to avoid ground elevation. If, possible provide a separate ground plane (layer) and directly connect all ground connections to this, plane, 11. Take care of components which need to be kept closer (Like decoupling capacitors for ICs), 12. Avoid sharp edges for tracks, 13. Provide neat and easily understandable Assembly notes, 14. Avoid the congestion of routes on a layer, 15. For double side component mounting, before placing a component on the bottom side of the PCB,, consider the components height and the clearance between the bottom side of PCB and the enclosure, when the PCB is in the mounted state, , 8.8, , PRINTED CIRCUIT BOARD (PCB) FABRICATION, , A Printed Circuit Board (PCB) is a platform for placing electronic and, LO 8 Learn the different, electro mechanical components and interconnecting them without discrete, mechanisms for PCB, wires. Printed Circuit Board (PCB) consists of printed conductive wires, fabrication, different, (called PCB Tracks) and component layouts attached to an insulator sheet., types of PCBs, How, The insulator sheet is referred as substrate and it is usually made up of, a finished PCB looks, ‘Glass Epoxy—A fibre glass reinforced epoxy material’ or ‘Pertinax—A, like and how it is made, phenol formaldehyde resin’. The normal thickness of this substrate sheet is, operational, 1.6 mm. PCB is also known as Printed Wiring Board (PWB). The finished, PCB layout looks exactly the same as the Physical PCB with all its layers representing the layers physically
Page 318 :
294, , Introduc on to Embedded Systems, , present in the PCB and routes of the layout represent the tracks of the PCB. The final step in the hardware, design is the fabrication of the PCB. For executing this, all information contained in the layout should be, transferred to the PCB fabrication tool understandable format. The Gerber file created from the layout along, with drill details serve the purpose of transferring this information from layout to PCB fabrication tool. Gerber, is a universally accepted standard for transferring relative co-ordinates and track information and component, details of a layout for PCB fabrication. Gerber files are a collection of art works. In a multilayer PCB, each, layer has its own art file representing the component co-ordinates, component info and track info for that, layer. The drill details file provides the drilling information (drill hole diameter, plating, etc.) of different vias, (PTH) present in the layout. The actual drilling is performed on the PCB using Computer Numeric Control, (CNC) drills or laser and the drilling is controlled in accordance with the drill details file., , 8.8.1, , Different Types of PCB, , Depending on the complexity of connections involved and component density, the PCB tracks may be, routed through a single layer or multiple layers and the component placement may be either on one side, (top or bottom of PCB) and or on both sides (top and bottom of PCB). According to this, PCBs are generally, classified into the following categories., , 8.8.1.1 Single Sided PCB, For simple and small circuits, only one layer (either the top layer or bottom layer) is used for routing the, connections. Such PCBs are known as single sided PCBs, where all the connections and tracks are present on, one side. If the components used in the design are all surface mount devices (SMD), the component placement, as well as the track creation is done on one side. If some components are ‘Through hole’ components and the, track routing is done only on one layer, the ‘Through hole’ components should be placed on the opposite side, of the PCB layer holding the tracks., , 8.8.1.2 Double Sided PCB, If track routing is done on both sides of the PCB and component placement is also done on both sides, the, PCB is called as ‘Double side Mounting PCB’. In ‘Double side Mounting PCB’, the connection required, from one side to the other side for circuit connectivity is achieved through ‘Plated Through Holes (PTH)’., The PTH/via is a drilled hole which is either copper electroplated or riveted with small rivets. The via may, be a visible via with a cylindrical hole and plating on both PCB sides or a completely buried via in which, the drill hole is totally filled with conductive material like copper. It is advised to use less via as possible in a, board and use buried via, in case of any via required. The major issue in using buried via is fabrication cost., In ancient times the circuit connection between two end points of a drill hole was achieved through inserting, a conductive wire and soldering the ends of the wire to the circuit on the pads present on both sides of the, board., , 8.8.1.3 Mul layer PCB, If the complexity of connections in the circuit to be fabricated is high, routing of connections is performed, using multiple layers. Multiple layered PCBs, contain additional routing layers called ‘inner layers’ apart, from the top and bottom layers. The number of layers required and the connections on each layer is fixed, at the routing time itself and each layer in the layout represents a physical layer in the PCB. The number of, inner layers may vary from 1 to 16 depending on the circuit complexity. It is a common practice to allocate, separate layers for ‘Ground’ and ‘Power Supply’ in multilayer PCBs. The separate ground layer and power, layer reduces the effect of any accidental antenna loop formation in the circuit. All layers of the PCB are, fabricated separately and finally they are stacked and glued together. Alignment marks are provided on each, layer for aligning the layers properly for stacking them. The final PCB looks like a single PCB, though it
Page 319 :
Embedded Hardware Design and Development, , 295, , contains PCB layers inside. The required interconnections between the tracks of different internal layers are, established through drill holes called ‘via’. The ‘via’ may be a copper electroplated drill hole or a riveted, ‘Plated Through Hole’., , 8.8.1.4 Piggy-Back/Plug-in/Daughter PCB, Piggy-back/plug-in/daughter PCBs are designed to plug into some other PCBs. The Piggy-back PCB may, itself be a single sided/double side mounting or multilayer PCB. Most of the COTS component comes as, piggy-back/plug-in PCBs., , 8.8.1.5 Flexible PCB, Flexible PCBs are highly flexible compared to normal PCBs. Normal PCBs use rigid substrate for copper, etching platform and they are ‘rigid’ in nature, whereas flexible PCBs use flexible substrates like plastic as, the substrate sheet and the copper film are deposited on top of it. Flexible PCBs are widely used in fabricating, ‘Antennas’ for RF systems and applications requiring connectors as a flexible PCB, like membrane keypad, connectors LCD connectors, etc., , 8.8.2, , PCB Fabrication Methods, , PCB fabrication is the process of creating physical PCB from the layout files supplied in the form of gerber, files and drill detail files. Three common techniques are adopted for this. They are described in detail in the, following sections., , 8.8.2.1 Photo Engraving (PCB Etching), Photo engraving is the oldest technology used in PCB fabrication. It is the most popular technology and even, today also it plays a vital role in PCB fabrication. Photo engraving is based on the photographic technique, (Technique similar to the one used in developing photographs from a negative film) and it makes use of photo, masks and chemical etching. To adopt photo engraving technique, the different layers of the layout should be, converted into a film very similar to the negatives of photograph. The gerber photo plotter files are inputted, to a photo plotting machine and it produces the photo-plot (PCB film) of each layer. The process of creation, of PCB film from art files is termed as ‘Photo plotting’. The tracks and copper using areas in the layer are, opaque (black) and other portions are transparent in the films. These PCB films are used as ‘Photo mask’ for, photo engraving., Copper coated on a substrate sheet is used as the metal for photo engraving. A photo sensitive material, called ‘photo resist’, which is resistant to acids and other etching materials is applied to the copper sheet., The ‘photo mask (PCB film for the corresponding layer)’ is kept on top of the photo resist material coated, copper sheet and it is aligned properly. This sheet is then exposed to strong ultraviolet rays. The places on the, target copper clad board where the PCB film is transparent gets hardened and the opaque regions remain as, such. The photo resist is then developed by washing in a solvent that removes the unhardened parts. Finally,, the copper area to be engraved (removed) is exposed to an acid or other etching compound which dissolves, the exposed parts of the copper sheet. Ferric chloride or ammonium per sulphate chemical bath is used for, removing the unwanted copper from the substrate. Each layer of the PCB is fabricated like this and then, the required vias are drilled on each layer. Finally all layers are stacked together exactly as present in the, layout design to form the finished PCB. Vias used for inter- connecting various layers are copper plated or a, conductive rivet is inserted into them to establish circuit connections., , 8.8.2.2 PCB Milling, PCB milling is a straightforward and more precise technique for fabricating PCBs. It uses 2 or 3 axial milling, machine to mill away the unwanted copper from a copper cladded substrate which is used for each layer. The
Page 320 :
296, , Introduc on to Embedded Systems, , milling is done on the basis of gerber file for each layer. Here no PCB films are created and it is a chemical, free process. PCB milling machine operates in a way similar to a photo plotter and receives the commands, from the host software that controls the position of the milling head in the x and y axes (for 2 axial milling), and x, y and z axes (for 3 axial milling). Compared to photo engraving, the accuracy of PCB milling is, very high. PCB milling accuracy is dependent only on milling system accuracy and the milling bits. With, milling technique it is very easy to create sharp track edges, pads, etc. on the PCB. Both milling process, and engraving process are ‘subtractive’ process since copper is removed from the substrate board to create, electrical isolation., , 8.8.2.3 PCB Prin ng, PCB printing is the latest technology adopted in PCB fabrication. As the name indicates PCB printing is, similar to the ordinary printing. The only difference is that instead of ink and toner, conductive ink is used, and papers are replaced by substrates. Also special types of printers are used for the same., , 8.8.3, , How a finished PCB looks like and, how it is made operational, , As mentioned earlier, all the layers of the ‘Layout file’ are transformed into corresponding physical layer, using any of the above-mentioned fabrication techniques and after fabrication of all layers, they are stacked, and glued together in the same order as they present in the ‘Layout file’. The conductive drill holes are plated, with copper, or riveted using appropriate rivets. Now the top layer and bottom layer are the only visible layers, and they contain the top layer and bottom layer tracks (if any) and component placement copper spread pads, (for Surface Mount Devices) and through hole pads (for through hole components). If you examine this PCB, you can see the tracks and component layouts but you may not be able to identify which component layout, is corresponding to a component given in the ‘schematic diagram’, since there is no visual indication marks, provided on the PCB at this stage, describing the component name, its value (if needed) and the component, polarity if any (for polar components like capacitors). Next step is the printing of component ‘Part reference, Number’ details on the top/bottom layer where component layout is done., , 8.8.3.1 Solder Mask, One more step is involved in the PCB fabrication process before printing the part reference text and layout, outlines. In the etched/milled or printed PCB the copper tracks are exposed and there is a chance for corrosion, and abrasion. To avoid this, a plastic layer is deposited on top of the PCB. This plastic layer is known as, ‘Solder Mask’. Solder mask protects all the copper track and spreading from exposure to the surrounding, atmosphere. Solder mask also resists the “bead-up” of solder (wetting by solder; where solder is a conductive, lead material for fixing components to the pad and track) and prevents the solder used for fixing components, from flowing in the PCB. Solder mask is exposed in points which are intended for soldering components. The, commonly used solder mask is green coloured and that’s why PCBs are green coloured in appearance. Solder, mask is applied to top and bottom layers of PCB depending on the presence of copper components. Solder, masks are also available in other colours like red, black, blue, etc., , 8.8.3.2 Silk Screen, The process of printing the part reference information for various components on top of the solder mask layer, is called ‘Silk Screen printing or Legend printing’ and the printings are referred to ‘Silk Screen legend’., This legend provides readable information on component part numbers and placement of components like, where the first pin should come, or the polarity information like + and – of components and also the layout, boundaries of the components. This information is necessary for placing the components while assembling, the components on the PCB and also for repairing. The printing is performed using ‘Silk screens’. It can also
Page 321 :
Embedded Hardware Design and Development, , 297, , be done using Inkjet printers. Silk screen printing is done on top and/or bottom layer of the PCB depending, on the placement of components on these layers. The silk screen layout file corresponding to the top layer is, ‘Silk Screen Top (SST)’ and for bottom layer it is ‘Silk Screen Bottom (SSB)’., , 8.8.3.3 Tes ng PCB, The PCB manufacturer itself conducts a preliminary test, after fabricating the PCB to ensure that all the nets, (connections) in the gerber file supplied by the end user got interconnected according to the gerber files. This, test is known as “Bare Board Test (BBT)”. BBT is conducted at the manufacturing setup and the PCB is, delivered to the end user only after ensuring the BBT is correct., Checking the internal connections within a multilayered board is very difficult. However the end user can, conduct tests like “Visual Inspection”, on receiving the PCB. “Visual Inspection” is performed to ensure, there are no ‘shorts’ within the visible part of the PCB. A magnifying glass is used for examining the board., It is advised to perform a Visual Inspection test always, before soldering the components. Nowadays tests, like JTAG Boundary scanning is available for testing the interconnection among various ICs present in the, board using the boundary scan cells of the ICs and JTAG interface., , 8.8.3.4 Component Assembly, Component assembly is the process of soldering the circuit components like capacitors, resistors, ICs,, connectors, etc. on the PCB. The components are connected to the PCB through soldering. The soldering, technique may be either manual or automated. In manual soldering process, components are soldered on, the board by soldering experts using soldering iron and soldering lead. The Bill of Materials generated for, the schematic diagram is used as the reference part number and value selector for the components and the, legend printed on the PCB helps in finding out which component is to be placed on which part of the PCB., In automated soldering process, machines are used for executing the soldering operation. Here also human, intervention is required. Various soldering techniques like re-flow soldering, etc. are used. Techniques like, X-ray are used for inspecting the correctness of machine soldering in lead free component assemblies., It is not recommended to assemble all components in a single stretch for the first time in a proto model, development. Split the circuit into different modules like power supply module, processor module, etc. and, assemble the components for one module at a time preferably starting with the power supply part of the board, and ensure that each module is working properly. Examine the expected output of each module and ensure, you are getting the correct output. Move on to the next modules only after getting the correct output from the, last assembled module. If you are not getting the expected output, ensure that all components necessary for, the functioning of that module is assembled properly, examine the input and output signals of the modules, using hardware debugging tools like Multimeter, CRO, Logic Analyser, etc. Make necessary changes in the, PCB circuits if required. Most of the times adding of additional components, cutting of tracks, etc. may be, required in the first board since we are using it for the first time and we are not familiar with the component, and system behaviour in it. Hence this board will be an experimenting board–More precisely “Prototype, Board” in embedded technical term. The drawbacks of the circuits in the proto board and the circuit and, component modifications, required if any, are included in the next versions of the proto board and it goes, into commercial production once it functions in the expected way. It is strongly advised to fabricate lesser, number of PCBs in the first run., Run small test applications on the processor part to ensure that the processor part is working properly. For, example, if the board contains some LEDs or buzzers connected to the output ports of the processor, you can, write small firmware program to manipulate their status (like blinking LED, turning buzzer ON and OFF,, etc.). This helps in ensuring the processor part is functioning properly. You may find it very difficult to do a, modulewise assembling and testing, but remember it is a one-time process and once you identify the problems, with a board you can apply the remedial measures to all boards and go for a mass assembly. The proverb “A
Page 322 :
298, , Introduc on to Embedded Systems, , stitch in time saves nine” is really meaningful in the case of embedded hardware design. If you spend some, effort for this it will definitely help you in saving the additional time, effort and money in debugging., If you assemble all the components together in a single stretch for the first time and power it ON, you can, see your product functioning properly only if you are a very lucky person ☺. Otherwise it may end up in a, board blast or damage. Moreover you won’t learn anything on the hardware and the mystery behind how, it functions, if it starts functioning in the first run itself. Debugging the hardware only gives you sufficient, knowledge on it (from a developer perspective). From a product development company perspective, the, product should function fully in the first run itself. The design is always well checked, simulated and debugged, before fabrication to avoid all possible problems. Still there may be chances for problems, since hardware, functioning is unpredictable., on Footprint, F, i, , Fig. 8.69, , Finished PCB with components Assembled (Top view), Courtesy of Keil (www.keil.com), , 8.8.3.5 Conformal Coa ng, The embedded product need not be deployed in a controlled environment always. Hence the PCB along with, the components assembled on it should withstand all the extreme operating conditions. The environment, where the PCB is going to deploy may be a dusty one, highly humid one, etc. Presence of metal dust particles, and conducting corroding particles may create electrical short-circuiting or corroding of the PCB. A special, coating called ‘Conformal coating’ is applied over the PCB to prevent this. Conformal coating should only, be applied after assembling all the components. Dilute solution of silicon rubber or epoxy is used as the, conformal coating material. The assembled PCB is either dipped in the conformal solution or the conformal, solution is sprayed on the assembled PCB. Another technique used for conformal coating is sputtering, of plastic on to the PCB in a vacuum chamber. The major disadvantage of using a conformal coating is,, servicing of the board and replacement of the components, in case of any damage, is extremely difficult, since, the coating is a permanent one.
Page 323 :
Embedded Hardware Design and Development, , Summary, The hardware of embedded system contains analog electronic components like resistors, capacitors,, inductors, OpAmps, diodes, transistors, MOSFETs, etc., Digital electronic components like logic, gates, buffers, encoders and decoders, multiplexers and de-multiplexers, latches, etc. and, digital sequential and combinational circuits, Analog, digital and mixed Integrated LO1, Circuits (ICs) and Printed Circuit Board, Open collector is a special transistor configuration for interfacing the output signals from Integrated, Circuits with other systems which operate at the same or different voltage level as that of LO1, the IC, A digital circuit used in embedded hardware design can be a Combinational or a Sequential circuit., The output of a combinational circuit is dependent only on the present input, whereas the, LO2, output of a sequential circuit depends on both present and past inputs, An Integrated Circuit (IC) is a miniaturised form of an electronics circuit built on the surface of a, thin silicon wafer. VLSI design deals with the design of ICs. VHDL is a hardware LO3, description language used in VLSI design, Electronic Design Automation (EDA) tool is a set of Computer Aided Design / Manufacturing, (CAD/CAM) software packages which help in designing and manufacturing the electronic LO4, hardware like integrated circuits, printed circuit board, etc., OrCAD is a popular EDA tool for PCB design from Cadence Design Systems (www.cadence.com)., CaptureCIS is the OrCAD tool for circuit creation (schematic capturing), Layout is the LO5, PCB layout tool and pSPICE is the circuit simulation tool, The schematic capturing tool converts the component details and the interconnection among them, in an electronic circuit to a soft form representation called netlist, LO6, Packages are standard entities for describing a component in PCB design. PDIP, ZIP, SOIC,, TSSOP, VQFP, PQFP are examples for standard packages., LO7, Netlist file contains information about the packages for different components of the circuit diagram,, and the interconnection among the different components represented in the form of LO7, ‘NET’s, The multiple planes used for interconnecting different components in a PCB is known as ‘Layers’, and the interconnection among various components is referred as ‘Routes’ in PCB, LO7, terminology, The layout tool generates a blueprint of the actual PCB in terms of the different component, placement, the interconnection among them. The layout information is passed to the PCB fabricator, in a universally acceptable standard called gerber file for fabricating the PCB. Gerber file is a, collection of art files corresponding to the different layers of the PCB and drill details for, LO7, the vias and holes present on the PCB, PCB is a platform for placing electronic and electromechanical components and interconnecting, them without discrete wires. PCB contains printed conductive wires (called PCB tracks) and, component layouts attached to an insulator sheet. The insulator sheet is referred as substrate and, it is usually made up of ‘Glass Epoxy—A fibre glass reinforced epoxy material’ or ‘Pertinax—A, phenol formaldehyde resin’. The normal thickness of this substrate sheet is 1.6 mm, LO7, PCB etching (Photo engraving), PCB milling and PCB printing are the commonly used, PCB fabrication techniques to develop a PCB from the gerber file information, LO7, PCBs can be classified into Single Sided PCB, Double Sided PCB, Multilayer PCB, etc., based on, the number of layers and component placement, LO8, , 299
Page 324 :
300, , Introduc on to Embedded Systems, , Keywords, Open Collector: An NPN transistor configura on with emi er connected to ground and collector le, unconnected. It is an I/O interface standard in electronic circuits, [LO 2], Logic Gate: Analog/Digital Circuit which produces the output as the output corresponding to the logical, opera on performed on the input signals, [LO 2], Buffer: Logic circuit for increasing the driving capability of a logic circuit in digital electronic circuits [LO 2], Latch: Logic circuit for latching data in digital circuits, [LO 2], Decoder: Logic circuit for genera ng all the possible combina ons of the input signals in digital circuit[LO 2], Encoder: Logic circuit for encoding the input signals to a par cular output format, [LO 2], Mul plexer: Logic circuit which acts as a switch which connects one input line from a set of input lines, to an, output line at a given point of me, [LO 2], De-Mul plexer: Logic circuit which performs the reverse opera on of mul plexer, [LO 2], Combina onal Circuit: A digital circuit which is a combina on of logic gates. The output of the combina onal, circuit at a given point of me is dependent only on the state of the inputs at the given point of me [LO 2], Sequen al Circuit: A digital logic circuit whose output at any given point of me depends on both the present, and past inputs, [LO 2], Integrated Circuit (IC): A miniaturised implementa on of an electronics circuit containing transistors and, other passive electronic components in a silicon wafer, [LO 3], VLSI Design: IC design, [LO 3], VHDL: A Hardware Descrip on Language for VLSI design, [LO 3], Electronic Design Automa on (EDA) tool: A set of Computer Aided Design / Manufacturing (CAD/CAM), so ware packages which helps in designing and manufacturing the electronic hardware, [LO 4], OrCAD: A popular EDA tool for PCB design from Cadence Design Systems, [LO 6], Package: An en ty represen ng the physical characteris cs (length, width, number of pins, type of pins, (surface mount or through hole), pin size, etc.) of a hardware component (like IC, capacitor, etc.) in electronic, circuit, [LO 7], Netlist file: A so form representa on of the package of components and the interconnec on among the, components in an electronic circuit, [LO 7], Footprint: A pictorial representa on of a component when it is looked from the top (top view of a component), , [LO 7], [LO 7], , Routes: The interconnec on among the pins/leads of various components in a PCB, Layers: The ‘Mul ple planes’ for performing the rou ng opera on, if the number of interconnec ons in a, design is high in a PCB, [LO 7], Vias: The conduc ve drill holes for providing electrical connec vity among various layers in a ‘Mul layer’ PCB, , [LO 7], Gerber File: A universally acceptable standard for represen ng layout informa on for PCB fabrica on[LO 7], Printed Circuit Board (PCB): A pla orm for placing electronic and electromechanical components and, interconnec ng them without discrete wires., [LO 7], PCB Etching (Photo engraving): A subtrac ve method for fabrica ng the PCB, [LO 7], PCB Milling: A subtrac ve method for fabrica ng the PCB, [LO 7], PCB Prin ng: An addi ve method for fabrica ng the PCB, [LO 7], Single Sided PCB: PCB with a single layer for rou ng and connec ons, [LO 8]
Page 325 :
Embedded Hardware Design and Development, , 301, , Double Sided PCB: PCB with track rou ng and component placement done on both sides of the PCB [LO 8], Mul layer PCB: PCB with mul ple layers for track rou ng, [LO 8], Piggy-back/plug-in/daughter PCB: PCB designed to plug into some other PCBs, [LO 8], Flexible PCB: PCB with flexible substrate for copper deposi ng for tracks and footprint, [LO 8], Solder Mask: A plas c layer deposited on the copper tracks of the PCB to protect it from corrosion and, abrasion, [LO 8], Silk Screen: The legend for prin ng readable informa on on the PCB, [LO 8], Conformal Coa ng: A protec ve coa ng made up of dilute solu on of silicon rubber or epoxy for protec ng, the PCB from extreme environmental condi ons, [LO 8], , Objec ve Ques ons, 1. Which of the following analog electronic component is used for clamping of voltage in electronic circuits, (a) Schottky diode (b) Transistor, (c) TRIAC, (d) Zener diode, 2. Which of the following analog electronic component(s) is (are) used for noise signal filtering in electronic, circuits, (a) Capacitor, (b) Transistor, (c) Inductor, (d) All of these, (e) Only (a) and (c), 3. Which of the following is (are) true about Open Collector configuration?, (a) The emitter of the transistor is grounded (b) The emitter of the transistor is open, (c) The collector of the transistor is open, (d) The collector of the transistor is grounded, (e) (a) and (c), (f) (b) and (d), __, __, 4. The logic expression Y = AB + AB represents the logic gate, (a) AND, (b) NAND, (c) OR, (d) XOR, (e) NOR, 5. Which of the following is an example for Buffer IC?, (a) 74LS00, (b) 74LS244, (c) 74LS08, (d) 74LS373, (e) None of these, 6. Which of the following digital circuits is used for selecting one input from a set of inputs and connecting it, to an output line, (a) Buffer, (b) Latch, (c) Multiplexer, (d) De-Multiplexer, (e) None of these, 7. Combinational circuits contain a memory element. State True or False, (a) True, (b) False, 8. Half Adder is an example of Sequential circuit. State True or False, (a) True, (b) False, 9. Which of the following flip-flop is known as Delay Flip-Flop, (a) S-R, (b) J-K, (c) D, (d) T, 10. For an S-R flip-flop, the previous output state is 0 and the current input state is S = R = 1, what is the current, output state?, (a) 1, (b) 0, (c) Undefined, 11. Which of the following flip-flop is known as Toggle Flip-Flop, (a) S-R, (b) J-K, (c) D, (d) T
Page 326 :
302, , Introduc on to Embedded Systems, , 12. For a J-K Flip-Flop, the previous output state is 1 and the current input state is J = K = 0, what is the current, output state?, (a) 1, (b) 0, (c) Undefined, 13. For a J-K Flip-Flop, the previous output state is 0 and the current input state is J=K=1, what is the current, output state?, (a) 1, (b) 0, (c) Undefined, 14. For a T Flip-Flop, the previous output state is 1 and the current input state is 1, what will be the current, output state on applying a clock pulse?, (a) 1, (b) 0, (c) Undefined, 15. The number of logic gates present in an IC is 500. The integration type of the IC is?, (a) MSI, (b) SSI, (c) LSI, (d) VLSI, 16. The type of integration for a microprocessor chip is, (a) MSI, (b) SSI, (c) LSI, (d) VLSI, 17. The design of an integrated circuit with built-in ADC is an example for, (a) Analog, (b) Digital, (c) Mixed signal, (d) None of these, 18. In embedded hardware design context, schematic represents, (a) The physical arrangement of various components present in the hardware product, (b) The different components involved in a hardware product and the interconnection among them, (c) Both of these, (d) None of these, 19. In embedded hardware design context, Bill of Materials (BoM) represents, (a) The type and value of each components present in the hardware, (b) The quantity of different components present in the hardware, (c) Both of these, (d) None of these, 20. In embedded hardware design context, ‘Netlist’ is, (a) The soft form representation of the different components of a hardware and the interconnection among, them, (b) The output file generated from schematic design, (c) The input file for the PCB layout design, (d) All of these, (e) None of these, 21. In embedded hardware design context, ‘Layout’ is, (a) A soft form representation of the PCB, (b) Software ‘Blueprint’ representing the physical placement of components in a hardware, (c) All of these, (d) None of these, 22. Which of the following are the building blocks of a ‘layout’?, (a) Footprints, (b) Routes, (c) Layers, (d) Vias, (e) All of these, (f) (a) and (b), 23. What is ‘Footprint’ in the ‘Layout’ context?, (a) The ‘Top view’ of a component, (b) The three-dimensional representation of a component, (c) Both of these, (d) None of these, 24. Which of the following package(s) contain pins/pads on only one side of the component?, (a) Zigzag In-line Package (ZIP), (b) Single In-line Package (SIP), (c) Dual In-line Package (DIP), (d) All of these, (e) None of these, 25. Which of the following is a Surface Mount Package?, (a) PDIP, (b) TSSOP, (c) SOIC, (d) All of these, (e) only (b) and (c)
Page 327 :
Embedded Hardware Design and Development, , 303, , 26. Which of the following package(s) contain(s) pins/pads on the four sides of the component?, (a) VQFP, (b) SOICS, (c) TSSOP, (d) PQFP, (e) (a) and (d), 27. The representation of interconnection among various components of a hardware in ‘Layout’ is known as, (a) Footprint, (b) Route/Trace, (c) Layer, (d) None of these, 28. In embedded hardware design context, a ‘via’ is a, (a) conductive drill hole, (b) interconnection among two components, (c) Ground line, (d) Power line, (e) None of these, 29. Which is (are) the layers of ‘Layout’ used for printing ‘Assembly Notes’?, (a) AST, (b) ASB, (c) TOP, (d) BOT, (e) (a) and (b), 30. What is gerber file in the PCB Design context?, (a) File containing the component PCB layout info, routing info, drill details, etc. in a universally accepted, file exchange protocol format, (b) File containing the component PCB layout info, routing info, drill details, etc. in a proprietary file, exchange protocol format, (c) A collection of art works in a gerber format for each layer of the PCB, (d) (a) and (c), (e) None of these, 31. Which of the following is(are) true about a single sided PCB?, (a) Only a single layer is used for routing the connections between components, (b) Components are placed on only one side of the PCB, (c) All of these, (d) None of these, 32. Which of the following is(are) true about flexible PCB?, (a) Highly flexible compared to normal PCB, (b) Uses flexible substrate for etching, (c) Commonly used for the fabrication of Antennas, membrane keyboards, etc., (d) All of these, (e) None of these, 33. Which of the following technique(s) is(are) used for PCB fabrication, (a) Photo Engraving (b) PCB Milling, (c) PCB printing, (d) All of these, 34. Which of the following is(are) subtractive process for PCB fabrication?, (a) Photo Engraving (b) PCB printing, (c) PCB Milling, (d) All of these, (e) None of these, (f) only (a) and (c), 35. Which of the following is(are) true about ‘Solder Mask’?, (a) It is a conductive layer, (b) It is a non-conductive layer, (c) It protects the copper tracks from corrosion, (d) It prevents the ‘wetting’ of solder, (e) (b), (c) and (d), 36. Which of the following is(are) true about ‘Conformal Coating’?, (a) It is a conductive layer, (b) It is a non-conductive layer, (c) It is a coating over the PCB to protect PCB, (d) Dilute solution of silicon rubber or epoxy, or plastic is used as the conformal coating material, (e) (b), (c) and (d)
Page 328 :
304, , Introduc on to Embedded Systems, , Review Ques ons, 1. Explain the role of the analog electronic components resistor, transistor, capacitor and diode in embedded, hardware design. Draw a circuit used in embedded application using these components., [LO 1], 2. Explain the role of logic gates in embedded hardware design. Draw a circuit using the ‘AND’ and ‘OR’ gate, ICs in embedded application., [LO 1, LO 2], 3. What is open collector? State its significance in embedded hardware development., [LO 1, LO 2], 4. Explain the role of de-coders in embedded hardware development. Draw the circuit diagram for interfacing, a 3-bit binary decoder with 8051. Explain the functioning of the circuit., [LO 1, LO 2], 5. What is a combinational circuit? Draw a combinational circuit for embedded application development., 6. What is a sequential circuit? Draw a sequential circuit and explain its functioning., , [LO 1, LO 2], [LO 1, LO 2], [LO 1, LO 2], , 7. Explain the difference between digital combinational and sequential circuits., 8. Explain the difference between synchronous and asynchronous sequential circuits. Give an example for, both., [LO 1, LO 2], 9. What is an Integrated Circuit (IC)? Explain the different types of integrations for ICs. Give an example for, each., [LO 3], 10. Explain the different types of IC design. Give an example for each., , [LO 3], , 11. Explain the different steps involved in VHDL based IC design., [LO 3], 12. What is Electronic Design Automation (EDA) tool. Explain the role of EDA tools in embedded system, design., [LO 4], 13. What is schematic? Explain the role of schematic in embedded hardware design. [LO 4, LO 5, LO 6], 14. Explain ‘Bill of Material’ (BoM) in embedded hardware design context. What is the use of BoM in Embedded, Hardware design and development?, [LO 5, LO 6], 15. What is ‘Netlist’ in the Embedded Hardware design context? Explain its role in hardware design., 16. Explain the terms ‘Layout’ and ‘Layout Design’ in the hardware design context., , [LO 5, LO 6], [LO 5, LO 7], [LO 5, LO 8], , 17. What are the building blocks of a ‘Layout’? Explain them in detail., 18. What is the difference between ‘Package’ and ‘Footprint’? Explain the significance of both in embedded, hardware design., [LO 5, LO 7], 19. What is ‘Package’ in the embedded hardware design context? What is ‘Through hole’ package and ‘Surface, Mount’ package?, [LO 5, LO 7], 20. What is the difference between ‘Single In-line Package’ (SIP) and ‘Dual In-line Package’ (DIP)?, 21. What are the commonly available DIP packages?, 22. What is ‘Zigzag In-line Package’ (ZIP)?, 23. Explain the commonly used ‘Surface Mount Packages’ in detail., 24. What is ‘layer’ in the embedded hardware design context?, 25. What is ‘via’? What is the difference between ‘via’ and ‘Through hole’?, , [LO 5, LO 7], [LO 5, LO 7], [LO 5, LO 7], [LO 5, LO 7], [LO 5, LO 7], [LO 5, LO 7]
Page 329 :
305, , Embedded Hardware Design and Development, , 26. What is ‘Through hole’? What are the different types of ‘Through holes’ used in PCB design?, , [LO 5, LO 7], 27. What is ‘Assembly Note’? What is the role of ‘Assembly Notes’ in embedded hardware design?, 28. What is ‘gerber’? What is ‘gerber file’ in PCB design context?, 29. Explain the general guidelines for an efficient PCB layout., 30. Explain PCB in the Hardware Design context? Explain the different types of PCBs., 31., 32., 33., 34., , [LO 5, LO 7], [LO 5, LO 7], [LO 5, LO 7], , [LO 1, LO 6, LO 8], What is ‘Flexible PCB’? What is its role in Embedded Systems?, [LO 8], Explain the different PCB fabrication techniques. State the merits and drawbacks of each., [LO 8], Explain the ‘PCB etching’ process in detail., [LO 8], What is ‘Solder Mask’? Explain its significance in PCB fabrication., [LO 8], What is ‘Silk Screen’ and ‘Silk Screen Printing’? Explain their significance in PCB fabrication., [LO 8], , 35., 36. What is ‘Conformal Coating’ in the PCB context? Explain its significance in hardware maintenance., , [LO 8], , Lab Assignments, 1. Draw the schematic diagram using CaptureCIS for encoding the keys connected to the input lines of the, 8 to 3 encoder 74LS148 and reading the encoded output using the AT89C51 microcontroller as per the, requirements given below, (a) The Enable Input (EI) line of the encoder is permanently grounded, (b) The output lines A0 to A2 of the encoder are interfaced to P1.0 to P1.2 of the microcontroller, (c) Assume that a regulated supply of 5V is fed to the board from an external ac-dc adaptor. Use a, power jack on the board for connecting the external supply. Use filter capacitor 0.1MFD/12V, along with the jack, (d) Use a crystal frequency of 12MHz for the microcontroller, 2. Develop the PCB layout for the above requirement using ‘Orcad PCB Design Tool’. The package, details for the components are given below, Microcontroller : PDIP 40, 74LS148 : PDIP 16, Capacitor : Use a 2 Pin Package from the design, Library, Crystal : Use the through hole package (or 2 Pin package) for crystal from the Layout design, library, Power Jack : Use the power jack package from the library, 3. Draw the schematic diagram using CaptureCIS to interface the 3 to 8 decoder 74LS138 with the, AT89C51 microcontroller as per the requirements given below, (a) LEDs are connected to the 8 output lines of the decoder in such a way that anode is connected to, 5V supply and cathode to the output pin of the decoder, (b) The enable lines E1\ and E2\ are grounded permanently and E3 is connected to the supply voltage, VCC through a high value current limiting resistor, (c) The input lines A0, A1 and A2 of the microcontroller are connected to the Port pins P1.0 to P1.2, of the microcontroller
Page 330 :
306, , Introduc on to Embedded Systems, , 4., , 5., , 6., , 7., , 8., , (d) Assume that a regulated supply of 5V is fed to the board from an external ac-dc adaptor. Use a, power jack on the board for connecting the external supply. Use filter capacitor 0.1MFD/12V, along with the jack, (e) Use a crystal frequency of 12MHz for the microcontroller, Develop the PCB layout for the above requirement using ‘Orcad PCB Design Tool’. The package, details for the components are given below, Microcontroller : PDIP 40, 74LS138 : PDIP 16, Capacitor : Use a 2 Pin Package from the design library,, Crystal : Use the through hole package (or 2 Pin package) for crystal from the Layout design library,, Power Jack : Use the power jack package from the library, Draw the schematic diagram using CaptureCIS for interfacing the Tri-State Buffer 74LS244 in memory, mapped configuration with AT89C51 microcontroller as per the requirements given below, (a) DIP switches are connected to the 8 input lines of the tri-state buffer through resistors 4.7K. The, input line is at logic high when the switch is at open state and at logic low when the switch is at, closed state, (b) The output lines of the buffer are connected to the data bus port P0 of the microcontroller, (c) The Port 0 pins are pulled to the supply voltage through 4.7K resistor, (d) The address for the tri-state buffer is assigned as 00F8H. Use logic gates AND, NAND and 3 to 8, decoder IC to decode the address line and generate the address selection pulse for the buffer, (e) The address selection pulse along with the RD\ signal of the microcontroller is used for enabling, the buffer, (f) Assume that a regulated supply of 5V is fed to the board from an external ac-dc adaptor. Use a, power jack on the board for connecting the external supply. Use filter capacitor 0.1MFD/12V, along with the jack, (g) Use a crystal frequency of 12MHz for the microcontroller, Develop the PCB layout for the above requirement using ‘Orcad PCB Design Tool’. The package, details for the components are given below, Microcontroller : PDIP 40, 74LS244 : PDIP 20, Capacitor : Use a 2 Pin Package from the design library,, AND and NAND Gates : Use respective DIP package for the IC in use, 74LS138 3-8 decoder: PDIP 16,, Crystal : Use the through hole package (or 2 Pin package) for crystal from the Layout design library,, Power Jack : Use the power jack package from the library, Draw the schematic diagram using CaptureCIS to de-multiplex the lower order address of 8051 with the, latch 74LS373 as per the requirements given below, (a) The output control line of the latch is permanently grounded, (b) The ALE signal of the microcontroller is connected to the Enable line (G) of the latch, (c) The Port 0 pins are pulled to the supply voltage through 4.7K resistor, (d) The de-multiplexed address bus is connected to an 8-pin jumper (connector), (e) Use a crystal frequency of 12MHz for the microcontroller, (f) Assume that a regulated supply of 5V is fed to the board from an external ac-dc adaptor. Use a, power jack on the board for connecting the external supply. Use filter capacitor 0.1MFD/12V, along with the jack, Draw the schematic diagram using CaptureCIS to interface a common cathode 7-Segmnet LED display, through a 74LS373 latch in memory mapped configuration with AT89C51 microcontroller as per the, requirements given below, (a) The output control line of the latch is permanently grounded
Page 331 :
Embedded Hardware Design and Development, , 307, , (b) The address for the latch is assigned as FF00H. Use logic gates AND, NAND and 3 to 8 decoder, IC to decode the address line and generate the address selection pulse for the buffer, (c) The address selection pulse along with the write signal WR\ of the microcontroller is used for, enabling the latch, (d) Use a crystal frequency of 12MHz for the microcontroller, (e) Assume that a regulated supply of 5V is fed to the board from an external ac-dc adaptor. Use a, power jack on the board for connecting the external supply. Use filter capacitor 0.1MFD/12V, along with the jack, 9. Develop the PCB layout for the above requirement using ‘Orcad PCB Design Tool’. The package, details for the components are given below, Microcontroller : PDIP 40, 74LS373 : PDIP 20, Capacitor : Use a 2 pin package from the design library,, AND and NAND Gates : Use respective DIP package for the IC in use, 74LS138 3-8 decoder: PDIP, 16, 7-segment LED: Use the available package from the layout design library, Crystal : Use the through, hole package (or 2 pin package) for crystal from the Layout design library, power jack : Use the power, jack package from the library., 10. Draw the schematic diagram for interfacing the AD570 AD converter from analog device, to the, AT89C51 microcontroller as per the requirements given below, (a) Assume that the supply voltages +5V and –15V are available externally and they are connected to the, circuit using a power jack., (b) The data line of the ADC is interfaced to Port P0, (c) The start pulse for conversion is applied through port pin P1.0, (d) The ADC uses interrupt of microcontroller for indicating the data conversion completion, (e) The analog input signal for conversion is supplied to the AD Converter from external source through, a jumper (connector), 11. Draw the schematic diagram for interfacing the DM9370 7-segment decoder driver, from Fairchild, semiconductor, for driving a common anode 7-segment LED display with the AT89C51 microcontroller, as per the requirements given below, (a) Use 330E external current limiting resistor for connecting the 7-segment LED display with the, DM9370 IC, (b) The DM9370 is memory mapped with the microcontroller and it is activated by a write to memory, location 8000H, (c) Assume that a regulated supply of 5V is fed to the board from an external ac-dc adaptor. Use a, power jack on the board for connecting the external supply. Use filter capacitor 0.1MFD/12V, along with the jack, (d) Use a crystal frequency of 12MHz for the microcontroller
Page 333 :
Embedded Firmware Design and Development, , 309, , The embedded firmware is responsible for controlling the various peripherals of the embedded hardware, and generating response in accordance with the functional requirements mentioned in the requirements, for the particular embedded product. Firmware is considered as the master brain of the embedded system., Imparting intelligence to an Embedded system is a one time process and it can happen at any stage, it can be, immediately after the fabrication of the embedded hardware or at a later stage. Once intelligence is imparted, to the embedded product, by embedding the firmware in the hardware, the product starts functioning properly, and will continue serving the assigned task till hardware breakdown occurs or a corruption in embedded, firmware occurs. In case of hardware breakdown, the damaged component may need to be replaced by a, new component and for firmware corruptions the firmware should be re-loaded, to bring back the embedded, product to the normal functioning. For most of the embedded products the embedded firmware is stored, at a permanent memory (ROM) and they are nonalterable by end users. Some of the embedded products, used in the Control and Instrumentation domain are adaptive. This adaptability is achieved by making use, configurable parameters which are stored in the alterable permanent memory area (like NVRAM/FLASH)., The parameters get updated in accordance with the deviations from expected behaviour and the firmware, makes use of these parameters for creating the response next time for similar variations., Designing embedded firmware requires understanding of the particular embedded product hardware, like, various component interfacing, memory map details, I/O port details, configuration and register details of, various hardware chips used and some programming language (either target processor/controller specific low, level assembly language or a high level language like C/C++/JAVA)., Embedded firmware development process starts with the conversion of the firmware requirements into, a program model using modelling tools like UML or flow chart based representation. The UML diagrams, or flow chart gives a diagrammatic representation of the decision items to be taken and the tasks to be, performed. Once the program model is created, the next step is the implementation of the tasks and actions, by capturing the model using a language which is understandable by the target processor/controller. The, following sections are designed to give an overview of the various steps involved in the embedded firmware, design and development., , 9.1, , EMBEDDED FIRMWARE DESIGN APPROACHES, , The firmware design approaches for embedded product is purely dependent on, the complexity of the functions to be performed, the speed of operation required,, etc. Two basic approaches are used for Embedded firmware design. They are, ‘Conventional Procedural Based Firmware Design’ and ‘Embedded Operating, System (OS) Based Design’. The conventional procedural based design is also, known as ‘Super Loop Model’. We will discuss each of them in detail in the, following sections., , 9.1.1, , LO 1 Understand, the different, steps involved in, the design and, development, of firmware for, embedded systems, , The Super Loop Based Approach, , The Super Loop based firmware development approach is adopted for applications that are not time critical, and where the response time is not so important (embedded systems where missing deadlines are acceptable)., It is very similar to a conventional procedural programming where the code is executed task by task. The, task listed at the top of the program code is executed first and the tasks just below the top are executed after, completing the first task. This is a true procedural one. In a multiple task based system, each task is executed, in serial in this approach. The firmware execution flow for this will be, 1. Configure the common parameters and perform initialisation for various hardware components memory,, registers, etc.
Page 334 :
310, , Introduc on to Embedded Systems, , 2. Start the first task and execute it, 3. Execute the second task, 4. Execute the next task, 5. :, 6. :, 7. Execute the last defined task, 8. Jump back to the first task and follow the same flow, From the firmware execution sequence, it is obvious that the order in which the tasks to be executed are, fixed and they are hard coded in the code itself. Also the operation is an infinite loop based approach. We can, visualise the operational sequence listed above in terms of a ‘C’ program code as, void main (), {, Configurations ();, Initialisations ();, while (1), {, Task 1 ();, Task 2 ();, :, :, Task n ();, }, }, , Almost all tasks in embedded applications are non-ending and are repeated infinitely throughout the, operation. From the above ‘C’ code you can see that the tasks 1 to n are performed one after another and when, the last task (nth task) is executed, the firmware execution is again re-directed to Task 1 and it is repeated, forever in the loop. This repetition is achieved by using an infinite loop. Here the while (1) { } loop. This, approach is also referred as ‘Super loop based Approach’., Since the tasks are running inside an infinite loop, the only way to come out of the loop is either a, hardware reset or an interrupt assertion. A hardware reset brings the program execution back to the main, loop. Whereas an interrupt request suspends the task execution temporarily and performs the corresponding, interrupt routine and on completion of the interrupt routine it restarts the task execution from the point where, it got interrupted., The ‘Super loop based design’ doesn’t require an operating system, since there is no need for scheduling, which task is to be executed and assigning priority to each task. In a super loop based design, the priorities, are fixed and the order in which the tasks to be executed are also fixed. Hence the code for performing these, tasks will be residing in the code memory without an operating system image., This type of design is deployed in low-cost embedded products and products where response time is not, time critical. Some embedded products demands this type of approach if some tasks itself are sequential. For, example, reading/writing data to and from a card using a card reader requires a sequence of operations like, checking the presence of card, authenticating the operation, reading/writing, etc. it should strictly follow a, specified sequence and the combination of these series of tasks constitutes a single task-namely data read/, write. There is no use in putting the sub-tasks into independent tasks and running them parallel. It won’t work, at all.
Page 335 :
Embedded Firmware Design and Development, , 311, , A typical example of a ‘Super loop based’ product is an electronic video game toy containing keypad and, display unit. The program running inside the product may be designed in such a way that it reads the keys to, detect whether the user has given any input and if any key press is detected the graphic display is updated., The keyboard scanning and display updating happens at a reasonably high rate. Even if the application, misses a key press, it won’t create any critical issues; rather it will be treated as a bug in the firmware ☺., It is not economical to embed an OS into low cost products and it is an utter waste to do so if the response, requirements are not crucial., The ‘Super loop based design’ is simple and straight forward without any OS related overheads. The, major drawback of this approach is that any failure in any part of a single task may affect the total system., If the program hangs up at some point while executing a task, it may remain there forever and ultimately the, product stops functioning. There are remedial measures for overcoming this. Use of Hardware and software, Watch Dog Timers (WDTs) helps in coming out from the loop when an unexpected failure occurs or when, the processor hangs up. This, in turn, may cause additional hardware cost and firmware overheads., Another major drawback of the ‘Super loop’ design approach is the lack of real timeliness. If the number, of tasks to be executed within an application increases, the time at which each task is repeated also increases., This brings the probability of missing out some events. For example in a system with Keypads, according to, the ‘Super loop design’, there will be a task for monitoring the keypad connected I/O lines and this need not, be the task running while you press the keys (That is key pressing event may not be in sync with the keypad, press monitoring task within the firmware). In order to identify the key press, you may have to press the keys, for a sufficiently long time till the keypad status monitoring task is executed internally by the firmware. This, will really lead to the lack of real timeliness. There are corrective measures for this also. The best advised, option in use interrupts for external events requiring real time attention. Advances in processor technology, brings out low cost high speed processors/controllers, use of such processors in super loop design greatly, reduces the time required to service different tasks and thereby are capable of providing a nearly real time, attention to external events., Throughout this book under the title ‘Embedded Firmware Design and Development’, we will be, discussing only the ‘Super loop based design’. Again the discussion is narrowed to super loop based firmware, development for 8051 controller., , 9.1.2, , The Embedded Operating System (OS) Based Approach, , The Operating System (OS) based approach contains operating systems, which can be either a General, Purpose Operating System (GPOS) or a Real Time Operating System (RTOS) to host the user written, application firmware. The General Purpose OS (GPOS) based design is very similar to a conventional PC, based application development where the device contains an operating system (Windows/Unix/ Linux, etc., for Desktop PCs) and you will be creating and running user applications on top of it. Example of a GPOS used, in embedded product development is Microsoft® Windows Embedded 8.1 which offers customisation to use, with a range of industry devices like Handhelds, Point of Sale Terminals, Patient Monitoring Systems, etc., Use of GPOS in embedded products merges the demarcation of Embedded Systems and general computing, systems in terms of OS. For Developing applications on top of the OS, the OS supported APIs are used., Similar to the different hardware specific drivers, OS based applications also require ‘Driver software’ for, different hardware present on the board to communicate with them., Real Time Operating System (RTOS) based design approach is employed in embedded products demanding, Real-time response. RTOS respond in a timely and predictable manner to events. Real Time operating system, contains a Real Time kernel responsible for performing pre-emptive multitasking, scheduler for scheduling tasks,, multiple threads, etc. A Real Time Operating System (RTOS) allows flexible scheduling of system resources
Page 336 :
312, , Introduc on to Embedded Systems, , like the CPU and memory and offers some way to communicate between tasks. We will discuss the basics of, RTOS based system design in a later chapter titled ‘Designing with Real Time Operating Systems (RTOS)’., ‘Windows Embedded Compact’, ‘pSOS’, ‘VxWorks’, ‘ThreadX’, ‘MicroC/OS-III’, ‘Embedded Linux’,, ‘Symbian’ etc are examples of RTOS employed in embedded product development., , 9.2, , EMBEDDED FIRMWARE DEVELOPMENT LANGUAGES, , LO 2 Discuss the, different languages for, embedded firmware, development and the, merits and limitations, of each, , 9.2.1, , As mentioned in Chapter 2, you can use either a target processor/controller, specific language (Generally known as Assembly language or low level, language) or a target processor/controller independent language (Like, C, C++, JAVA, etc. commonly known as High Level Language) or a, combination of Assembly and High level Language. We will discuss where, each of the approach is used and the relative merits and de-merits of each,, in the following sections., , Assembly Language based Development, , ‘Assembly language’ is the human readable notation of ‘machine language’, whereas ‘machine language’, is a processor understandable language. Processors deal only with binaries (1s and 0s). Machine language, is a binary representation and it consists of 1s and 0s. Machine language is made readable by using specific, symbols called ‘mnemonics’. Hence machine language can be considered as an interface between processor, and programmer. Assembly language and machine languages are processor/controller dependent and an, assembly program written for one processor/controller family will not work with others., Assembly language programming is the task of writing processor specific machine code in mnemonic, form, converting the mnemonics into actual processor instructions (machine language) and associated, data using an assembler., Assembly Language program was the most common type of programming adopted in the beginning of, software revolution. If we look back to the history of programming, we can see that a large number of, programs were written entirely in assembly language. Even in the 1990s, the majority of console video games, were written in assembly language, including most popular games written for the Sega Genesis and the, Super Nintendo Entertainment System. The popular arcade game NBA Jam released in 1993 was also coded, entirely using the assembly language., Even today also almost all low level, system related, programming is carried out using assembly language., Some Operating System dependent tasks require low-level languages. In particular, assembly language is, often used in writing the low level interaction between the operating system and the hardware, for instance, in device drivers., The general format of an assembly language instruction is an Opcode followed by Operands. The Opcode, tells the processor/controller what to do and the Operands provide the data and information required to, perform the action specified by the opcode. It is not necessary that all opcode should have Operands following, them. Some of the Opcode implicitly contains the operand and in such situation no operand is required. The, operand may be a single operand, dual operand or more. We will analyse each of them with the 8051 ASM, instructions as an example., MOV A, #30
Page 337 :
Embedded Firmware Design and Development, , 313, , This instruction mnemonic moves decimal value 30 to the 8051 Accumulator register. Here MOV A is the, Opcode and 30 is the operand (single operand). The same instruction when written in machine language will, look like, 01110100, 00011110, where the first 8 bit binary value 01110100 represents the opcode MOV A and the second 8 bit binary value, 00011110 represents the operand 30., The mnemonic INC A is an example for instruction holding operand implicitly in the Opcode. The machine, language representation of the same is 00000100. This instruction increments the 8051 Accumulator register, content by 1., The mnemonic MOV A, #30 explained above is an example for single operand instruction., LJMP 16bit address is an example for dual operand instruction. The machine language for the same is, 00000010, , addr_bit15 to addr_bit 8, , addr_bit7 to addr_bit 0, , The first binary data is the representation of the LJMP machine code. The first operand that immediately, follows the opcode represents the bits 8 to 15 of the 16bit address to which the jump is required and the, second operand represents the bits 0 to 7 of the address to which the jump is targeted., Assembly language instructions are written one per line. A machine code program thus consists of a, sequence of assembly language instructions, where each statement contains a mnemonic (Opcode + Operand)., Each line of an assembly language program is split into four fields as given below, LABEL, OPCODE, OPERAND, COMMENTS, LABEL is an optional field. A ‘LABEL’ is an identifier used extensively in programs to reduce the, reliance on programmers for remembering where data or code is located. LABEL is commonly used for, representing, A memory location, address of a program, sub-routine, code portion, etc., The maximum length of a label differs between assemblers. Assemblers insist strict formats for, labelling. Labels are always suffixed by a colon and begin with a valid character. Labels can contain, number from 0 to 9 and special character _ (underscore)., Labels are used for representing subroutine names and jump locations in Assembly language programming., It is to be noted that ‘LABEL’ is not a mandatory field; it is optional only., The sample code given below using 8051 Assembly language illustrates the structured assembly language, programming., ;####################################################################, ;, SUBROUTINE FOR GENERATING DELAY, ;, DELAY PARAMETR PASSED THROUGH REGISTER R1, ;, RETURN VALUE NONE, ;, REGISTERS USED: R0, R1, ;####################################################################, DELAY: MOV, R0, #255, ; Load Register R0 with 255, DJNZ, R1, DELAY, ; Decrement R1 and loop till, ; R1= 0, RET, ; Return to calling program
Page 338 :
314, , Introduc on to Embedded Systems, , The Assembly program contains a main routine which starts at address 0000H and it may or may not, contain subroutines. The example given above is a subroutine, where in the main program the subroutine is, invoked by the Assembly instruction, LCALL, DELAY, Executing this instruction transfers the program flow to the memory address referenced by the ‘LABEL’, DELAY., It is a good practice to provide comments to your subroutines before the beginning of it by indicating the, purpose of that subroutine, what the input parameters are and how they are passed to the subroutines, which, are the return values, how they are returned to the calling function, etc. While assembling the code a ‘;’, informs the assembler that the rest of the part coming in a line after the ‘;’ symbol is comments and simply, ignore it. Each Assembly instruction should be written in a separate line. Unlike C and other high level, languages, more than one ASM code lines are not allowed in a single line., In the above example the LABEL DELAY represents the reference to the start of the subroutine DELAY., You can directly replace this LABEL by putting the desired address first and then writing the Assembly code, for the routine as given below., ORG 0100H, MOV R0, #255, DJNZ R1, 0100H, RET, , ; Load Register R0 with 50H, ; Decrement R1 and loop till R1= 0, ; Return to calling program, , The advantage of using a label is that the required address is calculated by the assembler at the time of, assembling the program and it replaces the Label. Hence even if you add some code above the LABEL, ‘DELAY’ at a later stage, it won’t create any issues like code overlapping, whereas in the second method, where you are implicitly telling the assembler that this subroutine should start at the specified address (in the, above example 0100H). If the code written above this subroutine itself is crossing the 0100H mark of the, program memory, it will be over written by the subroutine code and it will generate unexpected results☺., Hence for safety don’t assign any address by yourself, let us refer the required address by using labels and let, the assembler handle the responsibility for finding out the address where the code can be placed. In the above, example you can find out that the label DELAY is used for calling the subroutine as well as looping (using, jumping instruction based on decision-DJNZ). You can also use the normal jump instruction to jump to the, label by calling LJMP DELAY., The statement ORG 0100H in the above example is not an assembly language instruction; it is an assembler, directive instruction. It tells the assembler that the Instructions from here onward should be placed at location, starting from 0100H. The Assembler directive instructions are known as ‘pseudo-ops’. They are used for, 1. Determining the start address of the program (e.g. ORG 0000H), 2. Determining the entry address of the program (e.g. ORG 0100H), 3. Reserving memory for data variables, arrays and structures (e.g. var EQU 70H, 4. Initialising variable values (e.g. val DATA 12H), The EQU directive is used for allocating memory to a variable and DATA directive is used for initialising, a variable with data. No machine codes are generated for the ‘pseudo-ops’., Till now we discussed about Assembly language and how it is used for writing programs. Now let us have, a look at how assembly programs are organised and how they are translated into machine readable codes., The Assembly language program written in assembly code is saved as .asm (Assembly file) file or an .src, (source) file or an extension format supported by the tool chain/assembler. Any text editor like ‘notepad’ or, ‘WordPad’ from Microsoft® or the text editor provided by an Integrated Development (IDE) tool can be used, for writing the assembly instructions.
Page 339 :
315, , Embedded Firmware Design and Development, , Similar to ‘C’ and other high level language programming, you can have multiple source files called, modules in assembly language programming. Each module is represented by an ‘.asm’ or ‘.src’ or a file with, an extension format specific to the ttol chain/assembler used similar to the ‘.c’ files in C programming. This, approach is known as ‘Modular Programming’. Modular programming is employed when the program is too, complex or too big. In ‘Modular Programming’, the entire code is divided into submodules and each module, is made re-usable. Modular Programs are usually easy to code, debug and alter. Conversion of the assembly, language to machine language is carried out by a sequence of operations, as illustrated below., , 9.2.1.1 Source File to Object File Transla on, Translation of assembly code to machine code is performed by assembler. The assemblers for different target, machines are different and it is common that assemblers from multiple vendors are available in the market, for the same target machines. Some target processor’s/controller’s assembler may be proprietary and is, supplied by a single vendor only. Some assemblers are freely available in the internet for downloading. Some, assemblers are commercial and requires licence from the vendor. A51 Macro Assembler from Keil software, is a popular assembler for the 8051 family microcontroller. The various steps involved in the conversion, of a program written in assembly language to corresponding binary file/machine language is illustrated in, Fig. 9.1., Library Files, , Source File 1, (.asm or .src file), (Module-1), , Module Assembler, , Object File 1, , Source File 2, (.asm or .src file), (Module-2), , Module Assembler, , Object File 2, , Object to Hex File, Converter, , Absolute Object File, , Linker/, Locator, , Machine Code, (Hex File), , Fig. 9.1, , Assembly language to machine language conversion process, , Each source module is written in Assembly and is stored as .src file or .asm file. Each file can be assembled, separately to examine the syntax errors and incorrect assembly instructions. On successful assembling of, each .src/.asm file a corresponding object file is created with extension ‘.obj’. The object file does not contain, the absolute address of where the generated code needs to be placed on the program memory and hence it, is called a re-locatable segment. It can be placed at any code memory location and it is the responsibility
Page 340 :
316, , Introduc on to Embedded Systems, , of the linker/locator to assign absolute address for this module. Absolute address allocation is done at the, absolute object file creation stage. Each module can share variables and subroutines (functions) among them., Exporting a variable/function from a module (making a variable/function from a module available to all other, modules) is done by declaring that variable/function as PUBLIC in the source module., Importing a variable or function from a module (taking a variable or function from any one of other, modules) is done by declaring that variable or function as EXTRN (EXTERN) in the module where it is going, to be accessed. The ‘PUBLIC’ Keyword informs the assembler that the variables or functions declared as, ‘PUBLIC’ needs to be exported. Similarly the ‘EXTRN’ Keyword tells the assembler that the variables or, functions declared as ‘EXTRN’ needs to be imported from some other modules. While assembling a module,, on seeing variables/functions with keyword ‘EXTRN’, the assembler understands that these variables or, functions come from an external module and it proceeds assembling the entire module without throwing any, errors, though the assembler cannot find the definition of the variables and implementation of the functions., Corresponding to a variable or function declared as ‘PUBLIC’ in a module, there can be one or more modules, using these variables or functions using ‘EXTRN’ keyword. For all those modules using variables or functions, with ‘EXTRN’ keyword, there should be one and only one module which exports those variables or functions, with ‘PUBLIC’ keyword. If more than one module in a project tries to export variables or functions with the, same name using ‘PUBLIC’ keyword, it will generate ‘linker’ errors., Illustrative example for A51 Assembler–Usage of ‘PUBLIC’ for importing variables with same name, on different modules. The target application (Simulator) contains three modules namely ASAMPLE1., A51, ASAMPLE2.A51 and ASAMPLE3.A51 (The file extension .A51 is the .asm extension specific to A51, assembler). The modules ASAMPLE2.A51 and ASAMPLE3.A51 contain a function named PUTCHAR. Both, of these modules try to export this function by declaring the function as ‘PUBLIC’ in the respective modules., While linking the modules, the linker identifies that two modules are exporting the function with name, PUTCHAR. This confuses the linker and it throws the error ‘MULTIPLE PUBLIC DEFINITIONS’., Build target ‘Simulator’, assembling ASAMPLE1.A51..., assembling ASAMPLE2.A51..., assembling ASAMPLE3.A51..., linking..., *** ERROR L104: MULTIPLE PUBLIC DEFINITIONS, SYMBOL: PUTCHAR, MODULE: ASAMPLE3.obj (CHAR_IO), , If a variable or function declared as ‘EXTRN’ in one or two modules, there should be one module defining, these variables or functions and exporting them using ‘PUBLIC’ keyword. If no modules in a project export, the variables or functions which are declared as ‘EXTRN’ in other modules, it will generate ‘linker’ warnings, or errors depending on the error level/warning level settings of the linker., Illustrative example for A51 Assembler–Usage of EXTRN without variables exported. The target, application (Simulator) contains three modules, namely, ASAMPLE1.A51, ASAMPLE2.A51 and ASAMPLE3., A51 (The file extension .A51 is the .asm extension specific to A51 assembler). The modules ASAMPLE1.A51, imports a function named PUT_CRLF which is declared as ‘EXTRN’ in the current module and it expects any, of the other two modules to export it using the keyword ‘PUBLIC’. But none of the other modules export this, function by declaring the function as ‘PUBLIC’ in the respective modules. While linking the modules, the, linker identifies that there is no function exporting for this function. The linker generates a warning or error, message ‘UNRESOLVED EXTERNAL SYMBOL’ depending on the linker ‘level’ settings.
Page 341 :
Embedded Firmware Design and Development, , 317, , *** WARNING L1: UNRESOLVED EXTERNAL SYMBOL, SYMBOL: PUT_CRLF, MODULE: ASAMPLE1.obj (SAMPLE), , 9.2.1.2 Library File Crea on and Usage, Libraries are specially formatted, ordered program collections of object modules that may be used by the, linker at a later time. When the linker processes a library, only those object modules in the library that are, necessary to create the program are used. Library files are generated with extension ‘.lib’. Library file is some, kind of source code hiding technique. If you don’t want to reveal the source code behind the various functions, you have written in your program and at the same time you want them to be distributed to application, developers for making use of them in their applications, you can supply them as library files and give them, the details of the public functions available from the library (function name, function input/output, etc). For, using a library file in a project, add the library to the project., If you are using a commercial version of the assembler/compiler suite for your development, the vendor of, the utility may provide you pre-written library files for performing multiplication, floating point arithmetic,, etc. as an add-on utility or as a bonus☺., ‘LIB51’ from Keil Software is an example for a library creator and it is used for creating library files for, A51 Assembler/C51 Compiler for 8051 specific controller., , 9.2.1.3 Linker and Locator, Linker and Locator is another software utility responsible for “linking the various object modules in a multimodule project and assigning absolute address to each module”. Linker generates an absolute object module, by extracting the object modules from the library, if any and those obj files created by the assembler, which is, generated by assembling the individual modules of a project. It is the responsibility of the linker to link any, external dependent variables or functions declared on various modules and resolve the external dependencies, among the modules. An absolute object file or module does not contain any re-locatable code or data. All, code and data reside at fixed memory locations. The absolute object file is used for creating hex files for, dumping into the code memory of the processor/controller., ‘BL51’ from Keil Software is an example for a Linker & Locator for A51 Assembler/C51 Compiler for, 8051 specific controller., , 9.2.1.4 Object to Hex File Converter, This is the final stage in the conversion of Assembly language (mnemonics) to machine understandable, language (machine code). Hex File is the representation of the machine code and the hex file is dumped, into the code memory of the processor/controller. The hex file representation varies depending on the target, processor/controller make. For Intel processors/controllers the target hex file format will be ‘Intel HEX’, and for Motorola, the hex file should be in ‘Motorola HEX’ format. HEX files are ASCII files that contain, a hexadecimal representation of target application. Hex file is created from the final ‘Absolute Object File’, using the Object to Hex File Converter utility., ‘OH51’ from Keil software is an example for Object to Hex File Converter utility for A51 Assembler/C51, Compiler for 8051 specific controller., , 9.2.1.5 Advantages of Assembly Language Based Development, Assembly Language based development was (is☺) the most common technique adopted from the beginning, of embedded technology development. Thorough understanding of the processor architecture, memory, organisation, register sets and mnemonics is very essential for Assembly Language based development. If
Page 342 :
318, , Introduc on to Embedded Systems, , you master one processor architecture and its assembly instructions, you can make the processor as flexible, as a gymnast. The major advantages of Assembly Language based development is listed below., Efficient Code Memory and Data Memory Usage (Memory Op misa on) Since the developer is well, versed with the target processor architecture and memory organisation, optimised code can be written, for performing operations. This leads to less utilisation of code memory and efficient utilisation of data, memory. Remember memory is a primary concern in any embedded product (Though silicon is cheaper and, new memory techniques make memory less costly, external memory operations impact directly on system, performance)., High Performance Optimised code not only improves the code memory usage but also improves the total, system performance. Through effective assembly coding, optimum performance can be achieved for a target, application., Low Level Hardware Access Most of the code for low level programming like accessing external device, specific registers from the operating system kernel, device drivers, and low level interrupt routines, etc. are, making use of direct assembly coding since low level device specific operation support is not commonly, available with most of the high-level language cross compilers., Code Reverse Engineering Reverse engineering is the process of understanding the technology behind a, product by extracting the information from a finished product. Reverse engineering is performed by ‘hackers’, to reveal the technology behind ‘Proprietary Products’. Though most of the products employ code memory, protection, if it may be possible to break the memory protection and read the code memory, it can easily be, converted into assembly code using a dis-assembler program for the target machine., , 9.2.1.6 Drawbacks of Assembly Language Based Development, Every technology has its own pros and cons. From certain technology aspects assembly language development, is the most efficient technique. But it is having the following technical limitations also., High Development Time Assembly language is much harder to program than high level languages. The, developer must pay attention to more details and must have thorough knowledge of the architecture, memory, organisation and register details of the target processor in use. Learning the inner details of the processor, and its assembly instructions is highly time consuming and it creates a delay impact in product development., One probable solution for this is use a readily available developer who is well versed in the target processor, architecture assembly instructions. Also more lines of assembly code are required for performing an action, which can be done with a single instruction in a high-level language like ‘C’., Developer Dependency There is no common written rule for developing assembly language based, applications whereas all high level languages instruct certain set of rules for application development. In, assembly language programming, the developers will have the freedom to choose the different memory, location and registers. Also the programming approach varies from developer to developer depending on his/, her taste. For example moving data from a memory location to accumulator can be achieved through different, approaches. If the approach done by a developer is not documented properly at the development stage, he/, she may not be able to recollect why this approach is followed at a later stage or when a new developer is, instructed to analyse this code, he/she also may not be able to understand what is done and why it is done., Hence upgrading an assembly program or modifying it on a later stage is very difficult. Well documenting, the assembly code is a solution for reducing the developer dependency in assembly language programming., If the code is too large and complex, documenting all lines of code may not be productive.
Page 343 :
Embedded Firmware Design and Development, , 319, , Non-Portable Target applications written in assembly instructions are valid only for that particular family, of processors (e.g. Application written for Intel x86 family of processors) and cannot be re-used for another, target processors/controllers (Say ARM Cortex M family of processors). If the target processor/controller, changes, a complete re-writing of the application using the assembly instructions for the new target processor/, controller is required. This is the major drawback of assembly language programming and it makes the, assembly language applications non-portable., “Though Assembly Language programming possesses lots of drawback, as a developer, from my, personal experience I prefer assembly language based development. Once you master the internals of, a processor/controller, you can really perform magic with the processor/controller and can extract the, maximum out of it.”, , 9.2.2, , High Level Language Based Development, , As we have seen in the earlier section, Assembly language based programming is highly time consuming,, tedious and requires skilled programmers with sound knowledge of the target processor architecture. Also, applications developed in Assembly language are non-portable. Here comes the role of high level languages., Any high level language (like C, C++ or Java) with a supported cross compiler (for converting the application, developed in high level language to target processor specific assembly code – We will discuss cross-compilers, in detail in a later section) for the target processor can be used for embedded firmware development. The, most commonly used high level language for embedded firmware application development is ‘C’. You may, be thinking why ‘C’ is used as the popular embedded firmware development language. The answer is “C is, the well defined, easy to use high level language with extensive cross platform development tool support”., Nowadays Cross-compilers for C++ is also emerging out and embedded developers are making use of C++, for embedded application development., The various steps involved in high level language based embedded firmware development is same as, that of assembly language based development except that the conversion of source file written in high level, language to object file is done by a cross-compiler, whereas in Assembly language based development it is, carried out by an assembler. The various steps involved in the conversion of a program written in high level, language to corresponding binary file/machine language is illustrated in Fig. 9.2., The program written in any of the high level language is saved with the corresponding language extension, (.c for C, .cpp for C++, etc). Any text editor like ‘notepad’ or ‘WordPad’ from Microsoft® or the text editor, provided by an Integrated Development (IDE) tool supporting the high level language in use can be used, for writing the program. Most of the high level languages support modular programming approach and, hence you can have multiple source files called modules written in corresponding high level language. The, source files corresponding to each module is represented by a file with corresponding language extension., Translation of high level source code to executable object code is done by a cross-compiler. The crosscompilers for different high level languages for the same target processor are different. It should be noted, that each high level language should have a cross-compiler for converting the high level source code into, the target processor machine code. Without cross-compiler support a high level language cannot be used, for embedded firmware development. C51 Cross-compiler from Keil software is an example for Crosscompiler. C51 is a popular cross-compiler available for ‘C’ language for the 8051 family of micro controller., Conversion of each module’s source code to corresponding object file is performed by the cross compiler., Rest of the steps involved in the conversion of high level language to target processor’s machine code are, same as that of the steps involved in assembly language based development., As an example of high level language based embedded firmware development, we will discuss how, ‘Embedded C’ is used for embedded firmware development, in a later section of this chapter.
Page 344 :
320, , Introduc on to Embedded Systems, , Library Files, , Source File 1, (.c /.c++ etc.), (Module-1), , Module, Cross-compiler, , Object File 1, , Source File 2, (.c /.c++ etc.), (Module-2), , Module, Cross-compiler, , Object File 2, , Object to Hex File, Converter, , Absolute Object File, , Linker/, Locator, , Machine Code, (Hex File), Fig. 9.2, , High level language to machine language conversion process, , 9.2.2.1 Advantages of High Level Language Based Development, Reduced Development Time Developer requires less or little knowledge on the internal hardware details, and architecture of the target processor/controller. Bare minimal knowledge of the memory organisation and, register details of the target processor in use and syntax of the high level language are the only pre-requisites, for high level language based firmware development. Rest of the things will be taken care of by the crosscompiler used for the high level language. Thus the ramp up time required by the developer in understanding, the target hardware and target machine’s assembly instructions is waived off by the cross compiler and, it reduces the development time by significant reduction in developer effort. High level language based, development also refines the scope of embedded firmware development from a team of specialised architects, to anyone knowing the syntax of the language and willing to put little effort on understanding the minimal, hardware details. With high level language, each task can be accomplished by lesser number of lines of code, compared to the target processor/controller specific Assembly language based development., Developer Independency The syntax used by most of the high level languages are universal and a program, written in the high level language can easily be understood by a second person knowing the syntax of the, language. Certain instructions may require little knowledge of the target hardware details like register set,, memory map etc. Apart from these, the high level language based firmware development makes the firmware,, developer independent. High level languages always instruct certain set of rules for writing the code and, commenting the piece of code. If the developer strictly adheres to the rules, the firmware will be 100%, developer independent.
Page 345 :
Embedded Firmware Design and Development, , 321, , Portability Target applications written in high level languages are converted to target processor/controller, understandable format (machine codes) by a cross-compiler. An application written in high level language, for a particular target processor can easily be converted to another target processor/controller specific, application, with little or less effort by simply re-compiling/little code modification followed by re-compiling, the application for the required target processor/controller, provided, the cross-compiler has support for the, processor/controller selected. This makes applications written in high level language highly portable. Little, effort may be required in the existing code to replace the target processor specific header files with new, header files, register definitions with new ones, etc. This is the major flexibility offered by high level language, based design., , 9.2.2.2 Limita ons of High Level Language Based Development, The merits offered by high level language based design take advantage over its limitations. Some crosscompilers available for high level languages may not be so efficient in generating optimised target processor, specific instructions. Target images created by such compilers may be messy and non-optimised in terms, of performance as well as code size. For example, the task achieved by cross-compiler generated machine, instructions from a high level language may be achieved through a lesser number of instructions if the same, task is hand coded using target processor specific machine codes. The time required to execute a task also, increases with the number of instructions. However modern cross-compilers are tending to adopt designs, incorporating optimisation techniques for both code size and performance. High level language based code, snippets may not be efficient in accessing low level hardware where hardware access timing is critical (of the, order of nano or micro seconds)., The investment required for high level language based development tools (Integrated Development, Environment incorporating cross-compiler) is high compared to Assembly Language based firmware, development tools., , 9.2.3, , Mixing Assembly and High Level Language, , Certain embedded firmware development situations may demand the mixing of high level language with, Assembly and vice versa. High level language and assembly languages are usually mixed in three ways;, namely, mixing Assembly Language with High Level Language, mixing High Level Language with Assembly, and In-line Assembly programming., , 9.2.3.1 Mixing Assembly with High level language (e.g. Assembly Language with ‘C’), Assembly routines are mixed with ‘C’ in situations where the entire program is written in ‘C’ and the cross, compiler in use do not have a built in support for implementing certain features like Interrupt Service Routine, functions (ISR) or if the programmer wants to take advantage of the speed and optimised code offered by, machine code generated by hand written assembly rather than cross compiler generated machine code. When, accessing certain low level hardware, the timing specifications may be very critical and a cross compiler, generated binary may not be able to offer the required time specifications accurately. Writing the hardware/, peripheral access routine in processor/controller specific Assembly language and invoking it from ‘C’ is the, most advised method to handle such situations., Mixing ‘C’ and Assembly is little complicated in the sense—the programmer must be aware of how, parameters are passed from the ‘C’ routine to Assembly and values are returned from assembly routine to ‘C’, and how ‘Assembly routine’ is invoked from the ‘C’ code., Passing parameter to the assembly routine and returning values from the assembly routine to the caller ‘C’, function and the method of invoking the assembly routine from ‘C’ code is cross compiler dependent. There, is no universal written rule for this. You must get these informations from the documentation of the cross
Page 346 :
322, , Introduc on to Embedded Systems, , compiler you are using. Different cross compilers implement these features in different ways depending on, the general purpose registers and the memory supported by the target processor/controller. Let’s examine this, by taking Keil C51 cross compiler for 8051 controller. The objective of this example is to give an idea on how, C51 cross compiler performs the mixing of Assembly code with ‘C’., 1. Write a simple function in C that passes parameters and returns values the way you want your assembly, routine to., 2. Use the SRC directive (#PRAGMA SRC at the top of the file) so that the C compiler generates an .SRC, file instead of an .OBJ file., 3. Compile the C file. Since the SRC directive is specified, the .SRC file is generated. The .SRC file, contains the assembly code generated for the C code you wrote., 4. Rename the .SRC file to .A51 file., 5. Edit the .A51 file and insert the assembly code you want to execute in the body of the assembly function, shell included in the .A51 file., As an example consider the following sample code (Extracted from Keil C51 documentation), #pragma SRC, unsigned char my_assembly_func (unsigned int argument), {, return (argument + 1); // Insert dummy lines to access all args and, // retvals, }, , This C function on cross compilation generates the following assembly SRC file., NAME, TESTCODE, ?PR?_my_assembly_func?TESTCODE, SEGMENT CODE, PUBLIC _my_assembly_func, ; #pragma SRC, ; unsigned char my_assembly_func (, RSEG ?PR?_my_assembly_func?TESTCODE, USING, 0, _my_assembly_func:, ;---- Variable ‘argument?040’ assigned to Register ‘R6/R7’ ---; SOURCE LINE # 2, ;, unsigned int argument), ; {, ; SOURCE LINE # 4, ; return (argument + 1);, // Insert dummy lines to access all args, ; and retvals, ; SOURCE LINE # 5, MOV, A,R7, INC, A, MOV, R7,A, ; }, ; SOURCE LINE # 6, ?C0001:, RET, ; END OF _my_assembly_func, END
Page 347 :
Embedded Firmware Design and Development, , 323, , The special compiler directive SRC generates the Assembly code corresponding to the ‘C’ function and, each lines of the source code is converted to the corresponding Assembly instruction. You can easily identify, the Assembly code generated for each line of the source code since it is implicitly mentioned in the generated, .SRC file. By inspecting this code segments you can find out which registers are used for holding the variables, of the ‘C’ function and you can modify the source code by adding the assembly routine you want., , 9.2.3.2 Mixing High Level Language with Assembly (e.g. ‘C’ with Assembly Language), Mixing the code written in a high level language like ‘C’ and Assembly language is useful in the following, scenarios:, 1. The source code is already available in Assembly language and a routine written in a high level language, like ‘C’ needs to be included to the existing code., 2. The entire source code is planned in Assembly code for various reasons like optimised code, optimal, performance, efficient code memory utilisation and proven expertise in handling the Assembly, etc., But some portions of the code may be very difficult and tedious to code in Assembly. For example, 16bit multiplication and division in 8051 Assembly Language., 3. To include built in library functions written in ‘C’ language provided by the cross compiler. For, example Built in Graphics library functions and String operations supported by ‘C’., Most often the functions written in ‘C’ use parameter passing to the function and returns value/s to the, calling functions. The major question that needs to be addressed in mixing a ‘C’ function with Assembly is, that how the parameters are passed to the function and how values are returned from the function and how the, function is invoked from the assembly language environment. Parameters are passed to the function and values, are returned from the function using CPU registers, stack memory and fixed memory. Its implementation is, cross compiler dependent and it varies across cross compilers. A typical example is given below for the Keil, C51 cross compiler, C51 allows passing of a maximum of three arguments through general purpose registers R2 to R7. If the, three arguments are char variables, they are passed to the function using registers R7, R6 and R5 respectively., If the parameters are int values, they are passed using register pairs (R7, R6), (R5, R4) and (R3, R2). If the, number of arguments is greater than three, the first three arguments are passed through registers and rest is, passed through fixed memory locations. Refer to C51 documentation for more details. Return values are, usually passed through general purpose registers. R7 is used for returning char value and register pair (R7,, R6) is used for returning int value. The ‘C’ subroutine can be invoked from the assembly program using the, subroutine call Assembly instruction (Again cross compiler dependent)., E.g., , LCALL, , _Cfunction, , Where Cfunction is a function written in ‘C’. The prefix _ informs the cross compiler that the parameters to, the function are passed through registers. If the function is invoked without the _ prefix, it is understood that, the parameters are passed through fixed memory locations., , 9.2.3.3 Inline Assembly, Inline assembly is another technique for inserting target processor/controller specific Assembly instructions at, any location of a source code written in high level language ‘C’. This avoids the delay in calling an assembly, routine from a ‘C’ code (If the Assembly instructions to be inserted are put in a subroutine as mentioned in the, section mixing assembly with ‘C’). Special keywords are used to indicate that the start and end of Assembly, instructions. The keywords are cross-compiler specific. C51 uses the keywords #pragma asm and #pragma, endasm to indicate a block of code written in assembly.
Page 348 :
324, , Introduc on to Embedded Systems, , E.g. #pragma asm, MOV A, #13H, #pragma endasm, , Important Note:, The examples used for illustration throughout the section Mixing Assembly & High Level Language is Keil, C51 cross compiler specific. The operation is cross compiler dependent and it varies from cross compiler, to cross compiler. The intention of the author is just to give an overall idea about the mixing of Assembly, code and High level language ‘C’ in writing embedded programs. Readers are advised to go through the, documentation of the cross compiler they are using for understanding the procedure adopted for the cross, compiler in use., , 9.3, , PROGRAMMING IN EMBEDDED C, , Whenever the conventional ‘C’ Language and its extensions are used for, programming embedded systems, it is referred as ‘Embedded C’ programming., Programming in ‘Embedded C’ is quite different from conventional Desktop, application development using ‘C’ language for a particular OS platform. Desktop, computers contain working memory in the range of Giga bytes and storage, memory in the range of Giga/Tera bytes. For a desktop application developer, the, resources available are surplus in quantity and the developer is not restricted in, terms of the memory usage. This is not the case for embedded application developers. Almost all embedded, systems are limited in both storage and working memory resources. Embedded application developers should, be aware of this fact and should develop applications in the best possible way which optimises the code, memory and working memory usage as well as performance. In other words, the hands of an embedded, application developer are always tied up in the memory usage context☺., LO 3 Understand, the fundamentals, of embedded, firmware design, using Embedded, ‘C’, , 9.3.1, , ‘C’ v/s. ‘Embedded C’, , ‘C’ is a well structured, well defined and standardised general purpose programming language with extensive, bit manipulation support. ‘C’ offers a combination of the features of high level language and assembly and, helps in hardware access programming (system level programming) as well as business package developments, (Application developments like pay roll systems, banking applications, etc). The conventional ‘C’ language, follows ANSI standard and it incorporates various library files for different operating systems. A platform, (operating system) specific application, known as, compiler is used for the conversion of programs written in, ‘C’ to the target processor (on which the OS is running) specific binary files. Hence it is a platform specific, development., Embedded ‘C’ can be considered as a subset of conventional ‘C’ language. Embedded ‘C’ supports all, ‘C’ instructions and incorporates a few target processor specific functions/instructions. It should be noted, that the standard ANSI ‘C’ library implementation is always tailored to the target processor/controller library, files in Embedded ‘C’. The implementation of target processor/controller specific functions/instructions, depends upon the processor/controller as well as the supported cross-compiler for the particular Embedded, ‘C’ language. A software program called ‘Cross-compiler’ is used for the conversion of programs written in, Embedded ‘C’ to target processor/controller specific instructions (machine language).
Page 349 :
325, , Embedded Firmware Design and Development, , 9.3.2, , Compiler vs. Cross-Compiler, , Compiler is a software tool that converts a source code written in a high level language on top of a particular, operating system running on a specific target processor architecture (e.g. Intel x86/Pentium). Here the, operating system, the compiler program and the application making use of the source code run on the same, target processor. The source code is converted to the target processor specific machine instructions. The, development is platform specific (OS as well as target processor on which the OS is running). Compilers are, generally termed as ‘Native Compilers’. A native compiler generates machine code for the same machine, (processor) on which it is running., Cross-compilers are the software tools used in cross-platform development applications. In cross-platform, development, the compiler running on a particular target processor/OS converts the source code to machine, code for a target processor whose architecture and instruction set is different from the processor on which the, compiler is running or for an operating system which is different from the current development environment, OS. Embedded system development is a typical example for cross-platform development where embedded, firmware is developed on a machine with Intel/AMD or any other target processors and the same is converted, into machine code for any other target processor architecture (e.g. 8051, PIC, ARM etc). Keil C51 is an, example for cross-compiler. The term ‘Compiler’ is used interchangeably with ‘Cross-compiler’ in embedded, firmware applications. Whenever you see the term ‘Compiler’ related to any embedded firmware application,, it could be referring to a cross-compiler., , 9.3.3, , Using ‘C’ in ‘Embedded C’, , The author takes the privilege of assuming the readers are familiar with ‘C’ programming. Teaching ‘C’ is not, in the scope of this book. If you are not familiar with ‘C’ language syntax and ‘C’ programming technique,, please get a handle on the same before you proceed. Readers are advised to go through books by ‘Brian W., Kernighan and Dennis M. Ritchie (K&R)’ or ‘E. Balagurusamy’ on ‘C’ programming. This section is intended, only for giving readers a basic idea on how ‘C’ Language is used in embedded firmware development., Let us brush up whatever we learned in conventional ‘C’ programming. Remember we will only go, through the high-level aspects and will not go in deep., , 9.3.3.1 Keywords and Iden fiers, Keywords are the reserved names used by the ‘C’ language. All keywords have a fixed meaning in the ‘C’, language context and they are not allowed for programmers for naming their own variables or functions., ANSI ‘C’ supports 32 keywords and they are listed below. All ‘C’ supported keywords should be written in, ‘lowercase’ letters., auto, , Double, , int, , struct, , break, , else, , long, , switch, , case, , enum, , register, , typedef, , char, , extern, , return, , union, , const, , float, , short, , unsigned, , continue, , for, , signed, , void, , default, , goto, , sizeof, , volatile, , do, , if, , static, , while
Page 350 :
326, , Introduc on to Embedded Systems, , Identifiers are user defined names and labels. Identifiers can contain letters of English alphabet (both, upper and lower case) and numbers. The starting character of an identifier should be a letter. The only special, character allowed in identifier is underscore (_)., , 9.3.3.2 Data Types, Data type represents the type of data held by a variable. The various data types supported, their storage space, (bits) and storage capacity for ‘C’ language are tabulated below., Data Type, , Size (Bits), , Range, , Comments, , char, , 8, , –128 to +127, , Signed character, , signed char, , 8, , –128 to +127, , Signed character, , unsigned char, , 8, , 0 to +255, , Unsigned character, , short int, , 8, , –128 to +127, , Signed short integer, , signed short int, , 8, , –128 to +127, , Signed short integer, , unsigned short int, , 8, , 0 to +255, , Unsigned short integer, , int, , 16, , –32,768 to +32,767, , Signed integer, , signed int, , 16, , –32,768 to +32,767, , Signed integer, , unsigned int, , 16, , 0 to +65,535, , Unsigned integer, , long int, , 32, , –2147,483,648 to +2,147,483,647, , Signed long integer, , signed long int, , 32, , –2147,483,648 to +2,147,483,647, , Signed long integer, , unsigned long int, , 32, , 0 to +4,294,967,295, , Unsigned long integer, , float, , 32, , 3.4E-38 to 3.4E+38, , Signed floating point, , double, , 64, , 1.7E-308 to 1.7E+308, , Signed floating point, (Double precision), , long double, , 80, , 3.4E-4932 to 3.4E+4932, , Signed floating point, (Long Double precision), , The data type size and range given above is for an ordinary ‘C’ compiler for 32 bit platform. It should, be noted that the storage size may vary for data type depending on the cross-compiler in use for embedded, applications., Since memory is a big constraint in embedded applications, select the optimum data type for a variable., For example if the variable is expected to be within the range 0 to 255, declare the same as an ‘unsigned, char’ or ‘unsigned short int’ data type instead of declaring it as ‘int’ or ‘unsigned int’. This will definitely, save considerable amount of memory., , 9.3.3.3 Storage Class, Keywords related to storage class provide information on the scope (visibility or accessibility) and life time, (existence) of a variable. ‘C’ supports four types of storage classes and they are listed below., Storage class, auto, , register, , Meaning, Comments, Variables declared inside a function. Default Scope and accessibility is restricted within the function, storage class is auto, where the variable is declared. No initialisation. Contains random values at the time of creation, Variables stored in the CPU register of proces- Same as auto in scope and access. The decision on, sor. Reduces access time of variable, whether a variable needs to be kept in CPU register of, the processor depends on the compiler
Page 351 :
Embedded Firmware Design and Development, , static, , 327, , Local variable with life time same as that of Retains the value throughout the program. By default, the program, initialises to zero on variable creation. Accessibility, depends on where the variable is declared, Variables accessible to all functions in a file Can be modified by any function within a file or across, and all files in a multiple file program, multiple files (variable needs to be exported by one file, and imported by other files using the same), , extern, , Apart from these four storage classes, ‘C’ literally supports storage class ‘global’. An ‘auto or static’, variable declared in the public space of a file (declared before the implementation of all functions including, main in a file) is accessible to all functions within that file. There is no explicit storage class for ‘global’. The, way of declaration of a variable determines whether it is global or not., , 9.3.3.4 Arithme c Opera ons, The list of arithmetic operators supported by ‘C’ are listed below, Operator, +, –, *, /, %, , Operation, Addition, Subtraction, multiplication, Division, Remainder, , Comments, Adds variables or numbers, Subtracts variables or numbers, multiplies variables or numbers, Divides variables or numbers, Finds the remainder of a division, , 9.3.3.5 Logical Opera ons, Logical operations are usually performed for decision making and program control transfer. The list of logical, operations supported by ‘C’ are listed below, Operator, &&, , Operation, , Comments, , Logical AND, , Performs logical AND operation. Output is true (logic 1) if both operands (left to, and right to of && operator) are true, , ||, , Logical OR, , Performs logical OR operation. Output is true (logic 1) if either operand (operands, to left or right of || operator) is true, , !, , Logical NOT, , Performs logical Negation. Operand is complemented (logic 0 becomes 1 and vice, versa), , 9.3.3.6 Rela onal Opera ons, Relational operations are normally performed for decision making and program control transfer on the basis, of comparison. Relational operations supported by ‘C’ are listed below., Operator, , Operation, , Comments, , <, , less than, , Checks whether the operand on the left side of ‘<’ operator is less than the operand, on the right side. If yes return logic one, else return logic zero, , >, , greater than, , Checks whether the operand on the left side of ‘>’ operator is greater than the operand, on the right side. If yes return logic one, else return logic zero, , <=, , less than or, equal to, , Checks whether the operand on the left side of ‘<=’ operator is less than or equal to, the operand on the right side. If yes return logic one, else return logic zero
Page 352 :
328, , Introduc on to Embedded Systems, , >=, , greater than, , Checks whether the operand on the left side of ‘>=’ operator is greater than or equal, to the operand on the right side. If yes return logic one, else return logic zero, , ==, , Checks equality, , Checks whether the operand on the left side of ‘==’ operator is equal to the operand, on the right side. If yes return logic one, else return logic zero, , !=, , Checks nonequality, , Checks whether the operand on the left side of ‘!=’ operator is not equal to the, operand on the right side. If yes return logic one, else return logic zero, , 9.3.3.7 Branching Instruc ons, Branching instructions change the program execution flow conditionally or unconditionally. Conditional, branching depends on certain conditions and if the conditions are met, the program execution is diverted, accordingly. Unconditional branching instructions divert program execution unconditionally., Commonly used conditional branching instructions are listed below, Conditional branching, instruction, , Explanation, , //if statement, if (expression), {, statement1;, statement2;, ………….;, }, statement 3;, …………..;, //if else statement, if (expression), {, if_statement1;, if_statement2;, …………….;, }, else, {, else_statement1;, else_statement2;, ……………….;, }, statement 3;, , Evaluates the expression first and if it is true executes the statements given within, the { } braces and continue execution of statements following the closing curly, brace (}). Skips the execution of the statements within the curly brace { } if the, expression is false and continue execution of the statements following the closing, curly brace (})., One way branching, , Evaluates the expression first and if it is true executes the statements given within, the { } braces following if (expression) and continue execution of the statements, following the closing curly brace (}) of else block. Executes the statements within, the curly brace { } following the else, if the expression is false and continue execution of statements following the closing curly brace (}) of else., , Two way branching
Page 353 :
Embedded Firmware Design and Development, , //switch case statement, switch (expression), {, case value1:, break;, case value2:, break;, default:, break;, }, //Conditional operator, // ?exp1 : exp2, (expression) ?exp1: exp2, E.g., if (x>y), a=1;, else, a=0;, can be written using conditional, operator as, a=(x>y)? 1:0, //unconditional branching, goto label, , 329, , Tests the value of a given expression against a list of case values for a matching, condition. The expression and case values should be integers. value1, value2, etc., are integers. If a match found, executes the statement following the case and breaks, from the switch. If no match found, executes the default case., Used for multiple branching., , Used for assigning a value depending on the (expression). (expression) is calculated, first and if it is greater than 0, evaluates exp1 and returns it as a result of operation, else evaluate exp2 and returns it as result. The return value is assigned to some, variable., It is a combination of if else with assignment statement., Used for two way branching, , goto is used as unconditional branching instruction. goto transfers the program, control indicated by a label following the goto statement. The label indicated by, goto statement can be anywhere in the program either before or after the goto, label instruction., goto is generally used to come out of deeply nested loops in abnormal conditions, or errors., , 9.3.3.8 Looping Instruc ons, Looping instructions are used for executing a particular block of code repeatedly till a condition is met or, wait till an event is fired. Embedded programming often uses the looping instructions for checking the status, of certain I/o ports, registers, etc. and also for producing delays. Certain devices allow write/read operations, to and from some registers of the device only when the device is ready and the device ready is normally, indicated by a status register or by setting/clearing certain bits of status registers. Hence the program should, keep on reading the status register till the device ready indication comes. The reading operation forms a loop., The looping instructions supported by ‘C’ are listed below.
Page 354 :
330, , Introduc on to Embedded Systems, , Looping instruction, //while statement, while (expression), {, body of while loop, , Explanation, Entry controlled loop statement., The expression is evaluated first and if it is true the body of the loop is entered, and executed. Execution of ‘body of while loop’ is repeated till the expression, becomes false., , }, // do while loop, do, {, , The ‘body of the loop’ is executed at least once. At the end of each execution of, the ‘body of the loop’, the while condition (expression) is evaluated and if it is, true the loop is repeated, else loop is terminated., , body of do loop, }, while (expression);, //for loop, for (initialisation; test for condition; update variable), {, body of for loop, }, //exiting from loop, break;, goto label, //skipping portion of a loop, while (expression), {, …………..;, if (condition);, continue;, ………….;, }, , Entry controlled loop. Enters and executes the ‘body of loop’ only if the test for, condition is true. for loop contains a loop control variable which may be initialised, within the initialisation part of the loop. Multiple variables can be initialised with, ‘,’ operator., , Loops can be exited in two ways. First one is normal exit where loop is exited when, the expression/test for condition becomes false. Second one is forced exit. break and, goto statements are used for forced exit., break exits from the innermost loop in a deeply nested loop, whereas goto transfers, the program flow to a defined label., Certain situation demands the skipping of a portion of a loop for some conditions., The ‘continue’ statement used inside a loop will skip the rest of the portion following, it and will transfer the program control to the beginning of the loop., //for loop with skipping
Page 355 :
Embedded Firmware Design and Development, , //do while with skipping, do, {, …………….;, if (condition), continue;, …………….;, }, while (expression);, , 331, , for (initialisation; test for condition; update variable), {, …………….;, if (condition), continue;, …………….;, }, , Every ‘for’ loop can be replaced by a ‘while’ loop with a counter., Let’s consider a typical example for a looping instruction in embedded C application. I have a device, which is memory mapped to the processor and I’m supposed to read the various registers of it (except status, register) only after the contents of its status register, which is memory mapped at 0x3000 shows device is, ready (say value 0x01 means device is ready). I can achieve this by different ways as given below., //###########################################################, //using while loop, //###########################################################, char *status_reg = (char *) 0x3000; //Declares memory mapped register, while (*status_reg!=0x01);, , //Wait till status_reg = 0x01, , //###########################################################, //using do while loop, //###########################################################, char *status_reg = (char*) 0x3000;, do, {, } while (*status_reg!=0x01); Loop till status_reg = 0x01, //###########################################################, //using for loop, //###########################################################, char *status_reg = (char*) 0x3000;, for (;(*status_reg!=0x01););, The instruction char *status_reg = (char*) 0x3000; declares status_reg as a character pointer pointing, to location 0x3000. The character pointer is used since the external device’s register is only 8bit wide. We, will discuss the pointer based memory mapping technique in a later section. In order to avoid compiler
Page 356 :
332, , Introduc on to Embedded Systems, , optimisation, the pointer should be declared as volatile pointer. We will discuss the same also in another, section., , 9.3.3.9 Arrays and Pointers, Array is a collection of related elements (data types). Arrays are usually declared with data type of array,, name of the array and the number of related elements to be placed in the array. For example the following, array declaration, char arr [5];, , declares a character array with name ‘arr’ and reserves space for 5 character elements in the memory as in, Fig. 9.3†.*, Contents of each memory location †, 0x10, , 0x00, , 0x23, , 0x03, , 0x45, , arr[0], , arr[1], , arr[2], , arr[3], , arr[4], , 0x8000, , 0x8001, , 0x8002, , 0x8003, , 0x8004, , Address of the memory location where the array elements are stored, , Fig. 9.3, , †, , Array representation in memory, , The elements of an array are accessed by using the array index or subscript. The index of the first element, is ‘0’. For the above example the first element is accessed by arr[0], second element by arr[1], and so on. In, the above example, the array starts at memory location 0x8000 (arbitrary value taken for illustration) and the, address of the first element is 0x8000. The ‘address of’, operator (&) returns the address of the memory location, 0x8000, &arr[0], where the variable is stored. Hence &arr[0] will return, 0x8000 and &arr[1] will return 0x8001, etc. The name, of the array itself with no index (subscript) always, returns the address of the first element. If we examine, 0x10, arr[0], the first element arr[0] of the above array, we can see, that the variable arr[0] is allocated a memory location, 0x8000 and the contents of that memory location holds Fig. 9.4 Array element address and content relationship, the value for arr[0] (Fig. 9.4)., Arrays can be initialised by two methods. The first method is initialising the entire array at the time of, array declaration itself. Second method is selective initialisation where any member can be initialised or, altered with a value., //Initialisation of array at the time of declaration, unsigned char arr[5] = {5, 10, 20, 3, 2};, unsigned char arr[ ] = {5, 10, 20, 3, 2};, †, , Arbitrary value taken for illustration.
Page 357 :
Embedded Firmware Design and Development, , 333, , //Selective initialisation, unsigned char arr[5];, arr[0], arr[1], arr[2], arr[3], arr[4], , =, =, =, =, =, , 5;, 10;, 20;, 3;, 2;, , A few important points on Arrays, 1. The ‘sizeof()’ operator returns the size of an array as the number of bytes. E.g. ‘sizeof (arr)’ in the, above example returns 5. If arr[ ] is declared as an integer array and if the byte size for integer is 4,, executing the ‘sizeof (arr)’ instruction for the above example returns 20 (5 × 4)., 2. The ‘sizeof()’ operator when used for retrieving the size of an array which is passed as parameter to a, function will only give the size of the data type of the array., E.g., void test (char *p);, //Function declaration, char arr [5] = {5, 10, 20, 3, 2};, //Array data type char, void main ( ), {, test (arr);, }, void test (char *p), {, printf (“%d”, sizeof (*p));, }, , This code snippet will print ‘1’ as the output, though the user expects 5 (size of arr) as output. The output, is equivalent to sizeof (char), size of the data type of the array., 3. Use the syntax ‘extern array type array name [ ]’ to access an array which is declared outside the, current file. For example ‘extern char arr[ ]’ for accessing the array ‘arr[ ]’ declared in another file, 4. Arrays are not equivalent to pointers. But the expression ‘array name’ is equivalent to a pointer, of, type specified by the array, to the first element of an array, e.g. ‘arr’ illustrated for sizeof () operator is, equivalent to a character pointer pointing to the first element of array ‘arr’., 5. Array subscripting is commutative in ‘C’ language and ‘arr[k]’ is same as ‘*((arr)+(k))’ where ‘arr[k]’, is the content of kth element of array ‘arr’ and ‘(arr)’ is the starting address of the array arr and k is the, index of the array or offset address for the ‘kth’ element from the base address of array. ‘*((arr) + (k))’, is the content of array for the index k., Pointers Pointer is a flexible at the same time most dangerous feature, capable of creating potential issues, leading to firmware crash, if not used properly. Pointer is a memory pointing based technique for variable, access and modification. Pointers are very helpful in, 1. Accessing and modifying variables, 2. Increasing speed of execution
Page 358 :
334, , Introduc on to Embedded Systems, , 3. Accessing contents within a block of memory, 4. Passing variables to functions by eliminating the use of a local copy of variables, 5. Dynamic memory allocation (Will be discussed later), To understand the pointer concept, let us have a look at the data memory organisation of a processor., For a processor/controller with 128 bytes user programmable internal RAM (e.g. AT89C51), the memory is, organised as, Memory, , Address, 0x00, 0x01, , 0x7E, 0x7F, , Fig. 9.5, , Data memory organisation for 8051, , If we declare a character variable, say char input, the compiler assigns a memory location to the variable, anywhere within the internal memory 0x00 to 0x7F. The allocation is left to compiler’s choice unless specified, explicitly (Let it be 0x45 for our example). If we assign a value (say 10) to the variable input (input=10), the, memory cell representing the variable input is loaded with 10., Variable Name, , Memory Address, , Content, , input, , 0x45, , 10, , Fig. 9.6, , Relationship between variable name, address and data held by variable, , The contents of memory location 0x45 (representing the variable input) can be accessed and modified by, using a pointer of type same as the variable (char for the variable input in the example). It is accomplished, by the following method., char input;, char *p;, p = &input, , //Declaring input as character variable, //Declaring a character pointer p (* denotes p is a pointer), //Assigns the address of input as content to p, , The same is diagrammatically represented as, Variable Name, , Memory Address, , Content, , input, , 0x45, , 10, , p, , 0x00, , 0x45, , Fig. 9.7, , Pointer based memory access technique
Page 359 :
Embedded Firmware Design and Development, , 335, , The compiler assigns a memory to the character pointer variable ‘p’. Let it be 0x00 (Arbitrary value chosen, for illustration) and the memory location holds the memory address of variable input (0x45) as content. In ‘C’, the address assignment to pointer is done using the address of operator ‘&’ or it can be done using explicitly, by giving a specific address. The pointer feature in ‘C’ is same as the indirect addressing technique used in, 8051 Assembly instructions. The code snippet, MOV R0, #45H, MOV A,@R0 ; R0 & R1 are the indirect addressing registers., , is an example for 8bit memory pointer usage in 8051 Assembly and the code snippet, MOV DPTR, #0045H, MOV A,@DPTR ; DPTR is the 16bit indirect addressing register, , is an example for 16bit memory pointer operation. The general form of declaring a pointer in ‘C’ is, data type *pointer; //’data type’ is the standard data type like, //int, char, float etc… supported by ‘C’ language., , The * (asterisk) symbol informs the compiler that the variable pointer is a pointer variable. Like any other, variables, pointers can also be initialised in its declaration itself., E.g., , char x, y;, char *ptr = &x;, , The contents pointed by a pointer is modified/retrieved by using * as prefix to the pointer., E.g., , char x=5, y=56;, char *ptr=&x;, *ptr = y;, , //ptr holds address of x, //x = y, , Pointer Arithme c and Rela onal Opera ons ‘C’ language supports the following Arithmetic and, relational operations on pointers., 1. Addition of integer with pointer. e.g. ptr+2 (It should be noted that the pointer is advanced forward by, the storage length supported by the compiler for the data type of the pointer multiplied by the integer., For example for integer pointer where storage size of int = 4, the above addition advances the pointer, by 4 × 2 = 8), 2. Subtraction of integer from pointer, e.g. ptr–2 (Above rule is applicable), 3. Incremental operation of pointer, e.g. ++ptr and ptr++ (Depending on the type of pointer, the ++, increment context varies). For a character pointer ++ operator increments the pointer by 1 and for an, integer pointer the pointer is incremented by the storage size of the integer supported by the compiler, (e.g. pointer ++ results in pointer + 4 if the size for integer supported by compiler is 4), 4. Decrement operation of pointer, e.g. – –ptr and ptr– – (Context rule for decrement operation is same as, that of incremental operation), 5. Subtraction of pointers, e.g. ptr1– ptr2, 6. Comparison of two pointers using relational operators, e.g. ptr1 > ptr2, ptr1 < ptr2, ptr1 = = ptr2, ptr1!, = ptr2 etc (Comparison of pointers of same type only will give meaningful results), Note:, 1. Addition of two pointers, say ptr1 + ptr2 is illegal, 2. Multiplication and division operations involving pointer as numerator or denominator are also not, allowed
Page 360 :
336, , Introduc on to Embedded Systems, , A few important points on Pointers, 1. The instruction *ptr++ increments only the pointer not the content pointed by the pointer ‘ptr’ and, *ptr– – decrements the pointer not the contents pointed by the pointer ‘ptr’, 2. The instruction (*ptr) ++ increments the content pointed by the pointer ‘ptr’ and not the pointer ‘ptr’., (*ptr)-- decrements the content pointed by the pointer ‘ptr’ and not the pointer ‘ptr’, 3. A type-casted pointer cannot be used in an assignment expression and cannot be incremented or, decremented, e.g. ((int *ptr))++; will not work in the expected way, 4. ‘Null Pointer’ is a pointer holding a special value called ‘NULL’ which is not the address of any variable, or function or the start address of the allocated memory block in dynamic memory allocations, 5. Pointers of each type can have a related null pointer viz. there can be character type null pointer, integer, type null pointer, etc., 6. ‘NULL’ is a preprocessor macro which is literally defined as zero or ((void *) 0). #define NULL 0 or, #define NULL ((void *) 0), 7. ‘NULL’ is a constant zero and both can be used interchangeably as Null pointer constants, 8. A ‘NULL’ pointer can be checked by the operator if ( ). See the following example, if (ptr) //ptr is a pointer declared, printf (“ptr is not a NULL pointer”);, else, printf (“ptr is a NULL pointer”);, , The statement if (ptr) is converted to if (ptr! =0) by the (cross) compiler. Alternatively you can directly, use the statement if (ptr! =0) in your program to check the ‘NULL’ pointer., 9. Null pointer is a ‘C’ language concept and whose internal value does not matter to us. ‘NULL’ always, guarantee a ‘0’ to you but Null pointer need not be., Pointers and Arrays—Are they related? Arrays are not equivalent to pointers and vice versa. But the, expression array ‘name [ ]’ is equivalent to a pointer, of type specified by the array, to the first element of an, array, e.g. for the character array ‘char arr[5]’, ‘arr[ ]’ is equivalent to a character pointer pointing to the first, element of array ‘arr’ (This feature is referred to as ‘equivalence of pointers and arrays’). You can achieve, the array features like accessing and modifying members of an array using a pointer and pointer increment/, decrement operators. Arrays and pointer declarations are interchangeable when they are used as parameters, to functions. Point 2 discussed under the section ‘A few important points on Arrays’ for sizeof() operator, usage explains this feature also., , 9.3.3.10 Characters and Strings, Character is a one byte data type and it can hold values ranging from 0 to 255 (unsigned character) or –128 to, +127 (signed character). The term character literally refers to the alpha numeric characters (English alphabet, A to Z (both small letters and capital letters) and number representation from ‘0’ to ‘9’) and special characters, like *, ?, !, etc. An integer value ranging from 0 to 255 stored in a memory location can be viewed in different, ways. For example, the hexadecimal number 0x30 when represented as a character will give the character ‘0’, and if it is viewed as a decimal number it will give 48. String is an array of characters. A group of characters, defined within a double quote represents a constant string., ‘H’ is an example for a character, whereas “Hello” is an example for a string. String always terminates, with a ‘\0’ character. The ‘\0’ character indicates the string termination. Whenever you declare a string using, a character array, allocate space for the null terminator ‘\0’ in the array length., E.g. char name [ ] = “SHIBU” ;, or, char name [6] = {‘S’, ‘H’, ‘I’, ‘B’, ‘U’, ‘\0’};
Page 361 :
Embedded Firmware Design and Development, , 337, , String operations are very important in embedded product applications. Many of the embedded products, contain visual indicators in the form of alpha numeric displays and are used for displaying text. Though the, conventional alpha numeric displays are giving way to graphic displays, they are deployed widely in low cost, embedded products. The various operations performed on character strings are explained below., Input & Output opera ons Conventional ‘C’ programs running on Desktop machines make use of the, standard string inputting (scanf()) and string outputting (printf()) functions from the platform specific I/O, library. Standard keyboard and monitor are used as the input and output media for desktop application. This, is not the case for embedded systems. Embedded systems are compact and they need not contain a standard, keyboard or monitor screen for I/O functions. Instead they incorporate application specific keyboard and, display units (Alpha numeric/graphic) as user interfaces. The standard string input instruction supported by, ‘C’ language is scanf( ) and a code snippet illustrating its usage is given below., char name [6];, scanf (“%s”, name);, , A standard ANSI C compiler converts this code according to the platform supported I/O library files and, waits for inputting a string from the keyboard. The scanf function terminates when a white space (blank,, tab, carriage return, etc) is encountered in the input string. Implementation of the scanf() function is (cross), compiler dependent. For example, for 8051 microcontroller all I/O operations are supposed to be executed by, the serial interface and the C51 cross compiler implements the scanf() function in such a way to expect and, receive a character/string (according to the scanf usage context (character if first parameter to scanf() is “%c”, and string if first parameter is “%s”)) from the serial port., printf() is the standard string output instruction supported by ‘C’ language. A code snippet illustrating the, usage of printf( ) is given below., char name [ ] = “SHIBU”;, printf (“%s”, name);, , Similar to scanf() function, the standard ANSI C compiler converts this code according to the, platform supported I/O library files and displays the string in a console window displayed on the monitor., Implementation of printf() function is also (cross) compiler specific. For 8051 microcontroller the C51 cross, compiler implements the printf() function in such a way to send a character/string (according to the printf, usage context (character if first parameter to printf() is “%c” and string if first parameter is “%s”)) to the, serial port., String Concatena on Concatenation literally means ‘joining together’. String concatenation refers to the, joining of two or more strings together to form a single string. ‘C’ supports built in functions for string, operations. To make use of the built in string operation functions, include the header file ‘string.h’ to your ‘.c’, file. ‘strcat()’ is the function used for concatenating two strings. The syntax of ‘strcat()’ is illustrated below., strcat (str1, str2); //’str1’ and ‘str2’ are the strings to, //be concatenated., , On executing the above instruction the null character (‘\0’) from the end of ‘str1’ is removed and ‘str2’ is, appended to ‘str1’. The string ‘str2’ remains unchanged. As a precautionary measure, ensure that str1 (first, parameter of ‘strcat( )’ function) is declared with enough size to hold the concatenated string. ‘strcat()’ can, also be used for appending a constant string to a string variable., E.g. strcat(str1, “Hello!”);
Page 362 :
338, , Introduc on to Embedded Systems, , Note:, 1. Addition of two strings, say str1+str2 is not allowed, 2. Addition of a string variable, say str1, with a constant string, say “Hello” is not allowed, String Comparison Comparison of strings can be performed by using the ‘strcmp()’ function supported by, the string operation library file. Syntax of strcmp()’ is illustrated below., strcmp (str1, str2); //str1 and str2 are two character strings, , If the two strings which are passed as arguments to ‘strcmp()’ function are equal, the return value of, ‘strcmp()’ will be zero. If the two strings are not equal and if the ASCII value of the first non-matching, character in the string str1 is greater than that of the corresponding character for the second string str2, the, return value will be greater than zero. If the ASCII value of first non-matching character in the string str1, is less than that of the corresponding character for the second string str2, the return value will be less than, zero. ‘strcmp()’ function is used for comparing two string variables, string variable and constant string or, two constant strings., E.g. char str1 [ ] = “Hello world”;, char str2 [ ] = “Hello World!”, int n;, n= strcmp(str1, str2);, , ;, , Executing this code snippet assigns a value which is greater than zero to n. (since ASCII value of ‘w’ is, greater than that of ‘W’). n= strcmp(str2, str1); will assign a value which is less than zero to n. (since ASCII, value of ‘W’ is less than that of ‘w’)., The function stricmp() is another version of strcmp(). The difference between the two is, stricmp() is not, case sensitive. There won’t be any differentiation between upper and lowercase letters when stricmp() is used, for comparison. If stricmp() is used for comparing the two strings str1 and str2 in the above example, the, return value of the function stricmp (str1, str2) will be zero., Note:, 1. Comparison of two string variables using ‘= =’ operator is invalid, e.g. if (str1 == str2) is invalid, 2. Comparison of a string variable and a string constant using ‘= =’ operator is also invalid, e.g. if (str1, == “Hello”) is invalid, Finding String Length String length refers to the number of characters except the null terminator character, ‘\0’ present in a string. String length can be obtained by using a counter combined with a search operation for, the ‘\0’ character. ‘C’ supplies a ready to use string function strlen() for determining the length of a string. Its, syntax is explained below., strlen (str1);, //where str1 is a character string, e.g. char str1 [ ] = “Hello World!” ;, int n;, n = strlen (str1);, , Executing this code snippet assigns the numeric value 12 to integer variable ‘n’., Copying Strings strcpy() function is the ‘C’ supported string operation function for copying a string to, another string. Syntax of strcpy( ) function is, strcpy (str1, str2);, , //str1, str2 are character strings.
Page 363 :
Embedded Firmware Design and Development, , 339, , This function assigns the contents of str2 to str1. The original content of str1 is overwritten by the contents, of str2. str2 remains unchanged. The size of the character array which is passed as the first argument the, strcpy( ) function should be large enough to hold the copied string. strcpy() function can also be used to, assign constant string to string variables., E.g. strcpy(str1, “Hello!”), , Note: A string variable cannot be copied to another string variable using the ‘=’ operator e.g. str1 = str2, is illegal, A few important points on Characters and Strings, 1. The function strcat() is used for concatenating two string variables or string variable and string, constants. Characters cannot be appended to a string variable using strcat() function. For example, strcat (str1, ‘A’) may not give the expected result. The same can be achieved by strcat (str1, “A”), 2. Strings are character arrays and they cannot be assigned directly to a character array (except the, initialisation of arrays using string constants at the time of declaring character arrays), //###########################################################, E.g., unsigned char str1 [] = ‘Hello”; // is valid;, unsigned char str1 [6];, str1= “Hello”; //is invalid., , 3. Whenever a character array is declared to hold a string, allocate size for the null terminator character, ‘\0’ also in the character array, , 9.3.3.11 Func ons, Functions are the basic building blocks of modular programs. A function is a self-contained and re-usable, code snippet intended to perform a particular task. ‘Embedded C’ supports two different types of functions, namely, library functions and user defined functions., Library functions are the built in functions which is either part of the standard ‘Embedded C’ library or user, created library files. ‘C’ provides extensive built in library file support and the library files are categorised into, various types like I/O library functions, string operation library functions, memory allocation library functions, etc. printf(), scanf (), etc. are examples of I/O library functions. strcpy(), strcmp(), etc. are examples for, string operations library functions. malloc(), calloc() etc are examples of memory allocation library functions, supported by ‘C’. All library functions supported by a particular library is implemented and exported in the, same. A corresponding header (‘.h’) file for the library file provides information about the various functions, available to user in a library file. Users should include the header file corresponding to a particular library file, for calling the functions from that library in the ‘C’ source file. For example, if a programmer wants to use, the standard I/O library function printf() in the source file, the header file corresponding to the I/O library file, (“stdio.h” meant for standard i/o) should be included in the ‘c’ source code using the #include preprocessor, directive., E.g., #include <stdio.h>, void main ( ), {, printf(“Hello World”);, }
Page 364 :
340, , Introduc on to Embedded Systems, , “string.h” is the header file corresponding to the built in library functions for string operations and, “malloc.h” is the header file for memory allocation library functions. Readers are requested to get info on, header files for other required libraries from the standard ANSI library. As mentioned earlier, the standard ‘C’, library function implementation may be tailored by cross-compilers, keeping the function name and parameter, list unchanged depending on Embedded ‘C’ application requirements. printf() function implemented by C51, cross compiler for 8051 microcontroller is a typical example. The library functions are standardised functions, and they have a unique style of naming convention and arguments. Users should strictly follow it while using, library functions., User defined functions are programmer created functions for various reasons like modularity, easy, understanding of code, code reusability, etc. The generic syntax for a function definition (implementation), is illustrated below., Return type, {, , function name (argument list), //Function body (Declarations & statements), //Return statement, , }, , Return type of a function tells—what is the data type of the value returning by the function on completion, of its execution. The return type can be any of the data type supported by ‘C’ language, viz. int, char, float,, long, etc. void is the return type for functions which do not return anything. Function name is the name by, which a function is identified. For user defined functions users can give any name of their interest. For library, functions the function name for doing certain operations is fixed and the user should use those standard, function names. Parameters are the list of arguments to be passed to the function for processing. Parameters, are the inputs to the functions. If a function accepts multiple parameters, each of them are separated using, ‘,’ in the argument list. Arguments to functions are passed by two means, namely, pass by value and pass by, reference. Pass by value method passes the variables to the function using local copies whereas in pass by, reference variables are passed to the function using pointers. In addition to the above-mentioned attributes,, a function definition may optionally specify the function’s linkage also. The linkage of the function can be, either ‘external’ or ‘internal’., The task to be executed by the function is implemented within the body of the function. In certain situations,, you may have a single source (‘.c’) file containing the entire variable list, user defined functions, function, main(), etc. There are two methods for writing user defined functions if the source code is a single ‘.c’ file., The first method is writing all user defined functions on top of the main function and other user defined, functions calling the user defined function., E.g., Int xyz (int i), {, ………….;, }, void abc (void), {, ………….;, xyz (a), }
Page 365 :
Embedded Firmware Design and Development, , 341, , void main (), {, abc ();, }, , If you are writing the user defined functions after the entry function main() and calling the same inside, main, you should specify the function prototype (function declaration) of each user defined functions before, the function main(). Otherwise the compiler assumes that the user defined function is an extern function, returning integer value and if you define the function after main() without using a function declaration/, prototype, compiler will generate error complaining the user defined function is redefining (Compiler already, assumed the function which is used inside main() without a function prototype as an extern function returning, an integer value). The function declaration informs the compiler about the format and existence of a function, prior to its use. Implicit declaration of functions is not allowed: every function must be explicitly declared, before it is called. The general form of function declaration is, Linkage Type Return type function name (arguments);, E.g. static int add(int a, int b);, , The ‘Linkage Type’ specifies the linkage for the function. It can be either ‘external’ or ‘internal’. The, ‘static’ keyword for the ‘Linkage Type’ specifies the linkage of the function as internal whereas the ‘extern’, ‘Linkage Type’ specifies ‘external’ linkage for the function. It is not mandatory to specify the name of the, argument along with its type in the argument list of the function declaration. The declarations can simply, specify the types of parameters in the argument list. This is called function prototyping. A function prototype, consists of the function return type, the name of the function, and the parameter list. The usage is illustrated, below., static int add(int, int);, , Let us have a look at the examples for the different scenarios explained above on user defined functions., //###################################################################, //Example for Source code with function prototype for user defined//functions. Source file test.c, //###################################################################, #include <stdio.h>, //function prototype for user defined function test, void test (void);, void main ( ), {, test ();, //Calling user defined function from main, }, //Implementation of user defined function test after function main, void test (void), {, printf (“Hello World!”);, return;, }
Page 366 :
342, , Introduc on to Embedded Systems, , //###################################################################, //Example for Source code without function prototype for user defined, //functions. Source file test.c, //###################################################################, #include <stdio.h>, //function prototype for user defined function test not declared, void main (), {, test ();, //Calling user defined function from main, }, //Implementation of user defined function test after function main, void test (void), {, printf (“Hello World!”);, return;, }, , Compiler Output:, Compiling…, test.c, test.c(5): warning c4013: ‘test’ undefined; assuming extern returning int, test.c(9): error C2371: ‘test’: redefinition; different basic types Error executing cl.exe., test.exe-1 error(s), 1 warning(s), There is another convenient method for declaring variables and functions involved in a source file. This, technique is a header (‘.h’) file and source (‘.c’) file based approach. In this approach, corresponding to each, ‘c’ source file there will be a header file with same name (not necessarily) as that of the ‘c’ source file. All, functions and global/extern variables for the source file are declared in the header file instead of declaring the, same in the corresponding source file. Include the header file where the functions are declared to the source, file using the “#include” pre-processor directive. Functions declared in a file can be either global (extern, access) in scope or static in scope depending on the declaration of the function. By default all functions are, global in scope (accessible from outside the file where the function is declared). If you want to limit the scope, (accessibility) of the function within the file where it is declared, use the keyword ‘static’ before the return, type in the function declaration., , 9.3.3.12 Func on Pointers, A function pointer is a pointer variable pointing to a function. When an application is compiled, the functions, which are part of the application are also get converted into corresponding processor/compiler specific codes., When the application is loaded in primary memory for execution, the code corresponding to the function, is also loaded into the memory and it resides at a memory address provided by the application loader. The, function name maps to an address where the first instruction (machine code) of the function is present. A, function pointer points to this address., The general form of declaration of a function pointer is given below., return_type (*pointer_name) (argument list), , where, ‘return_type’ represents the return type of the function, ‘pointer_name’ represents the name of the, pointer and ‘argument list’ represents the data type of the arguments of the function. If the function contains
Page 367 :
Embedded Firmware Design and Development, , 343, , multiple arguments, the data types are separated using ‘,’. Typical declarations of function pointer are given, below., //Function pointer to a function returning int and takes no parameter, int (*fptr)();, //Function pointer to a function returning int and takes 1 parameter, int (*fptr)(int), , The parentheses () around the function pointer variable differentiates it as a function pointer variable. If, no parentheses are used, the declaration will look like, int *fptr();, , The cross compiler interprets it as a function declaration for function with name ‘fptr’ whose argument, list is void and return value is a pointer to an integer. Now we have declared a function pointer, the next step, is ‘How to assign a function to a function pointer?’., Let us assume that there is a function with signature, int function1(void);, , and a function pointer with declaration, int (*fptr)();, , We can assign the address of the function ‘function1()’ to our function pointer variable ‘fptr’ with the, following assignment statement:, fptr = &function1;, , The ‘&’ operator gets the address of function ‘function1’ and it is assigned to the pointer variable ‘fptr’, with the assignment operator ‘=’. The address of operator ‘&’ is optional when the name of the function is, used. Hence the assignment operation can be re-written as:, fptr = function1;, , Once the address of the right sort of function is assigned to the function pointer, the function can be, invoked by any one of the following methods., (*fptr)();, fptr();, , Function pointers can also be declared using typedef. Declaration and usage of a function pointer with, typedef is illustrated below., //Function pointer to a function returning int and takes no parameter, typedef int (*funcptr)();, funcptr fptr;, , The following sample code illustrates the declaration, definition and usage of function pointer., #include <stdio.h>, void square(int x);, void main(), {, //Declare a function pointer
Page 368 :
344, , Introduc on to Embedded Systems, , void (*fptr)(int);, //Define the function pointer to function square, fptr = square;, //Style 1: Invoke the function through function pointer, fptr(2);, //Style 2: Invoke the function through function pointer, (*fptr)(2);, }, //###################################################################, //Function for printing the square of a number, void square(int x), {, printf(“Square of %d = %d\n”, x, x*x);, }, , Function pointer is a helpful feature in late binding. Based on the situational need in the application you, can invoke the required function by binding the function with the right sort of function pointer (The function, signature and function pointer signature should be matching). This reduces the usage of ‘if’ and ‘switch –, case’ statements with function names. Function pointers are extremely useful for handling situations which, demand passing of a function as argument to another function. Function pointers are often used within, functions where the function should be able to work with a number of functions whose names are not known, until the program is running. A typical example for this is callback functions, which requires the information, about the function which needs to be called. The following sample piece of code illustrates the usage of, function pointer as parameter to a function., #include <stdio.h>, //###################################################################, //Function prototype declaration, void square(int x);, void cube(int x);, void power(void (*fptr)(int), int x);, void main(), {, //Declare a function pointer, void (*fptr)(int);, //Define the function pointer to function square, fptr = square;, //Invoke the function ‘square’ through function pointer, power (fptr,2);, //Define the function pointer to function cube, fptr = cube;, //Invoke the function ‘cube’ through function pointer, power (fptr,2);, }, //###################################################################, //Interface function for invoking functions through function pointer
Page 369 :
Embedded Firmware Design and Development, , 345, , void power(void (*fptr)(int), int x), {, fptr(x);, }, //###################################################################, //Function for printing the square of a number, void square(int x), {, printf(“Square of %d = %d\n”, x, x*x);, }, //###################################################################, //Function for printing the third power (cube) of a number, void cube(int x), {, printf(“Cube of %d = %d\n”, x, x*x*x);, }, , Arrays of Func on Pointers An array of function pointers holds pointers to functions with same type of, signature. This offers the flexibility to select a function using an index. Arrays of function pointers can be, defined using either direct function pointers or the ‘typedef’ qualifier., //Declare an array of pointers to functions, which returns int and //takes, no parameters, using direct function pointer declaration, int (*fnptrarr[5])();, //Declare and initialise an array of pointers to functions, which //return, int and takes no parameters, using direct function pointer//declaration, int (*fnptrarr[])()= {/*initialisation*/};, //Declare and initialise to ‘NULL’ an array of pointers to functions, //, which return int and takes no parameters, using direct function //pointer, declaration, int (*fnptrarr[5])()= {NULL};, //Declare an array of pointers to functions, which returns int and //takes, no parameters, using typedef function pointer declaration, typedef int (*fncptr)();, fncptr fnptrarr[5])();, //Declare and initialise an array of pointers to functions, which //return, int and takes no parameters, using typedef function pointer//declaration, typedef int (*fncptr)();
Page 370 :
346, , Introduc on to Embedded Systems, , fncptr fnptrarr[] ()= {/*initialisation*/};, //Declare and initialise to ‘NULL’ an array of pointers to functions, //, which return int and takes no parameters, using typedef function //pointer, declaration, typedef int (*fncptr)();, fncptr fnptrarr[5]()= {NULL};, , The following piece of code illustrates the usage of function pointer arrays:, #include <stdio.h>, //###################################################################, //Function prototype definition, void square(int x);, void cube(int x);, void main(), {, //Declare a function pointer array of size 2 and initialise, void (*fptr[2])(int)= {NULL};, //Define the function pointer 0 to function square, fptr[0] = square;, //Invoke the function square, fptr[0](2);, //Define the function pointer 1 to function cube, fptr[1] = cube;, //Invoke the function cube through function pointer, fptr[1](2);, }, //###################################################################, //Function for printing the square of a number, void square(int x), {, printf(“Square of %d = %d\n”, x, x*x);, }, //###################################################################, //Function for printing the third power (cube) of a number, void cube(int x), {, printf(“Cube of %d = %d\n”, x, x*x*x);, }, , 9.3.3.13 Structures and Unions, structure’ is a variable holding a collection of data types (int, float, char, long etc). The data types can be, either unique or distinct. The tag ‘struct’ is used for declaring a structure. The general form of a structure, declaration is given below.
Page 371 :
Embedded Firmware Design and Development, , struct, , 347, , struct_name, {, //variable 1 declaration, //variable 2 to declaration, //……………, //variable n declaration, };, , struct_name is the name of the structure and the choice of the name is left to the programmer., Let us examine the details kept in an employee record for an employee in the employee database of an, organisation as example. A typical employee record contains information like ‘Employee Name’, ‘Employee, Code’, and ‘Date of Birth’. This information can be represented in ‘C’ using a structure as given below., struct employee, {, char emp_name [20]; // Allowed maximum length for name = 20, int emp_code;, char DOB [10]; // DD-MM-YYYY Format (10 character), };, , Hence in ‘C’, the employee record is represented by two string variables (character arrays) and an integer, variable. Since these three variables are relevant to each employee, they are grouped together in the form of, a structure. Literally structure can be viewed as a collection of related data. The above structure declaration, does not allocate memory for the variables declared inside the structure. It’s a mere representation of the data, inside a structure. To allocate memory for the structure we need to create a variable of the structure. The, structure variable creation is illustrated below., struct employee emp1;, , Keyword ‘struct’ informs the compiler that the variable ‘emp1’ is a structure of type ‘employee’. The, name of the structure is referred as ‘structure tag’ and the variables declared inside the structure are called, ‘structure elements’. The definition of the structure variable only allocates the memory for the different, elements and will not initialise the members. The members need to be initialised explicitly. Members of the, structure variable can be initialised altogether at the time of declaration of the structure variable itself or can, be initialised (modified) independently using the ‘.’ operator (member operator)., struct employee emp1= {“SHIBU K V”, 42170, “11-11-1977”};, , This statement declares a structure variable with name ‘emp1’ of type employee and each elements of the, structure is initialised as, emp_name = “SHIBU K V”, emp_code = 42170, DOB= “11-11-1977”, , It should be noted that the variables should be initialised in the order as per their declaration in the, structure variable. The selective method of initialisation/modification is used for initialising /modifying each, element independently., E.g., , struct employee emp1;, emp1.emp_code = 42170;
Page 372 :
348, , Introduc on to Embedded Systems, , All members of a structure, except character string variables can be assigned values using ‘.’ Operator and, assignment (‘=’) operator (character strings are character arrays and character arrays cannot be initialised, altogether using the assignment operator). Character string variables can be assigned using string copy, function (strcpy)., strcpy (emp1.emp_name,”SHIBU K V”);, strcpy (emp1.DOB,”11-11-1977”);, , Declaration of a structure variable requires the keyword ‘structure’ as the first word and it may sound, awkward from a programmer point of view. This can be eliminated by using ‘typedef’ in defining the structure., The above ‘employee’ structure example can be re-written using typedef as, typedef struct, {, char emp_name [20];// Allowed maximum length for name = 20, int emp_code;, char DOB [10];, // DD-MM-YYYY Format (10 character), } employee;, employee emp1; //No need to add struct before employee, , This approach eliminates the need for adding the keyword ‘struct’ each time a structure variable is, declared., Structure Opera ons The following table lists the various operations supported by structures, Operator, , Operation, , Example, , = (Assignment), , employee emp1,emp2; emp1., Assigns the values of one structure to emp_code = 42170; strcpy(emp1., another structure of same type, emp_name,“SHIBU”); strcpy(emp1., DOB,“11/11/1977”); emp2=emp1;, , == (Checking the equality of all, members of two structures), , employee emp1,emp2; emp1., Compare individual members of two, emp_code = 42170; strcpy(emp1., structures of same type for equality., emp_name,“SHIBU”); strcpy(emp1., Return 1 if all members are identical, DOB,“11/11/1977”); if, in both structures else return 0, (emp2==emp1), , != (Checking the equality of all, members of two structures), , Compare individual members of, two structures of same type for non, equality. Return 1 if all members are, not identical in both structures else, return 0, , sizeof(), , Returns the size of the structure, (memory allocated for the structure employee emp1; sizeof (emp1);, variable in bytes), , employee emp1,emp2; emp1., emp_code = 42170; strcpy(emp1., emp_name,”SHIBU”); strcpy(emp1., DOB,“11/11/1977”); if, (emp2!=emp1), , Note:, 1. The assignment and comparison operation is valid only if both structure variables are of the same type, 2. Some compilers may not support the direct assignment and comparison operation. In such situation the, individual members of structure should be assigned or compared separately.
Page 373 :
Embedded Firmware Design and Development, , 349, , Structure Pointers Structure pointers are pointers to structures. It is easy to modify the memory held by, structure variables if pointers are used. Functions with structure variable as parameter is a very good example, for it. The structure variable can be passed to the function by two methods; either as a copy of the structure, variable (pass by value) or as a pointer to a structure variable (pass by reference/address). Pass by value, method is slower in operation compared to pass by pointers since the execution time for copying the structure, parameter also needs to be accounted. Pass by pointers is also helpful if the structure which is given as input, parameter to a function need to be modified and returned on execution of the calling function. Structure, pointers can be declared by prefixing the structure variable name with ‘*’. The following structure pointer, declaration illustrates the same., struct employee *emp1;, employee *emp1;, , //structure defined using the structure tag, //structure defined with typedef structure, , For structure variables declared as pointers to a structure, the member selection of the structure is performed, using the ‘ ’ operator., E.g. struct, emp1 =, emp1, strcpy, , employee *emp1, emp2;, &emp2; //Obtain a pointer, emp_code = 42170;, (emp1 DOB, “11-11-1977”);, , Structure Pointers at Absolute Address Most of the time structures are used in Embedded C applications, for representing the memory locations or registers of chip whose memory address is fixed at the time of, hardware designing. Typical example is a Real Time Clock (RTC) which is memory mapped at a specific, address and the memory address of the registers of the RTC is also fixed. If we use a structure to define the, different registers of the RTC, the structure should be placed at an absolute address corresponding to the, memory mapped address of the first register given as the member variable of the structure. Consider the, structure describing RTC registers., typedef struct, {, //RTC Control register (8bit) memory mapped at 0x4000, unsigned char control;, //RTC Seconds register (8bit) memory mapped at 0x4001, unsigned char seconds;, //RTC Minutes register (8bit) memory mapped at 0x4002, unsigned char minutes;, //RTC Hours register (8bit) memory mapped at 0x4003, unsigned char hours;, //RTC Day of week register (8bit) memory mapped at 0x4004, unsigned char day;, //RTC Date register (8bit) memory mapped at 0x4005, unsigned char date;, //RTC Month register (8bit) memory mapped at 0x4006, unsigned char month;, //RTC Year register (8bit) memory mapped at 0x4007, unsigned char year;, } RTC;
Page 374 :
350, , Introduc on to Embedded Systems, , To read and write to these hardware registers using structure member variable manipulation, we need to, place the RTC structure variable at the absolute address 0x4000, which is the address of the RTC hardware, register, represented by the first member of structure RTC., The implementation of structures using pointers to absolute memory location is cross-compiler dependent., Desktop applications may not give permission to explicitly place structures or pointers at an absolute address, since we are not sure about the address allocated to general purpose RAM by the linker. Any attempt to, explicitly allocate a structure at an absolute address may result in access violation exception. More over there, is no need for a general purpose application to explicitly place structure or pointers at an absolute address,, whereas embedded systems most often requires it if different hardware registers are memory mapped to the, processor/controller memory map. The C51 cross compiler for 8051 microcontroller supports a specific, Embedded C keyword ‘xdata’ for external memory access and the structure absolute memory placement can, be done using the following method., RTC xdata *rtc_registers = (void xdata *) 0x4000;, , Structure Arrays In the above employee record example, three important data is associated with each, employee, namely; employee name (emp_name), employee code (emp_code) and Date of Birth (DOB)., This information is held together as a structure for associating the same with an employee. Suppose the, organisation contains 100 employees then we need 100 such structures to hold the data related to the 100, employees. This is achieved by array of structures. For the above employee structure example a structure, array with 100 structure variables can be declared as, struct employee emp [100]; //structure declared using struct keyword, or, employee emp [100]; //structure declared using typedef struct, , emp [0] holds the structure variable data for the first employee and emp [99] holds the structure variable, data corresponding to the 100th employee. The variables corresponding to each structure in an array can, be initialised altogether at the time of defining the structure array or can be initialised/modified using the, corresponding array subscript for the structure and the ‘.’ Operator as explained below., typedef struct, {, char emp_name [20]; // Allowed maximum length for name = 20, int emp_code;, char DOB [10]; // DD-MM-YYYY Format (10 character), } employee;, //Initialisation at the time of defining variable, employee emp [3] = {{“JOHN”, 1, “01-01-1988”}, {“ALEX”, 2, “10-01-1976”},, {“SMITH”, 3, “07-05-1985”}};, //Selective initialisation, emp [0].emp_code = 1;, strcpy (emp [0].emp_name, “JOHN”);, strcpy (emp [0].DOB, “01-01-1988”);, , Structure in Embedded ‘C’ Programming Simple structure variables and array of structures are widely, used in ‘embedded ‘C’ based firmware development. Structures and structure arrays are used for holding, various configuration data, exchanging information between Interrupt Service Routine (ISR) and application
Page 375 :
351, , Embedded Firmware Design and Development, , etc. A typical example for the structure usage is for holding the various register configuration data for setting, up a particular baudrate for serial communication. An array of such configuration data holding structures can, be used for setting different baudrates according to user needs. It is interesting to note that more than 90% of, the embedded C programmers use ‘typedef’ to define the structures with meaningful names., Structure Padding (Packed Structure) Structure variables are always stored in the memory of the target, system with structure member variables in the same order as they are declared in the structure definition. But, it is not necessary that the variables should be placed in continuous physical memory locations. The choice, on this is left to the compiler/cross-compiler. For multi byte processors (processors with word length greater, than 1 byte (8 bits)), if the structure elements are arranged in memory in such a way that they can be accessed, with lesser number of memory fetches, it definitely speeds up the operation. The process of arranging the, structure elements in memory in a way facilitating increased execution speed is called structure padding. As, an example consider the following structure:, typedef struct, {, char x;, int y;, } exmpl;, , Let us assume that the storage space for ‘int’ is 4 bytes (32 bits) and for ‘char’ it is 1 byte (8 bits) for the, target embedded system under consideration. Suppose the target processor for embedded application, where, the above structure is making use is with a 4 byte (32 bit) data bus and the memory is byte accessible. Every, memory fetch operation retrieves four bytes from the memory locations 4x, 4x + 1, 4x + 2 and 4x +3, where, x = 0, 1, 2, etc. for successive memory read operations. Hence a 4 byte (32 bit) variable can be fully retrieved, in a single memory fetch if it is stored at memory locations with starting address 4x (x = 0, 1, 2, etc.). If it is, stored at any other memory location, two memory fetches are required to retrieve the variable and hence the, speed of operation is reduced by a factor of 2., Let us analyse the various possibilities of storing the above structure within the memory., Method-1 member variables of structure stored in consecutive data memory locations., Memory, Address, , 4x + 3, , Data, , Byte 2 of, exmpl.y, , 4x + 2, Byte 1 of, exmpl.y, , 4x + 1, Byte 0 of, exmpl.y, , exmpl.x, Byte 3 of, exmpl.y, , Data, Memory, Address, , 4x, , 4(x + 1) + 3, , Fig. 9.8, , 4(x + 1) + 2, , 4(x + 1) + 1, , 4(x + 1), , Memory representation for structure without padding, , In this model the member variables are stored in consecutive data memory locations (Note: the member, variable storage need not start at the address mentioned here, the address given here is only for illustration), and if we want to access the character variable exmp1.x of structure exmp1, it can be achieved with a single, memory fetch. But accessing the integer member variable exmp1.y requires two memory fetches.
Page 376 :
352, , Introduc on to Embedded Systems, , Method-2 member variables of structure stored in data memory with padding, In this approach, a structure variable with storage size same as that of the word length (or an integer, multiple of word length) of the processor is always placed at memory locations with starting address as, multiple of the word length so that the variable can be retrieved with a single data memory fetch. The memory, locations coming in between the first variable and the second variable of the structure are filled with extra, bytes by the compiler and these bytes are called ‘padding bytes’ (Fig. 9.9). The structure padding technique, is solely dependent on the cross-compiler in use. You can turn ON or OFF the padding of structure by using, the cross-compiler supported padding settings. Structure padding is applicable only for processors with word, size more than 8bit (1 byte). It is not applicable to processors/controllers with 8bit bus architecture., Memory, Address, , 4x + 3, , 4x + 2, , 4x + 1, , 4x, , Data, , Padding, , Padding, , Padding, , exmpl.x, , Data, , Byte 3 of, exmpl.y, , Byte 2 of, exmpl.y, , Byte 1 of, exmpl.y, , Byte 0 of, exmpl.y, , 4(x + 1) + 2, , 4(x + 1) + 1, , 4(x + 1), , Memory, Address, , 4(x + 1) + 3, , Fig. 9.9, , Memory representation for structure with padding, , Structure and Bit Fields Bit field is a useful feature supported by structures for bit manipulation operation, and flag settings in embedded applications. Most of the processors/controllers used in embedded application, development provides extensive Boolean (bit) operation support and a similar support in the firmware, environment can directly be used to explore the Boolean processing capability of the target device., For most of the application development scenarios we use integer and character to hold data items even, though the variable is expected to vary in a range far below the upper limit of the data type used for holding, the variable. A typical example is flags. Flags are used for indicating a ‘TRUE’ or ‘FALSE’ condition., Practically this can be done using a single bit and the two states of the bit (1 and 0) can be used for representing, ‘TRUE’ or ‘FALSE’ condition. Unfortunately ‘C’ does not support a built in data type for holding a single, bit and it forces us to use the minimum sized data type (quite often char (8bit data type) and short int) for, representing the flag. This will definitely lead to the wastage of memory. Since memory is a big constraint, in embedded applications we cannot tolerate the memory wastage. ‘C’ indirectly supports bit data types, through ‘Bit fields’ of structures. Structure bit fields can be directly accessed and manipulated. A set of bits, in the structure bit field forms a ‘char’ or ‘int’ variable. The general format of declaration of bit fields within, structure is illustrated below., struct, , struct_name, {, data type (char or int) bit_var 1_name : bit_size,, bit_var 2_name : bit_size,, ………………………..,, ………………………...,, bit_var n_name : bit_size;, } ;
Page 377 :
353, , Embedded Firmware Design and Development, , ‘struct_name’ represents the name of the bit field structure. ‘data type’ is the data type which will be, formed by packing several bits. Only character (char) and integer (int/short int) data types are allowed in bit, field structures in Embedded C applications. Some compilers may not support the ‘char’ data type. However, our illustrative cross-compiler C51 supports ‘char’ data type as data type. ‘bit_var 1_name’ denotes the, bit variable and ‘bit_size’ gives the number of bits required by the variable ‘bit_var 1_name’ and so. The, operator ‘:’ associates the number of bits required with the bit variable. Bit variables that are packed to form, a data type should be separated inside the structure using ‘,’ operator. A real picture of bit fields in structures, for embedded applications can be provided by the Program Status Word (PSW) register representation of, 8051 controller. The PSW register of 8051 is bit addressable and its bit level representation is given below., PSW.7, , PSW.6, , PSW.5, , PSW.4, , PSW.3, , PSW.2, , CY, , AC, , F0, , RS1, , RS0, , OV, , PSW.1, , PSW.0, P, , Using structure and bit fields the same can be represented as, struct PSW, {, char, , P:1,, /* Bit 0 of PSW : Parity Flag */, :1,, /* Bit 1 of PSW : Unused */, OV:1, /* Bit 2 of PSW : Overflow Flag */, RS0:1, /* Bit 3 of PSW : Register Bank Select 0 bit */, RS1 :1, /* Bit 4 of PSW : Register Bank Select 1 bit */, F0:1,, /* Bit 5 of PSW : User definable Flag */, AC :1, /* Bit 6 of PSW : Auxiliary Carry Flag */, C:1;, /* Bit 7 of PSW : Carry Flag */, /*Note that the operator ‘;’ is used after the last bit field to, indicate end of bit field*/, };, In the above structure declaration, each bit field variable is defined with a name and an associated bit size, representation. If some of the bits are unused in a packed fashion, the same can be skipped by merely giving, the number of bytes to be skipped without giving a name for that bit variables. In the above example Bit 1 of, PSW is skipped since it is an unused bit in the PSW register., It should be noted that the total number of bits used by the bit field variables defined for a specific data, type should not exceed the maximum number of allocated bits for that specific data type. In the above, example the bit field data type is ‘char’ (8 bits) and 7 bit field variables each of size 1 are declared and one bit, variable is declared as unused bit. Hence the total number of bits consumed by all the bit variables including, the non declared bit variable sums to 8, which is same as the bit size for the data type ‘char’. The internal, representation of structure bit fields depends on the size supported by the cross-compiler data type (char/int), and the ordering of bits in memory. Some processors/controllers store the bits from left to right while others, store from right to left (Here comes the significance of endianness)., Unions Union is a concept derived from structure and union declarations follow the same syntax as that, of structures (structure tag is replaced by union tag). Though union looks similar to structure in declaration,, it differs from structure in the memory allocation technique for the member variables. Whenever a union, variable is created, memory is allocated only to the member variable of union requiring the maximum storage, size. But for structures, memory is allocated to each member variables. This helps in efficient data memory
Page 378 :
354, , Introduc on to Embedded Systems, , usage. Even if a union variable contains different member variables of different data types, existence is only, for a single variable at a time. The size of a union returns the storage size of its member variable occupying, the maximum storage size. The syntax for declaring union is given below, union, , union_name, {, //variable 1 declaration, //variable 2 to declaration, //……………, //variable n declaration, };, , or, typedef union, {, //variable 1 declaration, //variable 2 to declaration, //……………, //variable n declaration, } union_name;, , ‘union_name’ is the name of the union and programmers can use any name according to their programming, style. As an illustrative example let’s declare a union variable consisting of an integer member variable and, a character member variable., typedef union, {, int y;, char z;, } example;, example ex1;, , //Integer variable, //Character variable, , Assuming the storage location required for ‘int’ as 4 bytes and for ‘char’ as 1 byte, the memory allocated, to the union variable ex1 will be as shown below, Memory, Address, Data, , 4x + 3, , 4x + 2, , 4x + 1, , ex1.z, 4x, , Byte 3 of, exl.y, , Byte 2 of, exl.y, , Byte 1 of, exl.y, , Byte 0 of, exl.y, , ex1.x, , x =1, 2, 3… etc, , Fig. 9.10, , Memory representation for union, , Note: The start address is chosen arbitrarily for illustration, it can be any data memory. It is obvious from the, figure that by using union the same physical address can be accessed with different data type references. Hence, union is a convenient way of ‘variant access’.
Page 379 :
Embedded Firmware Design and Development, , 355, , In Embedded C applications, union may be used for fast accessing of individual bytes of ‘long’ or ‘int’, variables, eliminating the need for masking the other bytes of ‘long’ or ‘int’ variables which are of no interest,, for checking some conditions. Typical example is extracting the individual bytes of 16 or 32 bit counters., A few important points on Structure and Union, 1. The offsetof() macro returns the offset of a member variable (in bytes) from the beginning of its parent, structure. The usage is offsetof (structName, memberName); where ‘structName’ is the name of the, parent structure and ‘memberName’ is the name of the member in the parent data structure whose offset, is to be determined. For using this macro use the header file ‘stddef.h’, 2. If you declare a structure just before the main () function in your source file, ensure that the structure, is terminated with the structure definition termination indicator ‘;’. Otherwise function main () will be, treated as a structure and the application may crash with exceptions., 3. A union variable can be initialised at the time of creation with the first member variable value only., , 9.3.3.14 Pre-processors and Macros, Pre-processor in ‘C’ is compiler/cross-compiler directives used by compiler/cross-compiler to filter the, source code before compilation/cross-compilation. The pre-processor directives are mere directions to the, compilers/cross compilers on how the source file should be compiled/cross compiled. No executable code is, generated for pre-processor directives on compilation. They are same as pseudo ops in assembly language., Pre-processors are very useful for selecting target processor/controller dependent pieces of code for different, target systems and allow a single source code to be compiled and run on several different target boards., The syntax for pre-processor directives is different from the syntax of ‘C’ language. Each pre-processor, directive starts with the ‘#’ symbol and ends without a semicolon (;). Pre-processor directives are normally, placed before the entry point function main() in a source file. Pre-processor directives are grouped into three, categories; namely, 1. File inclusion pre-processor directives, 2. Compile control pre-processor directives, 3. Macro substitution pre-processor directives, File Inclusion Pre-processor Direc ves The file inclusion pre processor directives include external files, containing macro definitions, function declarations, constant definitions etc to the current source file., ‘#include’ is the pre processor directive used for file inclusion. ‘#include’ pre processor instruction reads, the entire contents of the file specified by the ‘#include’ directive and inserts it to the current source file at a, location where the ‘#include’ statement is invoked. This is generally used for reading header files for library, functions and user defined header files or source files. Header files contain details of functions and types, used within the library and user created files. They must be included before the program uses the library, functions and other user defined functions. Library header file names are always enclosed in angle brackets,, < >. This instructs the pre-processor to look the standard include directory for the header file, which needs to, be inserted to the current source file., e.g. #include <stdio.h> is the directive to insert the standard library file ‘stdio.h’. This file is available, in the standard include directory of the development environment. (Normally inside the folder ‘inc’). If the, file to be included is given in double quotes (“ ”), the pre-processor searches the file first in the current, directory where the current source code file is present and if not found will search the standard include, directory. Usually user defined files kept in the project folder are included using this technique. E.g. #include, “constants.h” where ‘constants’ is a user defined header file with name constants.h, kept in the local project, folder. An include file can include another include file in it (Nesting of include files). An include file is not, allowed to include the same file itself. Source files (.c) file can also be used as include files.
Page 380 :
356, , Introduc on to Embedded Systems, , Compile control pre-processor direc ves Compile control pre-processor directives are used for controlling, the compilation process such as skipping compilation of a portion of code, adding debug features, etc. The, conditional control pre-processor directives are similar to the conditional statement if else in ‘C’. #ifdef,, #ifndef, #else, #endif, #undef, etc are the compile control pre-processor directives., #ifdef uses a name as argument and returns true if the argument (name) is already defined. #define is used for, defining the argument (name)., #else is used for two way branching when combined with #ifdef (same as if else in ‘C’)., #endif is used for indicating the end of a block following #ifdef or #else, Usage of #ifdef, #else and #endif is given below., #ifdef, #else, , (optional), , #endif, , The pre-processor directive #ifndef is complementary to #ifdef. It is used for checking whether an argument, (e.g. macro) is not defined. Pre-processor directive #undef is used for disabling the definition of the argument, or macro if it is defined. It is complementary to #define. Pre-processor directives are a powerful option in, source code debugging. If you want to ensure the execution of a code block, for debug purpose you can define, a debug variable and define it. Within the code wherever you want to ensure the execution, use the #ifdef and, #endif pre-processors. The argument to #ifdef should be the debug variable. Insert a printf() function within, the #ifdef #endif block. If no debugging is required comment or remove the definition of debug variable., E.g., #define DEBUG 1, //Inside code block, #ifdef DEBUG, printf (“Debug Enabled”);, #endif, , The #error Pre-processor Direc ve The #error pre-processor generates error message in case of an error, and stops the compilation on accounting an error condition. The syntax of #error directive is given below, #error, , error message, , Macro Subs tu on Pre-processor Direc ves Macros are a means of creating portable inline code. ‘Inline’, means wherever the macro is called in a source file it is replaced directly with the code defined by the macro., In-line code improves the performance in terms of execution speed. Macros are similar to subroutines in, functioning but they differ in the way in which they are coded in the source code. Functions are normally, written only once with arguments. Whenever a function needs to be executed, a call to the function code is, made with the required parameters at the point where it needs to be invoked. If a macro is used instead of, functions, the compiler inserts the code for macro wherever it is called. From a code size viewpoint macros, are non-optimised compared to functions. Macros are generally used for coding small functions requiring, execution without latency. The ‘#define’ pre-processor directive is used for coding macros. Macros can be, either simple definitions or functions with arguments., #define PI 3.1415 is an example for a simple macro definition.
Page 381 :
Embedded Firmware Design and Development, , 357, , Macro definition can contain arithmetic operations also. Proper care should be taken in giving right syntax, while defining macros, keeping an eye on their usage in the source code. Consider the following example, #define A 12+25, #define B 45-10, , Suppose the source contains a statement multiplier = A*B; the pre-processor directly replaces the macros, A and B and the statement becomes, multiplier = 12+25*45-10;, , Due to the operator precedence criteria, this won’t give the expected result. Expected result can be obtained, by a simple re-writing of the macro with necessary parentheses as illustrated below., #define A (12+25), #define B (45-10), , Proper care should be given to parentheses the macro arguments. As mentioned earlier macros can also be, defined with arguments. Consider the following example, #define CIRCLE_AREA(a) (3.14 * a*a), , This defines a macro for calculating the area of a circle. It takes an argument and returns the area. It, should be noted that there is no space between the name of the macro (macro identifier) and the left bracket, parenthesis., Suppose the source code contains a statement like area=CIRCLE_AREA(5); it will be replaced as, area = (3.14*5*5);, , Suppose the call is like this, area=CIRCLE_AREA(2+5); the pre-processor will translate the same as, area = (3.14*2+5*2+5);, , Will it produce the expected result? Obviously no. This shortcoming in macro definition can be eliminated, by using parenthesis to each occurrence of the argument. Hence the ideal solution will be;, #define CIRCLE_AREA(a) (3.14 *(a)*(a)), , 9.3.3.15 Constant Declara ons in Embedded ‘C’, In embedded applications the qualifier (keyword) ‘const’ represents a ‘Read only’ variable. Use of the keyword, ‘const’ in front of a variable declares that the value of the variable cannot be altered by the program. This is, a kind of defensive programming in which any attempt to modify a variable declared as ‘const’ is reported, as an access violation by the cross-compiler. The different types of constant variables used in embedded ‘C’, application are explained below., , Constant Data Constant data informs that the data held by a variable is always constant and cannot be, modified by the application. Constants used as scaling variables, ratio factors, various scientific computing, constants (e.g. Plank’s constant), etc. are represented as constant data. The general form of declaring a, constant variable is given below., const, , data type, , variable name;, , or, data type, , const, , variable name;
Page 382 :
358, , Introduc on to Embedded Systems, , ‘const’ is the keyword informing compiler/cross compiler that the variable is constant. ‘data type’ gives, the data type of the variable. It can be ‘int’, ‘char’, ‘float’, etc. ‘variable name’ is the constant variable., E.g. const float PI = 3.1417;, float const PI = 3.1417;, , Both of these statements declare PI as floating point constant and assign the value 3.1417 to it., Constant variable can also be defined using the #define pre-processor directive as given below., #define PI 3.1417, /*No assignment using = operator and no ‘;’ at end*/, , The difference between both approaches is that the first one defines a constant of a particular data type, (int, char, float, etc.) whereas in the second method the constant is represented using a mere symbol (text), and there is no implicit declaration about the data type of the constant. Both approaches are used in declaring, constants in embedded C applications. The choice is left to the programmer., Pointer to Constant Data Pointer to constant data is a pointer which points to a data which is read only. The, pointer pointing to the data can be changed but the data is non-modifiable. Example of pointer to constant, data, const int* x;, int const* x, , //Integer pointer x to constant data, //Same meaning as above definition, , Constant Pointer to Data Constant pointer has significant importance in Embedded C applications. An, embedded system under consideration may have various external chips like, data memory, Real Time Clock, (RTC), etc interfaced to the target processor/controller, using memory mapped technique. The range of, address assigned to each chips and their registers are dependent on the hardware design. At the time of, designing the hardware itself, address ranges are allocated to the different chips and the target hardware, is developed according to these address allocations. For example, assume we have an RTC chip which is, memory mapped at address range 0x3000 to 0x3010 and the memory mapped address of register holding the, time information is at 0x3007. This memory address is fixed and to get the time information we have to look, at the register residing at location 0x3007. But the content of the register located at address 0x3007 is subject, to change according to the change in time. We can access this data using a constant pointer. The declaration, of a constant pointer is given below., // Constant character pointer x to constant/variable data, char *const x;, /*Explicit declaration of character pointer pointing to 8bit memory location,, mapped at location 0x3007; RTC example illustrated above*/, char *const x= (char*) 0x3007;, , Constant Pointer to Constant Data Constant pointers pointing to constant data are widely used in embedded, programming applications. Typical uses are reading configuration data held at ROM chips which are memory, mapped at a specified address range, Read only status registers of different chips, memory mapped at a fixed, address. Syntax of declaring a constant pointer to constant data is given below., /*Constant character pointer x pointing to constant data*/, const char *const x;
Page 383 :
Embedded Firmware Design and Development, , char const* const x;, , 359, , //Equivalent to above declaration, , /*Explicit declaration of constant character pointer* pointing to constant, data/, char const* const x = (char*) 0x3007;, , 9.3.3.16 The ‘Vola le’ Type Qualifier in Embedded ‘C’, The keyword ‘volatile’ prefixed with any variable as qualifier informs the cross-compiler that the value of the, variable is subject to change at any point of time (subject to asynchronous modification) other than the current, statement of code where the control is at present., Examples of variables which are subject to asynchronous modifications are, 1. Variables common to Interrupt Service Routines (ISR) and other functions of a file, 2. Memory mapped hardware registers, 3. Variables shared by different threads in a multi threaded application (Not applicable to Super loop, Firmware development approach), The ‘volatile’ keyword informs the cross-compiler that the variable with ‘volatile’ qualifier is subject, to asynchronous change and there by the cross compiler turns off any optimisation (assumptions on the, variable) for these variables. The general form of declaring a volatile variable is given below., volatile data type variable name; or, data type volatile variable name;, , ‘data type’ refers to the data type of the variable. It can be int, char, float, etc. ‘variable name’ is the user, defined name for the volatile variable of the specified type., E.g., , volatile unsigned char x;, unsigned char volatile x;, , What is the catch in using ‘vola le’ variable? Let’s examine the following code snippet., //Declare a memory mapped register, char* status_reg = (char*) 0x3000;, while (*status_reg!=0x01);, , //Wait till status_reg = 0x01, , On cross-compiling the code snippet, the cross-compiler converts the code to a read operation from the, memory location mapped at address 0x3000 and it will assume that there is no point where the variable is, going to modify (sort of over smartness) and may keep the data in a register to speed up the execution. The, actual intention of the programmer, with the above code snippet is to read a memory mapped hardware status, register and halt the execution of the rest of the code till the status register shows a ready status. Unfortunately, the program will not produce the expected result due to the oversmartness of the cross-compiler in optimising, the code for execution speed. Re-writing the code as given below serves the intended purpose., //Declares volatile variable, volatile char *status_reg = (char *) 0x3000;, while (*status_reg!=0x01);, , //Wait till status_reg = 0x01, , In embedded applications all memory mapped device registers which are subject to asynchronous, modifications (e.g. status, control and general purpose registers of memory mapped external devices) should
Page 384 :
360, , Introduc on to Embedded Systems, , be declared with ‘volatile’ keyword to inform the cross-compiler that the variables representing these, registers/locations are subject to asynchronous changes and do not optimise them. Another area which needs, utmost care in embedded applications is variables shared between ISR and functions (variables which can be, modified by both Interrupt Sub Routines and functions). These include structure variable, union variable and, other ordinary variables. To avoid unexpected behaviour of the application, always declare such variables, using ‘volatile’ keyword., The ‘Constant Vola le’ Variable Some variables used in embedded applications can be both ‘constant’ and, ‘volatile’. A ‘Read only’ status register of a memory mapped device is a typical example for this. From a, user point of view the ‘Read only’ status registers can only be read but cannot modify. Hence it is a constant, variable. From the device point the contents can be modified at any time by the device. So it is a volatile, variable. Typical declarations are given ahead., volatile const int a;, volatile const int* a;, , // Constant volatile integer, //Pointer to a Constant volatile integer, , Vola le Pointer Volatile pointers is subject to change at any point after they are initialised. Typical, examples are pointer to arrays or buffers modifiable by Interrupt Service Routines and pointers in dynamic, memory allocation. Pointers used in dynamic memory allocation can be modified by the realloc() function., The general form of declaration of a volatile pointer to a non-volatile variable is given below., data type* volatile variable name;, e.g. unsigned char* volatile a;, , Volatile pointer to a volatile variable is declared with the following syntax., data type volatile* volatile variable name;, e.g. unsigned char volatile* volatile a;, , 9.3.3.17 Delay Genera on and Infinite Loops in Embedded C, Almost every embedded application involves delay programming. Embedded applications employ delay, programming for waiting for a fixed time interval till a device is ready, for inserting delay between displays, updating to give the user sufficient time to view the contents displayed, delays involved in bit transmission, and reception in asynchronous serial transmissions like I2C, 1-Wire data transfer, delay for key de-bouncing, etc. Some delay requirements in embedded application may be critical, meaning delay accuracy should be, within a very narrow tolerance band. Typical example is delay used in bit data transmission. If the delay, employed is not accurate, the bits may lost while transmission or reception. Certain delay requirements in, embedded application may not be much critical, e.g. display updating delay., It is easy to code delays in desktop applications under DOS or Windows operating systems. The library, function delay() in DOS and Sleep () in Windows provides delays in milliseconds with reasonable accuracy., Coding delay routines in embedded applications is bit difficult. The major reason is delay is dependent on, target system’s clock frequency. So we need to have a trial and error approach to code delays demanding, reasonably good accuracy. Refer to the code snippet given for ‘Performance Analyser’ in Chapter 14 for, getting a handle on how to code delay routine in embedded applications using IDEs. Delay codes are generally, non-portable. Delay routine requires a complete re-work if the target clock frequency is changed. Normally, ‘for loops’ are used for coding delays. Infinite loops are created using various loop control instructions like, while (), do while (), for and goto labels. The super loop created by while (1) instruction in a traditional, super loop based embedded firmware design is a typical example for infinite loop in embedded application, development.
Page 385 :
Embedded Firmware Design and Development, , 361, , Infinite loop using while The following code snippet illustrates ‘while’ for infinite loop implementation., while (1), {, }, , Infinite loop using do while, do, {, } while (1);, , Infinite loop using for, for (; ; ;), {, }, , Infinite loop using goto ‘goto’ when combined with a ‘label’ can create infinite loops., label: //Task to be repeated, //………………, //………………, goto label;, , Which technique is the best? According to all experienced Embedded ‘C’ programmers while() loop is, the best choice for creating infinite loops. There is no technical reason for this. The clean syntax of while, loop entitles it for the same. The syntax of for loop for infinite loop is little puzzling and it is not capable, of conveying its intended use. ‘goto’ is the favourite choice of programmers migrating from Assembly to, Embedded C ☺., break; statement is used for coming out of an infinite loop. You may think why we implement an infinite, loop and then quitting it? Answer – There may be instructions checking some condition inside the infinite, loop. If the condition is met the program control may have to transfer to some other location., , 9.3.3.18 Bit Manipula on Opera ons, Though Embedded ‘C’ does not support a built in Boolean variable (Bit variable) for holding a ‘TRUE, (Logic 1)’ or ‘FALSE (Logic 0)’ condition, it provides extensive support for Bit manipulation operations., Boolean variables required in embedded application are quite often stored as variables with least storage, memory requirement (obviously char variable). Indeed it is wastage of memory if the application contains, large number of Boolean variables and each variable is stored as a char variable. Only one bit (Least, Significant bit) in a char variable is used for storing Boolean information. Rest 7 bits are left unused. This, will definitely lead to serious memory bottle neck. Considerable amount of memory can be saved if different, Boolean variables in an application are packed into a single variable in ‘C’ which requires less memory, storage bytes. A character variable can accommodate 8 Boolean variables. If the Boolean variables are packed, for saving memory, depending upon the program requirement each variable may have to be extracted and, some manipulation (setting, clearing, inverting, etc.) needs to be performed on the bits. The following Bit, manipulation operations are employed for the same.
Page 386 :
362, , Introduc on to Embedded Systems, , Bitwise AND Operator ‘&’ performs Bitwise AND operations. Please note that the Bitwise AND operator, ‘&’ is entirely different from the Logical AND operator ‘&&’. The ‘&’ operator acts on individual bits of the, operands. Bitwise AND operations are usually performed for selective clearing of bits and testing the present, state of a bit (Bitwise ANDing with ‘1’)., Bitwise OR Operator ‘|’ performs Bitwise OR operations. Logical OR operator ‘||’ is in no way related to, the Bitwise OR operator ‘|’. Bitwise OR operation is performed on individual bits of the operands. Bitwise, OR operation is usually performed for selectively setting of bits and testing the current state of a bit (Bitwise, ORing with ‘0’)., Bitwise Exclusive OR- XOR Bitwise XOR operator ‘^’ acts on individual operand bits and performs an, ‘Excusive OR’ operation on the bits. Bitwise XOR operation is used for toggling bits in embedded, applications., Bitwise NOT Bitwise NOT operations negates (inverts) the state of a bit. The operator ‘~’ (tilde) is used as, the Bitwise NOT operator in C., Se ng and Clearing and Bits Setting the value of a bit to ‘1’ is achieved by a Bitwise OR operation. For, example consider a character variable (8bit variable) flag. The following instruction sets its 0th bit always 1., flag = flag | 1;, , Brief explanation about the above operation is given below., Using 8 bits, 1 is represented as 00000001. Upon a Bitwise OR each bit is ORed with the corresponding, bit of the operand as illustrated below., Bit 0 of flag is ORed with 1 and Resulting o/p bit=1, Bit 1 of flag is ORed with 0 and Resulting o/p bit= Bit 1 of flag, Bit 2 of flag is ORed with 0 and Resulting o/p bit= Bit 2 of flag, Bit 3 of flag is ORed with 0 and Resulting o/p bit= Bit 3 of flag, Bit 4 of flag is ORed with 0 and Resulting o/p bit= Bit 4 of flag, Bit 5 of flag is ORed with 0 and Resulting o/p bit= Bit 5 of flag, Bit 6 of flag is ORed with 0 and Resulting o/p bit= Bit 6 of flag, Bit 7 of flag is ORed with 0 and Resulting o/p bit= Bit 7 of flag, Bitwise OR operation combined with left shift operation of ‘1’ is used for selectively setting any bit in a, variable. For example the following operation will set bit 6 of char variable flag., //Sets 6th bit of flag. Bit numbering starts with 0., flag = flag | (1<<6);, , Re-writing the above code for a neat syntax will give, flag |= (1<<6);, , //Equivalent to flag = flag | (1<<6);, , The same can also be achieved by bitwise ORing the variable flag with a mask with 6th bit ‘1’ and all other, bits ‘0’, i.e. mask with 01000000 in Binary representation and 0x40 in hex representation., flag |= 0x40; //Equivalent to flag = flag | (1<<6);, , Clearing a desired bit is achieved by Bitwise ANDing the bit with ‘0’. Bitwise AND operation combined, with left shifting of ‘1’ can be used for clearing any desired bit in a variable.
Page 387 :
Embedded Firmware Design and Development, , 363, , Example:, flag &= ~ (1<<6);, , The above instruction will clear the 6th bit of the character variable flag. The operation is illustrated, below., Execution of (1<<6) shifts ‘1’ to six positions left and the resulting output in binary will be 01000000., Inverting this using the Bitwise NOT operation (~ (1<<6)) inverts the bits and give 10111111 as output., When flag is Bitwise ANDed with 10111111, the 6th bit of flag is cleared (set to ‘0’) and all other bits of flag, remain unchanged., From the above illustration it can be inferred that the same operation can also be achieved by a direct, Bitwise ANDing of the variable flag and a mask with binary representation 10111111 or hex representation, 0xBF., flag &= 0xBF;, , //Equivalent to flag = flag & ~(1<<6);, , Shifting the mask ‘1’ for setting or clearing a desired bit works perfectly, if the operand on which these, operations are performed is 8bit wide. If the operand is greater than 8 bits in size, care should be taken to, adjust the mask as wide as the operand. As an example let us assume flag as a 32bit operand. For clearing, the 6th bit of flag as illustrated in the previous example, the mask 1 should be re-written as ‘1L’ and the, instruction becomes, flag &= ~ (1L<<6);, , Toggling Bits Toggling a bit is performed to negate (toggle) the current state of a bit. If current state of a, specified bit is ‘1’, after toggling it becomes ‘0’ and vice versa. Toggling is also known as inverting bits. The, Bitwise XOR operator is used for toggling the state of a desired bit in an operand., flag ^= (1<<6);, , //Toggle bit 6 of flag, , The above instruction toggles bit 6 of flag., Adding ‘1’ to the desired bit position (In the above example 0x40 for 6th bit) will also toggle the current, state of the desired bit. This approach has the following drawback. If the current state of the bit which is to, be inverted is ‘1’, adding a ‘1’ to that bit position inverts the state of that bit and at the same time a carry, is generated and it is propagated to the next most significant bit (MSB) and change the status of some of the, other bits falling to the left of the bit which is toggled., Extrac ng and Inser ng Bits Quite often it is meaningful to store related information as the bits of a single, variable instead of saving them as separate variables. This saves considerable amount of memory in an, embedded system where data memory is a big bottleneck. Typical scenario in embedded applications where, information can be stored using the bits of single variable is, information provided by Real Time Clock, (RTC). RTC chip provides various data like current date/month/year, day of the week, current time in hours/, minutes/seconds, etc. If an application demands the storage of all these information in the data memory of, the embedded system for some reason, it can be achieved in two ways;, 1. Use separate variables for storing each data (date, month, year, etc.), 2. Club the related data and store them as the bits of a single variable, As an example assume that we need to store the date information of the RTC in the data memory in D/M/Y, format. Where ‘D’ stands for date varying from 1 to 31, ‘M’ stands for month varying from 1 to 12 and ‘Y’, stands for year varying from 0 to 99. If we follow the first approach we need 3 character variables to store, the date information separately. In the second approach, we need only 5 bits for date (With 5 bits we can
Page 388 :
364, , Introduc on to Embedded Systems, , represent 0 to 25 –1 numbers (0 to 31), 4 bits for month and 7 bits for year. Hence the total number of bits, required to represent the date information is 16. All these bits can be fitted into a 16 bit variable as shown in, Fig. 9.11., Bit 9 to15, , Bit 5 to 8, , 15, , 9, Year (0 to 99), , Fig. 9.11, , Bit 0 to 4, 5, , Month (1 to 12), , 0, Date (1 to 31), , Packed Bits for data representation, , Suppose this is arranged in a 16bit integer variable date, for any calculation requiring ‘Year’, ‘Month’, or ‘Date’, each should be extracted from the single variable date. The following code snippet illustrates the, extraction of ‘Year’, char year = (date>>9) & 0x7F;, , (date>>9) shifts the contents 9 bits to the left and now ‘Year’ is stored in the variable date in bits 0 to 6, (including both). The contents of other bits (7 to 15) are not relevant to us and we need only the first 7 bits (0, to 6) for getting the ‘Year’ value. ANDing with the mask 0x7F (01111111 in Binary) retains the contents of, bits 0 to 6 and now the variable year contains the ‘Year’ value extracted from variable ‘date’., Similar to the extracting of bits, we may have to insert bits to change the value of certain data. In the above, example if the program is written in such a way that after each 1 minute, the RTC’s year register is read, and the contents of bit fields 9 to 15 in variable ‘date’ needs to be updated with the new value. This can be, achieved by inserting the bits corresponding to the data into the desired bit position. Following code snippet, illustrates the updating of ‘Year’ value for the above example. To set the new ‘Year’ value to the variable, ‘date’ all the corresponding bits in the variable for ‘Year’ should be cleared first. It is illustrated below., date = date & ~ (0x7F<<9);, , The mask for 7 bits is 0x7F (01111111 in Binary). Shifting the mask 9 times left aligns the mask to that, of the bits for storing ‘Year’. The ~ operator inverts the 7 bits aligning to the bits corresponding to ‘Year’., Bitwise ANDing with this negated mask clears the current bits for ‘Year’ in the variable ‘date’. Now shift the, new value which needs to be put at the ‘Year’ location, 9 times for bitwise alignment for the bits corresponding, to ‘Year’. Bitwise OR the bit aligned new value with the ‘date’ variable whose bits corresponding to ‘Year’, is already cleared. The following instruction performs this., date |= (new_year <<9);, , where ‘new_year’ is the new value for ‘Year’., In order to ensure the inserted bits are not exceeding the number of bits assigned for the particular bit, variable, bitwise AND the new value with the mask corresponding to the number of bits allocated to the, corresponding variable (Above example 7 bits for ‘Year’ and the mask is 0x7F). Hence the above instruction, can be written more precisely as, date |= (new_year & 0x7F) <<9;, , If all the bits corresponding to the bit field to be modified are not set to zero prior to Bitwise ORing with, the new value, any existing bit with value ‘1’ will remain as such and expected result will not be obtained.
Page 389 :
Embedded Firmware Design and Development, , 365, , Tes ng Bits So far we discussed the Bitwise operators for changing the status of a selected bit. Bitwise, operators can also be used for checking the present status of a bit without modifying it for decision making, operations., if (flag & (1<<6)), , //Checks whether 6th bit of flag is ‘1’, , This instruction examines the status of the 6th bit of variable flag. The same can also be achieved by using, a constant bit mask as, if (flag & 0x40), , //Checks whether 6th bit of flag is ‘1’, , 9.3.3.19 Coding Interrupt Service Rou nes (ISR), Interrupt is an event that stops the current execution of a process (task) in the CPU and transfers the program, execution to an address in code memory where the service routine for the event is located. The event which, stops the current execution can be an internal event or an external event or a proper combination of the, external and internal event. Any trigger signal coming from an externally interfaced device demanding, immediate attentions is an example for external event whereas the trigger indicating the overflow of an, internal timer is an example for internal event. Reception of serial data through the serial line is a combination, of internal and external events. The number of interrupts supported, their priority levels, interrupt trigger type, and the structure of interrupts are processor/controller architecture dependent and it varies from processor, to processor. Interrupts are generally classified into two: Maskable Interrupts and Non-maskable Interrupts, (NMI). Maskable interrupt can be ignored by the CPU if the interrupt is internally not enabled or if the CPU, is currently engaged in processing another interrupt which is at high priority. Non-maskable interrupts are, interrupts which require urgent attention and cannot be ignored by the CPU. Reset (RST) interrupt and TRAP, interrupt of 8085 processor are examples for Non-maskable interrupts., Interrupts are considered as boon for programmers and their main motto is “give real time behaviour to, applications”. In a processor/controller based simple embedded system where the application is designed in, a super loop model, each interrupt supported by the processor/controller will have a fixed memory location, assigned in the code memory for writing its corresponding service routine and this address is referred as, Interrupt Vector Address. The vector address for each interrupt will be pre-defined and the number of code, memory bytes allocated for each Interrupt Service Routine, starting from the Interrupt Vector Address may, also be fixed. For example the interrupt vector address for interrupt ‘INT0’ of 8051 microcontroller is ‘0003H’, and the number of code memory bytes allowed for writing its Service routine is 8 bytes., The function written for serving an Interrupt is known as Interrupt Service Routine (ISR). ISR for each, interrupt may be different and they are placed at the Interrupt Vector Address of corresponding Interrupt. ISR, is essentially a function that takes no parameters and returns no results. But, unlike a regular function, the, ISR can be active at any time since the triggering of interrupts need not be in sync with the internal program, execution (e.g. An external device connected to the external interrupt line can assert external interrupt at any, time regardless at what stage the program execution is currently). Hence special care must be taken in writing, these functions keeping in mind; they are not going to be executed in a pre-defined order. What all special, care should be taken in writing an ISR? The following section answers this query., Imagine a situation where the application is doing some operations and some registers are modified and, an interrupt is triggered in between the operation. Indeed the program flow is diverted to the Interrupt Service, Routine, if the interrupt is an enabled interrupt and the operation in progress is not a service routine of a high, priority interrupt, and the ISR is executed. After completing the ISR, the program flow is re-directed to the, point where it got interrupted and the interrupted operation is continued. What happens if the ISR modifies, some of the registers used by the program? No doubt the application will produce unexpected results and may
Page 390 :
366, , Introduc on to Embedded Systems, , go for a toss. How can this situation be tackled? Such a situation can be avoided if the ISR is coded in such, a way that it takes care of the following:, 1. Save the current context (Important Registers which the ISR will modify), 2. Service the Interrupt, 3. Retrieve the saved context (Retrieve the original contents of registers), 4. Return to the execution point where the execution is interrupted, Normal functions will not incorporate code for saving the current context before executing the function, and retrieve the saved context before exiting the function. ISR should incorporate code for performing these, operations. Also it is known to the programmer at what point a normal function is going to be invoked and the, programmer can take necessary precautions before calling the function, it is not the case for an ISR. Interrupt, Service Routines can be coded either in Assembly language or High level language in which the application, is written. Assembly language is the best choice if the ISR code is very small and the program itself is, written in Assembly. Assembly code generates optimised code for ISR and user will have a good control on, deciding what all registers needs to be preserved from alteration. Most of the modern cross-compilers provide, extensive support for efficient and optimised ISR code. The way in which a function is declared as ISR and, what all context is saved within the function is cross-compiler dependent., Keil C51 Cross-complier for 8051 microcontroller implements the Interrupt Service Routine using the, keyword interrupt and its syntax is illustrated below., void interrupt_name (void), {, /*Process Interrupt*/, }, , interrupt x using y, , interrupt_name is the function name and programmers can choose any name according to his/her taste. The, attribute ‘interrupt’ instructs the cross compiler that the associated function is an interrupt service routine., The interrupt attribute takes an argument x which is an integer constant in the range 0 to 31 (supporting, 32 interrupts). This number is the interrupt number and it is essential for placing the generated hex code, corresponding to the ISR in the corresponding Interrupt Vector Address (e.g. For placing the ISR code at, code memory location 0003H for Interrupt 0 – External Interrupt 0 for 8051 microcontroller). using is an, optional keyword for indicating which register bank is used for the general purpose Registers R0 to R7 (For, more details on register banks and general purpose registers, refer to the hardware description of 8051). The, argument y for using attribute can take values from 0 to 3 (corresponding to the register banks 0 to 3 of 8051)., The interrupt attribute affects the object code of the function in the following way:, 1. If required, the contents of registers ACC, B, DPH, DPL, and PSW are saved on the stack at function, invocation time., 2. All working registers (R0 to R7) used in the interrupt function are stored on the stack if a register bank, is not specified with the using attribute., 3. The working registers and special registers that were saved on the stack are restored before exiting the, function., 4. The function is terminated by the 8051 RETI instruction., Typical usage is illustrated below, void external_interrupt0 (void ), interrupt 0 using 0, {, adc_control = *adc_control_reg //Read memory mapped ADC, // control Register, }
Page 391 :
Embedded Firmware Design and Development, , 367, , If the cross-compiler you are using don’t have a built in support for writing ISRs, What shall you do? Don’t, be panic you can implement the ISR feature with little tricky coding. If the cross-compiler provides support, for mixing high level language-C and Assembly, write the ISR in Assembly and place the ISR code at the, corresponding Interrupt Vector address using the cross compiler’s support for placing the code in an absolute, address location of code memory (Using keywords like _at. Refer to your cross compiler’s documentation, for getting the exact keyword). If the ISR is too complicated, you can place the body of the ISR processing in, a normal C function and call it from a simple assembly language wrapper. The assembly language wrapper, should be installed as the ISR function at the absolute address corresponding to the Interrupt’s Vector, Address. It is responsible for executing the current context saving and retrieving instructions. Current context, saving instructions are written on top of the call to the ‘C’ function and context retrieving instructions are, written just below the ‘C’ function call. It is little puzzling to find answers to the following questions in this, approach., 1. Which registers must be saved and restored since we are not sure which registers are used by the cross, compiler for implementing the ‘C’ function?, 2. How the assembly instructions can be interfaced with high-level language like ‘C’?, Answers to these questions are cross compiler dependent and you need to find the answer by referring the, documentation files of the cross-compiler in use. Context saving is done by ‘Pushing’ the registers (using, PUSH instructions) to stack and retrieving the saved context is done by ‘Poping’ (using POP instructions), the pushed registers. Push and Pop operations usually follow the Last In First Out (LIFO) method. While, writing an ISR, always keep in mind that the primary aim of an interrupt is to provide real time behaviour, to the program. Saving the current context delays the execution of the original ISR function and it creates, Interrupt latency (Refer to the section on Interrupt Latency for more details) and thereby adds lack of real, time behaviour to an application. As a programmer, if you are responsible for saving the current context by, Pushing the registers, avoid Pushing the registers which are not used by the ISR. If you deliberately avoid, the saving of registers which are going to be modified by the ISR, your application may go for a toss. Hence, Context saving is an unavoidable evil in Interrupt driven programming. If you go for saving unused registers,, it will increase interrupt latency as well as stack memory usage. So always take a judicious decision on, the context saving operation. If the cross compiler offers the context saving operation by supporting ISR, functions, always rely on it. Because most modern cross compilers are smart and capable of taking a judicious, decision on context saving. In case the cross compiler is not supporting ISR function and as a programmer, you are the one writing ISR functions either in Assembly or by mixing ‘C’ and Assembly, ensure that the, size of ISR is not crossing the size of code memory bytes allowed for an Interrupt’s ISR (8 bytes for 8051)., If it exceeds, it will overlap with the location for the next interrupt and may create unexpected behaviour on, servicing the Interrupt whose Vector address got overlapped., , 9.3.3.20 Recursive Func ons, A function which calls itself repeatedly is called a Recursive Function. Using recursion, a complex problem, is split into its single simplest form. The recursive function only knows how to solve that simplest case., Recursive functions are useful in evaluating certain types of mathematical function, creating and accessing, dynamic data structures such as linked lists or binary trees. As an example let us consider the factorial, calculation of a number., By mathematical definition, n factorial = 1 × 2 ×……. (n – 2) × (n – 1) × n; where n = 1, 2, etc… and 0 factorial = 1
Page 392 :
368, , Introduc on to Embedded Systems, , Using ‘C’ the function for finding the factorial of a number ‘n’ is written as, int, {, int, int, for, , factorial (int n), , count;, factorial=1;, (count=1; count<=n; count++), factorial*=count;, return factorial;, }, , This code is based on iteration. The iteration of calculating the repeated products is performed until the, count value exceeds the value of the number whose factorial is to be calculated. We can split up the task, performed inside the function as count * (count +1) till count is one short of the number whose factorial is to, be calculated. Using recursion we can re-write the above function as, int factorial (int n), {, if (n==0), return 1;, else, return (n*factorial (n-1));, }, , Here the function factorial (n) calls itself, with a changed version of the parameter for each call, inside the, same for calculating the factorial of a given number. The ‘if’ statement within the recursive function forces the, function to stop recursion when a certain criterion is met. Without an ‘if’ statement a recursive function will, never stop the recursion process. Recursive functions are very effective in implementing solutions expressed, in terms of a successive application of the same solution to the solution subsets. Recursion is a powerful at, the same time most dangerous feature which may lead to application crash. The local variables of a recursive, function are stored in the stack memory and new copies of each variable are created for successive recursive, calls of the function. As the recursion goes in a deep level, stack memory may overflow and the application, may bounce., Recursion vs. Itera on: A Comparison Both recursion and iteration is used for implementing certain, operations which are self repetitive in some form., Recursion involves a lot of call stack overhead and function calls. Hence it is slower in operation, compared to the iterative method. Since recursion implements the functionality with repeated self, function calls, more stack memory is required for storing the local variables and the function return, address, Recursion is the best method for implementing certain operations like certain mathematical operation,, creating and accessing of dynamic data structures such as linked lists or binary trees, A recursive solution implementation can always be replaced by iteration. The process of converting a, recursive function to iterative method is called ‘unrolling’, Benefits of Recursion Recursion brings the following benefits in programming:, Recursive code is very expressive compared to iterative code. It conveys the intended use., Recursion is the most appropriate method for certain operations like permutations, search trees, sorting,, etc.
Page 393 :
Embedded Firmware Design and Development, , 369, , Drawbacks of Recursion Though recursion is an effective technique in implementing solutions expressed, in terms of a successive application of the same solution to the solution subsets, it possesses the following, drawbacks., Recursive operation is slow in operation due to call stack overheads. It involves lot of stack operations, like local variable storage and retrieval, return address storage and retrieval, etc., Debugging of recursive functions are not so easy compared to iterative code debugging, , 9.3.3.21 Re-entrant Func ons, Functions which can be shared safely with several processes concurrently are called re-entrant functions., When a re-entrant function is executing, another process can interrupt the execution and can execute the same, re-entrant function. The “another process” referred here can be a thread in a multithreaded application or, can be an Interrupt Service Routine (ISR). Re-entrant function is also referred as ‘pure’ function. Embedded, applications extensively make use of re-entrant functions. Interrupt Service Routines (ISR) in Super loop, based firmware systems and threads in RTOS based systems can change the program’s control flow to alter, the current context at any time. When an interrupt is asserted, the current operation is put on hold and the, control is transferred to another function or task (ISR). Imagine a situation where an interrupt occurs while, executing a function x and the ISR also contain the task of executing the function x. What will happen? Obviously the ISR will modify the shared variables of function x and when the control is switched back to, the point where the execution got interrupted, the function will resume its execution with the data which is, modified by the ISR. What will be the outcome of this action? - Unpredictable result causing data corruption, and potential disaster like application break-down. Why it happens so? Due to the corruption of shared data, in function which is unprotected. How this situation can be avoided? By carefully controlling the sharing of, data in the function., In embedded applications, a function/subroutine is considered re-entrant if and only if it satisfies the, following criteria., 1. The function should not hold static data over successive calls, or return a pointer to static data., 2. All shared variables within the function are used in an atomic way., 3. The function does not call any other non-reentrant functions within it., 4. The function does not make use of any hardware in a non-atomic way, Rule# 1 deals with variable usage and function return value for a reentrant function. In an operating, system based embedded system, the embedded application is managed by the operating system services and, the ‘memory manager’ service of the OS kernel is responsible for allocating and de-allocating the memory, required by an application for its execution. The working memory required by an application is divided, into three groups namely; stack memory, heap memory and data memory (Refer to the Dynamic Memory, Allocation section of this chapter for more details). The life time of static variables is same as that of the life, time of the application to which it belongs and they are usually held in the data memory area of the memory, space allocated for the application. All static variables of a function are allocated in the data memory area, space of the application and each instance of the function shares this, whereas local (auto) variables of a, function are stored in the stack memory and each invocation of the function creates independent copies, of these variables in the stack memory. For a function to be reentrant, it should not keep any data over, successive invocations (the function should not contain any static storage). If a function needs some data to, be kept over successive invocations, it should be provided through the caller function instead of storing it in, the function in the form of static variables. If the function returns a pointer to a static data, each invocation, of the function makes use of this pointer for returning the result. This can be tackled by using caller function, provided storage for passing the data back to the caller function. The ‘callee’ function needs to be modified, accordingly to make use of the caller function provided storage for passing the data back to the caller.
Page 394 :
370, , Introduc on to Embedded Systems, , Rule# 2 deals with ‘atomic’ operations. So what does ‘atomic’ mean in reentrancy context? Meaning the, operation cannot be interrupted. If an embedded application contains variables which are shared between, various threads of a multitasking system (Applicable to Operating System based embedded systems) or, between the application and ISR (In Non-RTOS based embedded systems), and if the operation on the shared, variable is non-atomic, there is a possibility for corruption of the variable due to concurrent access of the, variable by multiple threads or thread and ISR. As an example let us assume that the variable counter is shared, between multiple threads or between a thread and ISR, the instruction,, counter++;, , need not operate in an ‘atomic’ way on the variable counter. The compiler/cross-compiler in use converts this, high level instruction into machine dependent code (machine language) and the objective of incrementing, the variable counter may be implemented using a number of low level instructions by the compiler/cross, compiler. This violates the ‘atomic’ rule of operation. Imagine a situation where an execution switch (context, switch) happens when one thread is in the middle of executing the low level instructions corresponding to the, high level instruction counter++, of the function and another thread (which is currently in execution after the, context switch) or an ISR calls the same function and executes the instruction counter++, this will result in, inconsistent result. Refer to the section ‘Racing’ under the topic ‘Task Synchronisation Issues’ of the chapter, ‘Designing with Real Time Operating Systems’ for more details on this. Eliminating shared global variables, and making them as variables local to the function solves the problem of modification of shared variables by, concurrent execution of the function., Rule# 3 is selfexplanatory. If a re-entrant function calls another function which is non-reentrant, it may, create potential damages due to the unexpected modification of shared variables if any. What will happen if, a reentrant function calls a standard library function at run time? By default most of the run time library is, reentrant. If a standard library function is not reentrant the function will no longer be reentrant., Rule# 4 deals with the atomic way of accessing hardware devices. The term ‘atomic’ in hardware access, refers to the number of steps involved in accessing a specific register of a hardware device. For the hardware, access to be atomic the number of steps involved in hardware access should be one. If access is achieved, through multiple steps, any interruption in between the steps may lead to erroneous results. A typical example, is accessing the hardware register of an I/O device mapped to the host CPU using paged addressing technique., In order to Read/Write from/to any of the hardware registers of the device a minimum of two steps is required., First write the page address, corresponding to the page in which the hardware register belongs, to the page, register and then read the register by giving the address of the register within that page. Now imagine a, situation where an interrupt occurs at the moment executing the page setting instruction in progress. The, ISR will be executed after finishing this instruction. Suppose ISR also involves a Read/Write to another, hardware register belonging to a different page. Obviously it will modify the page register of the device with, the required value. What will be its impact? On finishing the ISR, the interrupted code will try to read the, hardware register with the page address which is modified by the ISR. This yields an erroneous result., How to declare a func on as Reentrant The way in which a function is declared reentrant is cross-compiler, dependent. For Keil C51 cross-compiler for 8051 controller, the keyword ‘reentrant’ added as function, attribute treats the function as reentrant. For each reentrant function, a reentrant stack area is simulated in, internal or external memory depending whether the data memory is internal or external to the processor/, controller. A typical reentrant function implementation for C51 cross-compiler for 8051 controller is given, below., int multiply (char i, int b) reentrant, {, int x;
Page 395 :
Embedded Firmware Design and Development, , 371, , x = table [i];, return (x * b);, }, , The simulated stack used by reentrant functions has its own stack pointer which is independent of the, processor stack and stack pointer. For C51 cross compiler the simulated stack and stack pointers are declared, and initialised in the startup code in STARTUP.A51 which can be found in the LIB subdirectory. You must, modify the startup code to specify which simulated stack(s) to initialise in order to use re-entrant functions., You can also modify the starting address for the top of the simulated stack(s) in the startup code. When, calling a function with a re-entrant stack, the cross-compiler must know that the function has a re-entrant, stack. The cross-compiler figures this out from the function prototype which should include the reentrant, keyword (just like the function definition). The cross compiler must also know which reentrant stack to stuff, the arguments for it. For passing arguments, the cross-compiler generates code that decrements the stack, pointer and then “pushes” arguments onto the stack by storing the argument indirectly through R0/R1 or, DPTR (8051 specific registers). Calling reentrant function decrements the stack pointer (for local variables), and access arguments using the stack pointer plus an offset (which corresponds to the number of bytes of, local variables). On returning, reentrant function adjusts the stack pointer to the value before arguments were, pushed. So the caller does not need to perform any stack adjustment after calling a reentrant function., Reentrant vs. Recursive Func ons The terms Reentrant and Recursive may sound little confusing. You may, find some amount of similarity among them and ultimately it can lead to the thought are Re-entrant functions, and Recursive functions the same? The answer is—it depends on the usage context of the function. It is not, necessary that all recursive functions are reentrant. But a Reentrant function can be invoked recursively by, an application., For 8051 Microcontroller, the internal data memory is very small in size (128 bytes) and the stack as well, user data memory is allocated within it. Normally all variables local to a function and function arguments, are stored in fixed memory locations of the user data memory and each invocation of the function will access, the fixed data memory and any recursive calls to the function use the same memory locations. And, in this, case, arguments and locals would get corrupted. Hence the scope for implementing recursive functions is, limited. A reentrant function can be called recursively to a recursion level dependent on the simulated stack, size for the same reentrant function., C51 Cross-compiler does not support recursive calls if the functions are non-reentrant., , 9.3.3.22 Dynamic Memory Alloca on, Every embedded application, regardless of whether it is running on an operating system based product or, a non-operating system based product (Super loop based firmware Architecture) contains different types of, variables and they fall into any one of the following storage types namely; static, auto, global or constant, data. Regardless of the storage type each variable requires memory locations to hold them physically. The, storage type determines in which area of the memory each variable needs to be kept. For an Assembly, language programmer, handling memory for different variables is quite difficult. The programmer needs to, assign a particular memory location for each variable and should recollect where it is kept for operations, involving that variable., Certain category of embedded applications deal with fixed number of variables with fixed length and, certain other applications deal with variables with fixed memory length as well as variable with total storage, size determined only at the runtime of application (e.g. character array with variable size). If the number of, variables are fixed in an application and if it doesn’t require a variable size at run time, the cross compiler can, determine the storage memory required by the application well in advance at the run time and can assign each
Page 396 :
372, , Introduc on to Embedded Systems, , variable an absolute address or relative (indirect) address within the data memory. Here the memory required, is fixed and allocation is done before the execution of the application. This type of memory allocation is, referred as ‘Static Memory Allocation’. The term ‘Static’ mentioned here refers ‘fixed’ and it is no way, related to the storage class static. As mentioned, some embedded applications require data memory which is a, combination of fixed memory (Number of variables and variable size is known prior to cross compilation) and, variable length data memory. As an example, let’s take the scenario where an application deals with reading, a stream of character data from an external environment and the length of the stream is variable. It can vary, between any numbers (say 1 to 100 bytes). The application needs to store the data in data memory temporarily, for some calculation and it can be ignored after the calculation. This scenario can be handled in two ways in, the application program. In the first approach, allocate fixed memory with maximum size (say 100 bytes) for, storing the incoming data bytes from the stream. In the second approach allocate memory at run time of the, application and de-allocate (free) the memory once the data memory storage requirement is over. In the first, approach if the memory is allocated fixedly, it is locked forever and cannot re-used by the application even, if there is no requirement for the allocated number of bytes and it will definitely create memory bottleneck, issues in embedded systems where memory is a big constraint. Hence it is not advised to go for fixed memory, allocations for applications demanding variable memory size at run time. Allocating memory on demand and, freeing the memory at run time is the most advised method for handling the storage of dynamic (changing), data and this memory allocation technique is known as ‘Dynamic Memory Allocation’., Dynamic memory allocation technique is employed in Operating System (OS) based embedded systems., Operating system contains a ‘Memory Management Unit’ and it is responsible for handling memory allocation, related operations. The memory management unit allocates memory to hold the code for the application, and the variables associated with the application. The conceptual view of storage of an application and the, variables related to the application is represented in Fig. 9.12., , Fig. 9.12, , Static and Dynamic Memory Storage Allocation
Page 397 :
Embedded Firmware Design and Development, , 373, , Memory manager allocates a memory segment to each application and the memory segment holds the, source code of the application as well as data related to the application. The actual program code (executable, machine code instructions) is stored at the lower address of the memory (at the beginning address of the, memory segment and stores upward). Constant data related to the application (e.g. const int x = 10;) is stored, at the memory area just above the executable code. The alterable data (global and static variables; e.g. static, int j = 10; int k = 2; (global declaration), etc.) are stored at the ‘Alterable Data’ memory area. The size of, the executable code, the number of constant data and alterable data in an application is always fixed and, hence they occupy only a fixed portion of the memory segment. Memory allocated for the executable code,, constant data and alterable data together constitute the ‘Static storage memory (Fixed storage memory)’. The, storage memory available within the memory segment excluding the fixed memory is the ‘Dynamic storage, memory’. Dynamic storage memory area is divided into two separate entities namely ‘stack’ and ‘heap’., ‘Stack memory’ normally starts at the high memory area (At the top address) of the memory segment and, grows down. Within a memory segment, fixed number of storage bytes are allocated to stack memory and the, stack can grow up to this maximum allocated size. Stack memory is usually used for holding auto variables, (variables local to a function), function parameters and function return values. Depending upon the function, calls/return and auto variable storage, the size of the stack grows and shrinks dynamically. If at any point of, execution the stack memory exceeds the allocated maximum storage size, the application may crash and this, condition is called ‘Stack overflow’. The free memory region lying in between the stack and fixed memory, area is called ‘heap’. Heap is the memory pool where storage for data is done dynamically as and when, the application demands. Heap is located immediately above the fixed memory area and it grows upward., Any request for dynamic memory allocation by the program increases the size of heap (depending on the, availability of free memory within heap) and the free memory request decrements the size of heap (size of, already occupied memory within the heap area). Heap can be viewed as a ‘bank’ in real life application,, where customers can demand for loan. Depending on the availability of money, bank may allot loan to the, customer and customer re-pays the loan to the bank when he/she is through with his/her need. Bank uses the, money repaid by a customer to allocate a loan to another customer—some kind of rolling mechanism. ‘C’, language establishes the dynamic memory allocation technique through a set of ‘Memory management library, routines’. The most commonly used ‘C’ library functions for dynamic memory allocation are ‘malloc’, ‘calloc’,, ‘realloc’ and ‘free’. The following sections illustrate the use of these memory allocation library routines for, allocating and de-allocating (freeing) memory dynamically., malloc() malloc() function allocates a block of memory dynamically. The malloc() function reserves a, block of memory of size specified as parameter to the function, in the heap memory and returns a pointer of, type void. This can be assigned to a pointer of any valid type. The general form of using malloc() function is, given below., pointer =, , (pointer_type *) malloc (no. of bytes);, , where ‘pointer’ is a pointer of type ‘pointer_type’. ‘pointer_type’ can be ‘int’, ‘char’, ‘float’ etc. malloc(), function returns a pointer of type ‘pointer_type’ to a block of memory with size ‘no. of bytes’. A typical, example is given below., ptr= (char *) malloc(50);, , This instruction allocates 50 bytes (If there is 50 bytes of memory available in the heap area) and the, address of the first byte of the allocated memory in the heap area is assigned to the pointer ptr of type char. It, should be noted that the malloc() function allocates only the requested number of bytes and it will not allocate
Page 398 :
374, , Introduc on to Embedded Systems, , memory automatically for the units of the pointer in use. For example, if the programmer wants to allocate, memory for 100 integers dynamically, the following code, x= (int *) malloc(100);, , will not allocate memory size for 100 integers, instead it allocates memory for just 100 bytes. In order to, make it reserving memory for 100 integer variables, the code should be re-written as, x= (int *) malloc(100 * sizeof (int));, , malloc() function can also be used for allocating memory for complex data types such as structure pointers, apart from the usual data types like ‘int’, ‘char’, ‘float’ etc. malloc() allocates the requested bytes of memory, in heap in a continuous fashion and the allocation fails if there is no sufficient memory available in continuous, fashion for the requested number of bytes by the malloc() functions. The return value of malloc() will be, NULL (0) if it fails. Hence the return value of malloc() should be checked to ensure whether the memory, allocation is successful before using the pointer returned by the malloc() function., E.g. int * ptr;, if ((ptr= (int *) malloc(50 * sizeof (int)))), printf (“Memory allocated successfully”);, else, printf (“Memory allocation failed”);, , Remember malloc() only allocates required bytes of memory and will not initialise the allocated, memory. The allocated memory contains random data., calloc() The library function calloc() allocates multiple blocks of storage bytes and initialises each allocated, byte to zero. Syntax of calloc() function is illustrated below., pointer =, , (pointer_type *) calloc (n, size of block);, , where ‘pointer’ is a pointer of type ‘pointer_type’. ‘pointer_type’ can be ‘int’, ‘char’, ‘float’ etc. ‘n’ stands for, the number of blocks to be allocated and ‘size of block’ tells the size of bytes required per block. The calloc(n,, size of block) function allocates continuous memory for ‘n’ number of blocks with ‘size of block’ number of, bytes per block and returns a pointer of type ‘pointer_type’ pointing to the first byte of the allocated block of, memory. A typical example is given below., ptr= (char *) calloc (50,1);, , Above instruction allocates 50 contiguous blocks of memory each of size one byte in the heap memory, and assign the address of the first byte of the allocated memory region to the character pointer ‘ptr’. Since, malloc() is capable of allocating only fixed number of bytes in the heap area regardless of the storage type,, calloc() can be used for overcomming this limitation as discussed below., ptr= (int *) calloc(50,sizeof(int));, , This instruction allocates 50 blocks of memory, each block representing an integer variable and initialises, the allocated memory to zero. Similar to the malloc() function, calloc() also returns a ‘NULL’ pointer if, there is not enough space in the heap area for allocating storage for the requested number of memory by the, calloc() function. Hence it is advised to check the pointer to which the calloc() assigns the address of the first, byte in the allocated memory area. If calloc() function fails, the return value will be ‘NULL’ and the pointer, also will be ‘NULL’. Checking the pointer for ‘NULL’ immediately after assigning with pointer returned by, calloc() function avoids possible errors and application crash.
Page 399 :
Embedded Firmware Design and Development, , 375, , Features provided by calloc() can be implemented using malloc() function as, pointer = (pointer_type *) malloc (n * size of block);, memset(pointer, 0, n * size of block);, , For example, ptr= (int *) malloc (10 * sizeof (int));, memset(ptr, 0, n * size of block);, , The function memset (ptr, 0, n * size of block) sets the memory block of size (n * size of block) with, starting address pointed by ‘ptr’, to zero., free() The ‘C’ memory management library function free() is used for releasing or de-allocating the memory, allocated in the heap memory by malloc() or calloc() functions. If memory is allocated dynamically, the, programmer should release it if the dynamically allocated memory is no longer required for any operation., Releasing the dynamically allocated memory makes it ready to use for other dynamic allocations. The syntax, of free() function is given below., free (ptr);, , ‘ptr’ is the valid pointer returned by the calloc() or malloc() function on dynamic memory allocation. Use of, an invalid pointer with function free() may result in the unexpected behaviour of the application., Note:, 1. The dynamic memory allocated using malloc () or calloc() functions should be released (deallocated), using free () function ., 2. Any use of a pointer which refers to freed memory space results in abnormal behaviour of application., 3. If the parameter to free () function is not a valid pointer, the application behaviour may be, unexpected., realloc() realloc() function is used for changing the size of allocated bytes in a dynamically allocated, memory block. You may come across situations where the allocated memory is not sufficient to hold the, required data or it is surplus in terms of allocated memory bytes. Both of these situations are handled using, realloc() function. The realloc() function changes the size of the block of memory pointed to, by the pointer, parameter to the number of bytes specified by the modified size parameter and it returns a new pointer to, the block. The pointer specified by the pointer parameter must have been created with the malloc, calloc, or, realloc subroutines and not been de-allocated with the free or realloc subroutines. Function realloc() may, shift the position of the already allocated block depending on the new size, with preserving the contents of, the already allocated block and returns a pointer pointing to the first byte of the re-allocated memory block., realloc() returns a void pointer if there is sufficient memory available for allocation, else return a ‘NULL’, pointer. Syntax of realloc is given below., realloc (pointer, modified size);, , Example illustrating the use of realloc() function is given below., char *p;, p= (char*) malloc (10); //Allocate 10 bytes of memory, p= realloc(p,15);, //Change the allocation to 15 bytes, realloc(p,0) is same as free(p), provided ‘p’ is a valid pointer.
Page 400 :
376, , Introduc on to Embedded Systems, , Summary, Embedded firmware can be developed to run with the help of an embedded operating system or, without an OS. The non-OS based embedded firmware execution runs the tasks in an infinite LO1, loop and this approach is known as ‘Super loop based’ execution, Low level language (Assembly code) or High Level language (C,C++ etc.) or a mix of both are used in, LO2, embedded firmware development, In Assembly language based design, the firmware is developed using the Assembly language, Instructions specific to the target processor. The Assembly code is converted to machine LO2, specific code by an assembler., In High Level language based design, the firmware is developed using High Level language like ‘C/, LO2, C++’ and it is converted to machine specific code by a compiler or cross-compiler, Mixing of Assembly and High Level language can be done in three ways namely; mixing assembly, routines with a high level language like ‘C’, mixing high level language functions like ‘C’ functions, with application written in assembly code and invoking assembly instructions inline from LO2, the high level code, Embedded ‘C’ can be considered as a subset of conventional ‘C’ language. Embedded C supports, almost all ‘C’ instructions and incorporates a few target processor specific functions/instructions. The, standard ANSI ‘C’ library implementation is always tailored to the target processor/, LO3, controller library files in Embedded C, Compiler is a tool for native platform application development, whereas cross-compiler is a tool for, LO3, cross platform application development, Embedded ‘C’ supports all the keywords, identifiers and data types, storage classes, arithmetic and, LO3, logical operations, array and branching instructions supported by standard ‘C’, structure is a collection of data types. Arrays of structures are helpful in holding configuration data in, embedded applications. The bitfield feature of structures helps in bit declaration and bit, LO3, manipulation in embedded applications, Pre-processor in ‘C’ is compiler/cross-compiler directives used by compiler/cross-compiler to filter the, source code before compilation/cross-compilation. Preprocessor directives falls into one of, LO3, the categories: file inclusion, compile control and macro substitution, ‘Read only’ variable in embedded applications are represented with the keyword const. Pointer to, constant data is a pointer which points to a data which is read only. A constant pointer is a pointer to a, fixed memory location. Constant pointer to constant data is a pointer pointing to a fixed LO3, memory location which is read only, A variable or memory location in embedded application, which is subject to asynchronous modification, should be declared with the qualifier volatile to prevent the compiler optimisation on the LO3, variable, A constant volatile pointer represents a Read only register (memory location) of a memory mapped, LO3, device in embedded application, while(1) { }; do { }while (1); for (;;){} are examples for infinite loop setting instructions in embedded, LO3, ‘C’., The ISR contains the code for saving the current context, code for performing the operation, corresponding to the interrupt, code for retrieving the saved context and code for informing, LO3, the processor that the processing of interrupt is completed, Recursive function is a function which calls it repeatedly. Functions which can be shared safely with, LO3, several processes concurrently are called re-entrant function., Dynamic memory allocation is the technique for allocating memory on a need basis for tasks. malloc(),, calloc(), realloc() and free() are the ‘C’ library routines for dynamic memory management LO3
Page 401 :
Embedded Firmware Design and Development, , 377, , Keywords, Super Loop Model: An embedded firmware design model which executes tasks in an infinite loop at a, predefined order, [LO 1], Assembly Language: The human readable nota on of ‘machine language’, [LO 2], Machine Language: Processor understandable language made up of 1s and 0s, [LO 2], Mnemonics: Symbols used in Assembly language for represen ng the machine language, [LO 2], Assembler: A program to translate Assembly language program to object code, [LO 2], Library: Specially forma ed, ordered program collec ons of object modules, [LO 2], Linker: A so ware for linking the various object files of a project, [LO 2], Hex File: ASCII representa on of the machine code corresponding to an applica on, [LO 2], Inline Assembly: A technique for inser ng assembly instruc ons in a C program, [LO 2], Embedded C: ‘C’ Language for embedded firmware development. It supports ‘C’ instruc ons and incorporates, a few target processor specific func ons/instruc ons along with tailoring of the standard library func ons for, the target embedded system, [LO 3], Compiler: A so ware tool that converts a source code wri en in a high level language on top of a par cular, opera ng system running on a specific target processor architecture, [LO 3], Cross-compiler: The so ware tools used in cross-pla orm development applica ons. It converts the, applica on to a target processor specific code, which is different from the processor architecture on which, the compiler is running, [LO 3], Func on: A self-contained and re-usable code snippet intended to perform a par cular task, [LO 3], Func on Pointer: Pointer variable poin ng to a func on, [LO 3], structure: Variable holding a collec on of data types (int, float, char, long, etc.) in C language, [LO 3], structure Padding: The act of arranging the structure elements in memory in a way facilita ng increased, execu on speed, [LO 3], union: A derived form of structure, which allocates memory only to the member variable of union requiring, the maximum storage size on declaring a union variable, [LO 3], Pre-processor: A compiler/cross-compiler direc ves used by compiler/ cross-compiler to filter the source, code before compila on/cross-compila on in ‘C’ language, [LO 3], Macro: The ‘C’ pre-processor for crea ng portable inline code, [LO 3], const: A keyword used in ‘C’ language for informing the compiler/cross-compiler that the variable is constant., It represents a ‘Read only’ variable, [LO 3], Dynamic Memory Alloca on: The technique for alloca ng memory on a need basis at run me, [LO 3], Stack: The memory area for storing local variables, func on parameters and func on return values and, program counter, in the memory model for an applica on/task, [LO 3], Sta c Memory Area: The memory area holding the program code, constant variables, sta c and global, variables, in the memory model for an applica on/task, [LO 3], Heap Memory: The free memory lying in between stack and sta c memory area, which is used for dynamic, memory alloca on, [LO 3]
Page 402 :
378, , Introduc on to Embedded Systems, , Objec ve Ques ons, 1. Which of the following is a processor understandable language?, (a) Assembly language, (b) Machine language, 2. Assembly language is the human readable notation of?, (a) Machine language, (b) High level language, 3. Consider the following piece of assembly code, , (c), , High level language, , (c), , None of these, , ORG 0000H, LJMP MAIN, Here ‘ORG’ is a, (a) Pseudo-op, (b) Label, (c) Opcode, (d) Operand, 4. Translation of assembly code to machine code is performed by the, (a) Assembler, (b) Compiler, (c) Linker, (d) Locator, 5. A cross-compiler converts an embedded ‘C’ program to, (a) The machine code corresponding to the processor of the PC used for application development, (b) The machine code corresponding to a processor which is different from the processor of the PC used for, application development, 6. ‘ptr’ is an integer pointer holding the address of an integer variable say x which holds the value 10. Assume, the address of the integer variable x as 0x12ff7c. What will be the output of the below piece of code? Assume, the storage size of integer is 4, ptr+=2;, //Print the address holding by the pointer, printf(“0x%x\n”, ptr);, (a) 0x12ff7c, (b) 0x12ff7e, (c) 0x12ff84, (d) None, 7. ‘ptr’ is a char pointer holding the address of a char variable say x which holds the value 10. Assume the, address of the char variable x as 0x12ff7c. What will be the output of the below piece of code?, //Print the address holding by the pointer, printf(“0x%x\n”, ptr++);, (a) 0x12ff7c, (b) 0x12ff7d, (c) 0x12ff80, (d) None, 8. ‘ptr’ is a char pointer holding the address of a char variable say x which holds the value 10. Assume the, address of the char variable x as 0x12ff7c. What will be the output of the below piece of code?, //Print the address holding by the pointer, printf(“0x%x\n”, ++ptr);, (a) 0x12ff7c, (b) 0x12ff7d, (c) 0x12ff80, (d) None, 9. ‘ptr1’ is a char pointer holding the address of the char variable say x which holds the value 10. ‘ptr2’ is a, char pointer holding the address of the char variable say y which holds the value 20. Assume the address of, char variable x as 0x12ff7c and char variable y as 0x12ff78. What will be the output of the following piece, of code?, //Print the address holding by the pointer, printf(“%x\n”, (ptr1+ptr2));
Page 403 :
379, , Embedded Firmware Design and Development, , (a) 30, (b) 4, (c) Compile error (cannot add two pointers), (d) 0x25fef4, 10. ‘ptr1’ is a char pointer holding the address of the char variable say x which holds the value 10. Assume the, address of char variable x as 0x12ff7c. What will be the output of the following piece of code?, ++*ptr1;, printf(“%x\n”, *ptr1);, (a) 0x0a, (b) 0x0b, (c) 0x12ff7c, (d) 0x12ff7d, 11. ‘ptr1’ is a char pointer holding the address of the char variable say x which holds the value 10. Assume the, address of char variable x as 0x12ff7c. What will be the output of the following piece of code?, ++*ptr1;, printf(“%x\n”, ptr1);, (a) 0x0a, (b) 0x0b, (c) 0x12ff7c, (d) 0x12ff7d, 12. ‘ptr1’ is a char pointer holding the address of the char variable say x which holds the value 10. Assume the, address of char variable x as 0x12ff7c. What will be the output of the following piece of code?, *ptr1++;, printf(“%x\n”, *ptr1);, (a) 0x0b, (b) The contents of memory location 0x12ff7d (c) 0x12ff7c, (d) 0x12ff7d, 13. ‘ptr1’ is a char pointer holding the address of the char variable say x which holds the value 10. Assume the, address of char variable x as 0x12ff7c. What will be the output of the following piece of code?, *ptr1++;, printf(“%x\n”, ptr1);, (a) 0x0b, (b) The contents of memory location 0x12ff7d (c) 0x12ff7c, (d) 0x12ff7d, 14. Which of the following is the string termination character?, (a) ‘\n’, (b) ‘\t’, (c) ‘\0’, (d) ‘\a’, 15. What is the output of the following piece of code?, char name[6] = {‘H’,’E’,’L’,’L’,’O’,’\0’};, printf(“%d”,strlen(name));, (a) 6, (b) 5, (c) 7, 16. What is the output of the following piece of code?, , (d) None of the above, , char str1[] = “Hello ”, char str2[] = “World!”;, str1+= str2;, printf(“%s\n”,str1);, (a) Hello, (b) Hello World!, (c) Compile error, 17. What is the output of the following piece of code?, char str1 [ ] = “Hello world!”;, char str2 [ ] = “Hello World!” ;, int n;, , (d) World!
Page 404 :
380, , Introduc on to Embedded Systems, , n= stricmp(str1, str2);, printf(“%d”, n);, (a) 1, (b) 0, (c) –1, 18. What is the output of the following piece of code?, char str1[] = “Hello ”, char str2[] = “World!”;, strcpy(str1,str2);, printf(“%s\n”,str1);, (a) Hello, (b) Hello World!, (c) Compile error, 19. What is the output of the following piece of code?, , (d) World!, , char str1[] = “Hello ”, char str2[] = “World!”;, str1 = str2;, printf(“%s\n”,str1);, (a) Hello, (b) Hello World!, (c) Compile error, 20. Consider the following structure declaration, typedef struct, {, unsigned, unsigned, unsigned, unsigned, }Info;, , char, char, char, char, , (d) World!, , command; // command to pass to device, status;, //status of command execution, BytesToSend; //No. of bytes to send, BytesReceived; //No. of bytes received, , Assuming the size of unsigned char as 1 byte, what will be the memory allocated for the structure?, (a) 1 byte, (b) 2 bytes, (c) 4 bytes, (d) 0 bytes, 21. Consider the following structure declaration, typedef struct, {, unsigned char hour;, // command to pass to device, unsigned char minute; //status of command execution, unsigned char seconds; //No. of bytes to send, }RTC_Time;, Assuming the size of unsigned char as 1 byte, what will be the output of the following piece of code when, compiled for Keil C51 cross compiler, static volatile RTC_Time xdata *current_time = (void xdata *) 0x7000;, void main(), {, unsigned char test;, test = current_time->minute;, printf(“%d”, test);, }
Page 405 :
381, , Embedded Firmware Design and Development, , (a) 0x7000, (b) 0x7001, (c) Content of memory location 0x7000, (d) Content of memory location 0x7001, 22. Consider the following structure declaration, typedef struct, {, unsigned char hour;, // Hour Reg value, unsigned char minute; // Minute value, unsigned char seconds; // Seconds value, }RTC_Time;, Assuming the size of unsigned char as 1 byte, what will be the output of the following piece of code when, compiled for Keil C51 cross compiler, void main(void), {, unsigned char test;, test = offsetof(RTC_Time, seconds);, printf(“%d”,test);, }, (a) 1, (b) 2, 23. Consider the following union definition, , (c) Compile error, , (d) 0, , typedef union, {, int intVal;, unsigned char charVal[3];, } union_ichar;, What will be the output of the following piece of code? Assume the storage size of int as 2 and unsigned char, as 1, union_ichar int_char;, void main(void), {, unsigned char test;, test = sizeof (int_char);, printf(“%d”,test);, }, (a) 0, (b) 2, (c) 3, (d) 5, 24. The default initialiser for a union with static storage is the default for, (a) The first member variable, (b) The last member variable, (c) The member variable with the highest storage requirement, 25. Which of the following is (are) True about pre-processor directives?, (a) compiler/cross-compiler directives, (b) executable code is generated for pre-processor directives on compilation, (c) No executable code is generated for pre-processor directives on compilation, (d) Start with # symbol (e) (a), (b) and (d) (f) (a), (c) and (d)
Page 406 :
382, , Introduc on to Embedded Systems, , 26. The ‘C’ pre-processor directive instruction always ends with a semicolon (;). State ‘True’ or ‘False’, (a) True, (b) False, 27. Which of the following is the file inclusion pre-processor directive?, (a) #define, (b) #include, (c) #ifdef, (d) None of these, 28. Which of the following pre-processor directive is used for indicating the end of a block following #ifdef or, #else?, (a) #define, (b) #undef, (c) #endif, (d) #ifndef, 29. Which of the following preprocessor directive is used for coding macros?, (a) #ifdef, (b) #define, (c) #undef, (d) #endif, 30. What will be the output of the following piece of code?, #define A 2+8, #define B 2+3, void main(void), {, unsigned char result ;, result = A/B ;, printf(“%d”, result) ;, }, (a) 0, 31. The instruction, , (b) 2, , (c) 9, , (d) 8, , const unsigned char* x;, represents:, (a) Pointer to constant data, (c) Constant pointer to constant data, 32. The instruction, , (b) Constant pointer to data, (d) None of these, , unsigned char* const x;, represents:, (a) Pointer to constant data, (c) Constant pointer to constant data, 33. The instruction, , (b) Constant pointer to data, (d) None of these, , const unsigned char* const x;, represents:, (a) Pointer to constant data, (c) Constant pointer to constant data, 34. The instruction, , (b) Constant pointer to data, (d) None of these, , volatile unsigned char* x;, represents:, (a) Volatile pointer to data, (c) Volatile pointer to constant data, , (b) Pointer to volatile data, (d) None of these
Page 407 :
383, , Embedded Firmware Design and Development, , 35. The instruction, volatile const unsigned char* x;, represents:, (a) Volatile pointer to data, (b) Pointer to volatile data, (c) Pointer to constant volatile data, (d) None of these, 36. The constant volatile variable in Embedded application represents a, (a) Write only memory location/register, (b) Read only memory location/register, (c) Read/Write memory location/register, 37. What will be the output of the following piece of code? Assume the data bus width of the controller on which, the program is executed as 8 bits., void main(void), {, unsigned char flag = 0x00;, flag |= (1<<7), printf(”%d”, flag);, }, (a) 0x00, (b) 0x70, (c) 0x80, 38. The variable ‘x’ declared with the following code statement, , (d) 0xFF, , const int x = 5;, will be stored in which section of the memory allocated to the program?, (a) Constant Data Memory, (b) Heap Memory, (c) Alterable Data Memory, (d) Stack Memory (e) Register, 39. What will be the memory allocated on successful execution of the following memory allocation request?, Assume the size of int as 2 bytes, x = (int *) malloc(100);, (a) 2 Bytes, (b) 100 Bytes, (c) 200 Bytes, (d) 4 Bytes, 40. Which of the following memory management routine is used for changing the size of allocated bytes in a, dynamically allocated memory block, (a) malloc(), (b) realloc(), (c) calloc(), (d) free(), , Review Ques ons, 1. Explain the different ‘embedded firmware design’ approaches in detail., [LO 1], 2. What is the difference between ‘Super loop’ based and ‘OS’ based embedded firmware design? Which one, is the better approach?, [LO 1], 3. What is ‘Assembly Language’ Programming?, 4. Explain the format of assembly language instruction., 5. What is ‘pseudo-ops’? What is the use of it in Assembly Language Programming?, 6. Explain the various steps involved in the assembling of an assembly language program., , [LO 2], [LO 2], [LO 2], [LO 2]
Page 408 :
384, , Introduc on to Embedded Systems, , 7. What is relocatable code? Explain its significance in assembly programming., 8. Explain ‘library file’ in assembly language context. What is the benefit of ‘library file’?, 9. What is absolute object file?, , [LO 2], [LO 2], [LO 2], [LO 2], , 10. Explain the advantages of ‘Assembly language’ based Embedded firmware development., 11. Explain the limitations/drawbacks of ‘Assembly language’ based Embedded firmware development., 12. What is the difference between compiler and cross-compiler?, 13. Explain the ‘High Level language’ based ‘Embedded firmware’ development technique., , [LO 2], [LO 2], [LO 2], [LO 2], , 14. Explain the advantages of ‘High Level language’ based ‘Embedded firmware’ development., 15. Give examples for situations demanding mixing of assembly with ‘C’. Explain the techniques for mixing, assembly with ‘C’., [LO 2], 16. Give examples for situations demanding mixing of ‘C’ with assembly. Explain the techniques for mixing ‘C’, with assembly., [LO 2], 17. What is ‘inline Assembly’? How is it different from mixing assembly language with ‘C’?, [LO 2], 18. What is ‘pointer’ in embedded C programming? Explain its role in embedded application development., 19. Explain the different arithmetic and relational operations supported by pointers., 20. What is ‘NULL’ Pointer? Explain its significance in embedded C programming., , [LO 3], [LO 3], [LO 3], [LO 3], , 21. Explain the similarities and differences between strings and character arrays., 22. Explain function in the Embedded C programming context. Explain the generic syntax of function declaration, and implementation., [LO 3], 23. What is static function? What is the difference between static and global functions?, 24. Explain the similarities and differences between function prototype and function declaration., , [LO 3], [LO 3], [LO 3], , 25. What is function pointer? How is it related to function? Explain the use of function pointers., 26. Explain structure in the ‘Embedded C’ programming context. Explain the significance of structure over, normal variables., [LO 3], 27. Explain the declaration and initialisation of structure variables., 28. Explain the different operations supported by structures., , [LO 3], [LO 3], [LO 3], , 29. What is structure pointer? What is the advantage of using structure pointers?, 30. Explain ‘structure placement at absolute memory location’ and its advantage in embedded application, development. Will it be possible to place a structure at absolute memory location in desktop application, development? Explain., [LO 3], 31. What is structure padding? What are the merits and demerits of structure padding?, 32. What is bit field? How bit field is useful in variant data access?, 33. Explain the use of offsetof() macro in structure operations., 34. What is union? What is the difference between union and structure?, 35. Explain how union is useful in variant data access., 36. Explain the use of union in ‘Embedded C’ applications., , [LO 3], [LO 3], [LO 3], [LO 3], [LO 3], [LO 3]
Page 409 :
Embedded Firmware Design and Development, , 385, , 37. What is pre-processor directive? How is a pre-processor directive instruction differentiated from normal, program code?, [LO 3], 38. What are the different types of pre-processor directives available in ‘Embedded C’? Explain them in detail., 39. What is macro in ‘Embedded C’ programming?, 40. What is the difference between macros and functions?, 41. What are the merits and drawbacks of macros?, , [LO 3], [LO 3], [LO 3], [LO 3], , 42. Write a macro to multiply two numbers., 43. Explain the different methods of ‘constant data’ declaration in ‘Embedded C’. Explain the differences, between the methods., [LO 3], 44. Explain the difference between ‘pointer to constant data’ and ‘constant pointer to data’ in ‘Embedded C’, programming. Explain the syntax for declaring both., [LO 3], 45. What is constant pointer to constant data? Where is it used in embedded application development?, , [LO 3], 46. Explain the significance of ‘volatile’ type qualifier in Embedded C applications. Which all variables need to, be declared as ‘volatile’ variables in Embedded C application?, [LO 3], 47. What is ‘pointer to constant volatile data’? What is the syntax for defining a ‘pointer to constant volatile, data’? What is its significance in embedded application development?, [LO 3], 48. What is volatile pointer? Explain the usage of ‘volatile pointer’ in ‘Embedded C’ application., [LO 3], 49. Explain the different techniques for delay generation in ‘Embedded C’ programming. What are the limitations, of delay programming for super loop based embedded applications?, [LO 3], , [LO 3], 51. What is Interrupt? Explain its properties? What is its role in embedded application development? [LO 3], 52. What is Interrupt Vector Address and Interrupt Service Routine (ISR)? How are they related?, [LO 3], 53. What is the difference between Interrupt Service Routine and Normal Service Routine?, [LO 3], 50. Explain the different bit manipulation operations supported by ‘Embedded C’., , 54. Explain context switching, context saving and context retrieval in relation to Interrupts and Interrupt Service, Routine (ISR)., [LO 3], , [LO 3], What is ‘recursion’? What is the difference between recursion and iteration? Which one is better? [LO 3], What are the merits and drawbacks of ‘recursion’?, [LO 3], What is ‘reentrant’ function? What is its significance in embedded applications development?, [LO 3], What is the difference between ‘recursive’ and ‘reentrant’ function?, [LO 3], , 55. What all precautionary measures need to be implemented in an Interrupt Service Routine (ISR)?, 56., 57., 58., , 59., 60. Explain the different criteria that need to be strictly met by a function to consider it as ‘reentrant’ function., , 61. What is the difference between Static and Dynamic memory allocation?, [LO 3], 62. Explain the different sections of a memory segment allocated to an application by the memory manager., , [LO 3], 63. Explain the different ‘Memory management library routines’ supported by C., [LO 3], 64. Explain the difference between the library functions malloc() and calloc() for dynamic memory allocation., , [LO 3]
Page 410 :
386, , Introduc on to Embedded Systems, , Lab Assignments, 1. Write a ‘C’ program to create a ‘reentrant’ function which removes the white spaces from a string, which is supplied as input to the function and returns the new string without white spaces. The main ‘C’, function passes a string to the reentrant function and accepts the string with white spaces removed., 2. Write a C program to place a character variable at memory location 0x000FF and load it with 0xFF., Compile the application using Microsoft Visual Studio compiler and run it on a desktop machine with, Windows Operating System. Record the output and explain the reason behind the output behaviour., 3. Write a small embedded C program to complement bit 5 (Assume bit numbering starts at 0) of the, status register of a device, which is memory mapped to the CPU. The status register of the device is, memory mapped at location 0x3000. The data bus of the controller and the status register of the device, is 8bit wide., 4. Write a small embedded C program to set bit 0 and clear bit 7 of the status register of a device, which, is memory mapped to the CPU. The status register of the device is memory mapped at location 0x8000., The data bus of the controller and the status register of the device is 8bit wide. The application should, illustrate the usage of bit manipulation operations., 5. Write a small embedded C program to test the status of bit 5 of the status register and reset it if it is 1,, of a device, which is memory mapped to the CPU. The status register of the device is memory mapped, at location 0x7000. The data bus of the controller and the status register of the device is 8bit wide. The, application should illustrate the usage of bit manipulation operations., 6. Write an ‘Embedded C’ program for Keil C51 cross-compiler for transmitting a string data through the, serial port of 8051 microcontroller as per the following requirements, (a) Use structure to hold the communication parameters., (b) Use a structure array for holding the configurations corresponding to various baudrates (say 2400,, 4800, 9600 and 195200)., (c) Write the code for sending a string to the serial port as function. The main routine invokes this, function with the string to send. Use polling of Transmit Interrupt for ensuring the sending of a, character.
Page 411 :
Real-Time Opera ng System (RTOS) based Embedded System Design, , 10, , 387, , Real-Time Operating, System (RTOS) based, Embedded System, Design, , LEARNING OBJECTIVES, LO 1 Understand the basics of an opera ng system and the need for an opera ng system, Learn the basic kernel services of an opera ng system, LO 2 Classify the types of opera ng systems, Learn the internals of Real-Time Opera ng System and the fundamentals of RTOS, based embedded firmware design, Learn about the different real- me kernels and the features that make a kernel, Real-Time, LO 3 Discuss tasks, processes and threads in the opera ng system context, Learn about the structure of a process, the different states of a process, process, life cycle and process management, Learn the concept of mul threading, thread standards and thread scheduling, LO 4 Understand the difference between mul processing and mul tasking, Learn about the different types of mul tasking (Co-opera ve, Preemp ve and, Non-preemp ve, LO 5 Describe the FCFS/FIFO, LCFS/LIFO, SJF and priority based task/process scheduling, Learn about the Shortest Remaining Time (SRT), Round Robin and priority based, preemp ve task/process scheduling, LO 6 Explain the different Inter Process Communica on (IPC) mechanisms used by tasks/, process to communicate and co-operate each other in a mul tasking environment, LO 7 Iden fy the RPC based Inter Process Communica on, Learn the different types of shared memory techniques (Pipes, memory mapped, object, etc.) for IPC, Learn the different types of message passing techniques (Message queue, mailbox,, signals, etc.) for IPC, LO 8 State the need for task synchronisa on in a mul tasking environment, Learn the different issues related to the accessing of a shared resource by mul ple, processes concurrently
Page 412 :
388, , Introduc on to Embedded Systems, , Learn about ‘Racing’, ‘Starva on’, ‘Livelock’, ‘Deadlock’, ‘Dining Philosopher’s, Problem’, ‘Producer-Consumer/Bounded Buffer Problem’, ‘Readers-Writers, Problem’ and ‘Priority Inversion’, Learn about the ‘Priority Inheritance’ and ‘Priority Ceiling’ based Priority avoidance, mechanisms, Learn the need for task synchronisa on and the different mechanisms for task, synchronisa on in a mul tasking environment, Learn about mutual exclusion and the different policies for mutual exclusion, implementa on, Learn about semaphores, different types of semaphores, mutex, cri cal sec on, objects and events for task synchronisa on, LO 9 Analyse device drivers, their role in an opera ng system based embedded system, design, the structure of a device driver, and interrupt handling inside device drivers, LO 10 Discuss the different func onal and non-func onal requirements that need to be, addressed in the selec on of a Real-Time Opera ng System, , In the previous chapter, we discussed about the Super loop based task execution model for firmware, execution. The super loop executes the tasks sequentially in the order in which the tasks are listed within the, loop. Here every task is repeated at regular intervals and the task execution is non-real time. As the number, of task increases, the time intervals at which a task gets serviced also increases. If some of the tasks involve, waiting for external events or I/O device usage, the task execution time also gets pushed off in accordance, with the ‘wait’ time consumed by the task. The priority in which a task is to be executed is fixed and is, determined by the task placement within the loop, in a super loop based execution. This type of firmware, execution is suited for embedded devices where response time for a task is not time critical. Typical examples, are electronic toys and video gaming devices. Here any response delay is acceptable and it will not create any, operational issues or potential hazards. Whereas certain applications demand time critical response to tasks/, events and any delay in the response may become catastrophic. Flight Control systems, Air bag control and, Anti-lock Brake System (ABS) systems for vehicles, Nuclear monitoring devices, etc. are typical examples, of applications/devices demanding time critical task response., How the increasing need for time critical response for tasks/events is addressed in embedded applications?, Well the answer is, 1. Assign priority to tasks and execute the high priority task when the task is ready to execute., 2. Dynamically change the priorities of tasks if required on a need basis., 3. Schedule the execution of tasks based on the priorities., 4. Switch the execution of task when a task is waiting for an external event or a system resource including, I/O device operation., The introduction of operating system based firmware execution in embedded devices can address these, needs to a greater extent.
Page 413 :
389, , Real-Time Opera ng System (RTOS) based Embedded System Design, , 10.1 OPERATING SYSTEM BASICS, The operating system acts as a bridge between the user applications/tasks and the, underlying system resources through a set of system functionalities and services., The OS manages the system resources and makes them available to the user, applications/tasks on a need basis. A normal computing system is a collection of, different I/O subsystems, working, and storage memory. The primary functions, of an operating system is, ∑ Make the system convenient to use, ∑ Organise and manage the system resources efficiently and correctly, Figure 10.1 gives an insight into the basic components of an operating system, rest of the world., , LO 1 Understand, the basics of an, operating system, and the need for an, operating system, , and their interfaces with, , Memory management, Process management, Time management, File system management, I/O system management, , Kernel Services, , User Applications, Application, programming, interface (API), , Device driver, interface, , Underlying hardware, Fig. 10.1, , 10.1.1, , The Operating System Architecture, , The Kernel, , The kernel is the core of the operating system and is responsible for managing the system resources and the, communication among the hardware and other system services. Kernel acts as the abstraction layer between, system resources and user applications. Kernel contains a set of system libraries and services. For a general, purpose OS, the kernel contains different services for handling the following., Process Management Process management deals with managing the processes/tasks. Process management, includes setting up the memory space for the process, loading the process’s code into the memory space,, allocating system resources, scheduling and managing the execution of the process, setting up and managing, the Process Control Block (PCB), Inter Process Communication and synchronisation, process termination/, deletion, etc. We will look into the description of process and process management in a later section of this, chapter., Primary Memory Management The term primary memory refers to the volatile memory (RAM) where, processes are loaded and variables and shared data associated with each process are stored. The Memory, Management Unit (MMU) of the kernel is responsible for, ∑ Keeping track of which part of the memory area is currently used by which process, ∑ Allocating and De-allocating memory space on a need basis (Dynamic memory allocation).
Page 414 :
390, , Introduc on to Embedded Systems, , File System Management File is a collection of related information. A file could be a program (source code, or executable), text files, image files, word documents, audio/video files, etc. Each of these files differ in the, kind of information they hold and the way in which the information is stored. The file operation is a useful, service provided by the OS. The file system management service of Kernel is responsible for, ∑ The creation, deletion and alteration of files, ∑ Creation, deletion and alteration of directories, ∑ Saving of files in the secondary storage memory (e.g. Hard disk storage), ∑ Providing automatic allocation of file space based on the amount of free space available, ∑ Providing a flexible naming convention for the files, The various file system management operations are OS dependent. For example, the kernel of Microsoft®, DOS OS supports a specific set of file system management operations and they are not the same as the file, system operations supported by UNIX Kernel., I/O System (Device) Management Kernel is responsible for routing the I/O requests coming from different, user applications to the appropriate I/O devices of the system. In a well-structured OS, the direct accessing, of I/O devices are not allowed and the access to them are provided through a set of Application Programming, Interfaces (APIs) exposed by the kernel. The kernel maintains a list of all the I/O devices of the system. This, list may be available in advance, at the time of building the kernel. Some kernels, dynamically updates the, list of available devices as and when a new device is installed (e.g. Windows NT kernel keeps the list updated, when a new plug ‘n’ play USB device is attached to the system). The service ‘Device Manager’ (Name may, vary across different OS kernels) of the kernel is responsible for handling all I/O device related operations., The kernel talks to the I/O device through a set of low-level systems calls, which are implemented in a, service, called device drivers. The device drivers are specific to a device or a class of devices. The Device, Manager is responsible for, ∑ Loading and unloading of device drivers, ∑ Exchanging information and the system specific control signals to and from the device, Secondary Storage Management The secondary storage management deals with managing the secondary, storage memory devices, if any, connected to the system. Secondary memory is used as backup medium for, programs and data since the main memory is volatile. In most of the systems, the secondary storage is kept in, disks (Hard Disk). The secondary storage management service of kernel deals with, ∑ Disk storage allocation, ∑ Disk scheduling (Time interval at which the disk is activated to backup data), ∑ Free Disk space management, Protec on Systems Most of the modern operating systems are designed in such a way to support multiple, users with different levels of access permissions (e.g. Windows 10 with user permissions like ‘Administrator’,, ‘Standard’, ‘Restricted’, etc.). Protection deals with implementing the security policies to restrict the access, to both user and system resources by different applications or processes or users. In multiuser supported, operating systems, one user may not be allowed to view or modify the whole/portions of another user’s data, or profile details. In addition, some application may not be granted with permission to make use of some of, the system resources. This kind of protection is provided by the protection services running within the kernel., Interrupt Handler Kernel provides handler mechanism for all external/internal interrupts generated by the, system., These are some of the important services offered by the kernel of an operating system. It does not mean, that a kernel contains no more than components/services explained above. Depending on the type of the
Page 415 :
391, , Real-Time Opera ng System (RTOS) based Embedded System Design, , operating system, a kernel may contain lesser number of components/services or more number of components/, services. In addition to the components/services listed above, many operating systems offer a number of addon system components/services to the kernel. Network communication, network management, user-interface, graphics, timer services (delays, timeouts, etc.), error handler, database management, etc. are examples for, such components/services. Kernel exposes the interface to the various kernel applications/services, hosted by, kernel, to the user applications through a set of standard Application Programming Interfaces (APIs). User, applications can avail these API calls to access the various kernel application/services., , 10.1.1.1 Kernel Space and User Space, As we discussed in the earlier section, the applications/services are classified into two categories, namely:, user applications and kernel applications. The program code corresponding to the kernel applications/services, are kept in a contiguous area (OS dependent) of primary (working) memory and is protected from the unauthorised access by user programs/applications. The memory space at which the kernel code is located is, known as ‘Kernel Space’. Similarly, all user applications are loaded to a specific area of primary memory, and this memory area is referred as ‘User Space’. User space is the memory area where user applications, are loaded and executed. The partitioning of memory into kernel and user space is purely Operating System, dependent. Some OS implements this kind of partitioning and protection whereas some OS do not segregate, the kernel and user application code storage into two separate areas. In an operating system with virtual, memory support, the user applications are loaded into its corresponding virtual memory space with demand, paging technique; Meaning, the entire code for the user application need not be loaded to the main (primary), memory at once; instead the user application code is split into different pages and these pages are loaded into, and out of the main memory area on a need basis. The act of loading the code into and out of the main memory, is termed as ‘Swapping’. Swapping happens between the main (primary) memory and secondary storage, memory. Each process run in its own virtual memory space and are not allowed accessing the memory space, corresponding to another processes, unless explicitly requested by the process. Each process will have certain, privilege levels on accessing the memory of other processes and based on the privilege settings, processes can, request kernel to map another process’s memory to its own or share through some other mechanism. Most, of the operating systems keep the kernel application code in main memory and it is not swapped out into the, secondary memory., , 10.1.1.2 Monolithic Kernel and Microkernel, As we know, the kernel forms the heart of an operating system. Different approaches are adopted for building, an Operating System kernel. Based on the kernel design, kernels can be classified into ‘Monolithic’ and, ‘Micro’., Monolithic Kernel In monolithic kernel architecture, all, kernel services run in the kernel space. Here all kernel, modules run within the same memory space under a, single kernel thread. The tight internal integration of, kernel modules in monolithic kernel architecture allows, the effective utilisation of the low-level features of the, underlying system. The major drawback of monolithic, kernel is that any error or failure in any one of the, kernel modules leads to the crashing of the entire kernel, application. LINUX, SOLARIS, MS-DOS kernels, are examples of monolithic kernel. The architecture, representation of a monolithic kernel is given in Fig. 10.2., , Applications, , Monolithic kernel with all, operating system services, running in kernel space, , Fig. 10.2, , The Monolithic Kernel Model
Page 416 :
392, , Introduc on to Embedded Systems, , Microkernel The microkernel design incorporates, only the essential set of Operating System services, Servers (kernel, into the kernel. The rest of the Operating System, services running, Applications, services are implemented in programs known as, in user space), ‘Servers’ which runs in user space. This provides a, highly modular design and OS-neutral abstraction to, the kernel. Memory management, process, management, timer systems and interrupt handlers, are the essential services, which forms the part of, Microkernel with essential, the microkernel. Mach, QNX, Minix 3 kernels are, services like memory, examples for microkernel. The architecture, management, process, representation of a microkernel is shown in, management, timer system, etc..., Fig. 10.3., Microkernel based design approach offers the, following benefits, Fig. 10.3 The Microkernel model, ∑ Robustness: If a problem is encountered in any, of the services, which runs as ‘Server’ application, the same can be reconfigured and re-started without, the need for re-starting the entire OS. Thus, this approach is highly useful for systems, which demands, high ‘availability’. Refer Chapter 3 to get an understanding of ‘availability’. Since the services which, run as ‘Servers’ are running on a different memory space, the chances of corruption of kernel services, are ideally zero., ∑ Configurability: Any services, which run as ‘Server’ application can be changed without the need to, restart the whole system. This makes the system dynamically configurable., , 10.2, , TYPES OF OPERATING SYSTEMS, , LO 2 Classify the, types of operating, systems, , 10.2.1, , Depending on the type of kernel and kernel services, purpose and type of, computing systems where the OS is deployed and the responsiveness to, applications, Operating Systems are classified into different types., , General Purpose Operating System (GPOS), , The operating systems, which are deployed in general computing systems, are referred as General Purpose, Operating Systems (GPOS). The kernel of such an OS is more generalised and it contains all kinds of, services required for executing generic applications. General-purpose operating systems are often quite, non-deterministic in behaviour. Their services can inject random delays into application software and may, cause slow responsiveness of an application at unexpected times. GPOS are usually deployed in computing, systems where deterministic behaviour is not an important criterion. Personal Computer/Desktop system is, a typical example for a system where GPOSs are deployed. Windows 10/8.x/XP/MS-DOS etc are examples, for General Purpose Operating Systems., , 10.2.2, , Real-Time Operating System (RTOS), , There is no universal definition available for the term ‘Real-Time’ when it is used in conjunction with operating, systems. What ‘Real-Time’ means in Operating System context is still a debatable topic and there are many, definitions available. In a broad sense, ‘Real-Time’ implies deterministic timing behaviour. Deterministic, timing behaviour in RTOS context means the OS services consumes only known and expected amounts of, time regardless the number of services. A Real-Time Operating System or RTOS implements policies and
Page 417 :
Real-Time Opera ng System (RTOS) based Embedded System Design, , 393, , rules concerning time-critical allocation of a system’s resources. The RTOS decides which applications should, run in which order and how much time needs to be allocated for each application. Predictable performance, is the hallmark of a well-designed RTOS. This is best achieved by the consistent application of policies and, rules. Policies guide the design of an RTOS. Rules implement those policies and resolve policy conflicts., Windows Embedded Compact, QNX, VxWorks MicroC/OS-II etc are examples of Real Time Operating, Systems (RTOS)., , 10.2.2.1 The Real-Time Kernel, The kernel of a Real-Time Operating System is referred as Real. Time kernel. In complement to the, conventional OS kernel, the Real-Time kernel is highly specialised and it contains only the minimal set of, services required for running the user applications/tasks. The basic functions of a Real-Time kernel are listed, below:, ∑ Task/Process management, ∑ Task/Process scheduling, ∑ Task/Process synchronisation, ∑ Error/Exception handling, ∑ Memory management, ∑ Interrupt handling, ∑ Time management, , Task/Process management Deals with setting up the memory space for the tasks, loading the task’s, code into the memory space, allocating system resources, setting up a Task Control Block (TCB) for the, task and task/process termination/deletion. A Task Control Block (TCB) is used for holding the information, corresponding to a task. TCB usually contains the following set of information., Task ID: Task Identification Number, Task State: The current state of the task (e.g. State = ‘Ready’ for a task which is ready to execute), Task Type: Task type. Indicates what is the type for this task. The task can be a hard real time or soft real, time or background task., Task Priority: Task priority (e.g. Task priority = 1 for task with priority = 1), Task Context Pointer: Context pointer. Pointer for context saving, Task Memory Pointers: Pointers to the code memory, data memory and stack memory for the task, Task System Resource Pointers: Pointers to system resources (semaphores, mutex, etc.) used by the task, Task Pointers: Pointers to other TCBs (TCBs for preceding, next and waiting tasks), Other Parameters: Other relevant task parameters, The parameters and implementation of the TCB is kernel dependent. The TCB parameters vary across, different kernels, based on the task management implementation. Task management service utilises the TCB, of a task in the following way, ∑ Creates a TCB for a task on creating a task, ∑ Delete/remove the TCB of a task when the task is terminated or deleted, ∑ Reads the TCB to get the state of a task, ∑ Update the TCB with updated parameters on need basis (e.g. on a context switch), ∑ Modify the TCB to change the priority of the task dynamically, Task/Process Scheduling Deals with sharing the CPU among various tasks/processes. A kernel application, called ‘Scheduler’ handles the task scheduling. Scheduler is nothing but an algorithm implementation, which
Page 418 :
394, , Introduc on to Embedded Systems, , performs the efficient and optimal scheduling of tasks to provide a deterministic behaviour. We will discuss, the various types of scheduling in a later section of this chapter., Task/Process Synchronisa on Deals with synchronising the concurrent access of a resource, which is, shared across multiple tasks and the communication between various tasks. We will discuss the various, synchronisation techniques and inter task /process communication in a later section of this chapter., Error/Excep on Handling Deals with registering and handling the errors occurred/exceptions raised during, the execution of tasks. Insufficient memory, timeouts, deadlocks, deadline missing, bus error, divide by zero,, unknown instruction execution, etc. are examples of errors/exceptions. Errors/Exceptions can happen at the, kernel level services or at task level. Deadlock is an example for kernel level exception, whereas timeout is, an example for a task level exception. The OS kernel gives the information about the error in the form of a, system call (API). GetLastError() API provided by Windows CE/Embedded Compact RTOS is an example, for such a system call. Watchdog timer is a mechanism for handling the timeouts for tasks. Certain tasks may, involve the waiting of external events from devices. These tasks will wait infinitely when the external device, is not responding and the task will generate a hang-up behaviour. In order to avoid these types of scenarios,, a proper timeout mechanism should be implemented. A watchdog is normally used in such situations. The, watchdog will be loaded with the maximum expected wait time for the event and if the event is not triggered, within this wait time, the same is informed to the task and the task is timed out. If the event happens before, the timeout, the watchdog is resetted., Memory Management Compared to the General Purpose Operating Systems, the memory management, function of an RTOS kernel is slightly different. In general, the memory allocation time increases, depending on the size of the block of memory needs to be allocated and the state of the allocated memory, block (initialised memory block consumes more allocation time than un-initialised memory block). Since, predictable timing and deterministic behaviour are the primary focus of an RTOS, RTOS achieves this, by compromising the effectiveness of memory allocation. RTOS makes use of ‘block’ based memory, allocation technique, instead of the usual dynamic memory allocation techniques used by the GPOS., RTOS kernel uses blocks of fixed size of dynamic memory and the block is allocated for a task on a need, basis. The blocks are stored in a ‘Free Buffer Queue’. To achieve predictable timing and avoid the timing, overheads, most of the RTOS kernels allow tasks to access any of the memory blocks without any memory, protection. RTOS kernels assume that the whole design is proven correct and protection is unnecessary., Some commercial RTOS kernels allow memory protection as optional and the kernel enters a fail-safe, mode when an illegal memory access occurs., A few RTOS kernels implement Virtual Memory* concept for memory allocation if the system supports, secondary memory storage (like HDD and FLASH memory). In the ‘block’ based memory allocation, a block, of fixed memory is always allocated for tasks on need basis and it is taken as a unit. Hence, there will not, be any memory fragmentation issues. The memory allocation can be implemented as constant functions and, thereby it consumes fixed amount of time for memory allocation. This leaves the deterministic behaviour of, the RTOS kernel untouched. The ‘block’ memory concept avoids the garbage collection overhead also. (We, will explore this technique under the MicroC/OS-II kernel in a latter chapter).The ‘block’ based memory, * Virtual Memory is an imaginary memory supported by certain operating systems. Virtual memory expands the address space available, to a task beyond the actual physical memory (RAM) supported by the system. Virtual memory is implemented with the help of a, Memory Management Unit (MMU) and ‘memory paging’. The program memory for a task can be viewed as different pages and the, page corresponding to a piece of code that needs to be executed is loaded into the main physical memory (RAM). When a memory page, is no longer required, it is moved out to secondary storage memory and another page which contains the code snippet to be executed is, loaded into the main memory. This memory movement technique is known as demand paging. The MMU handles the demand paging, and converts the virtual address of a location in a page to corresponding physical address in the RAM.
Page 419 :
Real-Time Opera ng System (RTOS) based Embedded System Design, , 395, , allocation achieves deterministic behaviour with the trade-of limited choice of memory chunk size and, suboptimal memory usage., Interrupt Handling Deals with the handling of various types of interrupts. Interrupts provide Real-Time, behaviour to systems. Interrupts inform the processor that an external device or an associated task requires, immediate attention of the CPU. Interrupts can be either Synchronous or Asynchronous. Interrupts which, occurs in sync with the currently executing task is known as Synchronous interrupts. Usually the software, interrupts fall under the Synchronous Interrupt category. Divide by zero, memory segmentation error, etc. are, examples of synchronous interrupts. For synchronous interrupts, the interrupt handler runs in the same context, of the interrupting task. Asynchronous interrupts are interrupts, which occurs at any point of execution of any, task, and are not in sync with the currently executing task. The interrupts generated by external devices (by, asserting the interrupt line of the processor/controller to which the interrupt line of the device is connected), connected to the processor/controller, timer overflow interrupts, serial data reception/ transmission interrupts,, etc. are examples for asynchronous interrupts. For asynchronous interrupts, the interrupt handler is usually, written as separate task (Depends on OS kernel implementation) and it runs in a different context. Hence,, a context switch happens while handling the asynchronous interrupts. Priority levels can be assigned to the, interrupts and each interrupts can be enabled or disabled individually. Most of the RTOS kernel implements, ‘Nested Interrupts’ architecture. Interrupt nesting allows the pre-emption (interruption) of an Interrupt Service, Routine (ISR), servicing an interrupt, by a high priority interrupt., Time Management Accurate time management is essential for providing precise time reference for all, applications. The time reference to kernel is provided by a high-resolution Real-Time Clock (RTC) hardware, chip (hardware timer). The hardware timer is programmed to interrupt the processor/controller at a fixed rate., This timer interrupt is referred as ‘Timer tick’. The ‘Timer tick’ is taken as the timing reference by the kernel., The ‘Timer tick’ interval may vary depending on the hardware timer. Usually the ‘Timer tick’ varies in the, microseconds range. The time parameters for tasks are expressed as the multiples of the ‘Timer tick’., The System time is updated based on the ‘Timer tick’. If the System time register is 32 bits wide and the, ‘Timer tick’ interval is 1 microsecond, the System time register will reset in, 232 * 10–6/ (24 * 60 * 60) = 49700 Days = ~ 0.0497 Days = 1.19 Hours, If the ‘Timer tick’ interval is 1 millisecond, the system time register will reset in, 232 * 10–3 / (24 * 60 * 60) = 497 Days = 49.7 Days = ~ 50 Days, The ‘Timer tick’ interrupt is handled by the ‘Timer Interrupt’ handler of kernel. The ‘Timer tick’ interrupt, can be utilised for implementing the following actions., ∑ Save the current context (Context of the currently executing task)., ∑ Increment the System time register by one. Generate timing error and reset the System time register if, the timer tick count is greater than the maximum range available for System time register., ∑ Update the timers implemented in kernel (Increment or decrement the timer registers for each timer, depending on the count direction setting for each register. Increment registers with count direction, setting = ‘count up’ and decrement registers with count direction setting = ‘count down’)., ∑ Activate the periodic tasks, which are in the idle state., ∑ Invoke the scheduler and schedule the tasks again based on the scheduling algorithm., ∑ Delete all the terminated tasks and their associated data structures (TCBs), ∑ Load the context for the first task in the ready queue. Due to the re-scheduling, the ready task might be, changed to a new one from the task, which was preempted by the ‘Timer Interrupt’ task., Apart from these basic functions, some RTOS provide other functionalities also (Examples are file, management and network functions). Some RTOS kernel provides options for selecting the required kernel
Page 420 :
396, , Introduc on to Embedded Systems, , functions at the time of building a kernel. The user can pick the required functions from the set of available, functions and compile the same to generate the kernel binary. Windows CE is a typical example for such an, RTOS. While building the target, the user can select the required components for the kernel., , 10.2.2.2 Hard Real-Time, Real-Time Operating Systems that strictly adhere to the timing constraints for a task is referred as ‘Hard, Real-Time’ systems. A Hard Real-Time system must meet the deadlines for a task without any slippage., Missing any deadline may produce catastrophic results for Hard Real-Time Systems, including permanent, data lose and irrecoverable damages to the system/users. Hard Real-Time systems emphasise the principle ‘A, late answer is a wrong answer’. A system can have several such tasks and the key to their correct operation, lies in scheduling them so that they meet their time constraints. Air bag control systems and Anti-lock Brake, Systems (ABS) of vehicles are typical examples for Hard Real-Time Systems. The Air bag control system, should be into action and deploy the air bags when the vehicle meets a severe accident. Ideally speaking, the, time for triggering the air bag deployment task, when an accident is sensed by the Air bag control system,, should be zero and the air bags should be deployed exactly within the time frame, which is predefined for, the air bag deployment task. Any delay in the deployment of the air bags makes the life of the passengers, under threat. When the air bag deployment task is triggered, the currently executing task must be pre-empted,, the air bag deployment task should be brought into execution, and the necessary I/O systems should be, made readily available for the air bag deployment task. To meet the strict deadline, the time between the, air bag deployment event triggering and start of the air bag deployment task execution should be minimum,, ideally zero. As a rule of thumb, Hard Real-Time Systems does not implement the virtual memory model for, handling the memory. This eliminates the delay in swapping in and out the code corresponding to the task, to and from the primary memory. In general, the presence of Human in the loop (HITL) for tasks introduces, unexpected delays in the task execution. Most of the Hard Real-Time Systems are automatic and does not, contain a ‘human in the loop’., , 10.2.2.3 So Real-Time, Real-Time Operating System that does not guarantee meeting deadlines, but offer the best effort to meet the, deadline are referred as ‘Soft Real-Time’ systems. Missing deadlines for tasks are acceptable for a Soft Realtime system if the frequency of deadline missing is within the compliance limit of the Quality of Service, (QoS). A Soft Real-Time system emphasises the principle ‘A late answer is an acceptable answer, but it could, have done bit faster’. Soft Real-Time systems most often have a ‘human in the loop (HITL)’. Automatic Teller, Machine (ATM) is a typical example for Soft-Real-Time System. If the ATM takes a few seconds more than, the ideal operation time, nothing fatal happens. An audio-video playback system is another example for Soft, Real-Time system. No potential damage arises if a sample comes late by fraction of a second, for playback., , 10.3, , TASKS, PROCESS AND THREADS, , The term ‘task’ refers to something that needs to be done. In our day-to-day life,, we are bound to the execution of a number of tasks. The task can be the one, assigned by our managers or the one assigned by our professors/teachers or the, one related to our personal or family needs. In addition, we will have an order of, priority and schedule/timeline for executing these tasks. In the operating system, context, a task is defined as the program in execution and the related information, maintained by the operating system for the program. Task is also known as ‘Job’ in the operating system, context. A program or part of it in execution is also called a ‘Process’. The terms ‘Task’, ‘Job’ and ‘Process’, refer to the same entity in the operating system context and most often they are used interchangeably., LO 3 Discuss, tasks, processes, and threads in the, operating system, context
Page 421 :
397, , Real-Time Opera ng System (RTOS) based Embedded System Design, , 10.3.1, , Process, , A ‘Process’ is a program, or part of it, in execution. Process is also known as an instance of a program in, execution. Multiple instances of the same program can execute simultaneously. A process requires various, system resources like CPU for executing the process, memory for storing the code corresponding to the process, and associated variables, I/O devices for information exchange, etc. A process is sequential in execution., , 10.3.1.1 The Structure of a Process, The concept of ‘Process’ leads to concurrent execution (pseudo parallelism) of tasks and thereby the efficient, utilisation of the CPU and other system resources. Concurrent execution is achieved through the sharing of, CPU among the processes. A process mimics a processor in properties and holds a set of registers, process, status, a Program Counter (PC) to point to the next executable instruction of the process, a stack for holding the, local variables associated with the process and the code corresponding to the process. This can be visualised, as shown in Fig. 10.4., A process which inherits all the properties of the CPU can be considered as a virtual processor, awaiting, its turn to have its properties switched into the physical processor. When the process gets its turn, its registers, and the program counter register becomes mapped to the physical registers of the CPU. From a memory, perspective, the memory occupied by the process is segregated into three regions, namely, Stack memory,, Data memory and Code memory (Fig. 10.5)., , Process, Stack Memory, Stack, (Stack pointer), , Stack memory grows, downwards, , Working registers, , Data memory, upwards, , Status registers, , grows, , Program counter (PC), Data Memory, Code memory, corresponding to the, Process, , Fig. 10.4, , Structure of a Process, , Code Memory, , Fig. 10.5, , Memory organisation of a Process, , The ‘Stack’ memory holds all temporary data such as variables local to the process. Data memory holds, all global data for the process. The code memory contains the program code (instructions) corresponding, to the process. On loading a process into the main memory, a specific area of memory is allocated for the, process. The stack memory usually starts (OS Kernel implementation dependent) at the highest memory, address from the memory area allocated for the process. Say for example, the memory map of the memory, area allocated for the process is 2048 to 2100, the stack memory starts at address 2100 and grows downwards, to accommodate the variables local to the process.
Page 422 :
398, , Introduc on to Embedded Systems, , 10.3.1.2 Process States and State Transi on, , Interrupted or, Preempted, , Scheduled for, Execution, , The creation of a process to its termination is not, Created, a single step operation. The process traverses, through a series of states during its transition from, the newly created state to the terminated state. The, Incepted into memory, cycle through which a process changes its state from, ‘newly created’ to ‘execution completed’ is known, as ‘Process Life Cycle’. The various states through, Ready, which a process traverses through during a Process, tion, d, mple, e, o, r, i, C, u, q, I/O, Life Cycle indicates the current status of the process, e Ac, sourc, d Re, e, r, a, h, with respect to time and also provides information on, S, what it is allowed to do next. Figure 10.6 represents, the various states associated with a process., Blocked, The state at which a process is being created is, referred as ‘Created State’. The Operating System, Wait, ing fo, Wait, r I/O, ing fo, recognises a process in the ‘Created State’ but no, r Sha, red R, esour, resources are allocated to the process. The state,, ce, Running, where a process is incepted into the memory and, awaiting the processor time for execution, is known, as ‘Ready State’. At this stage, the process is placed, Execution Completion, in the ‘Ready list’ queue maintained by the OS., The state where in the source code instructions, corresponding to the process is being executed is, Completed, called ‘Running State’. Running state is the state, at which the process execution happens. ‘Blocked, State/Wait State’ refers to a state where a running Fig. 10.6 Process states and state transition representation, process is temporarily suspended from execution, and does not have immediate access to resources. The blocked state might be invoked by various conditions, like: the process enters a wait state for an event to occur (e.g. Waiting for user inputs such as keyboard input), or waiting for getting access to a shared resource (will be discussed at a later section of this chapter). A state, where the process completes its execution is known as ‘Completed State’. The transition of a process from, one state to another is known as ‘State transition’. When a process changes its state from Ready to running, or from running to blocked or terminated or from blocked to running, the CPU allocation for the process may, also change., It should be noted that the state representation for a process/task mentioned here is a generic representation., The states associated with a task may be known with a different name or there may be more or less number, of states than the one explained here under different OS kernel. For example, under VxWorks’ kernel, the, tasks may be in either one or a specific combination of the states READY, PEND, DELAY and SUSPEND., The PEND state represents a state where the task/process is blocked on waiting for I/O or system resource., The DELAY state represents a state in which the task/process is sleeping and the SUSPEND state represents, a state where a task/process is temporarily suspended from execution and not available for execution. Under, MicroC/OS-II kernel, the tasks may be in one of the states, DORMANT, READY, RUNNING, WAITING, or INTERRUPTED. The DORMANT state represents the ‘Created’ state and WAITING state represents the, state in which a process waits for shared resource or I/O access. We will discuss about the states and state, transition for tasks under VxWorks and uC/OS-II kernel in a later chapter.
Page 423 :
399, , Real-Time Opera ng System (RTOS) based Embedded System Design, , 10.3.1.3 Process Management, Process management deals with the creation of a process, setting up the memory space for the process, loading, the process’s code into the memory space, allocating system resources, setting up a Process Control Block, (PCB) for the process and process termination/deletion. For more details on Process Management, refer to the, section ‘Task/Process management’ given under the topic ‘The Real-Time Kernel’ of this chapter., , 10.3.2, , Threads, , A thread is the primitive that can execute code. A, thread is a single sequential flow of control within, a process. ‘Thread’ is also known as lightweight, process. A process can have many threads of, execution. Different threads, which are part of a, process, share the same address space; meaning, they share the data memory, code memory and heap, memory area. Threads maintain their own thread, status (CPU register values), Program Counter (PC), and stack. The memory model for a process and its, associated threads are given in Fig. 10.7., , 10.3.2.1 The Concept of Mul threading, , Stack memory for Thread 1, Stack memory for Thread 2, , Stack Memory, for Process, , Data memory for process, Code memory for process, , Fig. 10.7 Memory organisation of a Process and its, A process/task in embedded application may be a, associated Threads, complex or lengthy one and it may contain various, suboperations like getting input from I/O devices connected to the processor, performing some internal, calculations/operations, updating some I/O devices etc. If all the subfunctions of a task are executed in, sequence, the CPU utilisation may not be efficient. For example, if the process is waiting for a user input,, the CPU enters the wait state for the event, and the process execution also enters a wait state. Instead of this, single sequential execution of the whole process, if the task/process is split into different threads carrying, out the different subfunctionalities of the process, the CPU can be effectively utilised and when the thread, corresponding to the I/O operation enters the wait state, another threads which do not require the I/O event, for their operation can be switched into execution. This leads to more speedy execution of the process and, the efficient utilisation of the processor time and resources. The multithreaded architecture of a process can, be better visualised with the thread-process diagram shown in Fig. 10.8., If the process is split into multiple threads, which executes a portion of the process, there will be a main, thread and rest of the threads will be created within the main thread. Use of multiple threads to execute a, process brings the following advantage., ∑ Better memory utilisation. Multiple threads of the same process share the address space for data, memory. This also reduces the complexity of inter thread communication since variables can be shared, across the threads., ∑ Since the process is split into different threads, when one thread enters a wait state, the CPU can be, utilised by other threads of the process that do not require the event, which the other thread is waiting,, for processing. This speeds up the execution of the process., ∑ Efficient CPU utilisation. The CPU is engaged all time.
Page 424 :
400, , Introduc on to Embedded Systems, , Task/Process, , Code memory, , Data memory, Stack, , Stack, , Stack, , Registers, , Registers, , Registers, , Thread 1, , Thread 2, , Thread 3, , void main (void), {, //Create child, thread 1, CreateThread (NULL,, 1000,(LPTHREAD_STA, RT_ROUTINE ), ChildThread 1,NULL,, 0, &dwThreadID );, //Create child, thread 2, CreateThread (NULL,, 1000,(LPTHREAD_STA, RT_ROUTINE ), ChildThread 2,NULL,, 0, &dwThreadID );, }, , int ChildThread 1, (void), {, //Do something, , int ChildThread 2, (void), {, //Do something, , }, , }, , Fig. 10.8 Process with multi-threads, , 10.3.2.2 Thread Standards, Thread standards deal with the different standards available for thread creation and management. These, standards are utilised by the operating systems for thread creation and thread management. It is a set of thread, class libraries. The commonly available thread class libraries are explained below., POSIX Threads POSIX stands for Portable Operating System Interface. The POSIX.4 standard deals with, the Real-Time extensions and POSIX.4a standard deals with thread extensions. The POSIX standard library, for thread creation and management is ‘Pthreads’. ‘Pthreads’ library defines the set of POSIX thread creation, and management functions in ‘C’ language., The primitive, int, pthread_create(pthread_t, *new_thread_ID,, const, pthread_attr_t, *attribute, void * (*start_function)(void *), void *arguments);, , creates a new thread for running the function start_ function. Here pthread_t is the handle to the newly, created thread and pthread_attr_t is the data type for holding the thread attributes. ‘start_function’ is the
Page 425 :
Real-Time Opera ng System (RTOS) based Embedded System Design, , 401, , function the thread is going to execute and arguments is the arguments for ‘start_function’ (It is a void * in, the above example). On successful creation of a Pthread, pthread_create() associates the Thread Control, Block (TCB) corresponding to the newly created thread to the variable of type pthread_t (new_thread_ID in, our example)., The primitive, int pthread_join(pthread_t new_thread,void * *thread_status);, , blocks the current thread and waits until the completion of the thread pointed by it (In this example new_, thread ), All the POSIX ‘thread calls’ returns an integer. A return value of zero indicates the success of the call. It, is always good to check the return value of each call., , Example 1, Write a multithreaded application to print “Hello I’m in main thread” from the main thread and “Hello I’m in, new thread” 5 times each, using the pthread_create() and pthread_join() POSIX primitives., //Assumes the application is running on an OS where POSIX library is, //available, #include <pthread.h>, #include <stdlib.h>, #include <stdio.h>, //******************************************************************, //New thread function for printing “Hello I’m in new thread”, void *new_thread( void *thread_args ), {, int i, j;, for( j= 0; j < 5; j++ ), {, printf(“Hello I’m in new thread\n” );, //Wait for some time. Do nothing, //The following line of code can be replaced with, //OS supported delay function like sleep(), delay () etc…, for( i= 0; i < 10000; i++ );, }, return NULL;, }, //******************************************************************, //Start of main thread, int main( void ), {, int i, j;, pthread_t tcb;, //Create the new thread for executing new_thread function, if (pthread_create( &tcb, NULL, new_thread, NULL )), {, //New thread creation failed, printf(“Error in creating new thread\n” );
Page 426 :
402, , Introduc on to Embedded Systems, , return -1;, }, for( j= 0; j < 5; j++ ), {, printf(“Hello I’m in main thread\n” );, //Wait for some time. Do nothing, //The following line of code can be replaced with, //OS supported delay function like sleep(), delay etc…, for( i= 0; i < 10000; i++ );, }, if (pthread_join(tcb, NULL )), {, //Thread join failed, printf(“Error in Thread join\n” );, return -1;, }, return 1;, }, , You can compile this application using the gcc compiler. Examine the output to figure out the thread, execution switching. The lines printed will give an idea of the order in which the thread execution is switched, between. The pthread_join call forces the main thread to wait until the completion of the thread tcb, if the, main thread finishes the execution first., The termination of a thread can happen in different ways. The thread can terminate either by completing, its execution (natural termination) or by a forced termination. In a natural termination, the thread completes, its execution and returns back to the main thread through a simple return or by executing the pthread_exit(), call. Forced termination can be achieved by the call pthread_cancel() or through the termination of the main, thread with exit or exec functions. pthread_cancel() call is used by a thread to terminate another thread., pthread_exit() call is used by a thread to explicitly exit after it completes its work and is no longer required, to exist. If the main thread finishes before the threads it has created, and exits with pthread_exit(), the other, threads continue to execute. If the main thread uses exit call to exit the thread, all threads created by the main, thread is terminated forcefully. Exiting a thread with the call pthread_exit() will not perform a cleanup. It, will not close any files opened by the thread and files will remain in the open status even after the thread, terminates. Calling pthread_join at the end of the main thread is the best way to achieve synchronisation and, proper cleanup. The main thread, after finishing its task waits for the completion of other threads, which were, joined to it using the pthread_join call. With a pthread_join call, the main thread waits other threads, which, were joined to it, and finally merges to the single main thread. If a new thread spawned by the main thread, is still not joined to the main thread, it will be counted against the system’s maximum thread limit. Improper, cleanup will lead to the failure of new thread creation., Win32 Threads Win32 threads are the threads supported by various flavours of Windows Operating, Systems. The Win32 Application Programming Interface (Win32 API) libraries provide the standard set of, Win32 thread creation and management functions. Win32 threads are created with the API, HANDLE, CreateThread(LPSECURITY_ATTRIBUTES, lpThreadAttributes,DWORD, dwStackSize, LPTHREAD_START_ROUTINE lpStartAddress, LPVOID lpParameter,, DWORD dwCreationFlags, LPDWORD lpThreadId );
Page 427 :
Real-Time Opera ng System (RTOS) based Embedded System Design, , 403, , The parameter lpThreadAttributes defines the security attributes for the thread and dwStackSize defines the, stack size for the thread. These two parameters are not supported by the Windows CE/Embedded Compact, Real-Time Operating Systems and it should be kept as NULL and 0 respectively in a CreateThread API Call., The other parameters are, lpStartAddress: Pointer to the function which is to be executed by the thread., lpParameter: Parameter specifying an application-defined value that is passed to the thread routine., dwCreationFlags: Defines the state of the thread when it is created. Usually it is kept as 0 or CREATE_, SUSPENDED implying the thread is created and kept at the suspended state., lpThreadId: Pointer to a DWORD that receives the identifier for the thread., On successful creation of the thread, CreateThread returns the handle to the thread and the thread, identifier., The API GetCurrentThread(void) returns the handle of the current thread and GetCurrentThreadId(void), returns its ID. GetThreadPriority (HANDLE hThread) API returns an integer value representing the current, priority of the thread whose handle is passed as hThread. Threads are always created with normal priority, (THREAD_PRIORITY_NORMAL. Refer MSDN documentation for the different thread priorities and their, meaning). SetThreadPriority (HANDLE hThread, int nPriority) API is used for setting the priority of a thread., The first parameter to this function represents the thread handle and the second one the thread priority., For Win32 threads, the normal thread termination happens when an exception occurs in the thread, or when, the thread’s execution is completed or when the primary thread or the process to which the thread is associated, is terminated. A thread can exit itself by calling the ExitThread (DWORD dwExitCode) API. The parameter, dwExitCode sets the exit code for thread termination. Calling ExitThread API frees all the resources utilised, by the thread. The exit code of a thread can be checked by other threads by calling the GetExitCodeThread, (HANDLE hThread, LPDWORD lpExitCode). TerminateThread (HANDLE hThread, DWORD dwExitCode), API is used for terminating a thread from another thread. The handle hThread indicates which thread is, to be terminated and dwExitCode sets the exit code for the thread. This API will not execute the thread, termination and clean up code and may not free the resources occupied by the thread. TerminateThread is a, potentially dangerous call and it should not be used in normal conditions as a mechanism for terminating a, thread. Use this call only as a final choice. When a thread is terminated through TerminateThread method, the, system releases the thread’s initial stack and the thread will not get a chance to execute any user-mode code., Also any dynamic link libraries (dlls) attached to the thread are not notified that the thread is terminating., TerminateThread can lead to potential issues like: Non-releasing of the critical section object, any, owned, by the thread, non-releasing of heap lock, if the thread is allocating memory from the heap, inconsistencies, of the kernel32 state for the thread’s process if the thread was executing certain kernel32 call when it is, terminated, issues in shared dll functions, if the thread was manipulating the global state of a shared dll, when it is terminated etc. SuspendThread(HANDLE hThread) API can be used for suspending a thread, from execution provided the handle hThread possesses THREAD_SUSPEND_RESUME access right. If the, SuspendThread API call succeeds, the thread stops executing and increments its internal suspend count. The, thread becomes suspended if its suspend count is greater than zero. The SuspendThread function is primarily, designed for use by debuggers. One must be cautious in using this API for the reason it may cause deadlock, condition if the thread is suspended at a stage where it acquired a mutex or shared resource and another, thread tries to access the same. The ResumeThread(HANDLE hThread) API is used for resuming a suspended, thread. The ResumeThread API checks the suspend count of the specified thread. A suspend count of zero, indicates that the specified thread is not currently in the suspended mode. If the count is not zero, the count is, decremented by one and if the resulting count value is zero, the thread is resumed. The API Sleep (DWORD
Page 428 :
404, , Introduc on to Embedded Systems, , dwMilliseconds) can be used for suspending a thread for the duration specified in milliseconds by the Sleep, function. The Sleep call is initiated by the thread., , Example 2, Write a multithreaded application using Win32 APIs to set up a counter in the main thread and secondary, thread to count from 0 to 10 and print the counts from both the threads. Put a delay of 500 ms in between the, successive printing in both the threads., #include “stdafx.h”, #include “windows.h”, #include “stdio.h”, //******************************************************************, //Child thread, //******************************************************************, void ChildThread(void), {, char i;, for (i = 0; i <= 10; ++i), {, printf(“Executing Child Thread : Counter = %d\n”, i);, Sleep(500);, }, }, //******************************************************************, //Primary thread, //******************************************************************, int main(int argc, char* argv[]), {, HANDLE hThread;, DWORD dwThreadID;, char i;, hThread = CreateThread(NULL, 1000, (LPTHREAD_START_ROUTINE)ChildThread,, NULL, 0, &dwThreadID);, if (hThread == NULL), {, printf(“Thread Creation Failed\nError No : %d\n”, GetLastError());, return 1;, }, for (i = 0; i <= 10; ++i), {, printf(“Executing Main Thread : Counter = %d\n”, i);, Sleep(500);, }, return 0;, }
Page 429 :
Real-Time Opera ng System (RTOS) based Embedded System Design, , 405, , To execute this program, create a new Win32 Console Application with Microsoft Visual Studio using, Visual C++ and add the above piece of code to it and compile. The output obtained on running this application, on a machine with Windows 10 operating system is given in Fig. 10.9., , Fig. 10.9, , Output of the Win32 Multithreaded application, , If you examine the output, you can see the switching between main and child threads. The output need not, be the same always. The output is purely dependent on the scheduling policies implemented by the windows, operating system for thread scheduling. You may get the same output or a different output each time you run, the application., Java Threads Java threads are the threads supported by Java programming Language. The java thread, class ‘Thread’ is defined in the package ‘java.lang’. This package needs to be imported for using the thread, creation functions supported by the Java thread class. There are two ways of creating threads in Java: Either, by extending the base ‘Thread’ class or by implementing an interface. Extending the thread class allows, inheriting the methods and variables of the parent class (Thread class) only whereas interface allows a way, to achieve the requirements for a set of classes. The following piece of code illustrates the implementation of, Java threads with extending the thread base class ‘Thread’., import java.lang.*;, public class MyThread extends Thread, {, public void run(), {, System.out.println(“Hello from MyThread!”);, }, public static void main(String args[]), {, (new MyThread()).start();, }, }
Page 430 :
406, , Introduc on to Embedded Systems, , The above piece of code creates a new class MyThread by extending the base class Thread. It also, overrides the run() method inherited from the base class with its own run() method. The run() method of, MyThread implements all the task for the MyThread thread. The method start() moves the thread to a pool, of threads waiting for their turn to be picked up for execution by the scheduler. The thread is said to be in the, ‘Ready’ state at this stage. The scheduler picks the threads for execution from the pool based on the thread, priorities., E.g., , MyThread.start();, , The output of the above piece of code when executed on Windows 10 platform is given in Fig. 10.10., , Fig. 10.10, , Output of the Java Multithreaded application, , Invoking the static method yield() voluntarily give up the execution of the thread and the thread is moved, to the pool of threads waiting to get their turn for execution, i.e. the thread enters the ‘Ready’ state., E.g., , MyThread.yield();, , The static method sleep() forces the thread to sleep for the duration mentioned by the sleep call, i.e. the, thread enters the ‘Suspend’ mode. Once the sleep period is expired, the thread is moved to the pool of threads, waiting to get their turn for execution, i.e. the thread enters the ‘Ready’ state. The method sleep() only, guarantees that the thread will sleep for the minimum period mentioned by the argument to the call. It will not, guarantee anything on the resume of the thread after the sleep period. It is dependent on the scheduler., E.g., , MyThread.sleep(100); Sleep for 100 milliseconds., , Calling a thread Object’s wait() method causes the thread object to wait. The thread will remain in the, ‘Wait’ state until another thread invokes the notify() or notifyAll() method of the thread object which is, waiting. The thread enters the ‘Blocked’ state when waiting for input from I/O devices or waiting for object, lock in case of accessing shared resources. The thread is moved to the ‘Ready’ state on receiving the I/O, input or on acquiring the object lock. The thread enters the ‘Finished/Dead’ state on completion of the task, assigned to it or when the stop() method is explicitly invoked. The thread may also enter this state if it is, terminated by an unrecoverable error condition., For more information on Java threads, visit Sun Micro System’s tutorial on Threads, available at http://, java.sun.com/tutorial/applet/overview/threads.html, Summary So far we discussed about the various thread classes available for creation and management of, threads in a multithreaded system in a General Purpose Operating System’s perspective. From an RTOS, perspective, POSIX threads and Win32 threads are the most commonly used thread class libraries for thread, creation and management. Many non-standard, proprietary thread classes are also used by some proprietary, RTOS. Portable threads (Pth), a very portable POSIX/ANSI-C based library from GNU, may be the “next, generation” threads library. Pth provides non-preemptive priority based scheduling for multiple threads inside, event driven applications. Visit http://www.gnu.org/software/pth/ for more details on GNU Portable threads.
Page 431 :
Real-Time Opera ng System (RTOS) based Embedded System Design, , 407, , 10.3.2.3 Thread Pre-emp on, Thread pre-emption is the act of pre-empting the currently running thread (stopping the currently running thread, temporarily). Thread pre-emption ability is solely dependent on the Operating System. Thread pre-emption, is performed for sharing the CPU time among all the threads. The execution switching among threads are, known as ‘Thread context switching’. Thread context switching is dependent on the Operating system’s, scheduler and the type of the thread. When we say ‘Thread’, it falls into any one of the following types., User Level Thread User level threads do not have kernel/Operating System support and they exist solely in, the running process. Even if a process contains multiple user level threads, the OS treats it as single thread, and will not switch the execution among the different threads of it. It is the responsibility of the process to, schedule each thread as and when required. In summary, user level threads of a process are non-preemptive, at thread level from OS perspective., Kernel/System Level Thread Kernel level threads are individual units of execution, which the OS treats, as separate threads. The OS interrupts the execution of the currently running kernel thread and switches the, execution to another kernel thread based on the scheduling policies implemented by the OS. In summary, kernel level threads are pre-emptive., For user level threads, the execution switching (thread context switching) happens only when the currently, executing user level thread is voluntarily blocked. Hence, no OS intervention and system calls are involved, in the context switching of user level threads. This makes context switching of user level threads very fast., On the other hand, kernel level threads involve lots of kernel overhead and involve system calls for context, switching. However, kernel threads maintain a clear layer of abstraction and allow threads to use system calls, independently. There are many ways for binding user level threads with system/kernel level threads. The, following section gives an overview of various thread binding models., Many-to-One Model Here many user level threads are mapped to a single kernel thread. In this model,, the kernel treats all user level threads as single thread and the execution switching among the user level, threads happens when a currently executing user level thread voluntarily blocks itself or relinquishes the, CPU. Solaris Green threads and GNU Portable Threads are examples for this. The ‘PThread’ example given, under the POSIX thread library section is an illustrative example for application with Many-to-One thread, model., One-to-One Model In One-to-One model, each user level thread is bonded to a kernel/system level thread., Windows NT and Linux threads are examples for One-to-One thread models. The modified ‘PThread’, example given under the ‘Thread Pre-emption’ section is an illustrative example for application with Oneto-One thread model., Many-to-Many Model In this model many user level threads are allowed to be mapped to many kernel, threads. Windows NT/2000 with ThreadFibre package is an example for this., , 10.3.2.4 Thread v/s Process, I hope, by now you got a reasonably good knowledge of process and threads. Now let us summarise the, properties of process and threads., Thread, , Process, , Thread is a single unit of execution and is part of process. Process is a program in execution and contains one or, more threads., A thread does not have its own data memory and heap Process has its own code memory, data memory and stack, memory. It shares the data memory and heap memory with memory., other threads of the same process.
Page 432 :
408, , Introduc on to Embedded Systems, , A thread cannot live independently; it lives within the A process contains at least one thread., process., There can be multiple threads in a process. The first thread Threads within a process share the code, data and heap, (main thread) calls the main function and occupies the start memory. Each thread holds separate memory area for stack, of the stack memory of the process., (shares the total stack memory of the process)., Threads are very inexpensive to create, , Processes are very expensive to create. Involves many OS, overhead., , Context switching is inexpensive and fast, , Context switching is complex and involves lot of OS overhead and is comparatively slower., , If a thread expires, its stack is reclaimed by the process., , If a process dies, the resources allocated to it are reclaimed, by the OS and all the associated threads of the process, also dies., , 10.4, , MULTIPROCESSING AND MULTITASKING, , The terms multiprocessing and multitasking are a little confusing and sounds alike., In the operating system context multiprocessing describes the ability to execute, multiple processes simultaneously. Systems which are capable of performing, multiprocessing, are known as multiprocessor systems. Multiprocessor systems, possess multiple CPUs and can execute multiple processes simultaneously., The ability of the operating system to have multiple programs in memory,, which are ready for execution, is referred as multiprogramming. In a uniprocessor system, it is not possible, to execute multiple processes simultaneously. However, it is possible for a uniprocessor system to achieve, some degree of pseudo parallelism in the execution of multiple processes by switching the execution among, different processes. The ability of an operating system to hold multiple processes in memory and switch, the processor (CPU) from executing one process to another process is known as multitasking. Multitasking, creates the illusion of multiple tasks executing in parallel. Multitasking involves the switching of CPU from, executing one task to another. In an earlier section ‘The Structure of a Process’ of this chapter, we learned, that a Process is identical to the physical processor in the sense it has own register set which mirrors the, CPU registers, stack and Program Counter (PC). Hence, a ‘process’ is considered as a ‘Virtual processor’,, awaiting its turn to have its properties switched into the physical processor. In a multitasking environment,, when task/process switching happens, the virtual processor (task/process) gets its properties converted into, that of the physical processor. The switching of the virtual processor to physical processor is controlled by the, scheduler of the OS kernel. Whenever a CPU switching happens, the current context of execution should be, saved to retrieve it at a later point of time when the CPU executes the process, which is interrupted currently, due to execution switching. The context saving and retrieval is essential for resuming a process exactly from, the point where it was interrupted due to CPU switching. The act of switching CPU among the processes or, changing the current execution context is known as ‘Context switching’. The act of saving the current context, which contains the context details (Register details, memory details, system resource usage details, execution, details, etc.) for the currently running process at the time of CPU switching is known as ‘Context saving’., The process of retrieving the saved context details for a process, which is going to be executed due to CPU, switching, is known as ‘Context retrieval’. Multitasking involves ‘Context switching’ (Fig. 10.11), ‘Context, saving’ and ‘Context retrieval’., LO 4 Understand, the difference, between, multiprocessing, and multitasking, , Toss Juggling The skilful object manipulation game is a classic real world example for the multitasking, illusion. The juggler uses a number of objects (balls, rings, etc.) and throws them up and catches them. At
Page 433 :
409, , Real-Time Opera ng System (RTOS) based Embedded System Design, , Delay in execution of, Process 2 happened, due to ‘Context, Switching’, , Process 1, , Running, , Idle, Running, , Delay in execution of, Process 1 happened, due to ‘Context, Switching’, , Idle, , Process 2, , 1. Save Current context into PCB1, 2. Perform other OS operations related to, ‘Context Switching’, 3. Reload Context for Process 1 from PCB0, , Execution switches to Process 1, (Interrupt or System Call), , 1. Save Current context into PCB0, 2. Perform other OS operations related to, ‘Context Switching’, 3. Reload Context for Process 2 from PCB1, , Processes, , Execution switches to Process 2, (Interrupt or System Call), , any point of time, he throws only one ball and catches only one per hand. However, the speed at which he is, switching the balls for throwing and catching creates the illusion, he is throwing and catching multiple balls, or using more than two hands ☺ simultaneously, to the spectators., , Running, , Waits in ‘Ready’ Queue, , Idle, , Waits in ‘Ready’ Queue, , Running, , Time, , Fig. 10.11, , 10.4.1, , Context switching, , Types of Multitasking, , As we discussed earlier, multitasking involves the switching of execution among multiple tasks. Depending, on how the switching act is implemented, multitasking can be classified into different types. The following, section describes the various types of multitasking existing in the Operating System’s context., , 10.4.1.1 Co-opera ve Mul tasking, Co-operative multitasking is the most primitive form of multitasking in which a task/process gets a chance to, execute only when the currently executing task/process voluntarily relinquishes the CPU. In this method, any, task/process can hold the CPU as much time as it wants. Since this type of implementation involves the mercy, of the tasks each other for getting the CPU time for execution, it is known as co-operative multitasking. If the, currently executing task is non-cooperative, the other tasks may have to wait for a long time to get the CPU., , 10.4.1.2 Preemp ve Mul tasking, Preemptive multitasking ensures that every task/process gets a chance to execute. When and how much time, a process gets is dependent on the implementation of the preemptive scheduling. As the name indicates, in, preemptive multitasking, the currently running task/process is preempted to give a chance to other tasks/, process to execute. The preemption of task may be based on time slots or task/process priority., , 10.4.1.3 Non-preemp ve Mul tasking, In non-preemptive multitasking, the process/task, which is currently given the CPU time, is allowed to, execute until it terminates (enters the ‘Completed’ state) or enters the ‘Blocked/Wait’ state, waiting for an I/O
Page 434 :
410, , Introduc on to Embedded Systems, , or system resource. The co-operative and non-preemptive multitasking differs in their behaviour when they, are in the ‘Blocked/Wait’ state. In co-operative multitasking, the currently executing process/task need not, relinquish the CPU when it enters the ‘Blocked/Wait’ state, waiting for an I/O, or a shared resource access or, an event to occur whereas in non-preemptive multitasking the currently executing task relinquishes the CPU, when it waits for an I/O or system resource or an event to occur., , 10.5, , TASK SCHEDULING, , As we already discussed, multitasking involves the execution switching among, the different tasks. There should be some mechanism in place to share the CPU, among the different tasks and to decide which process/task is to be executed at a, given point of time. Determining which task/process is to be executed at a given, point of time is known as task/process scheduling. Task scheduling forms the, basis of multitasking. Scheduling policies forms the guidelines for determining, which task is to be executed when. The scheduling policies are implemented in an, algorithm and it is run by the kernel as a service. The kernel service/application,, which implements the scheduling algorithm, is known as ‘Scheduler’. The process scheduling decision may, take place when a process switches its state to, 1. ‘Ready’ state from ‘Running’ state, 2. ‘Blocked/Wait’ state from ‘Running’ state, 3. ‘Ready’ state from ‘Blocked/Wait’ state, 4. ‘Completed’ state, A process switches to ‘Ready’ state from the ‘Running’ state when it is preempted. Hence, the type of, scheduling in scenario 1 is pre-emptive. When a high priority process in the ‘Blocked/Wait’ state completes, its I/O and switches to the ‘Ready’ state, the scheduler picks it for execution if the scheduling policy used is, priority based preemptive. This is indicated by scenario 3. In preemptive/non-preemptive multitasking, the, process relinquishes the CPU when it enters the ‘Blocked/Wait’ state or the ‘Completed’ state and switching, of the CPU happens at this stage. Scheduling under scenario 2 can be either preemptive or non-preemptive., Scheduling under scenario 4 can be preemptive, non-preemptive or co-operative., The selection of a scheduling criterion/algorithm should consider the following factors:, LO 5 Describe, the FCFS/FIFO,, LCFS/LIFO, SJF, and priority based, task/process, scheduling, , CPU Utilisation: The scheduling algorithm should always make the CPU utilisation high. CPU utilisation is, a direct measure of how much percentage of the CPU is being utilised., Throughput: This gives an indication of the number of processes executed per unit of time. The throughput, for a good scheduler should always be higher., Turnaround Time: It is the amount of time taken by a process for completing its execution. It includes the, time spent by the process for waiting for the main memory, time spent in the ready queue, time spent on, completing the I/O operations, and the time spent in execution. The turnaround time should be a minimal for, a good scheduling algorithm., Waiting Time: It is the amount of time spent by a process in the ‘Ready’ queue waiting to get the CPU time, for execution. The waiting time should be minimal for a good scheduling algorithm., Response Time: It is the time elapsed between the submission of a process and the first response. For a good, scheduling algorithm, the response time should be as least as possible., To summarise, a good scheduling algorithm has high CPU utilisation, minimum Turn Around Time, (TAT), maximum throughput and least response time.
Page 435 :
Real-Time Opera ng System (RTOS) based Embedded System Design, , 411, , The Operating System maintains various queues† in connection with the CPU scheduling, and a process, passes through these queues during the course of its admittance to execution completion., The various queues maintained by OS in association with CPU scheduling are:, Job Queue: Job queue contains all the processes in the system, Ready Queue: Contains all the processes, which are ready for execution and waiting for CPU to get their, turn for execution. The Ready queue is empty when there is no process ready for running., Device Queue: Contains the set of processes, which are waiting for an I/O device., A process migrates through all these queues during its journey from ‘Admitted’ to ‘Completed’ stage. The, following diagrammatic representation (Fig. 10.12) illustrates the transition of a process through the various, queues., , Fig. 10.12, , Illustration of process transition through various queues, , Based on the scheduling algorithm used, the scheduling can be classified into the following categories., , 10.5.1, , Non-preemptive Scheduling, , Non-preemptive scheduling is employed in systems, which implement non-preemptive multitasking model., In this scheduling type, the currently executing task/process is allowed to run until it terminates or enters the, ‘Wait’ state waiting for an I/O or system resource. The various types of non-preemptive scheduling adopted, in task/process scheduling are listed below., † Queue is a special kind of arrangement of a collection of objects. In the operating system context queue is considered as a buffer.
Page 436 :
412, , Introduc on to Embedded Systems, , 10.5.1.1 First-Come-First-Served (FCFS)/ FIFO Scheduling, As the name indicates, the First-Come-First-Served (FCFS) scheduling algorithm allocates CPU time to the, processes based on the order in which they enter the ‘Ready’ queue. The first entered process is serviced first., It is same as any real world application where queue systems are used; e.g. Ticketing reservation system, where people need to stand in a queue and the first person standing in the queue is serviced first. FCFS, scheduling is also known as First In First Out (FIFO) where the process which is put first into the ‘Ready’, queue is serviced first., , Example 1, Three processes with process IDs P1, P2, P3 with estimated completion time 10, 5, 7 milliseconds respectively, enters the ready queue together in the order P1, P2, P3. Calculate the waiting time and Turn Around Time, (TAT) for each process and the average waiting time and Turn Around Time (Assuming there is no I/O, waiting for the processes)., The sequence of execution of the processes by the CPU is represented as, P1, 0, , P2, 10, , 10, , P3, 15, , 5, , 22, 7, , Assuming the CPU is readily available at the time of arrival of P1, P1 starts executing without any waiting in, the ‘Ready’ queue. Hence the waiting time for P1 is zero. The waiting time for all processes are given as, Waiting Time for P1 = 0 ms (P1 starts executing first), Waiting Time for P2 = 10 ms (P2 starts executing after completing P1), Waiting Time for P3 = 15 ms (P3 starts executing after completing P1 and P2), Average waiting time = (Waiting time for all processes) / No. of Processes, = (Waiting time for (P1+P2+P3)) / 3, = (0+10+15)/3 = 25/3, = 8.33 milliseconds, Turn Around Time (TAT) for P1 = 10 ms, (Time spent in Ready Queue + Execution Time), Turn Around Time (TAT) for P2 = 15 ms, (-Do-), Turn Around Time (TAT) for P3 = 22 ms, (-Do-), Average Turn Around Time = (Turn Around Time for all processes) / No. of Processes, = (Turn Around Time for (P1+P2+P3)) / 3, = (10+15+22)/3 = 47/3, = 15.66 milliseconds, Average Turn Around Time (TAT) is the sum of average waiting time and average execution time., Average Execution Time = (Execution time for all processes)/No. of processes, = (Execution time for (P1+P2+P3))/3, = (10+5+7)/3 = 22/3, = 7.33, Average Turn Around Time = Average waiting time + Average execution time, = 8.33 + 7.33, = 15.66 milliseconds
Page 437 :
413, , Real-Time Opera ng System (RTOS) based Embedded System Design, , Example 2, Calculate the waiting time and Turn Around Time (TAT) for each process and the Average waiting time and, Turn Around Time (Assuming there is no I/O waiting for the processes) for the above example if the process, enters the ‘Ready’ queue together in the order P2, P1, P3., The sequence of execution of the processes by the CPU is represented as, P2, 0, , P1, 5, , 5, , P3, 15, , 10, , 22, 7, , Assuming the CPU is readily available at the time of arrival of P2, P2 starts executing without any waiting in, the ‘Ready’ queue. Hence the waiting time for P2 is zero. The waiting time for all processes is given as, Waiting Time for P2 = 0 ms (P2 starts executing first), Waiting Time for P1 = 5 ms (P1 starts executing after completing P2), Waiting Time for P3 = 15 ms (P3 starts executing after completing P2 and P1), Average waiting time = (Waiting time for all processes) / No. of Processes, = (Waiting time for (P2+P1+P3)) / 3, = (0+5+15)/3 = 20/3, = 6.66 milliseconds, Turn Around Time (TAT) for P2 = 5 ms, (Time spent in Ready Queue + Execution Time), Turn Around Time (TAT) for P1 = 15 ms (-Do-), Turn Around Time (TAT) for P3 = 22 ms (-Do-), Average Turn Around Time = (Turn Around Time for all processes) / No. of Processes, = (Turn Around Time for (P2+P1+P3)) / 3, = (5+15+22)/3 = 42/3, = 14 milliseconds, The Average waiting time and Turn Around Time (TAT) depends on the order in which the processes, enter the ‘Ready’ queue, regardless there estimated completion time., From the above two examples it is clear that the Average waiting time and Turn Around Time improve if, the process with shortest execution completion time is scheduled first., The major drawback of FCFS algorithm is that it favours monopoly of process. A process, which does, not contain any I/O operation, continues its execution until it finishes its task. If the process contains any, I/O operation, the CPU is relinquished by the process. In general, FCFS favours CPU bound processes and, I/O bound processes may have to wait until the completion of CPU bound process, if the currently executing, process is a CPU bound process. This leads to poor device utilisation. The average waiting time is not, minimal for FCFS scheduling algorithm., , 10.5.1.2 Last-Come-First Served (LCFS)/LIFO Scheduling, The Last-Come-First Served (LCFS) scheduling algorithm also allocates CPU time to the processes based, on the order in which they are entered in the ‘Ready’ queue. The last entered process is serviced first. LCFS, scheduling is also known as Last In First Out (LIFO) where the process, which is put last into the ‘Ready’, queue, is serviced first., , Example 1, Three processes with process IDs P1, P2, P3 with estimated completion time 10, 5, 7 milliseconds respectively, enters the ready queue together in the order P1, P2, P3 (Assume only P1 is present in the ‘Ready’ queue when
Page 438 :
414, , Introduc on to Embedded Systems, , the scheduler picks it up and P2, P3 entered ‘Ready’ queue after that). Now a new process P4 with estimated, completion time 6 ms enters the ‘Ready’ queue after 5 ms of scheduling P1. Calculate the waiting time and, Turn Around Time (TAT) for each process and the Average waiting time and Turn Around Time (Assuming, there is no I/O waiting for the processes). Assume all the processes contain only CPU operation and no I/O, operations are involved., Initially there is only P1 available in the Ready queue and the scheduling sequence will be P1, P3, P2. P4, enters the queue during the execution of P1 and becomes the last process entered the ‘Ready’ queue. Now the, order of execution changes to P1, P4, P3, and P2 as given below., P1, 0, , P4, 10, , 10, , P3, 16, , 6, , P2, 23, , 7, , 28, 5, , The waiting time for all the processes is given as, Waiting Time for P1 = 0 ms (P1 starts executing first), Waiting Time for P4 = 5 ms (P4 starts executing after completing P1. But P4 arrived after 5 ms of execution of, P1. Hence its waiting time = Execution start time – Arrival Time = 10 – 5 = 5), Waiting Time for P3 = 16 ms (P3 starts executing after completing P1 and P4), Waiting Time for P2 = 23 ms (P2 starts executing after completing P1, P4 and P3), Average waiting time = (Waiting time for all processes) / No. of Processes, = (Waiting time for (P1+P4+P3+P2)) / 4, = (0 + 5 + 16 + 23)/4 = 44/4, = 11 milliseconds, Turn Around Time (TAT) for P1 = 10 ms (Time spent in Ready Queue + Execution Time), Turn Around Time (TAT) for P4 = 11 ms (Time spent in Ready Queue + Execution Time = (Execution, Start Time – Arrival Time) + Estimated Execution Time = (10, – 5) + 6 = 5 + 6), Turn Around Time (TAT) for P3 = 23 ms (Time spent in Ready Queue + Execution Time), Turn Around Time (TAT) for P2 = 28 ms (Time spent in Ready Queue + Execution Time), Average Turn Around Time = (Turn Around Time for all processes) / No. of Processes, = (Turn Around Time for (P1+P4+P3+P2)) / 4, = (10+11+23+28)/4 = 72/4, = 18 milliseconds, LCFS scheduling is not optimal and it also possesses the same drawback as that of FCFS algorithm., , 10.5.1.3 Shortest Job First (SJF) Scheduling, Shortest Job First (SJF) scheduling algorithm ‘sorts the ‘Ready’ queue’ each time a process relinquishes the, CPU (either the process terminates or enters the ‘Wait’ state waiting for I/O or system resource) to pick the, process with shortest (least) estimated completion/run time. In SJF, the process with the shortest estimated, run time is scheduled first, followed by the next shortest process, and so on., , Example 1, Three processes with process IDs P1, P2, P3 with estimated completion time 10, 5, 7 milliseconds respectively, enters the ready queue together. Calculate the waiting time and Turn Around Time (TAT) for each process
Page 439 :
Real-Time Opera ng System (RTOS) based Embedded System Design, , 415, , and the Average waiting time and Turn Around Time (Assuming there is no I/O waiting for the processes) in, SJF algorithm., The scheduler sorts the ‘Ready’ queue based on the shortest estimated completion time and schedules the, process with the least estimated completion time first and the next least one as second, and so on. The order, in which the processes are scheduled for execution is represented as, , P2, 0, , P3, 5, , 5, , P1, 12, , 7, , 22, 10, , The estimated execution time of P2 is the least (5 ms) followed by P3 (7 ms) and P1 (10 ms)., The waiting time for all processes are given as, Waiting Time for P2 = 0 ms (P2 starts executing first), Waiting Time for P3 = 5 ms (P3 starts executing after completing P2), Waiting Time for P1 = 12 ms (P1 starts executing after completing P2 and P3), Average waiting time = (Waiting time for all processes) / No. of Processes, = (Waiting time for (P2+P3+P1)) / 3, = (0+5+12)/3 = 17/3, = 5.66 milliseconds, Turn Around Time (TAT) for P2 = 5 ms, (Time spent in Ready Queue + Execution Time), Turn Around Time (TAT) for P3 = 12 ms, (-Do-), Turn Around Time (TAT) for P1 = 22 ms, (-Do-), Average Turn Around Time = (Turn Around Time for all processes) / No. of Processes, = (Turn Around Time for (P2+P3+P1)) / 3, = (5+12+22)/3 = 39/3, = 13 milliseconds, Average Turn Around Time (TAT) is the sum of average waiting time and average execution time., The average Execution time = (Execution time for all processes)/No. of processes, = (Execution time for (P1+P2+P3))/3, = (10+5+7)/3 = 22/3 = 7.33, Average Turn Around Time = Average Waiting time + Average Execution time, = 5.66 + 7.33, = 13 milliseconds, From this example, it is clear that the average waiting time and turn around time is much improved with the, SJF scheduling for the same processes when compared to the FCFS algorithm., , Example 2, Calculate the waiting time and Turn Around Time (TAT) for each process and the Average waiting time and, Turn Around Time for the above example if a new process P4 with estimated completion time 2 ms enters, the ‘Ready’ queue after 2 ms of execution of P2. Assume all the processes contain only CPU operation and, no I/O operations are involved., At the beginning, there are only three processes (P1, P2 and P3) available in the ‘Ready’ queue and, the SJF scheduler picks up the process with the least execution completion time (In this example P2 with
Page 440 :
416, , Introduc on to Embedded Systems, , execution completion time 5 ms) for scheduling. The execution sequence diagram for this is same as that of, Example 1., Now process P4 with estimated execution completion time 2 ms enters the ‘Ready’ queue after 2 ms of, start of execution of P2. Since the SJF algorithm is non-preemptive and process P2 does not contain any I/O, operations, P2 continues its execution. After 5 ms of scheduling, P2 terminates and now the scheduler again, sorts the ‘Ready’ queue for process with least execution completion time. Since the execution completion, time for P4 (2 ms) is less than that of P3 (7 ms), which was supposed to be run after the completion of P2, as per the ‘Ready’ queue available at the beginning of execution scheduling, P4 is picked up for executing., Due to the arrival of the process P4 with execution time 2 ms, the ‘Ready’ queue is re-sorted in the order P2,, P4, P3, P1. At the beginning it was P2, P3, P1. The execution sequence now changes as per the following, diagram, P2, 0, , P4, 5, , 5, , P3, 7, , 2, , P1, 14, , 7, , 24, 10, , The waiting time for all the processes are given as, Waiting time for P2 = 0 ms (P2 starts executing first), Waiting time for P4 = 3 ms (P4 starts executing after completing P2. But P4 arrived after 2 ms of execution, of P2. Hence its waiting time = Execution start time – Arrival Time = 5 – 2 = 3), Waiting time for P3 = 7 ms (P3 starts executing after completing P2 and P4), Waiting time for P1 = 14 ms (P1 starts executing after completing P2, P4 and P3), Average waiting time = (Waiting time for all processes) / No. of Processes, = (Waiting time for (P2+P4+P3+P1)) / 4, = (0 + 3 + 7 + 14)/4 = 24/4, = 6 milliseconds, Turn Around Time (TAT) for P2 = 5 ms (Time spent in Ready Queue + Execution Time), Turn Around Time (TAT) for P4 = 5 ms (Time spent in Ready Queue + Execution Time = (Execution Start, Time – Arrival Time) + Estimated Execution Time = (5 – 2) + 2, = 3 + 2), Turn Around Time (TAT) for P3 = 14 ms (Time spent in Ready Queue + Execution Time), Turn Around Time (TAT) for P1 = 24 ms (Time spent in Ready Queue + Execution Time), Average Turn Around Time = (Turn Around Time for all Processes) / No. of Processes, = (Turn Around Time for (P2+P4+P3+P1)) / 4, = (5+5+14+24)/4 = 48/4, = 12 milliseconds, The average waiting time for a given set of process is minimal in SJF scheduling and so it is optimal, compared to other non-preemptive scheduling like FCFS. The major drawback of SJF algorithm is that, a process whose estimated execution completion time is high may not get a chance to execute if more, and more processes with least estimated execution time enters the ‘Ready’ queue before the process with, longest estimated execution time started its execution (In non-preemptive SJF ). This condition is known as, ‘Starvation’. Another drawback of SJF is that it is difficult to know in advance the next shortest process in, the ‘Ready’ queue for scheduling since new processes with different estimated execution time keep entering, the ‘Ready’ queue at any point of time.
Page 441 :
Real-Time Opera ng System (RTOS) based Embedded System Design, , 417, , 10.5.1.4 Priority Based Scheduling, The Turn Around Time (TAT) and waiting time for processes in non-preemptive scheduling varies with the, type of scheduling algorithm. Priority based non-preemptive scheduling algorithm ensures that a process, with high priority is serviced at the earliest compared to other low priority processes in the ‘Ready’ queue., The priority of a task/process can be indicated through various mechanisms. The Shortest Job First (SJF), algorithm can be viewed as a priority based scheduling where each task is prioritised in the order of the, time required to complete the task. The lower the time required for completing a process the higher is its, priority in SJF algorithm. Another way of priority assigning is associating a priority to the task/process at, the time of creation of the task/process. The priority is a number ranging from 0 to the maximum priority, supported by the OS. The maximum level of priority is OS dependent. For Example, Windows CE supports, 256 levels of priority (0 to 255 priority numbers). While creating the process/task, the priority can be assigned, to it. The priority number associated with a task/process is the direct indication of its priority. The priority, variation from high to low is represented by numbers from 0 to the maximum priority or by numbers from, maximum priority to 0. For Windows CE operating system a priority number 0 indicates the highest priority, and 255 indicates the lowest priority. This convention need not be universal and it depends on the kernel, level implementation of the priority structure. The non-preemptive priority based scheduler sorts the ‘Ready’, queue based on priority and picks the process with the highest level of priority for execution., , Example 1, Three processes with process IDs P1, P2, P3 with estimated completion time 10, 5, 7 milliseconds and priorities, 0, 3, 2 (0—highest priority, 3—lowest priority) respectively enters the ready queue together. Calculate the, waiting time and Turn Around Time (TAT) for each process and the Average waiting time and Turn Around, Time (Assuming there is no I/O waiting for the processes) in priority based scheduling algorithm., The scheduler sorts the ‘Ready’ queue based on the priority and schedules the process with the highest, priority (P1 with priority number 0) first and the next high priority process (P3 with priority number 2) as, second, and so on. The order in which the processes are scheduled for execution is represented as, P1, , 0, , P3, , 10, 10, , P2, , 17, 7, , 22, 5, , The waiting time for all the processes are given as, Waiting time for P1 = 0 ms (P1 starts executing first), Waiting time for P3 = 10 ms (P3 starts executing after completing P1), Waiting time for P2 = 17 ms (P2 starts executing after completing P1 and P3), Average waiting time = (Waiting time for all processes) / No. of Processes, = (Waiting time for (P1+P3+P2)) / 3, = (0+10+17)/3 = 27/3, = 9 milliseconds, Turn Around Time (TAT) for P1 = 10 ms (Time spent in Ready Queue + Execution Time), Turn Around Time (TAT) for P3 = 17 ms (-Do-), Turn Around Time (TAT) for P2 = 22 ms (-Do-), Average Turn Around Time = (Turn Around Time for all processes) / No. of Processes
Page 442 :
418, , Introduc on to Embedded Systems, , = (Turn Around Time for (P1+P3+P2)) / 3, = (10+17+22)/3 = 49/3, = 16.33 milliseconds, , Example 2, Calculate the waiting time and Turn Around Time (TAT) for each process and the Average waiting time and, Turn Around Time for the above example if a new process P4 with estimated completion time 6 ms and, priority 1 enters the ‘Ready’ queue after 5 ms of execution of P1. Assume all the processes contain only CPU, operation and no I/O operations are involved., At the beginning, there are only three processes (P1, P2 and P3) available in the ‘Ready’ queue and the, scheduler picks up the process with the highest priority (In this example P1 with priority 0) for scheduling., The execution sequence diagram for this is same as that of Example 1. Now process P4 with estimated, execution completion time 6 ms and priority 1 enters the ‘Ready’ queue after 5 ms of execution of P1. Since, the scheduling algorithm is non-preemptive and process P1 does not contain any I/O operations, P1 continues, its execution. After 10 ms of scheduling, P1 terminates and now the scheduler again sorts the ‘Ready’ queue, for process with highest priority. Since the priority for P4 (priority 1) is higher than that of P3 (priority 2),, which was supposed to be run after the completion of P1 as per the ‘Ready’ queue available at the beginning, of execution scheduling, P4 is picked up for executing. Due to the arrival of the process P4 with priority 1,, the ‘Ready’ queue is resorted in the order P1, P4, P3, P2. At the beginning it was P1, P3, P2. The execution, sequence now changes as per the following diagram, P1, , P4, 10, , 0, 10, , P3, 16, , 6, , P2, 23, , 7, , 28, 5, , The waiting time for all the processes are given as, Waiting time for P1 = 0 ms (P1 starts executing first), Waiting time for P4 = 5 ms (P4 starts executing after completing P1. But P4 arrived after 5 ms of execution of, P1. Hence its waiting time = Execution start time – Arrival Time = 10 – 5 = 5), Waiting time for P3 = 16 ms (P3 starts executing after completing P1 and P4), Waiting time for P2 = 23 ms (P2 starts executing after completing P1, P4 and P3), Average waiting time = (Waiting time for all processes) / No. of Processes, = (Waiting time for (P1+P4+P3+P2)) / 4, = (0 + 5 + 16 + 23)/4 = 44/4, = 11 milliseconds, Turn Around Time (TAT) for P1 = 10 ms (Time spent in Ready Queue + Execution Time), Turn Around Time (TAT) for P4 = 11 ms (Time spent in Ready Queue + Execution, Time = (Execution Start Time – Arrival Time) + Estimated, Execution Time = (10 – 5) + 6 = 5 + 6), Turn Around Time (TAT) for P3 = 23 ms (Time spent in Ready Queue + Execution Time), Turn Around Time (TAT) for P2 = 28 ms (Time spent in Ready Queue + Execution Time), Average Turn Around Time = (Turn Around Time for all processes) / No. of Processes, = (Turn Around Time for (P2 + P4 + P3 + P1)) / 4, = (10 + 11 + 23 + 28)/4 = 72/4, = 18 milliseconds
Page 443 :
Real-Time Opera ng System (RTOS) based Embedded System Design, , 419, , Similar to SJF scheduling algorithm, non-preemptive priority based algorithm also possess the drawback, of ‘Starvation’ where a process whose priority is low may not get a chance to execute if more and more, processes with higher priorities enter the ‘Ready’ queue before the process with lower priority started its, execution. ‘Starvation’ can be effectively tackled in priority based non-preemptive scheduling by dynamically, raising the priority of the low priority task/process which is under starvation (waiting in the ready queue for a, longer time for getting the CPU time). The technique of gradually raising the priority of processes which are, waiting in the ‘Ready’ queue as time progresses, for preventing ‘Starvation’, is known as ‘Aging’., , 10.5.2, , Preemptive Scheduling, , Preemptive scheduling is employed in systems, which implements preemptive multitasking model. In, preemptive scheduling, every task in the ‘Ready’ queue gets a chance to execute. When and how often each, process gets a chance to execute (gets the CPU time) is dependent on the type of preemptive scheduling algorithm, used for scheduling the processes. In this kind of scheduling, the scheduler can preempt (stop temporarily), the currently executing task/process and select another task from the ‘Ready’ queue for execution. When to, pre-empt a task and which task is to be picked up from the ‘Ready’ queue for execution after preempting the, current task is purely dependent on the scheduling algorithm. A task which is preempted by the scheduler, is moved to the ‘Ready’ queue. The act of moving a ‘Running’ process/task into the ‘Ready’ queue by the, scheduler, without the processes requesting for it is known as ‘Preemption’. Preemptive scheduling can be, implemented in different approaches. The two important approaches adopted in preemptive scheduling are, time-based preemption and priority-based preemption. The various types of preemptive scheduling adopted, in task/process scheduling are explained below., , 10.5.2.1 Preemp ve SJF Scheduling/Shortest Remaining Time (SRT), The non-preemptive SJF scheduling algorithm sorts the ‘Ready’ queue only after completing the execution of, the current process or when the process enters ‘Wait’ state, whereas the preemptive SJF scheduling algorithm, sorts the ‘Ready’ queue when a new process enters the ‘Ready’ queue and checks whether the execution, time of the new process is shorter than the remaining of the total estimated time for the currently executing, process. If the execution time of the new process is less, the currently executing process is preempted and, the new process is scheduled for execution. Thus preemptive SJF scheduling always compares the execution, completion time (It is same as the remaining time for the new process) of a new process entered the ‘Ready’, queue with the remaining time for completion of the currently executing process and schedules the process, with shortest remaining time for execution. Preemptive SJF scheduling is also known as Shortest Remaining, Time (SRT) scheduling., Now let us solve Example 2 given under the Non-preemptive SJF scheduling for preemptive SJF, scheduling. The problem statement and solution is explained in the following example., , Example 1, Three processes with process IDs P1, P2, P3 with estimated completion time 10, 5, 7 milliseconds respectively, enters the ready queue together. A new process P4 with estimated completion time 2 ms enters the ‘Ready’, queue after 2 ms. Assume all the processes contain only CPU operation and no I/O operations are involved., At the beginning, there are only three processes (P1, P2 and P3) available in the ‘Ready’ queue and, the SRT scheduler picks up the process with the shortest remaining time for execution completion (In this, example, P2 with remaining time 5 ms) for scheduling. The execution sequence diagram for this is same as, that of example 1 under non-preemptive SJF scheduling., Now process P4 with estimated execution completion time 2 ms enters the ‘Ready’ queue after 2 ms of
Page 444 :
420, , Introduc on to Embedded Systems, , start of execution of P2. Since the SRT algorithm is preemptive, the remaining time for completion of process, P2 is checked with the remaining time for completion of process P4. The remaining time for completion of, P2 is 3 ms which is greater than that of the remaining time for completion of the newly entered process P4, (2 ms). Hence P2 is preempted and P4 is scheduled for execution. P4 continues its execution to finish since, there is no new process entered in the ‘Ready’ queue during its execution. After 2 ms of scheduling P4, terminates and now the scheduler again sorts the ‘Ready’ queue based on the remaining time for completion, of the processes present in the ‘Ready’ queue. Since the remaining time for P2 (3 ms), which is preempted, by P4 is less than that of the remaining time for other processes in the ‘Ready’ queue, P2 is scheduled for, execution. Due to the arrival of the process P4 with execution time 2 ms, the ‘Ready’ queue is re-sorted in, the order P2, P4, P2, P3, P1. At the beginning it was P2, P3, P1. The execution sequence now changes as per, the following diagram, P2 P4, , 0, , 2, 2, , P2, , 4, 2, , P3, , 7, 3, , P1, , 14, 7, , 24, 10, , The waiting time for all the processes are given as, Waiting time for P2 = 0 ms + (4 – 2) ms = 2 ms (P2 starts executing first and is interrupted by P4 and has to, wait till the completion of P4 to get the next CPU slot), Waiting time for P4 = 0 ms (P4 starts executing by preempting P2 since the execution time for completion, of P4 (2 ms) is less than that of the Remaining time for execution completion of P2, (Here it is 3 ms)), Waiting time for P3 = 7 ms (P3 starts executing after completing P4 and P2), Waiting time for P1 = 14 ms (P1 starts executing after completing P4, P2 and P3), Average waiting time = (Waiting time for all the processes) / No. of Processes, = (Waiting time for (P4+P2+P3+P1)) / 4, = (0 + 2 + 7 + 14)/4 = 23/4, = 5.75 milliseconds, Turn Around Time (TAT) for P2 = 7 ms (Time spent in Ready Queue + Execution Time), Turn Around Time (TAT) for P4 = 2 ms (Time spent in Ready Queue + Execution Time = (Execution Start, Time – Arrival Time) + Estimated Execution Time = (2 – 2) + 2), Turn Around Time (TAT) for P3 = 14 ms (Time spent in Ready Queue + Execution Time), Turn Around Time (TAT) for P1 = 24 ms (Time spent in Ready Queue + Execution Time), Average Turn Around Time = (Turn Around Time for all the processes) / No. of Processes, = (Turn Around Time for (P2+P4+P3+P1)) / 4, = (7+2+14+24)/4 = 47/4, = 11.75 milliseconds, Now let’s compare the Average Waiting time and Average Turn Around Time with that of the Average, waiting time and Average Turn Around Time for non-preemptive SJF scheduling (Refer to Example 2 given, under the section Non-preemptive SJF scheduling), Average Waiting Time in non-preemptive SJF scheduling = 6 ms, Average Waiting Time in preemptive SJF scheduling = 5.75 ms, Average Turn Around Time in non-preemptive SJF scheduling = 12 ms, Average Turn Around Time in preemptive SJF scheduling = 11.75 ms
Page 445 :
Real-Time Opera ng System (RTOS) based Embedded System Design, , 421, , This reveals that the Average waiting Time and Turn Around Time (TAT) improves significantly with, preemptive SJF scheduling., , 10.5.2.2 Round Robin (RR) Scheduling, The term Round Robin is very popular among the sports and games activities. You might have heard about, ‘Round Robin’ league or ‘Knock out’ league associated with any football or cricket tournament. In the ‘Round, Robin’ league each team in a group gets an equal chance to play against the rest of the teams in the same, group whereas in the ‘Knock out’ league the losing team in a match moves out of the tournament ☺., In the process scheduling context also, ‘Round Robin’ brings the same message “Equal chance to all”., In Round Robin scheduling, each process in the ‘Ready’ queue is executed for a pre-defined time slot. The, execution starts with picking up the first process in the ‘Ready’ queue (see Fig. 10.13). It is executed for a, pre-defined time and when the pre-defined time elapses or the process completes (before the pre-defined time, slice), the next process in the ‘Ready’ queue is selected for execution. This is repeated for all the processes, in the ‘Ready’ queue. Once each process in the ‘Ready’ queue is executed for the pre-defined time period,, the scheduler comes back and picks the first process in the ‘Ready’ queue again for execution. The sequence, is repeated. This reveals that the Round Robin scheduling is similar to the FCFS scheduling and the only, difference is that a time slice based preemption is added to switch the execution between the processes in, the ‘Ready’ queue. The ‘Ready’ queue can be considered as a circular queue in which the scheduler picks, up the first process for execution and moves to the next till the end of the queue and then comes back to the, beginning of the queue to pick up the first process., , Process 1, , Execution Switch, , Execution Switch, , Process 4, , Process 2, , Execution Switch, , Execution Switch, Process 3, , Fig. 10.13, , Round Robin Scheduling, , The time slice is provided by the timer tick feature of the time management unit of the OS kernel (Refer the, Time management section under the subtopic ‘The Real-Time kernel’ for more details on Timer tick). Time, slice is kernel dependent and it varies in the order of a few microseconds to milliseconds. Certain OS kernels, may allow the time slice as user configurable. Round Robin scheduling ensures that every process gets a fixed, amount of CPU time for execution. When the process gets its fixed time for execution is determined by the
Page 446 :
422, , Introduc on to Embedded Systems, , FCFS policy (That is, a process entering the Ready queue first gets its fixed execution time first and so on…)., If a process terminates before the elapse of the time slice, the process releases the CPU voluntarily and the, next process in the queue is scheduled for execution by the scheduler. The implementation of RR scheduling, is kernel dependent. The following code snippet illustrates the RR scheduling implementation for RTX51, Tiny OS, an 8bit OS for 8051 microcontroller from Keil Software (www.keil.com), an ARM® Company., #include <rtx51tny.h>, int counter0;, int counter1;, job0 () _task_ 0 {, os_create_task (1);, while (1) {, counter0++;, }, }, job1 () _task_ 1 {, while (1) {, counter1++;, }, }, , /* Definitions for RTX51 Tiny */, , /* Mark task 1 as “ready”, , */, , /* Endless loop, /* Increment counter 0, , */, */, , /* Endless loop, /* Increment counter 1, , */, */, , RTX51 defines the tasks as simple C functions with void return type and void argument list. The attribute, _task_ is used for declaring a function as task. The general form of declaring a task is, void func (void) _task_ task_id, , where func is the name of the task and task_id is the ID of the task. RTX51 supports up to 16 tasks and so, task_id varies from 0 to 15. All tasks should be implemented as endless loops., The two tasks in this program are counter loops. RTX51 Tiny starts executing task 0 which is the function, named job0. This function creates another task called job1. After job0 executes for its time slice, RTX51, Tiny switches to job1. After job1 executes for its time slice, RTX51 Tiny switches back to job0. This process, is repeated forever., Now let’s check how the RTX51 Tiny RR Scheduling can be implemented in an embedded device (A, smart card reader) which addresses the following requirements., ∑ Check the presence of a card, ∑ Process the data received from the card, ∑ Update the Display, ∑ Check the serial port for command/data, ∑ Process the data received from serial port, These four requirements can be considered as four tasks. Implement them as four RTX51 tasks as explained, below., void check_card_task (void) _task_ 1, {, /* This task checks for the presence of a card */, /* Implement the necessary functionality here */, }
Page 447 :
Real-Time Opera ng System (RTOS) based Embedded System Design, , void process_card_task (void) _task_ 2, {, /* This task processes the data received from, /* Implement the necessary functionality here, }, void check_serial_io_task (void) _task_ 3, {, /* This task checks for serial I/O */, /* Implement the necessary functionality here, }, void process_serial_data_task (void) _task_ 4, {, /* This task processes the data received from, /* Implement the necessary functionality here, }, , 423, , the card */, */, , */, , the serial port */, */, , Now the tasks are created. Next step is scheduling the tasks. The following code snippet illustrates the, scheduling of tasks., void startup_task (void) _task_ 0, {, os_create_task (1);, /* Create check_card_task Task */, os_create_task (2);, /* Create process_card_task Task */, os_create_task (3);, /* Create serial_io_task Task */, os_create_task (4);, os_delete_task (0);, }, , /* Create serial_data_task Task */, /* Delete the Startup Task */, , The os_create_task (task_ID) RTX51 Tiny kernel call puts the task with task ID task_ID in the ‘Ready’, state. All the ready tasks begin their execution at the next available opportunity. RTX51 Tiny does not have, a main () function to begin the code execution; instead it starts with executing task 0. Task 0 is used for, creating other tasks. Once all the tasks are created, task 0 is stopped and removed from the task list with, the os_delete_task kernel call. The RR scheduler selects each task based on the time slice and continues the, execution. If we observe the tasks we can see that there is no point in executing the task process_card_task, (Task 2) without detecting a card and executing the task process_serial_data_task (Task 4) without receiving, some data in the serial port. In summary task 2 needs to be executed only when task 1 reports the presence, of a card and task 4 needs to be executed only when task 3 reports the arrival of data at serial port. So these, tasks (tasks 2 and 4) need to be put in the ‘Ready’ state only on satisfying these conditions. Till then these, tasks can be put in the ‘Wait’ state so that the RR scheduler will not pick them for scheduling and the RR, scheduling is effectively utilised among the other tasks. This can be achieved by implementing the wait and, notify mechanism in the related tasks. Task 2 can be coded in a way that it waits for the card present event, and task 1 signals the event ‘card detected’. In a similar fashion Task 4 can be coded in such a way that it, waits for the serial data received event and task 3 signals the reception of serial data on receiving serial data, from serial port. The following code snippet explains the same., void check_card_task (void) _task_ 1, {, /* This task checks for the presence of a card */
Page 448 :
424, , Introduc on to Embedded Systems, , /* Implement the necessary functionality here */, while (1), {, //Function for checking the presence of card and card reading, //………………………………, if (card is present), //Signal card detected to task 2, os_send_signal (2), }, }, void process_card_task (void) _task_ 2, {, /* This task processes the data received from the card */, /* Implement the necessary functionality here */, while (1), {, //Function for checking the signaling of card present event, os_wait1(K_SIG);, //Process card data, }, }, void check_serial_io_task (void) _task_ 3, {, /* This task checks for serial I/O */, /* Implement the necessary functionality here */, while (1), {, //Function for checking the reception of serial data, //………………………………, if (data is received), //Signal serial data reception to task 4, os_send_signal (4), }, }, void process_serial_data_task (void) _task_ 4, {, /* This task processes the data received from the serial port */, /* Implement the necessary functionality here */, while (1), {, //Function for checking the signaling of serial data received event, os_wait1(K_SIG);, //Process card data, }, }
Page 449 :
Real-Time Opera ng System (RTOS) based Embedded System Design, , 425, , The os_send_signal (Task ID) kernel call sends a signal to task Task ID. If the specified task is already, waiting for a signal, this function call readies the task for execution but does not start it. The os_wait1, (event) kernel call halts the current task and waits for an event to occur. The event argument specifies the, event to wait for and may have only the value K_SIG which waits for a signal. RTX51 uses the Timer 0 of, 8051 for time slice generation. The time slice can be configured by the user by changing the time slice related, parameters in the RTX51 Tiny OS configuration file CONF_TNY.A51 file which is located in the \Keil_v5\, C51\RtxTiny2\SourceCode\ folder. Configuration options in CONF_TNY.A51 allow users to:, ∑ Specify the Timer Tick Interrupt Register Bank., ∑ Specify the Timer Tick Interval (in 8051 machine cycles)., ∑ Specify user code to execute in the Timer Tick Interrupt., ∑ Specify the Round-Robin Timeout., ∑ Enable or disable Round-Robin Task Switching., ∑ Specify that your application includes long duration interrupts., ∑ Specify whether or not code banking is used., ∑ Define the top of the RTX51 Tiny stack., ∑ Specify the minimum stack space required., ∑ Specify code to execute in the event of a stack error., ∑ Define idle task operations., The RTX51 kernel provides a set of task management functions for managing the tasks. At any point of, time each RTX51 task is exactly in any one of the following state., Task State, , State Description, , RUNNING, , The task that is currently running is in the RUNNING State. Only one task at a time may be, in this state. The os_running_task_id kernel call returns the task number (ID) of the currently, executing task., , READY, , Tasks which are ready to run are in the READY State. Once the Running task has completed, processing, RTX51 Tiny selects and starts the next Ready task. A task may be made ready immediately (even if the task is waiting for a timeout or signal) by setting its ready flag using the, os_set_ready or isr_set_ready kernel functions., , WAITING, , Tasks which are waiting for an event are in the WAITING State. Once the event occurs, the task, is switched to the READY State. The os_wait function is used for placing a task in the WAITING, State., , DELETED, , Tasks which have not been started or tasks which have been deleted are in the DELETED State., The os_delete_task routine places a task that has been started (with os_create_task) into the, DELETED State., , TIME-OUT, , Tasks which were interrupted by a Round-Robin Time-Out are in the TIME-OUT State. This state, is equivalent to the READY State for Round-Robin programs., , Refer the documentation available with RTX51 Tiny OS for more information on the various RTX51 task, management kernel functions and their usage., RR scheduling with interrupts is a good choice for the design of comparatively less complex Real-Time, Embedded Systems. In this approach, the tasks which require less Real-Time attention can be scheduled with, Round Robin scheduling and the tasks which require Real-Time attention can be scheduled through Interrupt, Service Routines. RTX51 Tiny supports Interrupts with RR scheduling. For RTX51 the time slice for RR, scheduling is provided by the Timer interrupt and if the interrupt is of high priority than that of the timer, interrupt and if its service time (ISR) is longer than the timer tick interval, the RTX51 timer interrupt may
Page 450 :
426, , Introduc on to Embedded Systems, , be interrupted by the ISR and it may be reentered by a subsequent RX51 Tiny timer interrupt. Hence proper, care must be taken to limit the ISR time within the timer tick interval or to protect the timer tick interrupt, code from reentrancy. Otherwise unexpected results may occur. The limitations of RR with interrupt generic, approach are the limited number of interrupts supported by embedded processors and the interrupt latency, happening due to the context switching overhead., RR can also be used as technique for resolving the priority in scheduling among the tasks with same, level of priority. We will discuss about how RR scheduling can be used for resolving the priority among, equal tasks under the VxWorks kernel in a later chapter., , Example 1, Three processes with process IDs P1, P2, P3 with estimated completion time 6, 4, 2 milliseconds respectively,, enters the ready queue together in the order P1, P2, P3. Calculate the waiting time and Turn Around Time, (TAT) for each process and the Average waiting time and Turn Around Time (Assuming there is no I/O, waiting for the processes) in RR algorithm with Time slice = 2 ms., The scheduler sorts the ‘Ready’ queue based on the FCFS policy and picks up the first process P1 from the, ‘Ready’ queue and executes it for the time slice 2 ms. When the time slice is expired, P1 is preempted and P2, is scheduled for execution. The Time slice expires after 2ms of execution of P2. Now P2 is preempted and P3, is picked up for execution. P3 completes its execution within the time slice and the scheduler picks P1 again, for execution for the next time slice. This procedure is repeated till all the processes are serviced. The order, in which the processes are scheduled for execution is represented as, P1, , P2, , 2, , 0, 2, , P3, , 6, , 4, 2, , P1, , 2, , P2, , 10, , 8, 2, , P1, , 2, , 12, 2, , The waiting time for all the processes are given as, Waiting time for P1 = 0 + (6 – 2) + (10 – 8) = 0 + 4 + 2 = 6 ms, (P1 starts executing first and waits for two time slices to get execution back and again, 1 time slice for getting CPU time), Waiting time for P2 = (2 – 0) + (8 – 4) = 2 + 4 = 6 ms, (P2 starts executing after P1 executes for 1 time slice and waits for two time slices to, get the CPU time), Waiting time for P3 = (4 – 0) = 4 ms, (P3 starts executing after completing the first time slices for P1 and P2 and completes, its execution in a single time slice), Average waiting time = (Waiting time for all the processes) / No. of Processes, = (Waiting time for (P1 + P2 + P3)) / 3, = (6 + 6 + 4)/3 = 16/3, = 5.33 milliseconds, Turn Around Time (TAT) for P1 = 12 ms (Time spent in Ready Queue + Execution Time), Turn Around Time (TAT) for P2 = 10 ms (-Do-), Turn Around Time (TAT) for P3 = 6 ms, (-Do-)
Page 451 :
427, , Real-Time Opera ng System (RTOS) based Embedded System Design, , Average Turn Around Time = (Turn Around Time for all the processes) / No. of Processes, = (Turn Around Time for (P1 + P2 + P3))/3, = (12 + 10 + 6)/3 = 28/3, = 9.33 milliseconds, Average Turn Around Time (TAT) is the sum of average waiting time and average execution time., Average Execution time = (Execution time for all the process)/No. of processes, = (Execution time for (P1 + P2 + P3))/3, = (6 + 4 + 2)/3 = 12/3 = 4, Average Turn Around Time = Average Waiting time + Average Execution time, = 5.33 + 4, = 9.33 milliseconds, RR scheduling involves lot of overhead in maintaining the time slice information for every process which, is currently being executed., , 10.5.2.3 Priority Based Scheduling, Priority based preemptive scheduling algorithm is same as that of the non-preemptive priority based, scheduling except for the switching of execution between tasks. In preemptive scheduling, any high priority, process entering the ‘Ready’ queue is immediately scheduled for execution whereas in the non-preemptive, scheduling any high priority process entering the ‘Ready’ queue is scheduled only after the currently executing, process completes its execution or only when it voluntarily relinquishes the CPU. The priority of a task/, process in preemptive scheduling is indicated in the same way as that of the mechanism adopted for nonpreemptive multitasking. Refer the non-preemptive priority based scheduling discussed in an earlier section, of this chapter for more details., , Example 1, Three processes with process IDs P1, P2, P3 with estimated completion time 10, 5, 7 milliseconds and, priorities 1, 3, 2 (0—highest priority, 3—lowest priority) respectively enters the ready queue together. A new, process P4 with estimated completion time 6 ms and priority 0 enters the ‘Ready’ queue after 5 ms of start of, execution of P1. Assume all the processes contain only CPU operation and no I/O operations are involved., At the beginning, there are only three processes (P1, P2 and P3) available in the ‘Ready’ queue and the, scheduler picks up the process with the highest priority (In this example P1 with priority 1) for scheduling., Now process P4 with estimated execution completion time 6 ms and priority 0 enters the ‘Ready’ queue, after 5 ms of start of execution of P1. Since the scheduling algorithm is preemptive, P1 is preempted by P4, and P4 runs to completion. After 6 ms of scheduling, P4 terminates and now the scheduler again sorts the, ‘Ready’ queue for process with highest priority. Since the priority for P1 (priority 1), which is preempted, by P4 is higher than that of P3 (priority 2) and P2 ((priority 3), P1 is again picked up for execution by the, scheduler. Due to the arrival of the process P4 with priority 0, the ‘Ready’ queue is resorted in the order P1,, P4, P1, P3, P2. At the beginning it was P1, P3, P2. The execution sequence now changes as per the following, diagram, P1, , 0, , P4, , 5, 5, , 16, , 11, 6, , P3, , P1, , 5, , P2, , 23, 7, , 28, 5
Page 452 :
428, , Introduc on to Embedded Systems, , The waiting time for all the processes are given as, Waiting time for P1 = 0 + (11 – 5) = 0 + 6 = 6 ms, (P1 starts executing first and gets preempted by P4 after 5 ms and again gets the CPU, time after completion of P4), Waiting time for P4 = 0 ms, (P4 starts executing immediately on entering the ‘Ready’ queue, by preempting P1), Waiting time for P3 = 16 ms (P3 starts executing after completing P1 and P4), Waiting time for P2 = 23 ms (P2 starts executing after completing P1, P4 and P3), Average waiting time = (Waiting time for all the processes) / No. of Processes, = (Waiting time for (P1+P4+P3+P2)) / 4, = (6 + 0 + 16 + 23)/4 = 45/4, = 11.25 milliseconds, Turn Around Time (TAT) for P1 = 16 ms (Time spent in Ready Queue + Execution Time), Turn Around Time (TAT) for P4 = 6 ms, (Time spent in Ready Queue + Execution Time = (Execution Start Time – Arrival Time), + Estimated Execution Time = (5 – 5) + 6 = 0 + 6), Turn Around Time (TAT) for P3 = 23 ms (Time spent in Ready Queue + Execution Time), Turn Around Time (TAT) for P2 = 28 ms (Time spent in Ready Queue + Execution Time), Average Turn Around Time = (Turn Around Time for all the processes) / No. of Processes, = (Turn Around Time for (P2 + P4 + P3 + P1)) / 4, = (16 + 6 + 23 + 28)/4 = 73/4, = 18.25 milliseconds, Priority based preemptive scheduling gives Real-Time attention to high priority tasks. Thus priority, based preemptive scheduling is adopted in systems which demands ‘Real-Time’ behaviour. Most of the, RTOSs make use of the preemptive priority based scheduling algorithm for process scheduling. Preemptive, priority based scheduling also possesses the same drawback of non-preemptive priority based scheduling–, ‘Starvation’. This can be eliminated by the ‘Aging’ technique. Refer the section Non-preemptive priority, based scheduling for more details on ‘Starvation’ and ‘Aging’., , 10.6, , THREADS, PROCESSES AND SCHEDULING:, PUTTING THEM ALTOGETHER, , So far we discussed about threads, processes and process/thread, scheduling. Now let us have a look at how these entities are addressed, in a real world implementation. Let’s examine the following pieces, of code., , LO 6 Explain the different, Inter Process Communication, (IPC) mechanisms used by, tasks/process to communicate, and co-operate each other in a, multitasking environment, , //******************************************************************, //Process 1, //******************************************************************, #include “stdafx.h”, #include <windows.h>, #include <stdio.h>, //******************************************************************, //Thread for executing Task, //******************************************************************, void Task(void) {, while (1)
Page 453 :
Real-Time Opera ng System (RTOS) based Embedded System Design, , {, //Perform some task, //Task execution time is 7.5 units of execution, //Sleep for 17.5 units of execution, Sleep(17.5); //Parameter given is not in milliseconds, //Repeat task, }, }, //******************************************************************, //Main Thread., //******************************************************************, void main(void) {, DWORD id;, HANDLE hThread;, //Create thread with normal priority, //******************************************************************, hThread = CreateThread(NULL, 0, (LPTHREAD_START_ROUTINE)Task,, (LPVOID)0, 0, &id);, if (NULL == hThread), {//Thread Creation failed. Exit process, printf(“Creating thread failed : Error Code = %d”, GetLastError());, return;, }, WaitForSingleObject(hThread, INFINITE);, return;, }, //******************************************************************, //Process 2, //******************************************************************, #include “stdafx.h”, #include <windows.h>, #include <stdio.h>, //******************************************************************, //Thread for executing Task, //******************************************************************, void Task(void) {, while (1), {, //Perform some task, ///Task execution time is 10 units of execution, //Sleep for 5 units of execution, Sleep(5); //Parameter given is not in milliseconds, //Repeat task, }, }, //******************************************************************, //Main Thread., , 429
Page 454 :
430, , Introduc on to Embedded Systems, , //******************************************************************, void main(void) {, DWORD id;, HANDLE hThread;, //Create thread with above normal priority, //******************************************************************, hThread = CreateThread(NULL, 0, (LPTHREAD_START_ROUTINE)Task,, (LPVOID)0, CREATE_SUSPENDED, &id);, if (NULL == hThread), {//Thread Creation failed. Exit process, printf(“Creating thread failed : Error Code = %d”, GetLastError());, return;, }, SetThreadPriority(hThread, THREAD_PRIORITY_ABOVE_NORMAL);, ResumeThread(hThread);, WaitForSingleObject(hThread, INFINITE);, return;, }, , The first piece of code represents a process (Process 1) with priority normal and it performs a task which, requires 7.5 units of execution time. After performing this task, the process sleeps for 17.5 units of execution, time and this is repeated forever. The second piece of code represents a process (Process 2) with priority, above normal and it performs a task which requires 10 units of execution time. After performing this task,, the process sleeps for 5 units of execution time and this is repeated forever. Process 2 is of higher priority, compared to process 1, since its priority is above ‘Normal’., Now let us examine what happens if these processes are executed on a Real-Time kernel with pre-emptive, priority based scheduling policy. Imagine Process 1 and Process 2 are ready for execution. Both of them, enters the ‘Ready’ queue and the scheduler picks up Process 2 for execution since it is of higher priority, (Assuming there is no other process running/ready for execution, when both the processes are ‘Ready’ for, execution) compared to Process 1. Process 2 starts executing and runs until it executes the Sleep instruction, (i.e. after10 units of execution time). When the Sleep instruction is executed, Process 2 enters the wait state., Since Process 1 is waiting for its turn in the ‘Ready’ queue, the scheduler picks up it for execution, resulting, in a context switch. The Process Control Block (PCB) of Process 2 is updated with the values of the Program, Counter (PC), stack pointer, etc. at the time of context switch. The estimated task execution time for Process, 1 is 7.5 units of execution time and the sleeping time for Process 2 is 5 units of execution. After 5 units of, execution time, Process 2 enters the ‘Ready’ state and moves to the ‘Ready’ queue. Since it is of higher priority, compared to the running process, the running process (Process 1) is pre-empted and Process 2 is scheduled, for execution. Process 1 is moved to the ‘Ready’ queue, resulting in context switching. The Process Control, Block of Process 1 is updated with the current values of the Program Counter (PC), Stack pointer, etc. when, the context switch is happened. The Program Counter (PC), Stack pointer, etc. for Process 2 is loaded with, the values stored in the Process Control Block (PCB) of Process 2 and Process 2 continues its execution, form where it was stopped earlier. Process 2 executes the Sleep instruction after 10 units of execution time, and enters the wait state. At this point Process 1 is waiting in the ‘Ready’ queue and it requires 2.5 units of, execution time for completing the task associated with it (The total time for completing the task is 7.5 units, of time, out of this it has already completed 5 units of execution when Process 2 was in the wait state). The, scheduler schedules Process 1 for execution. The Program Counter (PC), Stack pointer, etc. for Process 1 is
Page 455 :
431, , Real-Time Opera ng System (RTOS) based Embedded System Design, , loaded with the values stored in the Process Control Block (PCB) of Process 1 and Process 1 continues its, execution form where it was stopped earlier. After 2.5 units of execution time, Process 1 executes the Sleep, instruction and enters the wait state. Process 2 is already in the wait state and the scheduler finds no other, process for scheduling. In order to keep the CPU always busy, the scheduler runs a dummy process (task), called ‘IDLE PROCESS (TASK)’. The ‘IDLE PROCESS (TASK)’ executes some dummy task and keeps the, CPU engaged. The execution diagram depicted in Fig. 10.14 explains the sequence of operations., , Process 1 & 2 are ready for, execution. Since Process 2 is of, higher priority compared to, Process 1 it is scheduled., Process 1 remains in the, ‘Ready’ queue., , Process 2 enters wait state (Sleep)., Scheduler picks up Process 1 for, execution. The Process Control, Block of Process 2 is updated with, the current Program Counter (PC), value, stack pointer value etc..., , Waiting, , R, , Running, , RD, , Ready, , Processes, , Process 2 executes Sleep, instruction and enters wait state., Scheduler picks up Process 1 for, execution. The Process Control, Block of Process 2 is updated with, the current Program Counter (PC), value, stack pointer value etc..., R, , IDLE TASK, Process 2, (High Priority), , R, , W, , R, , Process 1, (Low Priority), , RD, , R, , RD, , R, , 20, , 25, , 0, , W, , 5, , 10, , 15, , W, , RD, , R, , R, , W, W, , 30, , 35, , 40, , RD, , R, , R, , W, , R, , RD, , R, , RD, , Time, 50, 45, , 55, , 60, , 65, , W, R, , 70, , R, W, , 75, , 80, , Execution Units, Process 2 enters Ready state., Since it is of high priority, compared to Process 1, it, preempts Process 1. The, Process Control Block of, Process 1 is updated with the, current Program Counter (PC), value, stack pointer value etc..., , Fig. 10.14, , Process 1 enters wait state (Sleep). Process, 2 is already in the wait state. No other tasks, available for running. Scheduler schedules a, special task/Process called ‘IDLE, PROCESS/TASK’ for running. The Process, Control Block of Process 1 is updated with, the current Program Counter (PC) value,, stack pointer value etc..., , Process scheduling and context switch, , The implementation of the ‘IDLE PROCESS (TASK)’ is dependent on the kernel and a typical, implementation for a desktop OS may look like. It is simply an endless loop., void Idle_Process (void), {, //Simply wait., //Do nothing..., while(1);, }, , The Real-Time kernels deployed in embedded systems, where operating power is a big constraint (like, systems which are battery powered); the ‘IDLE TASK’ is used for putting the CPU into IDLE mode for, saving the power. A typical example is the RTX51 Tiny Real-Time kernel, where the ‘IDLE TASK’ sets the, 8051 CPU to IDLE mode, a power saving mode. In the ‘IDLE’ mode, the program execution is halted and
Page 456 :
432, , Introduc on to Embedded Systems, , all peripherals and the interrupt system continues its operation. Once the CPU is put into the ‘IDLE’ mode,, it comes out of this mode when an Interrupt occurs or when the RTX51 Tiny Timer Tick Interrupt (The, timer interrupt used for task scheduling in Round robin scheduling) occurs. It should be noted that the ‘IDLE, PROCESS (TASK)’ execution is not pre-emptive priority scheduling specific, it is applicable to all types of, scheduling policies which demand 100% CPU utilisation/CPU power saving., Back to the desktop OS environment, let’s analyse the process, threads and scheduling in the Windows, desktop environment. Windows provides a utility called task manager for monitoring the different process, running on the system and the resources used by each process. A snapshot of the process details returned, by the task manager for Windows 10 kernel is shown in Fig. 10.15. It should be noted that this snap- shot, is purely machine dependent and it varies with the number of processes running on the machine. ‘Name’, represents the name of the process. ‘PID’ represents the Process Identification Number (Process ID). As, mentioned in the ‘Threads and Process’ section, when a process is created an ID is associated to it. CPU usage, gives the % of CPU utilised by the process during an interval. ‘CPU Time’ gives the total processor time, in, seconds, used by a process since it started. ‘Working set (memory)’ represents the amount of memory in the, private working set plus the amount of memory the process is using that can be shared by other processes., ‘Commit Size’ represents the amount of virtual memory that’s reserved for use by a process. ‘Paged Pool’, represents the amount of pageable kernel memory allocated by the kernel or drivers on behalf of a process., Pageable memory is memory that can be written to another storage medium, such as the hard disk. ‘NP, Pool’ is the amount of non-pageable kernel memory allocated by the kernel or drivers on behalf of a process., , Fig. 10.15, , Windows 10 Task Manager for monitoring process and resource usage
Page 457 :
433, , Real-Time Opera ng System (RTOS) based Embedded System Design, , The non-paged memory cannot be swapped to the secondary storage disk. ‘Base Priority’ represents the, priority of the process (A precedence ranking that determines the order in which the threads of a process are, scheduled.). As mentioned in an earlier section, a process may contain multiple threads. The ‘Threads’ section, gives the number of threads running in a process. ‘Handles’ reflects the number of object handles owned by, the process. This value is the reflection of the object handles present in the process’s object table. ‘User, Objects’ reflects the number of objects active in the user mode for a process (A USER object is an object from, Window Manager, which includes windows, menus, cursors, icons, hooks, accelerators, monitors, keyboard, layouts, and other internal objects). Use ‘Ctrl’ + ‘Alt’ + ‘Del’ key for accessing the task manager and select, the ‘Details’ tab. Right click the mouse on the row title header displaying the parameters and choose ‘Select, columns’ option to select the different monitoring parameters for a process., , 10.7, , TASK COMMUNICATION, , In a multitasking system, multiple tasks/processes run concurrently (in pseudo, parallelism) and each process may or may not interact between. Based on the, degree of interaction, the processes running on an OS are classified as, Co-operating Processes: In the co-operating interaction model one process, requires the inputs from other processes to complete its execution., , LO 7 Identify, the RPC based, Inter Process, Communication, , Competing Processes: The competing processes do not share anything among themselves but they share the, system resources. The competing processes compete for the system resources such as file, display device,, etc., Co-operating processes exchanges information and communicate through the following methods., Co-operation through Sharing: The co-operating process exchange data through some shared resources., Co-operation through Communication: No data is shared between the processes. But they communicate, for synchronisation., The mechanism through which processes/tasks communicate each other is known as Inter Process/Task, Communication (IPC). Inter Process Communication is essential for process co-ordination. The various, types of Inter Process Communication (IPC) mechanisms adopted by process are kernel (Operating System), dependent. Some of the important IPC mechanisms adopted by various kernels are explained below., , 10.7.1, , Shared Memory, , Processes share some area of the memory to, Shared, communicate among them (Fig. 10.16). Information, Process 1, Process 2, memory area, to be communicated by the process is written to the, shared memory area. Other processes which require, Fig. 10.16 Concept of Shared Memory, this information can read the same from the shared, memory area. It is same as the real world example where ‘Notice Board’ is used by corporate to publish the, public information among the employees (The only exception is; only corporate have the right to modify the, information published on the Notice board and employees are given ‘Read’ only access, meaning it is only a, one way channel)., The implementation of shared memory concept is kernel dependent. Different mechanisms are adopted by, different kernels for implementing this. A few among them are:
Page 458 :
434, , Introduc on to Embedded Systems, , 10.7.1.1 Pipes, ‘Pipe’ is a section of the shared memory used by processes for communicating. Pipes follow the client-server‡, architecture. A process which creates a pipe is known as a pipe server and a process which connects to a pipe is, known as pipe client. A pipe can be considered as a conduit for information flow and has two conceptual ends., It can be unidirectional, allowing information flow in one direction or bidirectional allowing bi-directional, information flow. A unidirectional pipe allows the process connecting at one end of the pipe to write to the, pipe and the process connected at the other end of the pipe to read the data, whereas a bi-directional pipe, allows both reading and writing at one end. The unidirectional pipe can be visualised as, Process 1, Write, , Pipe, (Named/un-named), , Fig. 10.17, , Process 2, Read, , Concept of Pipe for IPC, , The implementation of ‘Pipes’ is also OS dependent. Microsoft® Windows Desktop Operating Systems, support two types of ‘Pipes’ for Inter Process Communication. They are:, Anonymous Pipes: The anonymous pipes are unnamed, unidirectional pipes used for data transfer between, two processes., Named Pipes: Named pipe is a named, unidirectional or bi-directional pipe for data exchange between, processes. Like anonymous pipes, the process which creates the named pipe is known as pipe server. A, process which connects to the named pipe is known as pipe client. With named pipes, any process can act as, both client and server allowing point-to-point communication. Named pipes can be used for communicating, between processes running on the same machine or between processes running on different machines, connected to a network., Please refer to the Online Learning Centre for details on the Pipe implementation under Windows, Operating Systems., Under VxWorks kernel, pipe is a special implementation of message queues. We will discuss the same in, a latter chapter., , 10.7.1.2 Memory Mapped Objects, Memory mapped object is a shared memory technique adopted by certain Real-Time Operating Systems, for allocating a shared block of memory which can be accessed by multiple process simultaneously (of, course certain synchronisation techniques should be applied to prevent inconsistent results). In this approach, a mapping object is created and physical storage for it is reserved and committed. A process can map the, entire committed physical area or a block of it to its virtual address space. All read and write operation to, this virtual address space by a process is directed to its committed physical area. Any process which wants to, share data with other processes can map the physical memory area of the mapped object to its virtual memory, space and use it for sharing the data., Windows Embedded Compact RTOS uses the memory mapped object based shared memory, technique for Inter Process Communication (Fig. 10.18). The CreateFileMapping (HANDLE hFile,, LPSECURITY_ATTRIBUTES lpFileMappingAttributes, DWORD flProtect, DWORD dwMaximumSizeHigh,, ‡Client Server is a software architecture containing a client application and a server application. The application which sends request is, known as client and the application which receives the request process it and sends a response back to the client is known as server. A, server is capable of receiving request from multiple clients.
Page 459 :
Real-Time Opera ng System (RTOS) based Embedded System Design, , Fig. 10.18, , 435, , Concept of memory mapped object, , DWORD dwMaximumSizeLow, LPCTSTR lpName) system call is used for sharing the memory. This API call, is used for creating a mapping from a file. In order to create the mapping from the system paging memory,, the handle parameter should be passed as INVALID_HANDLE_VALUE (–1). The lpFileMappingAttributes, parameter represents the security attributes and it must be NULL. The flProtect parameter represents the, read write access for the shared memory area. A value of PAGE_READONLY makes the shared memory read, only whereas the value PAGE_READWRITE gives read-write access to the shared memory. The parameter, dwMaximumSizeHigh specifies the higher order 32 bits of the maximum size of the memory mapped object, and dwMaximumSizeLow specifies the lower order 32 bits of the maximum size of the memory mapped, object. The parameter lpName points to a null terminated string specifying the name of the memory mapped, object. The memory mapped object is created as unnamed object if the parameter lpName is NULL. If lpName, specifies the name of an existing memory mapped object, the function returns the handle of the existing, memory mapped object to the caller process. The memory mapped object can be shared between the processes, by either passing the handle of the object or by passing its name. If the handle of the memory mapped object, created by a process is passed to another process for shared access, there is a possibility of closing the handle, by the process which created the handle while it is in use by another process. This will throw OS level, exceptions. If the name of the memory object is passed for shared access among processes, processes can use, this name for creating a shared memory object which will open the shared memory object already existing, with the given name. The OS will maintain a usage count for the named object and it is incremented each time, when a process creates/opens a memory mapped object with existing name. This will prevent the destruction, of a shared memory object by one process while it is being accessed by another process. Hence passing the, name of the memory mapped object is strongly recommended for memory mapped object based inter process, communication. The MapViewOfFile (HANDLE hFileMappingObject DWORD dwDesiredAccess, DWORD, dwFileOffsetHigh, DWORD dwFileOffsetLow, DWORD dwNumberOfBytesToMap) system call maps a view, of the memory mapped object to the address space of the calling process. The parameter hFileMappingObject, specifies the handle to an existing memory mapped object. The dwDesiredAccess parameter represents the, read write access for the mapped view area. A value of FILE_MAP_WRITE makes the view access readwrite, provided the memory mapped object hFileMappingObject is created with read-write access, whereas
Page 460 :
436, , Introduc on to Embedded Systems, , the value FILE_MAP_READ gives read only access to the shared memory, provided the memory mapped, object hFileMappingObject is created with read-write/read only access. The parameter dwFileOffsetHigh, specifies the higher order 32 bits and dwFileOffsetLow specifies the lower order 32 bits of the memory offset, where mapping is to begin from the memory mapped object. A value of ‘0’ for both of these maps the view, from the beginning memory area of the memory object. dwNumberOfBytesToMap specifies the number of, bytes of the memory object to map. If dwNumberOfBytesToMap is zero, the entire memory area owned by the, memory mapped object is mapped. On successful execution, MapViewOfFile call returns the starting address, of the mapped view. If the function fails it returns NULL. A mapped view of the memory mapped object is, unmapped by the API call UnmapViewOfFile (LPCVOID lpBaseAddress). The lpBaseAddress parameter, specifies a pointer to the base address of the mapped view of a memory object that is to be unmapped. This, value must be identical to the value returned by a previous call to the MapViewOfFile function. Calling, UnmapViewOfFile cleans up the committed physical storage in a process’s virtual address space. In other, words, it frees the virtual address space of the mapping object. Under Windows NT Kernel, a process can, open an existing memory mapped object by calling the API OpenFileMapping(DWORD dwDesiredAccess,, BOOL bInheritHandle, LPCTSTR lpName). The parameter dwDesiredAccess specifies the read write access, permissions for the memory mapped object. A value of FILE_MAP_ALL_ACCESS provides read-write, access, whereas the value FILE_MAP_READ allocates only read access and FILE_MAP_WRITE allocates, write only access. The parameter bInheritHandle specifies the handle inheritance. If this parameter is TRUE,, the calling process inherits the handle of the existing object, otherwise not. The parameter lpName specifies, the name of the existing memory mapped object which needs to be opened. Windows CE 5.0 does not support, handle inheritance and hence the API call OpenFileMapping is not supported., The following sample code illustrates the creation and accessing of memory mapped objects across, multiple processes. The first piece of code illustrates the creation of a memory mapped object with name, “memorymappedobject” and prints the address of the memory location where the memory is mapped within, the virtual address space of Process 1., ##include “stdafx.h”, #include <stdio.h>, #include <windows.h>, //*******************************************************************, //Process 1: Creates the memory mapped object and maps it to, //Process 1’s Virtual Address space, //*******************************************************************, void main() {, //Define the handle to Memory mapped Object, HANDLE hFileMap;, //Define the handle to the view of Memory mapped Object, LPBYTE hMapView;, printf(“//**********************************************\n”);, printf(“ Process 1\n”);, printf(“//**********************************************\n”);, //Create an 8 KB memory mapped object, hFileMap = CreateFileMapping((HANDLE)-1,, NULL, // default security attributes, PAGE_READWRITE, // Read-Write Access, 0, //Higher order 32 bits of the memory mapping object, 0x2000, //Lower order 32 bits of the memory mapping object
Page 461 :
Real-Time Opera ng System (RTOS) based Embedded System Design, , 437, , TEXT(“memorymappedobject”)); // Memory mapped object name, if (NULL == hFileMap), {, printf(“Memory mapped Object Creation Failed : Error Code : %d\n”,, GetLastError());, //Memory mapped Object Creation failed. Return, return;, }, //Map the memory mapped object to Process 1’s address space, hMapView = (LPBYTE)MapViewOfFile(hFileMap,, FILE_MAP_WRITE,, 0, //Map the entire view, 0,, 0);, if (NULL == hMapView), {, printf(“Mapping of Memory mapped view Failed : Error Code :%d\n”,, GetLastError());, //Memory mapped view Creation failed. Return, return;, }, else, {, //Successfully created the memory mapped view., //Print the start address of the mapped view, printf(“The memory is mapped to the virtual address starting at 0x%p\n”,, (void *)hMapView);, }, //Wait for user input to exit. Run Process 2 before providing, //user input, printf(“Press any key to terminate Process 1”);, getchar();, //Unmap the view, UnmapViewOfFile(hMapView);, //Close memory mapped object handle, CloseHandle(hFileMap);, return;, }, , The piece of code given below corresponds to Process 2. It illustrates the accessing of an existing memory, mapped object (memory mapped object with name “memorymappedobject” created by Process 1) and prints, the address of the memory location where the memory is mapped within the virtual address space of Process, 2. To demonstrate the application, the program corresponding to Process 1 should be executed first and the, program corresponding to Process 2 should be executed following Process 1., #include “stdafx.h”, #include <stdio.h>
Page 462 :
438, , Introduc on to Embedded Systems, , #include <windows.h>, //*******************************************************************, //Process 2: Opens the memory mapped object created by Process 1, //Maps the object to Process 2’s virtual address space., //*******************************************************************, void main() {, //Define the handle for the Memory mapped Object, HANDLE hChildFileMap;, //Define the handle for the view of Memory mapped Object, LPBYTE hChildMapView;, printf(“//**********************************************\n”);, printf(“ Process 2\n”);, printf(“//**********************************************\n”);, //Create an 8 KB memory mapped object, hChildFileMap = CreateFileMapping(INVALID_HANDLE_VALUE,, NULL, // default security attributes, PAGE_READWRITE, // Read-Write Access, 0, //Higher order 32 bits of the memory mapping object, 0x2000, //Lower order 32 bits of the memory mapping object, TEXT(“memorymappedobject”)); // Memory mapped object name, if ((NULL == hChildFileMap) || (INVALID_HANDLE_VALUE == hChildFileMap)), {, printf(“Memory mapped Object Creation Failed : Error Code : %d\n”,, GetLastError());, //Memory mapped Object Creation failed. Return, return;, }, else if (ERROR_ALREADY_EXISTS == GetLastError()), {, //A memory mapped object with given name exists already., printf(“The named memory mapped object is already existing\n”);, }, //Map the memory mapped object to Process 2’s address space, hChildMapView = (LPBYTE) MapViewOfFile(hChildFileMap,, FILE_MAP_WRITE, //Read-Write access, 0,, //Map the entire view, 0,, 0);, if (NULL == hChildMapView), {, printf(“Mapping of Memory mapped view Failed : Error Code : %d\n”,, GetLastError());, //Memory mapped view Creation failed. Return, return;, }
Page 463 :
Real-Time Opera ng System (RTOS) based Embedded System Design, , 439, , else, {, //Successfully created the memory mapped view., //Print the start address of the mapped view, printf(“The memory mapped view starts at memory location 0x%p\n”,, (void *) hChildMapView);, }, //Wait for user input to exit., printf(“Press any key to terminate Process 2”);, getchar();, //Unmap the view, UnmapViewOfFile(hChildMapView);, //Close memory mapped object handle, CloseHandle(hChildFileMap);, return;, }, , The output of the above programs when executed on Windows 10 OS in the sequence, Process 1 is, executed first and Process 2 is executed while Process 1 waits for the user input from the keyboard, is given, in Fig. 10.19., , Fig. 10.19, , Output of Win32 memory mapped object illustration program, , The starting address of the memory mapped view in the virtual address space of the process is decided, by the OS. However a process can request to map the view at a desired virtual address by using the, MapViewofFileEx function. Depending on the availability of the address space the OS may grand the request, or not. It is always safe to let the OS choose the address.
Page 464 :
440, , Introduc on to Embedded Systems, , Reading and writing to a memory mapped area is same as any read write operation using pointers. The, pointer returned by the API call MapViewOfFile can be used for this. The exercise of Read and Write operation, is left to the readers. Proper care should be taken to avoid any conflicts that may arise due to the simultaneous, read/write access of the shared memory area by multiple processes. This can be handled by applying various, synchronisation techniques like events, mutex, semaphore, etc., For using a memory mapped object across multiple threads of a process, it is not required for all the threads, of the process to create/open the memory mapped object and map it to the thread’s virtual address space., Since the thread’s address space is part of the process’s virtual address space, which contains the thread, only, one thread, preferably the parent thread (main thread) is required to create the memory mapped object and, map it to the process’s virtual address space. The thread which creates the memory mapped object can share, the pointer to the mapped memory area as global pointer and other threads of the process can use this pointer, for reading and writing to the mapped memory area. If one thread of a process tries to create a memory, mapped object with the same name as that of an existing mapping object, which is created by another thread, of the same process, a new view of the mapping object is created at a different virtual address of the process., This is same as one process trying to create two views of the same memory mapped object☺., , 10.7.2, , Message Passing, , Message passing is an (a)synchronous information exchange mechanism used for Inter Process/Thread, Communication. The major difference between shared memory and message passing technique is that, through, shared memory lots of data can be shared whereas only limited amount of info/data is passed through message, passing. Also message passing is relatively fast and free from the synchronisation overheads compared to, shared memory. Based on the message passing operation between the processes, message passing is classified, into, , 10.7.2.1 Message Queue, Usually the process which wants to talk to another process posts the message to a First-In-First-Out (FIFO), queue called ‘Message queue’, which stores the messages temporarily in a system defined memory object,, to pass it to the desired process (Fig. 10.20). Messages are sent and received through send (Name of the, process to which the message is to be sent, message) and receive (Name of the process from which the, message is to be received, message) methods. The messages are exchanged through a message queue. The, implementation of the message queue, send and receive methods are OS kernel dependent. The Windows XP, OS kernel maintains a single system message queue and one process/thread (Process and threads are used, interchangeably here, since thread is the basic unit of process in windows) specific message queue. A thread, which wants to communicate with another thread posts the message to the system message queue. The kernel, picks up the message from the system message queue one at a time and examines the message for finding, the destination thread and then posts the message to the message queue of the corresponding thread. For, posting a message to a thread’s message queue, the kernel fills a message structure MSG and copies it to the, message queue of the thread. The message structure MSG contains the handle of the process/thread for which, the message is intended, the message parameters, the time at which the message is posted, etc. A thread can, simply post a message to another thread and can continue its operation or it may wait for a response from, the thread to which the message is posted. The messaging mechanism is classified into synchronous and, asynchronous based on the behaviour of the message posting thread. In asynchronous messaging, the message, posting thread just posts the message to the queue and it will not wait for an acceptance (return) from the, thread to which the message is posted, whereas in synchronous messaging, the thread which posts a message, enters waiting state and waits for the message result from the thread to which the message is posted. The, thread which invoked the send message becomes blocked and the scheduler will not pick it up for scheduling.
Page 465 :
Real-Time Opera ng System (RTOS) based Embedded System Design, , 441, , The PostMessage (HWND hWnd, UINT Msg, WPARAM wParam, LPARAM lParam) or PostThreadMessage, (DWORD idThread, UINT Msg, WPARAM wParam, LPARAM lParam) API is used by a thread in Windows, for posting a message to its own message queue or to the message queue of another thread. PostMessage, places a message at the end of a thread’s message queue and returns immediately, without waiting for the, thread to process the message. The function’s parameters include a window handle, a message identifier, and, two message parameters. The system copies these parameters to an MSG structure, and places the structure in, the message queue. The PostThreadMessage is similar to PostMessage, except the first parameter is a thread, identifier and it is used for posting a message to a specific thread message queue. The SendMessage (HWND, hWnd, UINT Msg, WPARAM wParam, LPARAM lParam) API call sends a message to the thread specified, by the handle hWnd and waits for the callee thread to process the message. The thread which calls the, SendMessage API enters waiting state and waits for the message result from the thread to which the message, is posted. The thread which invoked the SendMessage API call becomes blocked and the scheduler will not, pick it up for scheduling., , ssa, me, nd, Se, , Fig. 10.20, , ge, ssa, me, , Process 1, , ive, ce, Re, , ge, , Message Queue, , Process 2, , Concept of message queue based indirect messaging for IPC, , The Windows Embedded Compact operating system supports a special Point-to-Point Message queue, implementation. The OS maintains a First In First Out (FIFO) buffer for storing the messages and each, process can access this buffer for reading and writing messages. The OS also maintains a special queue, with, single message storing capacity, for storing high priority messages (Alert messages). The creation and usage, of message queues under Windows Embedded Compact OS is explained below., The CreateMsgQueue(LPCWSTR lpszName, LPMSGQUEUEOPTIONS lpOptions) API call creates a, message queue or opens a named message queue and returns a read only or write only handle to the message, queue. A process can use this handle for reading or writing a message from/to of the message queue pointed, by the handle. The parameter lpszName specifies the name of the message queue. If this parameter is NULL,, an unnamed message queue is created. Processes can use the handle returned by the API call if the message, queue is created without any name. If the message queue is created as named message queue, other processes, can use the name of the message queue for opening the named message queue created by a process. Calling, the CreateMsgQueue API with an existing named message queue as parameter returns a handle to the existing, message queue. Under the Desktop Windows Operating Systems (Windows NT Kernel – Windows XP,, Windows 8.1/10, etc.), each object type (viz. mutex, semaphores, events, memory maps, watchdog timers
Page 466 :
442, , Introduc on to Embedded Systems, , and message queues) share the same namespace and the same name is not allowed for creating any of this., Windows CE/Embedded Compact kernel maintains separate namespace for each and supports the same, name across different objects. The lpOptions parameter points to a MSGQUEUEOPTIONS structure that, sets the properties of the message queue. The member details of the MSGQUEUEOPTIONS structure is, explained below., typedef MSGQUEUEOPTIONS_OS{, DWORD dwSize;, DWORD dwFlags;, DWORD dwMaxMessages;, DWORD cbMaxMessage;, BOOL bReadAccess;, } MSGQUEUEOPTIONS, FAR* LPMSGQUEUEOPTIONS, *PMSGQUEUEOPTIONS;, , The members of the structure are listed below., Member, , Description, , dwSize, , Specifies the size of the structure in bytes, , dwFlags, , Describes the behaviour of the message queue. Set to MSGQUEUE_NOPRECOMMIT to allocate message buffers on demand and to free the message buffers after they are read, or set to, MSGQUEUE_ALLOW_BROKEN to enable a read or write operation to complete even if there, is no corresponding writer or reader present., , dwMaxMessages, , Specifies the maximum number of messages to queue at any point of time. Set this value to zero, to specify no limit on the number of messages to queue at any point of time., , cbMaxMessage, , Specifies the maximum number of bytes in each message. This value must be greater than zero., , bReadAccess, , Specifies the Read Write access to the message queue. Set to TRUE to request read access to the, queue. Set to FALSE to request write access to the queue., , On successful execution, the CreateMsgQueue API call returns a ‘Read Only’ or ‘Write Only’ handle to, the specified queue based on the bReadAccess member of the MSGQUEUEOPTIONS structure lpOptions., If the queue with specified name already exists, a new handle, which points to the existing queue, is created, and a following call to GetLastError returns ERROR_ALREADY_EXISTS. If the function fails it returns, NULL. A single call to the CreateMsgQueue creates the queue for either ‘read’ or ‘write’ access. The, CreateMsgQueue API should be called twice with the bReadAccess member of the MSGQUEUEOPTIONS, structure lpOptions set to TRUE and FALSE respectively in successive calls for obtaining ‘Read only’, and ‘Write only’ handles to the specified message queue. The handle returning by CreateMsgQueue API, call is an event handle and, if it is a ‘Read Only’ access handle, it is signalled by the message queue if a, new message is placed in the queue. The signal is reset on reading the message by ReadMsgQueue API, call. A ‘Write Only’ access handle to the message queue is signalled when the queue is no longer full, i.e., when there is room for accommodating new messages. Processes can monitor the handles with the help of, the wait functions, viz. WaitForSingleObject or WaitForMultipleObjects. The OpenMsgQueue(HANDLE, hSrcProc, HANDLE hMsgQ, LPMSGQUEUEOPTIONS lpOptions) API call opens an existing named or, unnamed message queue. The parameter hSrcProc specifies the process handle of the process that owns the, message queue and hMsgQ specifies the handle of the existing message queue (Handle to the message queue, returned by the CreateMsgQueue function). As in the case of CreateMsgQueue, the lpOptions parameter, points to a MSGQUEUEOPTIONS structure that sets the properties of the message queue. On successful, execution the OpenMsgQueue API call returns a handle to the message queue and NULL if it fails. Normally
Page 467 :
Real-Time Opera ng System (RTOS) based Embedded System Design, , 443, , the OpenMsgQueue API is used for opening an unnamed message queue. The WriteMsgQueue(HANDLE, hMsgQ, LPVOID lpBuffer, DWORD cbDataSize, DWORD dwTimeout, DWORD dwFlags) API call is used, for writing a single message to the message queue pointed by the handle hMsgQ. lpBuffer points to a buffer, that contains the message to be written to the message queue. The parameter cbDataSize specifies the number, of bytes stored in the buffer pointed by lpBuffer, which forms a message. The parameter dwTimeout specifies, the timeout interval in milliseconds for the message writing operation. A value of zero specifies the write, operation to return immediately without blocking if the write operation cannot succeed. If the parameter is, set to INFINITE, the write operation will block until it succeeds or the message queue signals the ‘write only’, handle indicating the availability of space for posting a message. The dwFlags parameter sets the priority of, the message. If it is set to MSGQUEUE_MSGALERT, the message is posted to the queue as high priority or, alert message. The Alert message is always placed in the front of the message queue. This function returns, TRUE if it succeeds and FALSE otherwise., The ReadMsgQueue(HANDLE hMsgQ, LPVOID lpBuffer, DWORD cbBufferSize, LPDWORD, lpNumberOfBytesRead, DWORD dwTimeout, DWORD* pdwFlags) API reads a single message from the, message queue. The parameter hMsgQ specifies a handle to the message queue from which the message, needs to be read. lpBuffer points to a buffer for storing the message read from the queue. The parameter, cbBufferSize specifies the size of the buffer pointed by lpBuffer, in bytes. lpNumberOfBytesRead specifies, the number of bytes stored in the buffer. This is same as the number of bytes present in the message which, is read from the message queue. dwTimeout specifies the timeout interval in milliseconds for the message, reading operation. The timeout values and their meaning are same as that of the write message timeout, parameter. The dwFlags parameter indicates the priority of the message. If the message read from the, message queue is a high priority message (alert message), dwFlags is set to MSGQUEUE_MSGALERT., The function returns TRUE if it succeeds and FALSE otherwise. The GetMsgQueueInfo (HANDLE hMsgQ,, LPMSGQUEUEINFO lpInfo) API call returns the information about a message queue specified by the handle, hMsgQ. The message information is returned in a MSGQUEUEINFO structure pointed by lpInfo. The details, of the MSGQUEUEINFO structure is explained below., typedef MSGQUEUEINFO{, DWORD dwSize;, DWORD dwFlags;, DWORD dwMaxMessages;, DWORD cbMaxMessage;, DWORD dwCurrentMessages;, DWORD dwMaxQueueMessages;, WORD wNumReaders;, WORD wNumWriters;, } MSGQUEUEINFO, *PMSGQUEUEINFO, FAR* LPMSGQUEUEINFO;, , The member variable details are listed below., Member, , Description, , DwSize, , Specifies the size of the buffer passed in., , dwFlags, , Describes the behaviour of the message queue. It retrieves the MSGQUEUEOPTIONS., dwFlags passed when the message queue is created with CreateMsgQueue API call., , dwMaxMessages, , Specifies the maximum number of messages to queue at any point of time. This reflects, the MSGQUEUEOPTIONS. dwMaxMessages value passed when the message queue is, created with CreateMsgQueue API call.
Page 468 :
444, , Introduc on to Embedded Systems, , cbMaxMessage, , Specifies the maximum number of bytes in each message. This reflects the MSGQUEUEOPTIONS.cbMaxMessage value passed when the message queue is created with CreateMsgQueue API call., , dwCurrentMessages, , Specifies the number of messages currently existing in the specified message queue., , dwMaxQueueMessages, , Specifies maximum number of messages that have ever been in the queue at one time., , wNumReaders, , Specifies the number of readers (processes which opened the message queue for reading) subscribed to the message queue for reading., , wNumWriters, , Specifies the number of writers (processes which opened the message queue for writing), subscribed to the message queue for writing., , The GetMsgQueueInfo API call returns TRUE if it succeeds and FALSE otherwise. The, CloseMsgQueue(HANDLE hMsgQ) API call closes a message queue specified by the handle hMsgQ. If a, process holds a ‘read only’ and ‘write only’ handle to the message queue, both should be closed for closing, the message queue., ‘Message queue’ is the primary inter-task communication mechanism under VxWorks kernel. Message, queues support two-way communication of messages of variable length. The two-way messaging between, tasks can be implemented using one message queue for incoming messages and another one for outgoing, messages. Messaging mechanism can be used for task-to task and task to Interrupt Service Routine (ISR), communication. We will discuss about the VxWorks’ message queue implementation in a separate chapter., , 10.7.2.2 Mailbox, Mailbox is an alternate form of ‘Message queues’ and it is used in certain Real-Time Operating Systems, for IPC. Mailbox technique for IPC in RTOS is usually used for one way messaging. The task/thread which, wants to send a message to other tasks/threads creates a mailbox for posting the messages. The threads which, are interested in receiving the messages posted to the mailbox by the mailbox creator thread can subscribe, to the mailbox. The thread which creates the mailbox is known as ‘mailbox server’ and the threads which, subscribe to the mailbox are known as ‘mailbox clients’. The mailbox server posts messages to the mailbox, and notifies it to the clients which are subscribed to the mailbox. The clients read the message from the, mailbox on receiving the notification. The mailbox creation, subscription, message reading and writing are, achieved through OS kernel provided API calls. Mailbox and message queues are same in functionality. The, only difference is in the number of messages supported by them. Both of them are used for passing data, in the form of message(s) from a task to another task(s). Mailbox is used for exchanging a single message, between two tasks or between an Interrupt Service Routine (ISR) and a task. Mailbox associates a pointer, pointing to the mailbox and a wait list to hold the tasks waiting for a message to appear in the mailbox. The, implementation of mailbox is OS kernel dependent. The MicroC/OS-II implements mailbox as a mechanism, for inter-task communication. We will discuss about the mailbox based IPC implementation under MicroC/, OS-II in a latter chapter. Figure 10.21 given below illustrates the mailbox based IPC technique., , 10.7.2.3 Signalling, Signalling is a primitive way of communication between processes/threads. Signals are used for asynchronous, notifications where one process/thread fires a signal, indicating the occurrence of a scenario which the other, process(es)/thread(s) is waiting. Signals are not queued and they do not carry any data. The communication, mechanisms used in RTX51 Tiny OS is an example for Signalling. The os_send_signal kernel call under, RTX 51 sends a signal from one task to a specified task. Similarly the os_wait kernel call waits for a specified, signal. Refer to the topic ‘Round Robin Scheduling’ under the section ‘Priority based scheduling’ for more, details on Signalling in RTX51 Tiny OS. The VxWorks RTOS kernel also implements ‘signals’ for inter
Page 469 :
Real-Time Opera ng System (RTOS) based Embedded System Design, , 445, , process communication. Whenever a specified signal occurs it is handled in a signal handler associated with, the signal. We will discuss about the signal based IPC mechanism for VxWorks’ kernel in a later chapter., , Task 1, , Post message, ge, , sa, es, m, as, t, dc, , ssa, , oa, , me, , Br, , st, , a, dc, , 10.7.3, , oa, , Fig. 10.21, , Task 3, , Br, , Task 2, , Broadcast message, , ge, , Mail box, , Task 4, , Concept of Mailbox based indirect messaging for IPC, , Remote Procedure Call (RPC) and Sockets, , Remote Procedure Call or RPC (Fig. 10.22) is the Inter Process Communication (IPC) mechanism used, by a process to call a procedure of another process running on the same CPU or on a different CPU which, is interconnected in a network. In the object oriented language terminology RPC is also known as Remote, Invocation or Remote Method Invocation (RMI). RPC is mainly used for distributed applications like clientserver applications. With RPC it is possible to communicate over a heterogeneous network (i.e. Network where, Client and server applications are running on different Operating systems). The CPU/process containing the, procedure which needs to be invoked remotely is known as server. The CPU/process which initiates an RPC, request is known as client., It is possible to implement RPC communication with different invocation interfaces. In order to make the, RPC communication compatible across all platforms it should stick on to certain standard formats. Interface, Definition Language (IDL) defines the interfaces for RPC. Microsoft Interface Definition Language (MIDL), is the IDL implementation from Microsoft for all Microsoft platforms. The RPC communication can be, either Synchronous (Blocking) or Asynchronous (Non-blocking). In the Synchronous communication, the, process which calls the remote procedure is blocked until it receives a response back from the other process., In asynchronous RPC calls, the calling process continues its execution while the remote process performs
Page 470 :
446, , Introduc on to Embedded Systems, , CPU, , CPU, , Network, , Process, , Process, TCP/IP or UDP, Over Socket, , Procedure, , Processes running on different CPUs which are networked, , Process 1, , CPU, , Process 2, , TCP/IP or UDP, , Procedure, , Over Socket, , Processes running on same CPU, , Fig. 10.22, , Concept of Remote Procedure Call (RPC) for IPC, , the execution of the procedure. The result from the remote procedure is returned back to the caller through, mechanisms like callback functions., On security front, RPC employs authentication mechanisms to protect the systems against vulnerabilities., The client applications (processes) should authenticate themselves with the server for getting access., Authentication mechanisms like IDs, public key cryptography (like DES, 3DES), etc. are used by the client, for authentication. Without authentication, any client can access the remote procedure. This may lead to, potential security risks., Sockets are used for RPC communication. Socket is a logical endpoint in a two-way communication, link between two applications running on a network. A port number is associated with a socket so that the, network layer of the communication channel can deliver the data to the designated application. Sockets are, of different types, namely, Internet sockets (INET), UNIX sockets, etc. The INET socket works on internet, communication protocol. TCP/IP, UDP, etc. are the communication protocols used by INET sockets. INET, sockets are classified into:, 1. Stream sockets, 2. Datagram sockets, Stream sockets are connection oriented and they use TCP to establish a reliable connection. On the other, hand, Datagram sockets rely on UDP for establishing a connection. The UDP connection is unreliable when, compared to TCP. The client-server communication model uses a socket at the client side and a socket at, the server side. A port number is assigned to both of these sockets. The client and server should be aware, of the port number associated with the socket. In order to start the communication, the client needs to send, a connection request to the server at the specified port number. The client should be aware of the name of, the server along with its port number. The server always listens to the specified port number on the network., Upon receiving a connection request from the client, based on the success of authentication, the server grants, the connection request and a communication channel is established between the client and server. The client
Page 471 :
Real-Time Opera ng System (RTOS) based Embedded System Design, , 447, , uses the host name and port number of server for sending requests and server uses the client’s name and port, number for sending responses., If the client and server applications (both processes) are running on the same CPU, both can use the same, host name and port number for communication. The physical communication link between the client and, server uses network interfaces like Ethernet or Wi-Fi for data communication. The underlying implementation, of socket is OS kernel dependent. Different types of OSs provide different socket interfaces. The following, sample code illustrates the usage of socket for creating a client application under Windows OS. Winsock, (Windows Socket 2) is the library implementing socket functions for Win32., #include “stdafx.h”, #include <stdio.h>, #include <winsock2.h>, #include <Ws2tcpip.h>, //Specify the server address, #define SERVER “172.168.0.1”, //Specify the server port, #define PORT 5000, #pragma comment(lib, “Ws2_32.lib”), const int recvbuflen = 100;, char *sendbuf = “Hi from Client”;, char recvbuffer[recvbuflen];, void main() {, //*********************************************************, // Initialise Winsock, WSADATA wsaData;, if (WSAStartup(MAKEWORD(2, 2), &wsaData) == NO_ERROR), printf(“Winsock Initialisation succeeded...\n”);, else, {, printf(“Winsock Initialisation failed...\n”);, return;, }, //*********************************************************, // Create a SOCKET for connecting to server, SOCKET MySocket;, MySocket = socket(AF_INET, SOCK_STREAM, IPPROTO_TCP);, if (MySocket == INVALID_SOCKET), {, printf(“Socket Creation failed...\n”);, WSACleanup();, return;, }, else, {, printf(“Successfully created the socket...\n”);, //*********************************************************, // Set the Socket type, IP address and port of the server, sockaddr_in ServerParams;, ServerParams.sin_family = AF_INET;
Page 473 :
Real-Time Opera ng System (RTOS) based Embedded System Design, , 449, , The above application tries to connect to a server machine with IP address 172.168.0.1 and port number, 5000. Change the values of SERVER and PORT to connect to a machine with different IP address and port, number. If the connection is success, it sends the data “Hi from Client” to the server and waits for a response, from the server and finally terminates the connection., Under Windows, the socket function library Winsock should be initiated before using the socket related, functions. The function WSAStartup performs this initiation. The socket() function call creates a socket. The, socket type, connection type and protocols for communication are the parameters for socket creation. Here, the socket type is INET (AF_INET) and connection type is stream socket (SOCK_STREAM). The protocol, selected for communication is TCP/IP (IPPROTO_TCP). After creating the socket it is connected to a server., For connecting to server, the server address and port number should be indicated in the connection request., The sockaddr_in structure specifies the socket type, IP address and port of the server to be connected to. The, connect () function connects the socket with a specified server. If the server grants the connection request, the, connect () function returns success. The send() function is used for sending data to a server. It takes the socket, name and data to be sent as parameters. Data from server is received using the function call recv(). It takes the, socket name and details of buffer to hold the received data as parameters. The TCP/IP network stack expects, network byte order (Big Endian: Higher order byte of the data is stored in lower memory address location), for data. The function htons() converts the byte order of an unsigned short integer to the network order. The, closesocket() function closes the socket connection. On the server side, the server creates a socket using the, function socket() and binds the socket with a port using the bind() function. It listens to the port bonded to the, socket for any incoming connection request. The function listen() performs this. Upon receiving a connection, request, the server accepts it. The function accept() performs the accepting operation. Now the connectivity is, established. Server can receive and transmit data using the function calls recv() and send() respectively. The, implementation of the server application is left to the readers as an exercise., , 10.8, , TASK SYNCHRONISATION, , In a multitasking environment, multiple processes run concurrently (in pseudo, LO 8 State the, parallelism) and share the system resources. Apart from this, each process has, need for task, its own boundary wall and they communicate with each other with different IPC, synchronisation, mechanisms including shared memory and variables. Imagine a situation where, in a multitasking, two processes try to access display hardware connected to the system or two, environment, processes try to access a shared memory area where one process tries to write to a, memory location when the other process is trying to read from this. What could be the result in these scenarios?, Obviously unexpected results. How these issues can be addressed? The solution is, make each process aware, of the access of a shared resource either directly or indirectly. The act of making processes aware of the, access of shared resources by each process to avoid conflicts is known as ‘Task/Process Synchronisation’., Various synchronisation issues may arise in a multitasking environment if processes are not synchronised, properly. The following sections describe the major task communication synchronisation issues observed in, multitasking and the commonly adopted synchronisation techniques to overcome these issues., , 10.8.1, , Task Communication/Synchronisation Issues, , 10.8.1.1 Racing, Let us have a look at the following piece of code:, #include “stdafx.h”, #include <windows.h>
Page 474 :
450, , Introduc on to Embedded Systems, , #include <stdio.h>, //****************************************************************, //counter is an integer variable and Buffer is a byte array shared, //between two processes Process A and Process B, char Buffer[10] = { 1,2,3,4,5,6,7,8,9,10 };, short int counter = 0;, //****************************************************************, // Process A, void Process_A(void) {, int i;, for (i = 0; i<5; i++), {, if (Buffer[i] > 0), counter++;, }, }, //****************************************************************, // Process B, void Process_B(void) {, int j;, for (j = 5; j<10; j++), {, if (Buffer[j] > 0), counter++;, }, }, //****************************************************************, //Main Thread., int main() {, DWORD id;, CreateThread(NULL, 0, (LPTHREAD_START_ROUTINE)Process_A, (LPVOID)0, 0, &id);, CreateThread(NULL, 0, (LPTHREAD_START_ROUTINE)Process_B, (LPVOID)0, 0, &id);, Sleep(100000);, return 0;, }, , From a programmer perspective the value of counter will be 10 at the end of execution of processes, A & B. But ‘it need not be always’ in a real world execution of this piece of code under a multitasking, kernel. The results depend on the process scheduling policies adopted by the OS kernel. Now let’s dig, into the piece of code illustrated above. The program statement counter++; looks like a single statement, from a high level programming language (‘C’ language) perspective. The low level implementation of this, statement is dependent on the underlying processor instruction set and the (cross) compiler in use. The low, level implementation of the high level program statement counter++; under Windows XP operating system, running on an Intel Centrino Duo processor is given below. The code snippet is compiled with Microsoft, Visual Studio 6.0 compiler., mov eax,dword ptr [ebp-4];Load counter in Accumulator, add eax,1 ; Increment Accumulator by 1, mov dword ptr [ebp-4],eax ;Store counter with Accumulator
Page 475 :
Real-Time Opera ng System (RTOS) based Embedded System Design, , 451, , Whereas the same high level program statement when compiled with Visual Studio 2013 on an Intel i7, dual core Processor running Windows 10 OS yields the following low level implementation for the program, statement counter++, mov, add, mov, , ax,word ptr ds:[00A08140h], ax,1, word ptr ds:[00A08140h],ax, , In the first scenario, at the processor instruction level, the value of the variable counter is loaded to, the Accumulator register (EAX register). The memory variable counter is represented using a pointer. The, base pointer register (EBP register) is used for pointing to the memory variable counter. After loading the, contents of the variable counter to the Accumulator, the Accumulator content is incremented by one using, the add instruction. Finally the content of Accumulator is loaded to the memory location which represents, the variable counter. Both the processes Process A and Process B contain the program statement counter++;, Translating this into the machine instruction, Process A, , Process B, , mov eax,dword ptr [ebp-4], , mov eax,dword ptr [ebp-4], , add eax,1, , add eax,1, , mov dword ptr [ebp-4],eax, , mov dword ptr [ebp-4],eax, , Imagine a situation where a process switching (context switching) happens from Process A to Process B, when Process A is executing the counter++; statement. Process A accomplishes the counter++; statement, through three different low level instructions. Now imagine that the process switching happened at the point, where Process A executed the low level instruction, ‘mov eax,dword ptr [ebp-4]’ and is about to execute the, next instruction ‘add eax,1’. The scenario is illustrated in Fig. 10.23., , Process A, , Process B, , ………………………………., , mov eax,dwordptr [ebp-4], Context Switch, , add eax,1, mov dword ptr [ebp-4], eax, , Context Switch, , ………………………………., , mov eax,dword ptr [ebp-4], add eax,1, mov dword ptr [ebp-4], eax, ……………………………….., , ………………………………., , Fig. 10.23 Race condition, Process B increments the shared variable ‘counter’ in the middle of the operation where Process A tries, to increment it. When Process A gets the CPU time for execution, it starts from the point where it got, interrupted (If Process B is also using the same registers eax and ebp for executing counter++; instruction,, the original content of these registers will be saved as part of the context saving and it will be retrieved back
Page 476 :
452, , Introduc on to Embedded Systems, , as part of context retrieval, when process A gets the CPU for execution. Hence the content of eax and ebp, remains intact irrespective of context switching). Though the variable counter is incremented by Process, B, Process A is unaware of it and it increments the variable with the old value. This leads to the loss of one, increment for the variable counter. This problem occurs due to non-atomic§ operation on variables. This issue, wouldn’t have been occurred if the underlying actions corresponding to the program statement counter++;, is finished in a single CPU execution cycle. The best way to avoid this situation is make the access and, modification of shared variables mutually exclusive; meaning when one process accesses a shared variable,, prevent the other processes from accessing it. We will discuss this technique in more detail under the topic, ‘Task Synchronisation techniques’ in a later section of this chapter., To summarise, Racing or Race condition is the situation in which multiple processes compete (race) each, other to access and manipulate shared data concurrently. In a Race condition the final value of the shared data, depends on the process which acted on the data finally., , 10.8.1.2 Deadlock, A race condition produces incorrect results whereas, a deadlock condition creates a situation where none, of the processes are able to make any progress in, their execution, resulting in a set of deadlocked, processes. A situation very similar to our traffic jam, issues in a junction as illustrated in Fig. 10.24., In its simplest form ‘deadlock’ is the condition in, which a process is waiting for a resource held by, another process which is waiting for a resource held, by the first process (Fig. 10.25). To elaborate:, Process A holds a resource x and it wants a resource, y held by Process B. Process B is currently holding, resource y and it wants the resource x which is, currently held by Process A. Both hold the respective, resources and they compete each other to get the, resource held by the respective processes. The result, of the competition is ‘deadlock’. None of the, competing process will be able to access the resources, held by other processes since they are locked by the, Fig. 10.24 Deadlock visualisation, respective processes (If a mutual exclusion, policy is implemented for shared resource, Process A, Process B, access, the resource is locked by the process, which is currently accessing it)., Ho, ld, nts, The different conditions favouring a, Wa s, W s, an, ld, ts, Resource ‘x’, deadlock situation are listed below., Ho, Mutual Exclusion: The criteria that only one, process can hold a resource at a time. Meaning, processes should access shared resources with, mutual exclusion. Typical example is the, accessing of display hardware in an embedded device., § Atomic Operation: Operations which are non-interruptible., , Resource ‘y’, , Fig. 10.25, , Scenarios leading to deadlock
Page 477 :
Real-Time Opera ng System (RTOS) based Embedded System Design, , 453, , Hold and Wait: The condition in which a process holds a shared resource by acquiring the lock controlling, the shared access and waiting for additional resources held by other processes., No Resource Preemption: The criteria that operating system cannot take back a resource from a process, which is currently holding it and the resource can only be released voluntarily by the process holding it., Circular Wait: A process is waiting for a resource which is currently held by another process which in turn, is waiting for a resource held by the first process. In general, there exists a set of waiting process P0, P1 …, Pn with P0 is waiting for a resource held by P1 and P1 is waiting for a resource held by P0, …, Pn is waiting, for a resource held by P0 and P0 is waiting for a resource held by Pn and so on… This forms a circular wait, queue., ‘Deadlock’ is a result of the combined occurrence of these four conditions listed above. These conditions, are first described by E. G. Coffman in 1971 and it is popularly known as Coffman conditions., Deadlock Handling A smart OS may foresee the deadlock condition and will act proactively to avoid such a, situation. Now if a deadlock occurred, how the OS responds to it? The reaction to deadlock condition by OS is, nonuniform. The OS may adopt any of the following techniques to detect and prevent deadlock conditions., Ignore Deadlocks: Always assume that the system design is deadlock free. This is acceptable for the reason, the cost of removing a deadlock is large compared to the chance of happening a deadlock. UNIX is an, example for an OS following this principle. A life critical system cannot pretend that it is deadlock free for, any reason., Detect and Recover: This approach suggests the detection of a deadlock situation and recovery from it. This, is similar to the deadlock condition that may arise at a traffic junction. When the vehicles from different, directions compete to cross the junction, deadlock (traffic jam) condition is resulted. Once a deadlock (traffic, jam) is happened at the junction, the only solution is to back up the vehicles from one direction and allow the, vehicles from opposite direction to cross the junction. If the traffic is too high, lots of vehicles may have to, be backed up to resolve the traffic jam. This technique is also known as ‘back up cars’ technique, (Fig. 10.26)., Operating systems keep a resource graph in, their memory. The resource graph is updated on, each resource request and release. A deadlock, condition can be detected by analysing the, resource graph by graph analyser algorithms., Once a deadlock condition is detected, the system, can terminate a process or preempt the resource to, break the deadlocking cycle., Avoid Deadlocks: Deadlock is avoided by the, careful resource allocation techniques by the, Operating System. It is similar to the traffic light, mechanism at junctions to avoid the traffic jams., Prevent Deadlocks: Prevent the deadlock, condition by negating one of the four conditions, favouring the deadlock situation., ∑ Ensure that a process does not hold any, other resources when it requests a resource., , Fig. 10.26, , ‘Back up cars’ technique for deadlock recovery
Page 478 :
454, , Introduc on to Embedded Systems, , This can be achieved by implementing the following set of rules/guidelines in allocating resources to, processes., 1. A process must request all its required resource and the resources should be allocated before the, process begins its execution., 2. Grant resource allocation requests from processes only if the process does not hold a resource, currently., ∑ Ensure that resource preemption (resource releasing) is possible at operating system level. This can be, achieved by implementing the following set of rules/guidelines in resources allocation and releasing., 1. Release all the resources currently held by a process if a request made by the process for a new, resource is not able to fulfil immediately., 2. Add the resources which are preempted (released) to a resource list describing the resources which, the process requires to complete its execution., 3. Reschedule the process for execution only when the process gets its old resources and the new, resource which is requested by the process., Imposing these criterions may introduce negative impacts like low resource utilisation and starvation, of processes., Livelock The Livelock condition is similar to the deadlock condition except that a process in livelock condition, changes its state with time. While in deadlock a process enters in wait state for a resource and continues in, that state forever without making any progress in the execution, in a livelock condition a process always does, something but is unable to make any progress in the execution completion. The livelock condition is better, explained with the real world example, two people attempting to cross each other in a narrow corridor. Both, the persons move towards each side of the corridor to allow the opposite person to cross. Since the corridor, is narrow, none of them are able to cross each other. Here both of the persons perform some action but still, they are unable to achieve their target, cross each other. We will make the livelock, the scenario more clear in, a later section–The Dining Philosophers’ Problem, of this chapter., Starva on In the multitasking context, starvation is the condition in which a process does not get the, resources required to continue its execution for a long time. As time progresses the process starves on, resource. Starvation may arise due to various conditions like byproduct of preventive measures of deadlock,, scheduling policies favouring high priority tasks and tasks with shortest execution time, etc., , 10.8.1.3 The Dining Philosophers’ Problem, The ‘Dining philosophers’ problem’ is an interesting example for synchronisation issues in resource, utilisation. The terms ‘dining’, ‘philosophers’, etc. may sound awkward in the operating system context, but, it is the best way to explain technical things abstractly using non-technical terms. Now coming to the problem, definition:, Five philosophers (It can be ‘n’. The number 5 is taken for illustration) are sitting around a round table,, involved in eating and brainstorming (Fig. 10.27). At any point of time each philosopher will be in any, one of the three states: eating, hungry or brainstorming. (While eating the philosopher is not involved in, brainstorming and while brainstorming the philosopher is not involved in eating). For eating, each philosopher, requires 2 forks. There are only 5 forks available on the dining table (‘n’ for ‘n’ number of philosophers), and they are arranged in a fashion one fork in between two philosophers. The philosopher can only use the, forks on his/her immediate left and right that too in the order pickup the left fork first and then the right fork., Analyse the situation and explain the possible outcomes of this scenario., Let’s analyse the various scenarios that may occur in this situation.
Page 479 :
Real-Time Opera ng System (RTOS) based Embedded System Design, , 455, , Fig. 10.27 Visualisation of the ‘Dining Philosophers problem’, Scenario 1: All the philosophers involve in brainstorming together and try to eat together. Each philosopher, picks up the left fork and is unable to proceed since two forks are required for eating the spaghetti present in, the plate. Philosopher 1 thinks that Philosopher 2 sitting to the right of him/her will put the fork down and, waits for it. Philosopher 2 thinks that Philosopher 3 sitting to the right of him/her will put the fork down and, waits for it, and so on. This forms a circular chain of un-granted requests. If the philosophers continue in this, state waiting for the fork from the philosopher sitting to the right of each, they will not make any progress in, eating and this will result in starvation of the philosophers and deadlock., Scenario 2: All the philosophers start brainstorming together. One of the philosophers is hungry and he/she, picks up the left fork. When the philosopher is about to pick up the right fork, the philosopher sitting to his, right also become hungry and tries to grab the left fork which is the right fork of his neighbouring philosopher, who is trying to lift it, resulting in a ‘Race condition’., Scenario 3: All the philosophers involve in brainstorming together and try to eat together. Each philosopher, picks up the left fork and is unable to proceed, since two forks are required for eating the spaghetti present in, the plate. Each of them anticipates that the adjacently sitting philosopher will put his/her fork down and waits, for a fixed duration and after this puts the fork down. Each of them again tries to lift the fork after a fixed, duration of time. Since all philosophers are trying to lift the fork at the same time, none of them will be able, to grab two forks. This condition leads to livelock and starvation of philosophers, where each philosopher, tries to do something, but they are unable to make any progress in achieving the target., Figure 10.28 illustrates these scenarios.
Page 480 :
456, , Philosopher, 5, lds, , Ho, , W, an, ts, , Introduc on to Embedded Systems, , Holds, , Wants, , lds, , Ho, , Philosopher, 1, , Philosopher, 4, , Wa, nt, , Philosopher, 1, , lds, , s, , Philosopher, 2, , nts, Wa, , Hol, , ds, , Philosopher, 2, , Tri, e, , Wants, , Holds, , Ho, , s to, , s to, , gra, , gra, , b, , e, Tri, , b, , Philosopher, 3, , (a), , (b), , lds, , Ho, , Philosopher, 5, , Holds, , Philosopher, 1, , Philosopher, 4, lds, , Holds, , Ho, , Hol, , ds, , Philosopher, 2, , Philosopher, 3, , (c), , Fig. 10.28, , The ‘Real Problems’ in the ‘Dining Philosophers problem’ (a) Starvation and Deadlock, (b) Racing (c) Livelock and Starvation, , Solution: We need to find out alternative solutions to avoid the deadlock, livelock, racing and starvation, condition that may arise due to the concurrent access of forks by philosophers. This situation can be handled, in many ways by allocating the forks in different allocation techniques including Round Robin allocation,, FIFO allocation, etc. But the requirement is that the solution should be optimal, avoiding deadlock and, starvation of the philosophers and allowing maximum number of philosophers to eat at a time. One solution, that we could think of is:, ∑ Imposing rules in accessing the forks by philosophers, like: The philosophers should put down the fork, he/she already have in hand (left fork) after waiting for a fixed duration for the second fork (right fork), and should wait for a fixed time before making the next attempt.
Page 481 :
Real-Time Opera ng System (RTOS) based Embedded System Design, , 457, , This solution works fine to some extent, but, if all the philosophers try to lift the forks at the same time, a, livelock situation is resulted., Another solution which gives maximum concurrency that can be thought of is each philosopher acquires a, semaphore (mutex) before picking up any fork. When a philosopher feels hungry he/she checks whether the, philosopher sitting to the left and right of him is already using the fork, by checking the state of the associated, semaphore. If the forks are in use by the neighbouring philosophers, the philosopher waits till the forks are, available. A philosopher when finished eating puts the forks down and informs the philosophers sitting to, his/her left and right, who are hungry (waiting for the forks), by signalling the semaphores associated with, the forks. We will discuss about semaphores and mutexes at a latter section of this chapter. In the operating, system context, the dining philosophers represent the processes and forks represent the resources. The dining, philosophers’ problem is an analogy of processes competing for shared resources and the different problems, like racing, deadlock, starvation and livelock arising from the competition., , 10.8.1.4 Producer-Consumer/Bounded Buffer Problem, Producer-Consumer problem is a common data sharing problem where two processes concurrently access a, shared buffer with fixed size. A thread/process which produces data is called ‘Producer thread/process’ and, a thread/process which consumes the data produced by a producer thread/process is known as ‘Consumer, thread/process’. Imagine a situation where the producer thread keeps on producing data and puts it into the, buffer and the consumer thread keeps on consuming the data from the buffer and there is no synchronisation, between the two. There may be chances where in which the producer produces data at a faster rate than the, rate at which it is consumed by the consumer. This will lead to ‘buffer overrun’ where the producer tries to, put data to a full buffer. If the consumer consumes data at a faster rate than the rate at which it is produced, by the producer, it will lead to the situation ‘buffer under-run’ in which the consumer tries to read from an, empty buffer. Both of these conditions will lead to inaccurate data and data loss. The following code snippet, illustrates the producer-consumer problem, #include “stdafx.h”, #include <windows.h>, #include <stdio.h>, #define N 20, //Define buffer size as 20, int buffer[N];, //Shared buffer for producer & consumer, //*******************************************************************, //Producer thread, void producer_thread(void) {, int x;, while (true) {, for (x = 0; x<N; x++), {, //Fill buffer with random data, buffer[x] = rand() % 1000;, printf(“Produced : Buffer[%d] = % 4d\n”, x, buffer[x]);, Sleep(25);, }, }, }, //*******************************************************************, //Consumer thread
Page 482 :
458, , Introduc on to Embedded Systems, , void consumer_thread(void) {, int y = 0, value;, while (true) {, for (y = 0; y<N; y++), {, value = buffer[y];, printf(“Consumed : Buffer[%d] = % 4d\n”, y, value);, Sleep(20);, }, }, }, //*******************************************************************, //Main Thread, int main(), {, DWORD thread_id;, //Create Producer thread, CreateThread(NULL, 0, (LPTHREAD_START_ROUTINE)producer_thread, NULL, 0,, &thread_id);, //Create Consumer thread, CreateThread(NULL, 0, (LPTHREAD_START_ROUTINE)consumer_thread, NULL, 0,, &thread_id);, //Wait for some time and exit, Sleep(500);, return 0;, }, , Here the ‘producer thread’ produces random numbers and puts it in a buffer of size 20. If the ‘producer, thread’ fills the buffer fully it re-starts the filling of the buffer from the bottom. The ‘consumer thread’, consumes the data produced by the ‘producer thread’. For consuming the data, the ‘consumer thread’ reads, the buffer which is shared with the ‘producer thread’. Once the ‘consumer thread’ consumes all the data,, it starts consuming the data from the bottom of the buffer. These two threads run independently and are, scheduled for execution based on the scheduling policies adopted by the OS. The different situations that may, arise based on the scheduling of the ‘producer thread’ and ‘consumer thread’ is listed below., 1. ‘Producer thread’ is scheduled more frequently than the ‘consumer thread’: There are chances for, overwriting the data in the buffer by the ‘producer thread’. This leads to inaccurate data., 2. Consumer thread’ is scheduled more frequently than the ‘producer thread’: There are chances for, reading the old data in the buffer again by the ‘consumer thread’. This will also lead to inaccurate, data., The output of the above program when executed on a Windows 10 machine is shown in Fig. 10.29., The output shows that the consumer thread runs faster than the producer thread and most often leads to, buffer under-run and thereby inaccurate data., Note: It should be noted that the scheduling of the threads ‘producer_thread’ and ‘consumer_thread’ is, OS kernel scheduling policy dependent and you may not get the same output all the time when you run this, piece of code under Windows NT kernel (Say Windows 10 OS).
Page 483 :
Real-Time Opera ng System (RTOS) based Embedded System Design, , Fig. 10.29, , 459, , Output of Win32 program illustrating producer consumer problem, , The producer-consumer problem can be rectified in various methods. One simple solution is the ‘sleep and, wake-up’. The ‘sleep and wake-up’ can be implemented in various process synchronisation techniques like, semaphores, mutex, monitors, etc. We will discuss it in a latter section of this chapter., , 10.8.1.5 Readers-Writers Problem, The Readers-Writers problem is a common issue observed in processes competing for limited shared resources., The Readers-Writers problem is characterised by multiple processes trying to read and write shared data, concurrently. A typical real-world example for the Readers-Writers problem is the banking system where one, process tries to read the account information like available balance and the other process tries to update the, available balance for that account. This may result in inconsistent results. If multiple processes try to read, a shared data concurrently it may not create any impacts, whereas when multiple processes try to write and, read concurrently it will definitely create inconsistent results. Proper synchronisation techniques should be, applied to avoid the readers-writers problem. We will discuss about the various synchronisation techniques, in a later section of this chapter., , 10.8.1.6 Priority Inversion, Priority inversion is the byproduct of the combination of blocking based (lock based) process synchronisation, and pre-emptive priority scheduling. ‘Priority inversion’ is the condition in which a high priority task needs
Page 484 :
460, , Introduc on to Embedded Systems, , to wait for a low priority task to release a resource which is shared between the high priority task and the low, priority task, and a medium priority task which doesn’t require the shared resource continue its execution by, preempting the low priority task (Fig. 10.30). Priority based preemptive scheduling technique ensures that a, high priority task is always executed first, whereas the lock based process synchronisation mechanism (like, mutex, semaphore, etc.) ensures that a process will not access a shared resource, which is currently in use by, another process. The synchronisation technique is only interested in avoiding conflicts that may arise due to, the concurrent access of the shared resources and not at all bothered about the priority of the process which, tries to access the shared resource. In fact, the priority based preemption and lock based synchronisation are, the two contradicting OS primitives. Priority inversion is better explained with the following scenario:, , Process A finishes execution, and Process C continues its execution, , Running, Process C releases shared, resource and Process A acquires, it and starts execution, , Process B completes execution and, Process C is picked up for execution, since Process A is blocked by Resource, which is currently being accessed by, Process C, , Process A tries to access the, shared resource which is, currently being accessed by, Process C, , Process A enters ‘Ready', state and preempts Process B, , Process B enters ‘Ready’, state and preempts Process C, , Variable, , Process C acquires the shared, , Processes, , Waiting, , Delay in execution of Process A, happened due to ‘Priority Inversion, , Process A, , Running, , Blocked by Resource, , Running, , (High Priority), , Process B, , Running, , (Med Priority), , Process C, (Low Priority), , Running, , ‘Ready’, , Running, , Waits in ‘Ready’ Queue, , Running, , ‘Ready’, , Running, , Time, , Fig. 10.30, , Priority Inversion Problem, , Let Process A, Process B and Process C be three processes with priorities High, Medium and Low, respectively. Process A and Process C share a variable ‘X’ and the access to this variable is synchronised, through a mutual exclusion mechanism like Binary Semaphore S. Imagine a situation where Process C is, ready and is picked up for execution by the scheduler and ‘Process C’ tries to access the shared variable ‘X’., ‘Process C’ acquires the ‘Semaphore S’ to indicate the other processes that it is accessing the shared variable, ‘X’. Immediately after ‘Process C’ acquires the ‘Semaphore S’, ‘Process B’ enters the ‘Ready’ state. Since, ‘Process B’ is of higher priority compared to ‘Process C’, ‘Process C’ is preempted and ‘Process B’ starts, executing. Now imagine ‘Process A’ enters the ‘Ready’ state at this stage. Since ‘Process A’ is of higher, priority than ‘Process B’, ‘Process B’ is preempted and ‘Process A’ is scheduled for execution. ‘Process A’, involves accessing of shared variable ‘X’ which is currently being accessed by ‘Process C’. Since ‘Process, C’ acquired the semaphore for signalling the access of the shared variable ‘X’, ‘Process A’ will not be able, to access it. Thus ‘Process A’ is put into blocked state (This condition is called Pending on resource). Now, ‘Process B’ gets the CPU and it continues its execution until it relinquishes the CPU voluntarily or enters a, wait state or preempted by another high priority task. The highest priority process ‘Process A’ has to wait, till ‘Process C’ gets a chance to execute and release the semaphore. This produces unwanted delay in the, execution of the high priority task which is supposed to be executed immediately when it was ‘Ready’., Priority inversion may be sporadic in nature but can lead to potential damages as a result of missing, critical deadlines. Literally speaking, priority inversion ‘inverts’ the priority of a high priority task with that
Page 485 :
461, , Real-Time Opera ng System (RTOS) based Embedded System Design, , of a low priority task. Proper workaround mechanism should be adopted for handling the priority inversion, problem. The commonly adopted priority inversion workarounds are:, , Process A, , Running, , (High Priority), , Process B, , Running, , (Med Priority), , Process C, (Low Priority), , Running, , Delay in, execution, of Process, A, happened, due to, ‘resource, waiting’, , Process B completes its execution., Process C starts executing, , Waiting, Running, , Running, , Waits in ‘Ready’ Queue, , Waits in ‘Ready’ Queue, , Process A completes its execution. Process B, starts executing since it is of higher priority, compared to Process C, , Process C releases the shared resource., Priority of Process C is lowered to its, original value. Process A starts executing, since it is of highest priority, , Process A tries to access the shared, resource which is currently being, acquired by Process C. Priority, of Process C is increased to High, , Process A enters ‘Ready', state and preempts Process B, , Process B enters ‘Ready', state and preempts Process C, , Process C acquires the shared, Variable, , Processes, , Priority Inheritance: A low-priority task that is currently accessing (by holding the lock) a shared resource, requested by a high-priority task temporarily ‘inherits’ the priority of that high-priority task, from the moment, the high-priority task raises the request. Boosting the priority of the low priority task to that of the priority, of the task which requested the shared resource holding by the low priority task eliminates the preemption, of the low priority task by other tasks whose priority are below that of the task requested the shared resource, and thereby reduces the delay in waiting to get the resource requested by the high priority task. The priority, of the low priority task which is temporarily boosted to high is brought to the original value when it releases, the shared resource. Implementation of Priority inheritance workaround in the priority inversion problem, discussed for Process A, Process B and Process C example will change the execution sequence as shown in, Fig. 10.31., , Running, , Running, Waits in ‘Ready’ Queue, , Running, , Time, , Fig. 10.31, , Handling Priority Inversion Problem with Priority Inheritance, , Priority inheritance is only a work around and it will not eliminate the delay in waiting the high priority, task to get the resource from the low priority task. The only thing is that it helps the low priority task to, continue its execution and release the shared resource as soon as possible. The moment, at which the low, priority task releases the shared resource, the high priority task kicks the low priority task out and grabs the, CPU – A true form of selfishness☺. Priority inheritance handles priority inversion at the cost of run-time, overhead at scheduler. It imposes the overhead of checking the priorities of all tasks which tries to access, shared resources and adjust the priorities dynamically., Priority Ceiling: In ‘Priority Ceiling’, a priority is associated with each shared resource. The priority, associated to each resource is the priority of the highest priority task which uses this shared resource. This, priority level is called ‘ceiling priority’. Whenever a task accesses a shared resource, the scheduler elevates the, priority of the task to that of the ceiling priority of the resource. If the task which accesses the shared resource, is a low priority task, its priority is temporarily boosted to the priority of the highest priority task to which the
Page 486 :
462, , Introduc on to Embedded Systems, , resource is also shared. This eliminates the pre-emption of the task by other medium priority tasks leading, to priority inversion. The priority of the task is brought back to the original level once the task completes, the accessing of the shared resource. ‘Priority Ceiling’ brings the added advantage of sharing resources, without the need for synchronisation techniques like locks. Since the priority of the task accessing a shared, resource is boosted to the highest priority of the task among which the resource is shared, the concurrent, access of shared resource is automatically handled. Another advantage of ‘Priority Ceiling’ technique is that, all the overheads are at compile time instead of run-time. Implementation of ‘priority ceiling’ workaround, in the priority inversion problem discussed for Process A, Process B and Process C example will change the, execution sequence as shown in Fig. 10.32., , Process B, Process C, (Low Priority), , Process B completes its execution., Process C starts executing, , Process A completes its execution and, Process B is scheduled for execution, , Running, , (High Priority), (Med Priority), , Process A releases the shared Resource, , Process A enters ‘Ready’, state and preempts Process B, , Process A, , Process A acquires the, shared resource, , Running, , Process C releases the shared variable and its, priority is brought back to original. Process B, in ‘Ready’ queue preempts Process C, , Process B enters the ‘Ready' state, and waits in ‘Ready’ Queue, , Process C acquires the shared, Variable and its Priority is, Sealed to that of Process A, , Processes, , Waiting, , ‘Ready’, , Running, , Running, , Running, , Waits in ‘Ready’ Queue, Waits in ‘Ready’ Queue, , Running, , Time, , Fig. 10.32, , Handling Priority Inversion Problem with Priority Ceiling, , The biggest drawback of ‘Priority Ceiling’ is that it may produce hidden priority inversion. With ‘Priority, Ceiling’ technique, the priority of a task is always elevated no matter another task wants the shared resources., This unnecessary priority elevation always boosts the priority of a low priority task to that of the highest, priority tasks among which the resource is shared and other tasks with priorities higher than that of the low, priority task is not allowed to preempt the low priority task when it is accessing a shared resource. This, always gives the low priority task the luxury of running at high priority when accessing shared resources☺., , 10.8.2, , Task Synchronisation Techniques, , So far we discussed about the various task/process synchronisation issues encountered in multitasking, systems due to concurrent resource access. Now let’s have a discussion on the various techniques used for, synchronisation in concurrent access in multitasking. Process/Task synchronisation is essential for, 1. Avoiding conflicts in resource access (racing, deadlock, starvation, livelock, etc.) in a multitasking, environment.
Page 487 :
Real-Time Opera ng System (RTOS) based Embedded System Design, , 463, , 2. Ensuring proper sequence of operation across processes. The producer consumer problem is a typical, example for processes requiring proper sequence of operation. In producer consumer problem, accessing, the shared buffer by different processes is not the issue, the issue is the writing process should write, to the shared buffer only if the buffer is not full and the consumer thread should not read from the, buffer if it is empty. Hence proper synchronisation should be provided to implement this sequence of, operations., 3. Communicating between processes., The code memory area which holds the program instructions (piece of code) for accessing a shared, resource (like shared memory, shared variables, etc.) is known as ‘critical section’. In order to synchronise, the access to shared resources, the access to the critical section should be exclusive. The exclusive access to, critical section of code is provided through mutual exclusion mechanism. Let us have a look at how mutual, exclusion is important in concurrent access. Consider two processes Process A and Process B running on, a multitasking system. Process A is currently running and it enters its critical section. Before Process A, completes its operation in the critical section, the scheduler preempts Process A and schedules Process B, for execution (Process B is of higher priority compared to Process A). Process B also contains the access to, the critical section which is already in use by Process A. If Process B continues its execution and enters the, critical section which is already in use by Process A, a racing condition will be resulted. A mutual exclusion, policy enforces mutually exclusive access of critical sections., Mutual exclusions can be enforced in different ways. Mutual exclusion blocks a process. Based on the, behaviour of the blocked process, mutual exclusion methods can be classified into two categories. In the, following section we will discuss them in detail., , 10.8.2.1 Mutual Exclusion through Busy Wai ng/Spin Lock, ‘Busy waiting’ is the simplest method for enforcing mutual exclusion. The following code snippet illustrates, how ‘Busy waiting’ enforces mutual exclusion., //Inside parent thread/main thread corresponding to a process, bool bFlag; //Global declaration of lock Variable., bFlag= FALSE; //Initialise the lock to indicate it is available., //………………………………………………………………………………………………………………………………………………, //Inside the child threads/threads of a process, while(bFlag == TRUE); //Check the lock for availability, bFlag=TRUE; //Lock is available. Acquire the lock, //Rest of the source code dealing with shared resource access, , The ‘Busy waiting’ technique uses a lock variable for implementing mutual exclusion. Each process/, thread checks this lock variable before entering the critical section. The lock is set to ‘1’ by a process/, thread if the process/thread is already in its critical section; otherwise the lock is set to ‘0’. The major, challenge in implementing the lock variable based synchronisation is the non-availability of a single atomic, instruction¶ which combines the reading, comparing and setting of the lock variable. Most often the three, different operations related to the locks, viz. the operation of Reading the lock variable, checking its present, value and setting it are achieved with multiple low level instructions. The low level implementation of these, operations are dependent on the underlying processor instruction set and the (cross) compiler in use. The, low level implementation of the ‘Busy waiting’ code snippet, which we discussed earlier, under Windows, 10 Operating system running on an Intel i7 dual core Processor is given below. The code snippet is compiled, with Microsoft Visual Studio 2013 compiler., ¶ Atomic Instruction: Instruction whose execution is uninterruptible.
Page 488 :
464, , Introduc on to Embedded Systems, , --- d:\es\samples\rev1\counter.cpp --------------------------------------1:, #include “stdafx.h”, 2:, #include <stdio.h>, 3:, #include <windows.h>, 4:, 5:, int main(), 6:, {, //Code memory, Opcode, Operand, 00A21380, push, ebp, 00A21381, mov, ebp,esp, 00A21383, sub, esp,0CCh, 00A21389, push, ebx, 00A2138A, push, esi, 00A2138B, push, edi, 00A2138C, lea, edi,[ebp+FFFFFF34h], 00A21392, mov, ecx,33h, 00A21397, mov, eax,0CCCCCCCCh, 00A2139C, rep stos, dword ptr es:[edi], 7:, //Inside parent thread/ main thread corresponding to a process, 8:, bool bFlag; //Global declaration of lock Variable., 9:, bFlag = FALSE; //Initialise the lock to indicate it is available., 00A2139E, mov, byte ptr [ebp-5],0, 10: //………………………………………………………………………………………………………………………………………………, 11: //Inside the child threads/ threads of a process, 12: while (bFlag == TRUE); //Check the lock for availability, 00A213A2, movzx, eax,byte ptr [ebp-5], 00A213A6, cmp, eax,1, 00A213A9, jne, main+2Dh (0A213ADh), 00A213AB, jmp, main+22h (0A213A2h), 13: bFlag = TRUE; //Lock is available. Acquire the lock, 00A213AD, mov, byte ptr [ebp-5],1, 14: //Rest of the source code dealing with shared resource access, , The assembly language instructions reveals that the two high level instructions (while(bFlag==false);, and bFlag=true;), corresponding to the operation of reading the lock variable, checking its present value, and setting it is implemented in the processor level using five low level instructions. Imagine a hypothetical, situation where ‘Process 1’ read the lock variable and tested it and found that the lock is available and it is, about to set the lock for acquiring the critical section (Fig. 10.33). But just before ‘Process 1’ sets the lock, variable, ‘Process 2’ preempts ‘Process 1’ and starts executing. ‘Process 2’ contains a critical section code, and it tests the lock variable for its availability. Since ‘Process 1’ was unable to set the lock variable, its state, is still ‘0’ and ‘Process 2’ sets it and acquires the critical section. Now the scheduler preempts ‘Process 2’ and, schedules ‘Process 1’ before ‘Process 2’ leaves the critical section. Remember, ‘Process 1’ was preempted at, a point just before setting the lock variable (‘Process 1’ has already tested the lock variable just before it is, preempted and found that the lock is available). Now ‘Process 1’ sets the lock variable and enters the critical, section. It violates the mutual exclusion policy and may produce unpredicted results., The above issue can be effectively tackled by combining the actions of reading the lock variable, testing, its state and setting the lock into a single step. This can be achieved with the combined hardware and software, support. Most of the processors support a single instruction ‘Test and Set Lock (TSL)’ for testing and setting
Page 490 :
466, , Introduc on to Embedded Systems, , The process/thread checks the lock variable to see whether its state is ‘0’ and sets its state to ‘1’ if its, state is ‘0’, for acquiring the lock. To implement this at the 486 processor level, load the accumulator with, ‘0’ and a general purpose register with ‘1’ and compare the memory location holding the lock variable with, accumulator using CMPXCHG instruction. This instruction makes the accessing, testing and modification of, the lock variable a single atomic instruction. How the CMPXCHG instruction support provided by the Intel®, family of processors (486 and above) is made available to processes/threads is OS kernel implementation, dependent. Let us see how this feature is implemented by Windows Operating systems. Windows Embedded, Compact/Windows NT kernels support the compare and exchange hardware feature provided by Intel®, family of processors, through the API call InterlockedCompareExchange (LPLONG Destination, LONG, Exchange, LONG Comperand). The variable Destination is the long pointer to the destination variable. The, Destination variable should be of type ‘long’. The variable Exchange represents the exchange value. The, value of Destination variable is replaced with the value of Exchange variable. The variable Comperand, specifies the value which needs to be compared with the value of Destination variable. The function returns, the initial value of the variable ‘Destination’. The following code snippet illustrates the usage of this API call, for thread/process synchronisation., //Inside parent thread/ main thread corresponding to a process, long bFlag; //Global declaration of lock Variable., bFlag=0; //Initialise the lock to indicate it is available., //………………………………………………………………………………………………………………………………………………………………………………, //Inside the child threads/ threads of a process, //Check the lock for availability & acquire the lock if available., while (InterlockedCompareExchange (&bFlag, 1, 0) == 1);, //Rest of the source code dealing with shared resource access, , The InterlockedCompareExchange function is implemented as ‘Compiler intrinsic function’. The ‘code, for Compiler intrinsic functions’ are inserted inline while compiling the code. This avoids the function call, overhead and makes use of the built-in knowledge of the optimisation technique for intrinsic functions. The, compiler can be instructed to use the intrinsic implementation for a function using the compiler directive, #pragma intrinsic (intrinsic-function-name). A sample implementation of the InterlockedCompareExchange, interlocked intrinsic function for desktop Windows OS is given below., #include “stdafx.h”, #include <intrin.h>, #include <windows.h>, long bFlag; //Global declaration of lock Variable., //Declare InterlockedCompareExchange as intrinsic function, #pragma intrinsic(_InterlockedCompareExchange), void child_thread(void), {, //Inside the child thread of a process, //Check the lock for availability & acquire the lock if available., //The lock can be set by any other threads, while (_InterlockedCompareExchange (&bFlag, 1, 0) == 1);, //Rest of the source code dealing with shared resource access, //..................................................................., return;
Page 492 :
468, , Introduc on to Embedded Systems, , The Intel 486 and above family of processors provide hardware level support for atomic execution of, increment and decrement operations also. The XADD low level instruction implements atomic execution of, increment and decrement operations. Windows Embedded Compact/NT kernel makes these features available, to the users through a set of Interlocked function API calls. The API call InterlockedIncrement (LPLONG, lpAddend) increments the value of the variable pointed by lpAddend and the API InterlockedDecrement, (LPLONG lpAddend) decrements the value of the variable pointed by lpAddend., The lock based mutual exclusion implementation always checks the state of a lock and waits till the lock, is available. This keeps the processes/threads always busy and forces the processes/threads to wait for the, availability of the lock for proceeding further. Hence this synchronisation mechanism is popularly known, as ‘Busy waiting’. The ‘Busy waiting’ technique can also be visualised as a lock around which the process/, thread spins, checking for its availability. Spin locks are useful in handling scenarios where the processes/, threads are likely to be blocked for a shorter period of time on waiting the lock, as they avoid OS overheads, on context saving and process re-scheduling. Another drawback of Spin lock based synchronisation is that if, the lock is being held for a long time by a process and if it is preempted by the OS, the other threads waiting, for this lock may have to spin a longer time for getting it. The ‘Busy waiting’ mechanism keeps the process/, threads always active, performing a task which is not useful and leads to the wastage of processor time and, high power consumption., The interlocked operations are the most efficient synchronisation primitives when compared to the classic, lock based synchronisation mechanism. Interlocked function based synchronisation technique brings the, following value adds., ∑ The interlocked operation is free from waiting. Unlike the mutex, semaphore and critical section, synchronisation objects which may require waiting on the object, if they are not available at the time of, request, the interlocked function simply performs the operation and returns immediately. This avoids, the blocking of the thread which calls the interlocked function., ∑ The interlocked function call is directly converted to a processor specific instruction and there is no user, mode to kernel mode transition as in the case of mutex, semaphore and critical section objects. This, avoids the user mode to kernel mode transition delay and thereby increases the overall performance., The types of interlocked operations supported by an OS are underlying processor hardware dependent and, so they are limited in functionality. Normally the bit manipulation (Boolean) operations are not supported, by interlocked functions. Also the interlocked operations are limited to integer or pointer variables only., This limits the possibility of extending the interlocked functions to variables of other types. Under windows, operating systems, each process has its own virtual address space and so the interlocked functions can only, be used for synchronising the access to a variable that is shared by multiple threads of a process (Multiple, threads of a process share the same address space) (Intra Process Synchronisation). The interlocked functions, can be extended for synchronising the access of the variables shared across multiple processes if the variable, is kept in shared memory., , 10.8.2.2 Mutual Exclusion through Sleep & Wakeup, The ‘Busy waiting’ mutual exclusion enforcement mechanism used by processes makes the CPU always busy, by checking the lock to see whether they can proceed. This results in the wastage of CPU time and leads to, high power consumption. This is not affordable in embedded systems powered on battery, since it affects, the battery backup time of the device. An alternative to ‘busy waiting’ is the ‘Sleep & Wakeup’ mechanism., When a process is not allowed to access the critical section, which is currently being locked by another
Page 493 :
Real-Time Opera ng System (RTOS) based Embedded System Design, , 469, , process, the process undergoes ‘Sleep’ and enters the ‘blocked’ state. The process which is blocked on waiting, for access to the critical section is awakened by the process which currently owns the critical section. The, process which owns the critical section sends a wakeup message to the process, which is sleeping as a result, of waiting for the access to the critical section, when the process leaves the critical section. The ‘Sleep &, Wakeup’ policy for mutual exclusion can be implemented in different ways. Implementation of this policy is, OS kernel dependent. The following section describes the important techniques for ‘Sleep & Wakeup’ policy, implementation for mutual exclusion by Windows NT/CE OS kernels., Semaphore Semaphore is a sleep and wakeup based mutual exclusion implementation for shared resource, access. Semaphore is a system resource and the process which wants to access the shared resource can first, acquire this system object to indicate the other processes which wants the shared resource that the shared, resource is currently acquired by it. The resources which are shared among a process can be either for, exclusive use by a process or for using by a number of processes at a time. The display device of an embedded, system is a typical example for the shared resource which needs exclusive access by a process. The Hard, disk (secondary storage) of a system is a typical example for sharing the resource among a limited number, of multiple processes. Various processes can access the different sectors of the hard-disk concurrently., Based on the implementation of the sharing limitation of the shared resource, semaphores are classified, into two; namely ‘Binary Semaphore’ and ‘Counting Semaphore’. The binary semaphore provides exclusive, access to shared resource by allocating the resource to a single process at a time and not allowing the other, processes to access it when it is being owned by a process. The implementation of binary semaphore is OS, kernel dependent. Under certain OS kernel it is referred as mutex. Unlike a binary semaphore, the ‘Counting, Semaphore’ limits the access of resources by a fixed number of processes/threads. ‘Counting Semaphore’, maintains a count between zero and a maximum value. It limits the usage of the resource to the maximum, value of the count supported by it. The state of the counting semaphore object is set to ‘signalled’ when the, count of the object is greater than zero. The count associated with a ‘Semaphore object’ is decremented by, one when a process/thread acquires it and the count is incremented by one when a process/thread releases, the ‘Semaphore object’. The state of the ‘Semaphore object’ is set to non-signalled when the semaphore is, acquired by the maximum number of processes/threads that the semaphore can support (i.e. when the count, associated with the ‘Semaphore object’ becomes zero). A real world example for the counting semaphore, concept is the dormitory system for accommodation (Fig. 10.34). A dormitory contains a fixed number of, beds (say 5) and at any point of time it can be shared by the maximum number of users supported by the, dormitory. If a person wants to avail the dormitory facility, he/she can contact the dormitory caretaker for, checking the availability. If beds are available in the dorm the caretaker will hand over the keys to the user. If, beds are not available currently, the user can register his/her name to get notifications when a slot is available., Those who are availing the dormitory shares the dorm facilities like TV, telephone, toilet, etc. When a dorm, user vacates, he/she gives the keys back to the caretaker. The caretaker informs the users, who booked in, advance, about the dorm availability.
Page 494 :
470, , Introduc on to Embedded Systems, , Semaphore object unavailable. Sleep till, Semaphore object is available, , Process A, , Room(Key) unavailable., Wait till it is available, Is Semaphore object, available?, Is Key Available ?, , m, ble roo, e, aila ared, v, abl, ail ion, y Ahe sh, v, e, a, t, K yt, t sec, jec, cup, ob itical, e, Oc, r, r, o, ph the c, ma, Se quire, Ac, , Shared Memory, (Critical Section), Vacating the Room. Return the Key. Notify, the availability to other users booked the Room, Leaving critical section . Release the Semaphore object., Wakeup the Sleeping Processes, , Fig. 10.34, , The Concept of Counting Semaphore, , The creation and usage of ‘counting semaphore object’ is OS kernel dependent. Let us have a look at how, we can implement semaphore based synchronisation for the ‘Racing’ problem we discussed in the beginning,, under the Windows kernel. The following code snippet explains the same., ##include “stdafx.h”, #include <stdio.h>, #include <windows.h>, #define MAX_SEMAPHORE_COUNT 1, //Make the semaphore object for exclusive use, #define thread_count 2, //No.of Child Threads, //*******************************************************************, //counter is an integer variable and Buffer is a byte array shared //between, two threads Process_A and Process_B, char Buffer[10] = { 1,2,3,4,5,6,7,8,9,10 };, short int counter = 0;, //Define the handle to Semaphore object, HANDLE hSemaphore;, //*******************************************************************, // Child Thread 1, void Process_A(void) {
Page 495 :
Real-Time Opera ng System (RTOS) based Embedded System Design, , 471, , int i;, for (i = 0; i<5; i++), {, if (Buffer[i] > 0), {, //Wait for the signaling of Semaphore object, WaitForSingleObject(hSemaphore, INFINITE);, //Semaphore is acquired, counter++;, printf(“Process A : Counter = %d\n”, counter);, //Release the Semaphore Object, if (!ReleaseSemaphore(, hSemaphore, // handle to semaphore, 1, // increase count by one, NULL)) // not interested in previous count, {, //Semaphore Release failed. Print Error code & return., printf(“Release Semaphore Failed with Error Code : %d\n”,, GetLastError());, return;, }, }, }, return;, }, //*******************************************************************, // Child Thread 2, void Process_B(void) {, int j;, for (j = 5; j<10; j++), {, if (Buffer[j] > 0), {, //Wait for the signalling of Semaphore object, WaitForSingleObject(hSemaphore, INFINITE);, //Semaphore is acquired, counter++;, printf(“Process B : Counter = %d\n”, counter);, //Release Semaphore, if (!ReleaseSemaphore(, hSemaphore, // handle to semaphore, 1, // increase count by one, NULL)) // not interested in previous count, {, //Semaphore Release failed. Print Error code &, //return., printf(“Release Semaphore Failed Error Code : %d\n”, GetLastError());, return;
Page 497 :
Real-Time Opera ng System (RTOS) based Embedded System Design, , 473, , CloseHandle(hSemaphore);, return;, }, , Please refer to the Online Learning Centre for details on the various Win32 APIs used in the program for, counting semaphore creation, acquiring, signalling, and releasing. The VxWorks and MicroC/OS-II RealTime kernels also implements the Counting semaphore based task synchronisation/shared resource access., We will discuss them in detail in a later chapter., Counting Semaphores are similar to Binary Semaphores in operation. The only difference between, Counting Semaphore and Binary Semaphore is that Binary Semaphore can only be used for exclusive access,, whereas Counting Semaphores can be used for both exclusive access (by restricting the maximum count, value associated with the semaphore object to one (1) at the time of creation of the semaphore object) and, limited access (by restricting the maximum count value associated with the semaphore object to the limited, number at the time of creation of the semaphore object)., Binary Semaphore (Mutex) Binary Semaphore (Mutex) is a synchronisation object provided by OS for, process/thread synchronisation. Any process/thread can create a ‘mutex object’ and other processes/threads, of the system can use this ‘mutex object’ for synchronising the access to critical sections. Only one process/, thread can own the ‘mutex object’ at a time. The state of a mutex object is set to signalled when it is not, owned by any process/thread, and set to non-signalled when it is owned by any process/thread. A real world, example for the mutex concept is the hotel accommodation system (lodging system) Fig. 10.35. The rooms, in a hotel are shared for the public. Any user who pays and follows the norms of the hotel can avail the, Mutex object unavailable. Sleep till, Mutex object is available, , Process A, , Room (Key) unavailable., Book & Wait till it is available, Is Mutex object available?, Is Room (Key) Available?, lable, Avai, Key y the room, p, lable n, Occu, t avai, o, objec tical secti, x, e, t, Mu, e cri, h, t, e, r, i, Acqu, , Shared Memory, (Critical Section), , Leaving critical section. Release the Mutex object., Wakeup the Sleeping Processes, Vacating the Room. Return the Key. Notify, the availability to other users who booked the Room, , Fig. 10.35, , The Concept of Binary Semaphore (Mutex)
Page 498 :
474, , Introduc on to Embedded Systems, , rooms for accommodation. A person wants to avail the hotel room facility can contact the hotel reception, for checking the room availability (see Fig. 10.35). If room is available the receptionist will handover the, room key to the user. If room is not available currently, the user can book the room to get notifications when, a room is available. When a person gets a room he/she is granted the exclusive access to the room facilities, like TV, telephone, toilet, etc. When a user vacates the room, he/she gives the keys back to the receptionist., The receptionist informs the users, who booked in advance, about the room’s availability., Let’s see how we can implement mutual exclusion with mutex object in the ‘Racing’ problem example, given under the section ‘Racing’, under Windows kernel., #include “stdafx.h”, #include <stdio.h>, #include <windows.h>, #define thread_count 2 //No.of Child Threads, //*******************************************************************, //counter is an integer variable and Buffer is a byte array shared, //between two, //threads Process_A and Process_B, char Buffer[10] = { 1,2,3,4,5,6,7,8,9,10 };, short int counter = 0;, //Define the handle to Mutex Object, HANDLE hMutex;, //*******************************************************************, // Child Thread 1, void Process_A(void) {, int i;, for (i = 0; i<5; i++), {, if (Buffer[i] > 0), {, //Wait for signaling of the Mutex object, WaitForSingleObject(hMutex, INFINITE);, //Mutex is acquired, counter++;, printf(“Process A : Counter = %d\n”, counter);, //Release the Mutex Object, if (!ReleaseMutex(hMutex)) // handle to Mutex Object, {, //Mutex object Releasing failed. Print Error code & return., printf(“Release Mutex Failed with Error Code : %d\n”, GetLastError());, return;, }, }, }, return;, }, //*******************************************************************, // Child Thread 2, void Process_B(void) {
Page 500 :
476, , Introduc on to Embedded Systems, , if (NULL == child_threads[i]), {, //Child thread creation failed., printf(“Child thread Creation failed with Error Code : %d”, GetLastError());, return;, }, }, // Wait for the termination of child threads, WaitForMultipleObjects(thread_count, child_threads, TRUE, INFINITE);, //Close child thread handles, for (i = 0; i < thread_count; i++), {, CloseHandle(child_threads[i]);, }, //Close Mutex object handle, CloseHandle(hMutex);, return;, }, , Please refer to the Online Learning Centre for details on the various Win32 APIs used in the program for, mutex creation, acquiring, signalling, and releasing., The mutual exclusion semaphore is a special implementation of the binary semaphore by certain real-time, operating systems like VxWorks and MicroC/OS-II to prevent priority inversion problems in shared resource, access. The mutual exclusion semaphore has an option to set the priority of a task owning it to the highest, priority of the task which is being pended while attempting to acquire the semaphore which is already in, use by a low priority task. This ensures that the low priority task which is currently holding the semaphore,, when a high priority task is waiting for it, is not pre-empted by a medium priority task. This is the mechanism, supported by the mutual exclusion semaphore to prevent priority inversion., VxWorks kernel also supports binary semaphores for synchronising shared resource access. We will, discuss about it in detail in a later chapter., Cri cal Sec on Objects In Windows Embedded Compact, the ‘Critical Section object’ is same as the ‘mutex, object’ except that ‘Critical Section object’ can only be used by the threads of a single process (Intra process)., The piece of code which needs to be made as ‘Critical Section’ is placed at the ‘Critical Section’ area by the, process. The memory area which is to be used as the ‘Critical Section’ is allocated by the process. The process, creates a ‘Critical Section’ area by creating a variable of type CRITICAL_SECTION. The Critical Section’, must be initialised before the threads of a process can use it for getting exclusive access. The InitialiseCritica, lSection(LPCRITICAL_SECTION lpCriticalSection) API initialises the critical section pointed by the pointer, lpCriticalSection to the critical section. Once the critical section is initialised, all threads in the process, can use it. Threads can use the API call EnterCriticalSection (LPCRITICAL_SECTION lpCriticalSection), for getting the exclusive ownership of the critical section pointed by the pointer lpCriticalSection. Calling, the EnterCriticalSection() API blocks the execution of the caller thread if the critical section is already in, use by other threads and the thread waits for the critical section object. Threads which are blocked by the, EnterCriticalSection() call, waiting on a critical section are added to a wait queue and are woken when, the critical section is available to the requested thread. The API call TryEnterCriticalSection(LPCRITICA, L_SECTION lpCriticalSection) attempts to enter the critical section pointed by the pointer lpCriticalSection, without blocking the caller thread. If the critical section is not in use by any other thread, the calling thread, gets the ownership of the critical section. If the critical section is already in use by another thread, the
Page 501 :
Real-Time Opera ng System (RTOS) based Embedded System Design, , 477, , TryEnterCriticalSection() call indicates it to the caller thread by a specific return value and the thread, resumes its execution. A thread can release the exclusive ownership of a critical section by calling the API, LeaveCriticalSection(LPCR-ITICAL_SECTION lpCriticalSection). The threads of a process can use the API, DeleteCriticalSection (LPCRITICAL_SECTION lpCriticalSection) to release all resources used by a critical, section object which was created by the process with the CRITICAL_SECTION variable., Now let’s have a look at the ‘Racing’ problem we discussed under the section ‘Racing’. The racing, condition can be eliminated by using a critical section object for synchronisation. The following code snippet, illustrates the same., ##include “stdafx.h”, #include <stdio.h>, #include <windows.h>, //*******************************************************************, //counter is an integer variable and Buffer is a byte array shared, //between two threads, char Buffer[10] = { 1,2,3,4,5,6,7,8,9,10 };, short int counter = 0;, //Define the critical section, CRITICAL_SECTION CS;, //*******************************************************************, // Child Thread 1, void Process_A(void) {, int i;, for (i = 0; i<5; i++), {, if (Buffer[i] > 0), {, //Use critical section object for synchronisation, EnterCriticalSection(&CS);, counter++;, LeaveCriticalSection(&CS);, }, printf(“Process A : Counter = %d\n”, counter);, }, }, //*******************************************************************, // Child Thread 2, void Process_B(void) {, int j;, for (j = 5; j<10; j++), {, if (Buffer[j] > 0), {, //Use critical section object for synchronisation, EnterCriticalSection(&CS);, counter++;, LeaveCriticalSection(&CS);, }
Page 502 :
478, , Introduc on to Embedded Systems, , printf(“Process B : Counter = %d\n”, counter);, }, }, //*******************************************************************, // Main Thread, int main() {, DWORD id;, //Initialise critical section object, InitialiseCriticalSection(&CS);, CreateThread(NULL, 0, (LPTHREAD_START_ROUTINE)Process_A, (LPVOID)0, 0, &id);, CreateThread(NULL, 0, (LPTHREAD_START_ROUTINE)Process_B, (LPVOID)0, 0, &id);, Sleep(100000);, return 0;, }, , Here the shared resource is the shared variable ‘counter’. The concurrent access to this variable by the, threads ‘Process_A’ and ‘Process_B’ may create race condition and may produce incorrect results. The, critical section object ‘CS’ holds the piece of code corresponding to the access of the shared variable ‘counter’, by each threads. This ensures that the memory area containing the low level instructions corresponding to, the high level instruction ‘counter++’ is accessed exclusively by threads ‘Process_A’ and ‘Process_B’ and, avoids a race condition. The output of the above piece of code when executed on an Intel Centrino Duo, processor running Windows XP OS is given in Fig. 10.36., , Fig. 10.36, , Output of the Win32 application resolving racing condition through critical section object, , The final value of ‘counter’ is obtained as 10, which is the expected result for this piece of code. If you, observe this output window you can see that the text is not outputted to the o/p window in the expected, manner. The printf () library routine used in this sample code is re-entrant and it can be preempted while in, execution. That is why the outputting of text happened in a non expected way., Note: It should be noted that the scheduling of the threads ‘Process_A’ and ‘Process_B’ is OS kernel, scheduling policy dependent and you may not get the same output all the time when you run this piece of, code under Windows XP.
Page 503 :
Real-Time Opera ng System (RTOS) based Embedded System Design, , 479, , The critical section object makes the piece of code residing inside it non-reentrant. Now let’s try the above, piece of code by putting the printf () library routine in the critical section object., ##include “stdafx.h”, #include <stdio.h>, #include <windows.h>, //*******************************************************************, //counter is an integer variable and Buffer is a byte array shared, //between two threads, char Buffer[10] = { 1,2,3,4,5,6,7,8,9,10 };, short int counter = 0;, //Define the critical section, CRITICAL_SECTION CS;, //*******************************************************************, // Child Thread 1, void Process_A(void) {, int i;, for (i = 0; i<5; i++), {, if (Buffer[i] > 0), {, //Use critical section object for synchronisation, EnterCriticalSection(&CS);, counter++;, printf(“Process A : Counter = %d\n”, counter);, LeaveCriticalSection(&CS);, }, }, }, //*******************************************************************, // Child Thread 2, void Process_B(void) {, int j;, for (j = 5; j<10; j++), {, if (Buffer[j] > 0), {, //Use critical section object for synchronisation, EnterCriticalSection(&CS);, counter++;, printf(“Process B : Counter = %d\n”, counter);, LeaveCriticalSection(&CS);, }, }
Page 504 :
480, , Introduc on to Embedded Systems, , }, //*******************************************************************, // Main Thread, int main() {, DWORD id;, //Initialise critical section object, InitialiseCriticalSection(&CS);, CreateThread(NULL, 0, (LPTHREAD_START_ROUTINE)Process_A, (LPVOID)0, 0, &id);, CreateThread(NULL, 0, (LPTHREAD_START_ROUTINE)Process_B, (LPVOID)0, 0, &id);, Sleep(100000);, return 0;, }, , The output of the above piece of code when executed on a Windows 10 machine is given below., , Fig. 10.37, , Output of the Win32 application resolving racing condition through critical section object, , Note: It should be noted that the scheduling of the threads ‘Process_A’ and ‘Process_B’ is OS kernel, scheduling policy dependent and you may not get the same output all the time when you run this piece of, code in Windows 10. The output of the above program when executed at three different instances of time, is given shown in Fig. 10.38., Events Event object is a synchronisation technique which uses the notification mechanism for, synchronisation. In concurrent execution we may come across situations which demand the processes to wait, for a particular sequence for its operations. A typical example of this is the producer consumer threads, where, the consumer thread should wait for the consumer thread to produce the data and producer thread should wait, for the consumer thread to consume the data before producing fresh data. If this sequence is not followed, it will end up in producer-consumer problem. Notification mechanism is used for handling this scenario., Event objects are used for implementing notification mechanisms. A thread/process can wait for an event, and another thread/process can set this event for processing by the waiting thread/process. The creation and, handling of event objects for notification is OS kernel dependent. Please refer to the Online Learning Centre, for information on the usage of ‘Events’ under Windows Kernel for process/thread synchronisation., The MicroC/OS-II kernel also uses ‘events’ for task synchronisation. We will discuss it in a later, chapter.
Page 505 :
Real-Time Opera ng System (RTOS) based Embedded System Design, , Fig. 10.38, , Illustration of scheduler behaviour under Windows NT (E.g. Windows 10) kernel, , 481
Page 506 :
482, , 10.9, , Introduc on to Embedded Systems, , DEVICE DRIVERS, , Device driver is a piece of software that acts as a bridge between the, operating system and the hardware. In an operating system based product, architecture, the user applications talk to the Operating System kernel for, all necessary information exchange including communication with the, hardware peripherals. The architecture of the OS kernel will not allow direct, device access from the user application. All the device related access should, flow through the OS kernel and the OS kernel routes it to the concerned, hardware peripheral. OS provides interfaces in the form of Application, Programming Interfaces (APIs) for accessing the hardware. The device, driver abstracts the hardware from user, applications. The topology of user applications, User Level Applications/Tasks, and hardware interaction in an RTOS based, App 1, App 2, App 3, system is depicted in Fig. 10.39., Device drivers are responsible for initiating, and managing the communication with the, hardware peripherals. They are responsible, Operating System Services, for establishing the connectivity, initialising, the hardware (setting up various registers of, Device Drivers, the hardware device) and transferring data. An, embedded product may contain different types, of hardware components like Wi-Fi module,, Hardware, File systems, Storage device interface, etc. The, initialisation of these devices and the protocols, required for communicating with these devices Fig. 10.39 Role of Device driver in Embedded OS based products, may be different. All these requirements are, implemented in drivers and a single driver will not be able to satisfy all these. Hence each hardware (more, specifically each class of hardware) requires a unique driver component., Certain drivers come as part of the OS kernel and certain drivers need to be installed on the fly. For example,, the program storage memory for an embedded product, say NAND Flash memory requires a NAND Flash, driver to read and write data from/to it. This driver should come as part of the OS kernel image. Certainly the, OS will not contain the drivers for all devices and peripherals under the Sun. It contains only the necessary, drivers to communicate with the onboard devices (Hardware devices which are part of the platform) and for, certain set of devices supporting standard protocols and device class (Say USB Mass storage device or HID, devices like Mouse/keyboard). If an external device, whose driver software is not available with OS kernel, image, is connected to the embedded device (Say a medical device with custom USB class implementation is, connected to the USB port of the embedded product), the OS prompts the user to instal its driver manually., Device drivers which are part of the OS image are known as ‘Built-in drivers’ or ‘On-board drivers’. These, drivers are loaded by the OS at the time of booting the device and are always kept in the RAM. Drivers which, need to be installed for accessing a device are known as ‘Installable drivers’. These drivers are loaded by the, OS on a need basis. Whenever the device is connected, the OS loads the corresponding driver to memory., When the device is removed, the driver is unloaded from memory. The Operating system maintains a record, of the drivers corresponding to each hardware., The implementation of driver is OS dependent. There is no universal implementation for a driver. How, the driver communicates with the kernel is dependent on the OS structure and implementation. Different, Operating Systems follow different implementations., LO 9 Analyse device, drivers, their role in, an operating system, based embedded system, design, the structure, of a device driver, and, interrupt handling, inside device drivers
Page 507 :
Real-Time Opera ng System (RTOS) based Embedded System Design, , 483, , It is very essential to know the hardware interfacing details like the memory address assigned to the, device, the Interrupt used, etc. of on-board peripherals for writing a driver for that peripheral. It varies on the, hardware design of the product. Some Real-Time operating systems like ‘Windows CE’ support a layered, architecture for the driver which separates out the low level implementation from the OS specific interface., The low level implementation part is generally known as Platform Dependent Device (PDD) layer. The OS, specific interface part is known as Model Device Driver (MDD) or Logical Device Driver (LDD). For a, standard driver, for a specific operating system, the MDD/LDD always remains the same and only the PDD, part needs to be modified according to the target hardware for a particular class of devices., Most of the time, the hardware developer provides the implementation for all on board devices for a, specific OS along with the platform. The drivers are normally shipped in the form of Board Support Package., The Board Support Package contains low level driver implementations for the onboard peripherals and, OEM Adaptation Layer (OAL) for accessing the various chip level functionalities and a bootloader for, loading the operating system. The OAL facilitates communication between the Operating System (OS) and, the target device and includes code to handle interrupts, timers, power management, bus abstraction, generic, I/O control codes (IOCTLs), etc. The driver files are usually in the form of a dll file. Drivers can run on either, user space or kernel space. Drivers which run in user space are known as user mode drivers and the drivers, which run in kernel space are known as kernel mode drivers. User mode drivers are safer than kernel mode, drivers. If an error or exception occurs in a user mode driver, it won’t affect the services of the kernel. On the, other hand, if an exception occurs in the kernel mode driver, it may lead to the kernel crash. The way how, a device driver is written and how the interrupts are handled in it are operating system and target hardware, specific. However regardless of the OS types, a device driver implements the following:, 1. Device (Hardware) Initialisation and Interrupt configuration, 2. Interrupt handling and processing, 3. Client interfacing (Interfacing with user applications), The Device (Hardware) initialisation part of the driver deals with configuring the different registers of, the device (target hardware). For example configuring the I/O port line of the processor as Input or output, line and setting its associated registers for building a General Purpose IO (GPIO) driver. The interrupt, configuration part deals with configuring the interrupts that needs to be associated with the hardware. In the, case of the GPIO driver, if the intention is to generate an interrupt when the Input line is asserted, we need to, configure the interrupt associated with the I/O port by modifying its associated registers. The basic Interrupt, configuration involves the following., 1. Set the interrupt type (Edge Triggered (Rising/Falling) or Level Triggered (Low or High)), enable the, interrupts and set the interrupt priorities., 2. Bind the Interrupt with an Interrupt Request (IRQ). The processor identifies an interrupt through IRQ., These IRQs are generated by the Interrupt Controller. In order to identify an interrupt the interrupt, needs to be bonded to an IRQ., 3. Register an Interrupt Service Routine (ISR) with an Interrupt Request (IRQ). ISR is the handler for an, Interrupt. In order to service an interrupt, an ISR should be associated with an IRQ. Registering an ISR, with an IRQ takes care of it., With these the interrupt configuration is complete. If an interrupt occurs, depending on its priority, it is, serviced and the corresponding ISR is invoked. The processing part of an interrupt is handled in an ISR., The whole interrupt processing can be done by the ISR itself or by invoking an Interrupt Service Thread, (IST). The IST performs interrupt processing on behalf of the ISR. To make the ISR compact and short, it, is always advised to use an IST for interrupt processing. The intention of an interrupt is to send or receive, command or data to and from the hardware device and make the received data available to user programs, for application specific processing. Since interrupt processing happens at kernel level, user applications may, not have direct access to the drivers to pass and receive data. Hence it is the responsibility of the Interrupt
Page 508 :
484, , Introduc on to Embedded Systems, , processing routine or thread to inform the user applications that an interrupt is occurred and data is available, for further processing. The client interfacing part of the device driver takes care of this. The client interfacing, implementation makes use of the Inter Process communication mechanisms supported by the embedded, OS for communicating and synchronising with user applications and drivers. For example, to inform a user, application that an interrupt is occurred and the data received from the device is placed in a shared buffer,, the client interfacing code can signal (or set) an event. The user application creates the event, registers it and, waits for the driver to signal it. The driver can share the received data through shared memory techniques., IOCTLs, shared buffers, etc. can be used for data sharing. The story line is incomplete without performing an, interrupt done (Interrupt processing completed) functionality in the driver. Whenever an interrupt is asserted,, while vectoring to its corresponding ISR, all interrupts of equal and low priorities are disabled. They are reenable only on executing the interrupt done function (Same as the Return from Interrupt RETI instruction, execution for 8051) by the driver. The interrupt done function can be invoked at the end of corresponding, ISR or IST., We will discuss more about device driver development in a dedicated book coming under this book, series., , 10.10, , HOW TO CHOOSE AN RTOS, , LO 10 Discuss the, different functional, and non-functional, requirements that need, to be addressed in the, selection of a RealTime Operating System, , 10.10.1, , The decision of choosing an RTOS for an embedded design is very crucial., A lot of factors needs to be analysed carefully before making a decision on, the selection of an RTOS. These factors can be either functional or nonfunctional. The following section gives a brief introduction to the important, functional and non-functional requirements that needs to be analysed in the, selection of an RTOS for an embedded design., , Functional Requirements, , Processor Support It is not necessary that all RTOS’s support all kinds of processor architecture. It is, essential to ensure the processor support by the RTOS., Memory Requirements The OS requires ROM memory for holding the OS files and it is normally stored, in a non-volatile memory like FLASH. OS also requires working memory RAM for loading the OS services., Since embedded systems are memory constrained, it is essential to evaluate the minimal ROM and RAM, requirements for the OS under consideration., Real- me Capabili es It is not mandatory that the operating system for all embedded systems need to be, Real-time and all embedded Operating systems are ‘Real-time’ in behaviour. The task/process scheduling, policies plays an important role in the ‘Real-time’ behaviour of an OS. Analyse the real-time capabilities of, the OS under consideration and the standards met by the operating system for real-time capabilities., Kernel and Interrupt Latency The kernel of the OS may disable interrupts while executing certain services, and it may lead to interrupt latency. For an embedded system whose response requirements are high, this, latency should be minimal., Inter Process Communica on and Task Synchronisa on The implementation of Inter Process, Communication and Synchronisation is OS kernel dependent. Certain kernels may provide a bunch of, options whereas others provide very limited options. Certain kernels implement policies for avoiding priority, inversion issues in resource sharing.
Page 509 :
Real-Time Opera ng System (RTOS) based Embedded System Design, , 485, , Modularisa on Support Most of the operating systems provide a bunch of features. At times it may not, be necessary for an embedded product for its functioning. It is very useful if the OS supports modularisation, where in which the developer can choose the essential modules and re-compile the OS image for functioning., Windows CE is an example for a highly modular operating system., Support for Networking and Communica on The OS kernel may provide stack implementation and driver, support for a bunch of communication interfaces and networking. Ensure that the OS under consideration, provides support for all the interfaces required by the embedded product., Development Language Support Certain operating systems include the run time libraries required for, running applications written in languages like Java and C#. A Java Virtual Machine (JVM) customised for, the Operating System is essential for running java applications. Similarly the .NET Compact Framework, (.NETCF) is required for running Microsoft® .NET applications on top of the Operating System. The OS, may include these components as built-in component, if not, check the availability of the same from a third, party vendor for the OS under consideration., , 10.10.2, , Non-functional Requirements, , Custom Developed or Off the Shelf Depending on the OS requirement, it is possible to go for the complete, development of an operating system suiting the embedded system needs or use an off the shelf, readily, available operating system, which is either a commercial product or an Open Source product, which is in, close match with the system requirements. Sometimes it may be possible to build the required features by, customising an Open source OS. The decision on which to select is purely dependent on the development, cost, licensing fees for the OS, development time and availability of skilled resources., Cost The total cost for developing or buying the OS and maintaining it in terms of commercial product and, custom build needs to be evaluated before taking a decision on the selection of OS., Development and Debugging Tools Availability The availability of development and debugging tools is a, critical decision making factor in the selection of an OS for embedded design. Certain Operating Systems, may be superior in performance, but the availability of tools for supporting the development may be limited., Explore the different tools available for the OS under consideration., Ease of Use How easy it is to use a commercial RTOS is another important feature that needs to be, considered in the RTOS selection., A er Sales For a commercial embedded RTOS, after sales in the form of e-mail, on-call services, etc. for, bug fixes, critical patch updates and support for production issues, etc. should be analysed thoroughly., , Summary, The Operating System is responsible for making the system convenient to use, organise and manage, LO1, system resources efficiently and properly., Process/Task management, Primary memory management, File system management, I/O system, (Device) management, Secondary Storage Management, protection implementation, Time, management, Interrupt handling, etc. are the important services handled by the OS LO1, kernel.
Page 510 :
486, , Introduc on to Embedded Systems, , The core of the operating system is known as kernel. Depending on the implementation of the, different kernel services, the kernel is classified as Monolithic and Micro. User Space is the memory, area in which user applications are confined to run, whereas kernel space is the memory LO1, area reserved for kernel applications., Operating systems with a generalised kernel are known as General Purpose Operating Systems, (GPOS), whereas operating systems with a specialised kernel with deterministic timing behaviour, LO2, are known as Real-Time Operating Systems (RTOS)., In the operating system context a task/process is a program, or part of it, in execution. The process, holds a set of registers, process status, a Program Counter (PC) to point to the next executable, instruction of the process, a stack for holding the local variables associated with the process, LO2, and the code corresponding to the process., The different states through which a process traverses through during its journey from the newly, created state to finished state is known as Process Life Cycle, LO3, Process management deals with the creation of a process, setting up the memory space for the, process, loading the process’s code into the memory space, allocating system resources, setting up a, Process Control Block (PCB) for the process and process termination/deletion., LO3, A thread is the primitive that can execute code. It is a single sequential flow of control within a, process. A process may contain multiple threads. The act of concurrent execution of, LO3, multiple threads under an operating system is known as multithreading., Thread standards are the different standards available for thread creation and management., POSIX, Win32, Java, etc. are the commonly used thread creation and management LO3, libraries., The ability of a system to execute multiple processes simultaneously is known as multiprocessing,, whereas the ability of an operating system to hold multiple processes in memory and switch the, processor (CPU) from executing one process to another process is known as multitasking., LO4, Multitasking involves Context Switching, Context Saving and Context Retrieval., Co-operative multitasking, Preemptive multitasking and Non-preemptive multitasking are the three, important types of multitasking which exist in the Operating system context., LO4, CPU utilisation, Throughput, Turn Around Time (TAT), Waiting Time and Response Time are the, important criterions that need to be considered for the selection of a scheduling algorithm LO5, for task scheduling., Job queue, Ready queue and Device queue are the important queues maintained by an operating, LO5, system in association with CPU scheduling., First Come First Served (FCFS)/First in First Out (FIFO), Last Come First Served (LCFS)/Last in, First Out (LIFO), Shortest Job First (SJF), priority based scheduling, etc. are examples for Nonpreemptive scheduling, whereas Preemptive SJF Scheduling/Shortest Remaining Time (SRT),, Round Robin (RR) scheduling and priority based scheduling are examples for preemptive, LO5, scheduling., Processes in a multitasking system falls into either Co-operating or Competing. The co-operating, processes share data for communicating among the processes through Inter Process Communication, (IPC), whereas competing processes do not share anything among themselves but they, LO6, share the system resources like display devices, keyboard, etc., Shared memory, message passing and Remote Procedure Calls (RPC) are the important IPC mechanisms, through which the co-operating processes communicate in an operating system environment. The, implementation of the IPC mechanism is OS kernel dependent., LO7
Page 511 :
487, , Real-Time Opera ng System (RTOS) based Embedded System Design, , Racing, deadlock, livelock, starvation, producer-consumer problem, Readers-Writers problem and, priority inversion are some of the problems involved in shared resource access in task communication, through sharing., LO8, The ‘Dining Philosophers’ ‘Problem’ is a real-life representation of the deadlock, starvation, livelock, and ‘Racing’ issues in shared resource access in operating system context., Priority inversion is the condition in which a medium priority task gets the CPU for LO8, execution, when a high priority task needs to wait for a low priority task to release a resource which, is shared between the high priority task and the low priority task., LO8, Priority inheritance and Priority ceiling are the two mechanisms for avoiding Priority Inversion in a, multitasking environment., LO8, The act of preventing the access of a shared resource by a task/process when it is currently being, held by another task/process is known as mutual exclusion. Mutual exclusion can be implemented, through either busy waiting (spin lock) or sleep and wakeup technique., LO8, Test and Set, Flags, etc. are examples of Busy waiting based mutual exclusion implementation,, whereas Semaphores, mutex, Critical Section Objects and events are examples for Sleep and Wakeup, based mutual exclusion., LO8, Binary semaphore implements exclusive shared resource access, whereas counting semaphore limits, the concurrent access to a shared resource, and mutual exclusion semaphore prevents priority, inversion in shared resource access., LO8, Device driver is a piece of software that acts as a bridge between the operating system and the, hardware. Device drivers are responsible for initiating and managing the communication with the, hardware peripherals., LO9, Various functional and non-functional requirements need to be evaluated before the selection of an, RTOS for an embedded design., LO10, , Keywords, Opera ng System: A piece of so ware designed to manage and allocate system resources and execute other, pieces of the so ware, [LO 1], Kernel: The core of the opera ng system which is responsible for managing the system resources and the, communica on among the hardware and other system services, [LO 1], Kernel space: The primary memory area where the kernel applica ons are confined to run, [LO 1], User space: The primary memory area where the user applica ons are confined to run, [LO 1], Monolithic kernel: A kernel with all kernel services run in the kernel space under a single kernel thread, , [LO 1], Microkernel: A kernel which incorporates only the essen al services within the kernel space and the rest is, installed as loadable modules called servers, [LO 1], Real-Time Opera ng System (RTOS): Opera ng system with a specialised kernel with a determinis c ming, behaviour, [LO 2], Scheduler: OS kernel service which deals with the scheduling of processes/tasks, [LO 2], Hard Real-Time: Real- me opera ng systems that strictly adhere to the ming constraints for a task [LO 2], So Real-Time: Real- me opera ng systems that does not guarantee mee ng deadlines, but, offer the best, effort to meet the deadline, [LO 2]
Page 512 :
488, , Introduc on to Embedded Systems, , Task/Job/Process: In the opera ng system context a task/process is a program, or part of it, in execu on, , [LO 3], Process Life Cycle: The different states through which a process traverses through during its journey from the, newly created state to completed state, [LO 3], Thread: The primi ve that can execute code. It is a single sequen al flow of control within a process [LO 3], Mul processing systems: Systems which contain mul ple CPUs and are capable of execu ng mul ple, processes simultaneously, [LO 4], Mul tasking: The ability of an opera ng system to hold mul ple processes in memory and switch the, processor (CPU) from execu ng one process to another process, [LO 4], Context switching: The act of switching CPU among the processes and changing the current execu on context, , [LO 4], Co-opera ve mul tasking: Mul tasking model in which a task/process gets a chance when the currently, execu ng task relinquishes the CPU voluntarily, [LO 4], Preemp ve mul tasking: Mul tasking model in which a currently running task/process is preempted to, execute another task/process, [LO 4], Non-preemp ve mul tasking: Mul tasking model in which a task gets a chance to execute when the currently, execu ng task relinquishes the CPU or when it enters a wait state, [LO 4], First Come First Served (FCFS)/First in First Out (FIFO): Scheduling policy which sorts the Ready Queue with, FCFS model and schedules the first arrived process from the Ready queue for execu on, [LO 5], Last Come First Served (LCFS)/Last in First Out (LIFO): Scheduling policy which sorts the Ready Queue with, LCFS model and schedules the last arrived process from the Ready queue for execu on, [LO 5], Shortest Job First (SJF): Scheduling policy which sorts the Ready queue with the order of the shortest execu on, me for process and schedules the process with least es mated execu on comple on me from the Ready, queue for execu on, [LO 5], Priority based Scheduling: Scheduling policy which sorts the Ready queue based on priority and schedules the, process with highest priority from the Ready queue for execu on, [LO 5], Shortest Remaining Time (SRT): Preemp ve scheduling policy which sorts the Ready queue with the order of, the shortest remaining me for execu on comple on for process and schedules the process with the least, remaining me for es mated execu on comple on from the Ready queue for execu on, [LO 5], Round Robin: Preemp ve scheduling policy in which the currently running process is preempted based on, me slice, [LO 5], Co-opera ng processes: Processes which share data for communica ng among them, [LO 7], Inter Process/Task Communica on (IPC): Mechanism for communica ng between co-opera ng processes of, a system, [LO 7], Shared memory: A memory sharing mechanism used for inter process communica on, [LO 7], Message passing: IPC mechanism based on exchanging of messages between processes through a message, queue or mailbox, [LO 7], Message queue: A queue for holding messages for exchanging between processes of a mul tasking system, , [LO 7], Mailbox: A special implementa on of message queue under certain OS kernel, which supports only a single, message, [LO 7], Signal: A form of asynchronous message no fica on, [LO 7], Remote Procedure Call or RPC: The IPC mechanism used by a process to invoke a procedure of another, process running on the same CPU or on a different CPU which is interconnected in a network, [LO 7]
Page 513 :
Real-Time Opera ng System (RTOS) based Embedded System Design, , 489, , Racing: The situa on in which mul ple processes compete (race) each other to access and manipulate shared, [LO 8], data concurrently, Deadlock: A situa on where none of the processes are able to make any progress in their execu on. Deadlock, is the condi on in which a process is wai ng for a resource held by another process which is wai ng for a, resource held by the first process, [LO 8], Livelock: A condi on where a process always does something but is unable to make any progress in the, execu on comple on, [LO 8], Starva on: The condi on in which a process does not get the CPU or system resources required to con nue, its execu on for a long me, [LO 8], Dining Philosophers’ Problem: A real-life representa on of the deadlock, starva on, livelock and racing issues, in shared resource access in opera ng system context, [LO 8], Producer-Consumer problem: A common data sharing problem where two processes concurrently access a, shared buffer with fixed size, [LO 8], Readers-Writers problem: A data sharing problem characterised by mul ple processes trying to read and, write shared data concurrently, [LO 8], Priority inversion: The condi on in which a medium priority task gets the CPU for execu on, when a high, priority task needs to wait for a low priority task to release a resource which is shared between the high, priority task and the low priority task, [LO 8], Priority inheritance: A mechanism by which the priority of a low-priority task which is currently holding a, resource requested by a high priority task, is raised to that of the high priority task to avoid priority inversion, , [LO 8], Priority Ceiling: The mechanism in which a priority is associated with a shared resource (The priority of the, highest priority task which uses the shared resource) and the priority of the task is temporarily boosted to, the priority of the shared resource when the resource is being held by the task, for avoiding priority inversion, , [LO 8], Task/Process synchronisa on: The act of synchronising the access of shared resources by mul ple processes, and enforcing proper sequence of opera on among mul ple processes of a mul tasking system, [LO 8], Mutual Exclusion: The act of preven ng the access of a shared resource by a task/process when it is being, held by another task/process, [LO 8], Semaphore: A system resource for implemen ng mutual exclusion in shared resource access or for restric ng, the access to the shared resource, [LO 8], Mutex: The binary semaphore implementa on for exclusive resource access under certain OS kernel [LO 8], Device driver: A piece of so ware that acts as a bridge between the opera ng system and the hardware, , [LO 9], , Objec ve Ques ons, Operating System Basics, 1. Which of the following is true about a kernel?, (a) The kernel is the core of the operating system, (b) It is responsible for managing the system resources and the communication among the hardware and, other system services, (c) It acts as the abstraction layer between system resources and user applications.
Page 514 :
490, , 2., 3., , 4., , 5., , 6., , 7., , 8., , Introduc on to Embedded Systems, , (d) It contains a set of system libraries and services, (e) All of these, The user application and kernel interface is provided through, (a) System calls, (b) Shared memory (c) Services, (d) None of these, The process management service of the kernel is responsible for, (a) Setting up the memory space for the process, (b) Allocating system resources, (c) Scheduling and managing the execution of the process, (d) Setting up and managing the Process Control Block (PCB), inter-process communication and, synchronisation, (e) All of these, The Memory Management Unit (MMU) of the kernel is responsible for, (a) Keeping track of which part of the memory area is currently used by which process, (b) Allocating and de-allocating memory space on a need basis (Dynamic memory allocation), (c) Handling all virtual memory operations in a kernel with virtual memory support, (d) All of these, The memory area which holds the program code corresponding to the core OS applications/services is, known as, (a) User space, (b) Kernel space, (c) Shared memory, (d) All of these, Which of the following is true about Privilege separation?, (a) The user applications/processes runs at user space and kernel applications run at kernel space, (b) Each user application/process runs on its own virtual memory space, (c) A process is not allowed to access the memory space of another process directly, (d) All of these, Which of the following is true about monolithic kernel?, (a) All kernel services run in the kernel space under a single kernel thread., (b) The tight internal integration of kernel modules in monolithic kernel architecture allows the effective, utilisation of the low-level features of the underlying system, (c) Error prone. Any error or failure in any one of the kernel modules may lead to the crashing of the entire, kernel, (d) All of these, Which of the following is true about microkernel?, (a) The microkernel design incorporates only the essential set of operating system services into the kernel., The rest of the operating system services are implemented in programs known as ‘servers’ which runs in, user space., (b) Highly modular and OS neutral, (c) Less Error prone. Any ‘Server’ where error occurs can be restarted without restarting the entire kernel, (d) All of these, , Real-Time Operating System (RTOS), 1. Which of the following is true for Real-Time Operating Systems (RTOSes)?, (a) Possess specialised kernel, (b) Deterministic in behaviour, (c) Predictable performance, (d) All of these, 2. Which of the following is (are) example(s) for RTOS?, (a) Windows CE, (b) Windows XP, (c) Windows 2000, (d) QNX, 3. Interrupts which occur in sync with the currently executing task are known as, (a) Asynchronous interrupts, (b) Synchronous interrupts, (c) External interrupts, (d) None of these, , (e), , (a) and (d)
Page 515 :
Real-Time Opera ng System (RTOS) based Embedded System Design, , 491, , 4. Which of the following is an example of a synchronous interrupt?, (a) TRAP, (b) External interrupt (c) Divide by zero, (d) Timer interrupt, 5. Which of the following is true about ‘Timer tick’ for RTOS?, (a) The high resolution hardware timer interrupt is referred as ‘Timer tick’, (b) The ‘Timer tick’ is taken as the timing reference by the kernel, (c) The time parameters for tasks are expressed as the multiples of the ‘Timer tick’, (d) All of these, 6. Which of the following is true about hard real-time systems?, (a) Strictly adhere to the timing constraints for a task, (b) Missing any deadline may produce catastrophic results, (c) Most of the hard real-time systems are automatic and may not contain a human in the loop, (d) May not implement virtual memory based memory management, (e) All of these., 7. Which of the following is true about soft real-time systems?, (a) Does not guarantee meeting deadlines, but offer the best effort to meet the deadline are referred, (b) Missing deadlines for tasks are acceptable, (c) Most of the soft real-time systems contain a human in the loop, (d) All of these, Tasks, Process and Threads, 1. Which of the following is true about Process in the operating system context?, (a) A ‘Process’ is a program, or part of it, in execution, (b) It can be an instance of a program in execution, (c) A process requires various system resources like CPU for executing the process, memory for storing the, code corresponding to the process and associated variables, I/O devices for information exchange, etc., (d) A process is sequential in execution, (e) All of these, 2. A process has, (a) Stack memory (b) Program memory (c) Working Registers (d) Data memory, (e) All of these, 3. The ‘Stack’ memory of a process holds all temporary data such as variables local to the process. State ‘True’, or ‘False’, (a) True, (b) False, 4. The data memory of a process holds, (a) Local variables, (b) Global variables, (c) Program instructions, (d) None of these, 5. A process has its own memory space, when residing at the main memory. State ‘True’ or ‘False’, (a) True, (b) False, 6. A process when loaded to the memory is allocated a virtual memory space in the range 0x08000 to 0x08FF8., What is the content of the Stack pointer of the process when it is created?, (a) 0x07FFF, (b) 0x08000, (c) 0x08FF7, (d) 0x08FF8, 7. What is the content of the program counter for the above example when the process is loaded for the first, time?, (a) 0x07FFF, (b) 0x08000, (c) 0x08FF7, (d) 0x08FF8, 8. The state where a process is incepted into the memory and awaiting the processor time for execution, is, known as, (a) Created state, (b) Blocked state, (c) Ready state, (d) Waiting state
Page 516 :
492, , 9., , 10., , 11., 12., 13., , 14., , 15., , 16., 17., , 18., , 19., , 20., , Introduc on to Embedded Systems, , (e) Completed state, The CPU allocation for a process may change when it changes its state from _______?, (a) ‘Running’ to ‘Ready’, (b) ‘Ready’ to ‘Running’, (c) ‘Running’ to ‘Blocked’, (d) ‘Running’ to ‘Completed’, (e) All of these, Which of the following is true about threads?, (a) A thread is the primitive that can execute code, (b) A thread is a single sequential flow of control within a process, (c) ‘Thread’ is also known as lightweight process, (d) All of these, (e) None of these, A process can have many threads of execution. State ‘True’ or ‘False’, (a) True, (b) False, Different threads, which are part of a process, share the same address space. State ‘True’ or ‘False’, (a) True, (b) False, Multiple threads of the same process share ________?, (a) Data memory, (b) Code memory, (c) Stack memory, (d) All of these, (e) only (a) and (b), Which of the following is true about multithreading?, (a) Better memory utilisation, (b) Better CPU utilisation, (c) Reduced complexity in inter-thread communication, (d) Faster process execution, (e) All of these, Which of the following is a thread creation and management library?, (a) POSIX, (b) Win32, (c) Java Thread Library, (d) All of these, Which of the following is the POSIX standard library for thread creation and management, (a) Pthreads, (b) Threads, (c) Jthreads, (d) None of these, What happens when a thread object’s wait() method is invoked in Java?, (a) Causes the thread object to wait, (b) The thread will remain in the ‘Wait’ state until another thread invokes the notify() or notifyAll() method, of the thread object which is waiting, (c) Both of these, (d) None of these, Which of the following is true about user level threads?, (a) Even if a process contains multiple user level threads, the OS treats it as a single thread, (b) The user level threads are executed non-preemptively in relation to each other, (c) User level threads follow co-operative execution model, (d) All of these, Which of the following are the valid thread binding models for user level to kernel level thread binding?, (a) One to Many, (b) Many to One, (c) One to One, (d) Many to Many, (e) All of these, (f) only (b), (c) and (d), If a thread expires, the stack memory allocated to it is reclaimed by the process to which the thread belongs., State ‘True’ or ‘False’, (a) True, (b) False
Page 517 :
Real-Time Opera ng System (RTOS) based Embedded System Design, , 493, , Multiprocessing and Multitasking, 1. Multitasking and multiprocessing refers to the same entity in the operating system context. State ‘True’ or, ‘False’, (a) True, (b) False, 2. Multiprocessor systems contain, (a) Single CPU, (b) Multiple CPUs, (c) No CPU, 3. The ability of the operating system to have multiple programs in memory, which are ready for execution, is, referred as, (a) Multitasking, (b) Multiprocessing (c) Multiprogramming, 4. In a multiprocessing system, (a) Only a single process can run at a time, (b) Multiple processes can run simultaneously, (c) Multiple processes run in pseudo parallelism, 5. In a multitasking system, (a) Only a single process can run at a time, (b) Multiple processes can run simultaneously, (c) Multiple processes run in pseudo parallelism, (d) Only (a) and (c), 6. Multitasking involves, (a) CPU execution switching of processes (b) CPU halting, (c) No CPU operation, 7. Multitasking involves, (a) Context switching, (b) Context saving, (c) Context retrieval, (d) All of these, (e) None of these, 8. What are the different types of multitasking present in operating systems?, (a) Co-operative, (b) Preemptive, (c) Non-preemptive, (d) All of these, 9. In Co-operative multitasking, a process/task gets the CPU time when, (a) The currently executing task terminates its execution, (b) The currently executing task enters ‘Wait’ state, (c) The currently executing task relinquishes the CPU before terminating, (d) Never get a chance to execute, (e) Either (a) or (c), 10. In Preemptive multitasking, (a) Each process gets an equal chance for execution, (b) The execution of a process is preempted based on the scheduling policy, (c) Both of these, (d) None of these, 11. In Non-preemptive multitasking, a process/task gets the CPU time when, (a) The currently executing task terminates its execution, (b) The currently executing task enters ‘Wait’ state, (c) The currently executing task relinquishes the CPU before terminating, (d) All of these, (e) None of these, 12. MSDOS Operating System supports, (a) Single user process with single thread, (b) Single user process with multiple threads, (c) Multiple user process with single thread per process, (d) Multiple user process with multiple threads per process
Page 518 :
494, , Introduc on to Embedded Systems, , Task Scheduling, 1. Who determines which task/process is to be executed at a given point of time?, (a) Process manager, (b) Context manager, (c) Scheduler, (d) None of these, 2. Task scheduling is an essential part of multitasking., (a) True, (b) False, 3. The process scheduling decision may take place when a process switches its state from, (a) ‘Running’ to ‘Ready’, (b) ‘Running’ to ‘Blocked’, (c) ‘Blocked’ to ‘Ready’, (d) ‘Running’ to ‘Completed’, (e) All of these, (f) Any one among (a) to (d) depending on the type of multitasking supported by OS, 4. A process switched its state from ‘Running’ to ‘Ready’ due to scheduling act. What is the type of multitasking, supported by the OS?, (a) Co-operative, (b) Preemptive, (c) Non-preemptive, (d) None of these, 5. A process switched its state from ‘Running’ to ‘Wait’ due to scheduling act. What is the type of multitasking, supported by the OS?, (a) Co-operative, (b) Preemptive, (c) Non-preemptive, (d) (b) or (c), 6. Which one of the following criteria plays an important role in the selection of a scheduling algorithm?, (a) CPU utilisation (b) Throughput, (c) Turnaround time (d) Waiting time, (e) Response time (f) All of these, 7. For a good scheduling algorithm, the CPU utilisation is, (a) High, (b) Medium, (c) Non-defined, 8. Under the process scheduling context, ‘Throughput’ is, (a) The number of processes executed per unit of time, (b) The time taken by a process to complete its execution, (c) None of these, 9. Under the process scheduling context, ‘Turnaround Time’ for a process is, (a) The time taken to complete its execution (b) The time spent in the ‘Ready’ queue, (c) The time spent on waiting on I/O, (d) None of these, 10. Turnaround Time (TAT) for a process includes, (a) The time spent for waiting for the main memory, (b) The time spent in the ready queue, (c) The time spent on completing the I/O operations, (d) The time spent in execution, (e) All of these, 11. For a good scheduling algorithm, the Turn Around Time (TAT) for a process should be, (a) Minimum, (b) Maximum, (c) Average, (d) Varying, 12. Under the process scheduling context, ‘Waiting time’ for a process is, (a) The time spent in the ‘Ready queue’, (b) The time spent on I/O operation (time spent in wait state), (c) Sum of (a) and (b), (d) None of these, 13. For a good scheduling algorithm, the waiting time for a process should be, (a) Minimum, (b) Maximum, (c) Average, (d) Varying, 14. Under the process scheduling context, ‘Response time’ for a process is, (a) The time spent in ‘Ready queue’, (b) The time between the submission of a process and the first response
Page 519 :
Real-Time Opera ng System (RTOS) based Embedded System Design, , 15., 16., , 17., , 18., , 19., , 20., , 21., , 22., 23., , 24., , 25., , 26., , 495, , (c) The time spent on I/O operation (time spent in wait state), (d) None of these, For a good scheduling algorithm, the response time for a process should be, (a) Maximum, (b) Average, (c) Least, (d) Varying, What are the different queues associated with process scheduling?, (a) Ready Queue, (b) Process Queue, (c) Job Queue, (d) Device Queue, (e) All of the Above, (f ) (a), (c) and (d), The ‘Ready Queue’ contains, (a) All the processes present in the system (b) All the processes which are ‘Ready’ for execution, (c) The currently running processes, (d) Processes which are waiting for I/O, Which among the following scheduling is (are) Non-preemptive scheduling, (a) First In First Out (FIFO/FCFS), (b) Last In First Out (LIFO/LCFS), (c) Shortest Job First (SJF), (d) All of these, (e) None of these, Which of the following is true about FCFS scheduling, (a) Favours CPU bound processes, (b) The device utilisation is poor, (c) Both of these, (d) None of these, The average waiting time for a given set of process is ______ in SJF scheduling compared to FIFO, scheduling, (a) Minimal, (b) Maximum, (c) Average, Which among the following scheduling is (are) preemptive scheduling, (a) Shortest Remaining Time First (SRT), (b) Preemptive Priority based, (c) Round Robin (RR), (d) All of these, (e) None of these, The Shortest Job First (SJF) algorithm is a priority based scheduling. State ‘True’ or ‘False’, (a) True, (b) False, Which among the following is true about preemptive scheduling, (a) A process is moved to the ‘Ready’ state from ‘Running’ state (preempted) without getting an explicit, request from the process, (b) A process is moved to the ‘Ready’ state from ‘Running’ state (preempted) on receiving an explicit, request from the process, (c) A process is moved to the ‘Wait’ state from the ‘Running’ state without getting an explicit request from, the process, (d) None of these, Which of the following scheduling technique(s) possess the drawback of ‘Starvation’, (a) Round Robin, (b) Priority based preemptive, (c) Shortest Job First (SJF), (d) (b) and (c), (e) None of these, Starvation describes the condition in which, (a) A process is ready to execute and is waiting in the ‘Ready’ queue for a long time and is unable to get the, CPU time due to various reasons, (b) A process is waiting for a shared resource for a long time, and is unable to get it for various reasons., (c) Both of the above, (d) None of these, Which of the scheduling policy offers equal opportunity for execution for all processes?, (a) Priority based scheduling, (b) Round Robin (RR) scheduling
Page 520 :
496, , 27., , 28., , 29., , 30., , 31., , Introduc on to Embedded Systems, , (c) Shortest Job First (SJF), (d) All of these, (e) None of these, Round Robin (RR) scheduling commonly uses which one of the following policies for sorting the ‘Ready’, queue?, (a) Priority, (b) FCFS (FIFO), (c) LIFO, (d) SRT, (e) SJF, Which among the following is used for avoiding ‘Starvation’ of processes in priority based scheduling?, (a) Priority Inversion, (b) Aging, (c) Priority Ceiling, (d) All of these, Which of the following is true about ‘Aging’, (a) Changes the priority of a process at run time, (b) Raises the priority of a process temporarily, (c) It is a technique used for avoiding ‘Starvation’ of processes, (d) All of these, (e) None of these, Which is the most commonly used scheduling policy in Real-Time Operating Systems?, (a) Round Robin (RR), (b) Priority based preemptive, (c) Priority based non-preemptive, (d) Shortest Job First (SJF), In the process scheduling context, the IDLE TASK is executed for, (a) To handle system interrupts, (b) To keep the CPU always engaged or to keep the CPU in idle mode depending on the system design, (c) To keep track of the resource usage by a process, (d) All of these, , Task Communication and Synchronisation, 1. Processes use IPC mechanisms for, (a) Communicating between process, (b) Synchronising the access of shared resource, (c) Both of these, (d) None of these, 2. Which of the following techniques is used by operating systems for inter process communication?, (a) Shared memory (b) Messaging, (c) Signalling, (d) All of these, 3. Under Windows Operating system, the input and output buffer memory for a named pipe is allocated in, (a) Non-paged system memory, (b) Paged system memory, (c) Virtual memory, (d) None of the above, 4. Which among the following techniques is used for sharing data between processes?, (a) Semaphores, (b) Shared memory (c) Messages, d) (b) and (c), 5. Which among the following is a shared memory technique for IPC?, (a) Pipes, (b) Memory mapped Object, (c) Message blocks, (d) Events, (e) (a) and (b), 6. Which of the following is best advised for sharing a memory mapped object between processes under, windows kernel?, (a) Passing the handle of the shared memory object, (b) Passing the name of the memory mapped object, (c) None of these, 7. Why is message passing relatively fast compared to shared memory based IPC?, (a) Message passing is relatively free from synchronisation overheads, (b) Message passing does not involve any OS intervention, (c) All of these, (d) None of these
Page 521 :
Real-Time Opera ng System (RTOS) based Embedded System Design, , 497, , 8. In asynchronous messaging, the message posting thread just posts the message to the queue and will not wait, for an acceptance (return) from the thread to which the message is posted. State ‘True’ or ‘False’, (a) True, (b) False, 9. Which of the following is a blocking message passing call in Windows?, (a) PostMessage, (b) PostThreadMessage, (c) SendMessage, (d) All of these, (e) None of these, 10. Under Windows operating system, the message is passed through _____ for Inter Process Communication, (IPC) between processes?, (a) Message structure, (b) Memory mapped object, (c) Semaphore, (d) All of these, 11. Which of the following is true about ‘Signals’ for Inter Process Communication?, (a) Signals are used for asynchronous notifications, (b) Signals are not queued, (c) Signals do not carry any data, (d) All of these, 12. Which of the following is true about Racing or Race condition?, (a) It is the condition in which multiple processes compete (race) each other to access and manipulate shared, data concurrently, (b) In a race condition the final value of the shared data depends on the process which acted on the data, finally, (c) Racing will not occur if the shared data access is atomic, (d) All of these, 13. Which of the following is true about deadlock?, (a) Deadlock is the condition in which a process is waiting for a resource held by another process which is, waiting for a resource held by the first process, (b) Is the situation in which none of the competing process will be able to access the resources held by other, processes since they are locked by the respective processes, (c) Is a result of chain of circular wait, (d) All of these, 14. What are the conditions favouring deadlock in multitasking?, (a) Mutual Exclusion, (b) Hold and Wait, (c) No kernel resource preemption at kernel level, (d) Chain of circular waits, (e) All of these, 15. Livelock describes the situation where, (a) A process waits on a resource is not blocked on it and it makes frequent attempts to acquire the resource., But unable to acquire it since it is held by other process, (b) A process waiting in the ‘Ready’ queue is unable to get the CPU time for execution, (c) Both of these, (d) None of these, 16. Priority inversion is, (a) The condition in which a high priority task needs to wait for a low priority task to release a resource, which is shared between the high priority task and the low priority task, (b) The act of increasing the priority of a process dynamically, (c) The act of decreasing the priority of a process dynamically, (d) All of these
Page 522 :
498, , Introduc on to Embedded Systems, , 17. Which of the following is true about Priority inheritance?, (a) A low priority task which currently holds a shared resource requested by a high priority task temporarily, inherits the priority of the high priority task, (b) The priority of the low priority task which is temporarily boosted to high is brought to the original value, when it releases the shared resource, (c) All of these, (d) None of these, 18. Which of the following is true about Priority Ceiling based Priority inversion handling?, (a) A priority is associated with each shared resource, (b) The priority associated to each resource is the priority of the highest priority task which uses this shared, resource, (c) Whenever a task accesses a shared resource, the scheduler elevates the priority of the task to that of the, ceiling priority of the resource, (d) The priority of the task is brought back to the original level once the task completes the accessing of the, shared resource, (e) All of these, 19. Process/Task synchronisation is essential for?, (a) Avoiding conflicts in resource access in multitasking environment, (b) Ensuring proper sequence of operation across processes., (c) Communicating between processes, (d) All of these, (e) None of these, 20. Which of the following is true about Critical Section?, (a) It is the code memory area which holds the program instructions (piece of code) for accessing a shared, resource, (b) The access to the critical section should be exclusive, (c) All of these, (d) None of these, 21. Which of the following is true about mutual exclusion?, (a) Mutual exclusion enforces mutually exclusive access of resources by processes, (b) Mutual exclusion may lead to deadlock, (c) Both of these, (d) None of these, 22. Which of the following is an example of mutual exclusion enforcing policy?, (a) Busy Waiting (Spin lock), (b) Sleep & Wake up, (c) Both of these, (d) None of these, 23. Which of the following is true about lock based synchronisation mechanism?, (a) It is CPU intensive, (b) Locks are useful in handling situations where the processes is likely to be blocked for a shorter period of, time on waiting the lock, (c) If the lock is being held for a long time by a process and if it is preempted by the OS, the other threads, waiting for this lock may have to spin a longer time for getting, (d) All of these, (e) None of these, 24. Which of the following synchronisation techniques follow the ‘Sleep & Wakeup’ mechanism for mutual, exclusion?, (a) Mutex, (b) Semaphore, (c) Critical Section, (d) Spin lock, (e) (a), (b) and (c), 25. Which of the following is true about mutex objects for IPC synchronisation under Windows OS?, (a) Only one process/thread can own the ‘mutex object’ at a time, (b) The state of a mutex object is set to non-signalled when it is not owned by any process/thread, and set to, signalled when it is owned by any process/thread
Page 523 :
Real-Time Opera ng System (RTOS) based Embedded System Design, , 26., , 27., , 28., , 29., 30., , 499, , (c) The state of a mutex object is set to signalled when it is not owned by any process/thread, and set to nonsignalled when it is owned by any process/thread, (d) Both (a) & (b), (e) Both (a) & (c), Which of the following is (are) the wait functions provided by windows for synchronisation purpose?, (a) WaitForSingleObject, (b) WaitForMultipleObjects, (c) Sleep, (d) Both (a) and (b), Which of the following is true about Critical Section object?, (a) It can only be used by the threads of a single process (Intra process), (b) The ‘Critical Section’ must be initialised before the threads of a process can use it, (c) Accessing Critical Section blocks the execution of the caller thread if the critical section is already in use, by other threads, (d) Threads which are blocked by the Critical Section access call, waiting on a critical section, are added to, a wait queue and are woken when the Critical Section is available to the requested thread, (e) All of these, Which of the following is a non-blocking Critical Section accessing call under windows?, (a) EnterCriticalSection, (b) TryEnterCriticalSection, (c) Both of these, (d) None of these, The Critical Section object makes the piece of code residing inside it ____?, (a) Non-reentrant (b) Re-entrant, (c) Thread safe, (d) Both (a) and (c), Which of the following synchronisation techniques is exclusively used for synchronising the access of shared, resources by the threads of a process (Intra Process Synchronisation) under Windows kernel?, (a) Mutex object, (b) Critical Section object, (c) Interlocked functions, (d) Both (c) and (d), , Review Ques ons, Operating System Basics, 1. What is an Operating System? Where is it used and what are its primary functions?, 2. What is kernel? What are the different functions handled by a general purpose kernel?, 3. What is kernel space and user space? How is kernel space and user space interfaced?, , [LO 1], [LO 1], [LO 1], [LO 1], , 4. What is monolithic and microkernel? Which one is widely used in real-time operating systems?, 5. What is the difference between a General Purpose kernel and a Real-Time kernel? Give an example for both., , [LO 2], Real-Time Operating System (RTOS), 1. Explain the basic functions of a real-time kernel?, , [LO 2], [LO 3], , 2. What is task control block (TCB)? Explain the structure of TCB., 3. Explain the difference between the memory management of general purpose kernel and real-time kernel., 4. What is virtual memory? What are the advantages and disadvantages of virtual memory?, , [LO 2], [LO 2], [LO 2], , 5. Explain how ‘accurate time management’ is achieved in real-time kernel, 6. What is the difference between ‘Hard’ and ‘Soft’ real-time systems? Give an example for ‘Hard’ and ‘Soft’, Real-Time kernels., [LO 2]
Page 524 :
500, , Introduc on to Embedded Systems, , Tasks, Process and Threads, 1. Explain Task in the operating system context., 2. What is Process in the operating system context?, 3. Explain the memory architecture of a process., 4. What is Process Life Cycle?, 5. Explain the various activities involved in the creation of process and threads., 6. What is Process Control Block (PCB)? Explain the structure of PCB., 7. Explain Process Management in the Operating System Context., 8. What is Thread in the operating system context?, 9. Explain how Threads and Processes are related? What are common to Process and Threads?, 10. Explain the memory model of a ‘thread’., , [LO 3], [LO 3], [LO 3], [LO 3], [LO 3], [LO 3], [LO 3], [LO 3], [LO 3], [LO 3], [LO 3], , 11. Explain the concept of ‘multithreading’. What are the advantages of multithreading?, 12. Explain how multithreading can improve the performance of an application with an illustrative example., , [LO 3], [LO 3], , 13. Why is thread creation faster than process creation?, 14. Explain the commonly used thread standards for thread creation and management by different operating, systems., [LO 3], 15. Explain Thread context switch and the various activities performed in thread context switching for user level, and kernel level threads., [LO 3], 16. What all information is held by the thread control data structure of a user/kernel thread?, 17. What are the differences between user level and kernel level threads?, 18. What are the advantages and disadvantages of using user level threads?, 19. Explain the different thread binding models for user and kernel level threads., 20. Compare threads and processes in detail., , [LO 3], [LO 3], [LO 3], [LO 3], [LO 3], , Multiprocessing and Multitasking, 1. Explain multiprocessing, multitasking and multiprogramming., 2. Explain context switching, context saving and context retrieval., 3. What all activities are involved in context switching?, 4. Explain the different multitasking models in the operating system context., , [LO 3], [LO 3], [LO 3], [LO 3, LO 4], , Task Scheduling, 1. What is task scheduling in the operating system context?, 2. Explain the various factors to be considered for the selection of a scheduling criteria., , [LO 5], [LO 5], [LO 5], , 3. Explain the different queues associated with process scheduling., 4. Explain the different types of non-preemptive scheduling algorithms. State the merits and de-merits of each., , [LO 5], 5. Explain the different types of preemptive scheduling algorithms. State the merits and de-merits of each., 6. Explain Round Robin (RR) process scheduling with interrupts., , [LO 5], [LO 5]
Page 525 :
Real-Time Opera ng System (RTOS) based Embedded System Design, , 501, , 7. Explain starvation in the process scheduling context. Explain how starvation can be effectively tackled?, , [LO 5], 8. What is IDLEPROCESS? What is the significance of IDLEPROCESS in the process scheduling context?, , [LO 5], 9. Three processes with process IDs P1, P2, P3 with estimated completion time 5, 10, 7 milliseconds respectively, enters the ready queue together in the order P1, P2, P3. Process P4 with estimated execution completion, time 2 milliseconds enters the ready queue after 5 milliseconds. Calculate the waiting time and Turn Around, Time (TAT) for each process and the Average waiting time and Turn Around Time (Assuming there is no, I/O waiting for the processes) in the FIFO scheduling., [LO 5], 10. Three processes with process IDs P1, P2, P3 with estimated completion time 12, 10, 2 milliseconds, respectively enters the ready queue together in the order P2, P3, P1. Process P4 with estimated execution, completion time 4 milliseconds enters the Ready queue after 8 milliseconds. Calculate the waiting time and, Turn Around Time (TAT) for each process and the average waiting time and Turn Around Time (Assuming, there is no I/O waiting for the processes) in the FIFO scheduling., [LO 4], 11. Three processes with process IDs P1, P2, P3 with estimated completion time 8, 4, 7 milliseconds respectively, enters the ready queue together in the order P3, P1, P2. P1 contains an I/O waiting time of 2 milliseconds, when it completes 4 milliseconds of its execution. P2 and P3 do not contain any I/O waiting. Calculate the, waiting time and Turn Around Time (TAT) for each process and the average waiting time and Turn Around, Time in the LIFO scheduling. All the estimated execution completion time is excluding I/O wait time., , [LO 5], 12. Three processes with process IDs P1, P2, P3 with estimated completion time 12, 10, 2 milliseconds, respectively enters the ready queue together in the order P2, P3, P1. Process P4 with estimated execution, completion time 4 milliseconds enters the Ready queue after 8 milliseconds. Calculate the waiting time and, Turn Around Time (TAT) for each process and the Average waiting time and Turn Around Time (Assuming, there is no I/O waiting for the processes) in the LIFO scheduling., [LO 5], 13. Three processes with process IDs P1, P2, P3 with estimated completion time 6, 8, 2 milliseconds respectively, enters the ready queue together. Process P4 with estimated execution completion time 4 milliseconds enters, the Ready queue after 1 millisecond. Calculate the waiting time and Turn Around Time (TAT) for each, process and the Average waiting time and Turn Around Time (Assuming there is no I/O waiting for the, processes) in the non-preemptive SJF scheduling., [LO 5], 14. Three processes with process IDs P1, P2, P3 with estimated completion time 4, 6, 5 milliseconds and priorities, 1, 0, 3 (0—highest priority, 3 lowest priority) respectively enters the ready queue together. Calculate the, waiting time and Turn Around Time (TAT) for each process and the average waiting time and Turn Around, Time (Assuming there is no I/O waiting for the processes) in non-preemptive priority based scheduling, algorithm., [LO 5], 15. Three processes with process IDs P1, P2, P3 with estimated completion time 4, 6, 5 milliseconds and, priorities 1, 0, 3 (0—highest priority, 3 lowest priority) respectively enters the ready queue together. Process, P4 with estimated execution completion time 6 milliseconds and priority 2 enters the ‘Ready’ queue after, 5 milliseconds. Calculate the waiting time and Turn Around Time (TAT) for each process and the average, waiting time and Turn Around Time (Assuming there is no I/O waiting for the processes) in non-preemptive, priority based scheduling algorithm., [LO 5], 16. Three processes with process IDs P1, P2, P3 with estimated completion time 8, 4, 7 milliseconds respectively, enters the ready queue together. P1 contains an I/O waiting time of 2 milliseconds when it completes 4, milliseconds of its execution. P2 and P3 do not contain any I/O waiting. Calculate the waiting time and
Page 526 :
502, , 17., , 18., , 19., , 20., , Introduc on to Embedded Systems, , Turn Around Time (TAT) for each process and the average waiting time and Turn Around Time in the SRT, scheduling. All the estimated execution completion time is excluding I/O waiting time., [LO 5], Three processes with process IDs P1, P2, P3 with estimated completion time 12, 10, 6 milliseconds respectively, enters the ready queue together. Process P4 with estimated execution completion time 2 milliseconds enters, the Ready queue after 3 milliseconds. Calculate the waiting time and Turn Around Time (TAT) for each, process and the Average waiting time and Turn Around Time (Assuming there is no I/O waiting for the, processes) in the SRT scheduling., [LO 5], Three processes with process IDs P1, P2, P3 with estimated completion time 10, 14, 20 milliseconds, respectively, enters the ready queue together in the order P3, P2, P1. Calculate the waiting time and Turn, Around Time (TAT) for each process and the Average waiting time and Turn Around Time (Assuming there, is no I/O waiting for the processes) in RR algorithm with Time slice = 2 ms., [LO 5], Three processes with process IDs P1, P2, P3 with estimated completion time 12, 10, 12 milliseconds, respectively enters the ready queue together in the order P2, P3, P1. Process P4 with estimated execution, completion time 4 milliseconds enters the Ready queue after 8 milliseconds. Calculate the waiting time and, Turn Around Time (TAT) for each process and the Average waiting time and Turn Around Time (Assuming, there is no I/O waiting for the processes) in RR algorithm with Time slice = 4 ms., [LO 5], Three processes with process IDs P1, P2, P3 with estimated completion time 4, 6, 5 milliseconds and priorities, 1, 0, 3 (0—highest priority, 3 lowest priority) respectively enters the ready queue together. Calculate the, waiting time and Turn Around Time (TAT) for each process and the average waiting time and Turn Around, Time (Assuming there is no I/O waiting for the processes) in preemptive priority based scheduling algorithm., , [LO 5], 21. Three processes with process IDs P1, P2, P3 with estimated completion time 6, 2, 4 milliseconds, respectively, enters the ready queue together in the order P1, P3, P2. Process P4 with estimated execution, time 4 milliseconds entered the ‘Ready’ queue 3 milliseconds later the start of execution of P1. Calculate, the waiting time and Turn Around Time (TAT) for each process and the Average waiting time and Turn, Around Time (Assuming there is no I/O waiting for the processes) in RR algorithm with Time slice = 2 ms., , [LO 5], Task Communication and Synchronisation, 1. Explain the various process interaction models in detail., [LO 6], 2. What is Inter Process Communication (IPC)? Give an overview of different IPC mechanisms adopted by, various operating systems., [LO 6, LO 7], 3. Explain how multiple processes in a system co-operate., 4. Explain how multiple threads of a process co-operate., 5. Explain the shared memory based IPC., , [LO 6], [LO 6], [LO 7], [LO 7], , 6. Explain the concept of memory mapped objects for IPC., 7. Explain the handle sharing and name sharing based memory mapped object technique for IPC under Windows, Operating System., [LO 7], 8. Explain the message passing technique for IPC. What are the merits and de-merits of message based IPC?, , [LO 7], 9. Explain the synchronous and asynchronous messaging mechanisms for IPC under Windows kernel.[LO 7], 10. Explain Race condition in detail, in relation to the shared resource access., [LO 8], 11. What is deadlock? What are the different conditions favouring deadlock?, [LO 8]
Page 527 :
Real-Time Opera ng System (RTOS) based Embedded System Design, , 12. Explain by Coffman conditions?, 13. Explain the different methods of handling deadlocks., 14. Explain livelock in the resource sharing context., 15. Explain starvation in the resource sharing context., 16. Explain the Dining Philosophers problem in the process synchronisation context., 17. Explain the Produces-consumer problem in the inter process communication context., 18. Explain bounded-buffer problem in the interprocess communication context., , 503, , [LO 8], [LO 8], [LO 8], [LO 8], [LO 8], [LO 8], [LO 8], [LO 8], , 19. Explain buffer overrun and buffer under-run., 20. What is priority inversion? What are the different techniques adopted for handling priority inversion?, , [LO 8], 21. What are the merits and de-merits of priority ceiling?, [LO 8], 22. Explain the different task communication synchronisation issues encountered in Interprocess Communication., , [LO 8], [LO 8], , 23. What is task (process) synchronisation? What is the role of process synchronisation in IPC?, 24. What is mutual exclusion in the process synchronisation context? Explain the different mechanisms for, mutual exclusion., [LO 8], 25. What are the merits and de-merits of busy-waiting (spinlock) based mutual exclusion?, [LO 8], 26. Explain the Test and Set Lock (TSL) based mutual exclusion technique. Explain how TSL is implemented in, Intel family of processors., [LO 8], 27. Explain the interlocked functions for lock based mutual exclusion under Windows OS., [LO 8], 28. Explain the advantages and limitations of interlocked function based synchronisation under Windows., 29., 30., 31., 32., 33., 34., 35., 36., 37., 38., 39., , [LO 8], Explain the sleep & wakeup mechanism for mutual exclusion., [LO 8], What are the merits and de-merits of sleep & wakeup mechanism based mutual exclusion?, [LO 8], What is mutex?, [LO 8], Explain the mutex based process synchronisation under Windows OS., [LO 8], What is semaphore? Explain the different types of semaphores. Where is it used?, [LO 8], What is binary semaphore? Where is it used?, [LO 8], What is the difference between mutex and semaphore?, [LO 8], What is the difference between semaphore and binary semaphore?, [LO 8], What is the difference between mutex and binary semaphore?, [LO 8], Explain the semaphore based process synchronisation under Windows OS., [LO 8], Explain the critical section problem?, [LO 8], What is critical section? What are the different techniques for controlling access to critical section?[LO 8], , 40., 41. Explain the critical section object for process synchronisation. Why is critical section object based, synchronisation fast?, [LO 8], 42. Explain the critical section object based process synchronisation under Windows OS., 43. Explain the Event based synchronisation mechanism for IPC., , [LO 8], [LO 8]
Page 528 :
504, , Introduc on to Embedded Systems, , 44. Explain the Event object based synchronisation mechanism for IPC under Windows OS., 45. What is a device driver? Explain its role in the OS context., , [LO 8], [LO 8], [LO 9], , 46. Explain the architecture of device drivers., 47. Explain the different functional and non-functional requirements that needs to be evaluated in the selection, of an RTOS., [LO 10], , Lab Assignments, 1. Write a multithreaded Win32 console application satisfying:, (a) The main thread of the application creates a child thread with name “child_thread” and passes the, pointer of a buffer holding the data “Data passed from Main thread”., (b) The main thread sleeps for 10 seconds after creating the child thread and then quits., (c) The child thread retrieves the message from the memory location pointed by the buffer pointer and, prints the retrieved data to the console and sleeps for 100 milliseconds and then quits., (d) Use appropriate error handling mechanisms wherever possible., 2. Write a multithreaded Win32 console application for creating ‘n’ number of child threads (n is, configurable). Each thread prints the message “I’m in thread thread no” (‘thread no’ is the number, passed to the thread when it is created. It varies from 0 to n – 1) and sleeps for 50 milliseconds and then, quits. The main thread, after creating the child threads, wait for the completion of the execution of child, threads and quits when all the child threads are completed their execution., 3. Write a multithreaded application using ‘PThreads’ for creating ‘n’ number of child threads (n is, configurable). The application should receive ‘n’ as command line parameter. Each thread prints the, message “I’m in thread thread no” (‘thread no’ is the number passed to the thread when it is created. It, varies from 0 to n – 1) and sleeps for 1 second and then quits. The main thread, after creating the child, threads, wait for the completion of the execution of child threads and quits when all the child threads, are completed their execution. Compile and execute the application in Linux., 4. Write a multithreaded application in Win32 satisfying the following:, (a) Two child threads are created with normal priority, (b) Thread 1 retrieves and prints its priority and sleeps for 500 milliseconds and then quits, (c) Thread 2 prints the priority of thread 1 and raises its priority to above normal and retrieves the new, priority of thread 1, prints it and then quits, (d) The main thread waits for the completion of both the child threads and then terminates., 5. Write a Win32 console application illustrating the usage of anonymous pipes for data sharing between, a parent and child thread of a process. The application should satisfy the following conditions:, (a) The main thread of the process creates an anonymous pipe with size 512KB and assigns the handle, of the pipe to a global handle, (b) The main thread creates an event object “synchronise” with state non-signalled and a child thread, with name ‘child_thread’., (c) The main thread waits for the signalling of the event object “synchronise” and reads data from the, anonymous pipe when the event is signalled and prints the data read from the pipe on the console, window., (d) The main thread waits for the execution completion of the child thread and quits when the child, thread completes its execution.
Page 529 :
Real-Time Opera ng System (RTOS) based Embedded System Design, , 6., , 7., , 8., , 9., , 10., , (e) The child thread writes the data “Hi from child thread” to the anonymous pipe and sets the event, object “synchronise” and sleeps for 500 milliseconds and then quits., Compile and execute the application using Visual Studio under Windows OS., Write a Win32 console application (Process 1) illustrating the creation of a memory mapped object of, size 512KB with name “mysharedobject”. Create an event object with name “synchronise” with state, non-signalled. Read the memory mapped object when the event is signalled and display the contents on, the console window. Create a second console application (Process 2) for opening the memory mapped, object with name “mysharedobject” and event object with name “synchronise”. Write the message, “Message from Process 2” to the memory mapped object and set the event object “synchronise”. Use, appropriate error handling mechanisms wherever possible. Compile both the applications using Visual, Studio and execute them in the order Process 1 followed by Process 2 under Windows OS., Write a multithreaded Win32 console application where:, (a) The main thread creates a child thread with default stack size and name ‘Child_Thread’., (b) The main thread sends user defined messages and the message ‘WM_QUIT’ randomly to the child, thread., (c) The child thread processes the message posted by the main thread and quits when it receives the, ‘WM_QUIT’ message., (d) The main thread checks the termination of the child thread and quits when the child thread completes, its execution., (e) The main thread continues sending random messages to the child thread till the WM_QUIT, message is sent to child thread., (f) The messaging mechanism between the main thread and child thread is synchronous., Compile the application using Visual Studio and execute it under Windows OS., Write a Win32 console application illustrating the usage of anonymous pipes for data sharing between, a parent and child processes using handle inheritance mechanism. Compile and execute the application, using Visual Studio under Windows OS., Write a Win32 console application for creating an anonymous pipe with 512 bytes of size and pass the, ‘Read handle’ of the pipe to a second process (another Win32 console application) using a memory, mapped object. The first process writes a message “Hi from Pipe Server”. The second process reads, the data written by the pipe server to the pipe and displays it on the console window. Use event object, for indicating the availability of data on the pipe and mutex objects for synchronising the access to the, pipe., Write a multithreaded Win32 Process addressing:, (a) The main thread of the process creates an unnamed memory mapped object with size 1K and shares, the handle of the memory mapped object with other threads of the process, (b) The main thread writes the message “Hi from main thread” and informs the availability of data to, the child thread by signalling an event object, (c) The main thread waits for the execution completion of the child thread after writing the message to, the memory mapped area and quits when the child thread completes its execution, (d) The child thread reads the data from the memory mapped area and prints it on the console window, when the event object is signalled by the main thread, (e) The read write access to the memory mapped area is synchronised using a mutex object, , 505
Page 530 :
506, , Introduc on to Embedded Systems, , 11. Write a multithreaded application using Java thread library satisfying:, (a) The first thread prints “Hello I’m going to the wait queue” and enters wait state by invoking the, wait method., (b) The second thread sleeps for 500 milliseconds and then prints “Hello I’m going to invoke first, thread” and invokes the first thread., (c) The first thread prints “Hello I’m invoked by the second thread” when invoked by the second, thread.
Page 532 :
508, , Introduc on to Embedded Systems, , Learn about the interrupt handling mechanism and implementa on of Interrupt, Service Rou nes under MicroC/OS-II kernel, Learn about the Integrated Development Environment for OS customisa on, and applica on development for MicroC/OS-II, , In Chapter 10 we discussed about the fundamentals of RTOS, the different kernel services of an RTOS, the, different techniques used for implementing multitasking, the different mechanisms used for communicating, between multiple concurrently running tasks and the mechanisms to synchronise the execution of tasks and, accessing of shared resources. The implementation of the multitasking strategy, inter-task communication and, synchronisation is OS kernel dependent. It varies across kernels. Let’s have a look at these implementations, for the VxWorks and MicroC/OS-II Real Time Operating Systems., , 11.1, , VxWORKS, , VxWorks is a popular hard real-time, multitasking operating system from Wind, River Systems (http://www.windriver.com/). It supports a process model close to, the POSIX Standard 1003.1, with some deviations from the standard in certain, areas. It supports a variety of target processors/controllers including Intel x-86,, ARM, MIPS, Power PC (PPC) and 68K. Please refer to the Wind Driver System’s, VxWorks documentation for the complete list of processors supported., The kernel of VxWorks is popularly known as wind. The latest release of VxWorks introduces the concept, of Symmetric multiprocessing (SMP) and thereby facilitates multicore processor based Real Time System, design. The presence of VxWorks RTOS platform spans across aerospace and defence applications to, robotics and industrial applications, networking and consumer electronics, and car navigation and telematics, systems., VxWorks follows the task based execution model. Under VxWorks kernel, it is possible to run even a, ‘subroutine’ as separate task with own context and stack. The ‘wind’ kernel uses the priority based scheduling, policy for tasks. The inter-task communication among the tasks is implemented using message queues,, sockets, pipes and signals, and task synchronisation is achieved through semaphores., LO 1 Discuss the, VxWorks RTOS, from Wind River, Systems, , 11.1.1, , Task Creation and Management, , Under VxWorks kernel, the tasks may be in one of the following primary states or a specific combination of, it at any given point of time., READY: The task is ‘Ready’ for execution and is waiting for its turn to get the CPU, PEND: The task is in the blocked (pended) state waiting for some resources, DELAY: The task is sleeping, SUSPEND: The task is unavailable for execution. This state is primarily used for halting a task for debugging., Suspending a task prevents it only from the execution and will not block it from state transition. It is possible, for a suspended task to change the task state (For example, if a task is suspended when the task is in the, state ‘DELAY’, sleeping for a specified duration, its state will change to ‘READY’ ‘SUSPEND’ when the, sleeping delay is over.
Page 533 :
An Introduc on to Embedded System Design with VxWorks and MicroC/OS-II RTOS, , 509, , STOP: A state used by the debugger facilities when a break point is hit. The error detection and reporting, mechanism also uses this when an error condition occurs. The ‘STOP’ state is mainly associated with, development activity., A task may run to completion from its inception (‘READY’) state or it may get pended or delayed or, suspended during its execution. If a task is picked up for execution by the scheduler, and suppose another, task of higher priority becomes ‘READY’ for execution, and if the scheduling policy is pre-emptive priority, based, the currently executing task is pre-empted and the high priority task is executed. The pre-empted task, enters the ‘READY’ state. If a currently executing task requires a shared resource, which is currently held, by another task, the currently executing task is preempted and it enters the ‘PEND’ state until the resource, is released by the task holding it. If a task contains sleeping requirement like polling an external device, at a periodic interval or sampling data from the external world at a periodic time, the task sleeps during, the periodic interval. The task is said to be in the ‘DELAY’ state during this time. If a debug request for, debugging a task in execution happens during the execution of a task, it is moved to the state ‘SUSPEND’., The task in this state is unavailable for execution. The ‘SUSPEND’ state only prevents the execution of a task, and it does not prevent state transitions., When a task is created with the task creation kernel system call taskInit(), the task is created with the, state ‘SUSPEND’. In order to run the newly created task, it should be brought to the ‘READY’ state. It is, achieved by activating the task with the system call taskActivate(). The system call taskSpawn() can be used, for creating a task with ‘READY’ state. The taskSpawn() call follows the syntax, taskSpawn (task_name, task_priority, task_options, task_stack size, routine_, name, arg1, arg2, arg3, arg4, arg5, arg6, arg7, arg8, arg9, arg10 );, , where task_name is the name of the task and it is unique. The parameter task_priority defines the priority for, the task. It can vary from 0 (Highest priority) to 255. The task_options parameter specifies the options for the, task. For example, if the task requires any floating point operation, it should be set as VX_FP_TASK. Set the, option as VX_UNBREAKABLE for disabling breakpoints in the task. Refer to VxWorks’ documentation for, more details on the task options. The parameter routine_name specifies the entry point for the task. It can be, function main or a subroutine. ‘arg1’ to ‘arg10’ specifies the arguments required for executing the task. It is, possible to have multiple tasks with the same routine_name and different argument list. Each task will have, its own stack and context. On creating the task, taskSpawn returns a task ID which is a 4 byte handle to the, task’s data structure. The following table gives a snapshot of various task creation and management routines, supported by VxWorks., Function Call*, , Description, , taskInit(), , Create a task, , taskActivate(), , Initialise a task, , taskSpawn(), , Create and initialise a task, , taskName( ), , Return the task name associated with a task ID, , taskNameToId( ), , Return the task ID associated with a task name, , taskIdSelf( ), , Return the task ID of the calling task, , taskIdVerify( ), , Check whether the task with given ID exists., , taskOptionsGet( ), , Retrieve the options associated with a task, , * Please refer to the VxWorks library reference manual for the parameter details of each function call.
Page 534 :
510, , Introduc on to Embedded Systems, , taskOptionsSet( ), , Set the options for a task, , taskIsReady( ), , Check whether a task is ‘Ready’ to execute, , taskIsSuspended( ), , Check whether a task is in the ‘Suspend’ sate, , taskPriorityGet( ), , Get the task’s priority, , taskRegsGet( ), , Get the register details of a task, , taskRegsSet( ), , Set the registers for a task, , taskInfoGet( ), , Retrieve information about the task, , taskTcb( ), , Retrieve a pointer to the task’s Task Control Block, , taskIdListGet( ), , Retrieve the list of all ‘Active’ tasks., , taskSuspend( ), , Suspend a task (Change state to ‘SUSPEND’), , taskResume( ), , Resume a task (Change state to ‘READY’), , taskRestart( ), , Restart a task. It recreates a task with original task creation parameters, , taskDelay( ), , Sleep the task (Sleep period is given in timer tick units). The state of the task changes to, ‘DELAY’. The task is moved to the end of the ready queue for tasks of the same priority., , nanosleep( ), , Sleep the task (Sleep period is given in nanoseconds). The state of the task changes to ‘DELAY’, , exit(), , Terminate the calling task and free the memory occupied its stack and TCB., , taskDelete( ), , Terminate the task specified and free the memory occupied by its stack and TCB., , taskSafe( ), , Protects a task from deletion by other tasks. It is essential for ensuring that the task is not deleted by other tasks, when it is holding a shared resource and executing in the critical section., , taskUnsafe( ), , Used by a task to inform other tasks that it is available for deletion. A task uses this if it is, already declared as an undeletable task by the function call taskSafe( ), , The task creation and management system routines are part of the library taskLib. The following piece of, code illustrates the creation of task., //Header, #include, #include, #include, , for VxWorks kernel specific implementations, “vxWorks.h”, “taskLib.h”, “stdio.h”, , //Function Prototype, void print_task(void);, //*******************************************************************, //Main task, void main_task(void), {, int tasked;, //Spawn Task A, if((taskId = taskSpawn(“task1”,90,VX_NO_STACK_FILL,2000,
Page 535 :
An Introduc on to Embedded System Design with VxWorks and MicroC/OS-II RTOS, , 511, , (FUNCPTR) print_task,0,0,0,0,0,0,0,0,0,0)) == ERROR), printf(“Creation of print_task failed\n”);, exit();, }, //*******************************************************************, //Task print_task, void print_task (void), {, int ID;, //Get the task ID, ID = taskIdSelf( );, //Print the task ID, printf(“ The ID of the task is: %d\n”, ID);, //Delete the task, taskDelete(ID), }, , The main task main_task creates a new task with name task1, priority 90, stack size 2000 and option NO_, STACK_FILL and terminates. The new task task1 retrieves its task ID, prints it and finally deletes the task., , 11.1.2, , Task Scheduling, , On the scheduling front, VxWorks supports two types of scheduling interfaces, namely ‘POSIX scheduling’, and ‘wind’ scheduling interfaces. The ‘POSIX scheduling’ interface is based on the concept of ‘process’, and it defines a portable interface, whereas the ‘wind scheduling’ is based on the concept of ‘tasks’. The, POSIX standard for task scheduling allows setting the scheduling policies independently for process (i.e. It, is possible to set the scheduling policy of a process as ‘Round Robin’, whereas for another process it can be, ‘Priority-based’ scheduling, provided the scheduler have the implementation for both). But the VxWorks’, implementation of POSIX scheduling interface does not allow the setting of different scheduling policies for, different tasks. It allows only a single system wide scheduling policy for the different tasks running on it. The, table given below gives a snapshot of various POSIX scheduling calls supported by VxWorks., Function Call†, , Description, , sched_setparam( ), , Sets the priority for the task, , sched_getparam( ), , Retrieves the priority of the given task, , sched_setscheduler( ), , Set the scheduling policy and priority for the task, , sched_yield( ), , Stop task execution and relinquish the CPU to other tasks, , sched_getscheduler( ), , Retrieve the current scheduling policy. VxWorks supports two types of scheduling, namely;, priority based pre-emptive (SCHED_FIFO) and priority based Round Robin (SCHED_RR), , sched_get_priority_max( ), , Retrieve the maximum possible POSIX priority value, , sched_get_priority_min( ), , Retrieve the minimum possible POSIX priority value, , sched_rr_get_interval( ), , Retrieve the Time slice interval for Round Robin scheduling policy, , † Please refer to the VxWorks library reference manual for the parameter details of each function call.
Page 536 :
512, , Introduc on to Embedded Systems, , VxWorks supports two different types of scheduling policies namely; Round Robin (Time slice based), and Priority based pre-emptive. The Round Robin scheduling policy is adopted for priority resolution among, equal priority tasks. Imagine a situation where more than one tasks with equal priority are in the ‘READY’, state and the currently executing task is also with the same priority, if the scheduling policy adopted is preemptive, these tasks may not be able to pre-empt the currently running tasks since they are of equal priority., The other tasks will get a chance to execute only when the running task voluntarily relinquishes the CPU, or it is pended on a resource request. This issue can be addressed if Round Robin policy is adopted for, resolving the priority among equal priority tasks. Round Robin scheduling can be enabled with the function, call kernelTimeSlice(). This function takes the time slice in the form of timer tick. Each task is executed for, the amount of time specified, if there are multiple tasks with equal priority exist. The task relinquishes the, CPU to the other task with equal priority when this time interval is completed. Setting a time interval value, of 0 for the time slice interval disables Round Robin scheduling for equal priority tasks., VxWorks kernel has a well-defined exception handling module which takes care of the handling of, exceptions that arises during the execution of a task. In case of an exception, the task caused the exception is, suspended and the state of the task at the point of exception is saved. All other tasks and kernel continue their, operation without any interruption., , 11.1.3, , Kernel Services, , The kernel functionalities of VxWorks is also implemented as tasks and they are known as system tasks. The, system tasks exist concurrently with user defined tasks. The root task tUsrRoot is the first task executed by, the scheduler. The function usrRoot() is the entry point to this task and it performs the following:, ∑ Spawns the logging task tLogTask, the exception task tExcTask, the network task tNetTask, the target, agent task tWdbTask and tasks for optional components (like shell service tShell, Remote login tRlogind,, etc.) selected by the user while building the kernel., The Root task is user customisable and user can add necessary additional initialisation code to this, task during the kernel build time. The root task’s responsibility gets over with the starting of all necessary, initialisations and it is terminated and deleted after the initialisation process is completed. The kernel modules, use the logging task for logging system messages without current task context IO. The exception handling, task is responsible for handling the exceptions/errors encountered during the execution of a task. It has the, highest priority. The priority of it should not be altered in any form by suspending or deleting the task or, by assigning a lower priority. The tRlogind daemon is responsible for managing remote login request from, another VxWorks target or a host machine. For this functionality to work the VxWorks’ target shell tShell, and the remote login service components rlogin should be included in the kernel build configuration., , 11.1.4, , Inter-Task Communication, , The inter-task communication is facilitated through shared memory, message queues, pipes, sockets, Remote, Procedure Call (RPC) and signals. Mutual exclusion and synchronisation in shared resource access is, implemented through semaphores., VxWorks kernel follows a single linear address space for tasks. The data can be shared in the form of, global variable, linear buffer, linked list and ring buffer., ‘Message queue’ is the primary inter-task communication mechanism under VxWorks. Message queues, support two-way communication of messages of variable length. The two-way messaging between tasks can, be implemented using one message queue for incoming messages and another one for outgoing messages., Messaging mechanism can be used for task-to task and task to Interrupt Service Routine (ISR) communication., Two different versions of message queues are supported by VxWorks. They are; POSIX based message
Page 537 :
An Introduc on to Embedded System Design with VxWorks and MicroC/OS-II RTOS, , 513, , queues and Wind driver kernel (wind) specific message queues. The table given below gives a snapshot of, various Wind message queue based function calls for messaging., Function Call‡, , Description, , msgQCreate( ), , Create and initialise a message queue. The parameters are maximum number of messages supported, and the maximum length in bytes for a message., , msgQDelete( ), , Delete a message queue and free the messages, , msgQSend( ), , Send a message to the message queue. Used by a task or ISR to send a message. If any task is waiting from a message from the message queue, the message is delivered to the first waiting task. If no, tasks are waiting for a message, the message is added to the buffer holding the messages., , msgQReceive( ), , Retrieve a message from the message queue. If the message queue already contains messages, the, first message is removed from the queue and it is supplied to the calling task. If there is no messages present in the message queue at the time of calling this function, the task is blocked and it is, moved to the message waiting queue. The message waiting queue can be ordered on the basis of, either priority or FIFO policy. The task will be in the ‘PEND’ state., , It is not necessary that a message queue always have space to accommodate a message when a task, tries to write a message to it. The message queue may be full and may not have room for accommodating a, message. In such case the task can either wait until a space available in the queue or can return immediately., Similarly when a task tries to read a message from the message queue, there may be situations in which the, message queue is empty. The task needs to wait until a message is available or it can return immediately., The choice on whether the task needs to wait or return immediately is determined by the timeout parameters, used in conjunction with message sending and reception. A time out value NO_WAIT (0), allows the task, to return immediately and the value WAIT_FOREVER (–1) forces the task to wait until a space is available, for posting a message in the case of message sending and a message is available for reading in the case of, message reception., A message can be posted as either normal message or high priority (urgent) message. The msgQSend(), function provides options to set a message as either normal or high priority. A normal message is placed, at the bottom of the message queue and a high priority message is always placed at the top of the message, queue. A value MSG_PRI_NORMAL for the message priority option declares it as normal message whereas, the value MSG_PRI_URGENT sets a message as urgent., The following piece of code illustrates the implementation of Wind message queue based communication, in a multitasking application., , Example 1, Here a main task creates two tasks, namely, ‘task_a’ and ‘task_b’ with priority 100, stack size 10000 and, option NO_STACK_FILL. It also creates a message queue with number of messages supported as 50 and, the maximum length in bytes for a message as 20. The message queue is created with an option for queuing, the pended tasks (tasks waiting for a message to arrive in the message queue) as FIFO. ‘task_a’ sends the, message “Hi from Task A” with message priority ‘urgent’ and with option for waiting if there is no space, available in the message queue for posting the message. ‘task_b’ receives the message from the message, queue and waits for the availability of a message if the message queue is empty., , ‡ Please refer to the VxWorks library reference manual for the parameter details of each function call.
Page 539 :
An Introduc on to Embedded System Design with VxWorks and MicroC/OS-II RTOS, , 515, , if ((mesgQueueId = msgQCreate(MAX_MESSAGES,MAX_MESSAGE_LENGTH,MSG_Q_FIFO)), == NULL), printf(“Message Queue creation failed…\n”);, //Spawn Task A, if((taskId = taskSpawn(“task_a”,100,VX_NO_STACK_FILL,10000,, (FUNCPTR)task_A,0,0,0,0,0,0,0,0,0,0)) == ERROR), printf(“Creation of Task A failed\n”);, //Spawn Task B, if((taskId = taskSpawn(“task_b”,100,VX_NO_STACK_FILL,10000,, (FUNCPTR)task_B,0,0,0,0,0,0,0,0,0,0)) == ERROR), printf(“Creation of Task B failed\n”);, }, , The POSIX standard supports named message queues with options for setting message level priorities. The, table given below summarises the list of POSIX Message queue function calls supported by VxWorks., Function Call§, , Description, , mqPxLibInit( ), , Initialises the POSIX message library. The initialisation should be done before any task can make, use of the message queue, , mq_open( ), , Opens a message queue. The message queue must be created/opened by the task for posting and, receiving messages. A message queue is created by calling this function with parameter O_CREAT., A task can open a message queue in read only mode, write only mode or read write mode. This option, is specified by the flags O_RDONLY, O_WRONLY and O_RDWR., , mq_send( ), , Posts a message to the queue. The option O_NONBLOCK specifies the task to return immediately if, there is no room left for a message to place in the message queue. Otherwise the task will wait until, there is space for writing the message in the message queue. Messages can be sent with different, priorities. The priority ranges from 0 (lowest) to 31 (highest priority). The highest priority message, is always placed in front of the message queue., , mq_receive( ), , Retrieves a message from the message queue. The option O_NONBLOCK specifies the task to return, immediately if there is no message available in the message queue. Otherwise the task will wait until, there is a message to read in the message queue., , mq_close( ), , Used by a task to indicate it is not using the message queue anymore., , mq_unlink( ), , Used by a task to destroy a message queue. Unlinking destroys the message queue only after all tasks, which are using the queue close it., , mq_notify( ), , Notifies a task, when a message for the task arrives in an empty message queue. The mq_notify() call, specifies a signal to be sent to the task when a message is placed in an empty queue. A task can cancel, the notification registration at any point during the waiting by passing a NULL in place of the signal, value to the mq_notify() function call., , § Please refer to the VxWorks library reference manual for the parameter details of each function call
Page 540 :
516, , Introduc on to Embedded Systems, , mq_setattr( ), , Sets the attributes for the message queue. The attributes are:, 1. Blocking flag O_NONBLOCK., 2. Allowed maximum number of messages in the queue., 3. Allowed maximum size of a message., 4. The number of messages currently present in the queue., A task can change only the blocking flag., , mq_getattr( ), , Retrieves the attributes for the message queue., , Pipes are another form of IPC mechanism supported by VxWorks. Pipes use the message queue based, technique for communication. The only difference is that pipe acts as a virtual I/O device and it can be, accessed with I/O access calls in the same way as accessing an I/O device. The syntax for pipe creation, function is given below., pipeDevCreate (“/pipe/name”, max_msgs, max_length);, , where the first parameter is the name of the pipe, the parameter max_msgs represents the maximum number, of messages and the allowed maximum size of a message. Normal Input/ Output routines like open, read,, write and I/O controls are used for accessing pipes. Interrupt Service Routines are only allowed to write to a, pipe and not reading from the pipe., Sockets are the mechanism utilised by VxWorks to communicate between processes running on different, targets which are networked and for executing a procedure (function) which is part of another process, running on the same CPU or on a different CPU within the network (Remote Procedure Call (RPC)). Sockets, works on Internet communication protocols. VxWorks supports TCP/IP and UDP based protocols for socket, communication., ‘Signals’ is a form of software event notification based Inter Process Communication (IPC) mechanism, supported by VxWorks. The ‘signal’ mechanism of VxWorks supports 31 different signals. A signal is, associated with an event and the occurrence of the event asserts the signal. Any task or Interrupt Service, Routine (ISR) can generate a signal which is intended for a task. Upon receiving the signal notification, the, task is suspended and it executes the ‘signal handler’ associated with the signal on its next scheduling. As a, rule of thumb the signal handler should not contain any routines which contain code (e.g. Accessing a shared, resource, critical section, etc.) that may cause the blocking of the task and thereby leading to a deadlock, situation. ‘Signal’ based IPC mechanism is more appropriate for exception and error handling than general, purpose communication mechanism. The definition for a typical signal handler is given below., void sigHandler (int sigNum), , where sigHandler is the name of the signal handler function and sigNum is the signal number., The definition for a signal handler for passing additional arguments will look like, void sigHandler (int sigNum, int code, struct sigcontext *pSigContext), , where sigHandler is the name of the signal handler function, sigNum is the signal number, code is the, additional argument and pSigContext is the context of task before signal., The Signal handler function should be attached to the signal using the function sigaction( ) (For POSIX, compliant signal usage) or sigvec( ) for Wind signal usage., VxWorks support two kinds of ‘signal’ interfaces, namely;, 1. UNIX BSD Style Signals, 2. POSIX Compatible Signals
Page 541 :
An Introduc on to Embedded System Design with VxWorks and MicroC/OS-II RTOS, , 517, , The table given below summarises the list of basic ‘Signal’ function calls supported by VxWorks., Function Call¶, , Description, , sigInit( ), , Signal library initialisation routine. It must be executed during the OS initialisation before enabling, interrupts., , signal( ), , Specifies the handle associated with a signal. Supported by both Wind signal interface and POSIX, interface., , kill( ), , Sends a signal to a specified task. Supported by both Wind signal interface and POSIX interface., , raise( ), , Sends a signal to the same task. Supported by only POSIX interface., , sigaction( ), sigvec( ), , Binds a signal handler to a particular signal. sigaction() is the call corresponding to POSIX interface, and sigvec() is the call corresponding to Wind Signal interface., , sigsetmask( ), , Sets the mask of blocked signals. It selectively inhibits a signal. Supported by Wind signal interface., , sigblock( ), , Add a signal to the set of blocked signals. It selectively inhibits a signal. Supported by Wind signal, interface., , 11.1.5 Task Synchronisation and Mutual Exclusion, Data sharing is one of the inter-task communication mechanism adopted by VxWorks. VxWorks follows a, single linear address space for all user tasks. Imagine a situation where a global variable is being accessed by, a task and it is pre-empted by a high priority task (or by an ISR) and the high priority task (or ISR) also tries, to modify the global variable. It may result in inconsistent result, if the operation on the global variable is not, atomic. Hence it is advised to give exclusive access to a shared resource when it is being used by a task. In, other words make the access to shared resources mutually exclusive. It is essential for task synchronisation., VxWorks implements mutual exclusion policies in three different ways. They are, 1. Task Locking (Disabling task preemption), 2. Disabling interrupts, 3. Locking resource with semaphores, Task locking (Disabling of task preemption) provides restrictive access to shared resources. The function, call taskLock prevents the kernel from pre-empting the task. However it will not prevent the execution of, Interrupt Service Routines (ISRs). This method is suited when there is no global data shared between tasks, and ISR. Otherwise the problem will be in the half solved state. The major drawback of this approach is the, deviation from real-time behaviour. With task preemption disabled, a high priority task may not be serviced, until the currently running task relinquishes the CPU by enabling the pre-emption (By calling taskUnlock)., It is not an acceptable behaviour if the high priority task doesn’t involve accessing of shared resource which, is held by the currently executing task. An overview of the implementation of task locking based mutual, exclusion is given below., #include “vxWorks.h”, //*******************************************************************, //Task_A, void task_A(void), {, //………, //………, //Disable task preemption, ¶ Please refer to the VxWorks library reference manual for the parameter details of each function call.
Page 542 :
518, , Introduc on to Embedded Systems, , taskLock ();, //Shared data access code, //…………, //Enable task preemption, taskUnlock();, }, , Interrupt locking based mutual exclusion implementation disables interrupts. It is appropriate for exclusive, access of resource shared between tasks and Interrupt Service Routine (ISR). The major drawback of this, method is that the system will not respond to interrupts when the task is executing the critical section code, (Accessing shared resource). It is not acceptable for a real time system., An overview of the implementation of interrupt locking based mutual exclusion is given below., #include “vxWorks.h”, //*******************************************************************, //Task_A, void task_A(void), {, //………, //………, //Disable Interrupts, int lock = intLock ();, //Shared data access code, //…………, //Enable Interrupts, intUnlock(lock);, }, , It should be noted that the implementation of the intLock routine is processor architecture dependent. The, intLock routine returns an architecture-dependent lock-out key representing the interrupt level prior to the, call. For example, for ARM processors, interrupts (IRQs) are disabled by setting the ‘I’ bit in the CPSR., Semaphores provide both exclusive access to shared resource and synchronisation among tasks. VxWorks, has the implementation for Wind specific and POSIX compliant versions of semaphores. The Wind specific, semaphores supported by VxWorks are:, 1. Binary semaphore, 2. Mutual exclusion semaphore, 3. Counting semaphore, The binary semaphore provides exclusive access to resource by locking it exclusively. At any given point, of time the state of the binary semaphore is either ‘available’ or ‘unavailable’. Counting semaphore is used, for sharing resources among a fixed number of tasks. It associates a count with it and the count is decremented, each time when a resource acquires it. When the count reaches ‘0’ the semaphore will not be available and, a task requesting the semaphore is pended. The count associated with a counting semaphore is specified at, the time of creating the counting semaphore. Counting semaphores are usually used for protecting multiple, copies of resources. On releasing the semaphore by a task, the count associated with it is incremented by, one. The inherent problem with binary semaphore is that they are not deletion safety, meaning whenever a, task holding the semaphore is deleted, the semaphore is not released. Also the ‘binary’ semaphore doesn’t, support a mechanism for priority inheritance for avoiding priority inversion. These limitations are addressed, in a special implementation of ‘binary’ semaphore called ‘mutual exclusion’ semaphore.
Page 543 :
An Introduc on to Embedded System Design with VxWorks and MicroC/OS-II RTOS, , 519, , The semaphores are distinguished with the way they created. The access and control routines for all, semaphores remain the same. The following table gives a snapshot of the different semaphore related function, calls., Function Call**, , Description, , semBCreate( ), , Create and initialise a binary semaphore. Successful creation returns a semaphore ID which, can be used as the semaphore handle for all semaphore related actions. When a task tries to, access a semaphore, if the semaphore is not available the task is put in a wait queue. The queue, is ordered either in FIFO model or priority model. It can be specified at the time of creation, of the semaphore. A value of SEM_Q_FIFO sets FIFO model whereas SEM_Q_PRIORITY, sets the priority model. The semaphore creation also specifies its status at the time of creation, (Available or unavailable)., , semMCreate( ), , Create and initialise a mutual exclusion semaphore. Successful creation returns a semaphore, ID which can be used as the semaphore handle for all semaphore related actions. When a task, tries to access a semaphore, if the semaphore is not available the task is put in a wait queue., The queue is ordered either in FIFO model or priority model. It can be specified at the time of, creation of the semaphore. A value of SEM_Q_FIFO sets FIFO model whereas SEM_Q_PRIORITY sets the priority model. The semaphore creation also specifies its status at the time of, creation (Available or unavailable)., , semBCCreate( ), , Create and initialise a counting semaphore. Successful creation returns a semaphore ID which, can be used as the semaphore handle for all semaphore related actions. When a task tries to access a semaphore, if the semaphore is not available the task is put in a wait queue. The queue, is ordered either in FIFO model or priority model. It can be specified at the time of creation, of the semaphore. A value of SEM_Q_FIFO sets FIFO model whereas SEM_Q_PRIORITY, sets the priority model. The semaphore creation also specifies its status at the time of creation, (Available or unavailable)., , semDelete( ), , Terminate and free a semaphore., , semTake( ), , Acquires a semaphore., , semGive( ), , Release a semaphore., , semFlush( ), , Unblock all tasks which are waiting (pended) for the specified semaphore., , The mutual exclusion semaphore has an option to set its priority to the highest priority of the task which, is being pended while attempting to acquire a semaphore which is already in use by a low priority task., This ensures that the low priority task which is currently holding the semaphore, when a high priority task, is waiting for it, is not pre-empted by a medium priority task. This is the mechanism supported by the, mutual exclusion semaphore to prevent priority inversion. To make use of this feature, the mutual exclusion, semaphore should be created with the option SEM_INVERSION_SAFE and the queue holding the pended, tasks waiting for the semaphore should be sorted on priority basis. These two options should be specified, while creating the semaphore. The syntax for this is given below., Id = semMCreate (SEM_Q_PRIORITY | SEM_INVERSION_SAFE);, , where Id is the 4 byte ID returned by the system on creating the semaphore. It is used as the handle for, accessing the semaphore. The option SEM_Q_PRIORITY sets the ordering of the queue, holding the pended, tasks which are waiting for the semaphore, as priority based. The option SEM_INVERSION_SAFE enables, priority inheritance., ** Please refer to the VxWorks library reference manual for the parameter details of each function call.
Page 544 :
520, , Introduc on to Embedded Systems, , The mutual exclusion semaphore protects a task from deletion when it is currently in the critical section. If, the task is not protected from deletion when it is holding a semaphore and is executing in the critical section,, the semaphore will not be released properly and it may not be available for access to other resources. This, may lead to starvation and deadlock. In order to make a semaphore ‘task deletion safe’, it should be created, with the option SEM_DELETE_SAFE. The queue holding the pended tasks waiting for the semaphore can be, sorted on either priority basis or first come first served (FIFO) basis. The task safe option should be specified, while creating the semaphore. The syntax for this is given below., Id = semMCreate (SEM_Q_PRIORITY | SEM_DELETE_SAFE);, , The semFlush() operation is illegal for mutual exclusion semaphores., Whenever a task tries to acquire a semaphore and if the semaphore is not available (It is acquired and, being in use by other task(s)), the task enters the pended state and it waits for the semaphore in a pended, queue. The wind semaphores support a timeout mechanism to specify how long the task needs to wait. It is, useful for tasks which are not interested in wasting the time on waiting for the semaphore. The timeout option, can be set in the semTake() call used for accessing/acquiring the semaphore. Wind supports three different, timeout options. They are explained below., Return immediately: If the semaphore is not available when the task tries to acquire it, the task returns, immediately and it will not enter the pended state. The return value in case of nonavailability of semaphore, is S_objLib_OBJ_UNAVAILABLE. The timeout option NO_WAIT is used for specifying this., Wait for a predefined time: If the semaphore is not available when the task tries to acquire it, the task is, pended and it waits in the pended queue for semaphores for the specified timeout duration. The timeout, is usually specified in terms of the ‘kernel tick’. If the semaphore is not available even after the specified, timeout duration, the task times out and it returns the value S_objLib_OBJ_TIMEOUT., Wait Forever: If the semaphore is not available when the task tries to acquire it, the task is pended and it, waits in the pended queue for semaphores until it is available. The timeout option WAIT_FOREVER is used, for specifying this., As mentioned earlier the pended queue holding the pended tasks waiting for the semaphore can be ordered, based on either priority or FIFO. It is specified by the option parameters SEM_Q_PRIORITY or SEM_Q_, FIFO respectively at the time of creating the semaphore. The priority based sorting enhances the priority, based execution with expense of kernel overhead. Whereas FIFO based mechanism is simple to implement, and is free from overheads., VxWorks also supports the implementation of POSIX standard semaphores. POSIX supports named and, unnamed semaphores and are counting semaphores. The interface for POSIX semaphores is defined by the, library semPxLib., , 11.1.6, , Interrupt Handling, , VxWorks support a well-defined interrupt handling mechanism for handling hardware interrupts. Efficient, and fast handling of external interrupts is a key requirement for real-time systems. The salient features of, VxWorks’ interrupt handling mechanism are summarised below., 1. The Interrupt Service Routine (ISR) runs in a special context outside any task’s context. This eliminates, the delay in context saving and context retrieval (Context switch delay) in contrast to task execution., This greatly reduces interrupt latency., 2. A separate stack is maintained for use by all ISRs. It is allocated and initialised by the kernel at the time, of system startup. For processor architectures supporting this option, the same stack is used by all ISRs.
Page 545 :
An Introduc on to Embedded System Design with VxWorks and MicroC/OS-II RTOS, , 3., , 4., 5., 6., , 7., 8., , 9., , 10., 11., , 12., 13., , 14., , 521, , If the processor architecture doesn’t support a single stack for all ISRs, the stack of the task which is, currently preempted by the ISR is used by ISR. In this case the stack size for each task should be large, enough to accommodate ISR stack requirement also., Supports connecting of ‘C’ function with system hardware interrupts which are not used by VxWorks, kernel. The connecting of ‘C function’ with the interrupt vector is achieved through the function call, intConnect(). It is responsible for saving the processor registers, setting up the stack entry point, pushing, the argument, to be passed to the ISR function, on the stack and invoking the ‘C function’ as ISR. The, intConnect() function takes the arguments; byte offset of the interrupt vector to connect to, the address, of the ‘C function’ to be connected with the interrupt vector and an argument to the ‘C’ function. The, ‘C function’ becomes the ISR for the interrupt. On completion of the ISR, the registers are restored to, the original state., To avoid starvation and deadlock situations, as a rule of thumb, ISRs are not allowed invoking routines, (involving the access of shared resource protected through semaphores) that may block the ISR., ISRs are not allowed to acquire (take) a semaphore. But are allowed to release (give) a semaphore, (except mutual exclusion semaphore)., ISRs are not allowed to invoke memory allocation and de-allocation functions like malloc(), calloc(),, free() etc. The memory allocation functions internally make use of semaphores for synchronisation and, they may block the ISR., ISRs are not allowed to call any creation or deletion routines. The creation and deletion calls may use, semaphores internally and it may block the ISR., ISRs must not perform I/O operations through VxWorks drivers. The restriction is put for the reason,, most of the device drivers require a task context and it may block the ISR. However, ISRs are allowed, write operations for pipes, which is a virtual I/O device., ISR must not call routines/instructions involving floating point operations. The reason is that the floating, point registers are not saved and re-stored by the ISR connecting code. It is the responsibility of the user, to save and re-store floating point registers explicitly, if the ISR involves floating point calculation., ISRs can make use of the logging service supplied by logger component to send text messages to the, system console., If an exception happens during the execution of an ISR, wind stores the exception details and resets the, system. During the boot-up time, the boot ROM checks for captured exception messages and displays, it on the display console., Interrupts communicate with tasks using shared memory, message queues, pipes, semaphore (can give, a semaphore but can’t take one), pipes and signals., The intLock()function performs a system wide lockout of all interrupts to the highest priority level, supported by the kernel. If the intention is to lockout only interrupts up to a certain level and the system, wants to preserve the occurrence of high priority interrupts, it can be achieved through the system call, intLockLevelSet(), which sets the lock-out priority level to a desired one than locking out all interrupts, including high priority. With an intLockLevelSet(), the intLock()function locks only interrupts with, priority level specified by the lock level in intLockLevelSet(). All other enabled, high priority interrupts, are acknowledged., For interrupts whose priority is higher than that of the lock level set by the function intLockLevelSet(), and Non-maskable interrupts, the system call intVecSet() should be used for connecting a C function as, ISR for the interrupt and also the ISR should not use any kernel facilities that depend on interrupt locks, for their operation.
Page 546 :
522, , Introduc on to Embedded Systems, , The following table gives a snapshot of the Interrupt handling related function calls under VxWorks., Function Call††, IntConnect (VOIDFUNCPTR * vector,, VOIDFUNCPTR routine, int parameter), , Description, Used for connecting a ‘C’ routine with an interrupt vector. The ‘C’ routine, acts as the ISR. It also contains the necessary code for saving and retrieving, required registers, and setting up the stack for ISR, , intContext( ), , Checks whether the current execution context is at interrupt level. Returns, TRUE if the current execution context is at interrupt level. If not FALSE is, returned, , intCount( ), , Returns the current interrupt nesting level in a nested interrupt environment, , intLevelSet(int level ), , Sets the interrupt mask in the interrupt status register. Interrupts are locked out, at or below this level, , intLock( ), , Disables the processor interrupts. Its operation is processor architecture dependent. Used for interrupt locking based mutual exclusion implementa-tion, , intUnlock(int lockKey ), , Re-enable the interrupts. Used for interrupt locking based mutual exclusion, implementation, , intVecBaseSet(FUNCPTR * baseAddr), , Sets the CPU’s vector base register to the specified value. Initially it will be, 0 for almost all processors (Exceptions are their). The subsequent calls to, intVecSet( ) and intVecGet( ) uses this base address value, , intLockLevelSet (int newLevel ), , Sets the current interrupt lock-out level. When the interrupt lock-out level is, set only the interrupts which belong to this specified level are locked by the, function call intLock( ), , intLockLevelGet(), , Returns the current interrupt lock-out level, , intVecBaseGet( ), , Returns the vector base address from the CPU’s vector base register, , intVecSet(FUNCPTR * vector, FUNCPTR function ), , It attaches an exception/interrupt/trap handler to a specified vector. The vector, is specified as an offset into the CPU’s vector table. It takes an interrupt vector, as parameter, which is the byte offset into the vector table and the address of, the ‘C function’ to be connected with the interrupt vector, , intVecGet(FUNCPTR * vector ), , Returns a pointer to the exception/interrupt handler attached to a specified, vector. The vector is specified as an offset into the CPU’s vector table. It takes, an interrupt vector as parameter, which is the byte offset into the vector table, , 11.1.7, , Watchdog for Task Execution Monitoring, , Watchdog timers are essential for bringing the system out of ‘system hang-up’ condition. If a task hangs, at some point of execution due to some unexpected situations (like the peripheral device is not responding, while accessing it in an infinite loop), it should be brought out of the situation to make the system operational., Watchdog timers are used for this. You can set a watchdog timer for the time expected for the execution, completion of the task or a portion of the task which is more prone to hang-up. Start the watchdog timer, when the task is started or when the task is executing in the suspected portion of the code. If the execution, of the task or portion of the task is not completed within the time set in the watchdog timer, the watchdog, expires and it raises a watchdog timeout event. The necessary actions to handle the situation can be written, in the watchdog timeout handler. Under VxWorks, watchdog timeout is handled as part of the system clock, ISR. User can associate a ‘C’ function with the Watchdog timer. The ‘C’ function is executed when the, †† Please refer to the VxWorks library reference manual for the parameter details of each function call.
Page 547 :
An Introduc on to Embedded System Design with VxWorks and MicroC/OS-II RTOS, , 523, , watchdog expires. The time is specified in terms of system timer tick. The timer is created using the function, call wdCreate(). The timer is started with the function call wdStart() and it takes the number of ticks as timer, value, ‘C’ function to be executed in case of timeout and the parameter to the ‘C’ function as parameters., The watchdog timer can be stopped and cancelled at any time prior to its expiration by calling the function, wdCancel()., The following table gives a snapshot of the watchdog timer related function calls., Function Call†, , 11.1.8, , Description, , wdCreate(), , Allocate and initialise a watchdog timer, , wdStart(), , Start the watchdog timer, , wdCancel(), , Cancel the currently running watchdog timer, , wdDelete(), , Terminate and de-allocate a watchdog timer, , Timing and Reference, , In many of the scenarios the application may require timing reference. VxWorks provides access to the, system wide real-time clock for timing reference. Software timers and time reference can be generated using, these interfaces. For timer operations, the task can create a timer and set it for the desired time. The timer runs, with the system timer tick and it generates the ‘signal’, SIGALRM when it expires. The task can associate a, signal handler with this signal for performing the necessary operations in the event of timer expire., , 11.1.9, , The VxWorks Development Environment, , Tornado® II is the development environment from Wind River Systems for VxWorks 5.x development. It, includes the Tornado tools and the VxWorks run-time environment. The Tornado tools include the Integrated, Development Environment (IDE) for OS customisation and building. Debug interface for debugging and, simulator (VxSim) for simulating the target environment. Tornado® II development environment is available, for both Windows and UNIX development hosts. The Tornado (R) IDE is replaced by the Eclipse based IDE, Wind River Workbench for VxWorks 6.x and later., , 11.2, , MICROC/OS-II, , MicroC/OS-II (µC/OS-II) is a simple, easy to use real-time kernel written in ‘C’, language for embedded application development. MicroC OS 2 is the acronym, for Micro Controller Operating System Version 2. The µC/OS-II features:, Multitasking (Supports multi-threading), Priority based pre-emptive task scheduling, MicroC/OS-II is a commercial real-time kernel from Micrium Inc (www.micrium.com). The MicroC/OSII kernel is available for different family of processors/controllers and supports processors/controllers ranging, from 8bit to 64bit. ARM family of processors, Intel 8085/x86/8051, Freescale 68K series and Altera Nios II, are examples for some of the processors/controllers supported by MicroC/OS-II. Please check the Micrium, Inc website for complete details about the different family of processors/controllers for which the MicroC/, OS-II kernel port is available. MicroC/OS-III is the latest addition to the MicroC/OS family RTOS with lots, of improvements and features like support for unlimited number of tasks, mutexes, semaphores, event flags,, message queues, timers and memory partitions, unlimited number of priorities, allowing multiple tasks to run, at the same priority level and preemptive scheduling with Round-Robin for equal priority tasks etc. Please, LO 2 Explain, MicroC/OS-II, Real-time kernel, from Micrium Inc., , ‡‡ Please refer to the VxWorks library reference manual for the parameter details of each function call.
Page 548 :
524, , Introduc on to Embedded Systems, , refer to the Online learning centre for the detailed coverage of MicroC/OS-III based design MicroC OS, follows the task based execution model. Each task is implemented as infinite loop., , 11.2.1, , Task Creation and Management, , Under MicroC OS kernel, the tasks may be in one of the following state at a given point of time., Dormant: The dormant state corresponds to the state where a task is created but no resources are allocated to, it. This means the task is still present in the code memory space, but MicroC/OS needs to be informed about it., Ready: Corresponds to a state where the task is incepted into memory and is awaiting the CPU for its turn, for execution., Running: Corresponds to a state where the task is being executed by CPU., Pending: Corresponds to a state where a running task is temporarily suspended from execution and does not, have immediate access to resources. The waiting state might be invoked by various conditions like—the task, enters a wait state for an event to occur (e.g. Waiting for user inputs such as keyboard input) or waiting for, getting access to a shared resource., Interrupted: A task enters the Interrupted (or ISR) state when an interrupt is occurred and the CPU executes, the ISR., A task is usually created as non-ending function. The creation of a task is illustrated below., //*******************************************************************, //Creates a task with name MicroCTask, void MicroCTask(void *arg), {, while (1), {, //Code corresponding to task., //……………………………………………………………………, }, }, , It creates a task with name MicroCTask. The task doesn’t return anything. The argument to the task is, passed through a pointer to void. Depending on the argument required the pointer can pass structure variables,, other data types or function pointers to the task. The task MicroCTask is in the ‘Dormant’ state now., You need to pass this task to the MicroC kernel to make it ready for execution. It is essential for assigning, resources to the task MicroCTask. The MicroC kernel call OSTaskCreate() or OSTaskCreateExt() is used, for this. These function calls take the address of the task, the priority assigned to it and the stack size, requirement for the task as parameters. OSTaskCreate() is the older version of the task allocation call and, OSTaskCreateExt() is the enhanced version of it. Calling these functions allocate the memory for the task and, put the task in the ‘Ready’ state. The usage of these functions is illustrated below., //*******************************************************************, //Allocate resources for the task MicroCTask, //Make the task MicroCTask ‘Ready’ for execution, //Declare stack as type OS_STK, OS_STK TaskStk[1024];, OSTaskCreateExt(MicroCTask,(void *)0, & TaskStk[1023], 10,10, &TaskStk[0],1024,, (void*) 0, OS_TASK_OPT_STK_CHK );
Page 549 :
An Introduc on to Embedded System Design with VxWorks and MicroC/OS-II RTOS, , 525, , The parameter MicroCTask specifies the entry point of the task MicroCTask. The second parameter, specifies the arguments for executing the task. The parameter TaskStk[1023] sets the top of stack and, TaskStk[0] sets the bottom of the stack for the task. The other parameters are the task priority (10), task ID, (10), stack size (1024) and a pointer to user supplied memory location used as an extension of TCB. Here, it is not used. The last parameter specifies a task specific option like whether stack checking is allowed or, not, whether the stack needs to be cleared, etc. Here it is set for enabling stack check option. It should be, noted that the stack should be declared with type OS_STK. The value OS_STK_GROWTH specifies whether, stack grows downwards (OS_STK_GROWTH=1) or upwards (OS_STK_GROWTH=0). This value should be, configured properly depending on the processor architecture and the stack bottom, top and size should also, be configured accordingly for creating a task., uC/OS-II supports up to 64 tasks. Out of this 8 are reserved for the uC/OS-II kernel. Each task should have, a unique task priority assigned. No two tasks can have the same priority. In effect uC/OS-II supports 56 user, level tasks. The priority of tasks varies from 0 to 63, with 0 being the highest priority. Considering the future, expansions, uC/OS-II advices developers not to use the priority values 0, 1, 2, 3, OS_LOWEST_PRIO-3,, OS_LOWEST_PRIO-2, OS_LOWEST_PRIO-1 and OS_LOWEST_PRIO. Currently, the uC/OS-II reserves, only two task priorities for kernel tasks. Under the uC/OS-II kernel, the ID of the task is its priority. A Task, Control Block (TCB) is assigned to a task when a task is created. TCB is a data structure for holding the, state of a task. It is essential for handling the state information during a context switch. The TCB under uC/, OS-II is represented by OS_TCB. The following table gives a snapshot of the important task creation and, management routines supported by uC/OS-II., Function Call§§, , Description, , OSTaskCreate(), , Create a task and makes it ‘Ready’ for execution., , OSTaskCreateExt(), , Create a task and makes it ‘Ready’ for execution. This is an enhanced version of OSTaskCreate()., , OSTaskStkCheck(), , Checks stack overflow for the creation of tasks. uC/OS-II does not automatically check for, the status of stack on task creation., , OSTimeDly(), , Delay the task for the specified duration. The delay is mentioned in number of clock ticks. It, ranges from 0 to 65535 ticks., , OSTimeDlyHMSM(), , Delay the task for the specified duration. The delay time is specified by the combination of, hours (H), minutes (M), seconds (S) and milliseconds (M). Hour value can range from 0 to 255,, minutes value can range from 0 to 59, second’s value can range from 0 to 59 and millisecond, value can range from 0 to 999. Resolution depends on clock rate., , OSTimeDlyResume(), , Resumes a task which is delayed by a call to either OSTimeDly() or OSTimeDlyHMSM()., , OSTaskDel(), , Deletes a specified task. The task is specified by its priority. Calling this routine places the, task in ‘Dormant’ state. The task can be recreated later, if needed, by calling OSTaskCreate, or OSTaskCreateExt. It is the responsibility of the calling function to ensure that the task, doesn’t hold resources like semaphores and mailboxes. A task can delete itself by passing, OS_PRIO_SELF as the argument to this function call., , OSTaskDelReq(), , Same as OSTaskDel() function. It sends a task delete request to the MicroC kernel. This call, makes the deletion safe and protects the task from deletion when it is holding shared resources, like semaphore and mail boxes., , OSTaskNameGet(), , Returns the name associated with a task. The task is identified using its priority., , §§ Please refer to the MicroC library reference manual for the parameter details of each function call.
Page 550 :
526, , Introduc on to Embedded Systems, , OSTaskNameSet(), , Sets the name for a task. The task is identified using its priority., , OSTaskQuery(), , Retrieves the information about a task in a Task Control block structure (OS_TCB)., , OSTaskSuspend(), , Suspends or blocks a task from execution. On task suspension, the kernel reschedules the, next highest priority task for execution. A task can suspend itself by passing the argument, OS_PRIO_SELF to this call., , OSTaskResume(), , Resumes a suspended task., , MicroC/OS-III is the latest addition to the MicroC/OS family RTOS with lots of improvements and features, like support for unlimited number of tasks, mutexes, semaphores, event flags, message queues, timers and, memory partitions, unlimited number of priorities, allowing multiple tasks to run at the same priority level, and preemptive scheduling with Round-Robin for equal priority tasks etc. The MicroC/OS-III is designed, specifically for 32bit processors but it also supports a variety of 8 and 16bit processors/controllers., The function prototype for the task create function in MicroC/OS-III is, OSTaskCreate (OS_TCB *p_tcb,, , // Address of TCB assigned to task, CPU_CHAR *p_name, // Name you wish to give to the task, OS_TASK_PTR p_task, // Address of (pointer to) the task, void *p_arg,, // “p_arg”, OS_PRIO prio,, // Priority you want to assign to the task, CPU_STK *p_stk_base, // Base address of task’s stack, CPU_STK_SIZE stk_limit, // Watermark limit for stack growth, CPU_STK_SIZE stk_size, // Stack size in number of CPU_STK, //elements, OS_MSG_QTY q_size,, //Size of task message queue, OS_TICK time_quanta, // Time quanta (in number of ticks), void *p_ext,, // Extension pointer, OS_OPT opt,, // Task Options, OS_ERR *p_err);, // Error code, , The following example gives an overview of the task creation in MicroC/OS-III, //*******************************************************************, //Allocate resources for the task MicroCTask, //Make the task MicroCTask ‘Ready’ for execution, //Declare stack as type CPU_STK, CPU_STK TaskStk [512];, // Define the TCB, OS_TCB MicroCTaskTCB;, // Define the variable for returning error code, OS_ERR err;, // Define Task Priority, , OS_PRIO prio = 10;, OSTaskCreate (&MicroCTaskTCB, “MicroC Task”, MicroCTask,(void *)0,prio,, &TaskStk[0],10,200,5,0,(void *)0,OS_OPT_TASK_STK_CHK,&err);, The first parameter is a pointer to the task’s Task Control Block (TCB). A Task Control Block (TCB), is assigned to a task when it is created. TCB is a data structure for holding the state of a task. It is essential
Page 551 :
An Introduc on to Embedded System Design with VxWorks and MicroC/OS-II RTOS, , 527, , for handling the state information during a context switch. The TCB under uC/OS-III is represented by the, variable OS_TCB. It is assumed that storage for the TCB of the task will be allocated by the user code. The, second parameter is a pointer to a NUL terminated ASCII string defining the name of the task (Can be used, by debuggers to provide information about the task). The Parameter OS_TASK_PTR MicroCTask specifies, the entry point of the task MicroCTask. The next parameter specifies the arguments for executing the task, (It’s a void pointer in this case as there are no arguments passed to the task). The parameter OS_PRIO, prio defines the task’s priority. The lower the number, the higher the priority of the task. Priority level 0, is usually reserved for the kernel’s ISR Handler Task (OS_IntQTask ()) depending on the OS configuration., User tasks may not be allowed to use priority 0. In MicroC/OS-III, there is no practical limit to the number, of supported priority levels. The configuration OS_CFG_PRIO_MAX defines the number of maximum, supported priorities. It is usually a multiple of 8. If the priority is defined as a CPU_INT16 variable, there can, be up to 65536 priority levels (OS_CFG_PRIO_MAX = 65536). Priority level OS_CFG_PRIO_MAX-1 is, reserved for the Idle Task (OS_IdleTask ()). In summary, priorities 0, 1, OS_CFG_PRIO_MAX-2 and OS_, CFG_PRIO_MAX-1 are reserved and a task should have a priority between 2 and OS_CFG_PRIO_MAX-3,, inclusively., Whereas the uC/OS-II supported up to 64 tasks. Out of this 8 are reserved for the uC/OS-II kernel. In uC/, OS-II each task should have a unique task priority assigned. In effect uC/OS-II supported 56 user level tasks., The priority of tasks varies from 0 to 63, with 0 being the highest priority. uC/OS-II advices developers not, to use the priority values 0, 1, 2, 3, OS_LOWEST_PRIO-3, OS_LOWEST_PRIO-2, OS_LOWEST_PRIO-1, and OS_LOWEST_PRIO. Currently, the uC/OS-II reserves only two task priorities for kernel tasks. Under, the uC/OS-II kernel, the ID of the task is its priority, The parameter CPU_STK *p_stk_base is a pointer to the task’s stack base address. The task’s local, variables, function parameters, return addresses, and possibly CPU registers during an interrupt are stored, in the stack area. The size of the stack is determined by the task’s requirements (Like the number of bytes, required for storage of local variables for the task itself, all nested functions, as well as requirements for, interrupts) and the anticipated interrupt nesting (unless the processor has a separate stack just for interrupts)., The parameter CPU_STK_SIZE stk_limit acts as a water mark within the task’s stack which can be, used to monitor the stack size and prevent stack overflows. The next parameter related to stack of the task is, CPU_STK_SIZE stk_size which sets the size of the task’s stack in number stack elements defined by, the variable type CPU_STK. Defending on the type configuration of the stack width variable CPU_STK in, the os_type.h configuration file, CPU_STK_SIZE stk_size represents the number of 8/16/32, bit entries available on the stack for CPU_STK configurations CPU_INT08U, CPU_INT16U and CPU_, INT32U respectively., If OS_CFG_TASK_Q_EN configuration is set to DEF_ENABLED in os_cfg.h configuration file, µC/, OS-III allows an optional internal message queue for a task. The parameter OS_MSG_QTY q_size specifies, the maximum number of messages a task can receive through this message queue. Setting the argument OS_, MSG_QTY q_size to 0 while creating a task indicates that the task don’t have an internal message queue., Unlike uC/OS-II, uC/OS-III supports Round Robin task scheduling and the parameter OS_TICK time_, quanta specifies the time quanta in clock ticks when round robin scheduling is enabled. If a task specifies, 0 for the time quanta, the uC/OS-III default time quanta which is the tick rate divided by 10, will be used for, round robin scheduling., A task can also use a pointer to user supplied memory location for TCB extension. A task can opt out, using it by specifying a void pointer for this argument while task creation (As given in the above task creation, example). The OS_OPT opt parameter specifies the task specific options. OS_OPT_TASK_NONE (No, specific options) OS_OPT_TASK_STK_CHK (Option for allowing stack checking) OS_OPT_TASK_STK_, CLR (Specifies whether stack needs to be cleared). A task can combine multiple option through ORing (E.g.
Page 552 :
528, , Introduc on to Embedded Systems, , OS_OPT_TASK_STK_CLR + OS_OPT_TASK_STK_CHK). The parameter OS_ERR *p_err specifies, a pointer to a variable of type OS_ERR to return the error code details. A return value of OS_ERR_NONE, indicates that the task creation is successful., Please refer to the Online Learning Center for the details of the important task creation and management, routines supported by uC/OS-III and sample programs., Interrupt Service Routines (ISRs) are not allowed to create a task. The stack statistics of a task can be, examined by calling the function OSTaskStkCheck(). In order to get the stack statistics for a task, the task, should be created with the option OS_TASK_OPT_STK_CHK. The stack details of the stack for a task in, terms of no. of bytes used and no. of bytes free in the stack are returned in a structure variable of type, OS_STK_DATA. The execution time of this call is determined by the size of the stack and hence the call is, non-deterministic. It is advised not to call this function from ISR due to its non-deterministic nature. The, following code snippet illustrates the usage of this function., //*******************************************************************, //Define variable of type OS_STK_DATA, OS_STK_DATA stack_mem;, //Define 32 bit integer for holding stack size, INT32U stack_size;, //Define variable for holding return value, INT8U err;, //Get the stack details for task with priority 5, err = OSTaskStkChk(5, &stack_mem);, if (OS_NO_ERR == err), stack_size = stack_mem.OSFree + stack_mem.OSUsed;, , The function calls OSTaskSuspend() and OSTaskResume() are used in combination to suspend and resume, a task. Whenever an OSTaskSuspend() call is made by a task, the task is put in the ‘Waiting’ state and the, scheduler picks up the highest priority task from the ‘Ready’ list for execution. Suspending of IDLE task is, not allowed. The following code snippet illustrates the usage of the task suspend function., //*******************************************************************, //Task implementation, void task(void *args), {, while (1), {, //Execute the task specific details…., //………………………………………………………………………, //………………………………………………………………………, //Suspend task with priority 5, OSTaskSuspend(5);, //Rest of the task, //………………………………………………………………………, //………………………………………………………………………, }, }
Page 553 :
An Introduc on to Embedded System Design with VxWorks and MicroC/OS-II RTOS, , 529, , A task can delay itself by calling either OSTimeDly() or OSTimeDlyHMSM() function. Upon calling these, functions, the task is put into the ‘Waiting’ state. The task becomes ready for execution when the delay time, expires or when another task resumes the delayed task by calling a task resume function. Task delaying is, the mechanism by which a task can voluntarily relinquish the CPU to other tasks when it is waiting for any, events to occur. A task can only delay itself and cannot impose delaying of other tasks. The activation of, the delayed task to ‘Ready’ state from ‘Waiting’ state, when the wait period expires is done by the function, OSTimeTick(). The function OSTimeTick() is the Interrupt Service Routine (ISR) for the system timer clock, and the kernel executes it. Users don’t need to bother about it. A task which is currently in the waiting state, introduced by the self delaying can be resumed by another task. The function call OSTimeDlyResume(), resumes a specified task which is currently in the ‘waiting’ state induced by self delaying. A task which is, self delayed by invoking OSTimeDlyHMSM() function cannot be resumed by another tasks if the combined, delay set by the hour, minute, seconds and milliseconds parameter exceeds 65535 timer ticks., The task self delaying and resuming it from another tasks technique is a good approach for building, applications where one task requires waiting for I/O operations. The task involving Input operation (e.g., Waiting for a key press) can self delay it and key press event can be handled in an Interrupt Service Routine, (ISR) and the ISR can resume the delayed task upon receiving the key press event. The following code, snippet illustrates the usage of task delay and task resuming functions., //*******************************************************************, //Task implementation, void taskA(void *args), {, while (1), {, //Execute the task specific details, //………………………………………………………………………, //………………………………………………………………………, //Delay the task for 5 Timer ticks., OSTimeDly(5);, //Rest of the task, //………………………………………………………………………, }, }, //*******************************************************************, //Task implementation, void taskB(void *args), {, while (1), {, //Execute the task specific details, //………………………………………………………………………, //………………………………………………………………………, //Resume task 5., OSTimeDlyResume(5);, //Rest of the task, //………………………………………………………………………, }, }
Page 554 :
530, , Introduc on to Embedded Systems, , The function pair OSTaskSuspend() and OSTaskResume() can be used for suspending a task unconditionally, and resuming the suspended task. If a task which is being suspended is delayed by task delay call, the task is, resumed only after the task is resumed from suspension and both the time expires., Tasks can be deleted by calling OSTaskDel(). The task which is being deleted is kept in the ‘Dormant’ state, and it can be recreated, if needed by calling task creation functions like OSTaskCreate() or OSTaskCreateEx()., Proper care should be applied in the usage of OSTaskDel() function. Imagine a situation where Task 1 is, holding a shared resource, a semaphore and Task 2 attempts to delete Task 1 by executing OSTaskDel()., Task 1 will be moved to the ‘Dormant’ state and this will lead to the locking of the semaphore used by, Task 1 and this semaphore will not be available to other tasks – leading to starvation of tasks. The function, OSTaskDelReq() makes task deletion safe by ensuring that the task is not deleted when it is holding a shared, resource., , 11.2.2, , Kernel Functions and Initialisation, , The kernel needs to be initialised and started before executing the user tasks. MicroC/OS-II provides OS, kernel initialisation and start routines. The MicroC/OS-II kernel initialisation and OS kernel start is written, as part of the startup code which is executed before the execution of user tasks. The OS kernel initialisation, function OSInit() is executed first. It performs the following operations., 1. Initialise the different OS kernel data structure, 2. Creates the idle task OSIdle(), The idle task is the lowest priority task under the MicroC/OS-II kernel and it is executed to keep the CPU, always busy when there are no user tasks to execute. User tasks are not allowed to delete or suspend the ‘Idle’, task. The following code snippet illustrates the implementation of ‘Idle’ task., //*******************************************************************, //Idle Task implementation, void OS_TaskIdle(void *args), {, while (1), {, OS_ENTER_CRITICAL();, OSIdleCtr++;, OS_EXIT_CRITICAL();, OSTaskIdleHook();, }, }, , It simply increments a counter to keep the CPU always active. Depending on the power saving requirements,, the IDLE task can be re-written to include the CPU specific power down modes., The MicroC/OS-II kernel runs a statistical task for computing the percentage of CPU usage. The statistical, task is created with priority OS_LOWEST_PRIO – 1 and it is executed in every second. The function call, OSStatinit() sets up the statistical task related activities. This function must be called before OSStart(). The, OSStart() function starts the multitasking. It is invoked only after invoking OSInit(). It starts the execution of, the highest priority task from the ‘Ready’ list. It never returns to the calling function. There should be at least, one task to execute. The following code snippet illustrates the OS initialisation and start operations., //*******************************************************************, #include <includes.h>, ;The include file for uC functions, //Main task
Page 555 :
An Introduc on to Embedded System Design with VxWorks and MicroC/OS-II RTOS, , 531, , void main(void), {, //Initialise the kernel, OSInit();, //Create the first task. The function OSStatinit() should be//called from this task., //Start OS by executing the highest priority task, OSStart();, }, , 11.2.3, , Task Scheduling, , The MicroC/OS-II support preemptive priority based scheduling. Each task should be assigned a unique, priority ranging from 0 to 63 with 0 being the highest priority level. The four highest priorities (0 to 3) and, the four lowest priorities (63 to OS_LOWEST_PRIO – 3) are reserved for the kernel. When the kernel starts,, it executes the first available highest priority task. A task rescheduling happens if any one of the following, situation occurs., 1. Whenever high priority task becomes ‘Ready’ to run or when a task enters the ‘Waiting’ state due, to the invocation of system calls like OSTaskSuspend(),OSTaskResume(),OSTaskDel(),OSTimeDly(),, OSTimeDlyHMSM(), OSTimeDlyResume(), etc., 2. Whenever an Interrupt occurs, the tasks are rescheduled upon return from the Interrupt Service Routine, (ISR)., In general, the task scheduling happens at the task level and ISR level. The task level scheduling is, executed by the kernel service OS_Sched() when a system call occurs. The ISR level task scheduling is, done by the function call OSIntExit(). When an OSIntExit() call is executed, the kernel is notified that the, ISR is complete and the kernel checks whether there is any high priority task is ‘Ready’ for scheduling. If a, high priority task is ready for scheduling, the ISR returns to the high priority task instead of returning to the, interrupted task., For task level scheduling, the software interrupt OS_TASK_SW() is triggered and the context switch, handler OSCtxSw() is executed as ISR for this interrupt. The service OSCtxSw() is part of the MicroC/OS-II, kernel service and is responsible for handling the context switch operation. It saves the CPU registers and, Program Status Word (PSW) to the stack of the preempted task (context saving) and loads the CPU registers, and PSW from the stack of the highest priority task (context retrieval) which is going to execute., The task rescheduling will not take place if the scheduler is in the locked state. The scheduler can, be locked by invoking the system call OSSchedLock(). Proper care should be applied in the usage of, OSSchedLock(). Once the scheduler is locked with this call, the application should not call any other, function calls, which suspends the execution of the current task, like OSTaskSuspend(),OSTaskResume (),, OSTaskDel(), OSTimeDly(), OSTimeDlyHMSM(). Since the scheduler is in the locked state it will not be, able to schedule another task for execution and the current task is already in the suspended stage, the system, hangs-up., The scheduling can be resumed by calling OSSchedUnlock(). The MicroC/OS-II kernel supports nested, locking of scheduling up to 255 levels deep. Scheduling is enabled only when the same number of scheduler, unlocking calls as that of scheduler locking calls is executed. Interrupts are serviced even when the scheduler, is in the locked state. The scheduler locking and unlocking mechanism is used as a technique for exclusive, access to shared resources (An implementation of mutual exclusion). The following piece of code illustrates, the usage of scheduler locking and unlocking functions.
Page 556 :
532, , Introduc on to Embedded Systems, , //*******************************************************************, //Task implementation, void taskA(void *args), {, while (1), {, //Execute the task specific details, //………………………………………………………………………, //………………………………………………………………………, //Lock the scheduler., OSSchedLock();, //Perform shared resource access, //………………………………………………………………………, //Unlock the scheduler., OSSchedUnlock();, //Rest of the task, //………………………………………………………………………, //………………………………………………………………………, }, }, , The priorities associated with a task can be changed dynamically. The function call OSTaskChangePrio(), changes the priority associated with a task. The function takes current priority and new priority as, arguments., , 11.2.4, , Inter-Task Communication, , The MicroC/OS-II kernel supports the following inter-process communication techniques for data sharing, and co-operation among tasks, 1. Mailbox, 2. Message queue, Mailbox and message queues are same in functionality. The only difference is in the number of messages, supported by them. Both of them are used for passing data in the form of message(s) from a task to another, task(s) or from an ISR to task(s)., Mailbox is used for exchanging a single message between two tasks or between an Interrupt Service, Routine (ISR) and a task. Mailbox associates a pointer pointing to the mailbox and a wait list to hold the, tasks waiting for a message to appear in the mailbox. The following table gives a snapshot of the important, mailbox related routines supported by MicroC/OS-II., Function Call¶¶, , Description, , OSMboxCreate(), , Creates and initialises a mailbox., , OSMboxPost(), , Posts a message to the mailbox. The parameters are pointer to the mailbox (which is obtained, on creating a mailbox) and a pointer variable pointing to the message. If a message is already, present in the mailbox, the message posting fails and the message posting task returns immediately. Upon the arrival of a message in the mailbox it is routed to the highest priority task, waiting for the message., , ¶¶ Please refer to the MicroC library reference manual for the parameter details of each function call.
Page 557 :
An Introduc on to Embedded System Design with VxWorks and MicroC/OS-II RTOS, , 533, , OSMboxPostOpt(), , Same as OSMboxPost() function call. Allows the broadcasting of message to all tasks waiting, for the message. The broadcast option can be set in the options parameter., , OSMboxPend(), , Used for retrieving message from a mailbox. If a message is available in the mailbox at the, time of calling this function, it is retrieved through the pointer and the message is deleted from, the mailbox. If message is not available in the mailbox at the time of calling this function, the, calling task is blocked and it is put in the message wait list queue associated with the mailbox., A task can wait until a message is available in the mailbox or till a timeout occurs. The timeout, value for waiting can be specified in the ‘timeout’ argument of this function call. The ‘timeout’, value is specified in terms of clock ticks. It can take values ranging from 0 to 65535. A value, of 0 indicates wait until a message is available., , OSMboxAccept(), , Used for retrieving message from a mailbox. Similar to OSMboxPend() in functioning but differ, in the way it operates. It allows a task to check whether a message is available in the mailbox., Unlike OSMboxPend(), the calling task is not blocked (‘Pended’) if there is no message to read, in the mailbox., , OSMboxQuery(), , Retrieves information about the mailbox. The information is retrieved in a data structure of type, OS_MBOX_DATA. It is used for getting information like, whether a message is available in the, mailbox, is there any tasks waiting for the messages and if yes how many tasks, etc., , OSMboxDel(), , Deletes a mailbox. Option for specifying whether the mailbox needs to be deleted immediately, or only when the pending operations on this mailbox are completed., , A mailbox is created with the function call OSMboxCreate(void *msg), where the parameter msg is a, pointer holding the initial message. If this is a non-null value, the mailbox holds the message pointed by msg., If msg is a null pointer, the mailbox is created without any messages present initially. This function allocates, an Event Control Block (ECB) to the mailbox and returns a pointer of type OS_EVENT to the allocated ECB., The Event Control Block (ECB) is a data structure holding information like, the event associated, list of tasks, waiting for this event to occur, etc. A task can post a message to the mailbox if the task knows the ECB pointer, for the mailbox. Along with the ECB pointer of the mailbox, the task passes a pointer to the message which is, to be posted to the mailbox, as argument to the OSMboxPost(OS_EVENT *pevent, void *msg) function. If the, mailbox is not empty when a task is trying to post a message, the task returns immediately. On the arrival of, a message in the mailbox, it is delivered to the highest priority task waiting for the event and the message is, deleted from the mailbox. If the priority of the highest priority task waiting for the message is higher than that, of the message posting task, the message posting task is preempted and the highest priority task is executed, by the scheduler. A task can broadcast a message to all tasks waiting for a message by posting the message, with the function call OSMboxPostOpt(OS_EVENT *pevent, void *msg, INT8U opt). The ‘opt’ parameter, should be set as OS_POST_OPT_BROADCAST for broadcasting a message. If this parameter is set as OS_, POST_OPT_NONE, this function becomes equivalent to OSMboxPost. The functions OSMboxPend(), and, OSMboxAccept() can be used for retrieving a message from the mailbox. OSMboxPend() provides option to, set the function call as either a blocking call till a message is available in the mailbox or till a wait period, specified in the parameter list. OSMboxAccept() is a non-blocking call. This function will not block a calling, task when there is no message available in the mailbox. This can be used by ISRs to check the availability, of messages in a mailbox. A task can delete a mailbox by calling OSMboxDel(OS_EVENT *pevent, INT8U, opt, INT8U *err). The parameter ‘opt’ specifies whether a mailbox needs to be deleted immediately or only, when the pending operations on this mailbox are over. The value OS_DEL_NO_PEND for ‘opt’ sets the first, choice and a value OS_DEL_ALWAYS deletes the mailbox immediately. Proper care should be applied in, the usage of this function. There are possibilities for tasks to access a deleted mailbox. This may result in, unpredicted behaviour. Also tasks which are using the function OSMboxAccept() for checking the availability
Page 560 :
536, , Introduc on to Embedded Systems, , //Post a message to the mailbox Mbox., OSMboxPost(Mbox, (void *)&msg);, //Rest of the task, //………………………………………………………………………, //………………………………………………………………………, }, }, //*******************************************************************, //Implementation of Task2, void Task2(void *args), {, //Define pointer to message, char * msg;, //Define Return value handling variable, INT8U err;, while (1), {, //Execute the task specific details, //………………………………………………………………………, //………………………………………………………………………, //Receive a message from the mailbox Mbox., //Wait till a message is available., msg = (char *)OSMboxPend(Mbox, 0, &err);, //Rest of the task, //………………………………………………………………………, //………………………………………………………………………, }, }, , The sample application creates a main task TaskFirst which creates a mailbox and two tasks namely Task1, and Task2. Task1 posts the message ‘0’ to the mailbox and Task2 reads the mailbox to retrieve the message, present in it. The startup tasks, viz. the initialisation of MicroC kernel (OSInit()), main task creation and, starting of multitasking (OSStart()) is done by the main function., Message queue is same as that of mailbox in operation; the only difference is—mailbox is designed for, handling only a single message whereas message queue is designed for the handling of multiple messages., Message queue is used for exchanging a message data between two or more tasks or between an Interrupt, Service Routine (ISR) and tasks. Message queue associates a pointer pointing to the Message queue and a, wait list to hold the tasks waiting for a message to appear in the Message queue. The following table gives a, snapshot of the important message queue related routines supported by MicroC/OS-II., Function Call***, , Description, , OSQCreate(), , Creates and initialises a message queue. An array of pointers is allocated for storing the message., The size of the message storage area (size of the pointer array) is specified as the parameter to this, function., , *** Please refer to the MicroC library reference manual for the parameter details of each function call.
Page 561 :
An Introduc on to Embedded System Design with VxWorks and MicroC/OS-II RTOS, , 537, , OSQPost(), , Posts a message to the message queue. The parameters are pointer to the message queue (which, is obtained on creating a message queue) and a pointer variable pointing to the message. If there, is no room for a new message in the message queue, the message posting fails and the message, posting task returns immediately. Upon the arrival of a message in the message queue it is routed, to the highest priority task waiting for the message. Message queue normally follows the FIFO, structure for operation., , OSQPostFront(), , Same as OSQPost() function call. Only difference is that it posts the message in front of the message queue., , OSQPostOpt(), , Same as OSQPost() function call. It allows the broadcasting of message to all tasks waiting for the, message, or posts the message at the front of the message queue. The broadcast or post in front of, queue option is set by the options parameter., , OSQPend(), , Used for retrieving messages from a message queue. If a message is available in the message queue, at the time of calling this function, it is retrieved through the pointer and the message is deleted, from the message queue. If message is not available in the message queue at the time of calling this, function, the calling task is blocked and it is put in the message wait list queue associated with the, message queue. A task can wait until a message is available in the message queue or till a timeout, occurs. The timeout value for waiting can be specified in the ‘timeout’ argument of this function, call. The ‘timeout’ value is specified in terms of clock ticks. It can take values ranging from 0 to, 65535. A value of 0 indicates wait until a message is available., , OSQAccept(), , Used for retrieving messages from a message queue. Similar to OSQPend() in functioning but differ in the way it operates. It allows a task to check whether a message is available in the message, queue. Unlike OSQPend(), the calling task is not blocked (‘Pended’) if there is no message to read, in the message queue., , OSQQuery(), , Retrieves information about the message queue. The information is retrieved in a data structure of, type OS_Q_DATA. It is used for getting information like, what is the message queue size, whether, a message is available in the message queue, is there any tasks waiting for the messages and if yes, how many tasks, etc., , OSQFlush(), , Flushes the message queue and deletes all the messages present in it. The time required to execute, this function is fixed regardless of the number of messages present, and the number of tasks waiting, (in case no messages are present in the message queue)., , OSQDel(), , Deletes a message queue. Option for specifying whether the message queue needs to be deleted, immediately or only when the pending operations on this message queue are completed., , A message queue is created with the function call OSQCreate(void **start, INT8U size), where start is the, base address of the message storing area and size is the size of the message storage area in bytes. This function, allocates an Event Control Block (ECB) to the message queue and returns a pointer of type OS_EVENT to, the allocated ECB. A task can post a message to the message queue if the task knows the ECB pointer for the, message queue. Along with the ECB pointer of the mailbox, the task passes a pointer to the message which, is to be posted to the message queue, as argument to the OSQPost(OS_EVENT *pevent, void *msg) function., If there is no room for a message in the message queue when a task is trying to post a message, the task, returns immediately. On the arrival of a message in the message queue, it is delivered to the highest priority, task waiting for the event and the message is deleted from the message queue. If the priority of the highest, priority task waiting for the message is higher than that of the message posting task, the message posting, task is preempted and the highest priority task is executed by the scheduler. A task can broadcast a message, to all tasks waiting for a message by posting the message with the function call OSQPostOpt(OS_EVENT
Page 562 :
538, , Introduc on to Embedded Systems, , *pevent, void *msg, INT8U opt). The ‘opt’ parameter should be set as OS_POST_OPT_BROADCAST for, broadcasting a message. If this parameter is set as OS_POST_OPT_NONE, this function becomes equivalent, to OSQPost. This function can also serve the purpose of the function OSQPostFront(), which posts the, message to the front of the message queue. For this, set the ‘opt’ parameter as OS_POST_OPT_FRONT., The functions OSQPend(), and OQSAccept() can be used for retrieving a message from the message queue., OSQPend() provides option to set the function call as either a blocking call till a message is available in the, message queue or till a wait period specified in the parameter list. OSQAccept() is a non-blocking call. This, function will not block a calling task when there is no message available in the message queue. This can be, used by ISRs to check the availability of messages in a message queue. A task can delete a message queque, by calling OSQDel(OS_EVENT *pevent, INT8U opt, INT8U *err). The parameter ‘opt’ specifies whether, a message queue needs to be deleted immediately or only when the pending operations on this message, queue are over. The value OS_DEL_NO_PEND for ‘opt’ sets the first choice and a value OS_DEL_ALWAYS, deletes the message queue immediately. Proper care should be applied in the usage of this function. There are, possibilities for tasks to access a deleted message queue. This may result in unpredicted behaviour. Also tasks, which are using the function OSQAccept() for checking the availability of a message may never know about, the non-availability of a message queue. Hence use this function judiciously and as a precautionary measure, delete all task which uses the specified message queue before it is being deleted., Message queue and mailbox operates on the same principle. However message queue supports multiple, messages and also provides option to post a message as urgent message, by posting it in front of the message, queue. Mailbox holds only one message at a time and there is no provision to post a message to the mailbox, until the existing message is read by a task. Message queue supports emptying of the message queue by, flushing it., , 11.2.5, , Mutual Exclusion and Task Synchronisation, , In multitasking environment multiple tasks execute concurrently and share the system resources and data., The access to shared resources should be made mutually exclusive to prevent data corruption and ‘race’, conditions. Synchronisation techniques are used by tasks to synchronise their execution. For example, one, task may be waiting for a resource while it is being held by another task. The task which is currently holding, the resource can inform the waiting tasks when it releases the resource. MicroC/OS-II provides exclusive, access to shared resources through the following techniques., 1. Disabling task scheduling, 2. Disabling interrupts, 3. Semaphores for mutual exclusion, 4. Events (Flags) for synchronisation, In a multitasking environment, problems arise only when a task is preempted by another task, when the, task was accessing a shared resource and the task which preempted it also tries to access the resource. This, may lead to inconsistent results. The easiest option to solve this problem is prevent task preemption by, disabling the task scheduling when a task is accessing a shared resource. The task scheduling is re-enabled, only when the task completes the accessing of the shared resource. Interrupts are still identified and serviced, even if the scheduler is in the locked state. This technique is suited for controlling the access to resources, shared between tasks and it will not serve the purpose of exclusive access of resources shared between a task, and Interrupt Service Routine (ISR). The function calls OSSchedLock() and OSSchedUnlock() are used for, locking and unlocking the scheduler respectively., We have seen that the disabling of task scheduling will not serve the purpose of exclusive access to, resources shared between a task and ISR. The interrupts should be disabled to ensure error-free operation
Page 563 :
An Introduc on to Embedded System Design with VxWorks and MicroC/OS-II RTOS, , 539, , when a task is executing in the critical section of code (The piece of code which corresponds to the shared, resource access). The interrupts are re-enabled when the task complete the execution of the critical section, code. Disabling and enabling of interrupts can be done by the MicroC/OS-II supplied macros; OS_ENTER_, CRITICAL() and OS_EXIT_CRITICAL() respectively. The implementation of these macros is processor, specific. These macros need to be ported as per the target processor specific implementation of Interrupt, enabling and disabling. These macros are defined in the MicroC/OS-II header file ‘os_cpu.h’. The usage of, these ‘macros’ are illustrated below., //*******************************************************************, //Implementation of Task, void Task1(void *args), {, while (1), {, //Execute the task specific details, //………………………………………………………………………, //………………………………………………………………………, //Disable Interrupts, OS_ENTER_CRITICAL();, //Enter Critical section., //Access shared resource, Counter++;, //Leave Critical section., //Enable Interrupts, OS_EXIT_CRITICAL();, //Rest of the task, //………………………………………………………………………, //………………………………………………………………………, }, }, , Here the variable ‘Counter’ is shared between a task and ISR. The accessing of it is made exclusive in, the task by disabling the interrupt just before accessing the variable and re-enabling the interrupts when the, operation on the variable is over., Disabling of interrupts may produce adverse effects like impact on the real time response of the system. It, is advised not to disable interrupts for critical section access operations which are lengthy., Semaphore based mutual execution is the most efficient and easy technique for implementing exclusive, resource access. Semaphores control the access to shared resources as well as synchronise the execution of, tasks. The MicroC/OS-II supports two different types of semaphores namely counting semaphore and mutual, exclusion semaphore (mutex)., The counting semaphore is used for restricting the access to shared resources and as a signalling mechanism, for task synchronisation. It associates a count for keeping track of the number of tasks using the semaphore at
Page 564 :
540, , Introduc on to Embedded Systems, , a given point of time. It also holds a wait list queue for holding the tasks which are waiting for the semaphore., The following table gives a snapshot of the important counting semaphore related routines supported by, MicroC/OS-II., Function Call†††, , Description, , OSSemCreate(), , Creates and initialises a counting semaphore. It takes a count value as parameter. The count, value can range from 0 to 65535. Each time the semaphore is acquired by a task its count is, decremented by 1. When the count reaches 0, the semaphore is not available and the task trying, to acquire the semaphore is pended (blocked)., , OSSemPost(), , Signals the availability of a semaphore. A task can use this call to inform the waiting task that the, semaphore is available. The count associated with the semaphore is incremented by one. Upon, executing this call the highest priority task waiting (If the count associated with the semaphore, is 0) for this semaphore is granted access to the semaphore. If the priority of the task waiting, for the semaphore is greater than that of the priority of the task signalled the availability of the, semaphore, it is preempted., , OSSemPend(), , Used by a task for acquiring a semaphore. If the semaphore is available (The count associated, with the semaphore is greater than 0) at the time of calling this function, access is granted to the, task and the count associated with the semaphore is decremented by one. If the semaphore is, not available (The count associated with the semaphore is zero) at the time of calling this function, the calling task is blocked and it is put in the semaphore wait list queue associated with the, semaphore. A task can wait until the semaphore is available or till a timeout occurs. The timeout, value for waiting can be specified in the ‘timeout’ argument of this function call. The ‘timeout’, value is specified in terms of clock ticks. It can take values ranging from 0 to 65535. A value of, 0 indicates wait until the semaphore is available., , OSSemAccept(), , Used for acquiring a semaphore. Similar to OSSemPend() in functioning but differ in the way it, operates. It allows a task to check whether a semaphore is available. Unlike OSSemPend(), the, calling task is not blocked (‘Pended’) if the semaphore is not available., , OSSemQuery(), , Retrieves the information about the semaphore. The information is retrieved in a data structure, of type OS_SEM_DATA. It is used for getting information like, the semaphore count, whether, a semaphore is available, is there any tasks waiting for the semaphore and if yes how many, tasks etc., , OSSemSet(), , It is used for changing the current count value associated with the semaphore. The count associated, with the semaphore is reset to the value specified in the ‘count’ parameter to this function. If the, semaphore count is 0 at the time of executing this call, the count is changed only if there are no, tasks waiting for this semaphore. This function call is primarily used for signalling mechanism, for task synchronisation and not for protecting shared resources., , OSSemDel(), , Deletes a semaphore. Option for specifying whether the semaphore needs to be deleted immediately or only when the pending operations on this semaphore are over. Proper care should, be applied in the usage of this function. There are possibilities for tasks to access a deleted, semaphore. This may result in unpredicted behaviour., , The mutual exclusion semaphore or mutex is a binary semaphore. It differs from the ordinary semaphore, in the sense it implements provisions for handling priority inversion problems in task scheduling. The mutual, exclusion semaphore (mutex) temporarily raises the priority of a low priority task holding the mutex to a, priority above the highest priority of the task which tries to acquire the mutex when it is being in use by a low, priority task. The mutex object associates a flag to indicate whether the mutex object is available or currently, ††† Please refer to the MicroC library reference manual for the parameter details of each function call.
Page 565 :
An Introduc on to Embedded System Design with VxWorks and MicroC/OS-II RTOS, , 541, , in use and a priority to assign to the task owning the mutex, when another high priority task tries to acquire it., It also holds a waitlist queue for holding the tasks waiting for the mutex., Normally the mutex object elevates the priority of a task holding it to a priority value same as that of the, priority of the highest priority task trying to acquire it. However MicroC/OS-II doesn’t support the existence, of two tasks of the same priority. Hence a small work around is implemented to overcome this issue. Under, MicroC/OS-II, the priority of the task holding the mutex is elevated to a value which is greater than the, highest priority of the task which is trying to acquire it, when it is being held by a low priority task. The, priority reserved to the mutex is known as Priority Inheritance Priority (PIP). PIP should be an unused, priority by tasks. The following table gives a snapshot of the important mutual exclusion semaphore (mutex), related routines supported by MicroC/OS-II., Function Call‡‡‡, , Description, , OSMutexCreate(), , Creates and initialises a mutex. It takes Priority Inheritance Priority (PIP) as one parameter., The mutex is created with state available (The flag associated with it is set as 1). On successful, creation of the mutex a pointer to an Event Control Block (ECB) is returned., , OSMutexPend(), , Used by a task for acquiring a mutex. If the mutex is available (The mutex value is 0xFF) at, the time of calling this function, access is granted to the task and the mutex value is set to 0, to indicate the non-availability of mutex. If the mutex is not available (The mutex value is, zero) at the time of calling this function, the calling task is blocked and it is put in the mutex, wait list queue associated with the mutex. A task can wait until the mutex is available or till, a timeout occurs. The timeout value for waiting can be specified in the ‘timeout’ argument of, this function call. The ‘timeout’ value is specified in terms of clock ticks. It can take values, ranging from 0 to 65535. A value of 0 indicates wait until the mutex is available., , OSMutexAccept(), , Used for acquiring a mutex. Similar to OSMutexPend() in functioning but differ in the way, it operates. It allows a task to check whether a mutex is available. The function returns 1 if, the mutex is available, else returns 0. Unlike OSMutexPend(), the calling task is not blocked, (‘Pended’) if the mutex is not available., , OSMutexPost(), , Signals the availability of a mutex. A task can use this call to inform the waiting task that the, mutex is available. The following actions take place on the execution of this call., 1. The flag associated with the mutex is set as 1, i.e. (Mutex value is set as 0xFF)., 2. If the priority of the task holding the mutex was raised to the PIP, it is brought back to the, original priority of the task., 3. If more than one task is waiting for the mutex, the mutex is given to the highest priority, task and the flag associated with the mutex is set as 0 (Mutex value is set as 0x00) indicating mutex is not available., 4. If the priority of the task which acquired the mutex is greater than that of the task which, released the mutex, the task which released the mutex is pended., 5. A rescheduling of tasks is performed., , OSMutexQuery(), , Retrieves the information about the mutex. The information is retrieved in a data structure of, type OS_MUTEX_DATA. It is used for getting information like, whether a mutex is available, or not, What is the PIP for the mutex, is there any tasks waiting for the mutex and if yes how, many tasks, etc., , OSMutexDel(), , Deletes a mutex. Option for specifying whether the mutex needs to be deleted immediately or, only when the pending operations on this mutex are over. Proper care should be applied in the, usage of this function. There are possibilities for tasks to access a deleted mutex. This may, result in unpredicted behaviour., , ‡‡‡ Please refer to the MicroC library reference manual for the parameter details of each function call.
Page 568 :
544, , Introduc on to Embedded Systems, , //Code for accessing Shared Resource, //………………………………………………………………………, //Release Mutex, OSMutexPost(MyMutex);, //Rest of the task, //………………………………………………………………………, //………………………………………………………………………, }, }, //*******************************************************************, //Implementation of Task2, void Task2(void *args), {, //Variable for holding function return values, INT8U err;, while (1), {, //Execute the task specific details, //………………………………………………………………………, //………………………………………………………………………, //Acquire Mutex, OSMutexPend(MyMutex,0,&err);, //Code for accessing Shared Resource, //………………………………………………………………………, //Release Mutex, OSMutexPost(MyMutex);, //Rest of the task, //………………………………………………………………………, //………………………………………………………………………, }, }, , The sample application creates a main task TaskFirst with priority 10, which creates a mutex MyMutex, with PIP 9 and two tasks namely Task1 (with priority 11) and Task2 (with priority 12). Task1 and Task2, contain critical section access. The mutex MyMutex is used for acquiring exclusive access to the critical, section. Each task releases the mutex after they exit the critical section of code., It is possible to associate a name to the Event Control Block (ECB) which is associated with a semaphore,, mailbox, message queue or a mutex object. The function call OSEventNameSet (OS_EVENT *pevent, char, *pname, INT8U *err) associates the name holding by the character string pointed by pname to the entity, pointed by the ECB pointer pevent. Similarly the function OSEventNameSGet (OS_EVENT *pevent, char, *pname, INT8U *err) retrieves the name associated with the object pointed by the ECB pointer pevent into, a character string pointed by pname. These functions are mainly used for associating a name with a resource, for debugging purpose., Event flags are another mechanism supported by MicroC/OS-II for task synchronisation. You can create, a group of event flags and can assign specific meaning to each bit present in the event flags group. Tasks
Page 569 :
An Introduc on to Embedded System Design with VxWorks and MicroC/OS-II RTOS, , 545, , or Tasks and ISRs can modify or access these event flag bits to synchronise their execution. The following, table gives a snapshot of the important event flag related routines supported by MicroC/OS-II for task, synchronisation., Function Call§§§, , Description, , OSFlagCreate(), , Creates and initialises an event flag group. It takes the initial value that needs to be set, for flags as one parameter. Successful creation of the event flag group returns a pointer, to the Event Flag Group (OS_FLAG_GRP) associated with the event flag group., , OSFlagPost(), , Sets or clears the individual flag bits in the event flag group. A task can make another, task ready by setting the event flag bit pattern expected by the other task. The OSFlagPost function call readies each task that has its desired bits satisfied by this call. The, ‘flags’ parameter of the function call specifies which all bits to be set or reset and the, parameter ‘opt’ specifies whether the operation is a set or reset. For setting the bits, this, parameter is set as OS_FLAG_SET and for clearing, it is set as OS_FLAG_CLR. For, example for setting the 0th, 3rd and 5th bit, set the ‘flags’ parameter as 0x29 (00101001), and ‘opt’ parameter as OS_FLAG_SET. If the priority of the task waiting for the specified bit pattern is greater than that of the priority of the task signalled the availability, of the specified bit pattern, it is preempted., , OSFlagPend(), , Used by a task to wait for the arrival of a specific combination of flag bits in the event, flag group. The ‘flags’ parameter of the function call specifies which all event flag bits, to be checked and the parameter ‘opt’ specifies the type of event bit checking. It can, be any one of the following type., 1. OS_FLAG_WAIT_CLR_ALL : Check all specified bits in the flags is clear (0), 2. OS_FLAG_WAIT_CLR_ANY : Check any specified bit in the flags is clear (0), 3. OS_FLAG_WAIT_SET_ALL : Check all specified bits in the flags is set (1), 4. OS_FLAG_WAIT_SET_ANY : Check any specified bit in the flags is set (1), The flag OS_FLAG_CONSUME can be combined with the above flag to clear the bits, of the flag group when the specified condition occurs. For example a task can use, OS_FLAG_WAIT_SET_ANY + OS_FLAG_CONSUME to wait for the setting of any, specified flag bit and the flag bits are automatically reset (cleared) when the condition, occurs. If the priority of the task waiting for the specified bit pattern is greater than, that of the priority of the task signalled the availability of the specified bit pattern, it is, preempted. If the event flag bits satisfy the conditions specified by the task, the task is, readied. If the event flag bits don’t satisfy the conditions specified by the task, at the, time of calling this function, the calling task is blocked and it is put in the event flag, wait list queue associated with the event flags group. A task can wait until the specified, flag pattern arrives or till a timeout occurs. The timeout value for waiting can be specified in the ‘timeout’ argument of this function call. The ‘timeout’ value is specified in, terms of clock ticks. It can take values ranging from 0 to 65535. A value of 0 indicates, wait until the specified event flag condition occurs., , OSFlagAccept(), , Used for checking the occurrence of a specified flag bit pattern in the event flag group., Similar to OSFlagPend() in functioning but differ in the way it operates. It allows a, task to check whether the specified bit pattern is available. Unlike OSFlagPend(), the, calling task is not blocked (‘Pended’) if the specified flag event is not occurred., , OSFlagPendGetFlagsRdy(), , Returns the flag value that made the task ready from blocked state., , §§§ Please refer to the MicroC library reference manual for the parameter details of each function call.
Page 570 :
546, , Introduc on to Embedded Systems, , OSFlagQuery(), , Retrieves the current value of the event flags in the event flags group. The function, returns the state of the flag bits in the event group., , OSFlagNameSet(), , Associates a name with the specified event flag group. The name is passed as a character pointer. This function is mainly used for associating a name with a resource for, debugging purpose., , OSFlagNameGet(), , Retrieves the name associated with the specified event flag group. The name is retrieved, in a character pointer, which is passed as argument to this function. This function is, mainly used for associating a name with a resource for debugging purpose., , OSFlagDel(), , Deletes an event flags group. Option for specifying whether the event flags group, needs to be deleted immediately or only when the pending operations on this event, flags group are over. Proper care should be applied in the usage of this function. There, are possibilities for tasks to access a deleted event flags group. This may result in, unpredicted behaviour., , The following code snippet illustrates the usage of event flags., //*******************************************************************, #include <includes.h>, //Define Task IDs for First Task, Task 1 and Task 2, #define TASK_FIRST_ID 1, #define TASK_1_ID 2, #define TASK_2_ID 3, //Define Task Priorities for First Task, Task 1 and Task 2, #define TASK_FIRST_PRIO 10, #define TASK_1_PRIO 12, #define TASK_2_PRI0 11, //Set the default stack size for all tasks, #define TASK_STK_SIZE, 1024, //Define stack size for tasks, OS_STK TaskFirstStk[TASK_STK_SIZE]; // First task’s stack, OS_STK Task1Stk[TASK_STK_SIZE];, // Task 1’s task stack, OS_STK Task2Stk[TASK_STK_SIZE];, // Task 2’s task stack, //Define Even Flags Group pointer for the mutex, OS_FLAG_GRP *StatusFlags;, void main (void), {, //Initialise MicroC OS, OSInit();, //Create the first task., OSTaskCreateExt(TaskFirst,, (void *)0,
Page 572 :
548, , Introduc on to Embedded Systems, , //Implementation of Task1, void Task1(void *args), {, //Variable for holding function return values, INT8U err;, while (1), {, //Execute the task specific details, //………………………………………………………………………, //………………………………………………………………………, //Set the Flag bits 0, 2, OSFlagPost(StatusFlags, 0x05, &err);, //Rest of the task, //………………………………………………………………………, //………………………………………………………………………, }, }, //*******************************************************************, //Implementation of Task2, void Task2(void *args), {, //Variable for holding function return values, INT8U err;, while (1), {, //Execute the task specific details, //………………………………………………………………………, //………………………………………………………………………, //Wait for the signaling of either flag bit 0 or 2, OSFlagPend(StatusFlags, OS_FLAG_WAIT_SET_ANY,0, &err);, if (OS_NO_ERR == err), {, //Find out the flag bit value readied the task and print it, err = OSFlagPendGetFlagsRdy();, printf(“The Flag state readied the task is %x”, err);, }, else, {, //Rest of the task, //………………………………………………………………………, //………………………………………………………………………, }, }, }
Page 573 :
An Introduc on to Embedded System Design with VxWorks and MicroC/OS-II RTOS, , 549, , The sample application creates a main task TaskFirst with priority 10, which creates an event flag group, StatusFlags and two tasks namely Task1 (with priority 12) and Task2 (with priority 11). Task2 requires the, signalling of two flags to continue its execution. At some point of execution Task2 waits for the occurring of, any one of the specified event. Task1 sets the flags at some point of its execution. Since the priority of Task2, is higher than that of Task1, Task2 preempts Task1 when the signalling of event flag occurs. Task2 also prints, the event flag bits value which made Task2 ‘Ready’ for execution., The flag based task execution synchronisation is the best choice for synchronising the execution of, cooperating tasks which requires the occurring of a particular sequence of operation for completion. A typical, example is a ‘Smart Card Reader’ interfaced with a PC. The card reading operation can be controlled from, an application running on the PC. Obviously there are two tasks running in the Smart Card Reader Device., Task 1, ‘The Communication task’, checks the serial port or USB port to receive the commands from PC. The, second task ‘The card Reading task’ waits until a command is received from the PC, to continue its operation., The ‘Communication task’ can inform the ‘Card reading task’ that a command is received, by setting a flag, in the event flags group., , 11.2.6, , Timing and Reference, , The ‘Clock Tick’ acts as the time source for providing timing reference for time delays and timeouts., ‘Clock Tick’ generates periodic interrupts. The clock ticker interrupt should be enabled for handling the, clock ticks. The clock tick ISR (OSTickISR(void)) calls the function OSTimeTick() to service the clock, tick interrupt. The OS_TICKS_PER_SEC configuration parameter should be set properly for the proper, functioning of the system timer. It defines how many clock ticks are there in one second. It depends on the, clock frequency of the target board. The functions which relay upon OSTimeTick() are summarised in the, table given below., Function Call¶¶¶, , Description, , OSTimeDly(), , Delay the task for the specified duration. The delay is mentioned in number of clock ticks., It ranges from 0 to 65535 ticks., , OSTimeDlyHMSM(), , Delay the task for the specified duration. The delay time is specified by the combination of, hours (H), Minutes (M), Seconds (S) and Milliseconds (M). Hour value can range from 0 to, 255, Minutes value can range from 0 to 59, second’s value can range from 0 to 59 and millisecond value can range from 0 to 999. Resolution depends on clock rate., , OSTimeDlyResume(), , Resumes a task which is delayed by a call to either OSTimeDly() or OSTimeDlyHMSM()., , OSTimeGet(), , Returns the current value of the system clock. System clock is a 32 bit counter and it accumulates the clock tick numbers since a power on or a system reset., , OSTimeSet(), , Sets the value for the system clock counter., , 11.2.7, , Memory Management, , MicroC/OS-II supports runtime memory allocation and de-allocation on a need basis. The memory is divided, into multiple sectors (partitions). Each sector is further divided into blocks. Each block holds fixed bytes of, memory. Figure 11.1 illustrates the same., , ¶¶¶ Please refer to the MicroC library reference manual for the parameter details of each function call.
Page 574 :
550, , Introduc on to Embedded Systems, , Partition 1, Block 1, , Partition 2, , Partition n, , Block 1, , Block 1, Block 2, , Block 2, Block 2, , Block n, , Block n, Fig. 11.1, , Block n, , Memory partitioning under Micro C/OS-II, , Each partition contains a minimum of two memory blocks. The block size is uniform throughout a, partition. Each memory partition associates a memory control block (MCB) with it. The following table, gives a snapshot of various function calls supported by uC/OS-II for memory management., Function Call, , Description, , OSMemCreate(void *addr, IN- Creates and initialises a memory partition. The parameter addr specifies the start adT32U nblks, INT32U blksize,, dress of the partition, nblks specifies the number of blocks in the partition and blksize, INT8U *err), specifies the size of the block. On successful creation of memory partition, the function, returns a pointer to the created memory partition control block., OSMemGet(OS_MEM, *pmem, INT8U *err), , Acquires a memory block from a partition. pmem is a pointer to the memory partition, control block which is obtained while creating the memory partition. If the memory, block is allocated, this function returns a pointer to the allocated memory block., , OSMemPut(OS_MEM *pmem, Releases the specified memory block to the memory partition. pmem is a pointer to, void *pblk), the memory partition control block which is obtained while creating the memory, partition and pblk is the pointer to the memory block to be released. Returns the code, OS_NO_ERR if the memory block de-allocation is success., OSMemQuery(OS_MEM, *pmem, OS_MEM_DATA, *pdata), , Retrieves the information about a memory partition. The information is retrieved in, a data structure of type OS_MEM_DATA. It is used for getting information like, the, start address of memory partition, number of memory blocks in the partition, size of a, memory block, number of used memory blocks, number of free memory blocks, etc., , OSMemNameSet(OS_MEM, *pmem, char *pname, INT8U, *err), , Associates a name with the specified memory partition. The name is passed as a, character pointer pname. This function is mainly used for associating a name with a, resource for debugging purpose., , OSMemNameGSet(OS_MEM, *pmem, char *pname, INT8U, *err), , Retrieves the name associated with the specified memory partition. The name is retrieved, in a character pointer pname, which is passed as argument to this function. This function, is mainly used for associating a name with a resource for debugging purpose.
Page 575 :
An Introduc on to Embedded System Design with VxWorks and MicroC/OS-II RTOS, , 11.2.8, , 551, , Interrupt Handling, , Under MicroC/OS-II, each interrupt is assigned an interrupt request number (IRQ). The actions corresponding, to an interrupt is implemented in a function called Interrupt Service Routine (ISR).The IRQ links to the, corresponding ISR. The ISR contains code for saving the CPU registers and restoring it back when returning, from ISR. The register saving instructions are processor dependent and they are usually coded in processor, specific Assembly language. The interrupt service routine can be implemented in C function, provided the, cross compiler supports mixing of assembly code with ‘C’ (Inline assembly code for saving and restoring, CPU registers). If the cross-compiler doesn’t support inline assembly codes, the only option left with is code, the ISR in assembly . MicroC/OS-II supports nested interrupts with a nesting level of 255. The interrupt, nesting level is kept tracked by the counter OSIntNesting. The function OSIntEnter() informs the MicroC/, OS-II kernel that an ISR is being processed. This function contains the code for keeping track of nested, interrupts by incrementing the counter OSIntNesting. When an interrupt processing is over, it is notified to, the MicroC/OS-II kernel by calling the function OSIntExit(). It contains code for decrementing the interrupt, nesting counter OSIntNesting and task rescheduling if a high priority task is ‘ready’ for running at the end, of servicing the last nested interrupt. The ISR returns to the interrupted task if there is no high priority task, ‘ready’ for running at the time of execution completion. If there is a high priority task ‘ready’ for running at, the time of ISR completion, the execution is not returned to the low priority task which is preempted by the, ISR. Instead it executes the high priority task. The implementation of an ISR is illustrated below., //*******************************************************************, //Implementation of Interrupt, void interrupt xyzInterrupt(int vector), {, _asm, //Assembly instructions to save (PUSH) CPU registers, //………………………………………………………………………, //………………………………………………………………………, _endasm, //Track Interrupt nesting, OSIntEnter();, //Execute the ISR specific code, //………………………………………………………………………, //………………………………………………………………………, //Return from ISR, OSIntExit();, _asm, //Assembly instructions to retrieve (POP) CPU registers, //………………………………………………………………………, //………………………………………………………………………, _endasm, }, }, , The keyword interrupt identifies a function as Interrupt Service Routine (ISR). The parameter vector, specifies the interrupt vector address corresponding to the ISR. It should be noted that an ISR neither takes and, nor returns any variables. All CPU registers are saved (PUSHed) to the stack of the task which is interrupted, by the ISR. However certain processor architecture like Motorola 68030 requires a separate stack for ISR.
Page 576 :
552, , Introduc on to Embedded Systems, , 11.2.9, , The MicroC/OS-II Development Environment, , Various processor manufacturers, who develop the MicroC/OS-II port for their product, may also supply an, IDE for MicroC based development. The Nios® II IDE from Altera (www.altera.com) is an IDE supplied, by Altera for their Nios® II family of processors. The MPLAB IDE from Microchip support MicroC based, development for their PIC Family of Microcontrollers., , Summary, VxWorks is a POSIX compliant popular hard real time, multitasking operating system from Wind, LO1, River Systems. The kernel of VxWorks is popularly known as wind, Under VxWorks kernel, the tasks may be in one of the primary states ‘READY’, ‘PEND’, ‘DELAY’,, LO1, ‘SUSPEND’ or a specific combination of it at any given point of time, VxWorks supports priority levels from 0 to 255, with 0 being the highest priority, for tasks., VxWorks’ scheduler implements the pre-emptive priority based scheduling of tasks with, LO1, Round Robin scheduling for priority resolution among equal priority tasks, The kernel functionalities of ‘VxWorks’ is also implemented as tasks and they are known as system, tasks. The root task tUsrRoot is the first task executed by the scheduler. The function, LO1, usrRoot() is the entry point to this task, VxWorks implements Inter Task communication through shared memory, message queues, pipes,, LO1, sockets, Remote Procedure Call (RPC) and signals, VxWorks’ kernel follows a single linear address space for tasks. The data can be shared in the form, LO1, of global variable, linear buffer, linked list and ring buffer, VxWorks implements mutual exclusion policies in three different ways namely; Task Locking, LO1, (Disabling task preemption), Disabling Interrupts, Locking resource with semaphores, VxWorks supports three types of semaphores namely; Binary semaphore, counting semaphore and, LO1, mutual exclusion semaphore, Under VxWorks kernel, Interrupt Service Routines (ISRs) run at a special context outside any, LO1, task’s context. A separate stack is maintained for use by all ISRs, The watchdog timer interface provided by VxWorks kernel can be utilised for monitoring task, execution. The watchdog timeout is handled as part of the system clock ISR. User can, LO1, associate a ‘C’ function with the watchdog timeout handler, Wind River Workbench is the development environment from Wind River Systems for VxWorks, LO1, development, MicroC/OS-II is a portable, ROMable, scalable, preemptive, real-time, multitasking kernel from, LO2, Micrium Inc, MicroC/OS-II follows the task based execution model and each task is implemented as infinite loop., Under MicroC/OS-II kernel, the tasks may be in one of the states Ready, Running, Waiting,, LO2, Interrupted at a given point of time, MicroC/OS-II supports tasks up to 64. Out of this 8 are reserved for the MicroC/OS-II kernel. Each, LO2, task will have a unique task priority assigned. No two tasks can have the same priority, The OS kernel initialisation function OSInit() is the first task executed by MicroC kernel. It, initialises the different OS kernel data structure and creates the Idle task OSIdle(). The Idle task is, the lowest priority task under the MicroC/OS-II kernel and it is executed to keep the CPU LO2, always busy when there are no user tasks to execute., MicroC/OS-II executes a statistical task with priority OS_LOWEST_PRIO – 1 in every second to, LO2, capture the percentage of CPU usage.
Page 577 :
553, , An Introduc on to Embedded System Design with VxWorks and MicroC/OS-II RTOS, , The MicroC/OS-II supports preemptive priority based scheduling. Each task is assigned a unique, priority ranging from 0 to 63 with 0 being the highest priority level. The four highest priorities (0, to 3) and the four lowest priorities (63 to OS_LOWEST_PRIO – 3) are reserved for the LO2, kernel, The MicroC/OS-II kernel starts executing the first available highest priority task and a task rescheduling happens whenever a task enters the ‘Waiting’ state due to the invocation of system, calls, and whenever an Interrupt occurs, the tasks are rescheduled upon return from the, LO2, Interrupt Service Routine, The MicroC/OS-II kernel supports Inter Task Communication through mailbox and, LO2, message queues., The MicroC/OS-II kernel implements mutual exclusion through disabling task scheduling, disabling, LO2, interrupts, using semaphores and events, MicroC/OS-II supports two different types of semaphores, namely, counting semaphore and mutual, LO2, exclusion semaphore (mutex), Under MicroC/OS-II, the ‘Clock Tick’ acts as the time source for providing timing reference for time, LO2, delays and timeouts. ‘Clock Tick’ generates periodic interrupts, Under MicroC/OS-II, each interrupt is assigned an Interrupt Request number (IRQ). The actions, corresponding to an interrupt is implemented in a function called Interrupt Service Routine LO2, (ISR). The IRQ links to the corresponding ISR, LO2, The Micro-IDE is an example for 3rd party development tool for MicroC/OS-II, , Keywords, VxWorks: A popular hard real- me, mul tasking opera ng system from Wind River Systems, [LO 1], wind: The kernel of VxWorks, [LO 1], Task Scheduling: The act of alloca ng the CPU to different tasks, [LO 1, LO 2], Kernel: A set of services which forms the heart of an opera ng system, [LO 1, LO 2], Message Queue: An inter-task communica on mechanism used in VxWorks. It comprises queue for sending, and receiving messages, [LO 1, LO 2], Pipe: A message queue based IPC mechanism under VxWorks, [LO 1], Socket: The mechanism u lised by VxWorks to communicate between processes running on different targets, which are networked and for execu ng a procedure (func on) which is part of another process running on, the same CPU or on a different CPU within the network, [LO 1], Signals: A form of so ware event no fica on based Inter Process Mechanism supported by VxWorks [LO 1], Mutual Exclusion Semaphore: A binary semaphore implementa on under VxWorks kernel, which implements, mechanisms to prevent priority inversion, [LO 1], Watchdog Timer: A special mer implementa on for monitoring the task execu on me and triggering, precau onary ac ons in case the execu on exceeds the allowed me, [LO 1], Tornado® II: The VxWorks development environment from Wind River Systems, [LO 1], MicroC/OS-II: A portable, ROMable, scalable, preemp ve, real- me, mul tasking kernel from Micrium Inc, , [LO 2], Mailbox: An IPC mechanism supported by MicroC/OS-II kernel, for exchanging a single message between, two tasks or between an ISR and a task, [LO 2]
Page 578 :
554, , Introduc on to Embedded Systems, , Objec ve Ques ons, 1. Which of the following is true about VxWorks OS, (a) Hard real-time (b) Soft real-time, (c) Multitasking, (d) (a) and (c), (e) (b) and (c), 2. A task is waiting for a semaphore for its operation. Under VxWorks task state terminology, the task is said, to be in _______ state, (a) READY, (b) RUNNING, (c) PEND, (d) SUSPEND, (e) None of these, 3. Under VxWorks kernel the state of a task which is currently executing is changed to SUSPEND. Which of, the following system call might have occurred?, (a) taskSpawn(), (b) taskActivate(), (c) taskSuspend(), (d) msgQSend(), (e) None of these, 4. Under VxWorks kernel the state of a task is SUSPEND. Which of the following statement is true?, (a) It is a new task created with system call taskInit() and not yet activated, (b) It is a new task created with system call taskSpawn() and not yet activated, (c) The task is suspended by the system call taskSuspend(), (d) Execution of the task created some exception, (e) All of the above, (f) Only (a), (c) and (d), (g) Only (b), (c) and (d), 5. Which of the following is not part of a task’s context under standard VxWorks kernel?, (a) Program counter, (b) CPU Registers, (c) Memory address space, (d) Signal Handlers, (e) None of these, 6. Under VxWorks kernel, executing the system call kernelTimeSlice (0) produces the impact, (a) The scheduling becomes pre-emptive priority based with Round Robin for Priority resolution, (b) The scheduling becomes pre-emptive priority based with no priority resolution, (c) The scheduling becomes Round Robin, (d) None of these, 7. What is the priority level supported by VxWorks for tasks?, (a) 10, (b) 255, (c) 256, (d) Unlimited, 8. Which of the following is(are) true about the system call taskDelete(), (a) Terminates a specified task (b) Frees the task memory occupied by stack, (c) Frees the memory occupied by the task control block, (d) Frees the memory allocated by the task during its execution, (e) All of these, (f) Only (a), (b) and (c), 9. Which is the first task executed by VxWorks kernel on a system boot-up?, (a) tNetTask, (b) tUsrRoot, (c) tRlogind, (d) tWdbTask, 10. Which of the following is not an IPC mechanism supported by VxWorks, (a) Shared memory (b) Message queue, (c) mailslot, (d) Sockets, 11. While executing a task under VxWorks kernel, an address error exception occurred. Which of the following, actions are performed by the default exception handler service?, (a) The task caused the error is suspended, (b) The state of the task at the point of exception is saved (c) Initiates a system reset, (d) All of these, (e) Only (a) and (b)
Page 579 :
An Introduc on to Embedded System Design with VxWorks and MicroC/OS-II RTOS, , 555, , 12. Which of the following is not a mechanism supported by VxWorks for Inter Task Synchronisation?, (a) Binary semaphore, (b) Test and set, (c), Counting semaphore, (d) Mutual exclusion semaphore, 13. Which of the following is true about the scheduler locking based synchronisation under VxWorks kernel?, (a) May lead to unacceptable real-time response, (b) May increase interrupt latency, (c) Both of these, (d) None of these, 14. The mutual exclusion semaphore under VxWorks kernel is a type of, (a) Counting semaphore, (b) Binary semaphore, 15. The mutual exclusion semaphore prevents priority inversion by, (a) Priority ceiling, (b) Priority inheritance, 16. Which of the following is true about Interrupt Service Routine under VxWorks kernel, (a) It runs in a separate context, (b) It runs on the same context as that of the interrupted task, (c) It depends on the processor architecture in which the VxWorks kernel is running, (d) None of these, 17. Which of the following is true about the stack implementation for ISR under VxWorks?, (a) All ISRs share a common stack, (b) The ISR uses the stack of the interrupted task, (c) It depends on the processor architecture in which the kernel is running, (d) None of these, 18. What is the priority levels supported by MicroC/OS-II kernel, (a) 64, (b) 56, (c) 256, (d) Unlimited, 19. Which of the following is true about task scheduling under MicroC/OS-II kernel, (a) Priority based pre-emptive scheduling, (b) Priority based non-preemptive scheduling, (c) Round Robin, (d) Pre-emptive priority based with Round Robin for priority resolution, 20. Which of the following is not true about tasks under MicroC/OS-II kernel, (a) Supports multiple tasks with same priority, (b) ISRs are allowed to create tasks, (c) The stack can be specified as either upward growing or downward growing, (d) All of these, (e) Only (a) and (b) (f) Only (a) and (c), (g) Only (b) and (c), 21. Under MicroC/OS-II kernel changes its state from ‘RUNNING’ to ‘WAITING’, which of the following, conditions might have invoked this?, (a) The task attempted to acquire a shared resource which is currently in use by another task, (b) The task involves some I/O operation and is waiting for I/O, (c) The task undergoes sleeping, (d) The task is suspended by itself or by another task, (e) Any one of these, (f) None of these, 22. Which is the MicroC function responsible for initialising the different OS kernel data structure, (a) OSInit(), (b) OSStart(), (c) OSIdle(), (d) None of these, 23. Which of the following is not an IPC mechanism under MicroC/OS-II kernel, (a) Message queue (b) Mailbox, (c) Pipes, (d) None of these
Page 580 :
556, , Introduc on to Embedded Systems, , 24. Which is the function call used by an ISR to indicate the occurrence of an interrupt to the MicroC/OS-II, kernel, (a) Interrupt, (b) OSIntEnter, (c) OSIntExit, (d) OSIntNesting, 25. Under the MicroC/OS-II kernel, the ISR for normal processor architecture makes use of which stack?, (a) Stack of the Interrupted Task, (b) Separate stack, (c) A mix of a separate stack and stack of interrupted task, (d) ISR doesn’t use any stack, , Review Ques ons, 1. Explain ‘task’ in ‘VxWorks’ context? Explain the different possible states of a task under VxWorks kernel., , [LO 1], 2. Explain the state transition under VxWorks kernel with a state transition diagram. Give an example for the, scenarios for each state transitions., [LO 1], 3. Explain the task creation and management under VxWorks kernel., [LO 1], 4. Explain the difference between taskInit() and taskSpawn() system calls for task creation under VxWorks, kernel., [LO 1], 5. Explain the task scheduling supported by VxWorks kernel., [LO 1], 6. Explain the priority based pre-emptive scheduling with Round Robin scheduling for priority resolution, under VxWorks, with execution diagram for the following:, [LO 1], (a) There are 3 tasks T1, T2 and T3 with priority 15 READY to run and the execution time for the tasks are, 20, 15 and 20 Timer Tick respectively, (b) The Time slice for Round Robin scheduling is 5 timer ticks, (c) The scheduler selects the tasks in the order T1,T3,T2 for Round Robin execution, (d) After 7 timer ticks, task 4 with priority 14 and execution completion time 10 becomes ‘READY’, 7. Explain the exception handling mechanisms for tasks and interrupts under VxWorks kernel., [LO 1], 8. Explain how a task can be made safe from unwanted deletion under VxWorks kernel, when it is holding a, system resource., [LO 1], , [LO 1], 10. Explain the different types of Inter Process Communication Mechanisms supported by VxWorks. [LO 1], 9. Explain the kernel services of VxWorks., , 11. Explain the implementation of a two-way message queue between two tasks under VxWorks kernel, with a, block diagram., [LO 1], 12. Explain the different mutual exclusion mechanisms supported by VxWorks. State the relative merits and, limitations of each., [LO 1], 13. What is semaphore? Explain the different types of semaphores supported by VxWorks., [LO 1], 14. Explain how a mutual exclusion semaphore prevents priority inversion in task execution under VxWorks, kernel., [LO 1], 15. Explain the different system calls for wind message queue creation and management under VxWorks kernel., , [LO 1], 16. Explain the different system calls for POSIX standard message queue creation and management under, VxWorks kernel., [LO 1]
Page 581 :
An Introduc on to Embedded System Design with VxWorks and MicroC/OS-II RTOS, , 557, , 17. Explain pipe based IPC implementation under VxWorks kernel. How is it different form the message queue, based IPC?, [LO 1], 18. Explain the ‘Signals’ based IPC implementation under VxWorks kernel., [LO 1], 19. Explain the interrupt handling mechanism under VxWorks kernel., [LO 1], 20. Explain how a ‘C function’ can be used as the ISR for an interrupt under VxWorks., [LO 1], 21. Under VxWorks it is required to mask interrupts with priority less than 2 while allowing the other interrupts, to be serviced. Explain how it can be achieved?, [LO 1], 22. Explain the watchdog timer operation under VxWorks kernel., [LO 1], 23. Explain the time delay generation under VxWorks kernel., [LO 1], 24. Explain the different possible states of a task under MicroC/OS-II kernel., [LO 2], 25. Explain the state transition under MicroC/OS-II kernel with a state transition diagram. Give an example for, the scenarios for each state transitions., [LO 2], 26. Explain the task creation and management under MicroC/OS-II kernel., [LO 2], 27. Explain the task creation and management under MicroC/OS-III., [LO 2], 28. Explain the task scheduling supported by MicroC/OS-II kernel., [LO 2], 29. Explain the kernel functions and initialisation under MicroC/OS-II kernel., [LO 2], 30. Explain the role of Idle Task under MicroC/OS-II kernel., [LO 2], 31. Explain the different types of Inter Task Communication mechanisms supported by MicroC/OS-II kernel., , [LO 2], 32. Explain the different mutual exclusion mechanisms supported by MicroC/OS-II kernel. State the relative, merits and limitations of each., [LO 2], 33. Explain the different types of semaphores supported by MicroC/OS-II kernel., [LO 2], 34. Explain the event based task synchronisation under MicroC/OS-II kernel., [LO 2], 35. Compare the signal based synchronisation under VxWorks and event based task synchronisation under, MicroC/OS-II kernel., [LO1, LO 2], 36. Compare the VxWorks and MicroC/OS-II kernel., [LO1, LO 2], 37. Explain the time delay generation under MicroC/OS-II kernel., [LO 2], 38. Explain the dynamic memory management under MicroC/OS-II kernel., [LO 2], 39. Explain the Interrupt handling mechanism supported by MicroC/OS-II kernel., [LO 2], , Lab Assignments, 1. Write a VxWorks multitasking application to create two tasks as per the following requirements, (a) The stack size for both the tasks are 2000, (b) Priority for both the tasks are 100, (c) Task 1 prints the message “Hello from Task 1” continuously with a delay of 500 timer ticks between, successive printing, (d) Task 2 prints the message “Hello from Task 2” continuously with a delay of 500 timer ticks between, successive printing, 2. Write a VxWorks multitasking application to retrieve and change the POSIX priority assigned to the tasks as, per the following requirements, , (a) Create two tasks with names “Task1” and “Task2” respectively. The stack size for both the tasks are 2000
Page 582 :
558, , Introduc on to Embedded Systems, , 3., , 4., 5., , 6., 7., , 8., , (b) Priority for both the tasks are initially set at 100, (c) Task1 is spawned first and then Task2, (d) Task1 retrieves its priority and prints it on the console and then changes it to current priority-1, if the, current priority is an even number, else changes to priority+1, (e) Task2 retrieves its priority and prints it on the console and then changes it to current priority-1, if the, current priority is an even number, else changes to priority+1, (f) Use Round Robin scheduling with time slice 20 timer tick for priority resolution, An embedded application involves reading data from an Analog to Digital Converter. The ADC indicates, the availability of data by asserting the interrupt line which is connected to the processor of the system., The interrupt vector for the external interrupt line to which the ADC is interfaced is 0x0003. The ISR for, the external interrupt reads the data and stores it in a shared buffer of size 512 bytes. The received data is, processed by a task. The task reads the data and prints it on the console. The communication between the, ISR and task is synchronised using a binary semaphore. The task waits for the availability of the binary, semaphore and the ISR signals the availability of the binary semaphore when an interrupt occurs and the, data is read from the device. Write an application to implement this requirement under VxWorks kernel, Re-write the message queue example given under the Inter Task Communication section of VxWorks for, posting the message as a high priority message, Create a POSIX based message queue under VxWorks for communicating between two tasks as per the, requirements given below, (a) Use a named message queue with name “MyQueue”, (b) Create two tasks (Task1 and Task2) with stack size 4000 and priorities 99 and 100 respectively, (c) Task1 creates the specified message queue as Read Write and reads the message present, if any, from, the message queue and prints it on the console, (d) Task2 opens the message queue and posts the message “Hi From Task2”, (e) Handle all possible error scenarios appropriately, Implement the above requirements with ‘notification’ based POSIX message queue (Hint: Use signal for, handling the notification), Write a VxWorks application as per the requirements given below, (a) Three tasks with names Task1, Task2 and Task3 with priorities 100, 99 and 98 respectively are, created with stack size 2000, (b) Task1 checks the availability of a binary semaphore ‘binarySem’ and if it is available, it prints, the message “Hi from Task1” 50 times and then releases the binary semaphore and completes its, execution, (c) Task2 prints the message “Hi from Task2” 50 times and completes its execution, (d) Task3 checks the availability of a binary semaphore ‘binarySem’ and if it is available, it prints, the message “Hi from Task2” 50 times and then releases the binary semaphore and completes its, execution, (e) The tasks are spawned in the order Task1, Task2 and Task3, (f ) Handle all possible error scenarios appropriately, Observe the output and record your inference on the behaviour of the program, Write a complete MicroC program for implementing multitasking as per the following requirements, (a) Create two tasks with names Task1 and Task2 with stack size 1024 and priorities 9 and 10, respectively, (b) Task1 prints the message “Hi from Task1” (Assume that the compiler in use has a MicroC library, implementation for the printf() function tailored for the target processor port) and sleeps for 20 Timer, Ticks
Page 583 :
An Introduc on to Embedded System Design with VxWorks and MicroC/OS-II RTOS, , 559, , (c) Task2 prints the message “Hi from Task2” (Assume that the compiler in use has a MicroC library, implementation for the printf() function tailored for the target processor port) and sleeps for 20 Timer, Ticks, (d) The tasks are created in the order Task2, Task1, 9. Write a complete MicroC program for synchronising the access of an integer variable ‘Var’ shared, between two tasks using ‘disabling task scheduling technique’ as per the following requirements, (a) Create two tasks with names Task1 and Task2 with stack size 1024 and priorities 9 and 10, respectively, (b) Task1 increments the shared variable and prints its value with the message “From Task1 : Var =, ” (Assume that the compiler in use has a MicroC library implementation for the printf() function, tailored for the target processor port) and sleeps for 20 Timer Ticks, (c) Task2 decrements the shared variable and prints its value with the message “From Task2 : Var =, ” (Assume that the compiler in use has a MicroC library implementation for the printf() function, tailored for the target processor port) and sleeps for 20 Timer Ticks, (d) The tasks are created in the order Task2, Task1, 10. An embedded system involves the reception of serial data through a serial port and displaying the, current time in HH:MM:SS format on the first line of a 2 line 16 character display and indicating serial, data reception on the second line of the LCD. Design the system based on MicroC/OS-II as per the, requirements given below, (a) Task1 is created for polling the serial receive interrupt flag of the processor (Assume that MicroC, implementation provides a variable called RI for indicating the status. It is set on the reception of a, data byte). Task1 is created with stack size 512 bytes and priority 9, (b) Upon receiving serial data, Task1 displays the message “Data Received = ” and appends the received, data byte to the display, (c) Task2 is created for reading the time from a MicroC/OS-II time structure, which is assumed to be, updated every second by the system timer interrupt, and displaying the time on the first line of the, LCD in HH:MM:SS format. The Display should be centralised to the first line with packing with, blank characters on both sides, (“ HH:MM:SS ”), (d) Task2 is created with stack size 512 bytes and priority 10, (e) It is assumed that the function for initialising the LCD, LCDInit() is available. You can use a dummy, function call LCDInit() to indicate the initialisation of the LCD. Similarly a dummy function, LCDWrite(x, y, char) is also available for displaying character on the LCD at position x,y. x = 0 for, line 1 and 1 for line 2. y varies from 0 to 15, (f) Task3 displays the message “HAVE A GREAT DAY” on the second line of the LCD if there is no, data reception activity in progress. Task3 is created with stack size 512 bytes and priority 11, (g) Each task should contain self-delaying for a period of 5 timer ticks to give another task a chance to, execute, (h) When the system starts up, the current time is displayed on the first line and the message “HAVE A, GREAT DAY” is displayed on the second line of the LCD, (i) The learning objective of this application is the usage of semaphore under MicroC/OS-II kernel for, enforcing mutual exclusion in shared resource access
Page 584 :
560, , Introduc on to Embedded Systems, , 12, , Integration and Testing, of Embedded Hardware, and Firmware, , LEARNING OBJECTIVES, LO 1 Learn the different techniques for embedding firmware into hardware, Learn about the steps involved in the Out of system Programming, Learn about the In System Programming (ISP) for firmware embedding, Learn about the In Applica on Programming (IAP) for altering an area of the, program storage memory for upda ng configura on data, tables, etc., Learn the technique used for embedding OS image and applica ons into the, program storage memory of an embedded device, LO 2 Understand the various things to be taken care in the ‘board bring up’, , Integration testing of the embedded hardware and firmware is the immediate step following the embedded, hardware and firmware development. Embedded hardware and firmware are developed in various steps, as described in the earlier chapters. The final embedded hardware constitute of a PCB with all necessary, components affixed to it as per the original schematic diagram. Embedded firmware represents the control, algorithm and configuration data necessary to implement the product requirements on the product. Embedded, firmware will be in a target processor/controller understandable format called machine language (sequence, of 1s and 0s–Binary). The target embedded hardware without embedding the firmware is a dumb device and, cannot function properly. If you power up the hardware without embedding the firmware, the device may, behave in an unpredicted manner. As described in the earlier chapters, both embedded hardware and firmware, should be independently tested (Unit Tested) to ensure their proper functioning. Functioning of individual, hardware sections can be verified by writing small utilities which checks the operation of the specified part. As, far as the embedded firmware is concerned, its targeted functionalities can easily be checked by the simulator, environment provided by the embedded firmware development tool’s IDE. By simulating the firmware, the, memory contents, register details, status of various flags and registers can easily be monitored and it gives, an approximate picture of “What happens inside the processor/controller and what are the states of various, peripherals” when the firmware is running on the target hardware. The IDE gives necessary support for, simulating the various inputs required from the external world, like inputting data on ports, generating an
Page 585 :
Integra on and Tes ng of Embedded Hardware and Firmware, , 561, , interrupt condition, etc. This really helps in debugging the functioning of the firmware without dumping the, firmware in a real target board., , 12.1, , INTEGRATION OF HARDWARE AND FIRMWARE, , Integration of hardware and firmware deals with the embedding of firmware, LO 1 Learn the, into the target hardware board. It is the process of ‘Embedding Intelligence’, different techniques for, to the product. The embedded processors/controllers used in the target board, embedding firmware, may or may not have built in code memory. For non-operating system based, into hardware, embedded products, if the processor/controller contains internal memory, and the total size of the firmware is fitting into the code memory area, the code memory is downloaded into, the target controller/processor. If the processor/controller does not support built in code memory or the size of, the firmware is exceeding the memory size supported by the target processor/controller, an external dedicated, EPROM/FLASH memory chip is used for holding the firmware. This chip is interfaced to the processor/, controller. (The type of firmware storage, either processor storage or external storage is decided at the time, of hardware design by taking the firmware complexity into consideration). A variety of techniques are used, for embedding the firmware into the target board. The commonly used firmware embedding techniques for, a non-OS based embedded system are explained below. The non-OS based embedded systems store the, firmware either in the onchip processor/controller memory or offchip memory (FLASH/NVRAM, etc.)., , 12.1.1, , Out-of-Circuit Programming, , Out-of-circuit programming is performed outside the, target board. The processor or memory chip into which, the firmware needs to be embedded is taken out of the, target board and it is programmed with the help of a, programming device (Fig. 12.1). The programming, device is a dedicated unit which contains the necessary, hardware circuit to generate the programming signals., Most of the programmer devices available in the market, are capable of programming different family of devices, with different pin outs (Pin counts). The programmer, contains a ZIF socket with locking pin to hold the, device to be programmed. The programming device, will be under the control of a utility program running Fig. 12.1 Firmware Embedding Tool-Device, Programmer: LabTool-48UXP), on a PC. Usually the programmer is interfaced to the, (Courtesy of Burn Technology Limited, PC through RS-232C/USB/Parallel Port Interface. The, www.burntec.com & Advantech Equipment Corp, commands to control the programmer are sent from the, www.aec.com.tw ), utility program to the programmer through the interface, (Fig. 12.2)., The sequence of operations for embedding the firmware with a programmer is listed below., 1. Connect the programming device to the specified port of PC (USB/COM port/parallel port), 2. Power up the device (Most of the programmers incorporate LED to indicate Device power up. Ensure, that the power indication LED is ON), 3. Execute the programming utility on the PC and ensure proper connectivity is established between PC, and programmer. In case of error, turn off device power and try connecting it again, 4. Unlock the ZIF socket by turning the lock pin
Page 586 :
562, , Introduc on to Embedded Systems, , Fig. 12.2 Interfacing of Device Programmer with PC, 5. Insert the device to be programmed into the open socket as per the insert diagram shown on the, programmer, 6. Lock the ZIF socket, 7. Select the device name from the list of supported devices, 8. Load the hex file which is to be embedded into the device, 9. Program the device by ‘Program’ option of utility program, 10. Wait till the completion of programming operation (Till busy LED of programmer is off), 11. Ensure that programming is successful by checking the status LED on the programmer (Usually ‘Green’, for success and ‘Red’ for error condition) or by noticing the feedback from the utility program, 12. Unlock the ZIF socket and take the device out of programmer, Now the firmware is successfully embedded into the device. Insert the device into the board, power up, the board and test it for the required functionalities. It is to be noted that the most of programmers support, only Dual Inline Package (DIP) chips, since its ZIF socket is designed to accommodate only DIP chips., Hence programming of chips with other packages is not possible with the current setup. Adaptor sockets, which convert a non-DIP package to DIP socket can be used for programming such chips. One side of the, Adaptor socket contains a DIP interface and the other side acts as a holder for holding the chip with a nonDIP package (say VQFP). Option for setting firmware protection will be available on the programming, utility. If you really want the firmware to be protected against unwanted external access, and if the device is, supporting memory protection, enable the memory protection on the utility before programming the device., The programmer usually erases the existing content of the chip before programming the chip. Only EEPROM, and FLASH memory chips are erasable by the programmer. Some old embedded systems may be built around, UVEPROM chips and such chips should be erased using a separate ‘UV Chip Eraser’ before programming., The major drawback of out-of-circuit programming is the high development time. Whenever the firmware, is changed, the chip should be taken out of the development board for re-programming. This is tedious and, prone to chip damages due to frequent insertion and removal. Better use a socket on the board side to hold, the chip till the firmware modifications are over. The programmer facilitates programming of only one chip, at a time and it is not suitable for batch production. Using a ‘Gang Programmer’ resolves this limitation to, certain extent. A gang programmer is similar to an ordinary programmer except that it contains multiple ZIF, sockets (say 4 to 8) and capable of programming multiple devices at a time. But it is bit expensive compared, to an ordinary programmer. Another big drawback of this programming technique is that once the product is, deployed in the market in a production environment, it is very difficult to upgrade the firmware.
Page 587 :
Integra on and Tes ng of Embedded Hardware and Firmware, , 563, , The out-of-system programming technique is used for firmware integration for low end embedded products, which runs without an operating system. Out-of-circuit programming is commonly used for development of, low volume products and Proof of Concept (PoC) product Development., , 12.1.2, , In System Programming (ISP), , With ISP, programming is done ‘within the system’, meaning the firmware is embedded into the target device, without removing it from the target board. It is the most flexible and easy way of firmware embedding. The, only pre-requisite is that the target device must have an ISP support. Apart from the target board, PC, ISP, cable and ISP utility, no other additional hardware is required for ISP. Chips supporting ISP generates the, necessary programming signals internally, using the chip’s supply voltage. The target board can be interfaced, to the utility program running on PC through Serial Port/Parallel Port/USB. The communication between the, target device and ISP utility will be in a serial format. The serial protocols used for ISP may be ‘Joint Test, Action Group (JTAG)’ or ‘Serial Peripheral Interface (SPI)’ or any other proprietary protocol. In order to, perform ISP operations the target device (in most cases the target device is a microcontroller/microprocessor), should be powered up in a special ‘ISP mode’. ISP mode allows the device to communicate with an external, host through a serial interface, such as a PC or terminal. The device receives commands and data from the, host, erases and reprograms code memory according to the received command. Once the ISP operations are, completed, the device is re-configured so that it will operate normally by applying a reset or a re-power up., 12.1.2.1 In System Programming with SPI Protocol, Devices with SPI In System Programming support contains a built-in SPI interface and the on-chip EEPROM, or FLASH memory is programmed through this interface. The primary I/O lines involved in SPI – In System, Programming are listed below., MOSI – Master Out Slave In, MISO – Master In Slave Out, SCK – System Clock, RST – Reset of Target Device, GND – Ground of Target Device, PC acts as the master and target device acts as the slave in ISP. The program data is sent to the, MOSI pin of target device and the device acknowledgement is originated from the MISO pin of the device., SCK pin acts as the clock for data transfer. A utility program can be developed on the PC side to generate, the above signal lines. Since the target device works under a supply voltage less than 5V (TTL/CMOS),, it is better to connect these lines of the target device with the parallel port of the PC. Since Parallel port, operations are also at 5V logic, no need for any other intermediate hardware for signal conversion. The pins, of parallel port to which the ISP pins of device needs to be connected are dependent on the program, which, is used for generating these signals, or you can fix these lines first and then write the program according to, the pin inter-connection assignments. Standard SPI-ISP utilities are feely available on the internet and there, is no need for going for writing own program. What you need to do is just connect the pins as mentioned by, the program requirement. As mentioned earlier, for ISP operations, the target device needs to be powered up, in a pre-defined sequence. The power up sequence for In System Programming for Atmel’s AT89S series, microcontroller family is listed below., 1. Apply supply voltage between VCC and GND pins of target chip., 2. Set RST pin to “HIGH” state., 3. If a crystal is not connected across pins XTAL1 and XTAL2, apply a 3 MHz to 24 MHz clock to, XTAL1 pin and wait for at least 10 milliseconds.
Page 588 :
564, , Introduc on to Embedded Systems, , 4. Enable serial programming by sending the Programming Enable serial instruction to pin MOSI/P1.5., The frequency of the shift clock supplied at pin SCK/P1.7 needs to be less than the CPU clock at, XTAL1 divided by 40., 5. The Code or Data array is programmed one byte at a time by supplying the address and data together, with the appropriate Write instruction. The selected memory location is first erased before the new data, is written. The write cycle is self-timed and typically takes less than 2.5 ms at 5V., 6. Any memory location can be verified by using the Read instruction, which returns the content at the, selected address at serial output MISO/P1.6., 7. After successfully programming the device, set RST pin low or turn off the chip power supply and turn, it ON to commence the normal operation., Note: This sequence is applicable only to Atmel AT89S Series microcontroller and it need not be the same, for other series or family of microcontroller/ISP device. Please refer to the datasheet of the device which, needs to be programmed using ISP technique for the sequence of operations., The key player behind ISP is a factory programmed memory (ROM) called ‘Boot ROM’. The Boot ROM, normally resides at the top end of code memory space and it varies in the order of a few Kilo Bytes (For, a controller with 64K code memory space and 1K Boot ROM, the Boot ROM resides at memory location, FC00H to FFFFH). It contains a set of Low-level Instruction APIs and these APIs allow the processor/, controller to perform the FLASH memory programming, erasing and Reading operations. The contents of the, Boot ROM are provided by the chip manufacturer and the same is masked into every device. The Boot ROM, for different family or series devices is different. By default the Reset vector starts the code memory execution, at location 0000H. If the ISP mode is enabled through the special ISP Power up sequence, the execution, will start at the Boot ROM vector location. In System Programming technique is the most recommended, programming technique for development work since the effort required to re-program the device in case of, firmware modification is very little. Firmware upgrades for products supporting ISP is quite simple., , 12.1.3, , In Application Programming (IAP), , In Application Programming (IAP) is a technique used by the firmware running on the target device for, modifying a selected portion of the code memory. It is not a technique for first time embedding of user written, firmware. It modifies the program code memory under the control of the embedded application. Updating, calibration data, look-up tables, etc., which are stored in code memory, are typical examples of IAP. The Boot, ROM resident API instructions which perform various functions such as programming, erasing, and reading, the Flash memory during ISP mode, are made available to the end-user written firmware for IAP. Thus it is, possible for an end-user application to perform operations on the Flash memory. A common entry point to, these API routines is provided for interfacing them to the end-user’s application. Functions are performed, by setting up specific registers as required by a specific operation and performing a call to the common, entry point. Like any other subroutine call, after completion of the function, control will return to the enduser’s code. The Boot ROM is shadowed with the user code memory in its address range. This shadowing, is controlled by a status bit. When this status bit is set, accesses to the internal code memory in this address, range will be from the Boot ROM. When cleared, accesses will be from the user’s code memory. Hence the, user should set the status bit prior to calling the common entry point for IAP operations (The IAP technique, described here is for PHILIPS’ 89C51RX series microcontroller. Though the underlying principle in IAP is, the same, the shadowing technique used for switching access between Boot ROM and code memory may be, different for other family of devices).
Page 589 :
Integra on and Tes ng of Embedded Hardware and Firmware, , 12.1.4, , 565, , Use of Factory Programmed Chip, , It is possible to embed the firmware into the target processor/controller memory at the time of chip fabrication, itself. Such chips are known as ‘Factory programmed chips’. Once the firmware design is over and the, firmware achieved operational stability, the firmware files can be sent to the chip fabricator to embed it, into the code memory. Factory programmed chips are convenient for mass production applications and it, greatly reduces the product development time. It is not recommended to use factory programmed chips, for development purpose where the firmware undergoes frequent changes. Factory programmed ICs are bit, expensive., , 12.1.5, , Firmware Loading for Operating System Based Devices, , The OS based embedded systems are programmed using the In System Programming (ISP) technique. OS, based embedded systems contain a special piece of code called ‘Boot loader’ program which takes control, of the OS and application firmware embedding and copying of the OS image to the RAM of the system, for execution. The ‘Boot loader’ for such embedded systems comes as pre-loaded or it can be loaded to, the memory using the various interface supported like JTAG. The bootloader contains necessary driver, initialisation implementation for initialising the supported interfaces like UART/I2C, TCP/IP etc. Bootloader, implements menu options for selecting the source for OS image to load (Typical menu item examples are, Load from FLASH ROM, Load from Network, Load through UART etc). In case of the network based, loading, the bootloader broadcasts the target’s presence over the network and the host machine on which the, OS image resides can identify the target device by capturing this message. Once a communication link is, established between the host and target machine, the OS image can be directly downloaded to the FLASH, memory of the target device. We will discuss about the role of ‘Boot loader’, ‘Boot loader’ development and, embedding, firmware and OS embedding and booting process for an OS based embedded system in detail in, a dedicated book planned under this series. Please be patient till then., , 12.2, , BOARD BRING UP, , Now the firmware is embedded into the target board using one of the, LO 2 Understand the, programming techniques described above. ‘What Next?’ The answer is, various things to be, bring up/power up the board. You may be expecting the device functioning, taken care in the ‘board, exactly in a way as you designed. But in real scenario it need not be,, bring up’, especially for prototype versions and if the board functions well in the first, attempt itself, you are really fortunate. Sometimes you may encounter situations like - The first power up, ends up in a messy explosion leaving the smell of burned components behind . It may happen due to various, reasons, like Proper care was not taken in applying the power and power applied in reverse polarity (+ve, terminal of supply connected to –ve terminal of the target board and vice versa), components were not placed, in the correct polarity order (E.g. a capacitor on the target board is connected to the board with +ve terminal, to –ve of the board and vice versa), etc.… etc.…, Bring up of prototype/evaluation/production version is one of the most important steps in the embedded, product design. The prototype/evaluation/production version must pass through a varied set of tests to verify, that the embedded hardware is rock solid and the firmware functions as expected. The term bring up in, embedded product design deals with performing a series of validations in a controlled environment, in a, well-defined sequence which is specifically tailored for the product. Bring up process usually includes basic, hardware spot checks/validations to make sure that the individual components and buses/interconnects are, operational – which involves checking power, clocks, and basic functional connectivity; basic firmware
Page 590 :
566, , Introduc on to Embedded Systems, , verification to make sure that the processor is fetching the code and the firmware execution is happening in, the expected manner and then running advanced validations such as memory validations, signal integrity, validation etc., When the hardware PCB is assembled, most designers, in their eagerness to get the project rolling, will, try to power it on immediately. But before that there are a few spot checks that can quickly identify problems, that can damage the hardware when powering it on. The first check is to look over the board and check for, any missing parts, parts that are loose or partly soldered or shorts in the path, especially around the main, components. Now make sure that various power lines in the board (2.2V, 3.3V, 5.0V etc.) are up, are within, the spec limits and are clean and ripple free. Certain controllers/processors which has multiple power input, will have power sequencing requirement to apply the power in a predefined order. Make sure that the power, is applied in the proper sequence. Clocks play a critical role in the boot up of the system. In addition to power, rails, CPUs, chipsets and other components need reference clocks in order to start up. Make sure that all the, clocks are up and running and they are meeting the spec values. Monitor the different interconnect buses, (Like I2C) to ensure that they are meeting the electrical specifications as well as the protocol requirements, I would like to share a very interesting incident which happened in my development career during the, power up of a new board. Though the board was well checked and extreme care was taken in applying, the power, when powered the board after embedding the firmware, I heard an explosion followed by the, burning of a capacitor on the target board and I really struggled hard to stop the fire from spreading by a, strong puff of air—It is not a joke, It’s a true incident. The reason was very simple, the power applied to the, board was 9V and the filter capacitor placed at the voltage regulator IC input side was with a rating of 6V, (220MFD/6V). Since the capacitor voltage rating was below the input supply, the dielectric of capacitor got, burned. Be cautious: Before you power up the board make sure everything is intact. We will discuss about, the various tools used for troubleshooting the target hardware in a later chapter., , Summary, � Integration of hardware and firmware deals with the embedding of firmware into the target hardware, board., LO1, � For non-operating system based embedded products, if the processor/controller contains internal, memory and the total size of the firmware is fitting into the code memory area, the code memory is, downloaded into the target controller/processor. If the processor/controller does not support builtin code memory or the size of the firmware is exceeding the memory size supported by the target, processor/controller, the firmware is held in an external dedicated EPROM/FLASH, LO1, memory chip, � Out-of-circuit programming and In System Programming (ISP) are the two different methods for, embedding firmware into a non Operating System based product, LO1, � In the out-of-circuit programming, the device is removed from the target board and is programmed, using a ‘Device Programmer’, whereas in the In System Programming technique, the firmware is, embedded into the controller memory/program memory chip without removing the chip, LO1, from the target board, � JTAG, SPI, etc. are the commonly used serial protocols for transferring the embedded firmware, into the target device, LO1, � In Application Programming (IAP) is a technique used by the firmware running on the target, device for modifying a selected portion of the code memory. It is not a technique for first time, embedding of user written firmware. It modifies the program code memory under the, LO1, control of the embedded application
Page 591 :
567, , Integra on and Tes ng of Embedded Hardware and Firmware, , � IAP is normally used for updating calibration data, look-up tables, etc. which are stored in code, memory, LO1, � Factory programmed chip embeds firmware into the chip at the time of chip fabrication, LO1, � In System Programming (ISP) is used for embedding the OS image and application, program into the non-volatile storage memory of the embedded product. The bootloader program, running in the target device implements the necessary routine for embedding the OS image into the, non-volatile memory and booting the system, LO1, � Proper care should be taken while you power up the board. Make sure everything is intact before, you power up the board, LO2, , Keywords, JTAG: An Interface for hardware troubleshoo ng like debugging, boundary scan tes ng etc., [LO 1], In System Programming (ISP): Firmware embedding technique in which the firmware is embedded into the, program memory without removing the chip from the target board, [LO 1], Serial Peripheral Interface (SPI): Serial interface for connec ng devices, [LO 1], In Applica on Programming (IAP): A technique used by the firmware running on the target device for, modifying a selected por on of the code memory, [LO 1], BootROM: A program, which contains the libraries for implemen ng In System Programming, which is, embedded into the memory at the me of chip fabrica on, [LO 1], Bootloader: Program which takes control of the OS and applica on firmware embedding and copying of the, OS image (if required) to the RAM of the system for execu on, [LO 1], , Review Ques ons, 1. Explain the different techniques for embedding the firmware into the target board for a non-OS based, embedded system., [LO 1], 2. Explain the major drawbacks/limitations of out-of-circuit programming., , [LO 1], [LO 1], , 3. Explain the firmware embedding process for OS based embedded products., 4. What is the difference between In System Programming (ISP) and In Application Programming (IAP)?, , [LO 1]
Page 592 :
568, , Introduc on to Embedded Systems, , 13, , The Embedded, System Development, Environment, , LEARNING OBJECTIVES, LO 1 Discuss the different en es of the embedded system development environment, Learn about the Integrated Development Environments (IDEs) for embedded, firmware development and debugging, Learn the usage of μVision5 IDE from Keil so ware (www.keil.com) for, embedded firmware development, simula on and debugging for 8051 family of, microcontrollers, Familiarise with the different IDEs for firmware development for different family, of processors/controllers and Embedded Opera ng Systems, LO 2 Iden fy the different types of files (List File, Preprocessor output file, Object File, Map, File, Hex File, etc.) generated during the cross compila on of a source file wri en in, high level language like Embedded C and during the cross assembling of a source file, wri en in Assembly Language, LO 3 Discuss about disassembler and decompiler, and their role in embedded firmware, development, LO 4 Explain Simulators, In Circuit Emulators (ICE), and Debuggers and their role in, embedded firmware debugging, LO 5 Discuss the different tools and techniques used for embedded hardware debugging, Learn the use of magnifying glass, mul meter, CRO, logic analyser and func on, generator in embedded hardware Debugging, LO 6 Describe the boundary scanning technique for tes ng the interconnec on, among the various chips in a complex hardware board, , This chapter is designed to give you an insight into the embedded-system development environment. The, various tools used and the various steps followed in embedded system development are explained here. It is a, summary of the various design and development phases we discussed so far and an introduction to the various, design/development/debug tools employed in embedded system development. A typical embedded system, development environment is illustrated in Fig. 13.1.
Page 593 :
569, , The Embedded System Development Environment, , In System Programming (ISP) interface (Serial/USB/Parallel/TCP-IP), Integrated Development, Environment (IDE) tool, , Signal source, (Function generator), , EDA tool, Emulator-Target Board, interface (JTAG/BDM/Pin to, pin socket), Emu, lato, inter r-PC, face, USB, /Seri, /Para al, llel, , I/p, , Emulator, , Development PC, (Host), , er, , g, ug, eb, d, are face, rdw inter, Ha, , Target board, , PCB fabrication, files, Multimeter, , Logic Analyser/Oscilloscope, Hardware debugging tools, , Fig. 13.1, , The Embedded System Development Environment, , As illustrated in the figure, the development environment consists of a Development Computer (PC) or, Host, which acts as the heart of the development environment, Integrated Development Environment (IDE), Tool for embedded firmware development and debugging, Electronic Design Automation (EDA) Tool for, Embedded Hardware design, An emulator hardware for debugging the target board, Signal sources (like, Function generator) for simulating the inputs to the target board, Target hardware debugging tools (Digital, CRO, Multimeter, Logic Analyser, etc.) and the target hardware. The Integrated Development Environment, (IDE) and Electronic Design Automation (EDA) tools are selected based on the target hardware development, requirement and they are supplied as Installable files in CDs/Online downloads by vendors. These tools need, to be installed on the host PC used for development activities. These tools can be either freeware or licensed, copy or evaluation versions. Licensed versions of the tools are fully featured and fully functional whereas, trial versions fall into two categories, tools with limited features, and full featured copies with limited period, of usage.
Page 594 :
570, , 13.1, , Introduc on to Embedded Systems, , THE INTEGRATED DEVELOPMENT ENVIRONMENT (IDE), , In embedded system development context, Integrated Development, Environment (IDE) stands for an integrated environment for developing, and debugging the target processor specific embedded firmware. IDE is, a software package which bundles a ‘Text Editor (Source Code Editor)’,, ‘Cross-compiler (for cross platform development and compiler for same, platform development)’, ‘Linker’ and a ‘Debugger’. Some IDEs may provide interface to target board, emulators, Target processor’s/controller’s Flash memory programmer, etc. and incorporate other software, development utilities like ‘Version Control Tool’, ‘Help File for the Development Language’, etc. IDEs can, be either command line based or GUI based. Command line based IDEs may include little or less GUI, support. The old version of TURBO C IDE for developing applications in C/C++ for x86 processor on, Windows platform is an example for a generic IDE with command line interface. GUI based IDEs provide a, Visual Development Environment with user interactions through touch/mouse click interface. Such IDEs are, generally known as Visual IDEs. Visual IDEs are very helpful in firmware development. A typical example, for a Visual IDE is Microsoft® Visual Studio for developing Visual C++ and Visual Basic programs. Other, examples are NetBeans and Eclipse., IDEs used in embedded firmware development are slightly different from the generic IDEs used for, high level language based development for desktop applications. In Embedded Applications, the IDE is, either supplied by the target processor/controller manufacturer or by third party vendors or as Open Source., MPLAB is an IDE tool supplied by microchip for developing embedded firmware using their PIC family of, microcontrollers. Keil µVision5 (spelt as micro vision five) from ARMKeil is an example for a third party, IDE, which is used for developing embedded firmware for 8051/ARM family microcontrollers. CodeWarrior, Development Studio is an IDE for ARM family of processors/MCUs and DSP chips from Freescale. It should, be noted that in embedded firmware development applications each IDE is designed for a specific family of, controllers/processors and it may not be possible to develop firmware for all family of controllers/processors, using a single IDE (as of now there is no known IDE with support for all family of processors/controllers)., However there is a rapid move happening towards the open source IDE, Eclipse for embedded development., Most of the proccessor/control manufacturers and third party IDE providers are trying to build the IDE around, the popular Eclipse open source IDE. This may lead to a single IDE based on Eclipse for embedded system, development in the near future. Since this book is primarily focusing on 8051 based embedded firmware, development, the IDE chosen for demonstration is Keil µVision5. A demo version of the tool for Microsoft, Windows OS based development is available for free download from the Keil Software website. Please instal, the same on your machine before proceeding to the next sections., LO 1 Discuss the, different entities of, the embedded system, development environment, , 13.1.1, , The Keil μVision IDE for 8051, , Keil µVision5 is a licensed IDE tool from Keil Software (www.keil.com), an ARM company, for 8051 family, microcontroller based embedded firmware development. To start with the IDE (after installing the demo, tool) execute the program Uv4.exe (or the short cut ‘Keil µVision5’ from desktop or ‘All Programs’ tab from, ‘Start Menu’ – For Host machine with Microsoft® Windows Operating System). The IDE view is shown in, Fig. 13.2., The IDE looks very similar to the Microsoft® Visual Studio IDE and it contains various menu options,, a project window showing files, Register view, Books and Functions Tab and an output window. To start a, new project, go to the ‘Project’ tab on the menu, select ‘New µVision Project’ option. Give a name to your, workspace in the ‘File Name’ section of the ‘Create New Project’ Pop-up dialog Box (Let it be ‘sample’)., Choose the directory to save the project from the pop-up dialog. The default extension of a project workspace
Page 595 :
The Embedded System Development Environment, , 571, , file is .uvproj. On clicking the ‘Save’ button of the ‘Create New Project’ pop-up dialog, a device selection, dialog as shown in Fig. 13.3 appears on the screen., , Fig. 13.2, , Keil μVision5 Integrated Development Environment (IDE), , Fig. 13.3, , Target CPU Vendor selection for Keil μVision5 IDE
Page 596 :
572, , Introduc on to Embedded Systems, , This Dialog Box lists out all the vendors (manufacturers) for 8051 family microcontroller, supported by, IDE. Choose the manufacturer of the chip for your design (Let it be ‘Atmel’ for our design). Atmel itself, manufactures a variety of 8051 flavours. Choose the exact part number of the device used as the target, processor for the design, by expanding the vendor node. It will list out all supported CPUs by the selected, vendor under the vendor node. On selecting the target processor’s exact part number, the vendor name,, device name and tool set supported for the device is displayed on the appropriate fields of the dialog box, along with a small description of the target processor under the Description column on the right side of the, pop-up dialog as shown below. Press ‘OK’ to proceed after selecting the target CPU (Let it be ‘AT89C51’, for our design)., , Fig. 13.4, , Target CPU selection for Keil μVision5 IDE, , Once the target processor is selected, the IDE automatically adds the required startup code for the firmware, and it prompts you whether the standard startup code needs to be added to the project (Fig. 13.5). Press, ‘Yes’ to proceed. The startup code contains the required default initialisation like stack pointer setting and, initialisation, memory clearing, etc. On cross-compiling, the code generated for the startup file is placed, on top of the code generated for the function main(). Hence the reset vector (0000H) always starts with the, execution of startup code before the main code. For more details on the contents and code of startup file, please go through the μVision help files which is listed under the ‘Books’ section of the project workspace, window., , Fig. 13.5, , Startup file addition to the project
Page 597 :
The Embedded System Development Environment, , 573, , A ‘Target’ group with the name ‘Target1’ is automatically generated under the ‘Files’ section of the, project Window. ‘Target1’ contains a ‘Source Group’ with the name ‘Source Group1’ and the startup file, (STARTUP.A51) is kept under this group (Fig. 13.6). All these groups are generated automatically. If you, want you can rename these groups by clicking the respective group names., , Fig. 13.6, , Startup file added to the project, , You can see that similar to the Visual Studio IDE’s ‘Project Window’ for VC++ development, µVision, IDE’s ‘Project Window’ also contains multiple tabs. They are the ‘Files’ tab, which gives the file details, for the current project, ‘Regs’ tab, giving the Register details while debugging the source code, ‘Books’ tab, showing all the available help and documentation files supplied by the IDE, ‘Functions’ tab lists out the, functions present in a ‘C’ source file and finally a ‘Templates’ tab which generate automatic code framework, (function body) for if, if else, switch case etc and code documentation template (Header). These steps create, a project workspace. To start with the firmware development we need to create a source file and then add, that source file to the ‘Source Group’ of the ‘Target’. Click on the ‘File’ tab on the menu tool of the IDE and, select the option ‘New’. A blank text editor will be visible on the IDE to the right of the ‘Project Window’., Start writing the code on the text editor as per your design (Refer to the Keil help file for using Keil supported, specific Embedded C instructions for 8051 family). You can write the program in ANSI C and 8051 specific, codes (like Port Access, bit manipulation instruction etc) using Keil specific Embedded C codes. For using, the Keil specific Embedded code, you need to add the specific header file to the text editor using the #include, compiler directive. For example, #include <reg51.h> is the header file including all the target processor, specific declarations for 8051 family processors for Keil C51 Compiler. Standard ‘C’ programs (Desktop, applications) calls the library routines for accessing the I/O and they are defined in the stdio.h file, whereas, these library files cannot be used as such for embedded application development since the I/O medium is, not a graphic console as in the C language based development on DOS Operating system and they are re-
Page 598 :
574, , Introduc on to Embedded Systems, , defined for the target processor I/Os for the cross compilers by the cross compiler developer. If you open the, stdio.h file by ANSI C and Keil for its IDE, you can find that the implementation of I/O related functions (e.g., printf()) are entirely different., The difference in the implementation is explained with typical stdio.h function-printf() (e.g. printf(“Hello, World\n”)). With ANSI C & DOS the function outputs the string Hello World to the DOS console whereas, with the C51 cross-compiler, the same function outputs the string Hello World to the serial port of the, device with the default settings. Coming back to the firmware development, let’s follow the universal, unwritten law of first ‘C’ program- The “Hello World’ program. Write a simple ‘C’ code to print the string, Hello world., The code is written in the text editor which appears within the IDE on selecting the ‘New’ tab from the, ‘File’ Menu. Write the code in C language syntax (Fig. 13.7). Add the necessary header files. You can, make use of the standard template files available under the ‘Templates’ tab of the ‘Project Window’ for, adding functions, loops, conditional instructions, etc. for writing the code. Once you are done with the, code, save it with extension .c in a desired folder (Preferably in the current project directory). Let the name, of the file be ‘sample.c’. At the moment you save the program with extension .c, all the keywords (like, #include, int, void, etc.) appear in a different colour and the title bar of the IDE displays the name of the, current .c file along with its path. By now we have created a ‘c’ source file. Next step is adding the created, source file to the project. For this, right click on the ‘Source Group’ from the ‘Project Window’ and select, the option “Add Existing Files to Group ‘Source Group’”. Choose the file ‘sample.c’ from the file selection, Dialog Box and press ‘Add’ button and exit the file selection dialog by pressing ‘Close’ button. Now the, file is added to the target project (Fig. 13.8). You can see the file in the ‘Project Window’ under ‘Files’ tab, beneath the ‘Source Group’., , Fig. 13.7 Writing the first Embedded C code
Page 599 :
The Embedded System Development Environment, , Fig. 13.8, , 575, , Adding Files to the Project, , If you are following the modular programming technique, you may have different source files for, performing an intended operation. Add all those files to the project as described above. It should be noted that, function main() is the only entry point and only one ‘.c’ file among the files added to the project is allowed, to contain the function main(). If more than one file contains a function with the name main(), compilation, will end up in error. The next step is configuring the target. To configure the target, go to ‘Project’ tab on the, Menu and select ‘Options for Target’. The configuration window as shown in Fig. 13.9 is displayed., The target configuration window is a tabbed dialog box. The device is already configured at the time of, creating a new project by selecting the target device (e.g. Atmel AT89C51). If you want to check it, select the, ‘Device’ tab and verify the same. Select ‘Target’ tab and configure the following. Give the clock frequency, for which the system is designed. e.g. 6MHz, 11.0592MHz, 12MHz, 24MHz, etc. This has nothing to do with, the firmware creation but it is very essential while debugging the firmware to note the execution time since, execution time is dependent on the clock frequency. If the system is designed to make use of the processor, resident code memory, select the option Use On-chip ROM (For AT89C51 On-chip ROM is 4K only;, 0x0000 to 0x0FFF). If external code memory is used, enter the start address and size of the code memory at, the Off-chip Code memory column (e.g. Eprom Start: 0x0000 and Size 0x0FFF). The working memory (data, memory or RAM) can also be either internal or external to the processor. If it is external, enter the memory, map starting address of the external memory along with the size of external memory in the ‘Off-chip Xdata, memory section (e.g. Ram Start: 0x8000 and Size 0x 1000). Select the memory model for the target. Memory, model refers to the data memory. Keil supports three types of data memory model; internal data memory, (Small), external data memory in paged mode (Compact) and external data memory in non-paged mode
Page 600 :
576, , Introduc on to Embedded Systems, , (Large). Now select the Code memory size. Code memory model is also classified into three; namely, Small, (code less than 2K bytes), Compact (2K bytes functions and 64K bytes code memory) and Large (Plain 64K, bytes memory). Choose the type depending on your target application and target hardware design. If your, design is for an RTOS based system, select the supported RTOS by the IDE. Keil supports two 8 bit RTOS, namely, RTX51 Tiny and RTX51 Full. Choose none for a non RTOS based design., , Fig. 13.9, , Target Configuration, , Move to the next Tab, ‘Output’. The output tab holds the settings for output file generation from the source, code (Fig. 13.10). The source file can either be converted into an executable machine code or a library file., You can select one of the output settings (viz. executable binary file (hex) or library file (lib)). For executable, file, tick the ‘Create Hex File’ option and select the target processor specific hex file format. Depending on, the target processor architecture the hex file format may vary, e.g. Intel Hex file and Motorola hex file. For, 8051, only one choice is available and it is Intel hex File HEX-80. The list files section coming under the tab, ‘Listing’ tells what all listing files should be created during cross-compilation process (Fig. 13.11)., ‘C51’ tab settings are used for cross compiler directives and settings like/Pre-processor symbols, code, optimisation settings, type of optimisation (viz. code optimised for execution speed and code optimised for, size), include file’s path settings, etc. The ‘A51’ tab settings are used for assembler directives and settings like, conditional assembly control symbols, include file’s path settings etc. Another important option is ‘Debug’., The ‘Debug’ tab is used for configuring the firmware debugging. ‘Debug’ supports both simulation type, firmware debugging and debugging the application while it is running on the target hardware (Fig. 13.12).
Page 601 :
The Embedded System Development Environment, , Fig. 13.10, , Output File creation settings, , Fig. 13.11, , List File generation settings, , 577
Page 602 :
578, , Introduc on to Embedded Systems, , Fig. 13.12, , Firmware debugging options, , You can either select the Simulator based firmware debugging or a target firmware level debugging from, the ‘Debug’ option. If the Simulator is selected, the firmware need not be downloaded into the target machine., The IDE provides an application firmware debugging environment by simulating the target hardware in a, software environment. It is most suitable for offline analysis and rapid code developments. If target level, debugging is selected, the binary file created by the cross-compilation process needs to be downloaded into, the target hardware and the debugging is done by single stepping the firmware. A physical link should be, established between the target hardware and the PC on which the IDE is running for target level debugging., Target level hardware debugging is achieved using the Keil supported monitor programs or through an, emulator interface. Select the same from the Drop-down list. Normally the link between target hardware and, IDE is established through a Serial interface. Use the settings tab to configure the Serial interface. Select the, ‘Comm Port’ to which the target device is connected and the baudrate for communication (Fig. 13.13)., If the Debug mode is configured to use the Target level debugging using any one of the monitor program or, the emulator interface supported by the µVision IDE, the created binary file is downloaded into the target board, using the configured serial connection and the firmware execution occurs in real time. The firmware is single, stepped (Executing instruction-by-instruction) within the target processor and the monitor program running, on the target device reflects the various register and memory contents in the IDE using the serial interface., The ‘Utilities’ tab is used for configuring the flash memory programming of the target processor/controllers, from the µVision IDE (Fig. 13.14). You can use either µVision IDE supported programming drivers or a third, party tool for programming the target system’s FLASH memory. If you choose to use µVision IDE provided, flash memory programming drivers, select the option ‘Use Target Driver for Flash Programming’ and choose, a driver from the drop-down list. To use third party programming tools, select the option ‘Use External Tool, for Flash Programming’ and specify the third party tool to be used by giving the path in the ‘Command’, column and specify the arguments (if any) in the ‘Arguments’ tab to invoke the third party application.
Page 603 :
The Embedded System Development Environment, , Fig. 13.13, , Target hardware debug serial link configuration, , Fig. 13.14, , Target Flash Memory Programming configuration, , 579
Page 604 :
580, , Introduc on to Embedded Systems, , With this we are done with the writing of our first simple Embedded C program and configuring the, target controller for running it. The next step is the conversion of the firmware written in Embedded C to, machine language corresponding to the target processor/controller. This step is called cross-compilation. Go, to ‘Project’ tab in the menu and select ‘Rebuild all target files’. This cross-compiles all the files within the, target group (for modular programs there may be multiple source files) and link the object codes created by, each file to generate the final binary. The output of cross-compilation for the “Hello World” application is, given in Fig. 13.15., , Fig. 13.15, , Conversion of the Embedded C program to 8051 Machine code, , You can see the cross-compilation step & linking in the o/p window along with cross-compilation error, history. Now perform a ‘Build Target’ operation. This links all the object files created (in a multi-file system, where each source files are cross-compiled separately) (Fig. 13.16)., , Fig. 13.16 Linking of all object Files, In a multi source file project (source group containing multiple .c files) each file can be separately crosscompiled by selecting the ‘Translate current file’ option. This is known as Selective Compilation. Remember, this generates the object file for the current file only and it needs to be combined with object files generated for, other files, by using ‘Build Target’ option for creating the final executable (Fig. 13.17). Selective compilation, is very helpful in a multifile project where a modified file only needs to be re-compiled and it saves the time, in re-compiling all the files present in the target group.
Page 605 :
The Embedded System Development Environment, , Fig. 13.17, , 581, , Selective cross-compilation, , See the difference between the three; selective compilation cross-compiles a selected source file and, creates a re-locatable object file corresponding to it, whereas ‘Build Target’ performs the linking of different, re-locatable object files and generates an absolute object file and finally creates a binary file. ‘Rebuild all, target file’ creates re-locatable object files by cross-compiling all source files and links all object files to, generate the absolute object file and finally generates the binary file. If there is any error in the compilation,, it is displayed on the output window along with the line number of code where the error is occurred. So it is, easy to trace the code to find out the error part in the code. The error is listed out in the output window along, with line number and error description. On clicking the error description at the output window, the line of, code generated the error is highlighted with a bold arrow. One example of error code is given below. In the, “Hello World” example, the include file is commented and the code while compiling will generate the error, indicating printf function is not defined. Have a look at the same (Fig. 13.18)., , Fig. 13.18, , Compilation Error Example
Page 606 :
582, , Introduc on to Embedded Systems, , 13.1.1.1 Debugging with Keil μVision5 IDE, Debugging firmware is the process of monitoring the program flow, various registers and memory contents, while the firmware is executed. You can debug the firmware in two methods. The first method is by using, breakpoints and simulator (a software tool which simulates the functionalities of the target processor). The, second method is hardware level debugging., For simulator-based debugging, select the option ‘Use Simulator’ from the ‘Debug’ tab of the ‘Options, for Target’ as illustrated in a previous section on debug. Insert a ‘Breakpoint’ in the code line of the source, program where debugging needs to be started. Breakpoints can be inserted by right clicking on the desired, source code line and by selecting the ‘Insert/Remove Breakpoint’ option. It can also be inserted by using, the ‘Debug’ tab present in the menu of the IDE (Not the debug tab of Options for Target Pop-up dialog). It, toggles the breakpoint (if the breakpoint is already inserted, it is removed and if not a breakpoint is added)., The breakpoint breaks the firmware execution at the selected point and further execution requires user, interaction. After a break, the code can be executed by single stepping or by a complete run again. For, the above ‘Hello World’ example, we are going to debug the firmware at the source code line printf and a, breakpoint is inserted as shown in Fig. 13.19., , Fig. 13.19, , Breakpoint insertion and debugging, , The ‘breakpoint’ is distinguishable with a special visible mark. All debug related actions are grouped, within the ‘Debug’ tab of the IDE menu. Each debug instruction has a hot key (e.g. Ctrl+F5 for start and stop, of debugging) associated with it. Identify the hotkey and use it or use mouse to activate the debug related, action each time from the debug menu. To start debugging, select the option ‘Start/Stop Debug Session, (Ctrl+F5)’ from the ‘Debug’ menu. If you set the option ‘Go till main()’ on the ‘Debug’ tab of ‘Options, for Target’, the application runs till the code memory where the main() function starts. If this option is not, selected, the execution breaks at the Reset vector (0x0000) itself. Both of these options are shown below., Note that while debugging, the project window tab automatically selects the ‘Regs’ tab and shows the various, register contents in this window when the program is at the break stage. You can switch the project window, in between the ‘Files’ section and ‘Regs’ section to find out the changes happening to various registers on, executing each line of code (Fig. 13.20).
Page 607 :
The Embedded System Development Environment, , Fig. 13.20, , 583, , Firmware execution Break options, , If you observe these two figures you can see that code memory execution starts at location 0x0000 and, the firmware corresponding to the function main is located at 0x0C2A and it is not the first executable code., Before executing main () some other code placed at location 0x0C1E (jump from the reset vector to location, 0x0C1E) is executed. The code at this memory location is the code memory generated for the startup file., Startup file code is always executed before entering the function main. It should be noted that the code, memory location mentioned here for function main is not always fixed. It varies depending on the changes, made to the startup file. From this breakpoint you can go to the breakpoint you set in the code memory either, by single stepping (‘Step’ command (F11)) or by a run to the next breakpoint (‘Go’ command (F5))., By default, the text editor window in debug mode contains two tabs, namely Source code view tab and, Disassembly tab. The Source code and corresponding Disassembly view is shown in Fig. 13.21. While, debugging the firmware you can switch the view between Assembly code and original source code lines by, selecting the corresponding tab. This switches the view between the original source code and the corresponding, , Fig. 13.21, , Source Code and corresponding Disassembly View
Page 608 :
584, , Introduc on to Embedded Systems, , Assembly code for it. The Disassembly view disappears temporarily if you click the ‘Disassembly Window’, option under the ‘View’ tab of the IDE menu. To enable Disassembly View click again on the ‘Disassembly, Window’ option under the ‘View’ tab of the IDE menu (Fig. 13.22)., , Fig. 13.22 Workbook Mode for Source – Disassembly code View, During debugging the content of various CPU and general purpose registers are displayed under the, ‘Registers’ tab of the project Window. Apart from this you can inspect the data memory and code memory, by invoking the ‘Memory Window’ under the ‘View’ tab of the IDE menu (Fig. 13.23)., , Fig. 13.23, , Memory Window for memory inspection in firmware debugging, , For viewing the Data memory, use the Prefix ‘D:’ before the address and type it at the Address edit box, and press enter (For example, for viewing the data memory starting from 0x00, type D:0x00 at the Address, box and press enter). You can edit the content of the desired data memory by right clicking on the current, contents pointed by the address or just by a double click on the current content. Code memory can also be, inspected and modified in a similar way to the Data memory. The only difference is instead of D: use ‘C:’ (D, stands for Data and C stands for Code) (Fig. 13.24).
Page 609 :
The Embedded System Development Environment, , Fig. 13.24, , 585, , Memory modification while debugging, , Similar to other Desktop application development IDEs, this also provides option for viewing local, variables and call stack details. Invoke ‘Watch & Call Stack Window’ from the ‘View’ tab of the IDE menu, (Fig. 13.25)., , Fig. 13.25, , Watch and Call Stack Window for Debugging, , The ‘Call Stack + Locals’ tab of the ‘Call Stack Window’ provides details of the local variables and, ‘Callee-Caller’ details for subroutine call, whereas users can add other variables to the ‘Watch’ window, to get their values. Invoking ‘Symbols Window’ under the ‘View’ tab of IDE menu while debugging, shows, debug information about the application symbol name, location, and the symbol type. Location represents the, address which can either be Data memory address or Code memory address. ‘Type’ indicates whether it is a, variable or a Module/Application. Figure 13.26 shows the Symbols Window displaying the various symbols, used in Assembly for our sample application., Activating the ‘Code Coverage’ option through ‘View Æ Analysis Windows Æ Code Coverage’ tab of the, IDE menu when the execution is at halted stage, gives the details of instructions in each function/module and, how many of them are executed till execution break. Figure 13.27 illustrates the same.
Page 610 :
586, , Introduc on to Embedded Systems, , Fig. 13.26, , Symbols Window showing the various symbols, , Fig. 13.27 Code Coverage Details at the execution break, , 13.1.1.2 Simula ng Peripherals and Interrupts with Keil μVision5 IDE, Embedded systems are designed to interact with real world and the actions performed by them may depend, on the inputs from various sensors connected to the processor/controller of the embedded system. By a mere, software simulation of the firmware, we can only inspect the memory, register contents, etc. of the processor, and cannot infer anything on the real-time performance of the system since the inputs provided by the sensors, are real-time and dynamic. To a certain extent, we can simulate these inputs using the simulator support, provided by the IDE. Keil provides extensive support for simulating various peripherals like; ports, memory, mapped I/O, etc. and Interrupts (External, Timer and Serial interrupts). The main limitation of simulation is
Page 611 :
The Embedded System Development Environment, , 587, , that we can simulate it with only known values (in a real application the simulated value may not be the real, input) and also it is difficult to predict the real-time behaviour of the system based on these simulations. In, our “Hello World” application, if we debug the application by placing a breakpoint at the ‘printf’ function, in, the source code window you can observe that the ‘printf’ function is not getting completed on single stepping, and it gives you the feeling that the firmware is hang up somewhere. If you are single stepping (using F11) the, firmware from the beginning, in the disassembly window you can see that for the code corresponding to printf,, the application is looping inside another function called ‘putchar’, which checks a bit TI (Transmit Interrupt), and loops till it is asserted high (Fig. 13.28). As we mentioned earlier, the printf function is outputting the data, to the Serial port. As long as the Transmit Interrupt is not asserted, the firmware control is looped there and it, generates an application hang-up behaviour. If you are not able to view the point where the firmware loops in, the Disassembly window, invoke ‘Stop Running’ from ‘Debug’ tab of IDE menu. The firmware execution will, be stopped and in the disassembly window you can see the exact point where the application was looping., , Fig. 13.28, , Firmware Execution waiting for Transmit Interrupt (TI), , We can simulate the Transmit Interrupt ‘TI’ using the, simulator support provided by Keil. If you have already, stopped the execution, continue the code execution by, invoking ‘Go’ option from ‘Debug’ tab or by pressing, ‘F5’ key. Now select ‘Interrupt’ option from the, ‘Peripherals’ tab of the IDE menu. The interrupt, simulation window will pop-up. Select the ‘Serial Xmit’, interrupt and enable the Global Interrupt Enable (EA) as, well as Transmit Interrupt (TI) (Fig. 13.29)., You can simulate any other interrupt listed in the, interrupt system in a similar fashion. On enabling TI,, firmware execution comes out of the infinite loop and, dumps the string “Hello World” to the serial port. The, output of ‘Hello World’ application is shown in Fig., Fig. 13.29 Serial Transmit Interrupt Simulation, 13.30. You can capture whatever data going through the, serial port while simulation. For this invoke ‘Serial Window #1’ through ‘View Æ Serial Windows Æ UART, #1’ from the IDE menu.
Page 612 :
588, , Introduc on to Embedded Systems, , Fig. 13.30, , Output of ‘Hello World’ Application at Serial Port, , To simulate the Ports and their status, select ‘I/O-Ports’ from the ‘Peripherals’ tab of IDE menu (Fig., 13.31)., , Fig. 13.31, , Simulation of Ports and Port Pins, , The first value (E.g. P0: 0xFF) simulates the contents of Port 0 Special Function Register. In order to make, the port pins as input pins the port pin’s corresponding SFR bit should be set as 1. With the SFR bit set to 1,, the state of the corresponding port pin can be changed to either logic 1 or logic 0. To output logic 0 to a port, pin, clear the corresponding SFR bit and for outputting logic 1, set the corresponding port bit in the SFR bit., In the above example, if Port 0 is viewed as an output port, the port will be outputting all 1s. If it is treated, as an input port, the value inputted will be 0x0F (which is the state of the port pins). Serial Port and Timers, can also be simulated by selecting the respective commands from the ‘Peripherals’ tab of the IDE menu. It is, left for the readers for experimenting. The ‘Reset CPU’ option available under the ‘Peripherals’ tab is used, for resetting the firmware execution. Resetting the CPU while debugging brings the program execution to the, reset vector (0x0000).
Page 613 :
The Embedded System Development Environment, , Fig. 13.32, , 589, , Resetting CPU while Debug in progress, , Generating precise delays in software for super loop based embedded applications are often quite difficult, and there are no standard functions available for generating precise delays. If the ‘C’ program is running, on DOS platform, there is a standard function ‘delay()’ available which generates delay with multiples of, millisecond. There are no such standard functions available for generating delays in non-operating system, based embedded programming. The only way of generating delays is writing a loop and set its parameters, according to the clock frequency used. Often we need to do a trial and error method to fine-tune the parameters, depending on the crystal used. The ‘Performance analyser’ support by the Keil IDE helps in calculating the, time consumed by a function. To activate this, select ‘Performance Analyser…’ through ‘View Æ Analysis, Windows Æ Performance Analyser’ tab of the IDE menu while debugging is on, before entering the function, whose execution time needs to be calculated. Use the ‘Setup …’ option to set up Analyser for selected, function (Fig. 13.33)., , Fig. 13.33, , Performance Analyser setup for selected function, , The various functions available on the current module is listed on the right side of the ‘Setup Performance, analyser’ window under the ‘Function symbols:’ section. Double clicking on the function of interest displays, the same on the ‘Define Performance Analyser Range:’ Click the ‘Define’ button to add it to the analyser., Invoke the ‘Performance analyser window’ from the ‘View’ tab of the IDE menu. A new tab with name
Page 614 :
590, , Introduc on to Embedded Systems, , ‘Performance…’ will be added to the text editor window. Now execute the function whose execution time, is to be analysed by single step (F11) or by giving a step Over (F10) command. Select the tab ‘Performance, Analyser’ and click on the function name for which the analysis is performed. The time taken for executing, the function is displayed at the ‘total time’ display window. This gives a rough estimate on the execution, time of the function (Fig. 13.34). Note that in addition to this time, the time taken for calling this function, also needs to be taken into account. Moreover, all these calculations are based on the target clock frequency, set on the target options. We will discuss the same for a new function for generating milliseconds delay, added to our program ‘Hello World’ application. The main function calls the delay routine delay_ms() before, executing the printf function. To verify that this function is taking 1 millisecond time to finish execution, with parameter 1, add the function to the performance analyser as mentioned above. Invoke the performance, analyser and execute the function. Switch view to ‘Performance Analyser’ tab and observe the execution, time. The complete source code for including delay is given below., , Fig. 13.34, , Execution time from Performance Analyser, , #include <stdio.h>, //Function Prototype for milliseconds delay, void delay_ms (int);, int main(void), {, //Calling 1 milli second delay, delay_ms (1);, printf(“Hello World\n”);, }, //###################################################################, //Function for generating milli seconds delay, //Assumes clock frequency=24MHz, void delay_ms (int n), {, int j, k;, for (j=0; j<n; j++), {, for (k=0; k<247; k++);, }, }
Page 615 :
The Embedded System Development Environment, , 591, , It should be noted that generating highly precise delay is very difficult and there may be a tolerance of, +/– fraction of milliseconds in the delay. Also the delay is purely dependent on the system clock frequency., In a real world scenario, the stability of the clock is expressed in terms of +/– some parts per million (ppm), of the fundamental frequency. Any change in the target clock frequency needs the re-tuning of the code to, bring it back to the desired tolerance level. Precise time delay can be generated using the hardware timer unit, of the microcontroller., , 13.1.1.3 Target Level Firmware Debugging with Keil μVision5 IDE, Simulation based debugging technique lacks real-time behaviour and various input conditions needs to be, simulated using the IDE support for debugging the firmware. Target level hardware debugging involves, debugging the firmware which is embedded in the target board. This technique is also known as In Circuit, Debugging/ Emulation (ICD/E). For performing target level debugging with µVision IDE, the target board, should be connected to the development machine through a serial interface. The IDE debug settings should be, modified to activate target level debugging. Select the ‘Debug’ option from ‘Options for Target’ and change, ‘Use Simulator’ to ‘Use:’ selected debug support from a list of available target debug supports (Fig. 13.35)., , Fig. 13.35, , Configuring IDE Debug settings for target level debugging, , Select the target supported debug option from the drivers available on the drop-down list and configure, the serial link properties using the ‘Settings’ tab. µVision supports two types of target level debugging,, namely ‘Monitor program based debugging’ and ‘Emulator based debugging’. For Monitor program based, debugging, the target processor should have µVision IDE supported monitor program installed and the target, hardware should be configured to run the monitor program. Debug instructions from the IDE communicates, with the monitor program running on the target processor and it returns the debug information to the IDE
Page 616 :
592, , Introduc on to Embedded Systems, , using the configured serial link. For Emulator based debugging, µVision IDE acts as an interface between a, Keil supported third party Emulator hardware and the target board. The Serial link should be connected to, the emulator hardware and other end of the emulator hardware should be interfaced to the target hardware, using any ICE supported interfaces like JTAG, BDM or pin-to-pin socket (For JTAG/BDM interface, target, processor/controller should have this support at processor/controller side. If not, pin-to-pin socket is used)., , 13.1.1.4 Wri ng ISR in Embedded C using the μVision5 IDE, The C51 cross-compiler from Keil supports the implementation of Interrupt Service Routines (ISRs) in, Embedded C. The general form of writing an Interrupt Service Routine in C for C51 cross-compiler is, illustrated below., void ISR_Name (void) interrupt INTR_NO using REG_BANK, {, //Body of ISR, }, , The attribute interrupt informs the cross compiler that the function with given name (Here ISR_Name), is an Interrupt Service Routine. The attribute INTR_NO indicates the interrupt number for an interrupt. It is, essential for placing the ISR generated assembly code at the Interrupt Vector for the corresponding interrupt., Keil supports 32 ISRs for interrupt numbers 0 to 31. The interrupt number 0 corresponds to External Interrupt, 0, 1 corresponds to Timer 0 Interrupt, 2 corresponds to External Interrupt 1, 3 corresponds to Timer 1 Interrupt,, 4 corresponds to Serial Interrupt and so on. The keyword using specifies the Register bank mentioned in the, attribute REG_BANK for the registers R0 to R7 inside the ISR. It is an optional attribute and if it is not, mentioned in the ISR implementation, the current register bank in use by the controller is used by the ISR for, the registers R0 to R7. The value of REG_BANK can vary from 0 to 3, representing register banks 0 to 3. With, the attribute interrupt, the C51 cross compiler automatically generates the interrupt vector and entry and exit, code for the specified interrupt routine. The contents of the Accumulator, B register , DPH, DPL, and PSW, are Pushed to the stack as and when required, at the time of entering the ISR and are retrieved at the time, of leaving the ISR. If the register bank is not specified in the ISR implementation, all the working registers, which are modified inside the ISR is pushed to the stack and poped while returning from ISR. It should be, noted that the ISR neither takes any parameter nor return any. The following piece of code illustrates the, implementation of the Serial Interrupt ISR for 8051 using C51 cross compiler., #include <reg51.h>, //Keil C51 Header file, //ISR for handling Serial Interrupts. Interrupt number = 4, //Interrupt Vector at 0023H. Use Register Bank 1, void Serial_ISR (void) interrupt 4 using 1, {, if (TI) //Check transmit Interrupt (TI) Flag, {, //Transmit Interrupt Handler, }, else, {, //Receive Interrupt Handler, }, }
Page 617 :
The Embedded System Development Environment, , 593, , 13.1.1.5 Assembly Based Firmware Development with μVision5 IDE, Apart from Embedded C based development, Keil IDE also supports Assembly language based firmware, development. The steps involved in creating a project for writing assembly instructions are same as that of, Embedded C based development. The only difference is that there is no need to include the standard startup, file at the time of creating a project. Select the option ‘No’ to the query ‘Copy standard 8051 startup Code, to Project Folder and add File to Project?’ while creating a new project (Refer to Section 13.1.1 for details, on creating a new project). Since we are not using the IDE supplied startup code, the actions performed by, startup code (mainly initialisation of stack pointer), should be written by the programmer before the start, of the main program in the assembly file. Create a new file and start writing Assembly instructions in the, file. Save the file with extension ‘.src’ and add the file to the ‘Source Group’ of the target as illustrated in, embedded C based development (Section 13.1.1). A program written in Assembly Language corresponding, to the “Hello World” program written in Embedded C is illustrated below., ;####################################################################, ;, Start of Main Program, ;####################################################################, ORG, 0000H, JMP MAIN, ORG, 0003H, ; External Interrupt 0 Handler, RETI, ORG, 000BH, ; Timer0 Interrupt Handler, RETI, ORG, 0013H, ; External Interrupt 1 Handler, RETI, ORG, 001BH, ; Timer1 Interrupt Handler, RETI, ORG, 0023H, ; Serial Interrupt Handler, RETI, ORG, 0100H, MAIN:, MOV SP, #50H, ; Initialise stack pointer at 50H, ;####################################################################, ; 8051 Serial Routine Parameter settings, MOV SCON, #50h ; Configure Serial Communication, ; Register., MOV TMOD, #21h ; Baud Generation Settings, MOV TH1, #0FDH ; Re-Load Value for TIMER 1 in Auto, ; Re-Load, MOV TL1, #0FDH ; 9600 baud, MOV A, PCON, ANL A, #7FH, MOV PCON, A, SETB TR1, ; Start Timer1, ;####################################################################, OUT_TEXT:, CALL TEXT_OUT, JMP, OUT_TEXT, ;####################################################################, ; Text outputting Routine, ; Same as printf () in Embedded C
Page 618 :
594, , Introduc on to Embedded Systems, , TEXT_OUT:, SERIAL_OUT:, , MOV DPTR, #HELLO_WORLD, CLR TI, ; Clear Transmit Interrupt, CLR A, MOVC A,@A+DPTR, CJNE A, #’\’, FOLLOW, MOV SBUF, #0AH ; Send new line character, JNB TI, $, RET, FOLLOW:, MOV SBUF, A, JNB TI, $, ; Wait till Transmit Interrupt before, ; sending next byte, INC DPTR, JMP SERIAL_OUT, ;####################################################################, ; Store the string “Hello World” in program memory, ;####################################################################, HELLO_WORLD:, DB, , ‘Hello World\’, END, , ; End of Assembly, , Compile this source code using the same compile options illustrated for Embedded C based development., Here also you can have multiple source (.src) files. Add all source files to the ‘Source Group’ and compile, the program. The Assembly program is written to store the string “Hello World” in the code memory and, it is retrieved from the code memory for sending to the serial port. The string can also be stored in the data, memory and retrieve it from there for sending to the serial port. In that case the storage memory for the string, “Hello World” (12 bytes with string termination character ‘\’) in the code memory will be released and the, same will occupy in the data memory. Figure 13.36 shows the assembling of source code written in assembly, language., , Fig. 13.36, , Assembling of source code written in Assembly Language
Page 619 :
The Embedded System Development Environment, , 595, , If you observe the output window while compiling, you can see that the source code is ‘assembled’, instead of ‘compiling’. Why this strange thing happens? - The answer is conversion of program written in, assembly language to object code is carried out by the utility ‘Assembler’. Assembler is same as compiler, in functioning but the input is different. You can debug this application using the simulator in a similar way, as that of debugging the ‘C’ source code. On debugging the assembly code you can view the output on the, ‘Serial Window’ and it is exactly the same as the output produced by the “Hello World” Application written, in Embedded C., Now let’s have a comparison between the application written in Embedded C and Assembly Language for, outputting the string “Hello World” to the Serial port. Read carefully., Q1. How many lines of code you wrote for the program “Hello World”?, Embedded C: Only a single line of Code excluding the framework of main, Assembly: More than 25 lines, Q2. How many registers of the target processor you are familiar with for writing the “Hello World”, program?, Embedded C: None, Assembly: Almost all, , Fig. 13.37, , Debugging the Source code written in Assembly Language for outputting the text “Hello World” to serial port, , Q3. How many Assembly Instructions of the target processor you are familiar with for writing the, “Hello World” program?, Embedded C: None, Assembly: Almost all, Q4. What is the code size for the “Hello World” program written in?, Embedded C: 1078 bytes, Assembly: 314 bytes
Page 620 :
596, , Introduc on to Embedded Systems, , Q5. What is the data memory size for the “Hello World” Program written in?, Embedded C: 30 bytes + 1 bit, Assembly: 8 bytes Minimum and 21 Bytes Maximum (If the “Hello World” string is stored in Data, memory), Summary, 1. Compared to Assembly programming, Embedded C requires lesser number of lines of code to implement, a task, 2. Embedded C programmers require less or little knowledge on the internals of the target processor, whereas Assembly programmers require thorough knowledge of the internals of the processor, 3. Embedded C programmers need not be aware of the instruction set of the target processor whereas, Assembly language programmers should be well versed in the same., 4. The Code memory usage by programs written in Assembly is optimal compared to the one written in, Embedded C, 5. The Data memory usage by programs written in Assembly is optimal compared to the one written in, Embedded C, , 13.1.1.6 Flash Memory Programming with Keil μVision5 IDE, Once the firmware starts functioning properly, after the modifications following debug and simulation,, the next step is embedding the firmware into the target processor/controller. As mentioned in a previous, chapter, firmware can be embedded using various techniques like Out of System Programming, In System, Programming (ISP), etc. µVision IDE provides an In System Programming (ISP) support which is selected, at the time of configuring the ‘Options for Target’. It can be either Keil provided flash programming driver, or any third party tool which can be invoked from the IDE. The flash programming makes use of the serial, connection established between the Host PC and the target board. The target processor should contain a, bootloader or a monitor program which can understand the flash memory programming related commands, sent from the IDE. Cross-compile all the source files within the module, link them and generate the binary, code using ‘Rebuild all target files’ option. Download the generated binary file to the target processor’s/, controller’s memory by invoking ‘Flash Download’ option from the ‘Project’ tab of the IDE menu. The target, board should be powered and interfaced with the host PC where the IDE is running and the connection should, be configured properly., , 13.1.1.7 Summary of usage of Keil μVision5 IDE, So far we discussed about IDE and how IDE is helpful in Embedded application development and debugging., Our discussion was focusing only on 8051 family 8bit microcontroller firmware application development, using Keil μVision5 IDE. Though the discussion was specific to µVision IDE, I believe it was capable of, giving you the basic fundas of IDEs and how the IDE is used in embedded system development. The hot, key usage, GUI details and functions offered by different IDEs are totally different. Illustrating all IDEs is, out of scope of this book and also there is no common IDE supporting multiple family devices that can be, used for illustrating the same. Users are requested to go through the respective manuals of the IDE they are, using for firmware development. Also, IDEs undergo rapid changes by adding new features, functions, etc., and whatever we discussed here need not be the same after three months or six months or one year, in terms, of features, UI, hot keys, menu options, etc. When I started the work of this book, the IDE offered from Keil, was Keil μVision2 and at the time of the second edition of this book, the latest IDE available from Keil is, μVision5. It incorporated lots of new features and changes compared to the old IDE. Users are requested to, visit the web site www.keil.com to get the latest updates on the new versions of the IDE. You can directly, download the trial version of the IDE from the above site.
Page 622 :
598, , Introduc on to Embedded Systems, , Windows Embedded Compact, RTOS, , Platform Builder, , Microsoft., www.microsoft.com, Available as bundled package with Visual Studio IDE, , VxWorks RTOS, , Wind River Workbench, , Wind River Systems., www.windriver.com, , QNX RTOS, , QNX Momentics, , QNX Software Systems, www.qnx.com, , 3rd Party Tools, , MULTI IDE, , Green Hills Software Supports a variety of family of processors. Visit, www.ghs.com for more details, , And…. The list continues. There are thousands of IDEs available in the market as either commercial or noncommercial and as either Open source tools or proprietary tools. Listing all of them is out of the scope of this, book. The intention is to just make the readers familiar with some of the popular IDEs for some commonly, used processors/controllers and RTOSs for embedded development., , 13.2, , TYPES OF FILES GENERATED ON CROSS-COMPILATION, , Cross-compilation is the process of converting a source code written, in high level language (like ‘Embedded C’) to a target processor/, controller understandable machine code (e.g. ARM processor or, 8051 microcontroller specific machine code). The conversion of, the code is done by software running on a processor/controller, (e.g. x86 processor based PC) which is different from the target, processor. The software performing this operation is referred as, the ‘Cross-compiler’. In a single word cross-compilation is the, process of cross platform software/firmware development. Cross, assembling is similar to cross-compiling; the only difference is that, the code written in a target processor/controller specific Assembly, code is converted into its corresponding machine code. The, application converting Assembly instruction to target processor/controller specific machine code is known, as cross-assembler. Cross-compilation/cross-assembling is carried out in different steps and the process, generates various types of intermediate files. Almost all compilers provide the option to select whatever, intermediate files needs to be retained after cross-compilation. The various files generated during the crosscompilation/cross-assembling process are:, List File (.lst), Hex File (.hex), Pre-processor Output file, Map File (File extension linker dependent),, Object File (.obj), LO 2 Identify the different, types of files (List File,, Preprocessor output file, Object, File, Map File, Hex File, etc.), generated during the cross, compilation of a source file, written in high level language, like Embedded C and during the, cross assembling of a source file, written in Assembly Language, , 13.2.1, , List File (.LST File), , Listing file is generated during the cross-compilation process and it contains an abundance of information, about the cross compilation process, like cross compiler details, formatted source text (‘C’ code), assembly, code generated from the source file, symbol tables, errors and warnings detected during the cross-compilation, process. The type of information contained in the list file is cross-compiler specific. As an example let’s, consider the cross-compilation process of the file sample.c given as the first illustrative embedded C program, under Keil µVision5 IDE discussion. The ‘list file’ generated contains the following sections.
Page 623 :
The Embedded System Development Environment, , 599, , Page Header A header on each page of the listing file which indicates the compiler version number, source, file name, date, time, and page number., C51 COMPILER V9.53.0.0, , Command Line, , SAMPLE, , 10/16/2014 15:47:10 PAGE 1, , Represents the entire command line that was used for invoking the compiler., , C51 COMPILER V9.53.0.0, COMPILATION OF MODULE SAMPLE OBJECT MODULE PLACED, IN sample.OBJ, COMPILER INVOKED BY: C:\Keil_v5\C51\BIN\C51.EXE sample.c OPTIMISE(8,SPEED), BROWSE DEBUG OBJECTEXTEND CODE LISTINCLUDE SYMBOLS TABS(2) PREPRINT, , Source Code The source code listing outputs the line number as well as the source code on that line. Special, cross compiler directives can be used to include or exclude the conditional codes (code in #if blocks) in the, source code listings. Apart from the source code lines, the list file will include the comments in the source file, and depending on the list file generation settings the entire contents of all include files may also be included., Special cross compiler directives can be used to include the entire contents of the include file in the list file., line level source, 1, //Sample.c for printing Hello World!, 2, //Written by xyz, 3, #include <stdio.h>, 1, =1 /*-------------------------------------------------------------------------2, =1 STDIO.H, 3, =1, 4, =1 Prototypes for standard I/O functions., 5, =1 Copyright © 1988–2002 Keil Elektronik GmbH and Keil Software, Inc., 6, =1 All rights reserved., 7, =1 --------------------------------------------------------------------------*/, 8, =1, 9, =1 #ifndef __STDIO_H__, 10 =1 #define __STDIO_H__, 11 =1, 12 =1 #ifndef EOF, 13 =1 #define EOF -1, 14 =1 #endif, 15 =1, 16 =1 #ifndef NULL, 17 =1 #define NULL ((void *) 0), 18 =1 #endif, 19 =1, 20 =1 #ifndef _SIZE_T, 21 =1 #define _SIZE_T, 22 =1 typedef unsigned int size_t;, 23 =1 #endif, 24 =1, 25 =1 #pragma SAVE, 26 =1 #pragma REGPARMS, 27 =1 extern char _getkey (void);
Page 625 :
601, , The Embedded System Development Environment, , size_t . . . . . TYPEDEF, main . . . . . . .PUBLIC, _printf. . . . . .EXTERN, , ----CODE, CODE, , U_INT, PROC, PROC, , ----0000H, -----, , 2, ---------, , Module Informa on The module information provides the size of initialised and un-initialised memory, areas defined by the source file, MODULE INFORMATION:, STATIC, OVERLAYABLE, CODE SIZE, =, 9, ---CONSTANT SIZE, =, 13, ---XDATA SIZE, =, ------PDATA SIZE, =, ------DATA SIZE, =, ------IDATA SIZE, =, ------BIT SIZE, =, ------END OF MODULE INFORMATION., Warnings and Errors Warnings and Errors section of list file records the errors encountered or any, statement that may create issues in application (warnings), during cross compilation. The warning levels, can be configured before cross compilation. You can ignore certain warnings, e.g. a local variable is declared, within a function and it is not used anywhere in the program. Certain warnings require prompt attention., C51 COMPILATION COMPLETE., , 0 WARNING(S),, , 0 ERROR(S), , List file is a very useful tool for application debugging in case of any cross compilation issues., , 13.2.2, , Preprocessor Output File, , The preprocessor output file generated during cross-compilation contains the preprocessor output for the, preprocessor instructions used in the source file. Preprocessor output file is used for verifying the operation, of macros and conditional preprocessor directives. The preprocessor output file is a valid C source file. File, extension of preprocessor output file is cross compiler dependent., , 13.2.3, , Object File (.OBJ File), , Cross-compiling/assembling each source module (written in C/Assembly) converts the various Embedded C/, Assembly instructions and other directives present in the module to an object (.OBJ) file. The format (internal, representation) of the .OBJ file is cross compiler dependent. OMF51 or OMF2 are the two objects file formats, supported by C51 cross compiler. The object file is a specially formatted file with data records for symbolic, information, object code, debugging information, library references, etc. The list of some of the details stored, in an object file is given below., 1. Reserved memory for global variables., 2. Public symbol (variable and function) names., 3. External symbol (variable and function) references., 4. Library files with which to link., 5. Debugging information to help synchronise source lines with object code., The object code present in the object file are not absolute, meaning, the code is not allocated fixed memory, location in code memory. It is the responsibility of the linker/locater to assign an absolute memory location, to the object code. During cross-compilation process, the cross compiler sets the address of references to, external variables and functions as 0. The external references are resolved by the linker during the linking
Page 626 :
602, , Introduc on to Embedded Systems, , process. Hence it is obvious that the code generated by the cross-compiler is not executable without linking, it for resolving external references., , 13.2.4, , Map File (.MAP), , As mentioned above, the cross-compiler converts each source code module into a re-locatable object (OBJ), file. Cross-compiling each source code module generates its own list file. In a project with multiple source, files, the cross-compilation of each module generates a corresponding object file. The object files so created, are re-locatable codes, meaning their location in the code memory is not fixed. It is the responsibility of a, linker to link all these object files. The locater is responsible for locating absolute address to each module in, the code memory. Linking and locating of re-locatable object files will also generate a list file called ‘linker, list file’ or ‘map file’. Map file contains information about the link/locate process and is composed of a, number of sections. The different sections listed in a map file are cross compiler dependent. The information, generally held by map files is listed below. It is not necessary that the map files generated by all linkers/, locaters should contain all these information. Some may contain less information compared to this or others, may contain more information than given in this. It all depends on the linker/locater., Page Header A header on each page of the linker listing (MAP) file which indicates the linker version, number, date, time, and page number., e.g., , BL51 BANKED LINKER/LOCATER V6.22 10/16/2014, , Command Line, e.g., , 15:47:10, , PAGE 1, , Represents the entire command line that was used for invoking the linker., , BL51 BANKED LINKER/LOCATER V6.22, INVOKED BY: C:\KEIL_V5\C51\, BIN\BL51.EXE sample.obj, STARTUP.obj TO Sample, , CPU Details Details about the target CPU and memory model (internal data memory, external data memory,, paged data memory, etc.) come under this category., e.g., , MEMORY MODEL: SMALL, , Input Modules This section includes the names of all object modules, and library files and modules that are, included in the linking process. This section can be checked for ensuring all the required modules are lined, in the linking process, e.g., INPUT MODULES INCLUDED:, STARTUP.obj (?C_STARTUP), sample.obj (SAMPLE), C:\KEIL_V5\C51\LIB\C51S.LIB, C:\KEIL_V5\C51\LIB\C51S.LIB, C:\KEIL_V5\C51\LIB\C51S.LIB, C:\KEIL_V5\C51\LIB\C51S.LIB, C:\KEIL_V5\C51\LIB\C51S.LIB, C:\KEIL_V5\C51\LIB\C51S.LIB, C:\KEIL_V5\C51\LIB\C51S.LIB, , Memory Map, the program., , (PRINTF), (?C?CLDPTR), (?C?CLDOPTR), (?C?CSTPTR), (?C?PLDIIDATA), (?C?CCASE), (PUTCHAR), , Memory map lists the starting address, length, relocation type and name of each segment in
Page 628 :
604, , Introduc on to Embedded Systems, , Program Size Program size information contain the size of various memory areas as well as constant and, code space for the entire application, e.g., , Program Size: data=30.1 xdata=0 code=1078, , Warnings and Errors Errors and warnings generated while linking a program are written to this section. It, is very useful in debugging link errors., e.g., , LINK/LOCATE RUN COMPLETE., , 0 WARNING(S),, , 0 ERROR(S), , NB: The file extension for MAP files generated by different linkers/locaters need not be the same. It varies, across linker/locater in use. For example the map file generated for BL51 Linker/locater is with extension, .M51, , 13.2.5, , HEX File (.HEX), , Hex file is the binary executable file created from the source code. The absolute object file created by the, linker/locater is converted into processor understandable binary code. The utility used for converting an, object file to a hex file is known as Object to Hex file converter. Hex files embed the machine code in a, particular format. The format of Hex file varies across the family of processors/controllers. Intel HEX and, Motorola HEX are the two commonly used hex file formats in embedded applications. Intel HEX file is an, ASCII text file in which the HEX data is represented in ASCII format in lines. The lines in an Intel HEX, file are corresponding to a HEX Record. Each record is made up of hexadecimal numbers that represent, machine-language code and/or constant data. Individual records are terminated with a carriage return and a, linefeed. Intel HEX file is used for transferring the program and data to a ROM or EPROM which is used as, code memory storage., , 13.2.5.1 Intel HEX File Format, As mentioned, Intel HEX file is composed of a number of HEX records. Each record is made up of five fields, arranged in the following format:, :llaaaattdd...cc, Each group of letters corresponds to a different field, and each letter represents a single hexadecimal digit., Each field is composed of at least two hexadecimal digits (which make up a byte) as described below:, Field, , Description, , :, , The colon indicating the start of every Intel HEX record, , ll:, aaaa:, tt:, , Record length field representing the number of data bytes (dd) in the record, Address field representing the starting address for subsequent data in the record, Field indicating the HEX record type. According to its value it can be of the following types, 00: Data Record, 01: End of File Record, 02: 8086 Segment Address Record, 04: Extended Linear Address record, , dd:, , Data field that represents one byte of data. A record can have number of data bytes. The number, of data bytes in the record must match to the number specified by the‘ll’ field
Page 629 :
605, , The Embedded System Development Environment, , cc:, , Checksum field representing the checksum of the record. Checksum is calculated by adding the, values of all hexadecimal digit pairs in the record and taking modulo 256. Resultant o/p is 2’s, complemented to get the checksum., , An extract from the Intel hex file generated for “Hello World” application example is given below., :03000000020C1FD0, :0C0C1F00787FE4F6D8FD758121020C2BD3, :0E0C110048656C6C6F20576F726C64210A008E, :090C2B007BFF7A0C7911020862CA, :10080000E517240BF8E60517227808300702780B65, :10081000E475F001120BB4020B5C2000EB7F2ED2CA, :10082000008018EF540F2490D43440D4FF30040BD0, :10083000EF24BFB41A0050032461FFE518600215CD, :1008400018051BE51B7002051A30070D7808E475C2, :100BFA00B8130CC2983098FDA899C298B811F6306B, :070C0A0099FDC299F5992242, :00000001FF, Let’s analyse the first record, :, , l, , l, , a, , a, , a, , a, , t, , t, , d, , d, , d, , d, , d, , d, , c, , c, , :, , 0, , 3, , 0, , 0, , 0, , 0, , 0, , 0, , 0, , 2, , 0, , C, , 1, , F, , D, , 0, , : field indicates the start of a new record. 03 (ll) gives the number of data bytes in the record. For this, record,‘ll’ is 03 and the number of data bytes in the corresponding record is 03. The start address (aaaa) of, data in the record is 0000H. The record type byte (tt) for this record is 00 and it indicates that this record is a, data record. The data for the above record is 02, 0C and 1F. They are supposed to place at three consecutive, memory locations in the EEPROM with starting address 0000H. The arrangement is given below., Memory Address in Hex, , Data in Hex, , 0000H, , 02, , 0001H, , 0C, , 0002H, , 1F, , If you are familiar with 8051 Machine code you can easily identify that 02 is the machine code for, the instruction LJMP and the next two bytes represent the 16bit address of the location to which the jump is, intended. Obviously the instruction is LJMP 0C1F. The last two digits (cc) of the record holds the checksum, of the values present in the record. The checksum is calculated by adding all the bytes in the record and then, taking modulo 256 of the result. The resultant is 2’s complemented and represented as checksum in the record, field. Above example it is 0xD0. Intel hex files end with an end of file record indicating the end of records in, the hex file. Let’s examine the end of record structure., :, , l, , l, , a, , a, , a, , a, , t, , t, , c, , c, , :, , 0, , 0, , 0, , 0, , 0, , 0, , 0, , 1, , F, , F, , End of record also starts with the start of record symbol ‘:’. Since End of record does not contain any data, bytes, field ‘ll’ will be 00. The field ‘aaaa’ is not significant since the number of data bytes are zero. Field ‘tt’
Page 630 :
606, , Introduc on to Embedded Systems, , will hold the value 01 to indicate that this record is an End of record. Field ‘cc’ holds the checksum of all the, bytes present in the record and it is calculated as 2’s complement of Modulo 256 of (0 + 0 + 0 + 1) = 0xFF, , 13.2.5.2 Motorola HEX File Format, Similar to the Intel HEX file, Motorola HEX file is also an ASCII text file where the HEX data is represented, in ASCII format in lines. The lines in Motorola HEX file represent a HEX Record. Each record is made up, of hexadecimal numbers that represent machine-language code and/or constant data. The general form of, Motorola Hex record is given below., SOR, , RT, , Length, , Start Address, , Data/Code, , Checksum, , In other words it can be represented as Stllaaaaddddd…cc, The fields of the record are explained below., Field, , Description, , SOR, , Stands for Start of record. The ASCII Character ‘S’ is used as the Start of Record. Every, record begins with the character ‘S’, , RT, , Stands for Record type. The character‘t’ represents the type of record in the general format. There are different meanings for the record depending on the value of ‘t’, 0: Header. Indicates the beginning of Hex File, 1: Data Record with 16bit start address, 2: Data record with 24bit start address, 9: End of File Record, , Length (ll):, , Stands for the count of the character pairs in the record, excluding the type and record length, (Count includes the number of data/code bytes, data bytes representing start address and, character pair representing the checksum). Two ASCII characters ‘ll’ represent the length, field .Each ‘l’ in the representation can take values 0 to 9 and A to F., , Start Address (aaaa):, , Address field representing the starting address for subsequent data in the record., , Code/Data (dd):, , Data field that represents one byte of data. A record can have number of data bytes. The, number of data bytes in the record must match to the number specified by (ll - no. of character pairs for start address–1), , Checksum (cc):, , Checksum field representing the checksum of the record. Checksum is calculated by adding, the values of all hexadecimal digit pairs in the record and taking modulo 256. Resultant o/p, is 1’s complemented to get the checksum., , Typical example of a Motorola Hex File format is given below., S011000064656D6F5F68637331322E616273E5, S11311000002000800082629001853812341001812, S9030000FC, You can see that each Record starts with the ASCII character ‘S’. For the first record, the value for field, ‘t’ is 0 and it implies that this record is the first record in the hex file (Header Record). The second record is, a data record. The field ‘t’ for second record is 1. Number of character pairs held by second record is 0x13, (19 in decimal). Out of this two character pairs are used for holding the start address and one character pair, for holding the checksum. Rest 16 bytes are the data bytes. The start address for placing the data bytes is, 0x1100. The data bytes that are going to be placed in 16 consecutive memory locations starting from address, 0x1100 are 0x00, 0x02, 0x00, 0x08, 0x00, 0x08, 0x26, 0x29, 0x00, 0x18, 0x53, 0x81, 0x23, 0x41, 0x00 and, 0x18. The last two digits (here 0x12) represent the checksum of the record. Checksum is calculated as the
Page 631 :
The Embedded System Development Environment, , 607, , least significant byte of the one’s complement of the sum of the values represented by the pairs of characters, making up the record length, address, and data fields. The third record represents the End of File record. The, value for field ‘t’ for this record is 9 and it is an indicative of End of Hex file. Number of character pairs held, by this record is 03; two for address and one for the checksum. The address is insignificant here since the, record does not contain any values to dump into memory. Only one End of File Record is allowed per file, and it must be the last line of the file., , 13.3, , DISASSEMBLER/DECOMPILER, , Disassembler is a utility program which converts machine codes into target, LO 3 Discuss about, processor specific Assembly codes/instructions. The process of converting, disassembler and, machine codes into Assembly code is known as ‘Disassembling’., decompiler, and their, In operation, disassembling is complementary to assembling/crossrole in embedded, assembling. Decompiler is the utility program for translating machine codes, firmware development, into corresponding high level language instructions. Decompiler performs, the reverse operation of compiler/cross-compiler. The disassemblers/, decompilers for different family of processors/controllers are different. Disassemblers/Decompilers are, deployed in reverse engineering. Reverse engineering is the process of revealing the technology behind the, working of a product. Reverse engineering in Embedded Product development is employed to find out the secret, behind the working of popular proprietary products. Disassemblers/decompilers help the reverse-engineering, process by translating the embedded firmware into Assembly/high level language instructions. Disassemblers/, Decompilers are powerful tools for analysing the presence of malicious codes (virus information) in an, executable image. Disassemblers/Decompilers are available as either freeware tools readily available for free, download from internet or as commercial tools. It is not possible for a disassembler/decompiler to generate, an exact replica of the original assembly code/high level source code in terms of the symbolic constants and, comments used. However disassemblers/decompilers generate a source code which is somewhat matching to, the original source code from which the binary code is generated., , 13.4, , SIMULATORS, EMULATORS AND DEBUGGING, , Simulators and emulators are two important tools used in embedded system, development. Both the terms sound alike and are little confusing. Simulator, is a software tool used for simulating the various conditions for checking, the functionality of the application firmware. The Integrated Development, Environment (IDE) itself will be providing simulator support and they help, in debugging the firmware for checking its required functionality. In certain, scenarios, simulator refers to a soft model (GUI model) of the embedded, product. For example, if the product under development is a handheld, device, to test the functionalities of the various menu and user interfaces, a soft form model of the product, with all UI as given in the end product can be developed in software. Soft phone is an example for such a, simulator. Emulator is hardware device which emulates the functionalities of the target device and allows real, time debugging of the embedded firmware in a hardware environment., LO 4 Explain, Simulators, In Circuit, Emulators (ICE), and, Debuggers and their, role in embedded, firmware debugging, , 13.4.1, , Simulators, , In a previous section of this chapter, describing the Integrated Development Environment, we discussed about, simulators for embedded firmware debugging. Simulators simulate the target hardware and the firmware, execution can be inspected using simulators. The features of simulator based debugging are listed below.
Page 632 :
608, , 1., 2., 3., 4., , Introduc on to Embedded Systems, , Purely software based, Doesn’t require a real target system, Very primitive (Lack of featured I/O support. Everything is a simulated one), Lack of Real-time behaviour, , 13.4.1.1 Advantages of Simulator Based Debugging, Simulator based debugging techniques are simple and straightforward. The major advantages of simulator, based firmware debugging techniques are explained below., No Need for Original Target Board Simulator based debugging technique is purely software oriented., IDE’s software support simulates the CPU of the target board. User only needs to know about the memory, map of various devices within the target board and the firmware should be written on the basis of it. Since the, real hardware is not required, firmware development can start well in advance immediately after the device, interface and memory maps are finalised. This saves development time., Simulate I/O Peripherals Simulator provides the option to simulate various I/O peripherals. Using simulator’s, I/O support you can edit the values for I/O registers and can be used as the input/output value in the firmware, execution. Hence it eliminates the need for connecting I/O devices for debugging the firmware., Simulates Abnormal Condi ons With simulator’s simulation support you can input any desired value for, any parameter during debugging the firmware and can observe the control flow of firmware. It really helps the, developer in simulating abnormal operational environment for firmware and helps the firmware developer to, study the behaviour of the firmware under abnormal input conditions., , 13.4.1.2 Limita ons of Simulator based Debugging, Though simulation based firmware debugging technique is very helpful in embedded applications, they, possess certain limitations and we cannot fully rely upon the simulator-based firmware debugging. Some of, the limitations of simulator-based debugging are explained below., Devia on from Real Behaviour Simulation-based firmware debugging is always carried out in a development, environment where the developer may not be able to debug the firmware under all possible combinations of, input. Under certain operating conditions we may get some particular result and it need not be the same when, the firmware runs in a production environment., Lack of Real Timeliness The major limitation of simulator based debugging is that it is not real-time in, behaviour. The debugging is developer driven and it is no way capable of creating a real time behaviour., Moreover in a real application the I/O condition may be varying or unpredictable. Simulation goes for, simulating those conditions for known values., , 13.4.2, , Emulators and Debuggers, , What is debugging and why debugging is required? Debugging in embedded application is the process of, diagnosing the firmware execution, monitoring the target processor’s registers and memory while the firmware, is running and checking the signals from various buses of the embedded hardware. Debugging process in, embedded application is broadly classified into two, namely; hardware debugging and firmware debugging., Hardware debugging deals with the monitoring of various bus signals and checking the status lines of the, target hardware. The various tools used for hardware debugging will be explaining in detail in a later section, of this chapter. Firmware debugging deals with examining the firmware execution, execution flow, changes to, various CPU registers and status registers on execution of the firmware to ensure that the firmware is running, as per the design. This section deals with the debugging of firmware.
Page 633 :
The Embedded System Development Environment, , 609, , Why is debugging required? Well the counter question why you go for diagnosis when you are ill answers, this query. Firmware debugging is performed to figure out the bug or the error in the firmware which creates, the unexpected behaviour. Firmware is analogous to the human body in the sense it is widespread and/or, modular. Any abnormalities in any area of the body may lead to sickness. How is the region causing illness, identified correctly when you are sick? If we look back to the 1900s, where no sophisticated diagnostic, techniques were available, only a skilled doctor was capable of identifying the root cause of illness, that, too with his solid experience. Now, with latest technologies, the scenario is totally changed. Sophisticated, diagnostic techniques provide offline diagnosis like Computerised Tomography (CT), MRI and ultrasound, scans and online diagnosis like micro camera based imaging techniques. With the intrusion of a micro camera, into the body, the doctors can view the internals of the body in real time., During the early days of embedded system development, there were no debug tools available and the only, way was “Burn the code in an EEPROM and pray for its proper functioning”. If the firmware does not crash,, the product works fine. If the product crashes, the developer is unlucky and he needs to sit back and rework, on the firmware till the product functions in the expected way. Most of the time the developer had to seek the, help of an expert to figure out the exact problem creator. As technology has achieved a new dimension from, the early days of embedded system development, various types of debugging techniques are available today., The following section describes the improvements over firmware debugging starting from the most primitive, type of debugging to the most sophisticated On Chip Debugging (OCD)., , 13.4.2.1 Incremental EEPROM Burning Technique, This is the most primitive type of firmware debugging technique where the code is separated into different, functional code units. Instead of burning the entire code into the EEPROM chip at once, the code is burned in, incremental order, where the code corresponding to all functionalities are separately coded, cross-compiled, and burned into the chip one by one. The code will incorporate some indication support like lighting up an, “LED (every embedded product contains at least one LED). If not, you should include provision for at least, one LED in the target board at the hardware design time such that it can be used for debugging purpose)” or, activate a “BUZZER (In a system with BUZZER support)” if the code is functioning in the expected way. If, the first functionality is found working perfectly on the target board with the corresponding code burned into, the EEPROM, go for burning the code corresponding to the next functionality and check whether it is working., Repeat this process till all functionalities are covered. Please ensure that before entering into one level up,, the previous level has delivered a correct result. If the code corresponding to any functionality is found not, giving the expected result, fix it by modifying the code and then only go for adding the next functionality for, burning into the EEPROM. After you found all functionalities working properly, combine the entire source, for all functionalities together, re-compile and burn the code for the total system functioning., Obviously it is a time-consuming process. But remember it is a onetime process and once you test, the firmware in an incremental model you can go for mass production. In incremental firmware burning, technique we are not doing any debugging but observing the status of firmware execution as a debug method., The very common mistake committed by firmware developers in developing non-operating system-based, embedded application is burning the entire code altogether and fed up with debugging the code. Please don’t, adopt this approach. Even though you need to spend some additional time on incremental burning approach,, you will never lose in the process and will never mess up with debugging the code. You will be able to, figure out at least ‘on which point of firmware execution the issue is arising’–“A stitch in time saves nine”., Incremental firmware burning technique is widely adopted in small, simple system developments and in, product development where time is not a big constraint (e.g. R&D projects). It is also very useful in product, development environments where no other debug tools are available.
Page 634 :
610, , Introduc on to Embedded Systems, , 13.4.2.2 Inline Breakpoint Based Firmware Debugging, Inline breakpoint based debugging is another primitive method of firmware debugging. Within the firmware, where you want to ensure that firmware execution is reaching up to a specified point, insert an inline debug, code immediately after the point. The debug code is a printf() function which prints a string given as per, the firmware. You can insert debug codes (printf()) commands at each point where you want to ensure the, firmware execution is covering that point. Cross-compile the source code with the debug codes embedded, within it. Burn the corresponding hex file into the EEPROM. You can view the printf() generated data on the, a ‘Terminal Program’ like PUTTy or TeraTerm. Configure the serial communication settings of the ‘Terminal, Program’ connection to the same as that of the serial communication settings configured in the firmware (Say, Baudrate = 9600; Parity = None; Stop Bit = 1; Flow Control = None); Connect the target board’s serial port, (COM) to the development PC’s COM Port using an RS232 Cable. Power up the target board. Depending on, the execution flow of firmware and the inline debug codes inserted in the firmware, you can view the debug, information on the ‘Terminal Program’. Typical usage of inline debug codes and the debug info retrieved on, the HyperTerminal is illustrated below., //First Inline Debug Code, printf (“Starting Configuration…\n”);, Configurations……, ……………………, //Inline Debug code ensuring execution of Configuration section, printf (“End of Configuration…\n”);, printf (“Beginning of Firmware Execution…\n”);, Code segment1…., …………………., //Inline Debug code ensuring execution of Code Segment 1, printf (“End of Code segment 1…\n”);, Code segment2…., …………………., //Inline Debug code ensuring execution of Code Segment 2, printf (“End of Code segment 2…\n”);, , If the firmware is error free and the execution occurs properly, you will get all the debug messages on the, Terminal Program. Based on this debug info you can check the firmware for errors (Fig. 13.38)., , Fig. 13.38, , Inline Breakpoint Based Firmware Debugging with HyperTerminal
Page 635 :
611, , The Embedded System Development Environment, , 13.4.2.3 Monitor Program Based Firmware Debugging, Monitor program based firmware debugging is the first adopted invasive method for firmware debugging, (Fig. 13.39). In this approach a monitor program which acts as a supervisor is developed. The monitor, program controls the downloading of user code into the code memory, inspects and modifies register/memory, locations; allows single stepping of source code, etc. The monitor program implements the debug functions, as per a pre-defined command set from the debug application interface. The monitor program always listens, to the serial port of the target device and according to the command received from the serial interface it, performs command specific actions like firmware downloading, memory inspection/modification, firmware, single stepping and sends the debug information (various register and memory contents) back to the main, debug program running on the development PC, etc. The first step in any monitor program development is, determining a set of commands for performing various operations like firmware downloading, memory/, register inspection/modification, single stepping, etc. Once the commands for each operation is fixed, write, the code for performing the actions corresponding to these commands. As mentioned earlier, the commands, may be received through any of the external interface of the target processor (e.g. RS-232C serial interface/, parallel interface/USB, etc.). The monitor program should query this interface to get commands or should, handle the command reception if the data reception is implemented through interrupts. On receiving a, command, examine it and perform the action corresponding to it. The entire code stuff handling the command, reception and corresponding action implementation is known as the “monitor program”. The most common, type of interface used between target board and debug application is RS-232/USB Serial interface. After the, successful completion of the ‘monitor program’ development, it is compiled and burned into the FLASH, memory or ROM of the target board. The code memory containing the monitor program is known as the, ‘Monitor ROM’., Target CPU, Monitor ROM, Debugger, application, , RS-232 Serial link, , Host PC, Target board, Von-Neumann RAM, , Fig. 13.39, , Monitor Program Based Target Firmware Debug Setup, , The monitor program contains the following set of minimal features., 1. Command set interface to establish communication with the debugging application, 2. Firmware download option to code memory, 3. Examine and modify processor registers and working memory (RAM), 4. Single step program execution, 5. Set breakpoints in firmware execution, 6. Send debug information to debug application running on host machine
Page 636 :
612, , Introduc on to Embedded Systems, , The monitor program usually resides at the reset vector (code memory 0000H) of the target processor., The monitor program is commonly employed in development boards and the development board supplier, provides the monitor program in the form of a ROM chip. The actual code memory is downloaded into a, RAM chip which is interfaced to the processor in the Von-Neumann architecture model. The Von-Neumann, architecture model is achieved by ANDing the PSEN\ and RD\ signals of the target processor (In case of, 8051) and connecting the output of AND Gate to the Output Enable (RD\) pin of RAM chip. WR\ signal of, the target processor is interfaced to The WR\ signal of the Von Neumann RAM. Monitor ROM size varies, in the range of a few kilo bytes. An address decoder circuit maps the address range allocated to the monitor, ROM and activates the Chip Select (CS\) of the ROM if the address is within the range specified for the, Monitor ROM. A user program is normally loaded at locations 0x4000 or 0x8000. The address decoder, circuit ensures the enabling of the RAM chip (CS\) when the address range is outside that allocated to the, ROM monitor. Though there are two memory chips (Monitor ROM Chip and Von-Neumann RAM), the, total memory map available for both of them will be 64K for a processor/controller with 16bit address space, and the memory decoder units take care of avoiding conflicts in accessing both. While developing user, program for monitor ROM-based systems, special care should be taken to offset the user code and handling, the interrupt vectors. The target development IDE will help in resolving this. During firmware execution and, single stepping, the user code may have to be altered and hence the firmware is always downloaded into a, Von-Neumann RAM in monitor ROM-based debugging systems. Monitor ROM-based debugging is suitable, only for development work and it is not a good choice for mass produced systems. The major drawbacks of, monitor based debugging system are, 1. The entire memory map is converted into a Von-Neumann model and it is shared between the monitor, ROM, monitor program data memory, monitor program trace buffer, user written firmware and, external user memory. For 8051, the original Harvard architecture supports 64K code memory and, 64K external data memory (Total 128K memory map). Going for a monitor based debugging shrinks, the total available memory to 64K Von-Neumann memory and it needs to accommodate all kinds of, memory requirement (Monitor Code, monitor data, trace buffer memory, User code and External User, data memory)., 2. The communication link between the debug application running on Development PC and monitor, program residing in the target system is achieved through a serial link and usually the controller’s Onchip UART is used for establishing this link. Hence one serial port of the target processor becomes, dedicated for the monitor application and it cannot be used for any other device interfacing. Wastage, of a serial port! It is a serious issue in controllers or processors with single UART., , 13.4.2.4 In Circuit Emulator (ICE) Based Firmware Debugging, The terms ‘Simulator’ and ‘Emulator’ are little bit confusing and sounds similar. Though their basic, functionality is the same – “Debug the target firmware”, the way in which they achieve this functionality is, totally different. As mentioned before, ‘Simulator’ is a software application that precisely duplicates (mimics), the target CPU and simulates the various features and instructions supported by the target CPU, whereas, an ‘Emulator’ is a self-contained hardware device which emulates the target CPU. The emulator hardware, contains necessary emulation logic and it is hooked to the debugging application running on the development, PC on one end and connects to the target board through some interface on the other end. In summary, the, simulator ‘simulates’ the target board CPU and the emulator ‘emulates’ the target board CPU., There is a scope change that has happened to the definition of an emulator. In olden days emulators, were defined as special hardware devices used for emulating the functionality of a processor/controller, and performing various debug operations like halt firmware execution, set breakpoints, get or set internal, RAM/CPU register, etc. Nowadays pure software applications which perform the functioning of a hardware
Page 637 :
613, , The Embedded System Development Environment, , emulator is also called as ‘Emulators’ (though they are ‘Simulators’ in operation). The emulator application, for emulating the operation of a PDA phone for application development is an example of a ‘Software, Emulator’. A hardware emulator is controlled by a debugger application running on the development PC. The, debugger application may be part of the Integrated Development Environment (IDE) or a third party supplied, tool. Most of the IDEs incorporate debugger support for some of the emulators commonly available in the, market. The emulators for different families of processors/controllers are different. Figure 13.40 illustrates, the different subsystems and interfaces of an ‘Emulator’ device., Debugger application, , RS-232/USB cable, , Emulator POD, , Target board interface, (Device adaptor), , In Circuit Emulator, PC COM/USB port, PC, , Fig. 13.40, , Signal lines, (Flat Cable), , Target Board, , In Circuit Emulator (ICE) Based Target Debugging, , The Emulator POD forms the heart of any emulator system and it contains the following functional, units., Emula on Device Emulation device is a replica of the target CPU which receives various signals from the, target board through a device adaptor connected to the target board and performs the execution of firmware, under the control of debug commands from the debug application. The emulation device can be either a, standard chip same as the target processor (e.g. AT89C51) or a Programmable Logic Device (PLD) configured, to function as the target CPU. If a standard chip is used as the emulation device, the emulation will provide, real-time execution behaviour. At the same time the emulator becomes dedicated to that particular device and, cannot be re-used for the derivatives of the same chip. PLD-based emulators can easily be re-configured to, use with derivatives of the target CPU under consideration. By simply loading the configuration file of the, derivative processor/controller, the PLD gets re-configured and it functions as the derivative device. A major, drawback of PLD-based emulator is the accuracy of replication of target CPU functionalities. PLD-based, emulator logic is easy to implement for simple target CPUs but for complex target CPUs it is quite difficult., Emula on Memory It is the Random Access Memory (RAM) incorporated in the Emulator device. It acts, as a replacement to the target board’s EEPROM where the code is supposed to be downloaded after each, firmware modification. Hence the original EEPROM memory is emulated by the RAM of emulator. This is, known as ‘ROM Emulation’. ROM emulation eliminates the hassles of ROM burning and it offers the benefit, of infinite number of reprogrammings (Most of the EEPROM chips available in the market supports only, a few 1000 re-program cycles). Emulation memory also acts as a trace buffer in debugging. Trace buffer, is a memory pool holding the instructions executed/registers modified/related data by the processor while, debugging. The trace buffer size is emulator dependent and the trace buffer holds the recent trace information
Page 638 :
614, , Introduc on to Embedded Systems, , when the buffer overflows. The common features of trace buffer memory and trace buffer data viewing are, listed below:, ∑ Trace buffer records each bus cycle in frames, ∑ Trace data can be viewed in the debugger application as Assembly/Source code, ∑ Trace buffering can be done on the basis of a Trace trigger (Event), ∑ Trace buffer can also record signals from target board other than CPU signals (Emulator dependent), ∑ Trace data is a very useful information in firmware debugging, Emulator Control Logic Emulator control logic is the logic circuits used for implementing complex, hardware breakpoints, trace buffer trigger detection, trace buffer control, etc. Emulator control logic circuits, are also used for implementing logic analyser functions in advanced emulator devices. The ‘Emulator POD’, is connected to the target board through a ‘Device adaptor’ and signal cable., Device Adaptors Device adaptors act as an interface between the target board and emulator POD. Device, adaptors are normally pin-to-pin compatible sockets which can be inserted/plugged into the target board, for routing the various signals from the pins assigned for the target processor. The device adaptor is usually, connected to the emulator POD using ribbon cables. The adaptor type varies depending on the target, processor’s chip package. DIP, PLCC, etc. are some commonly used adaptors., The above-mentioned emulators are almost dedicated ones, meaning they are built for emulating a, specific target processor and have little or less support for emulating the derivatives of the target processor, for which the emulator is built. This type of emulators usually combines the entire emulation control logic, and emulation device (if present) in a single board. They are known as ‘Debug Board Modules (DBMs)’., An alternative method of emulator design supports emulation of a variety of target processors. Here the, emulator hardware is partitioned into two, namely, ‘Base Terminal’ and ‘Probe Card’. The Base terminal, contains all the emulator hardware and emulation control logic except the emulation chip (Target board, CPU’s replica). The base terminal is connected to the Development PC for establishing communication with, the debug application. The emulation chip (Same chip as the target CPU) is mounted on a separate PCB, and it is connected to the base terminal through a ribbon cable. The ‘Probe Card’ board contains the device, adaptor sockets to plug the board into the target development board. The board containing the emulation chip, is known as the ‘Probe Card’. For emulating different target CPUs the ‘Probe Card’ will be different and the, base terminal remains the same. The manufacturer of the emulator supplies ‘Probe Card’ for different CPUs., Though these emulators are capable of emulating different CPUs, the cost for ‘Probe Cards’ is very high., Communication link between the emulator base unit/ Emulator POD and debug application is established, through a Serial/Parallel/USB interface. Debug commands and debug information are sent to and from the, emulator using this interface., , 13.4.2.5 On Chip Firmware Debugging (OCD), Advances in semiconductor technology has brought out new dimensions to target firmware debugging. Today, almost all processors/controllers incorporate built in debug modules called On Chip Debug (OCD) support., Though OCD adds silicon complexity and cost factor, from a developer perspective it is a very good feature, supporting fast and efficient firmware debugging. The On Chip Debug facilities integrated to the processor/, controller are chip vendor dependent and most of them are proprietary technologies like Background Debug, Mode (BDM), OnCE, etc. Some vendors add ‘on chip software debug support’ through JTAG (Joint Test, Action Group) port. Processors/controllers with OCD support incorporate a dedicated debug module to the, existing architecture. Usually the on-chip debugger provides the means to set simple breakpoints, query, the internal state of the chip and single step through code. OCD module implements dedicated registers for, controlling debugging. An On Chip Debugger can be enabled by setting the OCD enable bit (The bit name
Page 639 :
The Embedded System Development Environment, , 615, , and register holding the bit varies across vendors). Debug related registers are used for debugger control, (Enable/disable single stepping, Freeze execution, etc.) and breakpoint address setting. BDM and JTAG are, the two commonly used interfaces to communicate between the Debug application running on Development, PC and OCD module of target CPU. Some interface logic in the form of hardware will be implemented, between the CPU OCD interface and the host PC to capture the debug information from the target CPU, and sending it to the debugger application running on the host PC. The interface between the hardware and, PC may be Serial/Parallel/USB. The following section will give you a brief introduction about Background, Debug Mode (BDM) and JTAG interface used in On Chip Debugging., Background Debug Mode (BDM) interface is a proprietary On Chip Debug solution from Motorola., BDM defines the communication interface between the chip resident debug core and host PC where the, BDM compatible remote debugger is running. BDM makes use of 10 or 26 pin connector to connect to the, target board. Serial data in (DSI), Serial data out (DSO) and Serial clock (DSCLK) are the three major signal, lines used in BDM. DSI sends debug commands serially to the target processor from the remote debugger, application and DSO sends the debug response to the debugger from the processor. Synchronisation of, serial transmission is done by the serial clock DSCLK generated by the debugger application. Debugging is, controlled by BDM specific debug commands. The debug commands are usually 17-bit wide. 16 bits are used, for representing the command and 1 bit for status/control., Chips with JTAG debug interface contain a built-in JTAG port for communicating with the remote, debugger application. JTAG is the acronym for Joint Test Action Group. JTAG is the alternate name for, IEEE 1149.1 standard. Like BDM, JTAG is also a serial interface. The signal lines of JTAG protocol are, explained below., Test Data In (TDI): It is used for sending debug commands serially from remote debugger to the target, processor., Test Data Out (TDO): Transmit debug response to the remote debugger from target CPU., Test Clock (TCK): Synchronises the serial data transfer., Test Mode Select (TMS): Sets the mode of testing., Test Reset (TRST): It is an optional signal line used for resetting the target CPU., The serial data transfer rate for JTAG debugging is chip dependent. It is usually within the range of 10 to, 1000 MHz., , 13.5, , TARGET HARDWARE DEBUGGING, , Even though the firmware is bug free and everything is intact in the board,, your embedded product need not function as per the expected behaviour in, the first attempt for various hardware related reasons like dry soldering of, components, missing connections in the PCB due to any un-noticed errors, in the PCB layout design, misplaced components, signal corruption due to, noise, etc. The only way to sort out these issues and figure out the real, problem creator is debugging the target board. Hardware debugging is not similar to firmware debugging., Hardware debugging involves the monitoring of various signals of the target board (address/data lines, port, pins, etc.), checking the inter-connection among various components, circuit continuity checking, etc. The, various hardware debugging tools used in Embedded Product Development are explained below., LO 5 Discuss the, different tools and, techniques used for, embedded hardware, debugging
Page 640 :
616, , 13.5.1, , Introduc on to Embedded Systems, , Magnifying Glass (Lens), , You might have noticed watch repairer wearing a small magnifying glass while engaged in repairing a watch., They use the magnifying glass to view the minute components inside the watch in an enlarged manner so, that they can easily work with them. Similar to a watch repairer, magnifying glass is the primary hardware, debugging tool for an embedded hardware debugging professional. A magnifying glass is a powerful visual, inspection tool. With a magnifying glass (lens), the surface of the target board can be examined thoroughly for, dry soldering of components, missing components, improper placement of components, improper soldering,, track (PCB connection) damage, short of tracks, etc. Nowadays high quality magnifying stations are available, for visual inspection. The magnifying station incorporates magnifying glasses attached to a stand with CFL, tubes for providing proper illumination for inspection. The station usually incorporates multiple magnifying, lenses. The main lens acts as a visual inspection tool for the entire hardware board whereas the other small, lens within the station is used for magnifying a relatively small area of the board which requires thorough, inspection., , 13.5.2, , Multimeter, , I believe the name of the instrument itself is sufficient to give an outline of its usage. A multimeter is used, for measuring various electrical quantities like voltage (Both AC and DC), current (DC as well as AC),, resistance, capacitance, continuity checking, transistor checking, cathode and anode identification of diode,, etc. Any multimeter will work over a specific range for each measurement. A multimeter is the most valuable, tool in the toolkit of an embedded hardware developer. It is the primary debugging tool for physical contact, based hardware debugging and almost all developers start debugging the hardware with it. In embedded, hardware debugging it is mainly used for checking the circuit continuity between different points on the, board, measuring the supply voltage, checking the signal value, polarity, etc. Both analog and digital versions, of a multimeter are available. The digital version is preferred over analog the one for various reasons like, readability, accuracy, etc. Fluke, Rishab, Philips, etc. are the manufacturers of commonly available high, quality digital multimeters., , 13.5.3, , Digital CRO, , Cathode Ray Oscilloscope (CRO) is a little more sophisticated tool compared to a multimeter. You might, have studied the operation and use of a CRO in your basic electronics lab. Just to refresh your brain, CRO, is used for waveform capturing and analysis, measurement of signal strength, etc. By connecting the point, under observation on the target board to the Channels of the Oscilloscope, the waveforms can be captured, and analysed for expected behaviour. CRO is a very good tool in analysing interference noise in the power, supply line and other signal lines. Monitoring the crystal oscillator signal from the target board is a typical, example of the usage of CRO for waveform capturing and analysis in target board debugging. CROs are, available in both analog and digital versions. Though Digital CROs are costly, featurewise they are best suited, for target board debugging applications. Digital CROs are available for high frequency support and they also, incorporate modern techniques for recording waveform over a period of time, capturing waves on the basis, of a configurable event (trigger) from the target board (e.g. High to low transition of a port pin of the target, processor). Most of the modern digital CROs contain more than one channel and it is easy to capture and, analyse various signals from the target board using multiple channels simultaneously. Various measurements, like phase, amplitude, etc. is also possible with CROs. Tektronix, Agilent, YOKOGAWA, Keysight, LeCroy,, etc. are the manufacturers of high precision good quality digital CROs.
Page 641 :
The Embedded System Development Environment, , 13.5.4, , 617, , Logic Analyser, , A logic analyser is the big brother of digital CRO. Logic analyser is used for capturing digital data (logic 1 and, 0) from a digital circuitry whereas CRO is employed in capturing all kinds of waves including logic signals., Another major limitation of CRO is that the total number of logic signals/waveforms that can be captured, with a CRO is limited to the number of channels. A logic analyser contains special connectors and clips, which can be attached to the target board for capturing digital data. In target board debugging applications,, a logic analyser captures the states of various port pins, address bus and data bus of the target processor/, controller, etc. Logic analysers give an exact reflection of what happens when a particular line of firmware, is running. This is achieved by capturing the address line logic and data line logic of target hardware. Most, modern logic analysers contain provisions for storing captured data, selecting a desired region of the captured, waveform, zooming selected region of the captured waveform, etc. Tektronix, Agilent, etc. are the giants in, the logic analyser market., , 13.5.5, , Function Generator, , Function generator is not a debugging tool. It is an input signal simulator tool. A function generator is capable, of producing various periodic waveforms like sine wave, square wave, saw-tooth wave, etc. with different, frequencies and amplitude. Sometimes the target board may require some kind of periodic waveform with, a particular frequency as input to some part of the board. Thus, in a debugging environment, the function, generator serves the purpose of generating and supplying required signals., , 13.6, , BOUNDARY SCAN, , As the complexity of the hardware increase, the number of chips present, LO 6 Describe the, in the board and the interconnection among them may also increase., boundary scanning, The device packages used in the PCB become miniature to reduce the, technique for testing the, total board space occupied by them and multiple layers may be required, interconnection among, to route the interconnections among the chips. With miniature device, the various chips in a, packages and multiple layers for the PCB it will be very difficult to, complex hardware board, debug the hardware using magnifying glass, multimeter, etc. to check the, interconnection among the various chips. Boundary scan is a technique used for testing the interconnection, among the various chips, which support JTAG interface, present in the board. Chips which support boundary, scan associate a boundary scan cell with each pin of the device. A JTAG port which contains the five signal, lines namely TDI, TDO, TCK, TRST and TMS form the Test Access Port (TAP) for a JTAG supported chip., Each device will have its own TAP. The PCB also contains a TAP for connecting the JTAG signal lines to, the external world. A boundary scan path is formed inside the board by interconnecting the devices through, JTAG signal lines. The TDI pin of the TAP of the PCB is connected to the TDI pin of the first device. The, TDO pin of the first device is connected to the TDI pin of the second device. In this way all devices are, interconnected and the TDO pin of the last JTAG device is connected to the TDO pin of the TAP of the PCB., The clock line TCK and the Test Mode Select (TMS) line of the devices are connected to the clock line and, Test mode select line of the Test Access Port of the PCB respectively. This forms a boundary scan path., Figure 13.41 illustrates the same.
Page 642 :
618, , Introduc on to Embedded Systems, , Boundary Scan Cells, , Boundary Scan Path, , TCK TDI, IC Device 2, , TCK TDI, IC Device 1, , TDO, , TCK TDI, , TDO, , PCB, , TDI, , TCK, , IC Device 3, TDO, , Test Port, TDO, , Fig. 13.41, , JTAG based boundary scanning for hardware testing, , As mentioned earlier, each pin of the device associates a boundary scan cell with it. The boundary scan, cell is a multipurpose memory cell. The boundary scan cell associated with the input pins of an IC is known, as ‘input cells’ and the boundary scan cells associated with the output pins of an IC is known as ‘output cells’., The boundary scan cells can be used for capturing the input pin signal state and passing it to the internal, circuitry, capturing the signals from the internal circuitry and passing it to the output pin, and shifting the, data received from the Test Data In pin of the TAP. The boundary scan cells associated with the pins are, interconnected and they form a chain from the TDI pin of the device to its TDO pin. The boundary scan cells, can be operated in Normal, Capture, Update and Shift modes. In the Normal mode, the input of the boundary, scan cell appears directly at its output. In the Capture mode, the boundary scan cell associated with each input, pin of the chip captures the signal from the respective pins to the cell and the boundary scan cell associated, with each output pin of the chip captures the signal from the internal circuitry. In the Update mode, the, boundary scan cell associated with each input pin of the chip passes the already captured data to the internal, circuitry and the boundary scan cell associated with each output pin of the chip passes the already captured, data to the respective output pin. In the shift mode, data is shifted from TDI pin to TDO pin of the device, through the boundary scan cells. ICs supporting boundary scan contain additional boundary scan related, registers for facilitating the boundary scan operation. Instruction Register, Bypass Register, Identification, Register, etc. are examples of boundary scan related registers. The Instruction Register is used for holding, and processing the instruction received over the TAP. The bypass register is used for bypassing the boundary, scan path of the device and directly interconnecting the TDI pin of the device to its TDO. It disconnects a, device from the boundary scan path. Different instructions are used for testing the interconnections and the, functioning of the chip. Extest, Bypass, Sample and Preload, Intest, etc. are examples for instructions for, different types of boundary scan tests, whereas the instruction Runbist is used for performing a self test on, the internal functioning of the chip. The Runbist instruction produces a pass/fail result., Boundary Scan Description Language (BSDL) is used for implementing boundary scan tests using, JTAG. BSDL is a subset of VHDL and it describes the JTAG implementation in a device. BSDL provides
Page 643 :
The Embedded System Development Environment, , 619, , information on how boundary scan is implemented in an integrated chip. The BSDL file (File which describes, the boundary scan implementation for a device in .bsd format) for a JTAG compliant device is supplied the, device manufacturers or it can be downloaded from internet repository. The BSDL file is used as the input, to a Boundary Scan Tool for generating boundary scan test cases for a PCB. Automated tools are available, for boundary scan test implementation from multiple vendors. The ScanExpress™ Boundary Scan (JTAG), product from Corelis Inc. (www.corelis.com) is a popular tool for boundary scan test implementation., , Summary, � Integrated Development Environment (IDE) is an integrated environment for developing and, debugging the target processor specific embedded firmware. IDE is a software package which, bundles a ‘Text Editor (Source Code Editor)’, ‘Cross-compiler (for cross platform, LO1, development and compiler for same platform development)’, ‘Linker’ and a ‘Debugger’, � Keil μVision5 is a licensed IDE tool from Keil Software (www.keil.com), an ARM company, for, 8051 family microcontroller based embedded firmware development, LO1, � List File (.lst), Pre-processor Output file, Map File (File extension linker dependent), Object File, (.obj), Hex File (.hex). etc. are the files generated during the cross-compilation process of a LO2, source file, � Hex file is the binary executable file created from the source code. The absolute object file created, by the linker/locater is converted into processor understandable binary code. Object to LO2, Hex file converter is the utility program for converting an object file to a hex file, � Intel HEX and Motorola HEX are the two commonly used Hex file formats in embedded, LO2, applications, � Disassembler is a utility program which converts machine codes into target processor specific, Assembly codes/instructions. Disassembling is the process of converting machine codes LO3, into Assembly code, � Decompiler is the utility program for translating machine codes into corresponding high level, LO3, language instructions, � Simulator is a software application that precisely duplicates (mimics) the target CPU and simulates, LO4, the various features and instructions supported by the target CPU, � Emulator is a self-contained hardware device which emulates the target CPU. Emulator hardware, contains necessary emulation logic and it is hooked to the debugging application running on the, development PC on one end and connects to the target board through some interface on LO4, the other end
Page 644 :
620, , Introduc on to Embedded Systems, , � Incremental EEPROM Burning technique, Inline breakpoint based Firmware Debugging, Monitor, Program based Firmware Debugging, In Circuit Emulator (ICE) based Firmware Debugging and, On Chip Firmware Debugging (OCD) are the techniques used for debugging embedded LO4, firmware on the target hardware, � Background Debug Mode (BDM) Interface and JTAG are the two commonly used interfaces for On, LO4, Chip Firmware Debugging (OCD), � Magnifying glass, Multimeter, Cathode Ray Oscilloscope (CRO), Logic Analyser and Function, generator are the commonly used hardware debugging tools, LO5, � Boundary scan is a technique for testing the interconnection among the various chips, which, support boundary scanning, in a complex board containing too many interconnections and, multiple planes for routing, LO6, � Boundary Scan Description Language (BSDL) is a language similar to VHDL, which describes the, boundary scan implementation of a device and is used for implementing boundary scan tests using, JTAG. BSDL file is a file containing the boundary scan description for a device in boundary scan, description language, which is supplied as input to a Boundary scan tool for generating the, LO6, boundary scan test cases, , Keywords, Integrated Development Environment (IDE): A so ware package which bundles a ‘Text Editor (Source Code, Editor)’, ‘Cross-compiler (for cross pla orm development and compiler for same pla orm development)’,, ‘Linker’ and a ‘Debugger’, [LO 1], Keil μVision5: A licensed IDE tool from Keil So ware (www.keil.com), an ARM company, for 8051 family, microcontroller based embedded firmware development, [LO 1], Lis ng file (.LST File): File generated during cross compila on of a source code and it contains informa on, about the cross compila on process, like cross compiler details, forma ed source text (‘C’ code), assembly, code generated from the source file, symbol tables, errors and warnings detected during the cross-compila on, process, etc., [LO 2], Object File (.OBJ File): A specially forma ed file with data records for symbolic informa on, object code,, debugging informa on, library references, etc. generated during the cross-compila on of a source file[LO 2], Map file: File generated during cross-compila on process and it contains informa on about the link/locate, process, [LO 2], Hex file: The binary executable file created from the source code, [LO 2], Intel HEX: HEX file representa on format, [LO 2], Motorola HEX: HEX file representa on format, [LO 2], Disassembler: U lity program which converts machine codes into target processor specific Assembly codes/, instruc ons, [LO 3], Decompiler: U lity program for transla ng machine codes into corresponding high level language instruc ons, , [LO 3], Simulator: So ware applica on that precisely duplicates (mimics) the target CPU and simulates the various, features and instruc ons supported by the target CPU, [LO 4], Monitor Program: Program which acts as a supervisor and controls the downloading of user code into the, code memory, inspects and modifies register/memory loca ons, allows single stepping of source code, etc., , [LO 4]
Page 645 :
The Embedded System Development Environment, , 621, , In Circuit Emulator (ICE): A hardware device for emula ng the target CPU for debug purpose, [LO 4], Debug Board Module (DBM): ICE device which contains the emula on control logic and emula on chip in a, single hardware unit and is designed for a par cular family of device, [LO 4], Background Debug Mode (BDM): A proprietary serial interface from Motorola for On Chip Debugging, , [LO 4], JTAG: A serial interface for target board diagnos cs and debugging, [LO 4], Boundary Scan: A target hardware debug method for checking the interconnec ons among the various chips, of a complex board, [LO 6], Boundary Scan Descrip on Language (BSDL): A language similar to VHDL, which describes the boundary scan, implementa on of a JTAG supported device, [LO 6], , Objec ve Ques ons, 1. Which of the following intermediate file, generated during cross-compilation of an Embedded C file holds, the assembly code generated corresponding to the c source code., (a) List File, (b) Preprocessor output file (c) Object file, (d) Map file, 2. Which of the following detail(s) is(are) kept in an object file generated during the process of cross-compiling, an Embedded C file., (a) Variable and function names, (b) Variable and function reference, (c) Reserved memory for global variables (d) All of these, (e) None of these, 3. Which of the following intermediate file, generated during the cross-compilation of an Embedded C files, holds the information about the link/locate process for the multiple object modules of the project?, (a) List file, (b) Preprocessor output file (c) Object file, (d) Map file, 4. Which of the following file generated during the cross-compilation process of an Embedded C project holds, the machine code corresponding to the target processor?, (a) List file, (b) Preprocessor output file (c) Object file, (d) Map file, 5. Examine the following Intel HEX Record, :03000000020C1FD0, This record is ?, (a) a Data Record, (b) an End of File Record, (c) a Segment Address Record, (d) an Extended Linear Address record, 6. Examine the following Intel HEX record, :03000000020C1FD0, What is the number of data bytes in this record?, (a) 0, (b) 3, (c) 2, (d) 20, 7. Examine the following Intel HEX record, :03000000020C1FD0, What is the start address of the data bytes in this record?, (a) 0x0000, (b) 0x3000 (c), 0x1FD0 (d), 0x20C1, 8. Examine the following Intel HEX Record, :03000000020C1FD0
Page 646 :
622, , Introduc on to Embedded Systems, , Which all are the data bytes present in this record?, (a) 03, 00, 00, (b) 02, 0C, 1F, (c) 0C, 1F, D0, (d) 00, 00, 20, 9. The program that converts machine codes into target processor specific Assembly code is known as, (a) Disassembler, (b) Assembler, (c) Cross-compiler, (d) Decompiler, 10. Which of the following is true about a simulator used in embedded software debugging?, (a) It is a software tool, (b) It requires target hardware for simulation, (c) It doesn’t require target hardware for simulation, (d) (a ) and (b), (e) (a) and (c), 11. Which of the following is an example for on chip firmware debugging?, (a) OnCE, (b) BDM, (c) All of these, , Review Ques ons, 1. Explain the various elements of an embedded system development environment., [LO 1], 2. Explain the role of Integrated Development Environment (IDE) for Embedded Software Development., , [LO 1, LO 2], 3. What are the different files generated during the cross-compilation of an Embedded C file? Explain them in, detail., [LO 1, LO 2], 4. Explain the various details held by a List file generated during the process of cross-compiling an Embedded, C project., [LO 1, LO 2], 5. Explain the various details held by a Map file generated during the process of cross-compiling an Embedded, C project., [LO 1, LO 2], 6. Explain the various details stored in an Object file generated during the cross-compilation of an Embedded, C file., [LO 1, LO 2], 7. Explain the difference between Intel Hex and Motorola Hex file format., 8. Explain the format of Hex records in an Intel Hex File., , [LO 1, LO 2], [LO 1, LO 2], [LO 1, LO 2], , 9. Explain the format of Hex records in a Motorola Hex File., 10. What is the difference between an assembler and a disassembler? State their use in Embedded Application, development., [LO 2, LO 3], 11. What is a decompiler?, 12. What is the difference between a simulator and an emulator?, , [LO 3], [LO 4], [LO 4], , 13. Explain the advantages and limitations of simulator based debugging., 14. What are the different techniques available for embedded firmware debugging? Explain them in detail., 15. What is a Monitor program? Explain its role in embedded firmware debugging?, 16. What is ROM emulation? Explain In Circuit Emulator (ICE) based debugging in detail., 17. Explain On Chip Debugging (OCD)., 18. Explain the different tools used for hardware debugging., 19. Explain the Boundary Scan based hardware debugging in detail., , [LO 5], [LO 5], [LO 5], [LO 5], [LO 5], [LO 6]
Page 647 :
The Embedded System Development Environment, , 623, , Lab Assignments, 1. Write an Embedded C program for building a dancing LED circuit using 8051 as per the requirements, given below, (a) 4 Red LEDs are connected to Port Pins P1.0, P1.2, P1.4 and P1.6 respectively, (b) 4 Green LEDs are connected to Port Pins P1.1, P1.3, P1.5 and P1.7 respectively, (c) Turn On and Off the Green and Red LEDs alternatively with a delay of 100 milliseconds, (d) Use a clock frequency of 12 MHz, (e) Use Keil μVision IDE and simulate the application for checking the firmware, (f) Write the application separately for delay generation using timer and software routines, 2. Implement the above requirement in Assembly Language, 3. Write an Embedded C application for reading the status of 8 Dip switches connected to the Port P1 of, the 8051 microcontroller using μVision IDE. Debug the application using the simulator and simulate, the state of DIP switches using the Port simulator for P1, 4. Implement the above requirement in Assembly language, 5. Write an Embedded C program to count the pulses appearing on the C/T0 input pin of 8051, microcontroller for a duration of 100 milliseconds using μVision IDE, 6. Implement the above requirement in Assembly language, 7. Write an Embedded C program for configuring the INT0 Pin of the 8051 microcontroller as edge, triggered and print the message “External 0 Interrupt in Progress” to the serial port of 8051 when the, External 0 interrupt occurs. Use Keil μVision IDE. Assume the crystal frequency for the controller as, 11.0592 MHz. Configure the serial Port for baudrate 9600, No parity, 1 Start bit, 1 Stop bit and 8 data, bits., 8. Implement the above requirement in Assembly language, 9. Write an Interrupt Service Routine in Embedded C to handle the INT0 interrupt as per the requirements, given below, (a) Use Register Bank 1, (b) Read port P1 and save it in register R7, (c) Use Keil mVision IDE and simulate the application, 10. Write an embedded ‘C’ program using Keil mVision IDE to control the stepping of a unipolar 2-phase, stepper motor in full step mode with a delay of 5 second between the steps. The stepper motor coils,, A is connected to P1.0, B is connected to Port pins P1.1, C is connected to P1.2 and D to P1.3 of 8051, through NPN transistor driving circuits. Assume the clock frequency of operation as 12.00MHz, 11. Write an Embedded C program using Keil mVision IDE to interface 8255 PPI device with 8051, microcontroller. The 8255 is memory interfaced to 8051 in the address map 8000H to FFFFH. Initialise, the Port A, Port B and Port C of 8255 as Output ports in Mode0, 12. Write an Embedded C program using Keil mVision IDE to interface ADC 0801 with 8051, microcontroller as per the requirements given below, (a) Data lines of ADC is interfaced to Port 1, (b) The Chip Select of ADC is supplied through Port Pin P3.3, Read signal through P3.0 and Write, signal through P3.1 of 8051 microcontroller, (c) ADC interrupt line is interfaced to External Interrupt 0 of 8051, (d) The ADC Data is read when an interrupt is asserted. The data is kept in a buffer in the data memory, (e) The buffer is located at 20H and its size is 15 bytes. When the buffer is full, the buffer address for the, next sample is reset to location 20H.
Page 648 :
624, , Introduc on to Embedded Systems, , 14, , Product Enclosure, Design and, Development, , LEARNING OBJECTIVES, LO 1 Know the product enclosure design tools, Learn about the Computer Aided Design (CAD) tools for Product enclosure, design, LO 2 Learn about the different techniques for product enclosure design and development, Learn about handmade enclosure development and Rapid Prototyping for, product enclosure development, Learn about Steriolithography (SLA), Selec ve Laser Sintering (SLS) and Fused, Deposi on Modelling (FDM) based Rapid Prototyping for product enclosure, development, Learn about the tooling and moulding techniques for product enclosure, development, Learn about Room Temperature Vulcanised (RTV), Computer Numeric Control, (CNC) and Injec on Moulding based Tooling techniques for mould development, Learn the sheet metal based product enclosure development process, Know the use of Commercial Off-the-shelf Enclosures (CoEs) in product enclosure, development, , The saying “The first Impression is the last impression” is really meaningful in the commercial embedded, product market. No matter whatever features a commercial product offers compared to its competitor’s, product, the aesthetics of the product plays an important role on its demand and popularity. A mobile handset, is a typical example for this. Most of the end users prefer handy, compact, nice looking handsets among a set, of handsets by various manufacturers offering more or less the same features. For a successful commercial, embedded product, the features offered and product aesthetics must be well balanced. Product aesthetics refers, to the look ‘n’ feel, size, colour, weight and shape of the product. User friendliness (Navigation key order,, placement, accessibility, etc.) is another important factor that should be considered for products involving
Page 649 :
Product Enclosure Design and Development, , 625, , extensive user interactions. In most of the product development process, the engineering design of the product, is carried out by a mechanical engineering wing. The mechanical engineering team and embedded hardware, development team should work hands on hand to develop products with nice aesthetics. The mechanical, design team is responsible for designing the product enclosure and this design is executed in parallel with, the design of embedded hardware and firmware. However, the aesthetics of the product should be finalised, before the development of the real embedded hardware (PCB). The PCB size and shape are restricted by, the suggested product enclosure. The PCB should be routed in a way to incorporate the directions (like, placement of keyboard if any, display unit if any, PCB mounting holes, placement of connectors, etc.) from, the engineering design team. Apart from the product aesthetics, the engineering design team should be well, aware of the budget limitations for the product and they should be capable of suggesting a design fitting into, the allocated budget. Some technical aspects also need to be considered while selecting materials for product, enclosures. For example, certain products involving RF signals cannot use metal enclosures since they absorb, the RF signals and reduce the field strength, hence in such cases some cheap alternatives should be put, forward. The enclosure design should also take into account various protections like mechanical shock, water, resistance, etc., , 14.1, , PRODUCT ENCLOSURE DESIGN TOOLS, , Frankly speaking, product enclosure design is an art. As a sculpture shows the, LO 1 Know the, artistic ability of its creator, the product’s enclosure reflects the design capabilities, product, enclosure, of its designer. With the latest design technologies, the custom drawing using pen, design, tools, and pencil on paper for a design (front, top and end view of the design) has given, way to Computer Aided Design (CAD). A variety of CAD tools are available, for Product Enclosure Design. ‘Solidworks’, ‘AutoCAD’, ‘PTC Creo’, ‘CATIA’, etc. are examples of CAD, tools. By combining the artistic ability of the designer with the design flexibility offered by the automated, tools, good product enclosures maintaining very good aesthetics can be developed., , 14.2, , PRODUCT ENCLOSURE DEVELOPMENT TECHNIQUES, , Choosing the right enclosure (housing) for a design is dependent upon a variety of, LO 2 Learn about, product specifications like size, shielding, materials and construction, ergonomics,, the, different, customisability, operating conditions and protection requirements. Various, techniques, for, techniques and materials are used for the enclosure (housing) development of, product enclosure, the product. The commonly used materials for enclosure (housing) development, design and, are metal and variants of plastic. The de facto standard for plastic is ABS, development, (acrylonitrile-butadiene-styrene). ABS is used in a multitude of consumer, products ranging from children’s toys to mobile handsets. Polycarbonate is also, a widely used plastic for cellphone enclosures. Metal is been pushed down in most modern products for the, requirement lightweight and compactness. Plastic is the right choice for products demanding lightweight and, compactness whereas metal is the right candidate for products requiring ruggedness and extensive shielding, from external RF interference. Certain applications demand products with tight sealing and watertight, enclosures conforming to protection standards like IP 65, NEMA 4, etc. The following sections give an, overview of various techniques adopted in Product enclosure (housing) development., , 14.2.1, , Handmade Enclosures, , This is the best choice for enclosure development for prototype products and low volume product requirements., The capital investment required is very small for handmade enclosures. Commonly used materials for
Page 650 :
626, , Introduc on to Embedded Systems, , handmade enclosures are plastics like Poly Vinyl Chloride (PVC) and Acrylic. The PVC/Acrylic sheet can be, cut into desired shape and combined using a suitable adhesive. It is a low cost technology but limited to the, fabrication of low volume products. The manpower involved is comparatively high and development time is, also high., , 14.2.2, , Rapid Prototyping Development, , Rapid prototyping is a 3-Dimensional Computer Assisted Manufacturing (3D CAM) technique used for, prototype development as well as mass production. The 3D model designed using any of the 3D CAD tools, is used as input for this and a 3D Printer creates the objects layer-by-layer. Rapid prototyping is also known, as generative manufacturing or solid freeform fabrication or layered manufacturing. Rapid prototyping is, best suggested for Proof of Concept (PoC) models. The various techniques adopted in rapid prototyping are, listed below., , 14.2.2.1 Stereolithography (SLA) Prototyping, Stereolithography is considered as the first rapid prototyping technology and it was developed by 3D systems, of Valencia, CA, USA. It is commercially introduced in the year 1988. Stereolithography is a process in, which liquid plastic is solidified in precise patterns by a UV laser beam, resulting in a solid epoxy realisation, of a 3D design of the enclosure. SLA prototyping machine uses a computer to direct UV laser to solidify, photosensitive polymer layer upon layer to produce a physical object. On completion of each layer, the, surface is re-wetted and the laser hardens the next layer. Upon completion of the entire layer, the part is, cleaned and cured. This technique is also referred as 3D layering., , 14.2.2.2 Selec ve Laser Sintering (SLS) Prototyping, Selective Laser Sintering (SLS) is similar to SLA, except that the 3D prototypes are created from the drawing, by fusing or sintering powdered thermoplastic materials layer by layer. SLS system consists of a part chamber,, laser unit and a computerised controller. The part chamber contains a building platform, powder cartridge and, levelling roller. The powder cartridge sinters the material over the building platform. The advantage of SLS, over SLA is the range of materials available; including nylon, metals, and elastomers., , 14.2.2.3 Fused Deposi on Modelling (FDM), Fused Deposition Modelling (FDM) is a solid-based rapid prototyping method. It makes use of melted, thermoplastic polymer in the form of paste for building the layers. The FDM system consists of a build, platform, extrusion nozzle, and control system. In order to generate a two-dimensional cross section of the, model under consideration, production quality thermoplastics (largely ABS) is melted and then extruded, through a specially designed head onto a platform. The platform is lowered down once the newly extruded, layer is solidified, for extruding the next layer. This process is repeated until the model is complete. On, completion the model is taken out of the build platform chamber and cleaned properly., , 14.2.3, , Tooling and Moulding, , The tooling and moulding techniques are mainly used for developing plastic and metal housings for high, volume production. ABS, nylon, polycarbonate, acrylic and a variety of other polymers are the commonly, used plastic. The initial investment for making a tool or mould is too high and hence it is profitable only for, high volume productions. Once a tool or mould is developed, thousands of pieces can be developed from, it and this will convert the initial investment into per piece housing price. The widely adopted tooling and, moulding techniques are:
Page 651 :
Product Enclosure Design and Development, , 627, , 14.2.3.1 Room Temperature Vulcanised (RTV) Tooling, Room Temperature Vulcanised (RTV) tooling technique is used for polyurethane housings. First an RTV, rubber tools is created by pouring liquid silicone rubber around a master pattern. The resulting model is taken, out of the master pattern, finished well and then used for casting polyurethane housings. These housings are, painted according to the user needs. Text and graphics can be printed on top of the painted housing. The key, advantage of RTV is the ability to produce high volume prototypes at a nominal cost., , 14.2.3.2 Computer Numeric Control (CNC) Tooling, In Computer Numeric Control (CNC) tooling, CNC machines are used for milling the block of plastic, according to the input from a design file generated by the 3D modelling tool to develop desired housing., , 14.2.3.3 Injec on Moulding, Injection moulding system consists of a moulding machine and mould plates (dummy shape of the product, to be developed). Plastic/resin is fed into the injection barrel of the machine through the hopper and in the, barrel it is heated to the appropriate melting temperature. Molted resin is injected to the space between the, mould plates through a nozzle to create moulds. Mould is cooled constantly to a temperature that allows the, resin to solidify. Mould plates are held together by hydraulic or mechanical force., , 14.2.4, , Sheet Metal Work, , Sheet metal is the foil (thin) form of metal sheets, which can be cut or bend into different shapes. Copper,, brass, mild steel, aluminum, tin, nickel, titanium, etc. are examples for metals used in sheet metal work., The thickness of metal sheets used for sheet metal work normally falls below 6 mm. Sheet metal is the best, choice for product enclosures where aesthetics are not a big constraint, where a functional product is the only, requirement. Sheet metal is best suited for products demanding high ruggedness. Sheet metal is not a good, choice for products including any RF circuitry, since the enclosure tend to attenuate the RF field. Also fancy, works like contours, curves are not possible to build on housing using sheet metal work., , 14.2.5, , Commercial Off-the-Shelf Enclosures (COE), , Commercial off-the-shelf enclosures are the readily available enclosures in the market. It can be either plastic or, metal. They are generally available with rectangular, square and circular shapes and with various dimensions., Multimeter housings, plastic boxes, etc. are typical examples for COE. If the product is important only in, terms of functionalities and not in terms of aesthetics, you can go for a commercial off-the-shelf enclosure., Before building the hardware, identify the best suiting COE and tailor the PCB to fit into the selected COE., COE is best suited for concept development projects and product development work with low budget., , 14.3, , SUMMARY, , Competitive products where features as well as aesthetics are important should always require attractive, enclosures. Mobile handsets, children toys, etc. are examples of it. The more you make the enclosure, attractive, the more is the demand. Custom enclosure development is required for such products. Proof of, Concept (PoC) design products and products which are not aiming a commercial market can go for either, custom enclosure or Commercial off-the-shelf enclosure. Moreover the enclosure should consider any special, needs by the product like protection standards, shielding requirements, etc.
Page 652 :
628, , Introduc on to Embedded Systems, , Summary, � Product enclosure is essential for protecting the hardware from dust, water, corrosion, etc. to, provide ruggedness and to provide a good aesthetics (look and feel) to the product, LO2, � Product enclosure design should take care of the aesthetics, protection requirements, shielding, requirements, etc., LO2, � Product enclosure design deals with the design of the enclosure for the embedded product (Hardware, with firmware integrated). Various computer aided design (CAD) tools like ‘Solidworks’,, LO1, ‘AutoCAD’, ‘ProEngineer’, ‘Catia Interface’, etc. can be used for product enclosure, design, � Product enclosure can be developed manually or using Computer Assisted Manufacturing (CAM), tools based on the design file generated from the Computer Aided Design, LO1, � Handmade enclosure is a typical example for manually developed product enclosure. It is the best, choice for prototype and low volume production. It uses plastics like ABS or PVC and LO2, sheet metal for enclosure design, � Rapid prototyping is a 3-Dimentional Computer Assisted Manufacturing (3D CAM) technique, used for prototype development as well as mass production, LO2, � Stereolithography (SLA), Selective Laser Sintering (SLS), Fused Deposition Modelling (FDM), etc., are examples for various types of rapid prototyping, LO2, � Stereolithography is a process in which liquid plastic is solidified in precise patterns by a UV laser, beam, resulting in a solid epoxy realisation of a 3D design of the enclosure, LO2, � Selective Laser Sintering (SLS) is similar to SLA, except that the 3D prototypes are created from, the drawing by fusing or sintering powdered thermoplastic materials layer by layer, LO2, � Fused Deposition Modelling (FDM) is a solid-based rapid prototyping method, which uses melted, thermoplastic polymer in the form of paste for building the layers, LO2, � The tooling and moulding techniques are mainly used for developing plastic and metal housings for, high volume production. Here a tool or mould is developed first and the enclosure is developed from, this mould. Room Temperature Vulcanised (RTV), Computer Numeric Control (CNC), LO2, injection moulding, etc. are examples for tooling techniques, � Room Temperature Vulcanised (RTV) tooling technique is used for polyurethane housings. First, an RTV rubber tool is created by pouring liquid silicone rubber around a master pattern. LO2, The resulting model is taken out of the master pattern, finished well and then used for casting, polyurethane housings, � In Computer Numeric Control (CNC) tooling, CNC machines are used for milling the block of plastic, according to the input from a design file generated by the 3D modeling tool to develop LO2, desired housing, � Injection moulding system consists of a moulding machine and mould plates (dummy shape of the, product to be developed). Plastic/resin is fed into the injection barrel of the machine LO2, through the hopper and in the barrel it is heated to the appropriate melting temperature. Molted, resin is injected to the space between the mould plates through a nozzle to create moulds, � Sheet metal is the foil (thin) form of metal sheets, which can be cut or bent into different LO2, shapes, � Commercial off-the-shelf enclosure is the readily available enclosures in the market. It can be either, plastic or metal, LO2
Page 653 :
629, , Product Enclosure Design and Development, , Keywords, Computer Assisted Design (CAD): Design using so ware tools, Product Enclosure: A protec ve casing for the hardware product, Acrylonitrile-Butadiene-Styrene (ABS): A type of plas c used in product enclosure development, Commercial Off-the-Shelf Enclosure: Ready to use plas c or metal enclosures available in the, , [LO 1], [LO 1], [LO 2], market, , [LO 2], Computer Aided Manufacturing: Manufacturing process with the aid of so ware tools, [LO 2], Computer Numeric Control (CNC) Tooling: A tooling mechanism for genera ng the mould by milling the block, of plas c according to the input from a design file generated by the 3D modelling tool to develop desired, housing, [LO 2], Fused Deposi on Modelling (FDM): A solid-based rapid prototyping method, which uses melted thermoplas c, polymer in the form of paste for building the layers, [LO 2], Handmade Enclosure: Manually developed enclosure using plas c or sheet metal, [LO 2], Injec on Moulding: A moulding technique in which molted resin is injected into the space between the, mould plates through a nozzle to create moulds, [LO 2], Rapid Prototyping: A 3-Dimensional Computer Assisted Manufacturing (3D CAM) technique for prototype, development as well as mass produc on, [LO 2], Room Temperature Vulcanised (RTV) Tooling: A tooling technique for building polyurethane enclosures, in, which an RTV rubber tools is created by pouring liquid silicone rubber around a master pa ern, [LO 2], Selec ve Laser Sintering (SLS): A rapid prototyping technique in which the 3D prototype is created by fusing, or sintering powdered thermoplas c materials layer by layer, [LO 2], Stereolithography (SLA): A rapid prototyping technique in which liquid plas c is solidified in precise pa erns, by a UV laser beam, resul ng in a solid epoxy realisa on of a 3D design of the enclosure, [LO 2], , Objec ve Ques ons, 1. Which of the following is not a Rapid Prototyping technology for product enclosure development?, (a) Selective Laser Sintering (SLS), (b) Fused Deposition Modelling (FDM), (c) Room Temperature Vulcanisation (RTV), (d) Stereolithography (SLA), 2. Which of the following is not a Tooling and Moulding technology for product enclosure development?, (a) Room Temperature Vulcanisation (RTV), (b) Sheet metal, (c) Injection moulding, (d) CNC tooling
Page 654 :
630, , Introduc on to Embedded Systems, , Review Ques ons, 1. Explain the various factors that need to be addressed while selecting an enclosure for an embedded product., 2. Explain the different product enclosure development techniques in detail., , [LO 1], [LO 1, LO 2], [LO 2], , 3. What are the merits and limitations of Handmade Enclosures?, 4. What is Rapid Prototyping? What are the different techniques available for Rapid Prototyping? Explain the, merits and limitations of each., [LO 2], 5. Explain the Tooling and Moulding techniques used for product enclosure development., 6. Explain the Sheet Metal based product enclosure development., , [LO 2], [LO 2]
Page 655 :
The Embedded Product Development Life Cycle (EDLC), , 15, , 631, , The Embedded Product, Development Life Cycle, (EDLC), , LEARNING OBJECTIVES, LO 1 Understand the life-cycle stages in embedded product development and the, modelling of the life cycle stages, LO 2 Explain the project management and its objec ves in embedded product, development, LO 3 Discuss the objec ves for modelling the life cycle, Learn about the techniques for produc vity improvement in embedded product, development, LO 4 Know the different phases (Need, Conceptualisa on, Analysis, Design, Development,, Tes ng, Deployment, Support, Upgrades and Disposal) of the product development, life cycle and the ac vi es happening in each stage of the life cycle, LO 5 Iden fy the different modelling techniques for modelling the stages involved in the, embedded product development life cycle, Learn about the applica on, advantages and limita ons of Linear/Waterfall, Model in embedded product development life cycle management, Learn about the applica on, advantages and limita ons of Itera ve/Incremental, or Fountain Model in embedded product development life cycle management, Learn about the applica on, advantages and limita ons of prototyping/, evolu onary model in embedded product development life cycle management, Learn about the applica on, advantages and limita ons of Spiral Model in, embedded product development life cycle management, , Just imagine about your favourite chicken dish that your mom served during a Weekend lunch. Have you ever, thought of the effort behind preparing the delicious chicken dish? Frankly speaking No, Isn’t it? Okay let’s, go back and analyse how the yummy chicken in the chicken stall became the delicious chicken dish served, on the dining table. One fine morning Mom thinks “Wohh!! It’s Sunday and why can’t we have a special, lunch with our favourite chicken dish.” Mom tells this to Papa and he agrees on it and together they decide
Page 656 :
632, , Introduc on to Embedded Systems, , how much quantity of chicken is required for the four-member family (may be based on past experience), and lists out the various ingredients required for preparing the dish. Now the list is ready and papa checks, his wallet to ensure whether the item list is at the reach of the money in his wallet. If not, both of them sit, together and make some reductions in the list. Papa goes to the market to buy the items in the list. Finds out a, chicken stall where quality chicken is selling at a nominal rate. Procures all the items and returns back home, with all the items in the list and hands over the packet to Mom. Mom starts cleaning the chicken pieces and, chopping the ingredient/vegetables and then puts them in a vessel and starts cooking them. Mom may go for, preparing other side dishes or rice and comes back to the chicken dish preparation at regular intervals to add, the necessary ingredients (like chicken masala, chilly powder, coriander powder, tamarind, coconut oil, salt,, etc.) in time and checks whether all ingredients are in correct proportion, if not adjust them to the required, proportion. Papa gives an overall supervision to the preparation and informs mom if she forgot to add any, ingredients and also helps her in verifying the proportion of the ingredients. Finally the fragrance of spicy, boiled chicken comes out of the vessel and mom realises that chicken dish is ready. She takes it out from, the stove and adds the final taste building ingredients. Mom tastes a small piece from the dish and ensures, that it meets the regular quality. Now the dish is ready to serve. Mom takes the responsibility of serving the, same to you and what you need to do is taste it and tell her how delicious it is. If you closely observe these, steps with an embedded product developer’s mind, you can find out that this simple chicken dish preparation, contains various complex activities like overall management, development, testing and releasing. Papa is the, person who did the entire management activity starting from item procurement to giving overall supervision., Mom is responsible for developing the dish, testing the dish to certain extent and serving the dish (release, management) and finally you are the one who did the actual field test. All embedded products will have, a design and development life cycle similar to our chicken dish preparation example, with management,, design, development, test and release activities., , 15.1, , WHAT IS EDLC?, , LO 1 Understand, the life-cycle, stages in, embedded product, development and, the modelling of, the life cycle stages, , 15.2, , Embedded Product Development Life Cycle (Let us call it as EDLC, though it, is not a standard and universal term) is an ‘Analysis-Design-Implementation’, based standard problem solving approach for Embedded Product Development., In any product development application, the first and foremost step is to figure, out what product needs to be developed (analysis), next you need to figure out a, good approach for building it (design) and last but not least you need to develop, it (implementation)., , WHY EDLC, , LO 2 Explain, the project, management and, its objectives in, embedded product, development, , EDLC is essential for understanding the scope and complexity of the work, involved in any embedded product development. EDLC defines the interaction, and activities among various groups of a product development sector including, project management, system design and development (hardware, firmware and, enclosure design and development), system testing, release management and, quality assurance. The standards imposed by EDLC on a product development, makes the product, developer independent in terms of standard documents and it, also provides uniformity in development approaches.
Page 657 :
The Embedded Product Development Life Cycle (EDLC), , 15.3, , 633, , OBJECTIVES OF EDLC, , The ultimate aim of any embedded product in a commercial production setup, LO 3 Discuss, is to produce marginal benefit. Marginal benefit is usually expressed in terms, the, objectives for, of Return on Investment (ROI). The investment for a product development, modelling, the life, includes initial investment, manpower investment, infrastructure investment,, cycle, supply chain and marketing expenses, etc. A product is said to be profitable only, if the turnover from the selling of the product is more than that of the overall, investment expenditure. For this, the product should be acceptable by the end user and it should meet the, requirements of end user in terms of quality, reliability and functionality. So it is very essential to ensure that, the product is meeting all these criteria, throughout the design, development, implementation and support, phases. Embedded Product Development Life Cycle (EDLC) helps out in ensuring all these requirements., EDLC has three primary objectives, namely, 1. Ensure that high quality products are delivered to end user., 2. Risk minimisation and defect prevention in product development through project management., 3. Maximise the productivity., , 15.3.1, , Ensuring High Quality for Products, , The primary definition of quality in any embedded product development is the Return on Investment (ROI), achieved by the product. The expenses incurred for developing the product may fall in any of the categories;, initial investment, developer recruiting, training, or any other infrastructure requirement related. There will be, some budgetary and cost allocation given to the development of the product and it will be allocated by some, higher officials based on the assumption that the product will produce a good return or a return justifying the, investment. The budget allocation might have done after studying the market trends and requirements of the, product, competition, etc. EDLC must ensure that the development of the product has taken account of all the, qualitative attributes of the embedded system. The qualitative attributes are discussed separately in an earlier, chapter of this book. Please refer back for the same., , 15.3.2 Risk Minimisation and Defect Prevention through, Management, You may be thinking what is the significance of project management, or why project management is essential, in product development. Nevertheless it is an additional expenditure to the project! If we look back to the, chicken dish example, we can find out that the management activity from dad is essential in the beginning, phase but in the preparation phase it can be handled by mom itself. There are projects in embedded product, development which requires ‘loose’ or ‘tight’ project management. If the product development project is a, simple one, a senior developer itself can take charge of the management activity and no need for a skilled, project manager to look after this with dedicated effort throughout the development process, but there should, be an overall supervision from a skilled project management team for ensuring that the development process, is going in the right direction. Projects which are complex and requires timeliness should have a dedicated, and skilled project management part and hence they are said to be “tightly” bounded to project management., ‘Project management is essential for predictability, co-ordination and risk minimisation’. Whenever a product, development request comes, an estimate on the duration of the development and deployment activity should, be given to the end user/client. The timeframe may be expressed in number of person days PDS (The effort, in terms of single person working for this much days) or ‘X person for X week (e.g. 2 person 2 week) etc., This is one aspect of predictability. The management team might have reached on this estimate based on past, experience in handling similar project or on the analysis of work summary or data available for a similar
Page 658 :
634, , Introduc on to Embedded Systems, , project, which was logged in using an activity tool. Resource (Developer) allocation is another aspect of, predictability in management. Resource allocations like how many resources should work for this project for, how many days, how many resources are critical with respect to the work handling by them and how many, backups required for the resources to overcome a critical situation where a resource is not available (Risk, minimisation). Resource allocation is critical and it has a direct impact on investment. The communication, aspect of the project management deals with co-ordination and interaction among partners, suppliers and, client from which the request for the product development aroused. Project management adds an extra cost, on the budget but it is essential for ensuring the development process is going in the right direction and the, schedules of the development activity are meeting. Without management, the development work may go, beyond the stipulated time frame (schedule slipping) and may end up in a product which is not meeting, the requirements from the client side, as a result re-works should be done to rectify the possible deviations, occurred and it will again put extra cost on the development. Project management makes the proverb “A, stitch in time saves nine” meaningful in an embedded product development. Apart from resource allocation,, project management also covers activities like task allocation, scheduling, monitoring and project tracking., Computer Assisted Software Engineering (CASE) Tools and Gantt charts help the manager in achieving this., Microsoft® Project Tool is a typical example of CASE tool for project management., , 15.3.3, , Increased Productivity, , Productivity is a measure of efficiency as well as Return on Investment (ROI). One aspect of productivity, covers how many resources are utilised to build the product, how much investment required, how much time, is taken for developing the product, etc. For example, the productivity of a system is said to be doubled if a, product developed by a team of ‘X’ members in a period of ‘X’ days is developed by another team of ‘X/2’, members in a period of ‘X’ days or by a team of ‘X’ members in a period of ‘X/2’ days. This productivity, measurement is based on total manpower efficiency. Productivity in terms of Returns is said to be increased,, if the product is capable of yielding maximum returns with reduced investment. Saving manpower effort will, definitely result in increased productivity. Usage of automated tools, wherever possible, is recommended for, this. The initial investment on tools may be an additional burden in terms of money, but it will definitely save, efforts in the next project also. It is a one-time investment. “Pay once use many time”. Another important, factor which can help in increased productivity is “re-usable effort”. Some of the works required for the, current product development may have some common features which you built for some of the other product, development in the projects you executed before. Identify those efforts and design the new product in such, a way that it can directly be plugged into the new product without any additional effort. (For example, the, current product you are developing requires an RS-232C USB serial interface and one of the product you, already developed have the same feature. Adapt this part directly from the existing product in terms of the, hardware and firmware required for the same.) This will definitely increase the productivity by reducing the, development effort. Another advised method for increasing the productivity is by using resources with specific, skill sets which matches the exact requirement of the entire or part of the product (e.g. Resource with expertise, in Bluetooth technology for developing a Bluetooth interface for the product). This reduces the learning time, taken by a resource, who does not have prior expertise in the particular feature or domain. This is not possible, in all product development environments, since some of the resources with the desired skill sets may be, engaged with some other work and releasing them from the current work is not possible. Recruiting people, with desired skill sets for the current product development is another option; this is worth only if you expect, to have more work on the near future on the same technology or skill sets. Use of Commercial Off-the-Shelf, Components (COTS) wherever possible in a product is a very good way of reducing the development effort, and thereby increasing the productivity (Refer back to the topic ‘Commercial Off-the-shelf components’, given in Chapter 2 for more details on COTS). COTS component is a ready to use component and you can
Page 659 :
635, , The Embedded Product Development Life Cycle (EDLC), , use the same as plug-in modules in your product. For example, if the product under development requires, a 10 base T Ethernet connectivity, you can either implement the same in your product by using the TCP/, IP chip and related components or can use a readily available TCP/IP full functional plug-in module. The, second approach will save effort and time. EDLC should take all these aspects into consideration to provide, maximum productivity., , 15.4, , DIFFERENT PHASES OF EDLC, , The life cycle of a product development is commonly referred to as models., Model defines the various phases involved in the life cycle. The number, of phases involved in a model may vary according to the complexity of, the product under consideration. A typical simple product contains five, minimal phases namely: ‘Requirement Analysis’, ‘Design’, ‘Development, and Test’, ‘Deployment’ and ‘Maintenance’. The classic Embedded Product, Life Cycle Model contains the phases: ‘Need’, ‘Conceptualisation’,, ‘Analysis’, ‘Design’, ‘Development and Testing’, ‘Deployment’, ‘Support’,, ‘Upgrades’ and ‘Retirement/Disposal’ (Fig. 15.1). In a real product, development environment, the phases given in this model may vary and, can have submodels or the models contain only certain important phases of, the classic model. As mentioned earlier, the number of phases involved in, the EDLC model depends on the complexity of the product. The following, section describes each phases of the classic EDLC model in detail., , Retirement, , Need, , LO 4 Know the, different phases (Need,, Conceptualisation,, Analysis, Design,, Development, Testing,, Deployment, Support,, Upgrades and Disposal), of the product, development life cycle, and the activities, happening in each stage, of the life cycle, , Conceptualisation, , Analysis, EDLC, Upgrades, , Support, , Fig. 15.1, , Design, , Deployment, , Development and, Testing, , Classic Embedded Product Development Life Cycle Model
Page 660 :
636, , 15.4.1, , Introduc on to Embedded Systems, , Need, , Any embedded product evolves as an output of a ‘Need’. The need, may come from an individual or from the public or from a company, (Generally speaking from an end user/client). ‘Need’ should be, articulated to initiate the Product Development Life Cycle and based on, the need for the product, a ‘Statement of Need’ or ‘Concept Proposal’, is prepared. The ‘Concept Proposal’ must be reviewed by the senior, management and funding agency and should get necessary approval., Once the proposal gets approval, it goes to a product development team,, which can either be an organisation from which the need arise or a third, party product development/service company (If a product development, company approaches a client/sponsor with the idea of a product, the, business needs for the product will be prepared by the company itself)., The product development need can be visualised in any one of the, following three needs., , 15.4.1.1 New or Custom Product Development, The need for a product which does not exist in the market or a product which acts as competitor to an existing, product in the current market will lead to the development of a completely new product. The product can be, a commercial requirement or an individual requirement or a specific organisation’s requirement. Example for, an Embedded Product which acts a competitor in the current market is ‘Mobile handset’ which is going to be, developed by a new company apart from the existing manufacturers. A PDA tailored for any specific need is, an example for a custom product., , 15.4.1.2 Product Re-engineering, The embedded product market is dynamic and competitive. In order to sustain in the market, the product, developer should be aware of the general market trends, technology changes and the taste of the end user, and should constantly improve an existing product by incorporating new technologies and design changes, for performance, functionalities and aesthetics. Re-engineering a product is the process of making changes, in an existing product design and launching it as a new version. It is generally termed as product upgrade., Re-engineering an existing product comes as a result of the following needs., 1. Change in Business requirements, 2. User Interface Enhancements, 3. Technology Upgrades, , 15.4.1.3 Product Maintenance, Product maintenance ‘need’ deals with providing technical support to the end user for an existing product, in the market. The maintenance request may come as a result of product non-functioning or failure. Product, maintenance is generally classified into two categories; Corrective maintenance and Preventive maintenance., Corrective maintenance deals with making corrective actions following a failure or non-functioning. The, failure can occur due to damages or non-functioning of components/parts of the product and the corrective, maintenance replaces them to make the product functional again. Preventive maintenance is the scheduled, maintenance to avoid the failure or non-functioning of the product.
Page 661 :
637, , The Embedded Product Development Life Cycle (EDLC), , 15.4.2, , Conceptualisation, , Conceptualisation is the ‘Product Concept Development Phase’ and it begins, immediately after a Concept Proposal is formally approved. Conceptualisation phase, defines the scope of the concept, performs cost benefit analysis and feasibility study, and prepares project management and risk management plans. Conceptualisation can, be viewed as a phase shaping the “Need” of an end-user or convincing the end user,, whether it is a feasible product and how this product can be realised (Fig. 15.2)., Planning for next, phases, Resource planning, , Risk management, planning, , Planning, , Cost benefit analysis, (CBA), , Statement of, needs, , Review and approval, , Feasibility study, , Product scope, , Analysis and estimation, , Fig. 15.2, , Various activities involved in Conceptualisation Phase, , The ‘Conceptualisation’ phase involves two types of activities, namely; ‘Planning Activity’ and ‘Analysis, and Study Activity’. The Analysis and Study Activities are performed to understand the opportunity of the, product in the market (for a commercial product). The following are the important ‘Analysis and Study, activities’ performed during ‘Conceptualisation Phase’., , 15.4.2.1 Feasibility Study, Feasibility study examines the need for the product carefully and suggests one or more possible solutions, to build the need as a product along with alternatives. Feasibility study analyses the Technical (Technical, Challenges, limitations, etc.) as well as financial feasibility (Financial requirements, funding, etc.) of the, product under consideration., , 15.4.2.2 Cost Benefit Analysis (CBA), The Cost Benefit Analysis (CBA) is a means of identifying, revealing and assessing the total development, cost and the profit expected from the product. It is somewhat similar to the loss-gain analysis in business term
Page 662 :
638, , Introduc on to Embedded Systems, , except that CBA is an assumption oriented approach based on some rule of thumb or based on the analysis, of data available for similar products developed in the past. In summary, CBA estimates and totals up the, equivalent money value of the benefits and costs of the product under consideration and give an idea about, the worthwhile of the product. Some common underlying principles of Cost Benefit Analysis are illustrated, below., Common Unit of Measurement In order to make the analysis sensible and meaningful, all aspects of the, product, either plus points or minus points should be expressed in terms of a common unit. Since the ultimate, aim of a product is “Marginal Profit” and the marginal profit is expressed in terms of money in most cases,, ‘money’ is taken as the common unit of measurement. Hence all benefits and costs of the product should be, expressed in terms of money. Money in turn may be represented by a common currency. It can be Indian, Rupee (INR) or US Dollar (USD), etc., Market Choice based Benefit Measurement Ensure that the product cost is justifying the money (value for, money), the end user is spending on the product to purchase, for a commercial product., Targeted End Users For a commercial product it is very essential to understand the targeted endusers for the product and their tastes to give them the best in the industry., , 15.4.2.3 Product Scope, Product scope deals with what is in scope (what all functionalities or tasks are considered) for the product, and what is not in scope (what all functionalities or tasks are not considered) for the product. Product scope, should be documented properly for future reference., , 15.4.2.4 Planning Ac vi es, The planning activity covers various plans required for the product development, like the plan and schedule, for executing the next phases following conceptualisation, Resource Planning – How many resources should, work on the project, Risk Management Plans – The technical and other kinds of risks involved in the work, and what are the mitigation plans, etc. At the end of the conceptualisation phase, the reports on ‘Analysis and, Study Activities’ and ‘Planning Activities’ are submitted to the client/project sponsor for review and approval,, along with any one of the following recommendation., 1. The product is feasible; proceed to the next phase of the product life cycle., 2. The product is not feasible; scrap the project, The executive committee, to which the various reports are submitted, will review the same and will, communicate the review comments to the officials submitted the conceptualisation reports and will give the, green signal to proceed, if they are satisfied with the analysis and estimates., , 15.4.3, , Analysis, , Requirements Analysis Phase starts immediately after the documents, submitted during the ‘Conceptualisation’ phase is approved by the client/, sponsor of the project. Documentation related to user requirements from the, Conceptualisation phase is used as the basis for further user need analysis, and the development of detailed user requirements. Requirement analysis, is performed to develop a detailed functional model of the product under, consideration. During the Requirements Analysis Phase, the product is, defined in detail with respect to the inputs, processes, outputs, and interfaces, at a functional level. Requirement Analysis phase gives emphasis on, determining ‘what functions must be performed by the product’ rather than
Page 663 :
639, , The Embedded Product Development Life Cycle (EDLC), , how to perform those functions. The various activities performed during ‘Requirement Analysis’ phase is, illustrated in Fig. 15.3., Analyse, articulate, and document functional, and non-functional, requirements, , Define the interfaces, and prepare interface, definition document, , Document review, , Requirements, specification, document, Define test plan and, procedure, , Fig. 15.3, , Rework on, Requirements, and document, , Various activities involved in Requirements Analysis Phase, , 15.4.3.1 Analysis and Documenta on, The analysis and documentation activity consolidates the business needs of the product under development, and analyses the purpose of the product. It addresses various functional aspects (product features and, functions) and quality attributes (non-functional requirements) of the product, defines the functional and, data requirements and connects the functional requirements with the data requirements. In summary, the, analysis activities address all business functionalities of the product and develop a logical model describing, the fundamental processes and the data required to support the functionalities. The various requirements, that need to be addressed during the requirement analysis phase for a product under consideration are listed, below., 1. Functional capabilities like performance, operational characteristics (Refer to Chapter 3 for details on, operational characteristics), etc., 2. Operational and non-operational quality attributes (Refer to Chapter 3 for Quality attributes of, embedded products), 3. Product external interface requirements, 4. Data requirements, 5. User manuals, 6. Operational requirements, 7. Maintenance requirements, 8. General assumptions, , 15.4.3.2 Interface Defini on and Documenta on, The embedded product under consideration may be a standalone product or it can be a part of a large distributed, system. If it is a part of another system there should be some interface between the product and the other, parts of the distributed system. Even in the case of standalone products there will be some standard interfaces
Page 664 :
640, , Introduc on to Embedded Systems, , like serial, parallel etc as a provision to connect to some standard interfaces. The interface definition and, documentation activity should clearly analyse on the physical interface (type of interface) as well as data, exchange through these interfaces and should document it. It is essential for the proper information flow, throughout the life cycle., , 15.4.3.3 Defining Test Plan and Procedures, Identifies what kind of tests are to be performed and what all should be covered in testing the product. Define, the test procedures, test setup and test environment. Create a master test plan to cover all functional as well, as other aspects of the product and document the scope, methodology, sequence and management of all kinds, of tests. It is essential for ensuring the total quality of the product. The various types of testing performed in, a product development are listed below., 1. Unit testing—Testing each unit or module of the product independently for required functionality and, quality aspects, 2. Integration testing—Integrating each modules and testing the integrated unit for required, functionality, 3. System testing—Testing the functional aspects/product requirements of the product after integration., System testing refers to a set of different tests and a few among them are listed below., Usability testing—Tests the usability of the product, Load testing—Tests the behaviour of the product under different loading conditions., Security testing—Testing the security aspects of the product, Scalability testing—Testing the scalability aspect of the product, Sanity testing—Superficial testing performed to ensure that the product is functioning properly, Smoke testing—Non exhaustive test to ensure that the crucial requirements for the product, are functioning properly. This test is not giving importance to the finer details of different, functionalities, Performance testing—Testing the performance aspects of the product after integration, Endurance testing—Durability test of the product, 4. User acceptance testing—Testing the product to ensure it is meeting all requirements of the end, user., At the end, all requirements should be put in a template suggested by the standard (e.g. ISO-9001) Process, Model (e.g. CMM Level 5) followed for the Quality Assurance. This document is referred as ‘Requirements, Specification Document’. It is sent out for review by the client and the client, after reviewing the requirements, specification document, communicates back with the review comments. According to the review comments, more requirement analysis may have to be performed and re-work required is performed on the initial, ‘Requirement Specification Document’., , 15.4.4, , Design, , Product ‘Design phase’ deals with the entire design of the product taking, the requirements into consideration and it focuses on ‘how’ the required, functionalities can be delivered to the product. The design phase identifies, the application environment and creates an overall architecture for the, product. Product design starts with ‘Preliminary Design/High Level Design’., Preliminary design establishes the top-level architecture for the product, lists, out the various functional blocks required for the product, and defines the
Page 665 :
641, , The Embedded Product Development Life Cycle (EDLC), , inputs and outputs for each functional block. The functional block will look like a ‘black box’ at this design, point, with only inputs and outputs of the block being defined. On completion, the ‘Preliminary Design, Document (PDD) is sent for review to the end-user/client who come up with a need for the product. If, the end-user agrees on the preliminary design, the product design team can take the work to the next level, – ‘Detailed Design’. Detailed design generates a detailed architecture, identifies and lists out the various, components for each functional block, the inter connection among various functional blocks, the control, algorithm requirements, etc. The ‘Detailed Design’ also needs to be reviewed and get approved by the end, user/customer. If the end user wants modifications on the design, it can be informed to the design team, through review comments., An embedded product is a real mix of hardware, embedded firmware and enclosure. Hence both Preliminary, Design and Detailed Design should take the design of these into consideration. For traditional embedded, system design approach, the functional requirements are classified into either hardware or firmware at an, early stage of the design and the hardware team works on the design of the required hardware, whereas, the software team works on the design of the embedded firmware. Today the scenario is totally changed, and a hardware software co-design approach is used. In this approach, the functional requirements are not, broken down into hardware and software, instead they are treated as system requirements and the partitioning, of system requirements into either hardware or software is performed at a later stage of the design based, on hardware-software trade-offs for implementing the required functionalities. The hardware and software, requirements are modelled using different modelling techniques. Please refer to Chapter 7 for more details on, hardware-software co-design and program models used in hardware-software co-design. The other activities, performed during the design phase are ‘Design of Operations and maintenance manual’ and ‘Design of, Training materials’ (Fig. 15.4). The operations manual is necessary for educating the end user on ‘how to, operate the product’ and the maintenance manual is essential for providing information on how to handle the, product in situations like non-functioning, failure, etc., , Preliminary design, , Preliminary design, document, , Detailed design, , Detailed design, document, , Operations manual, design, , Maintenance, manual design, , Product training, material design, , Fig. 15.4, , Various Activities involved in Design Phase
Page 666 :
642, , Introduc on to Embedded Systems, , C, , I, , I – Inputs, O – Outputs, C – Constraints, A – Assumptions, , A, , O, , Functional block 1, (Module-1), C, , A, , Functional block 2, (Module-2), , I, , C, , I, , O, , A, , O, , Functional block n, (Module-n), , Fig. 15.5, , Preliminary Design Illustration, , C, , I, , A, , C1, , IC, , O, , C2, , M1, C, , A, , IC, , I, , C1, , IC, , I, O, C, A, C1, C2, IC, M, , –, –, –, –, –, –, –, , Inputs, Outputs, Constraints, Assumptions, Component, Inter-connection, Module, , O, , C2, , M2, , Fig. 15.6, , 15.4.5, , Detailed Design Illustration, , Development and Testing, , The ‘Development Phase’ transforms the design into a realisable product. For this, the detailed specifications generated during the design phase are translated into, hardware and firmware. During development phase, the installation and setting, up of various development tools is performed and the product hardware and, firmware is developed using different tools and associated production setup. The, development activities can be partitioned into embedded hardware development,, embedded firmware development and product enclosure development. Embedded
Page 667 :
The Embedded Product Development Life Cycle (EDLC), , 643, , hardware development refers to the development of the component placement platform – PCB using CAD, tools and its fabrication using CAM Tools. Embedded firmware development is performed using the, embedded firmware development tools. The mechanical enclosure design is performed with CAD Tools like, Solid Works, AutoCAD, etc. “Look and Feel” of a commercial product plays an important role on its market, demand. So the entire product design and development should concentrate on the product aesthetics (Size,, Weight, Appearance, etc.) and special requirements like protection shielding, etc., Component procurement also carried out during this phase. As mentioned in one of the earlier chapters,, some of the components may have “lead time – The time required for the component to deliver after placing, the purchase order for the component” and the component procurement should be planned well in advance, to avoid the possible delay in the product development. The other important activities carried out during, this phase are preparation of test case procedures, preparation of test files and development of detailed user,, deployment, operations and maintenance manual. The embedded firmware development may be divided, into various modules and the firmware (code) review for each module as well as the schematic diagram and, layout file review for hardware is carried out during the development phase and the changes required should, be incorporated in the development from time to time., The testing phase can be divided into independent testing of firmware and hardware (Unit Testing),, testing of the product after integrating the firmware and hardware (Integration Testing), testing of the whole, system on a functionality and non-functionality basis (System Testing) and testing of the product against all, acceptance criteria mentioned by the client/end user for each functionality (User Acceptance Testing). The, Unit testing deals with testing the embedded hardware and its associated modules, the different modules, of the firmware for their functionality independently. A test plan is prepared for the unit testing (Unit Test, plan) and test cases (Unit Test cases) are identified for testing the functionality of the product as per the, design. Unit test is normally performed by the hardware developer or firmware developer as part of the, development phase. Depending on the product complexity, rest of the tests can be considered as the activities, performed in the ‘Testing phase’ of the product. Once the hardware and firmware are unit tested, they are, integrated using various firmware integration techniques and the integrated product is tested against the, required functionalities. An integration test plan is prepared for this and the test cases for integration testing, (Integration test cases) is developed. The Integration testing ensures that the functionality which is tested, working properly in an independent mode remains working properly in an integrated product (Hardware +, Firmware). The integration test results are logged in and the firmware/hardware is reworked against any flaws, detected during the Integration testing. The purpose of integration testing is to detect any inconsistencies, between the firmware modules units that are integrated together or between any of the firmware modules and, the embedded hardware. Integration testing of various modules, hardware and firmware is done at the end of, development phase depending on the readiness of hardware and firmware., The system testing follows the Integration testing and it is a set of various tests for functional and nonfunctional requirements verification. System testing is a kind of black box testing, which doesn’t require any, knowledge on the inner design logic or code for the product. System testing evaluates the product’s compliance, with the requirements. User acceptance test or simply Acceptance testing is the product evaluation performed, by the customer as a condition of the product purchase. During user Acceptance testing, the product is tested, against the acceptance value set by customer/end user for each requirement (e.g. The loading time for the, application running on the PDA device is less than 1 millisecond ☺). The deliverables from the ‘Design and, Testing’ phase are firmware source code, firmware binaries, finished hardware, various test plans (Hardware, and Firmware Unit Test plans, Integration Test plan, System Test plan and Acceptance Test plan), test cases, (Hardware and Firmware Unit Test cases, Integration Test cases, System Test cases and Acceptance Test, cases) and test reports (Hardware and Firmware Unit Test Report, Integration Test Report, System Test, Report and Acceptance Test Report).
Page 668 :
644, , 15.4.6, , Introduc on to Embedded Systems, , Deployment, , Deployment is the process of launching the first fully functional model of the, product in the market (for a commercial embedded product) or handing over, the fully functional initial model to an end user/client. It is also known as First, Customer Shipping (FCS). During this phase, the product modifications as per the, various integration tests are implemented and the product is made operational in a, production environment. The ‘Deployment Phase’ is initiated after the system is, tested and accepted (User Acceptance Test) by the end user. The important tasks, performed during the Deployment Phase are listed below., , 15.4.6.1 No fica on of Product Deployment, Whenever the product is ready to launch in the market, the launching ceremony details should be communicated, to the stake holders (all those who are related to the product in a direct or indirect way) and to the public if it is, a commercial product. The notifications can be sent out through e-mail, media, etc. mentioning the following, in a few words., 1. Deployment Schedule (Date Time and Venue), 2. Brief description about the product, 3. Targeted end users, 4. Extra features supported with respect to an existing product (for upgrades of existing model and new, products having other competitive products in the market), 5. Product support information including the support person name, contact number, contact mail ID, etc., , 15.4.6.2 Execu on of Training Plan, Proper training should be given to the end user to get them acquainted with the new product. Before, launching the product, conduct proper training as per the training plan developed during the earlier phases., Proper training will help in reducing the possible damages to the product as well as the operating person,, including personal injuries and product mal-functioning due to inappropriate usage. User manual will help in, understanding the product, its usage and accessing its functionalities to certain extend., , 15.4.6.3 Product Installa on, Instal the product as per the installation document to ensure that it is fully functional. As a typical example, take the case of a newly purchased mobile handset. The user manual accompanying it will tell you clearly, how to instal the battery, how to charge the battery, how many hours the battery needs to be charged, how the, handset can be switched on/off, etc., , 15.4.6.4 Product Post-Implementa on Review, Once the product is launched in the market, conduct a post-implementation review to determine the success, of the product. The ultimate aim behind post-implementation review is to document the problems faced, during installation and the solutions adopted to overcome them which will act as a reference document for, future product development. It also helps in understanding the customer needs and the expectations of the, customer on the next version of the product., , 15.4.7, , Support, , The support phase deals with the operations and maintenance of the product in a, production environment. During this phase all aspects of operations and maintenance, of the product are covered and the product is scrutinised to ensure that it meets the, requirements put forward by the end user/client. ‘Bugs (product mal-functioning
Page 669 :
The Embedded Product Development Life Cycle (EDLC), , 645, , or unexpected behaviour or any operational error)’ in the products may be observed and reported during, the operations phase. Support should be provided to the end user/client to fix the bugs in the product. The, support phase ensures that the product meets the user needs and it continues functioning in the production, environment. The various activities involved in the ‘Support’ phase are listed below., , 15.4.7.1 Set up a Dedicated Support Wing, The availability of certain embedded products in terms of product functioning in production environment, is crucial and they may require 24x7 support in case of product failure or malfunctioning. For example, the patient monitoring system used in hospitals is a very critical product in terms of functioning and any, malfunctioning of the product requires immediate technical attention/support from the supplier. Set up a, dedicated support wing (customer care unit) and ensure high quality service is delivered to the end user., ‘After service’ plays significant role in product movement in a commercial market. If the manufacturer fails, to provide timely and quality service to the end user, it will naturally create the talk ‘the product is good but, the after service is very poor’ among the end users and people will refrain from buying such products and will, opt for competitive products which provides more or less same functionalities and high quality service. The, support wing should be set up in such a way that they are easily reachable through e-mail, phone, fax, etc., , 15.4.7.2 Iden fy Bugs and Areas of Improvement, None of the products are bug-free. Even if you take utmost care in design, development and implementation, of the product, there can be bugs in it and the bugs reveal their real identity when the conditions are favouring, them, similar to the harmless microbes living in human body getting turned into harmful microbes when the, body resistance is weak. You may miss out certain operating conditions while design or development phase, and if the product faces such an operating condition, the product behaviour may become unexpected and it, is addressed with the familiar nick name ‘Bug’ by a software/product engineer. Since the embedded product, market is highly competitive, it is very essential to stay connected with the end users and know their needs for, the survival of the product. Give the end user a chance to express their views on the product and suggestions,, if any, in terms of modifications required or feature enhancements (areas of improvement), through user, feedbacks. Conduct product specific surveys and collect as much data as possible from the end user., , 15.4.8, , Upgrades, , The upgrade phase of product development deals with the development of, upgrades (new versions) for the product which is already present in the market., Product upgrade results as an output of major bug fixes or feature enhancement, requirements from the end user. During the upgrade phase the system is subject to, design modification to fix the major bugs reported or to incorporate the new feature, addition requirements aroused during the support phase. For embedded products, the, upgrades may be for the product resident firmware or for the hardware embedding, the firmware. Some bugs may be easily fixed by modifying the firmware and it is, known as firmware up-gradation. Some feature enhancements can also be performed easily by mere firmware, modification. The product resident firmware will have a version number which starts with version say 1.0, and after each firmware modification or bug fix, the firmware version is changed accordingly (e.g. version, 1.1). Version numbering is essential for backward traceability. Releasing of upgrades is managed through, release management. (Embedded Product Engineers might have used the term “Today I have a release” at, least once in their life). Certain feature enhancements and bug fixes require hardware modification and they, are generally termed as hardware upgrades. Firmware also needs to be modified according to the hardware, enhancements. The upgraded product appears in the market with the same name as that of the initial product, with a different version number or with a different name.
Page 670 :
646, , Introduc on to Embedded Systems, , 15.4.9, , Retirement/Disposal, , We are living in a dynamic world where everything is subject to rapid changes., The technology you feel as the most advanced and best today may not be the same, tomorrow. Due to increased user needs and revolutionary technological changes,, a product cannot sustain in the market for a long time. The disposal/retirement of, a product is a gradual process. When the product manufacture realises that there, is another powerful technology or component available in the market which is, most suitable for the production of the current product, they will announce the, current product as obsolete and the newer version/upgrade of the same is going to, be released soon. The retirement/disposition phase is the final phase in a product, development life cycle where the product is declared as obsolete and discontinued from the market. There is, no meaning and monetary benefit in continuing the production of a device or equipment which is obsolete in, terms of technology and aesthetics. The disposition of a product is essential due to the following reasons., 1. Rapid technology advancement, 2. Increased user needs, Some products may get a very long ‘Life Time’ in the market, beginning from the launch phase to the, retirement phase and during this time the product will get reasonably good amount of maturity and stability, and it may be able to create sensational waves in the market (e.g. Nokia 3310 Mobile Handset; Launched in, September 2000 and discontinued in early 2005, more than 4 years of continued presence in the market with, 126 million pieces sold). Some products get only small ‘Life Time’ in the market and some of them even fails, to register their appearance in the market., By now we covered all the phases of embedded product development life cycle. We can correlate the, various phases of the product development we discussed so far to the various activities involved in our daytoday life. Whenever you are a child you definitely have the ambition to become an earning person like your, mom/dad (There may be exceptions too ☺). The need for a job arises here. To get a good job you must have, a good academic record and hence you should complete the schooling with good marks and should perform, very well in interviews. Finally you are managed to get a good job and your professional career begins here., You may get promotions to next senior level depending on your performance. At last that day comes—Your, retirement day from your professional life., , 15.5, , EDLC APPROACHES (MODELING THE EDLC), , LO 5 Identify the, different modelling, techniques for, modelling the stages, involved in the, embedded product, development life cycle, , The term ‘Modelling’ in Embedded Product Development Life Cycle refers, to the interconnection of various phases involved in the development of, an embedded product. The various approaches adopted or models used in, Modelling EDLC are described below., , 15.5.1 Linear or Waterfall Model, , Linear or waterfall approach is the one adopted in most of the olden systems, and in this approach each phase of EDLC is executed in sequence. The, linear model establishes a formal analysis and design methodology with highly structured development, phases. In linear model, the various phases of EDLC are executed in sequence and the flow is unidirectional, with output of one phase serving as the input to the next phase. In the linear model all activities involved, in each phase are well documented, giving an insight into what should be done in the next phase and how, it can be done. The feedback of each phase is available locally and only after they are executed. The linear, model implements extensive review mechanisms to ensure the process flow is going in the right direction
Page 671 :
The Embedded Product Development Life Cycle (EDLC), , 647, , and validates the effort during a phase. One significant feature of linear model is that even if you identify, bugs in the current design, the corrective actions are not implemented immediately and the development, process proceeds with the current design. The fixes for the bugs are postponed till the support phase, which, accompanies the deployment phase. The major advantage of ‘Linear Model’ is that the product development, is rich in terms of documentation, easy project management and good control over cost and schedule. The, major drawback of this approach is that it assumes all the analysis can be done and everything will be in right, place without doing any design or implementation. Also the risk analysis is performed only once throughout, the development and risks involved in any changes are not accommodated in subsequent phases, the working, product is available only at the end of the development phase and bug fixes and corrections are performed, only at the maintenance/support phase of the life cycle. ‘Linear Model’ (Fig. 15.7) is best suited for product, developments, where the requirements are well defined and within the scope, and no change requests are, expected till the completion of the life cycle., Need, , Statement of Need, System boundary definition,, CBA Report, , Conceptualisation, , Analysis, , Requirements gathering, Preliminary and, detailed design, , Design, , Hardware and firmware, development, , Development and, testing, , Product launching, , Unit/Integration/, System testing, , Deployment, , Maintenance and bug fixes, , Support, , Product upgrades, , Product disposal, , Upgrades, , Retirement, , Fig. 15.7 Linear (Waterfall) EDLC Model, , 15.5.2, , Iterative/Incremental or Fountain Model, , Iterative or fountain model follows the sequence—Do some analysis, follow some design, then some, implementation. Evaluate it and based on the shortcomings, cycle back through and conduct more analysis,, opt for new design and implementation and repeat the cycle till the requirements are met completely. The
Page 672 :
648, , Introduc on to Embedded Systems, , iterative/fountain model can be viewed as a cascaded series of linear (waterfall) models. The incremental, model is a superset of iterative model where the requirements are known at the beginning and they are divided, into different groups. The core set of functions for each group is identified in the first cycle and is built and, deployed as the first release. The second set of requirements along with the bug fixes and modification for first, release is carried out in the second cycle and the process is repeated until all functionalities are implemented, and they are meeting the requirements. It is obvious that in an iterative/incremental model (Fig. 15.8), each, development cycle act as the maintenance phase for the previous cycle (release). Another approach for the, iterative/interactive model is the ‘Overlapped’ model where development cycles overlap; meaning subsequent, iterative/incremental cycle may begin before the completion of previous cycle., Need, , Conceptualisation, Cycle -1, , Cycle-n, , Cycle -2, , Analysis, , Analysis, , Analysis, , Design, , Design, , Design, , Development and, testing, , Development and, testing, , Development and, testing, , Deployment, , Deployment, Virtual support, phase for, Cycle-1, , Deployment, , Support, , Upgrades, Retirement, , Fig. 15.8, , Iterative/Incremental/Fountain EDLC Model, , If you closely observe this model you can see that each cycle is interconnected in a similar fashion, of a fountain, where water first moves up and then comes down, again moves up and comes down. The, major advantage of iterative/fountain model is that it provides very good development cycle feedback at, each function/feature implementation and hence the data can be used as a reference for similar product, development in future. Since each cycle can act as a maintenance phase for previous cycle, changes in feature, and functionalities can be easily incorporated during the development and hence more responsive to changing, user needs. The iterative model provides a working product model with at least minimum features at the first, cycle itself. Risk is spread across each individual cycle and can be minimised easily. Project management as, well as testing is much simpler compared to the linear model. Another major advantage is that the product, development can be stopped at any stage with a bare minimum working product. Though iterative model
Page 673 :
The Embedded Product Development Life Cycle (EDLC), , 649, , is a good solution for product development, it possess lots of drawbacks like extensive review requirement, at each cycle, impact on operations due to new releases, training requirement for each new deployment at, the end of each development cycle, structured and well documented interface definition across modules to, accommodate changes. The iterative/incremental model is deployed in product developments where the risk, is very high when the development is carried out by linear model. By choosing an iterative model, the risk, is spread across multiple cycles. Since each cycle produces a working model, this model is best suited for, product developments where the continued funding for each cycle is not assured., , 15.5.3, , Prototyping/Evolutionary Model, , Prototyping/evolutionary model is similar to the iterative model and the product is developed in multiple, cycles. The only difference is that this model produces a more refined prototype of the product at the end of, each cycle instead of functionality/feature addition in each cycle as performed by the iterative model. There, won’t be any commercial deployment of the prototype of the product at each cycle’s end. The shortcomings, of the proto-model after each cycle are evaluated and it is fixed in the next cycle., , Fig. 15.9, , Proto-typing/Evolutionary EDLC Model, , After the initial requirement analysis, the design for the first prototype is made, the development process, is started. On finishing the prototype, it is sent to the customer for evaluation. The customer evaluates the, product for the set of requirements and gives his/her feedback to the developer in terms of shortcomings and, improvements needed. The developer refines the product according to the customer’s exact expectation and, repeats the proto development process. After a finite number of iterations, the final product is delivered to, the customer and launches in the market/operational environment. In this approach, the product undergoes, significant evolution as a result of periodic shuttling of product information between the customer and, developer. The prototyping model follows the approach – ‘Requirements definition, proto-type development,, proto-type evaluation and requirements refining’. Since the requirements undergo refinement after each proto, model, it is easy to incorporate new requirements and technology changes at any stage and thereby the product, development process can start with a bare minimum set of requirements. The evolutionary model relies
Page 674 :
650, , Introduc on to Embedded Systems, , heavily on user feedback after each implementation and hence finetuning of final requirements is possible., Another major advantage of proto-typing model is that the risk is spread across each proto development cycle, and it is well under control. The major drawbacks of proto-typing model are, 1. Deviations from expected cost and schedule due to requirements refinement, 2. Increased project management, 3. Minimal documentation on each prototype may create problems in backward prototype traceability, 4. Increased Configuration Management activities, Prototyping model is the most popular product development model adopted in embedded product, industry. This approach can be considered as the best approach for products, whose requirements are not fully, available and are subject to change. This model is not recommended for projects involving the upgradation, of an existing product. There can be slight variations in the base prototyping model depending on project, management., , 15.5.4, , Spiral Model, , Spiral model (Fig. 15.10) combines the elements of linear and prototyping models to give the best possible, risk minimised EDLC Model. Spiral model is developed by Barry Boehm in 1988. The product development, starts with project definition and traverse through all phases of EDLC through multiple phases. The activities, involved in the Spiral model can be associated with the four quadrants of a spiral and are listed below., 1. Determine objectives, alternatives, constraints., 2. Evaluate alternatives. Identify and resolve risks., 3. Develop and test., 4. Plan., Objective, Alternative and, Constraints, , Evaluate Alternatives and Risks, , Risk analysis, Alternative and constraints, Reqmts. plan, , Prototyping, Product design, , Development, plan, I & T plan Validation and, verfication, Planning, , Design and Verification, , Fig. 15.10, , Spiral Model, , Spiral model is best suited for the development of complex embedded products and situations where, requirements are changing from customer side. Customer evaluation of prototype at each stage allows, addition of requirements and technology changes. Risk evaluation in each stage helps in risk planning and, mitigation. The proto model developed at each stage is evaluated by the customer against various parameters
Page 675 :
The Embedded Product Development Life Cycle (EDLC), , 651, , like strength, weakness, risk, etc. and the final product is built based on the final prototype on agreement with, the client., , Summary, Embedded Product Development Life Cycle (EDLC) is an ‘Analysis-Design-Implementation’ based, standard problem solving approach for Embedded Product Development, LO1, EDLC defines the interaction and activities among various groups of a product development sector, including project management, system design and development (hardware, firmware and LO1, enclosure design and development), system testing, release management and quality assurance, Project management, productivity improvement and ensuring quality of the product are the, primary objectives of EDLC, LO2, Project Management is essential for predictability, co-ordination and risk minimisation in product, development, LO2, The Life Cycle of a product development is commonly referred as Models and a Model defines the, various phases involved in a product’s life cycle, LO2, The classic Embedded Product Life Cycle Model contains the phases: Need, Conceptualisation,, Analysis, Design, Development and Testing, Deployment, Support, Upgrades and Retirement/ LO3, Disposal, The product development need falls into three categories namely, New or custom product, development, Product Re-engineering and product maintenance, LO4, Conceptualisation phase is the phase dealing with product concept development. Conceptualisation, phase includes activities like product feasibility analysis, cost–benefit analysis, product LO4, scoping and planning for next phases, The Requirements analysis phase defines the inputs, processes, outputs, and interfaces of the product, at a functional level. Analysis and documentation, interface definition and documentation, LO4, high level test plan and procedure definition, etc. are the activities carried out during requirement, analysis phase, Product design phase deals with the implementation aspects of the required functionalities for the, product., LO4, The Preliminary design establishes the top-level architecture for the product, lists out the various, functional blocks required for the product, and defines the inputs and outputs for each LO4, functional block, Detailed Design generates a detailed architecture, identifies and lists out the various components for, each functional block, the inter-connection among various functional blocks, the control LO4, algorithm requirements, etc., The Development phase transforms the design into a realisable product. The detailed specifications, generated during the design phase are translated into hardware and firmware during the LO4, development phase, The Testing phase deals with the execution of various tests like Integration testing, System testing,, User acceptance testing, etc., LO4, The Deployment phase deals with the launching of the product. Product deployment notification,, Training plan execution, product installation, Product post-implementation review, etc. LO4, are the activities performed during Deployment phase, The Support phase deals with the operations and maintenance of the product in a production, environment, LO4
Page 676 :
652, , Introduc on to Embedded Systems, , The Upgrade phase of product development deals with the development of upgrades (new versions), for the product which is already present in the market. Product upgrade results as an, output of major bug fixes or feature enhancement requirements from the end user, LO4, Retirement/Disposal phase of a product deals with the gradual disposal of a product from the, market, LO4, Linear or Waterfall, Iterative or incremental or fountain, Prototyping or evolutionary and Spiral models, are the commonly used EDLC models in embedded product development, LO5, The Linear or Waterfall model executes all phases of the EDLC in sequence, one after another. It is, the best suited method for product development where the requirements are fixed, LO5, Iterative or Fountain model follows the sequence—Do some analysis, follow some design, then some, implementation. Evaluate it and based on the short comings, cycle back through and conduct more, analysis, opt for new design and implementation and repeat the cycle till the requirements, LO5, are met completely., Prototyping model is a variation to the Iterative model, in which a more refined prototype is produced, at the end of each iteration. It is the best suited model for developing embedded products whose, requirements are not fully available at the time of starting the project, and are subject to, LO5, change, Spiral model is the EDLC model combining linear and prototyping model to give the best possible, risk minimisation in product development, LO5, , Keywords, Embedded Product Development Life Cycle (EDLC): An ‘Analysis-Design-Implementa on’ based standard, problem solving approach for Embedded Product Development, [LO 1], Conceptualisa on: Product Life Cycle stage which deals with the concept development for a product [LO 2], Model: The various phases involved in a product development life cycle, [LO 2], Need: Demand for a custom product or re-engineering of an exis ng product or maintenance of an exis ng, product, [LO 2], Deployment Phase: Product Life Cycle stage which deals with the launching of the product, [LO 4], Design Phase: Product Life Cycle stage which deals with the implementa on aspects of the required, func onali es for the product, [LO 4], Development Phase: Product Life Cycle stage which transforms the design into a realisable product [LO 4], First Customer Shipping (FCS): The process of handing over the fully func onal ini al model of the product to, an end user/client, [LO 4], Integra on Tes ng: Tests carried out to verify the func oning of a product for the required func onali es, a er the integra on of embedded firmware and hardware, [LO 4], Requirement Analysis: Product Life Cycle stage which deals with the ac vi es for developing a detailed, func onal model of the product under considera on, [LO 4], Re rement/Disposal: Product Life Cycle stage which deals with the gradual disposal of a product from the, market, [LO 4], Support Phase: Product Life Cycle stage which deals with the opera ons and maintenance of the product in a, produc on environment, [LO 4], System Tes ng: A set of various tests for func onal and non-func onal requirements verifica on of the, product, [LO 4]
Page 677 :
The Embedded Product Development Life Cycle (EDLC), , 653, , Tes ng Phase: Phase which deals with the execu on of various tests like Integra on tes ng, System tes ng,, User acceptance tes ng. etc., [LO 4], Unit Tes ng: Tests carried out to verify the func oning of the individual modules of the firmware and hardware, , [LO 4], Upgrade Phase: Product Life Cycle stage which deals with the development of upgrades (new versions) for, the product which is already present in the market, [LO 4], User Acceptance Tes ng (UAT): Tests performed by the user (customer) against the acceptance values for, each requirement, [LO 4], Itera ve or Fountain Model: EDLC Model which follows the sequence—Do some analysis, follow some design,, then some implementa on, [LO 5], Linear or Waterfall Model: EDLC Model which executes all phases of the EDLC in sequence, one a er another, , [LO 5], Prototyping Model: EDLC Model which is the varia on of the itera ve model in which a more refined prototype, is produced at the end of each itera on, [LO 5], Spiral Model: EDLC model combining linear and prototyping model to give the best possible risk minimisa on, in product development, [LO 5], , Objec ve Ques ons, 1. Which of the following is not in the scope of EDLC, (a) Maximise Return on Investment (RoI), (b) Minimise the risks involved in the product development, (c) Advertise the product, (d) Defect prevention in Product development, 2. The term ‘model’ in EDLC represents, (a) The various phases in the life cycle of the product, (b) The various analysis of the product, (c) The various designs of the product, (d) The various architecture of the product, 3. Which of the following is(are) a driving factor(s) for ‘Product Re-engineering’?, (a) Change in business requirement, (b) User interface enhancements, (c) Technology upgrades, (d) All of these, (e) (a) and (b), (f) (a) and (c), 4. An embedded product requires interfacing with another subsystem of an enterprise for data logging and, information exchange. The interface for this is defined during?, (a) Conceptualisation phase, (b) Requirement analysis phase, (c) Design phase, (d) Development phase, (e) Deployment phase, 5. An embedded product requires a TCP/IP interface and it is decided that the TCP/IP interface can be, implemented using Commercial of the Shelf (COTS) component. The COTS module for the TCP/IP Module, is finalised and selected during?, (a) Conceptualisation phase, (b) Requirement analysis phase, (c) Design phase, (d) Development phase, (e) Deployment phase
Page 678 :
654, , Introduc on to Embedded Systems, , 6. An embedded product contains LCD interfacing and a developer is assigned to work on this module. The, developer coded the module and tested its functioning using a simulator. The test performed by the developer, falls under?, (a) Integration Testing, (b) Unit Testing, (c) System Testing, (d) Acceptance Testing, 7. For an Embedded product, the requirements are well defined and are within the scope and no change requests, are expected till the completion of the life cycle. Which is the best-suited life cycle model for developing this, product?, (a) Linear, (b) Iterative, (c) Prototyping, (d) Spiral, 8. Which of the following is(are) not a feature of prototyping model, (a) Requirements refinement, (b) Documentation intensive, (c) Intensive Project Management, (d) Controlled risk, 9. An embedded product under consideration is very complex in nature and there is a possibility for change, in requirements of the product. Also the risk associated with the development of this product is very high., Which is the best-suited life cycle method to handle this product development?, (a) Linear, (b) Iterative, (c) Prototyping, (d) Spiral, , Review Ques ons, 1. What is EDLC? Why EDLC is essential in embedded product development?, , [LO 1], , 2. What are the objectives of EDLC?, [LO 1, LO 2], 3. Explain the significance of Productivity in embedded product development. Explain the techniques for, productivity improvements., [LO 3], 4. Explain the different phases of Embedded Product Development Life Cycle (EDLC)., 5. Explain the term ‘model’ in relation to EDLC., 6. Explain the different types of Product Development needs., , [LO 4], [LO 5], [LO 4], [LO 4], , 7. Explain the Product Re-engineering need in detail., 8. Explain the various activities performed during the Conceptualisation phase of an Embedded product, development., [LO 4], 9. Explain the various activities performed during the Requirement Analysis phase of an embedded product, development., [LO 4], 10. Explain the various activities performed during the Design phase of an embedded product development., , [LO 4], 11. Explain the various activities performed during the Development phase of an embedded product development., 12. Explain the various types of tests performed in the development of an embedded product., 13. Explain the various activities performed during the Deployment phase of an embedded product., , [LO 4], [LO 4], [LO 4], [LO 4], , 14. Explain the various activities performed during the Support phase of an embedded product., 15. Explain the need for Product upgrades in the Embedded Product development. Explain the different types, of product upgrades., [LO 4], 16. Explain the various factors leading to the Retirement/Disposal of an embedded product., , [LO 4]
Page 679 :
The Embedded Product Development Life Cycle (EDLC), , 17. Explain the different Life Cycle Models adopted in embedded product development., 18. Explain the merits and drawbacks of Linear model for embedded product development., 19. Explain the similarities and differences between Iterative and Incremental life cycle model., 20. Explain the merits and drawbacks of Fountain model for embedded product development., 21. Explain the similarities and differences between Iterative and Evolutionary life cycle model., 22. Explain the merits and drawbacks of Prototyping model for embedded product development., 23. Explain the need for Spiral life cycle model in embedded product development., , 655, , [LO 5], [LO 5], [LO 5], [LO 5], [LO 5], [LO 5], [LO 5]
Page 680 :
Introduc on to Embedded Systems, , 656, , 16, , Trends in the, Embedded Industry, , EPILOGUE, The embedded industry has evolved a lot from the first mass produced embedded system,, Autone cs D-17, to the recently launched Apple iPhone 6 Plus/AppleWatch* in terms of, miniaturisa on, performance, features, development cost and me to market. Revolu ons, in processor technology is a prime driving factor in the embedded development arena. The, embedded industry has witnessed the improvements over processor design from the 8bit, processors of the 1970s to today’s system on chip and mul core processors. The embedded, opera ng system vendors, standards bodies, alliances, and open source communi es are, also playing a vital role in the growth of Embedded domain., I hope this book was able to give you the fundamentals of embedded system, the steps, involved in their design and development. I know this book itself is not complete in all, aspects. It is quite difficult to present all the aspects of embedded design in a single book with, limited page count. Moreover, the embedded industry is the one growing at a tremendous, pace and whatever we feel superior in terms of performance and features may not be the, same tomorrow. Wait for the rest of the books planned under this series to get an in-depth, knowledge on the various aspects of embedded system design, So what next? Get your hands dirty with the design and development of Embedded, Systems☺., Wishing you good luck and best wishes in your new journey…., , From the first mass produced embedded system, Autonetics D-17, to the recently launched Apple iPhone/, AppleWatch, the embedded industry has evolved a lot, in terms of miniaturisation, performance, features,, development cost and time to market. This book will not be complete without throwing some light into the, current trends and bottlenecks in the embedded development., , *Apple iPhone6 Plus/AppleWatch was the sensational gadget in the consumer market at the time of the first revision of this book (Year, 2015).
Page 681 :
Trends in the Embedded Industry, , 16.1, , 657, , PROCESSOR TRENDS IN EMBEDDED SYSTEM, , Indeed, the advances in the processor technology are the prime driving factor in the embedded development, arena. In the 1970s we started developing our embedded devices based on the 8bit microprocessors/controllers., Later we moved to the 16 and 32bit processor based designs, depending on our system requirement, as, and when they appear in the market. Even today the 8bit processors/controllers are widely used in lowend applications. The only difference between the olden days 8bit processors/controllers and today’s 8bit, processors/controllers is that today’s 8bit processors/controllers are more power and feature packed. In the, olden days we used ‘n’ number of ICs for building a device, but today, with the high degree of integration, and IP Core re-use techniques, processors/controllers are integrating multiple IC functionalities into a single, chip (System on Chip). In the olden days we required a processor/controller, Brown out circuit, Reset circuit,, Watch Dog timer ICs, and ADC/DAC ICs separately for building a simple Data Acquisition System, today, a single microcontroller with all these components integrated is available in the market and it leads to the, concept of miniaturisation and cost saving. Embedded industry has also witnessed the architectural changes, for processors. In the beginning of the processor revolution, the speed at which an 8085 microprocessor, executing a piece of code was awesome to us. Because it was beyond our imaginations. As we experienced, the performance enhancements offered by general computing processors like x86, P-I to P-IV, Celeron,, Centrino, Core 2 Duo and Core i3/i5/i7, today we are unsatisfied with the performance offered by even, the most powerful processor, because we have witnessed the rapid growth in the processor technology and, our expectations are sky high today. Reduced Instruction Set Computing (RISC) and execution pipelining, contributed a lot to the improvement on processor performance. From the procedural execution, the processor, architecture moved to the single stage instruction pipelining and today processor families like ARM are, supporting 15+ stage pipelining (The 64bit ARM Core Cortex-A72 at the time of revising this book (Year, 2015)) with instruction and data cache., The operating clock frequency was a bottleneck in processor designs. The earlier versions of processors/, controllers were designed to operate at a few MHz. Advances in the semiconductor technology has elevated, the bar on the operating frequency limitations. Nowadays processors/controllers with operating frequency in, the range of Giga hertz (GHz) are available. Indeed, increase in operating frequency increases the total power, consumption. Another trend in the embedded processor market is the ‘Device oriented’ design of processors., As mentioned earlier, in the beginning of the embedded revolution, we started building our embedded, products around the available processors/controllers. As embedded industry started gaining momentum, the, need for device specific processor design is flagged and processor manufactures started thinking in that, direction. Today, when we think about developing a product, say Set Top Box or Handheld Device, we, have a bunch of processors to select for the design. ARM offers a variety of Microcontroller/Application, Processor Profiles (Like Cortex-M and Cortex-A series) as Semiconductor Intellectual Property (SIP) core., SoC providers like Qualcomm, NVidia, etc. licenses the ARM Core and provides device/application specific, processors. The Snapdragon family of SoCs from Qualcomm is a popular All-in-one mobile processor used, in smartphone design. The following section gives an overview of the key processor architecture/trends in, embedded development., , 16.1.1, , System on Chip (SoC), , As the name indicates, a System on Chip (SoC) makes a system on a single chip. The System on Chip, technology places multiple function ‘systems’ on a single chip. As mentioned earlier, in the beginning of, the embedded revolution, we used separate ICs in an interconnected fashion for implementing a system., Innovations in the semiconductor area introduced the concept of integration of multiple function ‘systems’, on a single chip. With this it is possible to integrate almost all functional systems required to build an
Page 682 :
658, , Introduc on to Embedded Systems, , embedded product into a single chip. SoCs changed the concept of embedded processor from general purpose, design to device specific design. Nowadays SoCs are available for diverse application needs like Set Top, Boxes, Portable media players, Smartphones, etc. iMX31 SoC from freescale semiconductor is a typical, example for SoC targeted for multimedia applications. It integrates a powerful ARM 11 Core and other, system functions like USB OTG interface, Multimedia and human interface (Graphics Accelerator, MPEG 4,, Keypad Interface), Standard Interfaces (Timers, Watch Dog Timer, general purpose I/O), Image Processing, Unit (Camera Interface, Display/TV control, Image Inversion and rotation, etc.) etc. on a single silicon wafer., On a first look SoC and Application Specific Integrated Circuit (ASIC) resembles the same. But they are, not. SoCs are built by integrating the proven reusable IPs of different sub-systems, whereas ASICs are IPs, developed for a specific application. By integrating multiple functions into a single chip, SoCs greatly save, the board space in embedded hardware development and thereby leads to the concept of miniaturisation., SoCs are also cost effective., , 16.1.2, , System in Package (SiP), , System in Package or System-in-a-Package (SiP) can be considered as a functional system or sub-system, assembled into a single package. System in Package is characterised by any combination of one or more, Integrated Circuit(s) of different functionalities (Like a Processor/Controller, ASIC/ASIP, RAM and Flash, memory) which may include passive components (such as filters, crystals, capacitors, inductors, and, resistors etc.) and/or Micro Electro Mechanical Systems (like MEMS accelerometer/Gyro sensors) and other, components (such as EMI shields, connectors, antennas etc.) assembled into a single package that functions, as a system or sub-system. System in Package is the modular design approach offering unprecedented, flexibility in product development. SiP based solution is an ideal choice for embedded products including RF, and wireless communication products like handheld devices, GPS Navigation systems etc., which demand, smaller size with increased functionality. Implementing the system/sub-system level functions using SiP, based design provides higher integration in a reduced foot print (PCB/Motherboard size). The major benefits, of adopting SiP based technology are reduced-time-to-market, reduced sizing requirements and PCB routing, complexity as well as cost savings on PCB, enhanced performance through shorter interconnect paths and, local shielding. Atmel, Microsemi, CHIPSIP, Amkor Technology, Samsung etc. are the major players of SiP, technology products., The terms System on Chip (SoC) and System-in-Package (SiP) sounds similar, but they differ in many, ways. An SOC is built on a single silicon die, whereas SiP may contain more than one silicon die which are, stacked into single package. SiP helps surpass the limits of the SoC designs. SiP brings together ICs including, SoCs and discrete components using lateral or vertical stacking technologies. The decision on whether to, choose SoC or SiP in the design is dependent on various factors like performance, cost, power, Design, flexibility, IP Core availability, foot-print requirements etc., , 16.1.3, , Multicore Processors/Chiplevel Multi Processor (CMP), , One way of achieving increased performance is to increase the operating clock frequency. Indeed it will, increase the speed of execution with the cost of high power consumption. In today’s world most embedded, devices are demanding battery power source for their operation. Here we don’t have the luxury to offer high, performance with the cost of reduced battery life. Here comes the role of Multicore processors. Multicore, processors incorporate multiple processor cores on the same chip and works on the same clock frequency, supplied to the chip. Based on the number of cores, the processors are known as dual core (2 cores), tri core (3, cores), quad core (4 cores), etc. Multicore processors implement multiprocessing (Simultaneous execution., Don’t confuse it with multitasking). Each core of the CMP implements pipelining, multithreading and
Page 683 :
Trends in the Embedded Industry, , 659, , superscalar execution. Current implementations† of Intel mobile/desktop product line multicore processors, support cores up to 4, whereas ARM Cortex-A72 Processor supports up to 4 Symmetric Multi-Processor, (SMP) cores within a single processor cluster. It is amazing to note that the multicore processor OCTEON™, CN7890, developed by Cavium Inc. (http://www.cavium.com) is supporting up to 48 cnMIPS64 III cores, capable of operating at a clock frequency up to 2.5 GHz., , 16.1.4, , Reconfigurable Processors, , Reconfigurable processor is a microprocessor/controller with reconfigurable hardware features. They contain, an array of Programming Elements (PE) along with a microprocessor (Typically a RISC processor). The, PE can be either a computational engine or a memory element. The hardware feature of the reconfigurable, processor can be changed statically or dynamically. The dynamic changing of hardware configuration brings, the advantage of making the chip adaptable to the firmware running on the processor. Depending on the, situational need, the reconfigurable processor can entirely change their functionality to adapt to the new, requirements. For example, a chip can configure itself to function as the heart of a camera system or a media, player in a single device by downloading the appropriate firmware. Reconfigurable SoCs (RSoCs) implement, the IP for different subsystems through a reconfigurable matrix. This enables configurable hardware, functionality for an SoC. The SoC needs to be configured to the required hardware functionality, through, software support at the time of system initialisation (startup task). The hardware configuration can also be, changed on the fly. A typical example for this is configuring the hardware codec for the required compression, like MPEG1, MPEG 2, etc. by a media player application on a need basis. The Field Programmable System, Level Integrated Circuit (FPSLIC) from Atmel Corporation is a typical example for RSoC. It integrates an, 8bit AVR processor and a dynamically reconfigurable Field Programmable Gate Array (FPGA). The system, is reconfigured from a library of pre-compiled IP cores stored in a FLASH memory on a need basis. RSoCS, bring the concept of silicon sharing and thereby leads to less silicon usage and low power consumption., , 16.2, , EMBEDDED OS TRENDS, , The Embedded OS industry is also undergoing revolutionary changes to take advantage of the potential, offered by the trends in processor technologies. Today we have lot of options to select from a bunch of, commercial and open source embedded OSs for building embedded devices. Most of the embedded OSs, are trying to bring the virtualisation concept to the embedded device industry by adopting the microkernel, architecture in place of the monolithic architecture. In microkernel architecture, the kernel contains very, limited and essential features/services and rest of the features or services are installed as service and they, run at the user space. Another noticeable trend adopting by OS suppliers is the ‘Device oriented’ design, similar to the processor trends. In the olden days for building a device, we have to select an OS matching the, device requirements and then customise it. Today OS suppliers are providing off-the-shelf OS customised, for the device. Microsoft Embedded OS product line is a typical example of this. Microsoft has a range of, OSs targeted for a group of device families like point of sale terminal, media player, set top box, etc. The, Windows Phone OS from Microsoft is specifically designed for mobile handsets. Open source embedded, OS (Mostly centered around Embedded Linux) are gaining attention in the embedded market and the open, source community is also offering off the shelf OS customised for specific group/family of devices. The, Ubuntu for Phone which is specifically designed for Mobile Phones is a typical example for this. Since the, processor technology is shifting the paradigm of computing from single core to multicore processors, the OS, suppliers are also forced to change their strategies for supporting multicore processors. The latest version, †, , The statistics shown here is based on the data available till Oct 2015. Since processor technology is undergoing rapid changes, this data, may not be relevant in future.
Page 684 :
Introduc on to Embedded Systems, , 660, , of the VxWorks RTOS is designed to support the latest market-leading multicore processors, including,, Asymmetric Multiprocessing (AMP), Symmetric Multiprocessing (SMP), and mixed AMP and SMP mode, configurations. ARM has launched an open source OS - mbed OS designed to run on its 32-bit Cortex-M, family of processors to enable the development Internet of Things (IoT) devices. Microsoft also offers a, custom version of the Windows OS for embedded development for connected devices and IoT., , 16.3, , DEVELOPMENT LANGUAGE TRENDS—BEYOND EMBEDDED C, , When we talk about languages for embedded development, there are two aspects. One is the system side, application (embedded device platform development) and the other one is the user application development., The system side application is responsible for managing the embedded device, interacting with low level, hardware, scheduling and executing user applications, memory management, etc. whereas the user application, runs on top of the system applications and requires the intervention of system application for performing, system resource access (Like hardware access, memory access, etc.). In Embedded terminology the system, side applications are referred as ‘Embedded Firmware’ and the user applications are known as ‘Embedded, Software’. The embedded firmware always comes as embedded into the program memory of the device and, it is unalterable by the end user. Embedded software comes as either embedded with the firmware or user can, install the software applications later on the device (A typical example is Smartphone, where the OS comes, as embedded in the device and along with the OS certain application software like document viewer, mail, client, etc. also comes as embedded in the device. Users can download and install rest of the applications in, the device)., Whenever we think of development languages for embedded firmware, the first and foremost language, that comes into our mind is ‘C’. The reason being historic, the flexibility provided by ‘C’ language in, hardware access and the bunch of cross-compilers and IDEs available for different platforms. We lived in an, era where imagining a language beyond ‘C’ and Assembly (ALP) for embedded firmware was impossible., Now the scenario is totally changed. We have object-oriented languages like C++ for embedded firmware, development. Efficient cross platform development tools and compilers from providers like Microsoft®, played a significant role in this transformation. Advances in the compiler implementations and processor, support brings java as one of the emerging language for system software development. Though java lacks lot, of features essential for system software development, a move towards improving the missing factors is in, progress. Still it is in the infancy stage. We will discuss the java based development under a separate thread., When it comes to embedded software development, a bunch of languages, including ‘C’, ‘C++’, Microsoft, C#, ASP.NET, VB, Java, etc. are available. The following sections illustrate the role of Java and Microsoft, .NET framework supported languages for embedded development., , 16.3.1, , Java for Embedded Development, , Java being considered as the popular language for enterprise applications due to its platform independent, implementations, but when it comes to embedded application development (firmware and software), it is, not so popular due to its inherent shortcomings in real time system development support. In a basic java, development, the java code is compiled by a java class compiler to platform independent code called java, bytecode. The java bytecode is converted into processor specific object code by a utility called Java Virtual, Machine (JVM). JVM abstracts the processor dependency from Java applications. JVM performs the operation, of converting the bytecode into the processor specific machine code implementations. During run time, the, bytecode is interpreted by the JVM for execution. The interpretation technique makes java applications slower, than the other (cross) compiled applications. JVM can be implemented as either a piece of software code or, hardware unit. Nowadays processors are providing built-in support for Java bytecode execution. The ARM
Page 685 :
Trends in the Embedded Industry, , 661, , processor implements hardware JVM called jazelle for supporting java. Figure 16.1 given below illustrates, the implementation of Java applications in an embedded device with Operating System., Java Applications, Java Virtual Machine (JVM), Embedded OS (RTOS/GPOS), Embedded Hardware, , Fig. 16.1, , Java based embedded application development, , As mentioned earlier, JVM interprets the bytecode and thereby greatly affects the speed of execution., Another technique called Just In Time (JIT) compiler speeds up the Java program execution by caching, all the previously interpreted bytecode. This avoids the delay in interpreting a bytecode which was already, interpreted earlier., The limitations of standard Java in embedded application development are:, 1. The interpreted version of Java is quite slower and is not meeting the real-time requirement demanding, by most embedded systems (For real-time applications), 2. The garbage collector of Java is non-deterministic in execution behaviour. It is not acceptable for a, hard real-time system., 3. Processors which don’t have a built-in JVM support or an off-the-shelf software JVM, require the JVM, ported for the processor architecture., 4. The resource access (Hardware registers, memory, etc.) supported by Java is limited., 5. The runtime memory requirement for JVM and Java class libraries or JIT is a bit high and embedded, systems which are constrained on memory cannot afford this., Some techniques like Ahead-of-Time (AOT) compilers for Java is intended for converting the Java, bytecodes to target processor specific assembly code during compile time. It eliminates the need for a JVM/, JIT for executing Java code. However there should be a piece of code for implementing the garbage collection, in place of JVM/JIT. AOT compiler also brings the advantage of linking the compiled bytecode with other, modules developed in languages like C/C++ and Assembly., Java provides an interface named Java Native Interface (JNI), which can be used for invoking the functions, written in other languages like C and Assembly. The JNI feature of Java can be explored for implementing, system software like, user mode device drivers which has access to the JVM. Since JVM runs on top of, the OS, device drivers which are statically linked with the OS kernel during OS image building or drivers, which are loaded as shared object cannot be implemented using Java. In the Java based drivers, the low level, hardware access is implemented in native languages like C., The Java Community Process within the Safety Critical Java Technology expert group has come up with, a real-time version for the JVM which is capable of providing comparable execution speed with C and also, with predictable latency and reduced memory footprint., Java Platform Micro Edition (Java ME), which was known as J2ME earlier, is a customised Java version, specifically designed for ‘Embedded application software’ development for devices like mobile phones,, PDAs, Set Top Boxes, printers, etc. Java ME applications are portable across devices. Java ME provides, flexible User Interface (UI), built-in network protocols, security, etc. Java ME Embedded is a special Java, runtime targeting embedded and IOT devices which leverages the core Java ME technologies (Java ME
Page 686 :
Introduc on to Embedded Systems, , 662, , Connected Limited Device Configuration (CLDC) and Java ME Embedded Profile (MEEP)). ORACLE, provides an Embedded version of the Java Standard Edition (Java SE) with optimised memory footprint, requirements for ‘embedded application software’ development. Java SE Embedded enables development of, reliable, portable embedded applications through a rich set of features and libraries and supports multicore, processors. The Oracle Java Embedded Suite bundles Java Embedded SE, Java Database (Java DB), GlassFish, for Embedded - A subset of the GlassFish web profile and Jersey Web Services framework for RESTful web, service implementation, thereby supporting a fast paced development for connected embedded devices in, various areas including the IOT space., , 16.3.2, , .NET Compact/Micro Framework for Embedded, Development, , .NET is a framework for application development for desktop Windows Operating Systems (Mono-Cross, platform, open source .NET framework for Linux & UNIX) from Microsoft®. It is a collection of precoded libraries and it acts as the run time component for .NET supported languages (C++, C#, VB, J#, etc.)., It contains class libraries for User Interface, database connectivity, network connectivity, image editing,, cryptography etc. The runtime environment of .NET is known as Common Language Runtime (CLR). The, CLR resembles JVM in operation. It abstracts the target processor from application programmer. Like JVM,, CLR also provides memory management (garbage collection), exception handling, etc. The CLR provides, a language neutral platform for application development and execution. Applications written in .NET, supported languages are compiled to a platform neutral intermediate language called Common Intermediate, Language (CIL). For actual execution, the CIL is converted to the target processor specific machine code, by the Common Language Runtime (CLR). Figure 16.2 illustrates the concept of .NET framework based, program execution., .NET supported languages, (C++,C#, VB etc…), Compiler, Common interface language, (CIL), Common language runtime, (CLR), Target processor specific, machine code, , Fig. 16.2, , .NET based Embedded Application Development, , The .NET framework is targeted for enterprise application development for desktop systems. The .NET, framework consumes significant amount of memory. When it comes to embedded application development,, the .NET framework is not a viable choice due to its memory requirement. For embedded and small devices, running on Microsoft Embedded Operating Systems (like Windows Embedded Compact), Microsoft® is
Page 687 :
Trends in the Embedded Industry, , 663, , providing a stripped down customised version of .NET framework called .NET Compact Framework or, simply .NET CF for application development. Obviously .NET CF doesn’t support all features of the .NET, Framework. But it supports all necessary components required for application development for small devices., Users can develop applications in .NET supported language including Visual Basic and Visual C#., .NET Micro Framework (.NETMF) is an open source platform that enables developers to build embedded, products on resource constrained embedded devices (Like Microcontrollers with a few hundred kilo bytes of, RAM and storage). Developers can use Visual Studio, C# and .NET knowledge to quickly build embedded, solutions without having to worry about the intricacies of each microcontroller. A developer can purchase a, .NET Micro Framework compatible board, connect the board to their development computer running Visual, Studio and start writing applications for physical devices. No extensive knowledge of hardware design is, needed to get started writing code for physical devices. Unlike .NET CF, .NET Micro Framework doesn’t, require an OS to run. It can run directly on the supported target board. It supports common embedded, peripherals including FLASH/EEPROM memory and peripheral interfaces like GPIO, UART, USB, I2C,, SPI, etc., , 16.4, , OPEN STANDARDS, FRAMEWORKS AND ALLIANCES, , Certain areas of the embedded industry are highly ‘hot’ and competitive. It demands strategic alliances to, sustain in the market and bring innovations through combined R&D. A typical example is the handset industry., The combined R&D helps hardware manufacturers to come up with new designs and software developers, to support the new hardware. With diverse market players it is essential to have formal specifications to, ensure interoperability in operations. The Open Alliances and standards body are aimed towards defining and, formulating the standards. Time to market is a critical factor in the sensational embedded market segments., Open sources and frameworks reduce the time to market in product development. The following sections, highlight the popular strategic alliances, open source standards and frameworks in the mobile handset, industry., , 16.4.1, , Open Mobile Alliance (OMA), , The Open Mobile Alliance (OMA) is a standards body for developing open standards for mobile phone, industry. The OMA alliance was formed in 2002 by stakeholders from the world’s leading network operators,, device manufacturers, Information technology companies and content providers. The mission of OMA is ‘To, create interoperable services across countries, operators and mobile terminals by acting as the centre of the, mobile service enabler specification work’. Please visit http://www.openmobilealliance.org/ for more details, on OMA., , 16.4.2, , Open Handset Alliance (OHA), , The Open Handset Alliance (OHA) is a business alliance formed by various handset manufacturers (HTC,, Samsung, LG, Motorola etc), chip manufacturers (Intel, Nvidia, Qualcomm, etc.), platform providers (Google,, Wind River Systems, etc.) and carriers (T-Mobile, China Mobile, Sprint Nextel, etc.) for developing open, standards for mobile devices. Please visit http://www.openhandsetalliance.com/ for more details on OHA., , 16.4.3, , Android, , Android is an open source software platform and operating system for mobile devices. It was developed by, Google Corporation (www.google.com) and retained by the Open Handset Alliance (OHA). The Android, operating system is based on the Linux kernel. Google has developed a set of Java libraries and developers, can make use of these libraries for application development in java. For more details on android, please visit, the website http://www.android.com/
Page 688 :
Introduc on to Embedded Systems, , 664, , 16.4.4, , Tizen, , Tizen is an open and flexible operating system based on the Linux kernel and the GNU library implementing, the Linux API by a community of developers, under open source governance. The Tizen OS implements, multiple profiles to serve different industry segments. Tizen IVI (In Vehicle Infotainment), Tizen Mobile,, Tizen TV, and Tizen Wearable are some of the profiles offered by Tizen. As of Tizen 3.0, all profiles are, built on top of a common, shared infrastructure called Tizen Common. Tizen is a project within the Linux, Foundation and is governed by a TSG (Technical Steering Group) composed of Samsung and Intel among, others. For more details on Tizen, please visit the website https://www.tizen.org/, , 16.5, , BOTTLENECKS, , So far we discussed about the positives of the embedded technology. Now let’s have a look at the bottlenecks, faced by the embedded industry today., , 16.5.1, , Performance, Power Optimisation and Thermal Management, , Achieving the right balance between performance, power consumption and thermal management is a real, challenge in Embedded Design. Embedded products like smartphones, portable media players, etc. in the, consumer market segment are battery powered and they should be capable of providing a reasonably good, battery back-up without compromising on the performance (e.g. No noticeable lag in response to user input, like touch screen operations) and aesthetics (slim and miniature design) of the product. High performance, requirements in a low cost design without using high end multi-core processing units may require increasing, the processor speed which will directly impact on the power consumption. This can be offsetted by increasing, the battery size, which in turn may make the product bulky, compromising on the product aesthetics., Handling increased power consumption on a small PCB unit requires additional thermal management and, cooling solutions. Chip manufacturers are focusing on low power designs to address this. Another area for, improvement is enhancing the memory speeds to utilise the full potential offered by the high performance, Processors/Controllers, by reducing the latency and increasing the bandwidth., , 16.5.2, , Lack of Standards/Conformance to Standards, , Though we talk about various alliances and open standards for specific areas of embedded system, there are, no specific standards in place to ensure interoperability in all areas of embedded development. Even though,, standards are in place for certain areas of the embedded development like mobile handset market, only a, minor proportion of the players are sticking on to these standards and majority of the players are still sticking, on to their own proprietary architecture and designs. To bring innovations and cutting edge feature rich, products, it is essential to have a combined effort and standardisation. It is high time to think about strategic, alliances in all areas of embedded development., , 16.5.3, , Lack of Skilled Resources, , This is the most crucial problem faced by the embedded industry today. ‘Design of Embedded System is, an Art’ and it requires highly skilled, self motivated and talented people to meet the time criticalities of, embedded product development. Though most of our engineering graduates are highly talented, they lack, proper orientation towards the design and development of embedded systems. Lack of good books on the, embedded fundamentals is also a major reason for it. It is high time to think about teaching embedded system, as a special branch of undergraduate course in all major universities.
Page 689 :
Trends in the Embedded Industry, , 16.6, , 665, , DEVELOPMENT PLATFORM TRENDS, , The Development platform is an integrated hardware platform which incorporates a processing unit, (Mircoprocessor/Microcontroller), integrated peripherals, expansion ports for connectivity with other external, peripherals, USB/RS-232/TCP Connectivity and debug interface for interfacing with a host computer for, firmware development. The ‘Shield’ concept is a latest trend in the embedded development platform, where, there will be a base platform containing the Processor/Controller with some integrated peripherals and a, header, which is either an Arduino connector compatible or a proprietary one to match with the break-out, boards (a.k.a) shields from the development platform provider. The break-out board/shield enhances the base, platform’s capabilities and can be used for quick prototyping of products. Arduino GSM Shield, Arduino WiFi shield, etc. are examples of Arduino shields. The STM32 Nucleo ARM MCU development board from ST, Microelectronics supports Arduino shields and STs own shields through Arduino connectors and ST Morpho, headers. The following section gives an overview of the various popular Hardware Development platforms., , 16.6.1, , ARDUINO, , Arduino is a single-board microcontroller, an open-source electronics platform based on easy-to-use hardware, and software. The hardware consists of an open-source hardware board designed around an 8-bit Atmel, AVR microcontroller or a 32-bit Atmel ARM Processor (AT91SAM). You can use the open source Arduino, development environment Arduino IDE for development. You can also use Embedded OS like ArdOS, which, is specifically written for Arduino, or build your own custom OS for Arduino. For more details and latest, updates on Arduino based development visit http://www.arduino.cc/, , 16.6.2, , BeagleBone, , BeagleBone is an open hardware, community-supported single board embedded computer for ARM Cortex, Processor based development. The latest BeagleBone hardware, BeagleBone Black‡ platform is built around, the TI Sitara™ ARM® Cortex-A8 processor with onboard EMMC Flash Memory, CTI JTAG interface for, debugging support, UART, USB 2.0 client and Host Ports, Ethernet Port, HDMI video OUT and GPIO lines, for external interfacing. There are Debian Linux, Ubuntu and Android OS ports available for Beaglebone., Alternatively you can write your own custom OS, or port an OS (which you have source code available) to, Beaglebone platform. For more details and latest updates on BeagleBone, visit http://beagleboard.org/, , 16.6.3, , Sharks Cove, , Sharks Cove is a development board from www.sharkscove.org for developing device drivers and reference, hardware like tablets, on Windows and Android Operating System. The Sharks Cove board is built around, Intel® Atom™ processor and supports various interfaces like I2C, SPI, GPIO, I2S, UART, SDIO, USB and, MIPI. It gives the flexibility to integrate off the shelf modules (Like Sensor modules with I2C interface) with, the existing hardware platform and write device driver for easy integration., , 16.6.4, , MinnowBoard MAX, , MinnowBoard MAX is an open hardware embedded design platform designed with Intel Atom Processor and, supports various interfaces like I2C, SPI, GPIO, I2S, UART, SDIO, USB2.0/3.0 Host amd PCI Express. It is, a powerful platform for small scale low cost embedded system design. Microsoft is supporting Windows on, MinnowBoard Max (http://msdn.microsoft.com/library/windows/hardware/dn781278(v=vs.85).aspx). You, may use Windows or port an OS of your choice to this platform for development. For more details and latest, updates on MinnowBoard MAX, visit http://www.minnowboard.org/, ‡, , At the time of first revision of this book (Oct 2014)
Page 690 :
Introduc on to Embedded Systems, , 666, , 16.6.4, , RASPBERRY PI, , RASPBERRY PI is a single board computer design platform developed by Raspberry Pi Foundation as aid, in computer education across the globe. It was designed with Broadcom SoC based on an ARM 11 core. The, Raspberry Pi B and B+ is designed to encourage Raspberry Pi for Embedded System Design. There are Arch, Linux, Raspbian, RISCOS, Debian, FreeBSD and NetBSD OS ports available for Raspberry Pi. Alternatively, you can write your own custom OS, or port an OS (which you have source code available and can compile, for the ARM version of the platform and meets the resource requirements like RAM, ROM, etc.) For more, details and latest updates on Raspberry Pi, visit http://www.raspberrypi.org/, , 16.6.5, , Intel® Galileo Gen 2, , Intel® Galileo Gen 2 board is an open source hardware development board based on Intel® x86 architecture, and specifically designed for makers, students, educators, and hobbyists. The Intel Galileo board is based on, the Intel® Quark SoC X1000 Application Processor, a 32-bit Intel Pentium-class SoC. It is designed to work, with the Arduino line of ‘SHIELDS’ products to deliver more advanced features like GPRS/Wi-Fi wireless, networking. Galileo board is also software compatible with the Arduino Software Development Environment, (Arduino IDE). It can run either Yocto Linux or Windows OS Port or you can write your own custom OS, or, port an OS. For more details and latest updates on Intel® Galileo, visit http://www.intel.com/content/www/, us/en/embedded/products/galileo/galileo-overview.html, , 16.7, , CLOUD, INTERNET OF THINGS (IOT) AND EMBEDDED SYSTEMS – THE, NEXT BIG THING, , Cloud based data storage and analytics capabilities can be leveraged extensively to make embedded systems, work beyond their limited set of intended functionalities, although the initial concept of embedded system, was a self-contained unit designed to serve a specific functionality or a set of functionalities. Cloud is rapidly, expanding the scope of embedded computing devices. The Connected Car concept in the Automotive industry, is a typical example where cloud computing can work hand in hand with the embedded computing units in, the car (ECUs) and transmit various statistics in real-time to cloud storage which can be used for online fault, diagnostics., Internet of Things (IoT) is the big BUZZ word at the time of the first revision of this book (Year 2015)., Internet of Things (IoT) is a topology representing the interconnection of embedded computing devices (known, as IoT Devices or Things), which can be identified uniquely (Like IP Address which is unique and universal)., IoT can be visualised as an enhanced version of the traditional Machine-to-Machine Communication (M2M), systems, with advanced capabilities. Depending on the targeted IoT use-cases, IoT devices may contain, sensor systems for data collection or it could be some smart consumer appliances like a Microwave oven,, or it could be any smart device which can talk to a cloud platform over internet. The following simplified, architectural diagram gives an overview of the different elements of an IoT system., In its simplest form, the IoT End-to-End model is comprised of Things/IOT Devices which are mostly, self-contained embedded systems/smart sensor-actuator subsystems distributed across multiple locations,, a local network (Wired/Wireless), which interfaces the Things/IOT Devices with a gateway/controller to, connect to the internet and a back-end system hosting a bunch of cloud services which connects the end users, and connected devices (Things/IOT Devices). The backend system provide various services like user access, control, security and authentication, data analytics, real-time status reporting etc. as well as any other specific, services related to the IoT implementation use-case.
Page 691 :
Trends in the Embedded Industry, , Fig. 16.3, , 667, , Simplified view of an IoT E2E System, , A Thing/IOT Device in an IoT implementation can be anything ranging from a smart sensor/actuator, device to a self-contained embedded device (E.g. Smart Appliances like Microwave, Thermostats, smart, light bulbs, dimmers etc.). The local network may be built around wired interfaces/protocols like Ethernet,, Modbus, Profinet, HomePlug, HomeGrid etc. or wireless interfaces like Wi-Fi, Bluetooth, ZigBee, Z-Wave,, DASH7, ISA100 etc. or power harvesting wireless networks like enocean, ZigBee Pro Green etc. The Gateway/, Controller acts as a middle man between the local-network, facilitating the exchange of information between, the Things/IOT Devices connected to the local network using a variety of wired/wireless interface and backend systems over Internet protocol. Gateway/Controller is an optional component and the requirements for, a gateway depends on the capabilities of the Things/IOT Devices present in the IoT implementation. If the, Things/IOT Devices is capable of interfacing directly with the backend system over internet protocol, a, gateway/controller is optional. Gateways/Controllers are ideal choice where the Things/IOT Devices in the, IoT implementation don’t have the capabilities of communicating directly with the backend systems and, there are multiple types of devices/wireless technologies involved in the implementation. There may be, off-the shelf gateways which works seamlessly with devices compliant with specified wireless technology, (E.g. VeraEdge Home Controller supporting only Z-Wave IoT devices, Philips Hue Bridge which works, only with Zigbee Light link protocol supported IoT devices) or with a variety of interfaces (E.g. Samsung, SmartThings Hub which works with ZigBee, Z-Wave and Wi-Fi IoT devices). The way embedded IoT devices, communicates over internet is significantly different from the way humans interact with the internet. The, protocols used in the internet communication in IoT implementation is not as the same way as conventional, internet communication. The conventional human internet communication works on web technologies (www), and TCP/IP protocol. Implementing the internet communication using these technologies is an overkill for
Page 692 :
668, , Introduc on to Embedded Systems, , IoT. MQ Telemetry Transport (MQTT), Constrained Application Protocol (CoAP), Extensible Messaging, and Presence Protocol (XMPP) Websocket and HTTP are some of the common protocols used in IoT, internet communication implementation. MQTT is an open source protocol for resource-constrained devices, and low-bandwidth, high-latency networks. MQTT is a publish/subscribe messaging TCP transport that is, extremely lightweight and ideal for connecting small devices to constrained networks. CoAP is a lightweight protocol based on the UDP transport, designed by the IETF for use with low-power and constrained, networks., So what is the role of cloud in an IoT eco-system, where embedded devices (or Things) are connected, to the internet? Depending on the number of connected devices in an IoT implementation and interactions, between connected devices, large volumes of data will be generated, which needs to be processed, stored and, securely accessed. Cloud computing/Cloud services provide an easy way to store, share, receive and manage, information (which comes from the things or users) securely and transform this data into valuable knowledge, and actionable intelligence in IoT implementation. Microsoft Azure IoT Suite, Amazon AWS IoT, IBM, IoT Foundation etc. are examples of off-the shelf cloud platform for IoT implementation. Microsoft Azure, IoT Suite enables reliable, secure bi-directional communication between devices and back end in the cloud, and implements secure access through per-device authentication using credentials and access control. It, supports standard and custom protocols, including HTTP, Advanced Message Queuing Protocol (AMQP),, and MQTT., IoT is gaining widespread adoption in various areas including manufacturing, automotive, retail,, transportation, healthcare and consumer market. Home-Automation is a typical example for IoT use-case in, the consumer market, where one can control smart home appliances like Microwave Oven, Home Surveillance, Systems, Lighting/heating controls etc. with a single tap on an App running on Smartphones/Tablets/PCs.
Page 693 :
Overview of PIC and AVR Family of Microcontrollers and ARM Processors, , Appendix, , I, , 669, , Overview of PIC, and AVR Family of, Microcontrollers and, ARM Processors, , INTRODUCTION TO PIC® FAMILY OF MICROCONTROLLERS, PIC® is a popular 8/16/32 bit RISC microcontroller family from Microchip Technology (www.microchip., com). The 8bit PIC family comprises the products PIC10F, PIC12F, PIC16F and PIC18F. They differ in, the amount of program memory supported, performance, instruction length and pin count. Based on the, architecture, the 8bit PIC family is grouped into three namely;, , Baseline Products based on the original PIC architecture. They support 12bit instruction set with very, limited features. They are available in 6 to 40 pin packages. The 6 pin 10F series, some 12F series (8 pin, 12F629) and some 16F series (The 20-pin 16F690 and 40-pin 16F887) falls under this category., , Mid-Range This is an extension to the baseline architecture with added features like support for interrupts,, on-chip peripherals (Like A/D converter, Serial Interfaces, LCD interface, etc.), increased memory, etc. The, instruction set for this architecture is 14bit wide. They are available in 8 to 64 pin packages with operating, voltage in the range 1.8V to 5.5V. Some products of the 12F (The 8 pin 12F629) and the 16F (20-pin 16F690, and 40-pin 16F887) series comes under this category., , High Performance The PIC 18F J and K series comes under this category. The memory density for these, devices is very high (Up to 128KB program memory and 4KB data memory). They provide built-in support, for advanced peripherals and communication interfaces like USB, CAN, etc. The instruction set for this, architecture is 16bit wide. They are capable of delivering a speed of 16MIPS., As mentioned earlier we have a bunch of devices to select for our design, from the PIC 8bit family., Some of them have limited set of I/O capabilities, on-chip Peripherals, data memory (SRAM) and program, memory (FLASH) targeting low end applications. The 12F508 controller is a typical example for this. It, contains 512 × 12 bits of program memory, 25 bytes of RAM, 6 I/O lines and comes in an 8-pin package., On the other hand some of the PIC family devices are feature rich with a bunch of on-chip peripherals (Like, ADC, UART, I2C, SPI, etc.), higher data and program storage memory, targeting high end applications. The, 16F877 controller is a typical example for this. It contains 8192 × 14 bits of FLASH program memory, 368, bytes of RAM, 256 bytes of EEPROM, 33 I/O lines, On-chip peripherals like 10-bit A/D converter, 3-Timer, units, USART, Interrupt Controller, etc. It comes in a 40-pin package., Here, the 16F877 device is selected as the candidate for illustrating the generic PIC architecture. Figure, A1.1 illustrates the architectural details of PIC 16F877 device.
Page 694 :
670, , Introduc on to Embedded Systems, RA0 to RA5, , Port A, , RB0 to RB7, , RC0 to RC7, , RD0 to RD7, , RE0 to RE2, , Port B, , Port C, , Port D, , Port E, , 8 Bit Data Bus, , Timers & counters, timer 0,1, 2, , Program counter, , 8 Level stack, , FLASH, , RAM file register, , 10 Bit ADC, , EEPROM, Instruction register, , Address MUX, Indirect, address, , Direct address, , Instruction decoder, , Control signals, , Interrupt control, unit, , FSR reg, USART, , Osc-Startup timer, , Status reg, , Powerup timer, , MUX, , Power on reset, , Synchronous serial, port, , Watchdog timer, , CCP 1, 2, , Brown-out reset, MCLR, Vcc, VSS, , ALU, , In-Circuit debugger, Low-Level voltage, programming, , Parallel slave port, W Reg, , Timing generation, OSC 1, , OSC 2, , Fig. A1.1, The 16F877 PIC family devices contain three types of memory namely; FLASH memory for storing, program code, data memory for storing data and holding registers and EEPROM for holding non-volatile, data. PIC follows the Harvard architecture and thereby contains two separate buses for program memory, and data memory fetching. The data bus is 8bit wide and program memory bus is 14bit wide. The Program, Counter is 13bit wide and is capable of addressing 8K program memory locations. The On-chip FLASH, memory is partitioned into pages of size 2K bytes each. The program counter is formed by two register,, an 8bit register PCL and a 5bit register PCH. PCL is a read/writable register whereas PCH is not directly, accessible. PCH can be written indirectly through the register PCLATH. A write to the PCLATH register, copies the least significant 5 bits to PCH. The W register holds the result of an operation performed in the, ALU. The data memory contains the general purpose and special function registers and it is partitioned into, multiple banks. Each bank contains 128 bytes. The special function registers are located at the lower memory, address area of each bank. The working RAM is implemented as general purpose registers. The data memory, bank is selected by setting the memory bank selector bits RPI and RP0 in the STATUS register. The RP0,, RP1 combinations for selecting different data memory banks is given in the following table.
Page 695 :
671, , Overview of PIC and AVR Family of Microcontrollers and ARM Processors, , RP1, , RP0, , Memory Bank, , 0, , 0, , 0, , 0, , 1, , 1, , 1, , 0, , 2, , 1, , 1, , 3, , General purpose registers are the memory locations available to users for data storage. They can be, accessed directly or indirectly through the File Select Register (FSR). Special Function Registers are used, by the CPU and peripherals for configuration, status indication, data association, etc. They are located in the, lower memory area of a memory bank. The size of the SFR memory varies across device families and the, typical size for 16F877 is 96 bytes. The status of arithmetic operations and reset along with the data memory, bank selector bits RP0 and RP1 are held in the STATUS register. The bit details of the status register is, explained below., B7, , B6, , B5, , B4, , B3, , B2, , B1, , B0, , IRP, , RP1, , RP0, , TO\, , PD\, , Z, , DC, , C, , The table given below explains the meaning and use of each bit., Bit, , Name, , Explanation, , C, , Carry/Borrow Flag, , C = 1 for addition operation indicates a carry generated by the addition, operation and C = 0 for subtraction operation indicates borrow generated by, the subtraction operation executed by ALU., , DC, , Digit Carry/Borrow Flag, , C = 1 for addition operation indicates a carry generated out of the fourth bit, by the addition operation and C = 0 for subtraction operation indicates borrow generated out of the fourth bit by the subtraction operation executed by, ALU., , Z, , Zero Flag, , Z=1 when the result of an arithmetic or logic operation executed by the ALU, is zero., , PD\, , Power Down Flag, , PD\= 1 After power up or on execution of the CLRWDT instruction., PD\= 0 On executing a SLEEP instruction., , TO\, , Time out Flag, , TO\= 1 After power up or on execution of the CLRWDT or SLEEP instruction., PD\= 0 On the expiration of Watchdog Timer (WDT), , RP0, , Memory Bank select bit 0, , Memory bank selector bit, , RP1, , Memory Bank select bit 1, , IRP, , Register Bank Select, , Memory bank selector for indirect addressing, IRP = 0 : Bank 0, 1 (Indirect Address 000H to 0FFH), IRP = 1 : Bank 2, 3 (Indirect Address 100H to 1FFH), , The stack of 16F877 is an 8 level deep 13bit wide hardware stack. The stack pointer register which holds, the current address of the stack is not readable and writeable. The stack space for PIC is an independent, implementation and it is not part of either data memory or program memory. The program counter PC is, PUSHed to the stack on execution of a CALL instruction or when an Interrupt is occurred. The Program, Counter is POPed on the execution of a Return instruction (RETURN or RETLW or RETFIE). The stack
Page 696 :
672, , Introduc on to Embedded Systems, , operates as a circular queue. When all the 8 locations are PUSHed, a 9th PUSH operation stores the pushed, data at the start of the stack., The indirect addressing of data memory is accomplished by the registers INDF and File Select Register, (FSR). INDF is a virtual register. Any instructions using the INDF register internally accesses the FSR, register. In indirect addressing the memory bank is indicated by the IRP bit of the STATUS register and the, 7th bit (In 0 to 7 numbering) of FSR. The memory location within the memory bank is pointed by the bits 0, to 6 of FSR register., 16F877 contains five bi-directional ports namely; PORTA, PORTB, PORTC, PORTD and PORTE. Ports, B, C and D are 8bit wide, whereas Port A is 6bit wide and Port E is 3bit wide. Each Port associates a data, direction register called TRISx (x= A for PORTA, B for PORTB, C for PORTC, D for PORTD and E for, PORTE). It sets the Input or Output mode for the port. If the TRISx.n bit (where ‘n’ is the port pin number, 0, to 5 for Port A, 0 to 7 for Port B, C and D, and 0 to 2 for Port E) is set, the corresponding port pin configures, as Input Port. PORTx (x = A or B or C or D or E) is the data register associated with each port. Some of, the ports have alternate functions associated with them. The alternate functions are enabled by setting the, corresponding bit in the register controlling the alternate functions for a Port. It should be noted that TRISx is, the register deciding I/O direction even when the port is operating in the alternate function mode. The number, of ports available in a device is device family specific., The PIC 16F877 supports 14 interrupt sources. The interrupt control register INTCON holds the global, and individual interrupt enable bits and bits for recording the status of all interrupts. 16F877 supports only, one Interrupt vector for servicing all the interrupts. The interrupt vector is located at code memory location, 0004H. The trigger type for external interrupts can be configured as either rising edge or falling edge, in the, OPTION_REG by setting or clearing the INTEDG flag respectively. RETFIE is the instruction for returning, from an interrupt service routine., A watchdog timer is implemented to keep track of the proper execution of instructions. The watchdog, timer is implemented as a free running RC oscillator. Watchdog timer doesn’t require an external clock for its, operation. During normal operation, a watchdog timeout resets the controller, whereas if the device is in the, SLEEP mode, the watchdog timeout wakes up the CPU and put the controller in the normal operation mode., The watchdog timer can be enabled or disabled by setting or clearing the WDTE bit of the CONFIGURATION, WORD register., The 16F877 device undergoes reset if any one of the following conditions is met:, , Power on Reset (POR) The power on reset signal is generated internally when the voltage supply to the, device reaches in the range 1.2V to 1.7V when it is raised from 0V. In order to ensure a proper voltage level, and stabilised clock, for proper operation of the device, some delays are introduced upon the detection of a, POR. The Power up Timer (PWRT) is started on detecting a POR. PWRT runs for a period of 72 ms allowing, the supply voltage to stabilise. When PWRT expires, the Oscillator Start-up Timer (OST) is started when, PWRTs time delay expires. OST provides a delay of 1024 oscillator periods. This ensures that the crystal, resonator for the oscillator circuit is properly stabilised before the code execution begins., Brown-out Reset (BOR) BOR ensures that the program execution flow is not corrupted when the supply, voltage falls below the threshold value for proper operation of the device. Whenever the supply voltage falls, below this threshold, the BOR holds the device under reset till the voltage raises above the threshold value., The Brown-out Reset can be enabled by setting the bit BODEN. Brown-out reset follows the same sequence, of operation for PWRT and OST as in the case of the Power on Reset., , Watchdog Reset Watchdog reset occurs when the watchdog timer overflows (if the watchdog timer is in, the enabled state). Watchdog reset can happen either in the normal operation mode or when the controller is
Page 697 :
Overview of PIC and AVR Family of Microcontrollers and ARM Processors, , 673, , in the SLEEP mode. During normal operation, a watchdog timeout resets the controller, whereas if the device, is in the SLEEP mode, the watchdog timeout wakes up the CPU and put the controller in the normal operation, mode. The Watchdog reset in the normal operation mode follows the same sequence of operation for PWRT, and OST as in the case of the Power on Reset., , External Reset The controller can be brought into the reset state at any time during program execution, by applying a reset pulse at the RESET pin (MCLR\). Similar to watchdog timer reset, external reset can, happen either in the normal operation mode or when the controller is in the SLEEP mode. During normal, operation, the external reset assertion resets the controller, whereas if the device is in the SLEEP mode, the, external reset wakes up the CPU and put the controller in the normal operation mode. The external reset in, the normal operation mode follows the same sequence of operation for PWRT and OST as in the case of the, Power on Reset., PIC microcontrollers support power saving, by executing the SLEEP instruction. During SLEEP mode,, the watchdog timer can be kept either in the enabled or disabled. If the watchdog timer is in the enabled state,, the controller resumes its operation when the watchdog timer expires. During SLEEP mode, the I/O pins, maintain their status at the time of entering the SLEEP state. The device is wakeup from the SLEEP mode, by one of the following events., 1. An external reset signal at pin MCLR\, 2. Watchdog timer expiration, 3. Occurrence of external Interrupts, port change interrupt or peripheral interrupt, 16F877 contains three timers/counters namely Timer 0, 1 and 2. Timer 0 can act as an 8bit timer/counter, with internal or external clock. Timer 0 interrupt is generated when the timer count rolls over to 00H from, FFH. Timer 0 mode can be selected by the T0CS bit of the OPTION_REG register. In the timer mode, Timer, 0 increments on every instruction cycle (If the timer pre-scaler is not set). Timer 1 is a 16bit timer/counter, (TMR1) consisting of two 8bit registers (TMR1H and TMR1L). Timer 1 can function as either a timer or, counter. In counter mode, timer 1 counts the external pulses occurring at the corresponding I/O pin. Timer, 2 is an 8bit timer which is specially designed for generating Pulse Width Modulation (PWM) signals. Timer, 2 generates the PWM time base for Capture Compare PWM module (CCP) 1 and 2. Timer 2 associates a, prescaler and a postscaler., The Capture Compare PWM Modules (CCP) are associated with PWM signal generation and each CCP, module contains a 16bit register which acts as either 16bit capture register or 16bit compare register or 16bit, PWM master/slave duty cycle register., The Parallel Slave Port (PSP) acts as a slave port which can be directly interfaced to the 8bit data bus of, an external microprocessor/controller. Port D operates as the Parallel Slave Port. In PSP mode, the external, microprocessor can read or write the PORTD latch., The Universal Synchronous Asynchronous Receiver Transmitter (USART) acts as the serial communication, interface (SCI) for the device. It supports full duplex asynchronous serial data transfer and half duplex, synchronous serial data transfer. In synchronous half duplex communication, the USART can act as either, master or slave. The baudrate for serial data communication is configurable., Master Synchronous Serial Port (MSSP) or Synchronous Serial Port (SSP) is another serial interface, supported by the 16F877 device. MSSP can operate as either Serial Peripheral Interface (SPI) or Inter, Integrated Circuit (I2C) interface. The SPI mode requires minimum 3 wires and I2C requires minimum 2, wires for communication., The 16F877 family device contains an on-chip Analog to Digital Converter ADC for analog signal, conversion. The resolution of the ADC is 10bit. The ADC is controlled by the ADC register ADCON0 and, the register ADCCON1 configures the port pin used for supplying Analog input signal.
Page 699 :
675, , Overview of PIC and AVR Family of Microcontrollers and ARM Processors, , Number of Ports/Pins per Port varies across product line, PA0 to PA7, , PB0 to PB7, , PC0 to PC7, , PD0 to PD7, , Port A drivers, , Port B drivers, , Port C drivers, , Port D drivers, , Port A Digital Interface, , Port B Digital Interface, , Port C Digital Interface, , Port D Digital Interface, , 8 Bit Data Bus, , Program Counter, , Stack Pointer, , FLASH, , SRAM, , Instruction Register, , Timers & Counters, , Watchdog Timer, , 32, 8 bit General, purpose registers, , Oscillator, , Watchdog Timer, Oscillator, , Interrupt Control, Unit, , USART, , Instruction Decoder, , Control Signals, AVR CPU, , ALU, , SPI, , Status & Control, Register, , Programming, Logic, , MUX & ADC, EEPR OM, , Debug interface, JTAG/1-Wire, , TWI, , Fig. A1.3, The Stack pointer register is a 16bit register holding the current address of the stack. For AVR architecture,, the stack memory grows down (From a highest memory address to lower address). The stack is implemented, in the SRAM memory area and the stack pointer points to the current location of the stack in the SRAM., The reset value of stack pointer is 0000H. It should be initialised to a value higher than 0060H for proper, functioning. Whenever a data byte is ‘PUSHed’ to the stack, the stack pointer register is decremented by one., Whenever a data byte is ‘POPed’ from the stack, the stack pointer register is incremented by one. This is, contradictory with the 8051 stack operation where the stack is located at the lowest address and it grows up., The stack pointer register is implemented as a combination of two eight bit registers namely Stack Pointer
Page 700 :
676, , Introduc on to Embedded Systems, , High (SPH) and Stack Pointer Low (SPL). Both the registers are required only if the size of the SRAM, is greater than 256 bytes. For AVR processors with SRAM less than 256 bytes only the SPL register is, physically implemented see Fig. A1.3., The status register SREG holds the status of the most recently executed arithmetic instruction in the ALU., The bit details of the status register is explained below., B7, , B6, , B5, , B4, , B3, , B2, , B1, , B0, , I, , T, , H, , S, , V, , N, , Z, , C, , The table given below explains the meaning and use of each bit., Bit, , Name, , Explanation, , C, , Carry Flag, , C = 1 indicates a carry generated by the arithmetic or logic operation executed by, ALU., , Z, , Zero Flag, , Sets when the result of an arithmetic or logic operation is zero., , N, , Negative Flag, , Sets when the result of an arithmetic or logic operation is negative., , V, , Over Flow, , Two’s complement overflow flag. Sets when overflow occurs in two’s complement, operation., , S, , Sign Flag, , Exclusive OR (XOR) between Negative Flag (N) and Overflow flag (V)., , H, , Half Carry, Flag, , Sets when a carry generated out of bit 3 (bit index starts from 0) in arithmetic operation. Useful in BCD arithmetic., , T, , Bit Copy Storage, , Acts as source and destination for the Bit Copy storage instructions, Bit Load (BLD), and Bit Store (BST) respectively. BLD loads the specified bit in the register with the, value of T. BST loads T with the value of the specified bit in the specified register., , I, , Global Interrupt Enable, , Activates or de-activates the interrupts. If set to 1 all interrupts configured through, their corresponding interrupt enabler register, are serviced. If set to 0 none of the interrupts are serviced. I bit is cleared by hardware when an interrupt is occurred and it is, set automatically on executing a RETI instruction., , AVR supports a number of interrupts including AVR CPU specific and additional On-chip hardware, specific (These are implemented only if the microcontroller integrates the hardware in it. Examples are, SPI interrupt). The table given below summarises the various interrupts supported by ATmega8 and their, interrupt vectors., Interrupt, Vector No#, , Interrupt Vector, address, , Interrupt Name, , Explanation, , 1, , 0000H, , RESET, , Microcontroller Reset occurred, , 2, , 0001H, , INT0, , External Interrupt 0, , 3, , 0002H, , INT1, , External Interrupt 1, , 4, , 0003H, , TIMER2 COMP, , Timer/Counter 2 compare match, , 5, , 0004H, , TIMER2 OVF, , Timer/Counter 2 overflow flag, , 6, , 0005H, , TIMER1 CAPT, , Timer/Counter 2 capture event occurred, , 7, , 0006H, , TIMER1 COMPA, , Timer/Counter 1 compare match A, , 8, , 0007H, , TIMER1 COMPB, , Timer/Counter 1 compare match B, , 9, , 0008H, , TIMER1 OVF, , Timer/Counter 1 overflow, , 10, , 0009H, , TIMER0 OVF, , Timer/Counter 0 overflow
Page 701 :
677, , Overview of PIC and AVR Family of Microcontrollers and ARM Processors, , 11, , 000AH, , SPI, STC, , Serial Transfer Complete, , 12, , 000BH, , USART RXC, , USART Data reception complete, , 13, , 000CH, , USART UDRE, , USART Data register is empty, , 14, , 000DH, , USART TXC, , USART Data transmission complete, , 15, , 000EH, , ADC, , ADC conversion complete, , 16, , 000FH, , EE_RDY, , EEPROM Ready, , 17, , 0010H, , ANA_COMP, , Analog Comparator, , 18, , 0011H, , TWI, , Two Wire Serial Interface, , 19, , 0012H, , SPM_RDY, , Store Program memory Ready, , If the BOOTRST fuse of the AVR microcontroller is programmed, the reset vector is shifted to the, bootloader start address. The interrupt vector address can be relocated to the start of the bootloader FLASH, memory by setting the interrupt vector select (IVSEL) bit of the Interrupt Control register GICR. The reset, address and the Interrupt vector address for the various combinations of interrupt vector select (IVSEL) and, BOOTRST and the corresponding reset address and interrupt vector location are listed in the table given, below., BOOTRST, Non-programmed, , IVSEL, 0, , Reset Address, , Interrupt vector start Address, , 0000H, , 0001H, , PROGRAMMED, , 0, , Bootloader Reset Address, , 0001H, , Non-programmed, , 1, , 0000H, , Bootloader Reset Address + 0001H, , PROGRAMMED, , 1, , Bootloader Reset Address, , Bootloader Reset Address + 0001H, , The bit details of the general interrupt control register GICR is explained below., B7, , B6, , B5, , B4, , B3, , B2, , B1, , B0, , INT1, , INT0, , RSD, , RSD, , RSD, , RSD, , IVSEL, , IVCE, , As mentioned earlier, the bit IVSEL controls the relocation of Interrupt vector addresses to the bootloader, area of FLASH memory. The Interrupt Vector Change Enable enables the relocating of interrupt vectors. In, order to enable the interrupt relocation, the following sequence of operation should be performed on IVCE, & IVSEL., 1. Set IVCE, 2. Within 4 machine cycles of setting IVCE, write the desired value to IVSEL (1 for interrupt vector, relocation enabling and 0 for disabling interrupt vector relocation) along with a value of 0 for IVCE flag., Interrupts are automatically disabled during the setting up of IVCE and for 4 machine cycles following, the instruction setting up IVCE. If IVSEL is not modified within this 4 machine cycles, interrupts are, automatically re-enabled. The global interrupt enabler bit in the status register SREG remains unchanged., The reset of AVR can happen in four ways. They are:, 1. Power ON Reset: The microcontroller is reset when the supply voltage is below the Power ON Reset, threshold value, 2. External Reset: The reset pin of the microcontroller is held low for a specified period., 3. Watchdog Reset: The watchdog Timer is expired. It happens due to flaws in program execution., 4. Brown Out Reset: The supply voltage to the microcontroller falls below a specified threshold. This, is essential for preventing data corruptions and unexpected program execution., During reset, all I/O registers are set to their initial values; all ports are reset to their initial states. When the, reset sources go inactive, a delay counter is started to wait for a specified period set by the CKSEL fuses of
Page 702 :
678, , Introduc on to Embedded Systems, , the device. It ensures the proper stabilisation of the power source before the start of program execution. The, program execution starts at either the rest vector (0000H) or the Reset address of Boot FLASH depending on, the configuration of the BOOTRST fuse. The MCU Control and Status Register MCUCSR keep track of the, source of reset. The bit details of this register are shown below., B7, *, , RSD, , B6, , B5, , B4, , B3, , B2, , B1, , B0, , RSD, , RSD, , RSD, , WDRF, , BORF, , EXTRF, , PORF, , WDRF is the flag corresponding to a watchdog initiated reset and BORF flag indicates a reset triggered by, Brown Out detection (The operating voltage goes beyond a threshold). If the reset is initiated by the external, RESET line, the EXTRF flag is set. A power On reset sets the PORF flag., Watchdog timer is a mechanism to bring the controller out of a system hang-up condition. Unexpected, program flow may result in unexpected behaviour and thereby leading to an illusion of total system hang-up., This can be prevented by using a watchdog timer to monitor the time taken to execute the code segment,, which is prone to create system hang-up behaviour., The AVR watchdog timer unit contains a built in watchdog timer oscillator which runs at a separate onchip oscillator at a frequency of 1MHz. The watchdog reset interval can be adjusted by changing the prescaler values of the watchdog timer. The watchdog timeout event triggers a reset when the watchdog timer, exceeds the time period set. The Watchdog Timer Control Register (WDTCR) controls the operation of the, watchdog timer. The bit details of the watchdog timer register are given below., B7, , B6, , B5, , B4, , B3, , B2, , B1, , B0, , RSD∗, , RSD, , RSD, , WDCE, , WDE, , WDP2, , WDP1, , WDP0, , The bits, WDP0, WDP1 and WDP2 set the oscillator cycles in which the watchdog timer expires (sets, the watchdog timer pre-scaler). It varies from 16K oscillator cycles (WDP0, WDP1, WDP2 = 000) to, 2048K oscillator cycles (WDP0, WDP1, WDP2 =111). The bit WDE controls the enabling and disabling, the watchdog timer. Setting it to 1 starts the watchdog timer. The bit, Watchdog Change Enable, controls the, disabling of the Watchdog timer. In order to disable a watchdog timer this bit should be set before clearing, the watchdog enable bit WDE. Writing a 0 to the Watchdog Enable bit takes effect only when the WDCE bit, is at logic 1. Before starting the watchdog timer, it should be resetted using the instruction WDR., Apart from the general purpose registers, AVR holds various status, control and configuration registers, for configuring, controlling and providing feedback on various operations like Port setting, initialisation, read, write, watch dog timer management, interrupt management, serial data communication, etc. These registers, are known as special function registers. These registers fall under the I/O space and they are accessed by, the I/O access instructions IN and OUT. I/O Registers within the address range 0x00–0x1F are directly bit, accessible using the SBI and CBI instructions. In these registers, the value of single bits can be checked by, using the SBIS and SBIC instructions. If the I/O registers are addressed as data space using the LD and SD, instructions, add 0x20 to these addresses., The external interrupts INT0 and INT1 are configurable for either level triggering or edge triggering., This can be configured by setting or clearing the Interrupt Sense Control bits of the MCU Control Register, (MCUCR). The bit details of this register are shown below., B7, , B6, , B5, , B4, , B3, , B2, , B1, , B0, , SE, , SM2, , SM1, , SM0, , ISC11, , ISC10, , ISC01, , ISC00, , * RSD – Reserved for Future Use
Page 703 :
Overview of PIC and AVR Family of Microcontrollers and ARM Processors, , 679, , Bits ISC11, ISC10 configures the external interrupt INT1 and bits ISC01, ISC00 configures the external, interrupt INT0. The various settings for the bits ISC1 and ISC0 and the corresponding interrupt triggering, conditions are listed below., ISCx1, , ISCx0, , Interrupt Trigger, , 0, , 0, , Low level, , 0, , 1, , Any logical change on INTx generates an interrupt request (x=0 for INT0 and 1 for INT1), , 1, , 0, , Falling Edge, , 1, , 1, , Raising Edge, , The AVR mega architecture supports multiple bidirectional ports (Up to 4 Ports: Port A, Port B, Port, C and Port D) with configurable pull-up option. The ports can be configured as either input port or output, port. Each port contains a group of port pins (up to 8 pins). Port pins are internally pulled to logic ‘High’, using pull-up resistors. All I/O pins have protection diodes to both +ve supply voltage and ground. Three I/O, mapped registers are associated with each port. They are:, , Data Direc on Register (DDRx) The data direction register associated with Port x (where x can be A or, B or C or D). If the bit corresponding to a port pin is set as 1, the port pin is configured as output pin. If the, bit is set as 0, the corresponding pin of the port is configured as input pin., , Data Register (PORTx) The data register associated with Port x (where x can be A or B or C or D). It, is used for holding the data to output to the port when it is configured as an Output port. When the Port is, configured as I/p port, the Data register is used for turning ON and OFF the pull-up resistors associated with, each pin of the port., , Port Input Pin (PINx) This register holds the Pin status., Three register bits namely DDxn (bits in (DDRx Register), PORTxn and PINxn (where x = A or B or C or, D and n = 0 to 7) are associated with each port pin. The DDxn bit selects the direction of the port. A value of 1, sets the port pin as Output port and a value of 0 sets the port pin as input port. If PORTxn is set at logic 1 when, the DDxn for the corresponding port pin is configured as input pin, the Pull-up associated with the port pin, is activated. The pull up associated with the pin can be turned Off by writing a logic 0 to the corresponding, PORTxn register bit or by setting the Pin as Output pin. If port pin PORTxn is written with logic 1 when the, DDxn pin of it is configured as Output pin, the port pin is driven ‘High’. The port pin is driven ‘Low’ in the, output mode by writing a 0 to the PORTxn register bit., Apart from bi-directional I/O operation, some of the port pins support alternate functions. The alternate, functions for a port pin can be enabled by overriding the port pin I/O functionality with alternate functions., These overriding is enabled by setting the override bit corresponding to the alternate function in the, corresponding special function register holding the override bit. The override value can be mentioned in the, corresponding bit. Hence for each alternate function, two bits are required; 1 for enabling the override and, the other one for setting the override value., The mega8 AVR supports two 8bit Timers/Counters and a 16bit Timer/Counter. Timer/counter 0 can, operate in any one of the modes; Single Channel Counter, Frequency Generator, External Event Counter and, 10-bit Clock pre-scaler:, The clock to the timer unit is supplied via the internal clock or via a clock prescaler or via an external, clock source on the port pin T0. The Timer/Counter is incremented at each clock tick. The counting happens, in the upward direction and the Timer/Counter register overflows to 00H on next clock pulse when the count
Page 704 :
680, , Introduc on to Embedded Systems, , value is maximum, i.e. 0FFH. Whenever a Timer/Counter overflow occurs, it is indicated through the flag, corresponding to the timer., Each 8bit timer ‘x’ (x = 0 or 2) associates the following registers with it for operation, 1. A Timer/Counter Control Register (TCCRx) for selecting the clock source, 2. A Timer/Counter Register (TCNTx) for holding the count, 3. A Timer/Counter Interrupt mask register (TIMSK). It contains the bit TOIEx for individually, enabling or disabling the Timer/Counter x interrupt., 4. Timer/Counter Interrupt Flag Register (TIFR). It contains the bit TOVx for indicating the overflow, of Timer/Counter x. It is cleared by hardware when the interrupt vectors to its ISR., The 16bit timer (Timer/Counter 1) serves as Pulse Width Modulation (PWM) generator/Frequency, generator and external event counter., AVR has a built-in USART for full duplex synchronous or asynchronous serial data communication., It supports Serial Frames with 5, 6, 7, 8, or 9 data bits and 1 or 2 Stop Bits, with hardware based odd or, even parity generation and parity check. Port D bit 0 and bit 1 when configured in the alternate function, mode serves as the Receive Pin and Transmit Pin respectively for serial data communication. The USART, Transmitter has two flags namely; USART Data Register Empty (UDRE) and Transmit Complete (TXC), for indicating its state. The flag UDRE is set when the transmit buffer is empty. The flag TXC is set upon, transmission of data. Both of these flags can be used for generating interrupts. Similarly the USART receiver, has one flag named Receive Complete (RXC) for indicating the availability of data in the receive buffer., AVR microcontroller contains a special program called bootloader located in the FLASH memory. It, has the capability to load program into the FLASH memory area of the controller. It facilitates firmware, upgrades. The bootloader is self modifiable, and it can also erase itself from the code if it is not required, anymore. The bootloader memory size is configurable with fuses and it has two independently configurable, boot lock bits for locking the bootloader for security reasons. The bootloader program can be configured to, execute either on power on reset (If the BOOTRST fuse of the AVR microcontroller is programmed, the reset, vector is shifted to the bootloader start address) or on receiving a specific command from a host PC through, the USART or SPI interface., The AVR architecture incorporates multiple levels of power saving. The different levels correspond to, a power saving mode and the device should put in the corresponding mode to take advantage of the power, savings. The power saving mode is activated by executing the SLEEP instruction. The power saving mode, is set in the MCU Control Register (MCUCR) before executing the SLEEP instruction. The details of the, MCUCR bits associated with power saving is illustrated below., B7, , B6, , B5, , B4, , B3, , B2, , B1, , B0, , SE, , SM2, , SM1, , SM0, , ISC11, , ISC10, , ISC01, , ISC00, , The Sleep Enable (SE) bit enables the CPU to enter sleep state on executing a SLEEP instruction. Bits, SM0, SM1 and SM2 sets the power saving mode. The different power saving modes supported by AVR are, listed below., , Idle Mode This mode is set by configuring the bits SM2:SM1:SM0 as 0:0:0 with SE = 1. The clock to, CPU is frozen. CPU stops execution. Other units like SPI, USART, Analog Comparator, ADC, Two-wire, Serial Interface, Timer/Counters, Watchdog, and the interrupt system continue operational. The Idle mode, is terminated by an externally or internally triggered interrupt like external interrupts, Timer Overflow and, USART Transmit Complete interrupts and Analog Comparator interrupt, etc.
Page 705 :
Overview of PIC and AVR Family of Microcontrollers and ARM Processors, , 681, , ADC Noise Reduc on Mode This mode is set by configuring the bits SM2:SM1:SM0 as 0:0:1 with SE, = 1. The clock to I/O system, CPU is frozen. CPU stops execution. Other units like ADC, external interrupts,, two-wire Serial Interface address watch, Timer/Counter2 and the Watchdog timer (if enabled) continue, operational. This mode is terminated by an ADC Conversion Complete interrupt, or an External reset, or a, Watchdog Reset, or a Brown-out Reset, or a Two-wire Serial Interface address match interrupt, or a Timer/, Counter2 interrupt, or an SPM/EEPROM ready interrupt, or an external interrupt (INT0 or INT1), , Power Down Mode This mode is set by configuring the bits SM2:SM1:SM0 as 0:1:0 with SE = 1., The external oscillator is halted and stops all internally generated clocks. All modules using the generated, clock are frozen. External interrupts, Two-wire Serial Interface address watch, and the watchdog continue, operational. The power down mode is terminated by an External Reset, or a Watchdog Reset, or a Brown-out, Reset, or a Two-wire Serial Interface address match interrupt, or an external level interrupt., , Power Save Mode This mode is set by configuring the bits SM2:SM1:SM0 as 0:1:1 with SE = 1. This, mode is same as Power down mode except that Timer/Counter 2 continue runs in this mode if it is clocked, asynchronously. Along with the power down mode termination conditions, a Timer Overflow or an Output, Compare event from Timer/Counter2 also triggers the termination of this mode., , Standby Mode This mode is set by configuring the bits SM2:SM1:SM0 as 1:1:0 with SE = 1 and when, the external clock is used. The device wakes up from the standby mode in 6 clock cycles., The size of on-chip FLASH memory, SRAM and EEPROM varies across different members of the AVR, family. AVR 8 family supports FLASH memory up to 256KB, EEPROM from 64 bytes to 4KB and SRAM, up to 8KB. Also the presence of on-chip peripherals like ADC, Two Wire Interface (TWI), SPI, etc. varies, across the family members., AVR normally does not support the execution of program from external program memory. The code is, always executed form the internal FLASH memory., AVR provides built in On-Chip debug support in the form of either JTAG interface or DebugWIRE, (1-Wire) interface. All AVR mega family devices with 16KB or more FLASH memory supports built in, JTAG interface for On-chip debugging and In System Programming. All new AVR mega family devices with, FLASH memory less than 16KB supports the 1-Wire debug interface., Please refer to the website http://www.atmel.com/dyn/resources/prod_documents/doc0856.pdf for details, on the Instruction set for 8bit AVR., AVR® 32 is a 32bit microcontroller family from Atmel featuring Single Instruction Multiple Data (SIMD), and DSP instructions. It also supports audio and video processing features., , INTRODUCTION TO ARM® FAMILY OF PROCESSORS, Advanced RISC Machines (or ARM) is a powerful 32/64 bit RISC processor from ARM Holdings (www., arm.com). ARM holdings is a joint venture between Acorn Computers, Apple Computers (www.apple.com), and VLSI Technology (www.nxp.com) and is founded in 1990. ARM Holdings is the Intellectual Property, (IP) supplier of ARM processor core and it doesn’t manufacture ARM processor chips. ARM designs the, ARM processor core and licences its ARM IP to their networked partners. The partners can utilise the ARM, IP for building System On Chip devices. Freescale semiconductors, Texas Instruments, NXP (Philips), Semiconductors, etc. are some of the channel partners of ARM, which fabricates ARM processors. Please, visit the ARM website https://www.arm.com/community/connected-community-partner-list.php for the, complete list of ARM community partners.
Page 706 :
682, , Introduc on to Embedded Systems, , The ARM architecture has evolved a lot from its first version ARM1 to the latest ARM11 Processor core., ARM1, ARM2, ARM3, ARM 4&5, ARM6, ARM7, ARM8, StrongARM, ARM9, ARM10, ARM 11, ARM, Cortex-M, Cortex-R and Cortex-A series are the product families from ARM since its introduction to the, market. Some ARM processor extensions like Thumb, EI Segundo, Jazelle, etc. are also introduced by ARM, during its journey from ARM1 to ARM11., ARM is a RISC processor and it supports multiple levels of pipelines for instruction execution. ARM, contains thirty-seven 32bit registers. Out of the 37 registers 30 are general purpose registers and 16 general, purpose registers (Registers r0 to r15) are available in the user mode of operation. Register r15 is the program, counter (pc). Register r13 functions as the stack pointer register (sp). Register r14 is used as link register (lr), for the branch and link instructions. The Current Program Status Register (CPSR) holds execution status of, the processor, processor operation mode, interrupt enable bit status, etc. The details of the bits associated with, the CPSR register is illustrated below., B31, , B30, , B29, , B28, , B27, , N, , Z, , C, , V, , Q, , B25 to, B26, , B 24, , B8 to, B23, , J, , B7, , B6, , B5, , B0 to, B4, , I, , F, , T, , Mode, Select, , The condition code flags’ status reflects the following scenarios:, N = 1: The result of ALU operation is negative, Z = 1: The result of ALU operation is zero, C = 1: Carry generated as a result of the operation executed in ALU, V = 1: ALU operation resulted in Overflow, The J bit specifies whether the processor is in Jazelle state or not. The T bit indicates whether the ARM, is using 32bit ARM instruction or 16bit Thumb instruction. The ‘I’ and ‘F’ flags are used for disabling, Interrupts. If ‘I’ is set to 1, the Normal interrupts are disabled. Setting ‘F’ to 1 disables the Fast Interrupts., The Mode select bits, B0 to B4, select the operating mode for the processor. ARM supports the following, operating modes:, User Mode It is the main execution mode for user applications. This mode is also known as ‘Unprivileged, Mode’. It enables the protection and isolation of operating system from user applications., Fast Interrupt Processing (FIQ) Mode, raised., , The processor enters this mode when a high priority interrupt is, , Normal Interrupt Processing (IRQ) Mode The processor enters this mode when a normal priority, interrupt (Interrupts other than high priority) is raised., , Supervisor/So ware Interrupt Mode The processor enters this mode on reset and when a software, interrupt instruction is executed., , Abort Mode Enters this mode when a memory access violation occurs, Undefined Instruc on Mode Enters this mode when the processor tries to execute an undefined, instruction., , System Mode This mode is used for running operating system tasks. It uses the same register as the User, mode., All the above modes, except User mode, are privileged modes. The privileged mode uses several other, registers than the registers available in the user mode. Figure A1.4 illustrates the register organisation for the, various modes.
Page 707 :
683, , Overview of PIC and AVR Family of Microcontrollers and ARM Processors, , r0, r1, r2, r3, r4, , r0, r1, r2, r3, r4, , r12, r13 (sp), r14 (lr), r15 (pc), , r8, r9, r10, r11, r12, r13 (sp), r14 (lr), , r13 (sp), r14 (lr), , CPSR, , SPSR, , SPSR, IRQ mode, , User mode, , FIQ mode, , r13 (sp), r14 (lr), , r12, r13 (sp), r14 (lr), r15 (pc), , r13 (sp), r14 (lr), , r13 (sp), r14 (lr), , SPSR, , SPSR, , SPSR, , CPSR, , Supervisor, mode, , Undef, Mode, , Abort, mode, , System, mode, , Fig. A1.4, ARM supports multiple levels of pipelining for improving the speed of operation. The first generation, of ARM processors implemented 3-stage pipelining. This pipelining model was followed till ARM7TDMI, core. This pipeline model was based on the classical fetch-decode-execute sequence and it executed one, instruction per cycle in the absence of pipelining. The ARM9 family implements a 5-stage pipelining with, separate instruction and data cache. The continuous improvements over the pipelining model brought a new, pipeline architecture, which supports 6-stage pipelining for the ARM10 family of devices. In this model, both, the instruction and data buses are 64bit wide and it enabled the fetching of two instructions on each cycle. The, ARM11 family of devices is designed to support 8-stage pipelining. Here the shift operation is segregated to, a separate pipeline and both instruction and data cache access are distributed across 2 pipeline stages., The Instruction Set Architecture (ISA) of ARM supports three different types of Instruction sets,, namely:, , ARM Instruc on Set The original ARM instruction set. Here all instructions are 32bit wide and are word, aligned. Since all instructions are word aligned, one single fetch reads four 8bit memory locations. Hence, there is no significance for the lower 2 bits (b0 and b1 which generates 4) of the program counter. Only bits, 2 to 31 of PC are significant for ARM instructions., Thumb Instruc on Set Thumb is the 16bit subset for the 32bit ARM instructions. These instructions, can be considered as a 16bit compressed form of the original 32bit ARM instructions. These instructions, can be executed either by decompressing the instruction to the original 32bit ARM instruction or by using, a dedicated 16bit Instruction decoding unit. Here all instructions are half word aligned; meaning one single, fetch reads two 8bit memory locations. Hence there is no significance for the lower bit (b0 which generates, 2) of the program counter. Only bits 1 to 31 of PC are significant for Thumb instructions. Thumb instructions, provide higher code density than the 32bit original ARM instructions. The concept of thumb instruction was, introduced in the ARM V4 (Version 4.0) architecture., , Jazelle Instruc on Set Jazelle is the hardware implementation of the Java Virtual Machine (JVM) for, executing java byte codes. The 140 Java instructions are implemented directly in the Jazelle hardware unit,, rest 94 Java instructions are implemented by emulating them with multiple ARM instructions. All instructions, related to the Jazelle are 8bit wide. Here the processor reads 4 instructions at a time by a word access., All ARM instructions are conditional, meaning all instructions associate a conditional code with them., The condition code specifies the condition to be checked (Flags to be tested) for executing the instruction. A
Page 708 :
684, , Introduc on to Embedded Systems, , typical instruction looks like Opcode <condition code> Operands, e.g. ADDAL r0,r1,r2 always adds r1 and, r2 and stores the result in register r0, whereas the instruction ADDEQ r0,r1,r2 adds r1 and r2 only if the zero, flag (Z) is set. The table given below gives a snapshot of the different condition codes supported by ARM., Condition Code, , Description, , Flag to Test, , EQ, , Check the equality, , Z == 1, , NE, , Check the Non-equality, , Z == 0, , CS/HS, , Unsigned higher or same, , C == 1, , CC/LO, , Unsigned Lower, , C == 0, , MI, , Negative, , N == 1, , PL, , Positive or Zero, , N == 0, , VS, , Overflow, , V == 1, , VC, , No Overflow, , V == 0, , HI, , Unsigned Higher, , C == 1 && Z == 0, , LS, , Unsigned Lower or same, , C == 0 && Z == 1, , GE, , Greater than or equal, , N == V, , LT, , Less than, , N != V, , GT, , Greater than, , Z == 0 & N == V, , LE, , Less than or equal, , Z == 1 & N != V, , AL, , Execute Always, , None, , Use the condition code AL for executing the instruction regardless of any conditions. The ARM instruction, set can be broadly classified into:, , Data Processing Instruc ons The data processing instructions include the arithmetical and logical, operation instructions, comparison and data movement instructions. The following table summarises the data, processing operations supported by ARM., Operation Category, , Instructions, , Arithmetic, , ADD, ADC, SUB, SBC, RSB, RSC, , Logical, , AND, ORR, EOR, BIC, , Comparisons, , CMP, CMN,TST, TEQ, , Data Movement, , MOV, MVN, , These instructions work only on registers. Not on memory., Single Register and Multiple Register Data transfer Instructions, The instructions related to register data transfer come under this category. These instructions involve, either a single register data transfer or multiple register data transfer, , Program Control (Branching) Instruc ons Diverts the program flow. It can be either a conditional, execution or unconditional branching. BX, B, BL, etc. are examples for branching instructions.
Page 709 :
685, , Overview of PIC and AVR Family of Microcontrollers and ARM Processors, , Mul plica on Instruc ons Multiply (MUL), Multiply Accumulate (MLA), Multiply Long (MLL) and, Multiply Long Accumulate (MLAL) instructions are the multiply instructions supported by ARM Instruction, set., Barrel Shi Opera ons ARM ISA doesn’t implement shift instructions by default. However shift, operations are implemented as part of other instructions, with the help of a barrel shifter. Bit shifting operations, like Logical Left Shift (LSL), Arithmetic Right Shift (ASR), Logical Right Shift (LSR), Rotate Right (ROR),, and Rotate Right Extended (RRE) are examples for this., Branching Instruc ons For changing the program execution flow. It can be either conditional branching, or unconditional branching., , Co-Processor Specific Instruc ons ARM does not execute certain instructions and lets a co-processor to, execute these instructions. CDP, LDC, STC, MRC, MCR, etc. are examples for this., Under ARM architecture, Interrupts, Reset, memory access error, etc. are considered as exceptions and, ARM has a well defined exception mechanism to handle them. The different exceptions defined by ARM are, listed below., Exception, , Description, , Reset, , Start the processor from a well defined state., , Data Abort, , Occurs when a load store instruction violates the memory access restrictions. It is asserted by the Memory Management Unit (MMU)., , Fast Interrupt, , This exception is raised when a high priority interrupt is asserted., , Normal Interrupt, , This exception is raised when any interrupt other than the high priority, interrupt is asserted., , Pre-fetch Abort, , Occurs when an instruction fetch violates the memory access permissions., It is asserted by the Memory Management Unit (MMU)., , Software Interrupt, , It is raised by a special instruction to request operating system service. It, is used by operating system to implement a set of privileged operations, which applications running in user mode can request., , Undefined Instruction Execution, , Asserted on the decoding of an instruction which is not supported by the, ARM architecture., , Priority, High, , Low, , For all exceptions except the ‘Reset’, the various operations performed are listed below., 1. Copy the contents of the CPSR register to the SPSR register of the new mode., 2. Set the following states in the CPSR register, (a) Change the state to ARM, (b) Change the mode to exception mode, e.g. FIQ mode for Fast Interrupts., (c) Disable interrupts if needed, 3. Save the address of the instruction following the instruction generated the exception to the register, ‘r14’ LR (register) of the mode corresponding to the exception., 4. Set Program counter with the vector address corresponding to the exception., Figure A1.5 given below explains the vector address for all exceptions.
Page 710 :
686, , Introduc on to Embedded Systems, , FIQ, IRQ, Reserved, Data Abort, Pre-fetch Abort, Software interrupt, Undefined instruction, Reset, Vector Table, , 0x1C, 0x18, 0x14, 0x10, 0x0C, 0x08, 0x04, 0x00, Address, , Fig. A1.5, Upon the execution completion of the exception code, the following actions are performed., 1. Restore CPSR register from the SPSR register of the current mode, 2. Restore Program counter from register ‘r14’, (LR) of the current mode., The processor bus architecture followed by ARM is known as Advanced Microcontroller Bus Architecture, (AMBA). The AMBA architecture standardises the on-chip connection of different IP cores and enables IP, reusability. The AMBA specifications define three different buses for on-chip device communication. They, are:, , Advanced High Performance Bus (AHB) AHB acts as the backbone for connecting high-performance,, high clock frequency system modules like memory controllers, DMA bus master, etc., , Advanced System Bus (ASB) ASB is used for connecting high performance system modules. ASB is an, alternative system bus for AHB, for system modules which don’t require performance up to the mark offered, by AHB., , Advanced Peripheral Bus (APB) APB is a simple, low performance, low power bus used for connecting, low speed peripherals., ARM supplies the high performance processor core and the specification for the different buses for, connecting with the ARM core. The ARM partners can build System on Chip (SoC) devices by integrating, various peripherals to the ARM core using the AMBA specified bus. A typical SoC architecture using the, ARM core and AMBA bus standard is given in Fig. A1.6., ARM based microcontroller SoC, , BUS interface, External memory, interface, , On-Chip, RAM, , UART, Bus bridge, , ARM core, , AHB or ASB, , APB, , Interrupt, controller, , DMA, bus master, , Fig. A1.6, , Timer, , Keyboard, interface
Page 711 :
Overview of PIC and AVR Family of Microcontrollers and ARM Processors, , 687, , The ARM architecture has evolved over the period of time incorporating architectural features to address, the growing demand for new functionality, high performance, integrated security features, and the needs, of new and emerging markets. The ARMv8 architecture implements 3 different types of profiles namely, ARMv8-A, ARMv8-R and ARMv8-M. the ARMv8-A stands for the Application profile targeting high, performance markets such as mobile and enterprise, the ARMv8-R stands for the Real-time profile targeting, real-time time critical embedded system implementation in various domains like automotive and industrial, control. The ARMv8-M architecture stands for Microcontroller profile targeting low cost embedded design, and Internet of Things (IoT) implementations. The Application Profile Architecture supports 32 bit and 64bit, modes of operations, virtual memory system and support for running feature rich Operating systems. The, Real-time profile architecture supports 32bit mode of operation with protected memory system (optional, support for virtual memory) and is highly optimised for real-time performance. The Microcontroller profile, architecture supports 32bit mode of operation with protected memory system and is highly optimised for, microcontroller applications with various integrated peripherals, low cost and low power designs. The latest, ARM Cortex family of chips represents the ARM processors/controllers from various ARM profiles. The, Cortex-M series represents the Microcontroller profiles which may fall into ARMv6 – M Architecture (E.g., Cortex M0/M+), ARMv7 – M Architecture (E.g. Cortex M3) etc. Cortex-R series represents the Real-time, profiles which falls into ARMv7 – R Architecture (E.g. Cortex R4/R5/R7), whereas the Cortex-A series, represents the Application profile which may fall into ARMv7 – A Architecture (E.g. Cortex A5/A7 etc.),, ARMv8 – A Architecture (E.g. Cortex A53/A57/A72) etc.
Page 712 :
Introduc on to Embedded Systems, , 688, , Appendix, , II, , Design Case Studies, , 1. DIGITAL CLOCK, Design and Implement a Digital Clock as per the requirements given below., 1. Use a 16 character 2-line display for displaying the current Time. Display the time in DAY HH:MM:SS, format on the first line. Display the message ‘Have A Nice Day!’ on the second line. DAY represents, the day of the Week (SUN, MON, TUE, WED, THU, FRI and SAT). HH represents the hour in 2 digit, format. Depending on the format settings it may vary from 00 to 12 (12 Hour Format) or from 00 to 23, (24 Hour format). MM represents the minute in 2 digit format. It varies from 00 to 59. SS represents the, seconds in 2 digit format. It varies from 00 to 59. The alignment of display character should be centre, justified (Meaning if the characters to display are 12, pack it with 2 blank space each at right and left, and then display)., 2. Interface a Hitachi HD44780 compatible LCD with 8051 microcontroller as per the following interface, details, Data Bus: Port P2, Register Select Control line (RS): Port Pin P1.4, Read/Write Control Signal (RW): Port Pin P1.5, LCD Enable (E): P1.6, 3. The Backlight of the LCD should be always ON, 4. Use AT89C51/52 or AT89S8252 microcontroller. Use a crystal Oscillator with frequency 12.00 MHz., This will provide accurate timing of 1 microsecond/machine cycle., 5. A 2 × 2 matrix key board (4 keys) is interfaced to Port P1 of the microcontroller. The key details, are MENU key connected to Row 0, and Column 0 of the matrix; ESC key connected to Row 0,, and Column 1 of the matrix; UP key connected to Row 1, and Column 0 of the matrix; DOWN key, connected to Row 1, and Column 1 of the matrix. The Rows 0, 1 and columns 0, 1 of matrix keyboard, are interfaced to Port pins P1.0, P1.1, P1.2 and P1.3 respectively., 6. The hour (HH) and minutes (MM) should be adjustable through a Menu Screen. The Menu screen is, invoked by pressing the MENU key of the matrix key., 7. The selection of an item in the menu is achieved by pressing the MENU key (Performs the Enter Key, function). Exit from the menu is achieved through pressing the ESC key. Pressing the ESC key takes, the user to the previous menu., 8. The menu contains 4 submenu items, namely ‘Adjust Hour’, ‘Adjust Minute’, ‘Adjust Day’ and ‘Adjust, Format’. The ‘Adjust Hour’ adjusts the hour, ‘Adjust Minute’ adjusts the minute, ‘Adjust Day’ adjusts, the day of the week (SUN to SAT) and ‘Adjust Format’ adjusts the hour display format (12 hour/24
Page 713 :
Design Case Studies, , 689, , hour format). ‘Adjust Hour’ is the default submenu item and on invoking the menu this prompt is, displayed on the screen. The user can select other menus by pressing the UP or DOWN key. Once, the submenu is selected, the User can enter that submenu by pressing the MENU key. The Submenu, lists the current Hour or the Current Minute or the Current Day or the Current Format according to the, submenu selected. User can adjust the values for each by pressing the UP or DOWN key. Once a value, is selected, it can be applied by pressing the MENU key. Pressing the MENU key applies the new value, and takes the user to the previous menu. Pressing ESC from any point takes the user to the previous, menu. The menu arrangement is illustrated in A2.1., Main Menu, , Submenu 1, , Submenu 2, Select AM/PM, , Adjust Hour, , Adjust Hour, (0 to 12 or 23, depending on, format settings), , Adjust Minute, , Adjust Minute, (00 to 59), , Adjust Day, , Adjust Day, [SUN], :, [SAT], , Adjust Format, , Adjust Format, [12 Hour], [24 Hour], , [AM], [PM], , 15 VCC, 16 GND, , 13 D6, 14 D7, , 11 D4, 12 D5, , 6 EN, 7 D0, 8 D1, 9 D2, 10 D3, , 3 VLcd, 4 RS, 5 RW\, , 1 GND, 2 Vcc, , Fig. A2.1 Menu implementation for Digital Clock, Solution:, The HD44780 standard for LCD defines a unique set of control signals, data bus and command set for Alpha, numeric Liquid Crystal Display (LCD) units. This makes the interfacing and controlling of Alpha numeric, LCD unit built using the Display Controller Hitachi, 44780, independent of the LCD manufacturer. As, 2 LINE 16 CHARACTER ALPHA NUMERIC LCD, per the HD44780 standard, the LCD contains 3, controlling signal and a 4 bit/8bit data bus. The 4, bit/8 bit mode of operation is configurable. The, Display modules come in different varieties like, single line 8 character, single line 16 character,, 2 line 8 character, 2 line 16 character, etc. The, Pin details for an HD44780 compatible, 2 line, 16-character LCD module (ODM16112) from, ORIOLE Electronics (www.orioleindia.com) is, Fig. A2.2 HD44780 Compatible 2 Line 16 Character LCD, given in Fig. A2.2.
Page 714 :
Introduc on to Embedded Systems, , 690, , The LCD module contains interface pins for power supply, backlight control, LCD control and data lines., They are explained below., , Power Supply and Backlight Control Interface, The Power supply and Backlight control interface for the LCD module is tabulated below., Pin No#, , Pin Name*, , 1, , GND, , Description, Power Supply Ground Pin for LCD module, Power Supply + ve for LCD module, , 2, , Vcc, , 3, , VLcd, , The Power supply for Liquid crystal units. Usually it is connected through a variable resistor and it should be adjusted for adjusting the brightness of display characters on the LCD, , 15∗, , VCC, , Backlight +ve supply. Power supply for backlight LED, , ∗, , GND, , Backlight –ve supply. Power supply for backlight LED, , 16, , Control and Data Interface, The LCD unit can accept either 4bit data or 8bit data. The data bit width can be set programmatically. There, are three control signals associated with controlling the data/control command exchange with LCD. The, control and data bus signal details are tabulated below., Pin No#, , Pin Name, , Description, , 7, , D0, , Data line 0, , 8, , D1, , Data line 1, , 9, , D2, , Data line 2, , 10, , D3, , Data line 3, , 11, , D4, , Data line 4, , 12, , D5, , Data line 5, , 13, , D6, , Data line 6, , 14, , D7, , Data line 7, , 4, , RS, , RS = 0 Selects Command Register, RS = 1 Selects Data Register, , 5, , RW, , RW = 0 Enables Data/Command Write, RW = 1 Enables Data/Command Register Read, , 6, , EN, , Enable Signal. Signal for latching the data present on the data bus to the LCD, unit. This signal is active falling edge triggered (1 to 0 transition is required for, asserting this signal), , Data Interface, , Control Interface, , The HD44780 display controller contains an Instruction register and a data register for holding the, commands and the data respectively to the controller. The commands and data to the controller is sent through, the same data bus interface. The RS control signal interface is asserted accordingly and the RW signal is, asserted low to inform the controller that the incoming data is command data or display data. For reading, * It may vary depending on the LCD module manufacturer.
Page 715 :
Design Case Studies, , 691, , from the controller, the RW signal is asserted high and the RS signal is asserted low or high according to the, requirement (RS = 0 for reading the command register. RS = 1 for reading from the data register)., The command register holds the different commands sent by the host controller (8051) CPU to control the, various options of the LCD. We will discuss the various control commands at a later section. For displaying, a character on the LCD, the ASCII value of the character (For example 30H for displaying 0) is written to the, data port of LCD. The LCD module contains two types of memory; namely; Display Data RAM (DDR) and, Character Generator RAM. Display Data RAM is the memory which holds the ASCII value of the characters, written to the LCD. The display data RAM size for the ODM16112 module is 80 characters. Each Crystal, cell in the LCD module is mapped to the DDRAM location. The first 40 DDRAM address locations (00H to, 27H) are mapped for the crystal cells corresponding to the first line. The next 40 DDRAM memory locations, are mapped to the crystal cells for the second line and the address range for these DDRAM is from 40H to, 67H., The Character Generator RAM (CGRAM) is used for generating and storing user generated character, patterns. Readers are requested to go through the LCD module manual for generating and storing user, generated character pattern., The various parameters for configuring and controlling the LCD is sent as commands to the Instruction, register of the LCD. These parameters include, the interface length setting (4 or 8 bit interface), Display Data, Address Selection, LCD cursor movement, Clear the LCD, display character scrolling, etc. For more details, on the supported command set for the LCD module, refer to the LCD manual. The common commands, supported for executing the commands for an HD44780 standard LCD module is listed below., D7, , D6, , D5, , D4, , D3, , D2, , D1, , D0, , 0, , 0, , 1, , DL, , N, , F, , X, , X, , Function Set, DL = 1 8Bit Interface; 0 = 4bit, N = 0 :1- Line Display; 0 = 2Line, F = 1: 5*10 Dots; = 0 : 5*7 Dots, , 0, , 0, , 0, , 0, , 0, , 0, , 0, , 1, , Clear Display, , ∗, , Command Description, , 0, , 0, , 0, , 0, , 0, , 0, , 1, , X, , 0, , 0, , 0, , 0, , 1, , D, , C, , B, , Display ON/OFF and Cursor ON/OFF/Blink, D = 1 Display ON; 0 – OFF, C = 1 Cursor ON; 0 – OFF, B =1 Cursor Blink; 0 – Non blink, , 0, , 0, , 0, , 0, , 0, , 1, , ID, , S, , Entry Mode Set, ID = 1 Increment Cursor after writing a character, S = 1 Shift Display on writing a character; 0 No shift, , 1, , A6, , A5, , A4, , A3, , A2, , A1, , A0, , DDRAM Address select, A0 to A6 Address bits, , BF, , X, , X, , X, , X, , X, , X, , X, , Check Busy Flag. BF represents the busy flag bit read from, LCD, , Move Cursor to Home Position, , For all the commands listed above, except the Busy flag check, the RS signal is 0 (RS = 0 Command, Register Selection) and RW signal is 0 (RW = 0 Write to LCD)., For the Busy Flag check instruction, the RS signal is 0 and RW signal is 1 (Read Operation). The busy, flag gives an indication of whether the system is busy in processing a command. The busy flag (BF) should, be checked before writing a command to the LCD., * Don’t Care. It can be either 0 or 1
Page 716 :
Introduc on to Embedded Systems, , 692, , For proper operation of the LCD, it should be initialised properly, as per the initialisation sequence listed in the LCD manual. The, LCD undergoes an internal power on initialisation following the, application of VCC to the LCD module. During this period the, LCD will not accept any external commands. The Initialisation, Wait for 15 milliseconds, sequence for a standard HD44780 display is illustrated in Fig. A2.3., Send function set command, Please refer to the datasheet of the LCD module for exact details, Wait for 5 milliseconds, on the initialisation routine., Send function set command, Wait for 160 microseconds, Now let us have a look at the matrix keyboard. You can either, Send function set command, buy a ready to use 2 × 2 matrix keyboard or can build own 2 × 2, Wait for 160 microseconds, matrix keyboard using 4 push button switches. The arrangement of, push buttons and the interfacing of the matrix keyboard is shown in, Fig. A2.4., VCC, Send function set command, In a matrix keyboard,, the keys are arranged in, matrix fashion (i.e. they, are connected in a row, Read busy flag, YES, and column style). For, detecting a keypress,, the keyboard uses the, MENU, ESC, scanning, technique,, BF = 1?, Row 0, where each row of the, matrix is pulled low, P1.0, UP, DOWN, and the columns are, Set entry mode, read. After reading the, Row 1, Clear display, status of each columns, Turn ON display, P1.1, corresponding to a row,, Set the Display Data RAM address, Set any other parameters required, the row is pulled high, (Check busy flag after sending each, and the next row is, command), pulled low one by one, and the status of the, P1.2, P1. 3, Fig. A2.3 Flow chart illustrating, columns are read. This, Fig. A2.4 Interfacing of 2 × 2 matrix, initialisation of HD44780, process is repeated until, keyboard with 8051 Port P1, Compatible LCD, the scanning for all rows, are completed. When a, row is pulled low and if a key connected to the row is pressed, reading the column to which the key is, connected will give logic 0. Since keys are mechanical devices, there is a possibility for debounce issues,, which may give multiple key press effect for a single keypress. To prevent this, a proper key debouncing, technique should be applied. Hardware keydebouncer circuits and software keydebounce techniques are the, keydebouncing techniques available. The software keydebouncing technique doesn’t require any additional, hardware and is easy to implement. In the software debouncing technique, on detecting a keypress, the key, is read again after a debounce delay. If the keypress is a genuine one, the state of the key will remain as, ‘pressed’ on the second read also. Pull-up resistors are connected to the column lines to limit the current that, flows to the row line on a keypress., The necessary hardware interfacing and circuit diagram for implementing the digital clock is given in, Fig. A2.5., Column 1, , Column 0, , 4.7K, , 4.7K, , Apply power
Page 718 :
694, , Introduc on to Embedded Systems, , The next step is the design of the firmware for implementing the digital clock. Timer 0 is used for, generating precise time generation. Timer 0 when configured in the 16bit timer mode can generate precise, timing of 65536 (FFFFH +1) machine cycles. For a clock frequency of 12MHz, the time for 1 machine cycle, is 1 microsecond. Timer 0 in 16bit Timer mode, with a count loaded 00H, generates Timer Interrupt after, 65536 machine cycles (i.e. after 65536 microseconds = ~ 65 milliseconds). For generating a timing of 1, second, timer 0 can be loaded with a count for generating 50 milliseconds. A Timer multiplier counter can be, used to generate 1 second timing. The Timer multiplier counter is incremented by one each time the timer 0, rolls over from FFFFH to 0000H. The seconds register is incremented each time when the Timer multiplier, counter becomes 20. The minutes register is incremented each time when the ‘seconds’ register become 60., The hour register is incremented by one each time when the minutes register become 60. The hour is adjusted, according to the hour format, i.e. hour is adjusted in the range 1 to 12 for 12 Hour format and 0 to 23 for 24, Hour format. For 24 hour format, the day register is incremented by one when the hour register rolls over, from 23 to 0. For 12 hour time format the day register is incremented by one when the hour register rolls over, from 12 to 1 and the time format changes from PM to AM., Two sets of registers or memory locations for hour, minute, seconds, day, time format and AM/PM, selection is used. The first set of registers is the real registers for representing the time. These registers are, modified inside the Timer 0 interrupt in accordance with the seconds, minute, hour, day and AM/PM change., The register details are given below., R7: Seconds Register, R6: Minute Register, R5: Hour Register, R4: Day Register, Bit 0: Format Register (only 1 bit is required since format falls into either of (12/24), Bit 1: AM/PM Register (only 1 bit is required since the time falls into either AM/PM, (The memory location 20H is the physical storage location for bits with address 00H and 01H), The second set of registers is used within the menu to adjust these values as and when the user changes, it through menu. Here data memory locations are used for holding the variables. The details of the memory, variables are given below., 30H: Seconds Register, 31H: Minute Register, 32H: Hour Register, 33H: Day Register, Bit 2: Format Register (only 1 bit is required since format falls into either of (12/24), Bit 3: AM/PM Register (only 1 bit is required since the time falls into either AM/PM, (The memory location 20H is the physical storage location for bits with address 02H and 03H), The LCD needs to be updated only when there is a change in time or when the user exits from the menu., This is indicated by setting a flag. The flag name is time_changed and it is a bit variable with bit address 04H., The flow chart given in Fig. A2.6 below models the firmware requirements for building the Digital Clock., The detection of keypress and the triggering of corresponding action are performed by the ‘Key Handler’, function implementation. The key handler scans the rows and columns of the keyboard and identifies which, key is pressed. On detecting a keypress the actions corresponding to that key is invoked by the ‘Key Handler’, function. The keybouncing is implemented using a 20 milliseconds delay. If a key is found closed during a, scan, the same key is read after 20 milliseconds to confirm it is a deliberate key closure. Hence a key should, be held in pressed condition for at least 20 milliseconds to identify it as valid key closure input. Otherwise the, key closure is considered as an accidental one and it is ignored. The flow chart given in Fig. A2.7 illustrates, the implementation of the ‘Key Handler’.
Page 719 :
Design Case Studies, , Main routine, start, , 695, , Timer 0 interrupt handler, , 1. Load Timer 0 with count for generating, 50 millisecond delay, 2. Decrement Timer multiplier Counter, , 1. Initialise port 1 and port 2 (Display port), 2. Disable all interrupts, 3. Initialise stack pointer, 4. Select register bank 0, 5. Stop timer 0, 6. Initialise LCD, 7. Configure timer 0 for 16 bit timer, 8. Load timer 0 with count for generating 50, millisecond delay, 9. Set Timer multiplier counter to 20, 10. Set current hour to 12, 11. Reset current minute and seconds, Register to 0 and day to ‘SUN’, 12. Set the time format to 12 Hour format, 13. Set the current time as AM, 14. Set Time changed Flag, 15. Enable Timer 0 interrupt & Run Timer 0, , Timer multiplier counter = 0?, YES, 1. Reset timer multiplier counter to 20, 2. Increment seconds register, , Seconds register = 60?, YES, 1.Reset seconds register to 0, 2. Increment minute register, , Is time changed?, (Time changed flag =1?), Minute register = 60?, YES, NO, , YES, , 1. Display the Current Time on LCD line 1, and the ‘HAVE A NICE DAY!’ prompt, on second line., 2. Reset Time changed Flag, , 1. Reset minute register to 0, 2. Increment hour register, YES, Time format = 12 Hour?, , ‘Key Handler’, Check for key press and handle it accordingly, , YES, , NO, , NO, Hour register > 12?, NO, , Outside menu?, (Main menu counter = 0?), , YES, NO, , Increment day register, , Hour register =, Hour register –12, Complement AM/PM bit, , NO, , AM/PM bit = 0?, (PM to AM transition?), , YES, , 1, NO, Day register = 7?, , Hour register = 24?, NO, , YES, Reset day register to 0, , YES, 1, , 1. Reset hour register to 0, 2. Increment day register, , NO, NO, , 1 Connects between the marked points, Indicate time changed, (Time changed Flag =1), , Return, , Fig. A2.6, , Flow chart for modelling Digital Clock firmware requirements
Page 720 :
Introduc on to Embedded Systems, , 696, , ‘Key Handler’ Start, , Scan Row 0 (Clear P1.0, Set P1.1), , MENU Key Handler, , YES, , Is MENU Key Pressed?, (P1.2 = 0?), , Wait for Key De-bounce, Period, , NO, , ESC Key Handler, , Is MENU Key Pressed?, (P1.2 = 0?), , NO, , YES, , Is ESC Key Pressed?, (P1.3 = 0?), , Wait for Key De-bounce, Period, , Is ESC Key Pressed?, (P1.3 = 0?), NO, , NO, , Scan Row 1 (Clear P1.1, Set P1.0), , YES, , UP Key Handler, , Is UP Key Pressed?, (P1.2 = 0?), , Wait for Key De-bounce, Period, , NO, , DOWN Key Handler, , Is UP Key Pressed?, (P1.2 = 0?), , NO, , YES, , Is DOWN Key, Pressed?, (P1.3 = 0?), , Wait for Key De-bounce, Period, , Is DOWN Key Pressed?, (P1.3 = 0?), NO, , NO, Return, , Fig. A2.7 Flow chart for implementing Keypress handler, The ‘Menu Key Handler’ function implements the handling of the ‘MENU’ key in different contexts., In the normal scenario, the ‘MENU’ key is used for invoking the ‘Main Menu’. Within the ‘Menu’, the, ‘MENU’ key functions as an ‘ENTER’ key. The flow chart given in Fig. A2.8 illustrates the implementation, of ‘MENU’ key handling., The ‘Up Key Handler’ function implements the handling of the ‘UP’ key in different contexts. Inside the, ‘MENU’, this key is used for navigating between the menu items and setting the values for menu items. This, key doesn’t have a function when the user is not inside the ‘MENU’, meaning, pressing this key will not, produce any impact when the user hasn’t invoked the ‘MENU’. The flow chart given in Fig. A2.9 illustrates, the implementation of ‘UP’ key handling., The ‘Down Key Handler’ function implements the handling of the ‘DOWN’ key in different contexts., Inside the ‘MENU’, this key is used for navigating between the menu items and setting the values for menu, items. This key doesn’t have a function when the user is not inside the ‘MENU’, meaning, pressing this key, will not produce any impact when the user hasn’t invoked the ‘MENU’. The flow chart given in Fig. A2.10, illustrates the implementation of ‘DOWN’ key handling.
Page 721 :
Design Case Studies, , 697, , MENU key handler, start, , Inside, submenu 2?, , YES, , 1. Set hour to the temporary hour, register value, 2. Set AM/PM to the temp am_pm bit, 3. Reset submenu 2 counter to, zero (0), 4. Reset submenu 1 counter to, zero (0), , NO, Display ‘Adjust Hour’ on first line, and blank the second line, Inside, submenu 1?, , NO, , Return, , YES, , YES, , Inside main, menu?, Submenu 1=, adjust hour?, , NO, Set Submenu 1, counter = menu, counter, , Display the menu, corresponding to the, menu counter on first, line. The menu details, V/s menu counter, mapping is given below., 1 = ‘Adjust Hour’, 2 = ‘Adjust Minute’, 3 = ‘Adjust ‘Day’, 4 = ‘Adjust Format’, Display the temporary, register values for the, selected menu item on, second line., , Submenu 1 =, adjust minute?, , NO, , Submenu 1=, adjust day?, , NO, , YES, Set menu counter, to 1, , Set the temporary, hour register value, to 12, temporary, minute reg to 30,, temp day reg to 3,, temp format bit to 0, and temp am_pm bit, to 0 (AM), , YES, , YES, , 1. Set submenu 2 counter, to 1, 2. Set the temp AM/PM, selector bit to AM (0), , Display ‘SELECT, AM/PM’ on first line and, AM on the second line, , 1. Set minute to the, temporary minute reg, value, 2. Reset submenu 1, counter to zero (0), , 1. Set day to the temp, day reg value, 2. Reset submenu 1, counter to zero (0), , Display ‘Adjust Minute’, on first line and blank, the second line, , Display ‘Adjust Day’ on, first line and blank the, second line, , Display ‘Adjust Hour’, on first line blank the, second line, , NO, , Return, , Return, Return, , Return, , Submenu 1 =, adjust format?, , YES, , NO, , 1. Set format to the temp format bit value, 2. Reset submenu 1 counter to zero (0), , Display ‘Adjust Format’ on first line and, blank the Second line, , Return, , Fig. A2.8, , Flow chart for implementing ‘MENU’ Key handler, , Return
Page 722 :
Introduc on to Embedded Systems, , 698, , UP key handler, start, , Inside, submenu 2?, , 1. Complement temp AM/PM bit., 2. Display ‘AM’ on second line if, temp AM/PM bit is 0. Otherwise, ‘PM’ on second line, , YES, , NO, Inside, submenu 1?, , NO, , Return, , YES, YES, , Inside main, menu?, , Submenu 1 =, Adjust hour?, , NO, , Submenu 1 =, Adjust minute?, , NO, , Submenu 1 =, Adjust day?, , NO, , Increment menu, counter, , YES, , Up key pressed, outside menu, , YES, , YES, , Increment temporary, hour register, , Increment temporary, minute register, , Increment temporary, day register, , Hour format = 12?, , Temp minute = 60?, , Temp day = 7?, , Return, Menu counter > 4?, , YES, , NO, , NO, , YES, , YES, , YES, , Reset temporary, minute register to 0, , Reset temp day to 0, , Reset menu counter to 1, NO, , NO, Temp hour > 12?, , NO, Display the menu, corresponding to the, menu counter on first, line. The menu details, V/s menu counter, mapping is given below., 1 = ‘Adjust Hour’, 2 = ‘Adjust Minute’, 3 = ‘Adjust ‘Day’, 4 = ‘Adjust Format’, Blank the second line, , YES, , Display ‘Adjust Minute’, on first line & temp, minute on second line, , Set temporary hour, register to 1, NO, , Return, Temp hour hour, > 23?, Submenu 1=, adjust format?, , YES, , Return, , Set temporary hour, register to 0, , YES, Complement, temporary Format bit, , Display ‘Adjust Hour’, on first line temp hour, on second line, , Return, , Return, NO, , Display ‘Adjust Format’ on first line & the, format corresponding to temporary ‘Format’, bit on second line. The format details V/s, temporary ‘Format’ bit mapping is given, below., 0 = 12, 1 = 24, , Return, , Fig. A2.9, , Display ‘Adjust Day’ on, first line & the day, corresponding to temp, ‘Day’ register on second, line. The day details V/s, temporary ‘Day’ register, mapping is given below., 0 = ‘SUN’, 1 = ‘MON’, 2 = ‘TUE’, 3 = ‘WED’, 4 = ‘THU’, 5 = ‘FRI’, 6 = ‘SAT’, , Flow chart for implementing ‘UP’ Key handler
Page 723 :
Design Case Studies, , 699, , Down key handler, start, , Inside, submenu 2?, , YES, , 1. Complement temp AM/PM bit., 2. Display ‘AM’ on second line if, temp AM/PM bit is 0. Otherwise, ‘PM’ on second line ., , NO, Inside, submenu 1?, , NO, , Return, , YES, YES, , Inside main, menu?, , Submenu 1 =, Adjust hour?, , NO, , Submenu 1 =, Adjust minute?, , NO, , Submenu 1 =, Adjust day?, , NO, , Decrement menu, counter, , YES, , Down key pressed, outside menu, , YES, , YES, , Decrement temporary, hour register, , Decrement temporary, minute register, , Decrement temporary, day register, , Hour format = 12?, , Temp minute < 0?, , Temp Day < 0?, , Return, Menu counter = 0?, , YES, , NO, , NO, , YES, , YES, , YES, , Reset temporary, minute register to 59, , Reset Temp Day to 6, , Reset menu counter to 4, NO, , NO, Temp hour = 0?, , NO, Display the menu, corresponding to the, menu counter on first, line. The menu details, V/s menu counter, mapping is given below., 1 = ‘Adjust Hour’, 2 = ‘Adjust Minute’, 3 = ‘Adjust ‘Day’, 4 = ‘Adjust Format’, Blank the second line, , YES, , Display ‘Adjust Minute’, on first line & temp, minute on second line, , Set temporary hour, register to 12, NO, , Return, Temp hour hour, < 0?, Submenu 1=, adjust format?, , YES, , Return, , Set temporary hour, register to 23, , YES, Complement, temporary format bit, , Display ‘Adjust Hour’, on first line and temp, hour on second line, , Return, , Return, NO, , Display ‘Adjust Format’ on first line & the, format corresponding to temporary ‘Format’, bit on second line. The format details V/s, temporary ‘Format’ bit mapping is given, below., 0 = 12, 1 = 24, , Return, , Fig. A2.10, , Display ‘Adjust Day’ on, first line & the day, corresponding to temp, ‘Day’ register on second, line. The day details V/s, temporary ‘Day’ register, mapping is given below., 0 = ‘SUN’, 1 = ‘MON’, 2 = ‘TUE’, 3 = ‘WED’, 4 = ‘THU’, 5 = ‘FRI’, 6 = ‘SAT’, , Flow chart for implementing ‘DOWN’ Key handler
Page 724 :
Introduc on to Embedded Systems, , 700, , The ‘ESC Key Handler’ function implements the handling of the ‘ESC’ key in different contexts. Inside, the ‘MENU’, this key is used for traversing to the previous menu and finally to come out of the ‘MENU’., This key doesn’t have a function when the user is outside the ‘MENU’, meaning, pressing this key will not, produce any effect when the user hasn’t invoked the ‘MENU’. The flow chart given in Fig. A2.11 illustrates, the implementation of ‘ESC’ key handling., ESC key handler, start, , Inside, submenu 2?, , YES, , 1. Reset submenu 2 Counter, to zero (0), 2. Display ‘Adjust Hour’ on first, line and the temporary hour, register value on second line, , NO, , NO, , Inside, submenu 1?, , Return, , YES, YES, , Inside main, menu?, , Reset submenu 1 counter to zero (0), , NO, , Reset menu counter, to zero (0), , ESC key pressed, outside menu, , Get main menu counter, (Go back to previous menu), , Return, Display the menu corresponding to, the menu counter on first line. The, menu details V/s menu counter, mapping is given below., 1 = ‘Adjust Hour’, 2 = ‘Adjust Minute’, 3 = ‘Adjust ‘Day’, 4 = ‘Adjust Format’, Blank the Second line, , Indicate time changed, (Time changed flag =1), , Return, , Return, , Fig. A2.11, , Flow chart for implementing ‘ESC’ Key handler, , Now comes the final part, implementation of the firmware requirements, which are modelled above, in, Assembly Language. The firmware implementation is given below., ;####################################################################, ;Digital_Clock.src, ;Firmware for Displaying the Current Day and Time, ;Written & assembled for A51 Assembler, ;Written by Shibu K V. Copyright (C) 2008, ;####################################################################, ;LCD interface details, ;Register Select RS connected to Port Pin P1.4
Page 742 :
Introduc on to Embedded Systems, , 718, , DB, TEXT_SUN:, DB, TEXT_MON:, DB, TEXT_TUE:, DB, TEXT_WED:, DB, TEXT_THU:, DB, TEXT_FRI:, DB, TEXT_SAT:, DB, TEXT_12HR:, DB, TEXT_24HR:, DB, TEXT_AM:, DB, TEXT_PM:, DB, END, , ‘, , #’, , ‘[SUN]#’, ‘[MON]#’, ‘[TUE]#’, ‘[WED]#’, ‘[THU]#’, ‘[FRI]#’, ‘[SAT]#’, ‘[12 HOUR]#’, ‘[24 HOUR]#’, ‘[AM]#’, ‘[PM]#’, ;END of Assembly Program, , The timer interrupt generates ‘seconds’ timing with a tolerance of 1 to 6 microseconds/Second. This code, may not be optimised for code size or performance. Fine tuning of the code, instruction usage, redundant and, dead code elimination, etc. are left to the readers as an assignment., , 2. BATTERY-OPERATED SMARTCARD READER, Smartcard is a credit card sized plastic card containing a memory or a ‘CPU and memory’. Smartcard, contains memory in the order of a few bytes to a few kilo bytes. Smartcard follows a specific command, sequence for data read/write operations. The data read write operation is controlled by a Smartcard Reader/, Writer IC. Based on the interface between the Smartcard and the Reader unit, smartcards are classified as, ‘Contact type’ and ‘Contactless’. The Contact type smartcard requires physical contact between the reader, and the smartcard. The contact type smartcard follows the ISO-7816 standard and its physical contact looks, exactly the same as that of the contacts of a GSM cell phone’s SIM card. Whereas the contactless smartcard, doesn’t require a physical contact between the reader and the smartcard for data communication. The data, communication for a contactless smartcard happens over air interface and it uses radio frequency waves for, data transmission. 13.56 MHz is the commonly used radio frequency for smartcard operation., We are going to design a battery operated contactless smartcard reader (Handheld Reader). A rechargeable, Li-Io battery (Say 7V with capacity 1000mAh) is used as the power source for the handheld. The battery, parameter (capacity and voltage) monitoring and charging is controlled using a battery monitor and charge, control IC (Like DS2770 from Maxim Dallas Semiconductor). The host processor can be an 8 or 16bit, microcontroller (Like 8051 or PIC family of controller). The device power ON is controlled through a push, button switch. A single chip contactless smartcard read/write IC is used for data read write operation with, the smartcard. The smartcard reader IC is interfaced to the host processor and the data communication will, be under the control of the host processor. The smartcard read/write IC contains CPU (Or control logic, implementation), read/write memory, analog circuits for data modulation and demodulation, transceiver unit, for RF data transmission and reception, and antenna driver circuitry. For the handheld reader to communicate
Page 743 :
Design Case Studies, , 719, , with a desktop machine, a communication channel using either USB or RS-232C is implemented in the, reader. The I/O unit of the system includes a matrix keyboard for user inputs and a graphical/alpha-numeric, LCD for visual indications. LEDs are used for various status indications like ‘Charging’, ‘Battery Low’,, ‘Busy/Error’, etc., The Oscillator and Reset circuitry generates the necessary clock and reset signals for the proper operation, of the host processor and smartcard read/write IC. The watchdog timer unit provides the necessary reset to, the system in case of system misbehaviour. Sometimes the watchdog timer hardware comes as part of the, host processor; if not a separate watchdog timer IC is used. The watchdog interrupt is connected to one of, the interrupt lines of the processor. Most of the microcontrollers contain built in data memory and program, memory. If the on-chip program and data memory are not sufficient for the application, external data memory, and program memory chips can be used in the design. The block diagram depicted in Fig. A2.12 illustrates, the various components required for building the handheld, contactless smartcard reader., , Program memory, , Data memory, , Power Supply Unit, , Keyboard, LCD &, LED Interface, , Re-chargeable, battery, , Battery monitor &, charge controller, e.g.: DS2770, , Voltage regulator, LM7805, , Antenna, , Microcontroller, (AT89C51), , Software controlled, battery On/Off, , Smartcard, reader IC, , Communication, module, (RS-232 or USB), , Oscillator unit, , Watchdog timer, , Fig. A2.12 Block Diagram of a Handheld Contactless Smart Card Reader, The firmware requirements for building the handheld smartcard reader can be divided into the following tasks., 1. Startup task, 2. Battery monitoring and Charge controlling task, 3. Card read/write operation task, 4. Communication Task, 5. Keyboard scanning task
Page 744 :
720, , Introduc on to Embedded Systems, , 6. LCD update task, 7. Watchdog timer expire event, The communication task and keyboard scanning task can be implemented either as a polling task or an, interrupt driven task. The watchdog timer expiration event is captured as an interrupt., The startup task implements the necessary startup operations like setting up the interrupts, configuring, the ports of the host processor, initialising the LCD, initialising the battery monitor and charge control IC,, initialising the smart card reader IC, etc., The battery monitoring and charge controlling task reads the various registers (Voltage, capacity registers,, etc.) of the battery monitor IC, checks the presence of a charger and initiates a charge command, terminates, the charging when the battery is full, produces warning signal when the battery voltage is below a threshold, value and switch off the unit if the battery voltage falls below the critical threshold value. This task is, assigned highest priority to avoid data corruption in case of a power down., The card read/write operation task is responsible for implementing the communication sequence for, data read/write operation with the card. The smartcard read/write operation follows a specific sequence of, operation. The sequence varies with the standards (Like ISO/IEC 14443 A/B, ISO/IEC 15693, etc.) supported, by the read write IC. A typical read write operation follows the sequence:, 1. Reader initiates a ‘Request’ command for checking the presence of cards in the vicinity of the, reader. If a card is present in the field it responds to the reader with Answer To Request (ATR)., 2. Upon receiving the ATR, the reader sends a command to capture the serial number of all cards, present in the field. Most of the reader ICs implement special algorithms to decode and capture the, serial number of all cards present in the field., 3. Reader selects the serial number of a card from the list of serial numbers received and sends a, command to select the specified card. The card whose serial number matches with the one sent, by the reader responds to the reader and all other cards in the field enters sleep state. Now the, communication channel is established exclusively between the reader and a card., 4. The Reader authenticates the card with an encrypted key. If the key matches with the key stored in, the card, the authentication succeeds. Different security mechanisms are used by different family of, cards and readers for implementing authentication., 5. The reader sends a read/write command to the card along with the details of the memory area which, the reader wants to read/write and the data to write in case of a write operation. The memory of the, card is segmented into different sectors and each sector may be further divided into blocks. Each, block holds a fixed number of data bytes. Each memory segment contains a key for authentication., The memory organisation of the card is manufacturer specific., The keyboard scanning task scans the keyboard and identifies a key press and performs the operation, corresponding to the key press. This can be implemented as a task or an Interrupt Service Routine if the, keyboard hardware supports interrupt generation on a key press., The LCD update task updates the LCD with new data. This task can be invoked by other tasks like, keyboard scanning task, battery monitoring task, card read/write task and communication task for displaying, the various information., The communication task handles reader communication with the host PC. The communication interface, can be either USB or RS-232. This task can also be implemented as Interrupt Service Routine. Most of the, processors support Serial Interrupt for handling Serial data transmission using UART and RS-232. If USB is, used as the interface, the interrupt line of the USB chip can be connected to the Interrupt line of the processor, and communication can be controlled in the ISR., The watchdog timer expiration ISR handles the actions corresponding to a watchdog timer event.
Page 745 :
Design Case Studies, , 721, , The firmware for controlling the handheld reader can be implemented in either a ‘Super loop’ model, where the tasks are executed in sequence in a super loop with interrupts running in the background or using, an RTOS scheduler like uC/OS-II or RTX-51 or VxWorks for scheduling the tasks., , 3. AUTOMATED METER READING SYSTEM (AMR), An Automated Meter Reading (AMR) system automates the utility metering (like electricity, water and gas, consumption). AMR technique replaces the existing manual meter reading operation. AMR systems transfer, the meter reading data automatically to a central station or operator for billing and usage monitoring purposes., The meter reading data is transferred over a wireless communication channel or a wired communication, medium. Radio Frequency (RF) transceivers, GPRS based communication over GSM network are examples, of wireless AMR data transfer, whereas Power Line Communication (PLC) in electricity metering is an, example for wired AMR data transfer. PLC uses the power carrying lines for data communication with a, substation. The AMR system contains an AMR data transmission unit, which is interfaced with the utility, meter and a remote AMR data receiver unit which collects the data for billing and usage monitoring purpose., The AMR data transmission interface can be built as an integral part of the utility meter or can be built as, an add-on module for existing utility readers. Nowadays, Application Specific Standard Product (ASSP) ICs, integrating both utility metering capability and AMR interface is available for building a utility meter with, integrated AMR interface. The AMR enabled utility meter can also be built using a low-cost microcontroller, with an AMR interface. Our discussion is focused only on AMR interfaces for energy metering for single, phase power supply., The implementation of a microcontroller-based AMR enabled energy metering device is shown in, Fig. A2.13. It contains an energy metering unit and a wireless/wired automated meter reading interface., The energy metering unit records the electricity consumption. A single chip energy meter IC forms the, heart of the energy metering unit. It contains a high performance microcontroller (typically a 16bit RISC, LCD, , Energy metering unit, , Single chip energy meter IC, Current, sensor, , LCD, Interface, , Wireless AMR interface, Serial, interface, , RF Transceiver, , Voltage, sensor, , Matching, circuit, , Serial, interface, , Power line, , Microcontroller, , ADC, , Wired AMR interface, (power line communication), Power line modem, , Fig. A2.13, , Block Diagram of an AMR enabled Integrated Electronic Energy Meter, , Antenna
Page 746 :
722, , Introduc on to Embedded Systems, , microcontroller), integrated ADCs and LCD controller, etc. The instantaneous power consumption in an, electric circuit is given as P = VI; where V is the instantaneous voltage and I is the instantaneous current., The electronic energy meter records the current consumption by integrating the instantaneous power. The, instantaneous current is measured using a current sensor circuit. The current sensor circuit essentially contains, a current sensing resistor and an instrumentation amplifier for signal conditioning. The signal conditioned, current value is fed to the energy metering IC. The ADC present in the energy metering IC digitises the, instantaneous current value. The voltage sensor circuit senses the instantaneous voltage and it is fed to the, energy metering IC for digitisation. The microcontroller present in the energy metering IC computes the, instantaneous power, the average power consumption and stores it in the EEPROM memory. It also displays, the parameters like instantaneous current, voltage, electricity consumed in KWh units on an LCD through a, built-in LCD controller interface. The MSP430 chip from Texas Instruments is a typical example of a single, chip energy metering IC., The Automated Meter Reading (AMR) interface to the energy metering unit can be provided through an, RF interface or through Power Line Communication (PLC) module. The RF based wireless AMR interface, is best suited for short range automated reading applications like handheld device based recording of energy, consumption. The meter reading official carries a handheld for recording the energy meter reading through, a Wireless AMR interface. The specific energy meter whose reading is to be recorded can be selected by, sending the unique meter identification number (Meter ID) of the meter and then initiating an automated, meter reading operation. The RF interface consists of an RF Transceiver (RF transmitter cum receiver), and, impedance matching circuit and an antenna for RF data transfer. The impedance matching circuit consists, of capacitor, resistors and inductors and it tunes the circuit for the required frequency. The RF transceiver, unit is responsible for RF Data modulation and de-modulation. The antenna is a metallic coil for transmitting, and receiving RF modulated data. The interface between the energy metering unit and the RF module is, implemented through serial interfaces like SPI, I2C, etc. The firmware running in the microcontroller of the, single chip energy meter IC controls the communication with the RF module., The Power Line Carrier Communication (PLCC) based AMR interface makes use of a power line modem, for interfacing the power lines with the energy metering unit for data communication. The PLC modem, provides bi-directional half-duplex data communication over the mains. The PLC modem can be interfaced, to the microcontroller of the energy metering unit through serial interfaces like UART, SPI, etc. The firmware, running in the microcontroller controls the communication with the PLC modem. Texas Instruments’ F28x, controller platform provides a cost-effective means to implement PLC technology., GPRS based data communication over GSM network is another option for implementing AMR interface, for long range communication. A GPRS modem is required for establishing the communication with the, GSM network. The GPRS modem can be interfaced to the microcontroller of the energy metering unit for, data communication. ZigBee, Wi-Fi, etc. are other wireless interface options for AMR interface., The firmware requirements for building the AMR enabled energy meter can be divided into the following tasks:, , 1. Startup task, 2. Energy consumtion recording task, 3. Automatic meter data transfer task, 4. LCD update task, The ‘Startup task’ deals with the initialisation of various port pins, interrupt configuration, stack pointer, setting, etc. for the microcontroller, initialisation of the RF interface for the communication parameter,, and initialisation of the LCD. The energy consumption task records the energy consumption. The energy, metering SoC may contain dedicated hardware units for calculating the energy consumption based on the, instantaneous voltage and current and the meter reading will be available in some dedicated registers of the, SoC. The energy consumprion recording task can read this register periodically and update the EEPROM
Page 747 :
Design Case Studies, , 723, , storage memory (Which may be part the SoC or an external chip interfaced to the SoC). The automatic, meter data transfer task can be implemented as a periodic task or a command driven operation in which the, meter reading is sent upon receiving a command from the host system (the system which requests energy, consumption for billing and usage purpose like the central electricity office or handheld terminal carried by, the meter reading official). For the command driven communication model, a set of command interfaces, are defined for communication between the AMR enabled meter and the host system. Each AMR enabled, meter holds a unique Meter ID and the firmware can be implemented in such a way that the AMR module, responds only when the Meter ID sent by the host along with the command matches the Meter ID stored in, the EEPROM of the Meter. The LCD update task updates the LCD when a change in display parameter (like, instantaneous current and voltage, energy consumption, etc.) occurs. These tasks can be implemented in a, super loop with interrupts or under an RTOS like uC/OS-II. The firmware requirements in the super loop, based implementation is modelled here with the flow chart as shown in Fig. A2.14., , Serial interrupt routine, Main Routine Start, , Receive Interrupt?, , Initialise the Microcontroller, Initialise the RF Interface, Initialise the LCD, , Read the instantaneous voltage,, Current and average energy consumption., Record the reading in the EEPROM, Display the parameters on LCD, , Receive Interrupt Handling, 1. Read the received data, 2. Check the received meter ID with EEPROM, stored value. Respond to command if Meter, ID matches. Else do nothing, 3. Rest of the processing, Transmit interrupt handling, Handle transmit interrupt, , Wait for sometime, , Return, , Fig. A2.14, , 4. DIGITAL CAMERA, Digital camera is a device for capturing and storing images in the form digital data (series of 1s and, 0s) in place of the conventional paper/film based image storage. It is a typical example of an embedded, computing system for data collection/storage application. It contains a lens and image sensors for, capturing the image, LCD for displaying the captured image, user interface buttons to control the, operation of the device and Communication interface to connect it with a PC to transfer captured images., Figure A2.15 given below illustrates the various subsystems of a digital camera., In today’s digital world people are accustomed to digital devices. Indeed they use digital camera for, capturing their favourite moments in life. But how the camera converts their favourite moments into a
Page 748 :
Introduc on to Embedded Systems, , 724, , digital picture is still a surprising thing to, most of them. Let us have a closer look at, the internals of a digital camera to explore, its functioning. Figure A2.16 illustrates the, various components of a digital camera., Like a normal film camera, it uses a, lens to focus the scene which is going to be, captured as an image. The only difference is, in ‘how the scene is captured’. In a normal, film camera, the image is captured in a photo, film and the photo film is later developed, to recreate the image, whereas in a digital, camera, the image is captured electronically., Charge Coupled Device (CCD) or CMOS, image sensors are used for capturing the, image. When exposed to light these sensors, produce electrons which in turn generates, analog voltage signals. These analog signals, are post-processed (filtered, amplified and, digitised) by an Analog Front End (AFE), system. Analog Front End ICs are available, , Lense, User interface buttons, , TFT LCD and touch screen, , Fig. A2.15, , FLASH memory, , SD RAM, , Power supply unit, , SD/CF/MMC, expansion slot, , Analog front end, , Battery monitor &, charge controller, e.g.: DS2770, Re-chargeable, battery, , Subsystems of a Digital Camera, (Photo courtesy of Casio), , Digital media, processor, , USB/IEEE, 1394 Interface, , CCD/CMOS, image sensor, , Shutter and focus, control, , Voltage regulator, e.g.: LM7805, , Software controlled, battery On/Off, , MCU, Touch screen and, LCD controller, , Clock circuit, , Fig. A2.16, , User, er interface, Interface, (Buttons), (Buttons), , Components of a Digital Camera, , TFT LCD display, , Lense
Page 749 :
Design Case Studies, , 725, , from various manufactures like Texas Instruments. The digitised data is supplied to a Digital Media processor,, which implements various compression algorithms like JPEG, TIFF, etc. for compressing the raw image data., The digital media processor may contain a DMA unit to transfer the compressed, digitised image directly to, the storage memory., The various system functions like shutter control and zooming control is performed by the ‘System, Control’ unit of the camera which is implemented using a 16/32 microprocessor/microcontroller. Stepper, motors are used for shutter and zoom control. The system control unit is also responsible for handling the I/O, (Buttons) and graphical user interface (LCD control)., The digital camera is powered by a re-chargeable battery and the monitoring and charging control is, carried out by a battery charge control and monitoring IC, which is under the control of the ‘System Control, Unit’., Provisions for interfacing various storage memory devices like SD/CF/MMC cards are implemented in, the digital camera. The camera device can be connected to a host PC through the communication interface, (Like USB, IEEE 1394, etc.) supported by the device, for image transfer., Nowadays, a single-chip called System on Chip (SoC), incorporating both image processing unit and, 16/32 processor in a single IC are available and they simplify the design. The resolution of a digital camera is, expressed in terms of mega pixels. You may be familiar with the terms 3.2 mega pixels, 5.1 mega pixels, 7.2, mega pixels, etc. It represents the pixels per inch of the image sensing device (CCD/CMOS). As the number, of pixels increase, the image quality also increases., The various system control tasks and image capturing and processing tasks for the digital camera are, implemented using an embedded operating system.
Page 752 :
728, , Index, , Index, , #error 356, .NET CF 663, 1-wire 49, 7-Segment LED Display 36, 8051 96, 157, Addressing Mode 169, Direct 169, Immediate addressing 171, Indexed addressing 171, Indirect 169, Register Addressing 170, Architecture 96, Arithmetic Instruction 181, Addition 182, Decimal Adjust 188, Decrement 187, Division 185, Increment 187, Multiplication 185, Subtraction 182, Bit Addressing 101, Clock Speed 106, Crystal Resonator 105, DA A instruction 188, Data Memory 98, Execution Speed 106, High Speed Core 155, Instruction Set 175, Arithmetic Instructions 181, Boolean instruction 194, Data Transfer Instructions 175, Logical Instruction 189, Program Control Transfer 196, Interrupt System 123, External Interrupts 128, Interrupt Enable Register 123, Interrupt Latency 126, Interrupt Priorities 124, Interrupt Service Routine 125, , IP Register 124, RETI instruction 125, IRAM 103, LCALL generation 125, Logical Instructions 189, ANL 191, CLR A 192, CPL A 192, ORL 191, Rotate Instruction 192, SWAP A Instruction 193, XRL 191, Machine Cycle 106, MOVC Instruction 181, MOVX Instruction 157, Oscillator Unit 62, Paged Data Memory Access 100, POP Instruction 175, Port 107, Alternate I/O Functions 110, Port 0 107, PORT 1 108, PORT 3 110, Read Latch 111, Read Pin 111, Sink Current 112, Source Current 112, Power Consumption 155, Power on Reset 157, Power Saving 153, IDLE Mode 153, PCON Register 154, Power Down Mode 155, Program Control Transfer 196, CALL Instruction 172, CJNE Instruction 196, DJNZ Instruction 199, Jump Instructions 197, Register Instructions 170
Page 753 :
Index, Registers 103, Accumulator 104, B Register 104, Data Pointer 105, DPTR 105, Program Counter 105, Program Status Word 103, PSW 103, Scratchpad Registers 105, Stack Pointer 105, Register Specific Instructions 170, Reset Circuitry 152, RET Instruction 126, Serial Port 141, baudrate 144, Mode 0 136, Mode 1 137, Mode 2 138, Mode 3 139, Multiprocessor Communication 146, Receive Interrupt 123, REN 143, SBUF Register 141, SCON Register 142, Transmit Interrupt 143, SFR 103, Single Stepping 128, Special Function Register 103, Stack 175, Stack Pointer 176, Timer/Counter Units 134, Auto Reload Mode 138, GATE Control 136, Mode 0 136, Mode 1 137, Mode 2 138, Mode 3 139, TMOD Register 134, T States 106, 8052 Microcontroller 157, 8255A 43, µVision 570, Actuators 17, ADC 129, Advanced High Performance Bus 686, Advanced Peripheral Bus 686, Advanced System Bus 686, Aging 419, AHB 686, AMBA 686, Analog to Digital Converter 129, Android 663, AOT Compiler 661, APB 686, , 729, Application Specific Instruction Set Processor 20, Application Specific Integrated Circuit 20, 26, 658, Application Specific Standard Product 26, Arduino 665, Arithmetic Operation 327, ARM 669, Array 332, 345, ASB 686, ASIC 20, 26, 658, ASIP 20, Assembler 312, Assembly Language 593, 312, Assembly Note 288, ASSP 26, AT89C51 112, AT89C51RD2/ED2 157, AT89S8252 113, Atomic 370, auto 325, 326, 371, Automotive 86, AVR 665, Baudrate 143, BCD 185, BeagleBone 665, Big-endian 24, Bill of Material 268, Binary Coded Decimal 188, Packed 186, Unpacked 186, Binary Semaphore 469, BIOS 33, Bit field 352, Bit Manipulation 361, Bitwise AND 362, Bitwise NOT 362, Bitwise OR 362, Bitwise XOR 362, Bluetooth 56, BOM 268, Boot loader 565, Boot ROM 564, Bottlenecks 664, Boundary Scan 617, Boundary Scan Description Language 618, Bounded Buffer Problem 457, Branching Instructions 328, break 318, 325, Brown-out Protection Circuit 61, BSDL 618, Buffer 237, Busy Waiting 463, calloc 373, CAN 87, 96
Page 754 :
730, case 324, Cathode Ray Oscilloscope 616, CDFG 212, char 323, Character 331, Chiplevel Multi Processor 658, CIL 662, Circular Wait 453, CISC 22, 210, Cloud 666, CLR 662, CMP 658, CMPXCHG 465, Co-design 210, Co-operating Process 433, Co-operative Multitasking 409, Code Memory 95, Combinational Circuit 242, Commercial Off-the-Shelf 28, Common Language Runtime 662, Communicating Process Model 218, Communication Interface 45, Competing Process 433, Compile Control 356, Compiler 319, Complex Instruction Set Computing 23, 211, Computational Engine 22, Computational Model 212, Computer Aided Design 625, Computer Numeric Control 627, Conceptualisation 637, Concurrent Process Model 212, Conditional Operator 329, const 357, Constant data 357, 371, Constant pointer 358, Context Retrieval 408, Context Saving 408, Context Switching 123, 407, continue 325, Control DFG 212, Controller Architecture 210, Controller Area Network 87, Cost Benefit Analysis 637, COTS 28, 634, Counter 125, Counting Semaphore 469, CPLD 27, CPU Utilisation 410, Critical Section 476, CRO 616, Cross Compiler 319, Data Flow Graph 212, Data Memory 22, 94, , Index, Datapath Architecture 210, Data type 326, ADC0801 129, De-multiplexer 242, Deadlock 452, Debugging 570, 601, Decoder 239, Decompiler 607, default 325, delay 360, Deployment 644, Detailed Design 641, Device driver 482, Device Queue 411, DFG 212, Digital Signal Processors (DSP) 7, Dining Philosophers’ Problem 454, Disassembler 607, Distributed 74, do 331, do while 331, DS80C320 158, DS80C323 158, Dynamic Memory 369, Dynamic RAM 32, EDA 254, EDLC 632, Electrically Erasable Programmable Read Only Memory 30, else 325, Embedded ‘C’ 350, Embedded firmware 309, Embedded Operating System 309, Embedded Systems 4, 73, Characteristics 73, Large-Scale 7, Medium-Scale 7, Quality Attributes 75, Small-Scale 7, Emulation 157, Encoder 240, enum 325, Erasable Programmable Read Only Memory 30, Events 480, Evolutionary Model 649, Exception Handling 394, Execute in Place 34, extern 325, 327, Factory programmed chips 565, FCFS 412, Feasibility Study 637, Feature set 94, FET 108, Field Programmable Gate Array (FPGA) 17, 656
Page 755 :
Index, File 355, File System Management 390, Finite State Machine 211, Finite State Machine Datapath 211, Firewire 55, Firmware 59, 309, 561, First-Come-First-Served (FCFS)/ FIFO Scheduling 412, Flip-flop 244, D 236, J-K 238, S-R 238, float 325, Footprint 273, for 330, Fountain Model 647, FPGA 27, FPSLIC 659, free 375, FSM 213, FSMD 211, Full Duplex 141, Function Generator 617, function pointer 342, Functions 339, Fused Deposition Modelling 626, General Packet Radio Service 59, General Purpose Operating System 392, General Purpose Processor 20, Gerber File 291, global 371, goto 325, 361, GPOS 392, GPP 20, GPRS 59, Hard Real-Time 396, Hardware Software Trade-offs 226, HCFSM 215, HECU 87, HEX File 604, Intel HEX File 604, Motorola HEX File 606, Hierarchical/Concurrent 215, High-speed Electronic Control Units 87, High Level Language 319, i.LINK 55, I/O System Management 389, I/O Unit 22, I2C 45, IAP 564, IC 240, ICE 612, IDE 552, 560, 587, , 731, IDL 445, IDLE Task 431, IE 123, IEEE 1394 55, if 328, if else 328, In Application Programming 564, In Circuit Emulator 612, Incremental Model 647, Infinite loops 360, Infrared 56, Injection Moulding 627, Inline Assembly 323, Instruction Set 175, In System Programming 113, 563, int 323, Integrated Circuit 249, Integrated Development Environment 570, Integration Testing 640, 643, Intel® Galileo Gen 2 666, Inter Integrated Circuit 45, Interlocked Compare Exchange 466, Intermediate Language 662, Internet of Things (IoT) 666, Interrupt 122, 365, Interrupt Handling 395, Interrupt Service Routine 365, IrDA 56, ISP 113, 563, Iterative Model 648, J2ME 661, Java bytecode 660, Java ME 661, Java Native Interface 661, Java Thread 405, Java Virtual Machine 660, JNI 661, Job Queue 411, JTAG 563, 614, Just In Time (JIT) Compiler 661, JVM 660, Keil 570, Kernel 389, Kernel Space 391, Kernel Thread 407, Keyboard 42, Keywords 325, Large-Scale Integration 249, Last-Come-First Served (LCFS)/LIFO Scheduling 413, Latch 238, Layers 276, Layout Design 277
Page 756 :
732, LCFS 413, LECU 87, LED 36, Library file 317, LIFO 413, Light Emitting Diode 36, LIN 88, Linear Model 646, Linker 317, List File 598, Little-endian 24, Livelock 454, 462, LM7805 113, Load Store Architecture 25, Local Interconnect Network Bus 88, Locator 317, Logical Operations 327, Logic Analyser 617, Logic Gates 237, long 340, Looping Instructions 329, Low-speed Electronic Control Units 87, Lynx 55, Machine Language 312, Macro 355, Mailbox 444, malloc 373, Map File 602, MAX232 146, Mean Time Between Failures 76, Mean Time To Repair 76, Media Oriented System Transport Bus 91, Medium-Scale Integration 249, Memory 18, 29, RAM 31, DRAM 32, NVRAM 32, SRAM 32, ROM 29, EEPROM 30, EPROM 30, FLASH 30, Masked ROM 29, OTP 30, PROM 30, Memory Management 389, Memory Mapped Objects 434, Memory Shadowing 33, memset 375, Message Passing 440, Message Queue 440, MicroC/OS-II 523, Counting Semaphore 479, Interrupt Handling 520, 551, , Index, Inter Task Communication 512, 532, Kernel functions 530, Mailbox 532, Memory Management 549, Message Queue 526, 532, Mutex 539, Mutual exclusion 517, 538, Task Creation 508, 524, Task Scheduling 531, Task Synchronisation 449, 517, 538, Timing & Reference 549, Microcontroller 6, 19, Microkernel 392, Microprocessor 6, 15, 18, MIMD 210, MinnowBoard MAX 665, MIPS 94, mnemonics 312, Model 626, Monitor Program 611, Monitor ROM 611, Monolithic Kernel 391, MOST 88, Motorola HEX 606, Moulding 626, 627, MROM 29, MTBF 76, MTTR 76, Multicore Processors 658, Multimeter 616, Multiple Instruction Multiple Data 210, Multiplexer 241, Multiprocessing 408, Multitasking 123, 408, 409, Multithreading 399, Mutex 473, Mutual Exclusion 452, NAND FLASH 34, Need 636, Netlist 270, Non-Operational Quality Attributes 77, Debug-ability 77, Evolvability 78, Portability 78, Testability 77, Non-preemptive Multitasking 409, Non-preemptive Scheduling 411, NOR FLASH 34, Object-Oriented Model 219, Object File 601, Object Oriented Design 220, OCD 614, offsetof 355
Page 757 :
Index, OHA 663, OMA 663, ONCE 157, On Chip Firmware Debugging 614, Opcode 169, Open Collector 236, Open Handset Alliance 663, Open Mobile Alliance 663, Operand 169, Operating System 311, 389, Operational Quality Attribute 75, Availability 77, Confidentiality 77, Integrity 77, Maintainability 77, Reliability 76, Response 76, Safety 77, Security 77, Throughput 76, Optocoupler 37, Oscillator Unit 62, Out-of-Circuit Programming 561, Package 273, Packed structure 351, PCB 64, 273, 399, PCB Etching 295, PCB Milling 295, PCB Printing 296, PIC 669, Piezo Buzzer 41, Pipelining 25, Pipes 434, Anonymous 434, Named 434, PLD 27, Pointer 332, Pointer to constant data 358, Polling 122, Portability 321, Portable threads 406, POSIX 508, POSIX Threads 400, PPI 43, Pre-processor 355, Preemptive multitasking 409, Preemptive Scheduling 419, Preemptive SJF Scheduling 419, Preliminary Design 640, Preprocessor Output File 601, Primary Memory Management 389, Princeton architecture 23, Printed Circuit Board 64, 293, printf 337, , 733, Priority Based Scheduling 417, 427, Priority Ceiling 461, Priority Inheritance 461, Priority Inversion 459, Process 393, 394, State 398, Process Control Block 399, Processing Elements 211, Process Life Cycle 398, Process Management 389, 393, 399, Processor Architecture 23, Harvard 23, Von-Neumann 23, Process Scheduling 393, Process Synchronisation 394, Producer Consumer Problem 457, Product Enclosure 625, Productivity 631, Product Life Cycle 79, 635, Product Re-engineering 636, Product Support 644, Programmable Logic Device 27, Programmable Peripheral Interface 43, Programmable Read Only Memory 30, Program Memory 29, Programming Elements 659, Project Management 633, Prototyping Model 649, Pthreads 400, Push Button 41, Quasi Bi-directional 109, Racing 449, RAM 31, 350, Random Access Memory 31, Rapid Prototyping 626, RASPBERRY PI 666, Re-entrant Function 369, Reactive System 74, Read-Modify-Write 107, 111, Readers-Writers Problem 459, Read Latch 107, Read Pin 107, Ready Queue 411, Real-Time 80, 392, 393, Real-Time Clock (RTC) 62, 395, Real-Time Kernel 393, realloc 375, Real Time Operating System 7, 311, 392, Reconfigurable Processor 659, Reconfigurable SoCs 659, Recursive Function 367, Reduced Instruction Set Computing 22, 210, register 320, 321
Page 758 :
734, Register Transfer Level 250, Relational Operations 327, Relay 40, Remote Method Invocation 445, Remote Procedure Call 445, Requirements Analysis 638, Reset Circuit 61, Response Time 410, RET 125, Retirement 646, return 322, RISC 7, 22, 210, 659, RMI 445, ROM 29, Room Temperature Vulcanised 627, Round Robin Scheduling 421, Routes 276, RPC 445, RS-232 51, 146, RS-422 53, RS-485 51, RSoC 7, 659, RTC 62, RTL 250, RTOS 392, scanf 337, Schematic Design 255, Schmitt Trigger 131, Selective Laser Sintering 626, Semaphore 469, Sensors 10, 16, 35, Sequential Circuits 243, Sequential Programming Model 216, Serial Peripheral Interface Bus 47, Shared Memory 433, Sharks Cove 665, Sheet Metal 627, short 326, Shortest Job First Scheduling 414, Shortest Remaining Time 419, Signalling 444, Silk Screen 296, SIMD 210, Simulator 578, 607, Single Instruction Multiple Data 210, sizeof 325, SJF 414, Sleep 360, Sleep & Wakeup 468, Small-Scale Integration 249, SoC 657, Sockets 445, Soft Real-Time 396, Solder Mask 296, , Index, SPI 47, 563, Spin Lock 463, Spiral Model 650, SRT 419, Stack 397, Starvation 416, 454, State Machine Model 213, static 325, 326, 341, 372, Static Memory 372, Static RAM 30, Stepper Motor 38, Bipolar 38, Half Step 39, Unipolar 38, Wave Stepping 39, Stereolithography 626, Storage Class 326, strcat 337, strcmp 338, strcpy 338, stricmp 338, String 338, strlen 338, struct 325, 346, structure 346, Structure padding 351, Super Loop 309, switch 325, switch case 329, System C 211, System on Chip 657, System Testing 640, Task 393, Task Communication 449, Task Synchronisation 449, 462, TCON 128, Test and Set Lock 464, Testing Bits 365, Integrated Development Environment 570, Thread 399, Binding 407, Many-to-One 407, One-to-One 407, Thread Pre-emption 407, Threads 399, Thread Standard 400, Throughput 410, Time Management 395, Timer 134, Timer tick 395, Time to Market 78, 209, Time to Prototype 78, Toggling Bits 363, Tooling 626
Page 759 :
Index, Tri-State 236, Truth Table 237, TSL 464, TTL Logic 108, Turnaround Time 410, typedef 325, 343, 351, UART 48, ULN2803 117, UML 215, 220, Activity diagram 223, Collaboration 220, Sequence diagram 223, State Chart diagram 223, Use Case diagram 223, Unified Modelling Language 220, union 346, Unit Testing 640, 643, Universal Asynchronous Receiver Transmitter 48, Universal Serial Bus 53, unsigned 322, Upgrades 635, USB 53, User Acceptance Testing 640, User Level Thread 407, User Space 391, Verilog 211, Very Large-Scale Integration 249, Very Long Instruction Word 211, VHDL 211, 250, Via 273, Virtual Memory 394, VLIW 210, VLSI 249, void 325, , 735, volatile 325, 359, volatile pointer 360, Von-Neumann 100, VxWorks 473, 508, Binary Semaphore 518, Counting Semaphore 518, Interrupt Handling 520, Interrupt Locking 522, Inter Task Communication 512, Kernel Service 512, Message Queue 515, Mutual Exclusion 517, Mutual exclusion Semaphore 518, Pipes 434, Signals 516, Task Creation 524, Task Locking 517, Task Scheduling 531, Task Synchronisation 538, Waiting Time 410, Watchdog Timer 63, Waterfall Model 646, while 326, 330, while continue 330, Wi-Fi 57, Win32 Thread 402, wind 511, XIP 34, ZigBee 58, ZigBee Coordinator 58, ZigBee End Device 58, ZigBee Router 58
 Learn better on this topic