Notes of B.Sc III Y- 5 Sem 21-22, Computer Science & Programming Visual Basic vb-6.0-complete-Notes.pdf - Study Material
Page 2 :
Visual Basic 6.0, , VISUAL BASIC, Unit 1, Introduction: Need of visual languages, integrated development, environment (IDE), advantage of Visual Basic, characteristics and features, of Visual Basic – IDE, Projects, user interface, objects oriented, visual, development and event-driven programming, forms/graphic controls, data, processing, sharing with windows and internet applications. 12 Hrs, , Unit 2, Visual Basic programming and tools: An introduction to Visual, Basic, programming,, simple, program, construction,, statements,, input/outputs, comments, editor, subroutines, controls flow statements,, objects and variants. 10 Hrs, , Unit 3, Designing user interface – elements of user interface, understanding, forms, menus and toolbars, designing menus and toolbars, building, dynamic forms, drag and drop operations, working with menus, customizing, the toolbars. 10 Hrs, , Unit 4, Controls – textbox, combo box, scroll bar and slider control operations,, generating timed events, drawing with Visual Basic using graphics controls,, coordinate systems and graphic methods, manipulating colors and pixels, with Visual Basic, working with ActiveX controls. 10 Hrs, , Unit 5, Menus: Creating a menu system, Creating and accessing pop-up menu,, Modifying menus at runtime, adding menu items at run-time, data access, methods, creating, reading and writing text files, data controls, creating, queries. Report generation. 10 Hrs, , Reference Books:, 1. David Schneider, Introduction to Programming using Visual Basic, PHI., 2. Mohammed Azam, Programming with Visual Basic 6.0, Vikas, Publications., 3. Dietel & Dietel, Visual Basic Programming, Pearson Education., 4. David I. Schneider, An Introduction To Programming Using Visual Basic, .Net®, PHI., 5. C Muthu , Visual Basic.Net, Tata Mc Graw Hill Year of Publication., , From the desk of Mr. Manjunatha Balluli, Asst. Professor, Dept. of CS, , Page 1 of 124
Page 3 :
Visual Basic 6.0, , Unit I & UNIT III, INTRODUCTION & DESIGNING USER INTERFACE, , INTRODUCTION, VISUAL BASIC is a high level programming language which evolved, from, the, earlier, DOS, version, called, BASIC, (Beginners' Allpurpose Symbolic Instruction Code). However, people prefer to use Microsoft, Visual Basic today, as it is a, well-developed programming language and supporting resources are, available everywhere., Visual Basic is easy to learn Programming language. With Visual, Basic you can develop Windows based applications and games. Visual Basic, is much easier to learn than other language (like Visual C++), and yet it’s, powerful programming language., Now, there are many versions of VB exist in the market, the most, popular one and still widely used by many VB programmers is none other, than Visual Basic 6 . We also have VB.net, Visual Basic 2005, Visual Basic, 2008 , Visual Basic 2010, Visual Basic 2012 and Visual Basic 2013 ., VB2008, VB2010, VB2012 and VB2013 are fully object oriented, programming (OOP) languages., Microsoft Visual Basic development system version 6.0 is the most, productive tool for creating high performance components and applications., Visual Basic 6.0 offers developers the Ability to create robust applications, that reside on the client or server, cooperate in a distributed n-tier, environment. Visual Basic 6.0 is the Rapid Application Development (RAD), tool available either as a stand-alone product or as a part of the Visual, Studio 6.0 suite of tools., , NEED OF VISUAL LANGUAGES OR IMPORTANCE OF VB, Visual Basic is regarded as the third generation event-driven, programming language. It was released in 1987. Being the first visual, development tool from Microsoft, it is considered as one of the most powerful, programming languages. As compared to other computer programming, languages, such as, C, C++, it is easy to learn and understand, provided, that one has determination and dedication to do so., Visual basic programming language allows programmers to create, software interface and codes in an easy to use graphical environment. VB, is the combination of different components that are used on forms having, specific attributes and actions with the help of those components. On the, one hand it allows programmers to develop widows based applications, rapidly; on the other hand, it helps greatly in accessing data bases, using, ADO while letting the programmers use ActiveX controls and various, objects. While it is intended more to develop applications, it is also useful for, From the desk of Mr. Manjunatha Balluli, Asst. Professor, Dept. of CS, , Page 2 of 124
Page 4 :
Visual Basic 6.0, games development for particular or limited purposes, unlike C++ that is, more suitable for developing games., As compared to other languages, Visual basic may be slower though,, yet it is flexible and it can be rightly said that things that are difficult in, other languages are comparatively easier in visual basic programming, language. It may also be said that, since it is one of the most popular, programming languages, lots of related books and material and other, resources are available and can be accessed for developing programming, skills at visual basic programming language conveniently., One of the most important things to be considered with regard to, programming in Visual basic is that the structure of VB is designed in a way, that allows programmers to create executable code – Exe files. It enables, programmers to develop programs that can be used as front end to, databases. Besides, it’s with the help of visual basic tools, one can change, the abstract ideas into programs or into the whole software while it allows, revising and modifying the programs fittingly., Once you have advanced your skills at visual basic programming, language, you can move to develop your skills at other languages, such as,, VB script. However, it all depends upon your interest and desire. It must be, noted that the sole objective of any computer programming language is to, save time and efforts of the users while making their lives easier. Visual, Basic is one of the most important programming languages having a, powerful front-end tool which is able to achieve simple and complex, business requisites in and effective and efficient manner., , EVOLUTION OR HISTORY OF VISUAL BASIC, BASIC (Beginners All Purpose Symbolic Instruction Code) was, developed in 1960’s by Profs Kemeny & Kurtz. 1970’s Bill gates, implemented BASIC in several PCs’., Alan Cooper is considered the father of Visual Basic. In 1987, the, then Director of Applications Software for Coactive Computing Corporation, wrote a program called Ruby (Tripod) that delivered visual programming to, the average programmer/user. Alan Cooper developed VB and sold to, Microsoft in 1988., The Visual Basic (VB) system is a fourth generation programming, system which produces much of the code itself as the programmer designs, the interface for his or her application. Microsoft surveys in the late 1990's, showed that roughly two-thirds of all business applications programming on, PCs was being done in Visual Basic., Visual Basic 1.0 for Windows was first released on May 20, 1991 at, the Windows World convention in Atlanta Georgia., From the desk of Mr. Manjunatha Balluli, Asst. Professor, Dept. of CS, , Page 3 of 124
Page 5 :
Visual Basic 6.0, VB version 2.0 for Windows (November 1992) was faster, more, powerful and easier to use than version 1. VB 2 was also available in a, freeware student release called the Primer edition., Visual Basic 3.0 (1993) added tools to access and control databases, and Object Linking and Embedding (OLE) version 2. It came in Standard, and Professional versions. A superset of VB, called Visual Basic for, Applications, was released as part of Microsoft Excel 5 and Microsoft Project, 4 in 1993. It has since become the internal programming language of the, Microsoft Office family of products, and is available for license by other, software companies., Visual Basic 4 was released in 1995 and supported the new Windows, 95 family of 32-bit operating systems. The Professional Edition could also, compile code to run on the older 16-bit Windows 3.x systems. Visual Basic, Scripting Edition (VBScript) was also announced in 1995. VBScript is used, to write embedded code for inclusion in web pages, although not all web, browsers will run VBScript., Visual Basic 5 added, among other things, the ability to create true, executables and to create your own custom controls. It also supported, Microsoft's Active-X technology., Visual Basic 5 was available in Standard (Learning), Professional and, Enterprise Editions., Visual Basic 6 (VB6) was introduced in 1998 and was included as, part of a package known as Visual Studio 6.0. VB6 added new capabilities, in the areas of data access, Internet features, controls, component creation,, language features and wizards. To quote Microsoft's web site, «Visual Basic, 6.0 features provide graphical, integrated data access to any ODBC or OLE, DB data source, and additional database-design tools for Oracle and, Microsoft SQL Server™-based databases. New Web development features, bring the easy-to-use, component-based programming model of Visual Basic to, the creation of HTML- and Dynamic HTML (DHTML)-based applications. Many, organizations are still using this version today., , Version, , Year, , VB 1.0, , 1991, , VB 2.0, , 1992, , VB 3.0, , 1993, , New Features, The interface was barely graphical, using extended, ASCII characters to simulate the appearance of a GUI., The programming environment was easier to use, and, its speed was improved., VB3 included a database engine that could read and, write Access databases., , From the desk of Mr. Manjunatha Balluli, Asst. Professor, Dept. of CS, , Page 4 of 124
Page 6 :
Visual Basic 6.0, VB 4.0, , 1995, , VB 5.0, , 1996, , VB 6.0, , 1998, , 32bit and It also introduced the ability to write, classes in Visual Basic., The ability to create custom user controls, as well as, the ability to compile to native Windows executable, code, speeding up runtime code execution., Improved in many areas including the ability to, create web-based applications using Internet, Explorer. Visual Basic 6 is no longer supported., , INTEGRATED DEVELOPMENT ENVIROMENT, An Integrated Development Environment (IDE) is a software, application that provides comprehensive facilities to computer programmers, for software development. An IDE normally consists of a source code editor,, build automation tools and a debugger., , WHY VB IS CALLED IDE, One of the most significant changes in Visual Basic 6.0 is the, Integrated Development Environment (IDE). IDE is a term commonly used in, the programming World to describe the interface and environment that we, use to create our applications. It is called integrated because we can access, virtually all of the development tools that we need from one screen called an, interface. The IDE is also commonly referred to as the design environment,, or the program., Integrated Development Environment (IDE) consists of inbuilt, compiler, debugger, editors, and automation tools for easy development of, code. Visual Basic.net 2006 IDE can be accessed by opening a new project., IDE was first introduced with version 5.0 and Integrated Development, Environment of Visual Studio.net 2008 had undergone minor design, changes. VB IDE consists of Solution Explorer, Toolbox, Form, Properties, Window, and Menu Bar. In Visual Studio windows related to a project are, combined together and placed at certain locations on the screen. This type, of IDE is known as Multiple Document Interface or MDI. It also having the, great feature called as drag and drop. We can drag & the drop the controls, without writing single line of coding., The below diagram shows the development environment with all the, important points labeled. Many of Visual basic functions work similar to, Microsoft word e.g. the Tool Bar and the tool box is similar to other products, on the market which work off a single click then drag the width of the object, required. The Tool Box contains the control you placed on the form window., All of the controls that appear on the Tool Box controls on the above picture, never runs out of controls as soon as you place one on the form another, awaits you on the tool box ready to be placed as needed., , From the desk of Mr. Manjunatha Balluli, Asst. Professor, Dept. of CS, , Page 5 of 124
Page 7 :
Visual Basic 6.0, , Elements of Integrated Development Environmental (IDE)., , The Visual Basic IDE is made up of a number of components, Menu Bar, Tool Bar, Project Explorer, Properties window, Form Layout Window, Toolbox, Form Designer, Object Browser, In previous versions of Visual Basic, the IDE was designed as a Single, Document Interface (SDI). In a Single Document Interface, each window is a, free-floating window that is contained within a main window and can move, anywhere on the screen as long as Visual Basic is the current application., But, in Visual Basic 6.0, the IDE is in a Multiple Document Interface (MDI), format. In this format, the windows associated with the project will stay, within a single container known as the parent. Code and form-based, windows will stay within the main container form., , , , , , , , , , From the desk of Mr. Manjunatha Balluli, Asst. Professor, Dept. of CS, , Page 6 of 124
Page 8 :
Visual Basic 6.0, , ADVANTAGES OF VB, 1. The structure of the Basic programming language is very simple,, particularly as to the executable code., 2. VB is not only a language but primarily an integrated, interactive, development environment (“IDE“)., 3. The VB-IDE has been highly optimized to support rapid application, development (“RAD”). It is particularly easy to Develop Graphical, User Interfaces and to connect them to handler functions provided by, the application., 4. The graphical user interface of the VB-IDE provides intuitively, appealing views for the management of the program structure in the, large and the various types of entities (classes, modules, procedures,, forms,)., 5. It is an Event Driven Programming which provides complete control, to the end user., 6. VB is a first Programmer friendly language in the world., 7. VB provides a comprehensive interactive and context-sensitive, online help system., 8. When editing program texts the “IntelliSense” technology informs you, in a little popup window about the types of constructs that may be, entered at the current cursor location., 9. Visual Basic 6.0 features provide graphical, integrated data access to, any ODBC or OLE DB data source, and additional database-design, tools for Oracle and Microsoft SQL Server-based databases., 10. New Web development features bring the easy-to-use, componentbased programming model of Visual Basic to the creation of HTMLand Dynamic HTML (DHTML)-based applications, 11. VB is a component integration language which is attuned to, Microsoft’s Component Object Model (“COM”)., 12. COM components can be written in different languages and then, integrated using VB., 13. Interfaces of COM components can be easily called remotely via, Distributed, COM, (“DCOM”),, which, makes, it, easy, to, construct distributed applications., 14. COM components can be embedded in / linked to your application’s, user interface and also in/to stored documents (Object Linking and, Embedding “OLE”, “Compound Documents”)., 15. There is a wealth of readily available COM components for many, different purposes., 16. Visual Basic is built around the .NET environment used by all, Microsoft Visual languages, so there is very little that can’t be done in, Visual Basic that can be done in other languages (such as C#)., , From the desk of Mr. Manjunatha Balluli, Asst. Professor, Dept. of CS, , Page 7 of 124
Page 9 :
Visual Basic 6.0, , DISADVANTAGES OF VB, 1. Visual basic is a proprietary programming language written by, Microsoft, so programs written in Visual basic cannot, easily, be, transferred to other operating systems. It’s a platform dependent it, only runs on MS Windows operating system., 2. There are some, fairly minor disadvantages compared with C. C has, better declaration of arrays – it’s possible to initialize an array of, structures in C at declaration time; this is impossible in VB., , EVENT DRIVEN PROGRAMMING, Event-driven programming is a programming paradigm in which the flow, of program execution is determined by events - for example a user action, such as a mouse click, key press, or a message from the operating system or, another program is known as the Event Driven Programming. VB, programming is also based on Events., An event-driven application is designed to detect events as they occur,, and then deal with them using an appropriate event-handling procedure., When you fire an event, the code in the event procedure is executed,, and then visual basic performs its operations as per the instructions written, in the event procedure code. For example, in the first sample program, when, you click the 'Print' button, the click event is fired, and then the code in the, click event procedure gets executed. The code tells Visual Basic to print a, text on the form. So as a result, you see a text printed on the form., Example:, Write the following code in the DblClick event procedure of the form., Private Sub Form_DblClick(), Print "You have double-clicked", End Sub, Output:, , When you double-click on the form, the DblClick event procedure of the, Form object is invoked, and then the code in the DblClick event procedure is, executed. Thus, the code instructs Visual Basic to print a text on the form., From the desk of Mr. Manjunatha Balluli, Asst. Professor, Dept. of CS, , Page 8 of 124
Page 10 :
Visual Basic 6.0, , CHARACTERISTICS AND FEATURES OF VISUAL BASIC, Visual Basic (VB) is a unique computer language---at least it was when, it first came out. Now there are many imitators. VB allows you to quickly, and easily develop a bank of visual controls with sliders, switches and, meters or a complex form for a user to fill out. It uses the BASIC language, which is known to most computer programmers, and which can be learned, quickly if it is not already known., IDE, Integrated Development Environment (IDE) consists of inbuilt, compiler, debugger, editors, and automation tools for easy development of, code. Visual Basic.net 2006 IDE can be accessed by opening a new project., IDE was first introduced with version 5.0 and Integrated Development, Environment of Visual Studio.net 2008 had undergone minor design, changes. VB IDE consists of Solution Explorer, Toolbox, Form, Properties, Window, and Menu Bar. In Visual Studio windows related to a project are, combined together and placed at certain locations on the screen. This type, of IDE is known as Multiple Document Interface or MDI. It also having the, great feature called as drag and drop. We can drag & the drop the controls, without writing single line of coding., GUI Interface or User Interface, VB is a Graphical User Interface (GUI) language. This means that a VB, program will always show something on the screen that the user can, interact with (usually via mouse and keyboard) to get a job done. The first, step in building the VB program is to get the GUI items on the screen. This, is done via pull-down menus that list the available graphical objects. Every, system is slightly different (Mac differs from Windows and VB4 Differs from, VB6) but, generally speaking, left-clicking on an object allows you to, describe attributes like size and position. Right clicking allows you to write, code. For example, if the GUI item is a switch, left-clicking would allow the, programmer to say how big the switch was, how it was labeled and where on, the screen it is positioned. Right-clicking on the switch would bring up a, window that allows the programmer to write the code that describes what, happens when the user clicks the switch., Object Oriented, Object Oriented Programming (OOP) is a concept where the programmer, thinks of the program in "objects" (however abstract the objects may be) that, interact with each other. In OOP, all the code associated with that object is, in one place. Once again, VB forces this good programming practice. The, GUI items are the objects and all the code associated with the object are just, a click away. This natural way of enforcing good programming practices--plus the ease of programming in BASIC---is exactly why VB has found so, many devoted fans., From the desk of Mr. Manjunatha Balluli, Asst. Professor, Dept. of CS, , Page 9 of 124
Page 11 :
Visual Basic 6.0, Event Driven Programming, Event-driven programming is a programming paradigm in which the flow, of program execution is determined by events - for example a user action, such as a mouse click, key press, or a message from the operating system or, another program is known as the Event Driven Programming. VB, programming is also based on Events., An event-driven application is designed to detect events as they occur,, and then deal with them using an appropriate event-handling procedure., Modularization, It is considered good programming practice to modularize your, programs. Small modules where it is clearly indicated what comes into the, module and what goes out makes a program easy to understand., Debugging, Visual Basic offers two different options for code debugging:- Debugging, Managed Code Runtime Debugger The Debugging Managed Code, individually debugs C and C++ applications and Visual Basic Windows, applications. The Runtime Debugger helps to find and fix bugs in programs, at runtime., Data Access, By using data access features, we can create databases, scalable serverside components for most databases, including Microsoft SQL Server and, other enterprise-level database., Macros IDE, The Macros integrated development environment is similar in design, and function to the Visual Studio IDE. The Macros IDE includes a code, editor, tool windows, the properties windows and editors., , From the desk of Mr. Manjunatha Balluli, Asst. Professor, Dept. of CS, , Page 10 of 124
Page 12 :
Visual Basic 6.0, , STRUCTURE OF A VISUAL BASIC APPLICATION, To run Visual Basic program, select, Start -> Programs ->Microsoft, Visual Basic 6.0 as shown in, , Fig.(2-1) Computer screen, , Fig.(2-2) New Project dialog., , The New Project dialog allows the programmer to choose what type of, Visual Basic program to create. Standard EXE, which is highlighted by, default, allows the programmer to create a standard executable. Each type, listed in Fig.(2-2) describes a group of related files called a Project., Project (VBP), Project is a program designed to user application that may be simple, (like calculator program) or complex (like word program). The project types, listed in Fig.(2-3) are the “Visual” in Visual Basic, because they contain, predefined features for designing Windows programs. The project is a, collection of files that makes the user program. They may consist of form,, modules, active x controls. The new project dialog contains three tabs, • New: creating new project., • Existing: opening an existing project., • Recent: opening a project that has been previously loaded into the IDE., Application (Project) is made up of:, 1. Forms - Windows that you create for user interface, 2. Controls - Graphical features drawn on forms to allow user, interaction (text boxes, labels, scroll bars, command buttons, etc.), (Forms and Controls are objects.), 3. Properties - Every characteristic of a form or control is specified by a, property. Example properties include names, captions, size, color,, From the desk of Mr. Manjunatha Balluli, Asst. Professor, Dept. of CS, , Page 11 of 124
Page 13 :
Visual Basic 6.0, , 4., 5., 6., 7., , position, and contents. Visual Basic applies default properties. You, can change properties at design time or run time., Methods - Built-in procedure that can be invoked to impart some, action to a particular object., Event Procedures - Code related to some object. This is the code that, is executed when a certain event occurs., General Procedures - Code not related to objects. This code must be, invoked by the application., Modules - Collection of general procedures, variable declarations, and, constant definitions used by application., , Steps in Developing Application, There are three primary steps involved in building a Visual Basic, application:, 1. Draw the user interface, 2. Assign properties to controls, 3. Attach code to controls, We’ll look at each step., Drawing the User Interface and Setting Properties, Visual Basic operates in three modes., Design mode - used to build application, Run mode - used to run the application, Break mode - application halted and debugger is available, We focus here on the design mode., Six windows appear when you start Visual Basic., The Main Window consists of the title bar, menu bar, and toolbar. The title, bar indicates the project name, the current Visual Basic operating mode,, and the current form. The menu bar has drop-down menus from which you, control the operation of the Visual Basic environment. The toolbar has, buttons that provide shortcuts to some of the menu options. The main, window also shows the location of the current form relative to the upper left, corner of the screen (measured in twips) and the width and length of the, current form., , From the desk of Mr. Manjunatha Balluli, Asst. Professor, Dept. of CS, , Page 12 of 124
Page 14 :
Visual Basic 6.0, , TOOL BAR, Contains several icons that provide quick access to commonly used, features, , Project1-Form/SDI (Form): window contains a form named Form1, which, is where the program’s Graphical User Interface (GUI) will be displayed. A, GUI is the visual portion of the program, this is where the user enters data, (called inputs) to the program and where the program displays its results, (called outputs). We refer to the Form1 window simply as “the form”. Forms, are the foundation for creating the interface of an application. You can use, the forms to add windows and dialog boxes to your application. You can also, use them as container for items that are not a visible part of the, application’s interface. For example, you might have a form in your, application that serves as a container for graphics that you plan to display, in other forms., , Toolbox Controls: Contains a collection of tools that are needed for project, design as shown in Fig.(2-4). To show the toolbox press View> toolbox icon., The user can place the tool on form, and then work with the tool. To place, the tool on form: click on tool>draw tool to form > the tool appears on form, or double click on tool then the tool appears on form. Table summarizes the, toolbox controls., From the desk of Mr. Manjunatha Balluli, Asst. Professor, Dept. of CS, , Page 13 of 124
Page 15 :
Visual Basic 6.0, , Control, Pointer, PictureBox, Label, TextBox, Frame, CommandButton, CheckBox, OptionButton, ListBox, ComboBox, HscrollBar, VscrollBar, Timer, DrivelistBox, DirlistBox, Filelistbox, Shape, Line, , Fig.(2-4), Description, Used to interact with controls on the form (resize them,, move them, etc.). The pointer is not a control, A control that display images or print the result., A control that displays uneditable text to the user., A control for accepting user input. Textbox can also, display text., A control for grouping other controls., A control that represents a button. The user presses or, clicks to initiate an action., A control that provides the user with a toggle choice, (checked or unchecked), Option buttons are used in groups where only one at a, time can be true., A control that provides a list of items., A control that provides a short list of items., A horizontal scrollbar., A vertical scrollbar., A control that performs a task at programmer specified, intervals. A timer is not visible to the user., A control accessing the system disk drivers., A control accessing directories on a system, A control accessing file in a directory, A control for drawing circles, rectangles, squares or, ellipse, A control for drawing line., , From the desk of Mr. Manjunatha Balluli, Asst. Professor, Dept. of CS, , Page 14 of 124
Page 16 :
Visual Basic 6.0, Image, OLE, , A control for displaying images. The images control, does not provide as many capabilities as a picturebox., A control for interacting with other window, applications., , PROPERTIES WINDOW:, The properties window displays the properties for a form or control., Properties are attributes such as size, position, etc. like a form; each control, type has its own set of properties. Some properties, like width and height,, such as, are common to both forms and controls, while other properties are, unique to form or control. Controls often differ in the number and type of, properties. Properties are listed either alphabetically (by selecting the, alphabetic tab) or categorically (by selecting the categorized tab). The most, important properties of the objects in general are listed in the following, table. To show the properties window press View> properties window icon., Properties, Objective, name, Name, Used to represent name, of object in code., Caption, Name appears on, object., Back color Background color for, object., Fore color Color of text written on, object., Font, Font style type and size, Visible, , Height, , The tool is visible or, invisible., The tool enable or, disable, Length of object, , Width, , Width of object, , Enable, , Top, Left, Text, , Coordinates of top of, object on screen, Coordinates of left of, object on screen, Allows inputting and, editing text in object., , From the desk of Mr. Manjunatha Balluli, Asst. Professor, Dept. of CS, , Page 15 of 124
Page 17 :
Visual Basic 6.0, PROJECT EXPLORER WINDOW: The window titled Project-Project1 is, called the Project Explorer and contains the project files. The project, explorer window’s tool bar contains three buttons, namely view code, view, object and toggle folders. When pressed, the view code button displays a, window for writing Visual Basic code. View object, when pressed, displays, the form. Double-clicking form1 (form1) also displays the form. The toggle, folders button toggles (i.e., alternately hides or shows) the forms folder. The, forms folder contains a listing of all forms in the current project. To show, the Project Explorer window press View> Project Explorer window icon, , FORM LAYOUT WINDOW: The Form Layout window specifies a form’s, position on the screen at runtime. The Form Layout window consists of an, image representing the screen and the form’s relative position on the screen., With the mouse pointer positioned over the form image, drag the form to a, new location., , As mentioned, the user interface is ‘drawn’ in the form window. There are, two ways to place controls on a form:, 1. Double-click the tool in the toolbox and it is created with a default size on, the form. You can then move it or resize it., 2. Click the tool in the toolbox, then move the mouse pointer to the form, window. The cursor changes to a crosshair. Place the crosshair at the upper, left corner of where you want the control to be, press the left mouse, button and hold it down while dragging the cursor toward the lower right, From the desk of Mr. Manjunatha Balluli, Asst. Professor, Dept. of CS, , Page 16 of 124
Page 18 :
Visual Basic 6.0, corner. When you release the mouse button, the control is drawn., · To move a control you have drawn, click the object in the form window, and drag it, to the new location. Release the mouse button., · To resize a control, click the object so that it is select and sizing handles, appear., Use these handles to resize the object., , Click here to move the object, Use, sizing handles, for resizing, , VISUAL BASIC 6.0 - PROPERTIES, METHODS & EVENTS, All the controls in the ToolBox except the Pointer are objects in Visual, Basic. These objects have associated properties, methods and events., Real world objects are loaded with properties. For example, a flower is, loaded certain color, shape and fragrance. Similarly, programming objects, are loaded with properties. A property is a named attribute of a, programming object. Properties define the characteristics of an object such, as Size, Color etc. or sometimes the way in which it behaves. For example, a, TextBox accepts properties such as Enabled, Font, MultiLine, Text, Visible,, Width, etc., Enables, , property allows the TextBox to be enabled or disabled at run time, depending on the condition set to True or False., Font property sets a particular font in the TextBox., MultiLine property allows the TextBox to accept and display multiple lines, at run time., Text property of the TextBox control sets a particular text in the control., Visible property is used to hide the object at run time., Width property sets the TextBox to the desired width at design time., The properties that are discussed above are design-time properties, that can be set at the design time by selecting the Properties Window. But, certain properties cannot be set at design time. For example, the CurrentX, and CurrentY properties of a Form cannot be set at the design time., , From the desk of Mr. Manjunatha Balluli, Asst. Professor, Dept. of CS, , Page 17 of 124
Page 19 :
Visual Basic 6.0, , METHODS, A method is an action that can be performed on objects. For example,, a cat is an object. Its properties might include long white hair, blue eyes, 3, pounds’ weight etc. A complete definition of cat must only encompass on its, looks, but should also include a complete itemization of its activities., Therefore, a cat's methods might be move, jump, play, breath etc., Similarly, in object-oriented programming, a method is a connected or, built-in procedure, a block of code that can be invoked to impart some, action on a particular object. A method requires an object to provide them, with a context. For example, the word Move has no meaning in Visual Basic,, but the statement,, Text1.Move 700, 400, performs a very precise action. The TextBox control has other, associated methods such as Refresh, SetFocus, etc., The Refresh method enforces a complete repaint of the control or a Form., For example, Text1.Refresh refreshes the TextBox., The Setfocus method moves the focus on the control. For Example, Text1.SetFocus sets the focus to TextBox control Text1., , EVENTS, An event is a signal that informs an application that something, important has occurred. For example, when a user clicks a control on a, form, the form can raise a Click event and call a procedure that handles, the event., Programs need to do something in response to user actions and, actions initiated by the operating system. Such actions, which are external, to the program itself (although they may be triggered by the program) are, called events., Keyboard and Mouse are two most important input devices. When, user uses these devices, Visual Basic generates a set of events., Types of Events, 1. Keyboard Events, 2. Mouse Events, 3. Program Events, Keyboard Events, When user presses a key on the keyboard, Visual Basic generates a, few events. These events allow user to know which key is exactly pressed., Keyboard events occur for the controls that can receive input (have focus)., The following are the keyboard events available in Visual Basic:, , From the desk of Mr. Manjunatha Balluli, Asst. Professor, Dept. of CS, , Page 18 of 124
Page 20 :
Visual Basic 6.0, Event When does it occur?, KeyDown When user presses the key on keyboard., KeyUp When user releases the key on keyboard., KeyAscii When user presses and releases an ANSI key., KeyDown and KeyUp events, Keydown event occurs when user has pressed a key from keyboard., KeyUp event occurs when user releases a key that he has pressed earlier., That means every KeyDown event is followed by a KeyUp event., These events occur for all types of keys including special keys like F1 and, Home key. The following are parameters for these two events., Parameter Meaning, KeyCode A key code is the code of the key pressed. Each key on the, keyboard has a code. You can use constants such as vbKeyF1 (the F1 key), to know which key on the keyboard is actually pressed by user., Shift An integer that corresponds to the state of the SHIFT, CTRL, and ALT, keys at the time of the event. Please see the section “Knowing status of, control key” for details on this., KeyPress Event, Keypress event occurs when user presses and releases a key. This, event occurs only when user presses one of the ANSI keys such as, alphabets, digits etc. This event doesn’t occur when user presses arrow, keys, function keys etc., Mouse Events, Mouse events occur when user presses and releases mouse buttons., The following are the events related to mouse., Event When does it occur?, Click When user presses and releases a mouse button., Dblclick When user presses and releases and again presses and releases a, mouse button., MouseDown When user presses a mouse button., MouseUp When user releases a mouse button., MouseMove When user moves mouse pointer., , From the desk of Mr. Manjunatha Balluli, Asst. Professor, Dept. of CS, , Page 19 of 124
Page 21 :
Visual Basic 6.0, , FORM/CONTAINER/SDI(SINGLE DOCUMENT INTERFACE), Visual Basic Form is the container for all the controls that make up, the user interface. Every window you see in a running visual basic, application is a form, thus the terms form and window describe the same, entity. Visual Studio creates a default form for you when you create, a Windows Forms Application., Every form will have title bar on which the form's caption is displayed and, there will be buttons to close, maximize and minimize the form shown, below −, , If you click the icon on the top left corner, it opens the control menu, which, contains the various commands to control the form like to move control, from one place to another place, to maximize or minimize the form or to, close the form., , Form Properties, Following table lists down various important properties related to a, form. These properties can be set or read during application execution. You, can refer to Microsoft documentation for a complete list of properties, associated with a Form control –, , From the desk of Mr. Manjunatha Balluli, Asst. Professor, Dept. of CS, , Page 20 of 124
Page 22 :
Visual Basic 6.0, Sl.No, 1, , Properties, AcceptButton, , 2, , CancelButton, , 3, , AutoScale, , 4, , AutoScroll, , 5, , AutoScrollMinSize, , 6, , AutoScrollPosition, , 7, 8, , BackColor, BorderStyle, , Description, The button that's automatically activated, when you press Enter, no matter which, control has the focus at the time. Usually, the OK button on a form is set as, AcceptButton for a form., The button that's automatically activated, when you hit the Esc key., Usually, the Cancel button on a form is set, as CancelButton for a form., This Boolean property determines whether, the controls you place on the form are, automatically scaled to the height of the, current font. The default value of this, property is True. This is a property of the, form, but it affects the controls on the form., This Boolean property indicates whether, scroll bars will be automatically attached to, the form if it is resized to a point that not all, its controls are visible., This property lets you specify the minimum, size of the form, before the scroll bars are, attached., The AutoScrollPosition is the number of, pixels by which the two scroll bars were, displaced from their initial locations., Sets the form background color., The BorderStyle property determines the, style of the form's border and the, appearance of the form −, None − Borderless window that can't, be resized., Sizable − This is default value and, will be used for resizable window, that's used for displaying regular, forms., Fixed3D − Window with a visible, border, "raised" relative to the main, area. In this case, windows can't be, resized., FixedDialog − A fixed window, used, to create dialog boxes., FixedSingle − A fixed window with a, single line border., FixedToolWindow − A fixed window, with a Close button only. It looks like, the toolbar displayed by the drawing, and imaging applications., SizableToolWindow − Same as the, FixedToolWindow but resizable. In, , From the desk of Mr. Manjunatha Balluli, Asst. Professor, Dept. of CS, , Page 21 of 124
Page 23 :
Visual Basic 6.0, , 9, , ControlBox, , 10, , Enabled, , 11, 12, , Font, HelpButton, , 13, 14, , Height, MinimizeBox, , 15, , MaximizeBox, , 16, , MinimumSize, , 17, , MaximumSize, , 18, 19, , Name, StartPosition, , 20, , Text, , 21, , Top, Left, , 22, , TopMost, , 23, , Width, , addition, its caption font is smaller, than the usual., By default, this property is True and you, can set it to False to hide the icon and, disable the Control menu., If True, allows the form to respond to, mouse and keyboard events; if False,, disables form., This property specify font type, style, size, Determines whether a Help button should, be displayed in the caption box of the form., This is the height of the Form in pixels., By default, this property is True and you, can set it to False to hide the Minimize, button on the title bar., By default, this property is True and you, can set it to False to hide the Maximize, button on the title bar., This specifies the minimum height and, width of the window you can minimize., This specifies the maximum height and, width of the window you maximize., This is the actual name of the form., This property determines the initial position, of the form when it's first displayed. It will, have any of the following values −, CenterParent − The form is centered, in the area of its parent form., CenterScreen − The form is centered, on the monitor., Manual − The location and size of the, form will determine its starting, position., WindowsDefaultBounds − The form, is positioned at the default location, and size determined by Windows., WindowsDefaultLocation − The form, is positioned at the Windows default, location and has the dimensions, you've set at design time., The text, which will appear at the title bar, of the form., These two properties set or return the, coordinates of the form's top-left corner in, pixels., This property is a True/False value that lets, you specify whether the form will remain on, top of all other forms in your application. Its, default property is False., This is the width of the form in pixel., , From the desk of Mr. Manjunatha Balluli, Asst. Professor, Dept. of CS, , Page 22 of 124
Page 24 :
Visual Basic 6.0, , FORM METHODS, The following are some of the commonly used methods of the Form, class. You can refer to Microsoft documentation for a complete list of, methods associated with forms control −, Sl.No., Method Name & Description, 1, Activate, Activates the form and gives it focus., 2, ActivateMdiChild, Activates the MDI child of a form., 3, AddOwnedForm, Adds an owned form to this form., 4, BringToFront, Brings the control to the front of the z-order., 5, CenterToParent, Centers the position of the form within the bounds of the parent, form., 6, CenterToScreen, Centers the form on the current screen., 7, Close, Closes the form., 8, Contains, Retrieves a value indicating whether the specified control is a, child of the control., 9, Focus, Sets input focus to the control., 10, Hide, Conceals the control from the user., 11, Refresh, Forces the control to invalidate its client area and immediately, redraw itself and any child controls., 12, Scale(SizeF), Scales the control and all child controls by the specified scaling, factor., 13, ScaleControl, Scales the location, size, padding, and margin of a control., 14, ScaleCore, Performs scaling of the form., 15, Select, Activates the control., 16, SendToBack, Sends the control to the back of the z-order., 17, SetAutoScrollMargin, Sets the size of the auto-scroll margins., 18, SetDesktopBounds, Sets the bounds of the form in desktop coordinates., 19, SetDesktopLocation, Sets the location of the form in desktop coordinates., 20, SetDisplayRectLocation, Positions the display window to the specified value., 21, Show, From the desk of Mr. Manjunatha Balluli, Asst. Professor, Dept. of CS, , Page 23 of 124
Page 25 :
Visual Basic 6.0, 22, , Displays the control to the user., ShowDialog, Shows the form as a modal dialog box., , FORM EVENTS, Following table lists down various important events related to a form., You can refer to Microsoft documentation for a complete list of events, associated with forms control −, Sl. No Event, Description, 1, Activated, Occurs when the form is activated in code, or by the user., 2, Click, Occurs when the form is clicked., 3, Closed, Occurs before the form is closed., 5, DoubleClick, Occurs when the form control is doubleclicked., 6, DragDrop, Occurs when a drag-and-drop operation is, completed., 8, GotFocus, Occurs when the form control receives, focus., 9, HelpButtonClicked Occurs when the Help button is clicked., 10, KeyDown, Occurs when a key is pressed while the, form has focus., 11, KeyPress, Occurs when a key is pressed while the, form has focus., 12, KeyUp, Occurs when a key is released while the, form has focus., 13, Load, Occurs before a form is displayed for the, first time., 14, LostFocus, Occurs when the form loses focus., 15, MouseDown, Occurs when the mouse pointer is over the, form and a mouse button is pressed., 16, MouseEnter, Occurs when the mouse pointer enters the, form., 17, MouseHover, Occurs when the mouse pointer rests on, the form., 19, MouseMove, Occurs when the mouse pointer is moved, over the form., 20, MouseUp, Occurs when the mouse pointer is over the, form and a mouse button is released., 22, Move, Occurs when the form is moved., 23, Resize, Occurs when the control is resized., 24, Scroll, Occurs when the user or code scrolls, through the client area., , From the desk of Mr. Manjunatha Balluli, Asst. Professor, Dept. of CS, , Page 24 of 124
Page 26 :
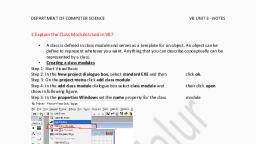
Visual Basic 6.0, , UNIT II, VISULA BASIC PROGRAMMING & TOOLS, INTRODUCTION TO VISUAL PROGRAMMING, VB stands for Visual Basic, and is a High-Level Programming, Language. A programming language basically allows you to create, programs or applications, such as Microsoft Word. These can then be run on, a number of operating systems, depending on which language you choose., Visual Basic is specifically for Windows 95 or above., A High-Level programming language essentially means a language, that is (relatively) easy to learn, and the code you write is similar to English, words. In comparison, a Low-level language would mainly involves working, with assembly language (ie what the PC's own language). It would involve far, more work creating a program using a Low Level language, so nearly, everyone uses High Level programming languages now. Visual, Basic, Java, C++, Pascal, and nearly every other language are now high level, languages., Visual Basic has its roots in a language called BASIC, back in the, days of Amstrads, and when Bill Gates was running Microsoft from his, garage. (BASIC actually stands for Beginners All-Purpose Symbolic, Instruction Code if you really want to know!). Since then, Visual Basic has, rapidly evolved, and today, Visual Basic one of the most popular, programming languages around. Fortunately for you, it is also one of the, easiest, and is ideal for beginners., , VISUAL BASIC, OPERATORS, , 6, , (VB6), , DATA, , TYPES,, , MODULES, , &, , Visual Basic uses building blocks such as Variables, Data Types,, Procedures, Functions and Control Structures in its programming, environment. This section concentrates on the programming fundamentals, of Visual Basic with the blocks specified., , MODULES, Code in Visual Basic is stored in the form of modules. The three kind, of modules are Form Modules, Standard Modules and Class Modules. A, simple application may contain a single Form, and the code resides in that, Form module itself. As the application grows, additional Forms are added, and there may be a common code to be executed in several Forms. To avoid, the duplication of code, a separate module containing a procedure is created, that implements the common code. This is a standard Module., Class module (.CLS filename extension) are the foundation of the, object oriented programming in Visual Basic. New objects can be created by, writing code in class modules. Each module can contain:, , From the desk of Mr. Manjunatha Balluli, Asst. Professor, Dept. of CS, , Page 25 of 124
Page 27 :
Visual Basic 6.0, Declarations: May include constant, type, variable and DLL procedure, declarations., Procedures: A sub function, or property procedure that contain pieces of, code that can be executed as a unit., These are the rules to follow when naming elements in VB - variables,, constants, controls, procedures, and so on:, A name must begin with a letter., May be as much as 255 characters long (but don't forget that somebody, has to type the stuff!)., Must not contain a space or an embedded period or type-declaration, characters used to specify a data type; these are ! # % $ & @, Must not be a reserved word (that is part of the code, like Option, for, example)\]]]]],, The dash, although legal, should be avoided because it may be confused, with the minus sign. Instead of First-name use First_name or FirstName., , DATA TYPES IN VISUAL BASIC, By default, Visual Basic variables are of variant data types. The, variant data type can store numeric, date/time or string data. When a, variable is declared, a data type is supplied for it that determines the kind of, data they can store. The fundamental data types in Visual Basic including, variant are integer, long, single, double, string, currency, byte and boolean., Visual Basic supports a vast array of data types. Each data type has limits, to the kind of information and the minimum and maximum values it can, hold. In addition, some types can interchange with some other types. A list, of Visual Basic's simple data types abbbbr e given below., 1. Numeric, Byte, Integer, Long, Single, Double, Currency, , Store integer values in the range of 0 - 255, Store integer values in the range of (-32,768) - (+ 32,767), Store integer values in the range of (- 2,147,483,468) - (+, 2,147,483,468), Store floating point value in the range of (-3.4x10-38) (+ 3.4x1038), Store large floating value which exceeding the single, data type value, store monetary values. It supports 4 digits to the right of, decimal point and 15 digits to the left, , 2. String, Use to store alphanumeric values. A variable length string can store, approximately 4 billion characters, From the desk of Mr. Manjunatha Balluli, Asst. Professor, Dept. of CS, , Page 26 of 124
Page 28 :
Visual Basic 6.0, 3. Date, Use to store date and time values. A variable declared as date type can, store both date and time values and it can store date values 01/01/0100 up, to 12/31/9999, 4. Boolean, Boolean data types hold either a true or false value. These are not, stored as numeric values and cannot be used as such. Values are internally, stored as -1 (True) and 0 (False) and any non-zero value is considered as, true., 5. Variant, Stores any type of data and is the default Visual Basic data type. In Visual, Basic if we declare a variable without any data type by default the data type is, assigned as default. A variant is a data type that knows how to be any data type. If, you declare a variable to be of type variant, it can be an Integer, Double,, String...whatever. Variables have a definite use in advanced programming. If you, are a beginning programmer, however, you shouldn't use variants to avoid the, labor of learning to use the proper data type for the proper situation., , Data type, Byte, Boolean, Integer, Long (long, integer), Single (singleprecision, floating-point), , Storage, size, 1 byte, 2 bytes, 2 bytes, , 0 to 255, True or False, -32,768 to 32,767, , 4 bytes, , -2,147,483,648 to 2,147,483,647, , 4 bytes, , Double (doubleprecision, 8 bytes, floating-point), Currency, (scaled integer), , 8 bytes, , Decimal, , 14 bytes, , Date, Object, String, , 8 bytes, 4 bytes, 10 bytes, , Range, , -3.402823E38 to -1.401298E-45 for negative, values; 1.401298E-45 to 3.402823E38 for, positive values, -1.79769313486232E308 to 4.94065645841247E-324 for negative values;, 4.94065645841247E-324 to, 1.79769313486232E308 for positive values, -922,337,203,685,477.5808 to, 922,337,203,685,477.5807, +/-79,228,162,514,264,337,593,543,950,335, with no decimal point; +/7.9228162514264337593543950335 with 28, places to the right of the decimal; smallest, non-zero number is +/0.0000000000000000000000000001, January 1, 100 to December 31, 9999, Any Object reference, + 0 to approximately 2 billion, , From the desk of Mr. Manjunatha Balluli, Asst. Professor, Dept. of CS, , Page 27 of 124
Page 29 :
Visual Basic 6.0, (variablelength), String (fixedlength), Variant (with, numbers), , string, length, Length of, string, 16 bytes, , 1 to approximately 65,400, Any numeric value up to the range of a, Double, , 22 bytes +, string, Same range as for variable-length String, length, Number, required, The range of each element is the same as the, by, range of its data type., elements, , Variant (with, characters), User-defined, (using Type), , In all probability, in 90% of your applications you will use at most six types:, String, Integer, Long, Single, Boolean and Date. The Variant type is often, used automatically when type is not important. A Variant-type field can, contain text or numbers, depending on the data that is actually entered. It is, flexible but it is not very efficient in terms of storage., , VARIABLES, Variables are the memory locations which are used to store values, temporarily. A defined naming strategy has to be followed while naming a, variable. A variable name must begin with an alphabet letter and should not, exceed 255 characters. It must be unique within the same scope. It should, not contain any special character like %, &, !, #, @ or $., The following are the rules when naming the variables in Visual Basic, It must be less than 255 characters, No spacing is allowed, It must not begin with a number, Period is not permitted, Cannot use exclamation mark (!), or the characters @, &, $, #, Cannot repeat names within the same level of scope., Examples of valid and invalid variable names are displayed, Examples of Valid and Invalid Variable Names, Valid Name, , Invalid Name, , My_Car, , My.Car, , this year, , 1NewBoy, , Long_Name_Can_beUSE He&HisFather, , *& is not acceptable, , From the desk of Mr. Manjunatha Balluli, Asst. Professor, Dept. of CS, , Page 28 of 124
Page 30 :
Visual Basic 6.0, There are many ways of declaring variables in Visual Basic. Depending on, where the variables are declared and how they are declared, we can, determine how they can be used by our application. The different ways of, declaring variables in Visual Basic are listed below and elucidated in this, section., Explicit Declaration, Using Option Explicit statement, Scope of Variables, , EXPLICIT DECLARATION, Declaring a variable tells Visual Basic to reserve space in memory. It, is not must that a variable should be declared before using it. Automatically, whenever Visual Basic encounters a new variable, it assigns the default, variable type and value. This is called implicit declaration. Though this type, of declaration is easier for the user, to have more control over the variables,, it is advisable to declare them explicitly. The variables are declared with a, Dim statement to name the variable and its type. The As type clause in the, Dim statement allows to define the data type or object type of the variable., This is called explicit declaration., Syntax, Dim VariableNamen As DataType, For example,, Dim strName As String, Dim intCounter As Integer, If you want to declare more variables, you can declare them in, separate lines or you may also combine more in one line , separating each, variable with a comma, as follows:, Dim VariableName1 As DataType1, VariableName2 As DataType2,, VariableName3 As DataType3, For example,, Dim password As String, yourName As String, firstnum As Integer, , USING OPTION EXPLICIT STATEMENT, It may be convenient to declare variables implicitly, but it can lead to, errors that may not be recognized at run time. Say, for example a variable, by name intcount is used implicitly and is assigned to a value. In the next, step, this field is incremented by 1 by the following statement, Intcount = Intcount + 1, This calculation will result in intcount yielding a value of 1 as intcount, would have been initialized to zero. This is because the intcount variable has, From the desk of Mr. Manjunatha Balluli, Asst. Professor, Dept. of CS, , Page 29 of 124
Page 31 :
Visual Basic 6.0, been mistyped as intcount in the right hand side of the second variable. But, Visual Basic does not see this as a mistake and considers it to be new, variable and therefore gives a wrong result., In Visual Basic, to prevent errors of this nature, we can declare a, variable by adding the following statement to the general declaration section, of the Form., , OPTION EXPLICIT, This forces the user to declare all the variables. The Option Explicit, statement checks in the module for usage of any undeclared variables and, reports an error to the user. The user can thus rectify the error on seeing, this error message., The Option Explicit statement can be explicitly placed in the general, declaration section of each module using the following steps., Click Options item in the Tools menu, Click the Editor tab in the Options dialog box, Check Require Variable Declaration option and then click the OK button, , , SCOPE OF VARIABLES, A variable is scoped to a procedure-level (local) or module-level, variable depending on how it is declared. The scope of a variable, procedure, or object determines which part of the code in our application are aware of, the variable's existence. A variable is declared in general declaration section, of e Form, and hence is available to all the procedures. Local variables are, recognized only in the procedure in which they are declared. They can be, declared with Dim and Static keywords. If we want a variable to be available, to all of the procedures within the same module, or to all the procedures in, an application, a variable is declared with broader scope., LOCAL VARIABLES, A local variable is one that is declared inside a procedure. This, variable is only available to the code inside the procedure and can be, declared using the Dim statements as given below., Dim sum As Integer, The local variables exist as long as the procedure in which they are, declared, is executing. Once a procedure is executed, the values of its local, variables are lost and the memory used by these variables is freed and can, be reclaimed. Variables that are declared with keyword Dim exist only as, long as the procedure is being executed., STATIC VARIABLES, Static variables are not reinitialized each time Visual Invokes a, procedure and therefore retains or preserves value even when a procedure, ends. In case we need to keep track of the number of times a command, From the desk of Mr. Manjunatha Balluli, Asst. Professor, Dept. of CS, , Page 30 of 124
Page 32 :
Visual Basic 6.0, button in an application is clicked, a static counter variable has to be, declared. These static variables are also ideal for making controls alternately, visible or invisible. A static variable is declared as given below., Static intPermanent As Integer, Variables have a lifetime in addition to scope. The values in a modulelevel and public variables are preserved for the lifetime of an application, whereas local variables declared with Dim exist only while the procedure in, which they are declared is still being executed. The value of a local variable, can be preserved using the Static keyword. The following procedure, calculates the running total by adding new values to the previous values, stored in the static variable value., Function RunningTotal ( ), Static Accumulate, Accumulate = Accumulate + num, RunningTotal = Accumulate, End Function, If the variable Accumulate was declared with Dim instead of static, the, previously accumulated values would not be preserved across calls to the, procedure, and the procedure would return the same value with which it, was called. To make all variables in a procedure static, the Static keyword is, placed at the beginning of the procedure heading as given in the below, statement., Static Function RunningTotal ( ), Example, The following is an example of an event procedure for a, CommandButton that counts and displays the number of clicks made., Private Sub Command1_Click ( ), Static Counter As Integer, Counter = Counter + 1, Print Counter, End Sub, The first time we click the CommandButton, the Counter starts with, its default value of zero. Visual Basic then adds 1 to it and prints the result., MODULE LEVEL VARIABLES, A module level variable is available to all the procedures in the, module. They are declared using the Public or the Private keyword. If you, declare a variable using a Private or a Dim statement in the declaration, section of a module—a standard BAS module, a form module, a class, module, and so on—you're creating a private module-level variable. Such, variables are visible only from within the module they belong to and can't be, accessed from the outside. In general, these variables are useful for sharing, data among procedures in the same module:, From the desk of Mr. Manjunatha Balluli, Asst. Professor, Dept. of CS, , Page 31 of 124
Page 33 :
Visual Basic 6.0, ' In the declarative section of any module, Private LoginTime As Date ' A private module-level variable, Dim LoginPassword As String ' Another private module-level variable, You can also use the Public attribute for module-level variables, for all, module types except BAS modules. (Public variables in BAS modules are, global variables.) In this case, you're creating a strange beast: a Public, module-level variable that can be accessed by all procedures in the module, to share data and that also can be accessed from outside the module. In this, case, however, it's more appropriate to describe such a variable as a, property:, ' In the declarative section of Form1 module, Public CustomerName As String ' A Public property, You can access a module property as a regular variable from inside, the module and as a custom property from the outside:, ' From outside Form1 module..., Form1.CustomerName = "John Smith", The lifetime of a module-level variable coincides with the lifetime of, the module itself. Private variables in standard BAS modules live for the, entire life of the application, even if they can be accessed only while Visual, Basic is executing code in that module. Variables in form and class modules, exist only when that module is loaded in memory. In other words, while a, form is active (but not necessarily visible to the user) all its variables take, some memory, and this memory is released only when the form is, completely unloaded from memory. The next time the form is re-created,, Visual Basic reallocates memory for all variables and resets them to their, default values (0 for numeric values, "" for strings, Nothing for object, variables)., PUBLIC VS LOCAL VARIABLES, A variable can have the same name and different scope. For example,, we can have a public variable named R and within a procedure we can, declare a local variable R. References to the name R within the procedure, would access the local variable and references to R outside the procedure, would access the public variable., , CONSTANTS, Constant also store values, but as the name implies, those values, remains constant throughout the execution of an application. Using, constants can make your code more readable by providing meaningful, names instead of numbers. There are a number of built –in constants in, Visual Basic. There are two sources for constants:, System-defined constants are provided by applications and controls., Visual Basic constants are listed in the Visual Basic (VB)., From the desk of Mr. Manjunatha Balluli, Asst. Professor, Dept. of CS, , Page 32 of 124
Page 34 :
Visual Basic 6.0, User-defined constants are declared using the Const statement. It is a, space in memory filled with fixed value that will not be changed., Syntax, Const constant_name = value, Here const is a keyword, Constant_name is name of the constant, Value is constant value, For example:, Const X=3.14156 Constant for procedure, Private Const X=3.14156 Constant for form and all procedure, Public Const X=3.14156 Constant for all forms, A Const statement's scope is the same as that of a variable declared in the, same location. You can specify scope in any of the following ways:, • To create a constant that exists only within a procedure, declare it within, that procedure., • To create a constant available to all procedures within a class, but not to, any code outside that module, declare it in the declarations section of the, class., • To create a constant that is available to all members of an assembly, but, not to outside clients of the assembly, declare it using the Friend keyword in, the declarations section of the class., • To create a constant available throughout the application, declare it using, the Public keyword in the declarations section the class, , OPERATORS IN VISUAL BASIC, An operator is a special symbol which indicates a certain process is, carried out. Operators in programming languages are taken from, mathematics. Programmers work with data. The operators are used to, process data., ARITHMETICAL OPERATORS, Arithmetic operators are used to perform many of the familiar, arithmetic operations that involve the calculation of numeric values, represented by literals, variables, other expressions, function and property, calls, and constants. Also classified with arithmetic operators are the bitshift operators, which act at the level of the individual bits of the operands, and shift their bit patterns to the left or right., , From the desk of Mr. Manjunatha Balluli, Asst. Professor, Dept. of CS, , Page 33 of 124
Page 35 :
Visual Basic 6.0, Operators, Description, Example, Result, +, Add, 5+5, 10, Subtract, 10-5, 5, /, Divide, 25/5, 5, \, Integer Division, 20\3, 6, *, Multiply, 5*4, 20, ^, Exponent (power of), 3^3, 27, Mod, Remainder of division, 20 Mod 6, 2, &, String concatenation "George"&" "&"Bush" "George Bush", COMPARISON/CONDITIONAL/RELATIONAL OPERATORS, Comparison operators compare two expressions and return, a Boolean value that represents the relationship of their values. There are, operators for comparing numeric values, operators for comparing strings,, and operators for comparing objects. Visual Basic compares numeric values, using six numeric comparison operators. Each operator takes as operands, two expressions that evaluate to numeric values. The following table lists the, operators and shows examples of each., Operators, Description, Example, Result, >, Greater than, 10>8, True, <, Less than, 10<8, False, >=, Greater than or, 20>=10, True, equal to, <=, Less than or, 10<=20, True, equal to, <>, Not Equal to, 5<>4, True, =, Equal to, 5=7, False, *Note: You can also compare strings with the above operators. However,, there are certain rules to follows: Upper case letters are less than lowercase, letters, "A"<"B"<"C"<"D".......<"Z" and number are less than letters., LOGICAL OPERATORS, In addition to conditional operators, there are a few logical operators, which offer added power to the VB programs. Logical operators, compare Boolean expressions, and, return, a Boolean result., The And, Or, AndAlso, OrElse, and Xor operators are binary because they, take two operands, while the Notoperator is unary because it takes a single, operand. Some of these operators can also perform bitwise logical operations, on integral values., , From the desk of Mr. Manjunatha Balluli, Asst. Professor, Dept. of CS, , Page 34 of 124
Page 36 :
Visual Basic 6.0, Operators, OR, AND, Xor, Not, , Description, Operation will be true if either of the operands is, true, Operation will be true only if both the operands are, true, One side or other must be true but not both, Negates true, , DATA TYPE CONVERSION, Visual Basic functions either to convert a string into an integer or vice, versa and many more conversion functions. A complete listing of all the, conversion functions offered by Visual Basic is elucidated below., Conversion To, , Function, , Boolean, , Cbool, , Byte, , Cbyte, , Currency, , Ccur, , Date, , Cdate, , Decimals, , Cdec, , Double, , CDbl, , Integer, , Cint, , Long, , CLng, , Single, , CSng, , Meaning, The function Cbool converts any data type to, Boolean 0 or 1., The function Cbyte converts any data type to, Byte., The function Ccur converts any data type to, currency., The function Cdate converts any data type to, date., The function Cdec converts any data type to, decimal., The function CDbl converts, integer, long, integer, and single- precision numbers to, double-precision numbers. If x is any, number, then the value of CDbl(x) is the, doubleprecision number determined by x., The function CInt converts long integer,, single-precision, and double precision, numbers to integer numbers. If x is any, number, the value of CInt(x) is the (possibly, rounded) integer constant that x determines., The function CLng converts integer, single, precision and double-precision numbers to, long integer numbers. If x is any number, the, value of CLng(x) is the (possibly rounded) long, integer that x determines., The function CSng converts integer, long, integer, and double-precision numbers to, single-precision numbers. If x is any number,, the value of CSng(x) is the singleprecision, number that x determines., , From the desk of Mr. Manjunatha Balluli, Asst. Professor, Dept. of CS, , Page 35 of 124
Page 37 :
Visual Basic 6.0, , String, , CStr, , Value, , val, , The function CStr converts integer, long, integer, single-precision, double-precision,, and variant numbers to strings. If x is any, number, the value of CStr(x) is the string, determined by x. unlike the Str function, CStr, does not place a space in front of positive, numbers.[variant], The CVal function is used to convert string to, double-precision numbers., , CONTROL STRUCTURES IN VISUAL BASIC 6.0, Control Statements are used to control the flow of program's, execution. Visual Basic supports control structures such as if... Then,, if...Then ...Else, Select...Case, and Loop structures such as Do While...Loop,, While...Wend, For...Next etc method., , SELECTION OR, STATEMENTS, , BRANCHING, , OR, , DECISION, , MAKING, , Decision making process is an important part of programming, because it can help to solve practical problems intelligently so that it can, provide useful output or feedback to the user., , If...Then selection structure, The If...Then selection structure performs an indicated action only, when the condition is True; otherwise the action is skipped., Syntax of the If...Then selection, If <condition> Then, statement, End If, e.g.: If average>75 Then, txtGrade.Text = "A", End If, , If...Then...Else selection structure, The If...Then...Else selection structure allows the programmer to, specify that a different action is to be performed when the condition is True, than when the condition is False., Syntax of the If...Then...Else selection, If <condition > Then, statements, Else, statements, End If, From the desk of Mr. Manjunatha Balluli, Asst. Professor, Dept. of CS, , Page 36 of 124
Page 38 :
Visual Basic 6.0, e.g.: If average>50 Then, txtGrade.Text = "Pass", Else, txtGrade.Text = "Fail", End If, , Nested If...Then...Else selection structure, Nested If...Then...Else selection structures test for multiple cases by, placing If...Then...Else selection structures inside If...Then...Else structures., Syntax of the Nested If...Then...Else selection structure, You can use Nested If either of the methods as shown above, Method 1, If < condition 1 > Then, statements, ElseIf < condition 2 > Then, statements, ElseIf < condition 3 > Then, statements, Else, Statements, End If, Method 2, If < condition 1 > Then, statements, Else, If < condition 2 > Then, statements, Else, If < condition 3 > Then, statements, Else, Statements, End If, End If, End If, e.g.: Assume you have to find the grade using nested if and display in a text, box, If average > 75 Then, txtGrade.Text = "A", ElseIf average > 65 Then, From the desk of Mr. Manjunatha Balluli, Asst. Professor, Dept. of CS, , Page 37 of 124
Page 39 :
Visual Basic 6.0, txtGrade.Text = "B", ElseIf average > 55 Then, txtGrade.text = "C", ElseIf average > 45 Then, txtGrade.Text = "S", Else, txtGrade.Text = "F", End If, , Select...Case selection structure, The Select Case structure compares one expression to different values., The advantage of the Select Case statement over multiple If...Then...Else, statements is that it makes the code easier to read and maintain., The Select Case structure tests a single expression, which is evaluated, once at the top of the structure. The result of the test is then compared with, several values, and if it matches one of them, the corresponding block of, statements is executed. Here’s the syntax of the Select Case statement:, The following program block illustrate the working of Select...Case., Syntax of the Select...Case selection structure, Select Case expression, Case value1, Statements, Case value2, Statements, ., ., ., ., Case valuen, Statements, Case else, statements, End Select, e.g.: Assume you have to find the grade using select...case and display in, the text box, Dim average as Integer, average = txtAverage.Text, Select Case average, Case 100 To 75, txtGrade.Text ="A", From the desk of Mr. Manjunatha Balluli, Asst. Professor, Dept. of CS, , Page 38 of 124
Page 40 :
Visual Basic 6.0, Case 74 To 65, txtGrade.Text ="B", Case 64 To 55, txtGrade.Text ="C", Case 54 To 45, txtGrade.Text ="S", Case 44 To 0, txtGrade.Text ="F", Case Else, MsgBox "Invalid average marks", End Select, , LOOPING STATEMENTS, Visual Basic procedure that allows the program to run repeatedly, until a condition or a set of conditions is met. This is procedure is known as, looping. Looping is a very useful feature of Visual Basic because it makes, repetitive works easier. There are three kinds of loops in Visual Basic,, the Do...Loop ,the For.......Next loop and the While.....Wend Loop., Loop statements allow you to execute one or more lines of code, repetitively. Many tasks consist of trivial operations that must be repeated, over and over again, and looping structures are an important part of any, programming language., Visual Basic supports the following loop statements:, • Do...Loop, • For...Next, • Existing Loop, • While...Wend, , Do...Loop, The Do...Loop executes a block of statements for as long as a condition, is True. Visual Basic evaluates an expression, and if it’s True, the statements, are executed. If the expression is False, the program continues and the, statement following the loop is executed., The Do Loop statements have four different forms, as shown below:, a) The Do While...Loop is used to execute statements until a certain, condition is met., Do While condition, Block of one or more VB statements, Loop, , From the desk of Mr. Manjunatha Balluli, Asst. Professor, Dept. of CS, , Page 39 of 124
Page 41 :
Visual Basic 6.0, Example, The following Do Loop counts from 1 to 100., Dim number As Integer, number = 1, Do While number <= 100, number = number + 1, Loop, A variable number is initialized to 1 and then the Do While Loop, starts. First, the condition is tested; if condition is True, then the statements, are executed. When it gets to the Loop it goes back to the Do and tests, condition again. If condition is False on the first pass, the statements are, never executed., b) The Do...Loop While statement first executes the statements and then, test the condition after each execution, Do, Block of one or more VB statements, Loop While condition, Example, Dim number As Long, number = 0, Do, number = number + 1, Loop While number < 201, The programs execute the statements between Do and Loop While, structure in any case. Then it determines whether the counter is less than, 501. If so, the program again executes the statements between Do and Loop, While else exits the Loop., c) Unlike the Do While...Loop repetition structures, the Do Until..., Loop structure tests a condition for falsity. Statements in the body of a Do, Until...Loop are executed repeatedly as long as the loop-continuation test, evaluates to False., Do Until condition, Block of one or more VB statements, Loop, Example, An example for Do Until...Loop statement. The coding is typed inside, the click event of the command button, , From the desk of Mr. Manjunatha Balluli, Asst. Professor, Dept. of CS, , Page 40 of 124
Page 42 :
Visual Basic 6.0, Dim number As Long, number=0, Do Until number > 1000, number = number + 1, Print number, Loop, Numbers between 1 to 1000 will be displayed on the form as soon as you, click on the command button., d), Do, Block of one or more VB statements, Loop Until condition, Example, Do, counter=counter+1, Loop until counter>1000, , For....Next Loop, The syntax is:, For counter = Start To End Step [Increment], One or more VB statements, Next [counter], The arguments counter, start, end, and increment are all numeric., The increment argument can be either positive or negative. If increment is, positive, start must be less than or equal to end or the statements in the, loop will not execute. If increment is negative, start must be greater than or, equal to end for the body of the loop to execute. If steps aren’t set, then, increment defaults to 1., In executing the For loop, visual basic:, 1., 2., (if, 3., 4., 5., , Sets counter equal to start., Tests to see if counter is greater than end. If so, visual basic exits the loop, increment is negative, visual basic tests to see if counter is less than end)., Executes the statements., Increments counter by 1 or by increment, if it’s specified., Repeats steps 2 through 4., , From the desk of Mr. Manjunatha Balluli, Asst. Professor, Dept. of CS, , Page 41 of 124
Page 43 :
Visual Basic 6.0, For Example:, 1)For I=0 To 10 step 5, Statements, Next I, 2) For counter = 100 To 0 Step -5, Statements, Next counter, , EXISTING LOOP, The exit statement allows you to exit directly from For Loop and Do, Loop, Exit For can appear as many times as needed inside a For loop, and, Exit Do can appear as many times as needed inside a Do loop ( the Exit Do, statement works with all version of the Do Loop syntax). Sometimes the user, might want to get out from the loop before the whole repetitive process is, executed; the command to use is Exit For To exit a For.....Next Loop or Exit, Do To exit a Do… Loop, and you can place the Exit For or Exit Do statement, within the loop; and it is normally used together with the, If....Then.....statement., Exit For, The syntax:, For counter= start To end step (increment), Statements, Exit for, Statement, Next counter, Exit Do, The syntax:, Do While condition, Statements, Exit do, Statements, Loop, , While... Wend Statement, A While...Wend statement, While...Loop statement., , behaves, , like, , the Do, , Syntax:, While condition, Statements, Wend, From the desk of Mr. Manjunatha Balluli, Asst. Professor, Dept. of CS, , Page 42 of 124
Page 44 :
Visual Basic 6.0, Example, The following While...Wend counts from 1 to 100, Dim number As Integer, number = 1, While number <=100, number = number + 1, Wend, , VISUAL BASIC FUNCTIONS:, Visual Basic offers a rich assortment of built-in functions. The, numeric and string variables are the most common used variables in, programming. Therefore, Visual Basic provides the user with many, functions to be used with a variable to perform certain operations or type, conversion. Detailed description of the function in general will be discussed, in the following functions section. The most common functions for (numeric, or string) variable X are stated in the following table., Function, , Description, Numerical/Mathematical Function, , X= RND, , Create random number value between 0 and 1, , Y=ABS(X), , Absolute of X, |X|, , Y=SQR(X), , Square root of X , √𝑋𝑋, , Y=SGN(X), , -(-1 or 0 or 1) for (X<0 or X=0 or X>0) Y=EXP(X) 𝒆𝒆𝑿𝑿, , Y=LOG(X), , Natural logarithms, ln𝑋𝑋 Y=LOG(X) / LOG(10) log𝑋𝑋, , Y=sin (𝑋𝑋), Y=cos (𝑋𝑋), Y=tan (𝑋𝑋), , Trigonometric functions, , Y=INT(X), , Integer of X Y= FIX(X) Take the integer part, , Y=ATN(X), , Is arc= tan−1(𝑋𝑋) (Where X angle in radian)., Function of String Variable, , Y=Len(x), , Number of characters of Variable, , Y=UCase (x), , Change to capital letters, , Y=LCase (x), , Change to small letters, , Y=Left (X,L), , Take L character from left, , Y=Right (X,L), , Take L character from right, , Y=Mid (X,S,L), , Take only characters between S and R, , From the desk of Mr. Manjunatha Balluli, Asst. Professor, Dept. of CS, , Page 43 of 124
Page 45 :
Visual Basic 6.0, , PROCEDURES IN VISUAL BASIC 6, Visual Basic offers different types of procedures to execute small, sections of coding in applications. The various procedures are elucidated in, details in this section. Visual Basic programs can be broken into smaller, logical components called Procedures. Procedures are useful for condensing, repeated operations such as the frequently used calculations, text and, control manipulation etc. The benefits of using procedures in programming, are:, It is easier to debug a program a program with procedures, which breaks a, program into discrete logical limits., Procedures used in one program can act as building blocks for other, programs with slight modifications., A Procedure can be Sub, Function or Property Procedure., , Sub Procedures, A sub procedure can be placed in standard, class and form modules., Each time the procedure is called, the statements between Sub and End, Sub are executed. The syntax for a sub procedure is as follows:, [Private | Public] [Static] Sub Procedurename [( arglist)], [ statements], End Sub, arglist is a list of argument names separated by commas. Each argument, acts like a variable in the procedure. There are two types of Sub Procedures, namely general procedures and event procedures., , Event Procedures, An event procedure is a procedure block that contains the control's, actual name, an underscore (_), and the event name. The following syntax, represents the event procedure for a Form_Load event., Private Sub Form_Load(), ....statement block.., End Sub, Event Procedures acquire the declarations as Private by default., , General Procedures, A general procedure is declared when several event procedures, perform the same actions. It is a good programming practice to write, common statements in a separate procedure (general procedure) and then, call them in the event procedure., From the desk of Mr. Manjunatha Balluli, Asst. Professor, Dept. of CS, , Page 44 of 124
Page 46 :
Visual Basic 6.0, In order to add General procedure:, , The Code window is opened for the module to which the procedure is, to be added., , The Add Procedure option is chosen from the Tools menu, which, opens an Add Procedure dialog box as shown in the figure given below., , The name of the procedure is typed in the Name textbox, , Under Type, Sub is selected to create a Sub procedure, Function to, create a Function procedure or Property to create a Property procedure., , Under Scope, Public is selected to create a procedure that can be, invoked outside the module, or Private to create a procedure that can be, invoked only from within the module., , We can also create a new procedure in the current module by typing Sub, ProcedureName, Function ProcedureName, or Property ProcedureName in, the Code window. A Function procedure returns a value and a Sub, Procedure does not return a value., , Function Procedures, Functions are like sub procedures, except they return a value to the, calling procedure. They are especially useful for taking one or more pieces of, data, called arguments and performing some tasks with them. Then the, functions returns a value that indicates the results of the tasks complete, within the function., The following function procedure calculates the third side or, hypotenuse of a right triangle, where A and B are the other two sides. It, takes two arguments A and B (of data type Double) and finally returns the, results., Function Hypotenuse (A As Double, B As Double) As Double, Hypotenuse = sqr (A^2 + B^2), End Function, The above function procedure is written in the general declarations section, of the Code window. A function can also be written by selecting the Add, Procedure dialog box from the Tools menu and by choosing the required, scope and type., From the desk of Mr. Manjunatha Balluli, Asst. Professor, Dept. of CS, , Page 45 of 124
Page 47 :
Visual Basic 6.0, , Property Procedures, A property procedure is used to create and manipulate custom properties. It, is used to create read only properties for Forms, Standard modules and Class, modules.Visual Basic provides three kind of property procedures-Property Let, procedure that sets the value of a property, Property Get procedure that returns the, value of a property, and Property Set procedure that sets the references to an, object., , ARRAYS, An array is a variable with a single name that represents many different, items. When we work with a single item, we only need to use one variable. However,, if we have a list of items which are of similar type to deal with, we need to declare, an array of variables instead of using a variable for each item, For example, if we need to enter one hundred names, it is difficult to declare 100, different names. Besides, if we want to process those data that involves decision, making, we might have to use hundreds of if...then statements, this is a waste of, time and efforts.So, instead of declaring one hundred different variables, we need, to declare only one array. We differentiate each item in the array by using, subscript, the index value of each item, for example, name(1), name(2), name(3), .......etc. , makes declaring variables more streamline., The Individual elements of an array are identified using an index. Arrays, have upper and lower bounds and the elements have to lie within those bounds., Each index number in an array is allocated individual memory space and therefore, users must evade declaring arrays of larger size than required. We can declare an, array of any of the basic data types including variant, user-defined types and object, variables. The individual elements of an array are all of the same data type., , Declaring arrays, Arrays occupy space in memory. The programmer specifies the array, type and the number of elements required by the array so that the compiler, may reserve the appropriate amount of memory. Arrays may be declared as, Public (in a code module), module or local. Module arrays are declared in the, general declarations using keyword Dim or Private. Local arrays are declared, in a procedure using Dim or Static. Array must be declared explicitly with, keyword "As"., , There are two types of arrays in Visual Basic namely:, Fixed-size/static array : The size of array always remains the same-size, doesn't change during the program execution., Dynamic array : The size of the array can be changed at the run time- size, changes during the program execution., , From the desk of Mr. Manjunatha Balluli, Asst. Professor, Dept. of CS, , Page 46 of 124
Page 48 :
Visual Basic 6.0, , Declaring one dimensional Array, The general syntax to declare a one dimensional array is as follow:, Dim arrayName(subscript) as dataType, where subs indicate the last subscript in the array., When you declare an array, you need to be aware of the number of elements, created by the Dim keyword. In the Dim arrayName(subscript), statement, subscript actually is a constant that defines the maximum, number of elements allowed. When an upper bound is specified in the, declaration, a Fixed-array is created. The upper limit should always be, within the range of long data type., EXAMPLE, Dim numbers(5) As Integer, In the above illustration, numbers is the name of the array, and the, number 6 included in the parentheses is the upper limit of the array. The, above declaration creates an array with 6 elements, with index numbers, running from 0 to 5., The second way is to specify the lower bound and the upper bound of the, subscript using To keyword. The syntax is, Dim arrayName(lowerbound To upperbound) As dataType, If we want to specify the lower limit, then the parentheses should, include both the lower and upper limit along with the To keyword. An, example for this is given below., EXAMPLE, Dim numbers (1 To 6 ) As Integer, In the above statement, an array of 10 elements is declared but with, indexes running from 1 to 6., A public array can be declared using the keyword Public instead of Dim as, shown below., Public numbers(5) As Integer, , From the desk of Mr. Manjunatha Balluli, Asst. Professor, Dept. of CS, , Page 47 of 124
Page 49 :
Visual Basic 6.0, , Multidimensional Arrays, Arrays can have multiple dimensions. A common use of, multidimensional arrays is to represent tables of values consisting of, information arranged in rows and columns. To identify a particular table, element, we must specify two indexes: The first (by convention) identifies the, element's row and the second (by convention) identifies the element's, column., Tables or arrays that require two indexes to identify a particular, element are called two dimensional arrays. Note that multidimensional, arrays can have more than two dimensions. Visual Basic supports at least, 60 array dimensions, but most people will need to use more than two or, three dimensional-arrays., , Declaring two dimensional Array, The general syntax to declare a two dimensional array is as follow:, Dim ArrayName(Sub1,Sub2) as dataType, The following statement declares a two-dimensional array 50 by 50 array, within a procedure., Example, Dim AvgMarks ( 50, 50), It is also possible to define the lower limits for one or both the, dimensions as for fixed size arrays. An example for this is given here., Dim Marks ( 101 To 200, 1 To 100), An example for three dimensional-array with defined lower limits is given, below., Dim Details( 101 To 200, 1 To 100, 1 To 100), , DYNAMIC ARRAY, So far we have learned how to define the number of elements in an, array during design time. This type of array is known as static array., However, the problem is sometimes we might not know how many data, items we need to store during run time. In this case, we need to use, dynamic array where the number of elements will be decided during run, time. In VB6, the dynamic array can be resized when the program is, executing., The first step in declaring a dynamic array is by using the Dim statement, without specifying the dimenson list, as follows:, Dim myArray(), From the desk of Mr. Manjunatha Balluli, Asst. Professor, Dept. of CS, , Page 48 of 124
Page 50 :
Visual Basic 6.0, Then at run time we can specify the actual array size using the ReDim, statement, as follows:, ReDim myArray(1 to n) when n is decided during run time, You can also declare a two dimensional array using ReDim statement, as, follows:, ReDim myArray(1 to n, 1 to m) when m and n are known during run, time, , DATE AND TIME FUNCTIONS, Not only does Visual Basic let you store date and time information in, the specific Date data type, it also provides a lot of date- and time-related, functions. These functions are very important in all business applications, and deserve an in-depth look. Date and Time are internally stored as, numbers in Visual Basic. The decimal points represents the time between, 0:00:00 and 23:59:59 hours inclusive., The system's current date and time can be retrieved using the Now,, Date and Time functions in Visual Basic. The Now function retrieves the, date and time, while Date function retrieves only date and Time function, retrieves only the time., To display both the date and time together a message box is displayed, use the statement given below., MsgBox "The current date and time of the system is" & Now, Here & is used as a concatenation operator to concentrate the string, and the Now function. Selective portions of the date and time value can be, extracted using the below listed functions., Function, Year ( ), Month ( ), Day ( ), WeekDay ( ), Hour ( ), Minute ( ), Second ( ), , Extracted Portion, Year (Now), Month (Now), Day (Now), WeekDay (Now), Hour (Now), Minute (Now), Second (Now), , The calculation and conversion functions related to date and time functions, are listed below., Function, , Description, , From the desk of Mr. Manjunatha Balluli, Asst. Professor, Dept. of CS, , Page 49 of 124
Page 51 :
Visual Basic 6.0, DateAdd ( ), DateDiff ( ), DatePart ( ), DateValue ( ), TimeValue ( ), DateSerial ( ), , Returns a date to which a specific interval has, been added, Returns a Long data type value specifying the, interval between the two values, Returns an Integer containing the specified part, of a given date, Converts a string to a Date, Converts a string to a time, Returns a date for specified year, month and day, , DateDiff Function, The DateDiff function returns the intervals between two dates in terms of, years, months or days. The syntax for this is given below., DateDiff (interval, date1, date2[, firstdayofweek[, firstweekofyear]]), Format Function, The format function accepts a numeric value and converts it to a string in, the format specified by the format argument. The syntax for this is given, below., Format (expression[, format[, firstdayofweek[, firstweekofyear]]]), The Format function syntax has these parts:, Part, Description, Expression, Required any valid expression, Format, Optional. A valid named or user-defined format, expression., Firstdayofweek Optional. A contant that specifies the first day, of the week., Firstweekofyear Optional. A contant that specifies the first, week of the year, , From the desk of Mr. Manjunatha Balluli, Asst. Professor, Dept. of CS, , Page 50 of 124
Page 52 :
Visual Basic 6.0, , Unit IV, CONTROLS, , From the desk of Mr. Manjunatha Balluli, Asst. Professor, Dept. of CS, , Page 51 of 124
Page 53 :
Visual Basic 6.0, , VB CONTROLS, Visual Basic controls and the ways of creating and implementing the., It also helps us to understand the concept of Control Arrays. Controls are, used to receive user input and display output and has its own set of, properties, methods and events. Let us discuss few of these controls in this, lesson., , Creating and Using Controls, A control is an object that can be drawn on a Form object to enable or, enhance user interaction with an application. Controls have properties that, define aspects their appearance, such as position, size and color, and, aspects of their behavior, such as their response to the user input. They can, respond to events initiated by the user or set off by the system. For instance,, a code could be written in a CommandButton control's click event procedure, that would load a file or display a result., In addition to properties and events, methods can also be used to, manipulate controls from code. For instance, the move method can be used, with some controls to change their location and size., Most of the controls provide choices to users that can be in the form of, OptionButton or CheckBox controls, ListBox entries or ScrollBars to select a, value. Let us discuss these controls by means of a few simple applications in, the following lessons., , Common properties, methods and events of controls, Every object, such as a form or control, has a set of properties that, describe it. Although this set isn't identical for all objects, some properties-such as those listed in Table are common to most controls. You can see, every property for a given control by looking at the Properties window in the, IDE., Common Properties of Visual Basic Controls, Property, Description, The position of the left side of a control with respect to its, Left, container, Top, The position of the top of a control with respect to its container, Height, A control's height, Width, A control's width, Name, The string value used to refer to a control, The Boolean (True/False) value that determines whether users, Enabled, can manipulate the control, The Boolean (True/False) value that determines whether users, Visible, can see the control, From the desk of Mr. Manjunatha Balluli, Asst. Professor, Dept. of CS, , Page 52 of 124
Page 54 :
Visual Basic 6.0, , Events, Events are what happen in and around your program. For example,, when a user clicks a button, many events occur: The mouse button is, pressed, the CommandButton in your program is clicked, and then the, mouse button is released. These three things correspond to the MouseDown, event, the Click event, and the MouseUp event. During this process, the, GotFocus event for the CommandButton and the LostFocus event for, whichever object previously held the focus also occur., Again, not all controls have the same events, but some events are, shared by many controls (see Table). These events occur as a result of some, specific user action, such as moving the mouse, pressing a key on the, keyboard, or clicking a text box. These types of events are user-initiated, events and are what you will write code for most often., Using GotFocus and LostFocus, The GotFocus and LostFocus events relate to most other events, because they occur whenever a new control becomes active to receive user, input. This makes GotFocus and LostFocus useful for data validation, the, process of making sure that data is in the proper format for your program., Be careful, though! Improperly coding these two events can cause your, program to begin an endless loop, which will cause your program to stop, responding., Common Events of Visual Basic Controls, Event, Occurrence, Change, The user modifies text in a combo box or text box., Click, The user clicks the primary mouse button on an object., The user double-clicks the primary mouse button on an, DblClick, object., DragDrop, The user drags an object to another location., DragOver, The user drags an object over another control., GotFocus, An object receives focus., KeyDown, The user presses a keyboard key while an object has focus., The user presses and releases a keyboard key while an object, KeyPress, has focus., KeyUp, The user releases a keyboard key while an object has focus., Event, Occurrence, LostFocus, An object loses focus., The user presses any mouse button while the mouse pointer, MouseDown, is over an object., MouseMove The user moves the mouse pointer over an object., The user releases any mouse button while the mouse pointer, MouseUp, is over an object., Example of Change event for TextBox, From the desk of Mr. Manjunatha Balluli, Asst. Professor, Dept. of CS, Page 53 of 124
Page 55 :
Visual Basic 6.0, Private Sub Text1_Change(), Form1.BackColor = vbBlue, End Sub, When the user changes the text in the textbox backcolor of the form will, change to blue color., Example of Click event for CommandButton, Private Sub Command1_Click(), Print "Click event activated", End Sub, When the user clicks on the commandbutton1 “Click event activated”, will print on the form., Example of DblClick event for Form, Private Sub Form_DblClick(), Form1.Caption = "Double Click event activated", End Sub, When the user double clicks on the form the caption of the form will be, changed to “Double Click event activated”., Example of MoveMove event for PictureBox, Private Sub Picture1_MouseMove(Button As Integer, Shift As Integer, X As, Single, Y As Single), Picture1.Picture = LoadPicture("D:\SMD\smc.jpg"), End Sub, When the user move mouse on picturebox1 the picture will be displayed, in the picturebox1., Example of MoveDown event for Image Control, Private Sub Image1_MouseDown(Button As Integer, Shift As Integer, X As, Single, Y As Single), Image1.Picture = LoadPicture("D:\SMD\smc.jpg"), End Sub, When the user move mouse down on Image1 the picture will be, displayed in the Image1 control., Example of KeyPress event for Form, Private Sub Form_KeyPress(KeyAscii As Integer), Print "Event KeyPress Activated", End Sub, When the user press any key in the keyboard it prints ”KeyPress event, activated” on the form., , From the desk of Mr. Manjunatha Balluli, Asst. Professor, Dept. of CS, , Page 54 of 124
Page 56 :
Visual Basic 6.0, Example of KeyUp event for Form, Private Sub Form_KeyUp(KeyCode As Integer, Shift As Integer), Print "Event KeyUp Activated", End Sub, When the user press any key in the keyboard it prints ”KeyUp event, activated” on the form., , Methods, Methods are blocks of code designed into a control that tell the control, how to do things, such as move to another location on a form. Just as with, properties, not all controls have the same methods, although some common, methods do exist, as shown in Table, Common, Method, Move, Drag, SetFocus, ZOrder, , Methods of Visual Basic Controls, Use, Changes an object's position in response to a code request, Handles the execution of a drag-and-drop operation by the user, Gives focus to the object specified in the method call, Determines the order in which multiple objects appear onscreen, , THE PICTUREBOX CONTROL, PictureBox controls are among the most powerful and complex items, in the Visual Basic Toolbox window. In a sense, these controls are more, similar to forms than to other controls. For example, PictureBox controls, support all the properties related to graphic output, including AutoRedraw,, ClipControls, HasDC, FontTransparent, CurrentX, CurrentY, and all the, Drawxxxx, Fillxxxx, and Scalexxxx properties. PictureBox controls also, support all graphic methods, such as Cls, PSet, Point, Line, and Circle and, conversion methods, such as ScaleX, ScaleY, TextWidth, and TextHeight. In, other words, all the techniques that I described for forms can also be used, for PictureBox controls (and therefore won't be covered again in this, section)., Loading images, Once you place a PictureBox on a form, you might want to load an, image in it, which you do by setting the Picture property in the Properties, window. You can load images in many different graphic formats, including, bitmaps (BMP), device independent bitmaps (DIB), metafiles (WMF),, enhanced metafiles (EMF), GIF and JPEG compressed files, and icons (ICO, and CUR). You can decide whether a control should display a border,, resetting the BorderStyle to 0-None if necessary. Another property that, comes handy in this phase is AutoSize: Set it to True and let the control, automatically resize itself to fit the assigned image., , From the desk of Mr. Manjunatha Balluli, Asst. Professor, Dept. of CS, , Page 55 of 124
Page 57 :
Visual Basic 6.0, You might want to set the Align property of a PictureBox control to, something other than the 0-None value. By doing that, you attach the, control to one of the four form borders and have Visual Basic automatically, move and resize the PictureBox control when the form is resized. PictureBox, controls expose a Resize event, so you can trap it if you need to move and, resize its child controls too., You can do more interesting things at run time. To begin with, you can, programmatically load any image in the control using the LoadPicture, function:, Picture1.Picture = LoadPicture("c:\windows\setup.bmp"), and you can clear the current image using either one of the following, statements:, ‘These are equivalent., Picture1.Picture = LoadPicture(""), Set Picture1.Picture = Nothing, The LoadPicture function has been extended in Visual Basic 6 to support, icon files containing multiple icons. The new syntax is the following:, LoadPicture(filename, [size], [colordepth], [x], [y]), where values in square brackets are optional. If filename is an icon file, you, can select a particular icon using the size or colordepth arguments. Valid, sizes are 0-vbLPSmall, 1-vbLPLarge (system icons whose sizes depend on, the video driver), 2-vbLPSmallShell, 3-vbLPLargeShell (shell icons whose, dimensions are affected by the Caption Button property as set in the, Appearance tab in the screen's Properties dialog box), and 4-vbLPCustom, (size is determined by x and y). Valid color depths are 0-vbLPDefault (the, icon in the file that best matches current screen settings), 1vbLPMonochrome, 2-vbLPVGAColor (16 colors), and 3-vbLPColor (256, colors)., You can copy an image from one PictureBox control to another by assigning, the target control's Picture property:, Picture2.Picture = Picture1.Picture, , From the desk of Mr. Manjunatha Balluli, Asst. Professor, Dept. of CS, , Page 56 of 124
Page 59 :
Visual Basic 6.0, * You must ensure the path to access the picture is correct. Besides that,, the image in the picture box is not resizable, , THE IMAGE CONTROL, Image controls are far less complex than PictureBox controls. They, don't support graphical methods or the AutoRedraw and the ClipControls, properties, and they can't work as containers, just to hint at their biggest, limitations. Nevertheless, you should always strive to use Image controls, instead of PictureBox controls because they load faster and consume less, memory and system resources. Remember that Image controls are, windowless objects that are actually managed by Visual Basic without, creating a Windows object. Image controls can load bitmaps and JPEG and, GIF images., When you're working with an Image control, you typically load a, bitmap into its Picture property either at design time or at run time using, the LoadPicture function. Image controls don't expose the AutoSize property, because by default they resize to display the contained image (as it happens, with PictureBox controls set at AutoSize = True). On the other hand, Image, controls support a Stretch property that, if True, resizes the image, (distorting it if necessary) to fit the control. In a sense, the Stretch property, somewhat remedies the lack of the PaintPicture method for this control. In, fact, you can zoom in to or reduce an image by loading it in an Image control, and then setting its Stretch property to True to change its width and height:, ' Load a bitmap., Image1.Stretch = False, Image1.Picture = LoadPicture("D:\smd\smc.jpg"), ' Reduce it by a factor of two., From the desk of Mr. Manjunatha Balluli, Asst. Professor, Dept. of CS, , Page 58 of 124
Page 60 :
Visual Basic 6.0, Image1.Stretch = True, Image1.Move 0, 0, Image1.Width / 2, Image1.Width / 2, Image controls support all the usual mouse events. For this reason,, many Visual Basic developers have used Image controls to simulate, graphical buttons and toolbars. Now that Visual Basic natively supports, these controls, you'd probably better use Image controls only for what they, were originally intended., , Image, , Properties, Appearance,, BorderStyle,, Container,, DataChanged,, DataField,, DataSource, DragIcon,, DragMode, Enabled,, Height, Index, Left,, MouseIcon,, MousePointer, Name,, Parent, Picture,, Stretch, Tag, Top,, Visible,, WhatsThisHelpID,, Width, , Methods, Drag, Move,, Refresh,, ShowWhatsThis,, ZOrder, , Events, Click,, DblClick,, DragDrop,, DragOver,, MouseDown,, MouseMove,, MouseUp, , Example:, , In this program, we insert a command button and an image control into the, form. Besides that, we set the image Strech property to true. Next, enter te following, code:, Private Sub cmd_LoadImg_Click(), Image1.Picture = LoadPicture LoadPicture("D:\smd\smc.jpg"), End Sub, , The Image Viewer, From the desk of Mr. Manjunatha Balluli, Asst. Professor, Dept. of CS, , Page 59 of 124
Page 61 :
Visual Basic 6.0, PictureBox, It act as container control, Use of memory to store the picture, Editing of picture is possible in, picture box, Having auto size property, Not having stretch property, , Image Control, it is not act as container control, Not use of memory to store the, picture, Editing of picture is not possible in, picture box, Not having auto size property, Having stretch property, , LABEL CONTROL, The label is a very useful control for Visual Basic, as it is not only, used to provide instructions and guides to the users, it can also be used to, display outputs. One of its most important properties is Caption. Using the, syntax Label.Caption, it can display text and numeric data. You can change, its caption in the properties window and also at runtime., Most people use Label controls to provide a descriptive caption and, possibly an associated hot key for other controls, such as TextBox, ListBox,, and ComboBox, that don't expose the Caption property. In most cases, you, just place a Label control where you need it, set its Caption property to a, suitable string (embedding an ampersand character in front of the hot key, you want to assign), and you're done. Caption is the default property for, Label controls. Be careful to set the Label's TabIndex property so that it's 1, minus the TabIndex property of the companion control., , Different settings for the Alignment property of Label controls., Some important Properties of Label Control, , , , , , , Caption - the text that is displayed in the label, BackColor and ForeColor - colors of the background and the text, BackStyle - Opaque or Transparent - whether the background is, visible or not, Font - font and size of text, Alignment - text centered, left or right, , From the desk of Mr. Manjunatha Balluli, Asst. Professor, Dept. of CS, , Page 60 of 124
Page 63 :
Visual Basic 6.0, The following Figure summarizes the common TextBox control's properties, and methods., , Property/, Method, , Description, Properties, , Enabled, Index, Locked, MaxLength, MousePointer, , specifies whether user can interact with this control, or not, Specifies the control array index, If this control is set to True user can use it else if this, control is set to false the control cannot be used, Specifies the maximum number of characters to be, input. Default value is set to 0 that means user can, input any number of characters, Using this we can set the shape of the mouse pointer, when over a TextBox, , Multiline, , By setting this property to True user can have more, than one line in the TextBox, , PasswordChar, , This is to specify mask character to be displayed in, the TextBox, , ScrollBars, , Text, ToolTipIndex, Visible, , This to set either the vertical scrollbars or horizontal, scrollbars to make appear in the TextBox. User can, also set it to both vertical and horizontal. This, property is used with the Multiline property., Specifies the text to be displayed in the TextBox at, runtime, This is used to display what text is displayed or in the, control, By setting this user can make the Textbox control, visible or invisible at runtime, Method, , SetFocus, , Transfers focus to the TextBox, Event procedures, , Change, , Action happens when the TextBox changes, , Click, , Action happens when the TextBox is clicked, , GotFocus, , Action happens when the TextBox receives the active, focus, , LostFocus, , Action happens when the TextBox loses it focus, , KeyDown, , Called when a key is pressed while the TextBox has, the focus, , KeyUp, , Called when a key is released while the TextBox has, the focus, , From the desk of Mr. Manjunatha Balluli, Asst. Professor, Dept. of CS, , Page 62 of 124
Page 64 :
Visual Basic 6.0, Example1:, In this application, two text boxes are inserted into the form together, with a few labels. The two text boxes are used to accept inputs from the user, and one of the labels will be used to display the sum of two numbers that, are entered into the two text boxes. Besides, a command button is also, programmed to calculate the sum of the two numbers using the plus, operator. The program use creates a variable sum to accept the summation, of values from text box 1 and text box 2.The procedure to calculate and to, display the output on the label is shown below., Private Sub Command1_Click(), 'To add the values in TextBox1 and TextBox2, Sum = Val(Text1.Text) +Val(Text2.Text), 'To display the answer on label 1, Label1.Caption = Sum, End Sub, The output is shown in Figure, , FRAME CONTROL, Frame controls are similar to Label controls in that they can serve as, captions for those controls that don't have their own. Moreover, Frame, controls can also (and often do) behave as containers and host other, controls. In most cases, you only need to drop a Frame control on a form, and set its Caption property. If you want to create a borderless frame, you, can set its BorderStyle property to 0-None., Controls that are contained in the Frame control are said to be child, controls. Moving a control at design time over a Frame control—or over any, other container, for that matter—doesn't automatically make that control a, child of the Frame control. After you create a Frame control, you can create, a child control by selecting the child control's icon in the Toolbox and, drawing a new instance inside the Frame's border. Alternatively, to make an, existing control a child of a Frame control, you must select the control,, press Ctrl+X to cut it to the Clipboard, select the Frame control, and press, From the desk of Mr. Manjunatha Balluli, Asst. Professor, Dept. of CS, , Page 63 of 124
Page 65 :
Visual Basic 6.0, Ctrl+V to paste the control inside the Frame. If you don't follow this, procedure and you simply move the control over the Frame, the two controls, remain completely independent of each other, even if the other control, appears in front of the Frame control., Frame controls, like all container controls, have two interesting, features. If you move a Frame control, all the child controls go with it. If you, make a container control disabled or invisible, all its child controls also, become disabled or invisible. You can exploit these features to quickly, change the state of a group of related controls., , Frame, , Properties, Appearance,, BackColor,, Caption,, ClipControls,, Container, DragIcon,, DragMode,, Enabled, Font,, FontBold, FontItalic,, FontName, FontSize,, FontStrikethru,, FontUnderline,, ForeColor, Height,, HelpContextID, hWnd,, Index, Left,, MouseIcon,, MousePointer, Name,, Parent, TabIndex, Tag,, Top, Visible,, WhatsThisHelpID,, Width, , Methods, Drag,, Move,, Refresh,, ShowWhatsThis,, ZOrder, , From the desk of Mr. Manjunatha Balluli, Asst. Professor, Dept. of CS, , Events, Click,, DblClick,, DragDrop,, DragOver,, MouseDown,, MouseMove,, MouseUp, , Page 64 of 124
Page 66 :
Visual Basic 6.0, , COMMAND BUTTON, The command button is one of the most important controls as it is, used to execute commands. It displays an illusion that the button is pressed, when the user click on it. The most common event associated with the, command button is the Click event, and the syntax for the procedure is, Private Sub Command1_Click (), Statements, End Sub, The Caption property determines the text to display on the face of the, button. The Default property, if set to true, means that the button will be, activated (same as Clicked) if the <Enter> key is hit anywhere in the form., If Cancel is set to True, the button will be activated from anywhere in the, form by the <Esc> key., , Command, Button, , Properties, Appearance,, BackColor, Cancel,, Caption, Container,, Default, DragIcon,, DragMode, Enabled,, Font, FontBold,, FontItalic,, FontName, FontSize,, FontStrikethru,, FontUnderline, Height,, HelpContextID, hWnd,, Index, Left,, MouseIcon,, MousePointer, Name,, Parent, Style,, TabIndex, TabStop,, Tag, Top, Value,, Visible,, WhatsThisHelpID,, Width, , Methods, Drag, Move,, Refresh, SetFocus,, ShowWhatsThis,, ZOrder, , Events, Click,, DragDrop,, DragOver,, GotFocus,, KeyDown,, KeyPress,, KeyUp,, LostFocus,, MouseDown,, MouseMove,, MouseUp, , Example:, we want to crack a secret password entered by the user. In the design, phase, insert a command button. Next, insert a TextBox and delete Text1, from the Text property. Besides that, set its PasswordChr to *. Now, enter, the following code in the code window., , From the desk of Mr. Manjunatha Balluli, Asst. Professor, Dept. of CS, , Page 65 of 124
Page 67 :
Visual Basic 6.0, Private Sub Command1_Click(), Dim yourpassword As String, yourpassword = Text1.Text, MsgBox ("Your password is: " & yourpassword), End Sub, Run the program and enter a password, then click on the Show Password, button to reveal the password, as shown in Figure, , The Password Cracker, You can also reveal the password by setting the PasswordChar property, back to normal mode, as follows:, Private Sub Command1_Click(), Dim yourpassword As String, Txt_Password.PasswordChar = "", End Sub, , THE CHECKBOX, The Check Box control lets the user selects or unselects an option., When the Check Box is checked, its value is set to 1 and when it is, unchecked, the value is set to 0. You can include the statements, Check1.Value=1 to mark the Check Box and Check1.Value=0 to unmark, the Check Box, as well as use them to initiate certain actions. In checkbox, user can select more than one option. Multiple selections are allowed in, checkbox., , From the desk of Mr. Manjunatha Balluli, Asst. Professor, Dept. of CS, , Page 66 of 124
Page 69 :
Visual Basic 6.0, The Output, , OPTION BUTTON, OptionButton controls are also known as radio buttons because of, their shape. You always use OptionButton controls in a group of two or, more because their purpose is to offer a number of mutually exclusive, choices. Anytime you click on a button in the group, it switches to a selected, state and all the other controls in the group become unselected. Its value is, set to “True” and when it is unselected; its value is set to “False”., A group of OptionButton controls is often hosted in a Frame control., This is necessary when there are other groups of OptionButton controls on, the form. As far as Visual Basic is concerned, all the OptionButton controls, on a form's surface belong to the same group of mutually exclusive, selections, even if the controls are placed at the opposite corners of the, window. The only way to tell Visual Basic which controls belong to which, group is by gathering them inside a Frame control. Actually, you can group, your controls within any control that can work as a container—PictureBox,, for example—but Frame controls are often the most reasonable choice., Methods, Drag, Move,, Refresh, SetFocus,, ShowWhatsThis,, Zorder, , Events, Click, DblClick,, DragDrop,, DragOver,, GotFocus,, KeyDown,, KeyPress,, KeyUp,, LostFocus,, MouseDown,, MouseMove,, MouseUp, , From the desk of Mr. Manjunatha Balluli, Asst. Professor, Dept. of CS, , Page 68 of 124, , Option, Button, , Properties, Alignment,, Appearance,, BackColor, Caption,, Container, DragIcon,, DragMode, Enabled,, Font, FontBold,, FontItalic, FontName,, FontSize,, FontStrikethru,, FontUnderline,, ForeColor, Height,
Page 70 :
Visual Basic 6.0, HelpContextID, hWnd,, Index, Left,, MouseIcon,, MousePointer, Name,, Parent, TabIndex,, TabStop, Tag, Top,, Value, Visible,, WhatsThisHelpID,, Width, Example:, In this application, we want to change the background color of the, form according to the selected option. We insert three option buttons and, change their captions to "Red Background","Blue Background" and "Green, Background" respectively. Next, insert a command button and change its, name to cmd_SetColor and its caption to "Set Background Color". Now, click, on the command button and enter the following code in the code window:, Private Sub Command1_Click(), If Option1.Value = True Then, Form1.BackColor = vbRed, ElseIf Option2.Value = True Then, Form1.BackColor = vbBlue, Else, Form1.BackColor = vbGreen, End If, End Sub, Run the program, select an option and click the "Set Background Color", produces the output, as shown in Figure, , Figure, , From the desk of Mr. Manjunatha Balluli, Asst. Professor, Dept. of CS, , Page 69 of 124
Page 71 :
Visual Basic 6.0, , COMBOBOX, A combobox control is combination of textbox and listbox. This control, enables user to select either by typing in the text into combobox or by, selecting items from the list. The function of the Combo Box is also to, present a list of items where the user can click and select the items from the, list. However, the user needs to click on the small arrowhead on the right of, the combo box to see the items which are presented in a drop-down list. In, order to add items to the list, you can also use the AddItem method., Combobox is collapsed and it does not displays all the items., The combobox controls has three different style that can be set., a) Drop down combo (style 0), b) Simple combo (style 1), c) Drop down list (style 2), , Drop down combo, The Dropdown Combo box first appears as only an edit area with a, down arrow button at the right. The list portion stays hidden until the user, clicks the down-arrow button to drop down the list portion. The user can, either select a value from the list or type a value in the edit area., Simple combo, The Simple Combo box displays an edit area with an attached list box, always visible immediately below the edit area. A simple combo box displays, the contents of its list all the time. The user can select an item from the list, or type an item in the edit box portion of the combo box. A scroll bar is, displayed beside the list if there are too many items to be displayed in the, list box area., Drop down list, The Dropdown list combo box turns the combo box into a Dropdown, list box. At run time, the control looks like the Dropdown combo box. The, user could click the down arrow to view the list. The difference between, Dropdown combo & Dropdown list combo is that the edit area in the, Dropdown list combo is disabled. The user can only select an item and, From the desk of Mr. Manjunatha Balluli, Asst. Professor, Dept. of CS, , Page 70 of 124
Page 72 :
Visual Basic 6.0, cannot type anything in the edit area. Anyway this area displays the selected, item., Property/Method, , Enabled, Index, List, ListCount, ListIndex, Locked, MousePointer, NewIndex, Sorted, Style, TabStop, Text, ToolTipIndex, Visible, AddItem, Clear, RemoveItem, SetFocus, Change, DropDown, GotFocus, LostFocus, , Description, Properties, By setting this property to True or False user, can decide whether user can interact with this, control or not, Specifies the Control array index, String array. Contains the strings displayed in, the drop-down list. Starting array index is 0., Integer. Contains the number of drop-down list, items, Integer. Contains the index of the selected, ComboBox item. If an item is not selected,, ListIndex is -1, Boolean. Specifies whether user can type or not, in the ComboBox, Integer. Specifies the shape of the mouse, pointer when over the area of the ComboBox, Integer. Index of the last item added to the, ComboBox. If the ComboBox does not contain, any items , NewIndex is -1, Boolean. Specifies whether the ComboBox's, items are sorted or not., Integer. Specifies the style of the ComboBox's, appearance, Boolean. Specifies whether ComboBox receives, the focus or not., String. Specifies the selected item in the, ComboBox, String. Specifies what text is displayed as the, ComboBox's tool tip, Boolean. Specifies whether ComboBox is visible, or not at run time, Methods, Add an item to the ComboBox, Removes all items from the ComboBox, Removes the specified item from the ComboBox, Transfers focus to the ComboBox, Event Procedures, Called when text in ComboBox is changed, Called when the ComboBox drop-down list is, displayed, Called when ComboBox receives the focus, Called when ComboBox loses it focus, , From the desk of Mr. Manjunatha Balluli, Asst. Professor, Dept. of CS, , Page 71 of 124
Page 73 :
Visual Basic 6.0, Adding items to a List, It is possible to populate the list at design time or run time, Design Time: To add items to a list at design time, click on List property in, the property box and then add the items. Press CTRL+ENTER after adding, each item as shown below., , Run Time : The AddItem method is used to add items to a list at run time., The AddItem method uses the following syntax., Combo1.AddItemitem number/string, The item argument is a string that represents the text to add to the list, Following is an example to add item to a combo box. The code is typed in the, Form_Load event, Private Sub Form_Load(), Combo1.AddItem “Bengaluru”, Combo1.AddItem “Ballari”, Combo1.AddItem “Bidar”, Combo1.AddItem “Chitradurga”, Combo1.AddItem “Raichur”, Combo1.AddItem “Doddabalapur”, End Sub, Removing Items from a List, The RemoveItem method is used to remove an item from a list., The syntax for this is given below., Combo1.RemoveItem index, The following code verifies that an item is selected in the list and then, removes the selected item from the list., Private Sub cmdRemove_Click(), If combo1.ListIndex > -1 Then, combo1.RemoveItem combo1.ListIndex, End If, End Sub, From the desk of Mr. Manjunatha Balluli, Asst. Professor, Dept. of CS, , Page 72 of 124
Page 74 :
Visual Basic 6.0, Clearing all Items from a List, The clear method is used to remove an item from a list., The syntax for this is given below., Combo1.clear, , LISTBOX, ListBox present a list of choices that are displayed vertically in single, column, if number of items exist the value can be displayed scrollbar, automatically appear on control. Listbox is expanded and displays all the, items., ListBox have list property contain list or item to display. To add the, item at design time, click on list property & add item, press ctrl + enter after, adding each item. To add item at runtime to AddItem method is used., Property/Method, , Enabled, Index, List, ListCount, ListIndex, Locked, MousePointer, NewIndex, Sorted, Style, TabStop, Text, ToolTipIndex, , Description, Properties, By setting this property to True or False user, can decide whether user can interact with this, control or not, Specifies the Control array index, String array. Contains the strings displayed in, the drop-down list. Starting array index is 0., Integer. Contains the number of drop-down list, items, Integer. Contains the index of the selected, ListBox item. If an item is not selected,, ListIndex is -1, Boolean. Specifies whether user can type or not, in the ListBox, Integer. Specifies the shape of the mouse, pointer when over the area of the ListBox, Integer. Index of the last item added to the, ListBox. If the ListBox does not contain any, items , NewIndex is -1, Boolean. Specifies whether the ListBox's items, are sorted or not., Integer. Specifies the style of the ListBox's, appearance, Boolean. Specifies whether ListBox receives the, focus or not., String. Specifies the selected item in the ListBox, String. Specifies what text is displayed as the, , From the desk of Mr. Manjunatha Balluli, Asst. Professor, Dept. of CS, , Page 73 of 124
Page 75 :
Visual Basic 6.0, Visible, AddItem, Clear, RemoveItem, SetFocus, Change, DropDown, GotFocus, LostFocus, , ListBox's tool tip, Boolean. Specifies whether ListBox is visible or, not at run time, Methods, Add an item to the ListBox, Removes all items from the ListBox, Removes the specified item from the ListBox, Transfers focus to the ListBox, Event Procedures, Called when text in ListBox is changed, Called when the ListBox drop-down list is, displayed, Called when ListBox receives the focus, Called when ListBox loses it focus, , Adding items to a List, It is possible to populate the list at design time or run time, Design Time: To add items to a list at design time, click on List property in, the property box and then add the items. Press CTRL+ENTER after adding, each item as shown below., , Run Time : The AddItem method is used to add items to a list at run time., The AddItem method uses the following syntax., List1.AddItemitem number/string, The item argument is a string that represents the text to add to the list, Following is an example to add item to a combo box. The code is typed in the, Form_Load event, , From the desk of Mr. Manjunatha Balluli, Asst. Professor, Dept. of CS, , Page 74 of 124
Page 76 :
Visual Basic 6.0, Private Sub Form_Load(), List1.AddItem “Bengaluru”, List1.AddItem “Ballari”, List1.AddItem “Bidar”, List1.AddItem “Chitradurga”, List1.AddItem “Raichur”, List1.AddItem “Doddabalapur”, End Sub, Removing Items from a List, The RemoveItem method is used to remove an item from a list., The syntax for this is given below., List1.RemoveItem index, The following code verifies that an item is selected in the list and then, removes the selected item from the list., Private Sub cmdRemove_Click(), If List1.ListIndex > -1 Then, List1.RemoveItem combo1.ListIndex, End If, End Sub, Clearing all Items from a List, The clear method is used to remove an item from a list., The syntax for this is given below., List1.clear, Difference between Listbox & Combobox, List Box :, 1. Occupies more space but shows more than one value., 2. We can select multiple items., 3. we can use checkboxes with in the list box., 4. Listbox is much easier to handle., 5. We can't add image item in listbox., Combo Box:, 1. Occupies less space but shows only one value for visibility, 2. Multiple select is not possible, 3. can't use checkboxes within combo boxes, 4. combobox is not easier to handle., 5. we can add image item in combobox., From the desk of Mr. Manjunatha Balluli, Asst. Professor, Dept. of CS, , Page 75 of 124
Page 77 :
Visual Basic 6.0, , HSCROLLBAR & VSCROLLBAR(HORIZONTAL & VERTICAL, SCROLL BARS), , The ScrollBar is a commonly used control, which enables the user to, select a value by positioning it at the desired location. It represents a set of, values. The Min and Max property represents the minimum and maximum, value. The value property of the ScrollBar represents its current value, that, may be any integer between minimum and maximum values assigned., Horizontal and vertical scroll bars are widely used in Windows, applications., Scroll bars provide an intuitive way to move through a list of, information and make great input devices., • Both type of scroll bars are comprised of three areas that can be, clicked, or dragged, to change the scroll bar value. Those areas are:, , End Arrow, Scroll Box(thumb), , Bar area, , Scroll Bar Properties:, LargeChange: Increment added to or subtracted from the scroll bar Value, property when the bar area is clicked., Max : The value of the horizontal scroll bar at the far right and the value of, the vertical scroll bar at the bottom. Can range from -32,768 to 32,767., Min : The other extreme value - the horizontal scroll bar at the left and the, vertical scroll bar at the top. Can range from -32,768 to 32,767., SmallChange : The increment added to or subtracted from the scroll bar, Value property when either of the scroll arrows is clicked., Value : The current position of the scroll box (thumb) within the scroll bar., If you set this in code, Visual Basic moves the scroll box to the proper, position., Properties for horizontal scroll bar:, Small Change, Max, , Min, , Small Change, , Value, , Large Change, , From the desk of Mr. Manjunatha Balluli, Asst. Professor, Dept. of CS, , Page 76 of 124
Page 78 :
Visual Basic 6.0, Properties for vertical scroll bar:, ·, , Min, , Small Change, , Large Value, , Value, , Large Value, , Small Change, Max, , A couple of important notes about scroll bars:, 1. Note that although the extreme values are called Min and Max, they do, not necessarily represent minimum and maximum values. There is nothing, to keep the Min value from being greater than the Max value. In fact, with, vertical scroll bars, this is the usual case. Visual Basic automatically, adjusts the sign on the SmallChange and LargeChange properties to insure, proper movement of the scroll box from one extreme to the other., 2. If you ever change the Value, Min, or Max properties in code, make sure, Value is at all times between Min and Max or and the program will stop with, an error message., Scroll Bar Events:, Change Event is triggered after the scroll box's position has been modified., Use this event to retrieve the Value property after any changes in the scroll, bar., Scroll Event triggered continuously whenever the scroll box is being moved., , From the desk of Mr. Manjunatha Balluli, Asst. Professor, Dept. of CS, , Page 77 of 124
Page 79 :
Visual Basic 6.0, , TIMER CONTROL, A Timer control is invisible at run time, and its purpose is, to send a periodic pulse to the current application. You can trap, this pulse by writing code in the Timer's Timer event procedure, and take advantage of it to execute a task in the background or, to monitor a user's actions. This control exposes only two meaningful, properties: Interval and Enabled. Interval stands for the number of, milliseconds between subsequent pulses (Timer events), while Enabled lets, you activate or deactivate events. When you place the Timer control on a, form, its Interval is 0, which means no events., Many times, especially in using graphics, we want to repeat certain, operations at regular intervals. The timer tool allows such repetition. The, timer tool does not appear on the form while the application is running., Timer tools work in the background, only being invoked at time intervals, you specify. This is multi-tasking - more than one thing is happening at a, time., Timer Properties:, Enabled : Used to turn the timer on and off. When on, it continues to, operate until the Enabled property is set to False., Interval :’ Number of milliseconds between each invocation of the Timer, Event., Timer Events:’, The timer tool only has one event, Timer. It has the form:, Private Sub Timer1_Timer(), ., ., End Sub, This is where you put code you want repeated every Interval seconds, Example:, In this application, we use a very simple technique to show animation by, using the properties Visible=False and Visible=true to show and hide two, images alternately. When you click on the program, you should see the, following animation., Private Sub Timer1_Timer(), If Image1.Visible = True Then, Image1.Visible = False, From the desk of Mr. Manjunatha Balluli, Asst. Professor, Dept. of CS, , Page 78 of 124
Page 80 :
Visual Basic 6.0, Image2.Visible = True, ElseIf Image2.Visible = True Then, Image2.Visible = False, Image1.Visible = True, End If, End Sub, Output, , DRIVELISTBOX, The drive list box control allows a user to select a valid, disk drive at run-time. The DriveListBox is for displaying a list, of drives available in your computer. When you place this, control into the form and run the program, you will be able to, select different drives from your computer as shown in Figure., It displays the available drives in a drop-down combo box. No code is needed, to load a drive list box; Visual Basic does this for us. We use the box to get, the current drive identification. DriveListBox control is a combobox-like, control that's automatically filled with your drive's letters and volume labels., , Drive List Box Properties:, Drive: Contains the name of the currently selected drive., Drive List Box Events:, Change Triggered whenever the user or program changes the drive, selection., , From the desk of Mr. Manjunatha Balluli, Asst. Professor, Dept. of CS, , Page 79 of 124
Page 81 :
Visual Basic 6.0, , DIRLISTBOX, The DirListBox means the Directory List Box. It is for, displaying a list of directories or folders in a selected drive., When you place this control into the form and run the program,, you will be able to select different directories from a selected, drive in your computer as shown in Figure. The DirListBox is a special list, box that displays a directory tree. The directory list box displays an ordered,, hierarchical list of the user's disk directories and subdirectories. The, directory structure is displayed in a list box. Like, the drive list box, little, coding is needed to use the directory list box – Visual Basic does most of the, work for us., , Directory List Box Properties:, Path: Contains the current directory path., Directory List Box Events:, Change Triggered when the directory selection is changed., , FILELISTBOX, The file list box locates and lists files in the directory, specified by its Path property at run-time. You may select the, types of files you want to display in the file list box. The, FileListBox control is a special-purpose ListBox control that, displays all the files in a given directory, optionally filtering them based on, their names, extensions, and attributes., , File List Box Properties:, FileName: Contains the currently selected file name., Path: Contains the current path directory., Pattern: Contains a string that determines which files will be, displayed. It supports the use of * and ? wildcard characters. For example,, using *.dat only displays files with the .dat extension., From the desk of Mr. Manjunatha Balluli, Asst. Professor, Dept. of CS, , Page 80 of 124
Page 82 :
Visual Basic 6.0, File List Box Events:, DblClick Triggered whenever a file name is double-clicked., PathChange Triggered whenever the path changes in a file list box., Note: You can also use the MultiSelect property of the file list box to allow, multiple file selection., These controls often work together on the same form; when the user, selects a drive in a DriveListBox, the DirListBox control is updated to show, the directory tree on that drive. When the user selects a path in the, DirListBox control, the FileListBox control is filled with the list of files in, that directory. These actions don't happen automatically, however—you, must write code to get the job done., After you place a DriveListBox and a DirListBox control on a form's, surface, you usually don't have to set any of their properties; in fact, these, controls don't expose any special property, not in the Properties window at, least. The FileListBox control, on the other hand, exposes one property that, you can set at design time—the Pattern property. This property indicates, which files are to be shown in the list area: Its default value is *.* (all files),, but you can enter whatever specification you need, and you can also enter, multiple specifications using the semicolon as a separator., , SHAPE CONTROL, The shape tool can create circles, ovals, squares,, rectangles, and rounded squares and rectangles. Colors can be, used and various fill patterns are available. Shape control is an, extension of the Line control. It can display six basic shapes: Rectangle,, Square, Oval, Circle, Rounded Rectangle, and Rounded Square. It supports, all the Line control's properties and a few more: BorderStyle (0-Transparent,, 1-Solid), FillColor, and FillStyle (the same as a form's properties with the, same names). The same performance considerations I pointed out for the, Line control apply to the Shape control., , From the desk of Mr. Manjunatha Balluli, Asst. Professor, Dept. of CS, , Page 81 of 124
Page 83 :
Visual Basic 6.0, Shape Tool Properties:, BackColor: Determines the background color of the shape (only used, when FillStyle not Solid., BackStyle: Determines whether the background is transparent or, opaque., BorderColor: Determines the color of the shape's outline., BorderStyle: Determines the style of the shape's outline. The border, can be transparent, solid, dashed, dotted, and combinations., BorderWidth: Determines the width of the shape border line., FillColor: Defines the interior color of the shape., FillStyle: Determines the interior pattern of a shape. Some choices, are: solid, transparent, cross, etc., Shape: Determines whether the shape is a square, rectangle, circle, or, some other choice., · Like the line tool, events and methods are not used with the shape tool., · Shapes are covered by all objects except perhaps line tools and image, boxes (depends on their Z-order) and printed or drawn information. This is a, good feature in that you usually use shapes to contain a group of control, objects and you'd want them to lie on top of the shape., , LINE CONTROL, The line tool creates simple straight line segments of, various width and color. Together with the shape tool discussed, next, you can use this tool to 'dress up' your application., Line Tool Properties:, BorderColor: Determines the line color., BorderStyle: Determines the line 'shape'. Lines can be transparent,, solid, dashed, dotted, and combinations., BorderWidth: Determines line width., · There are no events or methods associated with the line tool., · Since the line tool lies in the middle-layer of the form display, any lines, drawn will be obscured by all controls except the shape tool or image box., , From the desk of Mr. Manjunatha Balluli, Asst. Professor, Dept. of CS, , Page 82 of 124
Page 84 :
Visual Basic 6.0, , THE OLE CONTROL, When OLE first made its appearance, the concept of Object Linking, and Embedding seemed to most developers nothing short of magic. The, ability to embed a Microsoft Word Document or a Microsoft Excel worksheet, within another Windows application seemed an exciting one, and Microsoft, promptly released the OLE control—then called the OLE Container control—, to help Visual Basic support this capability., In the long run, however, the Embedding term in OLE has lost much, of its appeal and importance, and nowadays programmers are more, concerned and thrilled about Automation, a subset of OLE that lets them, control other Windows applications from the outside, manipulating their, object hierarchies through OLE. For this reason, I won't describe the OLE, control: It's a rather complex object, and a thorough description of its many, properties, methods, andfm events (and quirks) would take too much space., , CONTROL ARRAYS OR ARRAY OF CONTROLS, A control array is a group of controls that share the same name type, and the same event procedures. Adding controls with control arrays uses, fewer resources than adding multiple control of same type at design time., A control array can be created only at design time, and at the very, minimum at least one control must belong to it. You create a control array, following one of these three methods:, You create a control and then assign a numeric, non-negative value to, its Index property; you have thus created a control array with just one, element., , You create two controls of the same class and assign them an, identical Name property. Visual Basic shows a dialog box warning you that, there's already a control with that name and asks whether you want to, create a control array. Click on the Yes button., , You select a control on the form, press Ctrl+C to copy it to the, clipboard, and then press Ctrl+V to paste a new instance of the control,, which has the same Name property as the original one. Visual Basic shows, the warning mentioned in the previous bullet., , , Control arrays are one of the most interesting features of the Visual, Basic environment, and they add a lot of flexibility to your programs:, Controls that belong to the same control array share the same set of, event procedures; this often dramatically reduces the amount of code you, have to write to respond to a user's actions., , , From the desk of Mr. Manjunatha Balluli, Asst. Professor, Dept. of CS, , Page 83 of 124
Page 85 :
Visual Basic 6.0, You can dynamically add new elements to a control array at run time;, in other words, you can effectively create new controls that didn't exist at, design time., , Elements of control arrays consume fewer resources than regular, controls and tend to produce smaller executables. Besides, Visual Basic, forms can host up to 256 different control names, but a control array counts, as one against this number. In other words, control arrays let you effectively, overcome this limit., , , ARRAYS OF MENU ITEMS, , , Control arrays are especially useful with menus because arrays offer a, solution to the proliferation of menu Click events and, above all, permit, you to create new menus at run time. An array of menu controls is, conceptually similar to a regular control array, only you set the Index, property to a numeric (non-negative) value in the Menu Editor instead of, in the Properties window., , , , There are some limitations, though: All the items in an array of menu, controls must be adjacent and must belong to the same menu level, and, their Index properties must be in ascending order (even though holes in, the sequence are allowed). This set of requirements severely hinders your, ability to create new menu items at run time. In fact, you can create new, menu items in well-defined positions of your menu hierarchy—namely,, where you put a menu item with a nonzero Index value—but you can't, create new submenus or new top-level menus., , GRAPHICS METHODS, The graphic methods allow you to draw on the form and the, PictureBox control. In Visual Basic 6, graphic methods are only supported, by, the, form, object, and, the, PictureBox, control., , Graphics methods apply to forms and picture boxes (remember a, picture box is like a form within a form). With these methods, we can draw, lines, boxes, and circles. Before discussing the commands that actually, perform the graphics drawing, though, we need to look at two other topics:, screen management and screen coordinates., , In single program environments (DOS, for example), when something, is drawn on the screen, it stays there. Windows is a multi-tasking, environment. If you switch from a Visual Basic application to some other, application, your Visual Basic form may become partially obscured. When, you return to your Visual Basic application, you would like the form to, appear like it did before being covered. All controls are automatically, restored to the screen. Graphics methods drawings may or may not be, From the desk of Mr. Manjunatha Balluli, Asst. Professor, Dept. of CS, , Page 84 of 124
Page 86 :
Visual Basic 6.0, restored - we need them to be, though. To accomplish this, we must use, proper screen management., , The simplest way to maintain graphics is to set the form or picture, box's AutoRedraw property to True. In this case, Visual Basic always, maintains a copy of graphics output in memory (creates persistent, graphics). Another way to maintain drawn graphics is (with AutoRedraw set, to False) to put all graphics commands in the form or picture box's Paint, event. This event is called whenever an obscured object becomes, unobscured. There are advantages and disadvantages to both approaches, (beyond the scope of discussion here). For now, we will assume our forms, won't get obscured and, hence, beg off the question of persistent graphics, and using the AutoRedraw property and/or Paint event., All graphics methods described here will use the default coordinate, system, , Note the x (horizontal) coordinate runs from left to right, starting at 0, and extending to ScaleWidth - 1. The y (vertical) coordinate goes from top to, bottom, starting at 0 and ending at ScaleHeight - 1. Points in this coordinate, system will always be referred to by a Cartesian pair, (x, y). Later, we will see, how we can use any coordinate system we want., ScaleWidth and ScaleHeight are object properties representing the, “graphics” dimensions of an object. Due to border space, they are not the, same as the Width and Height properties. For all measurements in twips, (default coordinates), ScaleWidth is less than Width and ScaleHeight is less, than Height. That is, we can’t draw to all points on the form., , From the desk of Mr. Manjunatha Balluli, Asst. Professor, Dept. of CS, , Page 85 of 124
Page 87 :
Visual Basic 6.0, , , , , , , , , , , , , , , , Print: Print is the simplest graphic method in Visual Basic 6. This, method has been used throughout the earlier versions of the, language. It prints some text on the form or on the PictureBox control., It displays texts., Cls: The Cls method is another simple graphic method that is used to, clear the surface of the form or the PictureBox control. If some texts, are present, you can use the Cls method to remove the texts. It clears, any drawing created by the graphic methods., Point: The Point method returns the color value from an image for a, pixel at a particular point. This method is generally used to retrieve, color values from bitmaps., Refresh: The refresh method redraws a control or object. In other, words, it refreshes the control. Generally, controls are refreshed, automatically most of the times. But in some cases, you need to, refresh a control’s appearance manually by explicitly invoking the, Refresh method., PSet: The PSet method sets the color of a single pixel on the form., This method is used to draw points., Line: The Line method draws a line. Using the Line method, you can, also draw other geometric shapes such as rectangle, triangle etc., Circle: The Circle method draws a circle. Using the Circle method, you, can also draw other geometric shapes such ellipses, arcs etc., PaintPicture: The PaintPicture method displays an image on the form, at run-time., TextHeight: The TextHeight method returns the height of a string on, the form at run-time., TextWidth: The TextWidth method returns the width of a string on, the form at run-time., , GRAPHIC PROPERTIES, The graphic properties are useful while working with the graphic, methods. Some of the form's properties and some of the PictureBox's, properties, are, the, graphics, properties., The common graphic properties are discussed in this section. You’ll learn, more about them using code examples later in this tutorial., Consider, , , , , the, , following, , graphic, , properties., , DrawMode: The DrawMode property sets the mode of drawing for the, appearance of output from the graphic methods. In the DrawMode, property, you can choose from a variety of values., DrawStyle: The DrawStyle property sets the line style of any drawing, from any graphic methods. It allows you to draw shapes of different, line styles such as solid, dotted, dashed shapes etc., , From the desk of Mr. Manjunatha Balluli, Asst. Professor, Dept. of CS, , Page 86 of 124
Page 88 :
Visual Basic 6.0, , , , , , , , , , , , DrawWidth: The DrawWidth property sets the line width of any, drawing from any graphic methods. While drawing shapes, you can, control the thickness of the lines using this property., FillColor: The FillColor property is used to fill any shapes with a, color. You may use the symbolic color constants to fill your shapes., You may also use the color codes as well as the RGB function., FillStyle: The FillStyle property lets you fill shapes in a particular, filling style., ForeColor: The ForeColor property is used to set or return the, foreground color., AutoRedraw: Set the AutoRedraw property to True to get a persistent, graphics when you’re calling the graphic methods from any event, but, not from the Paint event., ClipControls: Set the ClipControls property to True to make the, graphic methods repaint an object., Picture: The Picture property is used to set a picture. Pictures can be, set both at design time and run-time., , Drawing points, This section shows you how to draw points using the PSet method and, how, to, use, the, Step, keyword, with, the, PSet, method., Drawing, points, using, the, PSet, method, The Pset method allows you to draw a point. You need to specify the, coordinate i.e. the drawing position. You can also pass a color constant that, is an optional argument in the PSet method., Private Sub cmdShow_Click(), DrawWidth = 10, PSet (100, 500), End Sub, , From the desk of Mr. Manjunatha Balluli, Asst. Professor, Dept. of CS, , Page 87 of 124
Page 89 :
Visual Basic 6.0, Relative positioning with the Step keyword, The Step keyword allows you to draw in a position relative to the, current position. See the example., Example:, Code:, Private Sub cmdShow_Click(), DrawWidth = 10, CurrentX = 500, CurrentY = 500, PSet Step(0, 0), End Sub, The above code draws a point in the (0, 0) position relative to the current, position that is (500, 500)., That means, the point is drawn in the (500, 500) position. But this is (0, 0), position relative to the current position., Output of code example:, , Drawing lines, The Line method lets you draw lines in Visual Basic 6. You need to, specify the starting point and the finishing point of the line in the argument., You may also specify the color of the line. This is optional, though., A simple line, The following code example shows how to draw a simple line using the, Line method in Visual Basic 6., Example:, Code:, Private Sub cmdShow_Click(), DrawWidth = 5, 'A hyphen is required between the points, Line (0, 0)-(2000, 2000), vbBlue, End Sub, , From the desk of Mr. Manjunatha Balluli, Asst. Professor, Dept. of CS, , Page 88 of 124
Page 90 :
Visual Basic 6.0, Output of code example:, , \, A line with drawing styles, Form’s DrawStyle property lets you draw lines using a particular style., The constant values of the DrawStyle property are 0 (vbSolid), 1 (vbDash), 2, (vbDot), 3 (vbDashDot, 4 (vbDashDotDot), 5 (vbTransparent) and 6, (vbInsideSolid). The default value is 0, vbSolid. You may use the numeric, constant or the symbolic constant such as vbSolid, vbDash etc to change, drawing styles in your code., NOTE: The DrawStyle property does not work if the value of DrawWidth is, other than 1., Example:, Code:, DrawWidth = 1, DrawStyle = 1, 'A hyphen is required between the points, Line (0, 0)-(2000, 2000), vbBlue, DrawStyle = vbDashDot, Line (100, 900)-(2800, 2800), vbRed, Output:, , Drawing circles, You can draw a circle using the Circle method in Visual Basic 6. You, may also use the Circle method to draw different geometric shapes such as, ellipses, arcs etc. You need to specify the circle’s center and radius values to, draw, a, circle, using, the, Circle, method., , From the desk of Mr. Manjunatha Balluli, Asst. Professor, Dept. of CS, , Page 89 of 124
Page 91 :
Visual Basic 6.0, A simple circle, The following code draws a simple circle using the Circle method in, Visual Basic 6., Example:, Code:, Private Sub cmdShow_Click(), DrawWidth = 3, Circle (1800, 1800), 1000, vbRed, End Sub, In the above code, (1800, 1800) is the circle’s center, and the radius value is, 1000. The color constant ‘vbRed’ is an optional argument., Output of code example 10:, , A circle filled with color, The following code example shows how to fill a circle with color in, Visual Basic 6., Example 11:, Code:, Private Sub cmdShow_Click(), FillStyle = vbSolid, FillColor = &H80C0FF, DrawWidth = 3, Circle (1800, 1800), 1000, vbRed, End Sub, Output:, , Rectangle, The Line method can be used to draw different geometric shapes such, as rectangle, triangle etc. The following example shows you how to draw a, rectangle, using, the, Line, method, in, Visual, Basic, 6., From the desk of Mr. Manjunatha Balluli, Asst. Professor, Dept. of CS, , Page 90 of 124
Page 92 :
Visual Basic 6.0, Example:, Code:, Private Sub cmdShow_Click(), DrawWidth = 3, Line (300, 300)-Step(4000, 2000), vbBlue, B, End Sub, The B argument in the Line method lets you draw a rectangle., Output:, , Displaying an image, The LoadPicture function sets a picture to the PictureBox control or, the form object. It requires the file path as an argument. The following, example, shows, you, how, to, use, the, LoadPicture, function., Example:, Code:, Private Sub cmdShow_Click(), Picture1 = LoadPicture("D:\pic.JPG"), End Sub, Output:, , The Paint event, The Paint event fires automatically when the form is refreshed. For, instance, the Paint event fires when you uncover areas in a form or when, you resize the form. If the AutoRedraw property is set to True, this event will, not be invoked. And while resizing, if you shrink the form, this event does, not, fire., From the desk of Mr. Manjunatha Balluli, Asst. Professor, Dept. of CS, Page 91 of 124
Page 93 :
Visual Basic 6.0, You may use the necessary graphic methods inside the Paint event, procedure so that whenever the form is refreshed, the graphic methods are, automatically, called., Example:, Code:, Private Sub Form_Paint(), DrawWidth = 5, Circle (Rnd * 3000, Rnd * 7000), Rnd * 800, vbYellow, End Sub, New circles are drawn automatically when you resize the form. New, circles are drawn in random positions and with random sizes., , USING COLORS, Notice that all the graphics methods can use a Color argument. If that, argument is omitted, the ForeColor property is used. Color is actually a, hexadecimal (long integer) representation of color - look in the Properties, Window at some of the values of color for various object properties. So, one, way to get color values is to cut and paste values from the Properties, Window. There are other ways, though., , SYMBOLIC CONSTANTS:, Visual Basic offers eight symbolic constants (see Appendix I) to, represent some basic colors. Any of these constants can be used as a Color, argument., Constant, vbBlack, vbRed, vbGreen, vbYellow, vbBlue, vbMagenta, vbCyan, vbWhite, , Value, 0x0, 0xFF, 0xFF00, 0xFFFF, 0xFF0000, 0xFF00FF, 0xFFFF00, 0xFFFFFF, , Color, Black, Red, Green, Yellow, Blue, Magenta, Cyan, White, , QBCOLOR FUNCTION:, For Microsoft QBasic, GW-Basic and QuickBasic programmers, Visual, Basic replicates the sixteen most used colors with the QBColor function. The, color is specified by QBColor(Index), where the colors corresponding to the, Index are:, Index, , Color, , Index, , Color, , From the desk of Mr. Manjunatha Balluli, Asst. Professor, Dept. of CS, , Page 92 of 124
Page 94 :
Visual Basic 6.0, 0, 1, 2, 3, 4, 5, 6, 7, , Black, Blue, Green, Cyan, Red, Magenta, Brown, White, , 8, 9, 10, 11, 12, 13, 14, 15, , Gray, Light blue, Light green, Light cyan, Light red, Light magenta, Yellow, Light (bright) white, , RGB FUNCTION:, The RGB function can be used to produce one of 224 (over 16 million), colors!, The syntax for using RGB to specify the color property is:, RGB(Red, Green, Blue), where Red, Green, and Blue are integer measures of intensity of the, corresponding primary colors. These measures can range from 0 (least, intensity) to 255 (greatest intensity). For example, RGB(255, 255, 0) will, produce yellow., · Any of these four representations of color can be used anytime your Visual, Basic code requires a color value., Color Examples:, Form1.BackColor = vbGreen, picExample.FillColor = QBColor(3), label1.ForeColor = RGB(100, 100, 100), , ACTIVEX CONTROLS, An ActiveX control is a component that may be added to the Form,, like the controls in the ToolBox. You can build three different types of ActiveX, control in Visual Basic., You can build an ActiveX Control without using any existing controls,, designing your control completely from scratch., You can build a control that takes an existing control and extends its, functionality., For example validating data entered into a TextBox., You can build an ActiveX control that is made up of existing, controls (Constituent, Controls)., For example grouping a Label and a TextBox to make a control that provides, text, input, with, a, read-only, prompt., From the desk of Mr. Manjunatha Balluli, Asst. Professor, Dept. of CS, , Page 93 of 124
Page 95 :
Visual Basic 6.0, To create an ActiveX control, start a new project and select ActiveX, Control as the project type. We will develop a control called RGBMixer, so, change the Name property to RGBMixer. The first stage is to draw the, Constituent Controls., , THE MULTIPLE DOCUMENT INTERFACE (MDI), The Multiple Document Interface (MDI) was designed to simplify the, exchange of information among documents, all under the same roof. With, the main application, you can maintain multiple open windows, but not, multiple copies of the application. Data exchange is easier when you can, view and compare many documents simultaneously., You almost certainly use Windows applications that can open multiple, documents at the same time and allow the user to switch among them with, a mouse-click. Multiple Word is a typical example, although most people use, it in single document mode. Each document is displayed in its own window,, and all document windows have the same behavior. The main Form, or MDI, Form, isn't duplicated, but it acts as a container for all the windows, and it, is called the parent window. The windows in which the individual, documents are displayed are called Child windows., An MDI application must have at least two Form, the parent Form and, one or more child Forms. Each of these Forms has certain properties. There, can be many child forms contained within the parent Form, but there can be, only one parent Form., The parent Form may not contain any controls. While the parent Form, is open in design mode, the icons on the ToolBox are not displayed, but you, can't place any controls on the Form. The parent Form can, and usually has, its own menu., , Advantages OF MDI, , , , , , , , With multiple document interfaces (and also tabbed document, interfaces), a single menu bar and/or toolbar is shared between all child, windows, reducing clutter and increasing efficient use of screen space., This argument is less relevant on an operating system which uses a, common menu bar., An, application's, child, windows, can, be, hidden/shown/minimized/maximized as a whole., Features such as "Tile" and "Cascade" can be implemented for the child, windows., Authors of cross-platform applications can provide their users with, consistent application behavior between platforms., If the windowing environment and OS lack good window management,, the application author can implement it themselves., , From the desk of Mr. Manjunatha Balluli, Asst. Professor, Dept. of CS, , Page 94 of 124
Page 96 :
Visual Basic 6.0, , , , Modularity: An advanced window manager can be upgraded, independently of the applications, Without an MDI frame window, floating toolbars from one application, can clutter the workspace of other applications, potentially confusing, users with the jumble of interfaces., , VB program for creating MDI application with Menu, This is an application program, that demonstrates about MDI, application, 1. Start a new project by selecting file->new project. Select standard EXE as, the project type if you have the project wizard enabled., 2. You will already a have a form in the project. Set its name property to, formchild and its caption property to MDI child., 3. To create the MDI parent form, right click the forms folder in the project, Explore and select add ->MDI form. If the form wizard appears, select MDI, form., 4. Set the name property to formMDI and the caption property to MDI, parent to MDI parent., 5. Right click project1 in the project Explorer and select project1 properties, from the top-up menu. Set the startup object list to form MDI. If you omit, this, the application will start with the child form showing., 6. Select form child from the project Explorer. Set the form’s MDI child, property to true. This will case this form, which is the child, to rest inside of, the MDI parent container., 7. Select form MDI the project Explorer., 8. Start the menu designer by selecting tools->Menu Editor. You will see a, window like the one in, 9. Type & file in the caption field., 10. in the name field, type menufile., 11. Click the next button., 12. Click the arrow right button., 13. Enter & new in the caption field., 14. in the name field, type menunew., 15. Click the ok button to close the Menu Editor., From the desk of Mr. Manjunatha Balluli, Asst. Professor, Dept. of CS, , Page 95 of 124
Page 97 :
Visual Basic 6.0, 16. The form MDI from should now have a file menu on it. Select file ->New, from the MDI menu. this will open up the window., 17. In the private sub menu file New-click () event, type the following lines of, code:, 18. Save and Run the project., PARENT FORM:, , From the desk of Mr. Manjunatha Balluli, Asst. Professor, Dept. of CS, , Page 96 of 124
Page 98 :
Visual Basic 6.0, , UNIT V, MENUS, MENU, The menu is a bar at the top of the form. The standard form is display, without menu, but the user can add it. This menu could be included in form, or MDI using menu editor., , MENU EDITOR, To use menu there are four ways:, 1- Press menu icon from toolbar., 2- press (ctrl+E) from key board., 3- click on: tools>Menu Editor., 4- Right Click on Form or MDI form Menu editor box appears., Creating Menus in VB, Menus Windows applications provide groups of related commands in, menus. These commands depend on the application, but some- such as, Open and Save – are frequently found in applications. Visual Basic provides, an easy way to create menus with the modal Menu Editor dialog. The dialog, is displayed when Menu Editor is selected from the tools menu., , The menu editor command is grayed unless the form is visible. The menu, dialog can also be displayed by right-clicking the form and selecting menu, editor., , The menu editor dialog, shown in figure below, contains the textboxes, Caption and Name. The value entered in the Caption Textbox is the menu, From the desk of Mr. Manjunatha Balluli, Asst. Professor, Dept. of CS, , Page 97 of 124
Page 99 :
Visual Basic 6.0, name the user sees. The value entered in the Name Textbox is the variable, name the programmer uses. Every menu must have a Caption and a Name., , Menus are like other controls in that they have properties and events. The, menu editor is a way of setting select properties for a menu. Once a menu is, created, its properties can be viewed in the properties window and its events, in the code window. The programmer can create menu control arrays. The, Index Textbox specifies the menu’s index in the control array. Menus that, are not top level menus can have shortcut keys (combinations of Ctrl, Shift, and letter keys). Shortcut keys are specified using the Shortcut ComboBox., All shortcut keys listed in the shortcut ComboBox are predefined by visual, basic. Programmers may not define their own., Each menu item has four properties associated with it. These properties can, be set at design time using the Menu Editor or at run-time using the, standard dot notation. These properties are:, Checked Used to indicate whether a toggle option is turned on or off. If, True, a check mark appears next to the menu item., Enabled If True, menu item can be selected. If False, menu item is grayed, and cannot be selected., Visible Controls whether the menu item appears in the structure., WindowList Used with Multiple Document Interface (MDI), At the bottom of the Menu Editor form is a list box displaying the, hierarchical list of menu items. Sub-menu items are indented to their level, in the hierarchy. The right and left arrows adjust the levels of menu, items, while the up and down arrows move items within the same level., From the desk of Mr. Manjunatha Balluli, Asst. Professor, Dept. of CS, , Page 98 of 124
Page 100 :
Visual Basic 6.0, The Next, Insert, and Delete buttons are used to move the selection down, one line, insert a line above the current selection, or delete the current, selection, respectively., , INTRODUCTION TO VB BUILT-IN DIALOGUE BOXES, A function is similar to a normal procedure but the main purpose of, the function is to accept a certain input from the user and return a value, which is passed on to the main program to finish the execution. There are, two types of functions, the built-in functions (or internal functions) and the, functions created by the programmers., The general format of a function is, FunctionName (arguments), The arguments are values that are passed on to the function., In this lesson, we are going to learn two very basic but useful internal, functions of Visual basic , i.e. the MsgBox( ) and InputBox ( ) functions., , MsgBox ( ) Function, The objective of MsgBox is to produce a pop-up message box and prompt the, user to click on a command button before he /she can continues. This, format is as follows:, yourMsg=MsgBox(Prompt, Style Value, Title), , The first argument, Prompt, will display the message in the message box., The Style Value will determine what type of command buttons appear on, the message box, please refer Table 10.1 for types of command button, displayed. The Title argument will display the title of the message board., Table: Style Values, Style Value, Named Constant, , Buttons Displayed, , 0, 1, 2, , vbOkOnly, vbOkCancel, vbAbortRetryIgnore, , Ok button, Ok and Cancel buttons, Abort, Retry and Ignore buttons., , 3, 4, 5, , vbYesNoCancel, vbYesNo, vbRetryCancel, , Yes, No and Cancel buttons, Yes and No buttons, Retry and Cancel buttons, , From the desk of Mr. Manjunatha Balluli, Asst. Professor, Dept. of CS, , Page 99 of 124
Page 101 :
Visual Basic 6.0, We can use named constant in place of integers for the second argument to, make the programs more readable. In fact, VB6 will automatically shows up, a list of names constant where you can select one of them., Example: yourMsg=MsgBox( "Click OK to Proceed", 1, "Startup Menu"), and yourMsg=Msg("Click OK to Proceed". vbOkCancel,"Startup Menu"), are the same., yourMsg is a variable that holds values that are returned by the MsgBox ( ), function. The values are determined by the type of buttons being clicked by, the users. It has to be declared as Integer data type in the procedure or in, the general declaration section. Table 10.2 shows the values, the, corresponding named constant and buttons., Table: Return Values and Command Buttons, Named, Value, Button Clicked, Constant, 1, vbOk, Ok button, 2, vbCancel, Cancel button, 3, vbAbort, Abort button, 4, vbRetry, Retry button, 5, vbIgnore, Ignore button, 6, vbYes, Yes button, 7, vbNo, No button, ii. The procedure for the test, Example, button:, i. The Interface:, You draw three command buttons and, Private Sub Test_Click(), a label as shown in Figure, Dim testmsg As Integer, testmsg = MsgBox("Click to test", 1,, Figure, "Test message"), If testmsg = 1 Then, Display.Caption = "Testing, Successful", Else, Display.Caption = "Testing fail", End If, End Sub, , When a user click on the test, button, the image like the one, shown in Figure will appear. As the, From the desk of Mr. Manjunatha Balluli, Asst. Professor, Dept. of CS, , Page 100 of 124
Page 102 :
Visual Basic 6.0, user click on the OK button, the, message "Testing successful" will, be displayed and when he/she, clicks on the Cancel button, the, message "Testing fail" will be, displayed., Figure, , To make the message box looks more, sophisticated, you can add an icon, besides the message. There are four, types of icons available in VB as shown, in Table, Table, Value Named, Constant, 16, vbCritical, 32, , vbQuestion, , 48, , vbExclamation, , 64, , vbInformation, , Icon, , Example, You draw the same Interface as in, example 10.1 but modify the codes, as follows:, , Private Sub test2_Click(), Dim testMsg2 As Integer, testMsg2 = MsgBox("Click to Test",, vbYesNoCancel + vbExclamation,, "Test Message"), If testMsg2 = 6 Then, display2.Caption = "Testing, successful", ElseIf testMsg2 = 7 Then, display2.Caption = "Are you sure?", Else, display2.Caption = "Testing fail", End If, End Sub, In this example, the following, message box will be displayed:, Figure, , From the desk of Mr. Manjunatha Balluli, Asst. Professor, Dept. of CS, , Page 101 of 124
Page 103 :
Visual Basic 6.0, , THE INPUTBOX( ) FUNCTION, An InputBox( ) function will display a, message box where the user can enter a, value or a message in the form of text., The format is, , ii. The procedure for the OK, button, , myMessage=InputBox(Prompt, Title,, default_text, x-position, y-position), , Dim userMsg As String, userMsg = InputBox("What is your, message?", "Message Entry Form",, "Enter your messge here", 500,, 700), If userMsg <> "" Then, message.Caption = userMsg, Else, message.Caption = "No Message", End If, End Sub, , myMessage is a variant data type but, typically it is declared as string, which, accept the message input by the users., The arguments are explained as follows:, , , , , , , , , Prompt, - The message, displayed normally as a question, asked., Title, - The title of the Input, Box., default-text - The default text that, appears in the input field where, users can use it as his intended, input or he may change to the, message he wish to key in., x-position and y-position - the, position or the coordinate of the, input box., , Private Sub OK_Click(), , When a user click the OK button,, the input box as shown in Figure, 10.5 will appear. After user, entering the message and click, OK, the message will be displayed, on the caption, if he click Cancel,, "No message" will be displayed., , Example, i. The Interface, Figure, , From the desk of Mr. Manjunatha Balluli, Asst. Professor, Dept. of CS, , Page 102 of 124
Page 104 :
Visual Basic 6.0, , FILE HANDLING, A file is a collection of bytes stored on the disk with a given name, (called as filename). Every development tool provides access to these files on, the disk. In this chapter we will understand how to access and manipulate, files, using, Visual, Basic., There are three special controls, called as File controls, which deal, with files and directories. We will also understand how to use these controls, in, this, chapter., , File handling, The following are three important steps in handling a file., • Opening the file, • Processing the file, i.e. either reading the content of the file or writing the, required data into file or both., • Closing the file, File access types, Depending upon the requirement you can use any of the three, different file access types:, , Sequential For reading and writing text files in continuous blocks., Random For reading and writing text or binary files structured as fixedlength, records., Binary For reading and writing arbitrarily structured files., Opening or Creating the file using Open statement, A file is opened using OPEN statement in Visual Basic. At the time of, opening a file, you have to specify the following., • Name of the file to be opened, • The mode in which file is to be opened. The mode specifies which, operations are allowed on the file., • File number. Each open file contains a file number. This file number is, used to access the file once the file is opened. The file number must be, unique., , From the desk of Mr. Manjunatha Balluli, Asst. Professor, Dept. of CS, , Page 103 of 124
Page 105 :
Visual Basic 6.0, Open pathname For mode [Access access] [lock] As [#] filenumber, [Len=reclength], Option Meaning, Pathname, Name, , of, , the, , file, , to, , be, , opened., , Mode Specifies the mode in which file is to be opened., Valid modes: Append, Input, Output, Binary and Random. If unspecified, then, Random, is, taken., Access Specifies the operations that are permitted on the open file., Valid, values:, Read,, Write,, or, ReadWrite., Lock Specifies the operations restricted on the file opened by other users., Value values: Shared, Lock Read, Lock Write, and Lock Read Write., Filenumber A number in the range 1 to 511. This number must be unique, among open files. Use FreeFile function to obtain the next available number., RecLength Specifies the size of each record in random files. It should be <=, 32767., For sequential files, this is the number of characters buffered. This, is ignored, if mode is Binary. If the file is not existing then a new file with, the given name is created in Append, Binary, Output and Random modes., Examples:, To open TEST.TXT file in input mode: Open “TEST.TXT” for input as #1, To open NUMBER.DAT file in Binary mode: Open “NUMBER.DAT” for, binary access write as #1, To open STUDENTS.DAT in random mode with a record length of 10:, Open “STUDENTS.DAT” for random as #1 len = 10, To get next available file number and then use it: 'FreeFile function, returns the number that can be used as the file 'number while opening, the file Fn = FreeFile Open “TEST.TXT” for input as #fn Functions, related to files The following are the functions that are used with files., Function Meaning Dir Returns the name of the file that matches the given, name. If file is not existing, then it returns "" (null string)., FileLen Returns the length of the file in bytes. LOF Returns the length of, an open file in bytes. EOF Returns true, if the specified file has reached, end-of-file marker. FreeFile Returns the next available file number. Seek, Sets or returns the position at which file pointer is currently positioned., For random files it returns the number of records read or written so far., Filecopy Copies the given source file to target file., GetAttr Returns the attributes of the given path., , From the desk of Mr. Manjunatha Balluli, Asst. Professor, Dept. of CS, , Page 104 of 124
Page 106 :
Visual Basic 6.0, SetAttr Changes the attributes of the specified file to the given attributes., FileDateTime Returns the date and time when file was last modified or, created., Loc Returns the current position of file pointer of an open file., Functions related to file handling., Example:, To find out the length of file CHARS.TXT:, fl = FileLen("c:\vb60\chars.txt") To find out whether file with the file, number 1 has reached end-of-file:, if EOF(1) then … end if To check whether STUDENTS.DAT file is existing or, not:, If dir(“students.dat”) = “” then, MsgBox “File students.dat is missing”, Else, Process the file, End if, Statement related to file Input and output, The following statements are used to perform input or output to file, and other operations such as opening and closing. Statement Meaning Close, Closes an open file Get Read a record from the given position of the specified, file., READING FILE, Input( ) Returns the specified number of characters from the given, file. Input # Reads data into specified list of variables from the given file., Line Input # Reads a complete line from the given file., Open Opens the given file in the specified mode., Print # Prints the specified data to the given file., Put Writes a record to the given position of the specified file., Write # Writes the specified data to the given file., Statements related to file handling. Not all statements are available in all, modes. So, the following table shows the availability of each statement in, each of the three access types., Statement Sequential Random Binary Close X X X Get X X Input( ) X X, Input # X Line Input # X Open X X X Print # X Put X X Write # X., , From the desk of Mr. Manjunatha Balluli, Asst. Professor, Dept. of CS, , Page 105 of 124
Page 107 :
Visual Basic 6.0, , BOF, EOF Properties, , , , BOF Indicates that the current record position is before the first record, in a Recordset object., EOF Indicates that the current record position is after the last record in, a Recordset object., , Return Value, The BOF and EOF properties return Boolean values., Remarks, Use, the BOF and EOF properties, to, determine, whether, a Recordset object contains records or whether you have gone beyond the, limits of a Recordset object when you move from record to record., The BOF property returns True (-1) if the current record position is before, the first record and False(0) if the current record position is on or after the, first record., The EOF property returns True if the current record position is after the last, record and False if the current record position is on or before the last, record., If either the BOF or EOF property is True, there is no current record., If, you, open, a Recordset object, containing, no, records,, the BOF and EOF properties are set to True(see the RecordCount property, for more information about this state of a Recordset). When you open, a Recordset object that contains at least one record, the first record is the, current record and the BOF and EOF properties are False., If you delete the last remaining record in the Recordset object,, the BOF and EOF properties may remain False until you attempt to, reposition the current record., This table shows which Move methods are, combinations of the BOF and EOFproperties., , allowed, , with, , different, , MoveFirst,, , MovePrevious,, , MoveNext,, , MoveLast, , Move < 0, , Move 0, , Move > 0, , BOF=True, EOF=False, , Allowed, , Error, , Error, , Allowed, , BOF=False, EOF=True, , Allowed, , Allowed, , Error, , Error, , Both True, , Error, , Error, , Error, , Error, , Both False, , Allowed, , Allowed, , Allowed, , Allowed, , From the desk of Mr. Manjunatha Balluli, Asst. Professor, Dept. of CS, , Page 106 of 124
Page 108 :
Visual Basic 6.0, Allowing a Move method does not guarantee that the, successfully locate a record; it only means that, specified Move method will not generate an error., , method, calling, , will, the, , The following table shows what happens to the BOF and EOF property, settings when you call various Move methods but are unable to successfully, locate a record., BOF, , EOF, , MoveFirst, MoveLast, , Set to True, , Set to True, , Move 0, , No change, , No change, , MovePrevious, Move < 0, , Set to True, , No change, , MoveNext, Move > 0, , No change, , Set to True, , DATA ACCESS OBJECTS (DAO), This is an object model that has a collection of objects using, which you can access a database. This model gives complete, control on the database. This model uses Jet Engine, which is the, native database engine used by Visual Basic and MS-Access. This, was the first model to be used in Visual Basic. Though it is possible to, access any database using this, it is particularly suitable for MS-Access, database and not suitable for ODBC data sources such as Oracle and MSSQL Server., Make sure you are not using this data control for the work in this class., This control is suitable for small databases. You might like to study it on, your own., • The data control (or tool) can access databases created by several other, programs besides Visual Basic (or Microsoft Access). Some other formats, supported include Btrieve, dBase, FoxPro, and Paradox databases., The data control can be used to perform the following tasks:, 1. Connect to a database., 2. Open a specified database table., 3. Create a virtual table based on a database query., 4. Pass database fields to other Visual Basic tools, for display or editing., Such tools are bound tools (controls), or data aware., 5. Add new records or update a database., 6. Trap any errors that may occur while accessing data., 7. Close the database., From the desk of Mr. Manjunatha Balluli, Asst. Professor, Dept. of CS, , Page 107 of 124
Page 109 :
Visual Basic 6.0, DATA CONTROL PROPERTIES:, Align, , Determines where data control is displayed., , Caption, , Phrase displayed on the data control., , ConnectionString, Contains the information used to establish a, connection to a database., LockType, Indicates the type of locks placed on records, during editing (default setting makes databases read-only)., Recordset, A set of records defined by a data control’s, ConnectionString and RecordSource properties. Run-time only., RecordSource, control is attached to., , Determines the table (or virtual table) the data, , • As a rule, you need one data control for every database table, or virtual, table, you need access to. One row of a table is accessible to each data, control at any one time. This is referred to as the current record., • When a data control is placed on a form, it appears with the assigned, caption and four arrow buttons:, , The arrows are used to navigate through the table rows (records). As indicated, the, buttons can be used to move to the beginning of the table, the end of the table, or, from record to record., DAO METHODS USED TO WORK WITH DATABASE, , 1., 2., 3., 4., 5., , MoveFirst repositions the control to the first record., MoveLast repositions the control to the last record., MovePrevious repositions the control to the previous record., MoveNext repositions the control to the next record., AddNew A new record is added to the table. All fields are set to Null, and this record is made the current record., 6. Delete The current record is deleted from the table. This method, must be immediately followed by one of the Move methods because, the current record is invalid after a Delete., 7. Update Saves the current contents of all bound tools, , From the desk of Mr. Manjunatha Balluli, Asst. Professor, Dept. of CS, , Page 108 of 124
Page 110 :
Visual Basic 6.0, , Steps to link Student Detail Application to Microsoft Access database:, 1. In menu bar go to Add-Ins → Visual Data Manager Dialog box called, Visdata will open., 2. In that select File → New → Microsoft access → Version 7.0MDB, [Microsoft Data Base]., 3. Give the file name (Database Name) Eg: STUDENT and then click, Save., 4. Right click on Database Window & Select New Table., 5. Table Structure Dialog box will open, type the Table Name which you, want to create Eg: STUDENT, & click on Add Field give the field Name, as NAME & Click OK., 6. Give another field name as REG No select the type as Integer &click, OK., 7. Give another field name as Address, click OK then Close., 8. Click on Build the Table., 9. Right click on the STUDENT option which is available in the database, window, Select OPEN., 10.Dynaset: STUDENT dialog box will open click Add & Give the inputs, & click UPDATE, repeat this for 2 or 3 inputs. & close the Database, Window., 11.Open the design window Select the Data1 Control and change the, properties DatabaseName Select the data base which is saved in My, Documents Eg: STUDENT.mdb & Click OPEN., 12.In Properties select RecordSource & Select the Table Name Eg:, STUDENT., 13.Select the Text1 control in the design window and change the properties, of DataSource as Data1 & select the DataField & Select the Attribute, Name., 14.Repeat the same process for Text2 & Text3., CODING, Coding for ADD Command:, Private Sub Command1_Click(), Data1.Recordset.AddNew, Text1.SetFocus, End Sub, , From the desk of Mr. Manjunatha Balluli, Asst. Professor, Dept. of CS, , Page 109 of 124
Page 112 :
Visual Basic 6.0, , ADO (ActiveX Data Object) Data Control, The ADO (ActiveX Data Object) data control is the primary, interface between a Visual Basic application and a database. It can, be used without writing any code at all! Or, it can be a central part, of a complex database management system. This icon may not appear in, your Visual Basic toolbox. If it doesn’t, select Project from the main menu,, then click Components. The Components window will appear. Select, Microsoft ADO Data Control, then click OK. The control will be added to, your toolbox., • As mentioned in Review and Preview, previous versions of Visual Basic, used another data control. That control is still included with Visual Basic, 6.0 (for backward compatibility) and has as its icon:, You need to go to Project/Components and select the Microsoft ADO, Data Control as shown below. In the example below, I had already made the, selection so you can see the icon at the bottom right in the Toolbox., , Put a ADO Data Control on your form. You then want to go to, Properties and Select (Custom). This will then give you the three dots to, bring up the Window shown below., As you can see in the screen below, you can now specify where the, data source is etc. First, we will use the Use Connection String option and, the Build Button. You will then see the screen entitled Data Link Properties., , From the desk of Mr. Manjunatha Balluli, Asst. Professor, Dept. of CS, , Page 111 of 124
Page 113 :
Visual Basic 6.0, That is shown in the second screen picture below., , THE ADODC CAN BE USED TO PERFORM THE FOLLOWING TASKS:, 1. Connect to a database., 2. Open a specified database table., 3. Create a virtual table based on a database query., 4. Pass database fields to other Visual Basic tools, for display or editing., Such tools are bound tools (controls), or data aware., 5. Add new records or update a database., 6. Trap any errors that may occur while accessing data., 7. Close the database., ADODC PROPERTIES:, Align, , Determines where data control is displayed., , Caption, , Phrase displayed on the data control., , ConnectionString, Contains the information used to establish a, connection to a database., LockType, Indicates the type of locks placed on records, during editing (default setting makes databases read-only)., Recordset, A set of records defined by a data control’s, ConnectionString and RecordSource properties. Run-time only., From the desk of Mr. Manjunatha Balluli, Asst. Professor, Dept. of CS, , Page 112 of 124
Page 114 :
Visual Basic 6.0, RecordSource, control is attached to., , Determines the table (or virtual table) the data, , • As a rule, you need one data control for every database table, or virtual, table, you need access to. One row of a table is accessible to each data, control at any one time. This is referred to as the current record., • When a data control is placed on a form, it appears with the assigned, caption and four arrow buttons:, , The arrows are used to navigate through the table rows (records). As, indicated, the buttons can be used to move to the beginning of the table, the end of, the table, or from record to record., ADODC METHODS USED TO WORK WITH DATABASE, , 1., 2., 3., 4., 5., , MoveFirst repositions the control to the first record., MoveLast repositions the control to the last record., MovePrevious repositions the control to the previous record., MoveNext repositions the control to the next record., AddNew A new record is added to the table. All fields are set to Null, and this record is made the current record., 6. Delete The current record is deleted from the table. This method, must be immediately followed by one of the Move methods because, the current record is invalid after a Delete., 7. Update Saves the current contents of all bound tools, , Steps to link Employee Detail Application to Microsoft Jet 4.0 database:, 1. Right click on ADODC Control which is in the design window., 2. Select ADODC Properties, Property Page dialog box will open., 3. Click on Build, Data link properties dialog box will open, Select, Microsoft Jet 4.0 OLE DB Provider then click Next., 4. Select Database Name from Select Access Database Window, i.e.,, NWIND.MDB & click OPEN, 5. Click on Test Connection, You will get Test Connection Succeeded then, click OK, 6. Select Record Source from Property Page Window, Select command, type as 2-adcmd Table & Select table Employee click on apply & then, OK, , From the desk of Mr. Manjunatha Balluli, Asst. Professor, Dept. of CS, , Page 113 of 124
Page 115 :
Visual Basic 6.0, , 7. Select the Text1 control in the design window and change the properties, of DataSource as ADODC1 & select the DataField & Select the, Attribute Name as Employee Id., 8. Select the Text2 control in the design window and change the properties, of DataSource as ADODC1 & select the DataField & Select the, Attribute Name as First Name., 9. Select the Text3 control in the design window and change the properties, of DataSource as ADODC1 & select the DataField & Select the, Attribute Name as Last Name., 10.Select the Text4 control in the design window and change the properties, of DataSource as ADODC1 & select the DataField & Select the, Attribute Name as Title., Select the Text5 control in the design window and change the properties of, DataSource as ADODC1 & select the DataField & Select the Attribute, Name as Address, REPORT GENERATION, You have learned how to build a database in Visual Basic 6 in, previous chapters, however, you have not learned how to display the saved, data in a report. Reports are important and useful in many respects because, they provide useful and meaningful information concerning a set of data. In, this chapter, we will show you how to create a report in Visual Basic 6. In, previous versions of Visual Basic 6, there is no primary reporting. Previous, versions of Visual Basic 6 uses Crystal Reports tool, a software from, Seagate. Fortunately, Microsoft has integrated a good report writer into, Visual Basic 6, so you no longer need to use Crystal Report., Steps in building your report in Visual Basic 6, Visual Basic 6 provides you with a data report designer to create, your report, it is somewhat similar to data report designer in Microsoft, Access. The data report designer has its own set of controls which allow, you to customize your report seamlessly., The steps in creating the report in VB6 are listed below:, Step 1: Adding Data Report, Start Visual Basic as a Standard EXE project. From the Project menu, in the VBE, select Add Data Report in the dropdown menu., Now, you will be presented with the data report environment, as, shown in Figure. The data report environment contains six controls, they, are RptTextBox, RptLine, RptFunction, RptLabel, RptImage and RptShape., , From the desk of Mr. Manjunatha Balluli, Asst. Professor, Dept. of CS, , Page 114 of 124
Page 116 :
Visual Basic 6.0, You can customize your report here by adding a title to the page, header using the report label RptLabel. Simply drag and draw the RptLabel, control on the data report designer window and use the Caption property to, change the text that should be displayed. You can also add graphics to the, report using the RptImage control., , The Data Report Environment, Step 2: Connecting the report to database using Data Environment Designer, Click the Project menu, then select Data Environment. from the dropdown menu. The default data environment will appear, as shown in Figure, , Data Environment, Now,, to, connect, to, the, database,, rightclick connection1 and select Microsoft Jet 3.51 OLE DB Provider (as we, are using MS Access database) from the Data Link Properties dialog (as, shown in Figure 40.3), then click next., , From the desk of Mr. Manjunatha Balluli, Asst. Professor, Dept. of CS, , Page 115 of 124
Page 117 :
Visual Basic 6.0, Now, you need to connect to the database by selecting a database file from, your hard disk. For demonstration purpose, we will use the, database BIBLIO.MDB that comes with Visual Basic, as shown in Figure., The path to this database file is C:\Program Files\Microsoft Visual, Studio\VB98\BIBLIO.MDB. This path varies from computers to computers,, depending on where you install the file., After selecting the file, you need to test the connection by clicking, the Test Connection button at the right bottom of the Data Link Properties, dialog., If the connection is successful, a message that says 'Test Connection, Succeeded' will appear., Click the OK button on the message box to return to the data, environment. Now you can rename connection1 to any name you like by, right-clicking it. For example, you can change it to MyConnection. You may, also change the name of DataEnvironment1 to MyDataEnvironment using, the Properties window., , Step 3: Retrieving Information from the Database, In order to use the database in your report, you need to create query to, retrieve the information from the database. Here , we will use SQL command, to create the query. First of all, right click on MyConnection to add a, command to the data environment. The default command is Command1,, you can rename it as MyCommand, as shown in Figure., , From the desk of Mr. Manjunatha Balluli, Asst. Professor, Dept. of CS, , Page 116 of 124
Page 118 :
Visual Basic 6.0, , MyCommand, In order to use SQL command, right-click MyCommand and you can see its, properties dialog. At the General tab, select SQL statement and key in the, following SQL statement:, SELECT Au_ID, Author FROM Authors ORDER BY Author, This command is to select all the fields from the Authors table in, the Biblio.Mdb database. The command ORDER BY Author is to arrange the, list in ascending order according to the Authors' Names., Now, you need to customize a few properties of your data report so that it, can connect to the database. The first property to set is the DataSource, set, it to MyDataEnvironment., Next, you need to set the DataMember property to MyCommand,as shown in, Figure, , Properties of DataReport1, From the desk of Mr. Manjunatha Balluli, Asst. Professor, Dept. of CS, , Page 117 of 124
Page 119 :
Visual Basic 6.0, To add data to your report, you need to drag the fields from MyCommand in, MyDataEnvironment into MyDataReport, as shown in Figure 40.7.Visual, Basic 6 will automatically draw a RptTextBox, along with a RptLabel control, for each field on the report. You can customize the look of the labels as well, as the TextBoxes from the properties window of MyDataReport., , The Final step is to set MydataReport as the Startup form from the Project, menu, then run the program. You will see your report as shown in Figure., You can print out your report., , The Final Report, , From the desk of Mr. Manjunatha Balluli, Asst. Professor, Dept. of CS, , Page 118 of 124
Page 120 :
Visual Basic 6.0, , PREVIOUS YEAR QUESTION PAPERS, , From the desk of Mr. Manjunatha Balluli, Asst. Professor, Dept. of CS, , Page 119 of 124
Page 121 :
Visual Basic 6.0, , From the desk of Mr. Manjunatha Balluli, Asst. Professor, Dept. of CS, , Page 120 of 124
Page 122 :
Visual Basic 6.0, , From the desk of Mr. Manjunatha Balluli, Asst. Professor, Dept. of CS, , Page 121 of 124
Page 123 :
Visual Basic 6.0, , From the desk of Mr. Manjunatha Balluli, Asst. Professor, Dept. of CS, , Page 122 of 124
Page 124 :
Visual Basic 6.0, , From the desk of Mr. Manjunatha Balluli, Asst. Professor, Dept. of CS, , Page 123 of 124
Page 125 :
Visual Basic 6.0, , From the desk of Mr. Manjunatha Balluli, Asst. Professor, Dept. of CS, , Page 124 of 124
 Learn better on this topic