Notes of M.Sc Botany I Sem 2021-23, Botany A text book of practical botany 1 {Ashok Bendre} [8171339239] (1984)-8-22.pdf - Study Material
Page 1 :
1, , Introduction to Laboratory, , Chapter, , Preamble, Science is a systematised study based on facts and observations. It involves curiosity, inquisitiveness and unbiased analysis. Most, of the scientific work is done in a laboratory. It provides an opportunity to a person with scientific frame of mind to see and, study various aspects of an object under observation. Hence, a biology student too is obliged to attend laboratory work-out with, utmost sincerity, honesty and inquisitiveness., , Laboratory Etiquette, , Necessary Instruments, , The study of living things in laboratory requires, that facilities provided are properly used., One is expected to complete the assigned work, within a specified time. This requires proper, utilization and planning of time. One should,, therefore, keep busy with own work and wherever, necessary consult the teacher alone., Laboratory provisions should be handled with, utmost care. At the end of the laboratory period,, working place should be left clean and in order., Laboratory exercise to be performed should be, read in advance and one is expected to arrive to, the class theoretically prepared., , The variety of instruments required depends upon, the nature of work. It has, however, been found, convenient to prepare a small kit in suitable, containers such as a pencil box containing, 1. a pair of forceps,, 2. two fine, long handle, dissecting needles,, 3. glass droppers,, 4. good and sharp razor,, 5. safety blade,, 6. a fme hair brush,, 7. a pair of sharpened pencils,, 8. pencil eraser,, 9. a clean and soft handkerchief and, 10. practical record with cover file and spare, pages, etc., , Work Plan, 1., , 2., 3., 4., 5., 6., 7., , Listen and understand the instructions and, information given by teacher-in-charge., Work out or observe the materials carefully., Mount to prepare slides as per requirements., Study the preparations or specimen carefully., Draw suitable diagrams in a proper sequence, and label them in your practical record., Write down the observations sequentially and, watch carefully if variations occur., Get your work checked by teacher-in-charge, and make necessary corrections., , Microscope, It is the most indispensable instrument in a biology, , laboratory, so much so that it comes to be called, 'The primary instrument of the biologists' . It, helps to increase the resolv.iJlg power (property, to distinguish objects lying very close as, separate bodies) of human eye which fails to, recognise objects lying closer between 0.01 to, 0.25 mm., (B-14)
Page 2 :
Introduction to Laboratory, , Fig. 1. A dissecting microscope., , Some common types of microscopes are listed, below1. dissecting microscope,, 2. compound microscope,, 3. binocular microscope,, 4. phase contrast microscope and, 5. electron microscope., Of these, dissecting microscope and compound, microscopes are very commonly used by the, students., [I] Dissecting microscope, It is used for dissection, specially during taxonomic, , studies, embryo separation, etc., Construction. It consists of basal foot, a, vertical limb, stage and a lens. The basal foot is a, stand. The limb has an attached stage made of glass, plate. A folded arm which can be moved vertically, holds the lens. A mirror is attached at the base of, the limb., Mechanical operation. 1. Move the lens and adjust, it over the object., 2. Illuminate the object suitably by adjusting the, mirror., 3. Focus the object by using adjustment screw., [II] Compound microscope, It is one of the most commonly used and by far the, , most suitable microscope in the Botany Laboratory., (B-I4), , iris diaphragm, '""'---mirror, , Fig. 2., , Compound microscope., , At one time, it employs one ocular (eye piece) and, one objective, in working position. As such, it is, also, known, as, monocular-mono-objective, microscope., Construction. The microscope is built around, a strong basal foot and a vertical limb. The foot, supports the vertical limb., A round, rectangular or square stage is fixed, to the limb. It is provided with spnng clips to hold, the slide in position., A movable or fixed sub-stage is situated, directly below the stage. It is provided with an iris, diaphragm and condenser lens. Iris diaphragm is a, wheel-shaped metal disc to regulate the aperture,, through which light rays reach the condenser and, are passed to an object. Condenser is a system of, two or more lenses under the stage which receives, parallel light rays from mirror and converge them, at the level of stage., A movable concave mirror is fixed at the, lowermost part of the limb to focus a converging
Page 3 :
Introduction to Laboratory, , cone of rays at the level of specimen. Whether day, or artificial light is used as a source, concave mirror, converges the light if there are no condensing lenses., Body of the microscope is composed of a tube., At the upper end of the tube, is an ocular (eye, piece) which can be changed for lower or higher, values of magnifications. At the lower end of this, tube is a revolving nose-piece with about three, objectives viz. low power, high power and oil, immersion. These magnifications range from 3.2x, to lOOx. The conventional low power objective is, lOx., Tube of the microscope is vertically movable, with the help of coarse and fine adjustment screws, on the limb, operated by a rack and pinion system., Coarse adjustment moves the tube rapidly, while, fine adjustment screw does it gradually., Mechanical operation. 1. Microscope is placed in, maximum diffuse light. Direct sunlight is, harmful for the eyes. The northern light is most, suitable. If light source is artificial, filter, (preferably blue coloured) is used., , 2. Light is adjusted by turning the mirror towards, the source of light and also by moving the, sub-stage up and down, as well as with the, help of iris diaphragm., 3. A prepared slide is placed on the stage. Object, is adjusted just over the stage aperture., 4. The object is located and focussed with a lowpower objective using coarse adjustment., 5. If higher magnification is desired, nose-piece, is turned to next higher power. Fine adjustment, can be used freely at this stage, while the use, of coarse adjustment be avoided., 6. High power objective and subsequent higher, powers are used only when object is properly, mounted under coverslip., 7. The object should always be observed with, both eyes open., Care. 1. Before and after the use, all the lenses, and metal parts including stage should be, cleaned. The lenses are cleaned with tissue, paper, muslin cloth or clean and soft, handkerchief., , ,I, , I', 1\ ,:, , 'I', ,, " ,, Ii' ,, , 'I.:, , ii', I,, ,, II, ,, tray, staining rack, , watch glass, , scissors, , needle, pencil, , eraser, , slide with coverslip, , Fig. 3. Some laboratory provisions and necessary instruments.
Page 4 :
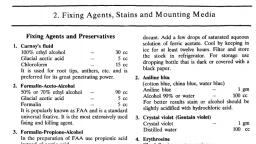
Introduction to Laboratory, , 2. Microscope is kept covered when not in use., Proper wodden box, plastic bags, bell jars or, even a clean cloth can be used., 3. Objectives should not be ordinarily removed, from the nose-piece., 4. Operating screws, condenser, iris diaphragm,, mirror and stage or stage clips should always, be handled carefully., , Other Laboratory Provisions, Some other provisions available in the laboratory, include staining rack, dropping bottles, slides, cover, glasses, watch glasses, petri dishes, beakers, enamel, trays, wash bottles, spirit lamp, hone, strop, dusters,, etc. Some of these are described below1. Staining rack. It is mostly made of wood, to hold the dropping bottles. The capacity of number, of bottles per rack varies., 2. Dropping bottle. The stains, chemicals,, mounting media, etc., are stored in these bottles., This glass bottle has a narrow mouth fitted with a, slotted cock. Cock is provided with a beak that, permits the liquid to flow out in drops., 3. Slides. The size of slides is mostly, 3" x I" (25 mm x 75 mm). It is about 1 mm thick., These are used to mount the material under study., 4. Cover glasses. The cover glasses are, mounted on the object when the preparation is fmally, , ready. These may be either square or round shaped., The standard thickness of the coverslip is 0.17 mm., , Fixing Agents and Preservatives, The plants or plant parts, collected fresh need to be, immediately killed and subsequently preserved for a, long time., For this purpose, a few chemicals are used, which do not cause any structural disturbance or, distortion of the material. Carnoy's fluid, Formalinaceto-alcohol, Formalin-propiono-alcohol, Randolph's, modified Navashin fluid and Bouin's fluid are some, of the common agents used., Plants are generally fixed immediately after, collection but these can also be fixed after bringing, them to laboratory. The collected material must, always be kept completely immersed in preservatives., , Laboratory Techniques, [I] Section cutting, Sections of preserved material are cut in suitable, planes for histological and ecological studies. Razor, is suitable for cutting the sections in laboratory., 1. Boning and stropping. Razor should be, sharp and free from nicks. Hence, it should be, sharpened on a hone (fine-grit stone). Oblique,, , T.S., , T.S., , T.L.S., , T.L.S, R.L.S, , R.L.S., Fig. 4. Planes for section cutting., , V.T.S.
Page 5 :
Introduction to Laboratory, uniform and slow strokes are carefully given to the, razor with edge foremost on this stone., After honing, uniform strokes are given on the, strop (a smooth leather belt). The leather side of, the belt is first slightly oiled and then razor is moved, over. This should be done more frequently than, honing, to maintain razor edge in good condition., 2. Planes. The following are a few commonly, needed planesIn case of cylindrical organs : (e.g., stems,, roots, etc.)., Transverse. The section is cut by passing, razor's edge at right angles to the longitudinal axis., Longitudinal. The section is cut by passing, razor's edge at right angles to the transverse axis., Two sections are possible in this plane., (i) Radial Longitudinal section (R.L.s.) if it, passes along one of the radii., (ii) Tangential Longitudinal section (T.L.s.) if, section is cut along one of its tangents., In case of dorsiventral organs (e.g. leaf, thallus, of liverwort, etc.), transverse section is cut. It is, known as vertical transverse section (being cut in, vertical plane)., 3. Method. Following steps would be useful, for section cutting., 1. Soft, thin and small materials are placed in, pith either by piercing a hole with a needle or, by splitting it longitudinally with a blade. The, pith used include carrot root and radish root,, potato tubers, etc., 2. A razor must be held properly to cut the, section. The handle and the blade of the razor, should be at right angles to one another. The, handle should remain free while the index, finger is placed on the hooked end of the, razor; 1st, 2nd and 3rd fingers pressed against, the thick back edge of the razor and thumb, against the milled surface of the thick shank, of blade., 3. The material or the pith with embedded, material is held between the thumb and the, fingers of the left hand., 4. The material in the left hand and the razor's, edge should form right angle., 5. The razor is now moved quickly over the, material and the stroke is completed in one, action only., , A, , 8, , c, Fig. 5. Method of section cutting. A. holding the material,, B. right way of holding the razor, C. holding the material, and stroke of the razor., , 6. More and more uniform strokes are used till, desired quality and number of sections are, obtained. Care is taken to keep the material, and the razor flooded with water., 7. Sections float in water on the razor's edge., These are carefully lifted by a fine camel hair, brush and then transferred to a watch glass, containing water., 8. After the section cutting is over, the razor is, tapped dry and cleaned without disturbing the, edge. It is honed, stropped and encased., 9. The sections which float on water in the watch, glass are considered to be thin., 10. These sections are lifted by a hair brush,, placed on a slide in a drop of water and, observed through microscope. A thin and, uniform section is selected for staining.
Page 6 :
Introduction to Laboratory, , [II] Stains and staining, The selected sections need to be stained. The stains, help to distinguish different tissues, cells or, inclusions from one another by developing specific, colours. Acetocarmine, Aniline blue, Crystal violet,, Erythrosine, Hematoxylins, Fast green, Light green, and Safranin are some of the commonly used stains., 1. Specificity. Most of the stains are specific, in reaction and are purposely used so that definite, structures or substances are stained. The following, are some of the stains used for staining different, structures., Achromatic figure, Aniline blue, Erythrosine, Fast green, Light green, Cellulose cell wall, Aniline blue, Delafield hematoxylin, Fast green, Light green, Lignified cell wall, Crystal violet, Safranin, Suberised cell wall, Safranin, CytoplasI1t, Aniline blue, Erythrosine, Fast green, Light green, , Cutinised cell wall, Crystal violet, Erythrosine, Safranin, Callose, Aniline blue, Chitin, Safranin, Proteins, Safranin, Mitochondria, Crystal violet, Plastids, Crystal violet, Iron hematoxylin, Nucleus, Crystal violet, Hematoxylin, Safranin, Chromosomes, Hematoxylin, Safranin, , 2. Single stains. Safranin or fast green is used, alone to stain filaments of algae, fungi, sections of, bryophytes, spores of pteridophytes, pollen grains, of gymnosperms, etc. Aniline blue or safranin is, suitable for algae., Following is the common method of staining., 1. The material is kept in a watch glass. A few, drops of stain are added so that the material, is immersed in the stain., 2. The material is allowed to remain so for a, few minutes and allowed to take stain. The, time required varies with materials., 3. After the stain is taken up, the excess of stain, is washed off in water. The washing is repeated, till stain stops coming out., 4. In some cases, excess stain is removed by acid, water or acid alcohol if water alone fails to, do so., , 5. The stained material is ready for mounting., Fungi are stained in cotton blue as given, below1. A drop of cotton blue (prepared in lactophenol), is placed on a slide., 2. Fungal hyphae is now placed in this drop., 3. The slide is run over the flame of the spirit, lamp so that the stain is warmed up., 4. The preparation is now ready for mounting., 3. Combinations. Commonly two or more, stains are employed wherever tissue differentiation, is found. Combination of acidic and basic dyes of, contrasting colours is of general use. This permits, the distinction of woody tissue from non-woody, tissue. The following few combinations are, commonly recommended1. hematoxylin and safranin,, 2. safranin and fast green,, 3. safranin and aniline blue,, 4. safranin and crystal violet and, 5. crystal violet and erythrosine., 4. Staining procedures. There are two types, of preparations-semi-permanent and permanent. The, procedures differ in both the cases. These are given, below., , (a) For semi-permanent and temporary, preparations. Certain preparations are made for, temporary use. The material is studied and the slide, is then discarded. The method for staining them is, given below., 1. The selected sections are transferred from, watch glass containing water to another, watch glass containing principal stain, (e.g. hematoxylin, safranin or crystal violet)., 2. The sections are allowed to remain in the stain, for sometime (for about 4-5 minutes)., 3. Excess amount of stain is removed by washing, the sections repeatedly with water. (This can, be seen under the microscope. The stain should, be taken either by lignified or non-lignified, tissues. Otherwise the section should be washed, till the stain disappears from one type of, tissue)., 4. If de staining is not achieved, sections are, washed with acid alcohol. In this case, further, washing with water is necessary till traces of, acid are removed., 5. This is followed by transfer of sections to a, watch, glass, containing, counter-stain
Page 7 :
Tntroduction to Laboratory, (e.g., safranin, fast green, erythrosine). This, stain acts on the tissue more rapidly than the, principal stain. Therefore, section is kept in, this stain for short period (about a minute or, two)., 6. Excess of stain is removed by washing stained, sections with glycerine (15-20%). The section, should distinctly bring out demarcation between, tissue system while preserving the colour of, the stain., 7. The section is now ready for mounting., (b) For permanent preparations. In certain, cases preparations need to be stored permanently as, a future record. The method of preparation followed, is described below., 1. The section is fIrst stained with principal stain, (aqueous hematoxylin, safranin or crystal, violet)., 2. The section is then washed with water till no, more stain dissolves and water remains, colourless., 3. Section is passed through a graded series of, alcohol for dehydration. A watch glass is fIlled, with requisite amount of alcohol, (beginning, with 30% alcohol) and the section is transferred, to it. This watch glass should always be, covered with another larger one. In order not, to disturb the section, used alcohol is removed, by glass dropper. All the 30% alcohol is, replaced with 50% alcohol. This procedure is, repeated till 70% of alcohol grade is reached., 4. At this stage, counterstain is employed, (e.g. safranin, fast green or erythrosine prepared, in 80% or 90% alcohol)., 5. This stain acts quickly and as such section is, washed immediately after the requisite time is, over., 6. Destaining is done by washing sections with, 90% or 100% alcohol., 7. The section is now transferred to absolute, alcohol to complete the dehydration., 8. Clearing now begins with 25% of xylol, (25 cc of xylol and 75 cc of absolute alcohol)., The sections are gradually passed through xylol, series of 25%, 50%, 70%, 90% and finally, transferred to pure xylol. If dehydration is not, complete, pure xylol turns white or turbid. At, this stage section should be passed through, reverse series., , 9. Pure xylol is the last stage of clearing. Section, is now ready for mounting., 10. Mounting is done in Canada balsam., , Specific Schemes for Staining, Combinations, (for temporary and semi-permanent preparations), 1. Hematoxylin, & safranin, , 2. Safranin & fast green, or aniline blue, , Select a section, .j,, Stain with hematoxylin, .j,, Wash with water, .j,, Wash with ammonia water, till stain turns blue, (tap water is suitable if, alkaline), .j,, Wash with water, .j,, Stain with safranin, .j,, Wash with glycerine, .j,, Mount in glycerine, , Select a section, .j,, Stain with safranin, (for 4-5 minutes), .j,, Wash with water, .j,, Destain with acid alcohol, if necessary, .j,, Wash repeatedly with water, .j,, Stain with fast green or, aniline blue, (for about a minute), .j,, Wash with glycenne, .j,, Mount in glycerine, , [III] Mounting an object, , Mounting is necessary to properly positlon an, object for clear view. Lactophenol, glycerine and, glycerine jelly are used for temporary mounting, while Canada balsam is used for permanent, mounting., 1. Mounting media. Following are some of, the common media., (a) Canada balsam. It is a resin obtained from, a conifer-Abies balsamea, most suitable for, permanent slide preparation. The material to be, mounted should come through alcohol (dehydration), and xylol (clearing) series., (b) Lactophenol. It is a mixture of equal parts, of phenol crystals, lactic acid, glycerine (sometimes, two parts) and distilled water. Stains may be mixed, with this medium (e.g. cotton blue in lactophenol, used to stain ,fungi) or copper acetate is added to, preserve green colOllf of t4e pigment.
Page 8 :
Introduction to Laboratory, , Specific Schemes for Staining Combinations, (for permanent preparations), 1. Hematoxylin, & safranin, , 2. Safranin & fast green, 3. Crystal violet & erythrosine, , Select a section, (If necessary use mordant), , j,, Stain in hematoxylin, (If necessary destain, with mordant), j,, Wash in ammonia water, or tap water, j,, Dehydration with 30% alcohol, j,, 50% alcohol, j,, 70% alcohol, j,, Stain with safranin, , Destain with 70% alcohol, j,, 90% alcohol, j,, Absolute alcohol, j,, Clear with 25% xylol, j,, 50% xylol, j,, 70% xylol, j,, 90% xylol, j,, Pure xylol, j,, Mount in Canada balsam, , Aqueous safranini, crystal violet, j,, Water change,, until, colourless, j,, Dehydration with, 30% alcohol, j,, 50% alcohol, j,, 70% alcohol, j,, 90% alcohol, j,, Stain with fast green!, erythrosine, Destain with 90% alcohol, j,, Absolute alcohol, j,, Clearing or de-alcoholizing, with 25% xylol, j,, 50% xylol, j,, ., 70% xylol, , j,, 90% xylol, , j,, Pure xylol, j,, Mount in Canada balsam, , (c) Glycerine. Pure glycerine diluted to 15-25%, is widely used. Semi-permanent and temporary, preparations are mounted in glycerine., (d) Glycerine jelly. Jelly is also used for, mounting. It is made of gelatin 1 : glycerine 7 :, water 6., Warm the gelatin for two hours by adding, water. Phenol (1%) is added later. Add crystals of, safranin if desired. Allow the solution to cool and, settle into jelly., Many other mounting media like cedar oil,, dammar, balsam, venetian turpentines and synthetic, resins are also used., , A, , B, , c, RNGIOSPERMS, CANNA, T.S.ROOT, , INDIRA, , D, Fig. 6. Method of mounting coverslip., , 2. Care. Following care should be taken, during mounting1. Object should be mounted in the centre of the, slide. A simple method may prove suitable for, this purpose. Take a piece of thick and white, cardboard sheet larger than the size of the, slide. Place the slide over it. Draw lines along, all the four edges. Join all the four corner, points diagonally by two lines. The point,, where these two lines cross, gives the centre, of the slide. While mounting an object, place, the slide over this drawn sheet and an object, on the central point., 2. No air bubbles should enter the medium while, mounting. This results in drying of medium, and preparation is spoiled. To avoid air, bubbles, touch one side of the coverslip to the, drop of mounting medium on the slide. Support, the coverslip by needle and lower it gradually, before finally removing it., 3. Use the necessary small quantity of mounting, medium so that it does not flow on to the
Page 9 :
Introduction to Laboratory, , slide. If so, use little lesser quantity for the, next preparation. The extra amount can be, soaked by touching a piece of blotting paper, to the edge of the coverslip., 4. Preparation should be clean, hence the edges, of slide and the coverslip alone should be held, between the fingers., 5. Labels are pasted uniformly on one side of, the prepared slide. It should carry the name of, the division or generic and specific names, the, part mounted and the section's plane. At the, bottom be written, the name of the student, who has prepared the slide., 3. Sealing, the, coverslip., Temporary, preparations can be sealed with Canada balsam, gum,, dammar, nail polish, etc. Such a preparation is called, a semi-permanent preparation., Sealing is done by simply painting the edges, of the coverslip with sealing agent in such a way, that the space between the slide and the coverslip, gets filled with the agent. It will prevent the, mounting medium from drying., Similarly ringing table should be used for, sealing the round coverslips. The use of Canada, balsam for ringing is more convenient., [IV] Maceration, , This is a technique of separating individual cells, from a group or tissue by dissolution of pectic, middle lamella. There are three common methods., 1. Jeffery's method. The following are the, steps1. Cut the fresh or dried material into small slices, thinner than a tooth-pick., 2. Fill the test tube with material. Boil it in water, till it settles down at the bottom indicating, that it is free from air., 3. Replace water with the following macerating, solution- (i) 10% Nitric acid, (90 cc water + 10 cc nitric acid), (ii) 10% Chromic acid, (90 cc water + 10 cc chromic acid), Mix both these acids in equal parts., 4. Heat the test tube filled with macerating fluid., 5. Stop heating as soon as the material becomes, soft and pulpy., 6. Transfer the fluid to a watch glass., , 7. Drain out all the macerating fluid. Wash the, material repeatedly with water till all the traces, of acids are removed., 8. The material is now stained with safranin and, destained with water., 9. The pulp of the material is crushed with the, glass rod and teased by a needle so that it is, spread over the slide., 10. The material is mounted in glycerine or, glycerine jelly., 2. Harlow's method. The following are the, steps1. Sliced and boiled material is treated with, chlorine water for two hours., 2. It is then washed with tap water., 3. The material is now boiled in sodium sulphate, for about 15 minutes., 4. The liquid is transferred to a watch glass., 5. The material is now washed repeatedly with, water., 6. It is teased with needle or crushed with glass, rod., 7. The teased material is evenly spread on the, slide, stained in safranin and then mounted in, glycerine or glycerine jelly., 3. Schultze's method. The following are the, steps1. Material is sliced and boiled in a test tube, filled with water., 2. The tube is now fIlled with concentrated nitric, acid, to which a few crystals of potassium, chlorate are added., 3. The test tube is heated slowly and gradually, till the material is bleached white., 4. The liquid is then transferred to watch glass, and drained out leaving only the material., 5. The material is now washed with water., 6. Later it is teased or crushed, till individual, cells appear isolated., [V] Peelings, The removal of leaf epidermis, to study the number,, arrangement, distribution and structure of stomata,, is called peeling. The method consists of breaking, the leaf irregularly with a force. This easily separates, a little part of the lower epidermis which remains, protruding on the lower surface of the leaf. It is
Page 10 :
Introduction to Laboratory, , pulled out so that a long ribbon or strip of lower, epidennis gets removed. If lower epidennis does, not separate easily, a needle or forceps is inserted,, and a small part is fIrst slowly broken. This can, now be held in hand and considerably large strip is, pulled apart., The stripped lower epidennis is stained in, safranin and washed. It can be mounted in glycerine, or glycerine jelly. If permanent preparation is, desired, normal procedure of dehydration and, clearing is followed before mounting it in mounting, medium., [VI] Smearing, Smearing is used to study the chromosomes. The, method consists of spreading the cells in a single, layer. The cells are smeared at a stage when they, are in the process of cell division. This pennits the, study of chromosome structure and various stages of, cell division. Pre-requisite for such studies is the, killing of dividing tissues at a proper stage of cell, division and selection of material where cells are not, frrmly united with one another by middle lamellae., Microsporocytes of Trillium spp., Lilium spp. and, Oenothera spp., as well as anthers of Tradescantia, spp., Triticum spp. and Nicotiana spp. and root tips, of onion, Ficus, etc. fIxed at appropriate time are, widely used for smear preparations., 1. Technique. The following are the steps1. Slides should be perfectly clean for preparation, of smears. In order to do so these are, immersed in sulphuric acid potassium, bichromate mixture or concentrated nitric acid, for a long time., 2. Slides are thoroughly washed with running, water and fInally dried with absolutely clean, cloth, free from dust and lint., 3. Fresh anthers dissected out from the buds are, placed in the centre of slide. The anthers on, the slide are crushed with scalpel or another, clean slide., 4. Slide is now inverted over a petri dish, containing killing fluid (most suitable being, Randolph modifIed Navashin fluid), in a way, that smeared surface comes in contact with the, fluid. It should be allowed in this position for, about 10-15 minutes., , 5. Slide is now inverted with smeared side, upward. It is now ready for staining.; It may, also be stained immediately without inhnersing, in killing fluid., 2. Staining procedure. The method described, below is called Belling's iron acetocannine method., The slides are stained in the following way., 1. A few drops of acetocannine are placed on, the smeared material or unsmeared anthers are, kept on slide in a drop of acetocannine. After, a few minutes, stain is replaced with a fresh, drop of stain., 2. At this stage, anthers are crushed and large, pieces and debris are removed., 3. Slide is gently heated over a flame, cover glass, is placed on the material and uniform pressure, is applied on the material by placing blotting, paper on the cover glass and then pressing it., 4. Slide is immediately sealed with melted wax., Another simple method is followed where, anthers are smeared on the cover glass. It is then, inverted on the slide with a drop of acetocannine., Cover glass is sealed with slide by melted wax., [VII] Squash, This technique is also useful in the study of cell, division especially mitosis and the chromosome, structure. Root tips give the best results. For this, purpose allow the onion bulbs to grow in bottle, fIlled with water. If the lower root portion of the, bulb touches the water, it quickly sends forth large, number of roots. Cut the root tips and fIx them., 1. Place the fIxed root tip in a drop of 45%, acetic acid., 2. Place a cover glass over the tip and diffuse, acetocannine., 3. Tap and apply uniform pressure over the cover, glass., 4. The squash preparation is ready., [VIII] Micrometry, (Measurement by means of microscope), This is the procedure used to measure the size of, microscopic objects like cell, spore, pollen grain,, etc. The method consists of using a calibrated ocular, micrometer (a glass disc with engraved scale). The, calibration is done by comparing ocular with stage
Page 11 :
Introduction to Laboratory, , Thus as in above example (when objective 45x, and eye piece lOx are used), each division of, 4, 1, 2, 3, 6, 7, ocular (micrometer) would measure the distance, of 14.4/! or microns., 11111111111111, 2. Now remove the stage micrometer and place a, 14.411, slide with object to be measured., 3., Use, oculometer (micrometer) to measure the, 11111111111, dns, width of a bacillus or diameter of a pollen, Fig. 7. Matching ocular micrometer with stage micrometer., grain or a fungal spore. For example a fungal, spore measures 2 divisions., micrometer (a slide bearing an engraved scale of, 4. The diameter of a fungal spore would be, known values). The stage micrometer is usually ruled, (2 x 14.4/!) 28.8/!., into tenths and hundredths of a millimeter (scales, The length, breadth, diameter, etc. of different, in hundredths of an inch are also obtainable). Each, structures can be measured in this way., of the 100 parts of stage micrometer scale represents, 0.01 mm or 10/! (1 mm = 1000 microns or /!)., Record of Work, 1. Calibration of ocular micrometer. The, After the preparations are ready, these should be, calibration is done as follows., carefully observed, salient features noted and drawn, 1. Place the ocular micrometer inside the eye, on a practical record sheet. The following, piece by unscrewing the upper lens., suggestions would prove useful., 2. The stage micrometer slide is now placed on, the stage of the microscope and focussed to, 1. Always use a sharp and pointed pencil for thin, observe the scale., and uniform lines., 3. The stage micrometer scale is moved in such, 2. Punched holes should be on the left hand side, a way that it lies by the side of the scale of, of the drawing sheet., ocular micrometer when focussed., 3. Diagrams of the entire plant or its various, 4. Now compare and count the divisions on both, aspects are drawn on the same page. The, micrometers to fmd out the number of divisions, diagrams of unrelated specimens should in no, where both scales are equally opposite., case be drawn on the same page., 5. For example when 45x objective and lOx eye, 4. The sequence of the diagrams should always, piece are used, divisions of ocular micrometer, be-external features, anatomy and then, are found equal to 72 divisions of stage, reproduction., micrometer., 5. For anatomical studies an outline diagram, 6. CalIbrate the ocular micrometer as given below., followed by a cellular sketch of its suitable, Stage micrometer scale :, sector are drawn one above the other on the, 100 dns = 1 mm (=100/! or microns*), same page., 1 dn =:: 0.01 mm (=10/! or microns), 6. All the parts of the diagram must be labelled., If, 50 dns (ocular micrometer), Capital letters are used for labelling. The labels, = 72 dns (stage micrometer), are arranged one below the other in a row., then, 50 dns (ocular micrometer), 7. Labelling lines should never cross one another., = 0.72 mm (=720/! or microns), Beautification and shading are not required, therefore, Idn (ocular micrometer), until specific effects are to be produced., = 0.14 mm (=14.4/! or microns), 8. Every diagram must have caption at its bottom, 2. Measurement of objects. The following, (e.g. T.s. stem)., method is useful in actually determining the size of, 9. Date is written in the left hand comer of the, objects. An example is given below., page., 10., Classification and name of the plant are given, *One milimeter = 1,00011., in the right hand comer of the sheet., 11, this Greek letter is an abbreviation for micron., 1., , stage micrometer scale 1 dn = 0.01 mm, , 5, , I I I I I I, , ~~s, , 150
Page 12 :
-1 12, , Introduction to Laboratory, , 11. The description is written either on the reverse, side of the drawing sheet or on a new facing, page., 12. During description only technical terms are, used. The points of identification are added in, the end., 13. Anatomical studies are described as others. A, section should be described starting from, epidermis to the central region; give thickness, of layer (how many cells deep), shape and, size of the cells constituting it. Also give in, details of the structure of stele and vascular, bundle., , Collection, Field work is one of the most essential part in the, Botanical study. It permits to come across many, types of plants, otherwise not seen and available in, the laboratory. It is, therefore, advisable to go round, many localities and explore their vegetation., Organised excursions or outings, led by experienced, persons, add to the knowledge of common plants in, nature., While on a collection trip, local or outstation,, following things are to be carried along., 1. Containers. For packing the collected, material, preferably carry plastic unbreakable, containers or polyethylene bags., 2. Preservatives., Formalin-Acetic-Alcohol, (FAA) or Alcohol 70% or Alcohol 90%, and/or, Formalin 6%-10%., 3. Other requirements. Scalpel, knife, blade,, forceps, pencil, paper, a hand lens, a bag or, vasculum for keeping plants or plant press with, many newspapers or blotting papers., After collecting the plant, it should be, immediately killed and preserved or pressed to avoid, its rotting and dehydration. Plants are either sprinkled, or immersed with a little of the killing agent at the, spot. On return to the laboratory collected material, should be transferred to new and suitable containers, with fresh preservative. The plants should be, completely immersed in the preservative., A few plants e.g. filamentous algae, fungi,, reproductive parts of bryophytes, fertile parts of, pteridophytes and different parts of gymnosperms,, if collected in large quantities, are preserved in, , Fig. 8. Collection bottles_, , containers. But if material (except a few algae and, fungi) are collected in lesser quantities a herbarium, sheet is prepared. Even if large quantity of such, plants is available, one plant with fertile parts be, preserved in the form of a herbarium sheet, while, others should be packed in a container., Every tube should be labelled. It is desired to, write the name of the specimen, place and date of, collection. The place of collection and date should, also be written on a small piece of white card with, a pencil, on the spot and inserted in the container., On return to laboratory, material is identified with, the help of standard books. A label bearing name, of the division and class to which the material, belongs, the name of the material, date and place, of collection and also the name of student is pasted, on the container. All the containers should be of, uniform size as far as possible., , Herbarium, A collection of dried plant specimen, mounted on, sheets is known as herbarium. Freshly-picked, specimen are dried and pasted on mounting paper, of regulation-sized herbarium sheets. The purpose, of such a collection is to study the vegetation of a, locality and maintain its record.
Page 13 :
Introduction to Lo.boratory, , HERBARIUM, , MEERUT COllEGE MfERUT, , HERBARIUM, Field Book No, , 12-, , Famlty Atb""1uJ4Ceal!, Bot NIIm6 Alb'i0 Canduia., Local Name lia.fed. Rat=, , Placellk~(.{oc.'otywh Road, , Notes, , Date20.1,~, CoIlecled by Hab,b, , Fig. 9. A typical herbarium sheet., , [I] Preparation of herbarium sheets, 1. Equipment. On excursion, for the collection of, plants, several items required to be carried include1. Trowel or pick,, 2. Collecting can (vasculum) or field plant press,, 3. Heavy laboratory plant press,, 4. Blotting papers or newspapers,, 5. Collecting sheets,, 6. Mounting sheets,, 7. Gum, gummed tape, labels, notebook, pen and, pencil, etc., Trowel or pick is used to dig out the plant as, a whole, wherever possible. A light-weight field, press is most practical. It is made by taking two, pieces of plyboard or heavy binder's board of, 12" x 17" size. These are held together by two, pieces of heavy cord or straps tied or buckled, together and press can be carried over the shoulders., A heavy plant press carries sheets of size at least, 11'12 x 17 inches. It is made of iron and tied and, , tightened by iron chain and screws. This is used, for pressing specimen after they are brought to the, laboratory. Vasculum may be used in case only a, small number of plants are to be brought back., 2. Collection. Collected plants are placed in, the collecting sheets. The most practical size is, 16;' x 23 inches; when folded 16'12 x 11 '12 inches., Old newspapers serve this purpose to an appreciable, extent and a large supply should always be included, in the kit., A specimen collected should represent root,, stem, leaves and flowers. The plants are placed, between the sheets or newspapers in such a way, that relation between different organs is maintained., Herbaceous plants, 2 feet or less higher, may be, collected entire. These can be bent to V or N shape, whenever necessary. The most desirable is to collect, a branch, about one foot high, containing leaves, and flowers. In cases, where entire plant or branch, cannot be folded to the size of herbarium sheet,, only reproductive and fruiting parts and a stem with, a few leaves are collected., Delicate reproductive parts collapse even if, pressed fresh. These can be pressed perfectly by, applying bits of moist paper to the fresh reproductive, structures and spreading them when plants are placed, in the press. If parts of the herbaceous plant are, thick and difficult to dry, split them before placing, on the collecting sheet., Water plants collapse if dried by usual method., These should be rolled up in wet paper when in the, field and brought to the laboratory. On return to, the laboratory, these plants are placed in water and, floated out on sheets of white paper. The sheets are, taken out of water carefully, so that the various, parts do not cohere. The white sheets are placed in, the blotting paper and then dried as usual., After specimen has been collected and placed, in collecting sheet, it is kept in plant press. This, collecting sheet be placed in between blotting papers,, one on either side., While on collection it is important to note date,, locality, habitat, height, method of branching, colour, of reproductive parts, common name, etc. This, should be noted separately in a field-book., 3. Pressing. The collecting sheets should be, transferred to a heavy laboratory press. It must be, remembered that specimen would acquire the same, shape, as on collecting sheet, after pressing. The
Page 14 :
Introduction to Laboratory, , press is securely tightened. It may also be equally, useful if field press is kept under heavy weight., The press should be placed in a warm, well-aired, place to dry., After 24 hours, press is taken out and opened., The old newspapers and blotting sheets are replaced, by new unused ones. At least such 3-4 changes are, given at an interval of 2-3 days. An average, specimen takes about a week for complete drying., Sometimes to hasten the process of drying, plant, press may be placed near the source of heat., 4. Mounting. The specimen are ready for, mounting once they are completely dry. The standard, size of the sheet is 16'12 x 11'12 inches. However,, 16 x 10 inches size also has been used. The paper, should be of good weight and not thin and flexible., The quality should be so, that it does not turn yellow, even with a considerable lapse of time., To mount, one of the following methods would, be found convenient., 1. The gum is spread on a glass plate and, specimen is laid on it. As soon as all the parts, come in contact with gum, it is lifted and then, placed in a position on a mounting sheet., 2. The specimen is inverted and painted with gum, by a brush and then transferred to a mounting, sheet., 3. The specimen is placed on a herbarium sheet, and small strips of gummed tape or cellulose, tape are pasted at suitable places, so that most, of the part remains loose., After mounting the specimen, a label is pasted, in the right hand lower comer of the sheet. This, carries information regarding botanical name of the, plant, common name, date, collector's name, place, of collection etc., 5. Arrangement of sheets. The sheets, are, finally arranged in accordance with standard, classification (preferably Bentham and Hooker's for, Angiosperms or the most accepted ones for other, groups of plants). The sheets are arranged into, groups according to species, genera, families, classes,, orders, series and sub-divisions, etc. Each group is, placed in a separate envelope, slightly larger than, the herbarium sheets (e.g. 17 x 12 or 17 x 11, inches). Each of such envelopes must be labelled, and a proper index be written or pasted over it., , 6. Care of sheets. Herbarium sheets are often, attacked by museum pests, fungi, etc. To guard, against them, specimen are fumed with carbon, bisulphide, 3-4 times a year. Mounted specimen may, also be treated with mercuric bichloride or copper, sulphate. To prevent them from attack, powdered, naphthalene balls or gamaxene powder be also, spread from time to time. This ensures durability, and long life of the herbarium sheet., [IT] Some important herbaria, , There are many institutions allover the world which, house collections of herbarium sheets. The, arrangement is mostly based on either Engler's,, Bessey's or Bentham and Hooker's system of, classification. A list of a few well-known herbaria, of the world is given here., 1. Herbarium Nationale', de, Histoire, Laboratories de Phanerogamie, Paris, France., National institute, established in 1635, more than, 5,000,000 specimens, mostly phanerogams and, vascular cryptogams., 2. Herbarium of Botanisches Institute de, Universtate, Kiel, Germany. Governed by Kiel, University, established in 1875, more than 90,000, specimens., 3. Royal Botanic Gardens, Herbarium, Kew,, Great Britain. Government institution of Royal, Botanic Gardens, established in 1841, world-wide, collection, more than 6,00,000 herbarium sheets., 4. British Museum of Natural History,, London, Great Britain. A private body, established, in 1753 more than 4,000,000 specimens, relating to, all the plant groups., 5. Gordon College Herbarium, Lahore,, Pakistan. A private mission, established in 1893,, ferns of the Himalayas and flowering plants of, Punjab, Kashmir, Afghanistan, Baluchistan, Pakistan, and Nepal, numbering about 55,000., 6. U.S., National, Museum, (Botanical, Department), U.S. Smithsonian Institution,, Washington, U.S.A. Independent government, agency, founded in 1868, world-wide collection of, all groups, more than 2,700,000 specimens., 7. U.S. National Arboretum, Herbarium,, Washington, U.S.A. Federal agency, established in
Page 15 :
Introduction to Laboratory, , 1934, 37,000 vascular plants of economic, importance, cultivated and woody., 8. Herbarium of the Department of, Systematic and Plant Geography of the Botanical, Institute of the Academy of Sciences of, Leningrad, Russia. Medical garden, established in, 1714, herbarium added in 1823, state owned, institution, representing flora of U.S.S.R., northern, Asia and world-wide collections, more than, 5,000,000 herbarium sheets., 9. Indian Botanic Garden, Herbarium,, Calcutta, India. Established in 1787, government, agency, more than 1,000,000 specimens, representing, phanerogams and ferns of India and adjacent, region., 10. Herbarium Blatter, St. Xavier's College,, Bombay, India. Private body, representing more than, , 100,000 specimens from western India and collection, of fungi established by Mundkur., 11. National Botanic Research Institute,, (formerly known as National Botanic Garden), Lucknow, India. C.S.I.R. body, established in 1948,, more than 40,000 specimens., Besides these herbaria, many well-reputed, collections exist; some of them being-Botanical, Gardens Herbarium, Singapore; National Botanic, Gardens Herbarium, Kirstenbosch, South Africa;, Herbarium Bogoriensis, Bogor, Indonesia; Botanical, Museum and Herbarium, of the State University of, Utrecht, Netherlands; Forest Research Institute,, Herbarium, Dehradun, India; Botanical Survey of, India Herbarium, Pune, India; Indian Agricultural, Research Institute, Botany Division Herbarium, New, Delhi, India., , (B-14)
 Learn better on this topic