Notes of B.Pharm Ist Sem, HAP-I COMPOUND-MICROSCOPE.pdf - Study Material
Page 1 :
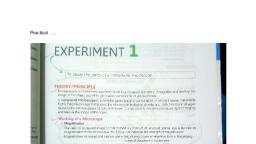
STUDY OF COMPOUND MICROSCOPE, Background, Compound microscope is an optical scientific equipment used to magnify and view smaller, structures which cannot be seen with naked eyes by using two or more number of lenses. The, compound microscope is used commonly used in biological experiments. It provides high, magnification (enlargement of the appearance or image of the object) as well as fair, resolution (differentiation of neighbouring points as separate entities)., Requirement, A compound microscope, Theory, Parts of Microscope:, The compound microscope has four sets of parts1., 2., 3., 4., , The stand or the support system, The optics or the magnification system, The mechanical adjustment system, The illumination system, , 1.) The support system: This system consists of –, Tube: It supports the objectives and eyepiece., The arm or limb: It is the curved metallic structure which is required to hold and, move the microscope. It gives correct height and angulation to the body tube., The revolving nose piece: It holds the objective at place while we are observing the, sample. It is the objective changer., Stage: It is the flat square shaped surface attached superiorly to the lower end of the, arm on which we put our slide. It possess pair of spring clips which hold the slide in, place., The foot: It is the heavy metallic bottom part which supports all the other parts of the, microscope. It may be oval, tripod or horseshoe shaped., 2.) The optics or magnification system: This consists of a system of lenses. The lenses of the, microscope are divided into two groups The first group of lenses present just above the preparation under examination that is, the object, is called the objective. The objective comes with its magnification labelled, on it such as 10X (low power), 45X (medium power), 100X (high power). Along with, the magnification, numerical aperture (NA) is also engraved on the objective ( 0.30 on, the 10X objective, 0.65 on the 45X objective, 1.30 on the 100X objective). The, greater the NA, greater is the resolution. The working distance of an objective is the
Page 2 :
, , distance between the front lens of the objective and the object slide. The greater the, magnification of the objective, smaller is the working distance. For 10X, 45X and, 100X objectives, the working distance is 5-6mm, 0.5-1.5mm and 0.15-0.20mm, respectively., The second group of lenses is present where the microscopist applies his eyes and is, called the eyepiece or ocular. It may be labelled with its magnification such as 5X or, 10X., , 3.) The adjustment system: This system comprises of The coarse adjustment knob: It is the large knob used to adjust the position of the, body tube allowing us to quickly bring the sample into view., The fine adjustment knob: It is the small knob used to change the position of body, tube by slowly making small adjustment. It is used to bring the object into perfect, focus., Condenser adjustment knob: It is the substage adjustment knob used to move the, condenser up and down to increase the illumination or to reduce the illumination., Iris diaphragm lever: This lever is fixed on the condenser and is generally used for, aperture adjustment. It is used to close and open the diaphragm for either reducing, or increasing the intensity of light., 4.) The illumination system: It comprises of Light source: Both electric light and daylight can be used as source of light., Electric light is more preferred as it is easier to adjust. An external source of, illumination that is 60 watt electric lamp placed 18 inch away from the, microscope can be used for routine purpose. Nowadays many microscopes are, provided with built-in lamps beneath the stage. Otherwise daylight can be used., Use of direct sunlight is bad both for the microscope and eyes. It is best to use, reflected sunlight of a dull white background., Mirror: It is located beneath the condenser and can be turned in any direction. and, it is used to increase the amount of light shining through our sample or slide. It, reflects the rays from the light source on to the object. It has two mirrors mounted, back to back. One is flat and the other is concave. Flat mirror is used in presence, of condenser and the concave mirror is used in absence of the condenser., Condenser: Beneath the stage, there is presence of condenser having standard, diameter of 39.5mm which collects and concentrates the light that passes through, the sample or brings the rays of light to a common focus on the object to be, examined. There may be two or more lenses.
Page 3 :
FIGURE: Showing Different Parts of Compound Microscope, , Instructions, 1), 2), 3), 4), 5), 6), 7), , 8), , Always keep the microscope in vertical direction., Don’t make the use of direct sunlight., Don’t keep the microscope near the edge of the table., The object to be examined should be mounted in mounting medium and should be, covered with cover slip before observation., Don’t use excess mounting medium., Always keep the microscope clean, dust free and covered., Concave mirror is used while using low power lens whereas plane mirror is used, while using high power or oil immersion lens. To obtain maximum and even, illumination the mirror must be adjusted accordingly., After placing the slide over the stage the low power lens is to be brought down using, coarse adjustment knob. Bend by the side of the tube and bring your eyes at the level, of slide while bringing it down. Never bring down the objective with coarse
Page 4 :
adjustment knob while looking through the eye-piece of the microscope. Bring it, down to the extent that it is just near to the slide but not touching it., 9) Slowly the objective is to be raised while looking through the eye-piece of the, microscope using coarse adjustment knob till the object is seen. The image of the, object is made clear using the fine adjustment knob., 10) To use high power lens, the objective is to be raised again. Change the lens and then, bring it down looking from the side. The objective is again raised while looking, through the eye-piece till the object is seen., 11) Remove the eye-piece for a while and adjust the position of condenser to get better, results., 12) Adjust the iris-diaphragm., 13) After adjusting the condenser and iris, replace the eye-piece and observe again. The, object will be very clear., 14) While using oil immersion lens, a drop of cedarwood oil is placed on the slide., Cedarwood oil is preferred to other oils because its refractive index is nearer to that of, glass. The oil on the objective should be removed using dry,soft cloth and then with a, little xylol. Use of excess xylol is to be avoided., 15) Never unscrew any part of microscope. Do not clean any lens of the microscope with, alcohol as the cementing material for the fixation of lens is soluble in alcohol., , REFERENCES:, 1) Study Of Microscope, Practical Human Anatomy And Physiology, S.R.Kale et.al., 8th, Edition, Dec 2002, pp.2-3, 2) Study Of Microscope And General Techniques, Practical Human Anatomy And, Physiology, Goyal et.al., pp. 3-5, 3) A Manual Of Medical Laboratory Technology, A.V.Naigaonkar et.al., pp.1-11
 Learn better on this topic