Notes of class 9th computer, Computer DIGITAL DOCUMENTATION.pdf - Study Material
Page 1 :
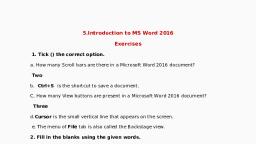
PART- B, UNIT-III, DIGITAL DOCUMENTATION, SESSION:-1 INTRODUCTION., , Q1. What is Word Processing? Name some Word Processing software., Ans. Word Processors are used to write documents such as articles, letter, resume,, report, poem and also making posters. They can help to:Correct any spelling mistakes, Edit the document, Print the document, Change the appearance of different portions of the document, Insert header & footer, page numbers, pictures or images in the document, Present information in a tabular form and many more, Some of the most popular Word Processing software are:Open Office Writer, MS-Word, Note pad, Google Documents, Q.2 Write the steps to Open MS Word ?, A. The Steps are as follows:, 1. Click on Start., 2. Click on All Programs, 3. Click on Microsoft Office, 4. Click on Microsoft Word., Q.3 Write the steps to Save a Document?, A. The Steps are as follows:, 1. Click on Office Button / File Menu, 2. Click on Save, 3. A Dialog Box appears, 4. Type the name of the file and set the location, 5. Click on Save., Q.4 Write the steps to Open a Document?, A. The Steps are as follows:, 1. Click on Office Button / File Menu, 2. Click on Open, 3. A Dialog Box appears, 4. Open the location and Click on the file name, 5. Click on Open
Page 2 :
Q.5 Write the steps to close a Document?, A. The Steps are as follows:, 1. Click on Office Button / File Menu, 2. Click on Close., Q.6 Write the short cuts for the following:Create a New Document:- Ctrl +N, Save a Document:- Ctrl + S, Open a Document:- Ctrl + O, Close a Document:- Alt + F4, Q.7 What is the difference between Save and Save As Option available in MS, Word?, A. If we save a file using File Menu -> Save, the previous file is overwritten and new, changes will reflect in the existing file only., But if we save a file using File Menu -> Save As, the previous file will not be replaced, and a new file will be created with a new name., Q. 8 Write the steps to use the Save As option ?, A. The steps are as follows:1. Click on Office button / File Menu, 2. Click on Save As Option, 3. A Dialog Box Appears, 4. Type the new name and select the new location., 5. Click on Save., Q.9 What is GUI?, A. GUI is a type of user interface that allows users to interact with electronic devices, using images rather than text commands. This type of interface have graphical, symbols or icon in the Ribbon., SESSION:-2 DISCUSS ABOUT TABS., Q.10 Name the Eight tabs and their groups., Home Tab:- Clipboard, Font, Paragraph, Styles, Editing, Insert:- Pages, Tables, Illustrations, Links, Header & Footer, Text, Page Layout:- Themes, Page Setup, Page Background, Paragraph, Arrange, References:- Table of Contents, Footnotes, Citations, & Bibilography, Captions,, Index, Table of Authorities, Mailings:- Create, Start Mail Merge, Write & Insert Fields, Preview Results, Finish, Review:- Proofing, Comments, Tracking, Changes, Compare, Protect, View:- Document View, Show/Hide, Zoom, Window, Macros.
Page 3 :
Q.11 Describe Home Tab in detail?, A. The Home Tab contains commands for formatting of text, drawing of objects,, editing content of documents such as copy and paste. The features of Home Tab are, as follows:1. The Clipboard group contains commands to cut, copy and paste text. The format, painter is also available here., 2. Font group command allows change of the Font-font face, size, style etc., 3. Paragraph group is used to change settings of the paragraph such as alignments,, indents, spacing etc., 4. The Styles group allows to choose a style and change the style., 5. Editing group contains command to select, find and replace text., Q. 12 Write the steps to Bold, Italics and Underline the text ?, A. For using the features of Bold, Italics and Underline the text,, Click on B, I, U option available under Font group of Home Tab., Short cuts, Bold: - Ctrl + B, Italics: - Ctrl + I, Underline: - Ctrl + U., Q.13 Write the steps to use Check Spelling/Grammar Feature?, A. Check Spelling Feature is a feature in MS Word that automatically checks the, spellings & grammar and helps the users to create flawless documents., Steps to use Check Spelling/Grammar Feature, 1. Click on the Review tab on the Ribbon., 2. Click on the option Spelling & Grammar in the Proofing group., 3. The Spelling & Grammar dialog box appears., 4. The suggestions of correct spellings are shown in the box., OR, 1. Position the cursor on the miss pelt word., 2. Right-click the mouse., 3. A pop-up menu box appears., 4. The correct spelled word is shown on the top of the box and the spelling will be, corrected automatically in the text., OR, Short Cut: - Press F7 key
Page 4 :
Q14. What is the use of Thesaurus option in word?, A. A word processor helps us to look up synonyms and antonyms in the thesaurus, option., Q15. Write the steps to use the Thesaurus option?, A. Steps to use Thesaurus Option are :1. Select the word, 2. Click on the Review tab, 3. Click on Thesaurus option in the proofing group, 4. A box opens up on the right side of the screen. This is called Research task pane. It, contains the synonyms and antonyms of the selected word., 5. Right click on the selected word and click in Insert. It will replace the original, word., Q16. What is the difference between Copy and Paste option and Cut and Paste, Option ?, A. Copy and Paste:- The original set of text remains where it was and it is also, pasted to another place in the document., Cut and Paste:- The original set of texts gets deleted and it pasted to another place, in the document., Q17. What is clipboard?, A. The clipboard is a temporary short-term data storage area in your computer, where the text is temporarily placed., Q18. Write the steps to Cut-Paste and Copy-Paste?, A. Steps to Cut-Paste are as follows:1. Select the word that is to be copied., 2. Right click the mouse anywhere on the selected text. A pop-up menu appears., Click on Cut., 3. Click at the position where you want to paste the text., 4. Right-click, then click paste from the pop-up menu., The selected text is copied to the new location., Steps to Copy-Paste are as follows:1. Select the word that is to be copied., 2. Right click the mouse anywhere on the selected text. A pop-up menu appears., Click on Copy., 3. Click at the position where you want to paste the text., 4. Right-click, then click paste from the pop-up menu., The selected text is copied to the new location.
Page 5 :
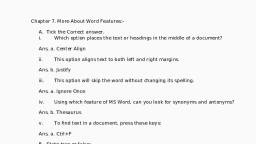
SESSION:-3 FIND AND REPLACE FEATURE., , Q19. What is the use of Find and Replace Feature of word processor., A. Find and Replace feature helps us to find all the occurrences of a specific word or, group of words in a document and also replace them with a new word or a group of, words., Q20. Write the steps to Find and Replace Feature?, A. Steps to use Find and Replace Feature are as follows:, 1. Click Find in the Home tab, editing group., 2. A Find and Replace dialog box appears., 3. To just find the word, click Find. Enter text you want to search in the Find what, box, click Find Next. To find all the occurrences of the word, click Find in, then, click Main document., 4. To find and replace, click Replace tab. Enter text to find in Find what. Enter text to, replace in Replace with., 5. Choose the action to be taken by clicking on – Replace, Replace All., Q21. Write the steps to create a list using numbers or bullets?, A. Steps to create list using numbers or bullets are as follows:, 1. Select the text., 2. On the Home tab, in the Paragraph group, click the Bullets icon. The bullets will, appear at the beginning of each sentence., Q22. When it is better to use bullets than numbers?, A. We Use numbered lists when we are working with instructions to be done in a, sequence ie., steps to be followed, and the numbers suggests a hierarchy. If numbers, aren’t essential, use bullets., Q23. When to capitalize the first letter in a bulleted item?, A. In most cases, it is recommended that you start each bulleted item with a capital, letter for the sake of a good presentation., Q24. What is Font?, A. Font refers to the style of writing i.e., how the characters look in the document., The look of characters can be changed using the Font face(name), Font Size and Font, Color., Q25. What is Alignment?, A. Alignment determines the appearance and orientation of the edges of the, paragraph. The different types of alignment are –, 1. Left Alignment :- Aligned the text evenly along the left margins., 2. Right Alignment :- Aligned the text evenly along the right margins., 3. Centre Alignment :- Aligned the text evenly with the centre of the page., 4. Justified Alignment :- Aligned the text evenly with both left and right margins.
Page 6 :
SESSION:-4 DIFFERENT TYPES OF VIEWS OF PRINT., , Q26. What are the different views of a document?, A. Word Processor provides options to work on a document in different formats /, layouts which gives a different look to the document. The different layouts are:• Print Layout, • Full Screen Reading, • Web Layout, • Outline, • Draft, Q27. Explain the different views of a Word document., 1. Print Layout: It is the default document view setting. User will able to see how, the document will look when it gets printed., 2. Full Screen Reading: This view provides the maximum space available for, reading the document. It hides the ribbon and view the document in two (side by, side) frames similar to a book., 3. Web Layout: It shows how the document will appear in the web browser. In this, view the document looks like a web page., 4. Outline: This view displays the document as an outline and shows only the, headings present in the document like an index of the book. It is useful when the, document has large number of pages and sections., 5. Draft: This view is used for quick editing of the document., It is useful for proof reading of the document., Q28. What is a Hard Copy and Soft Copy ?, A. In IT, a document saved on the computer is called a Soft Copy and one that is, printed is called Hard Copy., Q29. Write the steps to Print a Document?, A. The steps to print a document are as follows:, Click File -> Print. A print dialog box appears with multiple settings. Make desired, settings and print the page., Q30. Explain the different settings available in the Print Dialog Box., A. The different settings available in Print Dialog Box are as follows:1. Print Range:- It includes 4 options- All for printing whole document. Current, Page for printing the page on which the cursor is currently placed. Selection for, printing the selected text. Pages for printing the selected page numbers., 2. Copies:- for Selecting the number of copies of the document to be printed., 3. Properties:- for setting advanced properties.
Page 7 :
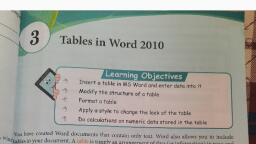
SESSION:-5 TABLE, , Q31. What is a Table?, A. A table is an arrangement of rows and columns. It helps you to present, information in an organized form., Q32. Write steps to insert a table in a word document., A., 1. Select the Insert tab. Select Table from the Tables group. An Insert Table drop, down menu appears., 2. Drag your mouse to the desired number of rows and columns and click the left, button of the mouse., 3. An empty table having the selected number of rows and columns is inserted in the, document., Q33. Write steps to format a table., A. Steps to format a table., 1. Click anywhere on the table. A Design tab and Layout tab appear in the ribbon., 2. Click on the Design tab. Different styles and options for formatting will appear., 3. Using the options available in Design tab, you can format the table., Q34. Write steps to change Layout of a table., A. Steps to change Layout of a table., 1. Click anywhere on the table. A Design tab and Layout tab appear in the ribbon., 2. Click on the Layout tab. Different options will appear to change the Layout., 3. Using the options available in Layout tab, you can change the Layout of the table., Q35. Write steps to convert text to table and table to text., A. While typing text, use comma between data to indicate where you want to divide, text into columns and use paragraph marks(Press Enter Key) to indicate where you, want to begin a new row], Steps to convert text to table:1. Select the text that you want to convert from the document., 2. On the Insert tab, in the Tables group, click Table, and then click Convert Text, to Table., 3. A convert text to table dialog box appears. In the dialog box, under Separate text, at, click the options for separate character that is in your text (commas in this, case), 4. In the Number of columns box, check the number of columns., 5. Select any other options that you want. Click on OK button., Steps to convert table to text:1. Select the entire table., 2. Click on convert to text option in Data group under Layout tab of Table Tools., 3. A convert table to text dialog box opens. Choose any Separate text with option., 4. Click OK.
Page 8 :
Q36. Write steps to add border to a page or a paragraph/text, A. Steps to add border to a page or paragraph/text are:1. Click on Page Borders option in the Page Background group on Page Layout, tab. A Borders and Shading dialog box appears., 2. In the dialog box, do one of the following, To add a paragraph or text border, click the Borders tab., To add a page border, click the Page Border tab. This tab has three, sections., In the left most section, under setting, selects the type of border you want., In the centre section, you can modify the line style, border colour and width., You can even click Art to add a design to a page border., 3. Check Preview to see how the border will look., 4. Click OK., Q37. Write steps to add shading to pages, paragraphs and text., A., 1. On the Page Layout tab in the Page Background group, click Page borders. A, Borders and Shading dialog box appears., 2. Click on the tab Shading., 3. There are three options under shading tab., Fill: By clicking on the down arrow, a colour palette is displayed. Choose the, desired colour shading., Style: This option allows the changes in darkness of the shading and also, different patterns of shading., Apply to:By clicking on the down arrow, you can choose if you want to, shade only the selected text or the entire paragraph., , SESSION:-6 MARGIN, Q38.What is Margin? How do we set the margin?, A. Page margins are the blank space around the edges of the page. You can position, some items in the margins such as headers, footers, page numbers etc. A document, has top, bottom, left and right margins., Steps to adjust/change margin are:1. Select the Page Layout tab., 2. Click on Margins in the Page Setup group. A Margins drop down list appears., 3. Select any one of the options shown, Narrow, Moderate, Wide or Mirrored OR, click on the Custom Margins... option to set the customise margin.
Page 9 :
Q39. What are the two types of Page Orientation? How do we change the page, orientation?, A. The Two types of Page orientation are:1. Portrait:- means that the page is taller than it is wider., 2. Landscape:- means that the page wider than it is taller., Steps to change the page orientation:1. Click on Page Layout tab, 2. Click on the Orientation button. This will give you two options: Portrait and, Landscape., 3. To change the orientation, click on the desired orientation icon., Q40. What is Print Preview? Write steps to check Print Preview., A. Print Preview enables you to see what the document will look like when it is, printed., Steps to check Print Preview:1. Select File-> Print-> Print Preview option., 2. A Print Preview tab opens. A sample Print Preview of the page displays., Q41. What are tabs? How do we set tabs?, A. Tabs are often used to format documents. Different types of tabs are:1. A Left Tab stop – sets the start position of text that will then run to the right as, you type., 2. A Centre Tab stop – sets the position of the middle of the text. The text, centers on this position as you type., 3. A Right Tab stop – sets the right end of the text. As you type the text moves, left., To set Tabs, do the following:1. Click the tab selector at the left end of the ruler until it displays the type of tab, that you want., 2. Click the ruler at the location you want., Session 7: Modifying Layout of a paragraph, Steps to Set the paragraph layout:1. Open a word document. Click on Page Layout tab on the ribbon., 2. Click on the icon under Paragraph group. A paragraph dialog box will appear., 3. Select the desired alignment, line spacing etc., 4. Click on Tab button. A tab dialog box will appear., 5. Specify the tab stop position by mentioning the stopping position in the, Tab stop position box. After specifying the tab stop position click on Set, button and the Tabs window appears., 6. Click OK. The ruler of the document will be marked with a L shaped symbol, at 2”, meaning that the tab stop position has been set at that position., (Now when you press the tab key, the cursor will automatically jump from, its initial position to the next tab stop position.)
Page 10 :
Session 8 : Managing Headers, Header:- Headers are text or images included at the top of the page. They usually, contain important information such as company or department name, logo, page, numbers etc., Steps to include header in a document, 1. Click on the Insert tab on the Ribbon., 2. Click on the option Header in the Header & Footer group., 3. A drop down list will appear. Insert any of the predefined options, from the list., 4. You can insert Page number, Date & Time or any picture or clip art in, the header area., Session 9 : Managing Footers, Footer: - Footers are text or image included at the bottom of the page and may, repeat in all pages of the document. You can include page number, date & time,, pictures or clip art in the footer area., Steps to include footer in a document, 1. Click on the Insert tab on the Ribbon., 2. Click on the option Footer in the Header & Footer group., 3. A drop down list will appear. Insert any of the predefined footer, options from the list., Session 10: Managing Styles, Styles: - Styles or Style sets are pre-defined or customized options used for creating, good looking profession documents with least efforts., Steps to apply and manage styles:, 1. Locate the Style group under Home tab. You can view list of styles in Styles, Group., 2. To view the list of style sets available, point to Style Set under Change, Styles option. A drop down with different styles will be displayed., 3. Select any of the styles listed by clicking it.
Page 11 :
Session 11:- Document Template, Template:- Templates or document templates refer to a sample fill-in-the-blank, document that can help in saving time. They may have sample content, themes, etc., Steps to view & use sample templates:1. Go to File->New. Different types of templates will be displayed., 2. Select any of the templates by double-clicking on it. Now you can use this, template and customize the contents according to your needs., Steps to create a template are:1. Create a word document that will serve as the template., 2. Click on File->Save As and give the template a name. Select Word, Template from the Save as type: drop down list., 3. Click on Save., Session 12 : Working with Page and Section Breaks, Page and Section Breaks can be used to separate a document into sections. To, separate a section in a portion use Section Break. To start a new page in a document, use Page Break., Steps to Use Section Break and Page Break :1. Click on the Page Layout tab on the ribbon., 2. Click on the option Breaks in the Page Setup group., 3. A dropdown list with options of different types of breaks appears., Steps to Delete Section / Page Break, 1. Click on the Section / Page Break., 2. Press Delete on your keyboard and the section / page break is removed., Use of Page Break: - A page break can be inserted anywhere in a document to force, the end of a page and the beginning of a new one., Use of Section Break: - Section Break add flexibility to formatting your document., You can create different headers and footers, different footnote numbering, change, the layout of columns, change page borders for different pages and even change the, page layout of the same document. Using Section breaks is like having minidocuments in one large document.
Page 12 :
Session 13: Applying Character Formats, Character Formatting:- To change look and design of characters is called character, formatting., Different options to make changes to a character or word:a) Font Face, b) Font Size, c) Grow Font - to make font size larger than the current size by the specified, point., d) Shrink Font - to make font size smaller than the current size by the specified, point., e) Strikethrough – to make a strike through the middle of the selected text., f) Subscript – to make the selected text lower than the normal text position., g) Superscript – to make the selected text higher than the normal text position., h) Clear Formatting – used to clear the character formatting., i) Text Highlight Colour - used to change the background colour of the text., j) Font Colour – used to change the colour of the text., k) Change Case – helps us to change the text case to capital letters or small, Letter., Different change case options are:• Sentence Case:- the first character in the First word of the selected sentence, will be, in Upper case and rest of characters will be in small case., • Lowercase:- selected text will be converted to small letters., • Uppercase:- selected text will be converted to Capital letters., • Capitalize Each Word:- the first character in all the words of the selected, sentence, will be converted to Capital letter., • TOGGLE CASE:- the small letters in the selected text will be converted to, capital, letters and capital letters will be converted to small letter., SESSION 14: INSERT GRAPHICAL OBJECTS AND ILLUSTRATIONS, Most Word processors has support for inserting illustrations in the form of Clip Arts,, Shapes, pictures, charts, etc., Clip Art: Clip Art can help in making a document look colorful and presentable. Clip, arts are pre-defined images available for use in documents. For example, if you, would like to create a greeting card for your friend, you can use clip arts such as, balloon, flowers, etc. along with text message., You can use the clip art gallery built-in within the word processor; you can also, download clipart, from websites. Some of the websites that have free clip arts are:, • www.openclipart.org
Page 13 :
Steps to insert a clip art in a document,, 1. Click on the Insert tab on the Ribbon., 2. Click on the option Clip Art in the Illustrations group, 3. The Clip Art Task Pane appears. Enter the clipart category name in the search box, and Click, Go., 4. Select the clipart that you want to use, double-click on it and it will be inserted into, your document, Steps to insert a clip art in a document from websites, Sometimes, you may need clip arts that may not be available within the word, processor application. In such cases, you can visit websites that offer clip arts such as, OpenClipart.org., To download a clip art from www.openclipart.org,, 1. Open the web browser, Type www.openclipart.org in the address bar and press, Enter, You can use the search box available on the website for viewing the list of clip arts to, suit your, needs., Now you can select the clip art you like, download it to your computer and insert it, using the photo option in the word processor., SESSION 15: TEXT WRAPPING, Text Wrapping enables you to surround a picture with text. The text wraps around, the graphic or a picture., Steps to insert Text Wrapping, 1. Insert the picture / graphic / clipart in the document., 2. Click on the wrap text option under Text section of the Insert tab after double, clicking on the picture., 3. Alternatively, select the picture then select the Text Wrapping dropdown arrow, in the Arrange group under the Format tab., Different Wrap Text Options, The different wrap text options available in word processing software are:1. Square, 2. Tight, 3. Through
Page 14 :
SESSION 16: INSERTING OBJECTS, In addition to graphic images, to add a personal touch to a special message or to, illustrate a special feature, you may want to embed sound files or maybe even actual, files from other software applications in your document. For example, you can insert, a PDF file or a spread sheet within the word processor., Steps to insert an object,, 1. Select Insert Tab, 2. Click Object under Text section. A dialog box will be displayed, 3. Select Create from File Tab, 4. Click Browse and select a file such as a spread sheet or a PDF document that is, available on your computer, Click Open and Click OK, Note: If you would like to edit the embedded document, double-click on it. It will, automatically open it for editing using respective application., Demerits of embedding an object, 1. The embedded objects cannot be printed., 2. The person opening your document must have the relevant software loaded on, their computer to operate the embedded file., 3. If you embed an object, the size of your document increases significantly and this, may cause problems in emailing the document as an attachment., 4. If you link an object, the person opening that document must have a direct, connection to the original file location of the object., SESSION 17: INSERT SHAPES, SYMBOLS AND SPECIAL CHARACTERS, We can insert objects that have different shapes such as lines, basic geometric, shapes, arrows,, Equations, shapes, flowchart shapes, stars, banners, and callouts using the shape, option., Steps to Insert Shapes, 1. Click on the Insert tab on the Ribbon., 2. Click on the option Shapes in the Illustrations group, 3. Once you click the Shapes option a dropdown list with pre-defined shape such, as box, circle, etc. appears., 4. You can select the shape from the list of shapes available and draw the shape, by dragging the mouse with the left button clicked, Steps to Insert Symbols and Special Characters, 1. Click on the Insert tab on the Ribbon., 2. Click on the option Symbol in the Symbols group, 3. A dropdown list appears, 4. Select a symbol from the list and double-click on to insert the symbol, into the document, Note: If you would like to view more symbols and special characters for inserting, into a document, click on the More Symbols… option in the Symbols Dropdown list.
Page 15 :
SESSION: 18 MAIL MERGE., Mail Merge is most important technique of word. Through we can send/print, information for many recipients., Steps to using Mail Merge:Click on MAILING tab and select Start Mail Merge button in Mail Merge group then click, “Step – by – Step Mail Merge Wizard”., , Step 1:- Mail Merge pane is open right side of the screen. Now select “ Letters” from, Select document type. And click Next button below “Starting document”.
Page 16 :
Step 2:- In “ Starting Document” select “ Use the current document button” and then, click next button “ Select Recipient”., , Step 3:- In “Select Recipient” pane. Select “type New list” if list not present in, computer., After selecting “Type new list” the create option enable. We can click on, “create” option.
Page 17 :
Customize window open for create list. We can customize the recipient, information and then click ok button., , Step 4:- After selecting Recipient list we write a letter using “Address book & Greeting, Line” from “Write your letter” pane. Then click on “Preview Your letter”.
Page 18 :
Step 5:- After complete of “Preview Your letter” check whether letter right or wrong. If, process is right then click on “Complete the Merge” option., , Step 6:- On clicking complete the Merge button the document is ready for “print or, edit”., , *****
 Learn better on this topic